

Dell OptiPlex K7822, OptiPlex GX280 DCSM, OptiPlex GX280 DHP, OptiPlex GX280 DHS, OptiPlex GX280 DHM Quick Reference Manual
Page 1

Dell™ OptiPlex™ GX280
Quick Reference Guide
Models DHP, DHS, DCNE, DHM, DCSM
Page 2

Notes, Notices, and Cautions
NOTE: A NOTE indicates important information that helps you make better use of your computer.
NOTICE: A NOTICE indicates either potential damage to hardware or loss of data and tells you how to avoid the
problem.
CAUTION: A CAUTION indicates a potential for property damage, personal injury, or death.
If you purchased a Dell™ n Series computer, any references in this document to Microsoft® Windows®
operating systems are not applicable.
Quick Reference Guide, Drivers and Utilities
The
CD, and operating system media are optional and may not ship
with all computers.
____________________
Information in this document is subject to change without notice.
© 2004 Dell Inc. All rights reserved.
Reproduction in any manner whatsoever without the written permission of Dell Inc. is strictly forbidden.
Trademarks used in this text: Dell, OptiPlex, and the DELL logo are trademarks of Dell Inc.; Microsoft and Windows are registered trademarks
of Microsoft Corporation.
Other trademarks and trade names may be used in this document to refer to either the entities claiming the marks and names or their products.
Dell Inc. disclaims any proprietary interest in trademarks and trade names other than its own.
Models DHP, DHS, DCNE, DHM, DCSM
September 2004 P/N K7822 Rev. A00
Page 3

Contents
Finding Information for Your Computer . . . . . . . . . . . . . . . . . . . 5
Front and Back Views
Small Form-Factor Computer
Small Desktop Computer
Desktop Computer
Small Mini-Tower Computer
Mini-Tower Computer
Opening the Computer Cover
. . . . . . . . . . . . . . . . . . . . . . . . . . . 7
. . . . . . . . . . . . . . . . . . . . . . 7
. . . . . . . . . . . . . . . . . . . . . . . 8
. . . . . . . . . . . . . . . . . . . . . . . . . . 9
. . . . . . . . . . . . . . . . . . . . . . 10
. . . . . . . . . . . . . . . . . . . . . . . . . 12
. . . . . . . . . . . . . . . . . . . . . . . . 13
Small Form-Factor, Small Desktop, and Small Mini-Tower Computers
Desktop and Mini-Tower Computers
Inside Your Computer
. . . . . . . . . . . . . . . . . . . . . . . . . . . 14
Small Form-factor Computer
Small Desktop Computer
Desktop Computer
. . . . . . . . . . . . . . . . . . . . . . . . . . 15
Small Mini-Tower Computer
Mini-Tower Computer
Setting Up Your Computer
Power Connections
Solving Problems
. . . . . . . . . . . . . . . . . . . . . . . . . . . . . 19
Dell Diagnostics
System Lights
. . . . . . . . . . . . . . . . . . . . . . . . . . . . . 22
. . . . . . . . . . . . . . . . . . . . . . . . . 16
. . . . . . . . . . . . . . . . . . . . . . . . . 16
. . . . . . . . . . . . . . . . . . . . . . . . . . 19
. . . . . . . . . . . . . . . . . . . . . . . . . . . . 19
. . . . . . . . . . . . . . . . . . . . . . 14
. . . . . . . . . . . . . . . . . . . . . . . 14
. . . . . . . . . . . . . . . . . . . . . . 15
. . . . . . . . . . . . . . . . . . 13
. . 13
Diagnostic Lights
Beep Codes
. . . . . . . . . . . . . . . . . . . . . . . . . . . . . 23
. . . . . . . . . . . . . . . . . . . . . . . . . . . . . . 26
Running the Dell™ IDE Hard Drive Diagnostics
Resolving Software and Hardware Incompatibilities
Using Microsoft
Reinstalling Microsoft
Using the Drivers and Utilities CD
Index . . . . . . . . . . . . . . . . . . . . . . . . . . . . . . . . . . . . 35
. . . . . . . . . . . . . 27
. . . . . . . . . . 27
®
Windows® XP System Restore . . . . . . . . . . . . 28
®
Windows® XP . . . . . . . . . . . . . . . . . 30
. . . . . . . . . . . . . . . . . . . . . 32
Contents 3
Page 4

4 Contents
Page 5
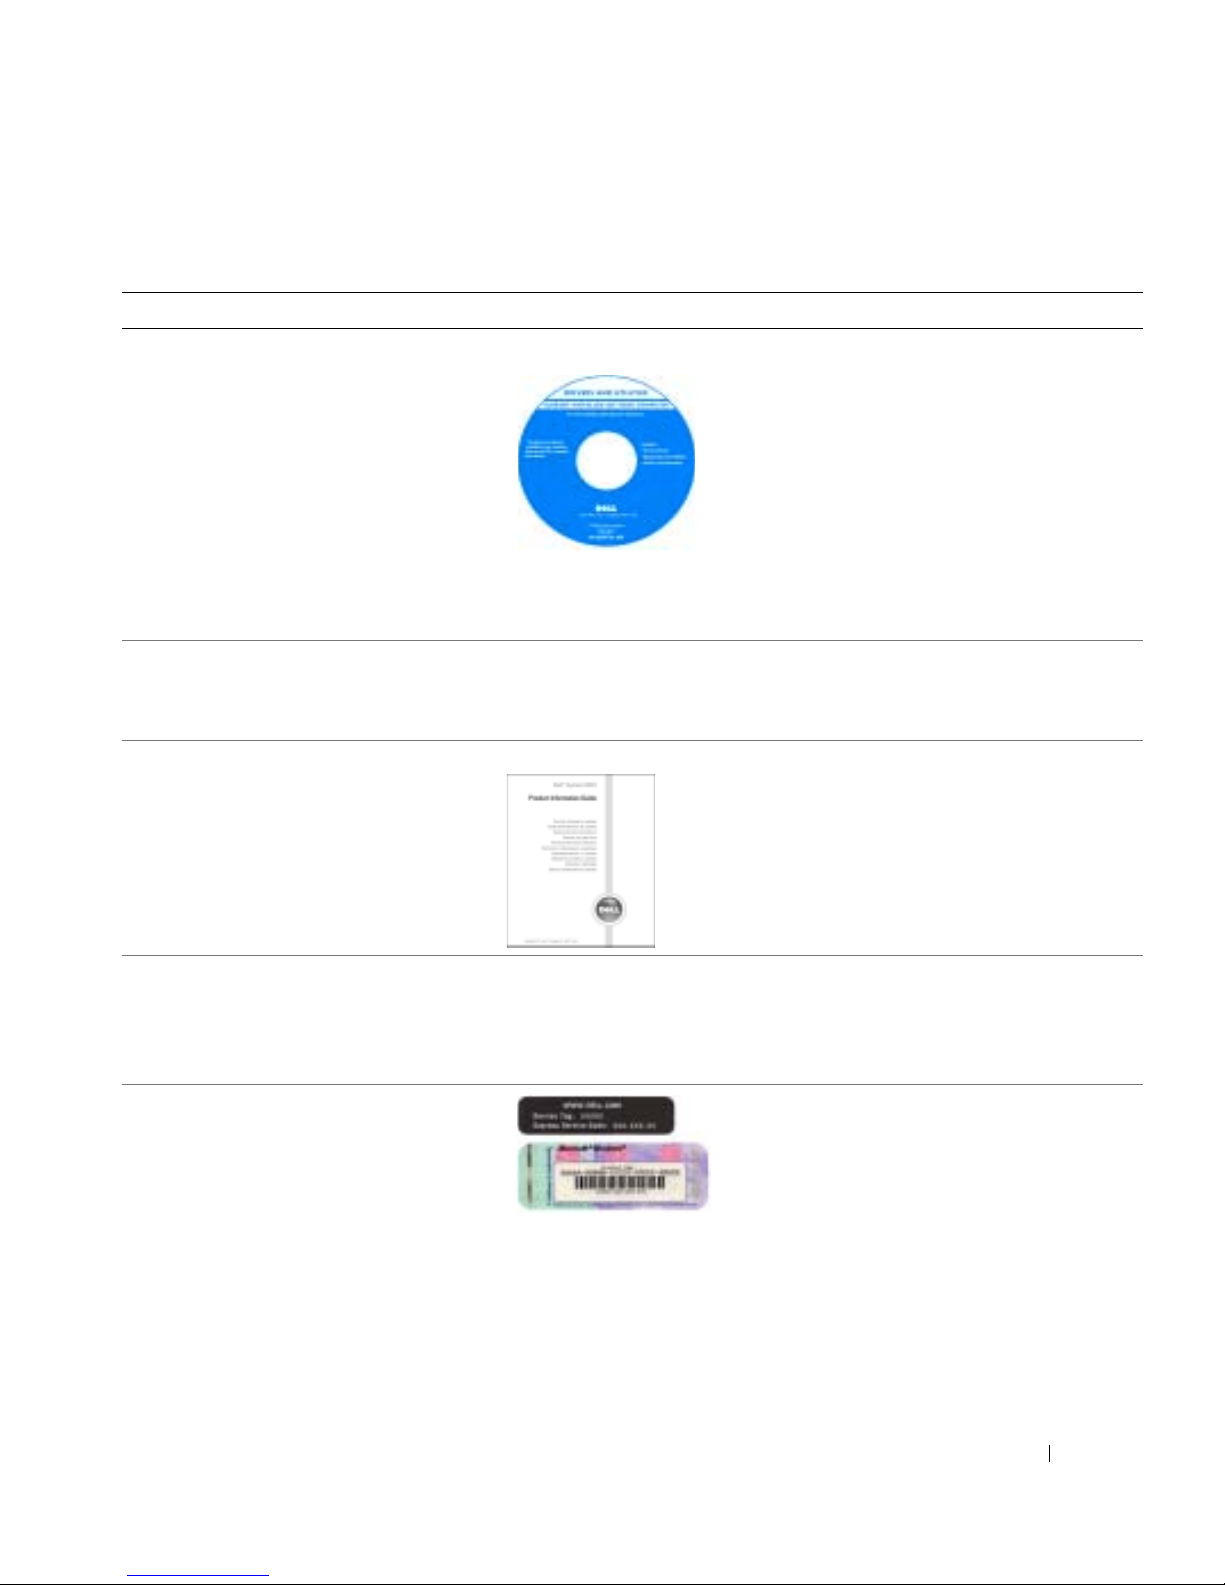
Finding Information for Your Computer
What Are You Looking For? Find It Here
• A diagnostic program for my computer
• Drivers for my computer
• My computer documentation
• My device documentation
• Desktop System Software (DSS)
• Operating system updates and patches
• Terms and Conditions
• Warranty information
• Safety instructions
• Regulatory information
• Ergonomics information
• End User License Agreement
Drivers and Utilities CD (also known as the ResourceCD)
Documentation and drivers are already
installed on your computer. You can use the
CD to reinstall drivers, run the Dell
Diagnostics, or access your documentation.
NOTE: The Drivers and Utilities CD is optional
and may not ship with all computers.
Readme files may be included on your CD
to provide last-minute updates about
technical changes to your computer or advanced technical-reference
material for technicians or experienced users.
Desktop System Software (DSS)
Located on the
support.dell.com
at
Product Information Guide
Drivers and Utilities
.
CD and the Dell Support website
• How to remove and replace parts
• Technical specifications
• How to configure system settings
• How to troubleshoot and solve problems
• Service Tag and Express Service Code
• Microsoft Windows License Label
Dell™ OptiPlex™ User’s Guide
®
Microsoft
1
Click the
2
Click
• Enter the Express Service Code to direct your call when contacting
technical support. The Express Service Code is not available in all
countries.
Windows® XP Help and Support Center
Start
button and click
User’s and system guides
Help and Support.
and click
Service Tag and Microsoft Windows License
These labels are located on your computer.
•Use the Service Tag to identify your computer
when you use
technical support.
User’s guides
support.dell.com
Quick Reference Guide 5
.
or contact
Page 6

What Are You Looking For? Find It Here
• Latest drivers for my computer
• Answers to technical service and support
questions
• Online discussions with other users and
technical support
• Documentation for my computer
www.dell.com | support.dell.com
• Service call status and support history
• Top technical issues for my computer
• Frequently asked questions
• File downloads
• Details on my computer configuration
• Service contract for my computer
• How to use Windows XP
• Documentation for my computer
• Documentation for devices (such as a
modem)
Dell Support Website — support.dell.com
NOTE: Select your region to view the appropriate support site.
The Dell Support website provides several online tools, including:
• Troubleshooting — Hints and tips, articles from technicians, and online
courses
• Upgrades — Upgrade information for components, such as memory, the
hard drive, and the operating system
• Services and Warranties — Contact information, order status, warranty,
and repair information
• Downloads — Drivers, patches, and software updates
• User Guides — Computer documentation and product specifications
Dell Premier Support Website — premiersupport.dell.com
The Dell Premier Support website is customized for corporate, government,
and education customers. This website may not be available in all regions.
Windows Help and Support Center
1
Click the
2
Type a word or phrase that describes your problem and click the arrow icon.
3
Click the topic that describes your problem.
4
Follow the instructions on the screen.
Start
button and click
Help and Support
.
• How to reinstall my operating system
• Regulatory model information and chassis
type
6 Quick Reference Guide
Operating System CD
The operating system is already installed on your computer. To reinstall
your operating system, use the Operating System CD. See your OptiPlex
User’s Guide for instructions.
NOTE: The operating system media is optional and may not ship with all
computers.
After you reinstall your operating system, use the
Drivers and Utilities CD (optional) to reinstall
drivers for the devices that came with your
computer.
Your operating system product key label is located
on your computer.
NOTE: The color of your CD varies based on the
operating system you ordered.
• DHP — Small form-factor chassis
• DHS — Small desktop chassis
• DCSM — Desktop chassis
• DHM — Small mini-tower chassis
• DCNE — Mini-Tower chassis
Page 7
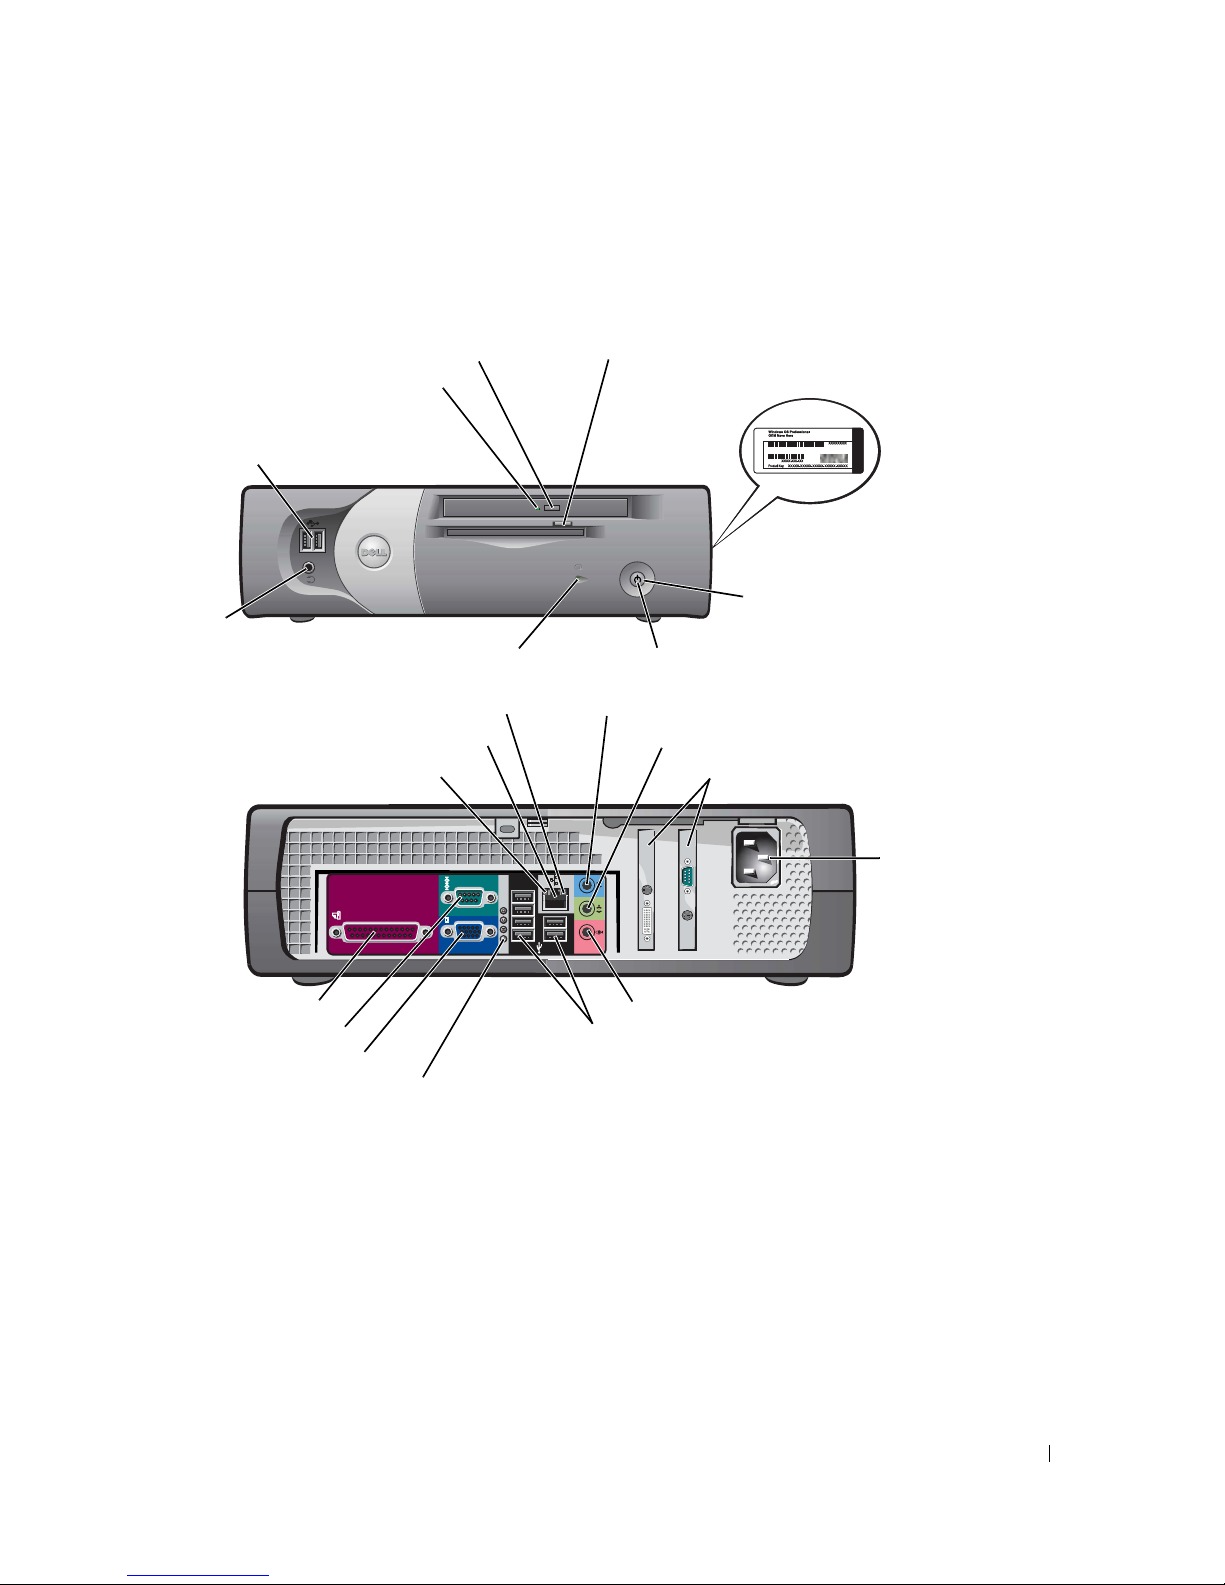
Front and Back Views
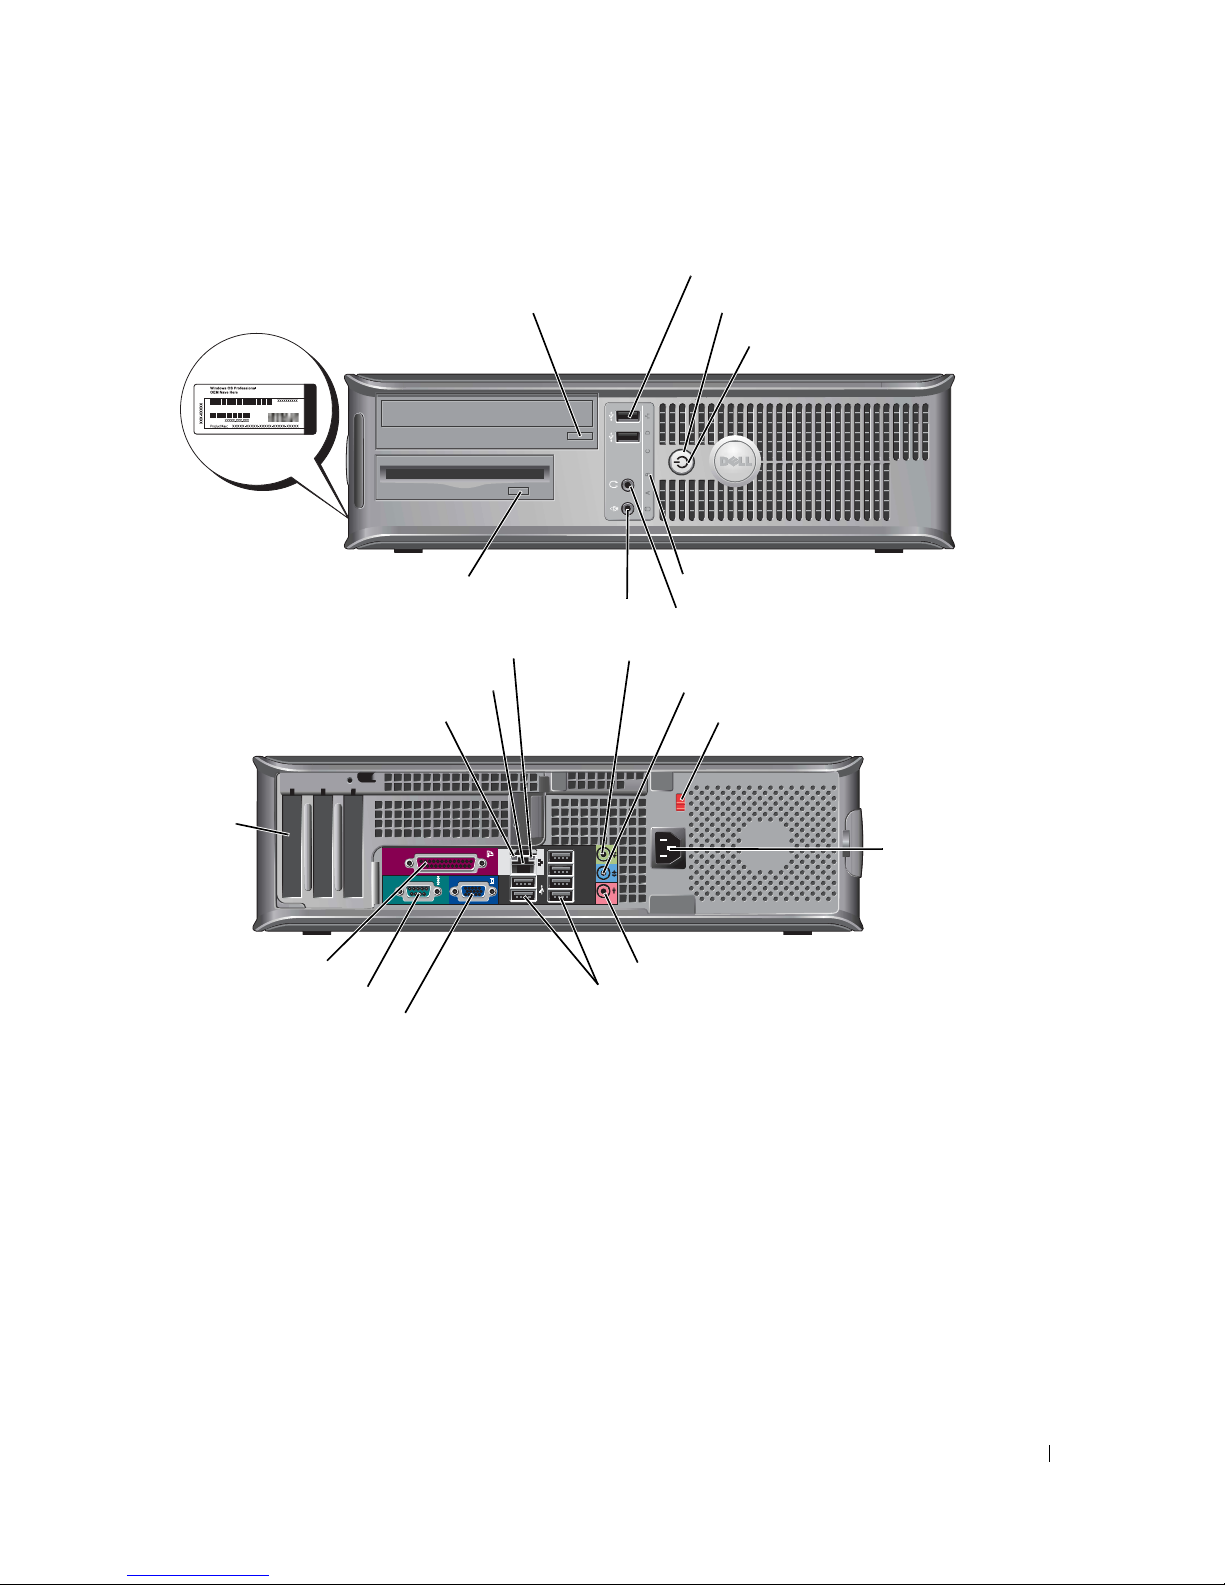
Small Form-Factor Computer
CD/DVD-drive activity light
USB 2.0
connectors (2)
headphone
connector
CD/DVD-drive eject button
hard-drive activity light
network activity light
network adapter connector
link integrity light
floppy-drive eject button
Microsoft
Windows
Product Key
power button
power light
line-in connector
line-out connector
card slots (2)
power
connector
parallel connector
serial connector
video connector
diagnostic lights
microphone connector
USB 2.0 connectors (6)
Quick Reference Guide 7
Page 8
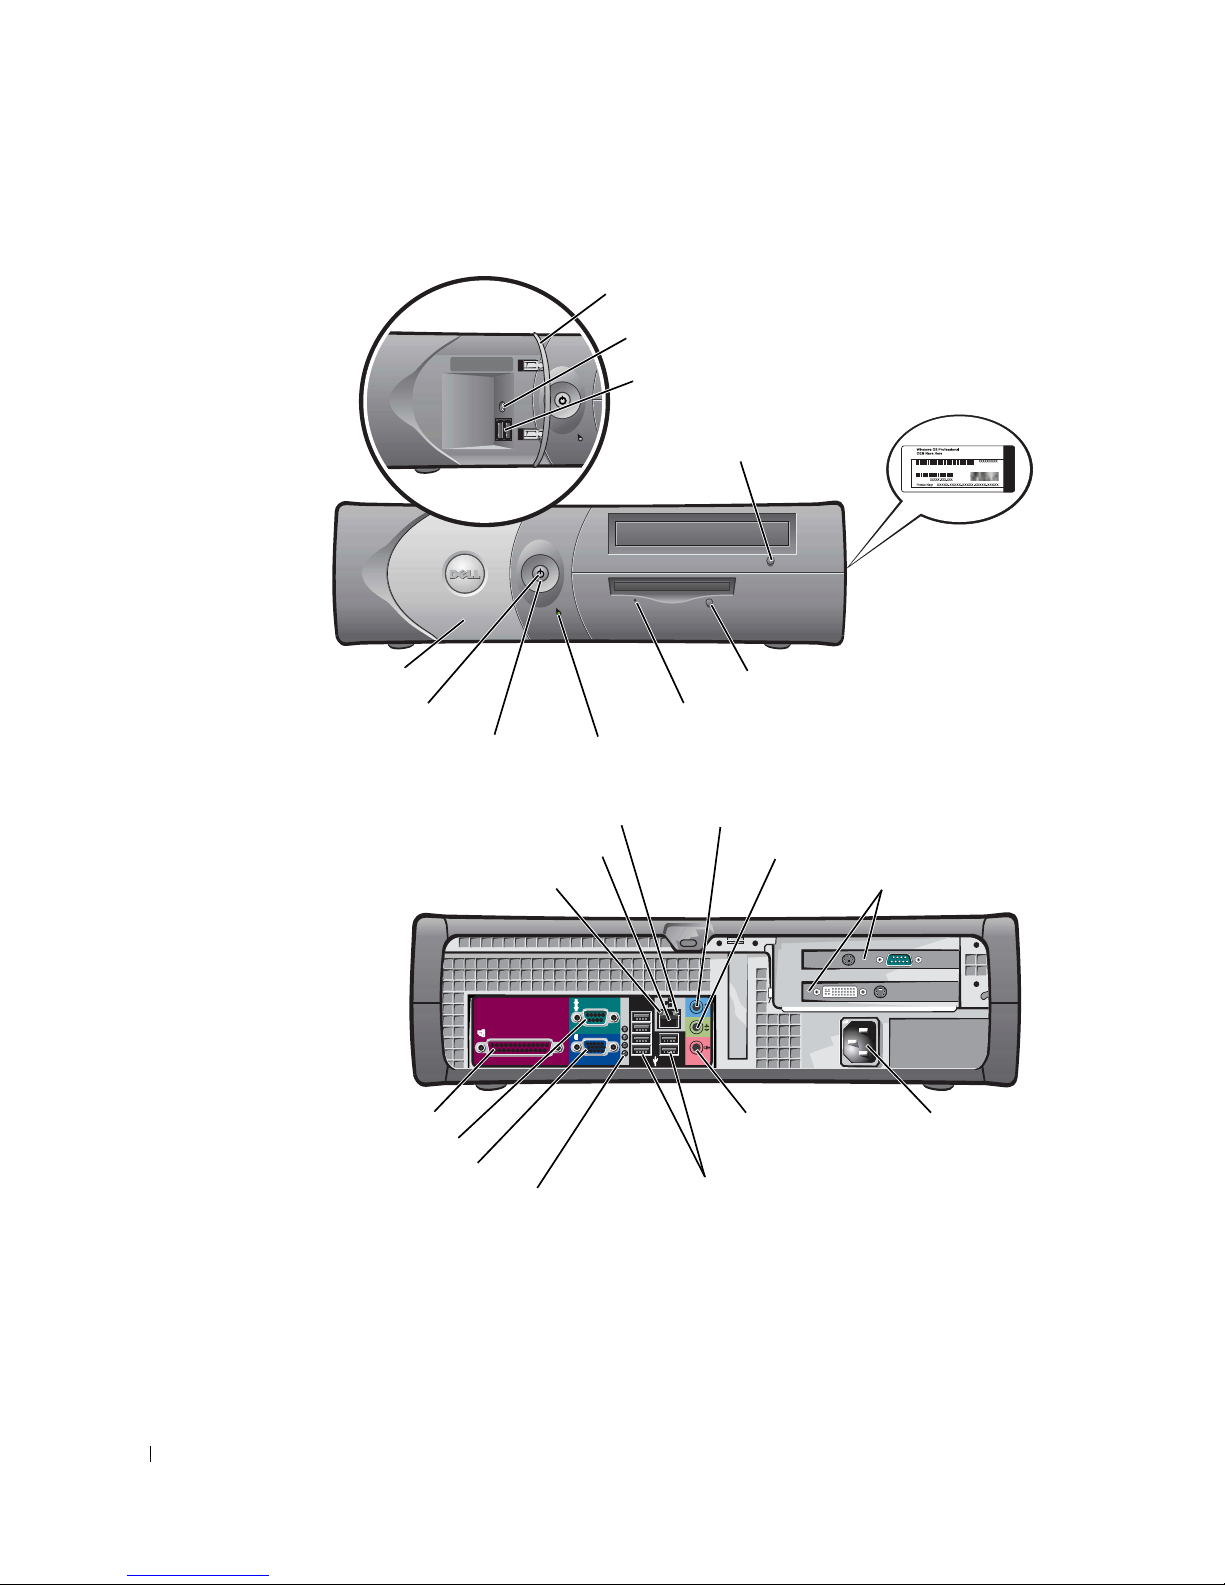
Small Desktop Computer
front panel door
headphone connector
USB 2.0 connectors (2)
CD/DVD-drive
eject button
www.dell.com | support.dell.com
front panel door
parallel connector
serial connector
power light
power button
network activity light
network adapter connector
link integrity light
video connector
diagnostic lights (4)
floppy-drive eject button
floppy-drive activity light
hard-drive activity light
line-in connector
microphone
connector
USB 2.0
connectors (6)
Microsoft
Windows
Product Key
line-out connector
card slots (2)
power
connector
8 Quick Reference Guide
Page 9

Desktop Computer
USB 2.0 connectors (2)
card
slots (3)
CD/DVD-drive eject button
Microsoft
Windows
Product Key
floppy-drive
eject button
network activity light
network adapter connector
link integrity light
microphone
connector
power button
power light
diagnostic lights
headphone connector
line-in connector
line-out connector
voltage selection switch
power
connector
parallel connector
serial connector
video connector
microphone connector
USB 2.0 connectors (6)
Quick Reference Guide 9
Page 10
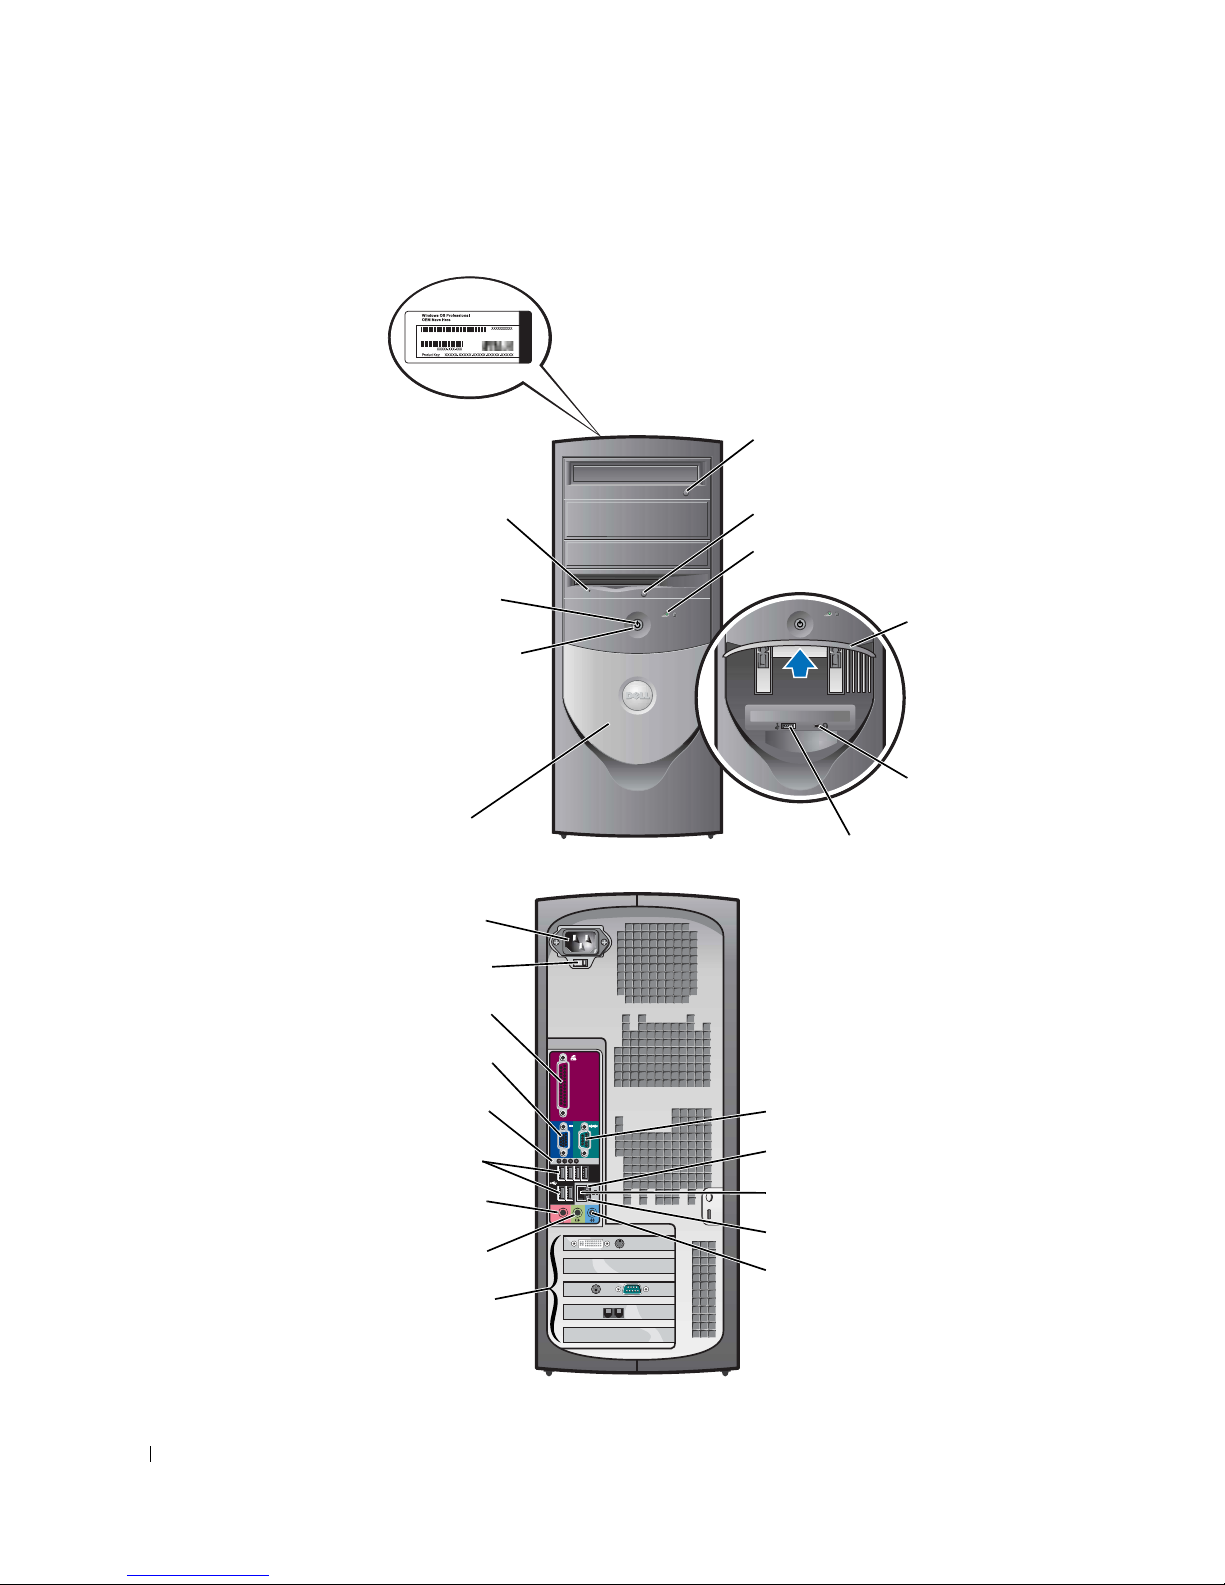
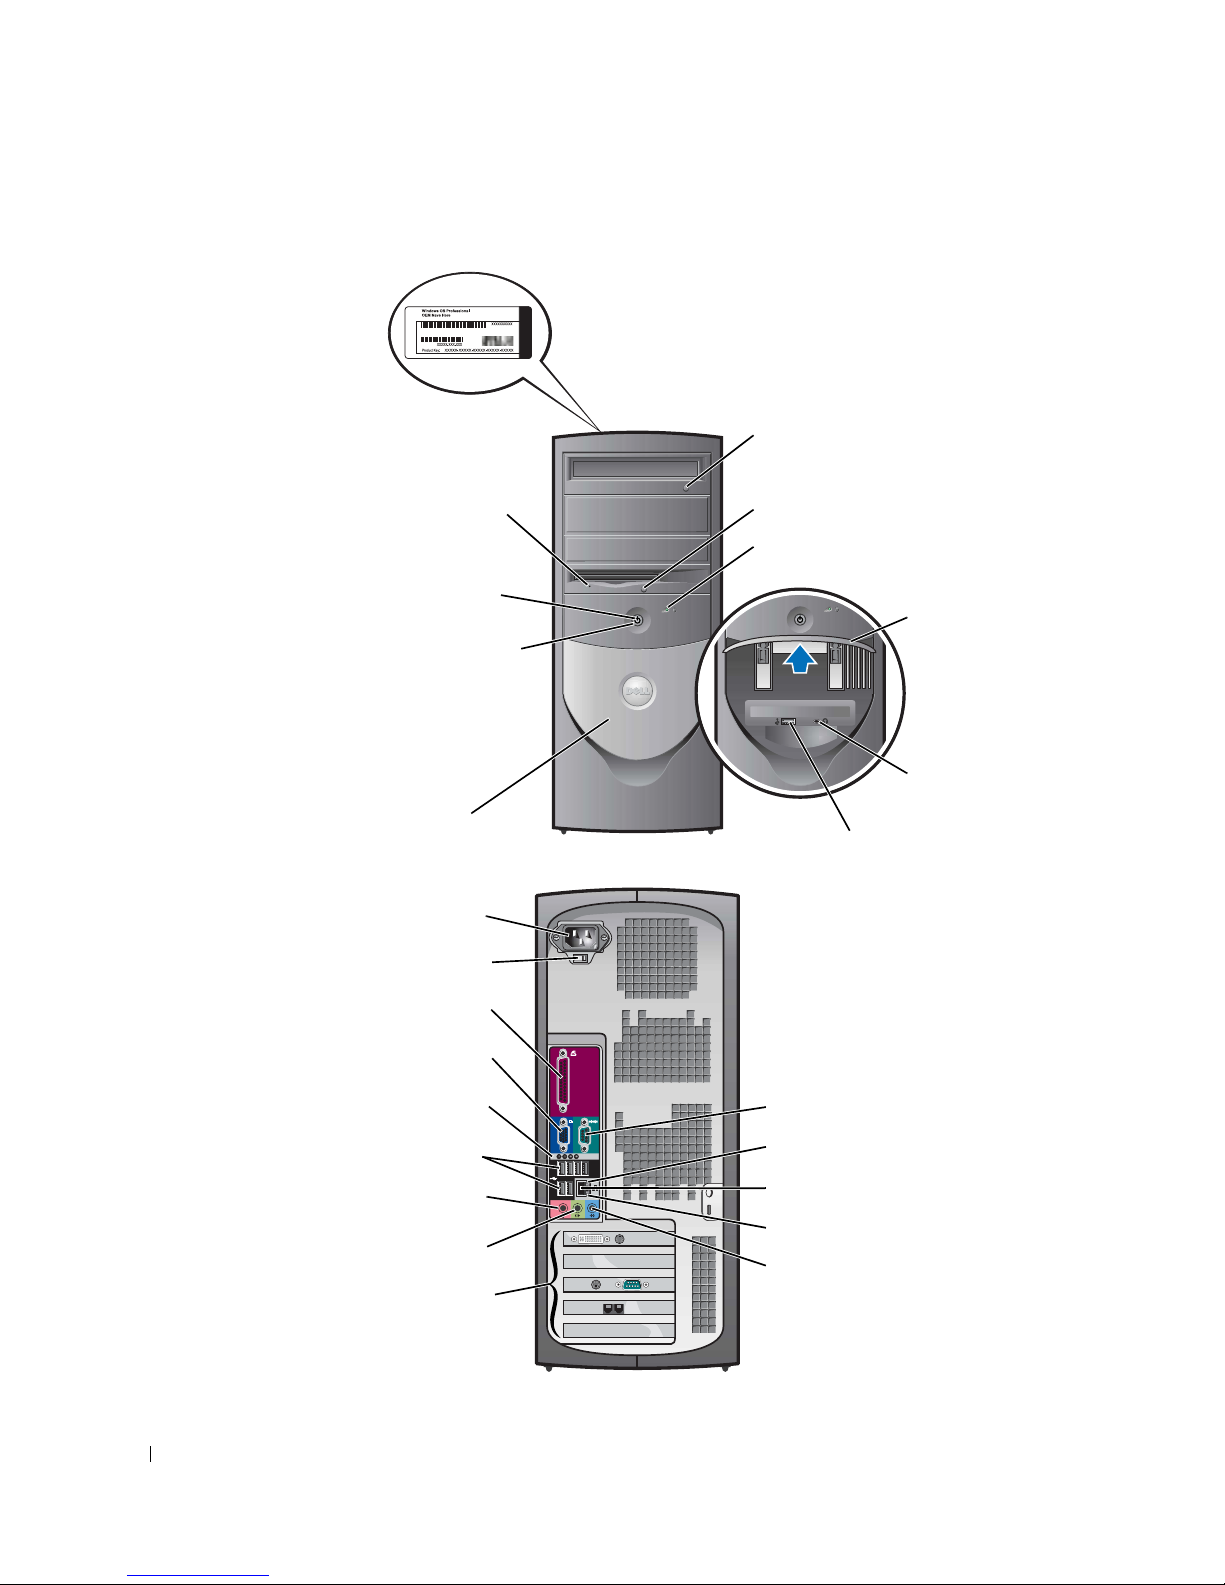
Small Mini-Tower Computer
Microsoft
Windows
Product Key
CD/DVD-drive eject button
www.dell.com | support.dell.com
front-panel door
NOTE: See "Small MiniTower Computer —
Front-Panel Door and
Hinge Arms" on page 11
for more information.
voltage selection switch
floppy-drive
activity light
power light
power button
power connector
parallel connector
video connector
floppy-drive eject button
hard-drive activity light
front panel door
headphone
connector
USB 2.0 connectors (2)
diagnostic lights
USB 2.0 connectors (6)
microphone connector
line-out connector
card slots (5)
10 Quick Reference Guide
serial connector
link integrity light
network adapter connector
network activity light
line-in connector
Page 11
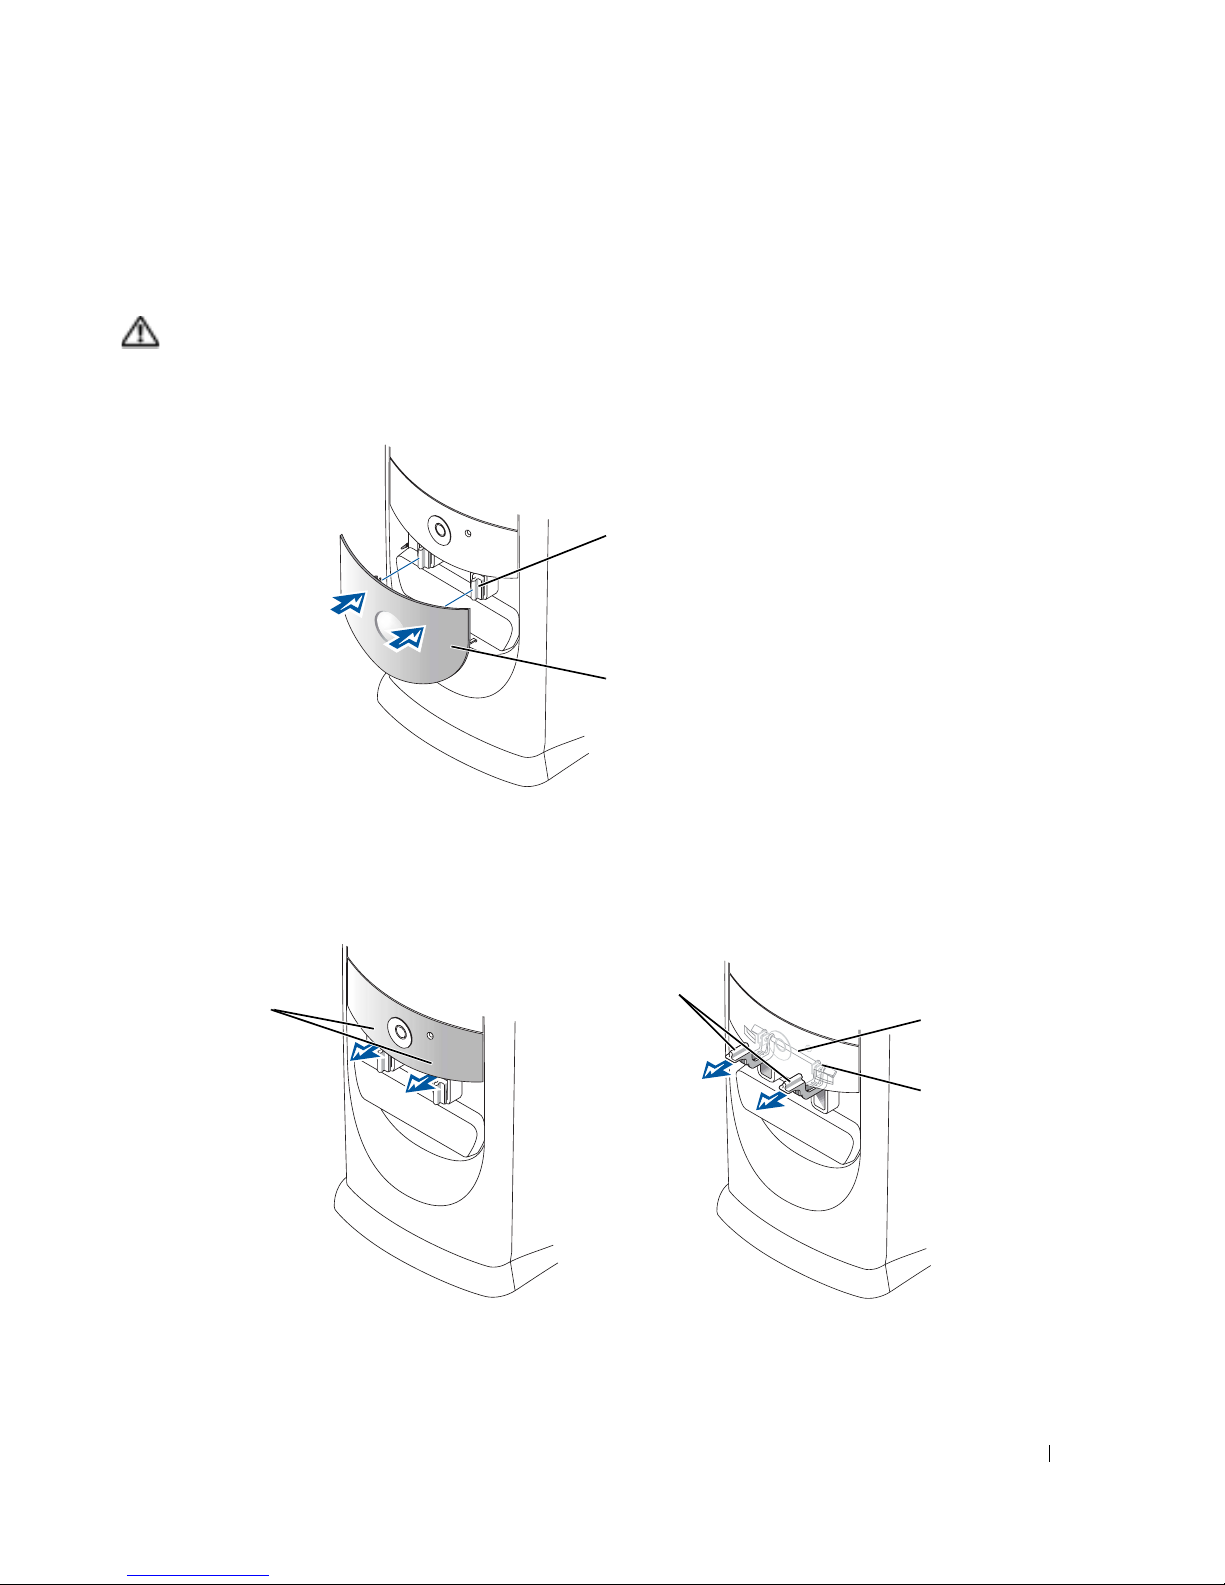
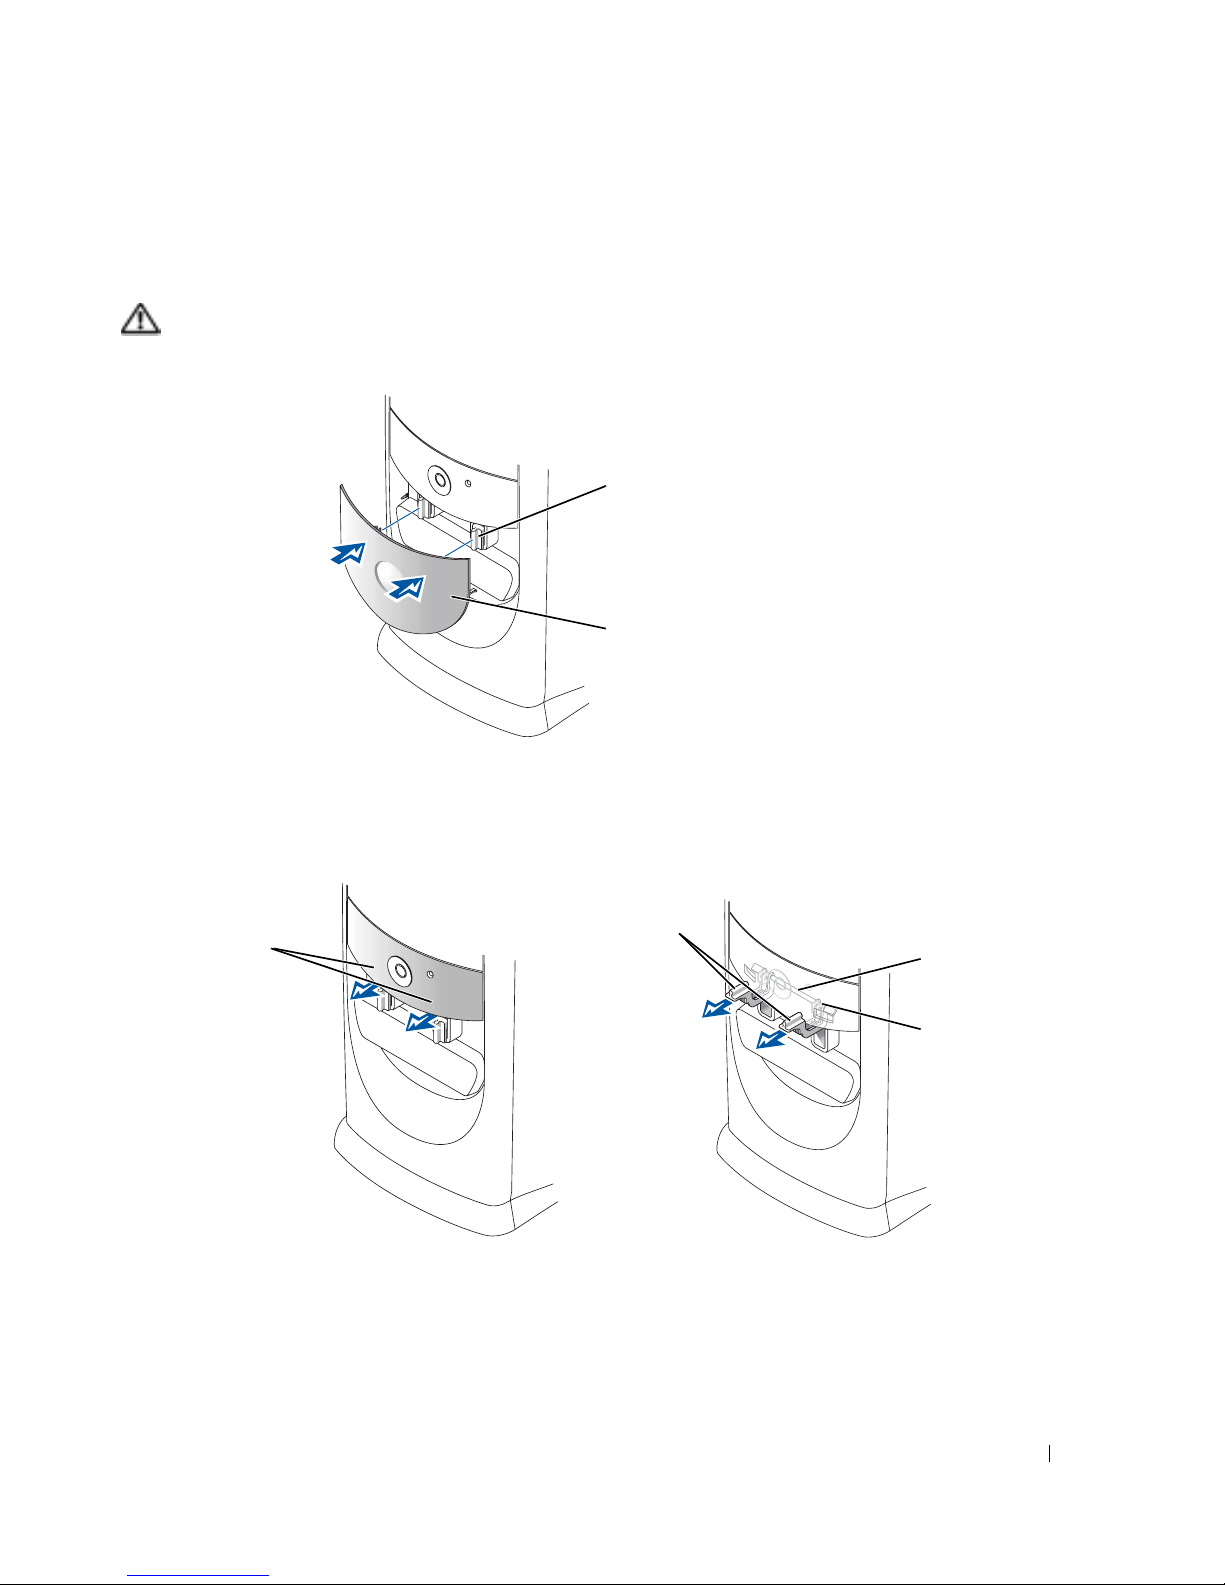
Small Mini-Tower Computer — Front-Panel Door and Hinge Arms
To prevent damage to your computer, the front-panel door is designed to "break away" if it is lifted
up or pushed down too far.
CAUTION: Before you begin any of the procedures in this section, follow the safety instructions in the
Product Information Guide.
To reattach the front-panel door:
1. Lower the two hinge
arms to the vertical.
position
2. Align the two clips on
the front-panel door with
the hinge arms, and
press inward.
To reattach the hinge arms, first remove the front-panel door by gently snapping it off the two
hinge arms:
1. Use your fingers
to pull here to
remove the frontpanel insert.
2. Lift both
hinge arms to
a horizontal
position.
3. Look through the two view
slots and align the pivot bar
with the two pivot-bar slots.
pivot bar
pivot-bar slot
Quick Reference Guide 11
Page 12
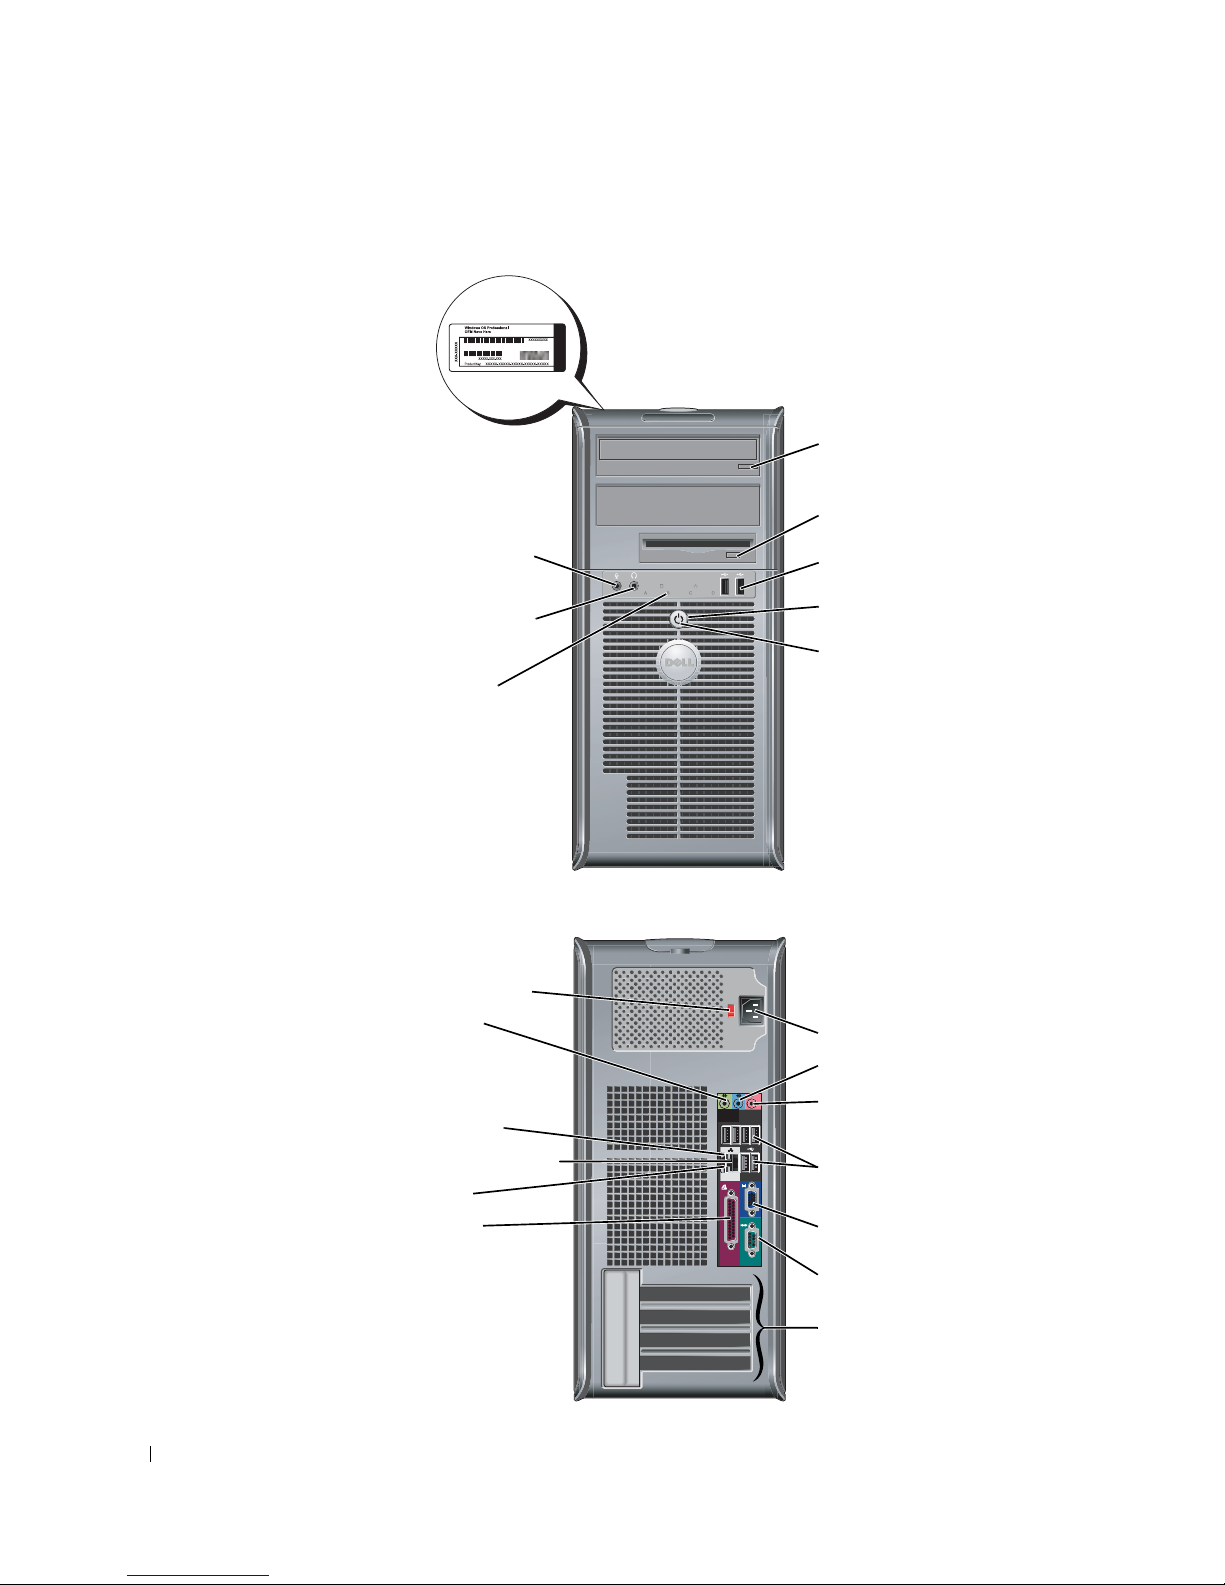
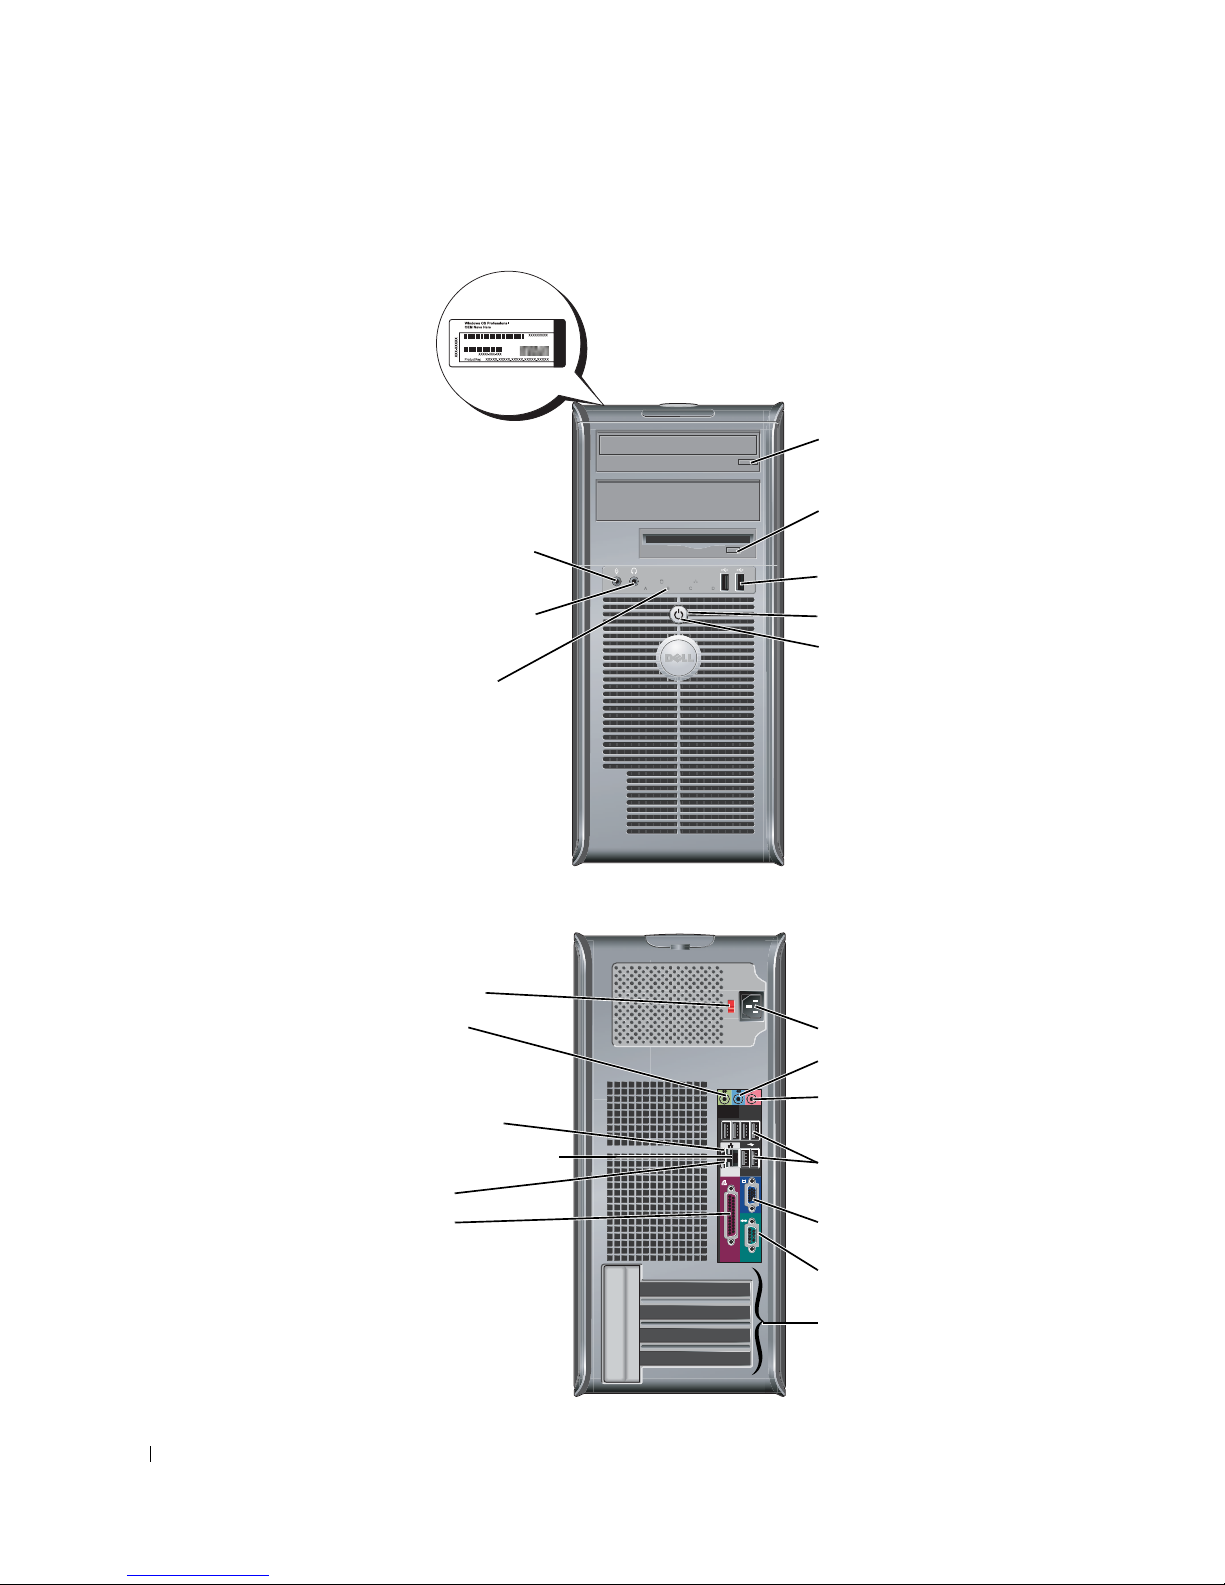
Mini-Tower Computer
Microsoft Windows
Product Key
CD/DVD-drive eject button
www.dell.com | support.dell.com
microphone
connector
headphone
connector
diagnostic
lights
voltage selection switch
line-out connector
floppy-drive eject button
USB 2.0 connectors (2)
power button
power light
power connector
line-in connector
network activity light
network adapter connector
link integrity light
parallel connector
12 Quick Reference Guide
microphone connector
USB 2.0 connectors (6)
video connector
serial connector
card slots (4)
Page 13

Opening the Computer Cover
CAUTION: Before you begin any of the procedures in this section, follow the safety instructions in the
Product Information Guide.
CAUTION: To guard against electrical shock, always unplug your computer from the electrical outlet
before opening the cover.
Before opening the cover, remove the lock if a lock is installed on the back of the computer.
Small Form-Factor, Small Desktop, and Small Mini-Tower Computers
NOTICE: Ensure that there is sufficient space to support the open cover—at least 30 cm (1 ft) of desk top
space.
Remove the computer stand, if one is attached.
1
2
Locate the
the
two
NOTICE: Open the cover slowly to ensure that you do not damage any
cables.
Raise the back of the cover, and pivot it toward the front of the
3
computer.
NOTE: When opening the small mini-tower computer, first press
the release button on the right side of the computer with one hand
while pulling up on the top of the cover with the other hand, and
then press the release button on the left side of the computer with
one hand while pulling up on the top of the cover with the other
hand.
two
release buttons shown in the figure. Then press
release buttons as you lift the cover.
Desktop and Mini-Tower Computers
Locate the cover release lever on the back of the computer, and
press the lever to release the cover.
Quick Reference Guide 13
Page 14

Inside Your Computer
Small Form-factor Computer
www.dell.com | support.dell.com
padlock ring
PCI-E x16
connector
heat sink and blower
assembly
Small Desktop Computer
floppy drive
hard drive
CD/DVD drive
internal speaker
chassis intrusion
switch
SATA connector
system board
power supply
system board
heat sink and blower
assembly
PCI-E x16
connector
PCI-E x1
connector
14 Quick Reference Guide
CD/DVD drive
floppy drive
hard drive
internal speaker
chassis intrusion switch
SATA connector(s) (2)
NOTE: Your computer may
not have the SATA1
connector.
power supply
card cage
Page 15
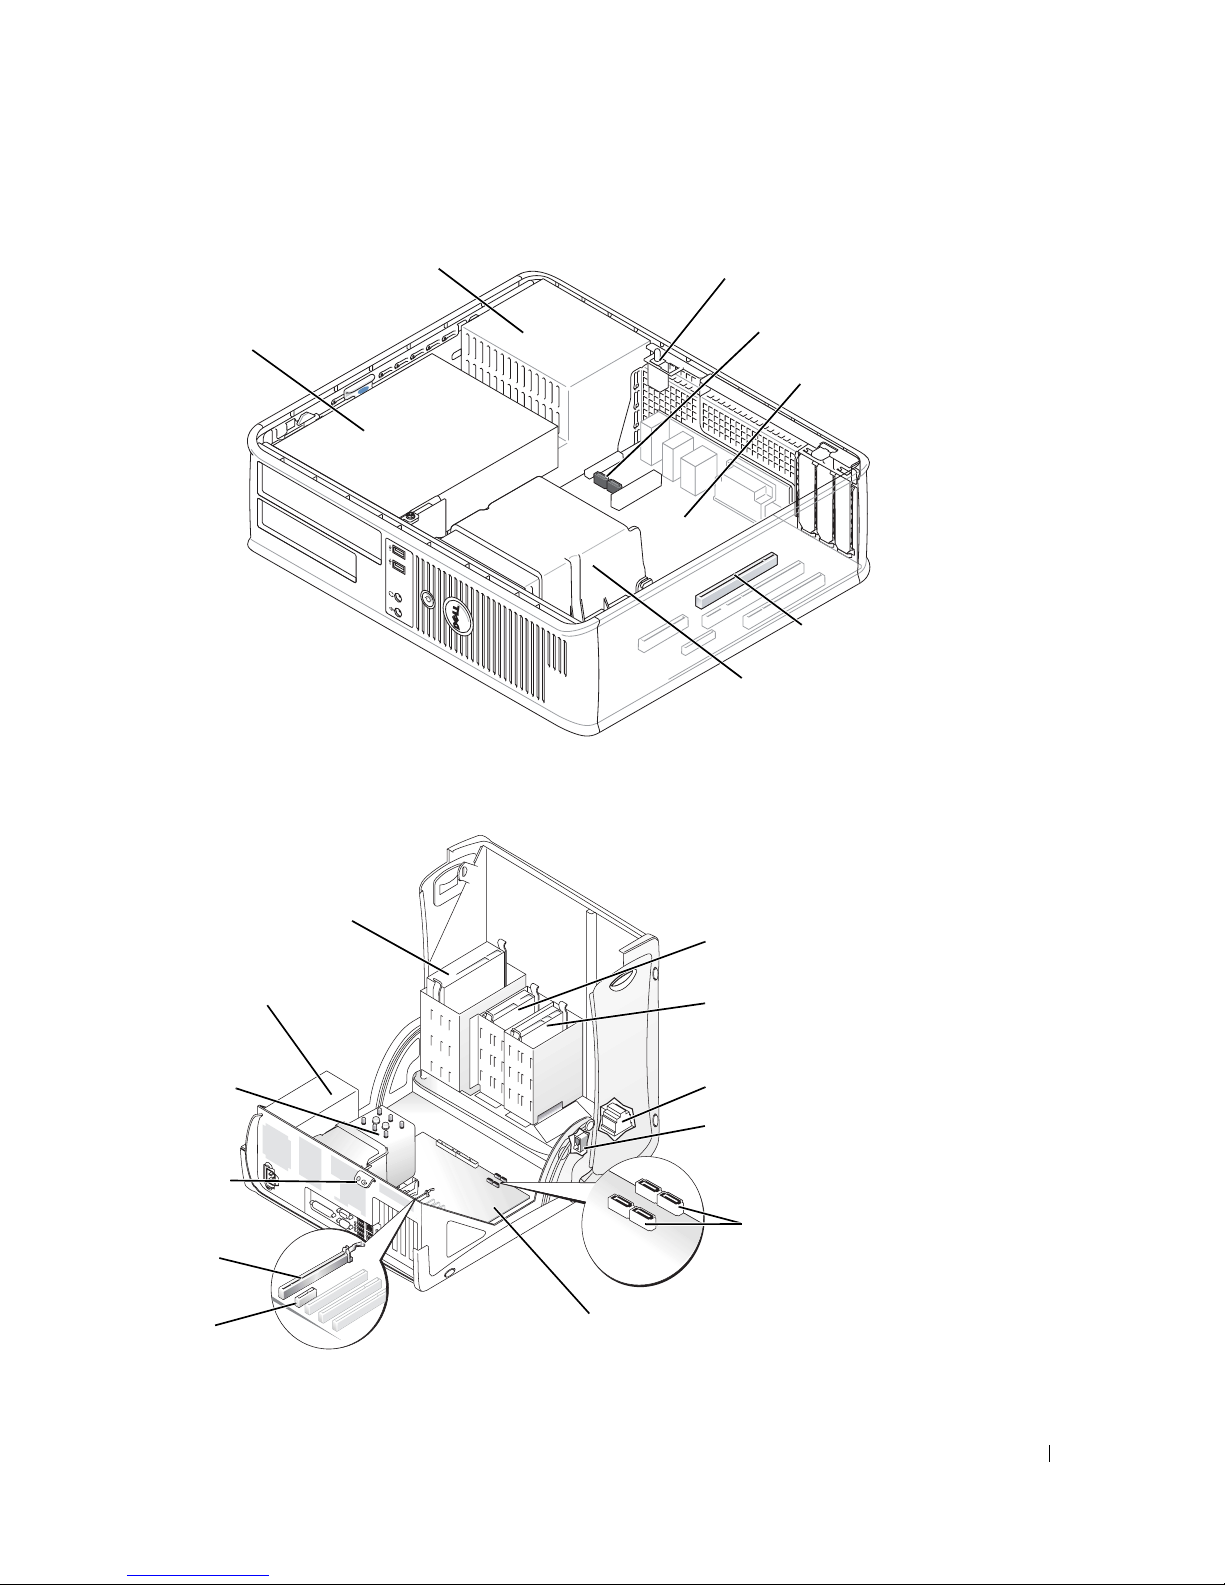
Desktop Computer
r
power supply
CD/DVD, floppy,
and hard drive
(stacked)
Small Mini-Tower Computer
chassis intrusion switch
SATA connectors (2)
system board
PCI-E x16 connecto
heat sink shroud
assembly
power supply
heat sink shroud
assembly
padlock ring
PCI-E x16
connector
PCI-E x1
connector
CD/DVD drive
system board
floppy drive
hard drive
internal speaker
chassis intrusion switch
SATA connectors (4)
NOTE: Your computer may not
have the SATA1 or SATA3
connectors.
Quick Reference Guide 15
Page 16
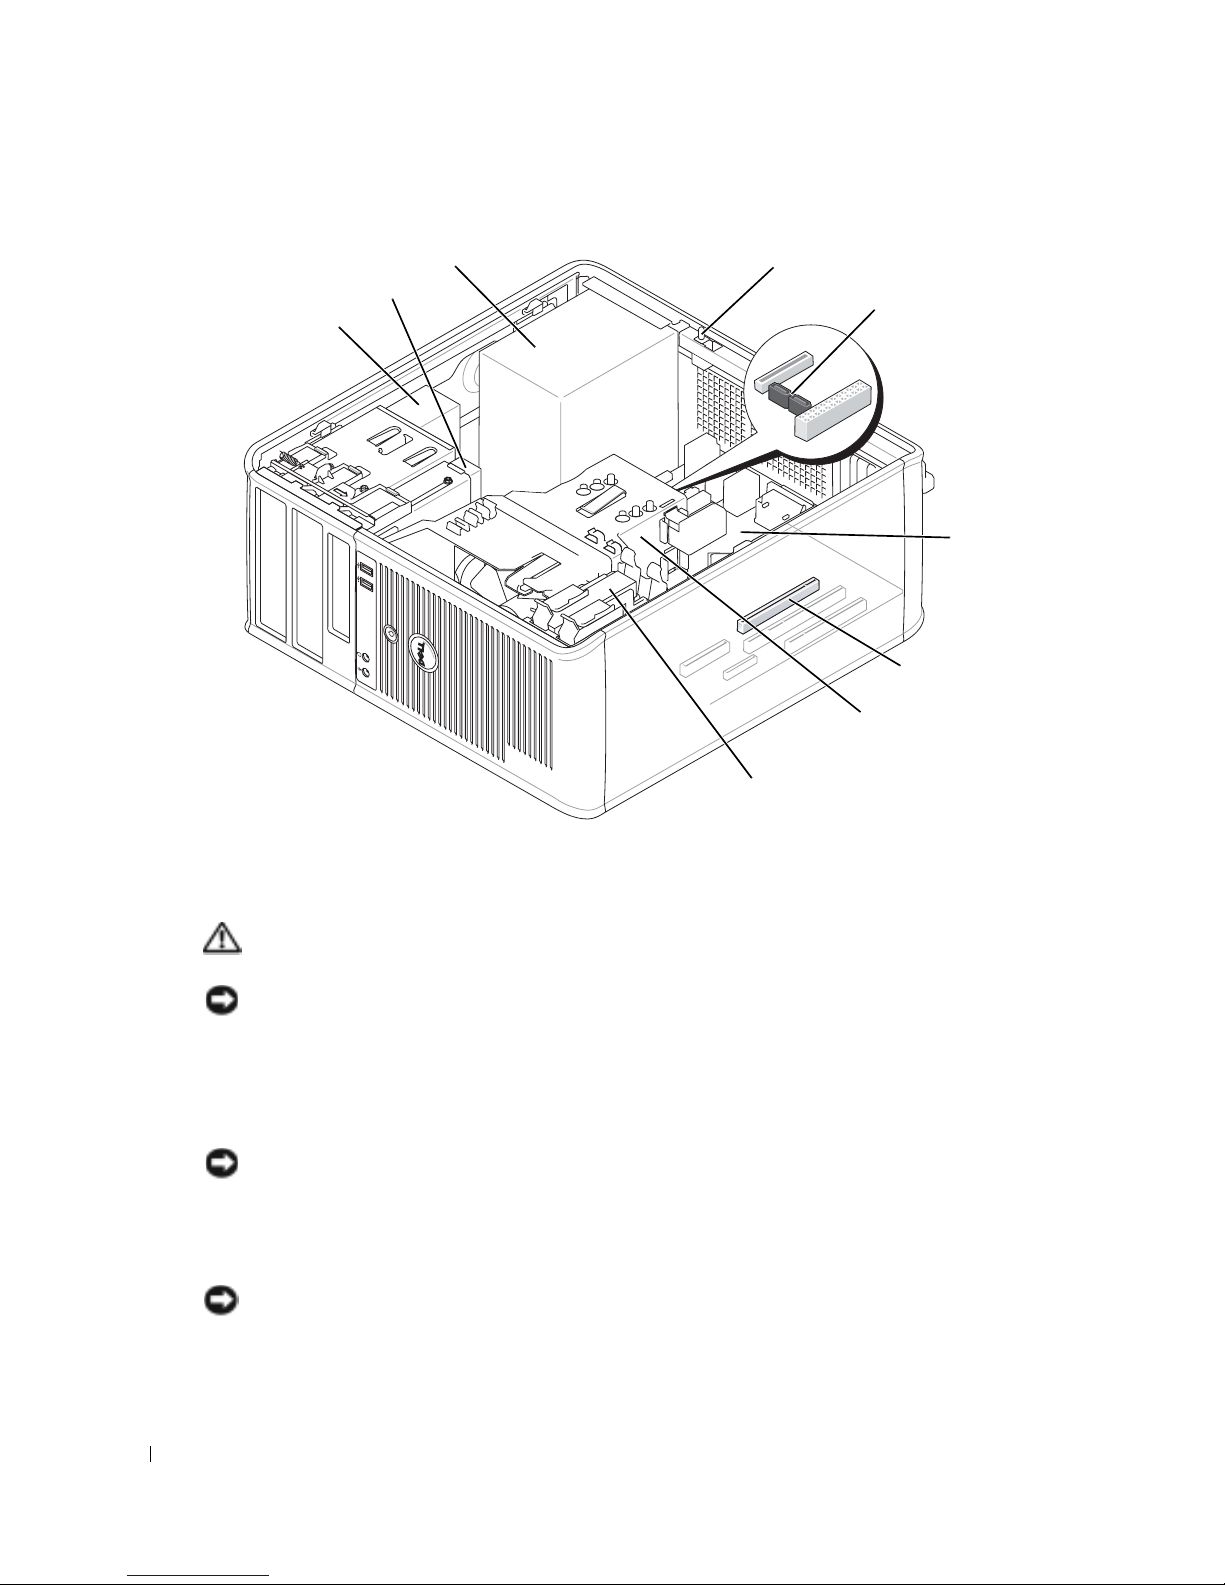
Mini-Tower Computer
power supply
floppy drive
CD/DVD drive
chassis intrusion switch
SATA connectors (2)
www.dell.com | support.dell.com
Setting Up Your Computer
CAUTION: Before performing any of the procedures in this section, follow the safety instructions in
Product Information Guide.
NOTICE: If your computer has an expansion card installed (such as a modem card), connect the
appropriate cable to the card, not to the connector on the back panel.
You must complete all the steps to properly set up your computer. See the appropriate figures that
follow the instructions.
system board
PCI-E x16 connector
heat sink shroud
assembly
hard drive
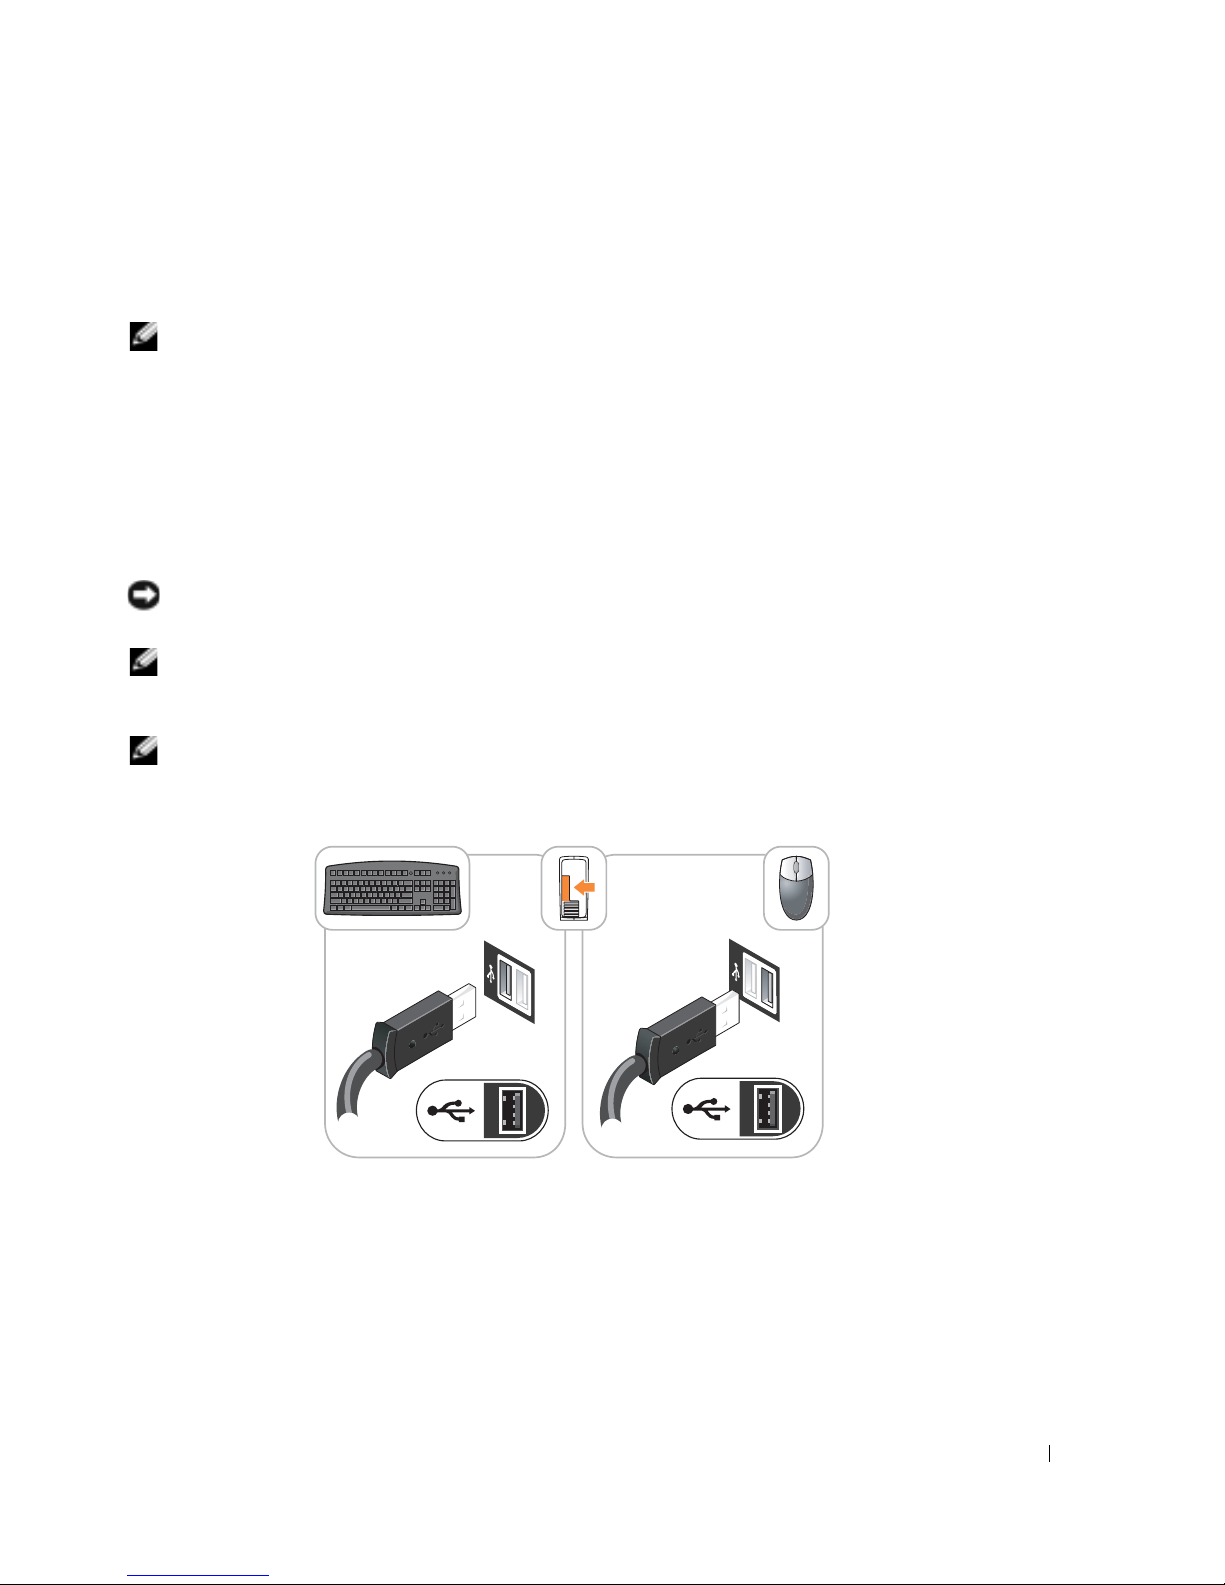
1
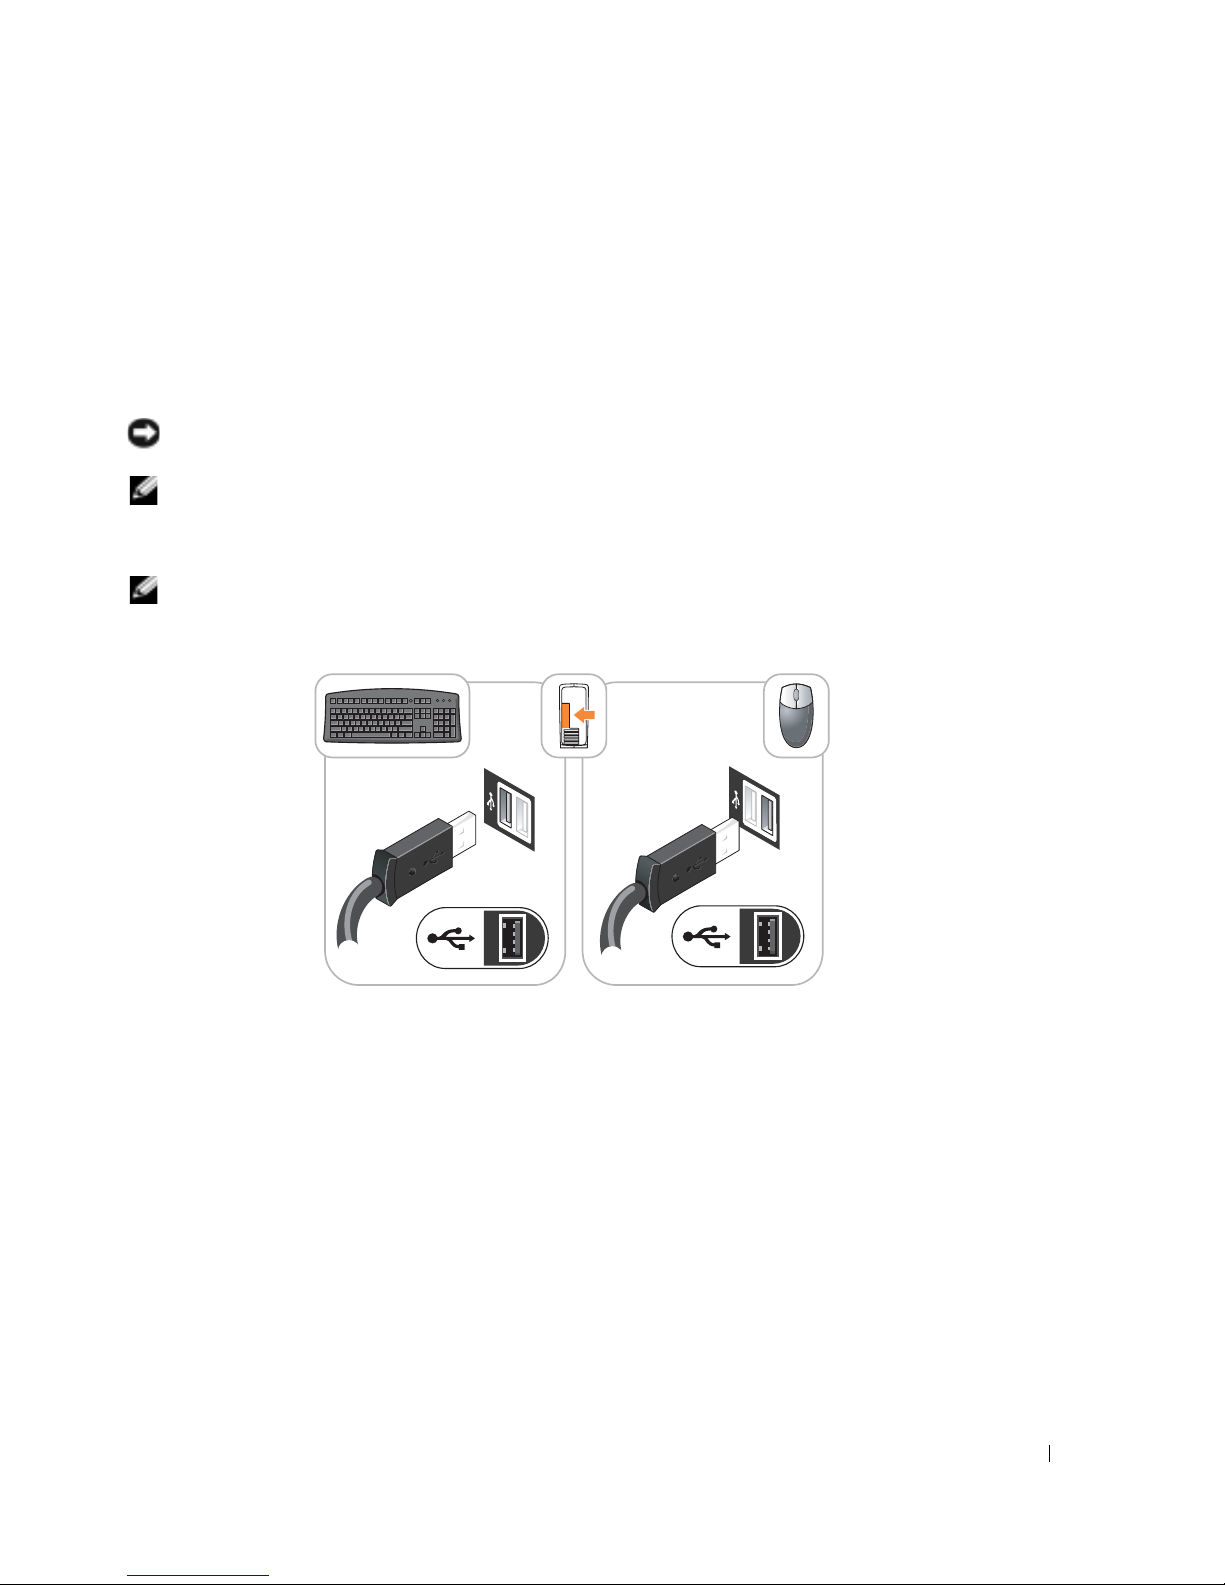
Connect the keyboard and mouse.
NOTICE: Do not attempt to operate a PS/2 mouse and a USB mouse simultaneously.
Connect the modem or network cable.
2
Insert the network cable, not the telephone line, into the network connector. If you have an
optional modem, connect the telephone line to the modem.
NOTICE: Do not connect a modem cable to the network adapter. Voltage from telephone
communications can cause damage to the network adapter.
16 Quick Reference Guide
Page 17
3
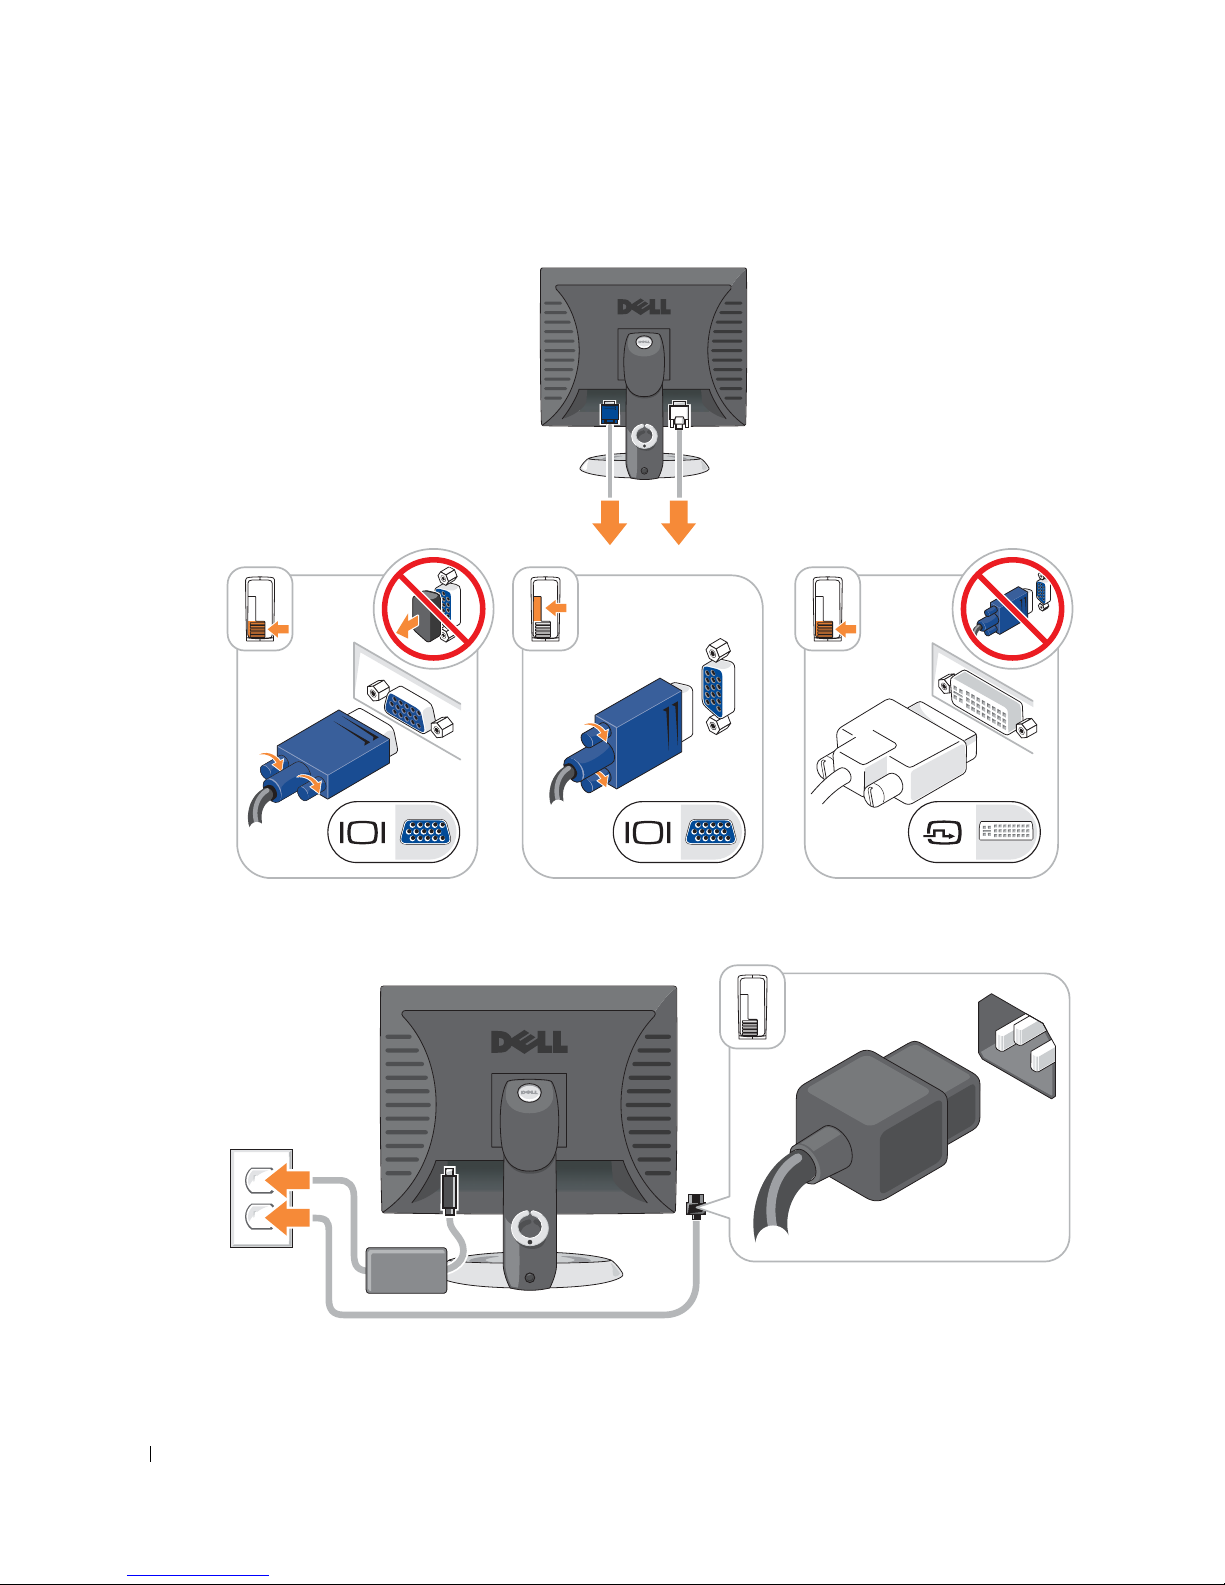
Connect the monitor.
Align and gently insert the monitor cable to avoid bending connector pins. Tighten the
thumbscrews on the cable connectors.
NOTE: Some monitors have the video connector underneath the back of the screen. See the
documentation that came with your monitor for its connector locations.
Connect the speakers.
4
5
Connect power cables to the computer, monitor, and devices and insert the other ends of the
power cables to electrical outlets.
6
Verify that the voltage selection switch is set correctly for your location.
Your computer has a manual voltage selection switch. Computers with a voltage selection
switch on the back panel must be manually set to operate at the correct operating voltage.
NOTICE: To help avoid damaging a computer with a manual voltage selection switch, set the switch for
the voltage that most closely matches the AC power available in your location.
NOTE: Before you install any devices or software that did not ship with your computer, read the
documentation that came with the device or software, or contact the vendor to verify that the device or
software is compatible with your computer and operating system.
NOTE: Your computer may vary slightly from the following setup figures.
Set Up Your Keyboard and Mouse
Quick Reference Guide 17
Page 18
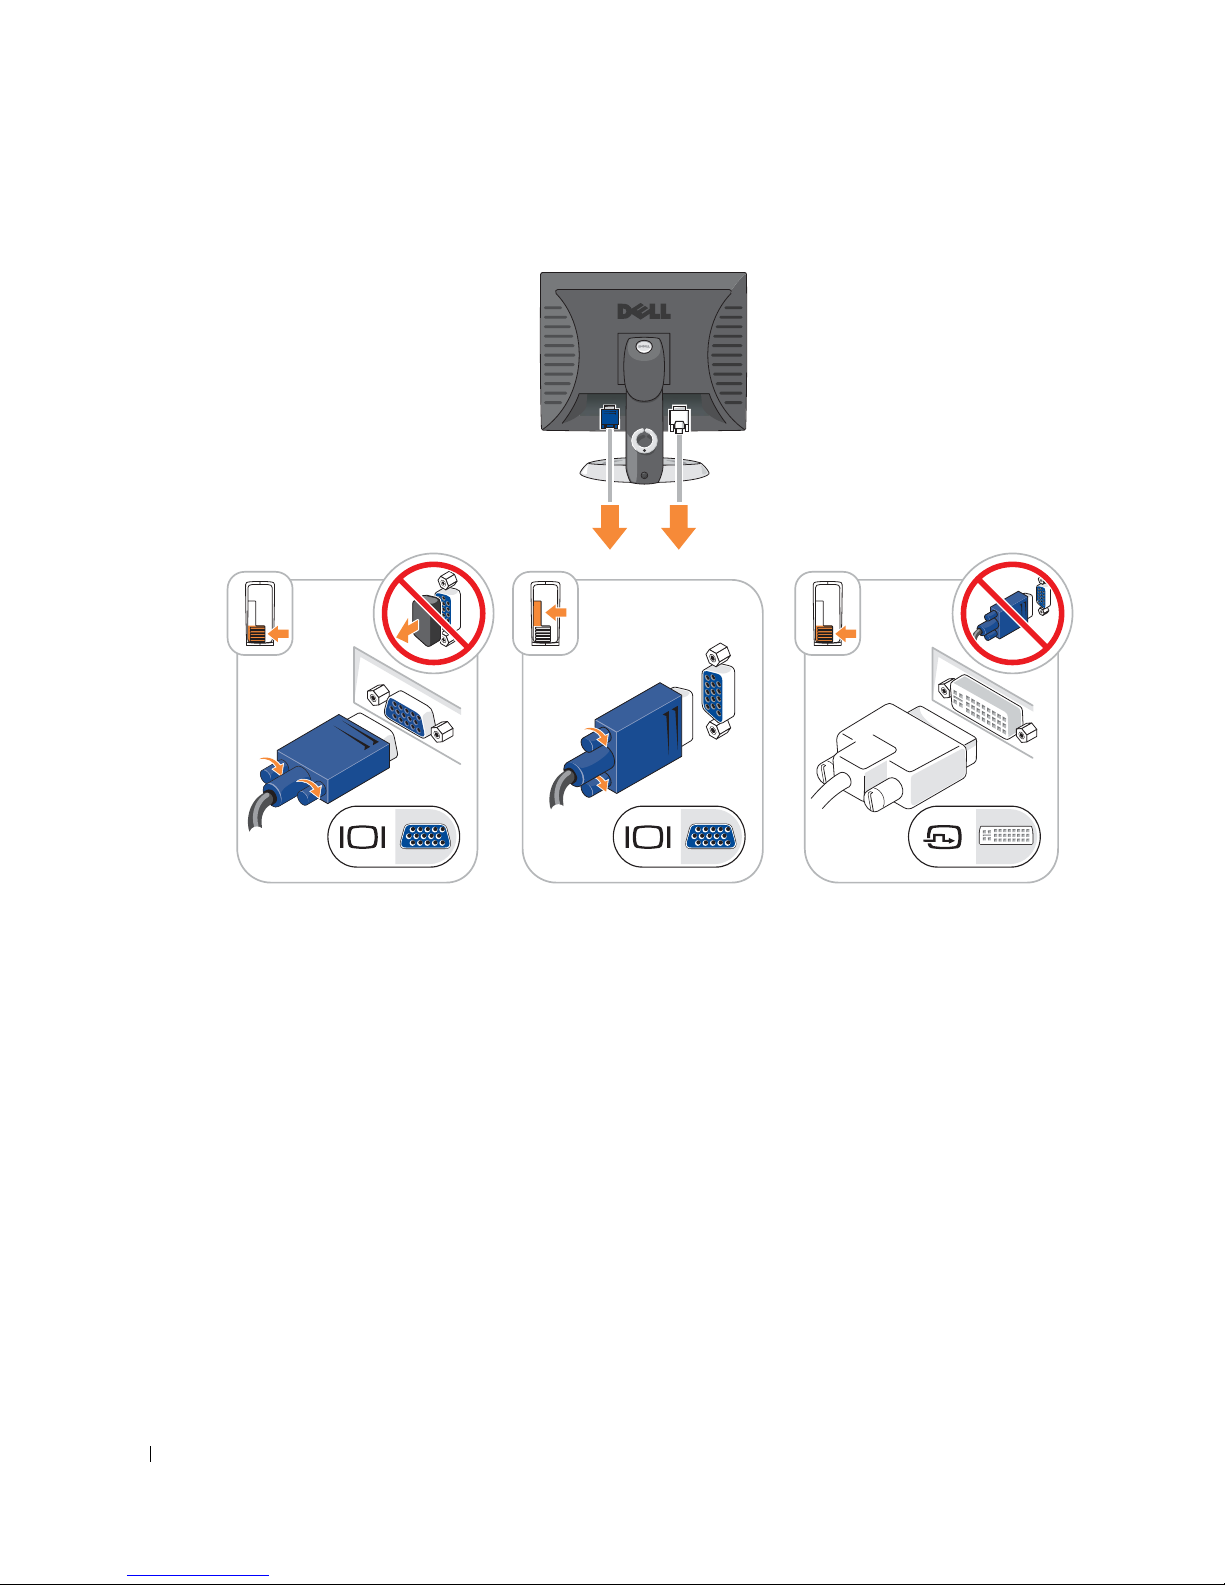
Set Up Your Monitor
www.dell.com | support.dell.com
18 Quick Reference Guide
Page 19
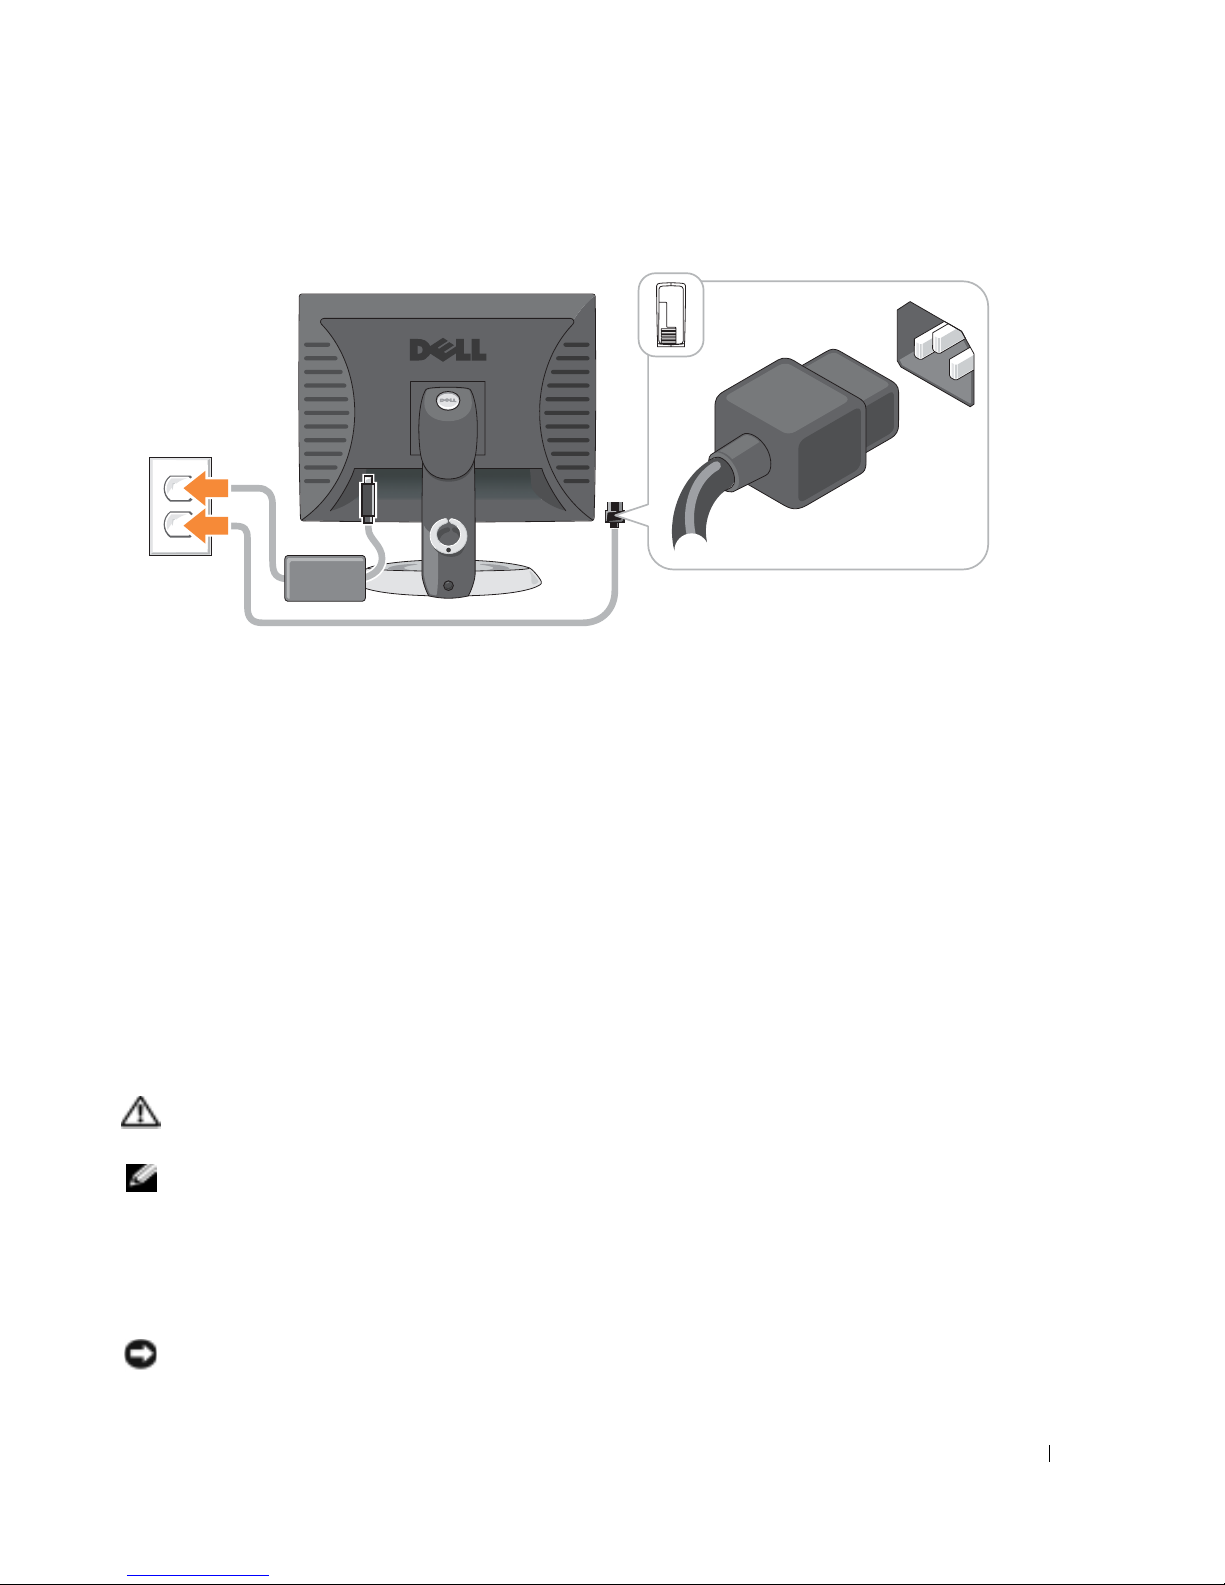
Power Connections
Solving Problems
Dell provides a number of tools to help you if your computer does not perform as expected. For the
latest troubleshooting information available for your computer, see the Dell Support website at
support.dell.com
.
If computer problems occur that require help from Dell, write a detailed description of the error,
beep codes, or diagnostics light patterns; record your Express Service Code and Service Tag below;
and then contact Dell from the same location as your computer.
See "Finding Information for Your Computer" on page 5 for an example of the Express Service
Code and Service Tag.
Express Service Code:___________________________
Service Tag:___________________________
Dell Diagnostics
CAUTION: Before you begin any of the procedures in this section, follow the safety instructions in the
Product Information Guide.
NOTE: The Drivers and Utilities CD (ResourceCD) is optional and therefore may not ship with all
computers.
When to Use the Dell Diagnostics
If you experience a problem with your computer, perform the checks in "Solving Problems" of your
online
User’s Guide
NOTICE: The Dell Diagnostics works only on Dell™ computers.
and run the Dell Diagnostics before you contact Dell for technical assistance.
Quick Reference Guide 19
Page 20

Enter system setup, review your computer’s configuration information, and ensure that the device
you want to test displays in system setup and is active.
Start the Dell Diagnostics from either your hard drive or from the optional
(also known as the ResourceCD).
Starting the Dell Diagnostics From Your Hard Drive
1
Turn on (or restart) your computer.
2
When the DELL™ logo appears, press <F12> immediately.
NOTE: If you see a message stating that no diagnostics utility partition has been found, run the Dell
Diagnostics from your Drivers and Utilities CD (optional).
www.dell.com | support.dell.com
If you wait too long and the operating system logo appears, continue to wait until you see the
Microsoft
3
When the boot device list appears, highlight
4
When the Dell Diagnostics
Starting the Dell Diagnostics From the Drivers and Utilities CD
NOTE: The Drivers and Utilities CD (ResourceCD) is optional and therefore may not ship with all
computers.
Insert the
1
2
Shut down and restart the computer.
Drivers and Utilities
®
Windows® desktop. Then shut down your computer and try again.
Main Menu
Drivers and Utilities
Boot to Utility Partition
appears, select the test you want to run.
CD.
and press <Enter>.
CD
When the DELL logo appears, press <F12> immediately.
If you wait too long and the Windows logo appears, continue to wait until you see the
Windows desktop. Then shut down your computer and try again.
NOTE: The next steps change the boot sequence for one time only. On the next start-up, the computer
boots according to the devices specified in system setup.
When the boot device list appears, highlight
3
4
Select the
5
Select the
6
Ty p e 1 to start the ResourceCD menu.
7
Ty p e 2 to start the Dell Diagnostics.
8
Select
IDE CD-ROM Device
Boot from CD-ROM
Run the 32 Bit Dell Diagnostics
select the version appropriate for your computer.
9
When the Dell Diagnostics
20 Quick Reference Guide
IDE CD-ROM Device
option from the CD boot menu.
option from the menu that appears.
from the numbered list. If multiple versions are listed,
Main Menu
appears, select the test you want to run.
and press <Enter>.
Page 21

Dell Diagnostics Main Menu
1
After the Dell Diagnostics loads and the
Main Menu
screen appears, click the button for the
option you want.
Option Function
Express Test Performs a quick test of devices. This test typically takes 10 to 20 minutes and
requires no interaction on your part. Run Express Test first to increase the
possibility of tracing the problem quickly.
Extended Test Performs a thorough check of devices. This test typically takes an hour or more
and requires you to answer questions periodically.
Custom Test Tests a specific device. You can customize the tests you want to run.
Symptom Tree Lists the most common symptoms encountered and allows you to select a test
based on the symptom of the problem you are having.
2
If a problem is encountered during a test, a message appears with an error code and a
description of the problem. Write down the error code and problem description and follow
the instructions on the screen.
If you cannot resolve the error condition, contact Dell.
NOTE: The Service Tag for your computer is located at the top of each test screen. If you contact Dell,
technical support will ask for your Service Tag.
3
If you run a test from the
Custom Test
or
Symptom Tree
option, click the applicable tab
described in the following table for more information.
Tab Function
Results Displays the results of the test and any error conditions encountered.
Errors Displays error conditions encountered, error codes, and the problem
description.
Help Describes the test and may indicate requirements for running the test.
Configuration Displays your hardware configuration for the selected device.
The Dell Diagnostics obtains configuration information for all devices from
system setup, memory, and various internal tests, and it displays the
information in the device list in the left pane of the screen. The device list may
not display the names of all the components installed on your computer or all
devices attached to your computer.
Parameters Allows you to customize the test by changing the test settings.
4
When the tests are completed, if you are running the Dell Diagnostics from the
Utilities
CD (optional), remove the CD.
Drivers and
Quick Reference Guide 21
Page 22

5
Close the test screen to return to the
restart the computer, close the
Main Menu
Main Menu
screen. To exit the Dell Diagnostics and
screen.
System Lights
Your power light may indicate a computer problem.
Power Light Problem Description Suggested Resolution
Solid green Power is on, and the computer is
Blinking green The computer is in the suspended
www.dell.com | support.dell.com
Blinks green several
times and then
turns off
Solid yellow The Dell Diagnostics is running a
Blinking yellow A power supply or system board
Solid green and a
beep code during
POST
No corrective action is required.
operating normally.
state (Microsoft
and Windows XP).
A configuration error exists. Check "Diagnostic Lights" on page 23 to see if
test, or a device on the system board
may be faulty or incorrectly installed.
failure has occurred.
A problem was detected while the
BIOS was executing.
®
Windows® 2000
Press the power button, move the mouse, or
press a key on the keyboard to wake the
computer.
the specific problem is identified.
If the Dell Diagnostics is running, allow the
testing to complete.
Check "Diagnostic Lights" on page 23 to see if
the specific problem is identified.
If the computer does not boot, contact Dell
for technical assistance.
contacting Dell, see your online
Check "Diagnostic Lights" on page 23 to see if
the specific problem is identified. See "Power
Problems" in your online User’s Guide.
See "Beep Codes" on page 26 for instructions
on diagnosing the beep code. Also, check
"Diagnostic Lights" on page 23 to see if the
specific problem is identified.
For information on
User’s Guide
.
Solid green power
light, no beep code
and no video during
POST
Solid green power
light and no beep
code but the
computer locks up
during POST
The monitor or the graphics card may
be faulty or incorrectly installed.
An integrated system board device
may be faulty.
22 Quick Reference Guide
Check "Diagnostic Lights" on page 23 to see if
the specific problem is identified.
Check "Diagnostic Lights" on page 23 to see if
the specific problem is identified. If the
problem is not identified, contact Dell for
technical assistance.
contacting Dell, see your online
For information on
User’s Guide
.
Page 23
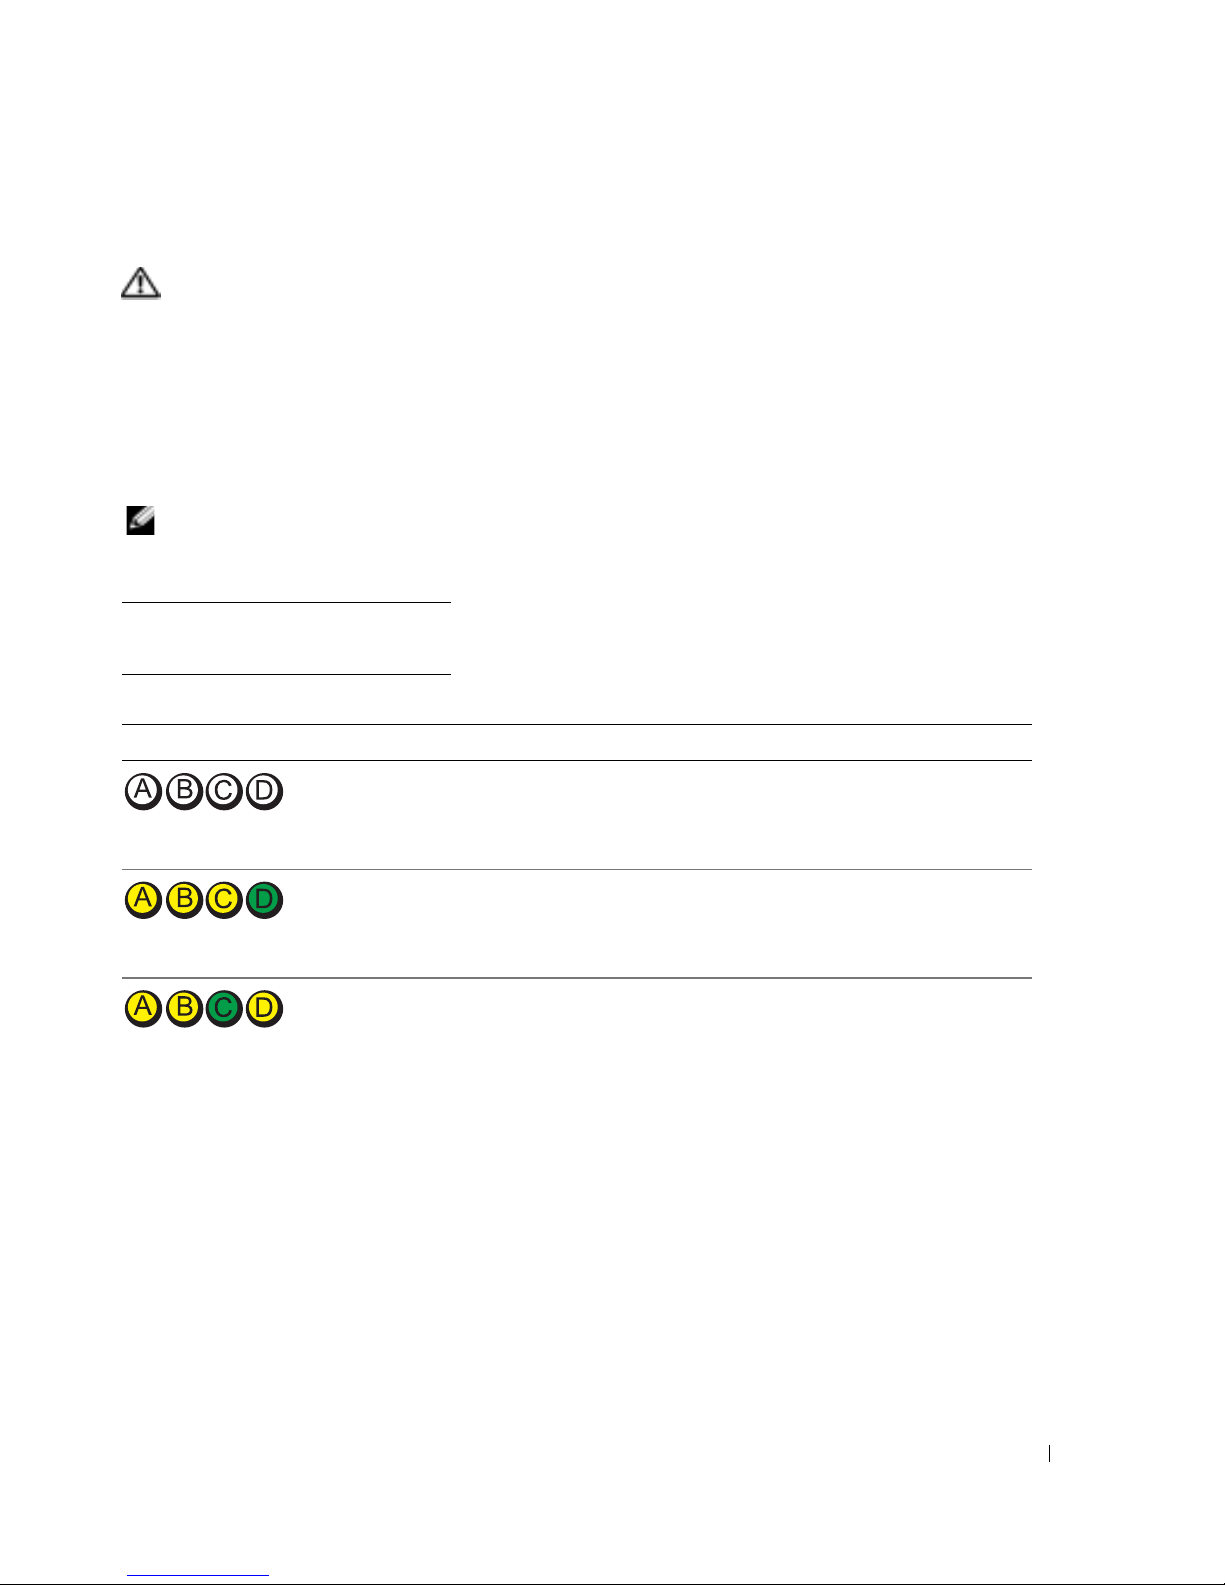
Diagnostic Lights
CAUTION: Before you begin any of the procedures in this section, follow the safety instructions in the
Product Information Guide.
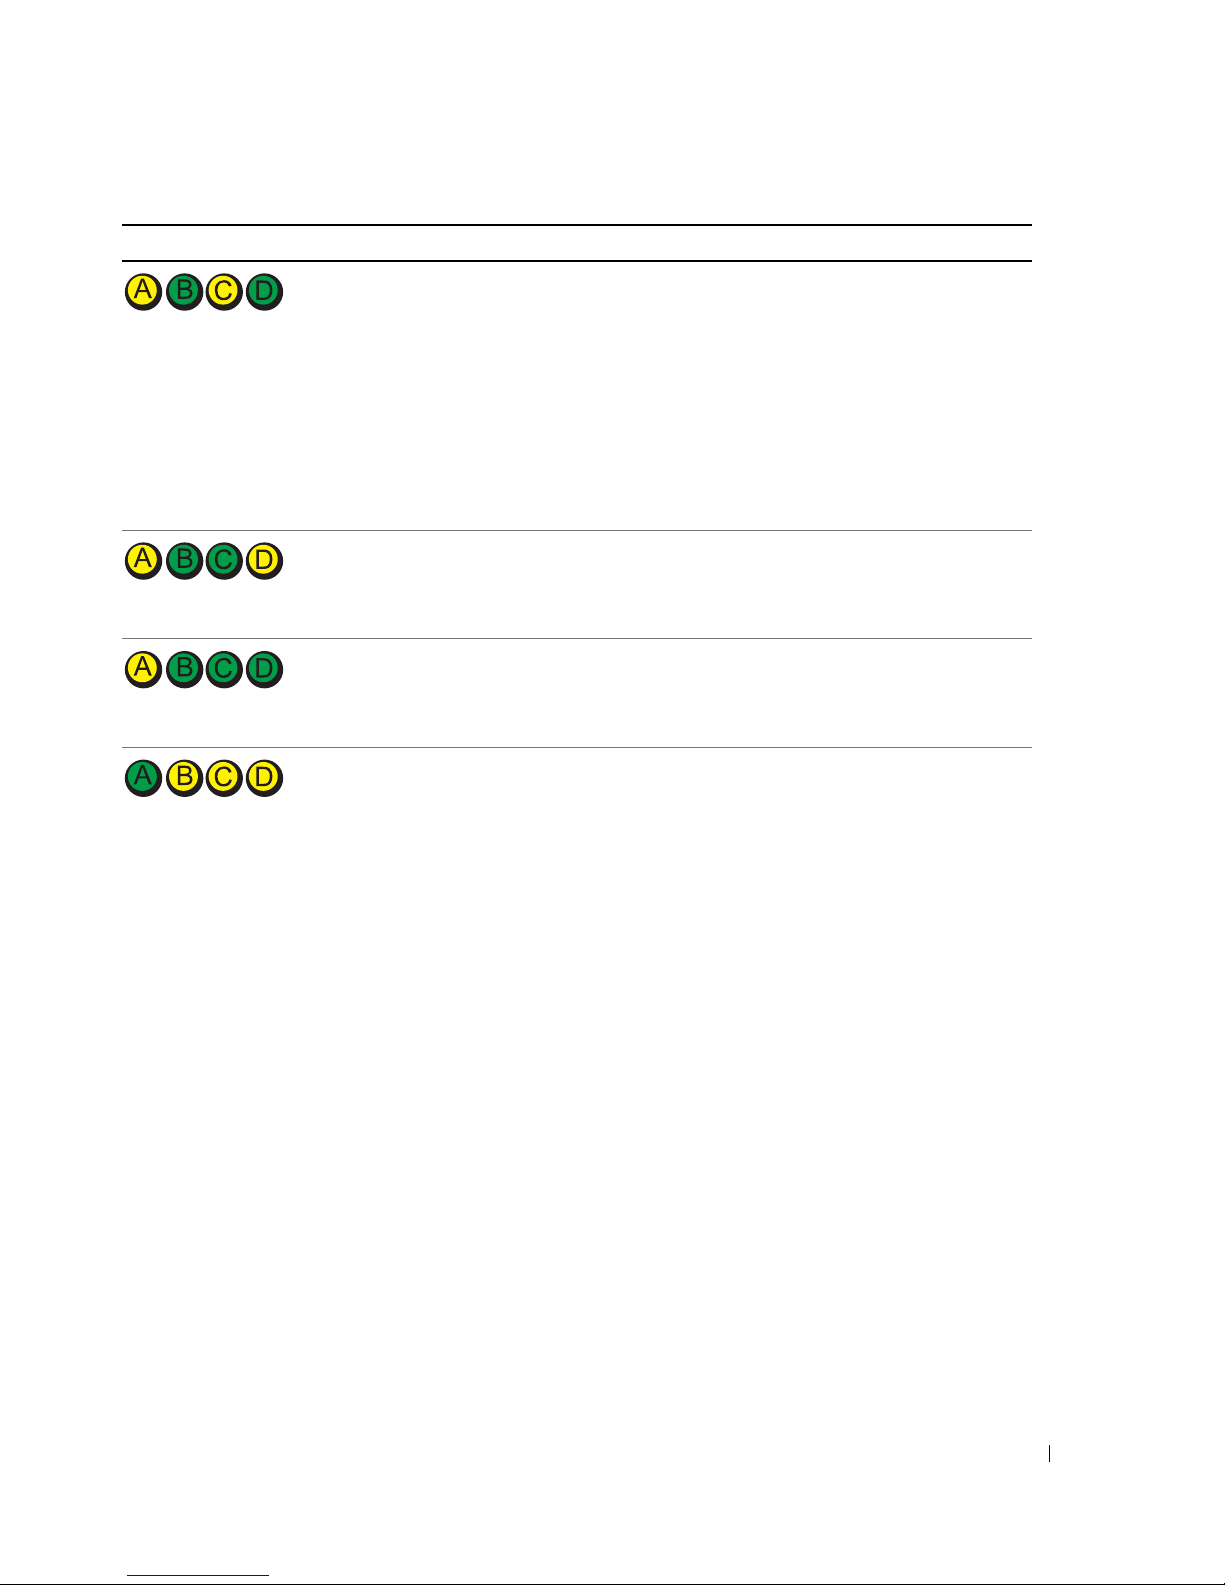
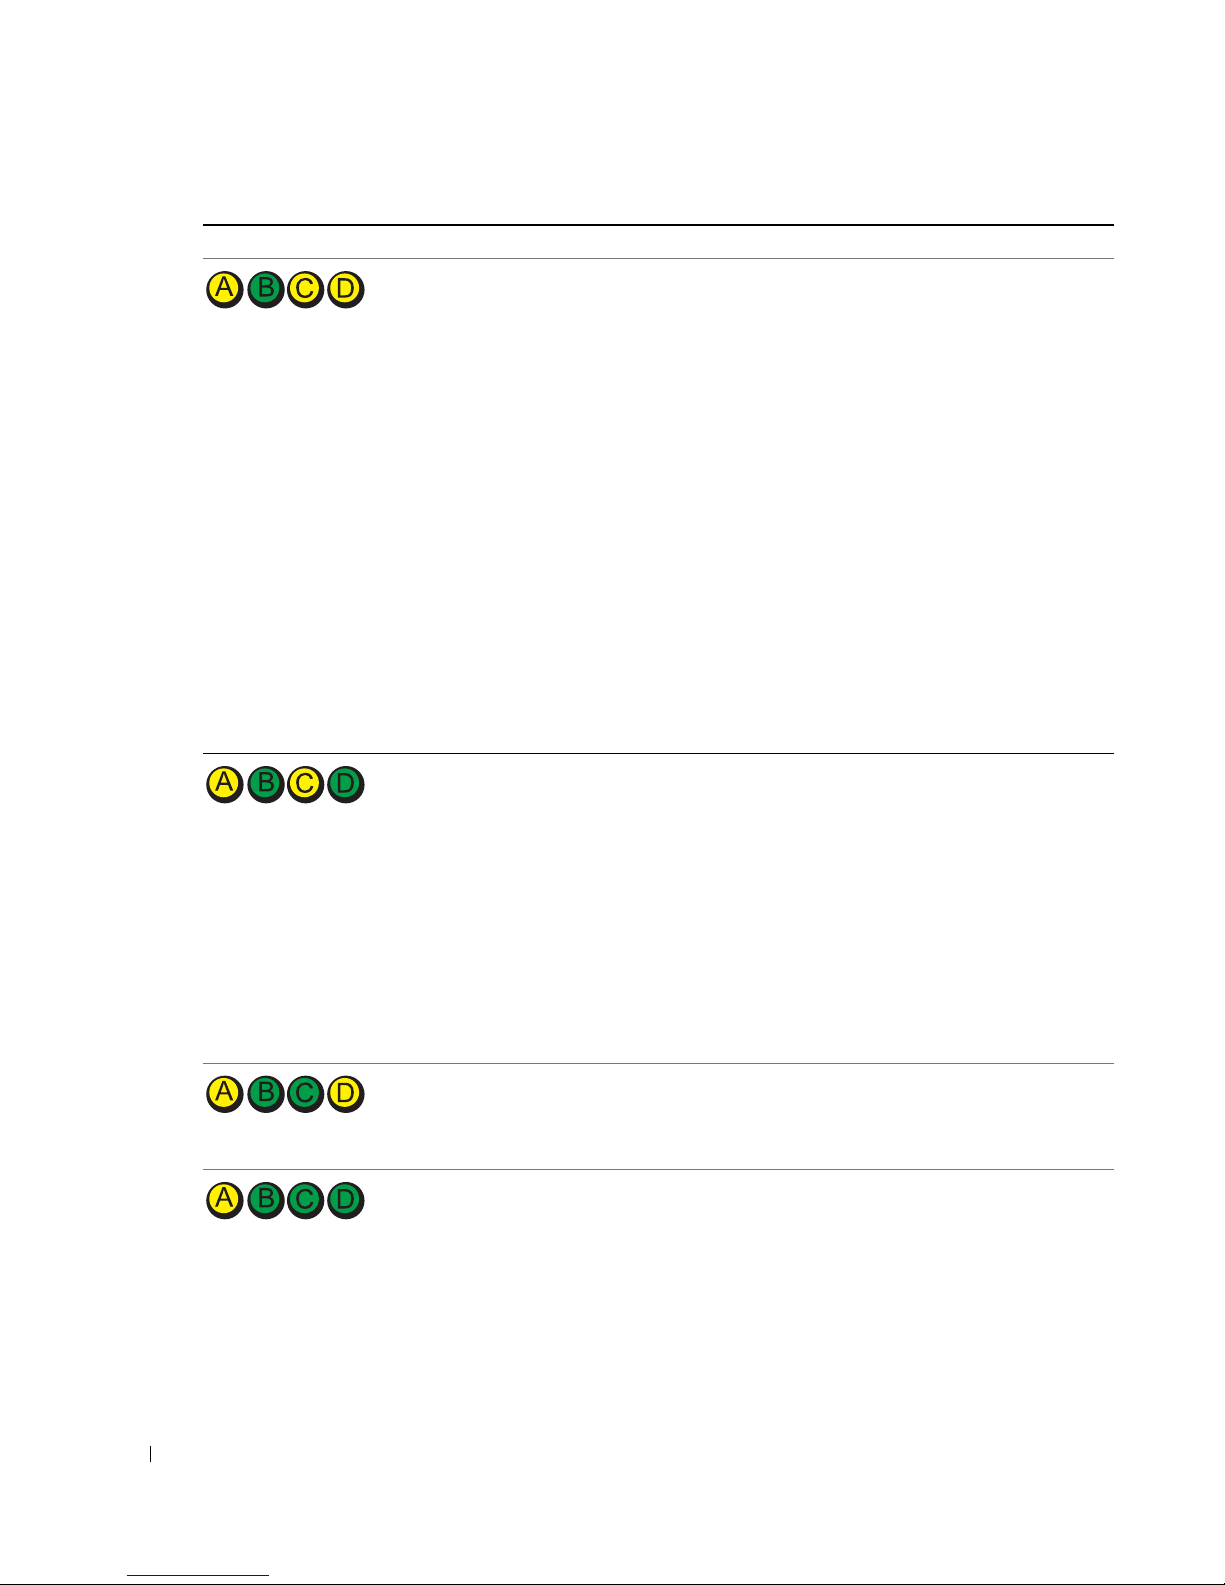
To help you troubleshoot a problem, your small form factor, small desktop, and small mini-tower
computers have four lights labeled "A," "B," "C," and "D" on the back panel. The lights can be
yellow or green. When the computer starts normally, the patterns or codes on the lights change as
the boot process completes. If the POST portion of system boot completes successfully, all four
lights display solid green. If the computer malfunctions during the POST process, the pattern
displayed on the LEDs may help identify where in the process the computer halted.
NOTE: The orientation of the diagnostic lights may vary depending on the system type. The diagnostic
lights can appear in either a vertical or horizontal orientation.
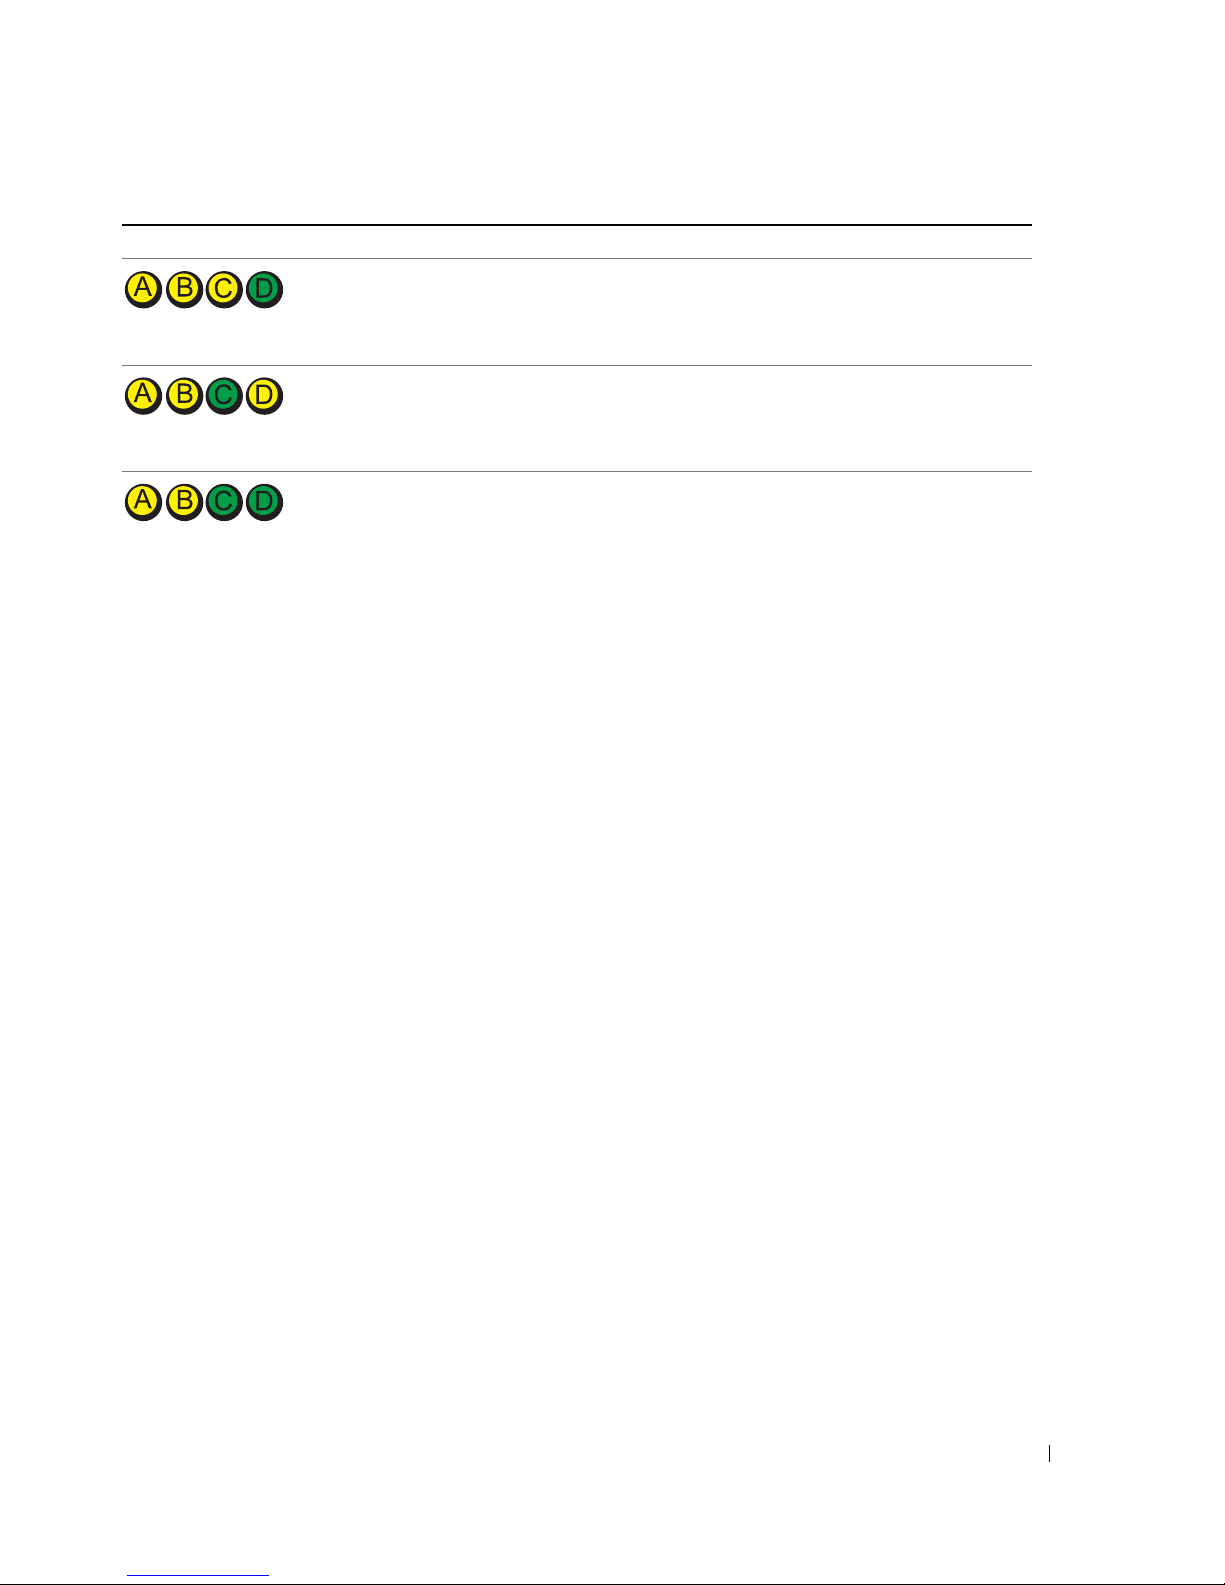
Y = Yellow
G = Green
Light Pattern Problem Description Suggested Resolution
off off off off
YYYG
YYGY
The computer is in a normal "off"
condition or a possible pre-BIOS failure
has occurred.
A possible BIOS failure has occurred; the
computer is in the recovery mode.
A possible processor failure has occurred. Reinstall the processor and restart the
Plug the computer into a working
electrical outlet and press the power
button.
Run the BIOS Recovery utility, wait for
recovery completion, and then restart the
computer.
computer. For information on reinstalling
the processor, see your online User’s
Guide.
Quick Reference Guide 23
Page 24

Light Pattern Problem Description Suggested Resolution
YYGG
www.dell.com | support.dell.com
YGYY
Memory modules are detected, but a
memory failure has occurred.
A possible expansion card failure has
occurred.
• If you have one memory module
installed, reinstall it and restart the
computer.
For information on
reinstalling memory modules, see your
online User’s Guide.
• If you have two or more memory
modules installed, remove the modules,
reinstall one module, and then restart
the computer. If the computer starts
normally, reinstall an additional module.
Continue until you have identified a
faulty module or reinstalled all modules
without error.
• If available, install properly working
memory modules of the same type into
your computer.
• If the problem persists,
contact Dell. For
information on contacting Dell, see
your online User’s Guide.
• Determine if a conflict exists by
removing a card (not the graphics card)
and then restarting the computer.
• If the problem persists, reinstall the card
that you removed, remove a different
card, and then restart the computer.
• Repeat this process for each card. If the
computer starts normally, troubleshoot
the last card removed from the computer
for resource conflicts (see "Resolving
Software and Hardware
Incompatibilities" on page 27).
• Move each card one at a time to a
different PCI connector and restart the
computer after each move.
• If the problem persists,
contact Dell. For
information on contacting Dell, see
your online User’s Guide.
24 Quick Reference Guide
Page 25
Light Pattern Problem Description Suggested Resolution
YGYG
YGGY
YGGG
GYYY
A possible graphics card failure has
occurred.
• If the computer has a graphics card,
remove the card, reinstall it, and then
restart the computer.
• If the problem still exists, install a
graphics card that you know works and
restart the computer.
• If the problem persists or the computer
has integrated graphics,
contact Dell
For information on contacting Dell, see
your online User’s Guide.
A possible floppy or hard drive failure has
occurred.
Reseat all power and data cables and
restart the computer.
A possible USB failure has occurred. Reinstall all USB devices, check cable
connections, and then restart the
computer.
No memory modules are detected.
• If you have one memory module
installed, reinstall it and restart the
computer.
For information on
reinstalling memory modules, see your
online User’s Guide.
• If you have two or more memory
modules installed, remove the modules,
reinstall one module, and then restart
the computer. If the computer starts
normally, reinstall an additional module.
Continue until you have identified a
faulty module or reinstalled all modules
without error.
• If available, install properly working
memory modules of the same type into
your computer.
• If the problem persists,
contact Dell. For
information on contacting Dell, see
your online User’s Guide.
.
Quick Reference Guide 25
Page 26

Light Pattern Problem Description Suggested Resolution
GYGY
www.dell.com | support.dell.com
GGGY
GGGG
Memory modules are detected, but a
memory configuration or compatibility
error exists.
Other failure has occurred.
The computer is in a normal operating
condition after POST.
• Ensure that no
or memory connector placement
requirements
• Verify that the
you are installing are compatible with
your computer.
• If the problem persists,
information on contacting Dell, see
your online User’s Guide.
• Ensure that the cables are properly
connected to the system board from the
hard drive, CD drive, and DVD drive.
• Check the computer message that
appears on your monitor screen.
• If the problem persists,
information on contacting Dell, see
your online User’s Guide.
None.
special memory module
exist.
memory modules
contact Dell. For
contact Dell. For
that
Beep Codes
Your computer might emit a series of beeps during start-up if the monitor cannot display errors or
problems. This series of beeps, called a beep code, identifies a problem. One possible beep code
(code 1-3-1) consists of one beep, a burst of three beeps, and then one beep. This beep code tells
you that the computer encountered a memory problem.
If your computer beeps during start-up:
1
Write down the beep code.
2
See "Dell Diagnostics" on page 19 to identify a more serious cause.
3
Contact Dell for technical assistance. For information on contacting Dell, see your online
User’s Guide
Code Cause Code Cause
1-1-2 Microprocessor register failure 3-1-4 Slave interrupt mask register failure
1-1-3 NVRAM read/write failure 3-2-2 Interrupt vector loading failure
1-1-4 ROM BIOS checksum failure 3-2-4 Keyboard Controller Test failure
1-2-1 Programmable interval timer failure 3-3-1 NVRAM power loss
.
26 Quick Reference Guide
Page 27

Code Cause Code Cause
1-2-2 DMA initialization failure 3-3-2 Invalid NVRAM configuration
1-2-3 DMA page register read/write failure 3-3-4 Video Memory Test failure
1-3 Video Memory Test failure 3-4-1 Screen initialization failure
1-3-1 through 2-4-4 Memory not being properly identified
or used
3-1-1 Slave DMA register failure 3-4-3 Search for video ROM failure
3-1-2 Master DMA register failure 4-2-1 No timer tick
3-1-3 Master interrupt mask register failure 4-2-2 Shutdown failure
4-2-3 Gate A20 failure 4-4-1 Serial or parallel port test failure
4-2-4 Unexpected interrupt in protected
mode
4-3-1 Memory failure above address 0FFFFh 4-4-3 Math-coprocessor test failure
4-3-3 Timer-chip counter 2 failure 4-4-4 Cache test failure
4-3-4 Time-of-day clock stopped
3-4-2
Screen retrace failure
4-4-2 Failure to decompress code to shadowed
memory
Running the Dell™ IDE Hard Drive Diagnostics
The Dell IDE Hard Drive Diagnostics is a utility that tests the hard drive to troubleshoot or
confirm a hard drive failure.
1
Turn on your computer (if your computer is already on, restart it).
2
When
F2= Setup
appears in the upper-right corner of the screen, press
<Ctrl><Alt><d>.
3
Follow the instructions on the screen.
If a failure is reported, see "Hard Drive Problems" in the "Solving Problems" section of the online
User’s Guide
.
Resolving Software and Hardware Incompatibilities
If a device is either not detected during the operating system setup or is detected but incorrectly
configured, you can use the Hardware Troubleshooter to resolve the incompatibility. In the
Microsoft
incompatibilities.
Windows XP
To resolve incompatibilities using the Hardware Troubleshooter:
1
2
3
®
Windows® 2000 operating system, you can also use Device Manager to resolve
Click the
Ty p e
Click
Start
button and click
hardware troubleshooter
Hardware Troubleshooter
Help and Support
in the
in the
Search
Search Results
.
field and click the arrow to start the search.
list.
Quick Reference Guide 27
Page 28

4
In the
Hardware Troubleshooter
computer
Windows 2000
To resolve incompatibilities using Device Manager:
1
Click the
2
In the
3
Click the
4
Click
5
Click
www.dell.com | support.dell.com
6
Double-click
Control Panel
Device Manager
View
, and click
Start
Next
.
button, point to
window, double-click
Hardware
tab.
.
and click
Resources by connection
Interrupt request (IRQ)
list, click
Settings
.
I need to resolve a hardware conflict on my
, and then click
System
Control Panel
.
.
.
Incorrectly configured devices are indicated by a yellow exclamation point (
!
) or a red X if the
device has been disabled.
7
Double-click any device marked with an exclamation point to display the
The
Device
status area in the
Properties
window reports the cards or devices that need to be
Properties
window.
reconfigured.
8
Reconfigure the devices or remove the devices from the Device Manager. See the
documentation that came with the device for information on configuring the device.
To resolve incompatibilities using the Hardware Troubleshooter:
1
Click the
2
Click
troubleshooters
In the
Hardware Troubleshooter
and click
Start
button and click
Help
Troubleshooting and Maintenance
, and then click
Hardware
list, click
Next
.
.
on the
Contents
tab, click
Windows 2000
.
I need to resolve a hardware conflict on my computer
Using Microsoft® Windows® XP System Restore
The Microsoft® Windows® XP operating system provides System Restore to allow you to return
your computer to an earlier operating state (without affecting data files) if changes to the
hardware, software, or other system settings have left the computer in an undesirable operating
state. See the Windows Help and Support Center for information on using System Restore.
NOTICE: Make regular backups of your data files. System Restore does not monitor your data files or
recover them.
28 Quick Reference Guide
Page 29

Creating a Restore Point
1
Click the
2
Click
3
Follow the instructions on the screen.
Restoring the Computer to an Earlier Operating State
NOTICE: Before you restore the computer to an earlier operating state, save and close any open files
and exit any open programs. Do not alter, open, or delete any files or programs until the system
restoration is complete.
Start
button and click
System Restore
Help and Support
.
.
Click the
1
System Restore
2
Ensure that
3
Click a calendar date to which you want to restore your computer.
The
Start
button, point to
.
Restore my computer to an earlier time
Select a Restore Point
All Programs→
Accessories→
System Tools
is selected and click
, and then click
Next
.
screen provides a calendar that allows you to see and select restore
points. All calendar dates with available restore points appear in boldface type.
4
Select a restore point and click
Next
.
If a calendar date has only one restore point, then that restore point is automatically selected.
If two or more restore points are available, click the restore point that you prefer.
5
Click
Next
.
The
Restoration Complete
screen appears after System Restore finishes collecting data and
then the computer restarts.
6
After the computer restarts, click OK.
To change the restore point, you can either repeat the steps using a different restore point, or you
can undo the restoration.
Undoing the Last System Restore
NOTICE: Before you undo the last system restore, save and close all open files and exit any open
programs. Do not alter, open, or delete any files or programs until the system restoration is complete.
Click the
1
System Restore
2
Click
3
Click
The
4
After the computer restarts, click OK.
Start
button, point to
.
Undo my last restoration
Next
.
System Restore
screen appears and the computer restarts.
All Programs→ Accessories→ System Tools
and click
Next
.
Quick Reference Guide 29
, and then click
Page 30

Enabling System Restore
If you reinstall Windows XP with less than 200 MB of free hard-disk space available, System
Restore is automatically disabled. To see if System Restore is enabled:
1
Click the
2
Click
Performance and Maintenance
3
Click
System
4
Click the
5
Ensure that
Reinstalling Microsoft® Windows® XP
www.dell.com | support.dell.com
Before You Begin
If you are considering reinstalling the Windows XP operating system to correct a problem with a
newly installed driver, first try using Windows XP Device Driver Rollback. If Device Driver
Rollback does not resolve the problem, then use System Restore to return your operating system to
the operating state it was in before you installed the new device driver.
NOTICE: Before performing the installation, back up all data files on your primary hard drive. For
conventional hard drive configurations, the primary hard drive is the first drive detected by the computer.
To reinstall Windows XP, you need the following items:
Start
button and click
.
System Restore
tab.
Turn off System Restore
Control Panel
.
is unchecked.
.
• Dell™
•Dell
NOTE: The Drivers and Utilities CD contains drivers that were installed during assembly of the computer.
Use the Drivers and Utilities CD to load any required drivers, including the drivers required if your
computer has a RAID controller.
Reinstalling Windows XP
NOTICE: You must use Windows XP Service Pack 1 or later when you reinstall Windows XP.
Operating System
Drivers and Utilities
CD
CD
To reinstall Windows XP, perform all the steps in the following sections in the order in which they
are listed.
The reinstallation process can take 1 to 2 hours to complete. After you reinstall the operating
system, you must also reinstall the device drivers, virus protection program, and other software.
NOTICE: The Operating System CD provides options for reinstalling Windows XP. The options can
overwrite files and possibly affect programs installed on your hard drive. Therefore, do not reinstall
Windows XP unless a Dell technical support representative instructs you to do so.
NOTICE: To prevent conflicts with Windows XP, disable any virus protection software installed on your
computer before you reinstall Windows XP. See the documentation that came with the software for
instructions.
30 Quick Reference Guide
Page 31

Booting From the Operating System CD
1
Save and close any open files and exit any open programs.
2
Insert the
3
Restart the computer.
4
Press <F12> immediately after the DELL™ logo appears.
Operating System
CD. Click
Exit
if
Install Windows XP
message appears.
If the operating system logo appears, wait until you see the Windows desktop, and then shut
down the computer and try again.
5
Press the arrow keys to select
6
When the
Windows XP Setup
1
When the
Windows now
2
Read the information on the
Press any key to boot from CD
Windows XP Setup
.
CD-ROM
, and press <Enter>.
message appears, press any key.
screen appears, press <Enter> to select
Microsoft Windows Licensing Agreement
To set up
screen, and press
<F8> to accept the license agreement.
3
If your computer already has Windows XP installed and you want to recover your current
Windows XP data, type
4
If you want to install a new copy of Windows XP, press <Esc> to select that option.
r
to select the repair option, and remove the CD.
5
Press <Enter> to select the highlighted partition (recommended), and follow the
instructions on the screen.
The
Windows XP Setup
screen appears, and the operating system begins to copy files and
install the devices. The computer automatically restarts multiple times.
NOTE: The time required to complete the setup depends on the size of the hard drive and the speed of
your computer.
NOTICE: Do not press any key when the following message appears: Press any key to boot
from the CD.
When the
6
location and click
7
Enter your name and organization (optional) in the
click
8
At the
computer (or accept the one provided) and a password, and click
9
If the
Next
10
Enter the date, time, and time zone in the
11
If the
Regional and Language Options
Next
.
Next
.
screen appears, select the settings for your
Computer Name and Administrator Password
Modem Dialing Information
screen appears, enter the requested information and click
.
Date and Time Settings
Networking Settings
screen appears, click
Personalize Your Software
window, enter a name for your
Next
.
window, and click
Typical
and click
Next
.
screen, and
Next
.
Quick Reference Guide 31
Page 32

12
If you are reinstalling Windows XP Professional and you are prompted to provide further
information regarding your network configuration, enter your selections. If you are unsure of
your settings, accept the default selections.
Windows XP installs the operating system components and configures the computer. The
computer automatically restarts.
NOTICE: Do not press any key when the following message appears: Press any key to boot
from the CD.
When the
13
14
When the
click
Skip
15
www.dell.com | support.dell.com
When the
click
Next
16
When the
17
Click
Next
18
Click
Finish
19
Reinstall the appropriate drivers with the
20
Reinstall your virus protection software.
21
Reinstall your programs.
NOTE: To reinstall and activate your Microsoft Office or Microsoft Works Suite programs, you need the
Product Key number located on the back of the Microsoft Office or Microsoft Works Suite CD sleeve.
Using the Drivers and Utilities CD
NOTE: The Drivers and Utilities CD (ResourceCD) is optional and therefore may not ship with all
computers.
To use the
Windows operating system:
Drivers and Utilities
Welcome to Microsoft
How will this computer connect to the Internet?
screen appears, click
Next
.
.
Ready to register with Microsoft?
screen appears, select
No, not at this time
.
Who will use this computer?
screen appears, you can enter up to five users.
.
to complete the setup, and remove the CD.
Drivers and Utilities
CD.
CD (also known as the ResourceCD) while you are running the
message appears,
and
NOTE: To access device drivers and user documentation, you must use the Drivers and Utilities CD while
you are running Windows.
Turn on the computer and allow it to boot to the Windows desktop.
1
2
Insert the
Drivers and Utilities
If you are using the
ResourceCD Installation
about to begin installation.
3
Click OK to continue.
To complete the installation, respond to the prompts offered by the installation program.
32 Quick Reference Guide
CD into the CD drive.
Drivers and Utilities
CD for the first time on this computer, the
window opens to inform you that the
Drivers and Utilities
CD is
Page 33

4
Click
Next
at the
5
Select the appropriate
Drivers for Your Computer
Welcome Dell System Owner
System Model, Operating System, Device Type,
screen.
and
To pi c
To display a list of device drivers for your computer:
1
Click
My Drivers
The
Drivers and Utilities
in the
To pi c
drop-down menu.
CD (optional) scans your computer’s hardware and operating
system, and then a list of device drivers for your system configuration is displayed on the
screen.
2
Click the appropriate driver and follow the instructions to download the driver to your
computer.
.
To view all available drivers for your computer, click
Drivers
from the
To pi c
drop-down menu.
Quick Reference Guide 33
Page 34

www.dell.com | support.dell.com
34 Quick Reference Guide
Page 35

Index
B
beep codes, 26
C
CD
operating system, 6
computer
beep codes, 26
restore to previous operating
state, 28
conflicts
software and hardware
incompatibilities, 27
cover
opening, 13
D
Dell
Premier Support website, 6
support site, 6
Dell Diagnostics, 19
Device Manager, 28
diagnostic lights, 22
diagnostics
beep codes, 26
Dell, 19
Drivers and Utilities CD, 5
lights, 22
documentation
device, 5
finding, 5
online, 6
Quick Reference, 5
ResourceCD, 5
User’s Guide, 5
door
reattaching, 11
drivers
reinstalling, 5
Drivers and Utilities CD, 5
E
error messages
beep codes, 26
diagnostic lights, 22
F
front door
reattaching, 11
H
hardware
beep codes, 26
conflicts, 27
Dell Diagnostics, 19
Hardware Troubleshooter, 27
Help and Support Center, 6
I
IRQ conflicts, 27
L
labels
Microsoft Windows, 5
Service Tag, 5
light, 22
lights
diagnostic, 22
front of computer, 22
power button, 22
system, 22
M
Microsoft Windows label, 5
O
operating system
CD, 6
Installation Guide, 6
reinstalling Windows XP, 30
Operating System CD, 6
P
power light, 22
problems
Index 35
Page 36

beep codes, 26
conflicts, 27
Dell Diagnostics, 19
diagnostic lights, 22
restore computer to previous
operating state, 28
R
U
User’s Guide, 5
W
Windows 2000
Device Manager, 28
Hardware Troubleshooter, 28
reinstalling
drivers, 5
Windows XP, 30
ResourceCD
Dell Diagnostics, 19
S
Service Tag, 5
software
conflicts, 27
system lights, 22
System Restore, 28
T
troubleshooting
conflicts, 27
Dell Diagnostics, 19
diagnostic lights, 22
Hardware Troubleshooter, 27
Help and Support Center, 6
restore computer to previous
operating state, 28
Windows XP
Hardware Troubleshooter, 27
Help and Support Center, 6
reinstalling, 30
System Restore, 28
36 Index
Page 37

Dell™ OptiPlex™ GX280
クイックリファレンスガイド
モデル DHP, DHS, DCNE, DHM, DCSM
Page 38

メモ、注意、警告
メモ : コンピュータを使いやすくするための重要な情報を説明しています。
注意 : ハードウェアの損傷やデータの損失の可能性を示し、その危険を回避するための方法を説明しています。
警告 : 物的損害、けが、または死亡の原因となる可能性があることを示します。
Dell™ n
シリーズコンピュータをご購入いただいた場合、このマニュアルの
Microsoft® Windows®
ティングシステムについての説明は適用されません。
『クイックリファレンスガイド』、『
Drivers and Utilities CD
』およびオペレーティングシステムのメディアはオプ
ションなので、出荷時にすべてのコンピュータに付属しているわけではありません。
オペレー
____________________
この文書の情報は、事前の通知なく変更されることがあります。
© 2004
Dell Inc. の書面による許可のない複写は、いかなる形態においても厳重に禁じられています。
このマニュアルに使用されている商標について:
は、Microsoft Corporation の登録商標です。
このマニュアルでは、上記記載以外の商標や会社名が使用されている場合があります。
ではありません。
モデル DHP, DHS, DCNE, DHM, DCSM
2004 年 9 月 P/N K7822 Rev. A00
すべての著作権は Dell Inc. にあります。
Dell、OptiPlex、および DELL ロゴは、Dell Inc. の商標です。Microsoft および Windows
これらの商標や会社名は、一切 Dell Inc. に所属するもの
Page 39

目次
お使いのコンピュータに関する情報の検索 . . . . . . . . . . . . . . . . . . . 41
前面図と背面図 . . . . . . . . . . . . . . . . . . . . . . . . . . . . . . . . . . 43
スモールフォームファクターコンピュータ . . . . . . . . . . . . . . . . 43
スモールデスクトップコンピュータ . . . . . . . . . . . . . . . . . . . . 44
デスクトップコンピュータ . . . . . . . . . . . . . . . . . . . . . . . . . 45
スモールミニタワーコンピュータ . . . . . . . . . . . . . . . . . . . . . 46
タワーコンピュータ. . . . . . . . . . . . . . . . . . . . . . . . . . . . . 48
コンピュータカバーを開く. . . . . . . . . . . . . . . . . . . . . . . . . . . . 49
スモールフォームファクター、スモールデスクトップ、
およびスモールミニタワーコンピュータ
デスクトップおよびタワーコンピュータ. . . . . . . . . . . . . . . . . . 49
コンピュータの内部 . . . . . . . . . . . . . . . . . . . . . . . . . . . . . . . 50
スモールフォームファクターコンピュータ . . . . . . . . . . . . . . . . 50
スモールデスクトップコンピュータ . . . . . . . . . . . . . . . . . . . . 50
デスクトップコンピュータ . . . . . . . . . . . . . . . . . . . . . . . . . 51
スモールミニタワーコンピュータ . . . . . . . . . . . . . . . . . . . . . 51
タワーコンピュータ. . . . . . . . . . . . . . . . . . . . . . . . . . . . . 52
コンピュータのセットアップ . . . . . . . . . . . . . . . . . . . . . . . . . . 52
電源接続. . . . . . . . . . . . . . . . . . . . . . . . . . . . . . . . . . . 54
. . . . . . . . . . . . . . . . 49
問題の解決 . . . . . . . . . . . . . . . . . . . . . . . . . . . . . . . . . . . . 55
Dell Diagnostics
システムライト . . . . . . . . . . . . . . . . . . . . . . . . . . . . . . . 57
診断ライト . . . . . . . . . . . . . . . . . . . . . . . . . . . . . . . . . . . . 58
ビープコード . . . . . . . . . . . . . . . . . . . . . . . . . . . . . . . . 62
(診断)プログラム. . . . . . . . . . . . . . . . . . . . 55
Dell™ IDE ハードドライブ診断プログラムの実行 . . . . . . . . . . . . . 62
ソフトウェアおよびハードウェアの非互換性の解決. . . . . . . . . . . . 63
Microsoft® Windows® XP システムの復元の使い方 . . . . . . . . . . . 64
Microsoft® Windows® XP の再インストール . . . . . . . . . . . . . . . 65
Drivers and Utilities CD の使い方 . . . . . . . . . . . . . . . . . . . . . . . . 67
索引 . . . . . . . . . . . . . . . . . . . . . . . . . . . . . . . . . . . . . . . . . 69
目次 39
Page 40

40 目次
Page 41
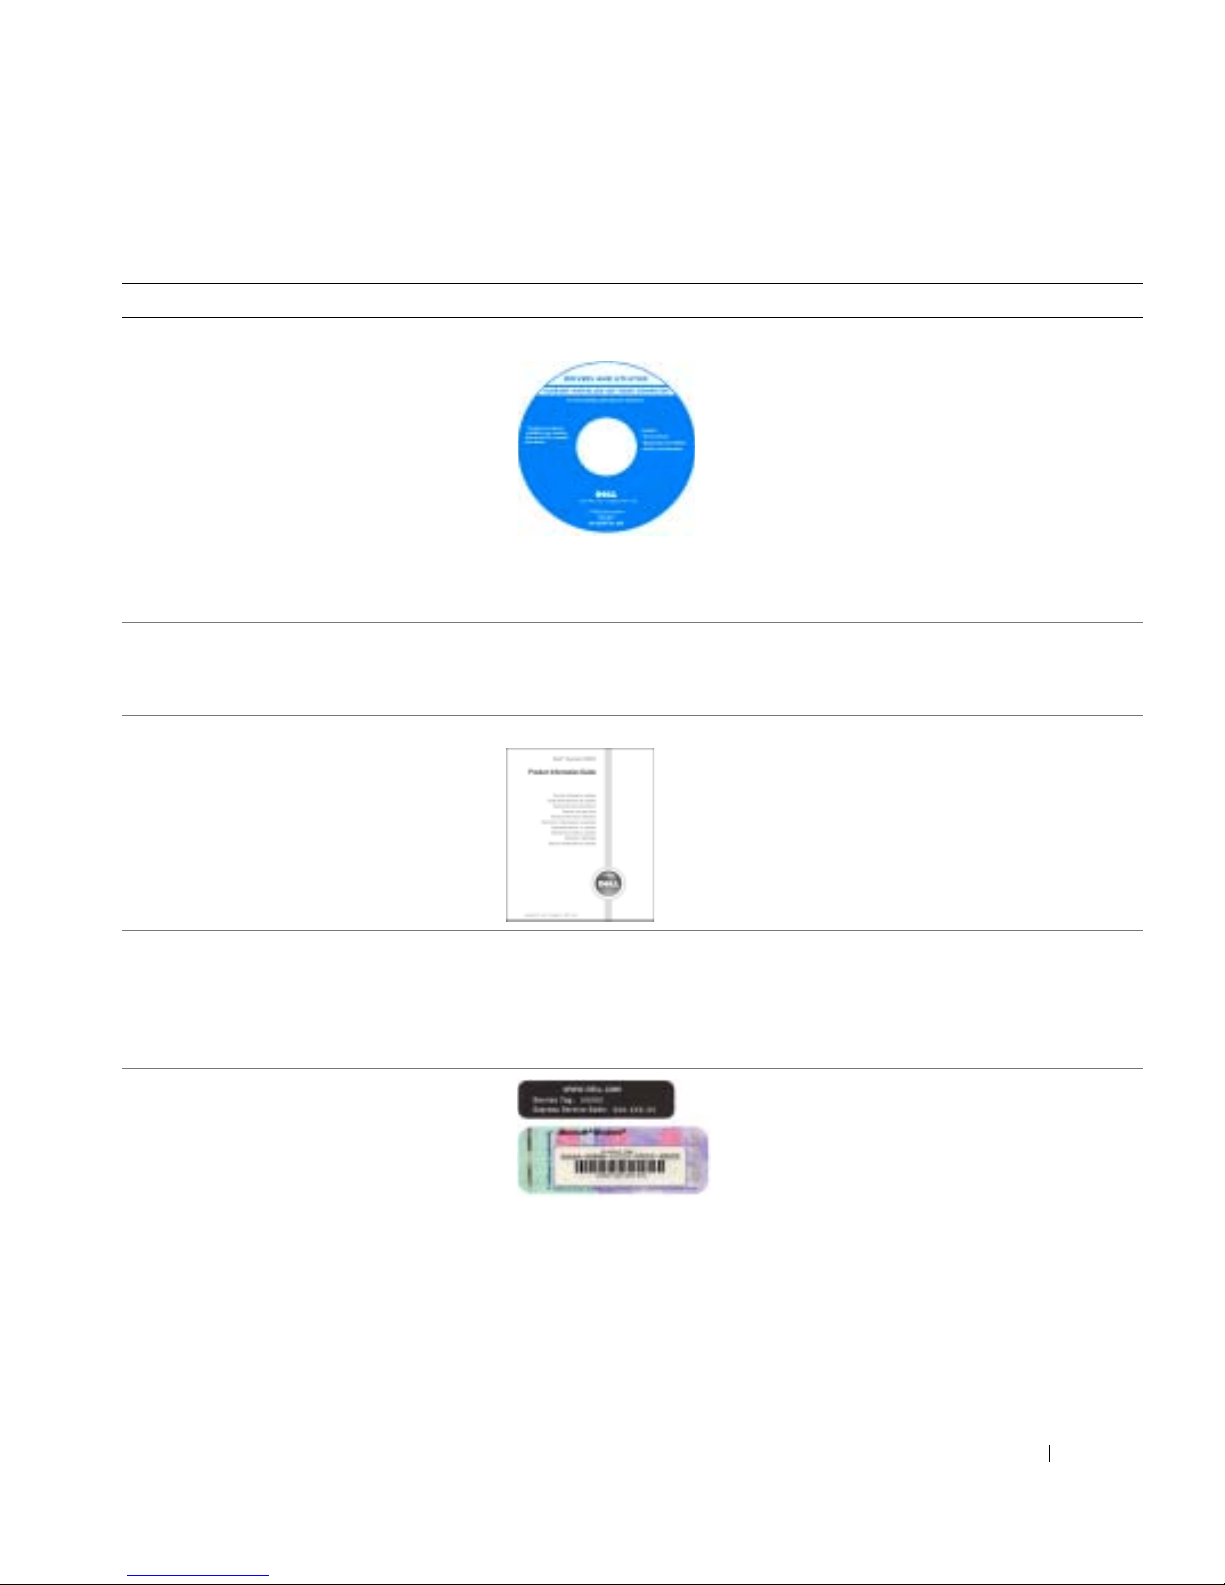
お使いのコンピュータに関する情報の検索
何をお探しですか ? こちらをご覧ください
•
コンピュータの診断プログラム
•
コンピュータのドライバ
•
コンピュータのマニュアル
•
デバイスのマニュアル
•DSS
(デスクトップシステムソフトウェア)
•
オペレーティングシステムのアップデート
とパッチ
•
安全にお使いいただくための注意
•
認可機関の情報
•
作業姿勢に関する情報
•
エンドユーザーライセンス契約
Drivers and Utilities CD(ResourceCD とも呼ばれます )
マニュアルの作成後にシステムに追加された変更や、技術者や専門知識をお持
ちのユーザーを対象とするテクニカルリファレンスなどが記載されています。
DSS(デスクトップシステムソフトウェア)
『
Drivers and Utilities CD
support.jp.dell.com
製品情報ガイド
』およびデルサポートサイトウェブサイト
で利用できます。
マニュアルおよびドライバは、本コンピュー
タにすでにインストールされています。
を使用して、ドライバを再インストールした
Dell Diagnostics(診断)プログラムを
り、
実行したり、マニュアルにアクセスできます。
CD
メモ : 『Drivers and Utilities CD』はオプ
ションなので、出荷時にすべてのコンピュー
タに付属しているわけではありません。
CD に収録されている Readme ファイルは、
•
部品の取り外しおよび取り付け方法
•
仕様
•
システムの設定方法
•
トラブルシューティングおよび問題解決の
方法
•
サービスタグとエクスプレスサービスコード
• Microsoft Windows
ライセンスラベル
Dell™ OptiPlex™ 『ユーザーズガイド』
Microsoft® Windows® XP ヘルプとサポートセンター
1
スタート ボタンをクリックして、
2
ユーザーズガイドおよびシステムガイド をクリックして ユーザーズガイド を
クリックします。
サービスタグおよび Microsoft Windows
ライセンス
次のラベルはお使いのコンピュータに貼られてい
ます。
•
•
エクスプレスサービスコードを利用するとテクニカルサポートに直接電話で
問い合わせることができます。
用できないことがあります。
ヘルプとサポート をクリックします。
support.jp.dell.com
ルサポートにお問い合わせになる際に、サービス
タグを使ってお使いのコンピュータを識別します。
エクスプレスサービスコードは、国によって利
クイックリファレンスガイド 41
を利用したり、テクニカ
Page 42

何をお探しですか ? こちらをご覧ください
•
コンピュータ用のドライバ
•
テクニカルサービスおよびサポートに関す
る質問の回答
•
コンピュータのマニュアル
• Windows XP
•
コンピュータのマニュアル
•
デバイス(モデムなど)のマニュアル
www.dell.com | support.dell.com
•
オペレーティングシステムの再インストー
ル方法
の基本情報
デルサポートサイト — support.jp.dell.com
デルサポートサイトには、以下のツールを含むいくつかのオンラインツールが
あります。
•
トラブルシューティング ―トラブル解決ナビ、
•
ダウンロード
•
ユーザーガイド ― コンピュータマニュアルおよび製品仕様
•
デルプレミアサポートウェブサイト ―
Windows ヘルプとサポートセンター
1
スタート ボタンをクリックして、
2
問題に関連する用語や文節をボックスに入力して、矢印アイコンをクリック
します。
3
問題に関連するトピックをクリックします。
4
画面に表示される指示に従ってください。
オペレーティングシステム CD
オペレーティングシステムは、本コンピュータにすでにインストールされてい
オペレーティングシステムを再インストールする場合は、『オペレー
ます。
ティングシステム
トールの手順については、
メモ : オペレーティングシステムのメディアはオプションなので、出荷時にす
べてのコンピュータに付属しているわけではありません。
•
認可モデルとシャーシのタイプ
• DHP —
• DHS —
スモールフォームファクターシャーシ
スモールデスクトップシャーシ
•DCSM —
• DHM —
•DCNE —
スモールミニタワーシャーシ
タワーシャーシ
Q&A
—
ドライバ、パッチ、およびソフトウェアのアップデート
premiersupport.dell.com
ヘルプとサポート をクリックします。
CD』を使用します。 オペレーティングシステムの再インス
OptiPlex『 ユーザーズガイド』 を参照してください。
オペレーティングシステムを再インストールしたら、
Drivers and Utilities CD』(オプション)を使っ
『
て、コンピュータに付属するデバイス用のドライバを
再インストールします。
オペレーティングシステムの
トキー)
ラベルは、コンピュータに貼付されています。
Product key
メモ : 注文されたオペレーティングシステムによっ
CD の色が違います。
て、
デスクトップシャーシ
(プロダク
42 クイックリファレンスガイド
Page 43
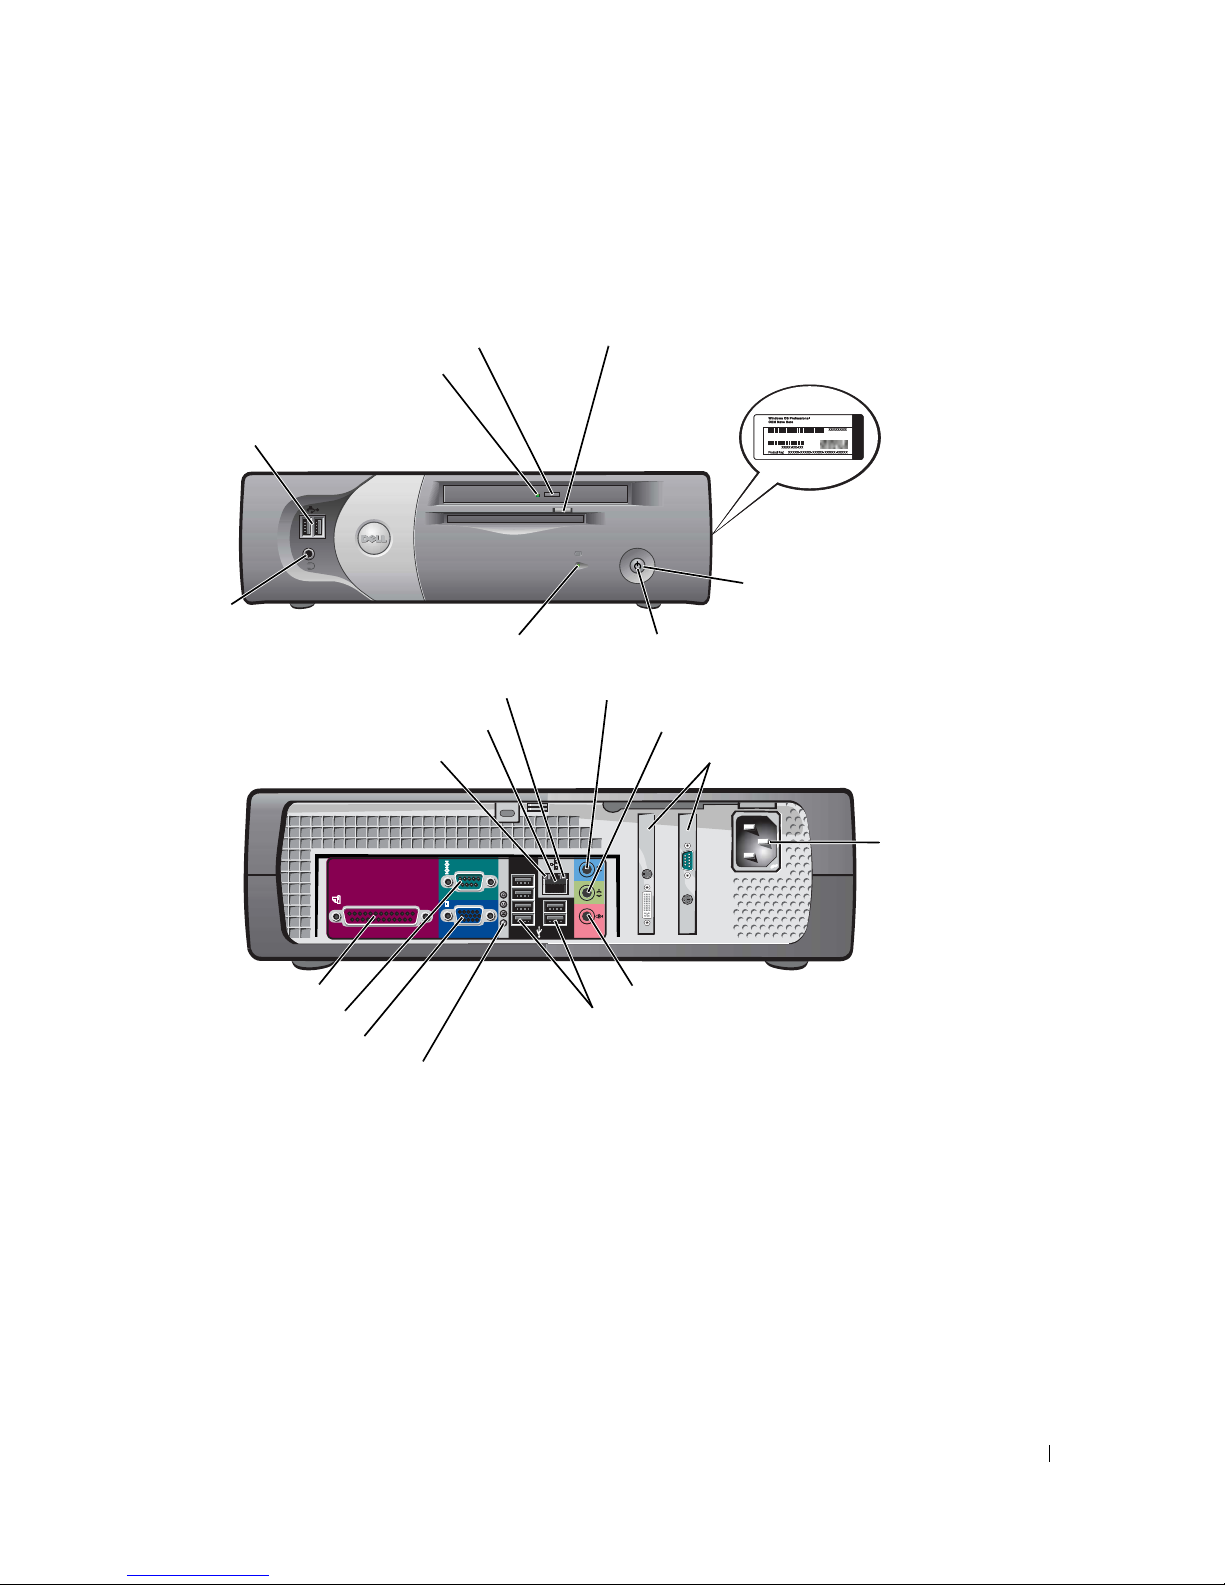
前面図と背面図
スモールフォームファクターコンピュータ
CD/DVD ドライブ取り出しボタン
CD/DVD ドライブ動作ライト
USB 2.0 コネクタ(2)
ッドフォン
コネクタ
ハードドライブアクティビティライト
ネットワーク動作ライト
ネットワークアダプタコネクタ
リンク保全ライト
フロッピードライブ取り出しボタン
Microsoft
Windows
プロダクト
キー
電源ボタン
電源ライト
ライン入力コネクタ
ライン出力コネクタ
カードスロット (2)
電源
コネクタ
パラレルコネクタ
シリアルコネクタ
ビデオコネクタ
マイク用コネクタ
USB 2.0 コネクタ(6)
診断ライト
クイックリファレンスガイド 43
Page 44
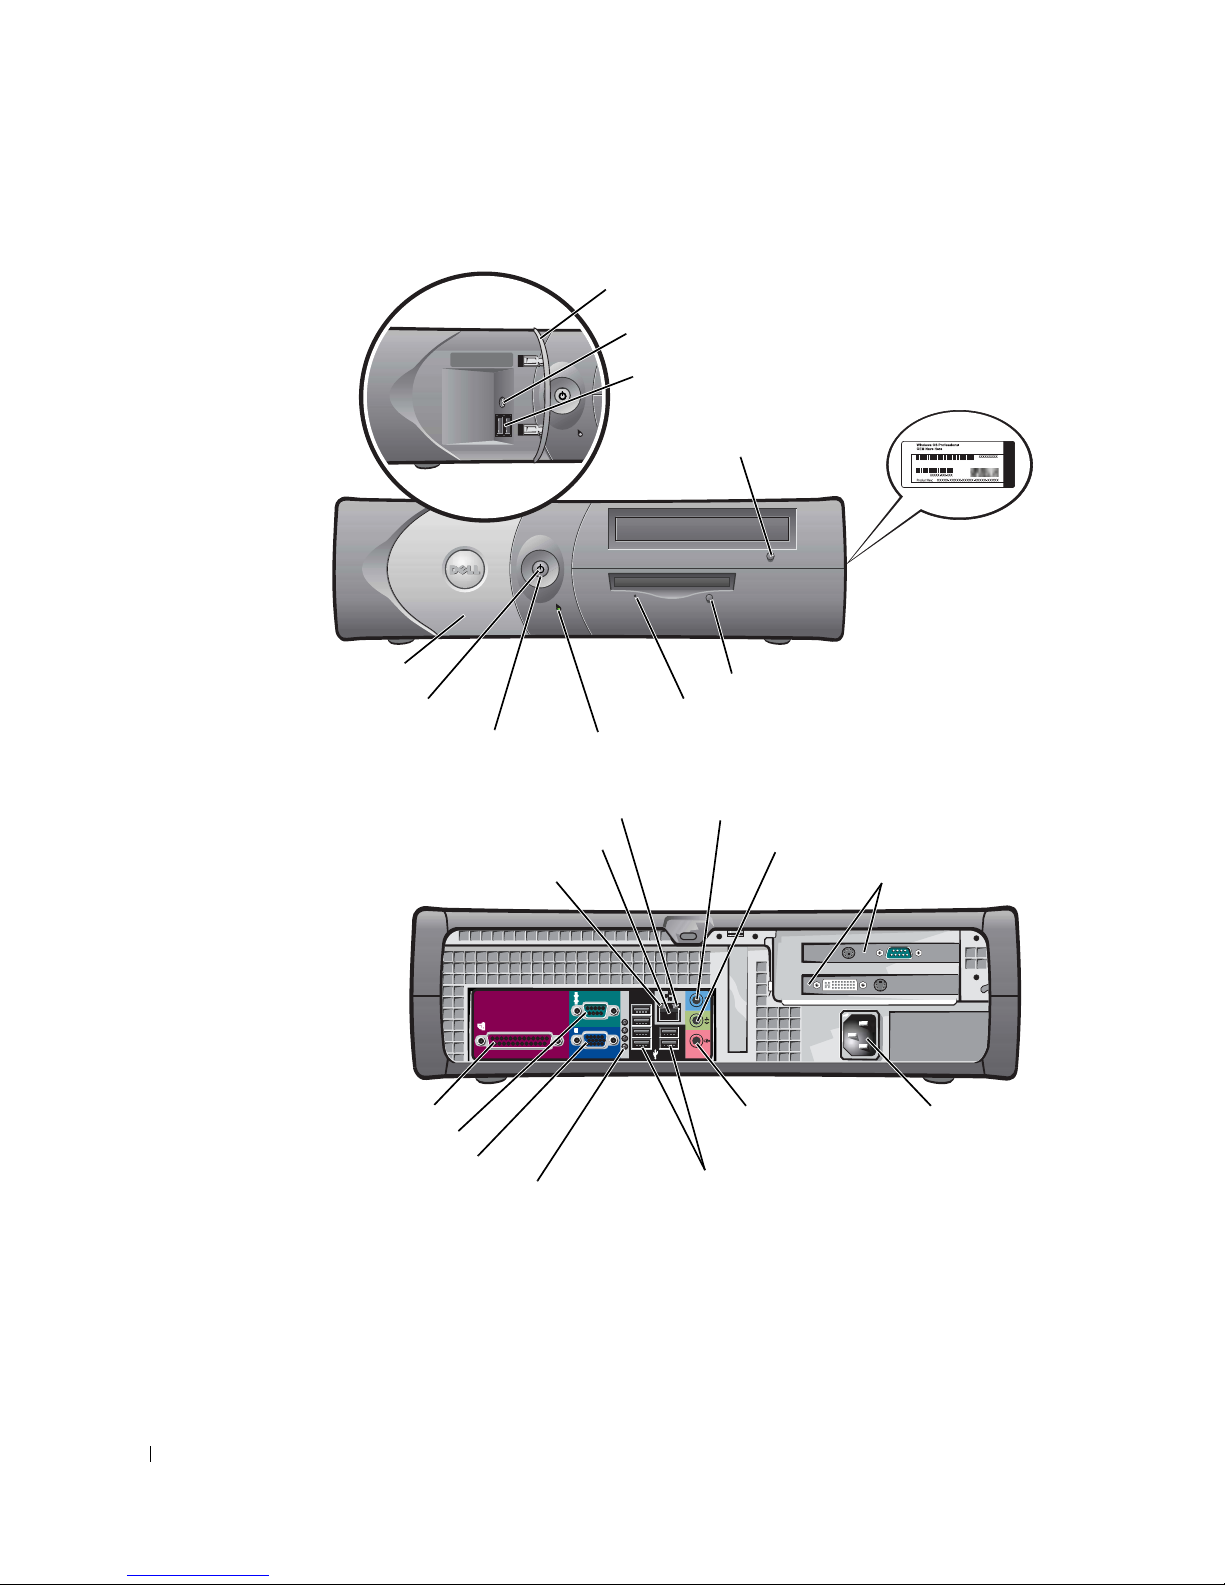
スモールデスクトップコンピュータ
www.dell.com | support.dell.com
前面パネルドア
ヘッドフォンコネクタ
USB 2.0 コネクタ(2)
CD/DVD ドライブ
取り出しボタン
Microsoft
Windows
プロダクト
キー
前面パネルドア
電源ライト
ネットワークアダプタコネクタ
パラレルコネクタ
シリアルコネクタ
ビデオコネクタ
電源ボタン
ネットワーク動作ライト
リンク保全ライト
診断ライト(4)
フロッピードライブ取り出しボタン
フロッピードライブ動作ライト
ハードドライブアクティビティライト
ライン入力コネクタ
ライン出力コネクタ
カードスロット
マイク用
コネクタ
USB 2.0
コネクタ(6)
電源
コネクタ
44 クイックリファレンスガイド
Page 45
デスクトップコンピュータ
USB 2.0 コネクタ(2)
Microsoft
Windows
プロダクト
キー
カード
スロット
(3)
CD/DVD ドライブ取り出しボタン
フロッピードライブ
取り出しボタン
ネットワーク動作ライト
ネットワークアダプタコネクタ
リンク保全ライト
マイク
コネクタ
電源ボタン
電源ライト
診断ライト
ヘッドフォンコネクタ
ライン入力コネクタ
ライン出力コネクタ
電圧切り替えスイッチ
電源
コネクタ
パラレルコネクタ
シリアルコネクタ
ビデオコネクタ
マイク用コネクタ
USB 2.0 コネクタ(6)
クイックリファレンスガイド 45
Page 46
スモールミニタワーコンピュータ
Microsoft Windows
プロダクトキー
CD/DVD ドライブ取り出しボタン
www.dell.com | support.dell.com
前面パネルドア
メモ
: 詳細に関しては、
47 ページの「スモールミニタ
ワーコンピュータ
ルドアおよびヒンジアーム」
を参照してください。
電圧切り替えスイッチ
フロッピードライ
ブ動作ライト
電源ライト
電源ボタン
— 前面パネ
電源コネクタ
パラレルコネクタ
ビデオコネクタ
フロッピードライブ取り出しボタン
ハードドライブアクティビティライト
前面パネルドア
ヘッドフォン
コネクタ
USB 2.0 コネクタ(2)
診断ライト
USB 2.0 コネクタ(6)
マイク用コネクタ
ライン出力コネクタ
カードスロット
46 クイックリファレンスガイド
シリアルコネクタ
リンク保全ライト
ネットワークアダプタコネクタ
ネットワーク動作ライト
ライン入力コネクタ
(5)
Page 47
スモールミニタワーコンピュータ — 前面パネルドアおよびヒンジアーム
お使いのコンピュータへの損傷を避けるため、前面パネルドアは、持ち上げたり押し下げすぎたりす
ると「離脱」するようにデザインされています。
警告 : 本項の手順を開始する前に、『製品情報ガイド』の安全手順に従ってください。
前面パネルドアを再び取り付けます。
1. 2 つのヒンジアーム
を下げ垂直にします。
2. 前面パネルドアにあ
2 つのクリップをヒ
る
ンジアームに合わせて、
内側に向けて押します。
ヒンジアームを再び取り付けるには、まず注意深く
と取り外します。
1. 指でここを押
して、ドライブ
ベイカバーを取
り外します。
2. 両方のヒン
ジアームを持
ち上げ、水平
にします。
2
つのヒンジアームから前面パネルドアをカチッ
3. 2 つのビュースロットを
のぞいて、回転バーを回転
バースロットに合わせます。
回転バー
回転バースロット
クイックリファレンスガイド 47
Page 48
タワーコンピュータ
www.dell.com | support.dell.com
マイク
コネクタ
ヘッドフォン
コネクタ
診断
ライト
Microsoft Windows
プロダクトキー
CD/DVD ドライブ
取り出しボタン
フロッピードライブ
取り出しボタン
USB 2.0 コネクタ(2)
電源ボタン
電源ライト
電圧切り替えスイッチ
ライン出力コネクタ
ネットワーク動作ライト
ネットワークアダプタコネクタ
リンク保全ライト
パラレルコネクタ
48 クイックリファレンスガイド
電源コネクタ
ライン入力コネクタ
マイクコネクタ
USB 2.0
ビデオコネクタ
シリアルコネクタ
カードスロット
コネクタ (6)
(4)
Page 49
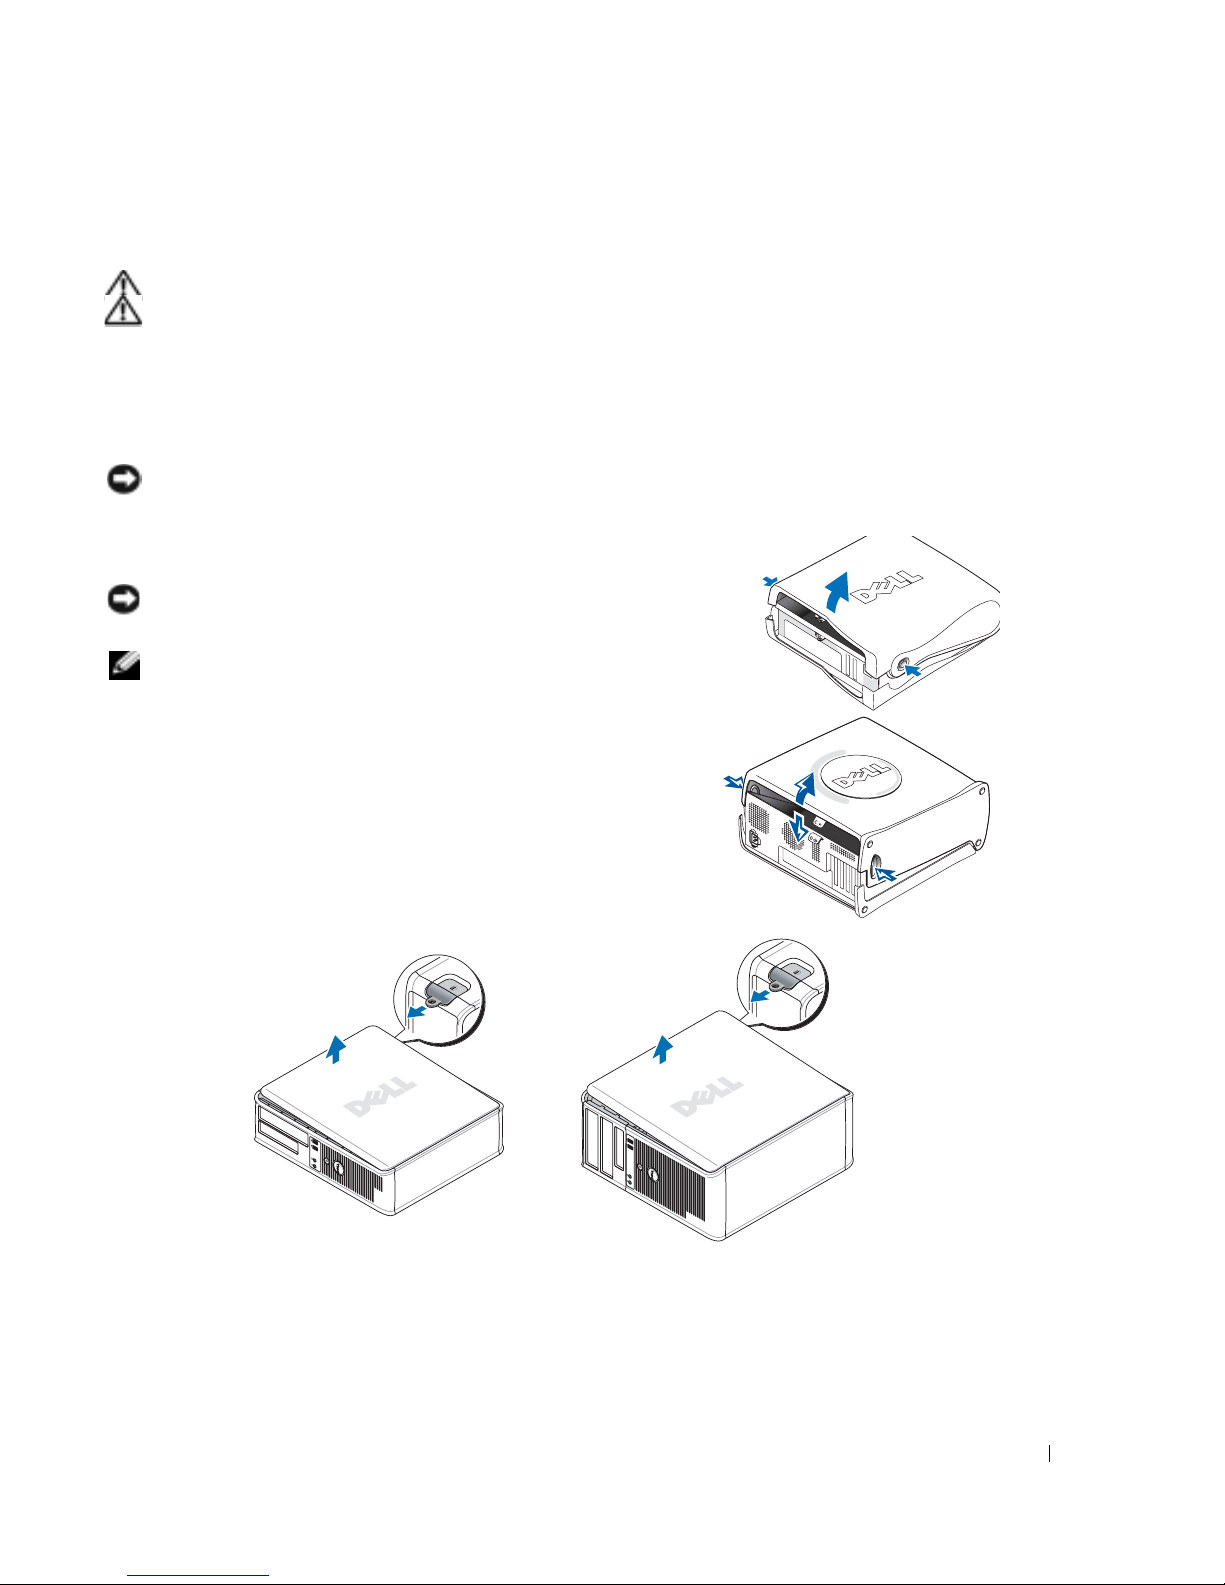
コンピュータカバーを開く
警告 : 本項の手順を開始する前に、『製品情報ガイド』の安全手順に従ってください。
警告 : 感電防止のため、カバーを開く前にコンピュータの電源プラグを必ずコンセントから抜いてくだ
さい。
コンピュータの後ろにロックが取り付けられている場合は、カバーを開ける前にロックを取り外します。
スモールフォームファクター、スモールデスクトップ、およびスモールミニタワー
コンピュータ
注意 : カバーを開いておくために十分なスペース(机の上に 30 cm 以上)があることを確認します。
1
コンピュータスタンドが取り付けられている場合、コンピュータスタンドを取り外します。
2
図に示されている、2 つのリリースボタンの位置を確認します。
2
この
注意 : ケーブルに損傷を与えないようにゆっくりとカバーを開きます。
3
カバーの後部を持ち上げ、コンピュータの前方へ起こします。
メモ : スモールミニタワーコンピュータを開くときは、まず片方の
手で右側のリリースボタンを押しながら、もう片方の手でカバーの
上部を引き上げます。そのあと片方の手で左側のリリースボタンを
押しながら、もう片方の手でカバー上部を引き上げます。
つのボタンを押しながら、カバーを持ち上げます。
デスクトップおよびタワーコンピュータ
コンピュータの背面にあるカバーリリースレバーを確認し、レバー
を押してカバーを外します。
クイックリファレンスガイド 49
Page 50
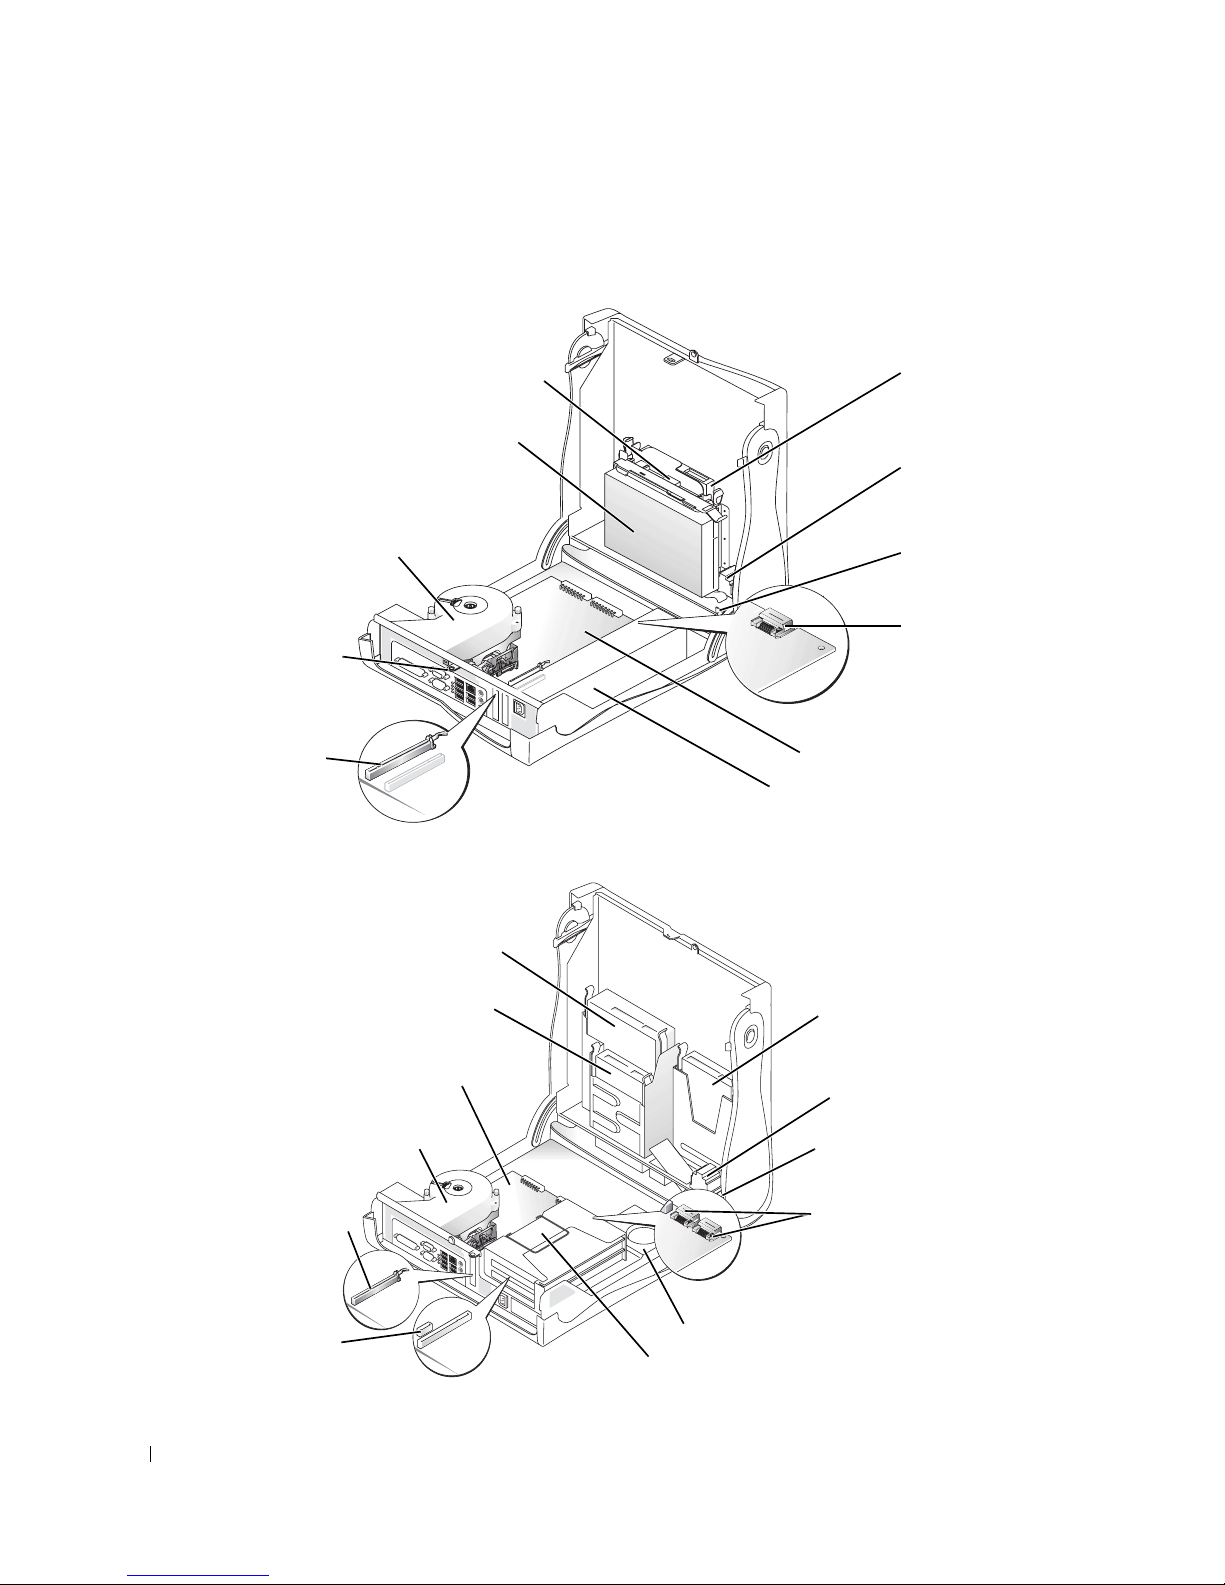
コンピュータの内部
タ
スモールフォームファクターコンピュータ
ヒートシンクと送風
www.dell.com | support.dell.com
装置アセンブリ
パドロック
リング
PCI-E x16
コネクタ
スモールデスクトップコンピュータ
フロッピードライブ
ハードドライブ
CD/DVD ドライブ
内蔵スピーカー
シャーシ
イントルージョン
スイッチ
SATA コネクタ
システム基板
電源装置
CD/DVD ドライブ
フロッピードライブ
システム基板
ヒートシンクと送風
装置アセンブリ
PCI-E x16
コネクタ
PCI-E x1
コネクタ
50 クイックリファレンスガイド
ハードドライブ
内蔵スピーカー
シャーシイントルージョン
スイッチ
SATA コネクタ (2)
メモ : お使いのコンピュー
には、「SATA1」コネクタ
がない場合があります。
電源装置
カードケージ
Page 51
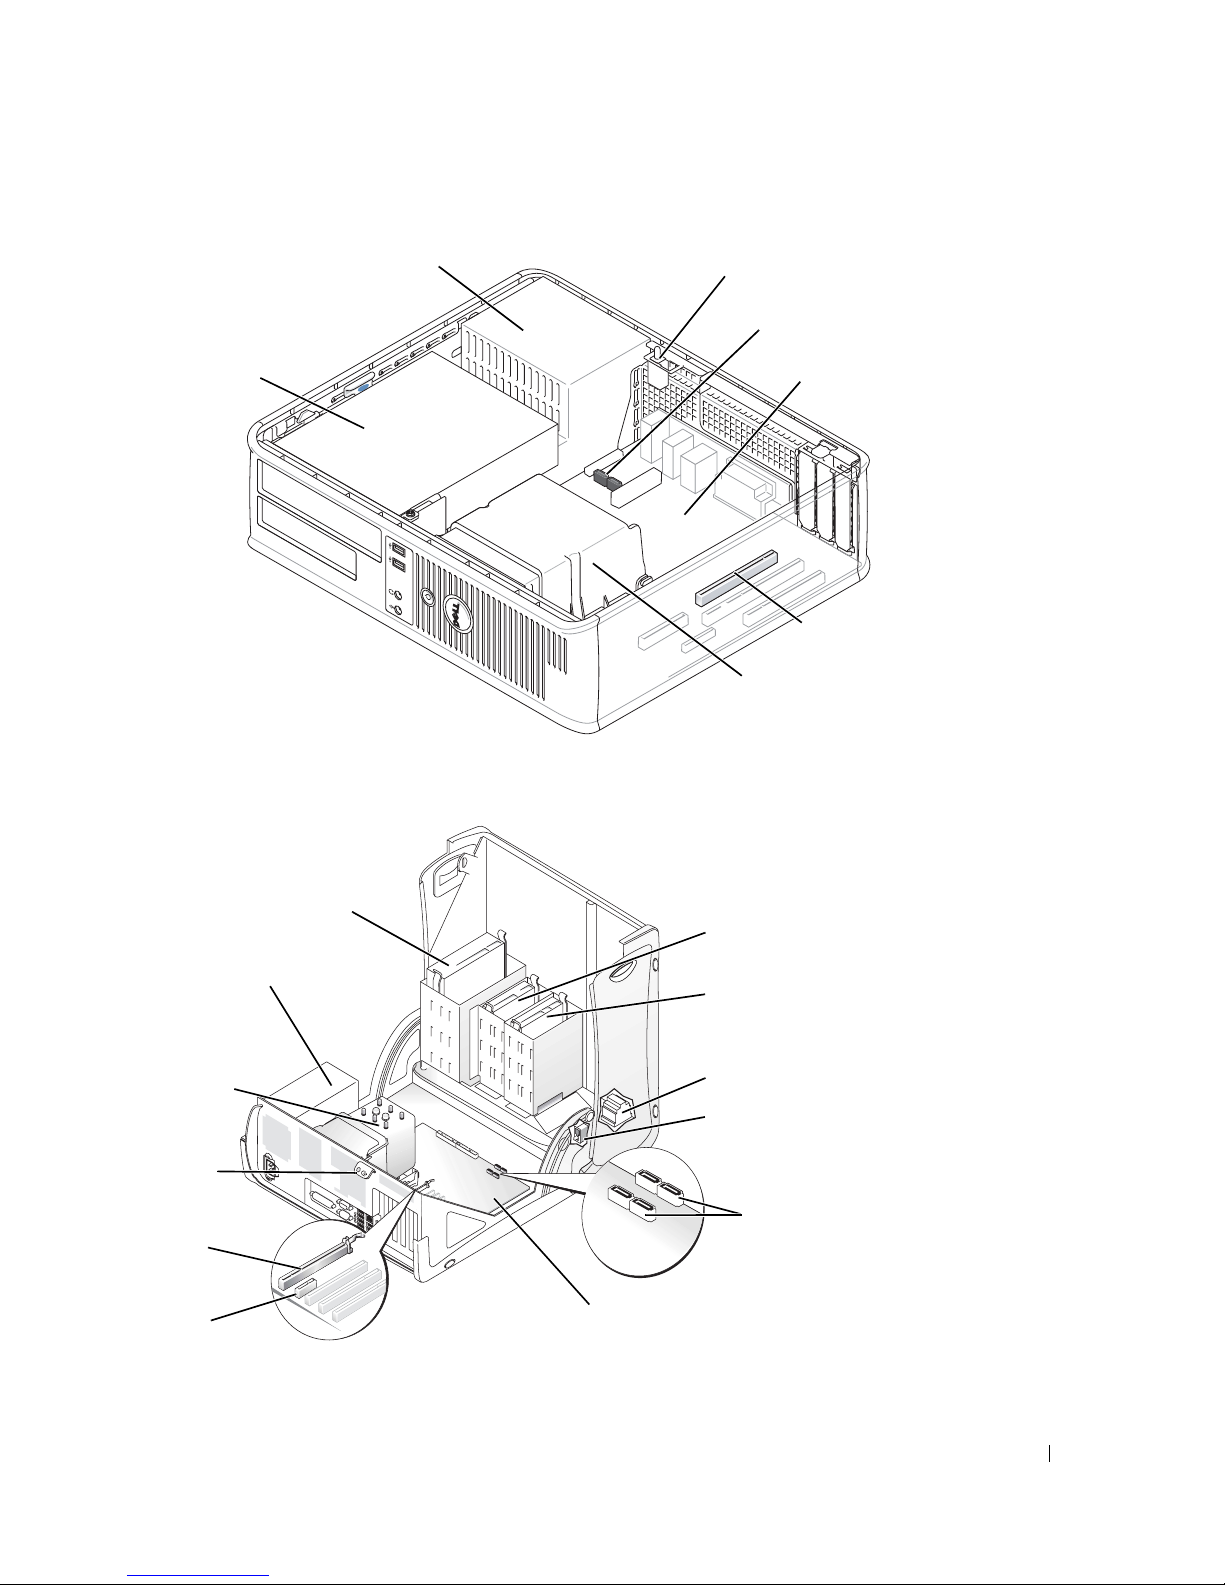
デスクトップコンピュータ
電源装置
CD/DVD、
フロッピー、および
ハードドライブ
スモールミニタワーコンピュータ
シャーシイントルージョン
スイッチ
SATA コネクタ (2)
システム基板
PCI-E x16 コネクタ
ヒートシンクエアフロー
カバーアセンブリ
CD/DVD ドライブ
電源装置
ヒートシンクエア
フローカバー
アセンブリ
パドロック
リング
PCI-E x16
コネクタ
PCI-E x1
コネクタ
システム基板
フロッピードライブ
ハードドライブ
内蔵スピーカー
シャーシイントルージョン
スイッチ
SATA コネクタ (4)
メモ:お使いのコンピュータ
には、「
「
合があります。
SATA1」または
SATA3」コネクタがない場
クイックリファレンスガイド 51
Page 52
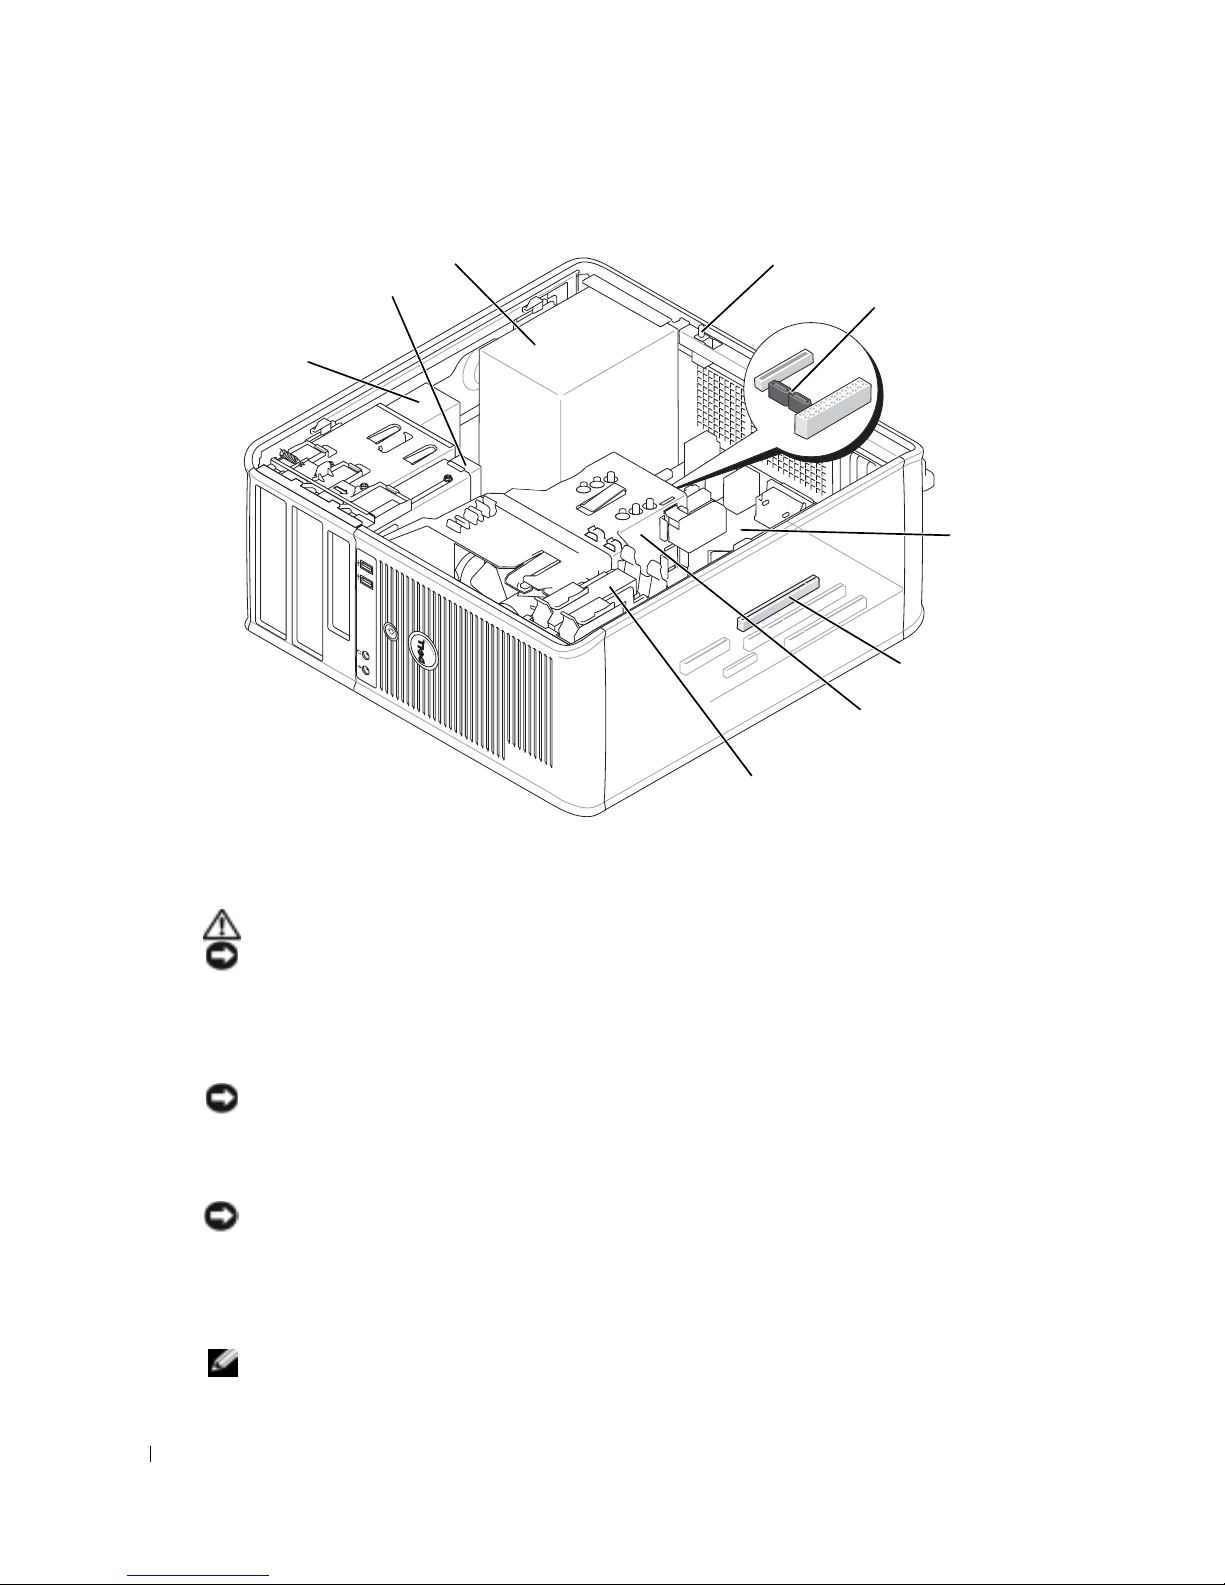
タワーコンピュータ
フロッピードライブ
CD/DVD
ドライブ
www.dell.com | support.dell.com
電源装置
シャーシイントルージョンスイッチ
SATA コネクタ (2)
システム基板
PCI-E x16 コネクタ
ヒートシンク
エアフローカバー
アセンブリ
ハードドライブ
コンピュータのセットアップ
警告 : 次の項の手順を開始する前に『製品情報ガイド』の安全手順に従ってください。
注意 : コンピュータにモデムカードなどの拡張カードが取り付けられている場合は、適切なケーブルを
カードに接続します。コンピュータ背面パネルのコネクタには接続しないでください。
コンピュータを正しくセットアップするには、すべての手順を行う必要があります。 それぞれの該当
する図を参照しながら、手順に従います。
1
キーボードとマウスを接続します。
注意 : PS/2 マウスと USB マウスを同時に操作しようとしないでください。
2
モデムまたはネットワークケーブルを接続します。
ネットワークケーブル(電話線ではなく)を、ネットワークコネクタに挿入してください。
ションのモデムをお持ちの場合、電話線をモデムに接続します。
注意 : モデムケーブルをネットワークアダプタに接続しないでください。 電話通信からの電圧は、ネット
ワークアダプタを損傷する恐れがあります。
3
モニターを接続します。
コネクタピンを曲げないように、慎重に位置に合わせ、モニターケーブルを挿入します。
タに差し込んだら、ケーブルコネクタの蝶ネジをしっかりと締めます。
メモ : モニターによっては、ビデオコネクタが画面の後ろの下にある場合があります。 コネクタの場所に
ついては、モニターに付属のマニュアルを参照してください。
52 クイックリファレンスガイド
オプ
コネク
Page 53
4
スピーカーを接続します。
5
電源ケーブルをコンピュータ、モニター、および各デバイスに接続し、もう一端を電源コンセン
トに差し込みます。
6
電圧設定スイッチが、設置場所の規定電圧に対して正しく設定(日本では
ているかを確認します。
115 V
に設定)され
お使いのコンピュータには手動の電圧切り替えスイッチがあります。 背面パネルに電圧切り替え
スイッチが付いているコンピュータでは、正しい動作電圧を手動で設定しなければなりません。
注意 : 手動電圧切り替えスイッチが付いているコンピュータへの損傷を防ぐため、スイッチはお使いに
なる地域の
メモ : コンピュータに同梱されていないデバイスやソフトウェアを取り付け / インストールする場合は、
事前にソフトウェアやデバイスに同梱のマニュアルを読むか、製品の提供先に問い合わせて、そのソフ
トウェアやデバイスがお使いのコンピュータとオペレーティングシステムに対応しているかどうか確認
してください。
メモ : お使いのコンピュータは次のセットアップ図とは多少異なる場合があります。
AC 電源に最も合った電圧に設定してください。
キーボードとマウスのセットアップ
クイックリファレンスガイド 53
Page 54
モニターのセットアップ
www.dell.com | support.dell.com
電源接続
54 クイックリファレンスガイド
Page 55

問題の解決
デルでは、コンピュータが正しく動作しないときにアドバイスを行ういくつかのツールを提供してい
ご使用のコンピュータに関するトラブルシューティングの情報については、デルサポートウェ
ます。
ブサイト
デルのサポートを必要とするコンピュータの問題が発生した場合、エラーの詳細、ビープコード、診
断ライトのパターンを書き留め、エクスプレスサービスコードとサービスタグを下記に記入して、コ
ンピュータが設置されている場所からデルにご連絡ください。
エクスプレスサービスコードとサービスタグナンバーの例については、
ピュータに関する情報の検索」
エクスプレスサービスコード:
サービスタグ
support.jp.dell.com
:___________________________
Dell Diagnostics(診断)プログラム
警告 : 本項の手順を開始する前に、『製品情報ガイド』の安全手順に従ってください。
メモ : 『Drivers and Utilities CD』(Resource CD)はオプションなので、出荷時にすべてのコンピュー
タに付属しているわけではありません。
Dell Diagnostics(診断)プログラムを使用する場合
コンピュータに問題が発生した場合、テクニカルサポートにお問い合わせいただく前に、オンライン
『ユーザーズガイド』の「問題の解決」の手順に従って、
行してください。
注意 : Dell Diagnostics(診断)プログラムは、Dell™ コンピュータ上でのみ機能します。
セットアップユーティリティを起動し、コンピュータの設定情報を確認します。次に、テストするデ
バイスがセットアップユーティリティに表示され、アクティブになっていることを確認します。
ハードドライブまたはオプションの『
Dell Diagnostics
ら、
(診断)プログラムをスタートします。
を参照してください。
を参照してください。
___________________________
Dell Diagnostics
Drivers and Utilities CD 』(ResourceCD
41
ページの「お使いのコン
(診断)プログラムを実
とも言います)か
ハードドライブからの Dell Diagnostics(診断)プログラムの起動
1
コンピュータの電源を入れます(または再起動します)。
2
DELL™
メモ : 診断ユーティリィティパーティションが見つからないことを知らせるメッセージが表示された場
合は、『
ここで時間をおきすぎてオペレーティングシステムのロゴが表示された場合、
Windows
てもう一度やり直します。
3
起動デバイス一覧が表示されたら、
<Enter>
4
Dell Diagnostics
びます。
ロゴが表示されたらすぐに
Drivers and Utilities CD』( オプション)から Dell Diagnostics(診断)プログラムを実行します。
®
デスクトップが表示されるまで待ちます。次に、コンピュータをシャットダウンし
を押します。
(診断)プログラムの
<F12>
を押します。
Boot to Utility Partition
Main Menu
が表示されたら、実行するテストを選
Microsoft®
をハイライト表示して
クイックリファレンスガイド 55
Page 56

『Drivers and Utilities CD』からの
メモ : 『Drivers and Utilities CD 』(ResourceCD) はオプションです。したがって、出荷時にすべてのコ
ンピュータに付属しているわけではありません。
1
『
Drivers and Utilities CD
2
コンピュータをシャットダウンして、再起動します。
DELL
のロゴが表示されたらすぐに
Dell Diagnostics
』を挿入します。
<F12>
(診断)プログラム
を押します。
の開始
ここで時間をおきすぎて
示されるまで待ちます。
メモ : 次の手順で、起動順序は一回だけ変更されます。 次回の起動時には、コンピュータはセットアップ
ユーティリティで指定したデバイスに従って起動します。
3
起動デバイス一覧が表示されたら、
www.dell.com | support.dell.com
押します。
4
CD
起動メニューから
5
表示されたメニューから
6
1 と入力して
7
2 と入力して
8
番号の付いたリストから
ンがリストにある場合は、コンピュータに適切なバージョンを選択します。
9
Dell Diagnostics
びます。
Dell Diagnostics(診断)プログラムのメインメニュー
1
Dell Diagnostics
のオプションのボタンをクリックします。
オプション 機能
Express Test
Extended Test
Custom Test
Symptom Tree
Windows
次にコンピュータをシャットダウンして、再度試みます。
IDE CD-ROM Device
Boot from CD-ROM
ResourceCD
メニューを開始します。
Dell Diagnostics
Run the 32 Bit Dell Diagnostics
(診断)プログラムの
(診断)プログラムがロードされ
デバイスのクイックテストを実行します。 通常このテストは 10 ~ 20 分かかり、
お客様の操作は必要ありません。
早く特定できる可能性が増します。
デバイスの全体チェックを実行します。 通常このテストは 1 時間以上かかり、質
問に定期的に応答する必要があります。
特定のデバイスをテストします。 実行するテストをカスタマイズできます。
検出した最も一般的な症状を一覧表示し、問題の症状に基づいたテストを選択す
ることができます。
のロゴが表示された場合、
IDE CD-ROM Device
オプションを選択します。
オプションを選択します。
(診断)プログラムを開始します。
Main Menu
最初に Express Test を実行すると、問題を素
が表示されたら、実行するテストを選
Main Menu
Windows
をハイライト表示して
を選択します。 複数のバージョ
のデスクトップが表
画面が表示されたら、希望
<Enter>
を
2
テスト実行中に問題が検出されると、エラーコードと問題の説明を示したメッセージが表示さ
れます。
エラーが解決できない場合は、デルにお問い合わせください。
メモ : 各テスト画面の上部には、コンピュータのサービスタグが表示されます。 デルにお問い合わせに
なった際に、テクニカルサポート担当者がサービスタグをお伺いいたします。
エラーコードと問題の説明を記録し、画面の指示に従います。
56 クイックリファレンスガイド
Page 57

3
Custom Test
または
Symptom Tree
オプションからテストを実行する場合、適切なタブを
クリックします(詳細については、以下の表を参照)。
タブ 機能
Results
Errors
Help
Configuration
テストの結果、および発生したすべてのエラーの状態を表示します。
検出されたエラー状態、エラーコード、問題の説明が表示されます。
テストについて説明します。また、テストを実行するための要件を示す場合もあ
ります。
選択したデバイスのハードウェア構成を表示します。
Dell Diagnostics(診断)プログラムは、セットアップユーティリティ、メモ
リ、および様々な内部テストからすべてのデバイスの設定情報を入手し、画面の
左側ペインのデバイス一覧に表示します。
り付けられたすべてのコンポーネント名、またはコンピュータに接続されたすべ
てのデバイス名が表示されるとは限りません。
Parameters
4
テストが完了し、
ション)から実行中の場合、
5
テスト画面を閉じて
了しコンピュータを再起動するには、
テストの設定を変更して、テストをカスタマイズすることができます。
Dell Diagnostics
CD
Main Menu
(診断)プログラムを『
を取り出します。
画面に戻ります。
Main Menu
Dell Diagnostics
画面を閉じます。
システムライト
電源ライトはコンピュータの問題を知らせる場合があります。
デバイス一覧には、コンピュータに取
Drivers and Utilities CD
』(オプ
(診断)プログラムを終
電源ライト 問題の説明 推奨される処置
緑色の点灯 電源がオンで、コンピュータは正常に
動作しています。
緑色の点滅 コンピュータはサスペンド状態です
Microsoft® Windows® 2000 およ
(
Windows XP)。
び
緑色に数回点滅した
あとオフになる
黄色の点灯 Dell Diagnostics(診断)プログラム
設定エラーが発生しています。 特定の問題を確認できるか、58 ページの「診
がテストを実行中、またはシステム基
板のデバイスが不良か、正しく取り付
けられていない可能性があります。
対応処置は必要ありません。
電源ボタンを押したり、マウスを動かしたり、
キーボードのキーを押すことで、コンピュータ
の操作を再開できます。
断ライト」
をチェックしてください。
Dell Diagnostics(診断)プログラムが実行中
であれば、テストを完了します。
特定の問題を確認できるか、
断ライト」をチェックしてください。
コンピュータが起動しない場合は、デルに連絡
してテクニカルサポートを受けてください。デ
ルへのお問い合わせの詳細は、オンライン
『ユーザーズガイド』を参照してください。
58 ページの「診
クイックリファレンスガイド 57
Page 58
電源ライト 問題の説明 推奨される処置
黄色の点滅 電源装置またはシステム基板の障害が
POST 中に、緑色の
点灯とビープコード
POST 中の緑色の点
灯、ビープコードお
よびビデオ表示があ
www.dell.com | support.dell.com
りません
POST 中の緑色の点
灯、ビープコードは
ないがコンピュータ
がロックアップ
診断ライト
. 警告 : 本項の手順を開始する前に、『製品情報ガイド』の安全手順に従ってください。
問題のトラブルシューティングを容易にするため、お使いのスモールファクター、スモールデスク
トップ、およびスモールミニタワーコンピュータには背面パネルに
とラベルの付いた
コンピュータが正常に起動すると、 起動プロセスが完了する際、ライトのパターンとコードが変
す。
化します。
ます。
のどこでコンピュータが停止したか識別できる場合があります。
システム起動プロセスの
POST
プロセス中にコンピュータが誤動作した場合、
メモ : 診断ライトの向きはシステムのタイプにより違い、縦向きまたは横向きのどちらかです。
発生しました。
特定の問題を確認できるか、
断ライト」をチェックしてください。
ン『ユーザーズガイド』の「電源の問題」を参
照してください。
58 ページの「診
オンライ
BIOS 実行中に問題が検出されました。 ビープコードを使った診断については、 62 ペー
ジの「ビープコード」を参照してください。
た、特定の問題を確認できるか、
「診断ライト」
モニターまたはグラフィックカードが
不良か、正しく取り付けられていない
可能性があります。
内蔵システム基板に欠陥がある可能性
があります。
4
つのライトが搭載されています。これらのライトは、黄色または緑色に点灯しま
POST
が正常に終了すると、4 つのライトはすべて緑色に点灯し
特定の問題を確認できるか、58 ページの「診
断ライト」をチェックしてください。
特定の問題を確認できるか、58 ページの「診
断ライト」をチェックしてください。
定できない場合は、デルに連絡してテクニカル
サポートを受けてください。デルへのお問い合
わせの詳細は、オンライン『ユーザーズガイ
ド』を参照してください。
LED
をチェックしてください。
「A
」、「B」、「C」、および 「D」
に表示されるパターンで、プロセス
58 ページの
問題が特
ま
Y = 黄色
G = 緑色
ライトパターン 問題の説明 推奨される処置
コンピュータが通常の「オフ」の状態、ま
たは
オフオフオフオフ
あります。
58 クイックリファレンスガイド
BIOS に障害が起こっている可能性が
コンピュータを使用可能なコンセントに接
続し、電源ボタンを押します。
Page 59
ライトパターン 問題の説明 推奨される処置
BIOS 障害が発生した可能性があります。コ
ンピュータは修復モードです。
YYYG
BIOS Recovery Utility を実行し、BIOS の
修復処理が完了するのを待って、コン
ピュータを再起動します。
YYGY
YYGG
プロセッサに障害が起こっている可能性が
あります。
メモリモジュールが検出されましたが、メ
モリ障害が発生しています。
プロセッサを取り付けなおして、コン
ピュータを再起動します。
取り付けに関する情報は、オンライン
『ユーザーズガイド』を参照してください。
•
取り付けているメモリモジュールが
の場合、そのモジュールを取り付けなお
してコンピュータを再起動します。
モジュールの再インストールについての
詳細は、オンライン『ユーザースガイ
ド』を参照してください。
•
取り付けているメモリモジュールが
以上の場合、モジュールを取り外し、モ
1
ジュールの
ピュータを再起動します。
正常に起動する場合、別のモジュールを
追加します。
かるまで、あるいはエラーなしにすべて
のモジュールを取り付けなおすまで続け
ます。
•
適切に動作する同じ種類のメモリがある
場合、そのメモリをコンピュータに取り
付けます。
•
問題が解決しない場合は、デルにお問い
合わせください。
詳細は、オンライン『ユーザーズガイド』
を参照してください。
つを取り付けなおしてコン
障害のあるモジュールが見つ
プロセッサの再
1
つ
メモリ
2
つ
コンピュータが
デルへのお問い合わせの
クイックリファレンスガイド 59
Page 60
ライトパターン 問題の説明 推奨される処置
YGYY
www.dell.com | support.dell.com
YGYG
YGGY
拡張カードの障害が発生した可能性があり
ます。
グラフィックスカードの障害が発生した可
能性があります。
フロッピードライブまたはハードドライブ
の障害が発生した可能性があります。
•
カード(グラフィックカードではありま
せん)を
を再起動し、コンフリクトが存在するか
どうか確認します。
•
問題が解決しない場合、取り外したカー
ドを取り付け直し、別のカードを取り外
して、コンピュータを再起動します。
•
それぞれのカードについて、この手順を
繰り返します。
する場合は、リソースコンフリクト時に
コンピュータから最後に取り外したカー
ドをトラブルシューティングします
63
(
ドウェアの非互換性の解決」を参照)。
•
それぞれのカードを
ネクタにつけかえ、そのつどコンピュー
タを再起動します。
•
問題が解決しない場合は、デルにお問い
合わせください。
詳細は、オンライン『ユーザーズガイド』
を参照してください。
•
コンピュータにグラフィックスカードを
取り付けている場合、カードを取り外し、
取り付けなおしてコンピュータを再起動
します。
•
それでも問題が解決しない場合、動作を
確認済みのグラフィックスカードを取り
付け、コンピュータを再起動します。
•
問題が解決しない場合、またはグラ
フィックスがコンピュータに内蔵されて
いる場合は、デルにお問い合わせくださ
い。
ライン『ユーザーズガイド』を参照して
ください。
すべての電源ケーブルおよびデータケーブ
ルを接続しなおし、コンピュータを再起動
します。
1
つ取り外して、コンピュータ
コンピュータが正常に起動
ページの「ソフトウェアおよびハー
1
つずつ別の
デルへのお問い合わせの
PCI
デルへのお問い合わせの詳細は、オン
コ
USB の障害が発生した可能性があります。 すべての USB デバイスを取り付けなおし、
YGGG
60 クイックリファレンスガイド
ケーブル接続を確認して、コンピュータを
再起動します。
Page 61
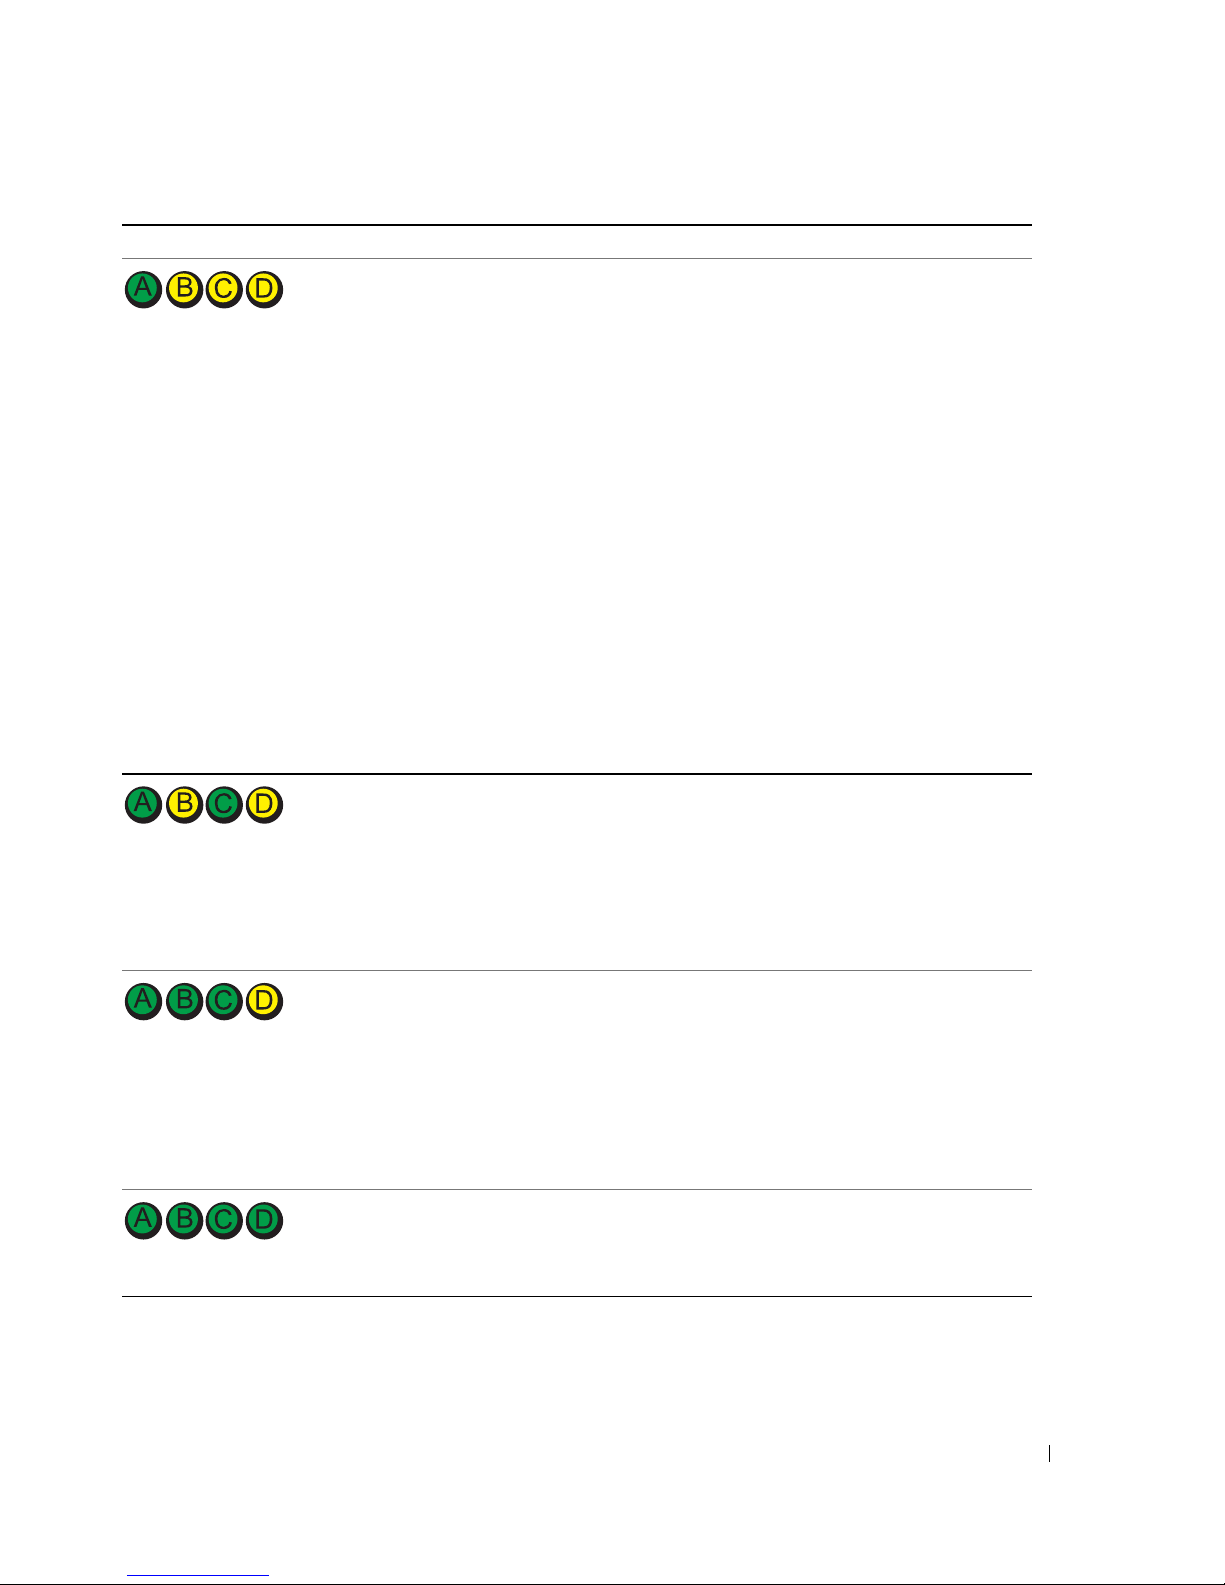
ライトパターン 問題の説明 推奨される処置
GYYY
GYGY
GGGY
メモリモジュールが検出されません。
メモリモジュールは検出されましたが、メ
モリの設定または互換性エラーが存在しま
す。
その他の障害が発生しました。
POST の後、コンピュータは通常の動作状
態にあります。
•
取り付けているメモリモジュールが
の場合、そのモジュールを取り付けなお
してコンピュータを再起動します。
モジュールの再インストールについての
詳細は、オンライン『ユーザースガイ
ド』を参照してください。
•
取り付けているメモリモジュールが2つ
以上の場合、モジュールを取り外し、モ
ジュールの
ピュータを再起動します。
正常に起動する場合、別のモジュールを
追加します。
かるまで、あるいはエラーなしにすべて
のモジュールを取り付けなおすまで続け
ます。
•
適切に動作する同じ種類のメモリがある
場合、そのメモリをコンピュータに取り
付けます。
•
問題が解決しない場合は、デルにお問い
合わせください。
詳細は、オンライン『ユーザーズガイド』
を参照してください。
•
特別なメモリモジュール
件がないか確認します
•
取り付けるメモリモジュールがコン
ピュータと互換性があるか確認します。
•
問題が解決しない場合は、デルにお問い
合わせください。
詳細は、オンライン『ユーザーズガイド』
を参照してください。
•
ハードドライブ、
DVD
ドライブからシステム基板へケーブ
ルが正しく接続されているか確認します。
•
モニター画面に表示されるコンピュータ
メッセージを確認します。
•
問題が解決しない場合は、デルにお問い
合わせください。
詳細は、オンライン『ユーザーズガイド』
を参照してください。
特にありません。
GGGG
1
メモリ
1
つを取り付けなおしてコン
コンピュータが
障害のあるモジュールが見つ
デルへのお問い合わせの
/
コネクタ設置要
デルへのお問い合わせの
CD
ドライブ、および
デルへのお問い合わせの
つ
クイックリファレンスガイド 61
Page 62

ビープコード
お使いのコンピュータの起動時に、モニターにエラーメッセージまたは問題を表示できない場合、
ビープ音が連続して鳴ることがあります。
定します。
るものがあります(コード
連続したビープ音には、ビープ音がまず
1-3-1)。
とを知らせます。
起動時にコンピュータがビープ音を発する場合、次の手順を実行します。
1
ビープコードを書き留めます。
2
55
ページの「
3
デルテクニカルサポートに問い合わせます。 デルへのお問い合わせの詳細は、オンライン『ユー
Dell Diagnostics
ザーズガイド』を参照してください。
この連続したビープ音はビープコードと呼ばれ、問題を特
1
回鳴り、次に連続して
3
回鳴ってから、1 回鳴
このビープコードは、コンピュータがメモリの問題を検出したこ
(診断)プログラム」を参照してより詳しい原因を調べます。
www.dell.com | support.dell.com
コード 原因 コード 原因
1-1-2
1-1-3
1-1-4
1-2-1
1-2-2
1-2-3
1-3
1-3-1 ~
2-4-4
3-1-1
3-1-2
3-1-3
4-2-3
4-2-4
4-3-1
4-3-3
4-3-4
マイクロプロセッサレジスタ障害
NVRAM
ROM BIOS
プログラム可能インターバルタイマー障害
DMA
DMA
ビデオメモリテスト障害
メモリが正しく認識されていないか使用さ
れていない
スレーブ DMA レジスタ障害
マスタ DMA レジスタ障害
マスタ割り込みマスクレジスタ障害
ゲート A20 エラー
プロテクトモードで予期せぬ割り込みがあ
りました。)
アドレス 0FFFFh 以上のメモリ障害
タイマーチップカウンタ 2 の障害
日時計の停止
読み書き障害
チェックサム障害
初期化障害
ページレジスタ読み書き障害
3-1-4
3-2-2
3-2-4
3-3-1
3-3-2
3-3-4
3-4-1
3-4-2
3-4-3
4-2-1
4-2-2
4-4-1
4-4-2
4-4-3
4-4-4
スレーブ割り込みマスクレジスタ障害
割り込みベクトルロード障害
キーボードコントローラテスト障害
NVRAM
無効な NVRAM 設定
ビデオメモリテスト障害
画面初期化障害
画面リトレース障害
ビデオ ROM の検索障害
タイマーが時間を計らない
シャットダウンエラー
シリアルまたはパラレルポートテスト
障害
シャドウメモリにコードを解凍でき
ない
数値演算コプロセッサテスト障害
キャッシュテスト障害
電力損失
Dell™ IDE ハードドライブ診断プログラムの実行
Dell IDE
する問題を解決したり、ハードドライブのエラーを確認するユーティリティです。
1
2
3
62 クイックリファレンスガイド
ハードドライブ診断プログラムは、ハードドライブのテストを行って、ハードドライブに関
コンピュータの電源を入れます(コンピュータの電源が入っている場合、再起動します)。
画面の右上隅に F2 = Setup が表示されたら、
画面に表示される指示に従ってください。
<Ctrl><Alt><d>
を押します。
Page 63

エラーが報告された場合は、オンライン『ユーザーズガイド』の「問題の解決」の項にある「ハード
ドライブの問題」を参照してください。
ソフトウェアおよびハードウェアの非互換性の解決
デバイスが
非互換性の問題を解決するためにハードウェアに関するトラブルシューティングを使用できます。
Microsoft
バイスマネージャーを使用するともできます。
Windows XP
ハードウェアに関するトラブルシューティングで非互換性の問題を解決するには、次の手順を実行し
ます。
1
2
3
4
Windows 2000
デバイスマネージャを使って非互換性を解決するには、次の手順を実行します。
1
2
3
4
5
6
OS
のセットアップ中に検知されない、または、検知されても設定が正しくない場合は、
®
Windows® 2000
スタート ボタンをクリックして、
検索 領域で、ハードウェアに関するトラブルシューティングと入力し、矢印をクリックして検
索を開始します。
検索の結果 の一覧で、
ハードウェアに関するトラブルシューティング 一覧で、
合を解決します
スタート ボタンをクリックし、
コントロールパネル ウィンドウで、
ハードウェア タブをクリックします。
デバイスマネージャ をクリックします。
表示 をクリックして、
割り込み要求(
間違って設定されているデバイスは黄色い感嘆符(
場合には赤い
をクリックして、
IRQ
X
で示されます。
オペレーティングシステムでは、非互換性の問題を解決するためにデ
ヘルプとサポート をクリックします。
ハードウェアに関するトラブルシューティング をクリックします。
コンピュータにあるハードウェアの競
次へ をクリックします。
設定 をポイントし、
システム をダブルクリックします。
リソース(接続別) をクリックします。
)
をダブルクリックします。
コントロールパネル をクリックします。
!
)で示され、デバイスが無効になっている
7
感嘆符でマークされたデバイスをダブルクリックして、
プロパティ ウィンドウの デバイス の状態領域に、再構成する必要のあるカードまたはデバイス
が表示されます。
8
デバイスを再構成するか、または デバイスマネージャーからデバイスを削除します。 デバイス
の再構成の詳細に関しては、デバイスに付属のマニュアルを参照してください。
ハードウェアに関するトラブルシューティングで非互換性の問題を解決するには、次の手順を実行し
ます。
1
スタート ボタンをクリックし、
2
目次 タブの トラブルシューティングと保守 をクリックし、
ルシューティング
ハードウェアに関するトラブルシューティング 一覧で、
決します
をクリックして、
をクリックしてから、
次へ をクリックします。
プロパティ ウィンドウを表示します。
ヘルプ をクリックします。
ハードウェア をクリックします。
コンピュータにあるハードウェアの競合を解
Windows 2000
クイックリファレンスガイド 63
に関するトラブ
Page 64

Microsoft® Windows® XP システムの復元の使い方
Microsoft® Windows® XP
テムの復元を使って、ハードウェア、ソフトウェア、または他のシステム設定への変更が原因でコン
ピュータの動作に不具合が生じた場合は、(データファイルに影響を与えずに)以前の動作状態に戻
すことができます。
照してください。
注意 : データファイルのバックアップを定期的に作成してください。 システムの復元は、データファイル
の変更を監視したり、データファイルを復元することはできません。
復元ポイントの作成
1
スタート ボタンをクリックして、
2
システムの復元 をクリックします。
www.dell.com | support.dell.com
3
画面に表示される指示に従ってください。
コンピュータの以前の動作状態への復元
注意 : コンピュータを以前の稼動状態に復元する前に、開いているファイルをすべて保存してから閉じ、
実行中のプログラムをすべて終了します。
ログラムも変更したり、開いたり、削除しないでください。
1
スタート ボタンをクリックし、
イントして、
2
コンピュータを以前の状態に復元する が選択されていることを確認して、
3
コンピュータを復元したいカレンダーの日付をクリックします。
復元ポイントの選択 画面に、復元ポイントを確認して選択できるカレンダーが表示されます。
復元ポイントが利用できる日付は太字で表示されます。
オペレーティングシステムは、システムの復元を提供しています。シス
システムの復元の使い方については、
ヘルプとサポート をクリックします。
システムの復元が完了するまでは、いかなるファイルまたはプ
すべてのプログラム
システムの復元 をクリックします。
Windows
→
アクセサリ
ヘルプとサポートセンターを参
→
システムツール の順にポ
次へ をクリックします。
4
復元ポイントを選択して、
日付の中に復元ポイントが
以上の復元ポイントが利用可能な場合、希望の復元ポイントをクリックします。
5
次へ をクリックします。
システムの復元がデータの収集を完了したら、
ピュータが自動的に再起動します。
6
コンピュータが再起動したら、
復元ポイントを変更するには、別の復元ポイントを使って手順を繰り返すか、または復元を取り消す
ことができます。
最後のシステムの復元を取り消す
注意 : 最後のシステムの復元を取り消す前に、開いているファイルをすべて保存してから閉じ、実行中
のプログラムをすべて終了します。
ムも変更したり、開いたり、削除しないでください。
1
スタート ボタンをクリックし、
ントして、
2
以前の復元を取り消す を選択して、
3
次へ をクリックします。
システムの復元 をクリックします。
64 クイックリファレンスガイド
次へ をクリックします。
1
つしかない場合、その復元ポイントが自動的に選択されます。
OK
クリックします。
システムの復元が完了するまでは、いかなるファイルまたはプログラ
すべてのプログラム
次へ をクリックします。
復元は完了しました 画面が表示され、コン
→
アクセサリ
→
システムツール 順にポイ
2
つ
Page 65

システムの復元 画面が表示され、コンピュータが再起動します。
4
コンピュータが再起動したら、
システムの復元の有効化
200 MB
の復元は自動的に無効に設定されます。
順を実行します。
1
2
3
4
5
より空容量が少ないハードディスクに
スタート ボタンをクリックして、
パフォーマンスとメンテナンス をクリックします。
システム をクリックします。
システムの復元 タブをクリックします。
システムの復元を無効にする にチェックマークが付いていないことを確認します。
OK
クリックします。
Windows XP
システムの復元が有効になっているか確認するには、次の手
コントロールパネル をクリックします。
を再インストールした場合、システム
Microsoft® Windows® XP の再インストール
はじめに
新しくインストールしたドライバの問題を解消するために
を再インストールする場合、
バイスドライバのロールバックを実行しても問題が解決されない場合、システムの復元を使ってオペ
レーティングシステムを新しいデバイスドライバがインストールされる前の動作状態に戻します。
注意 : インストールを実行する前に、お使いのプライマリハードドライブ上のすべてのデータファイル
のバックアップを作成しておいてください。
ライブはコンピュータによって
Windows XP
• Dell™
を再インストールするには、以下のアイテムが必要です。
『オペレーティングシステム
Windows XP
1 番目のドライブとして認識されます。
•Dell『Drivers and Utilities CD
メモ : 『Drivers and Utilities CD』 には、コンピュータの組み立て時に、工場でインストールされたドラ
イバが含まれています。
ピュータに
RAID コントローラがある場合に必要なドライバも含まれます。
『Drivers and Utilities CD』 を使用して必要なドライバをロードします。コン
のデバイスドライバのロールバックを試してみます。 デ
標準的なハードドライブ構成において、プライマリハードド
CD
』
』
Windows XP
オペレーティングシステム
Windows XP の再インストール
注意 : Windows XP を再インストールする際は、Microsoft® Windows® XP Service Pack 1 以降を使用
する必要があります。
Windows XP
再インストール処理を完了するには、
を再インストールした後、デバイスドライバ、アンチウイルスプログラム、およびその他のソフト
ウェアを再インストールする必要があります。
注意 : 『オペレーティングシステム CD』は、Windows XP の再インストールのオプションを提供しま
す。
与える可能性があります。
Windows XP を再インストールしないでください。
を再インストールするには、次項で記載されている手順を順番通りに実行します。
オプションはファイルを上書きして、ハードドライブにインストールされているプログラムに影響を
このような理由から、デルのテクニカルサポート担当者の指示がない限り、
1 ~ 2
時間かかることがあります。 オペレーティングシステム
クイックリファレンスガイド 65
Page 66

注意 : Windows XP とのコンフリクトを防ぐため、システムにインストールされているアンチウイルス
ソフトウェアを無効にしてから
ウェアに付属されているマニュアルを参照してください。
オペレーティングシステム CD からの起動
1
開いているファイルをすべて保存してから閉じ、実行中のプログラムをすべて終了します。
2
『オペレーティングシステム
表示された場合、終了
3
コンピュータを再起動します。
4
DELL™
オペレーティングシステムのロゴが表示された場合、
のを待ちます。次に、コンピュータをシャットダウンして、再度試みます。
www.dell.com | support.dell.com
5
矢印キーを押して
6
Press any key to boot from CD というメッセージが表示されたら、任意のキーを押します。
のロゴが表示されたら、すぐに
Windows XP のセットアップ
1
セットアップの開始 画面が表示されたら、
2
Microsoft Windows
用許諾契約書に同意します。
3
お使いのコンピュータに
タを復元したい場合は、
4
新たに
Windows XP
5
<Enter>
Windows XP
バイスのインストールを開始します。
Windows XP を再インストールしてください。 手順については、ソフト
CD
』を挿入します。
をクリックします。
<F12>
CD-ROM
を押してハイライト表示されたパーティション(推奨)を選び、画面の指示に従います。
セットアップ 画面が表示され、
を選んでから
ライセンス契約 画面の内容を読み、キーボードの
Windows XP
r と入力して修復オプションを選び、
をインストールする場合は、
がインストールされていて、現在の
コンピュータは自動的に数回再起動します。
Install Windows XP
を押します。
Windows
<Enter>
<Enter>
を押します。
を押して続行します。
<Esc>
を押してオプションを選択します。
Windows XP
というメッセージが
のデスクトップが表示される
<F8>
を押して、使
Windows XP
CD
を取り出します。
は、ファイルのコピーおよびデ
デー
メモ : ハードドライブの容量やコンピュータの速度によって、セットアップに要する時間は異なります。
注意 : 次のメッセージが表示される場合、キーは押さないでください。 Press any key to boot
from the CD
6
地域と言語のオプション 画面が表示されたら、地域の設定を必要に応じてカスタマイズし、
をクリックします。
へ
7
ソフトウェアの個人用設定 画面で、お名前と会社名(オプション)を入力して、
クします。
8
コンピュータと
を承認)とパスワードを入力して、
9
モデムのダイヤル情報 画面が表示されたら、必要な情報を入力し、
10
日付と時間の設定 ウィンドウに、日付、時間、タイムゾーンを入力して、
11
ネットワークの設定 画面が表示されたら、
12
Windows XP Professional
報を求められたら、該当する項目を入力します。
を選んでください。
Administrator
66 クイックリファレンスガイド
次
次へ をクリッ
ウィンドウでお使いのコンピュータ名(または記載の名前
次へ をクリックします。
次へ を押します。
次へ をクリックします。
標準設定 をクリックして、
の再インストール中に、ネットワーク設定についてより詳しい情
設定がわからない場合は、デフォルトの選択肢
次へ をクリックします。
Page 67

Windows XP
ピュータを設定します。
注意 : 次のメッセージが表示される場合、キーは押さないでください。 Press any key to boot
from the CD
13
Microsoft Windows
14
インターネットに接続する方法を指定してください というメッセージが表示されたら、
クリックします。
15
Microsoft
ユーザー登録しません
16
このコンピュータを使うユーザーを指定してください 画面が表示されたら、最大
ザーを入力できます。
17
次へ をクリックします。
18
完了 をクリックしてセットアップを完了して、
19
適切なドライバを『
20
アンチウイルスソフトウェアを再インストールします。
21
プログラムを再インストールします。
メモ : Microsoft Office または Microsoft Works Suite プログラムを再インストールして有効にするに
Microsoft Office または Microsoft Works Suite の CD ケースの裏にある Product Key(プロダクト
は、
キー)が必要です。
は、オペレーティングシステムのコンポーネントをインストールして、コン
コンピュータが自動的に再起動します。
へようこそ 画面が表示されたら、
次へ をクリックします。
にユーザー登録する準備はできましたか
を選択し、
次へ をクリックします。
?
画面が表示されたら、
いいえ、今回は
5
人のユー
CD
を取り出します。
Drivers and Utilities CD
』から再インストールします。
省略 を
Drivers and Utilities CD の使い方
メモ : 『Drivers and Utilities CD 』(ResourceCD) はオプションです。したがって、出荷時にすべてのコ
ンピュータに付属しているわけではありません。
Windows
ResourceCD
メモ : デバイスドライバやユーザーマニュアルにアクセスする場合は、Windows が起動している状態で
『
1
2
3
4
5
お使いのコンピュータ用のドライバ
ご使用のコンピュータに対応するデバイスドライバのリストを表示するには、次の手順に従います。
オペレーティングシステムが起動している状態で、『
)を使用するには、次の手順に従います。
Drivers and Utilities CD』を使用する必要があります。
コンピュータの電源を入れ、
CD
ドライブに『
お使いのコンピュータで『
ResourceCD
Utilities CD
OK
をクリックして続行します。
インストールを完了するには、インストールプログラムの出す指示に応答してください。
Drivers and Utilities CD
用の
InstallShield
』のインストールが開始することが通知されます。
Welcome Dell System Owner
適切な
択します。
システムモデル、オペレーティングシステム、デバイスの種類、
Windows
デスクトップが表示されるまで待ちます。
』を挿入します。
Drivers and Utilities CD
ウィザードへようこそウィンドウが表示され、『
画面で 次へ クリックします。
Drivers and Utilities CD
』を初めてご使用になる場合は、
』(または
Drivers and
および トピック
Dell
を選
クイックリファレンスガイド 67
Page 68

1
Topic
ドロップダウンメニューの
『
Drivers and Utilities CD
システムをスキャンし、システム構成に対応したデバイスドライバのリストを表示します。
2
適切なドライバを選択し、画面の指示に従ってドライバをコンピュータにダウンロードします。
お使いのコンピュータに対応するすべてのドライバを一覧表示するには、
ニューの
www.dell.com | support.dell.com
デバイスドライバ をクリックします。
My Drivers
』(オプション)がコンピュータのハードウェアとオペレーティング
を選択します。
トピック ドロップダウンメ
68 クイックリファレンスガイド
Page 69

索引
C
CD
オペレーティングシステム ,42
D
Dell Diagnostics(診断)
プログラム
,55
Diagnostics(診断)
ビープコード
『Drivers and Utilities CD』,
,62
41
I
IRQ コンフリコト ,63
M
Microsoft Windows ラベル ,
41
Windows XP
再インストール ,65
システムの復元 ,64
ハードウェアに関するトラブル
シューティング
ヘルプとサポートセンター ,42
,63
え
エラーメッセージ
ビープコード
診断ライト ,57
,62
お
オペレーティングシステム
CD,42
Windows XP の
再インストール
『インストールガイド』,42
,65
か
さ
サービスタグ ,41
再インストール
Windows XP,65
ドライバ ,41
し
システムの復元 ,64
システムライト ,57
診断
Dell,55
ライト ,57
診断ライト ,57
て
デバイスマネージャー ,63
デル
サポートサイト
電源ライト ,57
,42
R
『ResourceCD』
Dell 診断プログラム ,55
W
Windows 2000
デバイスマネージャー ,63
ハードウェアに関するトラブル
シューティング
,63
カバー
,49
開く
こ
コンピュータ
ビープコード
以前の作業状態に復元 ,64
コンフリクト
ソフトウェアとハードウェアの
非互換性
,62
,63
と
ドア
再取り付け
ドライバ
再インストール
トラブルシューティング
Dell Diagnostics(診断)
プログラム
コンピュータを以前の
作業状態に復元
コンフリクト ,63
,47
,41
,55
,64
索引 69
Page 70

ハードウェアに関するトラブル
シューティング
ヘルプとサポートセンター ,42
診断ライト ,57
,63
は
ハードウェア
Dell Diagnostics(診断)
プログラム
ビープコード ,62
ハードウェアに関するトラブル
シューティング
,55
,63
ひ
ビープコード ,62
へ
ヘルプとサポートセンター ,42
も
問題
Dell Diagnostics(診断)
プログラム
コンピュータを以前の
作業状態に復元
ビープコード ,62
診断ライト ,57
,55
,64
ゆ
『ユーザーズガイド』,41
ら
ライト
コンピュータの前面
システム ,57
診断 ,57
電源ボタン ,57
ラベル
Microsoft Windows,41
サービスタグ ,41
,57
ま
前面ドア
再取り付け
マニュアル
Resource CD,41
オンライン ,42
クイックリファレンス ,41
デバイス ,41
『ユーザーズガイド』,41
検索 ,41
70 索引
,47
 Loading...