How it Works
Log In / Sign Up
Buy Points
How it Works
FAQ
Contact Us
Questions and Suggestions
Users
Dell
Loading...
O
OpenManage Network Manager 5.1
OpenManage Network Manager 5.2
OpenManage Network Manager Version 4.4
3
OpenManage Network Manager Version 5.0
2
OpenManage Network Manager Version 5.1
3
OpenManage Plug-in
OpenManage Power Center v1.2
OpenManage Power Center v2.0
2
OpenManage Power Center Version 1.0
3
OpenManage Power Center Version 1.1
3
OpenManage Server Administrator
237
OpenManage Server Administrator Version 2.3
6
OpenManage Server Administrator Version 5.0
5
OpenManage Server Administrator Version 5.1
6
OpenManage Server Administrator Version 5.2
6
OpenManage Server Administrator Version 5.3
5
OpenManage Server Administrator Version 5.4
6
OpenManage Server Administrator Version 5.5
6
OpenManage Server Administrator Version 6.0.1
5
OpenManage Server Administrator Version 6.0.3
4
OpenManage Server Administrator Version 6.1
6
OpenManage Server Administrator Version 6.1.1
OpenManage Server Administrator Version 6.2
5
OpenManage Server Administrator Version 6.3
4
OpenManage Server Administrator Version 6.4
5
OpenManage Server Administrator Version 6.5
7
OpenManage Server Administrator Version 6.5 A02
4
OpenManage Server Administrator Version 7.0
7
OpenManage Server Administrator Version 7.1
7
OpenManage Server Administrator Version 7.2
6
OpenManage Server Administrator Version 7.3
6
OpenManage Server Administrator Version 7.4
5
OpenManage Server Administrator Version 8.0.1
4
OpenManage Server Support Kit Version 4.3
OPENVIEW NNM SE 1.2
OpriPlex XE3
OptiPlex
4
OptiPlex 0F1697A00
OptiPlex 100-Mbps
OptiPlex 160
63
OptiPlex 160L
6
OptiPlex 170L
26
OptiPlex 170LN
OPTIPLEX 1906FP
OptiPlex 1U919
OptiPlex 1U920
OptiPlex 210L
23
OptiPlex 210LN
21
OptiPlex 270
OptiPlex 2U454
OptiPlex 3010
99
OPTIPLEX 3010 Desktop
OptiPlex 3010 Mini-Tower
OptiPlex 3011
68
OptiPlex 3011 AIO
7
OptiPlex 3011 All-in-One
3
OptiPlex 3020
78
OptiPlex 3020M
39
OptiPlex 3020–Mini Tower
2
OptiPlex 3020 MT
OptiPlex 3020 SFF
OptiPlex 3030
48
Optiplex 3030 AIO
OptiPlex 3030 All In One
2
Optiplex 3040
66
OptiPlex 3040M
OptiPlex 3040M Series
OptiPlex 3046
25
OptiPlex 3050
124
Optiplex 3050-0399
OptiPlex 3050 All-in-One
Optiplex 3050 Micro
2
OptiPlex 3050 Tower
OptiPlex 3060
202
OptiPlex 3060 Micro
3
OptiPlex 3060 Tower
OptiPlex 3070
OptiPlex 3070 micro
OptiPlex 3070 Small Form Factor
OptiPlex 3080
OptiPlex 3080 Micro
2
OptiPlex 3080 Small
OptiPlex 3090 Ultra
7
OptiPlex 320
24
OptiPlex 3240
45
OptiPlex 330
35
Optiplex 330 SFF
OptiPlex 360
59
OptiPlex 360 MT
2
OptiPlex 380
11
OptiPlex 380 Desktop
27
OptiPlex 380 Mini-Tower
27
OptiPlex 380 MT
OptiPlex 380 Small Form Factor
26
OptiPlex 38WYD
OptiPlex 390
15
OptiPlex 390 Desktop
OptiPlex 390 DT
OptiPlex 390 Mini-Tower
OptiPlex 390 MT
Loading...
Loading...
Nothing found
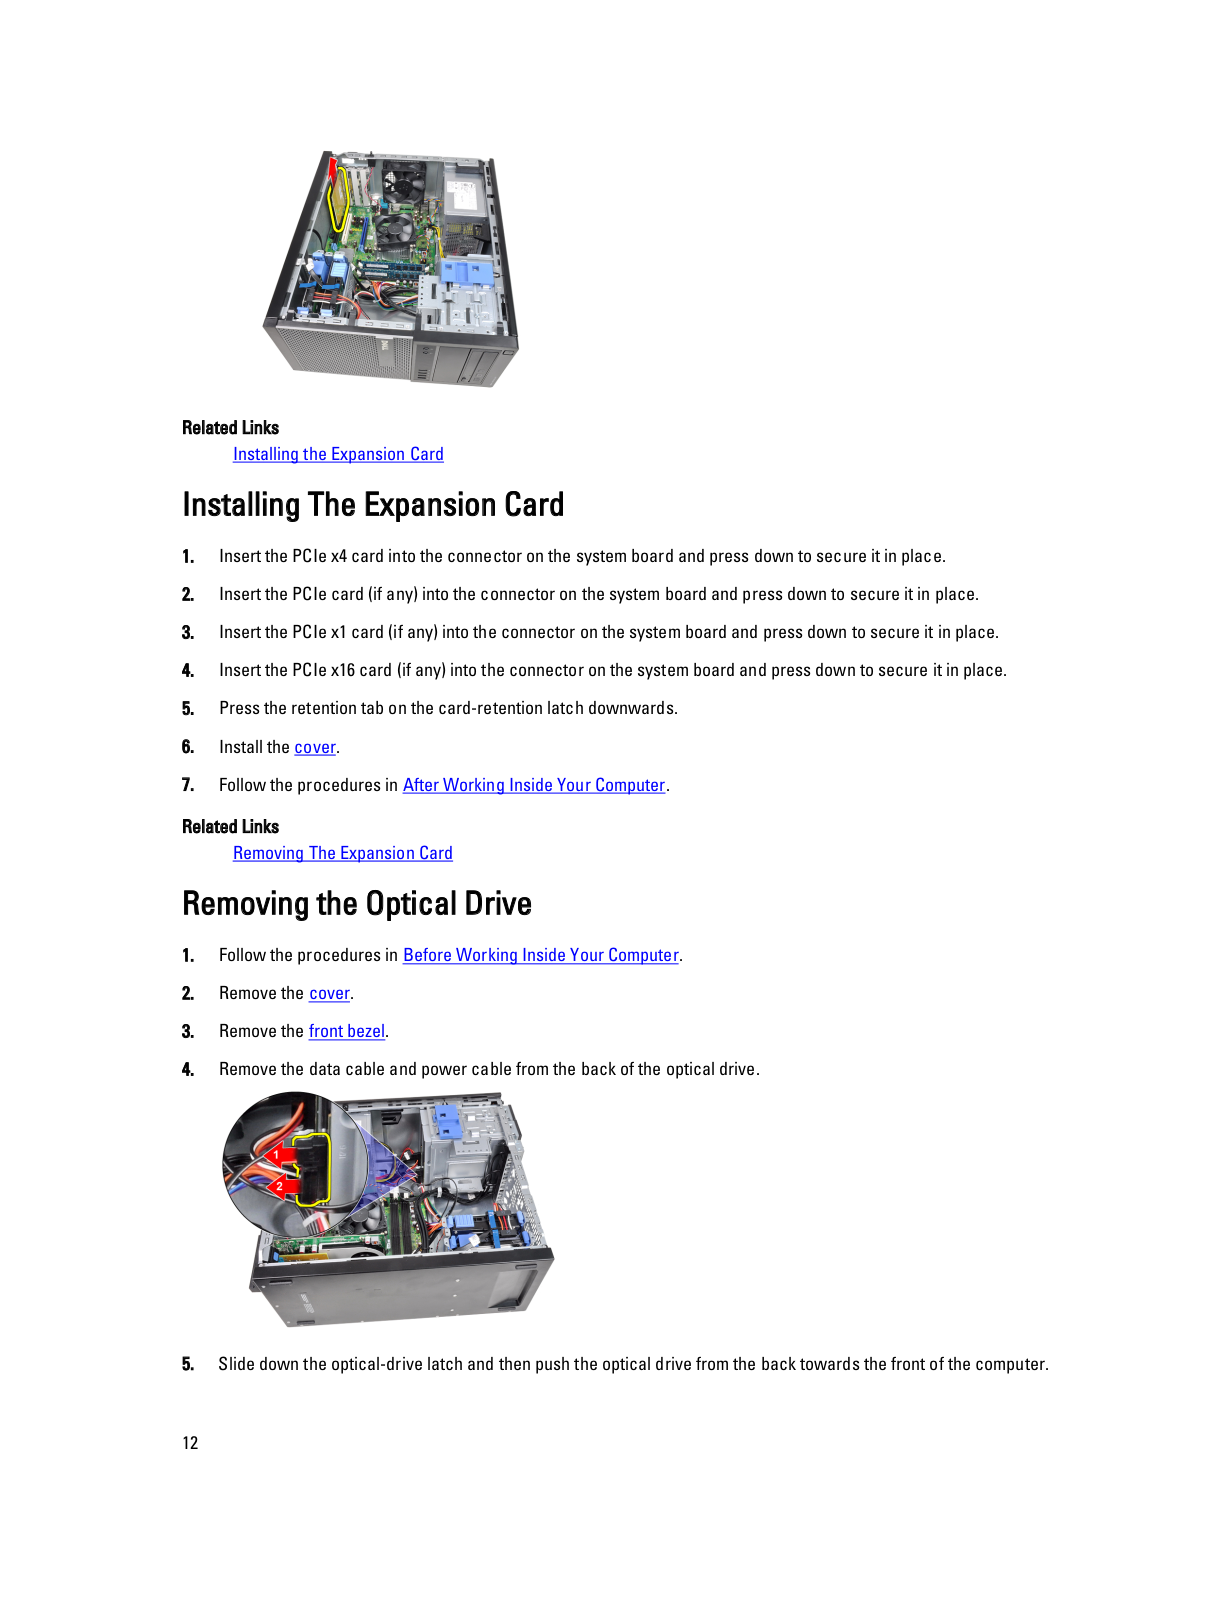
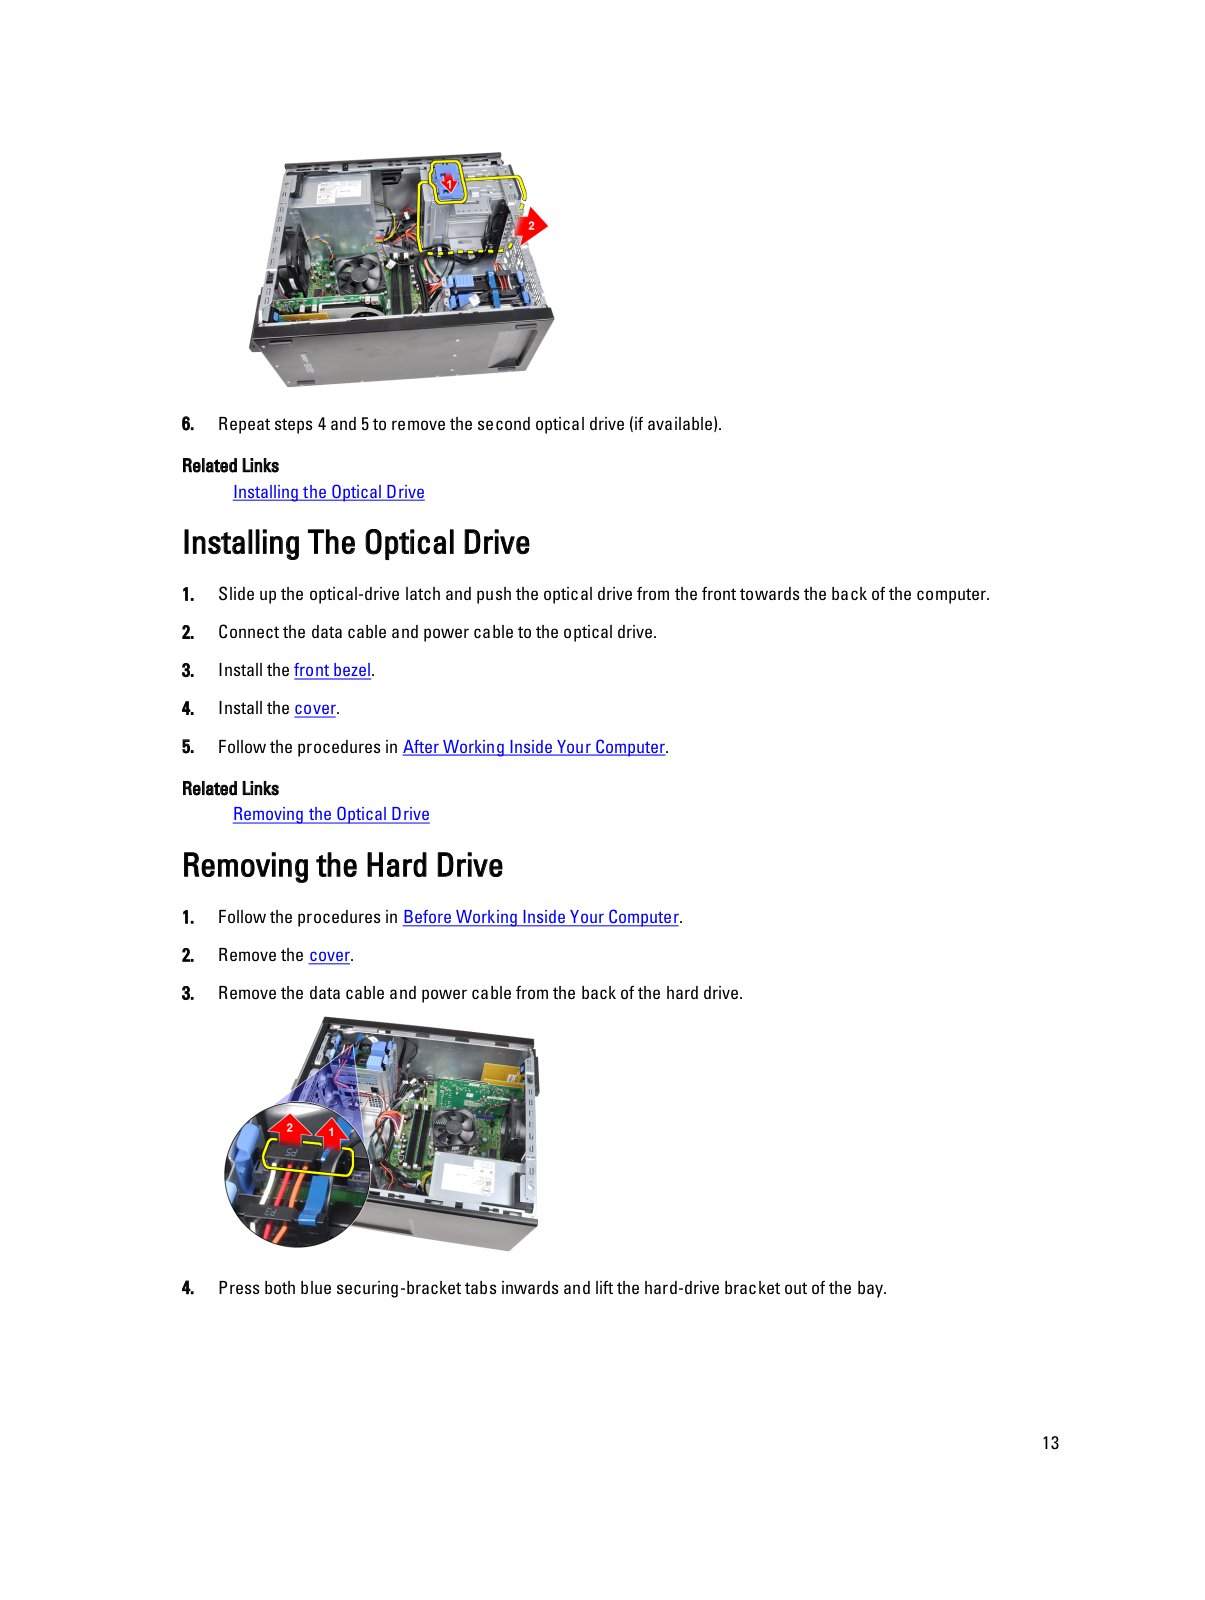
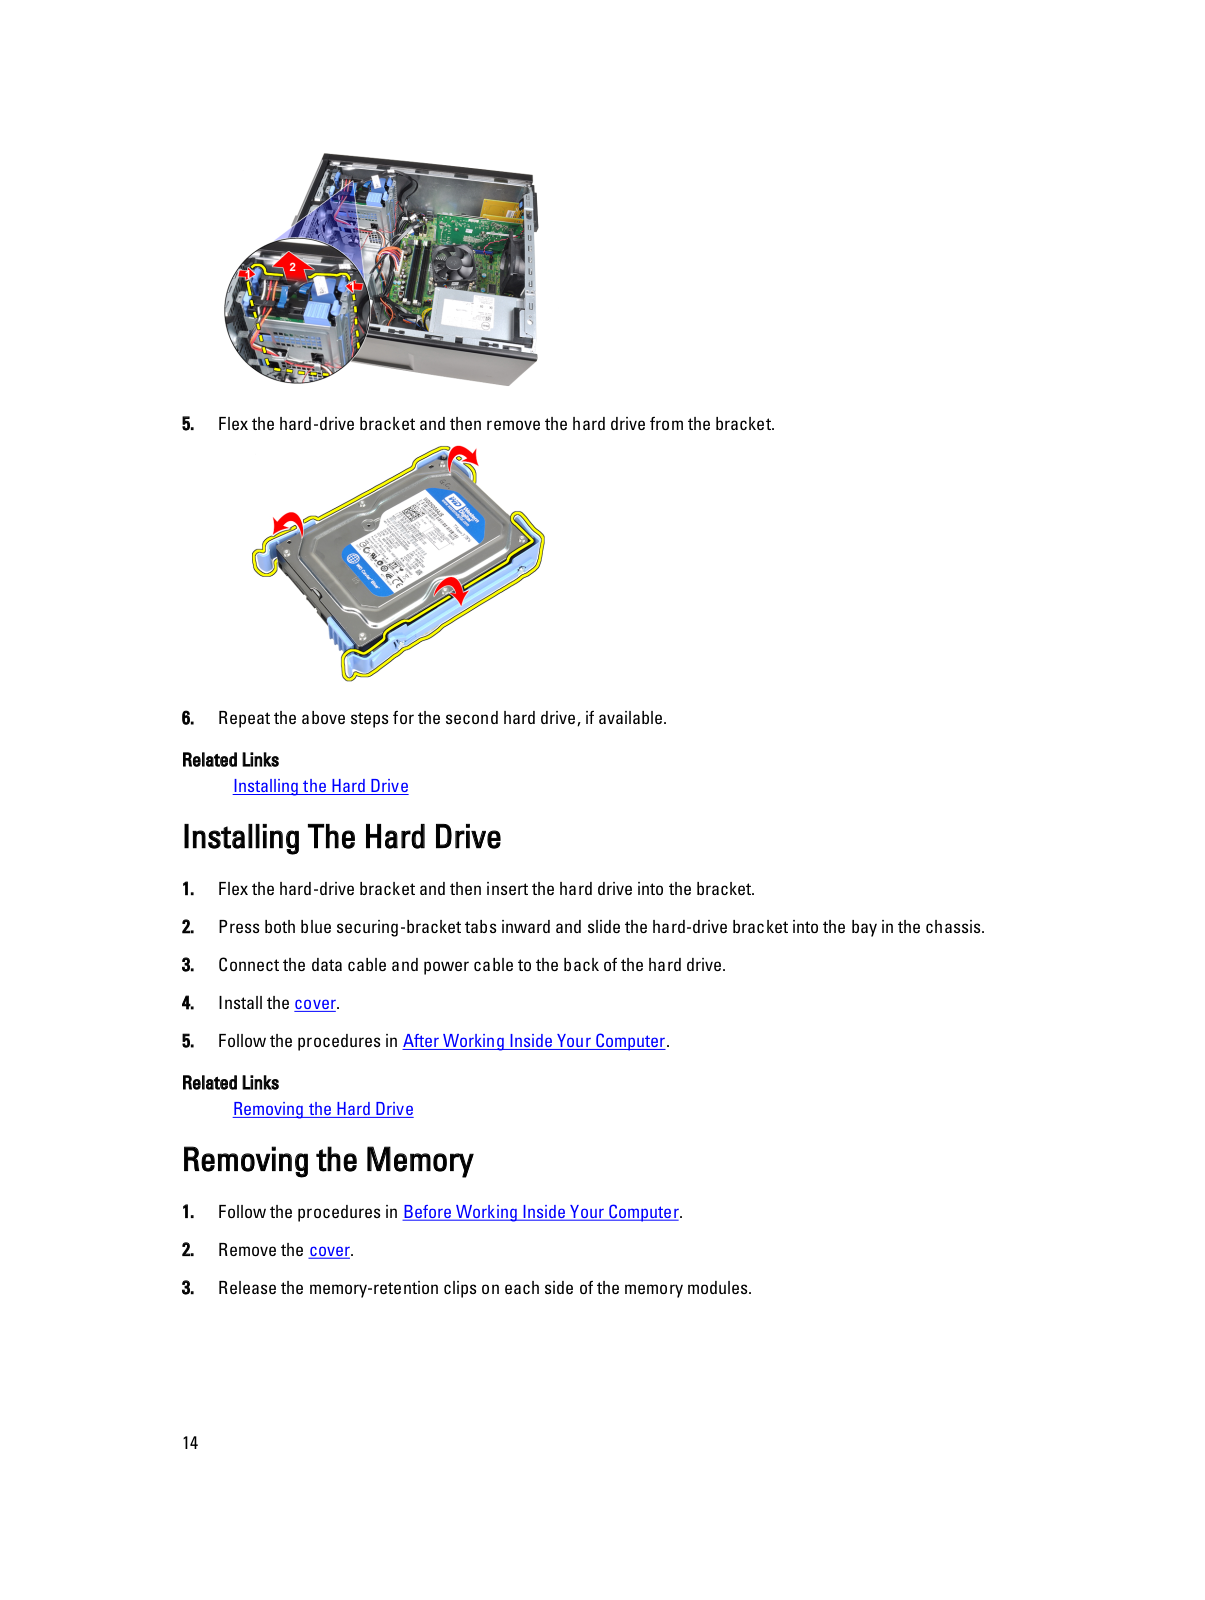
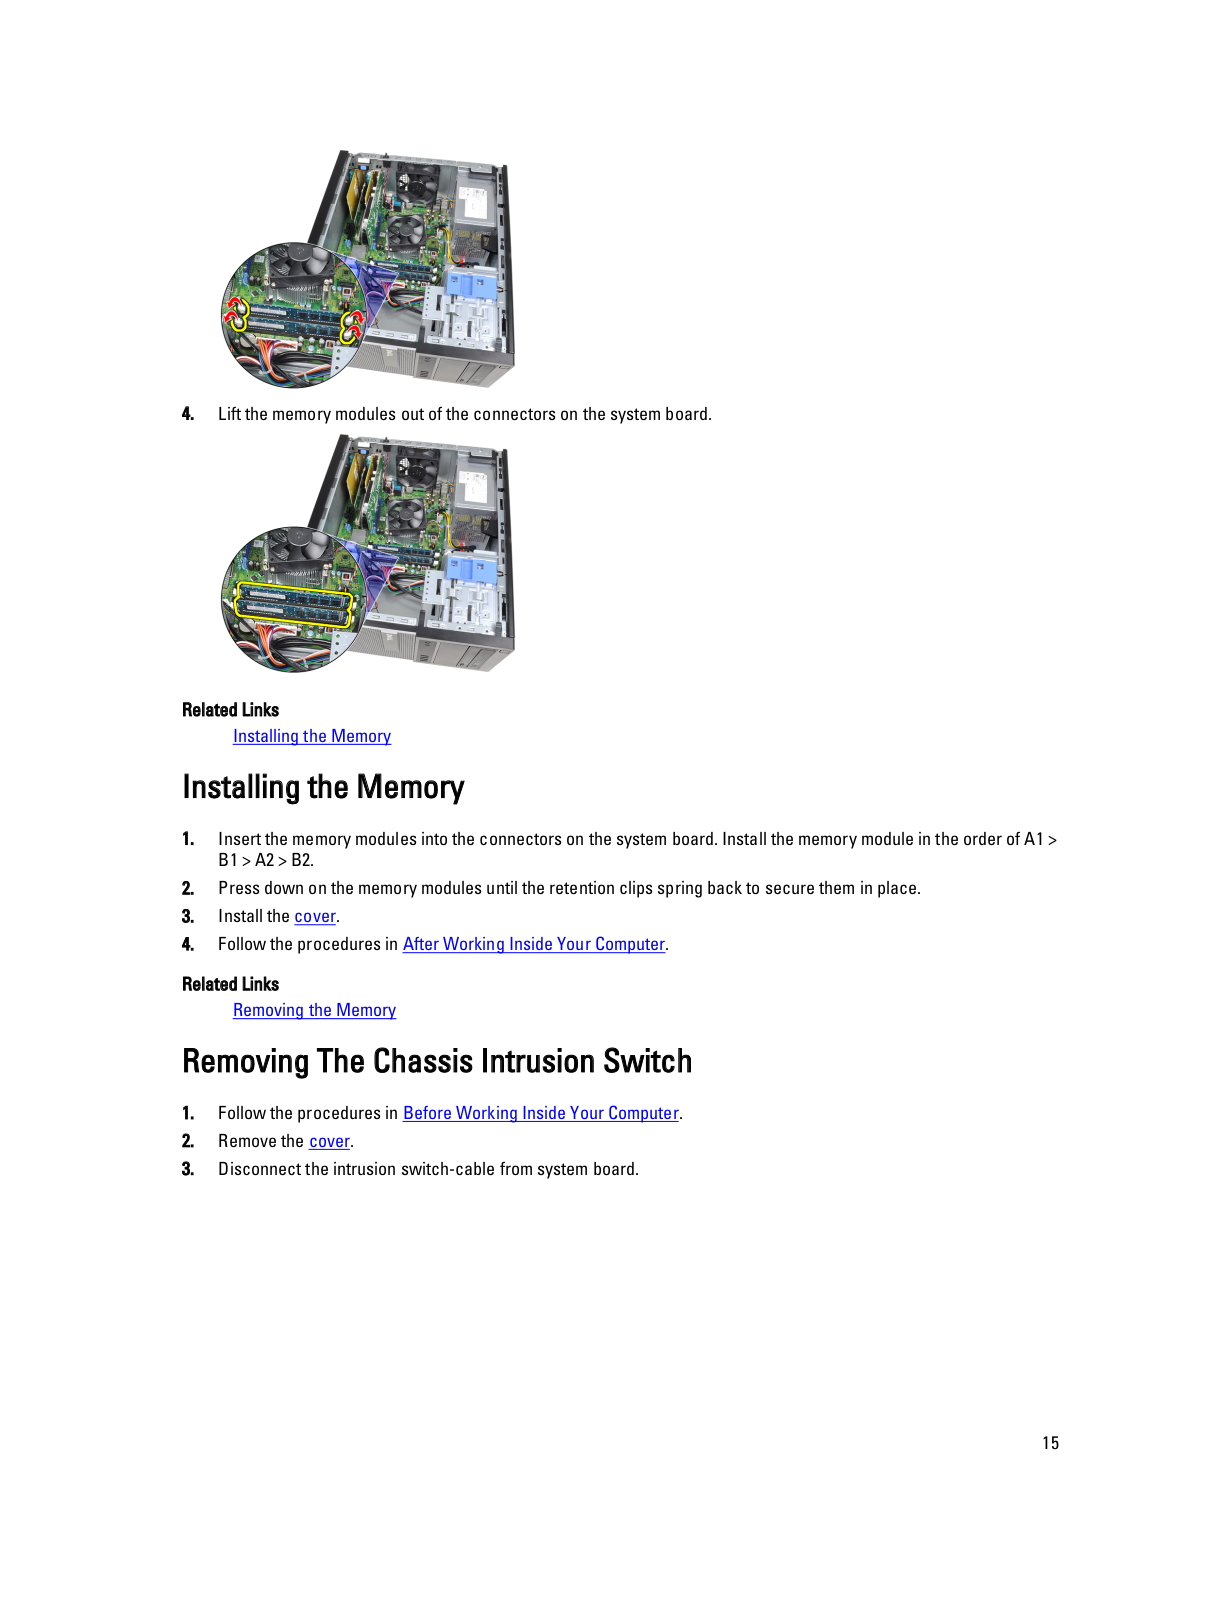
OptiPlex 3010
boardview
51 pgs
2.33 Mb
0
boardview BOTTOM
1 pgs
575.38 Kb
0
boardview top
1 pgs
1.02 Mb
0
Owner's Manual
61 pgs
17.83 Mb
0
Technical Manualbook
38 pgs
1.74 Mb
0
User Manual
63 pgs
17.57 Mb
0
User Manual
9 pgs
1.45 Mb
0
User Manual
3 pgs
167.22 Kb
0
User Manual [ar]
59 pgs
19.03 Mb
0
User Manual [ar]
57 pgs
17.96 Mb
0
User Manual [ar]
9 pgs
1.56 Mb
0
User Manual [cr]
61 pgs
17.62 Mb
0
User Manual [cr]
63 pgs
19.75 Mb
0
User Manual [cr]
9 pgs
1.47 Mb
0
User Manual [cs]
65 pgs
20.16 Mb
0
User Manual [cs]
9 pgs
1.57 Mb
0
User Manual [cs]
63 pgs
19.03 Mb
0
User Manual [da]
61 pgs
17.6 Mb
0
User Manual [da]
63 pgs
19.72 Mb
0
User Manual [da]
9 pgs
1.47 Mb
0
User Manual [de]
65 pgs
17.61 Mb
0
User Manual [de]
69 pgs
18.67 Mb
0
User Manual [de]
67 pgs
19.73 Mb
0
User Manual [de]
9 pgs
1.47 Mb
0
User Manual [es]
67 pgs
19.73 Mb
0
User Manual [es]
65 pgs
17.6 Mb
0
User Manual [es]
9 pgs
1.47 Mb
0
User Manual [fi]
61 pgs
17.6 Mb
0
User Manual [fi]
63 pgs
19.72 Mb
0
User Manual [fi]
9 pgs
1.47 Mb
0
User Manual [fr]
67 pgs
18.66 Mb
0
User Manual [fr]
65 pgs
17.6 Mb
0
User Manual [fr]
9 pgs
1.47 Mb
0
User Manual [gr]
71 pgs
19.93 Mb
0
User Manual [gr]
67 pgs
17.79 Mb
0
User Manual [gr]
9 pgs
1.51 Mb
0
User Manual [he]
9 pgs
1.5 Mb
0
User Manual [he]
63 pgs
18.89 Mb
0
User Manual [he]
61 pgs
17.82 Mb
0
User Manual [hu]
63 pgs
19.03 Mb
0
User Manual [hu]
65 pgs
21.19 Mb
0
User Manual [hu]
67 pgs
20.16 Mb
0
User Manual [hu]
9 pgs
1.57 Mb
0
User Manual [in]
67 pgs
19.72 Mb
0
User Manual [in]
65 pgs
18.66 Mb
0
User Manual [in]
63 pgs
17.6 Mb
0
User Manual [in]
9 pgs
1.47 Mb
0
User Manual [in]
9 pgs
1.47 Mb
0
User Manual [in]
65 pgs
17.6 Mb
0
User Manual [ja]
63 pgs
17.97 Mb
0
User Manual [ja]
65 pgs
20.1 Mb
0
User Manual [ja]
9 pgs
1.57 Mb
0
User Manual [ko]
63 pgs
19.94 Mb
0
User Manual [ko]
61 pgs
18.83 Mb
0
User Manual [ko]
9 pgs
1.66 Mb
0
User Manual [nl]
65 pgs
17.6 Mb
0
User Manual [nl]
67 pgs
18.66 Mb
0
User Manual [nl]
9 pgs
1.47 Mb
0
User Manual [no]
61 pgs
17.6 Mb
0
User Manual [no]
63 pgs
19.72 Mb
0
User Manual [no]
9 pgs
1.47 Mb
0
User Manual [po]
65 pgs
18.76 Mb
0
User Manual [po]
63 pgs
17.7 Mb
0
User Manual [po]
9 pgs
1.52 Mb
0
User Manual [pt]
67 pgs
19.73 Mb
0
User Manual [pt]
65 pgs
17.61 Mb
0
User Manual [pt]
67 pgs
18.67 Mb
0
User Manual [pt]
9 pgs
1.47 Mb
0
User Manual [pt]
9 pgs
1.47 Mb
0
User Manual [pt]
65 pgs
17.61 Mb
0
User Manual [ro]
67 pgs
18.71 Mb
0
User Manual [ro]
65 pgs
17.65 Mb
0
User Manual [ro]
9 pgs
1.48 Mb
0
User Manual [ru]
9 pgs
1.51 Mb
0
User Manual [ru]
67 pgs
17.76 Mb
0
User Manual [ru]
69 pgs
19.88 Mb
0
User Manual [ru]
71 pgs
18.82 Mb
0
User Manual [si]
63 pgs
18.68 Mb
0
User Manual [si]
61 pgs
17.62 Mb
0
User Manual [si]
9 pgs
1.47 Mb
0
User Manual [sk]
65 pgs
19.76 Mb
0
User Manual [sk]
9 pgs
1.48 Mb
0
User Manual [sk]
63 pgs
17.64 Mb
0
User Manual [sr]
63 pgs
18.69 Mb
0
User Manual [sr]
61 pgs
17.62 Mb
0
User Manual [sv]
63 pgs
19.72 Mb
0
User Manual [sv]
61 pgs
17.6 Mb
0
User Manual [sv]
9 pgs
1.47 Mb
0
User Manual [th]
61 pgs
17.66 Mb
0
User Manual [th]
63 pgs
18.72 Mb
0
User Manual [tr]
63 pgs
19.97 Mb
0
User Manual [tr]
61 pgs
20.98 Mb
0
User Manual [tr]
9 pgs
1.62 Mb
0
User Manual [zh]
63 pgs
19.17 Mb
0
User Manual [zh]
59 pgs
18.06 Mb
0
User Manual [zh]
61 pgs
19.14 Mb
0
User Manual [zh]
9 pgs
1.59 Mb
0
User Manual [zh]
61 pgs
18.09 Mb
0
User Manual [zh]
9 pgs
1.58 Mb
0
Table of contents
Loading...
Dell OptiPlex 3010 User Manual [th]
...
Dell User Manual [th]
Download
Specifications and Main Features
Frequently Asked Questions
User Manual
Download
Loading...
+
42
hidden pages
Unhide
You need points to download manuals.
1 point = 1 manual.
You can buy points or you can get point for every manual you upload.
Buy points
Upload your manuals
 Loading...