

Page 1

Dell™ OptiPlex™ 170L
Quick Reference Guide
Models MTC2 and DHS
www.dell.com | support.dell.com
Page 2

Notes, Notices, and Cautions
NOTE: A NOTE indicates important information that helps you make better use of your computer.
NOTICE: A NOTICE indicates either potential damage to hardware or loss of data and tells you how to avoid
the problem.
CAUTION: A CAUTION indicates a potential for property damage, personal injury, or death.
If you purchased a Dell™ n Series computer, any references in this document to Microsoft® Windows®
operating systems are not applicable.
The
Drivers and Utilities
and may not ship with all computers.
CD (ResourceCD), operating system media, and
Quick Reference Guides
are optional
____________________
Information in this document is subject to change without notice.
© 2004 Dell Inc. All rights reserved.
Reproduction in any manner whatsoever without the written permission of Dell Inc. is strictly forbidden.
Trademarks used in this text: Dell, the DELL logo, and OptiPlex are trademarks of Dell Inc.; Microsoft and Windows are registered trademarks
of Microsoft Corporation.
Other trademarks and trade names may be used in this document to refer to either the entities claiming the marks and names or their products.
Dell Inc. disclaims any proprietary interest in trademarks and trade names other than its own.
Models MTC2 and DHS
September 2004 P/N C7558 Rev. A00
Page 3

Contents
Finding Information for Your Computer . . . . . . . . . . . . . . . . . . . 5
About Your Small Desktop Computer
Front and Back Views
Inside Your Computer
. . . . . . . . . . . . . . . . . . . . . . . . . 8
. . . . . . . . . . . . . . . . . . . . . . . . . 9
. . . . . . . . . . . . . . . . . . . . 8
Attaching and Removing the Computer Stand
About Your Mini-Tower Computer
Front and Back Views
Inside Your Computer
Setting Up Your Computer
Small Desktop Computer
Mini-tower Computer
Completed Setup
. . . . . . . . . . . . . . . . . . . . . . . . . . . . . 16
Small Desktop Computer
Mini-Tower Computer
Solving Problems
Dell Diagnostics
System Lights
Diagnostic Lights
Beep Codes
. . . . . . . . . . . . . . . . . . . . . . . . . . . . . 17
. . . . . . . . . . . . . . . . . . . . . . . . . . . . 17
. . . . . . . . . . . . . . . . . . . . . . . . . . . . . 19
. . . . . . . . . . . . . . . . . . . . . . . . . . . 20
. . . . . . . . . . . . . . . . . . . . . . . . . . . . . . 22
. . . . . . . . . . . . . . . . . . . . . 11
. . . . . . . . . . . . . . . . . . . . . . . . . 11
. . . . . . . . . . . . . . . . . . . . . . . . . 12
. . . . . . . . . . . . . . . . . . . . . . . . . 13
. . . . . . . . . . . . . . . . . . . . . . . 14
. . . . . . . . . . . . . . . . . . . . . . . . . 15
. . . . . . . . . . . . . . . . . . . . . . . 16
. . . . . . . . . . . . . . . . . . . . . . . . . 16
Running the Dell™ IDE Hard Drive Diagnostics
Resolving Software and Hardware Incompatibilities
®
Using Microsoft
Reinstalling Microsoft
Windows® XP System Restore . . . . . . . . . . . . 25
®
Windows® XP . . . . . . . . . . . . . . . . . 26
. . . . . . . . . . . . . . 10
. . . . . . . . . . . . . 23
. . . . . . . . . . 24
Using the Drivers and Utilities CD
Index
. . . . . . . . . . . . . . . . . . . . . . . . . . . . . . . . . . . 31
. . . . . . . . . . . . . . . . . . . . . 29
Contents 3
Page 4

4 Contents
Page 5
Finding Information for Your Computer
What Are You Looking For? Find It Here
• A diagnostic program for my computer
• Drivers for my computer
• My computer documentation
• My device documentation
• Desktop System Software (DSS)
• OS updates and patches
• Warranty information
• Safety instructions
• Regulatory information
• Ergonomics information
• End User License Agreement
Drivers and Utilities CD (also known as the ResourceCD)
Documentation and drivers are already installed on your
computer. You can use the CD to reinstall drivers, run the
Dell Diagnostics, or access your documentation.
NOTE: The latest drivers and documentation updates can
be found at support.dell.com.
NOTE: The Drivers and Utilities CD is optional and may not
ship with all computers.
Desktop System Software
Located on the Drivers and Utilities CD and the Dell
Support website at support.dell.com.
Product Information Guide
Readme files may be
included on your CD to
provide last-minute
updates about technical
changes to your
computer or advanced
technical-reference
material for technicians
or experienced users.
• How to remove and replace parts
• Technical specifications
• How to configure system settings
• How to troubleshoot and solve problems
Dell™ OptiPlex™ User’s Guide
®
Microsoft
1
Click the
2
Click
The User’s Guide is also available on the
Utilities
Windows® XP Help and Support Center
Start
button and click
User’s and system guides
CD
.
Quick Reference Guide 5
Help and Support.
and click
User’s guides
Drivers and
.
Page 6
What Are You Looking For? Find It Here
• Service Tag and Express Service Code
• Microsoft Windows License Label
www.dell.com | support.dell.com
• Latest drivers for my computer
• Answers to technical service and support questions
• Online discussions with other users and technical
support
• Documentation for my computer
• Service call status and support history
• Top technical issues for my computer
• Frequently asked questions
• File downloads
• Details on my computer configuration
• Service contract for my computer
Service Tag and Microsoft Windows License
These labels are located on your computer.
• Use the Service Tag to
• Enter the Express
Dell Support Website — support.dell.com
NOTE: Select your region to view the appropriate support
site.
The Dell Support website provides several online tools,
including:
• Solutions — Troubleshooting hints and tips, articles
• Community — Online discussion with other Dell
• Upgrades — Upgrade information for components, such
• Customer Care — Contact information, order status,
• Downloads — Drivers, patches, and software updates
• Reference — Computer documentation, product
Dell Premier Support Website — premiersupport.dell.com
The Dell Premier Support website is customized for
corporate, government, and education customers. This
website may not be available in all regions.
identify your
computer when you
support.dell.com
use
or contact technical
support.
Service Code to direct your call when contacting
technical support. The Express Service Code is not
available in all countries.
from technicians, and online courses
customers
as memory, the hard drive, and the operating system
warranty, and repair information
specifications, and white papers
6 Quick Reference Guide
Page 7

What Are You Looking For? Find It Here
• How to use Windows XP
• Documentation for my computer
• Documentation for devices (such as a modem)
Windows Help and Support Center
1
Click the
2
Type a word or phrase that describes your problem and
click the arrow icon.
3
Click the topic that describes your problem.
4
Follow the instructions on the screen.
• How to reinstall my operating system
Operating System CD
The operating system is already installed on your
computer. To reinstall your operating system, use the
Operating System CD. See your OptiPlex User’s Guide for
instructions.
NOTE: The color of your CD varies based on the operating
system you ordered.
NOTE: The operating system media are optional and may
not ship with all computers.
• Regulatory Model Information and Chassis Type
DHS—Small desktop chassis
MTC2
—
Start
button and click
Mini-tower chassis
Help and Support
.
After you reinstall your
operating system, use the
Drivers and Utilities CD
to reinstall drivers for the
devices that came with
your computer.
Your operating system
product key
label is
located on your
computer.
Quick Reference Guide 7
Page 8
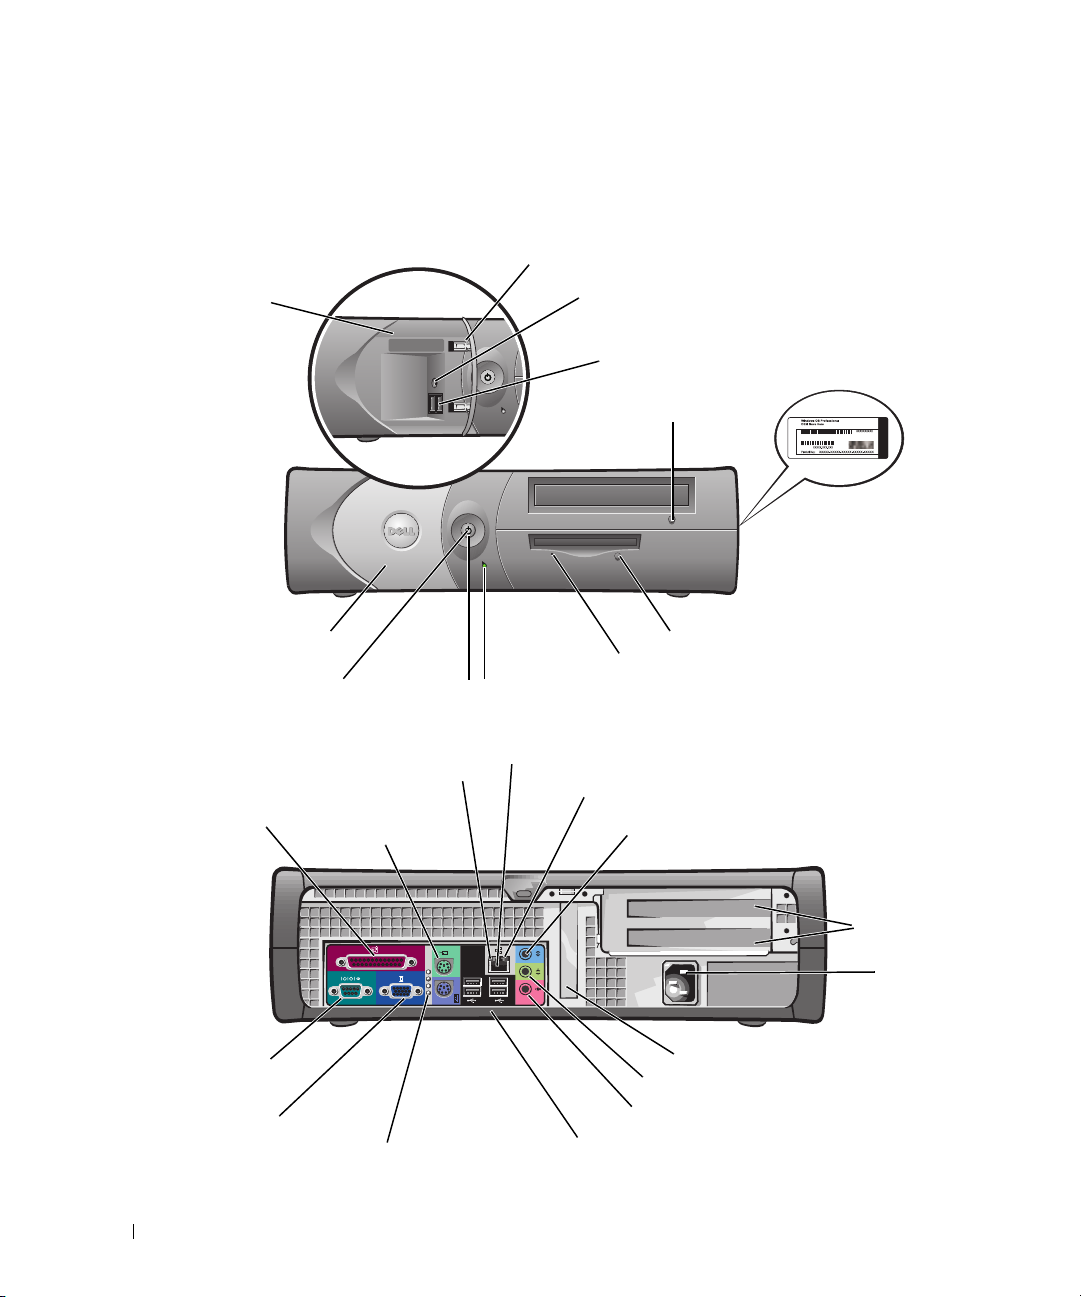
About Your Small Desktop Computer
Front and Back Views
service tag
www.dell.com | support.dell.com
front panel door
headphone connector
USB 2.0 connectors (2)
CD/DVD drive
eject button
Microsoft
Windows
Product Key
CD/DVD-drive
eject button
front panel door
power light
parallel
connector
serial
connector
video
connector
power button
link integrity light
mouse
connector
diagnostic lights
floppy-drive eject button
floppy-drive activity light
hard-drive activity light
network adapter connector
network activity light
line-in connector
optional card
slots (2)
A B C D
low-profile PCI card slot
line-out connector
microphone connector
USB 2.0 connectors (4)
power
connector
8 Quick Reference Guide
Page 9
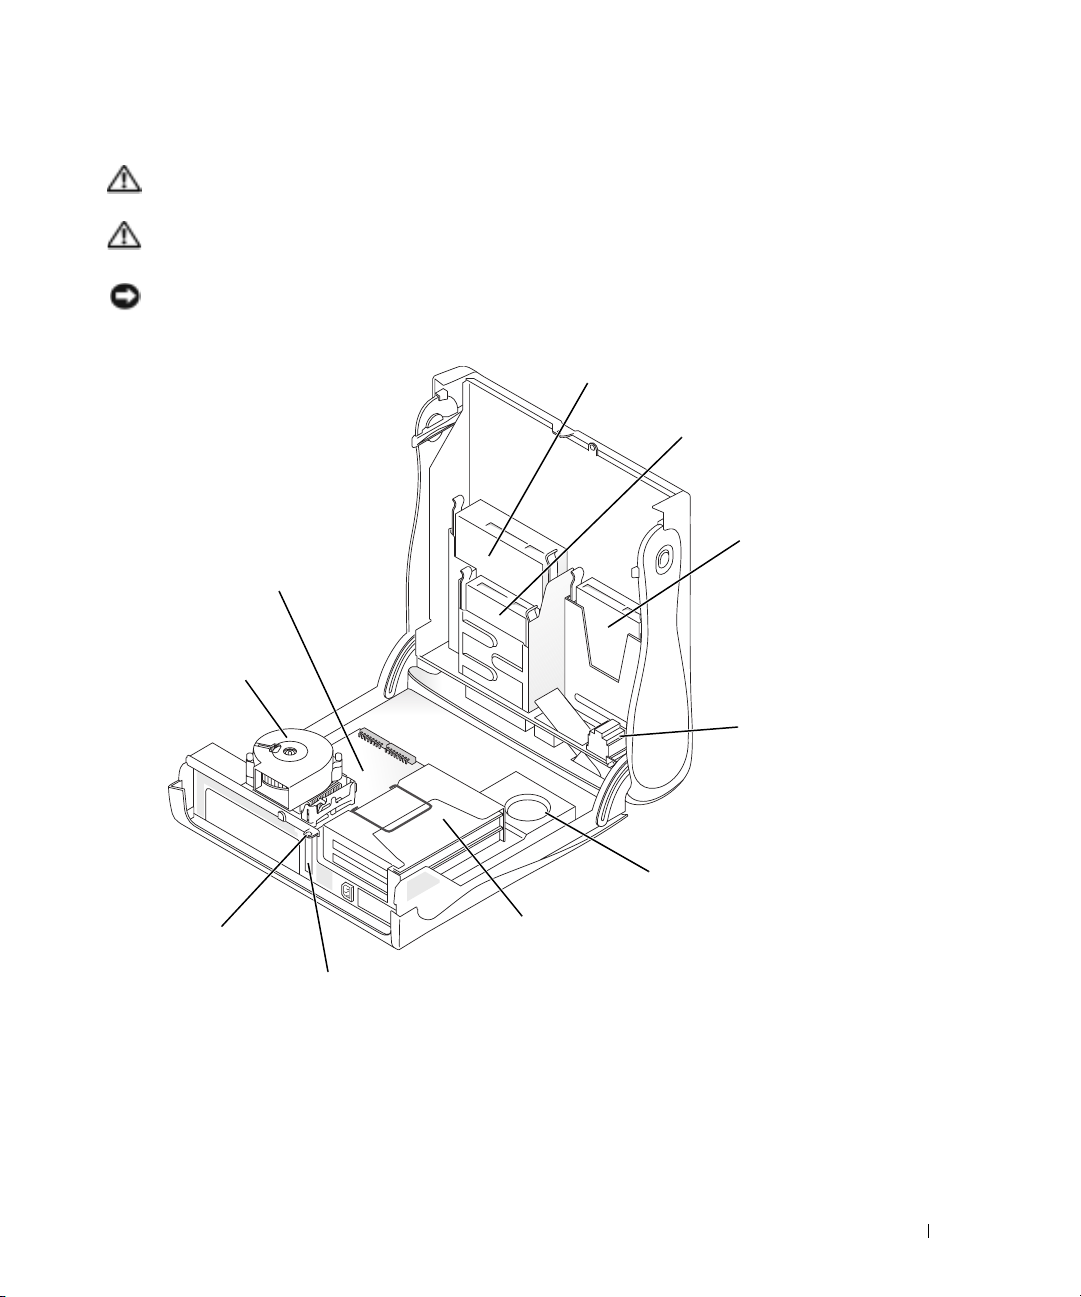
Inside Your Computer
CAUTION: Before you begin any of the procedures in this section, follow the safety instructions in the
Product Information Guide.
CAUTION: To avoid electrical shock, always unplug your computer from the electrical outlet before
opening the cover.
NOTICE: Be careful when opening the computer cover to ensure that you do not accidently disconnect
cables from the system board.
CD/DVD drive
floppy drive
hard drive
system board
heat sink and
blower assembly
optional internal
speaker
padlock ring
low-profile
PCI card slot
power supply
optional card cage
NOTE: Your computer may have a metal bracket
instead of a card cage
Quick Reference Guide 9
Page 10
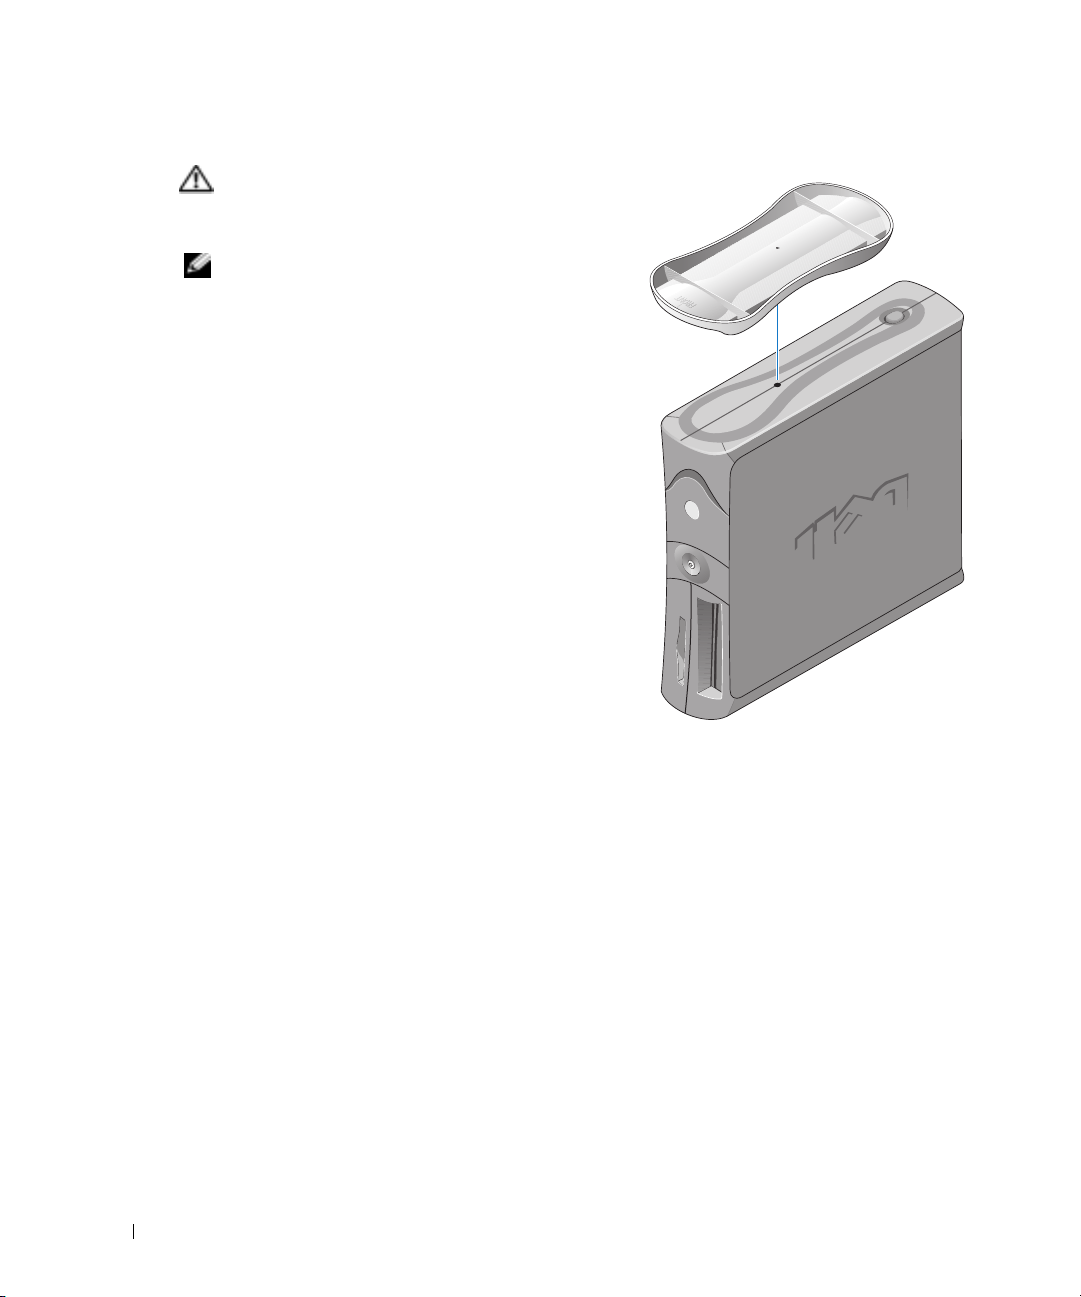
Attaching and Removing the Computer Stand
CAUTION: Before you begin any of the procedures in this
section, follow the safety instructions in the Product
Information Guide.
NOTE: Place your computer on a soft surface to prevent
scratching the top cover.
Your computer can be used in either a vertical or
horizontal position.
To use the computer in a vertical position, you must
attach the computer stand:
1
www.dell.com | support.dell.com
Place the computer on its right side so that the drive
bays are at the bottom and fit the stand onto what
was the left side of the computer:
a
Position the stand as shown in the following
figure by aligning the large round hole in the
stand with the securing button on the side of the
cover.
b
Align the captive screw in the stand with the
screw hole in the cover, and tighten the
thumbscrew.
2
Rotate the computer so that the stand is at the
bottom and the drives are at the top.
10 Quick Reference Guide
Page 11

About Your Mini-Tower Computer
Front and Back Views
service tag
CD or DVD drive activity light
CD or DVD eject button
second drive bay
floppy drive light
power light
power button
USB 2.0 connectors (2)
power connector
voltage selection switch
serial connector
video connector
keyboard connector
line-out connector
microphone connector
floppy drive eject button
hard-drive activity light
headphone connector
parallel connector
diagnostic lights (4)
mouse connector
line-in connector
cover latch
USB 2.0 connectors (4)
PCI card slots (3)
network adapter connector
security cable slot
Quick Reference Guide 11
Page 12
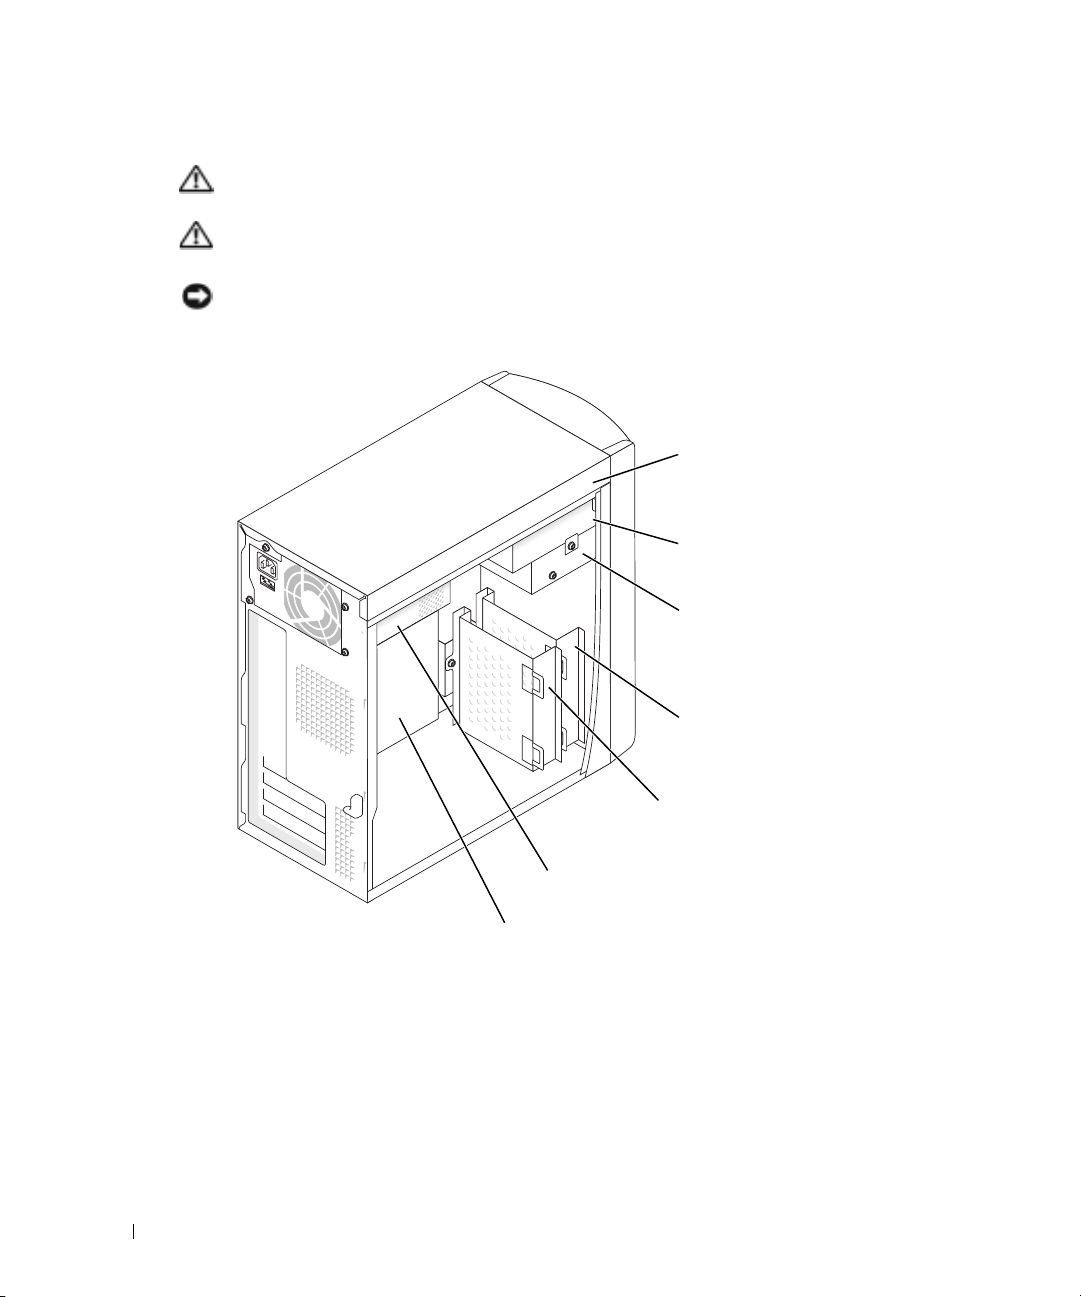
Inside Your Computer
CAUTION: Before you begin any of the procedures in this section, follow the safety instructions in the
Product Information Guide.
CAUTION: To avoid electrical shock, always unplug your computer from the electrical outlet before
opening the cover.
NOTICE: Be careful when opening the computer cover to ensure that you do not accidently disconnect
cables from the system board.
www.dell.com | support.dell.com
CD or DVD drive bay
secondary CD or DVD drive bay
floppy drive bay
secondary hard drive bay
primary hard drive bay
power supply
system board
12 Quick Reference Guide
Page 13

Setting Up Your Computer
CAUTION: Before performing any of the procedures in this section, follow the safety instructions in the
Product Information Guide.
NOTICE: If your computer has an expansion card installed (such as a modem card), connect the
appropriate cable to the card, not to the connector on the back panel.
You must complete all steps to properly set up your computer. See the appropriate illustrations that
follow the instructions.
1
Connect the keyboard and mouse.
NOTICE: Do not attempt to operate a PS/2 mouse and a USB mouse simultaneously.
NOTE: If you have a USB-compliant mouse or keyboard, use the USB connectors on the back of your
computer.
2
Connect the modem or network cable.
Insert the network cable, not the phone line, into the network connector. If you have an
optional modem, connect the phone line to the modem.
NOTICE: Do not connect a modem cable to the network adapter. Voltage from telephone
communications can cause damage to the network adapter.
3
Connect the monitor.
Align and gently insert the monitor cable to avoid bending connector pins. Tighten the
thumbscrews on the cable connectors.
NOTE: Some monitors have the video connector underneath the back of the screen. See the
documentation that came with your monitor for its connector locations.
4
Connect the speakers.
5
Connect power cables to the computer, monitor, and devices and insert the other ends of the
power cables to electrical outlets.
6
Verify that the voltage selection switch is set correctly for your location. Your computer has a
manual voltage selection switch. Computers with a voltage selection switch on the back panel
must be manually set to operate at the correct operating voltage.
NOTICE: To help avoid damaging a computer with a manual voltage selection switch, set the switch for
the voltage that most closely matches the AC power available in your location.
NOTE: Before you install any devices or software that did not ship with your computer, read the
documentation that came with the software or device, or contact the vendor to verify that the software or
device is compatible with your computer and operating system.
Quick Reference Guide 13
Page 14
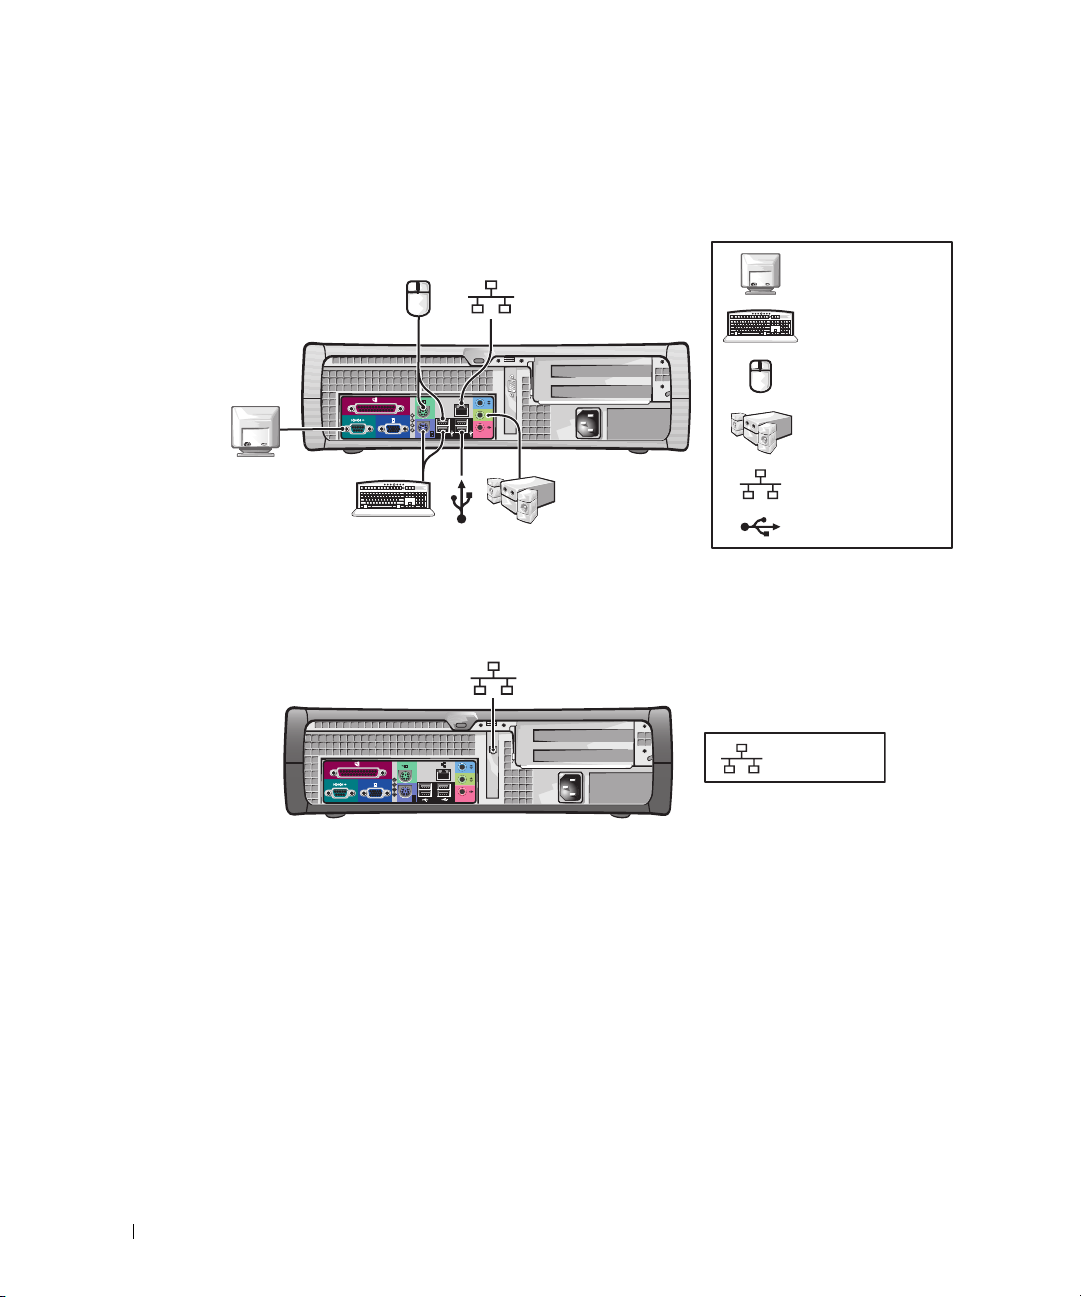
Small Desktop Computer
Setup Without Cards
www.dell.com | support.dell.com
Setup With Cards
monitor
keyboard
mouse
D
C
B
A
speakers
network
USB
14 Quick Reference Guide
network
Page 15
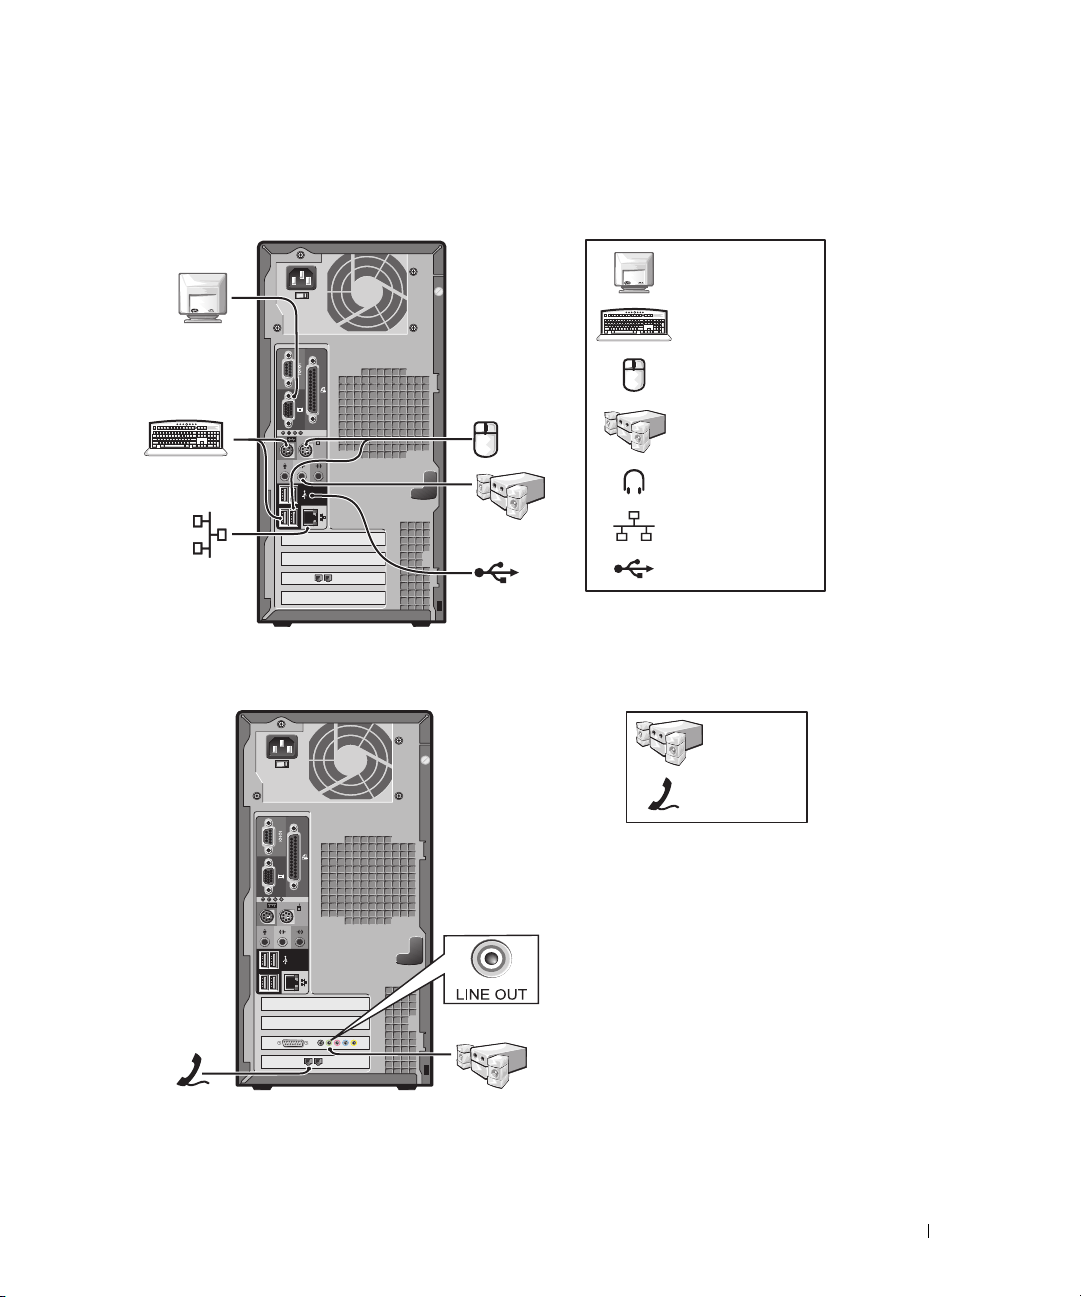
Mini-tower Computer
Setup Without Cards
Setup With Cards
monitor
keyboard
mouse
speakers
headphones
network
USB
speakers
telephony/
modem
Quick Reference Guide 15
Page 16
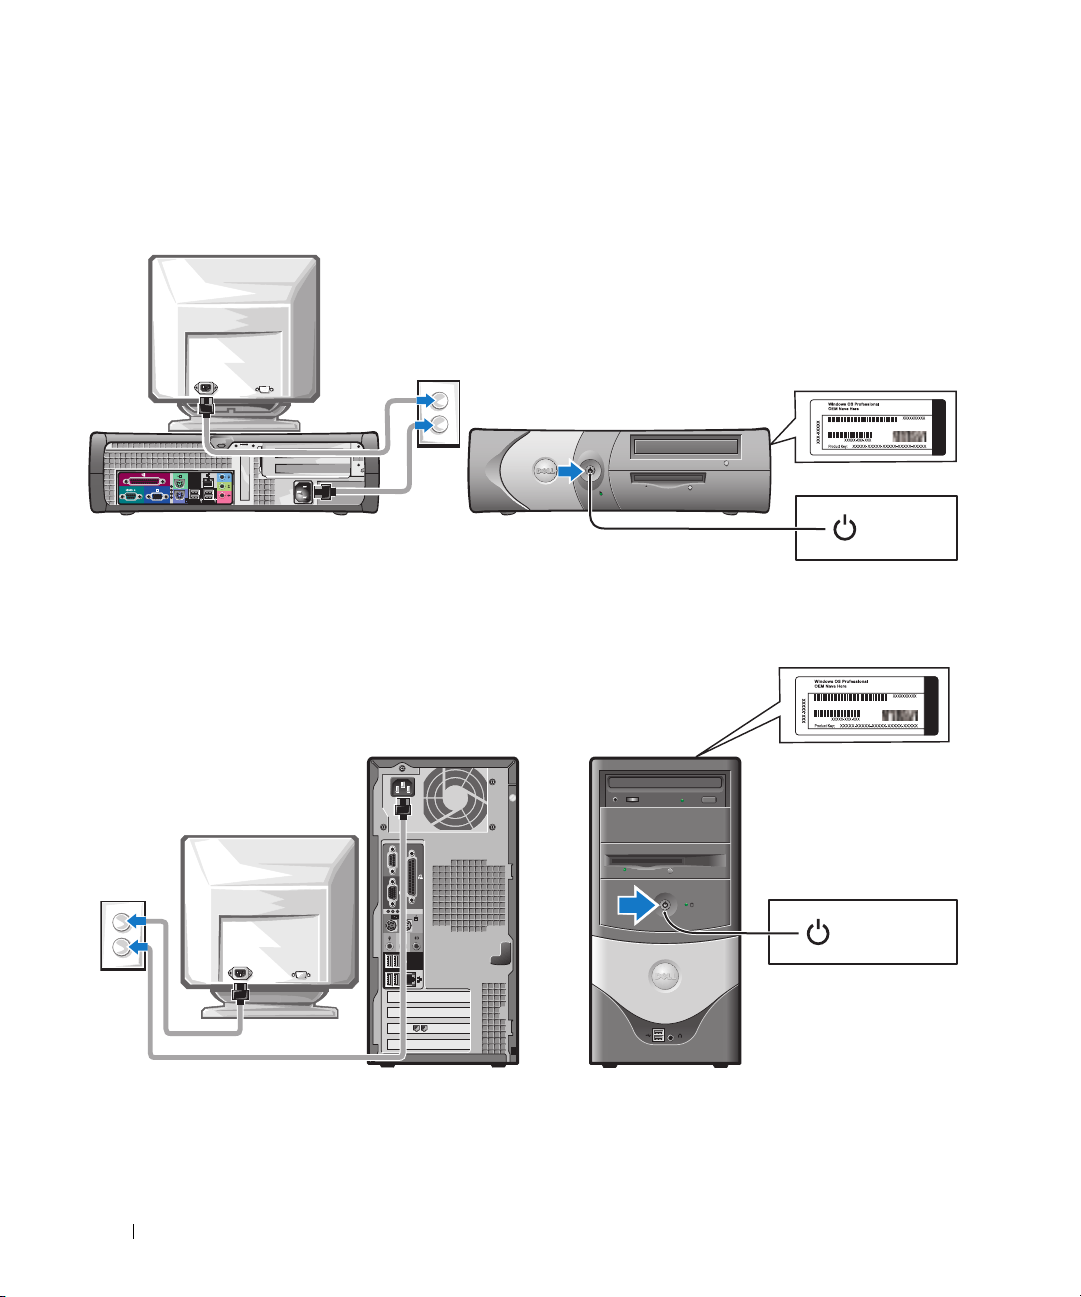
Completed Setup
Small Desktop Computer
www.dell.com | support.dell.com
Mini-Tower Computer
Microsoft Windows Product Key
power
Microsoft Windows Product Key
16 Quick Reference Guide
power
Page 17

Solving Problems
Dell provides a number of tools to help you if your computer does not perform as expected. For the
latest troubleshooting information available for your computer, see the Dell Support website at
support.dell.com
If computer problems occur that require help from Dell, write a detailed description of the error,
beep codes, or diagnostics light patterns; record your Express Service Code and Service Tag below;
and then contact Dell from the same location as your computer.
See "Finding Information for Your Computer" on page 5 for an example of the Express Service
Code and Service Tag.
Express Service Code:___________________________
Service Tag:___________________________
Dell Diagnostics
CAUTION: Before you begin any of the procedures in this section, follow the safety instructions
located in the Product Information Guide.
When to Use the Dell Diagnostics
If you experience a problem with your computer, perform the checks in "Solving Problems" of your
User’s Guide
online
It is recommended that you print these procedures before you begin.
NOTICE: The Dell Diagnostics works only on Dell™ computers.
Enter system setup, review your computer’s configuration information, and ensure that the device
you want to test displays in system setup and is active.
Start the Dell Diagnostics from either your hard drive or from the optional
(also known as the ResourceCD).
.
and run the Dell Diagnostics before you contact Dell for technical assistance.
Drivers and Utilities
CD
Starting the Dell Diagnostics From Your Hard Drive
1
Turn on (or restart) your computer.
2
When the DELL™ logo appears, press <F12> immediately.
NOTE: If you see a message stating that no diagnostics utility partition has been found, run the Dell
Diagnostics from your Drivers and Utilities CD.
If you wait too long and the operating system logo appears, continue to wait until you see the
Microsoft
3
When the boot device list appears, highlight
4
When the Dell Diagnostics
®
Windows® desktop. Then shut down your computer and try again.
Main Menu
Boot to Utility Partition
appears, select the test you want to run.
and press <Enter>.
Quick Reference Guide 17
Page 18

Starting the Dell Diagnostics From the Optional Drivers and Utilities CD
1
Insert the
2
Shut down and restart the computer.
When the DELL logo appears, press <F12> immediately.
If you wait too long and the Windows logo appears, continue to wait until you see the
Windows desktop. Then shut down your computer and try again.
NOTE: The next steps change the boot sequence for one time only. On the next start-up, the computer
boots according to the devices specified in system setup.
When the boot device list appears, highlight
3
4
www.dell.com | support.dell.com
Select the
5
Select the
6
Ty p e 1 to start the ResourceCD menu.
7
Ty p e 2 to start the Dell Diagnostics.
8
Select
Run the 32 Bit Dell Diagnostics
select the version appropriate for your computer.
9
When the Dell Diagnostics
Dell Diagnostics Main Menu
1
After the Dell Diagnostics loads and the
option you want.
Drivers and Utilities
CD.
IDE CD-ROM Device
Boot from CD-ROM
Main Menu
IDE CD-ROM Device
and press <Enter>.
option from the CD boot menu.
option from the menu that appears.
from the numbered list. If multiple versions are listed,
appears, select the test you want to run.
Main Menu
screen appears, click the button for the
Option Function
Express Test Performs a quick test of devices. This test typically takes 10 to 20 minutes and
Extended Test Performs a thorough check of devices. This test typically takes an hour or more
Custom Test Tests a specific device. You can customize the tests you want to run.
Symptom Tree Lists the most common symptoms encountered and allows you to select a test
2
If a problem is encountered during a test, a message appears with an error code and a
description of the problem. Write down the error code and problem description and follow
the instructions on the screen.
If you cannot resolve the error condition, contact Dell.
NOTE: The Service Tag for your computer is located at the top of each test screen. If you contact Dell,
technical support will ask for your Service Tag.
18 Quick Reference Guide
requires no interaction on your part. Run Express Test first to increase the
possibility of tracing the problem quickly.
and requires you to answer questions periodically.
based on the symptom of the problem you are having.
Page 19

3
If you run a test from the
Custom Test
or
Symptom Tree
option, click the applicable tab
described in the following table for more information.
Ta b Function
Results Displays the results of the test and any error conditions encountered.
Errors Displays error conditions encountered, error codes, and the problem
description.
Help Describes the test and may indicate requirements for running the test.
Configuration Displays your hardware configuration for the selected device.
The Dell Diagnostics obtains configuration information for all devices from
system setup, memory, and various internal tests, and it displays the
information in the device list in the left pane of the screen. The device list may
not display the names of all the components installed on your computer or all
devices attached to your computer.
Parameters Allows you to customize the test by changing the test settings.
4
When the tests are completed, if you are running the Dell Diagnostics from the
Utilities
5
Close the test screen to return to the
restart the computer, close the
CD, remove the CD.
Main Menu
Main Menu
screen. To exit the Dell Diagnostics and
screen.
Drivers and
System Lights
Your power light may indicate a computer problem.
Power Light Problem Description Suggested Resolution
Solid green Power is on, and the computer is
operating normally.
Blinking green The computer is in the suspended
state (Microsoft
and Windows XP).
Blinks green several
times and then
turns off
Solid yellow The Dell Diagnostics is running a
A configuration error exists. Check "Diagnostic Lights" on page 20 to see
test, or a device on the system board
may be faulty or incorrectly installed.
®
Windows® 2000
No corrective action is required.
Press the power button, move the mouse, or
press a key on the keyboard to wake the
computer.
if the specific problem is identified.
If the Dell Diagnostics is running, allow the
testing to complete.
Check "Diagnostic Lights" on page 20 to see
if the specific problem is identified.
If the computer does not boot, contact Dell
for technical assistance.
Quick Reference Guide 19
Page 20
Power Light Problem Description Suggested Resolution
Blinking yellow A power supply or system board
Solid green and a
beep code during
POST
Solid green power
light, no beep code
www.dell.com | support.dell.com
and no video during
POST
Solid green power
light and no beep
code but the
computer locks up
during POST
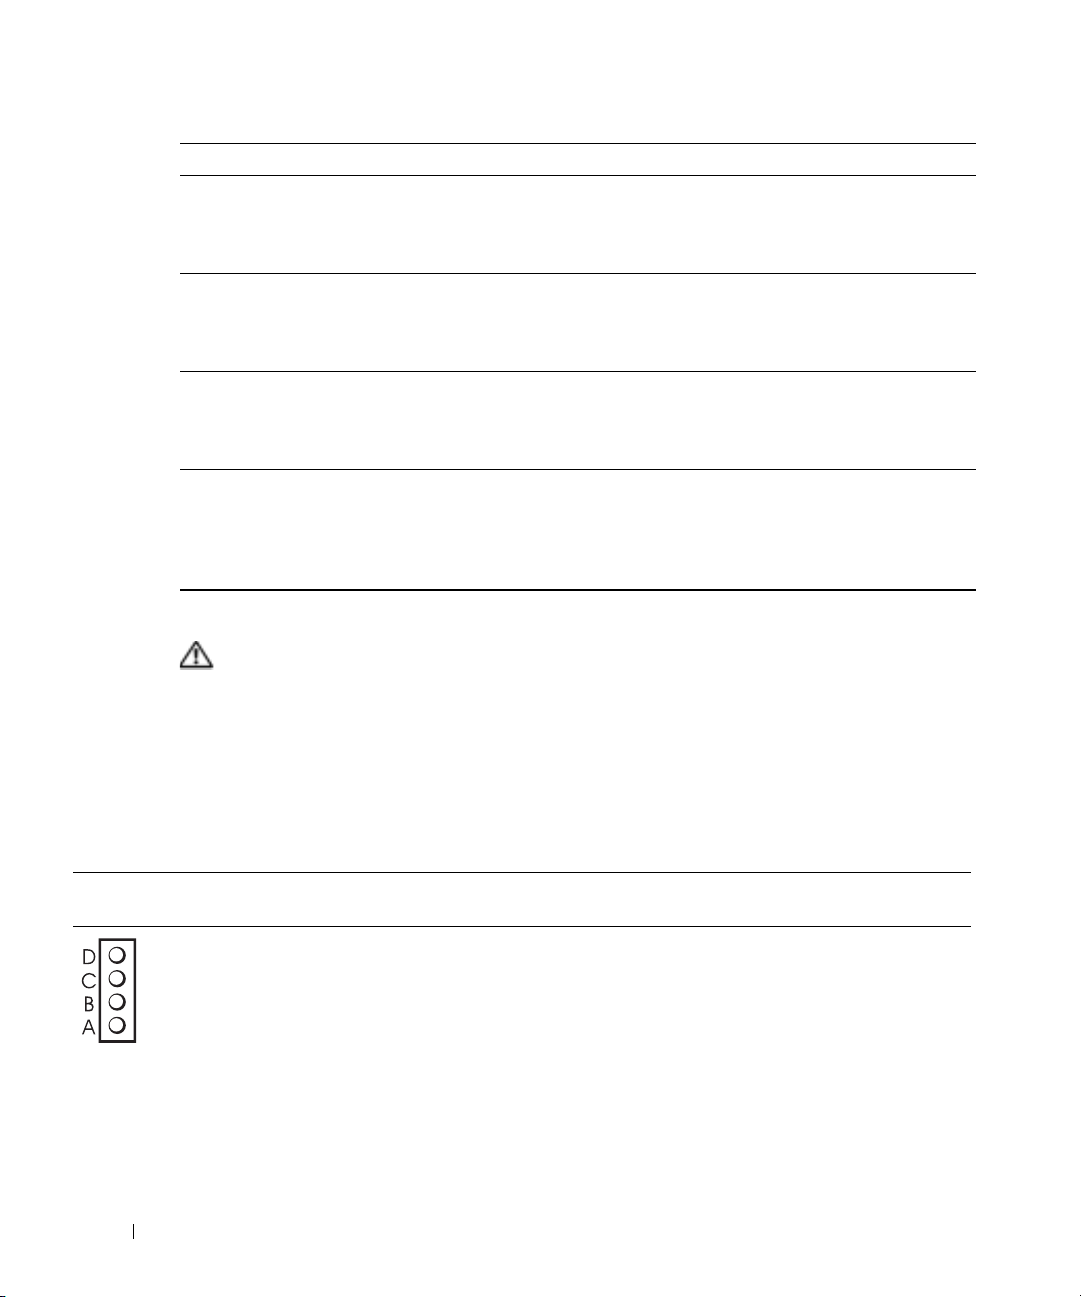
Diagnostic Lights
CAUTION: Before you begin any of the procedures in this section, follow the safety instructions
located in the Product Information Guide.
To help you troubleshoot a problem, your computer has four lights labeled "A," "B," "C," and "D" on
the back panel. The lights can be yellow or green. When the computer starts normally, the patterns
or codes on the lights change as the boot process completes. If the POST portion of system boot
completes successfully, all four lights display solid green. If the computer malfunctions during the
POST process, the pattern displayed on the lights may help identify where in the process the
computer halted.
failure has occurred.
A problem was detected while the
BIOS was executing.
The monitor or the graphics card may
be faulty or incorrectly installed.
An integrated system board device
may be faulty.
Check "Diagnostic Lights" on page 20 to see
if the specific problem is identified. See
"Power Problems" in your online User’s
Guide.
See "Beep Codes" on page 22 for instructions
on diagnosing the beep code. Also, check
"Diagnostic Lights" on page 20 to see if the
specific problem is identified.
Check "Diagnostic Lights" on page 20 to see
if the specific problem is identified.
Check "Diagnostic Lights" on page 20 to see
if the specific problem is identified. If the
problem is not identified, contact Dell for
technical assistance.
Light
Pattern
off
off
off
off
Problem Description Suggested Resolution
The computer is in a normal off
condition or a possible pre-BIOS
failure has occurred.
20 Quick Reference Guide
• Verify that the computer is plugged into a working
electrical outlet and that you have pressed the power
button.
Page 21
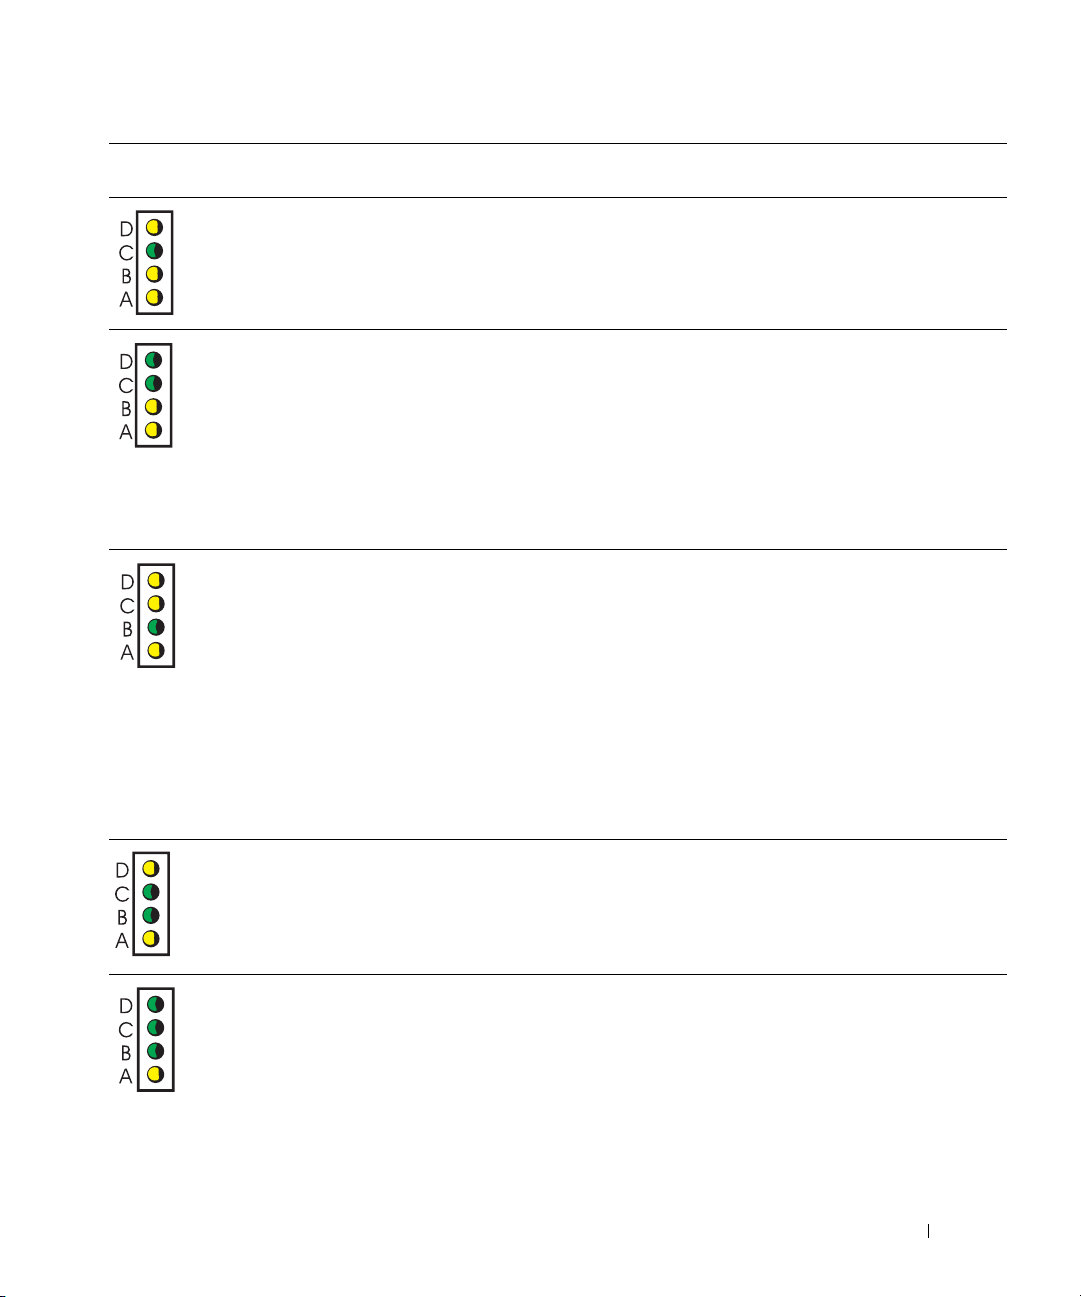
Light
Pattern
yellow
green
yellow
yellow
Problem Description Suggested Resolution
A possible processor failure has
occurred.
• Reinstall the processor and restart the computer.
green
green
yellow
yellow
yellow
yellow
green
yellow
yellow
green
green
yellow
Memory modules are detected, but a
memory failure has occurred.
A possible PCI expansion card failure
has occurred.
A possible IDE drive failure has
occurred.
• If you have one memory module installed, reinstall it and
restart the computer.
• If you have two memory modules installed, remove the
modules, reinstall one module, and then restart the
computer. If the computer starts normally, reinstall the
second module.
• If available, install properly working memory of the same
type into your computer.
• If the problem persists, contact Dell.
• Determine if a conflict exists by removing a card (not the
video card) and then restarting the computer.
• If the problem persists, reinstall the card that you
removed, remove a different card, and then restart the
computer.
• Repeat this process for each card. If the computer starts
normally, troubleshoot the last card removed from the
computer for resource conflicts (see ""Resolving Software
and Hardware Incompatibilities" on page 24").
• Move each card one at a time to a different PCI slot and
restart the computer after each move.
• If the problem persists, contact Dell.
• Reseat all IDE drive power and data cables and restart the
computer.
green
green
green
yellow
A possible USB failure has occurred.
• Reinstall all USB devices, check cable connections, and
then restart the computer.
Quick Reference Guide 21
Page 22
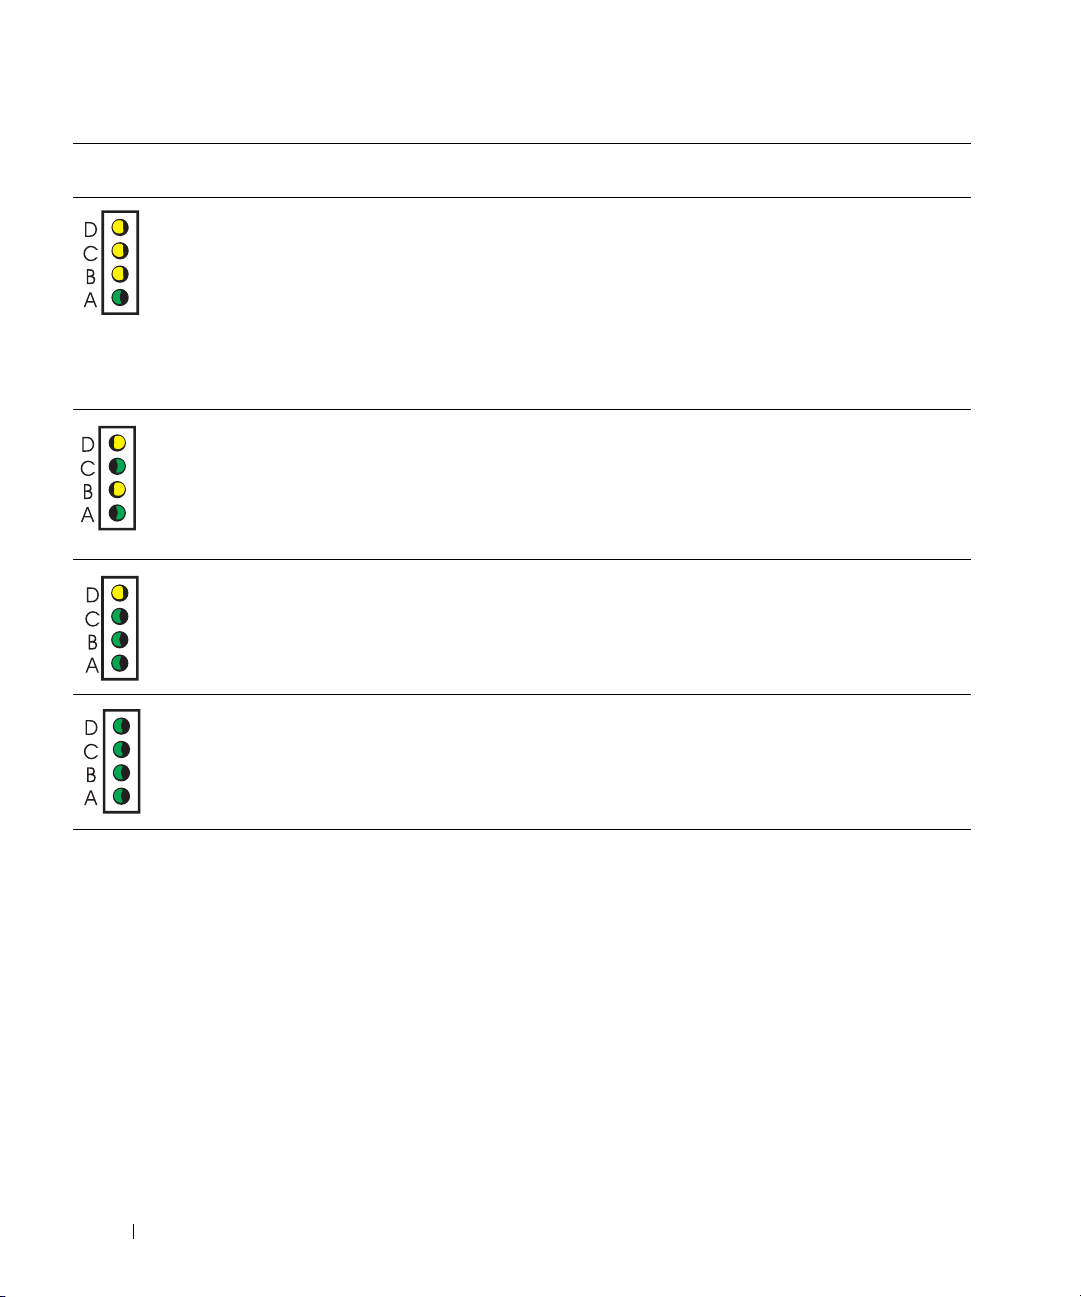
Light
Pattern
yellow
yellow
yellow
green
www.dell.com | support.dell.com
yellow
green
yellow
green
yellow
green
green
green
Problem Description Suggested Resolution
No memory modules are detected.
Memory modules are detected, but a
memory configuration or
compatibility error exists.
Another failure has occurred.
• Reinstall all memory modules and restart the computer.
• To eliminate the possibility of a faulty memory connector,
remove all memory modules, reinstall one memory
module (if the computer supports a single module), and
then restart the computer. If the computer starts
normally, move the memory module to a different
connector and restart the computer. Continue until you
have identified a faulty connector or reinstalled all
modules without error.
• Ensure that no special memory module/memory
connector placement requirements exist (see "Memory"
in the online
• Verify that the memory modules that you are installing
are compatible with your computer.
• If the problem persists, contact Dell.
• Ensure that the cables are properly connected to the
system board from all installed hard drives.
• Check the computer message that appears on your
monitor screen.
• If the problem persists, contact Dell.
User’s Guide
for more information).
green
green
green
green
The computer is in a normal
operating condition after POST.
Beep Codes
Your computer might emit a series of beeps during start-up if the monitor cannot display errors or
problems. This series of beeps, called a beep code, identifies a problem. One possible beep code
(code 1-3-1) consists of one beep, a burst of three beeps, and then one beep. This beep code tells
you that the computer encountered a memory problem.
If your computer beeps during start-up:
1
Write down the beep code.
2
See "Dell Diagnostics" on page 17 to identify a more serious cause.
3
Contact Dell for technical assistance.
22 Quick Reference Guide
•None.
Page 23

Code Cause Code Cause
1-1-2 Microprocessor register failure 3-1-4 Slave interrupt mask register failure
1-1-3 NVRAM read/write failure 3-2-2 Interrupt vector loading failure
1-1-4 ROM BIOS checksum failure 3-2-4 Keyboard Controller Test failure
1-2-1 Programmable interval timer failure 3-3-1 NVRAM power loss
1-2-2 DMA initialization failure 3-3-2 Invalid NVRAM configuration
1-2-3 DMA page register read/write
failure
1-3 Video Memory Test failure 3-4-1 Screen initialization failure
1-3-1 through 2-4-4 Memory not being properly
identified or used
3-1-1 Slave DMA register failure 3-4-3 Search for video ROM failure
3-1-2 Master DMA register failure 4-2-1 No timer tick
3-1-3 Master interrupt mask register
failure
4-2-3 Gate A20 failure 4-4-1 Serial or parallel port test failure
4-2-4 Unexpected interrupt in protected
mode
4-3-1 Memory failure above address
0FFFFh
4-3-3 Timer-chip counter 2 failure 4-4-4 Cache test failure
4-3-4 Time-of-day clock stopped
3-3-4 Video Memory Test failure
3-4-2 Screen retrace failure
4-2-2 Shutdown failure
4-4-2 Failure to decompress code to
shadowed memory
4-4-3 Math-coprocessor test failure
Running the Dell™ IDE Hard Drive Diagnostics
The Dell IDE Hard Drive Diagnostics is a utility that tests the hard drive to troubleshoot or
confirm a hard drive failure.
1
Turn on your computer (if your computer is already on, restart it).
2
When F2= Setup appears in the upper-right corner of the screen, press <Ctr><Alt><D>.
3
Follow the instructions on the screen.
If a failure is reported, see "Hard Drive Problems" in the "Solving Problems" section of the online
User’s Guide
.
Quick Reference Guide 23
Page 24

Resolving Software and Hardware Incompatibilities
If a device is either not detected during the operating system setup or is detected but incorrectly
configured, you can use the Hardware Troubleshooter to resolve the incompatibility. In the
Microsoft
incompatibilities.
Windows XP
To resolve incompatibilities using the Hardware Troubleshooter:
1
2
www.dell.com | support.dell.com
3
4
Windows 2000
To resolve incompatibilities using Device Manager:
1
2
3
4
5
6
®
Windows® 2000 operating system, you can also use Device Manager to resolve
Click the
Ty p e
hardware troubleshooter
Click
Hardware Troubleshooter
In the
Hardware Troubleshooter
computer
Click the
In the
Control Panel
Click the
Click
Device Manager
Click
View
Double-click
Incorrectly configured devices are indicated by a yellow exclamation point (
device has been disabled.
Start
button and click
, and click
Start
Next
.
button, point to
window, double-click
Hardware
tab.
.
and click
Resources by connection
Interrupt request (IRQ)
Help and Support
in the
Search
in the
Search Results
list, click
Settings
I need to resolve a hardware conflict on my
, and then click
System
.
.
.
field and click the arrow to start the search.
list.
Control Panel
.
.
!
) or a red X if the
7
Double-click any device marked with an exclamation point to display the
Device
The
reconfigured.
8
Reconfigure the devices or remove the devices from the Device Manager. See the
documentation that came with the device for information on configuring the device.
To resolve incompatibilities using the Hardware Troubleshooter:
1
Click the
2
Click
Start
Troubleshooting and Maintenance
troubleshooters
In the
Hardware Troubleshooter
Next
and click
.
24 Quick Reference Guide
status area in the
button and click
, and then click
list, click
Properties
Properties
Help
Hardware
window reports the cards or devices that need to be
.
on the
Contents
tab, click
Windows 2000
.
I need to resolve a hardware conflict on my computer
window.
Page 25

Using Microsoft® Windows® XP System Restore
The Microsoft® Windows® XP operating system provides System Restore to allow you to return
your computer to an earlier operating state (without affecting data files) if changes to the
hardware, software, or other system settings have left the computer in an undesirable operating
state. See the Windows Help and Support Center for information on using System Restore.
NOTICE: Make regular backups of your data files. System Restore does not monitor your data files or
recover them.
Creating a Restore Point
1
Click the
2
Click
3
Follow the instructions on the screen.
Restoring the Computer to an Earlier Operating State
NOTICE: Before you restore the computer to an earlier operating state, save and close any open files
and exit any open programs. Do not alter, open, or delete any files or programs until the system
restoration is complete.
Click the
1
System Restore
2
Ensure that
3
Click a calendar date to which you want to restore your computer.
The
points. All calendar dates with available restore points appear in boldface type.
Start
button and click
System Restore
Start
.
button, point to
.
Restore my computer to an earlier time
Select a Restore Point
Help and Support
All Programs→
.
Accessories→
System Tools
is selected and click
, and then click
Next
.
screen provides a calendar that allows you to see and select restore
4
Select a restore point and click
Next
.
If a calendar date has only one restore point, then that restore point is automatically selected.
If two or more restore points are available, click the restore point that you prefer.
5
Click
Next
.
Restoration Complete
The
screen appears after System Restore finishes collecting data and
then the computer restarts.
6
After the computer restarts, click OK.
To change the restore point, you can either repeat the steps using a different restore point, or you
can undo the restoration.
Quick Reference Guide 25
Page 26

Undoing the Last System Restore
NOTICE: Before you undo the last system restore, save and close all open files and exit any open
programs. Do not alter, open, or delete any files or programs until the system restoration is complete.
Click the
1
System Restore
2
Click
3
Click
The
4
After the computer restarts, click OK.
Start
button, point to
.
Undo my last restoration
Next
.
System Restore
screen appears and the computer restarts.
All Programs→ Accessories→ System Tools
and click
Next
.
, and then click
www.dell.com | support.dell.com
Enabling System Restore
If you reinstall Windows XP with less than 200 MB of free hard-disk space available, System
Restore is automatically disabled. To see if System Restore is enabled:
1
Click the
2
Click
Performance and Maintenance
3
Click
System
4
Click the
5
Ensure that
Reinstalling Microsoft® Windows® XP
Before You Begin
If you are considering reinstalling the Windows XP operating system to correct a problem with a
newly installed driver, first try using Windows XP Device Driver Rollback. If Device Driver
Rollback does not resolve the problem, then use System Restore to return your operating system to
the operating state it was in before you installed the new device driver.
NOTICE: Before performing the installation, back up all data files on your primary hard drive. For
conventional hard drive configurations, the primary hard drive is the first drive detected by the computer.
To reinstall Windows XP, you need the following items:
• Dell™
•Dell
Operating System
Drivers and Utilities
Start
button and click
.
System Restore
tab.
Turn off System Restore
CD
CD
Control Panel
.
is unchecked.
.
NOTE: The Drivers and Utilities CD contains drivers that were installed during assembly of the computer.
Use the Drivers and Utilities CD or go to the Dell support site to load any required drivers.
NOTE: The Operating System and Drivers and Utilities CDs are optional and may not ship with all
computers.
26 Quick Reference Guide
Page 27

Reinstalling Windows XP
NOTICE: You must use Windows XP Service Pack 1 or later when you reinstall Windows XP.
To reinstall Windows XP, perform all the steps in the following sections in the order in which they
are listed.
The reinstallation process can take 1 to 2 hours to complete. After you reinstall the operating
system, you must also reinstall the device drivers, virus protection program, and other software.
NOTICE: The Operating System CD provides options for reinstalling Windows XP. The options can
overwrite files and possibly affect programs installed on your hard drive. Therefore, do not reinstall
Windows XP unless a Dell technical support representative instructs you to do so.
NOTICE: To prevent conflicts with Windows XP, disable any virus protection software installed on your
computer before you reinstall Windows XP. See the documentation that came with the software for
instructions.
Booting From the Operating System CD
1
Save and close any open files and exit any open programs.
2
Insert the
3
Restart the computer.
4
Press <F12> immediately after the DELL™ logo appears.
Operating System
CD. Click
Exit
if
Install Windows XP
message appears.
If the operating system logo appears, wait until you see the Windows desktop, and then shut
down the computer and try again.
5
Press the arrow keys to select
6
When the
Press any key to boot from CD
CD-ROM
, and press <Enter>.
message appears, press any key.
Windows XP Setup
1
When the
Windows now
2
Read the information on the
Windows XP Setup
.
screen appears, press <Enter> to select
Microsoft Windows Licensing Agreement
To set up
screen, and press
<F8> to accept the license agreement.
3
If your computer already has Windows XP installed and you want to recover your current
Windows XP data, type
4
If you want to install a new copy of Windows XP, press <Esc> to select that option.
5
Press <Enter> to select the highlighted partition (recommended), and follow the
r
to select the repair option, and remove the CD.
instructions on the screen.
The
Windows XP Setup
screen appears, and the operating system begins to copy files and
install the devices. The computer automatically restarts multiple times.
NOTE: The time required to complete the setup depends on the size of the hard drive and the speed of
your computer.
Quick Reference Guide 27
Page 28

NOTICE: Do not press any key when the following message appears: Press any key to boot
from the CD.
6
When the
location and click
7
Enter your name and organization (optional) in the
click
Next
8
At the
Computer Name and Administrator Password
computer (or accept the one provided) and a password, and click
9
If the
Modem Dialing Information
Next
.
10
www.dell.com | support.dell.com
Enter the date, time, and time zone in the
11
If the
Networking Settings
12
If you are reinstalling Windows XP Professional and you are prompted to provide further
information regarding your network configuration, enter your selections. If you are unsure of
your settings, accept the default selections.
Windows XP installs the operating system components and configures the computer. The
computer automatically restarts.
NOTICE: Do not press any key when the following message appears: Press any key to boot
from the CD.
When the
13
14
When the
Skip
click
15
When the
click
Next
16
When the
17
Click
Next
18
Click
Finish
19
Reinstall the appropriate drivers with the
20
Reinstall your virus protection software.
21
Reinstall your programs.
Regional and Language Options
Next
.
screen appears, select the settings for your
Personalize Your Software
.
window, enter a name for your
Next
screen appears, enter the requested information and click
Date and Time Settings
screen appears, click
Welcome to Microsoft
How will this computer connect to the Internet?
screen appears, click
Typical
and click
Next
window, and click
Next
.
.
Ready to register with Microsoft?
screen appears, select
No, not at this time
.
Who will use this computer?
screen appears, you can enter up to five users.
.
to complete the setup, and remove the CD.
Drivers and Utilities
CD.
screen, and
.
.
message appears,
Next
and
.
NOTE: To reinstall and activate your Microsoft Office or Microsoft Works Suite programs, you need the
Product Key number located on the back of the Microsoft Office or Microsoft Works Suite CD sleeve.
28 Quick Reference Guide
Page 29

Using the Drivers and Utilities CD
To us e t h e
Drivers and Utilities
CD (also known as the ResourceCD) while you are running the
Windows operating system:
NOTE: To access device drivers and user documentation, you must use the Drivers and Utilities CD while
you are running Windows.
1
Turn on the computer and allow it to boot to the Windows desktop.
2
Insert the
If you are using the
ResourceCD Installation
Drivers and Utilities
Drivers and Utilities
window opens to inform you that the
CD into the CD drive.
CD for the first time on this computer, the
Drivers and Utilities
about to begin installation.
3
Click OK to continue.
To complete the installation, respond to the prompts offered by the installation program.
4
Click
Next
at the
5
Select the appropriate
Drivers for Your Computer
Welcome Dell System Owner
System Model, Operating System, Device Type,
screen.
and
To pi c
.
To display a list of device drivers for your computer:
1
Click
My Drivers
The
Drivers and Utilities
in the
To pi c
drop-down menu.
CD scans your computer’s hardware and operating system, and then
a list of device drivers for your system configuration is displayed on the screen.
2
Click the appropriate driver and follow the instructions to download the driver to your
computer.
To view all available drivers for your computer, click
Drivers
from the
To pi c
drop-down menu.
CD is
Quick Reference Guide 29
Page 30

www.dell.com | support.dell.com
30 Quick Reference Guide
Page 31

Index
B
beep codes, 22
C
CD
operating system, 7
computer
beep codes, 22
restore to previous state, 25
conflicts
software and hardware
incompatibilities, 24
D
Dell
premier support website, 6
support site, 6
Dell Diagnostics, 17
diagnostics
beep codes, 22
Dell, 17
Drivers and Utilities CD, 5
lights, 19-20
documentation
device, 5
online, 6
Quick Reference, 5
ResourceCD, 5
User’s Guide, 5
drivers
ResourceCD, 5
Drivers and Utilities CD, 5
E
error messages
beep codes, 22
diagnostic lights, 19-20
I
IRQ conflicts, 24
L
labels
Microsoft Windows, 6
Service Tag, 6
light, 19
lights
back of computer, 20
diagnostic, 19-20
front of computer, 19
power button, 19
system, 19
M
Microsoft Windows label, 6
Dell Premier Support
website, 6
Device Manager, 24
diagnostic lights, 19-20
H
hardware
beep codes, 22
conflicts, 24
Dell Diagnostics, 17
Hardware Troubleshooter, 24
Help and Support Center, 7
O
Operating System
CD, 7
Installation Guide, 7
operating system
reinstalling Windows XP, 26
Operating System CD, 7
Index 31
Page 32

P
S
U
power light, 19
problems
beep codes, 22
conflicts, 24
Dell Diagnostics, 17
diagnostic lights, 19-20
restore to previous state, 25
R
reinstalling
Drivers and Utilities CD, 5
ResourceCD, 5
Windows XP, 26
ResourceCD
Dell Diagnostics, 17
Service Tag, 6
software
conflicts, 24
stand
attach, 10
remove, 10
system lights, 19
System Restore, 25
T
troubleshooting
conflicts, 24
Dell Diagnostics, 17
diagnostic lights, 19-20
Hardware Troubleshooter, 24
Help and Support Center, 7
restore to previous state, 25
User’s Guide, 5
W
Windows 2000
Device Manager, 24
Hardware Troubleshooter, 24
Windows XP
Hardware Troubleshooter, 24
Help and Support Center, 7
reinstalling, 26
System Restore, 25
32 Index
Page 33

Dell™ OptiPlex™ 170L
Stručná referenční příručka
Modely MTC2 a DHS
www.dell.com | support.dell.com
Page 34

Poznámky, upozornění a výstrahy
POZNÁMKA: POZNÁMKA obsahuje důležité informace, které vám pomohou počítač lépe využívat.
UPOZORNĚNÍ: UPOZORNĚNÍ ukazuje na možnost poškození hardwaru nebo ztráty dat a sděluje vám, jak se
problému vyhnout.
POZOR: Odstavec uvozený slovem POZOR označuje možnost poškození majetku, zranění či smrtelného úrazu.
Pokud jste si zakoupili počítač řady Dell™ n, všechny odkazy na operační systémy Microsoft® Windows®
v tomto dokumentu nejsou platné.
Disk CD Drivers and Utilities (ResourceCD), média s operačním systémem a stručné referenční příručky jsou
volitelné doplňky a nemusejí být dodávány se všemi počítači.
____________________
Informace v tomto dokumentu se mohou měnit bez předchozího upozornění.
© 2004 Dell Inc. Všechna práva vyhrazena.
Jakákoli reprodukce bez písemného svolení společnosti Dell Inc. je přísně zakázána.
Ochranné známky použité v textu: Dell, logo DELL logo a OptiPlex jsou ochranné známky společnosti Dell Inc. Microsoft a Windows jsou
registrované ochranné známky společnosti Microsoft Corporation.
Jiné ochranné známky a obchodní názvy případně použité v tomto dokumentu mohou odkazovat na subjekty držící práva k těmto známkám
a názvy jejich výrobků. Společnost Dell Inc. odmítá vlastnické zájmy k ochranným známkám a obchodním názvům mimo své vlastní.
Modely MTC2 a DHS
Září 2004 P/N C7558 Rev. A00
Page 35

Obsah
Získání informací o počítači. . . . . . . . . . . . . . . . . . . . . . . . 37
Malý stolní počítač
Pohled zepředu a zezadu
Prvky uvnitř počítače
. . . . . . . . . . . . . . . . . . . . . . . . . . . . 40
. . . . . . . . . . . . . . . . . . . . . . . 40
. . . . . . . . . . . . . . . . . . . . . . . . . 41
Připojování a odstraňování stojanu počítače
Počítač Mini-Tower
Pohled zepředu a zezadu
Prvky uvnitř počítače
Instalace počítače
Malý stolní počítač
Počítač Mini-tower
Úplná instalace
Malý stolní počítač
Počítač Mini-tower
Řešení problémů
Diagnostický program Dell Diagnostics
Kontrolky zařízení
Diagnostické kontrolky
Kódy zvukových signálů (pípnutí)
. . . . . . . . . . . . . . . . . . . . . . . . . . . . 43
. . . . . . . . . . . . . . . . . . . . . . . 43
. . . . . . . . . . . . . . . . . . . . . . . . . 44
. . . . . . . . . . . . . . . . . . . . . . . . . . . . 45
. . . . . . . . . . . . . . . . . . . . . . . . . . 46
. . . . . . . . . . . . . . . . . . . . . . . . . . 47
. . . . . . . . . . . . . . . . . . . . . . . . . . . . . . 48
. . . . . . . . . . . . . . . . . . . . . . . . . . 48
. . . . . . . . . . . . . . . . . . . . . . . . . . 48
. . . . . . . . . . . . . . . . . . . . . . . . . . . . . 49
. . . . . . . . . . . . . . . . 49
. . . . . . . . . . . . . . . . . . . . . . . . . . 51
. . . . . . . . . . . . . . . . . . . . . . . . 53
. . . . . . . . . . . . . . . . . . . 55
Spuštění diagnostiky pevných disků IDE Dell™
Řešení nekompatibilit softwaru a hardwaru
Použití funkce obnovení systému v operačním systému
Microsoft
Přeinstalování Microsoft
®
Windows® XP . . . . . . . . . . . . . . . . . . . . . . 58
®
Windows® XP . . . . . . . . . . . . . . . 60
. . . . . . . . . . . . . . 42
. . . . . . . . . . . . . 56
. . . . . . . . . . . . . . 57
Práce s diskem CD Drivers and Utilities
Rejstřík
. . . . . . . . . . . . . . . . . . . . . . . . . . . . . . . . . 65
. . . . . . . . . . . . . . . . . . 63
Obsah 35
Page 36

36 Obsah
Page 37

Získání informací o počítači
Co hledáte? Kde to naleznete
• Diagnostický program pro počítač
• Ovladače pro počítač
• Dokumentaci k počítači
• Dokumentaci k zařízení
• Software Desktop System Software (DSS)
• Aktualizace a opravy operačního systému Desktop System Software
• Informace o záruce
• Bezpečnostní pokyny
• Právní předpisy
• Ergonomické zásady
• Licenční ujednání s koncovým uživatelem
Disk CD s ovladači a nástroji (Drivers and Utilities,
také ResourceCD)
Dokumentace a ovladače jsou v počítači již nainstalovány.
Tento disk CD umožňuje přeinstalování ovladačů, spuštění
diagnostických nástrojů Dell Diagnostics a přístup
k dokumentaci.
POZNÁMKA: Nejnovější ovladače a aktualizace
dokumentace naleznete na adrese support.dell.com.
POZNÁMKA: Disk CD Drivers and Utilities je nepovinný
a nemusí být dodáván se všemi počítači.
Umístěn na disku CD Drivers and Utilities aserveru
Dell Support na adrese support.dell.com.
Informační příručka produktu
Soubory readme, které
můžete nalézt na disku
CD, obsahují nejnovější
informace o technických
změnách počítače nebo
odborné technické
referenční materiály pro
techniky či zkušené
uživatele.
Stručná referenční příručka 37
Page 38

Co hledáte? Kde to naleznete
• Odstraňování a výměna součástí
• Technické údaje
• Konfigurace systému
• Odstraňování a řešení problémů
Příručka uživatele Dell™ OptiPlex™
Centrum pro nápovědu a odbornou pomoc
Microsoft
1 Klepněte na tlačítko Start a klepněte na položku
Help and Support (Nápověda a odborná pomoc).
2 Klepněte na položku User’s and system guides
(Uživatelské příručky a příručky k zařízení) a klepněte
na položku User’s guides (Uživatelské příručky).
Příručka uživatele je k dispozici i na disku CD Drivers
and Utilities.
www.dell.com | support.dell.com
• Servisní kód a kód pro expresní servis
• Licenční štítek Microsoft Windows
Licenční štítek Microsoft Windows a servisní kód
Štítky jsou umístěny na počítači.
• Servisní kód slouží
k identifikaci
počítače na serveru
support.dell.com
nebo při komunikaci
s oddělením technické
podpory.
• Při volání oddělení technické podpory zadejte kód pro
expresní servis, podle nějž budete spojeni. Kód pro
expresní servis nemusí být k dispozici ve všech zemích.
• Nejnovější ovladače pro počítač
• Odpovědi na technické otázky k servisu a podpoře
• Diskuse s jinými uživateli a technickou podporou
• Dokumentace k počítači
Webový server technické podpory Dell
Support – support.dell.com.
POZNÁMKA: Vyberte svůj region a systém přejde na
příslušný server podpory.
Webový server Dell Support obsahuje několik online
nástrojů jako jsou:
• Solutions (Řešení) — pokyny a tipy pro řešení
problémů, články techniků a online kurzy,
• Community (Fórum uživatelů) — online diskuse
s ostatními zákazníky společnosti Dell,
• Upgrades (Aktualizace) — informace o aktualizaci
součástí, například pamětí, pevných disků či operačního
systému,
• Customer Care (Péče o zákazníky) — kontaktní
informace, stav objednávek, záruky, informace o opravách,
• Downloads (Stahování) — ovladače, dočasné opravy
a aktualizace softwaru,
• Reference — dokumentace k počítačům, specifikace
výrobků a bílá kniha.
®
Windows® XP
38 Stručná referenční příručka
Page 39

Co hledáte? Kde to naleznete
• Stav servisních volání a historie podpory
• Nejpodrobnější technické údaje o počítači
• Často kladené otázky
• Stahování souborů
• Podrobnosti o konfiguraci počítače
• Servisní smlouva na počítač
• Práce se systémem Windows XP
• Dokumentace k počítači
• Dokumentace k zařízení (například k modemu)
• Přeinstalování operačního systému Disk CD s operačním systémem
Webový server Dell Premier Support —
premiersupport.dell.com
Webový server Dell Premier Support je přizpůsoben pro
zákazníky z komerční, státní a vzdělávací sféry. Tento
server nemusí být k dispozici ve všech oblastech.
Centrum pro nápovědu a odbornou pomoc Windows
1 Klepněte na tlačítko Start a klepněte na položku
Help and Support (Nápověda a odborná pomoc).
2 Napište slovo nebo frázi popisující vzniklé potíže
a klepněte na ikonu se šipkou.
3 Klepněte na téma popisující vaše potíže.
4 Postupujte podle pokynů na obrazovce.
Operační systém je v počítači již nainstalován. Chcete-li
operační systém přeinstalovat, použijte disk CD Operating
System (Operační systém). Pokyny naleznete v příručce
uživatele počítače OptiPlex.
na počítači.
POZNÁMKA: Barva disku CD se liší podle objednaného
operačního systému.
POZNÁMKA: Média s operačním systémem jsou volitelná
a nemusí být dodávána se všemi počítači.
—
• Předpisové informace o modelu a typ kostry DHS
model SD (small desktop)
MTC2
—
model MT (mini-tower)
Po přeinstalování
operačního systému
použijte disk CD Drivers
and Utilities s ovladači
a nástroji a nainstalujte
z něj ovladače pro
zařízení dodaná
s počítačem.
Štítek s kódem
operačního systému
(Product Key) je umístěn
Stručná referenční příručka 39
Page 40

Malý stolní počítač
Pohled zepředu a zezadu
servisní kód
www.dell.com | support.dell.com
dvířka čelního panelu
konektor sluchátek
2 konektory USB 2.0
tlačítko pro vysunutí
disku CD/DVD
kód operačního
systému (Product Key)
Microsoft Windows
tlačítko pro
vysunutí
dvířka čelního panelu
kontrolka napájení
kontrolka integrity spojení
konektor
paralelního
rozhraní
konektor
sériového rozhraní
konektor
zobrazovacího zařízení
diagnostické kontrolky
konektor myši
vypínač
A B C D
tlačítko pro vysunutí disketové jednotky
indikátor aktivity disketové jednotky
indikátor aktivity pevného disku
konektor sít
’ového adaptéru
kontrolka aktivity sítě
vstupní konektor
zásuvka pro nízké adaptéry PCI
výstupní konektor
konektor mikrofonu
4 konektory USB 2.0
2 zásuvky pro
volitelné karty
konektor
napájení
40 Stručná referenční příručka
Page 41

Prvky uvnitř počítače
POZOR: Před zahájením kteréhokoli postupu z tohoto oddílu si přečtěte bezpečnostní pokyny
v informační příručce produktu.
POZOR: Abyste zabránili úrazu elektrickým proudem, odpojujte při každém otevírání krytu počítač
od elektrické sítě.
UPOZORNĚNÍ: Kryt počítače otevírejte opatrně, abyste omylem nerozpojili kabely systémové desky.
jednotka CD/DVD
disketová jednotka
pevný disk
systémová deska
sestava chladiče
aventilátoru
volitelný vnitřní
reproduktor
otvor pro zámek
zásuvka pro nízké
adaptéry PCI
napájení
volitelná klec na adaptéry
POZNÁMKA: Ve vašem počítači může být
místo klece kovový držák
Stručná referenční příručka 41
Page 42

Připojování a odstraňování stojanu počítače
POZOR: Před zahájením kteréhokoli postupu z tohoto
oddílu si přečtěte bezpečnostní pokyny v informační
příručce produktu.
POZNÁMKA: Umístěte počítač na měkkou podložku,
abyste nepoškrábali horní kryt.
Počítač můžete používat ve vodorovné i svislé poloze.
Chcete-li počítač používat ve svislé poloze, musíte k němu
připojit stojan:
1 Položte počítač na pravou stranu přihrádky
www.dell.com | support.dell.com
disků dolů a připevněte stojan na původní levou
stranu počítače:
a Podle obrázku zarovnejte velký okrouhlý
otvor ve stojanu s upevňovacím tlačítkem
na postranním krytu.
b Zarovnejte jisticí šroubek ve stojanu s otvorem
v krytu a utáhněte prstový šroubek.
2 Otočte počítač stojanem dolů a jednotkami nahoru.
42 Stručná referenční příručka
Page 43

Počítač Mini-Tower
Pohled zepředu a zezadu
indikátor aktivity jednotky CD nebo DVD
servisní kód
indikátor disketové jednotky
kontrolka napájení
vypínač
2 konektory USB 2.0
konektor napájení
přepínač volby napětí
konektor sériového rozhraní
konektor zobrazovacího zařízení
konektor klávesnice
výstupní konektor
konektor mikrofonu
tlačítko pro vysunutí
CD nebo DVD
přihrádka druhého disku
tlačítko pro vysunutí diskety
indikátor aktivity
pevného disku
konektor sluchátek
konektor paralelního
rozhraní
4 diagnostické kontrolky
konektor myši
vstupní konektor
západka krytu
4 konektory USB 2.0
3 zásuvky pro adaptéry PCI
konektor sít’ového adaptéru
bezpečnostní oko
Stručná referenční příručka 43
Page 44

Prvky uvnitř počítače
POZOR: Před zahájením kteréhokoli postupu z tohoto oddílu si přečtěte bezpečnostní pokyny
v informační příručce produktu.
POZOR: Abyste zabránili úrazu elektrickým proudem, odpojujte při každém otevírání krytu počítač
od elektrické sítě.
UPOZORNĚNÍ: Kryt počítače otevírejte opatrně, abyste omylem nerozpojili kabely systémové desky.
www.dell.com | support.dell.com
přihrádka jednotky
CD nebo DVD
přihrádka sekundární
jednotky CD nebo DVD
přihrádka disketové jednotky
přihrádka sekundárního
pevného disku
přihrádka primárního
pevného disku
napájení
systémová deska
44 Stručná referenční příručka
Page 45

Instalace počítače
POZOR: Před provedením kteréhokoli postupu z tohoto oddílu si přečtěte bezpečnostní pokyny
v informační příručce produktu.
UPOZORNĚNÍ: Pokud je v počítači nainstalován rozšiřující adaptér (například modem), připojte
příslušný kabel k adaptéru, nikoli ke konektoru na zadním panelu.
Pro správné nastavení počítače musíte provést všechny kroky. Prohlédněte si ilustrace následující
za pokyny.
1 Připojte klávesnici a myš.
UPOZORNĚNÍ: Nepokoušejte se současně používat myš PS/2 a myš USB.
POZNÁMKA: Pokud používáte myš nebo klávesnici kompatibilní s rozhraním USB, použijte konektory
USB v zadní části počítače.
2
Připojte modem nebo sít’ový kabel.
Do sít’ového konektoru vložte sít
modem, připojte k němu telefonní linku.
UPOZORNĚNÍ: K sít’ovému adaptéru nepřipojujte kabel modemu. Napětí přenášené při telefonní
komunikaci může sít
3
Připojte monitor.
’ový adaptér poškodit.
Kabel monitoru nasaďte přesně na konektor a jemně ho zatlačte, abyste neohnuli vývody.
Utáhněte šrouby na konektorech kabelů.
POZNÁMKA: Některé monitory mají videokonektor umístěný pod zadní částí obrazovky. Informace
o umístění konektoru naleznete v dokumentaci k monitoru.
4
Připojte reproduktory.
5 Připojte k počítači, monitoru a ostatním zařízením napájecí kabely a opačné konce kabelů
zasuňte do elektrických zásuvek.
6 Ujistěte se, že je přepínač napájecího napětí nastaven na správnou hodnotu pro dané místo.
Počítač má ruční přepínač napájecího napětí. Počítače s přepínačem napájecího napětí na
zadní straně je třeba ručně nastavit na správné napájecí napětí.
’ový kabel, nikoli kabel telefonní linky. Pokud máte volitelný
UPOZORNĚNÍ: Přepínač napájecího napětí nastavte na hodnotu, která je nejbližší napětí místního
napájecího rozvodu. Zabráníte tak poškození počítače přepínačem napájecího napětí.
POZNÁMKA: Před instalací zařízení a softwaru nedodaného s počítačem si přečtěte dokumentaci
dodanou se softwarem nebo zařízením nebo u dodavatele zkontrolujte, zda je software nebo zařízení
kompatibilní s vaším počítačem a operačním systémem.
Stručná referenční příručka 45
Page 46

Malý stolní počítač
Instalace bez adaptérů
www.dell.com | support.dell.com
Instalace s adaptéry
monitor
klávesnice
myš
D
C
B
A
reproduktory
sít’
USB
46 Stručná referenční příručka
sít’
Page 47

Počítač Mini-tower
Instalace bez adaptérů
Instalace s adaptéry
monitor
klávesnice
myš
reproduktory
sluchátka
sít’
USB
reproduktory
telefon/
modem
Stručná referenční příručka 47
Page 48

Úplná instalace
Malý stolní počítač
www.dell.com | support.dell.com
Počítač Mini-tower
Kód operačního systému
Microsoft Windows
(Product Key)
vypínač
Kód operačního systému Microsoft Windows (Product Key)
48 Stručná referenční příručka
vypínač
Page 49

Řešení problémů
Společnost Dell nabízí několik nástrojů pomáhajících v případě, že počítač nepracuje podle
očekávání. Chcete-li získat nejnovější informace o řešení problémů s počítačem, použijte webový
server Dell Support na adrese support.dell.com.
Pokud dojde k potížím s počítačem, vyžadujícím pomoc společnosti Dell, zapište si podrobný
popis chyby, zvukové či světelné signály, kód pro expresní servis a servisní kód. Poté se spojte se
společností Dell z místa, kde je nefungující počítač.
Příklad kódu pro expresní servis a servisního kódu naleznete v části „Získání informací o počítači“
na stránce 37.
Kód pro expresní servis:___________________________
Servisní kód:___________________________
Diagnostický program Dell Diagnostics
POZOR: Před zahájením kteréhokoli postupu z tohoto oddílu si přečtěte bezpečnostní pokyny
v informační příručce produktu.
Kdy použít diagnostický program Dell Diagnostics
Pokud nastane problém s počítačem, proveďte kontrolní úkony uvedené v části „Řešení problémů“
v elektronické příručce uživatele a spust
volejte technickou podporu společnosti Dell.
Tyto postupy si před zahájením práce vytiskněte.
’te diagnostický program Dell Diagnostics. Teprve poté
UPOZORNĚNÍ: Diagnostický program Dell Diagnostics pracuje pouze na počítačích Dell™.
Spust’te program pro nastavení systému, prohlédněte si informace o konfiguraci počítače
a zkontrolujte, zda je zařízení, které chcete zkoušet, v konfiguraci uvedeno a zda je aktivní.
Z pevného disku nebo z volitelného disku CD s ovladači a nástroji (Drivers and Utilities, také
ResourceCD) spust
Spuštění programu Dell Diagnostics z pevného disku
1 Zapněte (nebo restartujte) počítač.
2 Ihned po zobrazení loga DELL
POZNÁMKA: Pokud obdržíte zprávu, že nelze nalézt oddíl nástroje Diagnostics, spust’te diagnostický
program Dell Diagnostics z disku CD Drivers and Utilities (Ovladače a nástroje).
’te diagnostický program Dell Diagnostics.
™
stiskněte klávesu <F12>.
Pokud jste čekali příliš dlouho a počítač zobrazil logo operačního systému, čekejte dále, až
počítač zobrazí pracovní plochu systému Microsoft
®
Windows®. Potom počítač vypněte
a opakujte akci.
Stručná referenční příručka 49
Page 50

3 Po zobrazení seznamu zařízení pro zavádění vyberte možnost Boot to Utility Partition
(Spustit z oddílu nástrojů) a stiskněte klávesu <Enter>.
4 Po zobrazení hlavní nabídky programu Dell Diagnostics vyberte typ zkoušky, kterou
chcete provést.
Spuštění programu Dell Diagnostics z volitelného disku CD Drivers and Utilities
1 Vložte do jednotky disk CD Drivers and Utilities (Ovladače a nástroje).
2 Vypněte a znovu spust’te počítač.
Ihned po zobrazení loga DELL
Pokud jste čekali příliš dlouho a počítač zobrazil logo Windows, čekejte dále, až počítač
www.dell.com | support.dell.com
zobrazí pracovní plochu systému Windows. Potom počítač vypněte a opakujte akci.
POZNÁMKA: Následující kroky mění pořadí zařízení jednotek při zavádění pouze jednorázově. Při dalším
spuštění počítač zavádí operační systém v pořadí uvedeném v nastavení systému.
3
Po zobrazení seznamu zařízení pro zavádění vyberte možnost IDE CD-ROM Device
(Zařízení CD-ROM IDE) a stiskněte klávesu <Enter>.
4 V zaváděcí nabídce zvolte možnost IDE CD-ROM Device (Zařízení CD-ROM IDE).
5 V následující nabídce zvolte možnost Boot from CD-ROM (Spustit z disku CD-ROM).
6 Stisknutím klávesy
7 Stisknutím klávesy
8 V seznamu vyberte položku Run the Dell 32-bit Diagnostics (Spustit 32bitovou diagnostiku
Dell). Je-li uvedeno více verzí, vyberte verzi odpovídající vašemu počítači.
9 Po zobrazení hlavní nabídky programu Dell Diagnostics vyberte typ zkoušky, kterou
chcete provést.
™
stiskněte klávesu <F12>.
1
spust’te nabídku ResourceCD.
2
spust’te program Dell Diagnostics.
Hlavní nabídka programu Dell Diagnostics
1 Po zobrazení hlavní nabídky programu Dell Diagnostics klepněte na tlačítko
požadované činnosti.
Možnost Funkce
Express Test
(Expresní zkouška)
Extended Test
(Podrobná zkouška)
Custom Test
(Vlastní zkouška)
Symptom Tree
(Strom příznaků)
50 Stručná referenční příručka
Provede rychlou zkoušku zařízení. Tato zkouška obvykle trvá 10 až 20 minut
a nevyžaduje žádný zásah obsluhy. Expresní zkoušku je vhodné spustit nejdříve,
zvýší totiž možnost rychlého nalezení problému.
Provede důkladnou zkoušku zařízení. Tato zkouška obvykle trvá nejméně hodinu
a vyžaduje opakované reagování na otázky.
Zkouší konkrétní zařízení. Spouštěné zkoušky můžete přizpůsobovat
svým potřebám.
Obsahuje nejběžnější příznaky a umožňuje vybrat zkoušku odpovídající
existujícím potížím.
Page 51

2 Pokud během zkoušky dojde k chybě, zobrazí počítač na monitoru kód chyby a zprávu
popisující vzniklý problém. Kód chyby a popis problému si opište a poté postupujte podle
pokynů na obrazovce.
Pokud chybu nedokážete napravit, obrat
POZNÁMKA: V horní části všech zkušebních obrazovek je uveden servisní kód počítače. Při spojení se
společností Dell vás technik podpory o servisní kód požádá.
Pokud spouštíte zkoušku Custom Test (Vlastní zkouška) nebo Symptom Tree (Strom
3
’te se na společnost Dell.
příznaků), klepněte na příslušnou kartu podle popisu v následující tabulce.
Karta Funkce
Results (Výsledky) Zobrazuje výsledky zkoušky a případně zjištěné chyby.
Errors (Chyby) Zobrazuje zjištěné chyby, chybové kódy a popis problému.
Help (Nápověda) Popisuje zkoušky a může obsahovat požadavky pro spuštění zkoušky.
Configuration
(Konfigurace)
Parameters (Parametry) Umožňuje přizpůsobovat zkoušky změnou nastavení.
4 Pokud jste program Dell Diagnostics spustili z disku CD s ovladači a nástroji (Drivers and
Zobrazí konfiguraci hardwaru pro vybrané zařízení.
Program Dell Diagnostics zjistí informace o konfiguraci všech zařízení
z konfiguračního programu, z paměti a pomocí různých vnitřních zkoušek.
Informace zobrazí v seznamu zařízení v levé části obrazovky. V seznamu nemusí
být uvedena všech součástí nainstalovaných v počítači nebo k němu připojených.
Utilities), vyjměte po ukončení zkoušek disk CD z jednotky.
5 Uzavřením zkušební obrazovky se vrat’te do hlavní nabídky. Chcete-li ukončit diagnostický
program a znovu spustit počítač, zavřete obrazovku s hlavní nabídkou (Main Menu).
Kontrolky zařízení
Problém s počítačem může označovat kontrolka napájení.
Kontrolka napájení Popis problému Návrh řešení
Zeleně svítí Napájení je zapnuto a počítač
normálně pracuje.
Zeleně bliká Počítač je v režimu spánku
(Microsoft
a Windows XP).
Několikrát zeleně
zabliká a zhasne
Došlo k chybě konfigurace. V části „Diagnostické kontrolky“
®
Win dow s® 2000
Není třeba žádná akce.
Počítač můžete probudit stisknutím
vypínače, pohybem myší nebo
stisknutím klávesy na klávesnici.
na stránce 53 zkontrolujte, zda kontrolky
nepopisují konkrétní chybu.
Stručná referenční příručka 51
Page 52

Kontrolka napájení Popis problému Návrh řešení
Svítí žlutě Diagnostický program Dell Diagnostics
Žlutě bliká Došlo k poruše zdroje napájení nebo
www.dell.com | support.dell.com
Při zkoušce po spuštění
(POST) svítí zeleně
a vydává zvukový
signál
Při zkoušce po spuštění
svítí kontrolka napájení
zeleně a současně
počítač nevydává
zvukový signál
a monitor nesvítí
Při zkoušce po spuštění
svítí kontrolka napájení
zeleně a současně
počítač nevydává
zvukový signál, ale
zablokuje se
provádí zkoušku nebo je poškozeno
nebo nesprávně nainstalováno zařízení
na systémové desce.
systémové desky.
Došlo k potížím při spouštění
systému BIOS.
Může být poškozen nebo
nesprávně nainstalován monitor
nebo grafický adaptér.
Může být poškozeno zařízení
integrované na systémové desce.
Pokud běží zkouška programu Dell
Diagnostics, nechejte ji dokončit.
V části „Diagnostické kontrolky“
na stránce 53 zkontrolujte, zda kontrolky
nepopisují konkrétní chybu.
Pokud počítač nezavádí operační systém,
požádejte o technickou pomoc
společnost Dell.
V části „Diagnostické kontrolky“
na stránce 53 zkontrolujte, zda kontrolky
nepopisují konkrétní chybu. Přečtěte si
část „Potíže s napájením“ v elektronické
příručce uživatele.
Pokyny k diagnostice zvukových
signálů naleznete v části „Kódy zvukových
signálů (pípnutí)“ na stránce 55. V části
„Diagnostické kontrolky“ na stránce 53
také zkontrolujte, zda kontrolky nepopisují
konkrétní chybu.
V části „Diagnostické kontrolky“
na stránce 53 zkontrolujte, zda kontrolky
nepopisují konkrétní chybu.
V části „Diagnostické kontrolky“
na stránce 53 zkontrolujte, zda kontrolky
nepopisují konkrétní chybu. Pokud
problém nelze identifikovat, požádejte
o technickou pomoc společnost Dell.
52 Stručná referenční příručka
Page 53

Diagnostické kontrolky
POZOR: Před zahájením kteréhokoli postupu z tohoto oddílu si přečtěte bezpečnostní pokyny
v informační příručce produktu.
Při řešení problémů pomáhají čtyři kontrolky na zadním panelu, které jsou označeny písmeny „A“,
„B“, „C“ a „D“. Kontrolky mohou svítit žlutě nebo zeleně. Při normálním spouštění počítače se
kódy (signály) kontrolek po dokončení zavádění změní. Pokud při zavádění systému proběhne
zkouška po spuštění (POST) úspěšně, rozsvítí se všechny čtyři kontrolky zeleně. Pokud během
zkoušky po spuštění dojde k poruše počítače, může signál zobrazený kontrolkami napomoci při
zjišt
’ování, kde se během procesu zavádění počítač zastavil.
Světelný
signál
nesvítí
nesvítí
nesvítí
nesvítí
žlutá
zelená
žlutá
žlutá
zelená
zelená
žlutá
žlutá
Popis problému Návrh řešení
Počítač je normálně vypnut nebo možná
došlo k selhání před zaváděním systému
BIOS.
Možná došlo k poruše procesoru. • Přeinstalujte procesor a znovu spust
Byly zjištěny pamět
k poruše paměti.
’ové moduly, ale došlo
• Zkontrolujte, zda je počítač zapojen do funkční
elektrické zásuvky a zda jste stiskli vypínač.
• Pokud máte nainstalován jeden pamět’ový modul,
přeinstalujte ho a znovu spust
• Pokud máte nainstalovány dva pamět
vyjměte je, nainstalujte jeden modul a znovu
spust
’te počítač. Pokud se počítač spustí normálně,
nainstalujte idruhý modul.
• Je-li to možné, instalujte do počítače funkční
pamět
’ové moduly jednoho typu.
• Pokud potíže potrvají, obrat
’te počítač.
’te se na společnost Dell.
’te počítač.
’ové moduly,
Stručná referenční příručka 53
Page 54

Světelný
Popis problému Návrh řešení
signál
žlutá
Možná došlo k chybě rozšiřovací karty PCI. • Vyjměte kartu PCI (nikoli videoadaptér)
žlutá
zelená
žlutá
www.dell.com | support.dell.com
žlutá
Možná došlo k poruše jednotky IDE. • Znovu usaďte všechny napájecí a datové kabely
zelená
zelená
žlutá
a znovu spust
’te počítač. Tak zjistíte, zda nedochází
ke konfliktu.
• Pokud potíže potrvají, vrat
vyjměte jinou kartu a znovu spust
’te vyjmutou kartu,
’te počítač.
• Tento postup opakujte pro všechny karty. Pokud se
počítač spustí normálně, vyřešte případné potíže
konfliktu prostředků pro poslední vyjmutou kartu
(viz část „Řešení nekompatibilit softwaru
a hardwaru“ na stránce 57).
• Jednu kartu po druhé přesouvejte do jiné zásuvky
PCI a po každém přesunutí znovu spust
• Pokud potíže potrvají, obrat
jednotky IDE a znovu spust
’te se na společnost Dell.
’te počítač.
’te počítač.
zelená
Možná došlo k poruše rozhraní USB. • Přeinstalujte všechna zařízení USB, zkontrolujte
zelená
zelená
žlutá
žlutá
Nebyly nalezeny žádné pamět
žlutá
žlutá
zelená
54 Stručná referenční příručka
připojení kabelů a znovu spust
’ové moduly. • Přeinstalujte všechny pamět’ové moduly a znovu
’te počítač.
spust
• Chcete-li se ujistit, že není vadný pamět
konektor, vyjměte všechny pamět
’te jeden pamět’ový modul (pokud počítač
vrat
’te počítač.
’ový
’ové moduly,
podporuje práci s jedním modulem) a znovu
spust’te počítač. Pokud se počítač spustí normálně,
přemístěte pamět
a znovu spust
’ový modul do jiného konektoru
’te počítač. Pokračujte, dokud
nenaleznete vadný konektor nebo nenainstalujete
všechny moduly zpět bez chyby.
Page 55

Světelný
signál
žlutá
zelená
žlutá
zelená
žlutá
zelená
zelená
zelená
zelená
zelená
zelená
zelená
Popis problému Návrh řešení
Byly zjištěny pamět
ale došlo k chybě konfigurace nebo
kompatibility paměti.
Došlo k jiné poruše. • Zkontrolujte, zda jsou kabely všech
Počítač po úvodních zkouškách POST
normálně pracuje.
’ové moduly,
• Zkontrolujte, zda neplatí nějaký zvláštní požadavek
na umístění pamět
(další informace naleznete v části
uživatele).
• Zkontrolujte, zda jsou instalované pamět
moduly kompatibilní s počítačem.
• Pokud potíže potrvají, obrat
nainstalovaných pevných disků správně připojeny
ksystémové desce.
• Zkontrolujte chybovou zprávu, která je zobrazena
na monitoru.
• Pokud potíže potrvají, obrat
• Žádné.
’ového modulu do konektoru
Pamě
’te se na společnost Dell.
’te se na společnost Dell.
Kódy zvukových signálů (pípnutí)
Pokud nelze chyby nebo potíže během spouštění zobrazit na monitoru, může počítač vydat
zvukový signál. Řada pípnutí, zvaná zvukový signál, problém popisuje. Příkladem zvukového
signálů (kód 1-3-1) může být jedno pípnutí, skupina tří pípnutí a jedno pípnutí. Tato posloupnost
sděluje, že má počítač potíže s pamětí.
Pokud počítač během spouštění vydá zvukový signál:
1 Zapište si zvukový signál.
2 Složitější problémy můžete identifikovat podle popisu v části „Diagnostický program
Dell Diagnostics“ na stránce 49.
3 Požádejte společnost Dell o technickou pomoc.
t’ v příručce
’ové
Kód Příčina Kód Příčina
1-1-2 Porucha registru procesoru 3-1-4 Porucha pomocného registru masky
přerušení
1-1-3 Selhání čtení nebo zápisu do
paměti NVRAM
1-1-4 Chyba kontrolního součtu paměti
ROM systému BIOS
3-2-2 Selhání zavádění vektoru přerušení
3-2-4 Selhání zkoušky řadiče klávesnice
Stručná referenční příručka 55
Page 56

Kód Příčina Kód Příčina
1-2-1 Porucha programovatelného měřiče
1-2-2 Selhání inicializace kanálu DMA 3-3-2 Neplatná konfigurace paměti NVRAM
1-2-3 Porucha čtení nebo zápisu do
1-3 Selhání zkoušky obrazové paměti 3-4-1 Selhání inicializace obrazovky
1-3-1 až 2-4-4 Nesprávná identifikace nebo
3-1-1 Porucha pomocného registru DMA 3-4-3 Selhání hledání obrazové paměti ROM
www.dell.com | support.dell.com
3-1-2 Porucha hlavního registru DMA 4-2-1 Chybí impuls časovače
3-1-3 Porucha hlavního registru
4-2-3 Porucha brány A20 4-4-1 Selhání zkoušky sériového nebo
4-2-4 Neočekávané přerušení v chráněném
4-3-1 Porucha paměti nad adresou 0FFFFh 4-4-3 Selhání zkoušky matematického
4-3-3 Porucha počitadla čipu časovače 2 4-4-4 Selhání zkoušky mezipaměti
4-3-4 Zastavené hodiny
časových intervalů
stránkového registru DMA
použití paměti
masky přerušení
režimu
3-3-1 Výpadek napájení paměti NVRAM
3-3-4 Selhání zkoušky obrazové paměti
3-4-2 Selhání přepisování obrazovky
4-2-2 Selhání vypnutí
paralelního portu
4-4-2 Selhání dekomprimace kódu do stínované
paměti
koprocesoru
Spuštění diagnostiky pevných disků IDE Dell™
Dell IDE Hard-Drive Diagnostics je nástroj, který vyzkouší pevný disk a pokusí se vyřešit nebo
potvrdit selhání pevného disku.
1 Zapněte počítač (je-li počítač zapnut, restartujte ho).
2 Jakmile se v pravém horním rohu obrazovky objeví údaj F2 = Setup, stiskněte klávesy
<Ctr><Alt><D>.
3 Postupujte podle pokynů na obrazovce.
Přečtěte si část „Potíže s pevným diskem“ v části „Řešení problémů“ v příručce uživatele.
56 Stručná referenční příručka
Page 57

Řešení nekompatibilit softwaru a hardwaru
Pokud při instalaci operačního systému není nějaké zařízení zjištěno nebo pokud je zjištěno,
ale je nesprávně nakonfigurováno, můžete nekompatibilitu vyřešit nástrojem Hardware
Troubleshooter. Voperačním systému Microsoft
řešit i ve správci zařízení.
Windows XP
Řešení nekompatibilit nástrojem Hardware Troubleshooter:
1 Klepněte na tlačítko Start a klepněte na položku Help and Support (Nápověda
a odborná pomoc).
2 Do pole Search (Hledat) napište
hardware troubleshooter
s hardwarem) a klepnutím na šipku zahajte hledání.
3 Vseznamu Search Results (Výsledky hledání) klepněte na položku Hardware
Troubleshooter (Poradce při potížích s hardwarem).
4 Vseznamu Hardware Troubleshooter (Poradce při potížích s hardwarem) klepněte na
položku I need to resolve a hardware conflict on my computer (Potřebuji vyřešit konflikt
hardwaru v počítači) a klepněte na tlačítko Next (Další).
Windows 2000
Řešení nekompatibilit nástrojem Správce zařízení:
1 Klepněte na tlačítko Start, ukažte na položku Settings (Nastavení) a poté klepněte na
položku Control Panel (Ovládací panely).
2 Vokně Control Panel (Ovládací panely) poklepejte na ikonu System (Systém).
3 Klepněte na kartu Hardware.
4 Klepněte na tlačítko Device Manager (Správce zařízení).
5 Klepněte na nabídku View (Zobrazit) a klepněte na položku Resources by connection
(Prostředky podle připojení).
6 Poklepejte na položku Interrupt request (IRQ) (Požadavek přerušení (IRQ)).
Nesprávně konfigurovaná zařízení jsou označena žlutým vykřičníkem (
zařízení vypnuto, červeným znakem
®
Windows® 2000 můžete nekompatibility
(poradce při potížích
!
) nebo, pokud bylo
X
.
7 Poklepáním na zařízení označené vykřičníkem otevřete okno Properties (Vlastnosti).
Ve stavové oblasti Device (Zařízení) v dialogovém okně Properties (Vlastnosti) jsou uvedeny
adaptéry nebo zařízení, která je třeba překonfigurovat.
8 Zařízení překonfigurujte nebo je odeberte ze správce zařízení. Informace o konfiguraci
naleznete v dokumentaci dodané se zařízením.
Stručná referenční příručka 57
Page 58

Řešení nekompatibilit nástrojem Hardware Troubleshooter:
1 Klepněte na tlačítko Start a klepněte na položku Help (Nápověda).
2 Na kartě Contents (Obsah) klepněte na možnost Troubleshooting and Maintenance
(Poradci při potížích a údržba), klepněte na položku Windows 2000 troubleshooters
(Poradci při potížích se systémem Windows 2000) a klepněte na položku Hardware.
Vseznamu Hardware Troubleshooter (Poradce při potížích s hardwarem) klepněte na položku
I need to resolve a hardware conflict on my computer (Potřebuji vyřešit konflikt hardwaru
v počítači) a klepněte na tlačítko Next (Další).
Použití funkce obnovení systému v operačním systému Microsoft® Windows® XP
www.dell.com | support.dell.com
Operační systém Microsoft® Windows® XP obsahuje funkci obnovení systému umožňující vrátit
počítač do dřívějšího funkčního stavu (bez ovlivnění dat), pokud změna hardwaru nebo softwaru či
změna nastavení systému převedla počítač do nežádoucího provozního stavu. Informace o práci
s funkcí obnovení systému naleznete v centru pro nápovědu a odbornou pomoc.
UPOZORNĚNÍ: Datové soubory pravidelně zálohujte. Funkce obnovení systému datové soubory
nesleduje ani je neobnovuje.
Vytvoření bodu obnovení
1 Klepněte na tlačítko Start a klepněte na položku Help and Support (Nápověda
a odborná pomoc).
2 Klepněte na možnost System Restore (Obnovení systému).
3 Postupujte podle pokynů na obrazovce.
Vrácení počítače do předchozího stavu
UPOZORNĚNÍ: Před obnovováním počítače uložte a zavřete všechny otevřené soubory a ukončete
všechny aplikace. Až do dokončení obnovení systému neměňte, neotevírejte ani neodstraňujte žádné
soubory ani programy.
Klepněte na tlačítko Start, ukažte na položku All Programs (Všechny programy) →
1
Accessories (Příslušenství) → System Tools (Systémové nástroje) a klepněte na položku
System Restore (Obnovení systému).
2 Zkontrolujte, zda je zaškrtnuto políčko Restore my computer to an earlier time (Obnovit
předchozí stav počítače) a klepněte na tlačítko Next (Další).
3 Klepněte na datum, ke kterému chcete počítač obnovit.
V dialogovém okně Select a Restore Point (Vyberte bod obnovení) je zobrazen kalendář,
ve kterém můžete prohlížet a vybírat body obnovení. Všechna data, pro která je k dispozici
bod obnovení, jsou zobrazena tučně.
58 Stručná referenční příručka
Page 59

4 Vyberte bod obnovení a klepněte na tlačítko Next (Další).
Pokud je pro dané datum k dispozici pouze jeden bod obnovení, program ho
automaticky vybere. Pokud je k dispozici více bodů obnovení, klepněte na bod obnovení,
který chcete použít.
5 Klepněte na tlačítko Next (Další).
Až funkce obnovení systému dokončí shromažďování dat, zobrazí systém dialogové
okno Restoration Complete (Dokončení obnovení) a počítač automaticky restartuje.
6 Po restartování počítače klepněte na tlačítko OK.
Chcete-li použít jiný bod obnovení, můžete použít stejný postup pro jiný bod nebo obnovení vrátit.
Vrácení posledního obnovení systému
UPOZORNĚNÍ: Před vracením posledního obnovení systému uložte a zavřete všechny otevřené soubory
a ukončete všechny aplikace. Až do dokončení obnovení systému neměňte, neotevírejte ani
neodstraňujte žádné soubory ani programy.
Klepněte na tlačítko Start, ukažte na položku All Programs (Všechny programy) →
1
Accessories (Příslušenství) → System Tools (Systémové nástroje) a klepněte na položku
System Restore (Obnovení systému).
2 Klepněte na možnost Undo my last restoration (Vzít poslední obnovení zpět) a klepněte
na tlačítko Next (Další).
3 Klepněte na tlačítko Next (Další).
Systém zobrazí obrazovku System Restore (Obnovení systému) a restartuje počítač.
4 Po restartování počítače klepněte na tlačítko OK.
Zapnutí funkce obnovení systému
Pokud přeinstalujete operační systém Windows XP a máte k dispozici méně než 200 MB místa
na pevném disku, bude funkce obnovení systému automaticky vypnuta. Kontrola zapnutí funkce
obnovení systému:
1 Klepněte na tlačítko Start a klepněte na položku Control Panel (Ovládací panely).
2 Klepněte na položku Performance and Maintenance (Výkon a údržba).
3 Klepněte na tlačítko System (Systém).
4 Klepněte na kartu System Restore (Obnovení systému).
5 Zkontrolujte, zda není zašrkrtnuto políčko Turn off System Restore (Vypnout nástroj
Obnovení systému).
Stručná referenční příručka 59
Page 60

Přeinstalování Microsoft® Windows® XP
Než začnete
Pokud uvažujete o přeinstalování Windows XP kvůli potížím s novým ovladačem, zkuste nejprve
použít funkci vracení předchozích ovladačů Windows XP (Device Driver Rollback). Pokud funkce
vracení předchozích ovladačů potíže nevyřeší, vrat
nového ovladače zařízení nástrojem System Restore (Obnovení systému).
UPOZORNĚNÍ: Před instalací zálohujte všechny datové soubory z primárního pevného disku. Při běžné
konfiguraci je primárním pevným diskem jednotka, kterou počítač nalezne jako první.
K přeinstalování Windows XP potřebujete tyto položky:
www.dell.com | support.dell.com
• Disk CD s operačním systémem Dell
• Disk CD s ovladači a nástroji (Dell Drivers and Utilities)
POZNÁMKA: Na disku CD Drivers and Utilities jsou ovladače, které byly nainstalovány při výrobě
počítače. Použijte disk CD Drivers and Utilities nebo navštivte server Dell Support, kde jsou k dispozici
všechny potřebné ovladače.
POZNÁMKA: Disky CD Operating System a Drivers and Utilities jsou volitelné a nemusí být dodávány se
všemi počítači.
Přeinstalování Windows XP
UPOZORNĚNÍ: Při přeinstalovávání Windows XP musíte použít aktualizaci Service Pack 1 nebo novější.
Chcete-li přeinstalovat operační systém Windows XP, použijte v uvedeném pořadí
následující postupy.
Přeinstalování může trvat 1 až 2 hodiny. Po přeinstalování operačního systému musíte přeinstalovat
i ovladače zařízení, antivirový program a ostatní software.
’te operační systém do stavu před instalací
™
Operating System
UPOZORNĚNÍ: K přeinstalování operačního systému Windows XP slouží disk CD s operačním
systémem. Jeho možnosti mohou přepsat soubory a ovlivnit programy nainstalované na pevném disku.
Proto není přeinstalování operačního systému Windows XP doporučeno, pokud vás k němu nevyzve
pracovník střediska technické podpory společnosti Dell.
UPOZORNĚNÍ: Konfliktům s operačním systémem Windows XP zabráníte, když před přeinstalováním
vypnete antivirové programy nainstalované v počítači. Pokyny naleznete v dokumentaci dodané se
softwarem.
Spuštění počítače z disku CD s operačním systémem
1 Uložte a zavřete všechny otevřené soubory a ukončete všechny programy.
2 Vložte disk CD s operačním systémem. Pokud systém zobrazí zprávu
(Instalovat systém Windows XP), klepněte na možnost Exit (Konec).
3 Znovu spust’te počítač.
60 Stručná referenční příručka
Install Windows XP
Page 61

4 Ihned po zobrazení loga DELL
™
stiskněte klávesu <F12>.
Pokud počítač zobrazil logo operačního systému, čekejte dále, až počítač zobrazí pracovní
plochu systému Windows. Poté počítač vypněte a opakujte spuštění.
5 Šipkami vyberte možnost CD-ROM a stiskněte klávesu <Enter>.
6 Až počítač zobrazí zprávu
klávesy spust
’te systém z disku CD), stiskněte libovolnou klávesu.
Press any key to boot from CD
(Stisknutím libovolné
Instalace Windows XP
1 Po zobrazení dialogového okna Windows XP Setup (Instalace Windows XP) vyberte
klávesou <Enter> možnost To set up Windows now (Nainstalovat Windows nyní).
2 Přečtěte si informace uvedené v dialogovém okně Microsoft Windows Licensing
Agreement (Licenční smlouva Microsoft Windows) a stisknutím klávesy <F8> potvrďte
souhlas s licenční smlouvou.
3 Pokud je operační systém Windows XP v počítači již nainstalován a chcete zachovat aktuální
data systému Windows XP, vyberte stisknutím klávesy
r
možnost repair (opravit) a vyjměte
disk CD z jednotky.
4 Chcete-li nainstalovat novou kopii systému Windows XP, vyberte příslušnou možnost
stisknutím klávesy <Esc>.
5 Stisknutím klávesy <Enter> vyberte zvýrazněný oddíl (doporučeno) a postupujte podle
pokynů na obrazovce.
Počítač zobrazí dialogové okno Windows XP Setup (Instalace Windows XP) a operační
systém začne kopírovat soubory a instalovat zařízení. Počítač se několikrát automaticky
restartuje.
POZNÁMKA: Doba instalace závisí na velikosti pevného disku a rychlosti počítače.
UPOZORNĚNÍ: Po zobrazení následující zprávy netiskněte žádnou klávesu:
boot from the CD
Po zobrazení dialogového okna Regional and Language Options (Místní a jazyková
6
(Stisknutím libovolné klávesy spust’te systém z disku CD).
Press any key to
nastavení) vyberte požadované nastavení a klepněte na tlačítko Next (Další).
7 Na obrazovce Personalize Your Software (Zadání osobních údajů) zadejte své jméno
a organizaci (nepovinný údaj) a klepněte na tlačítko Next (Další).
8 Vokně Computer Name and Administrator Password (Název počítače a heslo správce)
zadejte název počítače (nebo vyberte jeden z nabídnutých) a heslo a klepněte na tlačítko
Next (Další).
9 Pokud systém zobrazí dialogové okno Modem Dialing Information (Informace o vytáčení),
zadejte požadované informace a klepněte na tlačítko Next (Další).
Stručná referenční příručka 61
Page 62

10 Vokně Date and Time Settings (Datum a čas) zadejte datum, čas a časové pásmo a klepněte
na tlačítko Next (Další).
11 Pokud systém zobrazí dialogové okno Networking Settings (Nastavení sítě), klepněte
na možnost Ty p i c a l (Typická) a klepněte na tlačítko Next (Další).
12 Pokud vás instalační program při přeinstalovávání Windows XP vyzve k zadání dalších
informací o konfiguraci sítě, zadejte požadované hodnoty. Pokud si nastavením nejste jisti,
použijte výchozí nastavení.
Systém Windows XP začne instalovat součásti operačního systému a konfigurovat počítač.
Počítač se automaticky restartuje.
UPOZORNĚNÍ: Po zobrazení následující zprávy netiskněte žádnou klávesu:
www.dell.com | support.dell.com
to boot from the CD
Na úvodní obrazovce Welcome to Microsoft (Vítá vás operační systém Microsoft) klepněte
13
na tlačítko Next (Další).
14 Po zobrazení dotazu
(Jak je tento počítač připojen k síti Internet?) klepněte na tlačítko Skip (Přeskočit).
15 Po zobrazení dialogového okna Ready to register with Microsoft? (Registrace
u společnosti Microsoft) vyberte možnost No, not at this time (Nyní ne) a klepněte na
tlačítko Next (Další).
16 Na obrazovce Which computer is this? (O který počítač jde?) můžete zadat až 5 uživatelů.
17 Klepněte na tlačítko Next (Další).
18 Klepnutím na tlačítko Finish (Dokončit) ukončete instalaci a vyjměte disk CD.
19 Z disku CD Drivers and Utilities přeinstalujte potřebné ovladače.
20 Přeinstalujte antivirový software.
21 Přeinstalujte ostatní programy.
POZNÁMKA: K přeinstalování a aktivaci programů sady Microsoft Office nebo Microsoft Works Suite
potřebujete kód Product Key umístěný na zadní straně obalu CD s programy Microsoft Office nebo
Microsoft Works Suite.
Press any key
(Stisknutím libovolné klávesy spust'te systém z disku CD).
How will this computer connect to the Internet?
62 Stručná referenční příručka
Page 63

Práce s diskem CD Drivers and Utilities
Práce s diskem s ovladači a nástroji (Drivers and Ut i l it ie s, také ResourceCD) v operačním
systému Windows:
POZNÁMKA: Chcete-li hledat ovladače zařízení nebo číst dokumentaci, musíte disk CD Drivers and
Utilities použít při spuštěném operačním systému Windows.
1
Zapněte počítač a nechejte spustit pracovní plochu Windows.
2 Do jednotky CD vložte kompaktní disk Drivers and Utilities.
Pokud disk CD Drivers and Utilities používáte v tomto počítači poprvé, otevře systém
instalační okno ResourceCD Installation (Instalace ResourceCD) s informací, že bude
zahájena instalace disku CD Drivers and Utilities.
3 Pokračujte klepnutím na tlačítko OK.
Pokračujte podle pokynů instalačního programu a instalace bude dokončena.
4 Na obrazovce Welcome Dell System Owner (Vítejte u svého počítače Dell) klepněte na
tlačítko Next (Další).
5 V nabídkách System Model (Model), Operating System (Operační systém), Device Type
(Typ zařízení) a To pi c (Téma) vyberte odpovídající hodnoty.
Ovladače pro počítač
Zobrazení seznamu ovladačů zařízení pro váš počítač:
1 Vnabídce To pi c (Téma) klepněte na položku My Drivers (Ovladače pro tento počítač).
Disk CD Dri v e r s a nd Utilitie s prohlédne hardware a operační systém počítače a poté zobrazí
seznam ovladačů zařízení pro danou konfiguraci.
2 Klepněte na požadovaný ovladač a podle zobrazených pokynů ho přeneste do počítače.
Chcete-li zobrazit všechny ovladače pro váš počítač, klepněte v rozevírací nabídce Top ic (Téma)
na položku Drivers (Ovladače).
Stručná referenční příručka 63
Page 64

www.dell.com | support.dell.com
64 Stručná referenční příručka
Page 65

Rejstřík
C
CD
operační systém, 39
CD s ovladači a nástroji, 37
centrum pro nápovědu
a odbornou pomoc, 39
chybové zprávy
diagnostické kontrolky, 51, 53
zvukové signály, 55
D
Dell
server podpory, 38
webový server premier
support, 39
Dell Diagnostics, 49
Dell Premier Support, webový
server, 39
diagnostické kontrolky, 51, 53
diagnostika
CD s ovladači a nástroji, 37
Dell, 49
kontrolky, 51, 53
zvukové signály, 55
disk CD s operačním
systémem, 39
dokumentace
elektronická, 38-39
ResourceCD, 37
Stručná referenční příručka, 37
uživatelská příručka, 38
zařízení, 37
H
hardware
Dell Diagnostics, 49
konflikty, 57
zvukové signály, 55
Hardware Troubleshooter, 57
I
IRQ, konflikty, 57
K
konflikty
nekompatibility softwaru
a hardwaru, 57
kontrolka napájení, 51
kontrolky
diagnostické, 51, 53
přední část počítače, 51
systémové, 51
vypínač, 51
zadní část počítače, 53
O
obnovení systému, 58
operační systém
CD, 39
instalační příručka, 39
přeinstalování Windows XP, 60
ovladače
ResourceCD, 37
P
počítač
obnovení předchozího stavu, 58
zvukové signály, 55
problémy
Dell Diagnostics, 49
diagnostické kontrolky, 51, 53
konflikty, 57
obnovení předchozího stavu, 58
zvukové signály, 55
přeinstalování
CD s ovladači a nástroji, 37
ResourceCD, 37
Windows XP, 60
R
ResourceCD
Dell Diagnostics, 49
Rejstřík 65
Page 66

Ř
řešení problémů
centrum pro nápovědu
a odbornou pomoc, 39
Dell Diagnostics, 49
diagnostické kontrolky, 51, 53
Hardware Troubleshooter, 57
konflikty, 57
obnovení předchozího stavu, 58
S
stojan
odstranění, 42
připojení, 42
systémové kontrolky, 51
Š
štítek Microsoft Windows, 38
štítky
Microsoft Windows, 38
servisní kód, 38
W
Windows 2000
Hardware Troubleshooter, 57
Správce zařízení, 57
Windows XP
centrum pro nápovědu
a odbornou pomoc, 39
Hardware Troubleshooter, 57
obnovení systému, 58
přeinstalování, 60
servisní kód, 38
software
konflikty, 57
Správce zařízení, 57
U
uživatelská příručka, 38
Z
zvukové signály, 55
66 Rejstřík
Page 67

Dell™ OptiPlex™ 170L
Beknopte handleiding
Modellen MTC2 en DHS
www.dell.com | support.dell.com
Page 68

Opmerkingen, kennisgevingen en waarschuwingen
OPMERKING: een OPMERKING duidt belangrijke informatie aan voor een beter gebruik van de computer.
KENNISGEVING: een KENNISGEVING duidt mogelijke beschadiging van de hardware of gegevensverlies aan en geeft
aan hoe u dergelijke problemen kunt voorkomen.
WAARSCHUWING: een WAARSCHUWING duidt het risico van schade aan eigendommen, lichamelijk letsel
of overlijden aan.
Als u een Dell™-computer uit de n-serie hebt aangeschaft, zijn de verwijzingen naar de
Microsoft
De cd
®
Windows®-besturingssystemen in dit document niet van toepassing.
Drivers and Utilities
(Bron-cd), informatie over het besturingssysteem en
Beknopte handleidingen
zijn optioneel en worden niet bij alle computers geleverd.
____________________
De informatie in dit document kan zonder voorafgaande kennisgeving worden gewijzigd.
© 2004 Dell Inc. Alle rechtenvoorbehouden.
Verveelvoudiging van dit materiaal, op welke wijze dan ook, is alleen toegestaan na uitdrukkelijke, schriftelijke toestemming van Dell Inc.
Handelsmerken in dit document: Dell, het DELL-logo en OptiPlex zijn handelsmerk en van Dell Inc.; Microsoft en Windows zijn gedeponeerde
handelsmerken van Microsoft Corporation.
Andere handelsmerken en handelsnamen die mogelijk in dit document worden gebruikt, dienen ter aanduiding van de rechthebbenden met
betrekking tot de merken en namen of ter aanduiding van hun producten. Dell Inc. claimt op geen enkele wijze enig eigendomsrecht ten aanzien
van andere handelsmerken of handelsnamen dan haar eigen handelsmerken en handelsnamen.
Modellen MTC2 en DHS
September 2004 Artikelnr. C7558 Rev. A00
Page 69

Inhoud
Informatie over uw computer vinden . . . . . . . . . . . . . . . . . . . . 71
Over uw klein bureaumodel computer
Voor- en achteraanzicht
In de computer
. . . . . . . . . . . . . . . . . . . . . . . . . . . . 75
. . . . . . . . . . . . . . . . . . . . . . . . 74
. . . . . . . . . . . . . . . . . . . 74
De computerstandaard bevestigen en verwijderen
Over uw minitower computer
Voor- en achteraanzicht
In de computer
. . . . . . . . . . . . . . . . . . . . . . . . . . . . 78
De computer instellen
Klein bureaumodel computer
Minitower computer
Complete installatie
. . . . . . . . . . . . . . . . . . . . . . . . . . . . 82
Klein bureaumodel computer
Minitower computer
Problemen oplossen
Dell Diagnostics
Systeemlampjes
Controlelampjes
Geluidscodes
. . . . . . . . . . . . . . . . . . . . . . . . . . . . 83
. . . . . . . . . . . . . . . . . . . . . . . . . . . . 83
. . . . . . . . . . . . . . . . . . . . . . . . . . . . 86
. . . . . . . . . . . . . . . . . . . . . . . . . . . . 87
. . . . . . . . . . . . . . . . . . . . . . . . . . . . . 89
. . . . . . . . . . . . . . . . . . . . . . . 77
. . . . . . . . . . . . . . . . . . . . . . . . 77
. . . . . . . . . . . . . . . . . . . . . . . . . . . 79
. . . . . . . . . . . . . . . . . . . . . 80
. . . . . . . . . . . . . . . . . . . . . . . . . . 81
. . . . . . . . . . . . . . . . . . . . . 82
. . . . . . . . . . . . . . . . . . . . . . . . . . 82
Het diagnoseprogramma Dell™ IDE Hard Drive Diagnostics
uitvoeren
Software- en hardwareconflicten oplossen
Microsoft
Microsoft
. . . . . . . . . . . . . . . . . . . . . . . . . . . . . . . 90
®
Windows® XP Systeemherstel uitvoeren . . . . . . . . . . 92
®
Windows® XP opnieuw installeren . . . . . . . . . . . . . 93
. . . . . . . . . . . . . . . 91
. . . . . . . . . . . 76
De cd Drivers and Utilities (Stuur- en hulpprogramma’s) gebruiken
Trefwoordenregister
. . . . . . . . . . . . . . . . . . . . . . . . . . . . 99
. . . . . 96
Inhoud 69
Page 70

70 Inhoud
Page 71

Informatie over uw computer vinden
Waar bent u naar op zoek? Hier kunt u het vinden
• Een diagnoseprogramma voor de computer
• Stuurprogramma’s voor de computer
• Documentatie voor de computer
• Documentatie voor een apparaat
• DSS (Desktop System Software)
• Updates en patches voor het besturingssysteem
• Informatie omtrent garantie
• Veiligheidsinstructies
• Informatie omtrent wet- en regelgeving
• Informatie omtrent ergonomie
• Licentieovereenkomst voor eindgebruikers
De cd Drivers and Utilities (Stuur- en hulpprogramma’s, ook
wel deResourceCD of bron-cd genoemd)
Documentatie en stuurprogramma’s zijn al geïnstalleerd
op de computer. U kunt deze cd gebruiken voor het
opnieuw installeren van stuurprogramma’s, het uitvoeren
van het Dell-diagnoseprogramma of het lezen van
documentatie.
OPMERKING: De meest recente stuurprogramma’s en
documentatie-updates vindt u op support.dell.com.
OPMERKING: De cd Drivers and Utilities is optioneel
en wordt niet bij alle computers geleverd.
DSS (Desktop System Software)
Dit bevindt zich op de cd Drivers and Utilities en op de
Dell Support-site support.dell.com.
Productinformatiehandleiding
De cd kan readmebestanden (leesmijbestanden) bevatten
met de meest
recente updates over
technische wijzigingen
aan de computer, of
geavanceerd technisch
referentiemateriaal
voor ervaren gebruikers
of technici.
Beknopte handleiding 71
Page 72

Waar bent u naar op zoek? Hier kunt u het vinden
• Onderdelen verwijderen en vervangen
• Technische specificaties
• Systeeminstellingen configureren
• Problemen vaststellen en oplossen
Dell™ OptiPlex™ Gebruikershandleiding
Help en ondersteuning van Microsoft
1
Klik op de knop
ondersteuning
2
Klik op
User’s and system guides
systeemhandleidingen) en op
(Gebruikershandleidingen).
De Gebruikershandleiding is ook terug te vinden op de cd
Drivers and Utilities.
• Servicelabel en Express Service Code
www.dell.com | support.dell.com
• Microsoft Windows-licentielabel
Servicelabel en Microsoft Windows-licentie
Deze labels bevinden zich op de computer.
• Gebruik de gegevens
op het servicelabel
wanneer u naar
support.dell.com
of contact opneemt
met de technische
ondersteuning.
• Voer de Express Service Code in om uw telefoontje naar
de technische ondersteuning aan de juiste persoon te
richten. De Express Service Code is niet voor alle landen
beschikbaar.
• De meest recente stuurprogramma’s voor de computer
• Antwoorden op vragen op het gebied van technische
diensten en ondersteuning
• On line discussies met andere gebruikers en technische
ondersteuning
• Documentatie voor de computer
Dell Support-site — support.dell.com
OPMERKING: Selecteer uw land om de voor u van
toepassing zijnde support-website te bekijken.
De Dell Support-website biedt verschillende on line
hulpprogramma’s, waaronder:
• Solutions (Oplossingen) — hints en tips voor het
oplossen van problemen, artikelen van technici en
on line cursussen
• Community — on line discussies met andere gebruikers
van Dell-producten
• Upgrades — upgrade-informatie voor onderdelen zoals
het geheugen, de vaste schijf en het besturingssysteem.
• Customer Care (Klantenzorg) — contactinformatie,
een statusoverzicht van bestellingen, informatie over
garantie en reparaties
• Downloads — stuurprogramma’s, patches en
software-updates
• Reference (Naslag) — computerdocumentatie,
productspecificaties en andere documenten
Start
en vervolgens op
.
gaat
®
Windows® XP
Help en
(Gebruikers- en
User’s guides
72 Beknopte handleiding
Page 73

Waar bent u naar op zoek? Hier kunt u het vinden
• Status van serviceverzoeken en
ondersteuningsgeschiedenis
• De belangrijkste technische informatie over
de computer
Dell Premier Support-website — premiersupport.dell.com
De Dell Premier Support-website is aangepast voor
bedrijven, de overheid en onderwijsinstellingen. Mogelijk
is deze website niet overal beschikbaar.
• Veelgestelde vragen
• Downloadbare bestanden
• Meer informatie over de configuratie van de computer
• Onderhoudscontract voor de computer
• Met Windows XP werken
• Documentatie voor de computer
• Documentatie voor apparaten (zoals een modem)
Help en ondersteuning van Windows
1
Klik op de knop
ondersteuning
2
Geef met een of meer woorden een beschrijving van het
Start
.
probleem en klik vervolgens op het pijlpictogram.
3
Klik op het onderwerp dat uw probleem beschrijft.
4
Volg de instructies op het scherm.
• Het besturingssysteem opnieuw installeren
Cd besturingssysteem
Het besturingssysteem is al op de computer geïnstalleerd.
Gebruik de cd Besturingssysteem om het besturingssysteem
opnieuw te installeren. Zie voor instructies de OptiPlexgebruikershandleiding.
De productcode voor uw besturingssysteem bevindt zich
op de computer.
OPMERKING: De kleur van de cd varieert afhankelijk van
het besturingssysteem dat u hebt besteld.
OPMERKING: De media voor het besturingssysteem zijn
optioneel en worden niet bij alle computers geleverd.
• Kennisgeving betreffende model en chassistype
van de computer
DHS—Klein bureaumodel chassis
—
MTC2
Minitower chassis
en vervolgens op
Nadat u het
besturingssysteem
opnieuw hebt
geïnstalleerd, gebruikt
u de cd Drivers and
Utilities om de
stuurprogramma’s voor
de bij de computer
geleverde apparaten
opnieuw te installeren.
Help en
Beknopte handleiding 73
Page 74

Over uw klein bureaumodel computer
Voor- en achteraanzicht
deurtje in het voorpaneel
servicelabel
hoofdtelefoonaansluiting
www.dell.com | support.dell.com
deurtje in het
voorpaneel
aan/uit-lampje
parallelle
connector
aan/uit-knop
indicator van integriteit
van verbinding
muis-connector
USB 2.0-connectoren (2)
Cd/dvd-station
Eject-knop
lampje van vaste schijf
connector voor netwerkadapter
activiteitsindicator netwerk
Cd/dvd-station
Eject-knop
Eject-knop diskettestation
lampje diskettestation
lijningang
Productcode voor
Microsoft Windows
optionele
kaartsleuven (2)
seriële
connector
videoconnector
controlelampjes
74 Beknopte handleiding
A B C D
staande PCI-kaartsleuf
lijnuitgang
microfooningang
USB 2.0-connectoren (4)
netkabelaansluiting
Page 75

In de computer
WAARSCHUWING: Voordat u begint met de procedures in dit gedeelte, moet u de
veiligheidsinstructies in de Productinformatiegids raadplegen.
WAARSCHUWING: Om elektrische schokken te voorkomen, moet u voordat u de computerbehuizing
opent altijd eerst de stekker uit het stopcontact halen.
KENNISGEVING: Let op dat u bij openen van de computerbehuizing niet per ongeluk kabels van het
moederbord loskoppelt.
Cd/dvd-station
diskettestation
vaste schijf
moederbord
koelplaat met
ventilator
optionele interne
luidspreker
beugel voor
hangslot
staande PCI-kaartsleuf
voeding
optionele kaartkooi
OPMERKING: mogelijk heeft uw computer een
metalen beugel in plaats van een kaartkooi.
Beknopte handleiding 75
Page 76

De computerstandaard bevestigen en verwijderen
WAARSCHUWING: Voordat u begint met de procedures
in dit gedeelte, moet u de veiligheidsinstructies in de
Productinformatiegids raadplegen.
OPMERKING: Plaats de computer op een gladde
ondergrond, om krassen op de behuizing te voorkomen.
U kunt de computer verticaal of horizontaal plaatsen.
Als u de computer verticaal plaatst, moet u de
computerstandaard bevestigen:
1
Zet de computer op zijn rechterkant, zodat de
www.dell.com | support.dell.com
stationcompartimenten zich onderop bevinden
en monteer de standaard aan wat de linkerkant
van de computer was:
a
Houd de standaard zoals in de figuur wordt
weergegeven en plaats het grote ronde gat in
de standaard over de bevestigingsknop aan
de zijkant van de behuizing.
b
Plaats de schroef van de standaard in het
schroefgat van de behuizing en draai de
vingerschroef aan.
2
Draai de computer zodanig dat de standaard zich
onderaan en de stations zich bovenaan bevinden.
76 Beknopte handleiding
Page 77

Over uw minitower computer
Voor- en achteraanzicht
servicelabel
Lampje van cd- of dvd-station
Eject-knop cd- of dvd-station
tweede stationcompartiment
lampje van diskettestation
aan/uit-lampje
aan/uit-knop
USB 2.0-connectoren (2)
netkabelaansluiting
stroomselectieschakelaar
seriële connector
videoconnector
toetsenbordconnector
lijnuitgang
microfooningang
Eject-knop diskettestation
lampje van vaste schijf
hoofdtelefoonaansluiting
parallelle connector
controlelampjes (4)
muisconnector
lijningang
vergrendeling behuizing
USB 2.0-connectoren (4)
PCI-kaartsleuven (3)
connector voor
netwerkapdapter
sleuf voor beveiligingskabel
Beknopte handleiding 77
Page 78

In de computer
WAARSCHUWING: Voordat u begint met de procedures in dit gedeelte, moet u de
veiligheidsinstructies in de Productinformatiegids raadplegen.
WAARSCHUWING: Om elektrische schokken te voorkomen, moet u voordat u de computerbehuizing
opent altijd eerst de stekker uit het stopcontact halen.
KENNISGEVING: Let op dat u bij openen van de computerbehuizing niet per ongeluk kabels van het
moederbord loskoppelt.
www.dell.com | support.dell.com
compartiment voor
cd- of dvd-station
compartiment voor tweede
cd- of dvd-station
compartiment voor
diskettestation
compartiment voor
tweede vaste schijf
compartiment voor
primaire vaste schijf
voeding
moederbord
78 Beknopte handleiding
Page 79

De computer instellen
WAARSCHUWING: Voordat u begint met de procedures in dit gedeelte, moet u de
veiligheidsinstructies in de Productinformatiegids raadplegen.
KENNISGEVING: Als er in de computer een uitbreidingskaart is geïnstalleerd (bijvoorbeeld een
modemkaart), sluit u de bijbehorende kabel aan op de kaart en niet op de connector op het achterpaneel.
De computer is pas juist ingesteld nadat alle stappen uit de procedure zijn uitgevoerd. Zie de
illustraties die bij de instructies horen.
1
Sluit het toetsenbord en de muis aan.
KENNISGEVING: Probeer niet een PS/2-muis en een USB-muis tegelijkertijd te gebruiken.
OPMERKING: Als u een USB-muis of -toetsenbord hebt, gebruikt u de USB-connectoren aan de
achterkant van de computer.
2
Sluit de modem of de netwerkkabel aan.
Sluit de netwerkstekker (dus niet de telefoonstekker) aan op de netwerkconnector. Als de
computer beschikt over een modem, sluit u de telefoonlijn aan op de modem.
KENNISGEVING: Sluit geen modemkabel aan op de netwerkadapter. Het voltage van apparaten voor
telefooncommunicatie kan de netwerkadapter beschadigen.
3
Sluit de monitor aan.
Houd de stekker van de monitorkabel in de juiste positie voor de connector op de computer
en duw de stekker voorzichtig in de connector. Op die manier voorkomt u dat pennen in de
connector worden verbogen. Draai de vingerschroeven op de kabelconnectoren aan.
OPMERKING: Bij sommige monitoren is de videoconnector onder de achterzijde van het scherm
gemonteerd. Raadpleeg de documentatie van de monitor voor de locatie van de connector.
Sluit de luidsprekers aan.
4
5
Sluit de stroomkabels op de computer, monitor en andere apparaten aan en steek het andere
uiteinde van de stroomkabels in een stopcontact
6
Controleer of de stroomselectieschakelaar juist is ingesteld voor uw locatie. Uw computer
heeft een handmatige stroomselectieschakelaar. Computers met een stroomselectieschakelaar
op het achterpaneel moeten handmatig worden ingesteld op het juiste voltage.
KENNISGEVING: Om te voorkomen dat de computer wordt beschadigd door het gebruik van een
handmatige stroomselectieschakelaar, moet u de schakelaar instellen op een niveau dat de lokale
netstroom het dichtst mogelijk benadert.
OPMERKING: Voordat u apparaten of software installeert die niet zijn meegeleverd met de computer,
moet u de documentatie van het apparaat of de software lezen. U kunt ook contact opnemen met de
leverancier om te controleren of de software of het apparaat compatibel is met uw computer en
besturingssysteem.
Beknopte handleiding 79
Page 80

Klein bureaumodel computer
Installatie zonder kaarten
www.dell.com | support.dell.com
Installatie met kaarten
monitor
toetsenbord
muis
D
C
B
A
luidsprekers
netwerk
USB
80 Beknopte handleiding
netwerk
Page 81

Minitower computer
Installatie zonder kaarten
Installatie met kaarten
monitor
toetsenbord
muis
luidsprekers
hoofdtelefoon
netwerk
USB
luidspreke
telefoon/
modem
Beknopte handleiding 81
Page 82

Complete installatie
Klein bureaumodel computer
www.dell.com | support.dell.com
Minitower computer
Productcode voor Microsoft Windows
stroom
Productcode voor Microsoft Windows
82 Beknopte handleiding
stroom
Page 83

Problemen oplossen
Dell biedt een aantal hulpmiddelen die u kunt gebruiken wanneer uw computer niet naar wens
functioneert. De meest recente informatie over probleemoplossing voor de computer vindt u op
de Dell Support-website
Als er computerproblemen optreden waarbij u de hulp van Dell nodig hebt, schrijft u de fout tot
in detail op, noteert u geluidscodes of diagnostische lichtpatronen en uw Express Service Code en
servicelabel en neemt u contact op met Dell terwijl u bij de computer zit.
Zie voor een voorbeeld van de Express Service Code en het servicelabel “Informatie over uw
computer vinden” op pagina 71.
Express Service Code:___________________________
Servicelabel:___________________________
Dell Diagnostics
WAARSCHUWING: Voordat u begint met de procedures in dit gedeelte, moet u de
veiligheidsinstructies in de Productinformatiegids raadplegen.
Wanneer gebruikt u het diagnoseprogramma Dell Diagnostics?
Als u een probleem ondervindt met de computer, volgt u de controlestappen die worden
beschreven in het hoofdstuk “Problemen oplossen” van de on line
u Dell Diagnostics uit voordat u contact opneemt met Dell voor technische ondersteuning.
Het verdient aanbeveling deze procedures af te drukken voordat u begint.
support.dell.com
.
Gebruikershandleiding
en voert
KENNISGEVING: Het Dell-diagnoseprogramma werkt alleen op Dell™-computers.
Start het Setup-programma van het systeem, controleer de configuratiegegevens van de computer
en verzeker u ervan dat het apparaat dat u wilt testen, wordt weergegeven in het Setup-programma
van het systeem en dat het apparaat actief is.
Start het Dell-diagnoseprogramma vanaf de vaste schijf of vanaf de optionele cd
Utilities (Stuur- en hulpprogramma’s)
Het Dell-diagnoseprogramma starten vanaf de vaste schijf
1
Zet de computer aan of start deze opnieuw op.
2
Druk op <F12> zodra het DELL™-logo verschijnt.
OPMERKING: Als het bericht verschijnt dat er geen partitie is aangetroffen met het
diagnoseprogramma, voert u Dell Diagnostics uit vanaf de cd Drivers and Utilities (Stuur- en
hulpprogramma’s).
, ook wel ResourceCD of bron-cd genoemd.
Drivers and
Als u te lang hebt gewacht en het Microsoft® Windows®-logo verschijnt, wacht dan tot u het
bureaublad van Windows ziet. Vervolgens sluit u de computer af en probeert u het opnieuw.
Beknopte handleiding 83
Page 84

3
Selecteer in de lijst met opstartapparaten
Boot to Utility Partition
(Opstarten vanaf partitie
van hulpprogramma) en druk op <Enter>.
4
Wanneer het
hoofdmenu
van het Dell-diagnoseprogramma wordt weergegeven, selecteert u
de test die u wilt uitvoeren.
Het Dell-diagnoseprogramma starten vanaf de optionele cd Drivers and Utilities (Stuur- en
hulpprogramma’s)
1
Plaats de cd
2
Sluit de computer af en start deze opnieuw op.
Drivers and Utilities (Stuur- en hulpprogramma’s)
.
Druk zodra het DELL-logo wordt weergegeven, onmiddellijk op <F12>.
www.dell.com | support.dell.com
Als u te lang hebt gewacht en het Windows-logo wordt weergegeven, moet u wachten totdat
het bureaublad van Windows wordt weergegeven. Sluit vervolgens de computer af en probeer
het opnieuw.
OPMERKING: Met de volgende stappen wordt de opstartvolgorde eenmalig gewijzigd. Wanneer u de
computer opnieuw inschakelt, start de computer op met de hardwarevolgorde die is aangegeven in de
systeeminstellingen.
Selecteer
3
en druk op <Enter>.
4
Selecteer de optie
van de cd.
5
Selecteer de optie
wordt geopend.
6
Ty p 1 om het menu van de ResourceCD weer te geven.
7
Ty p 2 om het Dell-diagnoseprogramma te starten.
8
Selecteer
in de genummerde lijst. Als de lijst meerdere versies bevat, moet u de juiste versie voor uw
computer selecteren.
9
Wanneer het
u de test die u wilt uitvoeren.
IDE CD-ROM Device
(IDE CD-ROM-apparaat) in de lijst met opstartapparaten
IDE CD-ROM Device
Boot from CD-ROM
(Opstarten vanaf cd-rom) in het menu dat
Run the Dell 32-bit Diagnostics
hoofdmenu
van het Dell-diagnoseprogramma wordt weergegeven, selecteert
(IDE CD-ROM-apparaat) in het opstartmenu
(32-bits Dell-diagnoseprogramma uitvoeren)
84 Beknopte handleiding
Page 85

Hoofdmenu van Dell-diagnoseprogramma
1
Nadat het Dell-diagnoseprogramma is geladen en het scherm met het
hoofdmenu
wordt
weergegeven, klikt u op de knop voor de gewenste optie.
Optie Functie
Snelle test Hiermee wordt een snelle test uitgevoerd van apparaten. Deze test neemt
doorgaans 10 tot 20 minuten in beslag. Er is geen interactie vereist. Als u eerst
de Express Test (snelle test) uitvoert, vergroot u de kans om het probleem snel
op te sporen.
Uitgebreide test Hiermee wordt een grondige controle van apparaten uitgevoerd. Deze test
neemt doorgaans een uur of langer in beslag. U moet af en toe vragen
beantwoorden.
Aangepaste test Hiermee kunt u een bepaald apparaat testen. U kunt de uit te voeren
tests aanpassen.
Symptomenstructuur Hier vindt u de meest voorkomende symptomen. U kunt hier een test kiezen
op basis van de symptomen van het aangetroffen probleem.
2
Als tijdens het uitvoeren van een test een probleem wordt aangetroffen, wordt een bericht
weergegeven met de foutcode en een beschrijving van het probleem. Noteer de foutcode
en de beschrijving van het probleem en volg de instructies op het scherm.
Neem contact op met Dell, als u de foutconditie niet kunt herstellen.
OPMERKING: Boven in elk testscherm ziet u het servicelabel van de computer. Als u contact opneemt
met Dell, vraagt de technische ondersteuning naar het servicelabel.
Wanneer u een test uitvoert van de optie
3
Custom Test
(Aangepaste test) of
Symptom Tree
(Symptomenstructuur), kunt u voor meer informatie over de test op een van de tabbladen
klikken die in de volgende tabel worden beschreven.
Tabblad Functie
Results (Resultaten) Hier worden de resultaten van de test weergegeven, samen met eventuele
foutcondities die zijn aangetroffen.
Errors (Fouten) Hier worden aangetroffen foutcondities, foutcodes en probleembeschrijvingen
weergegeven.
Help Hier wordt de test beschreven en worden eventuele vereisten voor het uitvoeren
van de test vermeld.
Beknopte handleiding 85
Page 86

Tab b la d Functie (vervolg)
Configuration
(Configuratie)
Parameters Hiermee kunt u de test aanpassen door de testinstellingen te wijzigen.
4
Wanneer u het Dell-diagnoseprogramma uitvoert vanaf de cd
hulpprogramma’s),
www.dell.com | support.dell.com
5
Sluit het testscherm om terug te keren naar het
wilt afsluiten en de computer opnieuw wilt opstarten, sluit u het
Systeemlampjes
Het aan/uit-lampje kan een computerprobleem aanduiden
Aan/uit-lampje Omschrijving probleem Mogelijke oplossing
Constant groen De computer staat aan en werkt
Knipperend groen De computer staat in de slaapstand
Knippert een paar
keer groen en gaat
dan uit
Constant geel Het Dell-diagnoseprogramma voert
Knipperend geel Er is een storing in de voeding of het
Hier wordt de hardwareconfiguratie beschreven voor het geselecteerde apparaat.
Het Dell-diagnoseprogramma verkrijgt de configuratiegegevens voor alle
apparaten via de systeeminstellingen, het geheugen en verschillende interne
tests. Deze gegevens worden weergegeven in het linkerdeelvenster van het
scherm. Mogelijk worden in het apparaatoverzicht niet de namen van alle
onderdelen weergegeven die zijn geïnstalleerd in of aangesloten op de computer.
Drivers and Utilities (Stuur- en
moet u de cd verwijderen zodra de tests voltooid zijn.
hoofdmenu
normaal.
®
(Microsoft
Windows XP).
Er is sprake van een configuratiefout. Ga naar “Controlelampjes” op pagina 87 om
een test uit of een apparaat op het
moederbord is defect of onjuist
geïnstalleerd.
moederbord.
Windows® 2000 en
. Als u het Dell-diagnoseprogramma
hoofdmenu
U hoeft niets te doen.
Druk op de aan/uit-knop, beweeg de muis of
druk op een toets op het toetsenbord om de
computer te activeren
te zien of het probleem daar specifiek wordt
beschreven.
Als het Dell-diagnoseprogramma actief is,
wacht dan tot de test is voltooid.
Ga naar “Controlelampjes” op pagina 87 om
te zien of het probleem daar specifiek wordt
beschreven.
Als de computer niet opstart, neemt u
contact op met Dell voor technische
ondersteuning.
Ga naar “Controlelampjes” op pagina 87 om
te zien of het probleem daar specifiek wordt
beschreven. Zie “Problemen met de voeding”
in de on line Gebruikershandleiding.
.
86 Beknopte handleiding
Page 87

Aan/uit-lampje Omschrijving probleem Mogelijke oplossing
Constant groen
en een pieptoon
tijdens de
POST (Power On
Self Test)
Het aan/uit-lampje
is constant groen,
er is geen pieptoon
en geen beeld
tijdens de POST
Het aan/uit-lampje
is constant groen,
er is geen pieptoon
maar de computer
loopt vast tijdens
de POST
Er is een probleem gevonden terwijl
het BIOS actief was.
De monitor of de grafische kaart is
defect of verkeerd geïnstalleerd.
Er is mogelijk een fout opgetreden in
een geïntegreerd apparaat.
Zie “Geluidscodes” op pagina 89 voor
instructies over het identificeren van de
geluidscode. Ga ook naar “Controlelampjes”
op pagina 87 om te zien of het probleem daar
specifiek wordt beschreven.
Ga naar “Controlelampjes” op pagina 87 om
te zien of het probleem daar specifiek wordt
beschreven.
Ga naar “Controlelampjes” op pagina 87 om
te zien of het probleem daar specifiek wordt
beschreven. Als het probleem niet wordt
beschreven, neemt u contact op met Dell
voor technische ondersteuning.
Controlelampjes
WAARSCHUWING: Voordat u begint met de procedures in dit gedeelte, moet u de
veiligheidsinstructies in de Productinformatiegids raadplegen.
Om u te helpen bij het oplossen van problemen, heeft uw computer op het achterpaneel vier
lampjes: “A”, “B”, “C” en “D”. De lampjes kunnen geel of groen zijn. Als de computer normaal
opstart, veranderen de lichtpatronen of -codes na afloop van het opstartproces. Als het onderdeel
POST van de systeemboot goed is verlopen, branden alle vier de lampjes constant groen. Als de
computer tijdens het POST-proces niet goed functioneert, kunt u er aan de hand van deze lampjes
achter komen waar in het proces de computer is vastgelopen.
Lichtpatroon
uit
uit
uit
uit
geel
groen
geel
geel
Omschrijving probleem Mogelijke oplossing
De computer staat uit of er is mogelijk
een fout opgetreden voordat het BIOS
werd gestart.
Er is mogelijk een processorfout
opgetreden.
• Controleer of de computer is aangesloten op een
werkend stopcontact en of u de aan/uit-knop hebt
ingedrukt.
• Installeer de processor opnieuw en start de
computer opnieuw op.
Beknopte handleiding 87
Page 88

Lichtpatroon
groen
groen
geel
geel
www.dell.com | support.dell.com
geel
geel
groen
geel
geel
groen
groen
geel
Omschrijving probleem Mogelijke oplossing
Er zijn geheugenmodules gevonden maar
er is een geheugenfout opgetreden.
Er is mogelijk een fout in de
PCI-uitbreidingskaart opgetreden.
Er is mogelijk een fout in het IDE-station
opgetreden.
• Als er slechts één geheugenmodule is geïnstalleerd,
installeer deze dan opnieuw en start de computer
opnieuw op.
• Als er twee geheugenmodules zijn geïnstalleerd,
verwijder dan beide modules, installeer één module
opnieuw en start de computer opnieuw op. Als de
computer normaal opstart, installeert u de tweede
module opnieuw.
• Installeer, indien beschikbaar, een goed werkend
geheugen van hetzelfde type in de computer.
• Als het probleem aanhoudt, neemt u contact
op met Dell.
• Controleer of er sprake is van een conflict door
een kaart (niet de videokaart) te verwijderen en
de computer opnieuw op te starten.
• Als het probleem aanhoudt, installeert u opnieuw
de kaart die u hebt verwijderd, verwijdert u een
andere kaart en start u de computer opnieuw op.
• Herhaal deze stappen voor elke kaart. Als de
computer normaal opstart, controleert u of de
laatste kaart die u uit de computer hebt verwijderd,
voor bronconflicten zorgt (zie ““Software- en
hardwareconflicten oplossen” op pagina 91”).
• Verplaats steeds één kaart naar een andere
PCI-kaartsleuf en start de computer na elke
keer opnieuw op.
• Als het probleem aanhoudt, neemt u contact
op met Dell.
• Sluit alle stroom- en datakabels van het
IDE-station opnieuw aan en start de computer
opnieuw op.
groen
groen
groen
geel
Er is mogelijk een fout in de
USB-connector opgetreden.
88 Beknopte handleiding
• Installeer alle USB-apparaten opnieuw,
controleer kabelaansluitingen en start de
computer opnieuw op.
Page 89

Lichtpatroon
geel
geel
geel
groen
geel
groen
geel
groen
geel
groen
groen
groen
Omschrijving probleem Mogelijke oplossing
Er zijn geen geheugenmodules gevonden.
Er zijn geheugenmodules gevonden, maar
er is sprake van een configuratie- of
compatibiliteitsfout in het geheugen.
Er is een andere fout opgetreden.
• Installeer alle geheugenmodules opnieuw en start
de computer opnieuw op.
• Om de mogelijkheid van een defecte
geheugenconnector uit te sluiten, moet u
alle geheugenmodules verwijderen, één
geheugenmodule opnieuw installeren (als de
computer slechts één module ondersteunt) en de
computer opnieuw opstarten. Als de computer
normaal opstart, verplaatst u de geheugenmodule
naar een andere connector en start u de computer
opnieuw op. Ga hiermee door totdat u een defecte
connector hebt gevonden of alle modules zonder
problemen opnieuw hebt geïnstalleerd.
• Verzeker u ervan dat er geen speciale eisen gesteld
worden aan de plaatsing van
geheugenmodules/geheugenconnectoren (zie voor
meer informatie “Geheugen” in de on line
Gebruikershandleiding
• Controleer of de geheugenmodules die u
installeert, compatibel zijn met uw computer.
• Als het probleem aanhoudt, neemt u contact
op met Dell.
• Controleer of de kabels van alle geïnstalleerde vaste
schijven goed op het moederbord zijn aangesloten.
• Lees het bericht dat op uw beeldscherm verschijnt.
• Als het probleem aanhoudt, neemt u contact op
met Dell.
).
groen
groen
groen
groen
De computer werkt normaal na het
uitvoeren van de POST.
• Geen.
Geluidscodes
Tijdens het opstarten kan de computer diverse pieptonen laten horen als de monitor fouten
of problemen niet kan weergeven. Deze pieptonen, geluidscodes genoemd, duiden op een
probleem. Eén van die geluidscodes (code 1-3-1) bestaat bijvoorbeeld uit één pieptoon, drie
snelle pieptonen en dan weer één pieptoon. Deze geluidscode geeft aan dat de computer een
geheugenprobleem heeft.
Beknopte handleiding 89
Page 90

Als uw computer tijdens het opstarten pieptonen laat horen, doet u het volgende:
1
Schrijf de geluidscode op.
2
Ga naar “Dell Diagnostics” op pagina 83 om een ernstiger oorzaak vast te stellen.
3
Neem contact op met Dell voor technische ondersteuning.
Code Oorzaak Code Oorzaak
1-1-2 Registerfout in de microprocessor 3-1-4 Fout in het slave interrupt mask register
1-1-3 NVRAM lees/schrijf-fout 3-2-2 Interrupt vector loading-fout
1-1-4 Checksum-fout in het ROM-BIOS 3-2-4 Testfout toetsenbordcontroller
www.dell.com | support.dell.com
1-2-1 Fout programmeerbare
1-2-2 Initialisatiefout DMA 3-3-2 Ongeldige NVRAM-configuratie
1-2-3 Lees/schrijf-fout DMA page register 3-3-4 Testfout videogeheugen
1-3 Testfout videogeheugen 3-4-1 Initialisatiefout beeldscherm
1-3-1 tot en
met 2-4-4
3-1-1 Registerfout slave-DMA 3-4-3 Zoeken naar video-ROM mislukt
3-1-2 Registerfout master-DMA 4-2-1 Geen timer tick
3-1-3 Fout in het master interrupt
4-2-3 Gate A20-fout 4-4-1 Testfout van seriële of parallelle poort
4-2-4 Onverwachte interrupt in
4-3-1 Geheugenfout boven adres
4-3-3 Fout van de counter 2 timerchip 4-4-4 Testfout cachegeheugen
4-3-4 Fout in de real-time klok
intervaltimer
Het geheugen wordt niet goed
geïdentificeerd of gebruikt
mask register
protected-mode
0FFFFh
3-3-1 Stroomuitval NVRAM
3-4-2 Screen retrace failure
4-2-2 Fout bij afsluiten
4-4-2 Fout bij het decomprimeren van de
code naar het schaduwgeheugen
4-4-3 Testfout rekenkundige coprocessor
Het diagnoseprogramma Dell™ IDE Hard Drive Diagnostics uitvoeren
Het diagnoseprogramma Dell IDE Hard Drive Diagnostics test de vaste schijf om fouten van de
vaste schijf op te sporen of te bevestigen.
1
Zet de computer aan (als de computer al aan staat, start deze dan opnieuw op).
2
Als rechtsboven in het scherm F2= Setup verschijnt, drukt u op <Ctrl><Alt><D>.
3
Volg de instructies op het scherm.
In het geval van een foutmelding raadpleegt u “Problemen met de vaste schijf” in het hoofdstuk
“Problemen oplossen” van de on line
90 Beknopte handleiding
Gebruikershandleiding
.
Page 91

Software- en hardwareconflicten oplossen
Als een apparaat tijdens de installatie van het besturingssysteem niet wordt gevonden, of wel wordt
gevonden maar onjuist wordt geconfigureerd, kunt u het conflict oplossen met de Probleemoplosser
voor hardware. In het besturingssysteem Microsoft
gebruiken om conflicten op te lossen.
Windows XP
Conflicten oplossen met de Probleemoplosser voor hardware:
1
Klik op de knop
2
Ty p
probleemoplosser hardware
Start
en vervolgens op
zoekbewerking te starten.
3
Klik op
4
Klik in de lijst
computer
Windows 2000
Probleemoplosser voor hardware
Probleemoplosser voor hardware
en klik op
Vol ge nd e
.
Conflicten oplossen met Apparaatbeheer:
1
Klik op de knop
2
Dubbelklik in het
3
Klik op het tabblad
4
Klik op
5
Klik op
6
Dubbelklik op
Apparaatbeheer
Beeld
Start
, wijs
Instellingen
Configuratiescherm
Hardware
.
.
en klik op
Bronnen op verbinding
Interrupt Request (IRQ)
Onjuist geconfigureerde apparaten worden aangegeven door een geel uitroepteken (
X
als het apparaat niet meer werkt.
rode
®
Windows® 2000 kunt u ook Apparaatbeheer
Help en ondersteuning
in het veld
in de lijst
aan en klik op
op
Zoeken
op
Systeem
en klik op de pijl om de
Zoekresultaten
Er is een hardwareconflict op de
Configuratiescherm
.
.
.
.
.
.
!
) of een
7
Dubbelklik op een apparaat met een uitroepteken om het venster
Bij
Apparaatstatus
in het venster
Eigenschappen
ziet u welke kaarten of apparaten opnieuw
Eigenschappen
moeten worden geconfigureerd.
8
Configureer de apparaten opnieuw of verwijder de apparaten vanuit Apparaatbeheer.
Raadpleeg de bij het apparaat geleverde documentatie voor informatie over het configureren
van het apparaat.
Conflicten oplossen met de Probleemoplosser voor hardware:
1
Klik op de knop
2
Klik op
probleemoplossers
Klik in de lijst
klik op
Volgende
Problemen oplossen en onderhoud
Start
en klik op
en klik vervolgens op
Help
.
Hardware
Probleemoplosser voor hardware
.
op het tabblad
Inhoud
, klik op
Windows 2000
.
op
Er is een hardwareconflict op de computer
Beknopte handleiding 91
te openen.
en
Page 92

Microsoft® Windows® XP Systeemherstel uitvoeren
Met Systeemherstel biedt het besturingssysteem Microsoft® Windows® XP u de mogelijkheid
om de computer terug te zetten in een eerdere status (zonder gegevensbestanden te verliezen)
als de computer door wijzigingen in de hardware, software of andere systeeminstellingen niet
naar behoren werkt. Zie Help en ondersteuning van Windows voor informatie over het gebruik
van Systeemherstel.
KENNISGEVING: Maak regelmatig reservekopieën van uw gegevensbestanden. Systeemherstel kan
uw gegevensbestanden niet controleren of herstellen.
Een herstelpunt maken
1
www.dell.com | support.dell.com
Klik op de knop
2
Klik op
3
Volg de instructies op het scherm.
De computer terugzetten in een eerdere status
KENNISGEVING: Voordat u de computer in een eerdere status terugzet, moet u alle geopende
bestanden opslaan en sluiten en alle actieve programma’s afsluiten. Het is pas mogelijk om bestanden
of programma’s te bewerken, openen of verwijderen nadat de herstelbewerking is voltooid.
Klik op de knop
1
Systeemwerkset
2
Controleer of
Vol ge nd e
op
3
Klik op de datum waarnaar u de computer wilt terugzetten.
Het scherm
selecteren. De datums met beschikbare herstelpunten zijn vetgedrukt.
Start
en vervolgens op
Systeemherstel
Start
, wijs achtereenvolgens
aan en klik op
.
Systeemherstel
Help en ondersteuning
Alle programma’s →
.
Een eerdere status van deze computer herstellen
.
Selecteer een herstelpunt
laat een kalender zien met herstelpunten die u kunt
.
Bureau-accessoires →
is geselecteerd en klik
4
Selecteer een herstelpunt en klik op
Als een datum slechts één herstelpunt bevat, wordt dat herstelpunt automatisch geselecteerd.
Zijn er twee of meer herstelpunten beschikbaar, klik dan op het herstelpunt van uw voorkeur.
5
Klik op
Vol ge nd e
Als Systeemherstel klaar is met het verzamelen van gegevens, verschijnt het scherm
Herstellen voltooid
6
Als de computer opnieuw is opgestart, klikt u op OK.
Om het herstelpunt te wijzigen, kunt u bovenstaande stappen met een ander herstelpunt herhalen
of de herstelbewerking ongedaan maken.
92 Beknopte handleiding
Vol ge nd e
.
.
en start de computer opnieuw op.
Page 93

De laatste herstelbewerking ongedaan maken
KENNISGEVING: Voordat u de laatste herstelbewerking ongedaan maakt, moet u alle geopende
bestanden opslaan en sluiten en alle actieve programma’s afsluiten. Het is pas mogelijk om bestanden
of programma’s te bewerken, openen of verwijderen nadat de herstelbewerking is voltooid.
Klik op de knop
1
Systeemwerkset
2
3
Klik op
Klik op
De laatste herstelbewerking ongedaan maken
Volgende
Het scherm
4
Nadat de computer opnieuw is opgestart, klikt u op OK.
Systeemherstel inschakelen
Start
, wijs achtereenvolgens
aan en klik op
.
Systeemherstel
Alle programma’s → Bureau-accessoires →
Systeemherstel
.
en klik op
Vol ge nd e
verschijnt en de computer start opnieuw op.
.
Als u Windows XP opnieuw installeert met minder dan 200 MB vrije ruimte op de vaste schijf,
wordt Systeemherstel automatisch uitgeschakeld. Ga als volgt te werk om te controleren of
Systeemherstel is ingeschakeld:
1
Klik op de knop
2
Klik op
3
Klik op
4
Klik op het tabblad
5
Controleer of het selectievakje
Prestaties en onderhoud
Systeem
Start
en klik op
.
Systeemherstel
Configuratiescherm
.
.
.
Systeemherstel uitschakelen
is uitgeschakeld.
Microsoft® Windows® XP opnieuw installeren
Voordat u begint
Als u overweegt om het besturingssysteem Windows XP opnieuw te installeren om een
probleem met een recent geïnstalleerd stuurprogramma te verhelpen, probeer dan eerst de
functie Vorig stuurprogramma van Windows XP. Als u het probleem niet kunt verhelpen met
Vorig stuurprogramma, zet u het besturingssysteem via Systeemherstel terug in de status waarin
het was voordat u het nieuwe stuurprogramma installeerde.
KENNISGEVING: Maak voordat u met de installatie begint reservekopieën van al uw
gegevensbestanden op de primaire vaste schijf. Bij normale configuraties is de primaire vaste schijf de
eerste schijf die de computer detecteert.
Beknopte handleiding 93
Page 94

Om Windows XP opnieuw te installeren, hebt u het volgende nodig:
• De cd Dell™
•De cd Dell
OPMERKING: De cd Drivers and Utilities bevat stuurprogramma’s die tijdens de montage van de
computer geïnstalleerd werden. Gebruik de cd Drivers and Utilities of ga naar de Dell Support-website
om de benodigde stuurprogramma’s te downloaden.
OPMERKING: De cd’s Besturingssysteem en Drivers and Utilities zijn optioneel en worden niet bij alle
computers geleverd.
Windows XP opnieuw installeren
Besturingssysteem
Drivers and Utilities (Stuur- en hulpprogramma’s)
www.dell.com | support.dell.com
KENNISGEVING: Bij het opnieuw installeren van Windows XP moet u Windows Service Pack 1 of een
latere versie gebruiken.
Om Windows XP opnieuw te installeren, volgt u alle hieronder beschreven stappen in de
aangegeven volgorde.
Het installatieproces kan één tot twee uur in beslag nemen. Nadat u het besturingssysteem
opnieuw hebt geïnstalleerd, moet u ook de apparaatstuurprogramma’s, anti-virusprogramma’s
en andere software opnieuw installeren.
KENNISGEVING: De cd Besturingssysteem biedt opties voor het opnieuw installeren van Windows XP.
De opties kunnen bestanden overschrijven en op uw vaste schijf geïnstalleerde programma’s
beschadigen. Ga dus pas over tot het opnieuw installeren van Windows XP als een medewerker van
de technische ondersteuning van Dell u dat aangeeft.
KENNISGEVING: Verwijder alle anti-virusprogramma’s van uw computer voordat u Windows XP
opnieuw installeert, om conflicten met Windows XP te voorkomen. Raadpleeg de documentatie bij de
software voor instructies.
Opstarten van de cd Besturingssysteem
1
Voordat u begint, moet u alle geopende bestanden opslaan en sluiten, en alle actieve
programma’s afsluiten.
2
Plaats de cd
installeren
3
Start de computer opnieuw op.
4
Druk op <F12> zodra het DELL™-logo verschijnt.
Als het logo van het besturingssysteem verschijnt, wacht u totdat u het bureaublad van
Windows ziet. Sluit vervolgens de computer af en probeer opnieuw.
Besturingssysteem
verschijnt.
. Klik op
Afsluiten
als het bericht
Windows XP
5
Gebruik de pijltoetsen om
6
Als het bericht
opstarten
94 Beknopte handleiding
cd-rom
te selecteren en druk op <Enter>.
Druk op een toets als u de computer vanaf cd-rom wilt
verschijnt, drukt u op een willekeurige toets.
Page 95

Windows XP Setup
1
Als het scherm
wilt installeren
2
Lees de informatie in het scherm
Windows XP Setup
te selecteren.
Gebruiksrechtovereenkomst van Windows XP
verschijnt, drukt u op <Enter> om
Als u Windows nu
en druk op
<F8> om deze overeenkomst te accepteren.
3
Als Windows XP al is geïnstalleerd op uw computer en u wilt uw huidige installatie van
Windows XP herstellen, typ dan
4
Als u een nieuwe kopie van Windows XP wilt installeren, drukt u op <Esc> om die optie
r
om de hersteloptie te selecteren en verwijder de cd.
te selecteren.
5
Druk op <Enter> om de gemarkeerde optie (aanbevolen) te selecteren en volg de instructies
op het scherm.
Het scherm
Windows XP Setup
verschijnt en het besturingssysteem begint bestanden
te kopiëren en de apparaten te installeren. De computer start enkele keren automatisch
opnieuw op.
OPMERKING: De tijd die nodig is om de installatie te voltooien, is afhankelijk van de grootte van de
vaste schijf en de snelheid van uw computer.
KENNISGEVING: Druk op geen enkele toets wanneer het volgende bericht verschijnt: Druk op een
toets als u de computer vanaf cd-rom wilt opstarten.
Als het scherm
6
u op
Volgende
7
Typ uw naam en bedrijfsnaam (optioneel) in het scherm
op
Vol ge nd e
8
Voer in het venster
computer (of accepteer de gegeven naam), geef een wachtwoord op en klik op
9
Als het scherm
klikt u op
10
Voer in het venster
11
Als het venster
12
Als u Windows XP Professional opnieuw installeert en u wordt gevraagd naar meer informatie
Landinstellingen
.
.
Computernaam en beheerderswachtwoord
Belgegevens voor modem
Vol ge nd e
.
Datum en tijd instellen
Netwerkinstellingen
verschijnt, selecteert u de instellingen voor uw land en klikt
Uw software personaliseren
een naam in voor uw
Vol ge nd e
verschijnt, voert u de gevraagde informatie in en
de datum, tijd en tijdzone in en klik op
verschijnt, klikt u op
Standaard
en op
Vol ge nd e
over uw netwerkconfiguratie, voer dan uw instellingen in. Als u niet zeker bent van uw
instellingen, selecteert u de standaardopties.
Windows XP installeert de onderdelen van het besturingssysteem en configureert de
computer. De computer start automatisch opnieuw op.
en klik
.
Vol ge nd e
.
.
KENNISGEVING: Druk op geen enkele toets wanneer het volgende bericht verschijnt: Druk op een
toets als u de computer vanaf cd-rom wilt opstarten.
13
Wanneer het scherm
Welkom bij Microsoft
verschijnt, klikt u op
Vol ge nd e
.
Beknopte handleiding 95
Page 96

14
Wanneer het bericht
verschijnt, klikt u op
15
Wanneer het scherm
klikt u op
16
Wanneer het scherm
gebruikers invoeren.
17
Klik op
18
Klik op
19
Installeer de juiste stuurprogramma’s opnieuw met de cd
20
www.dell.com | support.dell.com
Installeer de anti-virussoftware opnieuw.
21
Installeer uw programma’s opnieuw.
OPMERKING: Voor het opnieuw installeren en activeren van uw Microsoft Office- of Microsoft Works
Suite-programma’s hebt u het nummer van de productcode nodig dat op de achterkant van het
cd-hoesje staat.
De cd Drivers and Utilities (Stuur- en hulpprogramma’s) gebruiken
De cd
Drivers and Utilities
genoemd) gebruiken terwijl het Windows-besturingssysteem actief is:
OPMERKING: Om de apparaatstuurprogramma’s en de gebruikersdocumentatie te kunnen gebruiken,
moet u de cd Drivers and Utilities (Stuur- en hulpprogramma’s) gebruiken terwijl Windows actief is.
Zet de computer aan en wacht tot het bureaublad van Windows wordt weergegeven.
1
2
Plaats de cd
Als u de cd
venster
aangegeven dat de cd
Hoe maakt deze computer verbinding met het Internet?
Overslaan
.
Nu registreren bij Microsoft?
Volgende
.
Wie gaat deze computer gebruiken?
Vol ge nd e
Voltooien
.
om de installatie af te ronden en verwijder de cd.
(Stuur- en hulpprogramma’s, ook wel ResourceCD of bron-cd
Drivers and Utilities
Drivers and Utilities
voor de eerste keer op deze computer gebruikt, wordt het
ResourceCD Installation
Drivers and Utilities
verschijnt, selecteert u
Nee, niet nu
verschijnt, kunt u maximaal vijf
Drivers and Utilities
.
in het cd-rom-station.
(Installatie van ResourceCD) geopend, waarin wordt
gereed is voor de installatie.
en
3
Klik op OK om door te gaan.
Voer de installatie uit door te reageren op de aanwijzingen van het installatieprogramma.
4
Klik op
Volgende
Dell-systeem).
5
Selecteer het juiste
Device Type
96 Beknopte handleiding
in het venster
System Model
(apparaattype) en
Welcome Dell System Owner
(systeemmodel),
To pi c
(onderwerp).
Operating System
(Welkom, gebruiker van het
(besturingssysteem),
Page 97

Stuurprogramma’s voor de computer
Een lijst met apparaatstuurprogramma’s weergeven voor uw computer:
1
Klik op
De cd
My Drivers
(mijn stuurprogramma’s) in het vervolgkeuzemenu
Drivers and Utilities
To pi c
(onderwerp).
controleert de hardware en het besturingssysteem van
de computer. Vervolgens wordt op het scherm een overzicht weergegeven van de
stuurprogramma’s voor de configuratie van uw computer.
2
Klik op het gewenste stuurprogramma en volg de instructies voor het downloaden van
het stuurprogramma naar de computer.
Voor een overzicht van alle beschikbare stuurprogramma’s voor uw computer klikt u op
(stuurprogramma’s) in het vervolgkeuzemenu
To pi c
(onderwerp).
Drivers
Beknopte handleiding 97
Page 98

www.dell.com | support.dell.com
98 Beknopte handleiding
Page 99

Trefwoordenregister
A
aan/uit-lampje, 86
Apparaatbeheer, 91
B
Besturingssysteem
cd, 73
installatiehandleiding, 73
besturingssysteem
Windows XP opnieuw
installeren, 93
Bron-cd
Dell Diagnostics, 83
C
cd
besturingssysteem, 73
Cd besturingssysteem, 73
cd Drivers and Utilities, 71
computer
geluidscodes, 89
terugzetten in een eerdere
status, 92
conflicten
soft-/hardwareconflicten, 91
controlelampjes, 86-87
D
Dell
Premier Support-website, 73
Support-website, 72
Dell Diagnostics, 83
Dell Premier Support-
website, 73
diagnoseprogramma
cd Drivers and Utilities, 71
Dell, 83
geluidscodes, 89
lampjes, 86-87
documentatie
apparaat, 71
Beknopte handleiding, 71
Bron-cd, 71
Gebruikershandleiding, 72
on line, 72-73
F
foutmeldingen
controlelampjes, 86-87
geluidscodes, 89
G
Gebruikershandleiding, 72
geluidscodes, 89
H
hardware
conflicten, 91
Dell Diagnostics, 83
geluidscodes, 89
probleemoplosser, 91
Help en ondersteuning, 73
I
IRQ-conflicten, 91
L
labels
Microsoft Windows, 72
Servicelabel, 72
lampjes
aan/uit-knop, 86
achterkant computer, 87
controle-, 86-87
systeem-, 86
voorkant computer, 86
M
Microsoft Windows-label, 72
Trefwoordenregister 99
Page 100

O
opnieuw installeren
Bron-cd, 71
cd Drivers and Utilities, 71
Windows XP, 93
P
probleemoplossing
conflicten, 91
probleemoplosser
hardware, 91
problemen
conflicten, 91
controlelampjes, 86-87
Dell Diagnostics, 83
geluidscodes, 89
terugzetten in een eerdere
status, 92
problemen oplossen
controlelampjes, 86-87
Dell Diagnostics, 83
Help en ondersteuning, 73
terugzetten in een eerdere
status, 92
S
Servicelabel, 72
software
conflicten, 91
standaard
bevestigen, 76
verwijderen, 76
stuurprogramma's
Bron-cd, 71
Systeemherstel, 92
systeemlampjes, 86
W
Windows 2000
Apparaatbeheer, 91
Probleemoplosser voor
hardware, 91
Windows XP
Help en ondersteuning, 73
opnieuw installeren, 93
Probleemoplosser
hardware, 91
Probleemoplosser voor
hardware, 91
Systeemherstel, 92
100 Trefwoordenregister
 Loading...