


Dell™ M110 Projector
Wireless Installation Guide

About Notes
NOTE: A NOTE indicates important information that helps you make better use of your projector.
__________________
Information in this document is subject to change without notice.
© 2011 Dell Inc. All rights reserved.
Reproduction of these materials in any manner whatsoever without the written permission of Dell Inc. is strictly forbidden
Trademarks used in this text:
registered trademarks of Microsoft Corporation in the United States and/or other countries.
Other trademarks and trade names may be used in this document to refer to either the entities claiming the marks and names or their products.
Dell Inc. disclaims any proprietary interest in trademarks and trade names other than its own.
October 2011 Rev. A00
Dell
and the
DELL
logo are trademarks of Dell Inc.;
Microsoft, Windows 7
, and
Windows Vista
are trademarks or

Wireless Installation Instruction
NOTE: Your computer must have the following minimum system requirements:
Wireless Installation Instruction
Operating System:
•Windows
Microsoft Windows XP™ Home or Professional
Service pack 2 (32-bit recommended), Windows
Vista 32-bit or 64-bit, and Windows
Professional 32-bit or 64-bit
•MAC
MacBook and above, MacOS 10.5 and above
Minimum Hardware:
®
a Intel
b 256 MB of RAM required, 512 MB or more
c 10 MB of available hard-disk space
d nViDIA or ATI graphic card must with 64 MB
e Ethernet adapter (10 / 100 bps) for an
Dual Core™ 1.8 MHz or greater
recommended
VRAM or above
Ethernet connection
®
7 Home or
f A supported WLAN adapter for a WLAN
connection (any NDIS-compliant 802.11b or
802.11g or 802.11n WiFi device)
®
Web browser:
Microsoft Internet Explorer 6.0 or 7.0
(recommended) or 8.0, Firefox 2.0, Safari 3.0 and
above
NOTE: The wireless dongle is not shipped
with your projector. You can purchase it on
the Dell website at www.dell.com.
3
Wireless Installation Instruction
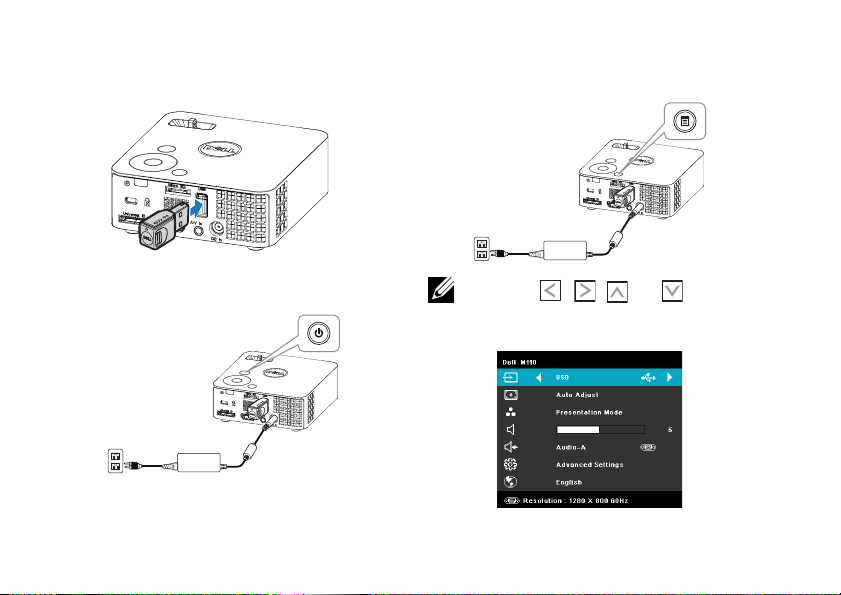
Enable Wireless on the Projector
1 Install the optional wireless dongle.
SUZ-WU5205C
FCC ID:
2 Connect the power cord with AC adapter to
the wall outlet and press the power button.
SUZ-WU5205C
FCC ID:
4
3 Press the Menu button on your projector
control panel or remote control.
S
UZ-W
FCC ID:
U520
5C
NOTE: Use , , and buttons to
navigate and to select.
4 Select the input source as USB.
Wireless Installation Instruction
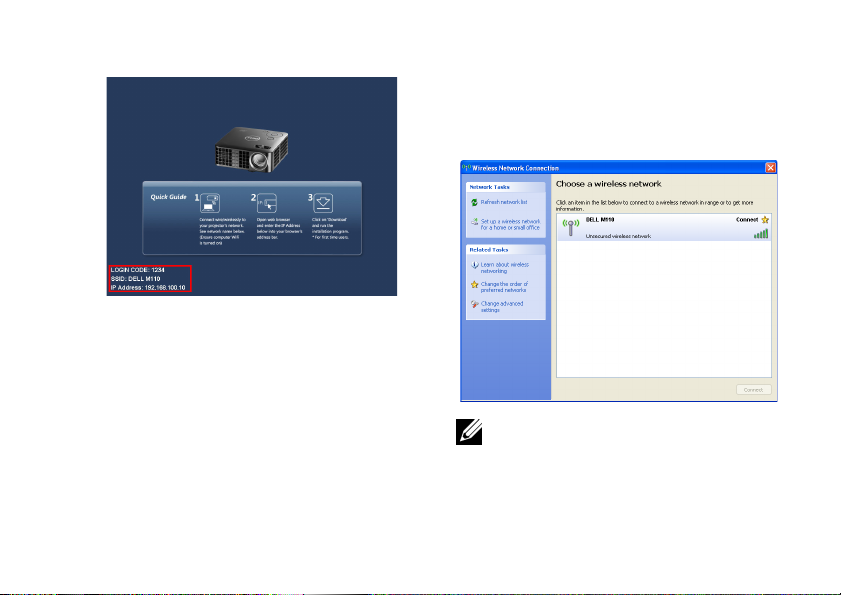
The Wireless Guide Screen shown below appears:
5 Make a note of the LOGIN CODE, SSID, and
IP ADDRESS. You will need this information
to log in later.
Install the Wireless Application Software on Your Computer
6 Connect your computer to the M110 wireless
network.
NOTE:
a Your computer must have wireless
network function to detect the connection.
5

Wireless Installation Instruction
b When you connect to the M110 wireless
network, you will lose wireless
connectivity with other wireless networks.
NOTE: It is recommended that all proxies are
turned off
Control Panel Internet Options
Connections LAN Settings)
7 "Wireless Application Software" is required if
used for wireless display. Please download
and install the software for first-time use. If it
is already installed, skip Step 7 - 12.
NOTE: You only need to install the "Wireless
Application Software" once.
6
. (In Microsoft® Windows 7: Click
8 Open the Internet browser on your computer.
You will be automatically directed to the
M110 Web Management web page.
NOTE: If the web page does not load
automatically, enter the IP address (default
IP address is 192.168.100.10) in the browser's
address bar.
9 The M110 web management page opens. For
first-time use, click Download.

Wireless Installation Instruction
10 Select the appropriate operating system, and
then click Download.
11 Click Run to proceed with the installation.
NOTE: You may choose to save the file and
install it at a later time. To do this, click Save.
NOTE: If you are unable to install the
application because of inadequate rights on
the computer, please contact your network
administrator.
12 The installation software will launch. Follow
the on-screen instructions to complete
setup.
7

Wireless Installation Instruction
Launch the Wireless Application
13 Once the installation is complete, the
program will launch automatically. Or you
can double-click the icon on the desktop
to start the application.
8
Login
14 To communicate with your projector, enter
the Login Code (see Step 5), and then click
OK.

Wireless Installation Instruction
Understanding the Buttons
After a successful log in, the following screen
appears:
Item Description
1 Status Bar Display IP and LOGIN CODE
information.
Menu
Minimize
button
Close button
Click to activate the
application menu.
Click to minimize the
application.
Click to exit the application.
2 Control Toolbar
Full screen
Stop
Pause
3 Connection Status
Connection
Icon
Click to project the image in
full screen.
Click to stop projection.
Click to pause projection.
Blinks when projection is in
progress.
Projecting the Presentation
• To project the presentation, click .
• To pause the presentation, click . The
icon turns green.
• To continue the presentation, click
again.
• To stop the presentation, click .
9

Wireless Installation Instruction
NOTE: The following information is for
wireless data presentation mode only. Image
display could be slow or not displayed
smoothly if displaying a video clip or
animation. Refer to the frame-rate table
below for reference:
Screen Variation %
<5 %
<10 %
<20 %
<40 %
<75 %
<=100 %
1
Estimated frames per second
3
30
3
28
3
26
3
23
3
19
3
18
NOTE:
1 The percentage of screen variation is based
on 1024 x 768. Example, to display a 320 x 240
video clip on 1024 x 768 desktop, the screen
variation is 9.8%.
10
2 Actual frame rate could be different
depending on factors such as network
environment, image content, signal
conditions, locations, and CPU performance.
3 Under clean WLAN environment using
802.11g connection, and no screen
stretching.
2
NOTE: Your computer will not enter S1
(standby mode) / S3 (sleep mode) / S4
(hibernate mode) when running a wireless
Display presentation.

Using the Menu
Click to display the menu.
EB MANAGEMENT—Click to open the Web
W
Management page.
S
EARCH FOR PROJECTOR—Click to search and
connect to wireless projector.
MAKE APPLICATION TOKEN—Click to make application
token. See "Make Application Token" on page 12.
INFO—Click to display system information.
OTKEY—Click to display the hotkey information.
H
BOUT—Click to display the application version.
A
XIT—Click to close the application.
E
Wireless Installation Instruction
11

Make Application Token
Make Application Token
The Application Token lets you perform Plug and
Show using a USB token.
1 From the application software, click >
Make Application Token.
2 The following screen appears. Click Next.
12
3 Plug a flash drive into the USB ports on your
computer. Select the drive from the list, and
then click Next.
4 Click Finish to close the wizard.


Printed in China.
www.dell.com | support.dell.com
36.8KT12G001-A
 Loading...