


Isilon OneFS 8.2.x Security Configuration
Guide
Version 8.2.x
Security Configuration Guide
January 2020

Copyright © 2013-2020 Dell Inc. All rights reserved.
Dell believes the information in this publication is accurate as of its publication date. The information is subject to change without notice.
THE INFORMATION IN THIS PUBLICATION IS PROVIDED “AS-IS.” DELL MAKES NO REPRESENTATIONS OR WARRANTIES OF ANY KIND
WITH RESPECT TO THE INFORMATION IN THIS PUBLICATION, AND SPECIFICALLY DISCLAIMS IMPLIED WARRANTIES OF
MERCHANTABILITY OR FITNESS FOR A PARTICULAR PURPOSE. USE, COPYING, AND DISTRIBUTION OF ANY DELL SOFTWARE DESCRIBED
IN THIS PUBLICATION REQUIRES AN APPLICABLE SOFTWARE LICENSE.
Dell Technologies, Dell, EMC, Dell EMC and other trademarks are trademarks of Dell Inc. or its subsidiaries. Other trademarks may be the property
of their respective owners. Published in the USA.
Dell EMC
Hopkinton, Massachusetts 01748-9103
1-508-435-1000 In North America 1-866-464-7381
www.DellEMC.com
2 Isilon OneFS 8.2.x Security Configuration Guide Security Configuration Guide

CONTENTS
Chapter 1
Chapter 2
Chapter 3
Introduction to this guide 5
About this guide..................................................................................................6
Reporting security vulnerabilities........................................................................ 6
Dell security advisories........................................................................................6
False positive security vulnerabilities.................................................................. 6
Related documents............................................................................................. 6
Where to go for support......................................................................................7
Terminology........................................................................................................ 7
Security overview 11
Security deployment models..............................................................................12
General business security deployment model........................................12
SmartLock security deployment model................................................. 12
Security Technical Implementation Guide (STIG) deployment model
(Federal accounts only)........................................................................ 13
Security control map......................................................................................... 14
Cryptography 15
Cryptography overview..................................................................................... 16
Cryptographic inventory for HTTPS.................................................................. 16
Cryptographic inventory for HTTPS in hardening mode........................17
Cryptographic inventory for NFS.......................................................................17
Cryptographic inventory for OpenSSH.............................................................. 18
Cryptographic inventory for SNMPv3............................................................... 19
Cryptographic inventory for SMB......................................................................19
Chapter 4
Chapter 5
Chapter 6
Authentication 21
Authentication overview................................................................................... 22
Kerberos authentication....................................................................................22
Network security 23
Network port usage.......................................................................................... 24
OneFS services.................................................................................................29
Mixed data-access protocol environments........................................................ 31
FTP security...................................................................................................... 31
HDFS security...................................................................................................32
HTTP and HTTPS security................................................................................32
NFS security..................................................................................................... 32
SMB security.................................................................................................... 32
SMB security settings..........................................................................32
Configuring SMB..................................................................................33
Physical security 35
Physical security overview................................................................................36
Security of the data center............................................................................... 36
Physical ports on Isilon nodes........................................................................... 36
Disable USB ports on Isilon nodes........................................................ 36
Isilon OneFS 8.2.x Security Configuration Guide Security Configuration Guide 3

Contents
Statements of Volatility.................................................................................... 37
Chapter 7
Security best practices 39
Overview.......................................................................................................... 40
Persistence of security settings .......................................................... 40
PCI compliance..................................................................................................41
Configure the cluster to meet PCI compliance......................................41
General cluster security best practices............................................................. 42
Create a login message ....................................................................... 42
Manifest check to confirm install authenticity and integrity.................42
Set a timeout for idle CLI sessions (CLI).............................................. 45
Set a timeout for idle SSH sessions (CLI)............................................ 47
Forward audited events to remote server............................................ 48
Firewall security................................................................................... 49
Disable OneFS services that are not in use.......................................... 49
Configure WORM directories using SmartLock....................................49
Back up cluster data............................................................................ 50
Use NTP time...................................................................................... 50
Login, authentication, and privileges best practices.......................................... 51
Restrict root logins to the cluster......................................................... 51
Use RBAC accounts instead of root......................................................51
Privilege elevation: Assign select root-level privileges to non-root users
............................................................................................................ 52
Restrict authentication by external providers...................................... 55
SNMP security best practices.......................................................................... 56
Use SNMPv3 for cluster monitoring.................................................... 56
Disable SNMP...................................................................................... 57
SSH security best practices..............................................................................57
Restrict SSH access to specific users and groups................................57
Disable root SSH access to the cluster................................................ 58
Data-access protocols best practices............................................................... 58
Use a trusted network to protect files and authentication credentials
that are sent in cleartext......................................................................58
Use compensating controls to protect authentication credentials that
are sent in cleartext............................................................................. 59
Use compensating controls to protect files that are sent in cleartext.. 59
Disable FTP access.............................................................................. 60
Limit or disable HDFS access............................................................... 60
Limit or disable HTTP access................................................................61
NFS best practices............................................................................... 61
SMB best practices..............................................................................62
SMB signing.........................................................................................63
Disable Swift access............................................................................ 65
Web interface security best practices.............................................................. 65
Replace the TLS certificate................................................................. 65
Secure the web interface headers....................................................... 66
Accept up-to-date versions of TLS in the OneFS web interface.......... 67
4 Isilon OneFS 8.2.x Security Configuration Guide Security Configuration Guide

CHAPTER 1
Introduction to this guide
This section contains the following topics:
l
About this guide...................................................................................................................... 6
l
Reporting security vulnerabilities............................................................................................ 6
l
Dell security advisories............................................................................................................ 6
l
False positive security vulnerabilities.......................................................................................6
l
Related documents................................................................................................................. 6
l
Where to go for support.......................................................................................................... 7
l
Terminology.............................................................................................................................7
Isilon OneFS 8.2.x Security Configuration Guide Security Configuration Guide 5

Introduction to this guide
About this guide
This guide provides an overview of the security configuration controls and settings available in
Isilon OneFS. This guide is intended to help facilitate secure deployment, usage, and maintenance
of the software and hardware used in Isilon clusters.
Your suggestions help us to improve the accuracy, organization, and overall quality of the
documentation. Send your feedback to http://bit.ly/isilon-docfeedback. If you cannot provide
feedback through the URL, send an email message to docfeedback@isilon.com.
Reporting security vulnerabilities
Dell EMC takes reports of potential security vulnerabilities in our products very seriously. If you
discover a security vulnerability, you are encouraged to report it to Dell EMC immediately.
For information on how to report a security issue to Dell EMC, see the Dell EMC Vulnerability
Response Policy at http://www.emc.com/products/security/product-security-response-
center.htm.
Dell security advisories
Dell Security Advisories (DSAs) notify customers about potential security vulnerabilities and their
remedies for Dell EMC products. The advisories include specific details about an issue and
instructions to help prevent or alleviate that security exposure.
Common Vulnerabilities and Exposures (CVEs) identify publicly known security concerns. A DSA
can address one or more CVEs.
All Isilon DSAs, together with the CVEs that they address, are listed at https://
community.emc.com/docs/DOC-45144.
False positive security vulnerabilities
It is possible for a security scan to incorrectly identify a CVE as affecting a Dell EMC product.
CVEs in this category are termed false positives.
False positives for OneFS and Insight IQ are listed at https://community.emc.com/docs/
DOC-45144.
Related documents
The complete documentation set for OneFS is available online.
You can find information that is related to the features and functionality described in this
document in the following documents available from the Dell EMC Online Support site.
l
EMC Secure Remote Services Installation and Operations Guide
l
EMC Secure Remote Services Policy Manager Operations Guide
l
EMC Secure Remote Services Site Planning Guide
l
EMC Secure Remote Services Technical Description
l
EMC Isilon Multiprotocol Data Access with a Unified Security Model
(white paper)
6 Isilon OneFS 8.2.x Security Configuration Guide Security Configuration Guide

l
Isilon Swift Technical Note
l
Managing identities with the Isilon OneFS user mapping service
l
OneFS Backup and Recovery Guide
l
OneFS CLI Administration Guide
l
OneFS Event Reference
l
OneFS HDFS Reference Guide
l
OneFS Release Notes
l
OneFS Web Administration Guide
l
OneFS Upgrade Planning and Process Guide
Where to go for support
This topic contains resources for getting answers to questions about Isilon products.
Introduction to this guide
(white paper)
Online support
l
Live Chat
l
Create a Service Request
For questions about accessing online support, send an email to
support@emc.com.
Telephone
support
l
United States: 1-800-SVC-4EMC (1-800-782-4362)
l
Canada: 1-800-543-4782
l
Worldwide: 1-508-497-7901
l
Local phone numbers for a specific country are available at Dell EMC
Customer Support Centers.
Isilon Community
Network
The Isilon Community Network connects you to a central hub of information
and experts to help you maximize your current storage solution. From this site,
you can demonstrate Isilon products, ask questions, view technical videos, and
get the latest Isilon product documentation.
Isilon Info Hubs For the list of Isilon info hubs, see the Isilon Info Hubs page on the Isilon
Community Network. Use these info hubs to find product documentation,
troubleshooting guides, videos, blogs, and other information resources about
the Isilon products and features you're interested in.
Terminology
The following terms and abbreviations describe some of the features and technology of the Isilon
OneFS system and Isilon cluster.
Access-based enumeration (ABE)
Access control entry (ACE)
In a Microsoft Windows environment, ABE filters the list of available files and folders to allow
users to see only those that they have permissions to access on a file server.
An element of an access control list (ACL) that defines access rights to an object (like a file or
directory) for a user or group.
Isilon OneFS 8.2.x Security Configuration Guide Security Configuration Guide 7

Introduction to this guide
Access control list (ACL)
A list of access control entries (ACEs) that provide information about the users and groups
allowed access to an object.
ACL policy
The policy that defines which access control methods (NFS permissions and/or Windows
ACLs) are enforced when a user accesses a file on the system in an environment that is
configured to provide multiprotocol access to file systems. The ACL policy is set through the
web administration interface.
Authentication
The process for verifying the identity of a user trying to access a resource or object, such as a
file or a directory.
Certificate Authority (CA)
A trusted third party that digitally signs public key certificates.
Certificate Authority Certificate
A digitally signed association between an identity (a Certificate Authority) and a public key to
be used by the host to verify digital signatures on public key certificates.
Command-line interface (CLI)
An interface for entering commands through a shell window to perform cluster administration
tasks.
Digital certificate
An electronic ID issued by a certificate authority that establishes user credentials. It contains
the user identity (a hostname), a serial number, expiration dates, a copy of the public key of
the certificate holder (used for encrypting messages and digital signatures), and a digital
signature from the certificate-issuing authority so that recipients can verify that the
certificate is valid.
Directory server
A server that stores and organizes information about a computer network's users and network
resources, and that allows network administrators to manage user access to the resources.
X.500 is the best-known open directory service. Proprietary directory services include
Microsoft Active Directory.
Group Identifier (GID)
Numeric value used to represent a group account in a UNIX system.
Hypertext Transfer Protocol (HTTP)
The communications protocol used to connect to servers on the World Wide Web.
Hypertext Transfer Protocol Secure (HTTPS)
HTTP over TLS. All network traffic between the client and server system is encrypted. In
addition, HTTPS provides the option to verify server and client identities. Typically, server
identities are verified and client identities are not.
Kerberos
An authentication, data integrity, and data-privacy encryption mechanism that is used to
encode authentication information. Kerberos coexists with NTLM and provides authentication
for client/server applications using secret-key cryptography.
8 Isilon OneFS 8.2.x Security Configuration Guide Security Configuration Guide

Introduction to this guide
Lightweight Directory Access Protocol (LDAP)
An information-access protocol that runs directly over TCP/IP. LDAP is the primary access
protocol for Active Directory and LDAP-based directory servers. LDAP Version 3 is defined by
a set of Proposed Standard documents in Internet Engineering Task Force (IETF) RFC 2251.
LDAP-based directory
A directory server that provides access through LDAP. Examples of LDAP-based directory
servers include OpenLDAP and SUN Directory Server.
Network File System (NFS)
A distributed file system that provides transparent access to remote file systems. NFS allows
all network systems to share a single copy of a directory.
Network Information Service (NIS)
A service that provides authentication and identity uniformity across local area networks and
allows you to integrate the cluster with your NIS infrastructure. Designed by Sun
Microsystems, NIS can be used to authenticate users and groups when they access the
cluster.
OneFS API
A RESTful HTTP-based interface that enables cluster configuration, management, and
monitoring functionality, and enables operations on files and directories.
OpenLDAP
The open source implementation of an LDAP-based directory service.
Public Key Infrastructure (PKI)
A means of managing private keys and associated public key certificates for use in Public Key
Cryptography.
Secure Sockets Layer (SSL)
A security protocol that provides encryption and authentication. SSL encrypts data and
provides message and server authentication. SSL also supports client authentication if
required by the server.
Security Identifier (SID)
A unique, fixed identifier used to represent a user account, user group, or other secure
identity component in a Windows system.
Server Message Block (SMB)
A network protocol used by Windows-based computers that allows systems within the same
network to share files.
Simple Network Management Protocol (SNMP)
A protocol that can be used to communicate management information between the network
management stations and the agents in the network elements.
Support Remote Services Gateway
Secure Remote Support (SRS) enables 24x7 proactive, secure, high-speed remote monitoring
and repair for many Dell EMC products.
Transport Layer Security (TLS)
The successor protocol to SSL for general communication authentication and encryption over
TCP/IP networks. TLS version 1 is nearly identical with SSL version 3.
Isilon OneFS 8.2.x Security Configuration Guide Security Configuration Guide 9

Introduction to this guide
User Identifier (UID)
Alphanumeric value used to represent a user account in a UNIX system.
X.509
A widely used standard for defining digital certificates.
10 Isilon OneFS 8.2.x Security Configuration Guide Security Configuration Guide

CHAPTER 2
Security overview
This section contains the following topics:
l
Security deployment models.................................................................................................. 12
l
Security control map..............................................................................................................14
Isilon OneFS 8.2.x Security Configuration Guide Security Configuration Guide 11

Security overview
Security deployment models
An Isilon cluster is only one piece of a complex installation and coexists with the surrounding
physical and electronic environment. You must develop and maintain comprehensive security
policies for the entire environment.
It is assumed that you have implemented the following security controls prior to the Isilon security
deployment:
l
Physical security of computer room facilities
l
Comprehensive network security
l
Monitoring of computer-related controls, including:
n
Access to data and programs
n
Secure organizational structure to manage login and access rights
n
Change control to prevent unauthorized modifications to programs
l
Service continuity to ensure that critical services and processes remain operational in the
event of a disaster or data breach.
With these security controls in place, Isilon offers the following deployment models:
l
General business
l
SmartLock
l
Security Technical Implementation Guide (STIG)
General business security deployment model
An Isilon cluster is designed to meet the storage needs of diverse users across the spectrum of big
data and enterprise IT. The general business security deployment model comprises a set of best
practices that can be implemented in any environment.
See the
Security Best Practices
chapter of this guide for recommended steps to increase the
security of an Isilon cluster.
SmartLock security deployment model
Smartlock is a data retention solution which protects files from accidental or deliberate
modification or deletion during a specified retention period. SmartLock employs Write Once Read
Many (WORM) data storage technology. WORM technology allows information to be written to a
drive once, after which it is non-erasable and non-rewritable.
There are two options for SmartLock implementation:
l
Compliance mode. This mode is designed for use only by those organizations which are legally
required to comply with the United States Securities and Exchange Commission’s (SEC) rule
17-a4(f).
l
Enterprise mode. This mode can be used by organizations that have no legal requirement but
want to use WORM technology to protect their data.
SmartLock compliance mode commits files to a WORM state in a compliance directory where the
files cannot be modified or deleted until the specified retention period has expired. If a cluster is
installed in compliance mode, the entire cluster is defined as a SmartLock compliance cluster.
SmartLock enterprise mode commits files to a WORM state in an enterprise directory where the
files cannot be modified or deleted until the retention period has expired. The only exception is
through a privileged delete feature that exists for the root account.
12 Isilon OneFS 8.2.x Security Configuration Guide Security Configuration Guide

Security overview
For more information about SmartLock, see the
Smartlock overview
section of this document.
Security Technical Implementation Guide (STIG) deployment model (Federal accounts only)
To meet Federal Approved Products List (APL) requirements, the configuration of OneFS must
comply with Security Technical Implementation Guides (STIGs) that define hardening
configuration requirements.
STIGs are maintained by the Defense Information Systems Agency (DISA), which produces STIGs
for several computing technologies, referred to as assessment areas. STIG hardening is designed
for Isilon clusters that support Federal Government accounts. Clusters that do not support Federal
Government accounts are generally not candidates for STIG hardening.
Note: STIG hardening assumes that the entire environment has been hardened to STIG
standards. Securing only the Isilon cluster, without the surrounding components also meeting
STIG requirements, can create problems due to different expectations between the
components.
For more information about STIG deployment, see the OneFS 8.2.0 Web Administration Guide and
the OneFS 8.2.0 CLI Command Reference.
Isilon OneFS 8.2.x Security Configuration Guide Security Configuration Guide 13
Security overview
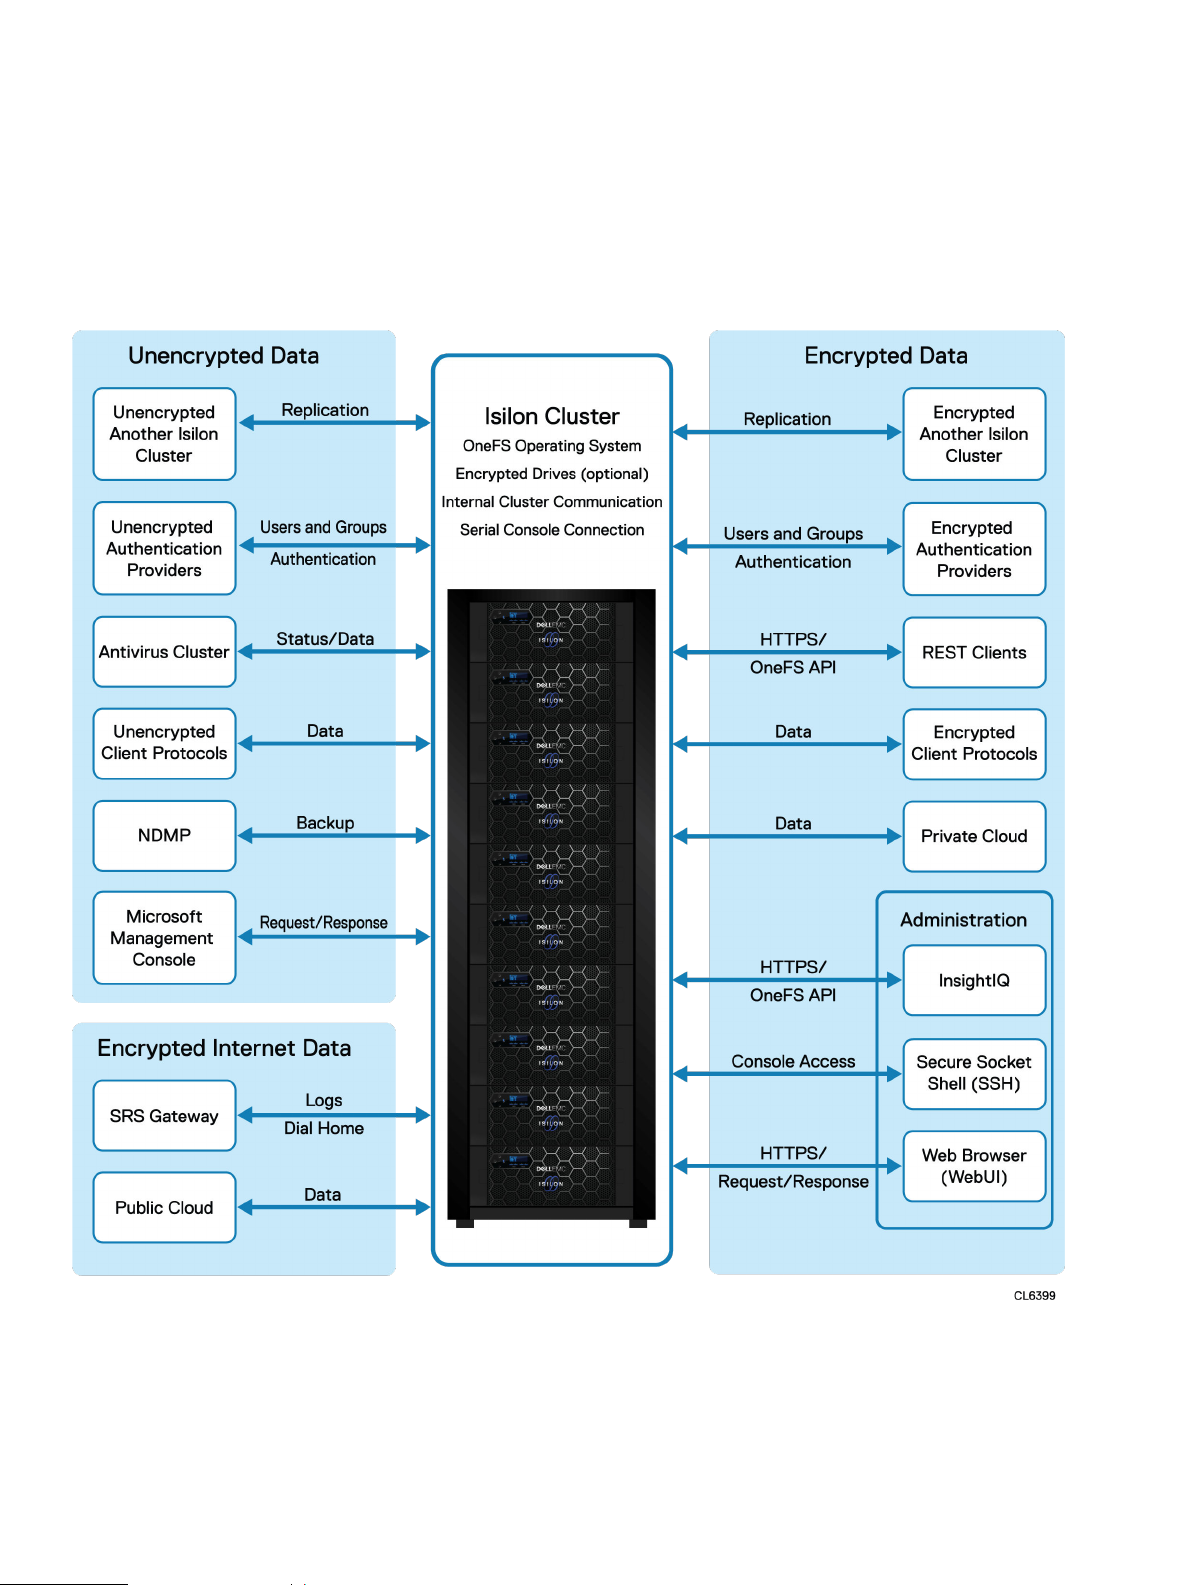
Security control map
The following diagram provides an overview of the various security controls that are available on
Isilon clusters.
Figure 1 Security control map
14 Isilon OneFS 8.2.x Security Configuration Guide Security Configuration Guide

CHAPTER 3
Cryptography
This section contains the following topics:
l
Cryptography overview..........................................................................................................16
l
Cryptographic inventory for HTTPS...................................................................................... 16
l
Cryptographic inventory for NFS........................................................................................... 17
l
Cryptographic inventory for OpenSSH.................................................................................. 18
l
Cryptographic inventory for SNMPv3....................................................................................19
l
Cryptographic inventory for SMB.......................................................................................... 19
Isilon OneFS 8.2.x Security Configuration Guide Security Configuration Guide 15

Cryptography
Cryptography overview
OneFS uses up-to-date, globally recognized cryptographic algorithms and protocols, including:
l
FTP
l
HDFS
l
HTTPS
l
Kerberos
l
NDMP
l
NFS
l
Secure Socket Shell (SSH)
l
SMB
l
Swift
l
Transport Layer Security (TLS)
l
TLS to Active Directory
l
TLS to Lightweight Directory Access Protocol (LDAP)
This chapter provides details on cryptographic use within OneFS, including the current
cryptographic releases, which algorithms are used, and where in the product the algorithms are
used.
Note:
Different releases of OneFS may support different cryptographic inventories. If you have
questions about the cryptographic inventory for different versions of OneFS, contact Isilon
Technical Support.
Cryptographic inventory for HTTPS
The HTTPS cryptography applies to REST clients and to the OneFS web administration interface.
This section lists the cipher suites that are supported by HTTPS in OneFS.
TLSv1.1 cipher suites supported by HTTPS
TLS_DHE_RSA_WITH_AES_256_CBC_SHA (dh 2048)
TLS_DHE_RSA_WITH_AES_128_CBC_SHA (dh 2048)
TLS_ECDHE_RSA_WITH_AES_128_CBC_SHA (secp256r1)
TLS_ECDHE_RSA_WITH_AES_256_CBC_SHA (secp256r1)
TLS_DHE_RSA_WITH_CAMELLIA_256_CBC_SHA (dh 2048)
TLS_DHE_RSA_WITH_CAMELLIA_128_CBC_SHA (dh 2048)
TLSv1.2 cipher suites supported by HTTPS
TLS_DHE_RSA_WITH_AES_256_CBC_SHA (dh 2048)
TLS_DHE_RSA_WITH_AES_128_CBC_SHA (dh 2048)
TLS_ECDHE_RSA_WITH_AES_128_GCM_SHA256 (secp256r1)
TLS_ECDHE_RSA_WITH_AES_256_GCM_SHA384 (secp256r1)
TLS_DHE_RSA_WITH_AES_128_GCM_SHA256 (dh 2048)
TLS_DHE_RSA_WITH_AES_256_GCM_SHA384 (dh 2048)
TLS_ECDHE_RSA_WITH_AES_128_CBC_SHA256 (secp256r1)
TLS_ECDHE_RSA_WITH_AES_128_CBC_SHA (secp256r1)
TLS_ECDHE_RSA_WITH_AES_256_CBC_SHA384 (secp256r1)
TLS_ECDHE_RSA_WITH_AES_256_CBC_SHA (secp256r1)
16 Isilon OneFS 8.2.x Security Configuration Guide Security Configuration Guide

TLS_DHE_RSA_WITH_AES_128_CBC_SHA256 (dh 2048)
TLS_DHE_RSA_WITH_AES_256_CBC_SHA256 (dh 2048)
TLS_DHE_RSA_WITH_CAMELLIA_256_CBC_SHA (dh 2048)
TLS_DHE_RSA_WITH_CAMELLIA_128_CBC_SHA (dh 2048)
Cryptographic inventory for HTTPS in hardening mode
The security hardening cryptography applies to REST clients and to the OneFS web administration
interface. This section lists the cipher suites that are supported by security hardening mode in
OneFS.
TLSv1.1 cipher suites supported by HTTPS in hardening mode
TLS_DHE_RSA_WITH_AES_256_CBC_SHA (dh 2048)
TLS_DHE_RSA_WITH_AES_128_CBC_SHA (dh 2048)
TLS_ECDHE_RSA_WITH_AES_128_CBC_SHA (secp521r1)
TLS_ECDHE_RSA_WITH_AES_256_CBC_SHA (secp521r1)
TLSv1.2 cipher suites supported by HTTPS in hardening mode
Cryptography
TLS_DHE_RSA_WITH_AES_256_CBC_SHA (dh 2048)
TLS_DHE_RSA_WITH_AES_128_CBC_SHA (dh 2048)
TLS_ECDHE_RSA_WITH_AES_128_GCM_SHA256 (secp521r1)
TLS_ECDHE_RSA_WITH_AES_256_GCM_SHA384 (secp521r1)
TLS_DHE_RSA_WITH_AES_128_GCM_SHA256 (dh 2048)
TLS_DHE_RSA_WITH_AES_256_GCM_SHA384 (dh 2048)
TLS_ECDHE_RSA_WITH_AES_128_CBC_SHA256 (secp521r1)
TLS_ECDHE_RSA_WITH_AES_128_CBC_SHA (secp521r1)
TLS_ECDHE_RSA_WITH_AES_256_CBC_SHA384 (secp521r1)
TLS_ECDHE_RSA_WITH_AES_256_CBC_SHA (secp521r1)
TLS_DHE_RSA_WITH_AES_128_CBC_SHA256 (dh 2048)
TLS_DHE_RSA_WITH_AES_256_CBC_SHA256 (dh 2048)
Cryptographic inventory for NFS
This section lists the NFS cryptographic algorithms that are available in OneFS.
Usage of these algorithms depends on your configuration and workflow. For configuration
information, refer to the OneFS CLI Administration Guide Info Hub.
Note:
When kerberos is used, it is important that a time sync for NTP be set up in common
with the KDC.
NFS default settings
Setting
Enabled/disabled
NFS service Enabled
NFSv3 Enabled
NFSv4 Disabled
Isilon OneFS 8.2.x Security Configuration Guide Security Configuration Guide 17

Cryptography
NFSv3 algorithms
Algorithm Description
Key Exchange Algorithms RPCSEC_GSS, KerberosV5
Authentication Algorithms *see NFS authentication algorithms table
Encryption Algorithms AES256-CTS AES128-CTS RC4-HMAC DES-CBC-MD5
DES-CBC-CRC
Message Authentication Code
Algorithms (integrity)
NFSv4 algorithms
Algorithm Description
Key Exchange Algorithms RPCSEC_GSS, KerberosV5
Authentication Algorithms *see NFS authentication algorithms table
Encryption Algorithms AES256-CTS AES128-CTS RC4-HMAC DES-CBC-MD5
Message Authentication Code
Algorithms (integrity)
NFS authentication algorithms
Authentication depends on the security approach but can be overridden if the device is blocked in
a netgroup, or there is a rule mapping a uid to something else.
Security approach
AUTH_UNIX AUTH_UNIX, trust the remote device for authentication, no integrity check,
Description
no encryption
RPCSEC_GSS, enforces TCP protocol at transport layer
DES-CBC-CRC
RPCSEC_GSS, enforces TCP protocol at transport layer
krb5 Trust the kdc, no integrity check, no encryption
krb5i Trust as krb5, integrity check using (RPCSEC_GSS) RPC headers are signed
and headers and data are hashed, no encryption
krb5p Trust as krb5, integrity as krb5i, encryption in (AES256-CTS AES128-CTS
RC4-HMAC DES-CBC-MD5 DES-CBC-CRC)
Cryptographic inventory for OpenSSH
This section lists the OpenSSH cryptographic algorithms as used in OneFS.
Algorithm
Encryption Algorithms aes128-ctr,aes192-ctr,aes256-ctr,aes128-
Key Exchange Algorithms curve25519-sha256 curve25519-sha256@libssh.org ecdh-sha2-
18 Isilon OneFS 8.2.x Security Configuration Guide Security Configuration Guide
Description
gcm@openssh.com,aes256-gcm@openssh.com,chacha20poly1305@openssh.com
nistp256 ecdh-sha2-nistp384 ecdh-sha2-nistp521 diffiehellman-group-exchange-sha256 diffie-hellman-group16-sha512

Cryptography
Algorithm Description
diffie-hellman-group18-sha512 diffie-hellman-group14-sha256
diffie-hellman-group14-sha1
Host Key Algorithms rsa-sha2-512 rsa-sha2-256 ssh-rsa ecdsa-sha2-nistp256 ssh-
ed25519
Authentication Algorithms Depends on cluster configuration
Message Authentication Code
Algorithms(integrity)
OpenSSH cryptographic algorithms used in hardening mode only:
Algorithm Description
Encryption Algorithms aes128-ctr aes192-ctr aes256-ctr
Key Exchange Algorithms ecdh-sha2-nistp256 ecdh-sha2-nistp384 ecdh-sha2-nistp521
Host Key Algorithm rsa-sha2-512 rsa-sha2-256 ssh-rsa ecdsa-sha2-nistp256 ssh-
Authentication Algorithms Depends on cluster configuration
Message Authentication Code
Algorithms (integrity)
hmac-sha1
diffie-hellman-group-exchange-sha256 diffie-hellman-groupexchange-sha1 diffie-hellman-group14-sha1
ed25519
hmac-sha1
Cryptographic inventory for SNMPv3
This section lists the SNMPv3 cryptographic algorithms as used in OneFS.
Algorithm
Authentication Algorithms HMAC-SHA-96, MD5
Privacy 3DES, AES-128-CFB
Note: The SNMPv3 authentication algorithm defaults to MD5 and to privacy AES.
Cryptographic inventory for SMB
This section lists the SMB cryptographic algorithms that are available in OneFS.
Note:
It is recommended that you use encryption, and not signing, for ultimate security.
Usage of these algorithms depends on your configuration and workflow. For configuration
information, refer to the OneFS CLI Administration Guide Info Hub.
For a secure OneFSenvironment, it is recommended that you use encryption rather than signing.
The SMB service is enabled by default in OneFS, and it supports SMBv1, SMBv2, and SMBv3.
Isilon OneFS 8.2.x Security Configuration Guide Security Configuration Guide 19
Description

Cryptography
SMB algorithms
Algorithm Description
Authentication Algorithm
SMBv3 Encryption
Algorithm
l
krb5
l
NTLM (GSS-SPNEGO)
l
AES-128-CCM
l
AES-128-GCM (faster)
SMB signing algorithms
Note: For signing information, see the SMB Signing section of the Design and Considerations
for SMB Environments whitepaper.
SMB protocol version SMB signing algorithm description
SMB 1 MD5
SMB 2.0.2, 2.1 HMAC-SHA256
GSS-API SessionKey (key derivation)
SMB 3.0, 3.0.2, 3.11 AES-128-CMAC (signing)
GSS-API SessionKey and KDF (key derivation)
Used via GSS-API, NTLM mechanism:
l
RC4 (schannel encryption)
l
MD5-HMAC (signing)
Used via GSS-API, KRB5 mechanism (all encryption types
provide signing and encryption):
l
AES256-CTS
l
AES128-CTS
l
RC4-HMAC
l
DES-CBC-MD5
l
DES-CBC-CRC
20 Isilon OneFS 8.2.x Security Configuration Guide Security Configuration Guide

CHAPTER 4
Authentication
This section contains the following topics:
l
Authentication overview........................................................................................................22
l
Kerberos authentication........................................................................................................ 22
Isilon OneFS 8.2.x Security Configuration Guide Security Configuration Guide 21

Authentication
Authentication overview
For general information about authentication, see the OneFS 8.2.0 Web Administration Guide and
the OneFS 8.2.0 CLI Administration Guide.
Kerberos authentication
Kerberos is a network authentication provider that negotiates encryption tickets for securing a
connection. OneFS supports Microsoft Kerberos and MIT Kerberos authentication providers on a
cluster. If you configure an Active Directory provider, support for Microsoft Kerberos
authentication is provided automatically. MIT Kerberos works independently of Active Directory.
For MIT Kerberos authentication, you define an administrative domain known as a realm. Within
this realm, an authentication server has the authority to authenticate a user, host, or service; the
server can resolve to either IPv4 or IPv6 addresses. You can optionally define a Kerberos domain to
allow additional domain extensions to be associated with a realm.
The authentication server in a Kerberos environment is called the Key Distribution Center (KDC)
and distributes encrypted tickets. When a user authenticates with an MIT Kerberos provider within
a realm, a cryptographic ticket-granting ticket (TGT) is created to enable the user request an
access to a service principal name (SPN).
Each MIT Kerberos provider must be associated with a groupnet. The groupnet is a top-level
networking container that manages hostname resolution against DNS nameservers and contains
subnets and IP address pools. The groupnet specifies which networking properties the Kerberos
provider will use when communicating with external servers. The groupnet associated with the
Kerberos provider cannot be changed. Instead you must delete the Kerberos provider and create it
again with the new groupnet association.
You can add an MIT Kerberos provider to an access zone as an authentication method for clients
connecting through the access zone. An access zone may include at most one MIT Kerberos
provider. The access zone and the Kerberos provider must reference the same groupnet. You can
discontinue authentication through an MIT Kerberos provider by removing the provider from
associated access zones.
22 Isilon OneFS 8.2.x Security Configuration Guide Security Configuration Guide

CHAPTER 5
Network security
This section contains the following topics:
l
Network port usage...............................................................................................................24
l
OneFS services..................................................................................................................... 29
l
Mixed data-access protocol environments.............................................................................31
l
FTP security.......................................................................................................................... 31
l
HDFS security....................................................................................................................... 32
l
HTTP and HTTPS security.................................................................................................... 32
l
NFS security......................................................................................................................... 32
l
SMB security.........................................................................................................................32
Isilon OneFS 8.2.x Security Configuration Guide Security Configuration Guide
23

Network security
Network port usage
Standardized protocols enable other computers to exchange data with OneFS.
The TCP/IP protocol suite uses numbered ports to describe the communication channel within the
protocol. Generally, the OneFS system uses a well-known port for receiving incoming data. That
ephemeral port number is used by the client to send data. Port numbers and IP addresses are
included in a data packet, which enables other systems to make determinations about the data
stream. TCP and UDP protocols within the TCP/IP suite use ports that range from 1 to 65535.
Port numbers are assigned and maintained by the Internet Assigned Numbers Authority (IANA)
and are divided into three ranges:
1. Well-known ports, ranging from 0 to 1023.
2. Registered ports, ranging from 1024 to 49151.
3. Dynamic or private ports, ranging from 49152 to 65535.
Protocols support both IPv4 and IPv6 addresses except where noted.
Note: As a security best practice, you should use an external firewall to limit access to the
cluster to only those trusted clients and servers that require access. Allow restricted access
only to ports that are required for communication. Block access to all other ports.
Port Service
name
20 ftp-data TCP Outbound
21 ftp TCP Inbound
22 ssh TCP Inbound
23 telnet TCP Inbound Telnet: telnetd Telnet access to
25 smtp TCP Outbound Email deliveries Outbound email
53 DNS UDP Outbound Domain Name Service resolution Services not able to
Protocol Connection
type
Usage and description Effect if closed Default on
l
FTP access (disabled by default)
l
Data channel for FTP service
l
FTP access
l
Control channel for FTP access
l
SSH login service
l
EMC Secure Remote Support
console management
Note: EMC Secure Remote
Support does not support
IPv6.
FTP access is
unavailable.
FTP access is
unavailable.
SSH secure shell
access is
unavailable.
OneFS is
unavailable.
alerts from OneFS
are unavailable.
resolve domain
names.
installation
Disabled
Disabled
Enabled
Disabled
Disabled
Enabled
53 DNS TCP/UDP Inbound Domain Name Service requests SmartConnect DNS
resolution is
unavailable.
24 Isilon OneFS 8.2.x Security Configuration Guide Security Configuration Guide
Enabled

Network security
Port Service
name
Protocol Connection
type
Usage and description Effect if closed Default on
80 http TCP Inbound HTTP for file access HTTP access to
files is unavailable.
88 kerberos TCP/UDP Outbound Kerberos authentication services that
are used to authenticate users against
Microsoft Active Directory domains
111 rpc.bind TCP/UDP Inbound ONC RPC portmapper that is used to
locate services such as NFS, mountd,
and isi_cbind_d
123 ntp UDP Outbound Network Time Protocol used to
synchronize host clocks within the
cluster
Kerberos
authentication is
unavailable.
Cannot be closed;
disrupts core
functionality.
Cluster time cannot
be synchronized
with an external
NTP time source.
135 dcerpc TCP/UDP Inbound RPC Endpoint mapper service Witness
connections for
SMB continuous
availability are not
established.
137 netbios-nsUDP Inbound NetBIOS Name Service that provides
None. Disabled
name resolution service for preWindows 2000 SMB1 clients
installation
Disabled
Disabled
Enabled
Enabled
Enabled
138 netbios-
dgm
UDP Inbound NetBIOS Datagram Service that
provides legacy connectionless
None. Disabled
service for pre-Windows 2000 SMB1
clients
139 netbios-
ssn
TCP Inbound NetBIOS Session Service that
provides SMB1 support for preWindows 2000 clients
Old SMB1 clients
unable to use port
445 cannot access
the server.
161 snmp UDP Inbound Simple Network Management
Protocol support. Typically, agents
listen on port 161
162 snmptrapUDP Inbound Simple Network Management
Protocol support. Typically,
asynchronous traps are received on
SNMP
communications are
not available.
SNMP
communications are
not available.
port 162
300 mountd TCP/UDP Inbound NFSv3 mount service NFSv3 mount
service is not
available.
302 statd TCP/UDP Inbound NFS Network Status Monitor (NSM) The NSM service is
not available.
304 lockd TCP/UDP Inbound NFS Network Lock Manager (NLM) The NLM service is
not available.
Disabled
Enabled
Enabled
Enabled
Enabled
Enabled
389 ldap TCP/UDP Outbound Microsoft Active Directory domain
services. Used to fetch the list of
Isilon OneFS 8.2.x Security Configuration Guide Security Configuration Guide 25
The cluster cannot
fetch list of AD
Enabled

Network security
Port Service
name
389 ldap UDP Outbound CLDAP pings. Used to determine if a
Protocol Connection
type
Usage and description Effect if closed Default on
servers from the Active Directory
domain and other domain information
domains or verify
they are active.
The cluster cannot
domain server is running
perform user or
group lookups or
authentications
against LDAP or
Active Directory.
389 ldap TCP Outbound LDAP SASL (secure LDAP). Normally
used to query for user/group
information after authentication.
Note: Whether SASL is used is
configured on the AD/LDAP
servers, not on the cluster. During
The cluster cannot
perform user or
group lookups or
authentications
against LDAP or
Active Directory.
LDAP connection setup, there is
an option to determine whether to
use a secure connection.
443 https TCP Inbound HTTPS file access The /ifs directory
is not available.
installation
Enabled
Enabled
Disabled
443 https TCP Outbound Typical port for CloudPools access to
a cloud storage provider.
Note: Port 443 is typical, but not
always the correct port. The cloud
storage provider (or other archive
location such as ECS or another
Isilon cluster) may use or require a
different port. Customer load
balancers may also affect which
port is required for CloudPools
connections.
445 microsof
TCP Outbound SMB1 and SMB2 client Joining an Active
t-ds
445 microsof
TCP Inbound SMB1 and SMB2 server SMB server is not
t-ds
585 hdfs
(datanod
TCP (IPv4
only)
Inbound HDFS (Hadoop file system) HDFS is
e)
If CloudPools is
using this port,
CloudPools features
are not available.
Directory domain
and the NTLM
authentication
against it are not
possible.
available.
unavailable.
Disabled
Enabled
Enabled
Enabled
623 n/a TCP/UDP Inbound Reserved for hardware n/a Enabled
636 ldap TCP Outbound
l
LDAP Directory service queries
LDAP is unavailable. Disabled
that are used by OneFS Identity
services
l
Default port for LDAPS
26 Isilon OneFS 8.2.x Security Configuration Guide Security Configuration Guide

Network security
Port Service
name
Protocol Connection
type
Usage and description Effect if closed Default on
installation
664 n/a TCP/UDP Inbound Reserved for hardware n/a Enabled
989 ftps-
data
(implicit)
TCP Outbound
l
Secure FTP access (disabled by
default)
l
Secure data channel for FTP
Secure FTP access
is unavailable.
Disabled
service
990 ftps
(implicit)
2049 nfs TCP/UDP Inbound Network File Service (NFS) server The NFS server and
TCP Inbound
l
Secure FTP access
l
Control channel for FTP access
Secure FTP access
is unavailable.
Disabled
Enabled
all related NFS
services (including
mount, NSM, and
NLM) are not
available. NFS is an
important
component of the
OneFS interaction,
even if no NFS
exports are visible
externally.
2097 n/a TCP Inbound SyncIQ: isi_migr_pworker SyncIQ is
unavailable.
2098 n/a TCP Inbound SyncIQ: isi_migr_pworker SyncIQ is
unavailable.
3148 n/a TCP Inbound SyncIQ: isi_migr_bandwidth SyncIQ is
unavailable.
3149 n/a TCP Inbound SyncIQ: isi_migr_bandwidth SyncIQ is
unavailable.
3268 n/a TCP Outbound Microsoft Active Directory global
catalog search requests used when
joined to an Active Directory domain
through plaintext.
Some forms of
Active Directory
authentication
might not work,
depending on the
configuration.
3269 n/a TCP Outbound Microsoft Active Directory global
catalog search requests used when
joined to an Active Directory domain
through SSL.
Some forms of
Active Directory
authentication
might not work,
depending on the
configuration.
5019 ifs TCP Inbound/
Outbound
(Internal)
Isilon file system Intra-cluster
communication is
not available.
Disabled
Disabled
Disabled
Disabled
Disabled
Disabled
Enabled
5055 smartco
nnect
UDP Inbound
(Internal)
SmartConnect SmartConnect is
Enabled
unavailable.
Isilon OneFS 8.2.x Security Configuration Guide Security Configuration Guide 27

Network security
Port Service
name
Protocol Connection
type
Usage and description Effect if closed Default on
5667 n/a TCP Inbound SyncIQ: isi_migr_sworker SyncIQ is
unavailable.
5668 n/a TCP Inbound SyncIQ: isi_migr_sworker SyncIQ is
unavailable.
6557 n/a TCP Inbound Performance collector Performance
collection and
analysis is
unavailable.
8020 hdfs
(nameno
TCP (IPv4
only)
Inbound HDFS (Hadoop file system) HDFS is
unavailable.
de)
8080 apache2 TCP (IPv4
only)
Inbound
l
OneFS web administration
interface
l
OneFS API
l
WebHDFS
l
HTTPS
l
HTTP sessions
l
Restful access for namespace
(RAN)
l
OneFS web administration
interface
l
CloudPools, when a second Isilon
cluster is used for archiving
l
HTTPS access
to the web
administration
interface is
unavailable.
l
OneFS API is
unavailable.
l
HTTPS access
to WebHDFS is
unavailable.
l
RAN
unavailable.
l
CloudPools
archive to
another Isilon
cluster is
unavailable.
installation
Disabled
Disabled
Disabled
Enabled
Enabled
8081 VASA TCP Inbound
l
l
VASA
HTTPS
vCenter plug-in for
VMware
integrations is
unavailable.
8082 WebHDFSTCP (IPv4
only)
Inbound WebHDFS over HTTP Access to HDFS
data is unavailable
through WebHDFS.
8083 httpd TCP Inbound Swift protocol access Swift protocol
access is
unavailable.
8440 Ambari
agent
TCP (IPv4
only)
Outbound Handshake from Ambari agent to
Ambari server.
Ambari Agent is
unavailable to
monitor and report
status of HDFS
access zone.
8441 Ambari
agent
28 Isilon OneFS 8.2.x Security Configuration Guide Security Configuration Guide
TCP (IPv4
only)
Outbound Heartbeat status from Ambari agent
to Ambari server.
Ambari Agent is
unavailable to
Disabled
Disabled
Enabled
Disabled
Disabled

Network security
Port Service
name
8470 n/a TCP Inbound SyncIQ: isi_replicate SyncIQ is
8649 gmond TCP/ UDP Inbound Ganglia monitoring Ganglia monitoring
9443 isi_esrs_dTCP Outbound EMC Secure Remote Support
10000 NDMP TCP Inbound Network data management for
15100 isi_upgra
de_agen
t_d
Protocol Connection
type
TCP Inbound
(Internal)
Usage and description Effect if closed Default on
monitor and report
status of HDFS
access zone.
unavailable.
is unavailable.
EMC Secure
outbound alerts
backup
Isilon upgrade daemon Cluster reimages
Remote Support is
unable to send
alerts, log gathers,
and other event
data to Dell EMC
Isilon Technical
Support.
NDMP backup is
disabled.
are unavailable.
installation
Disabled
Disabled
Disabled
Disabled
Enabled
28080 lwswift TCP Inbound Swift protocol access Swift protocol
access is
unavailable.
OneFS services
To improve OneFS security, you should restrict access to the OneFS cluster by disabling network
services that you do not use.
Note:
There are some services that you should not disable, because doing so could have a
detrimental effect on cluster operations. The list in this section includes only those services
that can be disabled without disrupting other operations on the cluster. This list does not
include all of the network services available on OneFS.
You can disable network services by running the following command, where
of the service to disable:
isi services -a <service> disable
Disable the following services when they are not in use:
Service
name
Service
description
Service function Corresponding
daemons
Enabled
<service>
Default
setting
is the name
apache2 Apache2 Web
Server
Connects to the Apache web server.
Disabling apache2 disables file sharing over
HTTP/HTTPS, but the OneFS web interface
is still available.
Isilon OneFS 8.2.x Security Configuration Guide Security Configuration Guide 29
httpd Enabled

Network security
Service
name
Service
description
Service function Corresponding
hdfs HDFS Server Connects to Hadoop Distributed File System
(HDFS).
isi_migrate SyncIQ Service Replicates data from one Isilon cluster
(source) to another cluster (target).
isi_object_dIsilon Object
Services OneFS API requests. isi_object_d Enabled
Interface
isi_vasa_d The Isilon
VMware vSphere
API for Storage
Awareness
Allows virtual machine (VM) administrators to
deploy VMs based on storage capabilities.
OneFS communicates with VMware vSphere
through VASA.
(VASA) Provider
Daemon
isi_vc_d The Isilon for
vCenter Job
Daemon
Processes tasks that are sent from the NAS
plugin that is installed on the ESXi server to
the gconfig database.
Default
daemons
setting
lw-container hdfs Disabled
l
isi_migr_sched
l
isi_migrate
l
isi_migr_bandwidt
Enabled
h
l
isi_migr_pworker
l
isi_migr_sworker
isi_vasa_d Disabled
isi_vc_d Disabled
lwswift Swift Server Enables you to access file-based data that is
stored on the cluster as objects. The Swift
API is implemented as a set of
Representational State Transfer (REST) web
services over HTTP or secure HTTP (HTTPS).
Content and metadata can be ingested as
objects and concurrently accessed through
other supported Dell EMC Isilon protocols. For
ndmpd Network Data
more information, see the
Note
.
Backs up and restores services. isi_ndmp_d Disabled
Isilon Swift Technical
Management
Protocol Daemon
nfs NFS Server Manages Network File System (NFS) protocol
settings.
smb SMB Service Enables or disables the Server Message Block
(SMB) server.
lw-container lwswift Disabled
l
isi_netgroup_d
l
mountd
l
gssd
l
nfsd
l
rpc.statd
l
rpc.locked
l
srv
l
rdr
l
srvsvc
Enabled
Enabled
30 Isilon OneFS 8.2.x Security Configuration Guide Security Configuration Guide

Network security
Service
name
snmp SNMP Server Connects to the Simple Network Management
telnetd Telnet Server Connects to the Telnet server. telnetd Disabled
vsftpd VSFTPD Server Connects to the Very Secure FTP (VSFTPD)
Service
description
Service function Corresponding
daemons
snmpd Enabled
Protocol (SNMP) server.
vsftpd Disabled
server.
Default
setting
Mixed data-access protocol environments
With the OneFS operating system, you can access data with multiple file-sharing and transfer
protocols. As a result, Microsoft Windows, UNIX, Linux, and Mac OS X clients can share the same
directories and files.
The /ifs directory is the root directory for all file system data in the cluster, serving as an SMB
share, an NFS export, and a document root directory. You can create additional shares and exports
within the /ifs directory tree. You can configure your OneFS cluster to use SMB or NFS
exclusively, or both. You can also enable HTTP, FTP, and SSH.
Access rights are consistently enforced across access protocols on all security models. A user is
granted or denied the same rights to a file whether using SMB or NFS. Clusters running OneFS
support a set of global policy settings that enable you to customize the default access control list
(ACL) and UNIX permissions settings.
OneFS is configured with standard UNIX permissions on the file tree. Through Windows Explorer
or OneFS administrative tools, you can give any file or directory an ACL. In addition to Windows
domain users and groups, ACLs in OneFS can include local, NIS, and LDAP users and groups. After
a file is given an ACL, the mode bits are no longer enforced and exist only as an estimate of the
effective permissions.
For information about Data-access protocols, see the OneFS 8.2.0 Web Administration Guide and
the OneFS 8.2.0 CLI Command Reference.
FTP security
The FTP service is disabled by default. You can set the FTP service to allow any node in the cluster
to respond to FTP requests through a standard user account.
When configuring FTP access, ensure that the specified FTP root is the home directory of the user
who logs in. For example, the FTP root for local user jsmith should be ifshome/jsmith. You can
enable the transfer of files between remote FTP servers and enable anonymous FTP service on the
root by creating a local user named anonymous or ftp.
Note:
We recommend that you configure ACL and UNIX permissions only if you fully
understand how they interact with one another.
Note: As a security best practice, we recommend that you disable or place restrictions on all
protocols that you do not plan to support. For instructions, see the
access protocols
CAUTION
section of this guide.
The FTP service supports cleartext authentication. If you enable the FTP service,
Best practices for data-
the remote FTP server allows the user's name and password to be transmitted in cleartext and
authentication credentials might be intercepted. If you must use FTP, we recommend that you
enable TLS on the FTP service, and then connect with an FTP client that supports TLS.
Isilon OneFS 8.2.x Security Configuration Guide Security Configuration Guide 31

Network security
To enable TLS on the FTP service, you must change the <ssl_enable> property in
the /etc/mcp/sys/vsftpd_config.xml file on each node to the following configuration:
<ssl_enable default="NO">YES<isi-meta-tag id="ssl_enable" can-mod-text="yes"/></
ssl_enable>
HDFS security
There are no additional security options beyond what is listed in the HDFS Hadoop Guide.
HTTP and HTTPS security
There are no additional security options beyond what is listed in the OneFS 8.2.0 Web
Administration Guide and the OneFS 8.2.0 CLI Command Reference.
NFS security
There are no additional security options beyond what is listed in the OneFS 8.2.0 Web
Administration Guide and the OneFS 8.2.0 CLI Command Reference.
SMB security
For information about SMB that is not covered in this section, see the OneFS 8.2.0 Web
Administration Guide and the OneFS 8.2.0 CLI Administration Guide.
SMB security settings
You can view and configure the security settings of an SMB share by clicking Protocols >
Windows Sharing (SMB) > SMB Shares, selecting the share, clicking View/Edit, and then
clicking Edit SMB Share. You can view and configure the default SMB share security settings by
clicking Protocols > Windows Sharing (SMB) > Default Share Settings. The security settings
are available in the Advanced Settings section.
Note:
Changes that are made directly to an SMB share override the default settings that are
configured from the Default Share Settings tab.
Setting Setting value
Create Permission Sets the default source permissions to apply
when a file or directory is created. The default
value is Default acl.
Directory Create Mask Specifies UNIX mode bits that are removed
when a directory is created, restricting
permissions. Mask bits are applied before
mode bits are applied. The default value is
that the user has Read, Write, and
Execute permissions.
Directory Create Mode Specifies UNIX mode bits that are added
when a directory is created, enabling
32 Isilon OneFS 8.2.x Security Configuration Guide Security Configuration Guide

Setting Setting value
permissions. Mode bits are applied after mask
bits are applied. The default value is None.
File Create Mask Specifies UNIX mode bits that are removed
when a file is created, restricting permissions.
Mask bits are applied before mode bits are
applied. The default value is that the user has
Read, Write, and Execute permissions.
File Create Mode Specifies UNIX mode bits that are added
when a file is created, enabling permissions.
Mode bits are applied after mask bits are
applied. The default value is that the user has
Execute permissions.
Impersonate Guest Determines guest access to a share. The
default value is Never.
Impersonate User Allows all file access to be performed as a
specific user. This must be a fully qualified
user name. The default value is No value.
Network security
NTFS ACL Allows ACLs to be stored and edited from
Access Based Enumeration Allows access based enumeration only on the
HOST ACL The ACL that defines host access. The default
Configuring SMB
You can configure global and share-level SMB settings that specify the behavior of client
connections through the SMB protocol.
SMB data access to the cluster is enabled by default. In addition, Isilon provides the following
default configurations with no access restrictions:
l
l
Isilon cluster administrators must consider whether these configurations are suitable for their
deployment, and manage the security implications appropriately.
For more information about SMB and additional SMB management tasks, see the
Administration Guide
SMB clients. The default value is Yes.
files and folders that the requesting user can
access. The default value is No.
value is No value.
An unrestricted SMB share (/ifs)
Unlimited access to the /ifs directory for the Everyone account
or the
OneFS CLI Administration Guide
.
OneFS Web
Isilon OneFS 8.2.x Security Configuration Guide Security Configuration Guide 33

Network security
34 Isilon OneFS 8.2.x Security Configuration Guide Security Configuration Guide

CHAPTER 6
Physical security
This section contains the following topics:
l
Physical security overview.................................................................................................... 36
l
Security of the data center................................................................................................... 36
l
Physical ports on Isilon nodes................................................................................................36
l
Statements of Volatility.........................................................................................................37
Isilon OneFS 8.2.x Security Configuration Guide Security Configuration Guide 35

Physical security
Physical security overview
Physical security addresses a different class of threats than the operating environment and user
access security concepts that are discussed elsewhere in this guide. The objective of physical
security is to safeguard company personnel, equipment, and facilities from theft, vandalism,
sabotage, accidental damage, and natural or man-made disasters.
Physical security concepts are applicable to all corporate facilities, but data center security is most
relevant in terms of Isilon deployment.
Security of the data center
Isilon components are not designed to be self-secure in either resource discrimination or physical
access. For example, drive data encryption keys reside on node hardware. If access is gained to
these components, security of the data cannot be guaranteed. Thus, data center physical security
is a necessary compensating control.
In addition to superior resource delivery, a secure data center protects Isilon components from
security violations at the physical level including:
l
Malicious power reset
l
Interference with internal cabling
l
Unauthorized local access to communication ports
l
Unauthorized local access to internal node components
Optimal operation of an Isilon cluster is achieved when the cluster is installed in a data center
where proper measures have been taken to protect equipment and data. Refer to the
Preparation and Planning Guide
Isilon Site
for complete data center requirements.
Physical ports on Isilon nodes
There are several types of Isilon nodes. Refer to the node installation guide for a particular node
type to find the locations and descriptions of each of the ports.
Follow these security guidelines when using the ports on a node:
l
Connect only the minimum number of cables required. If you do not need to use a port, leave it
empty.
l
Follow the instructions in the node installation guide about which ports to use, and which ports
not to use.
l
You can connect to a node using a serial cable and enter single user mode. Exception:
SmartLock compliance clusters do not allow you to boot into single user mode.
l
Contact Isilon Technical Support if you have any questions.
Disable USB ports on Isilon nodes
Disabling of USB ports on Isilon nodes is supported though BIOS options. Disabling the USB ports
on nodes will prevent USB devices from interacting with OneFS, and unauthorized copying of data
via USB storage devices.
About this task
Procedure
1. Restart the node.
36 Isilon OneFS 8.2.x Security Configuration Guide Security Configuration Guide

2. Execute break sequence during node boot.
3. On the BIOS main screen, select Advanced > Advanced Chipset Con
4. Set USB Functions to Disabled
5. Set USB 2.0 Controller to Disabled
6. Set BIOS EHCI Hand-Off to Disabled
7. Save and exit BIOS
8. Reboot the node
Statements of Volatility
A Statement of Volatility (SOV) details the conditions under which the non-disk components of
physical Isilon products, such as storage arrays or physical appliances, are capable of retaining
data when power is removed. It is important to understand which parts of a product contain (and
retain) customer-specific data when power is removed, because the data may be sensitive or
covered by breach, scrubbing, or data retention requirements.
Statements of Volatility are not directly customer accessible, but can be made available to
customers on request. Contact your account team for assistance.
Physical security
Isilon OneFS 8.2.x Security Configuration Guide Security Configuration Guide 37

Physical security
38 Isilon OneFS 8.2.x Security Configuration Guide Security Configuration Guide

CHAPTER 7
Security best practices
This section contains the following topics:
l
Overview...............................................................................................................................40
l
PCI compliance...................................................................................................................... 41
l
General cluster security best practices..................................................................................42
l
Login, authentication, and privileges best practices...............................................................51
l
SNMP security best practices...............................................................................................56
l
SSH security best practices.................................................................................................. 57
l
Data-access protocols best practices....................................................................................58
l
Web interface security best practices...................................................................................65
Isilon OneFS 8.2.x Security Configuration Guide Security Configuration Guide
39

Security best practices
Overview
This chapter provides suggestions and recommendations to help administrators maximize security
on Isilon clusters. Consider these recommendations in the context of your specific business
policies and use cases.
Root-level privileges are required to perform many of the procedures. However, this chapter also
includes procedures to use the following options instead:
l
Restrict the root account and use an RBAC account with root privileges
l
Restrict the root account and use the sudo command with privilege elevation
If a procedure requires you to "log in as root," it is assumed that you will log in using a businessauthorized privileged account, whether it be root, an RBAC account with root privileges, or sudo.
Note:
Ensure that you have the latest security patches installed. For more information, see the
Current Isilon OneFS Patches document on the Customer support site.
Persistence of security settings
Some of these best practice configurations do not persist after OneFS is upgraded, and might not
persist after a patch for OneFS is applied. For best results, keep track of which best practices you
implement, so that if the settings do not persist, you can configure them again.
The following table lists each of the best practices that are described in this chapter.
You can use the second column of the table as a checklist to track which security settings you
implement on the cluster.
Security setting
General cluster best practices
Create a login message
Set a timeout for idle CLI sessions
Set a timeout for idle SSH sessions
Forward audited events to a remote server
Firewall security
Disable OneFS services that are not in use
Configure WORM directories using SmartLock
Back up cluster data
Specify an NTP time server
Implemented on cluster?
Login, authentication, and privileges best practices
Restrict root logins to the cluster
Assign RBAC access and privileges
Privilege elevation: Assign select root-level
privileges to non-root users
Restrict authentication by external providers
SNMP best practices
40 Isilon OneFS 8.2.x Security Configuration Guide Security Configuration Guide

Security setting Implemented on cluster?
Use SNMPv3 for cluster monitoring
Disable SNMP
SSH best practices
Restrict SSH access to specific users and groups
Disable root SSH access to the cluster
Data-access protocols best practices
Use a trusted network to protect files and
authentication credentials that are sent in
cleartext
Use compensating controls to protect
authentication credentials that are sent in
cleartext
Use compensating controls to protect files that
are sent in cleartext
Disable FTP access
Security best practices
Limit or disable HDFS access
Limit or disable HTTP access
NFS best practices
SMB best practices
SMB signing
Disable Swift access
Web interface best practices
Replace the TLS certificate
Secure the web interface headers
Accept up-to-date versions of TLS in the web
interface
PCI compliance
Configure the cluster to meet PCI compliance
About this task
Should it become required for the cluster to meet PCI compliance, root ssh must be disabled.
Procedure
1. Open a secure shell (SSH) connection to any node in the cluster and log in with
ISI_PRIV_AUTH privileges.
Isilon OneFS 8.2.x Security Configuration Guide Security Configuration Guide 41

Security best practices
2. Run the following command to disable root ssh:
isi ssh settings modify --permit-root-login False
Note:
If SSH access is still desired for other users, ensure there is at least one other user with
SSH privileges on the cluster.
To verify this on the command line interface, run the following command to confirm
there is at least one non-root user listed:
isi auth roles view SecurityAdmin
To verify on the OneFS web administration interface, click Access > Membership and
Roles > Roles > tab. Select the view/edit button in the SecurityAdmin section.
General cluster security best practices
The following general security recommendations can be applied to any cluster.
Create a login message
The login message appears as a separate box on the login page of the OneFS web administration
interface, and also as the last line of introductory text on the command-line interface after a user
logs in. The login message can convey information, instructions, or warnings that a user should
know before using the cluster. Note: Login messages convey policy information and are typically
written in conjunction with a legal team.
Procedure
1. On the OneFS web administration interface, click Cluster Management > General
Settings > Cluster Identity.
2. (Optional) In the Login Message area, type a title in the Message Title field and a message
in the Message Body field.
3. Click Save Changes.
Manifest check to confirm install authenticity and integrity
Download and extract the installer and the signed manifest
Procedure
1. If you do not have the signature release artifacts, these are on the Online support site:
https://support.emc.com/search/?text=OneFS_v8.2.2.0_signature.tar.
2. Run the following command to extract the signed manifest and signature:
tar -xf OneFS_v8.2.2.0_signature.tar
42 Isilon OneFS 8.2.x Security Configuration Guide Security Configuration Guide

Verify the OneFS Install Signature from the Certificate Authority
To independently verify the authenticity and integrity of the certificate of your OneFS install file,
you can validate that the Manifest.sha256.signed file is a valid signature of
Manifest.sha256, signed with the Dell code signing cert that is issued from the external
Certificate authority Entrust, Inc.
There are three steps in this procedure:
1. Verify Manifest.sha256.signed is signed by a Dell Code Signing Certificate.
2. Verify that Manifest.sha256.signed is the signature for the Manifest.sha256.
3. Verify the SHA256 hash in Manifest.sha256 matches that of your installer.
Verify Manifest.sha256.signed is signed by a Dell Code Signing Certificate.
Procedure
1. Run the following command to check that the key signing this is issued to Dell:
openssl x509 -noout -subject -in Manifest.sha256.signed
Security best practices
2. One of the following outputs should display, depending on your version of OpenSSL:
subject=C = US, ST = Texas, L = Round Rock, O = Dell Technologies Inc.,
OU = Isilon OneFS, CN = Dell Technologies Inc.
subject= /C=US/ST=Texas/L=Round Rock/O=Dell Technologies Inc./OU=Isilon
OneFS/CN=Dell Technologies Inc.
3. For UNIX-like environments that have OpenSSL and already trust the Entrust CA (this is
common), run the following command to verify that our certificate signed the
Manifest.sha256.signed file:
openssl verify Manifest.sha256.signed
4. The following output should display:
Manifest.sha256.signed: OK
5. If you do not have the Entrust CA already trusted, the following output will display showing
the Dell certificate, but will state it cannot find the trust of the Entrust certificate. In this
case, proceed to the next procedure, Manually verify using our CA. Otherwise, proceed to
the subsequent procedure.
C = US, ST = Texas, L = Round Rock, O = Dell Technologies Inc., OU =
Isilon OneFS, CN = Dell Technologies
Isilon OneFS 8.2.x Security Configuration Guide Security Configuration Guide 43

Security best practices
Inc.
error 20 at 0 depth lookup: unable to get local issuer certificate
Manually verify using our CA
If your system does not currently trust the Entrust CA and the codesigning intermediary, you can
still verify this by obtaining and using the public key for the root CA and the intermediate CA that
is signing the Dell key. To build the CA bundle, concatenate the public keys in the PEM format as
follows.
Procedure
1. Get the intermediate CA public der format key and save as PEM:
curl http://aia.entrust.net/ovcs1-chain256.cer | openssl x509 -inform
der > ovcs1-chain256.pem
2. Get the root CA public PEM format key:
curl -k https://www.entrust.com/root-certificates/entrust_g2_ca.cer >
entrust_g2_ca.pem
cat entrust_g2_ca.pem ovcs1-chain256.pem > EntrustCodeSignedBundle
3. Run the following command to verify the correct key is present:
openssl x509 -in EntrustCodeSignedBundle -fingerprint -noout
4. The following output should display:
SHA1
Fingerprint=8C:F4:27:FD:79:0C:3A:D1:66:06:8D:E8:1E:57:EF:BB:93:22:72:D4
Verify that Manifest.sha256.signed is the signature for the Manifest.sha256.
Procedure
1. Run the following command to verify the Manifest.sha256.signed file:
openssl verify -CAfile EntrustCodeSignedBundle Manifest.sha256.signed
2. The following output should display:
Manifest.sha256.signed: OK
44 Isilon OneFS 8.2.x Security Configuration Guide Security Configuration Guide

Verify the SHA256 hash in Manifest.sha256 matches that of your installer.
Note: This procedure may be done either with the included manifest files or directly on the archive,
which may be the full install or a patch file.
Procedure
1. Using the OneFS_v8.2.2.0_Install.tar.gz files as the example for this step, run the
following commands to verify the hash:
INSTALLER=OneFS_v8.2.2.0_Install.tar.gz
sha256sum $INSTALLER 2>/dev/null || sha256 $INSTALLER
grep 'OneFS_v8.2.2.0_Install.tar.gz$' Manifest.sha256
2. The outputs should list the same hexadecimal hashes.
Set a timeout for idle CLI sessions (CLI)
Security best practices
The timeout value is the maximum period after which a user's inactive CLI session is terminated.
This timeout applies to both SSH connections and serial console connections that are running in
the bash, rbash, ksh, and zsh shells.
About this task
For additional security, it is recommended that you also configure an idle SSH session timeout (see
the
Set a timeout for idle SSH sessions
section of this guide). If you configure both timeouts, the
shorter timeout applies to SSH sessions only.
Note:
These changes take effect for all new shell logins for all existing and new users. Users
who are logged in while these changes are being made will not be affected by these changes
until they log out and log in again.
Procedure
1. Open a secure shell (SSH) connection to any node in the cluster and log in as root.
2. Create a backup directory by running the following command:
mkdir /ifs/data/backup/
3. Set the permissions on the backup directory to 700:
chmod 700 /ifs/data/backup
4. Check whether the /etc/profile file exists on every node in the cluster:
isi_for_array 'test -f /etc/profile || echo /etc/profile \
missing on node `hostname`'
If the file exists on every node in the cluster, there is no output. If the file does not exist on
every node, the output displays which nodes do not contain the file.
Isilon OneFS 8.2.x Security Configuration Guide Security Configuration Guide 45

Security best practices
5. Perform one of the following actions:
l
If the file exists on every node in the cluster, run the following two commands to make a
working copy and a backup copy in the /ifs/data/backup directory:
cp /etc/profile /ifs/data/backup/profile
cp /etc/profile /ifs/data/backup/profile.bak
Note: If a file with the name profile.bak exists in the backup directory, either
overwrite the existing file, or, to save the old backups, rename the new file with a
timestamp or other identifier.
l
If the file does not exist on every node in the cluster, the integrity of the OneFS
installation is in doubt. Stop here and contact Isilon Technical Support to check the
OneFS installation on the node. This file is part of a normal installation and it is important
to understand how and why it was removed.
6. Open the /ifs/data/backup/profile file in a text editor.
7. Add the following lines at the end of the file, after the # End Isilon entry. Replace
<seconds>
with the timeout value in seconds. For example, a 10-minute timeout would be
600 seconds.
# Begin Security Best Practice
# Set shell idle timeout to <seconds> seconds
TMOUT=<seconds>
export TMOUT
readonly TMOUT
# End Security Best Practice
8. Confirm that the changes are correct. Then save the file and exit the text editor.
9. Check whether the /etc/zprofile file exists, and then do one of the following things:
l
If the file exists, run the following two commands to make a working copy and a backup
copy in the /ifs/data/backup directory:
cp /etc/zprofile /ifs/data/backup/zprofile
cp /etc/zprofile /ifs/data/backup/zprofile.bak
Note:
If a file with the name zprofile.bak exists in the backup directory, either
overwrite the existing file, or, to save the old backups, rename the new file with a
timestamp or other identifier.
l
If the file does not exist, create it in the /ifs/data/backup directory:
touch /ifs/data/backup/zprofile
10. Open the /ifs/data/backup/zprofile file in a text editor.
11. Add the same lines that you added to the /ifs/data/backup/profile file, where
<seconds>
# Begin Security Best Practice
# Set shell idle timeout to <seconds> seconds
46 Isilon OneFS 8.2.x Security Configuration Guide Security Configuration Guide
is the timeout value in seconds. Add these lines at the very end of the file:

Security best practices
TMOUT=<seconds>
export TMOUT
readonly TMOUT
# End Security Best Practice
12. Confirm that the changes are correct. Then save the file and exit the text editor.
13. Set the permissions on both files to 644 by running the following command:
chmod 644 /ifs/data/backup/profile /ifs/data/backup/zprofile
14. Run the following two commands to copy the two files to the /etc directory on all of the
nodes in the cluster:
isi_for_array 'cp /ifs/data/backup/profile /etc/profile'
isi_for_array 'cp /ifs/data/backup/zprofile /etc/zprofile
15.
(Optional) Delete the working and backup copies from the /ifs/data/backup directory:
rm /ifs/data/backup/profile /ifs/data/backup/profile.bak \
/ifs/data/backup/zprofile /ifs/data/backup/zprofile.bak
Set a timeout for idle SSH sessions (CLI)
The timeout value is the maximum period after which a user's inactive SSH session is terminated.
About this task
If you are connected to the cluster through a serial console, the SSH timeout does not apply.
Therefore, it is recommended that you also configure an idle CLI session timeout for additional
security. For instructions, see the
Note:
If you configure both timeouts, the shorter timeout applies to SSH sessions only.
Procedure
1. Open a secure shell (SSH) connection to any node in the cluster and log in as root.
2. Create a backup directory by running the following command:
mkdir /ifs/data/backup/
3. Set the permissions on the backup directory to 700:
Set a timeout value for idle CLI sessions
section of this guide.
chmod 700 /ifs/data/backup
4. Make a working copy of the /etc/mcp/templates/sshd_config file in the backup
directory:
cp /etc/mcp/templates/sshd_config /ifs/data/backup/
Isilon OneFS 8.2.x Security Configuration Guide Security Configuration Guide 47

Security best practices
5. Make a backup copy of the /etc/mcp/templates/sshd_config file in the backup
directory:
cp /etc/mcp/templates/sshd_config \
/ifs/data/backup/sshd_config.bak
Note: If a file with the same name exists in the backup directory, either overwrite the
existing file, or, to save the old backups, rename the new file with a timestamp or other
identifier.
6. Open the /ifs/data/backup/sshd_config file in a text editor.
7. Find the existing KeepAlive line and edit it as shown here. Then add two new lines directly
below that line, as shown, where
<seconds>
is the timeout value in seconds. For example, to
configure a 10-minute timeout, the number of seconds would be 600. Enclose these three
lines with # Begin Security Best Practice and # End Security Best
Practice.
# Begin Security Best Practice
KeepAlive no
ClientAliveInterval <seconds>
ClientAliveCountMax 0
# End Security Best Practice
8. Confirm that the changes are correct. Then save the file and exit the text editor.
9. Copy the updated file to the /etc/mcp/templates directory on all nodes:
isi_for_array 'cp /ifs/data/backup/sshd_config \
/etc/mcp/templates/sshd_config'
10. (Optional) Delete the working and backup copies from the /ifs/data/backup directory:
rm /ifs/data/backup/sshd_config \
/ifs/data/backup/sshd_config.bak
11. Restart the sshd service by running the following command:
Note:
Restarting the sshd service disconnects all current SSH connections to the
cluster. To minimize the potential impact, coordinate this activity with other cluster
administrators.
isi_for_array 'killall -HUP sshd'
Forward audited events to remote server
We strongly recommend that you use the auditing and audit forwarding capabilities in OneFS .
Auditing can detect many potential sources of data loss, including fraudulent activities,
48 Isilon OneFS 8.2.x Security Configuration Guide Security Configuration Guide

inappropriate entitlements, and unauthorized access attempts. Forwarding audited events to a
remote server has the following security benefits:
l
You can scan the data for security issues on the remote server and avoid interfering with
cluster operation or performance.
l
You can send syslog output from multiple locations to the same remote server, and run
scanning software on all of the logs in one location. This may be easier and more convenient
than trying to run scanning software on the cluster.
l
When hackers access a system such as an Isilon cluster, they try to erase their tracks. If audit
information is forwarded to a remote server, the audit trail on the remote server is preserved,
making identification and containment of the breach faster and easier.
l
If the cluster node that contains the syslog events fails, you can still access the information
that was forwarded to the remote server for diagnosis and troubleshooting.
Instructions for forwarding audited events to a remote server
To forward protocol access auditing and system configuration changes to a remote server, you
must enable auditing, enable the forwarding of audited events to syslog, and configure syslog
forwarding on the cluster.
Procedure
Security best practices
1. Enable auditing and forwarding to syslog. For instructions, see the OneFS 8.2.0 Web
Administration Guide and the OneFS 8.2.0 CLI Command Reference.
2. Configure syslog forwarding on the cluster. For instructions, see the OneFS: How to
configure remote logging from a cluster to a remote server (syslog forwarding).
Firewall security
Use an external firewall to limit access to the cluster to only those trusted clients and servers that
require access. Allow restricted access only to ports that are required for communication. Block
access to all other ports.
We recommend that you limit access to the cluster web administration interface to specific
administrator terminals via IP address, or isolate web-based access to a specific management
network.
See the
Network port usage
section of this guide for more information about all of the ports on the
Isilon cluster.
Disable OneFS services that are not in use
OneFS has a number of services that are safe to disable when they are not in use.
See the
OneFS Services
section of this guide for a list of all of the services that should be disabled
when they are not in use, and instructions for disabling them.
Configure WORM directories using SmartLock
Use the SmartLock feature to create write-once read-many (WORM) directories to protect files
from being modified for a specified retention period.
Note:
WORM file access does not protect against hardware or file system issues. If the data
on the cluster becomes unavailable, the WORM files are also unavailable. Therefore, we
recommend that you additionally back up the cluster data to separate physical devices.
Isilon OneFS 8.2.x Security Configuration Guide Security Configuration Guide 49

Security best practices
Back up cluster data
OneFS offers a range of options to preserve user and application data in the event of accidental or
malicious modification, deletion, or encryption (for example, through a ransomware attack).
We strongly recommend that you use local snapshots, plus either SyncIQ replication or NDMP
backups, to protect data in case it becomes compromised.
Option Required
license
Replication to
a secondary
Isilon cluster
NDMP
backups
SyncIQ Replicate data from one Isilon cluster to another. You can specify
None Back up and restore data through the Network Data Management
Description
which files and directories to replicate. SyncIQ also offers
automated failover and failback capabilities so that you can
continue operations on the secondary cluster should the primary
cluster become unavailable. While this option does not make the
data more secure, it does provide a backup if the data is
compromised or lost.
It is recommended that the secondary cluster be located in a
different geographical area from the primary cluster to protect
against physical disasters. It is also recommended that the
secondary cluster have a different password from the primary
cluster in case the primary cluster is compromised.
Protocol (NDMP). From a backup server, you can direct backup
and restore processes between the cluster and backup devices
such as tape devices, media servers, and virtual tape libraries
(VTLs). While this option does not make the original data more
secure, it does provide a backup if the data is compromised or lost.
It is recommended that the external backup system be located in a
different geographical area from the Isilon cluster to protect
against physical disasters.
Local
snapshots
SnapshotIQ Snapshots protect data against accidental deletion and
modification by enabling you to restore deleted and modified files.
Snapshots do not protect against hardware or file system issues.
Snapshots reference data that is stored on a cluster. If the data on
the cluster becomes unavailable, the snapshots are also
unavailable. Therefore, it is recommended that you additionally
back up the cluster data to separate physical devices.
Use NTP time
Network Time Protocol (NTP) is recommended as the most consistent source for cluster time. In a
Windows environment, it is strongly recommended to use the Active Directory Domain Control
NTP service.
Use the OneFS web administration interface to configure NTP time service synchronization to an
external time service.
For additional recommendations for using NTP time with Smartlock directories and Smartlock
compliance mode, see the OneFS 8.2.0 Web Administration Guide and the OneFS 8.2.0 CLI
Command Reference.
50 Isilon OneFS 8.2.x Security Configuration Guide Security Configuration Guide

Specify an NTP time server
You can specify one or more Network Time Protocol (NTP) servers to synchronize the system
time on the Isilon cluster. The cluster periodically contacts the NTP servers and sets the date and
time based on the information that it receives.
Procedure
1. Click Cluster Management > General Settings > NTP.
2. In the NTP Servers area, type the IPv4 or IPv6 address of one or more NTP servers. If you
want to use a key file, type the key numbers in the field next to the server's IP address.
Click Add Another NTP Server if you are specifying multiple servers.
3. (Optional) If you are using a key file for the NTP server, type the file path for that file in the
Path to Key File field.
4. In the Chimer Settings area, specify the number of chimer nodes that contact NTP servers
(the default is 3).
5. To exclude a node from chiming, type its logical node number (LNN) in the Nodes Excluded
from Chiming field.
6. Click Save Changes.
Security best practices
Login, authentication, and privileges best practices
Following are security best practice recommendations for configuring how users will log in to the
cluster, authenticate, and access privileges.
Restrict root logins to the cluster
A strong security stance entails using the root account as little as possible. You can use one or
more of the following methods to restrict root access to the cluster:
l
Use SmartLock compliance mode to completely remove root access to the cluster. This is the
most restrictive method. When you are logged in to a SmartLock compliance mode cluster
through the compliance administrator account, you can perform administrative tasks through
the sudo command. Using the sudo command provides an audit trail by logging all command
activity to /var/log/auth.log.
l
Disable root SSH access to the cluster. You can still log in as root using other methods. See
the
Disable root SSH access to the cluster
l
Limit the number of people who know the root password by doing one or both of the following:
n
Assign admin users an RBAC role with only the privileges that they require to do their job.
n
If an admin user needs greater privileges than the RBAC role can provide, use privilege
elevation to give them select root-level privileges.
Use RBAC accounts instead of root
section of this guide for details and instructions.
Instead of using the root account, assign roles and privileges to users and groups as needed by
using the role-based access control (RBAC) functionality. The following RBAC best practices are
recommended:
l
Ensure that each administrator has a unique user account. Do not allow users to share
accounts.
Isilon OneFS 8.2.x Security Configuration Guide Security Configuration Guide 51

Security best practices
l
For each user and group, assign the lowest level of privileges required.
l
Use privilege elevation to assign select root-level privileges to specified users as needed.
Privilege elevation: Assign select root-level privileges to non-root users
A root account is necessary for some cluster administrative purposes, but for security reasons the
root privileges should be closely monitored. Instead of providing the root account to an
administrator, you can elevate the administrator's privileges so that they can run selected rootlevel commands using sudo. Using the sudo command also provides an audit trail by logging all
command activity to /var/log/auth.log.
About this task
Note: This procedure is not intended for use on clusters that are in SmartLock compliance
mode. In SmartLock compliance mode, the compadmin account exists with the correct sudo
infrastructure.
Note: Users who are logged in while these changes are being made will not be affected by
these changes until they log out and log in again.
You can also perform steps 1 - 5 of this procedure by using the OneFS web interface. See the
OneFS Web Administration Guide
for instructions.
Procedure
1. Open a secure shell (SSH) connection to any node in the cluster and log in as root.
2. Run the following command to create a group to assign elevated privileges to, where
<groupname>
is the name of the group. This group must be in the local provider and System
zone.
isi auth groups create <groupname> --provider local --zone system
For example, we can create a group named SPECIAL, as follows:
isi auth groups create SPECIAL --provider local --zone system
3. (Optional) Verify that the users that you want to add to the SPECIAL group are already
members of either the SystemAdmin or the SecurityAdmin role. Since these two roles have
strong security privileges, this step ensures that the user has already been approved for a
high level of access. To check whether the user is a member of the SystemAdmin or
SecurityAdmin role, run the following two commands to list the members of those roles:
isi auth roles members list SystemAdmin
isi auth roles members list SecurityAdmin
4. Run the following command to add a user to the group you will assign elevated privileges to,
where
<groupname>
is the name of the group and
you want to add:
isi auth groups modify <groupname> –-add-user <username>
52 Isilon OneFS 8.2.x Security Configuration Guide Security Configuration Guide
<username>
is the name of the user that

Security best practices
For example, to add a user named bob to the SPECIAL group, the command would be:
isi auth groups modify SPECIAL –-add-user bob
5. Run the following command to confirm that the user has been added to the group:
isi auth groups members list <groupname>
6. Create a backup directory by running the following command:
mkdir /ifs/data/backup/
7. Set the permissions on the backup directory to 700:
chmod 700 /ifs/data/backup
8. Make a working copy of the /etc/mcp/override/sudoers file in the backup directory:
cp /etc/mcp/override/sudoers /ifs/data/backup
9. Make a backup copy of the /etc/mcp/override/sudoers file in the backup directory:
cp /etc/mcp/override/sudoers /ifs/data/backup/sudoers.bak
Note:
If a file with the same name exists in the backup directory, either overwrite the
existing file, or, to save the old backups, rename the new file with a timestamp or other
identifier.
10. Open the /ifs/data/backup/sudoers file in a text editor.
11. Add the following entry, where
Note:
You can make additional changes to this entry as described in the last bullet
<groupname>
is the name of the group:
below.
# Begin Security Best Practices
%<groupname> ALL=(ALL) PASSWD: PROCESSES, SYSADMIN, ISI, ISI_ADMIN, \
ISI_SUPPORT, ISI_HWTOOLS, ISI_HARDENING
# End Security Best Practices
For example, for the SPECIAL group, the entry would look like the following:
%SPECIAL ALL=(ALL) PASSWD: PROCESSES, SYSADMIN, ISI, ISI_ADMIN, \
ISI_SUPPORT, ISI_HWTOOLS, ISI_HARDENING
This entry in the sudoers file provides the following security benefits:
Isilon OneFS 8.2.x Security Configuration Guide Security Configuration Guide 53

Security best practices
l
Requires the user to preface all root-level commands with sudo.
l
Requires the user to type the user password the first time that they run a sudo
command in a session, and caches these credentials for five minutes. After five minutes,
the user must re-type the user password to run sudo commands.
l
Assigns a comma-separated list of command sets (called command aliases) to the group
(for example, PROCESSES, SYSADMIN, ISI, and so on). The command aliases that are
listed in the line as written above include all of the diagnostic and hardware tools
available, making the privileges equivalent to the compadmin role in a SmartLock
compliance mode cluster. You can modify the line to include fewer command aliases, or
different command aliases, to allow only the privileges that you want the group to have.
To see the available command aliases and the lists of commands included in each alias,
review the /etc/mcp/templates/sudoers file.
CAUTION Do not modify the /etc/mcp/templates/sudoers file.
12. Confirm that the changes are correct. Then save the file and exit the text editor.
13. Copy the /ifs/data/backup/sudoers file to the /etc/mcp/override/sudoers file.
cp /ifs/data/backup/sudoers /etc/mcp/override/sudoers
14. To identify the commands that are now available to the user, log in as the user and run the
following command:
sudo -l
The output looks similar to the following. The privileges listed after (ALL) NOPASSWD are
the privileges for the user's assigned RBAC role, and they do not require the user to re-type
the user password to use the privileges. The commands listed after (ALL) PASSWD are the
sudo commands that are available to the user, and they require the user to type the user
password after typing the command.
Note:
If the user's existing RBAC role includes commands that are also granted by
privilege elevation, then the user does not need to re-type the user password to access
these commands.
User bob may run the following commands on this host:
(ALL) NOPASSWD: ISI_PRIV_SYS_TIME, (ALL) /usr/sbin/isi_upgrade_logs,
(ALL)
ISI_PRIV_ANTIVIRUS, (ALL) /usr/sbin/isi_audit_viewer, (ALL)
ISI_PRIV_CLOUDPOOLS, (ALL) ISI_PRIV_CLUSTER, (ALL) ISI_PRIV_DEVICES,
(ALL)
ISI_PRIV_EVENT, (ALL) ISI_PRIV_FILE_FILTER, (ALL) ISI_PRIV_FTP, (ALL)
ISI_PRIV_HARDENING, (ALL) ISI_PRIV_HDFS, (ALL) ISI_PRIV_HTTP, (ALL)
ISI_PRIV_JOB_ENGINE, (ALL) ISI_PRIV_LICENSE, (ALL) ISI_PRIV_NDMP,
(ALL)
ISI_PRIV_NETWORK, (ALL) ISI_PRIV_NFS, (ALL) ISI_PRIV_NTP, (ALL)
ISI_PRIV_QUOTA, (ALL) ISI_PRIV_REMOTE_SUPPORT, (ALL)
ISI_PRIV_SMARTPOOLS,
(ALL) ISI_PRIV_SMB, (ALL) ISI_PRIV_SNAPSHOT, (ALL) ISI_PRIV_SNMP,
(ALL)
ISI_PRIV_STATISTICS, (ALL) ISI_PRIV_SWIFT, (ALL) ISI_PRIV_SYNCIQ,
(ALL)
ISI_PRIV_VCENTER, (ALL) ISI_PRIV_WORM
(ALL) PASSWD: /bin/date, /sbin/sysctl, /sbin/shutdown, /bin/ps,
/usr/sbin/ntpdate, /sbin/ifconfig, /usr/sbin/newsyslog, /usr/sbin/
nfsstat,
/usr/sbin/pciconf, /usr/sbin/tcpdump, (ALL) /usr/bin/isi_classic,
54 Isilon OneFS 8.2.x Security Configuration Guide Security Configuration Guide

/usr/bin/isi_for_array, /usr/bin/isi_gconfig, /usr/bin/isi_job_d,
/usr/bin/isi_vol_copy
15. Verify that everything looks correct.
16. (Optional) Delete the working and backup copies from the /ifs/data/backup directory:
rm /ifs/data/backup/sudoers /ifs/data/backup/sudoers.bak
About this task
Note: The ISI_PRIV_JOB_ENGINE privilege allows the user to run jobs through the Job
Engine. These jobs currently run as root. Under specific circumstances, the user then may be
able to use some of these jobs to delete entire sections of OneFS, or to acquire ownership of
files to which the user normally would not have access. Care must therefore be exercised
when granting this privilege. The recommendation is to only grant this level to trusted users.
Restrict authentication by external providers
OneFS provides certain system-defined accounts for the file provider in the System zone (also
known as the System file provider). OneFS relies on the identity of these system-defined accounts
to ensure normal cluster functionality and security. The identity includes the UID, GID, shell,
passwords, privileges, permissions, and so on. Problems can arise if an external authentication
provider authenticates a user or group with the same name as one of these system-defined
accounts.
The OneFS mapping service consolidates all user or group accounts with the same name from all
authentication providers into a single access token which identifies the user and controls access to
directories and files. For each access zone in OneFS, there is an ordered list of providers.
When an identity is found in more than one authentication provider, the provider that comes
earliest in the list acts as the source for that identity. If the external provider comes earlier in the
list than the System file provider, then the externally provided identity "overrides" the systemdefined identity. If this happens, unintended users could gain inappropriate access to the cluster,
and appropriate administrators could lose access to the cluster.
OneFS provides the following cluster management accounts for the System file provider:
User accounts
Security best practices
l root
l admin
l compadmin
l ftp
l www
l nobody
l insightiq
l remotesupport
l _lldpd
l _ypldap
Isilon OneFS 8.2.x Security Configuration Guide Security Configuration Guide 55

Security best practices
Group accounts
l wheel
l admin
l ftp
l guest
l ifs
l nobody
l video
l _lldpd
l _ypldap
To prevent externally provided identities from overriding the system-defined identities, use the
unfindable-users and unfindable-groups options of the isi auth ads|ldap|nis CLI
command. Run the command for each user or group account that you do not want to be
overridden. These accounts can be in any access zone, and can include the system-defined
accounts that are described here, as well as accounts that you create.
For details on how to use the commands, see the
OneFS CLI Administration Guide
.
To view the users and groups that the System file provider manages, click Access > Membership
& Roles. Click either the Users or the Groups tab. Select System from the Current Access Zone
list, and select FILE: System from the Providers list.
Alternatively, you can run one of the following commands on the command-line interface:
isi auth users list --provider='lsa-file-provider:System'
isi auth groups list --provider='lsa-file-provider:System'
SNMP security best practices
If you plan to monitor cluster statistics, we recommend that you use SNMPv3. If you do not plan
to monitor cluster statistics, you should disable the SNMP service.
For more information about how to configure SNMP, see the OneFS 8.2.0 Web Administration
Guide and the OneFS 8.2.0 CLI Command Reference.
Use SNMPv3 for cluster monitoring
If you plan to monitor cluster statistics, SNMPv3 is recommended. When SNMPv3 is used, OneFS
requires the SNMP-specific security level of AuthNoPriv as the default value when querying the
EMC Isilon cluster. The security level AuthPriv is not supported.
Procedure
1. Open a secure shell (SSH) connection to any node in the cluster and log in as root.
2. Enable SMNPv3 access by running the following command:
isi snmp settings modify --snmp-v3-access=yes
56 Isilon OneFS 8.2.x Security Configuration Guide Security Configuration Guide

Disable SNMP
Security best practices
3. (Recommended) Disable SNMPv1 and SNMPv2 access:
isi snmp settings modify --snmp-v1-v2c-access no
Disable the SNMP service if SNMP monitoring is not required. Disabling SNMP on the cluster does
not affect the sending of SNMP trap alerts from the cluster to an SNMP server.
About this task
Procedure
1. Open a secure shell (SSH) connection to any node in the cluster and log in as root.
2. Run the following command:
isi services snmp disable
SSH security best practices
This section provides recommendations for restricting SSH access and disabling root SSH access
to the cluster. You can perform one or more of these procedures, depending on what is best for
your environment.
Restrict SSH access to specific users and groups
By default, only the SecurityAdmin, SystemAdmin, and AuditAdmin roles have SSH access
privileges. You can grant SSH access for specific cluster management tasks to users and groups
that have more restricted roles.
Before you begin
To perform these steps, you must log in as a user who has the ISI_PRIV_ROLE privilege, which
allows you to create roles and assign privileges.
Procedure
1. Open a secure shell (SSH) connection to any node in the cluster and log in.
2. Create a custom role by running the following command, where
the custom role:
isi auth roles create <role_name>
<role_name>
is the name of
3. Add the ISI_PRIV_LOGIN_SSH privilege to the role:
isi auth roles modify <role_name> --add-priv ISI_PRIV_LOGIN_SSH
Isilon OneFS 8.2.x Security Configuration Guide Security Configuration Guide 57

Security best practices
4. Add a user or a group to the role by running one or both of the following commands, where
<user_name>
isi auth roles modify <role_name> --add-user <user_name>
isi auth roles modify <role_name> --add-group <group_name>
is the name of the user, and
Disable root SSH access to the cluster
Disabling root SSH access to the cluster prevents attackers from accessing the cluster by bruteforce hacking of the root password.
About this task
After disabling root SSH access, you can still log in as root by performing one of the following
actions:
l
Physically connect to the cluster using a serial cable, and log in as root.
l
Open a secure shell (SSH) connection to any node in the cluster and log in using an RBACauthorized account. At the command prompt, type login root and press ENTER. Type the
root password when prompted. This method has the security benefit of requiring two
passwords (the user password and the root password).
You can also elevate the privileges for select users to give them access to specified root-level
commands (see the
this guide).
Privilege elevation: Assign select root-level privileges to non-root users
<group_name>
is the name of the group:
section of
Procedure
1. Ensure that there is at least one non-root administrator account that is configured and
working, and that allows remote SSH login to the cluster, before you disable root SSH
access.
2. Open a secure shell (SSH) connection to any node in the cluster and log in as root.
3. Disable root access by running the following command:
isi ssh modify --permit-root-login=false
Data-access protocols best practices
To prevent unauthorized client access through unused or unmonitored protocols, disable protocols
that you do not support. For those protocols that you do support, limit access to only those clients
that require it.
The following sections provide instructions for limiting or disabling these protocols.
Use a trusted network to protect files and authentication credentials that are sent in cleartext
The security between a client and the Isilon cluster is dependent on which protocol is being used.
Some protocols send files and/or authentication credentials in cleartext. Unless you implement a
compensating control, the best way to protect your data and authentication information from
interception is to ensure that the path between clients and the cluster is on a trusted network.
58 Isilon OneFS 8.2.x Security Configuration Guide Security Configuration Guide

Security best practices
Even if you do implement a compensating control, a trusted network provides an additional layer of
security.
Use compensating controls to protect authentication credentials that are sent in cleartext
Some protocols send authentication credentials in cleartext. You can use compensating controls to
enable more secure authentication.
Protocols that send authentication credentials in cleartext include:
l
FTP
l
HDFS (and WebHDFS)
l
HTTP
l
NFS
l
Swift
Compensating controls for cleartext authentication in OneFS include:
l
Kerberos authentication (supported by some protocols).
l
NTLM authentication (supported by some protocols).
l
Secure impersonation on HDFS.
l
Enabling TLS on the FTP service.
l
SSH tunneling (wraps an existing non-secure protocol and moves all communication to an
encrypted channel).
l
The OneFS API (all authentication credentials are sent over TLS).
Use compensating controls to protect files that are sent in cleartext
Files specific to the web interface are sent over TLS. Files specific to /ifs are sent differently
depending on the protocol. You can use compensating controls to increase the security of files
that are sent in cleartext.
Protocols that may send /ifs data files in cleartext include:
l
FTP
l
HDFS (and WebHDFS)
l
HTTP
l
NFS
l
Some versions of SMB
Compensating controls for data transmission in OneFS include:
l
The OneFS API (all file access communication is sent over TLS).
l
SSH tunneling (wraps an existing non-secure protocol and moves all communication to an
encrypted channel).
Isilon OneFS 8.2.x Security Configuration Guide Security Configuration Guide 59

Security best practices
Disable FTP access
The FTP service is disabled by default. It should remain disabled unless it is required.
Disable FTP access (Web UI)
Procedure
1. Click Protocols > FTP Settings.
2. In the Service area, clear the Enable FTP service check box.
3. Click Save Changes.
Disable FTP access (CLI)
Procedure
1. Open a secure shell (SSH) connection to any node in the cluster and log in as root.
2. Run the following command:
isi services vsftpd disable
Limit or disable HDFS access
The HDFS service on the cluster is enabled by default, and is configured on a per-access-zone
basis. If you support Hadoop, you should disable HDFS access from any access zones that do not
require it. If you do not support Hadoop, you should disable the HDFS service entirely.
Limit HDFS access to specific access zones
If you are using Hadoop, you should disable HDFS access from any access zones that do not
require it.
About this task
Note:
Disabling HDFS for an individual access zone prevents HDFS access to that zone. It does
not disable the HDFS service on the cluster.
Procedure
1. From the OneFS web administration interface, click Protocols > Hadoop (HDFS) >
Settings.
2. From the Current Access Zone list, select the access zone for which you want to disable
HDFS.
3. In the HDFS Service Settings area, clear the Enable HDFS Service check box.
4. Click Save Changes.
Results
HDFS is disabled for the selected access zone.
Disable HDFS access
If you do not support HDFS, you should disable the HDFS service entirely.
Procedure
1. Open a secure shell (SSH) connection to any node in the cluster and log in as root.
60 Isilon OneFS 8.2.x Security Configuration Guide Security Configuration Guide

2. Run the following command:
isi services hdfs disable
Limit or disable HTTP access
HTTP is used to access the OneFS web administration interface, the OneFS API, WebHDFS, and
file sharing. HTTP access to the cluster is enabled by default.
If you support HTTP, there are several options that you can use to limit access. If you do not
support HTTP, you can disable the apache2 service on the cluster.
Administrators must consider whether limiting or disabling HTTP is suitable for their deployment,
and manage the security implications appropriately.
Limit HTTP access
Security best practices
For options and instructions on how to limit HTTP access, see the
practices
Disable HTTP access
Disabling HTTP closes the HTTP port that is used for file access. If you disable HTTP, you can still
access the OneFS web interface by using HTTPS and specifying the port number in the URL. The
default port is 8080.
Disable HTTP access (Web UI)
Procedure
2. In the Service area, select Disable HTTP.
3. Click Save Changes.
Disable HTTP access (CLI)
Procedure
2. Run the following command:
Web interface security best
section of this guide.
1. Click Protocols > HTTP Settings.
1. Open a secure shell (SSH) connection to any node in the cluster and log in as root.
isi services apache2 disable
NFS best practices
NFS data access to the cluster is enabled by default. In addition, the NFS export /ifs has no
access restrictions.
Administrators must consider whether these configurations are suitable for their deployment, and
manage the security implications appropriately.
If you support NFS, recommendations for limiting access are provided in the following sections. If
you do not support NFS, you should disable the NFS service on the cluster.
Isilon OneFS 8.2.x Security Configuration Guide Security Configuration Guide 61

Security best practices
Delete the default /ifs NFS export
If you support NFS, we recommend that you delete the default NFS export of /ifs. If you choose
to keep the /ifs export, you should assess the security attributes of the export and configure the
attributes appropriately for your environment.
Limit access to NFS exports
Use the OneFS web administration interface or command-line interface to control which IP
addresses or machines can access NFS shares, and to configure their access levels.
For details, see the
Disable NFS access
If you do not support NFS, you should disable NFS the NFS service.
Disable NFS access (Web UI)
Procedure
1. Click Protocols > UNIX Sharing (NFS) > Global Settings.
2. In the Settings area, clear the Enable NFS Export Service check box:
3. Click Save Changes.
Disable NFS access (CLI)
Procedure
1. Open a secure shell (SSH) connection to any node in the cluster and log in as root.
2. Run the following command:
SMB best practices
OneFS Web Administration Guide
isi services nfs disable
or the
OneFS CLI Administration Guide
.
SMB data access to the cluster is enabled by default. In addition, Isilon provides the following
default configurations with no access restrictions:
l
An unrestricted SMB share (/ifs)
l
Unlimited access to the /ifs directory for the Everyone account
Isilon cluster administrators must consider whether these configurations are suitable for their
deployment, and manage the security implications appropriately.
If you support SMB, recommendations for limiting access are provided in the following sections. If
you do not support SMB, you should disable the SMB service on the cluster.
62 Isilon OneFS 8.2.x Security Configuration Guide Security Configuration Guide

Delete the default /ifs SMB share
If you support SMB, we recommend that you delete the default SMB share of /ifs. If you choose
to keep the /ifs share, you should assess the security attributes of the share and configure the
attributes appropriately for your environment.
Limit access to SMB shares
It is possible to restrict access to a share by using the share access control list (ACL). However, it
is preferred to configure the share ACL to grant full control to everyone, and manage access to
individual files and directories by using the file system ACLs.
Limiting the entire share to read or read/write permissions can complicate management because
these restrictive permissions on the entire share override more permissive permissions that may
exist on individual files and directories. For example, if the entire share is configured for read-only
access, but an individual file is configured for read/write access, only read access is granted to the
file. More permissive permissions on the share do not override more restrictive permissions that
exist on individual files and directories.
For details, see the
Disable SMB access
If you do not support SMB, you should disable the SMB service.
OneFS Web Administration Guide
or the
Security best practices
OneFS CLI Administration Guide
.
SMB signing
Disable SMB access (Web UI)
Procedure
1. Click Protocols > Windows Sharing (SMB) > SMB Server Settings.
2. In the Service area, clear the Enable SMB Service check box.
3. Click Save Changes.
Disable SMB access (CLI)
Procedure
1. Open a secure shell (SSH) connection to any node in the cluster and log in as root.
2. Run the following command:
isi services smb disable
SMB is used for file sharing and is a transport protocol for Remote Procedure Call (RPC) services
such as SAMR (modify local users), LSAR (look up local users), and SRVSVC (modify SMB shares
configuration). SMB, and the Distributed Computing Environment Remote Procedure Call
(DCERPC) services, which use SMB for transport, are susceptible to man-in-the-middle attacks. A
man-in-the-middle attack occurs when an attacker intercepts and potentially alters communication
between parties who believe that they are in direct communication with one another.
SMB signing can prevent man-in-the-middle attacks within the SMB protocol. However, SMB
signing has performance implications and is disabled by default on Isilon clusters. Customers
should carefully consider whether the security benefits of SMB signing outweigh the performance
costs. The performance degradation that is caused by SMB signing can vary widely depending on
the network and storage system implementation. Actual performance can be verified only through
testing in your network environment.
Isilon OneFS 8.2.x Security Configuration Guide Security Configuration Guide 63

Security best practices
If SMB signing is desired, you can perform one of the following actions:
l
Enable SMB signing for all connections. This is the easiest and most secure solution. However,
this option causes significant performance degradation because it requires SMB signing for
both file transfer and control path DCERPC connections.
l
Enable SMB signing for the control path only. This solution requires that clients use SMB
signing when accessing all DCERPC services on the cluster, but does not require signed
connections for the data path. This option requires you to enable four advanced parameters on
the cluster. With these parameters enabled, the OneFS server rejects any non-signed IPC
request that a client initiates. If clients are configured not to sign, they can access files over
SMB, but cannot perform certain other functions, such as SMB share enumeration.
Enable SMB signing for all connections
To enable SMB signing for all connections, perform the following steps.
Procedure
1. Open a secure shell (SSH) connection to any node in the cluster and log in as root.
2. Run the following command:
isi smb settings global modify --require-security-signatures yes
3. Configure the client to enable SMB signing. SMB signing may already be enabled by default.
See the client documentation for instructions.
Enable SMB signing for the control path only
To enable SMB signing for the control path only, perform the following steps.
Procedure
1. Open a secure shell (SSH) connection to any node in the cluster and log in as root.
2. Run the following four commands. The value of 1 at the end of the command enables the
parameter:
/usr/likewise/bin/lwregshell set_value "[HKEY_THIS_MACHINE\\Services\
\lsass\\Parameters\\RPCServers\\lsarpc]" "RequireConnectionIntegrity" 1
/usr/likewise/bin/lwregshell set_value "[HKEY_THIS_MACHINE\\Services\
\lsass\\Parameters\\RPCServers\\samr]" "RequireConnectionIntegrity" 1
/usr/likewise/bin/lwregshell set_value "[HKEY_THIS_MACHINE\\Services\
\lsass\\Parameters\\RPCServers\\dssetup]" "RequireConnectionIntegrity" 1
/usr/likewise/bin/lwregshell set_value "[HKEY_THIS_MACHINE\\Services\
\srvsvc\\Parameters]" "RequireConnectionIntegrity" 1
64 Isilon OneFS 8.2.x Security Configuration Guide Security Configuration Guide

Security best practices
3. To review the value for each of the settings, run the following four commands. In the
output, the value in the line for "RequireConnectionIntegrity" indicates whether the
parameter is enabled (1) or disabled (0).
/usr/likewise/bin/lwregshell list_values "[HKEY_THIS_MACHINE\\Services\
\lsass\\Parameters\\RPCServers\\lsarpc]"
/usr/likewise/bin/lwregshell list_values "[HKEY_THIS_MACHINE\\Services\
\lsass\\Parameters\\RPCServers\\samr]"
/usr/likewise/bin/lwregshell list_values "[HKEY_THIS_MACHINE\\Services\
\lsass\\Parameters\\RPCServers\\dssetup]"
/usr/likewise/bin/lwregshell list_values "[HKEY_THIS_MACHINE\\Services\
\srvsvc\\Parameters]"
Example output:
"LpcSocketPath" REG_SZ "/var/lib/likewise/rpc/lsass"
"Path" REG_SZ "/usr/likewise/lib/lsa-rpc/
lsa.so"
"RegisterTcpIp" REG_DWORD 0x00000000 (0)
"RequireConnectionIntegrity" REG_DWORD 0x00000000 (1)
4. Configure the client to require SMB signing. This step is required in order for the DCERPC
services to function. See the client documentation for instructions.
Disable Swift access
The Swift service on the cluster is enabled by default. If Swift is not being used to access the
cluster, a strong security posture requires that the service be disabled entirely.
Procedure
1. Open a secure shell (SSH) connection to any node in the cluster and log in as root.
2. Run the following command:
isi services lwswift disable
Web interface security best practices
This section provides recommendations for limiting access to the OneFS web administration
interface, securing the web interface headers, and configuring the system to use the most up-todate versions of TLS. You can perform one or more of these procedures, depending on what is
best for your environment.
Replace the TLS certificate
Isilon clusters ship with a self-signed TLS certificate. We recommend that you replace the default
TLS certificate with a signed certificate.
For instructions, see the OneFS 8.2.0 Web Administration Guide and the OneFS 8.2.0 CLI
Command Reference.
Isilon OneFS 8.2.x Security Configuration Guide Security Configuration Guide 65

Security best practices
Secure the web interface headers
Securing the web interface header helps to protect against sniffing, clickjacking, and cross-site
scripting attacks.
Before you begin
Ensure that you have the latest security patches installed. For more information, see the Current
Isilon OneFS Patches document on the Customer support site.
Note:
l
This procedure will restart the httpd service. Restarting the httpd service disconnects all
current web interface sessions to the cluster. To minimize the potential impact, coordinate
this activity with other cluster administrators.
l
Changes will not be preserved following upgrade and rollback options.
l
Changes will not be copied to new nodes.
l
Changes might be removed during patching.
l
Changes might block security hardening from working.
Procedure
1. Open a secure shell (SSH) connection to any node in the cluster and log in as root.
2. Create a backup directory by running the following command:
mkdir /ifs/data/backup/
3. Set the permissions on the backup directory to 700:
chmod 700 /ifs/data/backup
4. Make working copies of the /etc/mcp/templates/webui_httpd.conf and
the /etc/mcp/templates/apache24.conf files in the backup directory:
cp /etc/mcp/templates/webui_httpd.conf /ifs/data/backup
cp /etc/mcp/templates/apache24.conf /ifs/data/backup
5. Make backup copies of the /etc/mcp/templates/webui_httpd.conf and
the /etc/mcp/templates/apache24.conf files in the backup directory:
cp /etc/mcp/templates/webui_httpd.conf \
/ifs/data/backup/webui_httpd.conf.bak
cp /etc/mcp/templates/apache24.conf \
/ifs/data/backup/apache24.conf.bak
66 Isilon OneFS 8.2.x Security Configuration Guide Security Configuration Guide

Security best practices
Note: If a file with the same name exists in the backup directory, either overwrite the
existing file, or, to save the old backups, rename the new file with a timestamp or other
identifier.
6. Open the /ifs/data/backup/webui_httpd.conf and the /etc/mcp/templates/
apache24.conf files in a text editor.
7. Add the following lines to the very bottom of the file (after </VirtualHost>):
# Begin Security Best Practices
Header always append X-Frame-Options SAMEORIGIN
Header always append X-Content-Type-Options nosniff
Header always append X-XSS-Protection "1; mode=block"
# End Security Best Practices
8. Confirm that the changes are correct. Then save the file and exit the text editor.
9. Copy the updated file to the /etc/mcp/templates directory on all nodes in the cluster:
isi_for_array 'cp /ifs/data/backup/webui_http.conf \
/etc/mcp/templates/webui_httpd.conf'
isi_for_array 'cp /ifs/data/backup/apache24.conf \
/etc/mcp/templates/apache24.conf'
10. (Optional) Delete the working and backup copies from the /ifs/data/backup directory:
rm /ifs/data/backup/webui_httpd.conf \
/ifs/data/backup/webui_httpd.conf.bak
rm /ifs/data/backup/apache24.conf \
/ifs/data/backup/apache24.conf.bak
Accept up-to-date versions of TLS in the OneFS web interface
If required, configure the OneFS web administration interface to accept transmissions from the
most up-to-date versions of the TLS protocol.
If your current configuration at /etc/mcp/templates/webui_httpd.conf contains +TLSv1,
install the latest security patches. For more information, see the Current Isilon OneFS Patches
document on the Customer support site.
Isilon OneFS 8.2.x Security Configuration Guide Security Configuration Guide 67

Security best practices
68 Isilon OneFS 8.2.x Security Configuration Guide Security Configuration Guide
 Loading...