


Dell EMC Integrated Data Protection
Appliance
Version 2.4.1
Product Guide
REV 01
November 2019

Copyright © 2019 Dell Inc. or its subsidiaries. All rights reserved.
Dell believes the information in this publication is accurate as of its publication date. The information is subject to change without notice.
THE INFORMATION IN THIS PUBLICATION IS PROVIDED “AS-IS.” DELL MAKES NO REPRESENTATIONS OR WARRANTIES OF ANY KIND
WITH RESPECT TO THE INFORMATION IN THIS PUBLICATION, AND SPECIFICALLY DISCLAIMS IMPLIED WARRANTIES OF
MERCHANTABILITY OR FITNESS FOR A PARTICULAR PURPOSE. USE, COPYING, AND DISTRIBUTION OF ANY DELL SOFTWARE DESCRIBED
IN THIS PUBLICATION REQUIRES AN APPLICABLE SOFTWARE LICENSE.
Dell Technologies, Dell, EMC, Dell EMC and other trademarks are trademarks of Dell Inc. or its subsidiaries. Other trademarks may be the property
of their respective owners. Published in the USA.
Dell EMC
Hopkinton, Massachusetts 01748-9103
1-508-435-1000 In North America 1-866-464-7381
www.DellEMC.com
2 Dell EMC Integrated Data Protection Appliance Product Guide

CONTENTS
Revision history 5
Chapter 1
Chapter 2
Introduction 7
Document scope and audience............................................................................8
Product features.................................................................................................8
System architecture and components............................................................... 10
Detailed configuration...........................................................................10
Base hardware.......................................................................................11
Embedded software.............................................................................. 11
System self-protection..........................................................................11
Network connectivity overview............................................................. 11
Customer Support tasks....................................................................................13
Monitor and manage the appliance 15
About the ACM dashboard................................................................................ 16
Basic management tasks...................................................................... 16
Appliance Configuration Manager dashboard........................................17
Shut down the IDPA.............................................................................28
Advanced backup configuration........................................................... 29
Health.................................................................................................. 30
Upgrade................................................................................................31
Install the IDPA post-installation patch on DataProtection-ACM.......................31
Start up the IDPA..............................................................................................33
Access components with a browser.................................................................. 33
User accounts for components......................................................................... 35
Change passwords and synchronize components............................................. 36
Change passwords for individual components......................................36
Synchronize components.....................................................................40
Configure IDPA to use specific interfaces for replication.................................. 40
Chapter 3
Chapter 4
Upgrade the IDPA software (DP4400) 43
Upgrade components........................................................................................44
Upgrade Prerequisites (DP4400)......................................................................44
Upgrade the appliance software (DP4400).......................................................45
Upgrade Postrequisites .................................................................................... 47
Upgrade CDRA manually...................................................................... 48
Troubleshooting 51
System log files.................................................................................................52
Troubleshoot shutdown.................................................................................... 52
Avamar shutdown validation errors...................................................... 52
Shut down Avamar manually................................................................ 53
Shut down Data Domain manually........................................................ 54
Shut down vCenter manually............................................................... 54
Shut down ESX manually..................................................................... 54
Troubleshooting startup....................................................................................55
Adding a CA-signed certificate..........................................................................57
Dell EMC Integrated Data Protection Appliance Product Guide 3

Contents
Enabling certificate verification........................................................................ 58
Configure secure AD having self-signed Certificates on IDPA...........................58
Troubleshoot LDAP...........................................................................................59
Troubleshoot secure LDAP configuration.............................................59
Verify Internal LDAP password............................................................ 59
Create internal LDAP password........................................................... 60
Change the expired root password................................................................... 60
Change expired password of administrator@vsphere.local user account...........61
When the upgrade is not initiated......................................................... 61
Credential mismatch..........................................................................................61
Troubleshoot Avamar........................................................................................62
Troubleshooting health monitoring....................................................................63
Troubleshooting component software upgrades............................................... 64
Retry upgrade process.........................................................................64
Advanced troubleshooting (support only)............................................ 64
Rollback is Successful..........................................................................65
Rollback Failed..................................................................................... 65
Upgrade log files.................................................................................. 67
Resolve TLS Error After the Firmware Update for IDPA 2.4.1.............. 68
Chapter 5
Index
Additional resources 69
Document references for IDPA......................................................................... 70
Document references for individual components.............................................. 70
IDPA training resources.....................................................................................72
73
4 Dell EMC Integrated Data Protection Appliance Product Guide

Revision history
The following table presents the revision history of this document.
Table 1 IDPA Product Guide Revision History
Revision Date Description
01 November 2019 First release of this document
for Integrated Data
Protection Appliance 2.4.1.
Dell EMC Integrated Data Protection Appliance Product Guide 5

Revision history
6 Dell EMC Integrated Data Protection Appliance Product Guide

CHAPTER 1
Introduction
This chapter provides a general overview of the Integrated Data Protection Appliance 2.4.1
features and hardware configurations.
Topics include:
l
Document scope and audience................................................................................................ 8
l
Product features..................................................................................................................... 8
l
System architecture and components....................................................................................10
l
Customer Support tasks........................................................................................................ 13
Dell EMC Integrated Data Protection Appliance Product Guide 7

Introduction
Document scope and audience
This document describes the administrative details of Integrated Data Protection Appliance
(IDPA).
The target audience for this document includes field personnel, partners, and customers
responsible for managing and operating IDPA. This document is designed for people familiar with
Data Protection solutions.
Product features
IDPA provides a simplified configuration and integration of data protection components in a
consolidated solution.
Integrated solution
IDPA DP4400 model is a hyperconverged, 2U system that a user can install and configure onsite.
The DP4400 includes a virtual edition of Avamar server (AVE) as a Backup Server node with an
optional NDMP Accelerator, a virtual edition of Data Domain system (DDVE) as the Protection
Storage node, Cloud Disaster Recovery, IDPA System Manager as a centralized system
management , an Appliance Configuration Manager(ACM) for simplified configuration and
upgrades, Search, Reporting and Analytics, and a compute node that hosts the virtual components
and the software.
The Search, Reporting and Analytics, and CDRA are optional. Also, you can also perform the
Search, Reporting and Analytics, and CDRA functions in a central corporate implementation.
If your organization enables communication through the Internet, as part of the initial configuration
of the system, you can register the IDPA Appliance, Avamar, Data Domain and Reporting and
Analytics components with Secure Remote Services (formerly ESRS). The Secure Remote
Services is a secure, IP-based, distributed customer service support system that provides Dell
EMC customers with command, control, and visibility of support-related activities.
Centralized management
IDPA System Manager provides advanced monitoring and management capabilities of the IDPA
from a single pane of glass and includes the following features.
l
A comprehensive dashboard that includes information about Avamar, IDPA Appliance, Data
Domain, Search, and Data Protection Advisor.
n
Backup activities
n
Replication activities
n
Assets
n
Capacity
n
Health
n
Alerts
l
A comprehensive dashboard to manage Avamar, Data Domain, Data Protection Advisor, and
Search components.
l
Advanced search and recover operations through integration with Search.
l
Comprehensive reporting capabilities
l
Cloud backups.
8 Dell EMC Integrated Data Protection Appliance Product Guide

Introduction
Appliance administration
The ACM provides a graphical, web-based interface for configuring, monitoring, and upgrading the
appliance.
The ACM dashboard displays a summary of the configuration of the individual components. It also
enables the administrators to monitor the appliance, change configuration details such as changing
the Data Domain disk capacity, changing the common password for the appliance, change LDAP
settings, update customer information, and change the values in the General Settings panel. The
ACM dashboard enables you to upgrade the system and its components. It also displays the health
information of the Appliance Server and VMware components.
Backup administration
The IDPA uses Avamar Virtual Edition (AVE) servers to perform backup operations, with the data
being stored in a Data Domain system. Generally, when using the Avamar Administrator
Management Console, all Avamar servers look and behave the same. The main differences among
the Avamar server configurations are the number of nodes and disk drives that are reported in the
server monitor.
You can also add an Avamar NDMP Accelerator (one NDMP Accelerator node is supported in
DP4400) to enable backup and recovery of NAS systems. The Avamar NDMP Accelerator uses the
network data management protocol (NDMP) to enable backup and recovery of network-attached
storage (NAS) systems. The accelerator performs NDMP processing and then sends the data
directly to the Data Domain Server (DDVE Storage).
Reporting and Analytics
The Reporting and Analytics feature offers a robust reporting functionality with dedicated sections
for various features. These reports help you retrieve information about the Data Domain (DDVE )
and Avamar (AVE). Using these reports, you can identify outages in the environment, diagnose
problems, plan to mitigate risks, and forecast future trends. You can also run system and
customized reports, dashboard templates, and schedule the reports generation as per your
requirements.
Search
The Search feature provides a powerful way to search backup data within the IDPA and then
restore the backup data based on the results of the Search. Scheduled collection activities are
used to gather and index the metadata (such as keyword, name, type, location, size, and backup
server/client, or indexed content) of the backup, which is then stored within the IDPA.
Disaster recovery
The CDRA is a solution, which enables disaster recovery of one or more on-premises virtual
machines (VMs) to the cloud. CDRA integrates with the existing on-premises backup software and
a Data Domain system to copy the VM backups to the cloud. It can then run a disaster recovery
test or a failover, which converts a VM to an Amazon Web Services Elastic Compute Cloud (EC2)
instance, and then runs this instance in the cloud.
Note:
Installing CDRA, Search, and Reporting and Analytics (based on Data Protection Advisor) is
optional. Also, if these components are already configured in your environment, then the
appliance can be configured to use the central implementation in your environment. You do not
need to configure the optional components that are bundled in IDPA again.
However, the IDPA dashboard does not display any data that is associated with external
CDRA, Search, and Data Protection Advisor. Moreover, you must manage and configure any
such external instances. Also, IDPA does not support local Search and Analytics (not part of
IDPA but are centrally implemented at the customer environment) when these functions are
performed by external implementations.
Dell EMC Integrated Data Protection Appliance Product Guide 9
Introduction
Scalability
The DP4400 is designed to be scalable so it can scale up with ever-changing needs. See the
Expanding storage capacity
Guide
for more information about how to add storage capacity.
l
For the DP4400 model with a capacity from 8 TB to 24 TB, you can expand the storage
section in the
Dell EMC Integrated Data Protection Appliance Product
capacity in multiples of 4 TB increments up to 24 TB. You can now expand the capacity beyond
24 TB in 12 TB increments.
l
For the DP4400 model with a capacity from 24 TB to 96 TB, you can expand the storage
capacity in 12 TB increments, and you can expand the capacity up to a maximum of 96 TB.
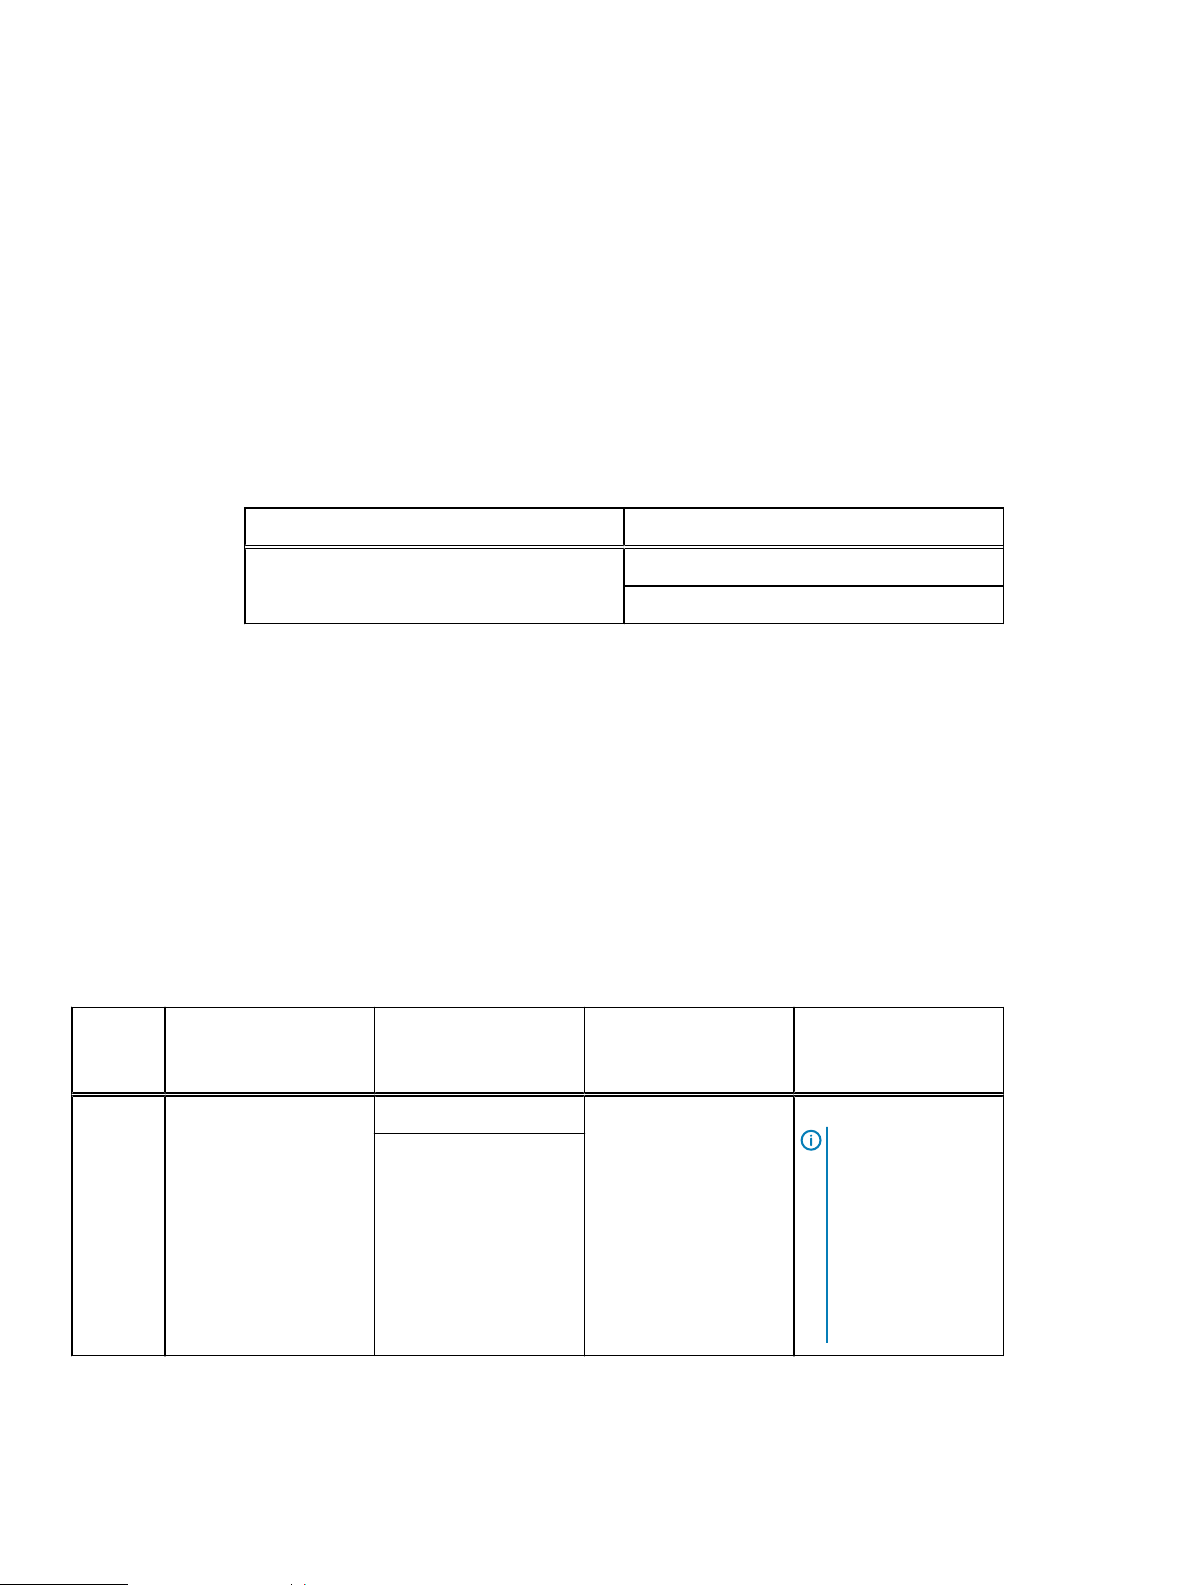
The following table details the configuration for the DP4400 models.
Table 2 Configuration for IDPA DP4400 Models
Model Configuration Details
DP4400 From 8 TB up to 24 TB
From 24 TB up to 96 TB
Unified support
The same Customer Support team supports both the hardware and the software that is used in the
appliance.
System architecture and components
The IDPA integrates multiple data protection components into a single product.
Detailed configuration
The IDPA DP4400 is available in the following configurations:
Table 3
Model Protection Storage
model
DP4400 Data Domain Virtual
Edition
Configuration options
Protection Storage
configuration options
(usable TB)
8, 12, 16, 20, or 24 TB Avamar Virtual Edition 3TBNDMP Accelerator (1)
24, 36, 48, 60, 72, 84, or
96 TB
Backup Server Avamar Accelerator
Node for NDMP/NAS
Backup (optional)
Note: The Avamar
NDMP Accelerator
is supported with
IDPA but is not
bundled with the
product. You must
contact Customer
Support to set it up
with IDPA.
10 Dell EMC Integrated Data Protection Appliance Product Guide

Base hardware
The IDPA DP4400 includes a Dell PowerEdge R740 Server.
Embedded software
After the initial configuration, the following applications are deployed and configured:
l
Data Domain Virtual Edition
l
VMware vCenter Server
l
Avamar Virtual Edition
l
IDPA System Manager
l
Data Protection Advisor (optional)
n
Datastore Server
n
Application Server
l
Search (optional)
n
Search Index Master
l
Cloud Disaster Recovery Add-on (optional)
l
Appliance Configuration Manager
Introduction
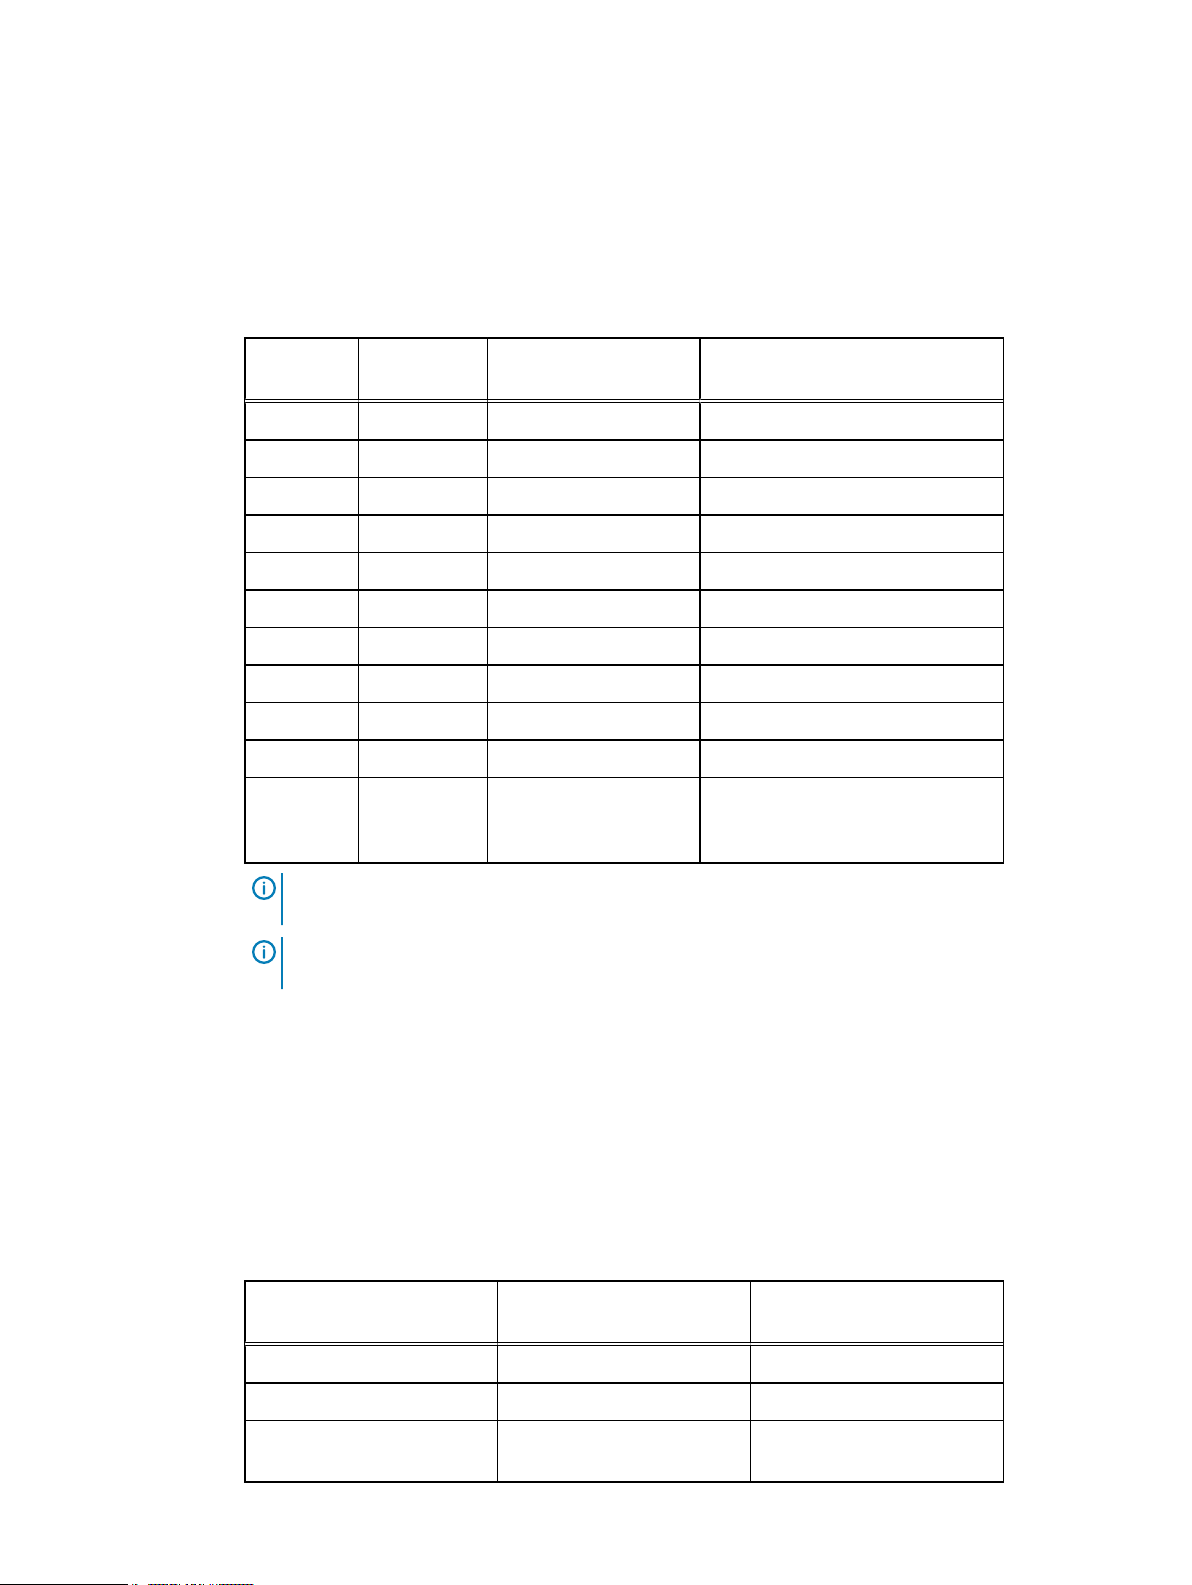
System self-protection
The IDPA is configured to protect itself from data loss with the backup and storage applications
that are in the system.
It is protected with a predefined backup job policy that is scheduled daily and has a 30-day
retention period. The metadata is protected through a backup to the Protection Storage (Data
Domain) using checkpoints.
Table 4
Component VM backup jobs
Virtual machine Backup job
ACM Management_VM_Backup
vCenter vCenter_Backup
DP Advisor DataProtectionAdvisor_Backup
Search DataProtectionSearch_Backup
IDPA System Manager DataProtectionCentral_Backup
CDRA DataDomainCloudDisasterRecovery_Backup
Network connectivity overview
During the initial configuration, IP addresses are assigned to various functional components of
IDPA, typically by allocating a range of IP addresses. IDPA requires 13 IP addresses for the various
components. Using a range is the preferred method as it simplifies the assignment and reduces the
chance for errors while entering the IP addresses. When a range of IP addresses is used during the
IDPA configuration, the IP addresses are assigned in a standard order. Optionally, discrete IP
addresses can be assigned manually to each functional component.
Of these 13 IP addresses, two are required for the initial network configuration; one for the ACM
and the other for the ESXi server. After the initial network configuration is successful, the IPs for
Dell EMC Integrated Data Protection Appliance Product Guide 11
Introduction
the other components can be configured using a range of 11 IP addresses. If a range of IPs is not
available, users can also set random IPs of the same subnet to the components.
Use the following table to determine which IP address is allocated to a component. The
Allocation
(first column in the table) is the value that you should add to the first IP address in the
IP Range
range.
Table 5 IP address range assignments for DP4400
IP Range
Allocation
+0
+1
+2
+3
+4
+5
+6
+7
+8
+9
+10
Example Component Assigned Field
192.0.2.1
192.0.2.2
192.0.2.3
192.0.2.4
192.0.2.5
192.0.2.6
192.0.2.7
192.0.2.8
192.0.2.9
192.0.2.10
192.0.2.11
vCenter VMware vCenter Server VM
Protection storage Management IP
Protection storage Backup IP 1
Protection storage Backup IP 2
Backup application Avamar Virtual Edition Server IP
Backup application Avamar Proxy VM
IDPA System Manager IDPA System Manager VM
Reporting and Analytics Application Server Host VM
Reporting and Analytics Datastore Server Host VM
Search Index Master Node Host VM
DD Cloud DR CDRA
(optional)
Data Domain Cloud Disaster
Recovery (DD Cloud DR) Cloud DR
Add-on (CDRA) virtual appliance
Note: IDPA is compatible with IPv4 enabled networks and does not support pure IPv6 or dual-
stack networks.
Note: For more information on the network and firewall ports that are used in IDPA, see
Network ports
in the
IDPA Security Configuration Guide
Separate management network
DP4400 models support separating the backup network traffic from the management network
traffic. For configuring separate management network you need two IP addresses one for the
management network and one for the backup settings on the ACM, and one for the ESXi server.
Use the following table to determine which IP address is allocated to a component when you
configure a separate management network. The
the value that you should add to the first IP address in the range.
Table 6
Network
12 Dell EMC Integrated Data Protection Appliance Product Guide
Management IP address range assignments for the DP4400 with Dedicated Backup
Management IP Range
Allocation
+0 vCenter VMware vCenter Server VM
+1 Protection storage Management IP
+2 Backup application Avamar Virtual Edition Server
Component Assigned Field
.
IP Range Allocation
IP
(first column in the table) is

Table 6 Management IP address range assignments for the DP4400 with Dedicated Backup
Network (continued)
Introduction
Management IP Range
Allocation
+3 Backup application Avamar Proxy VM
+4 IDPA System Manager IDPA System Manager VM
+5 Reporting and Analytics Application Server Host VM
+6 Reporting and Analytics Datastore Server Host VM
+7 Search Index Master Node Host VM
+8 DD Cloud DR CDRA (optional) Data Domain Cloud Disaster
Table 7 Backup IP address range assignments for the DP4400 with Dedicated Backup Network
Backup IP Range Allocation Component Assigned Field
+0 Protection storage Backup IP 1
+1 Protection storage Backup IP 2
+2 Backup application Avamar Proxy VM
Component Assigned Field
Recovery (DD Cloud DR)
Cloud DR Add-on (CDRA)
virtual appliance
Customer Support tasks
This section describes IDPA components that require Customer Support for additional assistance.
Table 8
Customer Support tasks
Task Description
Licensing
Secure Remote Services
(SRS)
Physical NDMP server For fresh installation, configuration, and upgrade.
Latest firmware, BIOS, and
driver updates on the Dell
Server
l
For obtaining the right license keys for any of the IDPA
components.
l
For obtaining licensing for increased storage capacity.
For issues when registering customer site IDs to the SRS
gateway.
For upgrading IDPA models on Generation 14 servers.
Dell EMC Integrated Data Protection Appliance Product Guide 13

Introduction
14 Dell EMC Integrated Data Protection Appliance Product Guide

CHAPTER 2
Monitor and manage the appliance
This chapter introduces the features and functionality of the ACM dashboard.
Topics include:
l
About the ACM dashboard.....................................................................................................16
l
Install the IDPA post-installation patch on DataProtection-ACM........................................... 31
l
Start up the IDPA.................................................................................................................. 33
l
Access components with a browser...................................................................................... 33
l
User accounts for components..............................................................................................35
l
Change passwords and synchronize components..................................................................36
l
Configure IDPA to use specific interfaces for replication...................................................... 40
Dell EMC Integrated Data Protection Appliance Product Guide
15

Monitor and manage the appliance
About the ACM dashboard
The ACM dashboard enables you to manage settings for the appliance and individual components,
update customer support information, and upgrade software for the appliance and its components.
The ACM dashboard also performs system health monitoring for the appliance hardware.
To access the dashboard, type https://<ACM IP address>:8543/ in a web browser and log in.
The dashboard requires Google Chrome version 64 and later or Mozilla Firefox 47.2 and later.
Note: The dashboard is enabled only after configuring IDPA.
The initial view displays the Home page and tabs for Health and Upgrade.
Basic management tasks
The ACM Dashboard enables you to view system details, change the password of appliance
components, and log out from the dashboard.
Changing the appliance password
The appliance password is common for all IDPA components.
1. Click the Change Password icon.
2. Type the Current Password.
3. Type and confirm the New Password.
The password must contain 9 through 20 characters and include at least one of each type of
supported character. The following types of characters are supported:
l
Uppercase letters (A–Z)
l
Lowercase letters (a–z)
l
Numbers (0–9)
l
Special characters: Period (.), hyphen (-), and underscore (_)
Note:
A password with a period (.) as the last character (for example, Idpa1234.) is not
accepted as a valid password.
l
Must not start with a hyphen (-)
l
The password must not include common names or user names such as root or admin.
4. Click Change Password.
The password change process for ACM and all the other IDPA components is initiated. The
Password change progress shows the progress bar with status descriptions.
Note:
The password change process takes approximately 40 minutes to complete.
The password gets changed for the users in the following sequence:
1. ACM internal LDAP user idpauser
2. Storage (DDVE) sysadmin user
3. Backup Server (Avamar) users:
a. Operating system admin and operating system root
b. Avamar server users – root, mcuser, repulser, and viewuser
4. Backup server proxy operating system root user
5. IDPA System Manager(DPC) users: Operating system admin and operating system root
16 Dell EMC Integrated Data Protection Appliance Product Guide

6. Reporting and analytics (DPA) users: Application Server operating system root, Datastore
operating system root, Application server administrator
7. Search(DPS) operating system root and search default LDAP root and admin
8. Cloud disaster recovery(CDRA) admin password
9. VCenter and ESXi idpauser password.
10. ACM root password
Note: Once the password is changed, ACM users will be logged out and they need to log in
again using the updated password.
Viewing version and build details
Click the Information (i) icon. The About page displays details about the IDPA software version,
build number, and the hardware version.
Logging out
Click the Logout button.
Appliance Configuration Manager dashboard
The Home tab provides an overview of the status and settings for the IDPA components and also
displays the general settings and customer information of the IDPA appliance.
Monitor and manage the appliance
On the dashboard Home tab, you can view the network configuration and product details, manage
the password, time zone, SMTP, SNMP, and NTP settings, and modify customer support
information.
You can also configure the LDAP settings, create and download log bundles, download the current
appliance configuration, shutdown the appliance, register components with Secure Remote
Services (formerly ESRS), and install optional components such as Reporting and Analytics,
Search, Data Protection Advisor, and Cloud Disaster Recovery (CDRA) if not already installed.
Note:
The Secure Remote Services (SRS) is a seperate application that can be installed and
deployed. For more information on SRS such as overview, documentation, and so on, see
https://support.emc.com/products/31755?siteLocale=en_US.
You can configure the Secure Remote Services present under the General Settings panel. If
the Secure Remote Services is not configured, you can configure it by clicking the Edit icon.
Downloading the configuration details
To download a PDF containing the current details of the IDPA configuration, click the Adobe PDF
icon.
Managing system components
The Home tab contains panels for each of the following:
l
IDPA System Manager
l
Backup Server
l
Protection Storage
l
Reporting and Analytics
l
Search
l
Cloud Disaster Recovery
l
Virtualization
l
Customer Information
Dell EMC Integrated Data Protection Appliance Product Guide 17

Monitor and manage the appliance
l
General Settings
Note: If a component cannot be reached on the network or has an incorrect stored credential,
the corresponding panel prompts the user to resolve the issue.
IDPA System Manager panel
The IDPA System Manager panel displays the IDPA System Manager version and component IP
address.
You can hover over the Services to view the status information for IDPA System Manager
services.
To launch the web interface, click IDPA System Manager Web UI and log in.
Note: If external LDAP has not been configured, then use the idpauser as the username. If
external LDAP has been configured, then use the external LDAP username.
For more information about IDPA System Manager workflows and capabilities, refer to the
System Manager Administration Guide
Backup Server panel
The Backup Server panel displays the component IP address, Avamar version, metadata of the
total and available backup storage, number of NDMP servers, license status of the Backup Server
node, and whether the installation of agents is in progress.
You can hover over the Services to view the status information for Avamar services.
Click Backup Server Web UI to launch the Avamar Web Interface and log in. You can download
the Avamar agents from the web interface.
For more information about the role of backup agents and how to install them, refer to the
Administration Guide
Protection Storage panel
The Protection Storage panel displays the DD OS version, component IP address, total and
available backup storage, the file system and license status of the Protection Storage node, and
any alerts that require your action.
To access additional functionality of the component, click the Protection Storage System
Manager link.
Note:
Center (DDMC) instance.
IDPA
.
Avamar
.
Protection Storage (Data Domain) cannot be managed by the Data Domain Management
Expanding storage capacity
You can expand the storage capacity by obtaining the required additional licenses through ELMS
(an electronic license management system).
Before you begin
Note:
Adding licenses to expand the storage directly from the Data Domain user interface is
not recommended, as it may result in loss of critical functionality.
About this task
Once the system detects the hardware, the Expand storage option is available in the gear icon
menu under the Protection Storage panel. For more information on expanding storage capacity,
see the Storage expansion section in the latest
Installation Guide.
18 Dell EMC Integrated Data Protection Appliance Product Guide
Dell EMC Integrated Data Protection Appliance

Monitor and manage the appliance
Procedure
1. In the Protection Storage panel, mouse over the gear icon on the top right and click the
Expand storage.
The Storage expansion and license upgrade wizard appears.
2. Click Browse and select the required license files for the additional storage.
3. Click Expand.
Results
After several minutes, the dashboard reflects the increased storage capacity.
Configuring cloud long-term retention feature on IDPA
DD Cloud Tier is configured through ACM configuration. Follow the below procedures to create DD
cloud units and configure Avamar backup policies for cloud long-term retention (LTR).
Before you begin
Note: For detailed information on creating DD cloud units, refer
Administration Guide
.
Data Domain Operating System
This process refers to the procedures in the following documents:
l
Data Domain Operating System Administration Guide
l
Avamar and Data Domain System Integration Guide
for DD OS 6.0 or higher
for Avamar 7.4 or higher
Procedure
1. On the ACM home tab, click the Protection Storage System Manager link.
The Data Domain System Manager GUI is displayed.
2. Follow the "Importing CA certificates" procedure in the
Administration Guide
.
Data Domain Operating System
After importing the certificate, close the Data Domain System Manager.
3. Connect to the Avamar user interface through IDPA System Manager.
The Avamar Administrator GUI is displayed.
4. Follow the "Adding or editing a Data Domain system with cloud tier support" procedure in
the
Avamar and Data Domain System Integration Guide
Note:
The ACM makes the step that refers to "Adding a Data Domain system"
.
unnecessary. To learn how to access the Edit Data Domain System dialog box, refer to
"Editing a Data Domain system."
5. Follow the "Creating a new tier group" procedure in the
Integration Guide
6. To verify your configuration, click the Activity launcher button in Avamar Administrator
and review the list of session on the Activity Monitor tab.
Reporting and Analytics panel
The Reporting and Analytics panel displays the Data Protection Advisor (DPA) version, IP
addresses for the Application Server and the Datastore Server, the license status of the Reporting
and Analytics node, and any alerts that require your action.
You can hover over the Services to view the status information for Data Protection Advisor
services.
To load the Reporting and Analytics console, click the Reporting and Analytics Web UI link.
Avamar and Data Domain System
.
Dell EMC Integrated Data Protection Appliance Product Guide 19

Monitor and manage the appliance
If Reporting and Analytics is not configured during the initial configuration process, the panel
displays a message indicating Reporting and Analytics is not configured. To configure the
Reporting and Analytics node, click the message. The Reporting and Analytics Configuration
screen is displayed. On the Reporting and Analytics Configuration screen, provide the required
license information and IP addresses and click Configure.
IDPA supports use of an external DPA implementation to analyze the system if you are running a
corporate deployment of the DPA instance. However, IDPA dashboard (ACM) does not display any
data that is associated with the external DPA separately. IDPA does not support local analytics and
search functions when an external instance of DPA or Search is used. Moreover, if you are using
an external DPA instance, you must configure and manage any such external DPA instances as
external instances cannot be configured or managed through the ACM.
Search panel
The Search panel displays the Search version, IP address for the Index Master node, and any
alerts that require your action. To load the Search console, click the Search link.
Hover over Services to view the status information for Search services.
If Search is not configured during the initial configuration process, the panel displays a message
indicating Search is not configured. To configure the Search node, click the message. The Search
Configuration screen appears. On the Search Configuration screen, provide the required IP
address and click Configure.
IDPA supports the use of an external Search node if you are running a corporate deployment of the
Search instance. However, the Search panel on the IDPA dashboard (ACM) does not display any
data that is associated with the external Search separately. IDPA does not support local analytics
and search functions when external instances of Search are used. Moreover, if you are using an
external Search instance, you must configure and manage any such external instances as external
instances cannot be configured and managed through the ACM.
Configuring clients in Search
To enable indexing for backup clients, additional configuration in Search is required.
Refer to the procedures in the "Collections" chapter of the
Administration Guide
connected to the appliance.
All the domains under Avamar get indexed automatically. Only those client domains that are added
post deployment of Search, are added manually.
Cloud Disaster Recovery panel
The Cloud Disaster Recovery panel displays the CDRA version, and alerts that require any action.
To load the Cloud Disaster Recovery console, click the Cloud Disaster Recovery Web UI link.
IDPA supports the use of an external CDRA if you are running a corporate deployment of the
CDRA instance. However, the Cloud Disaster Recovery panel on the IDPA dashboard (ACM) does
not display any events or data that is associated with the external CDRA separately. Moreover, if
you are using an external CDRA instance, you must configure and manage any such external CDRA
instances as external instances cannot be configured and managed through the ACM.
If CDRA is not configured during the initial configuration process, the panel displays Click here to
configure Cloud Disaster Recovery, indicating that Cloud Disaster Recovery is not configured.
To configure the Cloud Disaster Recovery node, click the message. The Cloud Disaster Recovery
Configuration screen is displayed. On the Cloud Disaster Recovery Configuration screen,
provide the IP address and click Configure.
Note:
Data Protection Search Installation and
. In the Sources section of the Collections wizard, select the clients that are
20 Dell EMC Integrated Data Protection Appliance Product Guide

Monitor and manage the appliance
l
Do not change the Avamar root user password before configuring CDRA from the
dashboard.
l
Do not change the Data Domain boost user password before configuring CDRA from the
Dashboard.
l
If a cloud account and email address are not configured during the CDRA configuration, the
CDRA Login page does not work. You must configure a cloud account and email address
manually in CDRA.
Connect to the cloud account and add Cloud DR targets
Connect the CDRA to the Amazon Web Services account and add targets to the account.
Before you begin
l
You have logged in to CDRA as administrator.
l
You have an AWS account that is already configured before connecting to the cloud account.
Note: IDPA performs the CDRA configuration automatically.
Procedure
1. Click Cloud Account on the menu bar.
The Connect to Cloud Account page appears.
2. Click Add Cloud Account.
3. In the Connecting to AWS Cloud account dialog box, enter the access key and the secret
key for the AWS account. http://docs.aws.amazon.com/IAM/latest/UserGuide/
id_credentials_access-keys.html provides information about obtaining the access and
secret keys.
4. To copy the IAM policy, click Copy IAM Policy.
This action copies to the buffer a JSON version of the minimum AWS user account
permissions that are required for Cloud DR implementation, which can then be applied to
AWS to set the permissions policy for the AWS user.
5. To view the Identity and Access Management (IAM) policy that represents the minimum
AWS user account permissions that are required for Cloud DR implementation, click Show
IAM Policy.
6. To save the AWS cloud account, click Verify & Save.
The CDRA verifies that the account exists before saving the cloud account information and
closing the Connecting to AWS Cloud account dialog box.
Note:
After you have provided credentials to an AWS account, you cannot change to
another AWS account.
Add cloud targets
You can add one or more cloud targets to the cloud account that includes selecting an Amazon S3
bucket and an encryption method.
Procedure
1. Click Cloud Account on the menu bar.
The Connect to Cloud Account page appears.
2. Click Add Cloud DR Target to set up one or more Cloud DR targets on the cloud account.
The Cloud DR target is the S3 bucket on AWS where data is written when VMs are backed
up to the cloud. The Cloud DR Server is deployed on one of the targets.
Dell EMC Integrated Data Protection Appliance Product Guide 21

Monitor and manage the appliance
3. Enter a name for the Cloud DR target.
4. Select an Amazon S3 bucket for the Cloud DR target.
5. Click Advance security option and select an encryption method:
The Add Cloud DR Target dialog box opens.
The name entered here appears in the Avamar Administrator when creating a Cloud DR
backup policy.
Option Description
SSE-S3 Default encryption (no cost)
SSE-KMS Key management service encryption (incurs a cost)
Note: If you select the SSE-KMS encryption method, only the default customer
managed key is supported. Changing the encryption key might cause errors with the
files in the Amazon S3 bucket.
For more information about these encryption methods, see:
l
SSE-S3 - https://docs.aws.amazon.com/AmazonS3/latest/dev/
UsingServerSideEncryption.html
l
SSE-KMS - https://docs.aws.amazon.com/AmazonS3/latest/dev/
UsingKMSEncryption.html
6. Click Add.
Deploy the Cloud DR Server
Deploy the CDRS on a specific Cloud DR target.
Before you begin
l
Cloud DR targets are required in the AWS account before performing this task. Connect to the
cloud account and add Cloud DR targets on page 21 contains information about adding Cloud
DR targets to the AWS account.
l
AWS Marketplace terms must be accepted before deploying the Cloud DR Server.
Procedure
1. Click Cloud DR Server on the menu bar.
l
If no CDRS has been deployed, the Deploy Cloud DR Server page appears.
l
If the CDRS has already been deployed, the Cloud DR Server page appears. You cannot
deploy additional CDRS instances.
2. In the Cloud DR Server Configuration section, select the Cloud DR target on which to
deploy the Cloud DR Server.
3. To allocate IP addresses for the Cloud DR solution, provide the IPV4 CIDR Range.
4. In the User Configuration section, enter and confirm passwords for the CDRS Admin and
CDRS Monitor users.
The passwords must:
l
Be at least eight characters in length
l
Contain characters of a minimum of three of the following types:
22 Dell EMC Integrated Data Protection Appliance Product Guide

Monitor and manage the appliance
n
English uppercase: A-Z
n
English lowercase: a-z
n
Numeric character: 0–9
n
Special (non-alphanumeric) characters
a. Enter and confirm passwords for the CDRS Admin and CDRS Monitor users.
b. Enter an email address for DD Cloud DR password reset requests.
When the Cloud DR Server is successfully deployed, AWS sends an email to this address
for verification. Follow the instructions in the email within 24 hours of deployment.
5. To confirm that you accept the marketplace terms, click the I have accepted the AWS
Marketplace terms checkbox.
6. Click Deploy Cloud DR Server.
The CDRA begins deployment of the CDRS to the Cloud DR target. If an error occurs during
deployment, click Cleanup to delete the cloud resources that CDRS creates, and then retry
deployment.
Deploying the CDRS may take up to 30 minutes.
If the deployment is successful, the Cloud DR Server page appears, listing the hostname of
the CDRS host, and the region. Also deployed are:
l
A Virtual Private Cloud (VPC).
l
An Amazon Relational Database Services (RDS) catalog, to maintain persistent data.
l
A private subnet for communication between the RDS and CDRS.
l
A public subnet (Standard Mode) or private subnet (Professional Mode) with internet
access to be used by CDRS.
l
The CDRS EC2 instance.
The M4.Large instance type is used for the CDRS instance. To reduce deployment costs,
you may want to purchase reserved instances from AWS; otherwise an on-demand instance
is used. An elastic IP address is automatically assigned to the CDRS instance. You cannot
change this IP address.
Note:
Multiple Cloud DR Add-on appliances can connect to a single Cloud DR Server
instance. However, one Cloud DR Add-on appliance cannot connect to multiple Cloud
DR Server instances.
Results
When the CDRS is deployed, connect to the Cloud DR Server by clicking the CDRS hostname.
Create rapid recovery images for protected VMs
You can accelerate the recovery process ahead of time by creating rapid recovery images for
protected VMs.
About this task
Creating a rapid recovery image starts the rehydration process and converts the VMDK files to an
Amazon Machine Image (AMI). The recovery process then launches the recovered instance from
the AMI.
Perform this procedure when a new backup copy is available in the Amazon S3 bucket.
Dell EMC Integrated Data Protection Appliance Product Guide 23

Monitor and manage the appliance
Procedure
1. In the CDRS user interface, select Protection > VM Protection in the navigation pane.
2. Select one or more VMs and click Create Rapid Recovery Image.
Results
l
The CDRS creates the AMI and removes any previous AMI for an earlier copy.
l
You can verify the results by reviewing the Rapid recovery image column.
l
You can disable rapid recovery for a VM by selecting it and clicking Disable Rapid Recovery
Image.
l
You can monitor the protection status and its progress by reviewing the Protection status
column.
Note: Ensure that when you set up Disaster Recovery for client VMs that need to be restored
on the cloud using CDRA, the OS version on the client VMs must be supported by AWS at the
time of restore. While performing a recovery to AWS, if the kernel version of the OS on the
client VMs is not an AWS supported kernel version, then the recovery activities fail with an
error message.
The existing protected VMs appear in the right pane. The Rapid recovery image column
indicates whether the VM is enabled for rapid recovery.
Perform a DR test or failover of a single VM
This procedure describes how to perform a DR test or failover on a single VM by using the Cloud
DR Server interface.
Before you begin
To perform a DR test or failover of a VM by using the Cloud DR Server interface, you must have
instances of virtual machines that are backed up by the on-premises backup software and copied
to the cloud.
About this task
To ensure a successful failover, and better prepare for a disaster, best practices recommend
testing various disaster recovery scenarios. After performing a DR test, you can promote the test
to a failover.
When an operational error or disaster occurs on premises, you can fail over a VM to the public
cloud. When the on-premise issue is resolved, you may fail the VM back to the on-premises
environment.
Note:
When performing failovers, you must fail over VMs in the correct order to ensure the
continued operation of servers and applications.
Procedure
1. In the Cloud DR Server user interface, select Recovery > VM Recovery
You can also open the VM Recovery page from the dashboard by clicking See All in the
Recovery pane.
The VM Recovery page appears.
2. Select the VM you want to recover and click DR Test or Failover.
If you click Failover and the VM has never been tested, a message prompts you about this
condition. Running a DR test is recommended before implementing a failover. The message
also recommends that you shut down the production VM to avoid a possible data loss that is
caused by accidental user access.
Click Select Copy to continue.
24 Dell EMC Integrated Data Protection Appliance Product Guide

Monitor and manage the appliance
3. On the Copy and Network window, select the VM copy and the network where you want to
launch the EC2 instance.
The Advanced Options section at the bottom of the window indicates the auto-selected
EC2 instance type and security group to use for the recovery process.
4. If you do not want to use the auto-selected EC2 instance type or security group, expand
Advanced Options and select an alternate EC2 instance type and one or more security
groups.
5. Click Start DR Test or Start Failover.
Results
The recovery process begins and you can monitor progress on the DR Activities page. During the
recovery process:
1. If the VM is not enabled for rapid recovery, a temporary Restore Service instance is launched
in each region where recovery is needed. This instance performs hydration during recovery,
and is automatically terminated after 10 minutes of idle time.
2. The Cloud DR Server then converts the VMDK to an AMI and launches an EC2 instance that is
based on the AMI.
3. When the EC2 instance is running, the Cloud DR Server deletes the VMDK and AMI.
Virtualization panel
The Virtualization panel displays information about the internal virtual environment on the
appliance, including the IP address and version of the vCenter server and ESXi host.
Customer information panel
The Customer Information panel displays the contact information of the administrator. It also
displays the location or site information.
About this task
To view the full value of an item, hover over the item. Perform the following actions to change the
customer information:
Procedure
1. In the Customer Information panel, click the corresponding Edit icon next to the value you
want to modify.
2. Type a new value:
l
Admin Name—Type the name of the administrator and click Save.
l
Admin Number—Type the phone number of the administrator and click Save.
l
Admin Email—Type the email address of the administrator and click Save.
l
Company Name—Type the name of the company and click Save.
l
Location—Type the location of the IDPA and click Save.
l
Site ID—Type the Site ID of the IDPA and click Save.
You can verify your Site ID number on the Online Support website:
a. Log in to the Online Support website with your credentials.
b. Select Service Center.
c. On the Service Center page, below the Sites and Contracts area, click Administer a
Site.
Dell EMC Integrated Data Protection Appliance Product Guide 25

Monitor and manage the appliance
General Settings panel
The General Settings panel displays basic settings including time and network configuration.
About this task
To view the full value of an item, hover over the item. Perform the following actions to change the
general settings information:
Procedure
1. In the General Settings panel, click the corresponding Edit icon next to the value you want
2. Select or type a new value:
d. Ensure that the site where the storage system is installed is listed in the My Sites area.
Note: You can also search for a site and add it to the My Sites list. If a site ID is not
available or the correct site ID is not listed, you must notify your local field
representative to request one.
to change.
l
Time Zone—Select the time zone from the list and click Save. The time zone is updated
for the Avamar, Data Domain, DP Advisor nodes, and Search nodes, the ACM, and the
vCenter host server.
NOTICE If this setting is changed, the Data Domain node restarts automatically.
l
SMTP—Type the SMTP server IP address and click Save. The SMTP server IP address
is updated for the Avamar and Data Domain nodes and the vCenter host server.
NOTICE
If this setting is changed, the Avamar MCS and Backup Scheduler services
restart automatically. Ensure that there is no backup running on the Avamar node
before changing this setting.
l
SNMP—Type the SNMP server IP address and click Save. The SNMP server IP address
is updated for the Avamar and Data Domain nodes and the vCenter host server.
l
NTP—Type the NTP server IP address and click Save. The NTP server IP address is
updated for the Avamar, Data Domain, DP Advisor, and Search nodes, the ACM, and the
vCenter host server.
Note:
The NTP server must be specified by IP address. Do not use a server name in
this field.
3. To change ACM DNS, perform the following step:
a. Edit the etc/resolv.conf file, and then specify the IP address of the customer DNS
server and the domain name.
For example, when the customer environment has a public DNS server with an IP
address of 10.254.66.23 and the domain name is mycompany.com, the /etc/
resolv.conf file contains the following entries:
Note:
The following output is an example, not the actual domain name and
nameserver addresses. These values must be provided by the customer.
search mycompany.com
nameserver 10.254.66.23
nameserver 192.168.100.100
Note:
Ensure that the entry for the public DNS server appears before the private
DNS server. If the private DNS server appears first, the DPA integration with the
Data Domain system will fail.
26 Dell EMC Integrated Data Protection Appliance Product Guide

Configure external LDAP environment
The Configure LDAP settings page on the ACM dashboard is used to configure the LDAP
settings.
About this task
By default, IDPA is set to use internal LDAP configuration. However, using the Configure LDAP
settings page, you can change this default configuration to an external LDAP configuration.
The LDAP username and password configured using the Configure LDAP settings page are used
to log in to IDPA System Manager and Search components only. To configure LDAP settings for
other components of IDPA, such as Avamar, Data Domain, DPA, Compute node, and ESXi, see the
respective component's documentation. You can also see the
chapter in the
information.
Also, you cannot view the existing LDAP settings from the Configure LDAP settings page. If you
want to view the LDAP settings, click the Download current configuration icon that is next to the
Shutdown appliance icon on the ACM dashboard. IDPA generates a PDF file (as part of the
current configuration of the appliance), detailing all your current LDAP settings.
To configure the LDAP settings, perform the following actions:
Dell EMC Integrated Data Protection Appliance Security Configuration Guide
Monitor and manage the appliance
Product and subsystem security
for more
Procedure
1. Select LDAP type.
2. Check Secure LDAP to verify if the LDAP is secure.
3. Enter Server hostname.
4. Enter Domain name.
l
The domain to which the Server hostname belongs should be the same as the Domain
name specified.
l
The domain name can be alphanumeric characters and special characters.
5. Enter Query username.
The query username can be alphanumeric characters and special characters (-, _, ., ,, and
=).
6. Enter Query password.
The query password should consist a minimum of 9 to 20 characters, contains at least one
lower case alphabet, one upper case alphabet, one digit, and any of the supported special
characters (-, _, and .).
7. Enter Admin group name.
The Admin group name is case-sensitive and must be identical to the group name entered
in the LDAP server. If there is a mismatch in the names, the configuration fails.
You must have already added the required users and provided the appropriate privileges to
those users who need access to the IDPA System Manager (DPC) because IDPA System
Manager is used to access or connect to the user interfaces of respective point products.
For more information, see the
System Manager Version 18.2 Getting Started Guide
Configure LDAP or AD user access
, which is available on the Online Support
section in the
Dell EMC IDPA
website at https://www.dell.com/support/home.
8. Enter Port number.
9. Click Validate to check the validation of your LDAP details.
Dell EMC Integrated Data Protection Appliance Product Guide 27

Monitor and manage the appliance
10. Click Submit, and then click Close.
The settings have been updated to external LDAP environment.
11. Click Close.
Revert to internal LDAP environment
By default, IDPA uses the internal LDAP configuration. However, if you have changed this default
configuration to an external LDAP configuration and if you need to revert it to internal LDAP
configuration, perform the following steps:
About this task
Consider a scenario where you have changed the common appliance password after configuring
the external LDAP. In such cases, the internal LDAP account is still associated with the old
common appliance password that was in use before the external LDAP was configured.
To create or verify an internal LDAP password, see the Troubleshoot LDAP on page 59 section.
Procedure
1. Update the LDAP settings from the ACM dashboard using the following values:
l
LDAP type:
l
Secure LDAP:
l
Server hostname:
l
Domain name:
l
Query username:
l
Query password:
l
Admin groupname:
l
Port number:
OPENLDAP
Checked/selected
<ACM_HOSTNAME_FQDN>
dc=idpa,dc=com
uid=idpauser,ou=People,dc=idpa,dc=com
<Internal LDAP user account password>
dp_admin
636
2. Connect to the ACM by using an SSH client.
3. Modify the following settings in the /usr/local/dataprotection/var/configmgr/
server_data/config/commonconfig.xml file:
<useExternalLdapSettings>true</useExternalLdapSettings> to
<useExternalLdapSettings>false</useExternalLdapSettings>
Shut down the IDPA
You can shut down the IDPA appliance from the ACM console.
Before you begin
l
Ensure that there are no backup jobs running on the Avamar Backup Server.
l
Shutting down the IDPA appliance requires physical intervention or the use of iDRAC to restart
the system. If you are remotely shutting down the IDPA appliances, ensure that either you
have physical access to the system or have configured iDRAC on the system.
Note:
n
If there are backup jobs running on Avamar Backup Server when the IDPA appliance
shutdown operation is in progress, the shutdown operation waits for the Avamar jobs to
complete with the status Waiting for shutdown of Backup Server.
n
It is recommended that you wait for the backup jobs to complete. However, if you must
shut down the appliance immediately, and then you must log in to the Avamar UI and
cancel the backup jobs that are in progress.
28 Dell EMC Integrated Data Protection Appliance Product Guide

Monitor and manage the appliance
About this task
To shut down IDPA, perform the following actions:
Procedure
1. On the ACM dashboard Home tab, click the Shutdown Appliance icon.
2. Enter the ACM root password, and click Yes.
The appliance shut down progress is displayed.
The IDPA appliance shuts down the components in the following order:
l
Backup Server
l
Search
l
Reporting and Analytics
l
System Manager
l
Cloud Disaster Recovery Agent
l
Protection Storage
l
Appliance Configuration Manager
l
vCenter Server
l
Compute Node
If the ACM-initiated shutdown fails to shut down the Backup Server and the Protection
Storage or both, then the ACM displays a message listing the component(s) that failed to
shut down. The ACM then continues to shut down the other components.
If any components fail to shut down, you must manually shut down the components. For
more information about manual shut down of IDPA components, see Troubleshooting shut
down.
Advanced backup configuration
The Advanced backup configuration tab is only displayed when you have NDMP Accelerators and
configuring NAS systems. The Advanced Backup Configuration tab allows an administrator to
add, delete, or edit a NAS system on the IDPA.
Configuring NAS servers with NDMP Accelerators
Before you begin
Adding a NAS system requires at least one NDMP Accelerator.
About this task
From the Advanced Backup Configuration tab of the dashboard, an administrator can add the
following supported NAS systems:
l
EMC Celerra, EMC Unity, or EMC VNX
l
EMC Isilon
l
NetApp filer
l
Oracle ZFS
This view also allows an administrator to edit or delete an existing connected NAS system.
Procedure
1. From Advanced Backup Configuration > NAS page, click Add.
2. Select the NAS Type, Encoding Scheme, and NDMP Accelerator.
Dell EMC Integrated Data Protection Appliance Product Guide 29

Monitor and manage the appliance
3. Type the NDMP Account Name, NDMP Account Password, and Avamar Account Name.
4. Click Save.
Results
After adding a NAS system, you can create a protection job for the new system with the Avamar
Administrator GUI.
Health
The Health tab displays status information and alerts for the server hardware and the virtual
infrastructure components of IDPA including vSphere alerts from ESXi servers.
The IDPA uses Secure Remote Services to automatically send critical and fatal events to Customer
Support for troubleshooting (events are sent only for the IDPA Appliance, Avamar, Data Domain,
and Data Protection Advisor). A support ticket is opened based on the events that are received.
Critical and fatal events are sent to Customer Support either after 30 min have elapsed, or when
30 events have accumulated, whichever occurs first.
By default, all events are deleted after 30 days. If no events have occurred in the selected time
period, the Event Summary and Event Details panel indicate that there is no data available.
Note: Only the following characters may be used in the NDMP account name: a-z
(lowercase), '.', '-', and '_'.
A green check mark indicates that the NDMP Account Password and Confirm Password
field match.
Event Summary
The Event Summary panel displays a summary of the status events on the appliance, which is
grouped by Device and Severity.
To refresh the data displayed on the Health page, click the Refresh icon beside the Event filter
list.
Note:
The application refreshes the data based on the filters that you have selected.
To change the time period for which events are displayed, select an option from the Event filter
list. Selecting Today lists events that have occurred from midnight to the present.
To show only events for a specific device or of a specific severity in the Event Details panel, click
the corresponding wedge in the chart.
Event Details
The Event Details panel displays a list of the status events on the appliance. Use the Component,
Component Name, and Severity lists and click Search to filter the events and display the details
of each event. To read more detailed information about an event, click its table entry. To export
the list as a .CSV file, click the CSV icon.
To clear the options selected in the filters, click Reset.
Troubleshooting
If a critical component of the health monitoring function is not working, the panels indicate that
the service is down and an error message is displayed at the top of the page. For more information
about how to resolve issues with the Health tab, see Troubleshooting health monitoring on page
63.
30 Dell EMC Integrated Data Protection Appliance Product Guide

Monitor and manage the appliance
Upgrade
The Upgrade tab allows an administrator to upgrade the IDPA software.
Install the IDPA post-installation patch on DataProtectionACM
Perform the following steps to install a postinstallation patch:
Before you begin
You must go through the readme file available along with this postinstallation patch to verify if
there are any preinstallation tasks that you must perform before applying this postinstallation
patch.
Procedure
1. Go to https://support.emc.com/downloads/41849_Integrated-Data-Protection-Appliance
website to verify if any postinstallation patches are available for your version of IDPA. If any
postinstallation patch is available, download it to your local folder.
Information similar to the following is displayed when you go to the https://
support.emc.com/downloads/41849_Integrated-Data-Protection-Appliance website to
download the postinstallation patch:
Idpa_post_update_N.N.N.nnnnnn.tar.gz
Where:
l
N.N.N
is the latest postinstallation patch version.
l
nnnnnn
is the build number.
2. Copy the Idpa_post_update_N.N.N.nnnnnn.tar.gz file to /data01/upgrade
location on the ACM.
Note:
Ensure that only the postinstallation patch file exists in this folder and no other
packages exist. If there are any other install files in this folder, you must delete them
before installing the patch.
3. Ensure that you have the executable permission for the install package that you copied to
the /data01/upgrade directory. If you do not have the executable permission, run the
chmod 644 Idpa_post_update_<
the permission.
4. Log in to the ACM and click the Upgrade tab.
The latest upgrade package file is automatically detected and is displayed in Upgrade
Binary Location.
5. Click Extract.
The browser redirects to
number.
Note:
The validation process takes approximately 15 minutes, and the ACM can time out
while waiting. To resume the session, you must login in once again.
The system validates the following:
l
VLAN status
https://<acm_configured_public_ip>:9443
version.build number
>.tar.gz command to obtain
with a changed port
Dell EMC Integrated Data Protection Appliance Product Guide 31

Monitor and manage the appliance
n
Validates if it can connect to all 3 ESXi servers (Applicable for DP5300, DP5800,
DP8300, and DP8800 models only).
n
Validates the number of vSAN clusters (Applicable for DP5300, DP5800, DP8300,
and DP8800 models only).
n
Validate if the vSAN datastore is greater than 16.2 TB (Applicable for DP5300,
DP5800, DP8300, and DP8800 models only).
l
Validates the connection to all components.
l
Validates the license status.
l
Validates if Avamar services are running.
l
Validates to ensure that no backup jobs are running on Avamar.
l
Validates if the DD capacity used is less than 85%.
l
Avamar checkpoint validation
l
vSAN requirements (Applicable for DP5300, DP5800, DP8300, and DP8800 models
only):
n
Checks for inaccessible vSAN objects or virtual machines.
n
Checks if the vSAN cluster requires a disk data rebalance.
n
Checks if a component rebuilding task is currently in progress in the vSAN cluster.
n
Checks for sufficient disk space requirements (30%).
l
ESX upgrade prerequisites:
n
Requires valid connection points to all the required ESXi servers.
n
Requires that the applicable ESXi servers are in maintenance mode.
n
Requires that the VCSA version is higher than ESXi version. In case, there is a major
upgrade to VCSA, then the private IP address of the VCSA, 192.168.100.108
should not be in use.
Note:
The private IP address of the VCSA,
192.168.100.108
, is only required
temporarily during the upgrade process.
A table displays the current version, new version, and type (for example, major, patch) of
each component for which an upgrade is available.
If the validation is not successful, check the errors that are displayed when you hover over
the exclamation mark. Resolve all the errors and then click Extract.
6. Click Upgrade, type the ACM password, and click Authenticate.
7. To start the upgrade, click Yes.
The upgrade process starts.
Note:
The upgrade process can take five to six hours, during which all activity on the
IDPA must be quiesced. The system is not accessible during parts of the upgrade.
WARNING If the upgrade process is still running, do not shut down/reboot the ACM or
restart the
rebooted the ACM or restarted the
dataprotection_webapp
service. For some reason, if you have shut down/
dataprotection_webapp
service while the upgrade
process is still running, and if you are unable to see the progress of the upgrade after
the ACM is rebooted, then contact a technical support professional.
The Upgrade Progress displays the following:
32 Dell EMC Integrated Data Protection Appliance Product Guide

Monitor and manage the appliance
l
The ACM upgrade progress bar with the progress percentage and description of the
upgrade step in progress
l
Individual component upgrade progress bar with progress percentage and description of
the upgrade step in progress
8. After all the components are upgraded successfully and the overall IDPA upgrade progress
bar shows 100%, click Finish.
9. Click OK on the Upgrade Finish window.
Note: After the upgrade is complete, there can be a scenario where Avamar is in
maintenance mode and the jobs cannot be executed at that time. After Avamar comes
out of the maintenance mode, the jobs are executed.
Note: After the upgrade is complete, acknowledge the notification Event
ConnectEMC notification failed on the Avamar Administrator. This notification
is generated during upgrade when the MC service is disconnected.
Note: After the upgrade is complete, there is a warning on vCenter about a potential
vulnerable issue that is described in CVE-2018-3646. IDPA uses the ESXi version which
has the fix for this vulnerability, however this fix is not enabled by default as it has
severe performance impact. Refer to the
information.
IDPA Security Configuration Guide
for more
Note: If you have NDMP Accelerator nodes added to IDPA, you must manually upgrade
the NDMP accelerator nodes. To upgrade NDMP accelerator nodes, see the
the accelerator software
NAS Systems User Guide
The dashboard with all the products and their upgraded versions are displayed along with
the newly configured ACM. If the upgrade process does not complete as expected, see
Troubleshooting component software upgrades on page 64.
If the upgrade for any component fails, then the upgrade process is stopped until you
troubleshoot and resolve the failure. However, if there are any noncritical warnings, the
upgrade process continues. These warnings must be resolved once the upgrade process is
completed.
Start up the IDPA
IDPA DP4400 has only one ESXi Server, and switching on that ESXi Server ensures powering of all
the IDPA point products in the required sequence.
About this task
After IDPA starts successfully, you can connect to the ACM dashboard and monitor the progress
of the startup. If there is a failure in the startup, the application displays an error message with an
option to access the ACM dashboard page.
section in the
.
Upgrading
Dell EMC Avamar NDMP Accelerator for Dell EMC
Access components with a browser
In addition to clicking the links in the ACM panel, you can access the user interface for individual
components by browsing to the corresponding network location and typing the username and
password.
In each of the following sections,
credentials for Search and IDPA System Manager are determined by your LDAP setup. The IDPA
System Manager is used to access or connect to the user interfaces of respective point products.
<component_ip>
Dell EMC Integrated Data Protection Appliance Product Guide 33
refers to the IP address of the component. The

Monitor and manage the appliance
The IDPA System Manager uses single sign-on when you are trying to access a particular point
product's UI.
The LDAP references in the below table apply to IDPA System Manager and Search components
only. The appliance and other components do not use the LDAP settings that are configured from
the ACM.
Note: Ensure you are using Flash version 27.0.0.183 or later to access the vCenter web client.
Table 9 Access Components
Component Location SSO from IDPA System
Manager
Avamar client
manager
Avamar user
interface
Data Domain user
interface
IDPA System
Manager user
interface
DP Advisor user
interface
https://
<component_ip>
/aam
https://
<component_ip>
/mcui
https://
<component_ip>
https://
<component_ip>
https://
<component_ip>
:9002/
dpaui/jsp
Yes
Yes
Yes
Not applicable
Yes
Username
MCUser
MCUser
sysadmin
<username>@<do
main>
Note: If external
LDAP has not
been
configured, then
the username is
idpauser, by
default.
administrator
Search user
interface
vCenter web client
Cloud Disaster
Recovery
34 Dell EMC Integrated Data Protection Appliance Product Guide
https://
<component_ip>
/admin/#/login
https://
<component_ip>
https://
<component_ip>
Yes
No
No User name is admin
<username>@<do
main>
Note: If external
LDAP has not
been
configured, then
the username is
idpauser, by
default.
idpauser

User accounts for components
The IDPA configuration uses the user accounts in Table 10 on page 35. By default, these
accounts use the common IDPA password that is set from the General settings page of the ACM
UI.
The LDAP references in the below table apply to IDPA System Manager and Search components
only. The appliance and other components do not use LDAP.
For information about how to change component passwords, see Change passwords and
synchronize components on page 36.
Table 10 Component and user account mapping
Component Username Password
ACM root Common password provided during IDPA
Monitor and manage the appliance
Appliance configuration.
IDPA System Manager (If
external LDAP is not
configured)
IDPA System Manager (If
external LDAP is
configured)
Avamar admin Common password provided during the
Data Domain sysadmin Common password provided during the
Data Protection Advisor administrator Common password provided during IDPA
Search Respective LDAP
CDRA admin Common password provided during IDPA
CDRS admin or monitor Password set during CDRS deployment.
vCenter idpauser Common password provided during IDPA
idpauser Common password provided during IDPA
Appliance configuration.
Respective LDAP
credentials
credentials. If external
LDAP is not configured,
then idpauser
External LDAP password as applicable.
IDPA Appliance configuration
IDPA Appliance configuration.
Appliance configuration.
Common password provided during IDPA
Appliance configuration.
Appliance configuration.
Appliance configuration.
ESXi idpauser Common password provided during IDPA
Appliance configuration.
Dell EMC Integrated Data Protection Appliance Product Guide 35

Monitor and manage the appliance
Change passwords and synchronize components
Single-click user password change is one of the features, which simplifies the password
maintenance of IDPA.
Change passwords for individual components
Some changes to component passwords and settings require updating the settings of other
components.
l
All passwords for the individual components must adhere to the IDPA requirements, even when
they are changed on individual components.
l
If you modify the password manually on the Avamar server, and do not use the change
password option on the IDPA Appliance, the system displays an error message when you try to
update the password using the ACM dashboard. For more information about resolving the
Avamar password being out of sync, see the Credential mismatch section.
l
Ensure that all the point product VMs should be up and running before changing the password.
l
Make sure that the IDPA dashboard is all green before changing the password.
WARNING Changing passwords of individual components is not recommended. Due to any
unforeseen circumstances, if you have to change passwords of individual components, see the
following sections:
Data Domain settings
Updating the Data Domain password
For information on how to change the Data Domain sysadmin account password, see the
Domain Operating System Administration Guide
account, log in to DP Advisor and update the Data Domain SSH credentials with the same
password that you used for the sysadmin account.
After updating the password in DP Advisor, log in to the ACM and update the Protection Storage
password with the same password that you used for the sysadmin account.
Avamar settings
Avamaruses multiple user accounts, including MCUser, viewuser, server root, OS admin, and
OS root.
Updating Avamar passwords
IDPA requires that the OS admin and OS root accounts use the same password. The MCUser,
viewuser, and server root accounts must also share a password, which can be different than
the OS admin and OS root password. For more information about how to change an Avamar
password, refer to the
After changing the password for any Avamar account, log in to the ACM and update the Backup
Server password with the same password that you used for the Avamar account.
Data
. After changing the password for the sysadmin
NOTICE
Update the Data Domain SSH credentials in DP Advisor immediately. Failure to do so
can cause account lockout as DP Advisor repeatedly tries to connect with the old password.
Note:
Update the DD Boost user password only after configuring CDRA from the Dashboard.
Avamar Administration Guide
.
If you change the MCUser account password, update it in the Search Admin UI. For more
information about how to change the Avamar password for Search, refer to the
Search Installation and Administration Guide
36 Dell EMC Integrated Data Protection Appliance Product Guide
Data Protection
.

If you change the viewuser account password, update it in the DP Advisor UI. For more
information about how to change the Avamar password in DP Advisor, refer to the
Advisor Installation and Administration Guide
Updating the DD Boost user password
After changing the password for the Data Domain DDBoostUser account, log in to the Avamar
Administrator GUI. Edit the Data Domain system settings and update the DD Boost user password
with the same password that you used for Data Domain DDBoostUser account . For more
information, see the "Editing a Data Domain system" procedure in the
DP Advisor settings
To change the DP Advisor administrator account password or root password, you must log in
and change that password for each DP Advisor node.
Updating DP Advisor passwords
Monitor and manage the appliance
Data Protection
.
Avamar Administration Guide
Note: Update the DD boost user password only after configuring CDRA from the Dashboard.
.
For more information about how to change a password in DP Advisor, refer to the
Advisor Installation and Administration Guide
.
Data Protection
After changing the password on all nodes, log in to the ACM and update the Reporting and
Analytics password with the same password that you used for DP Advisor administrator
account or root.
Updating the Data Domain SNMP community string
public
If the community string is changed from its default value of
, DP Advisor must be updated to
reflect the change.
1. Log in to Data Domain and change the community string with the following command, where
<community_string>
is the new string and
<Dpa_DC_Agent_IP>
is the IP address of the Data
Collection Agent VM.
snmp add rw-community
<community_string> hosts
<Dpa_DC_Agent_IP>
2. In the Reporting and Analytics panel of the ACM, click the Reporting and Analytics Web UI
link.
3. Click Manage Credentials on the Admin > System page.
4. Select the EMC Data Domain Credential and update the community string with the same
password that you used for community string.
Search settings
To change the Search OS root password, you must log in and change the OS root password for
each Search node.
Updating the Search password
For more information about how to change the OS root password, refer to the
Search Installation and Administration Guide
.
Data Protection
After changing the password for the Search OS root account, log in to the ACM and update the
Search password with the same password that you used for Search OS root account.
Note:
#, ?, /, and \ are illegal characters for new passwords.
Dell EMC Integrated Data Protection Appliance Product Guide 37

Monitor and manage the appliance
Updating the LDAP configuration for Search
If the LDAP query user password is changed, it may not be possible to log in to the Search Admin
UI. To update this password, refer to the referenced procedures in the
Installation and Administration Guide
1. The first time you log in to a Search node with SSH, you must accept the EULA. For more
information, refer to the "Initializing the Data Protection Search environment" procedure in the
Data Protection Search Installation and Administration Guide
2. After accepting the EULA, select the option [2] Configure Network Settings and then
press F9 to quit.
3. When the system displays Do you want to reboot now? y(es) or n(o):, type no.
4. To update the LDAP configuration, complete the "Updating LDAP configuration in the Data
Protection Search Admin installation script" procedure in the
and Administration Guide
5. Repeat steps 1–4 for each Search node.
6. Log in to each Search Index Data Node with SSH and run the command service unicorn
restart.
7. Log in to the Search Index Master Node with SSH and run the command service unicorn
restart.
Data Protection Search
.
.
Data Protection Search Installation
.
vCenter settings
For information about how to change the vCenter root password, refer to the documentation on
the vCenter Support website.
Updating the vCenter password for the ACM
After changing the password:
Note:
If you are manually changing the password for the vCenter Server, the password you set
for the vsphere.local\Administrator and the root user accounts must be the same.
1. Log in to the ACM with SSH.
2. Change directory to /usr/local/dataprotection/customscripts/tools
3. Run the script sync_vcenter_password.sh
4. Modify the permissions on the script by running the command chmod +x
sync_vcenter_password.sh
For more information about the sync_vcenter_passwords.sh script, run
sync_vcenter_passwords.sh -h
If you need to log in to vCenter to troubleshoot an issue encountered during installation, use the
idpauser@localos
user
and the common password for the IDPA. This user account has limited
privileges, but has access to information that can help identify and address problems.
Updating the vCenter password for Avamar
1. Connect to the Avamar user interface with an SSH client as a user with the Administrator role.
The Avamar Administrator GUI is displayed.
2. Locate the vCenter client in the vCenter domain.
3. Edit the vCenter client and update the root password with the same password that you used
for the root account.
38 Dell EMC Integrated Data Protection Appliance Product Guide

Monitor and manage the appliance
Updating the vsphere.local\Administrator password
For information about how to change the vsphere.local\Administrator password, refer to
the documentation on the vCenter Support website. The domain is vsphere.local.
Configure the root password expiry policy
While the vCenter root password is still valid/has not expired, and if you want that the vCenter
root password should never expire for the vCenter root user, perform the following steps:
Procedure
ESXi settings
Log in to the VMware vSphere Appliance Management UI by going to https://<
1.
hostname
2. In the vCenter Server Appliance Management UI, click Administration.
3. In the Password Expiration Settings pane, select No for the Root password expires field.
4. Click Submit.
or IP>:5480 using the credentials as root/<
common IDPA password
VCSA
>.
Change expired password of root user account
If the upgrade fails, you must perform the following steps to change the expired password of the
root user account:
Procedure
1. Log in to the VMware vSphere Appliance Management UI by going to https://<
hostname
2. In the vCenter Server Appliance Management UI, click Administration.
3. In the Change root password pane, specify all the required fields and click Submit.
4. Cycle through a new password five times to clear the restriction and reset to the same
password that was set before the password expiry.
5. Initiate the upgrade process using the RETRY option.
For information about how to change the ESXi password, see the documentation on the ESXi
Support website.
or IP>:5480 using the credentials as root/<
common IDPA password
VCSA
>.
LDAP settings
Updating the ESXi password
After changing the password:
1. Log in to the ACM with SSH.
2. Change directory to /usr/local/dataprotection/customscripts/tools
3. Run the script sync_Switch_Server_ESX_Passwords.sh
4. Modify the permissions on the script by running the command chmod +x
sync_Switch_Server_ESX_Passwords.sh
For more information about the sync_Switch_Server_ESX_Passwords.sh script, run
sync_Switch_Server_ESX_Passwords.sh -h
LDAP password requirements
The LDAP password must:
l
Use only the following characters:
Dell EMC Integrated Data Protection Appliance Product Guide 39

Monitor and manage the appliance
n
Letters (A–Z, a–z)
n
Numbers (0–9)
n
Period (.)
n
Hyphen (-)
n
Underscore (_)
l
Contain at least one supported special character
l
Be no longer than 20 characters
Synchronize components
Changing a password for an IDPA component causes the ACM UI to display the password out
of sync error message.
To enable the ACM to gather health information for the component, you must update the stored
password (old password) in the ACM UI with the respective component's updated password. To
update an unsynchronized password, click the error text.
If the vCenter and ESXi server passwords are out of sync, you can go the Virtualization panel on
the ACM dashboard to resynchronize them once again. However, both the vCenter and ESXi
server versions as well as the vCenter Web UI link are disabled until you resynchronize the
passwords.
Configure IDPA to use specific interfaces for replication
A replication job copies the client backup data from the source IDPA to another IDPA, for example,
a Data Domain system. The purpose of replication is to protect against data loss if the source IDPA
system fails.
About this task
Perform the following steps to configure replication of the backup data:
After performing the following steps, you must continue to follow the steps mentioned in the:
l
Replication
l
Fore more information about ifgroups for replication traffic, see the
Boost for Partner Integration Administration Guide
Note:
connections instead of the default 1G connection for the replication.
Procedure
1. Log in to the Data Domain system using SSH.
2. Run the following command to list the available
system:
sysadmin@ddhostname # mtree list
Output similar to the following is displayed:
section of the
Dell EMC Avamar Administration Guide
to configure replication.
Dell EMC Data Domain
.
The need for additional steps listed below are to configure the IDPA appliance to use 10G
mtree
(Avamar mtree) on the Data Domain
Name Pre-Comp (GiB) Status
---------------------------- -------------- -----/data/col1/avamar-1542004352 3999.3 RW
/data/col1/backup 0.0 RW
40 Dell EMC Integrated Data Protection Appliance Product Guide

Monitor and manage the appliance
/data/col1/esx1-logs 0.0 RW/Q
---------------------------- -------------- -----
Note down the Avamar mtree details.
3. Run the following command to assign Avamar mtree to the
ifgroup
, and also to add the
destination Data Domain server:
ifgroup replication assign <IFGROUP_NAME> mtree <MTREE_PATH> remote
<TARGET_DD_MANAGEMENT_HOSTNAME>
Output similar to the following is displayed:
ifgroup replication assign vlan280 mtree /data/col1/avamar-1542004352
remote vdppunvm126.vdp.emc.com
4. Run the following command to see the summary of the
ifgroup
:
sysadmin@ddhostname # ifgroup show config <IFGROUP_NAME> all
Output similar to the following is displayed:
Group-name Status Interface Clients Replication
---------- ------- --------- ------- -----------
vlan280 enabled 2 1 1
---------- ------- --------- ------- -----------
Group-name Status Interfaces
---------- ------- --------------
vlan280 enabled 10.118.136.110
vlan280 enabled 10.118.136.111
---------- ------- --------------
Group-name Status DD Boost Clients
---------- ------- ----------------
vlan280 enabled 10.118.136.0/22
---------- ------- ----------------
Group-name Status Replication Mtree Replication
Remote Host
---------- ------- ---------------------------- -----------
------------
vlan280 enabled /data/col1/avamar-1542004352
vdppunvm126.vdp.emc.com
---------- ------- ---------------------------- -----------
Dell EMC Integrated Data Protection Appliance Product Guide 41

Monitor and manage the appliance
------------
File replication is allowed on ifgroup.
Client may use any interface.
5. Similarly, create the
clients, and the Avamar
Once you have successfully created the
ifgroup replication assign <IFGROUP_NAME> mtree <MTREE_PATH> remote
<SOURCE_DD_MANAGEMENT_HOSTNAME>
ifgroup
mtree
on the destination Data Domain system, and add the interfaces,
path as mentioned in the above steps.
ifgroup
, output similar to the following is displayed:
6. Execute the replication from the Avamar UI, and from the Data Domain system, verify if the
replication traffic is using the interfaces in the replication
ifgroup
, by running the following
command:
ifgroup show connections
7. Once the above steps are successfully executed, you can continue to configure the
replication policies. For more information, see the
Dell EMC Avamar Administration Guide
.
42 Dell EMC Integrated Data Protection Appliance Product Guide

CHAPTER 3
Upgrade the IDPA software (DP4400)
This chapter describes how to upgrade the IDPA software on DP4400 models.
Topics include:
l
Upgrade components............................................................................................................ 44
l
Upgrade Prerequisites (DP4400).......................................................................................... 44
l
Upgrade the appliance software (DP4400)........................................................................... 45
l
Upgrade Postrequisites ........................................................................................................ 47
Dell EMC Integrated Data Protection Appliance Product Guide 43

Upgrade the IDPA software (DP4400)
Upgrade components
This topic describes the list of core components that are required for the upgrade process.
Upgrade of the software for various core components of IDPA happens in this sequence:
1. Backup Server (Avamar), IDPA System Manager, Reporting and Analytics (Data Protection
Advisor), Search , CDRA, and ACM.
2. Protection Storage (Data Domain).
3. VCSA (vCenter Server Appliance) and Compute node (ESXi).
Upgrade components:
l
Backup Server (Avamar).
l
IDPA System Manager.
l
Reporting and Analytics (Data Protection Advisor).
l
Search.
l
Protection Storage (Data Domain).
l
CDRA.
l
ACM.
l
VCSA.
l
Compute node (ESXi).
Upgrade Prerequisites (DP4400)
This section provides you information about the prerequisites that you need to complete before
you begin the upgrade procedure.
Note:
All the existing Avamar packages and the snapshots are deleted before the upgrade.
l
Review the
current release.
l
If you have NDMP Accelerator nodes added to IDPA, you must manually upgrade the NDMP
accelerator nodes. To upgrade NDMP accelerator nodes, see the
software
Guide
l
An upgrade should be started only during a software upgrade maintenance window. Ensure
that no other maintenance or backup activity is occurring on Avamar or Avamar Virtual Edition
during the upgrade process (Avamar jobs should not be running and Avamar Server status
should be idle). You can check the server status by running the following command on the
Avamar server:
admin@vdppunvm140:~/>: opstatus.dpn
l
Ensure that you note down the Search settings before starting the upgrade procedure because
as part of the upgrade, Search is also upgraded. Search upgrade comprises of deleting the old
Search VM and adding the new Search VM, which will delete all the Search settings such as
the custom user permissions and email notifications after the upgrade. Similarly, the LDAP
settings are stored on ACM, and ACM restores the previous LDAP settings on the new Search
VM after the upgrade.
Integrated Data Protection Appliance Release Notes
section in the
Dell EMC Avamar NDMP Accelerator for Dell EMC NAS Systems User
.
for information specific to the
Upgrading the accelerator
44 Dell EMC Integrated Data Protection Appliance Product Guide

Upgrade the IDPA software (DP4400)
l
Ensure that all the ESXi passwords are synchronized with ACM. If you have changed the ESXi
passwords, see
the
IDPA Product Guide
l
Make sure that the ACM Dashboard is not displaying any Password out of sync for any of
ESXi settings
under
Change passwords and synchronize components
to synchronize them.
section in
the components.
l
Ensure that the VCenter passwords are synchronized with ACM. If you have changed the
VCenter password, see under
IDPA Product Guide
l
Ensure that the ESXi server is up and running, by verifying on the vCenter UI.
l
Ensure that Avamar and Data Domain storage consumption is less than 85 percent. Refer to
.
Monitoring the system with the Avamar Administrator Dashboard
system capacity
sections in the
Change passwords and synchronize components
and
Monitoring Data Domain
Dell EMC Avamar Data Domain System Integration Guide
section in the
information.
l
Disable all the backup policies through the Avamar UI. Refer to the section
disabling a backup policy
l
Restart MCS on Avamar before starting the upgrade process to ensure Avamar is quiesced, so
in the
Dell EMC Avamar Administration Guide
.
Enabling and
that the upgrade does not fail due to Avamar being busy. To restart MCS on Avamar , login to
the Avamar Utility node with SSH (ssh login credential is admin and the password is the
common appliance password that you would have provided) by using the Avamar IP address
and run the dpnctl stop mcs command to stop and then run the dpnctl start mcs
command to restart the Avamar server.
l
Make sure that you check the health of the vCenter before the upgrade procedure. To check
the health of the vCenter, login to the vCenter Web interface. If there are any critical alerts
requiring user action, you must first fix those critical alerts before starting the IDPA upgrade
procedure.
for more
Upgrade the appliance software (DP4400)
Upgrade the software for the components of IDPA from the Upgrade tab of the ACM.
About this task
You can upgrade from IDPA version 2.4 to IDPA version 2.4.1 (on DP4400 models). However,
before upgrading the IDPA software, the IDPA system must have its firmware updated to June
2019 Block release. See the
Guide available
on the Online Support website for a detailed procedure on how to update the IDPA
firmware on DP4400 models.
Procedure
1. Download the upgrade package file from Online Support and use the md5sum validation
process to verify its integrity.
The name of the file is in the format IDPA_Upgrade_<version>.tar.gz.
2. Copy the file to /data01/upgrade on the ACM.
Note:
Ensure that only the upgrade file exists in this folder and no other post or
prepatch packages exist.
3. Ensure that you have the executable permission for the upgrade package that you copied to
the /data01/upgrade directory. If you do not have the executable permission, type the
chmod 644 Idpa_Upgrade_<version>.tar.gz command to obtain the permission.
Dell EMC Integrated Data Protection Appliance Version 2.4.1 Installation
4. Log in to the ACM and click the Upgrade tab.
Dell EMC Integrated Data Protection Appliance Product Guide 45

Upgrade the IDPA software (DP4400)
The latest upgrade package file is automatically detected and is displayed in Upgrade
Binary Location.
5. Click Extract.
The tar.gz file is extracted and the validations are performed.
The system validates the following:
l
l
l
l
l
l
l
l
l
Note: The validation process takes approximately 15 minutes, and the ACM can time out
while waiting. To resume the session, you must log in once again.
VLAN status
Validates the connection to all components.
Validates the license status.
Validates if Avamar services are running.
Validates to ensure that no backup jobs are running on Avamar.
Validates if the DD capacity used is less than 85%.
Avamar Checkpoint validation
Validates the DPA version on the component VM and the version being installed.
ESX upgrade prerequisites:
n
Requires valid connection points to the ESXi server.
n
Verify that the ESXi Server can enter and exit maintenance mode successfully before
the upgrade.
n
Requires that the VCSA version is higher than ESXi version.
n
In case, there is a major upgrade to VCSA, then the private IP address of the VCSA,
192.168.100.108 should not be in use in the customer environment as it will be
temporarily used by IDPA.
Note:
The private IP address of the VCSA,
192.168.100.108
, is only required
temporarily during the upgrade process.
A table displays the current version, new version, and type (for example, major, patch) of
each component for which an upgrade is available.
If the validation is not successful, check the errors that are displayed when you hover on the
exclamation mark. Resolve all the errors and then click Revalidate. If you want to cancel the
upgrade and return to the ACM dashboard, click Cancel.
6. Click Upgrade, type the ACM password, and click Authenticate.
7. To start the upgrade, click Yes. To cancel the upgrade, click No.
The upgrade process starts. The ACM also undergoes an upgrade which results in users
getting logged out of ACM.
Note:
The upgrade process can take five to six hours, during which all jobs on the IDPA
must be quiesced. The system is not accessible during parts of the upgrade.
Note: If the upgrade process is still running, do not shut down/reboot the ACM or
restart the
rebooted the ACM or restarted the
dataprotection_webapp
service. For some reason, if you have shut down/
dataprotection_webapp
service while the upgrade
process is still running, and if you are unable to see the progress of the upgrade after
the ACM is rebooted, then contact Customer Support.
46 Dell EMC Integrated Data Protection Appliance Product Guide

Upgrade the IDPA software (DP4400)
8. Relogin to the ACM.
The Upgrade Progress displays the following:
l
The ACM upgrade progress bar with the progress percentage and description of the
upgrade step in progress.
l
Individual component upgrade progress bar with progress percentage and description of
the upgrade step in progress.
9. After all the components are upgraded successfully and the overall IDPA upgrade progress
bar shows 100%, click Finish.
10. Click OK on the Upgrade Finish window to reboot the IDPA system.
Note: After the upgrade is complete, there can be a scenario where Avamar is in
maintenance mode and the jobs cannot be executed at that time. After Avamar comes
out of the maintenance mode, the jobs are executed.
Note: After the upgrade is complete, acknowledge the notification Event
ConnectEMC notification failed on the Avamar Administrator GUI. This
notification is generated during upgrade when the Avamar service is disconnected.
Note: After the upgrade is complete, there is a warning on vCenter about a potential
vulnerability issue that is described in CVE-2018-3646. See https://kb.vmware.com/s/
article/57374 and https://kb.vmware.com/s/article/55806 for more information. IDPA
uses the ESXi version which has the fix for this vulnerability, however this fix is not
enabled by default as it has severe performance impact. See the
patching
section on the
IDPA Security Configuration Guide
for more information.
Security updates and
Results
The following components are updated:
l
Backup Server (Avamar)
l
IDPA System Manager (Data Protection Central)
l
Reporting and Analytics (Data Protection Advisor)
l
Search
l
Protection Storage (Data Domain)
l
ACM
l
VCSA (vCenter Server Appliance)
l
Compute nodes (ESXi)
The dashboard with all the products and their upgraded versions are displayed along with the
newly configured ACM. If the upgrade process does not complete as expected, see
Troubleshooting component software upgrades
If the upgrade for any component fails, then the upgrade process is stopped until you troubleshoot
and resolve the failure. However, if there are any noncritical warnings, the upgrade process
continues. These warnings must be resolved once the upgrade process is completed to ensure a
trouble-free operation of IDPA.
Upgrade Postrequisites
in the
IDPA Product Guide
.
After you have successfully completed the upgrade procedure, ensure that you are aware/perform
the following:
l
To save the log files from the upgrade process, click Download logs when the upgrade is
complete. When you have finished, click Finish.
Dell EMC Integrated Data Protection Appliance Product Guide 47

Upgrade the IDPA software (DP4400)
l
After the upgrade process is complete, you must close the browser and start a new browser
session before you relogin to ACM.
l
Upgrading proxies
The
upgrading the Avamar proxies. The upgrade must be performed on each Avamar proxy in the
environment.
n
Note: Verify if the old Avamar proxy VMs still exist in your vCenter, and if they do,
delete them from your vCenter after they are successfully replaced by the upgraded
Avamar proxy VMs. To completely delete the old Avamar proxy VMs, click the Delete
from disk option.
l
If the upgrade operation fails and if you attempt to upgrade again after two or three days using
the Retry button, the upgrade operation fails with a message No validated checkpoint
found. For more information on this, see the Knowledge Base article
Upgrade CDRA manually
This section provides information on how to upgrade CDRA manually.
About this task
If your existing CDRA is not configured to communicate with CDRS, then your CDRA instance is
replaced with the CDRA that is bundled within the IDPA release package. However, if your existing
CDRA is configured to communicate with CDRS, then the IDPA release package does not upgrade
your CDRA. You must manually upgrade it after the IDPA is upgraded from version 2.2 to version
2.3, using the IDPA user interface by first upgrading the CDRS, which in turn notifies you to
upgrade the appropriate CDRA version.
For more information about Cloud Disaster Recovery Add-on (CDRA) compatibility for various
IDPA versions, see the
IDPA version 2.2 is bundled with CDRA version 17.4. However, IDPA 2.3 is compatible with CDRA
version 18.3 P2.
To upgrade from CDRA version 17.4 to 18.3 P2, first you must manually upgrade the CDRA from
17.4 to 18.1. Once you complete the upgrade from 17.4 to 18.1, then you must manually upgrade
from 18.1 to 18.2. Once this upgrade is also complete, you must upgrade from 18.2 to 18.3 P2,
which is compatible with IDPA 2.3.
section of the
Integrated Data Protection Appliance Software Compatibility Guide
Avamar for VMware User Guide
provides instructions for
535533
.
.
Note:
For detailed information about how to upgrade CDRA/CDRS, see the
DR Add-on, Upload upgrade packages for the CDRS and CDRA
procedures in the
Guide
, which can be obtained from Online Support website.
Dell EMC Data Domain Cloud Disaster Recovery Installation and Administration
To upgrade the CDRA/CDRS from IDPA 2.2 to IDPA 2.3:
Procedure
1. Download the following Data Domain Cloud Disaster Recovery Upgrade Packages from the
Online Support website at https://support.emc.com:
l
Data Domain Cloud Disaster Recovery 18.1 Upgrade Package.
l
Data Domain Cloud Disaster Recovery 18.2 Upgrade Package.
l
Data Domain Cloud Disaster Recovery 18.3 P2 Upgrade Package.
2. Upload the Data Domain Cloud Disaster Recovery 18.1 Upgrade Package to CDRS and
upgrade the CDRS to 18.1.
3. Upgrade the CDRA to 18.1.
4. Upload the Data Domain Cloud Disaster Recovery 18.2 Upgrade Package to CDRS and
upgrade the CDRS to 18.2.
48 Dell EMC Integrated Data Protection Appliance Product Guide
Upgrade the Cloud
, and
Upgrade the Cloud DR Server

Upgrade the IDPA software (DP4400)
5. Upgrade CDRA to 18.2.
6. Upload the Data Domain Cloud Disaster Recovery 18.3 P2 Upgrade Package to CDRS and
upgrade the CDRS to 18.3 P2.
7. Upgrade the CDRA to 18.3 P2.
Dell EMC Integrated Data Protection Appliance Product Guide 49

Upgrade the IDPA software (DP4400)
50 Dell EMC Integrated Data Protection Appliance Product Guide

CHAPTER 4
Troubleshooting
This chapter contains basic troubleshooting information to help resolve possible issues.
Topics include:
l
System log files..................................................................................................................... 52
l
Troubleshoot shutdown.........................................................................................................52
l
Troubleshooting startup........................................................................................................ 55
l
Adding a CA-signed certificate.............................................................................................. 57
l
Enabling certificate verification.............................................................................................58
l
Configure secure AD having self-signed Certificates on IDPA............................................... 58
l
Troubleshoot LDAP............................................................................................................... 59
l
Change the expired root password........................................................................................60
l
Change expired password of administrator@vsphere.local user account............................... 61
l
Credential mismatch.............................................................................................................. 61
l
Troubleshoot Avamar............................................................................................................ 62
l
Troubleshooting health monitoring........................................................................................ 63
l
Troubleshooting component software upgrades....................................................................64
Dell EMC Integrated Data Protection Appliance Product Guide
51

Troubleshooting
System log files
To help troubleshoot issues, download bundled log files for the IDPA from the Home tab page
directly. Select the Download log bundle option from the log bundle icon available on the Home
tab page to download the log files. The log files for the specified components are saved in the
folder /Downloads/ on the system in a compressed format.
During an upgrade, additional log files are generated in a different location. For more information,
refer to Upgrade log files on page 67.
Note: The user should not create or copy their logs in /data01/log_bundle folder as this
functionality deletes all existing log while creating log bundle.
Troubleshoot shutdown
During the shut down process, if the appliance or any of the components fail to shut down
automatically, you can manually shut down the IDPA appliance and its individual components.
If the Avamar or Data Domain systems fail to shut down, aside from performing a manual shut
down of these components, you must also shut down the infrastructure components, which
include vCenter and ESX servers.
Avamar shutdown validation errors
The following is a comprehensive list of Avamar shutdown validation errors that you might
encounter before shutting down the Avamar Server.
If you encounter any of these errors, you must take the suggested action for the error you
encounter. After you take the suggestion action on the validation error, you can initiate the
appliance shutdown once again.
Table 11
Avamar shutdown validation errors
Validation error message Suggested action
One of the Avamar OS user is
out of sync
Avamar MC user is out of sync
Accelerators found to be out
of sync
On the ACM dashboard, click the error
message pop-up window and enter the
password for that particular Avamar user
which is out of sync.
On the ACM dashboard, click the error
message pop-up window and enter the
password for that particular Avamar user
which is out of sync.
On the ACM dashboard, click the error
message pop-up window and enter the
password for the Accelerator node that is out
of sync.
Failed to stop scheduler
service of Avamar
52 Dell EMC Integrated Data Protection Appliance Product Guide
To manually stop the scheduler services on
Avamar:
1. Login to Avamar Utility node.
2. Run the dpnctl stop scheduler
command.

Table 11 Avamar shutdown validation errors (continued)
Validation error message Suggested action
3. Shut down the appliance.
Troubleshooting
One or more of the services
are down/disabled so cannot
shutdown
Found running jobs on Avamar,
will not proceed for appliance
shutdown
Backup Server MCS flush not
done within last 12 hours
Shut down Avamar manually
Ensure that
services on Avamar are up and running.
To check the status of the services, log in to
Avamar Utility node and run the dpnctl
status all command.
Ensure that there are no backup jobs running
on Avamar Server. See Shut down the IDPA
on page 28 for more information.
Also see
section in the
Guide
through the Avamar UI.
1. Log in to the Avamar Utility node.
2. Backup the MCS data by running the
mcserver.sh –flush command.
3. Shut down the appliance.
Avamar server, MCS
Enabling and disabling a backup policy
Dell EMC Avamar Administration
for disabling all the backup policies
, and
EMT
DP4400
You can shut down the Avamar component manually for the various IDPA Appliances.
You can shut down the Avamar component manually for the DP4400 appliance.
About this task
To manually shut down the Avamar virtual edition component, perform the following actions:
Procedure
1. Log in to the Avamar Virtual Edition (AVE) server with SSH by using the Avamar IP address.
a. Create a checkpoint by running the following command:
mccli checkpoint create --override_maintenance_scheduler
b. Back up the MCS data by running the following command:
mcserver.sh --flush
c. Stop all Avamar services by running the following command:
dpnctl stop all
d. Power off the AVE from vCenter.
Note:
You must shut down the ESX. For more information about manual shut down of
ESX, see Shut down ESX manually.
Dell EMC Integrated Data Protection Appliance Product Guide 53

Troubleshooting
Shut down Data Domain manually
This section provides you information about how to shut down the Data Domain component
manually.
About this task
To manually shut down the Data Domain Virtual Edition, perform the following actions:
Procedure
1. Open a new SSH session to log in to Data Domain Virtual Edition .
2. Shut down the Data Domain Virtual Edition by running the following command:
system poweroff
3. You must also shut down the ESX.
For more information about manual shut down of ESX, see Shut down ESX manually.
Shut down vCenter manually
This section provides you information about how to shut down the vCenter manually.
About this task
This procedure to shut down vCenter manually is applicable for all models of IDPA. To manually
shut down the vCenter, perform the following actions.
Procedure
1. Open a browser and enter the IP address to access vCenter.
The login page is displayed.
2. Enter your username and password on the vCenter login page.
3. Shut down the Data Protection virtual application.
Note:
application are automatically shut down.
4. Shut down the IDPA Virtual Machine Guest operating system and the virtual machine.
Shut down ESX manually
This section provides you information about how to shut down the ESX manually.
About this task
This procedure to shut down ESX manually is applicable for all models of IDPA. To manually shut
down the ESX, perform the following actions.
All virtual machines and virtual applications under Data Protection virtual
Procedure
1. Login to the ESXi server on which the vCenter is installed.
2. Login to each ESXi host.
3. Set all ESXi hosts into maintenance mode by running the following command on each host
esxcli system maintenanceMode set -e true -m noAction
4. Shut down all ESXi host using the vSphere client or the ESXi host.
54 Dell EMC Integrated Data Protection Appliance Product Guide

Troubleshooting startup
If one part of the startup process fails to complete automatically, the problem can be resolved
manually to enable startup to continue.
Avamar does not start
If Avamar does not complete startup, connect to the Avamar server. If Avamar reports that
Avamar server did not shut down cleanly, select the option to roll back to the last checkpoint.
The ACM does not start
If the ACM Service does not start within 2 hours and 15 minutes of powering on the appliance, one
or more of the following components are not powered on or are not accessible on the network:
l
Data Domain
l
AVE
1. Verify that the components that are required for the configuration are powered on.
2. Verify that the required components are accessible on the network. Resolve any connectivity
issues that are encountered.
l
If the ACM loads successfully, skip the rest of this procedure. The Search nodes, DP
Advisor nodes, IDPA System Manager, AVE, and Avamar Proxy start automatically.
l
If all required components are powered on and accessible, but the ACM does not load,
restart the ACM Service:
3. Stop the dataprotection_webapp service:
service dataprotection_webapp stop
Troubleshooting
4. Start the dataprotection_webapp service:
service dataprotection_webapp start
The Search nodes, DP Advisor nodes, IDPA System Manager, AVE, and Avamar Proxy start
automatically.
The VMs do not start
Switch on the power button present on the Dell Server. The ACM internally starts local.sh
(/etc/init.d/local.sh) and the VMs start automatically. To start the VMs manually:
1. Move ESXi out of maintenance mode manually.
Note:
To do this, log in to ESX using idpauser and select Exit maintenance mode.
2. Start the DataProtection-VCSA by running the /etc/init.d/local.sh script on ESXi or
power on the VM from the ESXi.
DataProtection-ACM VM starts five minutes after the VCSA VM starts.
3. If DDVE VM is not up, click the Power on button to start the DDVE VM.
The system waits until DDVE VM up and running.
4. If AVE is not started, start AVE VM from ESX UI.
5. Log in to AVE using admin credentials.
ACM runs dpnctl status all, dpnctl start all, and dpnctl start maint
commands.
6. If something goes wrong, run the following in sequence and click the Power on button:
l
DataProtectionSearch Vapp
Dell EMC Integrated Data Protection Appliance Product Guide 55

Troubleshooting
l
DPADatastoreServer VM
l
DPAApplicationServer VM
l
DataDomainCloudDR VApp
l
DataProtectionCentral VApp
l
AVProxy VM
7. If DPS vApp does not get started, start the vApp.
8. Start the services of Search by logging in to index master IP using operating system root
credentials and run the following commands:
service elasticsearch start
a.
service search-cis-core start
b.
service search-cis-schedule start
c.
service search-networker-worker start
d.
service search-networker-action start
e.
service search-avamar-worker start
f.
service search-avamar-action start
g.
service search-worker start
h.
service search-adminapi start
i.
service search-api start
j.
9. Log in to the DPA Application Server VM using SSH.
10. Stop all DPA Application Services by running the following command:
/opt/emc/dpa/services/bin/dpa.sh service stop
If there are any errors, you may continue to ignore them.
11. Log in to the DPA Application Server VM using SSH.
12. Stop all DPA Datastore Server services by running the following command:
/opt/emc/dpa/services/bin/dpa.sh service stop
13. Verify if all the services are stopped on the DPA Application Server and on the DPA Datastore
Server by running the following command:
/opt/emc/dpa/services/bin/dpa.sh service status
14. Once all the services on both the DPA Application and the DPA Datastore servers are stopped,
restart the services on the DPA Datastore Server by running the following command:
/opt/emc/dpa/services/bin/dpa.sh service start
15. Once all the services on the DPA Datastore servers are started, restart the services on the
DPA Application Server by running the following command:
/opt/emc/dpa/services/bin/dpa.sh service start
16. You must wait for sometime until all the services are started on DPA Datastore Server. You can
verify the status by running the following command:
/opt/emc/dpa/services/bin/dpa.sh service status
17. You must wait for sometime until all the services are started on DPA Application Server. You
can verify the status by running the following command:
/opt/emc/dpa/services/bin/dpa.sh service status
18. Log in to VCSA using idpauser credentials, select AVProxy VM and click the Power on
button.
56 Dell EMC Integrated Data Protection Appliance Product Guide

19. After IDPA starts, start two services of Avamar using dpnctl start emt.
Adding a CA-signed certificate
The ACM includes a self-signed certificate, which may cause the browser to report an unsecured
connection. To resolve this issue, replace the default certificate with a CA-signed certificate.
Before you begin
l
Access the IDPA command line using one of the following procedures:
n
Log in to vCenter, right-click the DataProtection-ACM VM, and select Open Console.
Specify the ACM credentials.
OR
n
Connect to the ACM by using an SSH client to access the ACM's IP address. Specify the
ACM credentials.
l
Change the directory to /home/idpauser
Procedure
1. Stop the Tomcat server.
service dataprotection_webapp stop
Troubleshooting
2. Back up the existing keystore file.
cp /home/idpauser/.keystore /home/idpauser/.keystore.bkp
Use the backup if you encounter any errors in this process.
3. Delete the existing self-signed certificate from the keystore.
/usr/java/latest/bin/keytool -delete -alias tomcat -storepass changeit
4. Create a new certificate.
/usr/java/latest/bin/keytool -genkeypair -v -alias tomcat -keyalg RSA sigalg SHA256withRSA -keystore /home/idpauser/.keystore -storepass
changeit -keypass changeit -validity 3650 -dname "CN=idpa.companyname,
OU=Idpa, O=CompanyName, L=Hopkinton, S=Massachusetts, C=US"
5. Generate a CSR file for the keystore.
/usr/java/latest/bin/keytool -certreq -alias tomcat -keyalg RSA -file /
home/idpauser/ACM_Host.csr -keystore /home/idpauser/.keystore
6. Get the CA-signed certificate in the
.p7b
format by using the CSR content and save the
certificate.
7. Import the new certificate into the keystore.
/usr/java/latest/bin/keytool -import -alias tomcat -file /home/idpauser/
certnew.p7b -keystore /home/idpauser/.keystore
8. To ensure that the /usr/local/dataprotection/tomcat/conf/server.xml is
using the /home/idpauser/.keystore file, check the value of the keystoreFile
attribute for the HTTP Connector.
9. Verify the certificates in the keystore.
/usr/java/latest/bin/keytool -list -keystore /home/idpauser/.keystore alias tomcat
10. Start the Tomcat server.
Dell EMC Integrated Data Protection Appliance Product Guide 57

Troubleshooting
service dataprotection_webapp start
Enabling certificate verification
By default, vCenter certificate checking is disabled on the IDPA.
About this task
The IDPA uses a modified version of the Avamar MCServer.xml file. During configuration, this
modification causes vCenter certificates to be ignored when adding vCenter servers. To enable
certificate checking:
1. In the MCServer.xml file, change the ignore_vc_cert value to false.
The MCServer.xml file is located in /space/avamar/var/mc/server_data/prefs/
mcserver.xml.
2. Restart the MC service using dpnctl,
3. Stop mcs and dpctl, and
4. Start mcs commands on Avamar server.
Configure secure AD having self-signed Certificates on IDPA
If you are using secure AD with self-signed certificates, search fails to configure if the self-signed
certificate is not present on search VM.
Procedure
1. Export root CA certificate.
Refer https://support.microsoft.com/en-us/help/555252 to know how to export the root
CA certificate.
2. Log into the Root Certification Authority server or Active Directory Server with
administrator account.
3. Go to Start > Run, type cmd, and press Enter.
4. To export the Root Certification Authority server into a new file name ca_name.cer, run
certutil -ca.cert ca_name.cer.
5. Convert certificate as PEM format as follows:
a. Cy ca_name.cer to Search Master.
b. Run openssl x509 -in ca_ name.cer -inform der -out ca_name.pem -
outform pem.
c. Copy this ca_name.pem to /etc/pki/trust/anchors/ on Search Node.
6. Do LDAP Configuration from Dashboard.
58 Dell EMC Integrated Data Protection Appliance Product Guide

Troubleshoot LDAP
This topic provides you information about how to troubleshoot LDAP configurations.
Troubleshoot secure LDAP configuration
While configuring secure LDAP, an error message Unable to connect to secure
LDAP/AD. Please verify whether the LDAP/AD Server provided is present as
alternate name in LDAPS Certificate may be displayed.
About this task
Troubleshooting
The recent changes to
Endpoint Identification. For more information on this issue, see the
Update 181 Release Notes
Perform the following steps to disable the LDAP Endpoint Identification to work around this issue.
Procedure
1. Connect to the ACM by using an SSH client.
2. Using a text editor, open the
dataprotection/tomcat/bin/ directory.
3. In the
4. Modify this line as per the values provided below:
5. Save the changes you made to the
6. Restart the data protection service on ACM using the below command:
catalina.sh
JAVA_OPTS="$JAVA_OPTS Dorg.apache.catalina.security.SecurityListener.UMASK=`umask`"
JAVA_OPTS="$JAVA_OPTS Dcom.sun.jndi.ldap.object.disableEndpointIdentification=true Dorg.apache.catalina.security.SecurityListener.UMASK=`umask`"
Java SE Development Kit 8, Update 181
.
catalina.sh
file, locate the following line:
file that is located in the /usr/local/
catalina.sh
file.
is causing this issue related to LDAP
Java SE Development Kit 8,
service dataprotection_webapp restart
Verify Internal LDAP password
If you already know internal LDAP password, then perform the following steps to verify the
password:
Before you begin
If you know your internal LDAP password, note it down and keep it ready.
Procedure
1. Connect to the ACM by using an SSH client.
Dell EMC Integrated Data Protection Appliance Product Guide 59

Troubleshooting
2. To validate your existing password, run the ldapsearch command with your password. An
example is given below.
# ldapsearch -h ldaps:/<ACM_IP> -p 636 -D
uid=idpauser,ou=People,dc=idpa,dc=com -b dc=idpa,dc=com -w
<IDPAUSER_PWD>
Create internal LDAP password
If you do not remember the internal LDAP password, you must first set the internal LDAP
password, by performing the following steps:
Procedure
1. Connect to the ACM by using an SSH client.
2. Generate a hash for the new password. An example input is given below.
#/etc/openldap/slappasswd -s <NEW_PASSWORD>
3. Create a file with the modified hash file. An example is given below.
# vi /etc/openldap/update_idpauserpwd.ldif
dn: uid=idpauser,ou=People,dc=idpa,dc=com
changetype: modify
replace: userPassword
userPassword: <COMMAND_OUPUT_IN_FIRSTSTEP>
4. Execute the following command to update the password using the LDAP root password.
# ldapmodify -x -D cn=Manager,dc=idpa,dc=com -w "<LDAP_ROOT_PASSWORD>" f /etc/openldap/update_idpauserpwd.ldif
Where the
<LDAP_ROOT_PASSWORD>
5. Execute the ldapsearch command on the ACM with the new password to validate. An
example is given below.
# ldapsearch -h ldaps:/<ACM_IP> -p 636 -D
uid=idpauser,ou=People,dc=idpa,dc=com -b dc=idpa,dc=com -w
<NEW_IDPAUSER_PWD>
Change the expired root password
is the same as the common appliance password.
If your vCenter root password has already expired for the vCenter root user, perform the following
steps to change the password:
Procedure
1. Log in to the VMware vSphere Appliance Management UI by going to https://<
hostname
or IP>:5480 using the credentials as root/<
2. In the vCenter Server Appliance Management UI, click Administration.
3. In the Change root password pane, specify all the required fields and click Submit.
60 Dell EMC Integrated Data Protection Appliance Product Guide
common IDPA password
VCSA
>.

Troubleshooting
The new password that you are specifying must contain at least six characters and it should
not be the same as your previous five passwords.
Note: To ensure that you are never logged out of the vCenter server, configure the
password expiration settings for the root user account to never expire.
4. Synchronize the changed password with the ACM. For more information about changing
passwords and synchronizing components, see Change passwords and synchronize
components on page 36.
Change expired password of administrator@vsphere.local user account
This topic details on how to change the expired password for administrator@vsphere.local user
account when the upgrade is not initiated or if the upgrade fails.
When the upgrade is not initiated
When the upgrade is still not initiated, you must perform the following steps to change the expired
password of the administrator@vsphere.local user account:
Procedure
If the upgrade fails
If the upgrade fails, you must perform the following steps to change the expired password of the
administrator@vsphere.local user account:
Procedure
1. Log in to the VMware vSphere Appliance Management UI by going to https://<
hostname
IDPA password
2. In the vCenter Client UI, click Administrator@VSPHERE.LOCAL.
3. From the drop-down menu, select Change Password.
4. Specify the required fields.
5. Synchronize the changed password with the ACM.
For more information about changing passwords and synchronizing components, see
Change passwords and synchronize components on page 36.
1. Log in to the VMware vSphere Appliance Management UI by going to https://<
hostname
IDPA password
2. In the vCenter Client UI, click Administrator@VSPHERE.LOCAL.
3. From the drop-down menu, select Change Password.
4. Specify the required fields.
5. Cycle through a new password five times to clear the restriction and reset to the same
password that was set before the password expiry.
6. Initiate the IDPA Upgrade process once again using the RETRY option.
or IP>:5480 using the credentials as administrator@vsphere.local/<
>.
or IP>:5480 using the credentials as administrator@vsphere.local/<
>.
VCSA
common
VCSA
common
Credential mismatch
This section provides information about how to resolve the password mismatch scenario for the
IDPA point products. If you manually modify the password on the point products and do not use
Dell EMC Integrated Data Protection Appliance Product Guide 61

Troubleshooting
the change password option on IDPA Appliance the system displays an error message when you try
to update the password using the ACM dashboard.
About this task
Also, if you encounter the Failed to validate connection error message, there could be a
credential mismatch between the point products or the VMs/services of those associated point
points.
To resolve a password mismatch, perform the following actions:
Procedure
1. Click the warning message in the point products panel and enter a new password.
2. Click Update Password in the point products panel and enter a new password.
3. Click the Refresh button on the ACM dashboard.
The system updates the new password for all the relevant accounts.
Troubleshoot Avamar
there is a problem with Avamar, the Backup Server panel in the ACM dashboard displays the
following status:
Backup Agents Installation in progress...
Possible causes for this issue include:
l
The Avamar service, Avamar, or AVE is down.
l
Avamar cannot be pinged.
l
There is a mismatch between the Avamar administrator password and the password stored in
the ACM.
The Avamar service is down
To start the Avamar service:
1. Using an SSH client, connect to the Avamar Utility node as the admin user.
2. Type the command dpnctl start all
Avamar or AVE is down
Power on the Avamar or AVE server.
Avamar cannot be pinged
If Avamar cannot be pinged, find and resolve the source of the issue. Possible causes include:
l
The Avamar server is down.
l
There is a network connectivity issue.
l
The Avamar server has a hardware issue.
62 Dell EMC Integrated Data Protection Appliance Product Guide

Troubleshooting health monitoring
If there is an issue with SNMP or one of the health monitor processes, the Health tab cannot
display data.
SNMP validation errors
By default, the ACM validates the SNMP configuration of the Dell server every 4 hours. If the
ACM detects that the SNMP configuration for a component is disabled or missing, it automatically
corrects the configuration.
If the ACM cannot reach one of the components on its internal IP, the following message is
displayed on the Health tab: Failed to validate SNMP configuration on
component(s) <unreachable-component>
To resolve this issue:
1. Verify that the internal IP addresses of IDPA Appliance server is reachable on the network.
2. If the component is reachable on the network, verify SSH connectivity by attempting to
connect with the default SSH password. If an SSH connection cannot be established, revert
the SSH password on the component to the default password.
Note: Refer Changing passwords and synchronizing components to know how to change
passwords and synchronize components.
Troubleshooting
Health monitor processes errors
If the SNMP Receiver port, Message Broker service, or Database service is down, the following
message is displayed on the Health tab: Health monitor processes are down :
<process>
To resolve this issue, connect to the ACM using SSH and follow the procedure that corresponds to
the error message:
l
If the SNMP Receiver port is down, verify that port 161 is enabled. If the port is enabled and
the problem persists, restart the Tomcat service with the following command:
service dataprotection_webapp restart
l
If the Message Broker service is down, verify that the RabbitMQ service is running with the
following command:
service rabbitmq-server status
If the service is not running, start it with the following command:
service rabbitmq-server start
l
If the Database service is down, verify that the PostgreSQL service is running with the
following command:
service dataprotection_database status
Dell EMC Integrated Data Protection Appliance Product Guide 63

Troubleshooting
If the service is not running, start it with the following command:
service dataprotection_database start
Troubleshooting component software upgrades
You can troubleshoot the upgrade failures using the different options available.
Retry upgrade process
When there is an upgrade failure for a component, the progress bar is displayed in red and you can
see the RETRY and DOWNLOAD LOGS buttons. To retry the upgrade again, click the RETRY
button.
Alternatively, you can click DOWNLOAD LOGS to download the logfiles.
Avamar
If the Avamar upgrade fails while upgrading the IDPA appliance software, and if you are retrying
the Avamar upgrade even after 24 hours of failure, then you must manually upgrade the Avamar
server.
If the Avamar upgrade fails during the RETRY operation, with a message Validated
checkpoint not found, you must manually resolve this issue by creating a checkpoint on the
Avamar Server. To create a checkpoint on the Avamar Server, see the Upgrade prerequisites
section. Once a valid checkpoint is created, you can go to Avamar UI and click the Sync button
which is displayed for the failed component.
vCenter
In case if the vCenter is rebooted when any of the component product upgrade is in progress, then
the upgrade process stops. You must wait until the services on the vCenter server are up and
running, and then attempt a retry of the upgrade for that component.
To verify that the vCenter server services are up and running, try logging into the vSphere client
console. A successful login indicates that the services on the vCenter server are started.
Advanced troubleshooting (support only)
When there is an upgrade failure even after using the Retry option, the technical support
professional can use the Rollback and Sync options to troubleshoot the upgrade failure.
Using rollback
The Rollback option reverts the component to its previous state using the snapshots taken. The
upgrade process uses vSphere snapshot technology to preserve the preupgrade configuration of
the IDPA. Before a component is upgraded, a snapshot of the component VM is created. When the
upgrade is completed successfully, the snapshots are deleted. If the upgrade fails, the snapshots
are used to revert the components to their previous state. If the upgrade fails and any of the VMs
are not restored, review the information in Upgrade log files on page 67 and contact Customer
Support.
Note:
If upgrading DD OS is not successful, contact Customer Support.
1. In the Upgrade progress window, select Troubleshooting (Support only) checkbox at the
top.
The ROLLBACK button is displayed for the component with upgrade failure.
2. Click ROLLBACK.
64 Dell EMC Integrated Data Protection Appliance Product Guide

Troubleshooting
The component reverts to the previous version. Refer to the section Rollback is Successful on
page 65.
If rollback is unsuccessful, see the section Rollback Failed on page 65.
Using Sync
If there is a mismatch between the versions of the upgraded component, for example, instead of
upgrading to Avamar version 18.2.0-134, the component gets upgraded to Avamar version
7.5.1-101, this results in upgrade failure of that particular point product. Although the Support
personnel can manually update the failed component/point product in the background using the
SYNC functionality, the SYNC functionality does not verify the operating system version of the
point product. The customer or Support personnel performing the manual upgrade must ensure
that the appropriate operating system rollup is applied to the point product before manually
upgrading it.
If there is no mismatch between the versions of the upgraded component, the SYNC operation is
successful. Once the SYNC operation is completed successfully, the ROLLBACK, RETRY, and
SYNC buttons are disabled.
For more information about the operating system rollup versions and their associated patches if
applicable, see the
After the manual update, follow these steps:
Integrated Data Protection Appliance Software Compatibility Guide
.
1. In the Upgrade progress window, select Troubleshooting (Support only) checkbox at the
top.
The SYNC and ROLLBACK buttons get enabled for the components that failed to upgrade.
2. Click SYNC. The SYNC validates the manually upgraded component version and reflects the
upgrade progress bar in green and status to completed.
Rollback is Successful
IDPA is rolled back to its previous state.
No manual action is required from your side. You can login to dashboard to ensure that all the
services are up and running.
Optionally, after analyzing the logs, if you find any issues with the upgrade, you can go to upgrade
once again.
You can download the logs from the upgrade progress user interface. Alternatively, you can also
retrieve the logs from /data01/upgradeLogs directory on the Appliance Configuration
Manager.
Rollback Failed
If the IDPA rollback fails during the upgrade procedure, you need to perform the following manual
steps.
About this task
Many of these steps are most likely completed by the IDPA upgrade workflow as IDPA upgrade
does not stop operations if an error is encountered.
Procedure
1. Check for all the products in VMware vCenter to ensure that there is no snapshot by the
name
BeforeUpgrade
To delete the
the following steps on each of the component where
l
Avamar Proxy:
. If the
BeforeUpgrade
Dell EMC Integrated Data Protection Appliance Product Guide 65
BeforeUpgrade
VMware vCenter snapshots from all the components, perform
snapshot exists, you must delete that snapshot.
BeforeUpgrade
snapshot exists:

Troubleshooting
a. Revert to the snapshot and then delete the snapshot.
l
AVE Server:
a. Shut down the AVE VM.
b. Revert to the snapshot and delete the snapshot.
c. Change all the data disks to independent-persistent.
d. Power on the AVE VM to verify if all the AVE services are up and running.
l
DPA VMs:
a. Revert to snapshots of all DPA VMs such as DPA Datastore Server, DPA Application
Server, DPA Agent, DPA DD Processor Tool, and so on.
b. Delete the snapshots.
c. Log in using putty to the DPA Datastore Server and note down the datastore directory
in /data01 with the name
datastore-xxxx
d. Execute following command:
/opt/emc/dpa/services/bin/dpa.sh datastore import /data01/
datastore-*/
e. Log in to the DPA Application Server using putty and run the following command:
/opt/emc/dpa/services/bin/dpa.sh service start
f. Verify that the services are correctly starting by going to
l
DPS VMs:
https://dpaAppServerIp:9002
a. Stop the DPS Services.
b. Shutdown or power off the DPS Vapp.
c. Revert to the snapshot
d. Delete the snapshot
BeforeUpgrade
BeforeUpgrade
.
from all DPS VMs.
e. Change hard disk 3 mode to independent-persistent for all the DPS VMs.
f. Power on the DPS VApp.
g. Ensure that all DPS Services are up and running.
l
DPS Index Master Node Services:
a. Log in to DPS Master Index Node using putty.
b. Execute the following commands:
l
service dpworker status
l
service unicorn status
l
service elasticsearch status
l
Data Domain: If there is a failure in the Data Domain upgrade, contact Customer Support.
2. Start the Avamar scheduler service by logging in to Avamar using putty and running the
dpnctl start scheduler command:
3. Uninstall the dataprotection-upgrade RPM from ACM
To uninstall the dataprotection-upgrade RPM, on ACM, run the rpm -qa | grep
dataprotection-upgrade command to check if any dataprotection-upgrade RPM is
66 Dell EMC Integrated Data Protection Appliance Product Guide

4. Use create tar command to create a tarball of /data01/tmp/patch/logs folder and
5. Restart the tomcat service on ACM using following commands:
Upgrade log files
If both the upgrade process and the snapshot recovery fails, you can collect the log files in the
following locations and contact Customer Support:
l
l
l
Troubleshooting
present. If it is present, note down its name and uninstall it by using the –e
dataprotection-upgrade-rpm-name command.
save it to the /data01/upgradeLogs folder.
l
service dataprotection_webapp stop
l
service dataprotection_webapp start
Log files for the most recent upgrade process are located in /data01/tmp/patch/logs and
include the following:
n
ACM—acm_upgrade.log
n
Data Domain—dd_precheck.log, dd_upgrade.log
n
DP Advisor—dpa_upgrade.log
n
Search—dps_upgrade.log
n
AVE—AvamarServerUpgrade.log, av_upgrade.log
n
IDPA System Manager—dpc_deploy_config.log
n
Common logs for all components—appLevelUpgrade.log,
detailed_upgrade_logs.log
n
Internal service call logs — Upgrade-utility.log
n
Validation logs — Validate.log
Log files for past upgrades are archived in /data01/upgradeLogs, in the format
idpa_upgradeLogs<date>_<time>.tgz.
The logs of user interface messages for individual components are available in /data01/tmp/
patch/log/status/.
Log file details
The following log file content is extraneous and can be ignored:
In the log file /data01/tmp/patch/logs/appLevelUpgrade.log
RUNNING,26,Please Contact Dell/EMC Support to upgrade Physical Backup server
and NDMP
RUNNING,74,Performing post upgrade operations
RUNNING,74,Please login again to Appliance Management deployment and
configuration page
In the log file /data01/tmp/patch/logs/detailed_upgrade_logs.log
ERROR : Couldn't upgrade avi-cli to 0.2.1-44.
Performing post upgrade operations
Check if the dataprotection-upgrade package deployed successfully on tomcat.
Dataprotection-upgrade package deployed successfully.
Old Version , New Version
Updateing Appliance status for Old Version .., New Version ..
Dell EMC Integrated Data Protection Appliance Product Guide 67

Troubleshooting
Input oldVersion .., newVersion ..
No implementation for given version ..
Appliance status updated Failed.
In the log file /data01/tmp/patch/logs/acm_upgrade.log
Error: Could not open input file: /usr/java/jdk1.8.0_131/lib/tools.pack
plugin.jar...
Error: Could not open input file: /usr/java/jdk1.8.0_131/jre/lib/plugin.pack
javaws.jar...
Error: Could not open input file: /usr/java/jdk1.8.0_131/jre/lib/javaws.pack
deploy.jar...
Error: Could not open input file: /usr/java/jdk1.8.0_131/jre/lib/deploy.pack
rt.jar...
Error: Could not open input file: /usr/java/jdk1.8.0_131/jre/lib/rt.pack
jsse.jar...
Error: Could not open input file: /usr/java/jdk1.8.0_131/jre/lib/jsse.pack
charsets.jar...
Error: Could not open input file: /usr/java/jdk1.8.0_131/jre/lib/charsets.pack
localedata.jar...
Error: Could not open input file: /usr/java/jdk1.8.0_131/jre/lib/ext/
localedata.pack
warning: file /usr/local/dataprotection/var/configmgr/server_data/config/
InfrastructureComponents_Template.xml: remove failed: No such file or
directory
Resolve TLS Error After the Firmware Update for IDPA 2.4.1
After the
you may encounter a TLS error on the iDRAC GUI (iDRAC Settings > iDRAC Service Module.
To resolve this error, perform the following steps:
1. Login to the ESXi host and run the following command:
2. Run the following command:
3. Wait for a few minutes and refresh the iDRAC GUI.
June 2019 Block
has been applied as part of the Firmware Update on a DP4400 model,
# /etc/init.d/dcism-netmon-watchdog stop
Wait for 30 seconds
# /etc/init.d/dcism-netmon-watchdog start install
68 Dell EMC Integrated Data Protection Appliance Product Guide

CHAPTER 5
Additional resources
This chapter provides references to other materials related to the IDPA and individual components.
Topics include:
l
Document references for IDPA..............................................................................................70
l
Document references for individual components...................................................................70
l
IDPA training resources......................................................................................................... 72
Dell EMC Integrated Data Protection Appliance Product Guide 69

Additional resources
Document references for IDPA
The IDPA documentation set includes the following publications:
l
Integrated Data Protection Appliance DP4400 Installation Guide
Instruction for installing the IDPA DP4400 hardware.
l
Integrated Data Protection Appliance Getting Started Guide
Explains how to perform initial IDPA configuration tasks and how to get started with basic
functionality like backup and restore.
l
Integrated Data Protection Appliance Product Guide
Provides the overview and administration information about the IDPA system.
l
Integrated Data Protection Appliance Release Notes
Product information about the current IDPA release.
l
Integrated Data Protection Appliance DP4400 Service Procedure Guide
Procedures for replacing or upgrading hardware components of the IDPA.
l
Integrated Data Protection Appliance Security Configuration Guide
Information about the security features that are used to control user and network access,
monitor system access and use, and support the transmission of storage data.
l
Integrated Data Protection Appliance Software Compatibility Guide
Information about software components and versions that are used in the IDPA product.
Document references for individual components
The documentation for these components can be obtained from Online Support at the following
location:
https://www.dell.com/support.
Protection Storage node
The following document contains information that is related to Data Domain:
l
Data Domain Operating System Administration Guide
This publication explains how to manage Data Domain systems with an emphasis on procedures
using the Data Domain System Manager.
Backup Server node
The following documents contain information that is related to Avamar:
l
Avamar Administration Guide
This publication describes how to configure, administer, monitor, and maintain an Avamar
server.
l
Avamar and Data Domain System Integration Guide
This guide includes procedures for configuring the Avamar server to perform cloud tier
operations on the Data Domain system.
l
Avamar for VMware User Guide
This publication describes various methods and strategies for protecting VMware virtual
machines.
l
Avamar NDMP Accelerator for Oracle ZFS User Guide
This publication describes how to install, configure, administer, and use the Avamar NDMP
Accelerator (accelerator) to back up and restore supported Oracle ZFS storage appliances.
l
Avamar NDMP Accelerator for NetApp Filers User Guide
70 Dell EMC Integrated Data Protection Appliance Product Guide

Additional resources
This publication describes how to install, configure, administer, and use the Avamar NDMP
Accelerator (accelerator) to back up and restore supported NetApp filers.
l
Avamar NDMP Accelerator for EMC NAS Systems User Guide
This publication describes how to install, configure, administer, and use the Avamar NDMP
Accelerator (accelerator) to back up and restore supported EMC Isilon, Unity, VNX, VNXe, and
Celerra systems.
l
Avamar for VMware User Guide
This publication describes various methods and strategies for protecting VMware virtual
machines.
IDPA System Manager node
The following documents contain information that is related to Integrated Data Protection
Appliance System Manager:
l
IDPA System Manager Release Notes
Contains the most up-to-date information about the current release.
l
IDPA System Manager Getting Started Guide
This document includes information about how to deploy Integrated Data Protection Appliance
System Manager, and then get started with Integrated Data Protection Appliance System
Manager administration.
l
IDPA System Manager Administration Guide
This document includes information about how to administer Integrated Data Protection
Appliance System Manager.
l
IDPA System Manager Security Configuration Guide
This document includes information about security features and capabilities of Integrated Data
Protection Appliance System Manager.
Reporting and Analytics node
The following documents contain information that is related to Data Protection Advisor:
l
Data Protection Advisor Installation and Administration Guide
This publication describes how to install, maintain and configure DP Advisor.
l
Data Protection Advisor Product Guide
This document provides information on how to use the DP Advisor web console to run and
create reports, view alerts, and view the status of replication operations.
Search
The following document contains information that is related to Search:
l
Data Protection Search Installation and Administration Guide
This publication describes how to install, maintain and configure Search.
Cloud Disaster Recovery
The following documents contain information that is related to DD Cloud DR and CDRA.
l
Data Domain Cloud Disaster Recovery Release Notes
Contains supplemental information about DD Cloud DR and the most up-to-date information
about the current release.
l
Data Domain Cloud Disaster Recovery Installation and Administration Guide
This document describes how to install, deploy, and use the DD Cloud DR product.
Dell EMC Integrated Data Protection Appliance Product Guide 71

Additional resources
IDPA training resources
Video walkthroughs, demonstrations, and explanations of product features are available online.
You can obtain additional IDPA training and information at https://education.emc.com.
72 Dell EMC Integrated Data Protection Appliance Product Guide

INDEX
A
avamar 53
Avamar 53
Avamar shutdown 53
C
CDRA 48
Credential mismatch 61
D
data domain 54
Data Domain shutdown 54
DD 54
E
ESX 54
ESX shutdown 54
I
IDPA 33
M
manual avamar shutdown 53
manual Avamar shutdown 53
manual data domain shutdown 54
manual ESX shutdown 54
Manual Shutdown 52–54
manual vCenter shutdown 54
Upgrade CDRA 48
Upgrade DP4400 44
Upgrade troubleshooting 64
V
vCenter 54
vCenter shutdown 54
P
postinstallation 31
Postrequisites 47
Power on 33
Prerequisites 44
S
Shutdown 52–54
Start IDPA 33
Start Up 33
T
Troubleshooting 52–54, 64
advanced 64
Troubleshooting Shutdown 52–54
U
Upgrade 44, 47, 64
critical components 44
non-critical components 44
retry 64
Dell EMC Integrated Data Protection Appliance Product Guide 73

Index
74 Dell EMC Integrated Data Protection Appliance Product Guide
 Loading...