

Page 1

QUICK START GUIDE
Page 2

Page 3

QUICK START GUIDE
Page 4

Notes and Cautions
NOTE: A NOTE indicates important information that helps you make better use of your
computer.
CAUTION: A CAUTION indicates either potential damage to hardware or loss of data and tells
you how to avoid the problem.
__________________
Information in this document is subject to change without notice.
© 2009 Dell Inc. All rights reserved.
Reproduction of these materials in any manner whatsoever without the written permission of Dell Inc. is strictly forbidden.
Trademarks used in this text:
logo are registered trademarks of Canonical Ltd.
Other trademarks and trade names may be used in this document to refer to either the entities claiming the marks and
names or their products. Dell Inc. disclaims any proprietary interest in trademarks and trade names other than its own.
September 2009 P/N VM0DJ Rev. A00
Dell
, the
DELL
logo, and YOURS IS HERE are trademarks of Dell Inc.;
Ubuntu
and the
Ubuntu
Page 5

Contents
About Your Ubuntu Netbook Desktop . . . . .4
Main Menu . . . . . . . . . . . . . . . . . . . . . . . . . . . .6
Getting Started With Ubuntu. . . . . . . . . . . . .8
Connecting to the Internet . . . . . . . . . . . . . . . 8
Browsing the Internet . . . . . . . . . . . . . . . . . . .9
Instant Messaging. . . . . . . . . . . . . . . . . . . . . 12
Creating Files and Folders . . . . . . . . . . . . . . 12
Transferring Data . . . . . . . . . . . . . . . . . . . . . . 16
Setting System Preferences . . . . . . . . . . . . 16
Switching to the Classic Desktop Mode . . . 18
Basic Ubuntu Shortcuts . . . . . . . . . . . . . . . . 19
Reinstalling Your Operating System . . . . .20
3
Page 6
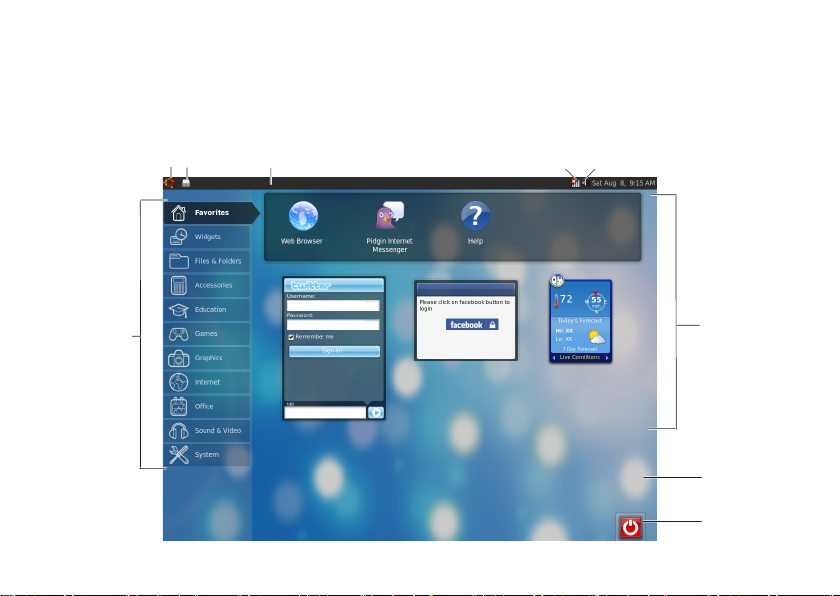
About Your Ubuntu Netbook Desktop
7
8
1
3 42
9
6
5
About Your Ubuntu Netbook Desktop
The Ubuntu Netbook Desktop launches when you turn on your computer.
4
Page 7
1
Main Menu — Provides access to
applications and settings on your
computer. Click the desired category
to view the available applications and
settings. For more information, see “Main
Menu” on page 8.
Home icon — Click to minimize all
2
open windows and to display the main
menu.
3
Running application icon — Each running
application is represented by an icon in
the panel. Click the running application to
bring it to the foreground.
4
Panel — Provides quick access to running
applications and utilities on your computer.
About Your Ubuntu Netbook Desktop
5
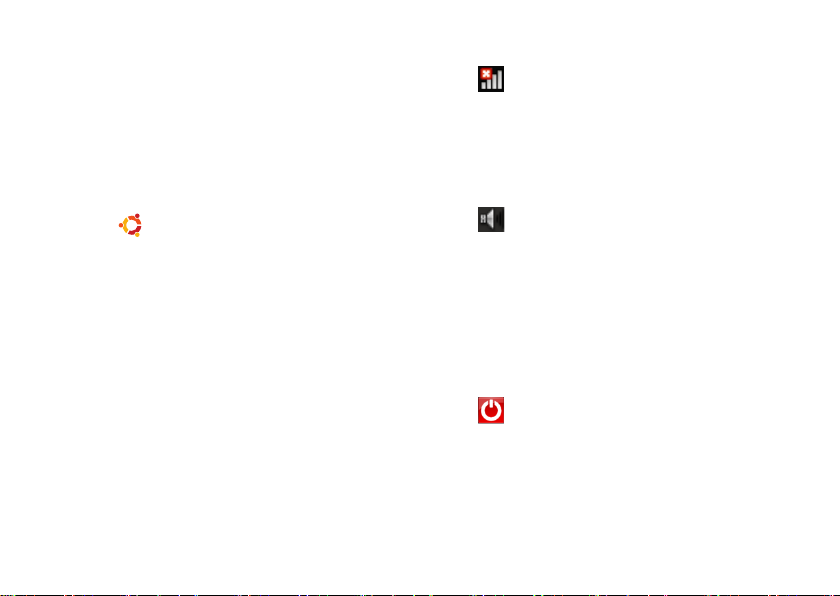
Network status indicator — Indicates
if you are connected to a wired or wireless
network. Click to view the list of available
wireless networks. When connected to a
wireless network, the indicator displays a
series of bars indicating the signal strength.
Volume icon — Click to adjust the
6
volume level, mute the sound, or change
the volume settings. Adjust the slider to
increase or decrease the volume level.
7
Application icons — Displays the icons for
the applications available within a category.
8
Desktop — Right-click the desktop to
change the desktop background.
Power icon — Click to log out or shut
9
down your computer.
5
Page 8
About Your Ubuntu Netbook Desktop
11
1
3
4
5
6
7
8
9
10
2
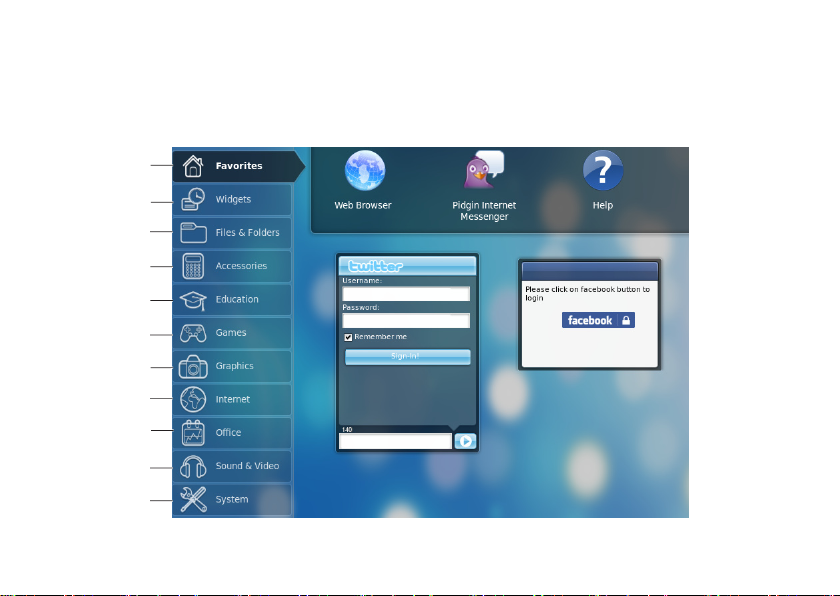
Main Menu
The main menu has categories of the different applications and settings on your computer.
6
Page 9

About Your Ubuntu Netbook Desktop
1
Favorites — Displays your favorite
applications. To add an application to
the Favorites category, right-click the
application and click Add to Favorites.
For more information on Ubuntu, see
the Ubuntu Help Center. To access the
Help Center, click Favorites→ Help.
2
Widgets — Displays applications that
enable you to network with friends, watch
popular videos, and get updates about the
weather.
3
Files & Folders — Allows you to view,
create, organize, and search for files and
folders.
4
Accessories — Displays tools such as text
editor, calculator, CD/DVD Creator, and
so on.
5
Education — Displays educational
applications available on your computer.
6
Games — Displays the games available on
your computer.
7
Graphics — Displays applications that
capture, edit, and transfer photos and
videos.
8
Internet — Displays applications that you
can use when connected to the Internet.
9
Office — Displays word processing,
spreadsheets, and presentation
applications.
10
Sound & Video — Displays applications
that enable you to watch movies and listen
to music.
11
System — Displays applications that
enable you to perform administrative tasks
and change your computer settings.
7
Page 10

Getting Started With Ubuntu
Getting Started With Ubuntu
Connecting to the Internet
Setting Up a Wireless Network
Click the network1. status indicator icon
on the panel.
Select 2. Wireless Networks.
Follow the instructions on the screen to 3.
complete the setup.
8
Setting Up a Wired Network
Connect the network cable to the network
connector on your computer.
Certain network connections may require you to
configure the IP address manually.
To configure your IP address manually:
Click 1. System on the main menu.
Click 2. Network Tools in the Administration
subcategory.
Enter the IP address and the network 3.
information.
NOTE: Contact your ISP or network
administrator for the IP address and
network information.
Page 11

Getting Started With Ubuntu
Browsing the Internet
The web browser allows you to browse the
Internet.
To open the web browser, click Internet on the
main menu and then click the web browser
icon.
Tabbed Browsing
You can open multiple web pages within the
same browser window.
To open a new tab:
Open the web browser.1.
Click 2. File→ New Tab or press <Ctrl><T>.
To close a tab, click the X button on the tab or
press <Ctrl><W>.
9
Page 12

Getting Started With Ubuntu
10
Page 13

Getting Started With Ubuntu
Bookmarks
You can create, organize, and edit bookmarks in
the web browser.
To create a bookmark:
Open the web browser.1.
To bookmark a page or a group of tabs:2.
Click – Bookmarks→ Bookmark This Page
or press <Ctrl><D>.
Click – Bookmarks→ Bookmark All Tabs.
Type in the name of the bookmark.3.
To save the bookmark, select the folder from 4.
the drop-down menu or create a new folder.
Click 5. Done.
To organize and edit your bookmarks, click
Bookmarks→ Organize Bookmarks.
Adding Bookmarks to the Favorites
Category
You can add website bookmarks to the Favorites
category from within the web browser.
To add a bookmark to the Favorites category,
open the web browser and use one of the
following methods:
Click • Bookmarks→ Bookmark in Launcher.
Press <Ctrl><Shift><D>.•
Click the • icon.
11
Page 14

Getting Started With Ubuntu
Instant Messaging
The Pidgin messaging client allows you to use
multiple instant messaging accounts all at once.
Click Internet on the main menu, and then click
the Pidgin icon . The Buddy List window
appears.
If you are opening Pidgin for the first time,
an Accounts dialog box prompts you to add
accounts.
Click 1. Add in the Accounts dialog box.
In the2. Add Account window, enter the
required information and then click Add.
Click 3. Close on the Accounts dialog box.
12
Creating Files and Folders
The Files & Folders category in the main menu
allows you to view, create, organize, and search
for files and folders.
Creating a New Folder
To create a new folder:
Click 1. Files & Folders on the main menu.
Browse to the desired folder.2.
Click 3. File→ Create Folder or right-click and
click Create Folder.
Name the folder and press <Enter4. >.
Adding Bookmarks
You can create bookmarks to access frequentlyused folders.
To bookmark a folder:
Browse to the required folder and open it.1.
Click 2. Bookmarks→ Add Bookmark or press
<Ctrl><D>.
The bookmark appears in the Bookmarks menu.
Page 15

Getting Started With Ubuntu
13
Page 16

Getting Started With Ubuntu
Setting Screen Saver Preferences
To set the screen saver preferences:
Click 1. System on the main menu.
Click 2. ScreenSaver in the Preferences
subcategory.
The Screensaver Preferences window
appears.
Select a screen saver of your choice from 3.
the Screensaver theme list.
Adjust the slider to set the duration that you 4.
want your computer to be idle before the
screen saver appears.
14
Select the 5. Activate screensaver when
computer is idle check box.
If you want the screen saver to lock the 6.
screen, select the Lock screen when
screensaver is active check box.
Click 7. Close.
Page 17

Getting Started With Ubuntu
15
Page 18

Getting Started With Ubuntu
Transferring Data
Ubuntu supports easy transfer of data from USB
devices.
USB Storage Devices
Connect storage devices such as USB hard 1.
drives or keys to an available USB connector
on the computer.
The drivers are automatically installed and
the File Browser window appears.
Select the files to be transferred and the 2.
location to transfer the files.
Click 3. Copy. The files are transferred to the
selected location.
Digital Cameras
Connect your digital camera to an available 1.
USB connector on the computer.
Turn on the camera and place it in review or 2.
file transfer mode.
16
The 3. Import window appears, choose F-Spot
Photo Manager as the program to open your
files.
Select the files to be transferred and the 4.
location to transfer the files.
Click 5. Copy. The files are transferred to the
selected location.
Setting System Preferences
The System category provides or displays tools
to control the appearance and operation of your
computer.
The subcategories are:
Preferences —• for setting or changing the
keyboard shortcuts, power management
options, switching desktop mode, and so on.
Administration —• for managing computer
tasks such as printing, setting the time
and date, running tests on your computer
hardware and so on.
Page 19

Getting Started With Ubuntu
Installing or Removing Applications
To install or remove applications from your
computer:
Click 1. System on the main menu.
Click 2. Synaptic Package Manager in the
Administration subcategory.
Enter your password and click 3. OK.
To install an application, select the check –
box adjacent to the required application.
To remove an application, clear the check –
box next to the required application.
Some applications may require additional
supporting applications or may be a
part of a bundle. If you want to continue
installing or removing the application,
click Install All/Remove All in the
confirmation window.
After you make the changes, click 4. OK.
In the confirmation window, select the 5.
changes you have made and click Apply.
Progress windows appear while downloading,
installing, and removing applications. After
the process completes, the Changes Applied
window appears.
Click 6. Close.
17
Page 20

Getting Started With Ubuntu
Switching to the Classic Desktop Mode
To switch to the Classic Desktop:
Click 1. System on the main menu.
Click 2. Switch Desktop Mode in the
Preferences subcategory.
Select3. Classic Desktop and click Apply.
To switch back to the Ubuntu Netbook Desktop:
Click 1. System on the panel.
Click 2. Preferences→ Switch Desktop Mode.
3. Select Ubuntu Netbook Desktop and click
Apply.
18
Starting an Application in the Classic
Desktop Mode
Click1. Applications on the panel.
Select the desired category and click the 2.
application you want to start.
Adding or Removing an Application Icon
on Your Classic Desktop
You can add an icon on your Classic Desktop for
quick access.
Select an application in the 1. Applications
menu.
Drag and drop the application onto the 2.
Classic Desktop.
To remove an application icon from your Classic
Desktop, right-click the application icon, and
select Move to Trash.
Page 21

Getting Started With Ubuntu
Basic Ubuntu Shortcuts
Shortcut Action
<Alt><Tab> Press the key
<Ctrl><Alt><D> Press the key
<Alt><F4> Press the key
<Shift><Ctrl><N> Press the key
Click the icon to view
the Ubuntu Netbook
Desktop
combination to switch
between applications
combination to minimize
the active window
combination to close a
window
combination to create
a new folder in Files &
Folders
For more information about shortcut keys in
Ubuntu:
Click 1. System on the main menu.
Click 2. Keyboard Shortcuts in the Preferences
subcategory.
NOTE: The following instructions are
applicable to the Ubuntu Netbook Desktop
view. They may not apply if you set your
computer to the Classic Desktop view.
19
Page 22

Reinstalling Your Operating System
Reinstalling Your Operating System
CAUTION: Using the Ubuntu DVD deletes
all data on the hard drive.
NOTE: Your computer may or may not have
an optical drive. Use an external optical
drive or any external storage device for the
procedures that involve media.
Use the
Ubuntu
DVD that shipped with your
computer to reinstall your operating system.
To reinstall the operating system:
Turn off the computer.1.
Connect an external USB optical drive 2.
into an available USB connector on your
computer.
CAUTION: Using the Ubuntu DVD deletes
all data on the hard drive.
Insert the 3.
optical drive.
Ubuntu
DVD in the external USB
20
Turn on the computer.4.
When the DELL logo appears, press <F12> 5.
immediately.
NOTE: The following steps will change
the boot sequence. The next time your
computer boots, the boot sequence will be
based on devices specified in the System
Setup program.
When the boot device list appears, highlight 6.
CD/DVD/CD-RW and press <Enter>.
Press any key to 7. Boot from CD-ROM. Follow
the instructions on the screen to complete
the installation.
Page 23

Page 24

Printed in China.
0VM0DJA00
Printed on recycled paper.
www.dell.com | support.dell.com
 Loading...