

Page 1

Dell™ Inspiron™
Quick Reference Guide
Model: DCMF
www.dell.com | support.dell.com
Page 2
Notes, Notices, and Cautions
NOTE: A NOTE indicates important information that helps you make better use of
your computer.
NOTICE: A NOTICE indicates either potential damage to hardware or loss of data
and tells you how to avoid the problem.
CAUTION: A CAUTION indicates a potential for property damage, personal injury,
or death.
____________________
Information in this document is subject to change without notice.
© 2008 Dell Inc. All rights reserved.
Reproduction of these materials in any manner whatsoever without the written permission of Dell Inc.
is strictly forbidden.
Trademarks used in this text: Dell, the DELL logo, DellConnect, Inspiron, and YOURS IS HERE are
trademarks of Dell Inc.; Intel, Celeron, Core, and Pentium are registered trademarks of Intel Corporation;
AMD, AMD Athlon, and Phenom are trademarks of Advanced Micro Devices, Inc.; HyperTr ansport is
a licensed trademark of the HyperTransport Technology Consortium; Microsoft, Windows, Windows
Vista, and Windows Vista start button are either trademarks or registered trademarks of Microsoft
Corporation in the United States and/or other countries; Bluetooth is a trademark owned by Bluetooth
SIG, Inc. and is used by Dell Inc. under license; Blu-ray Disc is a trademark of Blu-ray Disc Association.
Other trademarks and trade names may be used in this document to refer to either the entities claiming
the marks and names or their products. Dell Inc. disclaims any proprietary interest in trademarks and
trade names other than its own.
Model: DCMF
June 2008 P/N MT480 Rev. A01
Page 3

Contents
1 About Your Dell™ Inspiron™ 518/519 . . . . 7
Front View . . . . . . . . . . . . . . . . . . . . . . 7
Back View
Back Panel Connectors
. . . . . . . . . . . . . . . . . . . . . . 8
. . . . . . . . . . . . . . . . 9
2 Setting Up Your Computer . . . . . . . . . . . . 11
Installing Your Computer in an Enclosure. . . . . . . . 11
Connecting to the Internet
Setting Up Your Internet Connection
Transferring Information to a New Computer
. . . . . . . . . . . . . . . . 13
. . . . . . . . 13
. . . . . . 15
3 Specifications . . . . . . . . . . . . . . . . . . . . . 17
4 Troubleshooting
. . . . . . . . . . . . . . . . . . . . 27
Troubleshooting Tools . . . . . . . . . . . . . . . . . . 27
Beep Codes
System Messages
Troubleshooting Hardware Problems in the
Windows Vista
Dell Diagnostics
. . . . . . . . . . . . . . . . . . . . . 27
. . . . . . . . . . . . . . . . . 29
®
Operating System . . . . . . . . 31
. . . . . . . . . . . . . . . . . . 31
Contents 3
Page 4

Solving Problems . . . . . . . . . . . . . . . . . . . . 35
Power Problems
Memory Problems
Lockups and Software Problems
. . . . . . . . . . . . . . . . . . 35
. . . . . . . . . . . . . . . . . 36
. . . . . . . . . . 37
5 Reinstalling Your Operating System . . . 41
Drivers . . . . . . . . . . . . . . . . . . . . . . . . . . 41
What Is a Driver?
Identifying Drivers
Reinstalling Drivers and Utilities
Using the Drivers and Utilities media
Restoring Your Operating System
Using Microsoft
Using Dell Factory Image Restore
Using the Operating System Media
. . . . . . . . . . . . . . . . . . 41
. . . . . . . . . . . . . . . . . 42
. . . . . . . . . . 42
. . . . . . . . 43
. . . . . . . . . . . . 44
Windows System Restore . . . . . 45
. . . . . . . . . 46
. . . . . . . . . 47
6 Finding Information . . . . . . . . . . . . . . . . 49
7 Getting Help
Obtaining Assistance . . . . . . . . . . . . . . . . . . 51
Technical Support and Customer Service
DellConnect™
Online Services
AutoTech Service
Automated Order-Status Service
Problems With Your Order
Product Information
. . . . . . . . . . . . . . . . . . . . . . 51
. . . . . 52
. . . . . . . . . . . . . . . . . . . . 52
. . . . . . . . . . . . . . . . . . . 52
. . . . . . . . . . . . . . . . . . 53
. . . . . . . . . . 53
. . . . . . . . . . . . . . . . 53
. . . . . . . . . . . . . . . . . . . 54
4 Contents
Page 5

Returning Items for Warranty Repair or Credit . . . . . 54
Before You Call
Contacting Dell
. . . . . . . . . . . . . . . . . . . . . 55
. . . . . . . . . . . . . . . . . . . . . 57
A Appendix . . . . . . . . . . . . . . . . . . . . . . . . . 59
FCC Notice (U.S. Only) . . . . . . . . . . . . . . . . . . 59
FCC Class B
Macrovision Product Notice
. . . . . . . . . . . . . . . . . . . . . 59
. . . . . . . . . . . . . . 60
Index . . . . . . . . . . . . . . . . . . . . . . . . . . . . . . . 61
Contents 5
Page 6

6 Contents
Page 7
About Your Dell™ Inspiron™
1
2
3
5
6
7
8
9
10
11
12
13
4
518/519
NOTE: For more information about the ports and connectors on your computer,
see "Specifications" on page 17.
Front View
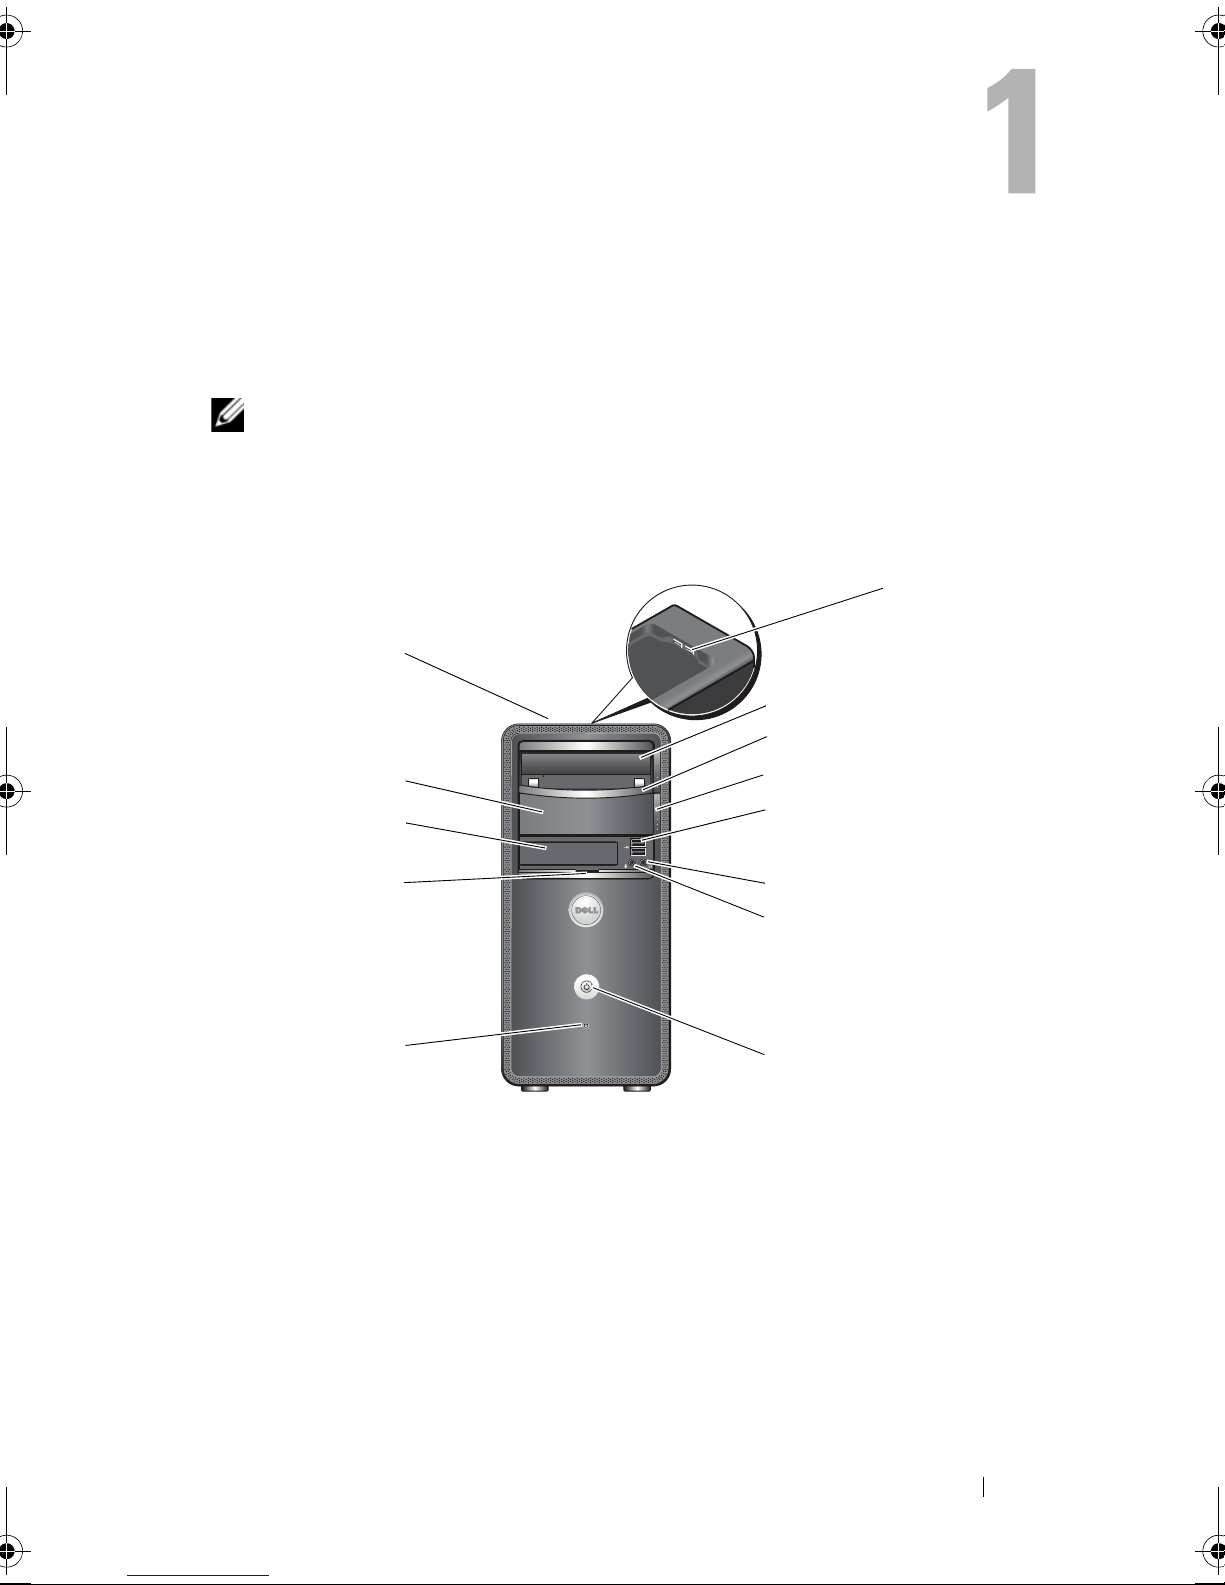
1 USB 2.0 connectors (2) 2 optical drive
3 optical-drive panel 4 optical-drive eject button
5 USB 2.0 connectors (2) 6 headphone connector
7 microphone connector 8 power button
9 drive activity light 10 front-panel door grip
11 FlexBay drive 12 optional optical-drive bay
13 Service Tag (located on top of
the chassis towards the front)
About Your Dell™ Inspiron™ 518/519 7
Page 8
Back View
1
2
3
4
5
7
6
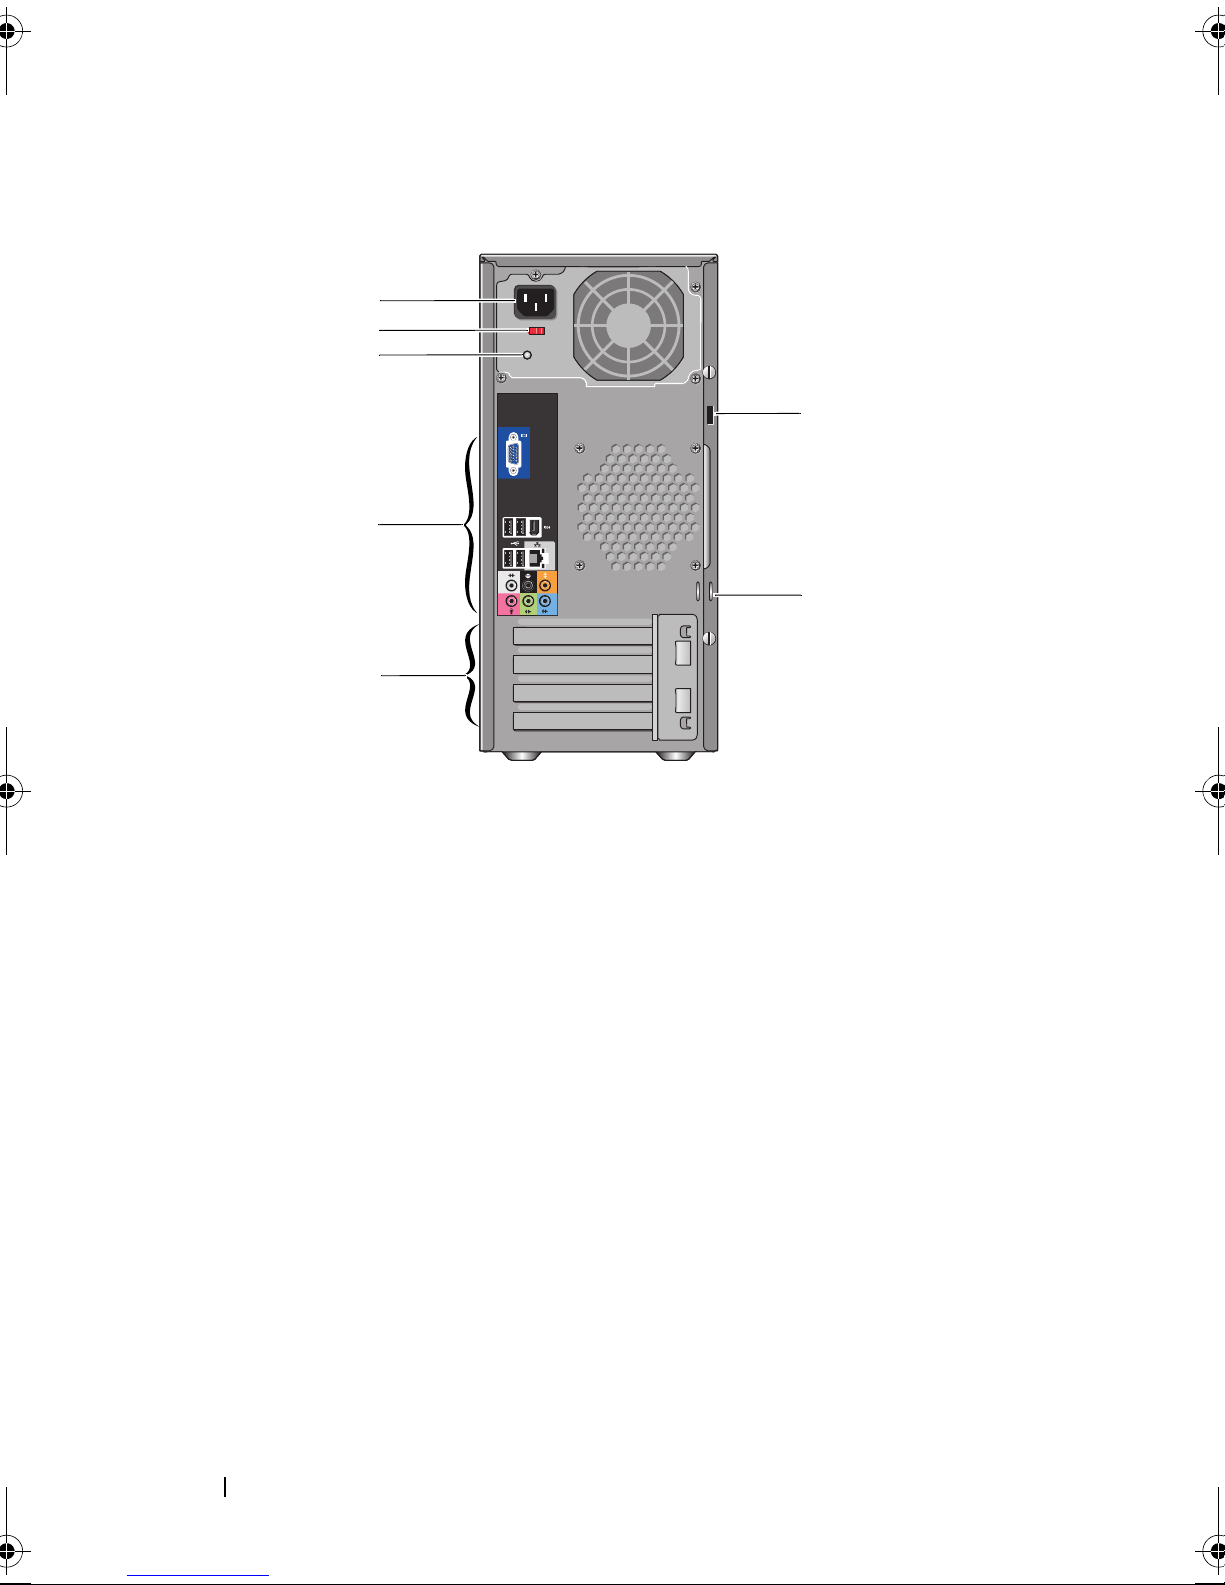
1 power connector 2 voltage selector switch
3 power supply light 4 back panel connectors
5 expansion card slots (4) 6 padlock rings
7 security cable slot
8 About Your Dell™ Inspiron™ 518/519
Page 9
Back Panel Connectors
23
9
8
4
5
6
7
11
12
10
1
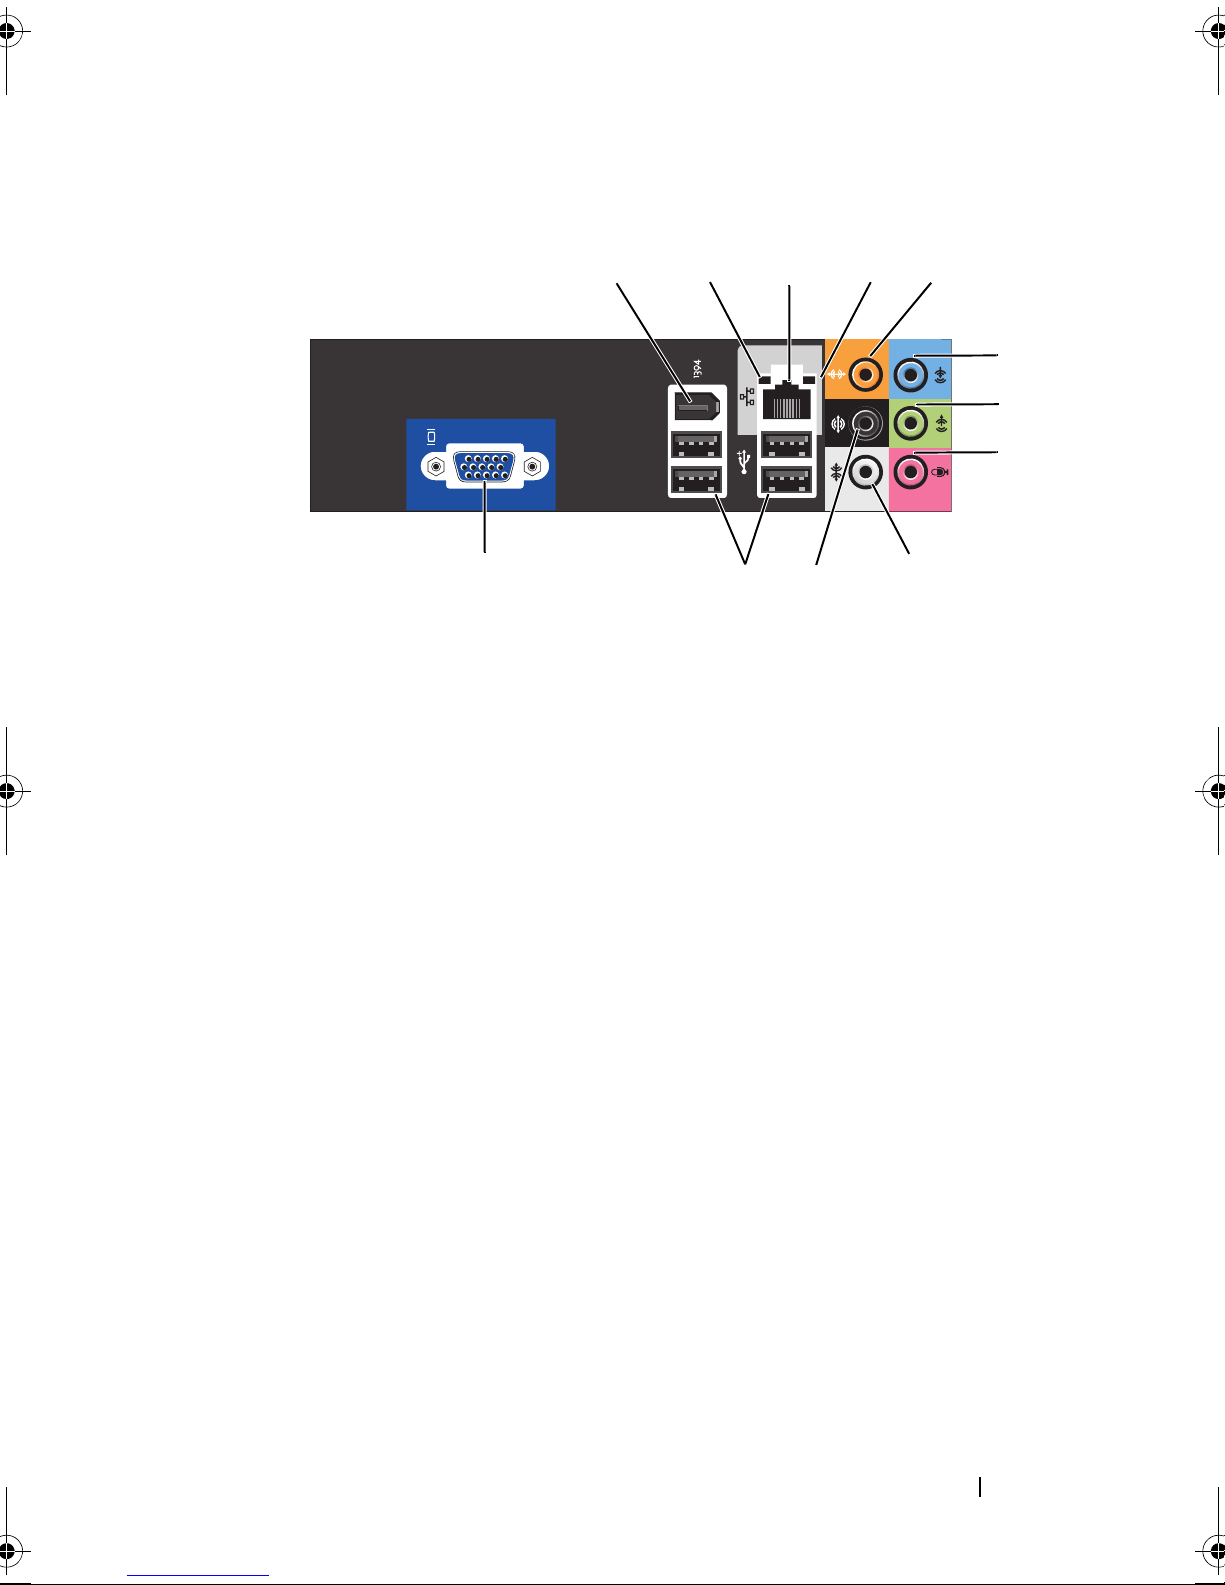
1 IEEE 1394 connector 2 link integrity light
3 network adapter connector 4 network activity light
5 center/subwoofer connector 6 line-in connector
7 front L/R line-out connector 8 microphone
9 side L/R surround connector 10 back L/R surround connector
11 USB 2.0 connectors (4) 12 VGA video connector
About Your Dell™ Inspiron™ 518/519 9
Page 10

10 About Your Dell™ Inspiron™ 518/519
Page 11

Setting Up Your Computer
Installing Your Computer in an Enclosure
Installing your computer in an enclosure can restrict the airflow and impact
your computer’s performance, possibly causing it to overheat. Follow the
guidelines below when installing your computer in an enclosure:
NOTICE: The operating temperature specifications indicated in this manual
reflects the maximum ambient operating temperature. The room ambient
temperature needs to be a consideration when installing your computer in an
enclosure. For example, if the ambient room temperature is at 25°C (77°F),
depending on your computer’s specifications, you only have 5° to 10°C (9° to 18°F)
temperature margin before you reach your computer’s maximum operating
temperature. For details about your computer’s specifications, see "Specifications"
on page 17.
• Leave a 10.2 cm (4 in) minimum clearance on all vented sides of the
computer to permit the airflow required for proper ventilation.
• If your enclosure has doors, they need to be of a type that allows at least
30 percent airflow through the enclosure (front and back).
NOTICE: Do not install your computer in an enclosure that does not allow airflow.
Restricting the airflow impacts your computer’s performance, possibly causing it to
overheat.
Setting Up Your Computer 11
Page 12
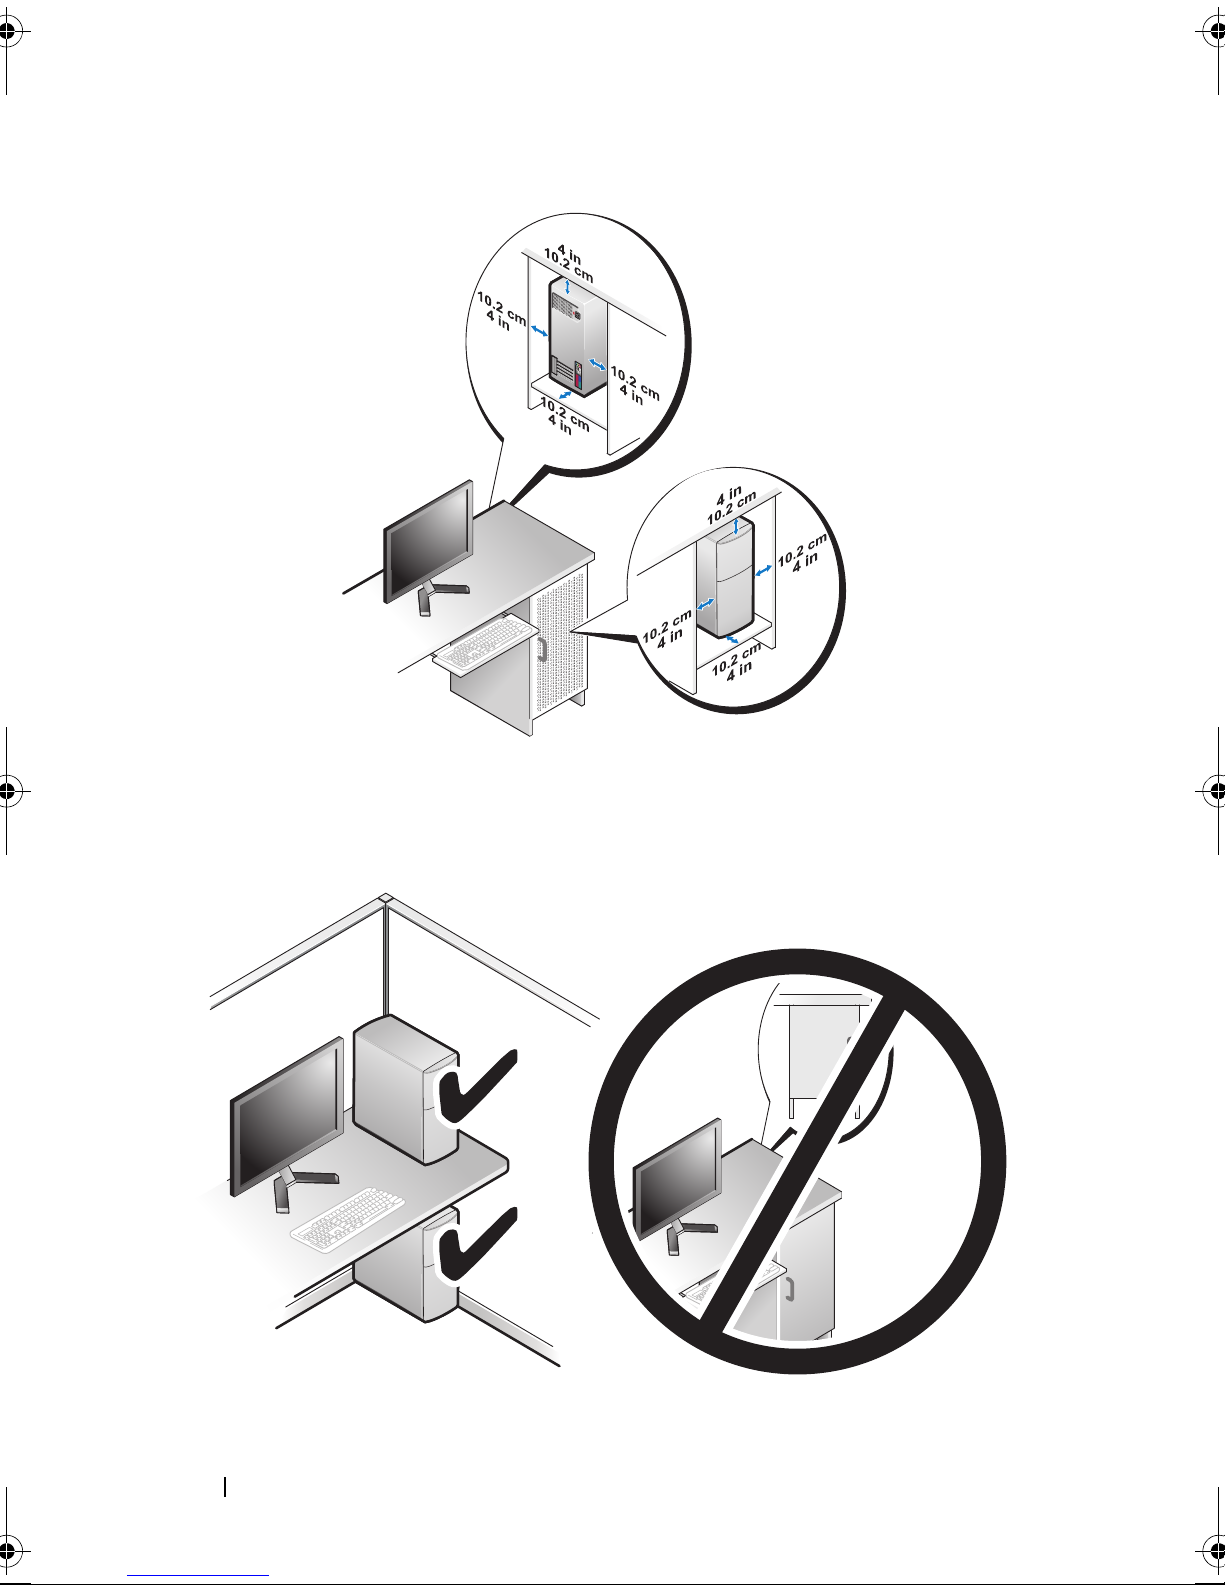
• If your computer is installed in a corner on a desk or under a desk, leave at
least 5.1 cm (2 in) clearance from the back of the computer to the wall to
permit the airflow required for proper ventilation.
12 Setting Up Your Computer
Page 13

Connecting to the Internet
NOTE: ISPs and ISP offerings vary by country.
To connect to the Internet, you need a modem or network connection and an
Internet service provider (ISP). Your ISP will offer one or more of the
following Internet connection options:
• DSL connections that provide high-speed Internet access through your
existing telephone line or cellular telephone service. With a DSL
connection, you can access the Internet and use your telephone on the
same line simultaneously.
• Cable modem connections that provide high-speed Internet access
through your local cable TV line.
• Satellite modem connections that provide high-speed Internet access
through a satellite television system.
• Dial-up connections that provide Internet access through a telephone line.
Dial-up connections are considerably slower than DSL and cable (or
satellite) modem connections.
• Wireless LAN connections that provide Internet access using Bluetooth
wireless technology.
®
If you are using a dial-up connection, connect a telephone line to the modem
connector on your computer and to the telephone wall jack before you set up
your Internet connection. If you are using a DSL or cable/satellite modem
connection, contact your ISP or cellular telephone service for setup
instructions.
Setting Up Your Internet Connection
To set up an Internet connection with a provided ISP desktop shortcut:
1
Save and close any open files, and exit any open programs.
2
Double-click the ISP icon on the Microsoft® Windows® desktop.
3
Follow the instructions on the screen to complete the setup.
Setting Up Your Computer 13
Page 14
If you do not have an ISP icon on your desktop or if you want to set up an
Internet connection with a different ISP, perform the steps in the following
section that corresponds to the operating system your computer is using.
NOTE: If you are having problems connecting to the Internet, see your
Dell Technology Guide. If you cannot connect to the Internet but have successfully
connected in the past, the ISP might have a service outage. Contact your ISP to
check the service status, or try connecting again later.
NOTE: Have your ISP information ready. If you do not have an ISP, the Connect to
the Internet wizard can help you get one.
1
Save and close any open files, and exit any open programs.
2
Click the Windows Vista start button™ , and click
3
Under
The
4
Click either
Network and Internet,
Connect to the Internet
Broadband (PPPoE)
click
Connect to the Internet
window appears.
or
Dial-up
, depending on how you want
Control Panel
.
.
to connect:
• Choose
Broadband
if you will use a DSL, satellite modem, cable TV
modem, or Bluetooth wireless technology connection.
• Chose
NOTE: If you do not know which type of connection to select, click Help me
choose or contact your ISP.
5
Follow the instructions on the screen and use the setup information
Dial-up
if you will use a dial-up modem or ISDN.
provided by your ISP to complete the setup.
6
Save and close any open files, and exit any open programs.
7
Click the Windows Vista start button , and click
8
Under
The
Network and Internet,
Connect to the Internet
click
Connect to the Internet
window appears.
Control Panel
.
.
14 Setting Up Your Computer
Page 15
9
Click either
to connect:
Broadband (PPPoE)
or
Dial-up
, depending on how you want
•Choose
Broadband
if you will use a DSL, satellite modem, cable TV
modem, or Bluetooth wireless technology connection.
• Chose
NOTE: If you do not know which type of connection to select, click Help me
choose or contact your ISP.
10
Follow the instructions on the screen and use the setup information
Dial-up
if you will use a dial-up modem or ISDN.
provided by your ISP to complete the setup.
Transferring Information to a New Computer
You can use your operating system "wizards" to help you transfer files and
other data from one computer to another—for example, from an old
computer to a new computer. To transfer information to a new computer
using the Windows Vista
1
Click the Windows Vista start button , and then click
and settings
2
In the
User Account Control
→
Start Windows Easy Transfer
®
wizard:
.
dialog box, click
Continue
Transfer files
.
3
Click
Start a new transfer
or
Continue a transfer in progress
.
Follow the instructions provided on the screen by the Windows Easy Transfer
wizard.
Setting Up Your Computer 15
Page 16

16 Setting Up Your Computer
Page 17
Specifications
NOTE: Offerings may vary by region. For more information regarding the
configuration of your computer, click Start→ Help and Support and select the option
to view information about your computer.
Processor Inspiron 518 Inspiron 519
Ty p e
L2 cache At least 512 KB pipelined-burst,
DRAM bus width Not applicable 64 bits per channel
Computer Information Inspiron 518 Inspiron 519
System chipset Intel G33 and ICH9 AMD RS780 and SB700
•Intel® Core™ 2 Quad processor
• Intel Core 2 Duo processor
®
• Intel Pentium
processor
• Intel Celeron
eight-way set associative,
writeback SRAM
Dual-Core
®
processor
• AMD Atholon™ 64/ LE/
64 X2/ X2 BE
• AMD Phenom™ X2/ X4/
X2 GE/ triple core
• Up to 2 MB for AMD
Athlon 64 X2 dual-core
processors
• Up to 512 KB for AMD
Athlon 64 processors
• Up to 4 MB for AMD
Phenom processors
RAID support RAID 1 (mirroring) Not applicable
Data bus width 64 bits Not applicable
DRAM bus width 64 bits Not applicable
Processor address
bus width
Flash EPROM 8 Mb 8 Mb
32 bits 16 bit up/down
HyperTransport link
Specifications 17
Page 18

Expansion Bus Inspiron 518 Inspiron 519
Bus type PCI 2.3
PCI Express 1.0A
SATA 1.0 and 2.0
USB 2.0
Bus speed
PCI
PCI Express
133 MB/s 133 MB/s
x1 slot bidirectional speed
— 500 MB/s
x16 slot bidirectional speed
— 8 GB/s
SATA
1.5 Gbps and 3.0 Gbps 1.5 Gbps and 3.0 Gbps
USB • High speed — 480 Mbps
• Full speed — 12 Mbps
• Low speed — 1.2 Mbps
PCI
Connectors
One
PCI 2.3
PCI Express 2.0
SATA 1.0 and 2.0
USB 2.0
x1 slot bidirectional speed
—1 GB/s
x16 slot bidirectional speed
— 16 GB/s
• High speed — 480 Mbps
• Full speed — 12 Mbps
• Low speed — 1.2 Mbps
One
Connector size
Connector data
width (maximum)
PCI Express
Connector
Connector size
Connector data
width (maximum)
PCI Express
Connector
Connector size
Connector data
width (maximum)
124 pins
32 bits
Two x1
36 pins
1 PCI Express lane
One x16
164 pins
16 PCI Express lane
124 pins
32 bits
Two x1
36 pins
1 PCI Express lane
One x16
164 pins
16 PCI Express lane
18 Specifications
Page 19
Memory Inspiron 518/519
Memory module connector Four user-accessible DDR2 DIMM sockets
Memory module capacities 512 MB, 1 GB, and 2 GB
Memory type 667 MHz, 800 MHz Non-ECC DDR2
SDRAM
Minimum memory 512 MB
Maximum memory 4 GB
Drives Inspiron 518/519
Externally accessible One 3.5-inch drive bay
Two 5.25-inch drive bays
Internally accessible Two 3.5-inch drive bays
Available devices Two 3.5-inch SATA hard drives
Two 5.25-inch SATA DVD-ROM/ DVD+/RW super multi drive / Blu-ray Disc drive /
Blu-ray Disc RW drive
One 3.5-inch USB media card
reader/Bluetooth media card reader
Specifications 19
Page 20

Connectors Inspiron 518/519
External connectors
Audio
ALC888 (7.1 Channel audio)
Line-in connector — Use the blue line-in
connector to attach a record/playback device
such as a microphone, cassette player, CD
player, or VCR.
On computers with a sound card, use the
connector on the card.
Front L/R line-out connector — Use the
green line-out connector to attach
headphones and most speakers with
integrated amplifiers.
On computers with a sound card, use the
connector on the card.
Microphone connector — Use the pink
connector to attach a personal computer
microphone for voice or musical input into a
sound or telephony program.
On computers with a sound card, use the
microphone connector on the card.
IEEE 1394
Center/sub-woofer connector — Use the
orange connector to attach the sub-woofer.
Back L/R speakers connector — Use the black
surround connector to attach multichannelcapable speakers.
Side L/R surround connector — Use the gray
connector to provide enhanced surround
audio for computers with 7.1 speakers.
On computers with a sound card, use the
connector on the card.
One 6-pin serial connector on the back-panel
Use the IEEE 1394 connector for high-speed
data devices such as digital video cameras
and external storage devices.
20 Specifications
Page 21

Connectors (continued) Inspiron 518/519
Network
10/100/1000 Mbps Ethernet LAN on the
system board.
RJ-45 port — Connect one end of a network
cable to either a network connector or your
network or broadband device. Connect the
other end of the network cable to the network
adapter connector on your computer. A click
indicates that the network cable has been
securely attached.
NOTICE: Do not plug a telephone cable
into the network connector.
On computers with an additional network
connector card, use the connectors on the
card and on the back of the computer when
setting up multiple network connections
(such as a separate intra- and extranet).
It is recommended that you use Category 5
wiring and connectors for your network. If
you must use Category 3 wiring, force the
network speed to 10 Mbps to ensure reliable
operation.
USB
Eight USB 2.0-compliant connectors
Front-panel (2)
Back-panel (4)
Top USB tray (2)
Use the back USB connectors for devices that
typically remain connected, such as printers
and keyboards.
NOTE: It is recommended that you use the
front USB connectors for devices that you
connect occasionally, such as flash memory
keys or cameras, or for bootable USB devices.
Specifications 21
Page 22

Connectors (continued) Inspiron 518/519
Video
System board connectors
Chassis fan
Front panel audio HDA header
Front panel control
Internal USB
Memory
PCI 2.3
PCI Express x1
Integrated video
15-hole connector — Connect the monitor’s
VGA cable to the VGA connector on the
computer.
NOTE: Your computer supports an optional PCI
Express x16 graphics card. If you have installed
a graphics card, use the connector on the card.
One 3-pin connector
One 10-pin connector
One 10-pin connector
Four 10-pin connectors
Four 240-pin connectors
One 124-pin connector
Two 36-pin connectors
PCI Express x16
Power
Power 12V
One 164-pin connector
One 24-pin connector
One 4-pin connector
Processor • Inspiron 518 — one 775-pin connector
• Inspiron 519 — one 940-pin connector
Processor fan
Serial ATA
One 4-pin connector
Four 7-pin connectors
22 Specifications
Page 23

Controls and Lights Inspiron 518/519
Front of the computer
Power button
Power light
Drive activity light
Push button
Blue light — Blinking blue indicates that
the computer is in sleep state; solid blue
indicates power-on state.
Amber light — Blinking amber indicates a
problem with the system board. A solid
amber light when the system does not
boot indicates that the system board
cannot start initialization. This could be
an issue with the system board or power
supply (see "Power Problems" on
page 35).
Blue light — A blinking blue light
indicates the computer is reading data
from or writing data to to the SATA hard
drive or the optical drive.
Specifications 23
Page 24

Controls and Lights (continued) Inspiron 518/519
Back of the computer
Link integrity light (on integrated
network adapter)
Network activity light (on integrated
network adapter)
Power supply diagnostic light
Green light — indicates a good
connection exists between a 10/100-Mbps
network and the computer.
Orange light — indicates a good
connection exists between a 1000-Mbps
network and the computer.
Off (no light) — indicates that the
computer is not detecting a physical
connection to the network.
Yellow blinking light — indicates that the
is activity on the network.
Off (no light) — indicates that there is no
activity on the network.
Green — indicates that the power supply
is receiving power.
Off — indicates that the power supply is
not receiving power or the power supply is
not working.
Power Inspiron 518/519
DC power supply:
Wattage 300 W
Maximum heat dissipation 162 W
NOTE: Heat dissipation is calculated by
using the power supply wattage rating.
Voltage (see the safety instructions that
115/230 VAC, 50/60 Hz, and 7A/ 4A
shipped with your computer for
important voltage setting information)
Coin cell battery 3-V CR2032 lithium coin cell
24 Specifications
Page 25
Physical Inspiron 518/519
Height 379 mm (14.9 inches)
Width 17.0 cm (6.7 inches)
Depth 43.5 cm (17.1 inches)
Weight 13.1 kg (28.9 lb)
Environmental Inspiron 518/519
Temperature range:
Operating
Storage
10° to 35°C (50° to 95°F)
–40° to 65°C (–40° to 149°F)
Relative humidity (maximum): 20% to 80% (noncondensing)
Maximum vibration (using a randomvibration spectrum that simulates user
environment):
Operating
Storage
5 to 350 Hz at 0.0002 G2/Hz
5 to 500 Hz at 0.001 to 0.01 G2/Hz
Maximum shock (measured with hard
drive in head-parked position and a 2-ms
half-sine pulse):
Operating
40 G +/- 5% with pulse duration of 2 msec
+/- 10% (equivalent to 20 in/sec [51
cm/sec])
Storage
105 G +/- 5% with pulse duration of 2
msec +/- 10% (equivalent to 50 in/sec [127
cm/sec])
Altitude (maximum):
Operating
Storage
Airborne contaminant level G2 or lower as defined by ISA-S71.04-1985
–15.2 to 3048 m (–50 to 10,000 ft)
–15.2 to 10,668 m (–50 to 35,000 ft)
Specifications 25
Page 26

26 Specifications
Page 27
Troubleshooting
CAUTION: To guard against likelihood of electric shock, laceration by moving fan
blades or other unexpected injuries, always unplug your computer from the
electrical outlet before opening the cover.
Troubleshooting Tools
Follow these tips when troubleshooting your computer:
• If you added or removed a part before the problem started, review the
installation procedures and ensure that the part is correctly installed.
• If a peripheral device does not work, ensure that the device is properly
connected.
• If an error message appears on the screen, write down the exact message.
This message may help support personnel diagnose and fix the problem(s).
• If an error message occurs in a program, see the program’s documentation.
NOTE: The procedures in this document were written for the
Microsoft
computer to the Windows Classic view.
®
Windows® default view, so these may not apply if you set your Dell™
Beep Codes
Your computer might emit a series of beeps during start-up if the monitor
cannot display errors or problems. This series of beeps, called a beep code,
identifies a problem. One possible beep code consists of repetitive three short
beeps. This beep code tells you that the computer encountered a possible
system board failure.
If your computer beeps during start-up:
1
Write down the beep code.
2
Run the Dell Diagnostics to identify a more serious cause (see "Dell
Diagnostics" on page 31).
Troubleshooting 27
Page 28

Code
(repetitive
short beeps)
Description Suggested Remedy
1 BIOS checksum
failure. Possible
system board failure.
2 No memory modules
are detected
3 Possible system
board failure
Contact Dell. For more information, see
"Contacting Dell" on page 57.
1
If you have two or more memory modules
installed, remove the modules, reinstall one
module (see the
Support website at
Service Manual
support.dell.com
on the Dell
), and
then restart the computer. If the computer
starts normally, reinstall an additional module.
Continue until you have identified a faulty
module or reinstalled all modules without
error.
2
If available, install good memory of the same
type into your computer (see the
Manual
support.dell.com
3
If the problem persists, contact Dell.
on the Dell Support website at
).
Service
Contact Dell. For more information, see
"Contacting Dell" on page 57.
4 RAM Read/Write
failure
5 Real time clock
failure. Possible
battery failure or
system board failure.
28 Troubleshooting
1
Ensure that no special memory
module/memory connector placement
requirements exist (see the
the Dell Support website at
2
Verify that the memory modules that you are
Service Manual
support.dell.com
installing are compatible with your computer
(see the
website at
3
If the problem persists, contact Dell
Service Manual
support.dell.com
"Contacting Dell
1
Replace the battery (see the
the Dell Support website at
2
If the problem persists, contact Dell
"Contacting Dell
on the Dell Support
).
" on page 57
).
Service Manual
support.dell.com
" on page 57).
(see
(see
on
).
on
).
Page 29
Code
(repetitive
short beeps)
Description Suggested Remedy
6 Video BIOS Test
Failure
7 CPU cache test
failure
Contact Dell. For more information, see
"Contacting Dell" on page 57.
Contact Dell. For more information, see
"Contacting Dell" on page 57.
System Messages
NOTE: If the message you received is not listed in the table, see the documentation
for either the operating system or the program that was running when the message
appeared.
NOTE: For information on removing and installing parts, see the Service Manual on
the Dell Support website at support.dell.com.
1394 CABLE CONNECTION FAILURE — The IEEE 1394 cable may be loose. Check
for loose cable connection.
ALERT! PREVIOUS ATTEMPTS AT BOOTING THIS SYSTEM HAVE FAILED AT
CHECKPOINT [NNNN]. FOR HELP IN RESOLVING THIS PROBLEM, PLEASE NOTE
THIS CHECKPOINT AND CONTACT DELL TECHNICAL SUPPORT — The computer
failed to complete the boot routine three consecutive times for the same error (see
"Contacting Dell" on page 57 for assistance).
CMOS CHECKSUM ERROR — Possible system board failure or RTC battery low.
Replace battery. See the Service Manual on the Dell Support website at
support.dell.com or see "Contacting Dell" on page 57 for assistance.
CPU FAN FAILURE — CPU fan failure. Replace CPU fan.
DISKETTE READ FAILURE — The floppy disk may be defective or a cable may be
loose. Replace floppy disk or check for loose cable connection.
FRONT I/O CABLE CONNECTION FAILURE — The front I/O panel cable may be loose.
Troubleshooting 29
Page 30
FRONT USB CABLE CONNECTION FAILURE — The USB cable that connects the
USB ports on the front I/O panel to the system board may be loose.
HARD- DISK DRIVE FAILURE — Possible hard disk drive failure during hard drive
power-on self-test (POST). Check cables /swap hard disks or see "Contacting Dell"
on page 57 for assistance.
HARD- DISK DRIVE READ FAILURE — Possible hard drive failure during hard drive
boot test (see "Contacting Dell" on page 57 for assistance).
KEYBOARD FAILURE — Keyboard failure or keyboard cable loose.
NO BOOT DEVICE AVAILABLE — No bootable partition on hard drive or no
bootable media in the optical drive, or hard drive/optical drive cable is loose, or no
bootable device exists.
• If the optical drive is your boot device, ensure that a bootable media is in the
drive.
• If the hard drive is your boot device, ensure that the cables are connected and
that the drive is installed properly and partitioned as a boot device.
• Enter system setup and ensure that the boot sequence information is correct.
NO TIMER TICK INTERRUPT — A chip on the system board might be
malfunctioning or system board failure.
NOTICE - HARD DRIVE SELF MONITORING SYSTEM HAS REPORTED THAT A
PARAMETER HAS EXCEEDED ITS NORMAL OPERATING RANGE. DELL
RECOMMENDS THAT YOU BACK UP YOUR DATA REGULARLY. A PARAMETER OUT
OF RANGE MAY OR MAY NOT INDICATE A POTENTIAL HARD DRIVE PROBLEM.—
Self monitoring, analysis, and reporting technology (S.M.A.R.T.) error. Possible
hard drive failure. This feature can be enabled or disabled in basic input/output
system (BIOS) setup.
TOP USB CABLE CONNECTION FAILURE — The USB cable that connects the USB
ports on the top USB tray to the system board may be loose.
30 Troubleshooting
Page 31
USB OVER CURRENT ERROR — Disconnect the USB device. Use external power
source for the USB device.
WARNING: SYS T EM FAN FAILURE, PLEASE CONTACT DELL TECHNICAL SUPPORT
IMMEDIATELY — System fan failure. Replace system fan.
Troubleshooting Hardware Problems in the Windows Vista® Operating
System
If a device is either not detected during the operating system setup or is
detected but incorrectly configured, you can use the Hardware
Troubleshooter to resolve the incompatibility.
To start the Hardware Troubleshooter:
1
Click the Windows Vista start button ,
2
Ty p e
hardware troubleshooter
<Enter> to start the search.
In the search results, select the option that best describes the problem and
follow the remaining troubleshooting steps.
and click
Help and Support.
in the search field and press
Dell Diagnostics
CAUTION: Before you begin any of the procedures in this section, follow the
safety instructions that shipped with your compter.
When to Use the Dell Diagnostics
If you experience a problem with your computer, perform the checks in Lockups
and Software Problems (see "Lockups and Software Problems" on page 37) and
run the Dell Diagnostics before you contact Dell for technical assistance.
It is recommended that you print these procedures before you begin.
NOTICE: The Dell Diagnostics works only on Dell™ computers.
NOTE: The Drivers and Utilities media is optional and may not ship with your computer.
See the System Setup section in the Service Manual to review your computer’s
configuration information, and ensure that the device that you want to test
displays in the system setup program and is active.
Start the Dell Diagnostics from your hard drive or from the Drivers and
Utilities media.
Troubleshooting 31
Page 32
Starting the Dell Diagnostics From Your Hard Drive
The Dell Diagnostics is located on a hidden diagnostic utility partition on
your hard drive.
NOTE: If your computer cannot display a screen image, see
page 57.
1
Ensure that the computer is connected to an electrical outlet that is
"Contacting Dell
known to be working properly.
2
Turn on (or restart) your computer.
3
When the DELL™ logo appears, press <F12> immediately. Select
Diagnostics
NOTE: If you wait too long and the operating system logo appears, continue to
wait until you see the Microsoft
computer and try again.
NOTE: If you see a message stating that no diagnostics utility partition has
been found, run the Dell Diagnostics from the Drivers and Utilities media.
4
Press any key to start the Dell Diagnostics from the diagnostics utility
from the boot menu and press <Enter>.
®
Windows® desktop; then, shut down your
partition on your hard drive.
Starting the Dell Diagnostics From the Drivers and Utilities Media
1
Insert the
Drivers and Utilities
media.
" on
2
Shut down and restart the computer.
When the DELL logo appears, press <F12> immediately.
NOTE: If you wait too long and the operating system logo appears, continue
to wait until you see the Microsoft
computer and try again.
NOTE: The next steps change the boot sequence for one time only. On the
next start-up, the computer boots according to the devices specified in the
system setup program.
3
When the boot device list appears, highlight
<Enter>.
4
Select the
Boot from CD-ROM
press <Enter>.
5
Ty p e 1 to start the CD menu and press <Enter> to proceed.
32 Troubleshooting
®
Windows® desktop; then, shut down your
CD/DVD/CD-RW
and press
option from the menu that appears and
Page 33
6
Select
Run the 32 Bit Dell Diagnostics
from the numbered list.
If multiple versions are listed, select the version appropriate for your
computer.
7
When the Dell Diagnostics
Main Menu
appears, select the test you want
to run.
Dell Diagnostics Main Menu
1
After the Dell Diagnostics loads and the
Main Menu
screen appears, click
the button for the option you want.
NOTE: It is recommended that you select Test System to run a complete test
on your computer.
Option Function
Test Memory
Test System
Exit
2
After you have selected the
following menu appears:
NOTE: It is recommended that you select Extended Test from the menu below
to run a more thorough check of devices in the computer.
Option Function
Express Test
Extended Test
Custom Test
Run the stand-alone memory test
Run System Diagnostics
Exit the Diagnostics
Test System
Performs a quick test of devices in the system.
This typically can take 10 to 20 minutes.
Performs a thorough check of devices in the system.
This typically can take an hour or more.
Use to test a specific device or customize the tests to
be run.
option from the main menu, the
Symptom Tree
This option allows you to select tests based on a
symptom of the problem you are having. This option
lists the most common symptoms.
Troubleshooting 33
Page 34
3
If a problem is encountered during a test, a message appears with an error
code and a description of the problem. Write down the error code and
problem description and see "Contacting Dell" on page 57.
NOTE: The Service Tag for your computer is located at the top of each test
screen. If you contact Dell, technical support will ask for your Service Tag.
4
If you run a test from the
Custom Test or Symptom Tree
option, click the
applicable tab described in the following table for more information.
Tab Function
Results
Errors
Help
Configuration
Parameters
Displays the results of the test and any error
conditions encountered.
Displays error conditions encountered, error codes,
and the problem description.
Describes the test and may indicate requirements for
running the test.
Displays your hardware configuration for the
selected device.
The Dell Diagnostics obtains configuration
information for all devices from system setup,
memory, and various internal tests, and it displays
the information in the device list in the left pane of
the screen. The device list may not display the
names of all the components installed on your
computer or all devices attached to your computer.
Allows you to customize the test by changing the
test settings.
5
When the tests are complete, close the test screen to return to the
Menu
the
6
Remove the
screen. To exit the Dell Diagnostics and restart the computer, close
Main Menu
screen.
Drivers and Utilities
34 Troubleshooting
media (if applicable).
Main
Page 35
Solving Problems
Power Problems
CAUTION: Before you begin any of the procedures in this section, follow the
safety instructions that shipped with your computer.
IF THE POWER LIGHT IS OFF — The computer is either turned off or is not
receiving power.
• Reseat the power cable into both the power connector on the back of the computer
and the electrical outlet.
• If the computer is plugged into a power strip, ensure that the power strip is
plugged into an electrical outlet and that the power strip is turned on. Also bypass
power protection devices, power strips, and power extension cables to verify that
the computer turns on properly.
• Ensure that the electrical outlet is working by testing it with another device, such
as a lamp.
IF THE POWER LIGHT IS STEADY BLUE OR WHITE AND THE COMPUTER IS NOT
RESPONDING —
• Ensure that the display is connected and powered on.
• If the display is connected and powered on, see "Beep Codes" on page 27.
IF THE POWER LIGHT IS BLINKING BLUE OR WHITE — The computer is in
standby mode. Press a key on the keyboard, move the mouse, or press the power
button to resume normal operation.
IF THE POWER LIGHT IS STEADY AMBER — Power problem or internal device
malfunction.
• Ensure that the 12-volt power connector (12V) is securely connected to the system
board (s
• Ensure that the main power cable and front panel cable are securely connected to
the system board (s
support.dell.com
ee the Service Manual on the Dell Support website at support.dell.com
ee the Service Manual on the Dell Support website at
).
).
Troubleshooting 35
Page 36
IF THE POWER LIGHT IS BLINKING AMBER — The computer is receiving electrical
power, a device might be malfunctioning or incorrectly installed.
• Remove and then reinstall the memory modules (s
Dell Support website at support.dell.com
• Remove and then reinstall any cards (s
website at support.dell.com
• Remove and then reinstall the graphics card, if applicable (s
on the Dell Support website at support.dell.com
ELIMINATE INTERFERENCE — Some possible causes of interference are:
• Power, keyboard, and mouse extension cables.
• Too many devices on a power strip.
• Multiple power strips connected to the same electrical outlet.
).
).
ee the Service Manual on the Dell Support
ee the Service Manual on the
ee the Service Manual
).
Memory Problems
CAUTION: Before you begin any of the procedures in this section, follow the
safety instructions that shipped with your computer.
IF YOU RECEIVE AN INSUFFICIENT MEMORY MESSAGE —
• Save and close any open files and exit any open programs you are not using to see if
that resolves the problem.
• See the software documentation for minimum memory requirements. If necessary,
install additional memory (
at support.dell.com
• Reseat the memory modules (
website at support.dell.com
communicating with the memory.
• Run the Dell Diagnostics (see "Dell Diagnostics" on page 31).
).
See the Service Manual on the Dell Support website
See the Service Manual on the Dell Support
) to ensure that your computer is successfully
36 Troubleshooting
Page 37
IF YOU EXPERIENCE OTHER MEMORY PROBLEMS —
• Reseat the memory modules (s
website at support.dell.com
communicating with the memory.
• Ensure that you are following the memory installation guidelines (s
Manual on the Dell Support website at support.dell.com
• Your computer supports DDR2 memory. For more information about the type of
memory supported by your computer, see "Specifications" on page 17.
• Run the Dell Diagnostics (see "Dell Diagnostics" on page 31).
ee the Service Manual on the Dell Support
) to ensure that your computer is successfully
ee the Service
).
Lockups and Software Problems
CAUTION: Before you begin any of the procedures in this section, follow the
safety instructions that shipped with your computer.
The computer does not start up
Ensure that the power cable is firmly connected to the computer and to the
electrical outlet.
The computer stops responding
NOTICE: You might lose data if you are unable to perform an operating system
shutdown.
TURN THE COMPUTER OFF — If you are unable to get a response by pressing a key
on your keyboard or moving your mouse, press and hold the power button for at
least 8 to 10 seconds until the computer turns off. Then restart your computer.
Troubleshooting 37
Page 38
A program stops responding
END THE PROGRAM —
1
Press <Ctrl><Shift><Esc> simultaneously.
2
Click
Applications
3
Click the program that is no longer responding.
4
Click
End Task
.
.
A program crashes repeatedly
NOTE: Software usually includes installation instructions in its documentation or
on a floppy disk or CD.
CHECK THE SOFTWARE DOCUMENTATION — If necessary, uninstall and then
reinstall the program.
A program is designed for an earlier Microsoft® Windows® operating system
RUN THE PROGRAM COMPATIBILITY WIZARD —
The Program Compatibility Wizard configures a program so that it runs in an
environment similar to non-Windows Vista operating system environments.
1
Click
Start
→
Control Panel→Programs→ Use an older program with this
version of Windows.
2
In the welcome screen, click
3
Follow the instructions on the screen.
Next
.
A solid blue screen appears
TURN THE COMPUTER OFF — If you are unable to get a response by pressing a key
on your keyboard or moving your mouse, press and hold the power button for at
least 8 to 10 seconds until the computer turns off. Then restart your computer.
38 Troubleshooting
Page 39
Other software problems
CHECK THE SOFTWARE DOCUMENTATION OR CONTACT THE SOFTWARE
MANUFACTURER FOR TROUBLESHOOTING INFORMATION —
• Ensure that the program is compatible with the operating system installed on your
computer.
• Ensure that your computer meets the minimum hardware requirements needed to
run the software. See the software documentation for information.
• Ensure that the program is installed and configured properly.
• Verify that the device drivers do not conflict with the program.
• If necessary, uninstall and then reinstall the program.
BACK UP YOUR FILES IMMEDIATELY
USE A VIRUS-SCANNING PROGRAM TO CHECK THE HARD DRIVE, FLOPPY DISKS,
OR CDS
SAVE AND CLOSE ANY OPEN FILES OR PROGRAMS AND SHUT DOWN YOUR
COMPUTER THROUGH THE START MENU
Troubleshooting 39
Page 40

40 Troubleshooting
Page 41
Reinstalling Your Operating System
Drivers
What Is a Driver?
A driver is a program that controls a device such as a printer, mouse, or
keyboard. All devices require a driver program.
A driver acts like a translator between the device and any other programs that
use the device. Each device has its own set of specialized commands that only
its driver recognizes.
Dell™ ships your computer to you with required drivers already installed—no
further installation or configuration is needed.
NOTICE: The Drivers and Utilities media may contain drivers for operating systems
that are not on your computer. Ensure that you are installing software appropriate
for your operating system.
Many drivers, such as the keyboard driver, come with your Microsoft®
Windows
®
operating system. You may need to install drivers if you:
• Upgrade your operating system.
• Reinstall your operating system.
• Connect or install a new device.
Reinstalling Your Operating System 41
Page 42
Identifying Drivers
If you experience a problem with any device, identify whether the driver is the
source of your problem and, if necessary, update the driver.
1
Click the Windows Vista start button™
2
Click
Properties→ Device Manager
NOTE: The User Account Control window may appear. If you are an
administrator on the computer, click Continue; otherwise, contact your
administrator to continue.
.
,
and right-click
Computer
.
Scroll down the list to see if any device has an exclamation point (a yellow
circle with a [!]) on the device icon.
If an exclamation point is next to the device name, you may need to reinstall
the driver or install a new driver (see "Reinstalling Drivers and Utilities" on
page 42).
Reinstalling Drivers and Utilities
NOTICE: The Dell Support website at support.dell.com and your Drivers and
Utilities media provide approved drivers for Dell™ computers. If you install drivers
obtained from other sources, your computer might not work correctly.
Using Windows Device Driver Rollback
If a problem occurs on your computer after you install or update a driver, use
Windows Device Driver Rollback to replace the driver with the previously
installed version.
Click the Windows Vista start button
1
2
Click
3
Right-click the device for which the new driver was installed and click
Properties
4
Click the
Properties→ Device Manager
NOTE: The User Account Control window may appear. If you are an
administrator on the computer, click Continue; otherwise, contact your
administrator to enter the Device Manager.
.
.
Drivers
tab→ Roll Back Driver
,
and right-click
.
Computer
.
42 Reinstalling Your Operating System
Page 43
Using the Drivers and Utilities media
If using Device Driver Rollback or System Restore ("Restoring Your Operating
System" on page 44) does not resolve the problem, then reinstall the driver
from the Drivers and Utilities media.
1
With the Windows desktop displayed, insert the
Drivers and Utilities
media.
If this is your first time to use the
Drivers and Utilities
If not, go to step 5.
2
When the
Drivers and Utilities
media installation program starts, follow
the prompts on the screen.
3
When the
Drivers and Utilities
4
When you see the Windows desktop, reinsert the
5
At the
NOTE: The Drivers and Utilities media displays drivers only for hardware that
came installed in your computer. If you installed additional hardware, the
drivers for the new hardware might not be displayed by the Drivers and
Utilities media. If those drivers are not displayed, exit the Drivers and Utilities
media program. For drivers information, see the documentation that came
with the device.
A message appears, stating that the
InstallShield Wizard Complete
media and click
Welcome Dell System Owner
Drivers and Utilities
Finish
screen, click
hardware in your computer.
media, go to step 2.
window appears, remove the
to restart the computer.
Drivers and Utilities
Next
.
media.
media is detecting
The drivers that are used by your computer are automatically displayed in
the
My Drivers—The Drivers and Utilities media has identified these
components in your system
6
Click the driver that you want to reinstall and follow the instructions on
window.
the screen.
If a particular driver is not listed, that driver is not required by your operating
system.
Reinstalling Your Operating System 43
Page 44
Manually Reinstalling Drivers
After extracting the driver files to your hard drive as described in the previous
section:
1
Click the Windows Vista start button
2
Click
3
Double-click the type of device for which you are installing the driver (for
example,
4
Double-click the name of the device for which you are installing the driver.
5
Click the
software
6
Click
Properties→ Device Manager
NOTE: The User Account Control window may appear. If you are an
administrator on the computer, click Continue; otherwise, contact your
administrator to enter the Device Manager.
Audio
Driver
or
Video
tab→
).
Update Driver→ Browse my computer for driver
.
.
Browse
and browse to the location to which you previously copied
,
and right-click
Computer
.
the driver files.
7
When the name of the appropriate driver appears, click the name of the
driver
→
OK→ Next
.
8
Click
Finish
and restart your computer.
Restoring Your Operating System
You can restore your operating system in the following ways:
• System Restore returns your computer to an earlier operating state without
affecting data files. Use System Restore as the first solution for restoring
your operating system and preserving data files.
• Dell Factory Image Restore returns your hard drive to the operating state it
was in when you purchased the computer. Both permanently delete all
data on the hard drive and remove any programs installed after you
received the computer. Use Dell Factory Image Restore only if System
Restore did not resolve your operating system problem.
• If you received an
it to restore your operating system. However, using the
disc also deletes all data on the hard drive. Use the disc
Restore did not resolve your operating system problem.
Operating System
disc with your computer, you can use
Operating System
only
if System
44 Reinstalling Your Operating System
Page 45
Using Microsoft Windows System Restore
The Windows operating systems provide a System Restore option which
allows you to return your computer to an earlier operating state (without
affecting data files) if changes to the hardware, software, or other system
settings have left the computer in an undesirable operating state. Any
changes that System Restore makes to your computer are completely
reversible.
NOTICE: Make regular backups of your data files. System Restore does not
monitor your data files or recover them.
NOTE: The procedures in this document were written for the Windows default
view, so they may not apply if you set your Dell™ computer to the Windows
Classic view.
Starting System Restore
1
Click
2
In the Start Search box, type
Start
.
System Restore
NOTE: The User Account Control window may appear. If you are an
administrator on the computer, click Continue; otherwise, contact your
administrator to continue the desired action.
and press <Enter>.
3
Click
Next
and follow the remaining prompts on the screen.
In the event that System Restore did not resolve the issue, you may undo the
last system restore.
Undoing the Last System Restore
NOTICE: Before you undo the last system restore, save and close all open files and
exit any open programs. Do not alter, open, or delete any files or programs until the
system restoration is complete.
1
Click
2
In the Start Search box, type
3
Click
Start
.
System Restore
Undo my last restoration
and click
Next
and press <Enter>.
.
Reinstalling Your Operating System 45
Page 46
Using Dell Factory Image Restore
NOTICE: Using Dell Factory Image Restore permanently deletes all data on the
hard drive and removes any programs or drivers installed after you received your
computer. If possible, back up the data before using these options. Use Dell Factory
Image Restore only if System Restore did not resolve your operating system
problem.
NOTE: Dell Factory Image Restore may not be available in certain countries or on
certain computers.
Use Dell Factory Image Restore only as the last method to restore your
operating system. These options restore your hard drive to the operating state
it was in when you purchased the computer. Any programs or files added since
you received your computer—including data files—are permanently deleted
from the hard drive. Data files include documents, spreadsheets, e-mail
messages, digital photos, music files, and so on. If possible, back up all data
before using Factory Image Restore.
Dell Factory Image Restore
1
Turn on the computer. When the Dell logo appears, press <F8> several
times to access the Vista Advanced Boot Options Window.
2
Select
Repair Your Computer
.
The System Recovery Options window appears.
3
Select a keyboard layout and click
4
To access the recovery options, log on as a local user. To access the
command prompt, type
click
OK
.
5
Click
Dell Factory Image Restore
NOTE: Depending upon your configuration, you may need to select Dell
Factory Tools, then Dell Factory Image Restore.
administrator
Next
.
.
in the User name field, then
The Dell Factory Image Restore welcome screen appears.
6
Click
Next.
The Confirm Data Deletion screen appears.
NOTICE: If you do not want to proceed with Factory Image Restore, click Cancel.
46 Reinstalling Your Operating System
Page 47
7
Click the checkbox to confirm that you want to continue reformatting the
hard drive and restoring the system software to the factory condition, then
click
Next
.
The restore process begins and may take five or more minutes to complete.
A message appears when the operating system and factory-installed
applications have been restored to factory condition.
8
Click
Finish
to reboot the system.
Using the Operating System Media
Before you Begin
If you are considering reinstalling the Windows operating system to correct a
problem with a newly installed driver, first try using Windows Device Driver
Rollback. See "Using Windows Device Driver Rollback" on page 42. If Device
Driver Rollback does not resolve the problem, then use System Restore to
return your operating system to the operating state it was in before you
installed the new device driver. See "Using Microsoft
Restore" on page 45.
Windows System
NOTICE: Before performing the installation, back up all data files on your primary
hard drive. For conventional hard drive configurations, the primary hard drive is the
first drive detected by the computer.
To reinstall Windows, you need the following items:
•Dell™
•Dell
NOTE: The
during the assembly of the computer. Use the
load any required drivers. Depending on the region from which you ordered your
computer, or whether you requested the media, the
media
Reinstalling Windows Vista
Operating System
Drivers and Utilities
Dell
Drivers and Utilities
and
Operating System
®
media
media
media
media may not ship with your computer.
contains drivers that were installed
Dell
Drivers and Utilities
Dell
Drivers and Utilities
media
to
The reinstallation process can take 1 to 2 hours to complete. After you
reinstall the operating system, you must also reinstall the device drivers, virus
protection program, and other software.
Reinstalling Your Operating System 47
Page 48
1
Save and close any open files and exit any open programs.
2
Insert the
3
Click
4
Restart the computer.
Operating System
Exit
if the
Install Windows
media.
message appears.
When the DELL logo appears, press <F12> immediately.
NOTE: If you wait too long and the operating system logo appears, continue
to wait until you see the Microsoft
computer and try again.
NOTE: The next steps change the boot sequence for one time only. On the
next start-up, the computer boots according to the devices specified in the
system setup program.
5
When the boot device list appears, highlight
®
Windows® desktop; then, shut down your
CD/DVD/CD-RW Drive
and press <Enter>.
6
Press any key to
7
Follow the instructions on the screen to complete the installation.
Boot from CD-ROM
.
48 Reinstalling Your Operating System
Page 49
Finding Information
NOTE: Some features or media may be optional and may not ship with your
computer. Some features or media may not be available in certain countries.
NOTE: Additional information may ship with your computer.
Document/Media/Label Contents
Service Tag/Express Service Code
The Service Tag/Express Service Code is
located on your computer.
Drivers and Utilities Media
The Drivers and Utilities media is a CD or
DVD that may have shipped with your
computer.
• Use the Service Tag to identify your
computer when you use
support.dell.com or contact support.
• Enter the Express Service Code to direct
your call when contacting support.
NOTE: Your Service Tag/Express Service
Code is located on your computer.
• A diagnostic program for your computer.
• Drivers for your computer.
NOTE: Drivers and documentation updates
can be found at support.dell.com.
• Desktop System Software (DSS).
• Readme files.
NOTE: Readme files may be included on
your media to provide last-minute updates
about technical changes to your computer
or advanced technical-reference material
for technicians or experienced users.
Operating System Media
The Operating System media is a CD or
DVD that may have shipped with your
computer.
Service Manual
The Service Manual for your computer
can be found at support.dell.com.
Reinstall your operating system
• How to remove and replace parts
• How to configure system settings
• How to troubleshoot and solve problems
Finding Information 49
Page 50
Document/Media/Label Contents
Dell Technology Guide
The Dell Technology Guide is a available at
support.dell.com.
Microsoft® Windows® License Label
Your Microsoft Windows License is
located on your computer.
Product safety and warranty information
is available as a hardcopy with your
computer.
• About your operating system.
• Using and maintaining peripherals.
• Understanding technologies such as
®
RAID, Internet, Bluetooth
, E-mail,
networking, and more.
• Provides your operating system product
key.
• Warranty information
• Terms and Conditions (U.S. only)
• Safety instructions
• Regulatory information
• Ergonomics information
• End User License Agreement
50 Finding Information
Page 51
Getting Help
Obtaining Assistance
CAUTION: If you need to remove the computer cover, first disconnect the
computer power and modem cables from all electrical outlets.
If you experience a problem with your computer, you can complete the
following steps to diagnose and troubleshoot the problem:
1
See "Solving Problems" on page 35 for information and procedures that
pertain to the problem your computer is experiencing.
2
See "Dell Diagnostics" on page 31 for procedures on how to run Dell
Diagnostics.
3
Fill out the "Diagnostics Checklist" on page 56.
4
Use Dell's extensive suite of online services available at Dell Support
(
support.dell.com
procedures. See "Online Services" on page 52 for a more extensive list of
Dell Support online.
) for help with installation and troubleshooting
5
If the preceding steps have not resolved the problem, see "Contacting
Dell" on page 57.
NOTE: Call Dell Support from a telephone near or at the computer so that the
support staff can assist you with any necessary procedures.
NOTE: Dell's Express Service Code system may not be available in all countries.
When prompted by Dell's automated telephone system, enter your Express
Service Code to route the call directly to the proper support personnel. If you
do not have an Express Service Code, open the Dell Accessories folder,
double-click the Express Service Code icon, and follow the directions.
Getting Help 51
Page 52

For instructions on using the Dell Support, see "Technical Support and
Customer Service" on page 52.
NOTE: Some of the following services are not always available in all locations
outside the continental U.S. Call your local Dell representative for information on
availability.
Technical Support and Customer Service
Dell's support service is available to answer your questions about Dell™
hardware. Our support staff uses computer-based diagnostics to provide fast,
accurate answers.
To contact Dell's support service, see "Before You Call" on page 55, and then
see the contact information for your region or go to support.dell.com.
DellConnect™
DellConnect is a simple online access tool that allows a Dell service and
support associate to access your computer through a broadband connection,
diagnose your problem and repair it all under your supervision. For more
information, go to support.dell.com and click DellConnect.
Online Services
You can learn about Dell products and services on the following websites:
www.dell.com
www.dell.com/ap
www.dell.com/jp
www.euro.dell.com
www.dell.com/la
www.dell.ca
You can access Dell Support through the following websites and e-mail addresses:
• Dell Support websites
support.dell.com
support.jp.dell.com
support.euro.dell.com
(Asian/Pacific countries only)
(Japan only)
(Europe only)
(Latin American and Caribbean countries)
(Canada only)
(Japan only)
(Europe only)
52 Getting Help
Page 53

• Dell Support e-mail addresses
[email protected] (Latin America and Caribbean countries only)
• Dell Marketing and Sales e-mail addresses
[email protected] (Canada only)
• Anonymous file transfer protocol (FTP)
ftp.dell.com
(Asian/Pacific countries only)
(Asian/Pacific countries only)
Log in as user:
anonymous
, and use your e-mail address as your password.
AutoTech Service
Dell's automated support service—AutoTech—provides recorded answers to
the questions most frequently asked by Dell customers about their portable
and desktop computers.
When you call AutoTech, use your touch-tone telephone to select the
subjects that correspond to your questions. For the telephone number to call
for your region, see "Contacting Dell" on page 57.
Automated Order-Status Service
To check on the status of any Dell products that you have ordered, you can go
to support.dell.com, or you can call the automated order-status service. A
recording prompts you for the information needed to locate and report on
your order. For the telephone number to call for your region, see "Contacting
Dell" on page 57.
Problems With Your Order
If you have a problem with your order, such as missing parts, wrong parts, or
incorrect billing, contact Dell for customer assistance. Have your invoice or
packing slip handy when you call. For the telephone number to call for your
region, see "Contacting Dell" on page 57.
Getting Help 53
Page 54

Product Information
If you need information about additional products available from Dell, or if
you would like to place an order, visit the Dell website at www.dell.com. For
the telephone number to call for your region or to speak to a sales specialist,
see "Contacting Dell" on page 57.
Returning Items for Warranty Repair or Credit
Prepare all items being returned, whether for repair or credit, as follows:
1
Call Dell to obtain a Return Material Authorization Number, and write it
clearly and prominently on the outside of the box.
For the telephone number to call for your region, see "Contacting Dell" on
page 57. Include a copy of the invoice and a letter describing the reason for
the return.
2
Include a copy of the Diagnostics Checklist (see "Diagnostics Checklist"
on page 56), indicating the tests that you have run and any error messages
reported by the Dell Diagnostics (see "Contacting Dell" on page 57).
3
Include any accessories that belong with the item(s) being returned
(power cables, software floppy disks, guides, and so on) if the return is for
credit.
4
Pack the equipment to be returned in the original (or equivalent) packing
materials.
You are responsible for paying shipping expenses. You are also responsible for
insuring any product returned, and you assume the risk of loss during
shipment to Dell. Collect On Delivery (C.O.D.) packages are not accepted.
Returns that are missing any of the preceding requirements will be refused at
Dell’s receiving dock and returned to you.
54 Getting Help
Page 55
Before You Call
NOTE: Have your Express Service Code ready when you call. The code helps Dell’s
automated-support telephone system direct your call more efficiently. You may also
be asked for your Service Tag (located on the back or bottom of your computer).
Remember to fill out the Diagnostics Checklist (see "Diagnostics Checklist"
on page 56). If possible, turn on your computer before you call Dell for
assistance and call from a telephone at or near the computer. You may be
asked to type some commands at the keyboard, relay detailed information
during operations, or try other troubleshooting steps possible only at the
computer itself. Ensure that the computer documentation is available.
CAUTION: Before working inside your computer, follow the safety instructions
that shipped with your computer.
Getting Help 55
Page 56

Diagnostics Checklist
Name:
Date:
Address:
Phone number:
Service Tag:
Express Service Code:
Return Material Authorization Number (if provided by Dell support technician):
Operating system and version:
Devices:
Expansion cards:
Are you connected to a network? Yes No
Network, version, and network adapter:
Programs and versions:
See your operating system documentation to determine the contents of the
system’s start-up files. If the computer is connected to a printer, print each file.
Otherwise, record the contents of each file before calling Dell.
Error message, beep code, or diagnostic code:
Description of problem and troubleshooting procedures you performed:
56 Getting Help
Page 57

Contacting Dell
For customers in the United States, call 800-WWW-DELL (800-999-3355).
NOTE: If you do not have an active Internet connection, you can find contact
information on your purchase invoice, packing slip, bill, or Dell product catalog.
Dell provides several online and telephone-based support and service options.
Availability varies by country and product, and some services may not be
available in your area. To contact Dell for sales, technical support, or
customer service issues:
1
Visit
support.dell.com
2
Verify your country or region in the
menu at the bottom of the page.
3
Click
4
Select the appropriate service or support link based on your need.
5
Choose the method of contacting Dell that is convenient for you.
Contact Us
.
Choose A Country/Region
on the left side of the page.
drop-down
Getting Help 57
Page 58

58 Getting Help
Page 59

Appendix
FCC Notice (U.S. Only)
FCC Class B
This equipment generates, uses, and can radiate radio frequency energy and,
if not installed and used in accordance with the manufacturer’s instruction
manual, may cause interference with radio and television reception. This
equipment has been tested and found to comply with the limits for a Class B
digital device pursuant to Part 15 of the FCC Rules.
This device complies with Part 15 of the FCC Rules. Operation is subject to
the following two conditions:
1
This device may not cause harmful interference.
2
This device must accept any interference received, including interference
that may cause undesired operation.
NOTICE: The FCC regulations provide that changes or modifications not expressly
approved by Dell Inc. could void your authority to operate this equipment.
These limits are designed to provide reasonable protection against harmful
interference in a residential installation. However, there is no guarantee that
interference will not occur in a particular installation. If this equipment does
cause harmful interference with radio or television reception, which can be
determined by turning the equipment off and on, you are encouraged to try
to correct the interference by one or more of the following measures:
• Reorient the receiving antenna.
• Relocate the system with respect to the receiver.
• Move the system away from the receiver.
• Plug the system into a different outlet so that the system and the receiver
are on different branch circuits.
If necessary, consult a representative of Dell Inc. or an experienced
radio/television technician for additional suggestions.
Appendix 59
Page 60
The following information is provided on the device or devices covered in this
document in compliance with the FCC regulations:
• Product name: Dell™ Inspiron 518/Dell Inspiron 519
• Model number: DCMF
• Company name:
Dell Inc.
Worldwide Regulatory Compliance & Environmental Affairs
One Dell Way
Round Rock, TX 78682 USA
512-338-4400
NOTE: For further regulatory information, see the regulatory information that
shipped with your computer.
Macrovision Product Notice
This product incorporates copyright protection technology that is protected
by method claims of certain U.S. patents and other intellectual property
rights owned by Macrovision Corporation and other rights owners. Use of this
copyright protection technology must be authorized by Macrovision
Corporation, and is intended for home and other limited viewing uses only
unless otherwise authorized by Macrovision Corporation. Reverse engineering
or disassembly is prohibited.
60 Appendix
Page 61

Index
B
beep codes, 27
C
CDs
operating system, 49
computer
beep codes, 27
crashes, 37-38
restore to previous state, 44
specifications, 17
stops responding, 37
conflicts
software and hardware
incompatibilities, 31
documentation
Dell Technology Guide, 50
End User License Agreement, 50
ergonomics, 50
Product Information Guide, 50
regulatory, 50
safety, 50
Service Manual, 49
warranty, 50
drivers, 41
about, 41
identifying, 42
reinstalling, 42
Drivers and Utilities media
Dell Diagnostics, 31
contacting Dell, 57
D
Dell
contacting, 57
Dell Diagnostics, 31
Dell Technology Guide, 50
DellConnect, 52
diagnostics
beep codes, 27
Dell, 31
E
End User License Agreement, 50
ergonomics information, 50
error messages
beep codes, 27
F
Factory Image Restore, 46
Files and Settings Transfer
Wizard, 15
Index 61
Page 62

H
conditions, 35
hardware
beep codes, 27
conflicts, 31
Dell Diagnostics, 31
I
Internet connection
about, 13
options, 13
setting up, 13
IRQ conflicts, 31
M
memory
problems, 36
printer
connecting, 13
setting up, 13
problems
beep codes, 27
blue screen, 38
computer crashes, 37-38
computer stops responding, 37
conflicts, 31
Dell Diagnostics, 31
general, 37
memory, 36
power, 35
power light conditions, 35
program crashes, 38
program stops responding, 38
programs and Windows
compatibility, 38
restore to previous state, 44-45
O
operating system
media, 47
reinstalling, 49
Operating System CD, 49
P
phone numbers, 57
power
problems, 35
power light
62 Index
software, 38-39
Program Compatibility
Wizard, 38
R
regulatory information, 50
Page 63

S
S.M.A.R.T, 30
safety instructions, 50
Service Manual, 49
software
conflicts, 31
problems, 38-39
specifications, 17
Starting the Dell Diagnostics
From the Drivers and
Utilities CD, 32
Starting the Dell Diagnostics
From Your Hard Drive, 32
Windows Vista
Factory Image Restore, 46
Hardware Troubleshooter, 31
Program Compatibility
Wizard, 3 8
System Restore, 45
Windows XP
Device Driver Rollback, 42
Files and Settings Transfer
Wizard, 1 5
reinstalling, 49
System Restore, 44-45
wizards
Files and Settings Transfer
Wizard, 1 5
support
contacting Dell, 57
System Restore, 44-45
T
telephone numbers, 57
transferring information to a new
computer, 15
troubleshooting
conflicts, 31
Dell Diagnostics, 31
Hardware Troubleshooter, 31
restore to previous state, 44-45
Program Compatibility
Wizard, 3 8
W
warranty information, 50
Index 63
Page 64

64 Index
 Loading...