


Me and My Dell
© 2013 Dell Inc.

NOTE: A NOTE indicates important information that helps you make
better use of your computer.
CAUTION: A CAUTION indicates potential damage to hardware or
loss of data if instructions are not followed.
WARNING: A WARNING indicates a potential for property damage,
personal injury, or death.
© 2013 Dell Inc. All rights reserved.
Information in this document is subject to change without notice.
Reproduction of these materials in any manner whatsoever without the
written permission of Dell Inc. is strictly forbidden.
Trademarks used in this text: Dell™, the DELL logo, and Inspiron™ are
trademarks of Dell Inc.; Intel®, Centrino®, Core™, and Atom™ are either
trademarks or registered trademarks of Intel Corporation in the U.S. and
other countries; Microsoft®, Windows®, and Windows start button logo
are either trademarks or registered trademarks of Microsoft Corporation
in the United States and/or other countries; Bluetooth® is a registered
trademark owned by Bluetooth SIG, Inc. and is used by Dell under license;
Blu-ray Disc™ is a trademark owned by the Blu-ray Disc Association(BDA)
and licensed for use on discs and players; Other trademarks and trade
names may be used in this document to refer to either the entities
claiming the marks and names or their products. Dell Inc. disclaims any
proprietary interest in trademarks and trade names other than its own.
2013 – 01 Rev. A00

Contents
Charms Sidebar ...................................... 15
Signing in to Windows 8 .............................. 16
Closing a Windows 8 app...............................17
Turning off your computer – Windows 8 ................17
Power Adapter ....................................... 21
Battery .............................................. 22
Laptop Battery . . . . . . . . . . . . . . . . . . . . . . . . . . . . . . . . 22
Conserving the Battery Power . . . . . . . . . . . . . . . . . . . . . . . 22
Coin-Cell Battery . . . . . . . . . . . . . . . . . . . . . . . . . . . . . . . 23
Improving the Battery Performance . . . . . . . . . . . . . . . . . . . 23
Touchpad............................................ 24
About Touchpad . . . . . . . . . . . . . . . . . . . . . . . . . . . . . . . 24
Touchpad Gestures. . . . . . . . . . . . . . . . . . . . . . . . . . . . . . 24
Scroll. . . . . . . . . . . . . . . . . . . . . . . . . . . . . . . . . . . . . 24
Zoom. . . . . . . . . . . . . . . . . . . . . . . . . . . . . . . . . . . . . 26
Rotate . . . . . . . . . . . . . . . . . . . . . . . . . . . . . . . . . . . . 27
Flick . . . . . . . . . . . . . . . . . . . . . . . . . . . . . . . . . . . . . 28
My Favorites . . . . . . . . . . . . . . . . . . . . . . . . . . . . . . . . 28
Desktop . . . . . . . . . . . . . . . . . . . . . . . . . . . . . . . . . . . 28
Display .............................................. 29
3D Display . . . . . . . . . . . . . . . . . . . . . . . . . . . . . . . . . . . 29
Wireless Display. . . . . . . . . . . . . . . . . . . . . . . . . . . . . . . . 29
Touchscreen Display . . . . . . . . . . . . . . . . . . . . . . . . . . . . . 30
Contents 3

Touchscreen Gestures . . . . . . . . . . . . . . . . . . . . . . . . . . . . 30
Zoom. . . . . . . . . . . . . . . . . . . . . . . . . . . . . . . . . . . . . 30
Dwell. . . . . . . . . . . . . . . . . . . . . . . . . . . . . . . . . . . . . 31
Flick . . . . . . . . . . . . . . . . . . . . . . . . . . . . . . . . . . . . . 31
Scroll. . . . . . . . . . . . . . . . . . . . . . . . . . . . . . . . . . . . . 31
Rotate . . . . . . . . . . . . . . . . . . . . . . . . . . . . . . . . . . . . 32
Keyboard ............................................ 33
Backlit Keyboard . . . . . . . . . . . . . . . . . . . . . . . . . . . . . . . 34
Keyboard Connection Types . . . . . . . . . . . . . . . . . . . . . . . . 35
Locating the Service Tag and Express—Service Code..... 36
Locating the Label on Your Computer . . . . . . . . . . . . . . . . . . 36
Using Dell’s Online System Profiler . . . . . . . . . . . . . . . . . . . . 36
Storage .............................................. 36
About Storage Devices. . . . . . . . . . . . . . . . . . . . . . . . . . . . 36
Internal Storage Devices . . . . . . . . . . . . . . . . . . . . . . . . . . 37
Hard Drives . . . . . . . . . . . . . . . . . . . . . . . . . . . . . . . . . 37
Solid-State Drives . . . . . . . . . . . . . . . . . . . . . . . . . . . . . 37
Removable Storage Devices . . . . . . . . . . . . . . . . . . . . . . . . 37
Optical Discs . . . . . . . . . . . . . . . . . . . . . . . . . . . . . . . . 38
Memory Cards . . . . . . . . . . . . . . . . . . . . . . . . . . . . . . . 38
Memory Module...................................... 39
System Board ........................................40
Processor ............................................ 42
Computer Fan........................................ 43
Heat Sink ............................................43
Thermal Grease ......................................44
4 Contents

Video Cards ..........................................44
TV Tuners............................................ 45
Speakers............................................. 46
Webcam .............................................46
Enabling a Webcam . . . . . . . . . . . . . . . . . . . . . . . . . . . . . 47
Dell Webcam Manager. . . . . . . . . . . . . . . . . . . . . . . . . . . . 47
ExpressCards.........................................48
Communication Devices ..............................49
Setting Up Your Laptop ............................... 55
Setting Up Your Desktop .............................. 57
Internet.............................................. 59
Setting Up a Wired Internet Connection . . . . . . . . . . . . . . . . 59
Setting Up a Wireless Internet Connection . . . . . . . . . . . . . . . 60
Display .............................................. 61
Setting Up Your Display . . . . . . . . . . . . . . . . . . . . . . . . . . . 61
Setting Up 3D Display . . . . . . . . . . . . . . . . . . . . . . . . . . . . 62
Setting Up Wireless Display. . . . . . . . . . . . . . . . . . . . . . . . . 64
Digital Visual Interface Connector Cables . . . . . . . . . . . . . . . . 65
Audio................................................ 66
Setting Up 5.1 Audio . . . . . . . . . . . . . . . . . . . . . . . . . . . . . 66
Setting Up 7.1 Audio . . . . . . . . . . . . . . . . . . . . . . . . . . . . . 68
Setting Up Your Printer................................ 70
Setting Up Your Webcam...............................71
Installing Your USB Wireless Adapter ....................71
Contents 5

Battery .............................................. 75
Charging Laptop Battery . . . . . . . . . . . . . . . . . . . . . . . . . . 75
Improving the Battery Performance . . . . . . . . . . . . . . . . . . . 75
Dell Desktop Mode . . . . . . . . . . . . . . . . . . . . . . . . . . . . . . 76
Dell Desktop Mode . . . . . . . . . . . . . . . . . . . . . . . . . . . . . . 76
Keyboard ............................................ 77
General Keyboard Shortcuts . . . . . . . . . . . . . . . . . . . . . . . . 77
Changing Keyboard Input Language . . . . . . . . . . . . . . . . . . . 79
Using Numeric Keypad on a Laptop Computer . . . . . . . . . . . . . 80
Touchpad............................................ 81
Using Your Touchpad . . . . . . . . . . . . . . . . . . . . . . . . . . . . 81
Touchpad Gestures. . . . . . . . . . . . . . . . . . . . . . . . . . . . . . 81
Scroll. . . . . . . . . . . . . . . . . . . . . . . . . . . . . . . . . . . . . 81
Zoom. . . . . . . . . . . . . . . . . . . . . . . . . . . . . . . . . . . . . 83
Rotate . . . . . . . . . . . . . . . . . . . . . . . . . . . . . . . . . . . . 84
Flick . . . . . . . . . . . . . . . . . . . . . . . . . . . . . . . . . . . . . 84
My Favorites . . . . . . . . . . . . . . . . . . . . . . . . . . . . . . . . 84
Desktop . . . . . . . . . . . . . . . . . . . . . . . . . . . . . . . . . . . 84
Touchscreen ......................................... 85
Using a Touchscreen Display . . . . . . . . . . . . . . . . . . . . . . . . 85
Using a Touchscreen Display . . . . . . . . . . . . . . . . . . . . . . . . 85
Audio Connectors ....................................89
Types of audio connectors . . . . . . . . . . . . . . . . . . . . . . . . . 89
5.1 Audio . . . . . . . . . . . . . . . . . . . . . . . . . . . . . . . . . . . . 90
7.1 Audio . . . . . . . . . . . . . . . . . . . . . . . . . . . . . . . . . . . . 90
6 Contents

USB .................................................90
USB Connectors . . . . . . . . . . . . . . . . . . . . . . . . . . . . . . . 90
USB Standards. . . . . . . . . . . . . . . . . . . . . . . . . . . . . . . . . 91
Digital Visual Interface (DVI) ........................... 92
DisplayPort/Mini–DisplayPort .........................92
Advantages of DisplayPort . . . . . . . . . . . . . . . . . . . . . . . . . 93
HDMI................................................ 93
Advantages of HDMI . . . . . . . . . . . . . . . . . . . . . . . . . . . . . 93
eSATA Connector.....................................94
S/PDIF ...............................................94
IEEE 1394 ............................................94
Key Features . . . . . . . . . . . . . . . . . . . . . . . . . . . . . . . . . . 94
Types of IEEE 1394 Cables . . . . . . . . . . . . . . . . . . . . . . . . . 95
Comparing USB and IEEE 1394. . . . . . . . . . . . . . . . . . . . . . . 96
Network .............................................99
Local Area Network (LAN). . . . . . . . . . . . . . . . . . . . . . . . . . 99
Wireless Local Area Network (WLAN) . . . . . . . . . . . . . . . . . . 100
Wireless Wide Area Network (WWAN) . . . . . . . . . . . . . . . . . 100
Wireless Personal Area Network (WPAN). . . . . . . . . . . . . . . . 100
Worldwide Interoperability for Microwave Access (WiMAX) . . . . .101
Setting Up Your Network ............................. 101
Setting Up a Wired Network . . . . . . . . . . . . . . . . . . . . . . . .101
Setting Up Wireless Network . . . . . . . . . . . . . . . . . . . . . . . 102
Setting Up Your Internet Connection. . . . . . . . . . . . . . . . . . 102
Contents 7

Setting Up a Local Area Network ......................103
Setting Up a Wired Internet Connection . . . . . . . . . . . . . . . . 103
To set up WLAN: . . . . . . . . . . . . . . . . . . . . . . . . . . . . . 103
Setting Up a Wireless Local Area Network . . . . . . . . . . . . . . . 104
To set up WLAN: . . . . . . . . . . . . . . . . . . . . . . . . . . . . . 104
Checking Your Wireless Network Card. . . . . . . . . . . . . . . . . 105
Setting Up a Wired Internet Connection . . . . . . . . . . . . . . . 105
Setting Up a Wireless Internet Connection . . . . . . . . . . . . . . .107
Computrace .........................................111
About Computrace . . . . . . . . . . . . . . . . . . . . . . . . . . . . . .111
Enabling Computrace . . . . . . . . . . . . . . . . . . . . . . . . . . . .112
Getting Help on Computrace . . . . . . . . . . . . . . . . . . . . . . .112
My Dell Downloads .................................. 113
My Dell Support Center .............................. 113
Downloading or Upgrading Dell Support Center . . . . . . . . . .113
PC Checkup Utilities . . . . . . . . . . . . . . . . . . . . . . . . . . .114
Solution Station ..................................... 114
Solution Station Offerings . . . . . . . . . . . . . . . . . . . . . . . . 115
Dell QuickSet ....................................... 116
Installation . . . . . . . . . . . . . . . . . . . . . . . . . . . . . . . . . . .116
NVIDIA 3DTV Play . . . . . . . . . . . . . . . . . . . . . . . . . . . . . .116
3D Games . . . . . . . . . . . . . . . . . . . . . . . . . . . . . . . . . . .116
Playing Games in 3D . . . . . . . . . . . . . . . . . . . . . . . . . . .116
Keyboard Shortcuts . . . . . . . . . . . . . . . . . . . . . . . . . . . .117
Customizing Keyboard Shortcuts . . . . . . . . . . . . . . . . . . .118
3D Photos . . . . . . . . . . . . . . . . . . . . . . . . . . . . . . . . . . .118
8 Contents

DellConnect ........................................ 118
DellConnect . . . . . . . . . . . . . . . . . . . . . . . . . . . . . . . . . .118
Using DellConnect . . . . . . . . . . . . . . . . . . . . . . . . . . . . . .118
About Restoring Your Operating
System – Windows 8 ................................ 123
Dell Backup and Recovery............................ 123
Dell Backup and Recovery - Windows 8 . . . . . . . . . . . . . . . . .123
Dell Backup and Recovery Basic – Windows 8 . . . . . . . . . . . . 124
Dell Backup and Recovery Professional – Windows 8. . . . . . . . .125
System Recovery Media ..............................126
System Recovery Media – Windows 8 . . . . . . . . . . . . . . . . . 126
Restoring Your Computer Using System
Recovery Media – Windows 8 . . . . . . . . . . . . . . . . . . . . . . 126
Restoring Your Operating System .................... 127
System Restore...................................... 127
About System Restore . . . . . . . . . . . . . . . . . . . . . . . . . . . .127
Starting System Restore . . . . . . . . . . . . . . . . . . . . . . . . . . 128
Undoing the Last System Restore . . . . . . . . . . . . . . . . . . . . 128
Dell DataSafe Local Backup........................... 129
About Dell DataSafe Local Backup . . . . . . . . . . . . . . . . . . . 129
Dell DataSafe Local Backup. . . . . . . . . . . . . . . . . . . . . . . . 129
Dell DataSafe Local Backup Basic . . . . . . . . . . . . . . . . . . . . 130
Dell DataSafe Local Backup Professional. . . . . . . . . . . . . . . . 130
System Recovery Media .............................. 131
About System Recovery Media . . . . . . . . . . . . . . . . . . . . . . .131
Restoring Your Computer Using System Recovery Media . . . . . .131
Contents 9

Dell Factory Image Restore ........................... 132
About Dell Factory Image Restore . . . . . . . . . . . . . . . . . . . .132
Starting Dell Factory Image Restore . . . . . . . . . . . . . . . . . . .132
Operating System Disc ............................... 133
About Operating System Disc . . . . . . . . . . . . . . . . . . . . . . .133
Reinstalling the Operating System Using the
Operating System Disc . . . . . . . . . . . . . . . . . . . . . . . . . . .133
Diagnostics ......................................... 137
Pre-Boot System Assessment . . . . . . . . . . . . . . . . . . . . . . .137
Invoking PSA. . . . . . . . . . . . . . . . . . . . . . . . . . . . . . . . . .137
Enhanced PSA . . . . . . . . . . . . . . . . . . . . . . . . . . . . . . . . 138
Invoking ePSA . . . . . . . . . . . . . . . . . . . . . . . . . . . . . . . . 138
Beep Codes . . . . . . . . . . . . . . . . . . . . . . . . . . . . . . . . . 139
Troubleshooting.....................................140
Display Screen is Difficult to Read. . . . . . . . . . . . . . . . . . . . 140
Desktop. . . . . . . . . . . . . . . . . . . . . . . . . . . . . . . . . . . . 140
Laptop . . . . . . . . . . . . . . . . . . . . . . . . . . . . . . . . . . . . .141
No Display on the Screen or Screen is Blank . . . . . . . . . . . . . 142
Desktop. . . . . . . . . . . . . . . . . . . . . . . . . . . . . . . . . . . . 142
Laptop . . . . . . . . . . . . . . . . . . . . . . . . . . . . . . . . . . . . 143
Keyboard Not Working, Not Detected, or Working
Intermittently . . . . . . . . . . . . . . . . . . . . . . . . . . . . . . . . 143
External Keyboard . . . . . . . . . . . . . . . . . . . . . . . . . . . . . 143
Laptop Keyboard . . . . . . . . . . . . . . . . . . . . . . . . . . . . . . 144
System Setup (BIOS) ................................. 147
Entering System Setup (BIOS)......................... 147
System Setup Screens................................148
Changing the Boot Sequence for the Current Boot .....149
10 Contents

Changing the Default Boot Sequence .................150
Flashing the BIOS . . . . . . . . . . . . . . . . . . . . . . . . . . . . . . 150
Getting Help and Contacting Dell ..................... 155
Self-Help Options . . . . . . . . . . . . . . . . . . . . . . . . . . . . . .155
Accessing Windows Help and Support: . . . . . . . . . . . . . . . .155
Contacting Dell . . . . . . . . . . . . . . . . . . . . . . . . . . . . . . . .156
Before Calling Dell................................... 159
Computer Maintenance .............................160
Ergonomic Instructions for Desktops..................160
Ergonomic Instructions for Laptops ................... 162
Dell and the Environment ............................164
Regulatory Compliance Policy ....................... 165
Contact Details for Regulatory Compliance Web site . . . . . . . . .165
Additional Compliance Information . . . . . . . . . . . . . . . . . . .165
Migration Tips.......................................166
Migrating to Windows 7 From an Earlier Windows
OperatingSystem. . . . . . . . . . . . . . . . . . . . . . . . . . . . . . 166
Transfer Methods . . . . . . . . . . . . . . . . . . . . . . . . . . . . . . .167
Power Management ................................. 167
Configuring the Power Settings . . . . . . . . . . . . . . . . . . . . . 168
Contents 11

12 Contents

New Features in Windows 8

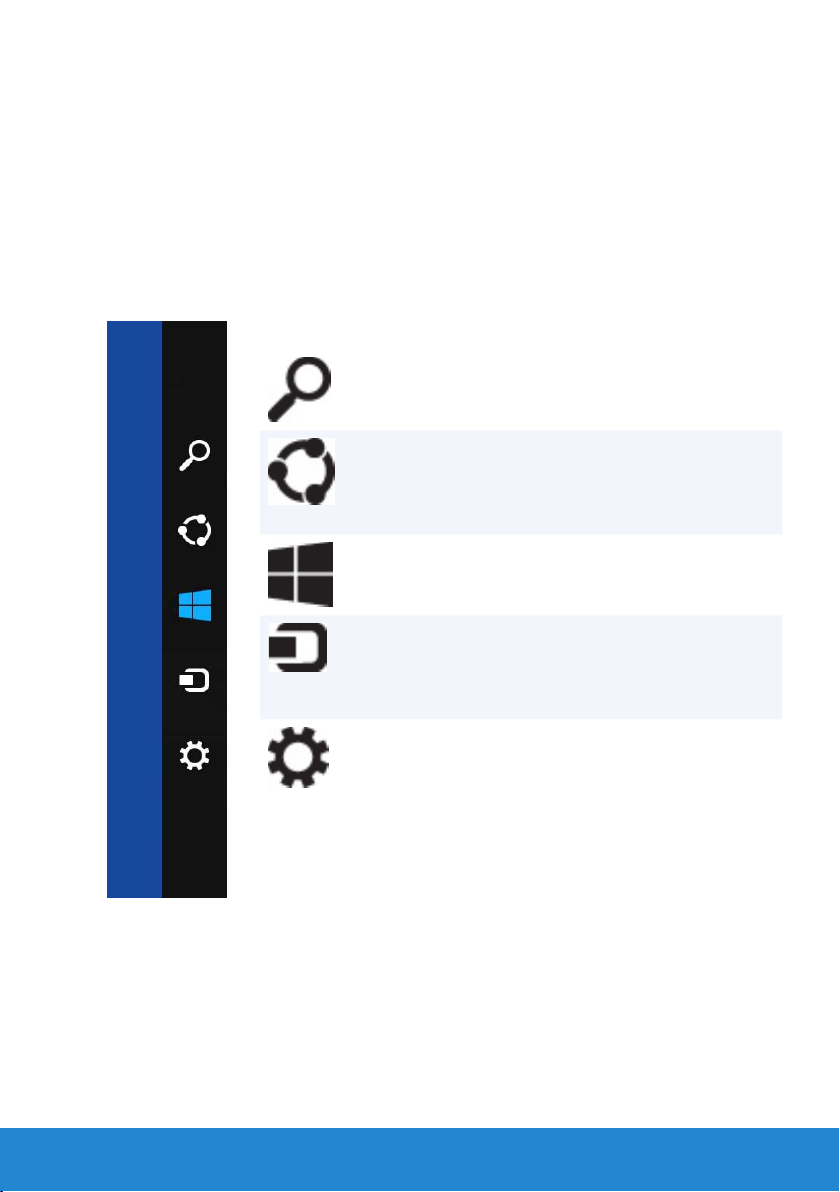
Charms Sidebar
Charms are a set of features which are located within the Start screen.
To open the Charms menu, you can swipe in from the right edge of the
screen. If you are using a mouse, point to the upper-right corner of the
screen, move the mouse pointer down. If you are using a multi-touch
touchpad, place your finger to the right of your touchpad and swipe
left onto the touchpad. Charms include Search, Share, Start, Devices,
andSettings.
Search charm Allows you to search the
web, files, and apps.
Share charm Allows you to share
photos, links, and so on
with your friends and
social networks.
Start charm Takes you to the Start
screen.
Devices charm Allows you to send files
and stream movies to
TVs, printers, and other
devices.
Settings charm Provides access to
notifications, volume
controls, brightness
controls, and other
computer setting
options.
Charms Sidebar 15

Signing in to Windows 8
The following options are available when you log on to your computer for
the first time.
1. Using a Microsoft account: If you already have a Microsoft account,
you can use the Microsoft account e-mail ID in the Email address
field to log on to your computer. This feature will synchronize your
computer with your Microsoft accounts.
2. Creating a Microsoft account: You can create a Microsoft account,
ifyou do not have it already, to log on to your computer. Tap or click
Sign up for a new email address to create a new Microsoft account.
This feature will provide you access to most of the Microsoft services
(such as Outlook, SkyDrive, and so on).
3. Logging on without a Microsoft account: You can log on to your
computer with out using a Microsoft account. Tap or click Sign in
without a Microsoft account and follow the instructions on the
screen.
To lock your computer:
1. Open Start by swiping in from the right edge of the screen (or if you
are using a mouse, pointing to the upper-right corner of the screen),
and then tapping or clicking Start.
2. Tap or click your account picture in the upper-right corner, and then
choose Lock.
To dismiss the lock screen:
1. Swipe up from the bottom edge of the screen (or press any key if you
are using a keyboard) to dismiss the lock screen.
2. In the sign-in screen, sign in to your computer using the method of
your choice.
NOTE: To use a different sign-in method, tap or click Sign-in options
to see the available options.
16 Signing in to Windows 8

Closing a Windows 8 app
To close an app:
• If you are using a mouse, click and drag the app from the top of the
screen to the bottom of the screen and release the app.
• If you are using touchscreen, drag the app to the bottom of the screen
and release the app.
Turning off your computer – Windows 8
To turn off your computer:
1. Swipe from the right edge of the screen (or if you are using a mouse,
point to the upper-right corner of the screen), and then click Settings.
2. Tap or click Power and then choose Shut down.
NOTE: You can also choose to put your computer in sleep or
hibernate state.
Closing a Windows 8 app 17

18 Closing a Windows 8 app

About Your Computer

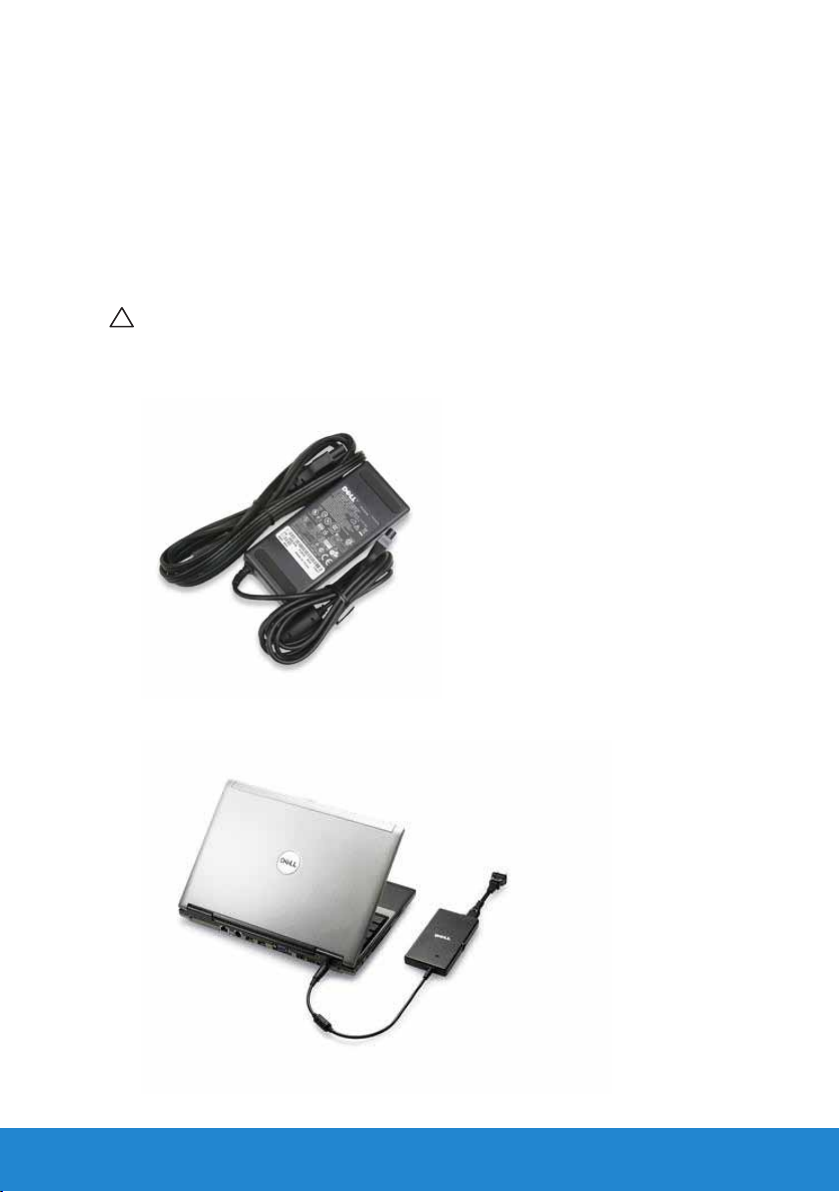
Power Adapter
Power adapters are used to supply power to portable computers and
certain desktop computers. Power adapters convert AC current to
DCcurrent for supplying to computers. The Dell power-adapter kit
consists of the power adapter and the power cable. The power-adapter
power rating (65 W, 90 W, and so on) depends on the computer it is
designed for, and the power cable varies based on the country where the
power adapter is shipped.
CAUTION: It is recommended to use only the power adapter that
shipped with your computer or a Dell-approved replacement power
adapter, to avoid damaging your computer.
Power Adapter 21

Battery
Laptop Battery
The following table compares the most commonly used batteries.
3-cell battery 6-cell battery 9-cell battery
Low cost Moderate cost High cost
Small in size Large in size Large in size
Low capacity Moderate capacity High capacity
Low weight Moderate weight Heavy
NOTE: When used under the same conditions, a low capacity battery
will wear out faster than a moderate or high capacity battery because
it has to be charged more often.
Conserving the Battery Power
To conserve battery power on your laptop, do any of the following:
• Connect the computer to an electrical outlet when possible; battery
life is largely determined by the number of times the battery is used
and recharged.
• Configure the power management settings using Microsoft Windows
Power Options to optimize your computer’s power usage (see Setting
Power Options).
• Use the Sleep power state when you leave the computer unattended
for long periods of time.
22 Battery

Coin-Cell Battery
Coin-cell battery resides on the system board and provides power to
the Complementary Metal Oxide Semiconductor (CMOS) chip while the
computer is turned off. The CMOS chip contains the time, date, and other
configuration settings and the coin-cell battery helps preserve these
settings while the computer is switched off.
The coin-cell battery can last for several years. The factors that affect
coin-cell battery life are type of system board, temperature, the time for
which the computer is powered off, and so on.
Improving the Battery Performance
The operating time of a battery, which is the time the battery can hold a
charge, varies depending on how you use your laptop computer.
The following activities significantly reduce the operating time of your
battery:
• Using optical drives.
• Using wireless communications devices, ExpressCards, media cards, or
USB devices.
• Using high-brightness display settings, 3D screen savers, or other
power-intensive programs like complex 3D graphics applications and
games.
You may improve the battery performance by:
• Using the computer while connected to an electrical outlet when
possible. Battery life reduces with the number of times the battery is
discharged and recharged.
• Configuring the power management settings using Microsoft Windows
Power Options to optimize your computer’s power usage (see Power
Management).
• Using the Sleep power state when you leave the computer unattended
for long periods of time.
The life of the battery decreases over time depending on how often the
battery is used and the conditions under which it is used. You may need
to purchase a new battery during the life of your computer.
Battery 23
Touchpad
About Touchpad
A touchpad provides the functionality of a mouse to move the cursor,
drag or move selected items, and right-click or left-click by tapping the
surface. A touchpad has a touch-sensitive surface that senses the motion
and position of your finger(s) to a relative position on the computer
screen. Touchpads are available on laptop computers and some high-end
keyboards.
Touchpad Gestures
NOTE: Some of the touchpad gestures may not be supported on your
computer.
NOTE: You can change the touchpad gestures settings by double-
clicking the touchpad icon in the notification area of your computer
desktop.
Your computer may support Scroll, Zoom, Rotate, Flick, My Favorites,
and Desktop gestures.
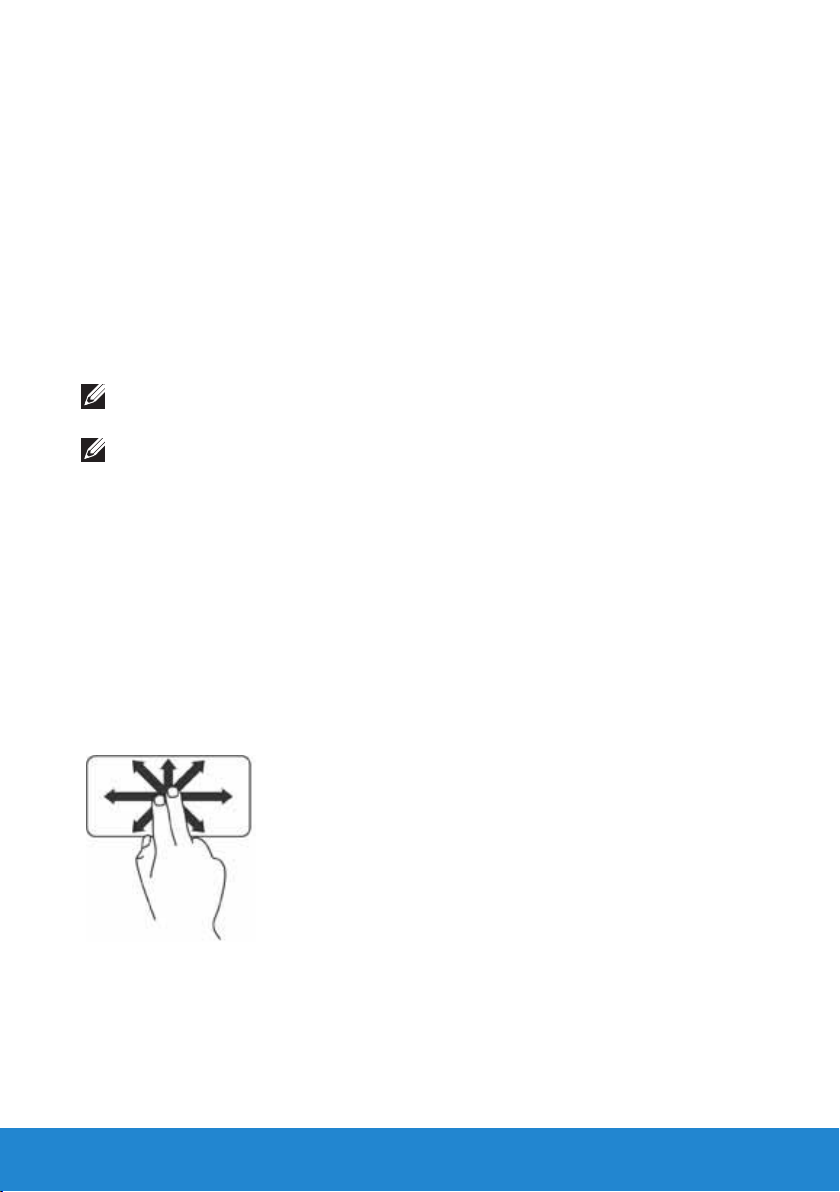
Scroll
Allows you to scroll through content. The scroll feature includes:
Pan – Allows you to move the focus on the selected object when the
entire object is not visible.
Move two fingers in the desired direction to pan scroll the selected
object.
24 Touchpad
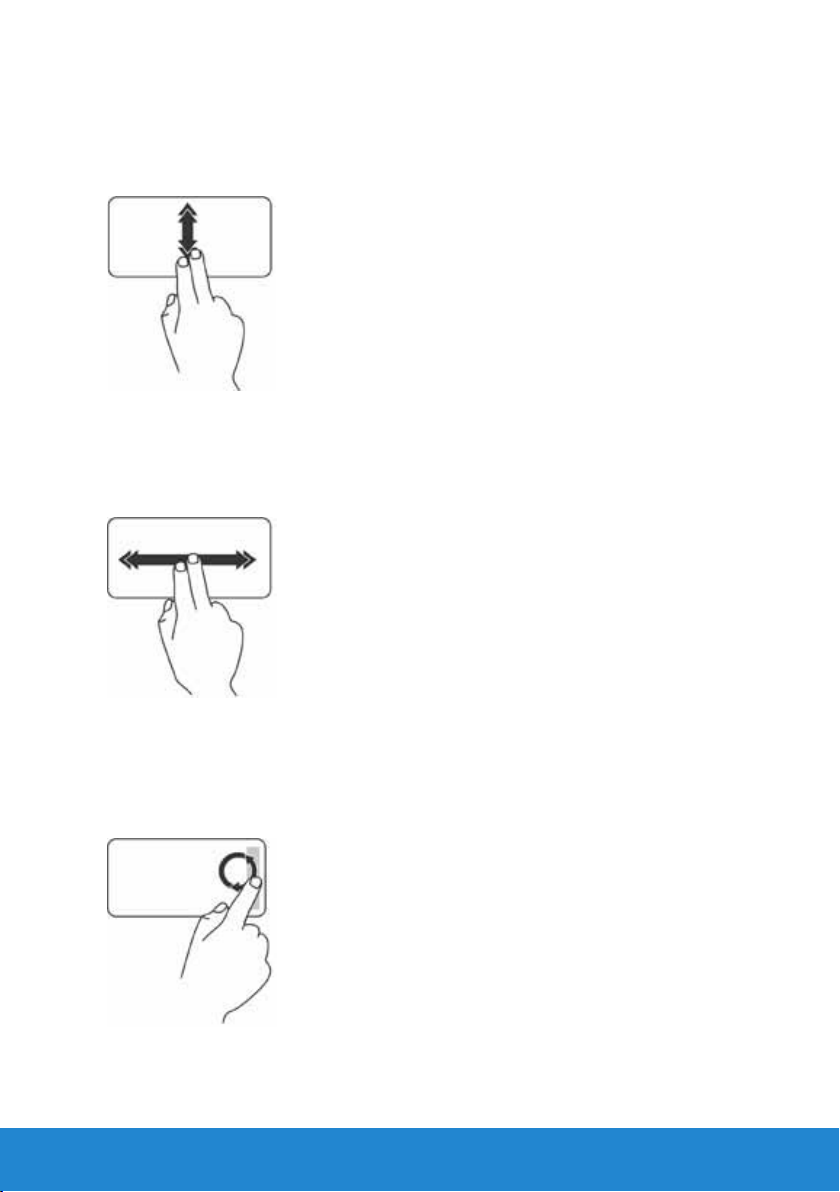
Auto Scroll Vertical – Allows you to scroll up or down on the active
window.
Move two fingers up or down at a fast pace to activate vertical auto
scrolling. Tap on the touchpad to stop auto scrolling.
Auto Scroll Horizontal – Allows you to scroll left or right on the active
window.
Move two fingers to your left or right at a fast pace to activate horizontal
auto scrolling. Tap on the touchpad to stop auto scrolling.
Circular Scroll – Allows you to scroll up or down, and right or left.
To scroll up or down: Move a finger in the vertical scroll zone (extreme
right of the touchpad), in a clockwise circular motion to scroll up or
counterclockwise circular motion to scroll down.
Touchpad 25

To scroll right or left: Move a finger in the horizontal scroll zone (extreme
bottom of the touchpad), in a clockwise circular motion to scroll right or
counterclockwise circular motion to scroll left.
Zoom
Allows you to increase or decrease the magnification of the screen
content.
The zoom feature includes:
One finger zoom – Allows you to zoom in or out.
To zoom in: Move a finger up in the zoom zone (extreme left of the
touchpad).
To zoom out: Move a finger down in the zoom zone (extreme left of the
touchpad).
26 Touchpad
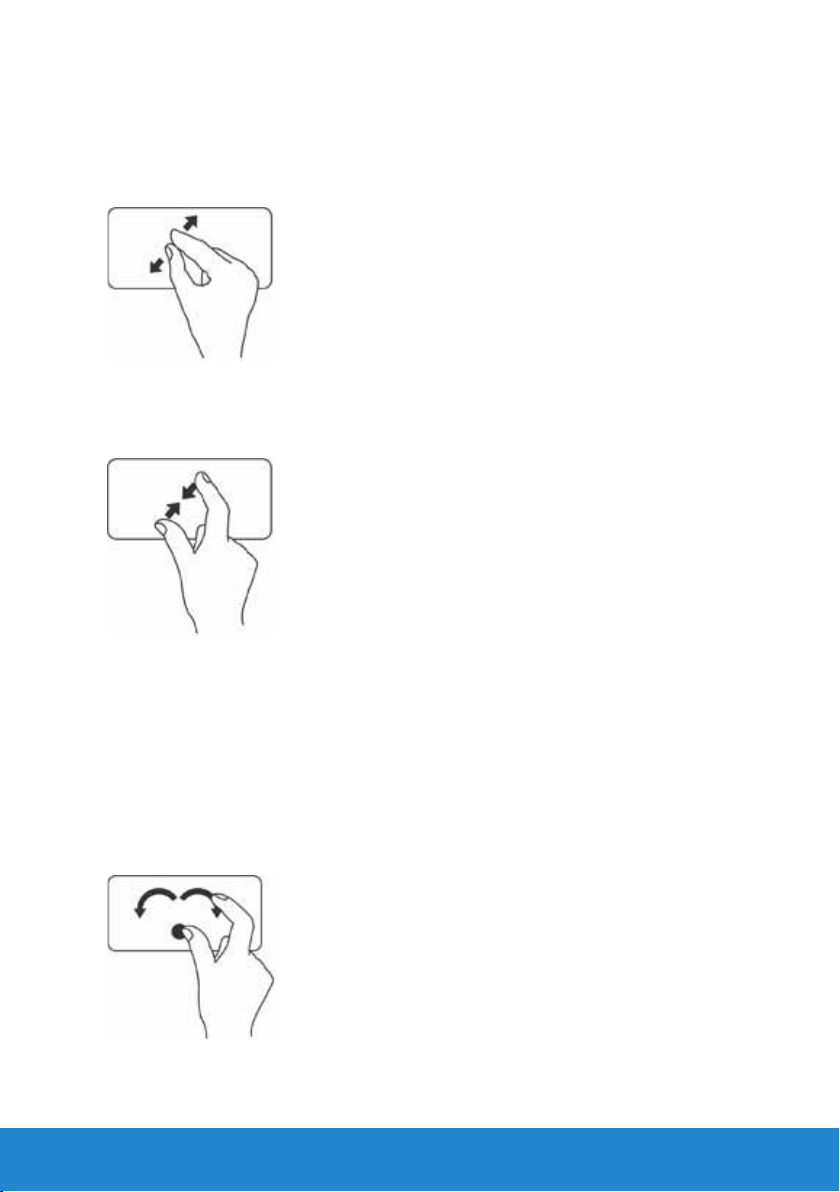
Pinch – Allows you to zoom in or zoom out by moving two fingers apart
or bringing them closer together on the touchpad.
To zoom in: Move two fingers apart to enlarge the view of the active
window.
To zoom out: Move two fingers close together to reduce the view of the
active window.
Rotate
Allows you to rotate the active content on the screen. The rotate feature
includes:
Twist – Allows you to rotate active content in 90° increments using two
fingers where one finger is anchored and the other rotates.
Keeping the thumb in place, move the index finger in an arced
direction right or left to rotate the selected item 90° clockwise or
counterclockwise.
Touchpad 27
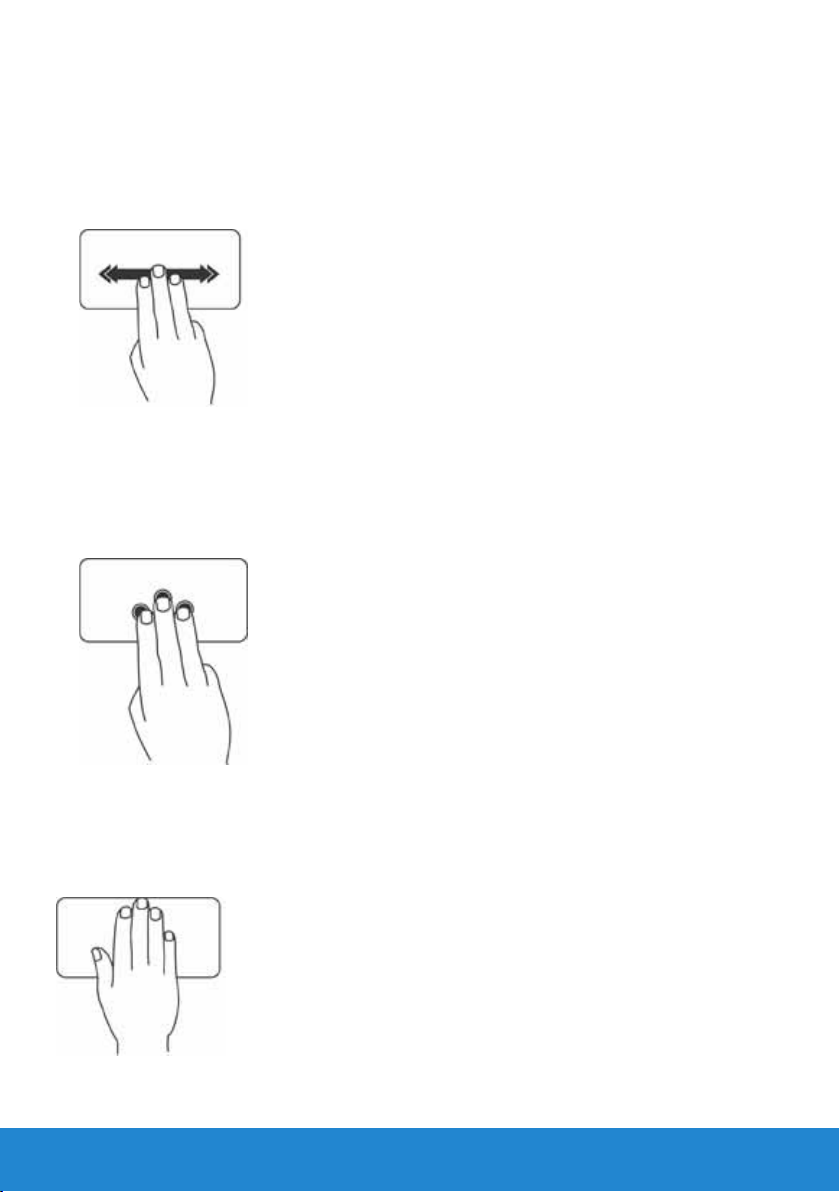
Flick
Allows you to flip content forward or backward based on the direction of
the flick.
Move three fingers quickly in the desired direction to flip content in the
active window.
My Favorites
Allows you to open your favorite applications.
Tap three fingers on the touchpad. The applications that are configured in
the touchpad configuration tool launch.
Desktop
Allows you to minimize all open windows so that the desktop is visible.
Place your hand on the touchpad in any orientation and briefly hold in
place.
28 Touchpad

Display
A display is an output device for visual presentation of computer
information.
Commonly available types of display are:
• Touchscreen
• 3D
• Wireless
3D Display
A 3D display is a video output device that can display a 3-dimensional
image. 3D displays work by presenting separate offset 2D images to the
left and right eye. These 2D images are then combined and interpreted by
the brain as having depth, thus creating 3D effects.
NOTE: 3D display may not be supported on all computers.
Wireless Display
The wireless display feature allows you to share your computer display
with a TV without the use of cables. You must connect a wireless display
adapter to your TV before setting up wireless display.
Minimum requirements for setting up wireless display are:
Processor Intel Core i3-3xx to i7-66xx
Video Controller Intel HD Graphics
WLAN card Intel Centrino 6100/6200/6300 or Intel Centrino
Advanced-N + WiMAX 6250
Operating System Windows 7 Home Premium, Professional,
or Ultimate
Driver Latest wireless-card drivers and Intel Wireless
Display Connection Manager available at
support.dell.com.
NOTE: Wireless display may not be supported on all computers.
Display 29

Touchscreen Display
Touchscreen is a display device that lets you interact with the objects on
the screen by touching the display instead of using a mouse, touchpad,
or a keyboard. You can operate a touchscreen display with a finger, hand,
or another passive object, such as a stylus. Touchscreen displays are
commonly used in phones, tablets, computers, and so on. Commonly
used touchscreen technologies are capacitive touch and resistive touch.
NOTE: Touchscreen display may not be supported on all computers.
Touchscreen Gestures
Touchscreen gestures enhance the usability of a touchscreen display
by allowing you to perform tasks like zoom, scroll, rotate, and so on, by
sliding or flicking your finger on the display.
NOTE: Some of these gestures are application-specific and may not
work across applications.
Zoom
Allows you to increase or decrease the magnification of the active screen
content by moving two fingers apart or bringing them closer together on
the display.
Zoom in
Zoom out
30 Display

Dwell
Allows you to access additional information by simulating a right-click.
Press and hold a finger on the touch screen, to open context-sensitive
menus.
Flick
Allows you to flip content forward or backward based on the direction of
the flick.
Move a finger quickly in the desired direction to flip through content in
the active window like pages in a book.
Flick also works vertically when navigating content such as images or
songs in a playlist.
Scroll
Allows you to scroll through content. The scroll features include:
Pan – Allows you to move the focus on the selected object when the
entire object is not visible.
Move two fingers in the desired direction to pan scroll the selected
object.
Display 31

Scroll Vertical – Allows you to scroll up or scroll down on the active
window.
Move a finger up or down to activate vertical scrolling.
Scroll Horizontal – Allows you to scroll right or left on the active window.
Move a finger to the right or left to activate horizontal scrolling.
Rotate
Allows you to rotate the active content on the screen.
Twist – Allows you to rotate the active content using two fingers.
Keeping a finger or thumb in place, move the other finger in an arced
direction right or left.
You can also rotate the active content by moving both the fingers in a
circular motion.
32 Display

Keyboard
Computer Keyboards are arrangements of square and rectangular labeled
keys, each with one or more assigned functions. Press these keys to either
type letters and numbers or perform the tasks assigned to the keys.
Different manufacturers arrange the keys on their keyboards slightly
differently, but all keyboards feature essentially the same keys.
Most keyboards have a number pad, a standard arrangement of numerical
and mathematical keys, in addition to the normal numbered keys. Laptop
computers have a physical keyboards built into their chassis, but most
exclude the number pad to save space. Some small-sized laptops and
netbook computers do not have a physical keyboard, and provide an
on-screen keyboard.
Keyboard 33

Your keyboard provides different sets of keys to perform different sets of
functions:
• Alphanumeric keys for typing letters, numbers, punctuation, and
symbols
• Control keys for performing certain actions: <Ctrl>, <Alt>, <Esc>, and
the Windows key
• Function keys, labeled <F1>,< F2>, <F3>, and so on, for performing
specific tasks
• Navigation keys for moving the cursor around in documents or
windows: <Home>, <End>, <Page Up>, <Page Down>, <Delete>,
<Insert >, and arrow keys
• Numeric keypad of numbers grouped together like those on an adding
machine (the numeric keypad on most laptop computers is integrated
into the alphabetic keys).
Backlit Keyboard
Backlit keyboards provide visibility in dark environments by illuminating
the symbols on the keys using LEDs present below the keyboard. You
can turn on the backlight manually or configure the backlight to turn on
automatically when your computer is placed in a dark environment.
34 Keyboard

On a Dell laptop computer, there are generally three lighting states
available:
• Full keyboard/touchpad brightness
• Half keyboard/touchpad brightness
• No lighting
Pressing the <Fn> and the right-arrow key toggles between the three
lighting states.
NOTE: Backlit keyboard may not be available on all computers. See
the specifications of your computer for more details.
Keyboard Connection Types
You can connect a keyboard to your computer using a wired or a wireless
connection.
Wired: The keyboard is connected to the computer using a cable
and does not require additional power source, such as batteries. The
connection can be using any of the following:
• USB – Used in all current generation computer.
• PS/2 port – Used on older computers.
Wireless: Keyboard is connected to the computer using wireless signals.
This connection method reduces cable clutter and gives you the flexibility
to use the keyboard from a more comfortable position within a few
meters from the computer. Such keyboards require batteries to operate
and some wireless keyboards have rechargeable batteries. The wireless
connection can be any of the following:
• Radio Frequency (RF) – An RF receiver is connected to the USB port
on the computer.
• Bluetooth – The keyboard connects to the computer using the
Bluetooth adapter already installed in your computer or using a
Bluetooth adapter connected to an USB port of your computer.
Keyboard 35

Locating the Service Tag and Express— Service Code
You can locate the Service Tag and the Express-Service Code of your
computer either on the label on the computer, or using the using the
Dell’s online System Profiler.
Locating the Label on Your Computer
The Service Tag and the Express-Service Code is located on a label on
your computer. The location on the label is:
• Portable computers: Bottom of the portable computer
• Desktop computer: Back or top of the computer chassis
Using Dell’s Online System Profiler
If your computer is powered on and you have access to the Internet,
you can use Dell’s online System Profiler to scan for the Service Tag and
Express-Service code. To scan for the Service Tag follow the steps below:
- Go to support.dell.com.
- Click System Configuration.
- Click Find My Service Tag and follow the instructions on the screen.
Storage
About Storage Devices
Storage devices allow you to store data for later use. Storage devices
can be internal or external. Most of the storage devices store data till you
manually delete the data. Examples of storage devices are hard drives,
optical drives, USB memory keys, and so on.
36 Locating the Service Tag and Express—Service Code

Internal Storage Devices
Storage devices that are installed inside your computer are called internal
storage devices. Generally, you cannot remove such devices when the
computer is powered on. The data stored on internal storage devices
is generally stored till you manually delete it. Internal storage devices
include hard drives (HDD) and solid-state drives (SSD).
Hard Drives
An HDD contains magnetically coated platters that rotate on a
motor-driven spindle, within a protective enclosure. Data is magnetically
read from and written to the platter by read/write heads that are
present above the platters. The hard disk drive is the data center of your
computer.
A typical HDD design consists of a spindle that holds flat circular disks
called platters, onto which the data is recorded. The platters are made
from a non-magnetic material, usually aluminum alloy or glass, and are
coated with a shallow layer of magnetic material, with an outer layer of
carbon for protection.
Solid-State Drives
An SSD is a data storage device that uses solid-state (flash) memory to
store data. SSDs contain no moving parts as data is stored in electrical
circuits. Compared to HDDs, SSDs are typically less susceptible to
physical shock, are quieter, and have lower access time and latency.
SSDsuse the same interface to connect to the computer as HDDs,
making them compatible with most existing computers.
Removable Storage Devices
Removable storage devices that you can remove from your computer
without turning the computer off are called removable storage devices.
Commonly used removable storage devices include:
• Optical discs
• Memory cards
• Magnetic tapes
Storage 37

Optical Discs
Some examples of optical discs are:
• Blu-ray Disc – Blu-ray Disc (BD) was designed to supersede the DVD
format. The standard physical medium is a 12 cm plastic optical disc,
the same size as DVDs and CDs. A Blu-ray Discs stores 25 GB (single
layer) or 50 GB (dual layer).
• DVD – A Digital Versatile Disc (DVD) stores data up to 4.7 GB (single
layer) or 8.5 GB (dual layer).
• CD – A Compact Disc (CD) stores data up to 800 MB.
Memory Cards
Memory cards, also referred to as flash cards, use flash memory to store
digital information. They are re-writeable, fast, and retain data even when
power supply is cut off. Memory cards are commonly used in devices
such as digital cameras, mobile phones, media players, gaming consoles,
and so on.
Some common types of memory cards are:
Secure Digital (SD)/Secure Digital High
Capacity (SDHC)
Memory Stick (MS)/Memory Stick Pro
(MS Pro)
Extreme Digital (xD)
Multimedia Card (MMC)
Secure Digital Extended Capacity
(SDXC) [card with Ultra High Speed
(UHS)]
38 Storage

Memory Stick XC (MSXC)
MultiMedia Card plus (MMC+)
Memory Module
Memory modules are Printed Circuit Boards (PCB) with Random Access
Memory (RAM) chips soldered on them. Memory modules provide RAM
needed by your computer. Based on the type of computer they are used
in, memory modules are categorized as:
• Dual In-line Memory Module (DIMM) – Used in desktop computers.
• Small Outline Dual In-line Memory Module (SODIMM) – Smaller in size
than DIMMs. Generally used in notebook computers, however, may
also be used in some compact desktops and all-in-one computers.
Memory Module 39

System Board
A system board is a printed circuit board that forms the central part of
computers. All other devices connect to the system board to be able to
interact with each other. The system board holds various controllers and
connectors that help in exchange of data among various components of
the computer.
Some important components of a system board are:
• Processor socket(s) – Provides slot(s) to install processor(s).
• Memory-module connector(s) – Provides slot(s) to install memory
module(s).
• Expansion card slot(s) – Provides slot(s) to install expansion card(s).
• Chipset – Provides an interface between the processor’s front-side
bus, main memory, and peripheral buses.
• Flash memory – Contains the system memory or BIOS program.
• Power connectors – Provide power to the system board from the
computer power supply.
Additionally, a system board may have integrated graphics, sound, and
network capabilities.
The figure below lists the basic components of a desktop system board.
NOTE: Size, shape, and location of components may vary based on
the type of system board and the computer it is designed for.
40 System Board

1 battery socket 2 PCI-Express x1 connector
3 PCI-Express x16 connector 4 eSATA connector
5 processor 6 processor socket
7 memory-module connector 8 power connector
System Board 41

Processor
Processor is the part of the computer or another electronic device that
processes data and instructions to generate a desired output.
Processors are mainly classified based on:
• Number of processing cores present on the die
• Speed or frequency measured in GigaHertz (GHz) or MegaHertz (MHz)
• Onboard memory, also referred to as Cache
The performance of a processor is generally measured in number
of calculations it can perform in a second. The current generation
of processors have speeds of about 50,000 Million Instructions Per
Second (MIPS), or more for high-end models. The current generation
of processors are connected to the system board using a Land Grid
Array (LGA) or Pin Grid Array (PGA) connector. Some processors may be
integrated on the system board, however, these are mostly for handheld
devices.
Some of the current processor families are:
• Intel Pentium
• Intel Celeron
• Intel Core series
• Intel i series
• Intel Xeon
• AMD Athlon
• AMD Phenom
• AMD Sempron
42 Processor

Processors are specifically designed for mobile devices, laptop
computers, desktop computers, servers, and so on. A processor designed
for mobile devices consumes less power compared to the ones designed
for desktop computers or servers.
Computer Fan
A computer fan cools the internal components of a computer by
expelling hot air from the computer. Computer fans are commonly
used to cool components that have high power consumption and thus
generate a high amount of heat. Keeping the components cool helps in
protecting them from overheating, malfunctioning, and damage.
Fans are used to cool:
• Computer chassis
• Processor
• Graphics card
• Chipset
• Hard drive and so on.
Heat Sink
Heat sinks are used to dissipate heat generated by the processor or some
high-end graphics cards. Heat sinks generally have a fan mounted above
them to increase airflow and are made up of fins or blades instead of a
single block of metal. This helps increase the surface area for maximum
heat dissipation. A layer of thermal grease is applied between the
processor/graphics card and the heat sink for easy exchange of heat.
Computer Fan 43

Thermal Grease
Thermal grease, also called thermal gel, thermal compound, and so on, is
used to create a heat inductive layer between a processor and heat sink.
Applying thermal grease between the processor and heat sink increases
the heat transfer from the processor to the heat sink, as the thermal
grease has better conductivity than air.
Video Cards
Video card is a component that sends video signals or information to a
display device such as a monitor or projector.
Video cards can be of two types:
• Integrated video – Often referred to as an on-board video card, it is
a chip that is part of the system board. Integrated video cards do not
have dedicated memory, and share the system memory and processor
to output video. Integrated video cards are suitable for users who do
not require high video performance.
• Discrete video – Discrete video cards are installed separately on
the system board. Discrete video cards have dedicated memory on
the cards and generally provide higher performance than integrated
video cards. These video cards are generally installed in a PCI-Ex16
expansion slots on the system board. Legacy connectors for
video cards include PCI and AGP. These cards are best suited for
graphic-intensive applications, playing high-definition video games,
and so on.
NOTE: When a discrete video card is installed on a computer that also
has an integrated video card, the integrated video card is disabled.
Usethe system setup program to manually enable the integrated
video card.
• Accelerated Processing Unit (APU) – APUs are formed by etching a
graphics processing unit (GPU), or any other processing system on
the same chip as the CPU. Hence, APUs provide higher data transfer
rates while reducing the power consumption which improves the
performance of the computer when compared to Integrated video.
44 Thermal Grease

TV Tuners
You can use TV tuners to watch television on your computer. TV tuners
are available for both desktop and laptop computers and are available in
various connectivity options such as:
• Internal
- PCI-E
- PCI
• External
- USB
- PC Card
- ExpressCard
TV tuners are mostly standalone, however, some video cards also have
built in TV tuners. Most TV-tuner cards are bundled with software that lets
you record the television content on your computer.
TV Tuners 45

Speakers
Speakers are used to listen to sound from the computer. Speakers
can be internal or external. On desktop computers, internal speakers
are generally used only for producing error or failure beeps. External
speakers, also called multimedia speakers, produce sound for movies,
songs, multimedia content, and so on. Speakers are generally identified as
2, 2.1, 5.1, 7.1, and so on. The digit before the decimal point indicates the
number of channels and the digit after the decimal point (1) indicates the
subwoofer. Speakers are commonly connected to the computer using a
3.5 mm connector or using USB connector.
NOTE: For 5.1 or 7.1 channel speakers to produce 5.1 or 7.1 channel
sound, your computer sound card must support 5.1 or 7.1 channel
audio.
Webcam
A webcam is a device that allows you to capture real-time video or
images, and can also be used for video conferencing.
The webcam type may vary based on the selections you made while
purchasing your computer. You may have a built-in webcam or you may
need to buy an external webcam. External webcams connect to your
computer using the USB connector. A camera quality is generally defined
by the number of pixels it can capture.
46 Speakers

Enabling a Webcam
1. Click Start → Control Panel → Device Manager.
2. Click Imaging Devices and then double-click Camera.
3. Click Enable.
The webcam is now enabled.
Open the webcam software to use all features of the webcam.
Dell Webcam Manager
The Dell Webcam Manager acts as a hub for all the webcam features and
configuration options. Dell Webcam Manager includes:
• Webcam Center – Control core recording functions of the webcam
such as video recording, motion detection, and photo capture.
• Webcam Console – Configure webcam features like picture quality,
face tracking, pan and zoom, audio and video effects, and so on.
• Video Chat – Video chat with popular instant messaging services such
as Google Talk, Yahoo! Messenger, AOL Instant Messenger, and so on.
• Live! Cam Avatar – Select avatars for video chat, apply audio filters, or
use emoticon style emotions with the video avatars.
• Create Avatar – Create a unique avatar using the Live! Cam Avatar
Creator software for video chat.
Access Dell Webcam Manager
1. Click Start → All Programs or Programs.
2. Click Dell Webcam→ Dell Webcam Manager.
The Dell Webcam Manager window appears.
Enable the Digital Array Microphone in the Dell Webcam Center
1. Click Start → All Programs or Programs.
2. Click Dell Webcam→ Dell Webcam Manager.
Dell Webcam Manager window opens.
3. Click Webcam Center.
4. Click the drop-down arrow next to Audio Source and click Digital Mic
(Realtek High Definition Audio) to enable the microphone.
Webcam 47

ExpressCards
ExpressCards allow you to connect peripheral devices such as
memory cards, wired and wireless communications, printers, scanners,
microphone, and so on, to your laptop computer. ExpressCards replace
PC cards.
ExpressCards are installed on externally accessible ExpressCard slots.
ExpressCard slot on laptops and desktops is normally installed with a
blank, when no ExpressCard is installed, to protect the slot from dust
particles. You must remove the blank to install an ExpressCard.
1 ExpressCard or blank 2 ExpressCard release latch
Types of ExpressCards Features
ExpressCard/34 • Used in smaller computers and
supports limited peripheral
devices
• Can be used on both EC 34 and
EC 54 slots
ExpressCard/54 • Supports a wide range of
peripheral devices
• Consumes more power than the
34 mm cards
• Can be used only on computers
that support EC54 slots
48 ExpressCards

The following figure shows the size-comparison of PC-cards and
ExpressCards:
PC Card 54 mm ExpressCard
(EC 54)
34 mm ExpressCard
(EC 34)
Communication Devices
An electronic device that can send and receive data on the network is
called a communication device. Communication devices are used on
both ends of a connection. Signals may travel from one device to another
in either analog or digital form. Most communication devices have the
ability to convert digital signals to analog signals or analog signals to
digital signals, so that the signals can be transmitted from one device to
another.
Some of the commonly used communication devices are:
Communication Devices 49

Modem – Stands for Modulator and Demodulator. Modems can be
analog (dial-up) or digital.
• Dial-up modem – Electronic devices that convert analog phone
signals into digital signals that the computer can process, and digital
computer signals into analog signals that can be transmitted over the
telephone lines. Dial-up modems can be internal or external.
• Digital modem – Used to send and receive data to and from a digital
telephone line, like Digital Subscriber Line (DSL) or Integrated Services
Digital Network (ISDN).
Network Interface Controller (NIC) – Also referred to as network adapters
or Local Area Network (LAN) adapters. They usually connect to networks
using an Ethernet cable. NICs can be internal (expansion cards or
integrated to the system board) or external
50 Communication Devices

Wireless Local Area Network (WLAN) controllers – Allow communication
over short distances using radio signals instead of traditional network
cabling. WLAN controllers can be internal (expansion cards or integrated
to the system board) or external.
Wireless Wide Area Network (WWAN) controllers – Allow wireless
connectivity through cellular tower technology. A SIM card may be is
required for WWAN connectivity.
Bluetooth adapters – Allow Bluetooth-enabled devices to communicate
with each other over a short distance. Bluetooth adapters can be internal
(expansion cards or integrated to the system board) or external.
Communication Devices 51

52 Communication Devices

Setting Up Your Computer


Setting Up Your Laptop
WARNING: The AC adapter works with electrical outlets worldwide.
However, power connectors and power strips vary among countries.
Using an incompatible cable or improperly connecting the cable
to a power strip or electrical outlet may cause fire or equipment
damage.
1. Connect the AC adapter to the computer and then plug it into a wall
outlet or surge protector.
Setting Up Your Laptop 55

2. Press the power button to turn on your laptop.
NOTE: The location of the power button and AC adapter connector
may vary depending on the your computer model.
56 Setting Up Your Laptop

Setting Up Your Desktop
1. Connect the display to the appropriate display connector on your
computer (see Setting Up Your Display).
2. Connect the USB keyboard and mouse to the USB connectors.
NOTE: Depending on your computer model, USB ports may also be
present on the front panel of your computer.
Setting Up Your Desktop 57

3. Connect the power cable.
4. Press the power button to turn on your computer.
58 Setting Up Your Desktop

Internet
Setting Up a Wired Internet Connection
You can setup a wired Internet connection using a dial-up, DSL, or a
cable/satellite modem.
• If you are using a dial-up connection, connect the telephone line
to the optional external USB modem and to the telephone wall jack
before you set up your Internet connection.
• If you are using a DSL or cable/satellite modem connection, contact
your Internet Service Provider (ISP) or cellular telephone service for
setup instructions.
NOTE:ISPs and ISP offerings vary by country. Contact your ISP for
offerings available in your country.
Have your ISP information ready. If you do not have an ISP, the Connect
to the Internet wizard can help you get one.
To setup a wired Internet connection:
Windows 8
1. Save and close any open files, and exit any open programs.
2. Swipe from the right edge of the screen (or if you are using a mouse,
pointing to the upper-right corner of the screen), and then click
Search .
3. Click Settings.
4. Type Network and Sharing Center in the search box, and press
<Enter>. Click Network and Sharing Center → Set up a new
connection or network → Connect to the Internet. The Connect to
the Internet window appears.
NOTE:If you do not know which type of connection to select, click
Help me choose or contact your ISP.
5. Follow the instructions on the screen and use the setup information
provided by your ISP to complete the setup.
Internet 59

Windows 7 and Windows Vista
1. Click Start , type network in the search box, and then click Network
and Sharing Center → Set up a new connection or network →
Connect to the Internet. The Connect to the Internet window
appears.
NOTE: If you do not know which type of connection to select, click
Help me choose or contact your ISP.
2. Follow the instructions on the screen and use the setup information
provided by your ISP to complete the setup.
If you cannot connect to the Internet but have successfully connected in
the past, the ISP might have a service outage. Contact your ISP to check
the service status, or try connecting again later.
Setting Up a Wireless Internet Connection
NOTE: To set up your wireless router, see the documentation that
shipped with your router.
Before you can use your wireless Internet connection, you need to
connect to your wireless router.
Windows 8
1. Ensure that wireless is enabled on your computer.
2. Open the Charms Bar.
3. Select the Settings Charm.
4. Select the Network Icon.
5. Click on the network you wish to connect.
6. Enter the network key.
7. Turn on/off file sharing.
NOTE: Actual steps may vary based on the operating system installed
in your computer.
Windows 7
To set up your connection to a wireless router on Microsoft Windows 7 or
Windows Vista:
1. Ensure that wireless is enabled on your computer.
2. Click Start , type network in the search box, and then click Network
and Sharing Center → Set up a new connection or network →
Connect to the Internet. The Connect to the Internet window
appears.
3. Follow the instructions on the screen to complete the setup.
60 Internet

Display
Setting Up Your Display
1. Check the type of connectors available on your display and verify the
cables shipped with your display. See the following table to identify
and select the appropriate display connector to use.
NOTE: If you purchased the optional discrete graphics card, connect
the display using the connector on the discrete graphics card.
NOTE: The integrated VGA and HDMI connectors may be disabled
and capped if your computer has a discrete graphics card.
NOTE: When connecting to a single display, connect the display to
ONLY ONE of the connectors on your computer.
2. Use the appropriate cable based on the connectors available on your
computer and display. You may need to use an appropriate adapter
(DVI-to-VGA adapter or HDMI-to-DVI adapter) to connect your display
to the discrete graphics card if the connector on your display and the
discrete graphics card is different.
Display 61

3. See the following table to identify the connectors on your computer
and display.
Connection
Type
VGA-to-VGA
(VGA cable)
DVI-to-DVI (DVI
cable)
DVI-to-VGA
(DVI-to-VGA
adapter + VGA
cable)
HDMI-to-HDMI
(HDMI cable)
HDMI-to-DVI
(HDMI-to-DVI
adapter + DVI
cable)
You can purchase the DVI-to-VGA adapter, HDMI-to-DVI adapter, and
additional HDMI or DVI cables at dell.com.
Computer Cable Display
Setting Up 3D Display
NOTE: Your TV or computer may not support 3D. To know if your
computer supports 3D, see the documentation that shipped with your
computer. To know if your TV supports 3D features available on your
computer, see System Requirements at www.nvidia.com/3dtv.
1. Connect your computer to the 3D TV using a HDMI cable.
NOTE: The HDMI cable transmits both audio and video signals.
2. Set up the HDMI 1.4 3D TV:
a. Browse to the TV’s 3D settings menu.
b. Set the 3D mode to Automatic.
62 Display

c. Set the eye order for the glasses to default or normal.
NOTE: Do not change the eye order settings when using NVIDIA
3DTV Play as the application controls the timing of the glasses.
NOTE: If you are unable to view the entire Windows desktop on
your TV, use the 3D TV’s settings to reduce the display resolution.
For more information about configuring the 3D settings, see the
documentation that shipped with your TV.
3. Set your TV as the primary display:
a. Right-click the desktop and select NVIDIA Control Panel.
b. In the NVIDIA Control Panel window, click Display to expand the
selection (if not already expanded) and then click Set up multiple
display.
c. In the Verify the display configuration section, right-click the
3DTV and select Make this the Windows primary display.
4. Set up the NVIDIA 3DTV Play application:
a. In the NVIDIA Control Panel window, click Stereoscopic 3D to
expand the selection, and then click Set up stereoscopic 3D.
b. Select the Enable stereoscopic 3D check box. The 3DTV Play setup
wizard appears.
c. Ensure that the 3DTV Play logo appears in the control panel.
5. Change the desktop resolution to match the resolution of the 3D
content type:
a. In the NVIDIA Control Panel window, click Display to expand the
selection, and then click Change resolution.
b. For 3D gaming, set the resolution to 720p, 1280x720 and refresh
rate to 60/59 Hz in HD 3D mode.
c. For Blu-ray 3D playback, set the resolution to 1080p, 1920x1080
and refresh rate to 24/23 Hz in HD 3D mode.
NOTE: For TVs using PAL system with refresh rates of 50 Hz or
100Hz or NTSC system with refresh rates of 60 Hz or 120 Hz, set
the resolution to 720p and refresh rate to 60/59 Hz.
NOTE: The performance of games may reduce in HD 3D mode
even if 3DTV Play is disabled. To maximize performance, select HD
or SD mode when 3DTV Play is disabled.
6. Check the HDMI audio on the TV by playing a video, game, or music
and adjusting the volume on the TV.
Display 63

Setting Up Wireless Display
To set up wireless display:
1. Turn on your computer.
2. Ensure that wireless is enabled.
3. Connect the wireless display adapter to the TV.
NOTE: The wireless display adapter does not ship with your
computer and must be purchased separately.
4. Turn on the TV and the wireless display adapter.
5. Select the appropriate video source for your TV, such as HDMI1,
HDMI2, or S-Video.
6. Double-click the Intel Wireless Display icon on the desktop. The
Intel Wireless Display window appears.
7. Select Scan for available displays.
8. Select your wireless display adapter from the Detected wireless
displays list.
9. Type the security code that appears on your TV.
To enable wireless display:
1. Double-click the Intel Wireless Display icon on the desktop. The
Intel Wireless Display window appears.
2. Select Connect to Existing Adapter.
NOTE: You can download and install the latest driver for Intel Wireless
Display Connection Manager from support.dell.com.
NOTE: For more information on wireless display, see the
documentation that shipped with your wireless display adapter.
64 Display

Digital Visual Interface Connector Cables
Use the appropriate cable based on the connectors available on your
computer and display. See the following table to identify the connectors
on your computer and display.
Connector on the
computer
DVI-D
DVI-A
DVI-I
NOTE: When connecting to a single display, connect the display to
ONLY ONE of the connectors on your computer.
1. Turn off your computer.
2. Turn off the display and disconnect it from the power supply.
3. Connect one end of the display cable to the DVI port on your
computer.
4. Connect the other end of the cable to the same connector on your
display.
5. If necessary, connect one end of the power cable to the display’s
power connector.
Connector on
the display
DVI-D DVI-D Cable
DVI-I DVI-D Cable
DVI-A DVI-D to VGA convertor
VGA DVI-D to VGA converter
HDMI DVI-D to HDMI cable
DVI-D VGA to DVI-D converter
DVI-I DVI-A cable
DVI-A DVI-A cable
VGA DVI to VGA cable
DVI-D DVI-D cable
DVI-I DVI-I cable
DVI-A DVI-A cable
VGA DVI to VGA cable
HDMI DVI-D to HDMI cable
Cable needed
Display 65

6. Connect the other end of the power cable to the display’s three-prong
power strip or wall outlet.
7. Turn on your computer, and then turn on your display.
Audio
Setting Up 5.1 Audio
5.1 audio is most effective when the speakers are placed as shown in the
following figure:
66 Audio

See the following figure to connect 5.1 speakers to your computer.
1 Rear audio connector on the
computer
2 Center/LFE surround out on
the computer
3 Front audio connector on
the computer
4 5.1 channel audio cable
5 Center/LFE surround out on
the speaker
6 Front audio connector on the
speaker
7 Rear audio connector on the
speaker
Audio 67

To set up your speakers:
Windows 7 and Windows Vista
1. Click Start Control Panel Hardware and Sound→ Sound.
2. Select Speakers and click Configure. The Speaker Setup window
appears.
3. Select a speaker configuration under Audio channels: and click Test.
You should hear a tone from every speaker.
4. Click Next.
5. Follow the instructions on the screen.
If you experience problems with your computer sound, see the
knowledge base article 266424 at support.dell.com.
Setting Up 7.1 Audio
7.1 audio is most effective when the speakers are placed as shown in the
following figure:
See the following figure to connect 7.1 speakers to your computer:
68 Audio

1 Rear audio connector on
the computer
2 Center/LFE surround out
on the computer
3 Side audio connector on
the computer
4 Front audio connector on
the computer
5 7.1 channel audio cable
To set up your speakers:
Windows 7 and Windows Vista
1. Click Start → Control Panel→ Hardware and Sound→ Sound.
2. Select Speakers and then click Configure.
The Speaker Setup window appears.
3. Select a speaker configuration under Audio channels: and then
clickTest.
You should hear a tone from every speaker.
6 Center/LFE surround out on
the speaker
7 Front audio connector on the
speaker
8 Rear audio connector on the
speaker
9 Side audio connector on the
speaker
Audio 69

4. Click Next.
5. Follow the instructions on the screen.
If you experience problems with your computer sound, see the
knowledge base article 266424 at support.dell.com.
Setting Up Your Printer
You can connect one or more printers to your computer and also add
one or more computers to your printer.
Adding a Printer
1. In Windows 7, click Start → Devices and Printers.
In Windows Vista, click Start → Control Panel→ Hardware and
Sound→ Printers.
In Windows XP, click Start → Control Panel→ Printers and Other
Hardware→ Printers and Faxes.
2. Click Add a Printer. The Add Printer Wizard appears.
3. Follow the instructions in the Add Printer Wizard.
NOTE: You may be prompted to install the printer driver while
adding your printer. Insert the printer driver media that shipped
with your printer into the optical drive and follow the instructions
on screen.
70 Setting Up Your Printer

Setting Up Your Webcam
To set up your webcam:
Webcam integrated on laptop
display or external display
purchased with your computer
External webcam Use the media shipped with your
Drivers and software are installed
when you receive your computer.
Use the media shipped with the
computer only to reinstall the
drivers and software.
webcam to install the drivers and
other required software to use
all the features of your webcam.
For more information, see the
documentation that shipped with
your webcam.
Installing Your USB Wireless Adapter
NOTE: The instructions may vary depending on the model of the
wireless adapter. See the documentation that shipped with your
wireless adapter for specific instructions.
1. Install the software that shipped with your USB wireless adapter:
a. Insert the optical disc into the optical drive of your computer.
b. If the installation does not begin automatically, select Start Run
and then type x:\setup.exe (where x is the drive letter of your
optical drive).
c. Follow the instructions on the screen.
2. Shut down the computer.
3. Connect one end of the USB cable to the USB wireless adapter.
4. Connect the other end of the USB cable to a USB connector on your
computer.
5. Turn on the computer.
Your computer automatically detects the wireless adapter and configures
the software.
Setting Up Your Webcam 71

72 Setting Up Your Webcam

Using Your Computer


Battery
Charging Laptop Battery
When you connect the computer with the battery installed to an electrical
outlet, the computer checks the battery charge and temperature. If
necessary, the AC adapter charges the battery and maintains the battery
charge.
NOTE: The AC adapter charges the battery even when the computer
is turned off. The internal circuitry of the battery prevents the battery
from overcharging.
If the battery is hot from being used in your computer or being in a
hot environment, the battery may not charge when you connect the
computer to an electrical outlet.
NOTE: You can operate your computer while the battery is charging.
For laptop battery related FAQs, see the Article ID: 405686 at
support.dell.com.
Improving the Battery Performance
The operating time of a battery, which is the time the battery can hold a
charge, varies depending on how you use your laptop computer.
The operating time of your battery significantly reduces if you use:
• Optical drives.
• Wireless communications devices, ExpressCards, media cards, or USB
devices.
• High-brightness display settings, 3D screen savers, or other
power-intensive programs like complex 3D graphics applications
andgames.
You can improve the battery performance by:
• Operating the computer on AC power when possible. Battery life
reduces with the number of times the battery is discharged and
recharged.
• Configuring the power management settings using Microsoft Windows
Power Options to optimize your computer’s power usage (see Power
Management).
• Enabling the Sleep/Standby and Hibernation features of your
computer.
NOTE: The life of the battery decreases over time depending on how
often the battery is used and the conditions under which it is used.
Battery 75

Dell Desktop Mode
The Dell longevity mode feature enables you to protect your laptop
battery health.
Frequently connecting and disconnecting your computer to a power
source without allowing the battery to fully discharge may reduce battery
life. The longevity mode feature protects the battery health by moderating
the extent to which your battery charges, and prevents your battery from
frequent charge and discharge cycles.
Your Dell laptop automatically monitors the charging and discharging
behavior of your battery, and if applicable, displays a message requesting
you to enable longevity mode.
NOTE: Dell longevity mode may not be supported on your laptop
battery.
To enable or disable longevity mode:
1. Right-click the battery icon on the Windows notification area, and
then click Dell Extended Battery Life Options.
The Battery Meter dialog box is displayed.
2. Click the Longevity mode tab.
3. Click Enable or Disable based on your preference.
4. Click OK.
NOTE: When longevity mode is enabled, the battery charges only
between 88 percent and 100 percent of its capacity.
Dell Desktop Mode
The Dell Desktop Mode feature enables you to protect your laptop battery
health.
Continuously powering your computer by connecting it to an A/C power
outlet may reduce the battery life. The desktop mode feature protects the
battery health by moderating the extent to which your battery charges,
protecting your battery when it is not in use.
Your Dell laptop automatically monitors the charging and discharging
behavior of your battery, and if applicable, displays a message requesting
you to enable Desktop Mode.
NOTE: Dell desktop mode may not be supported on your laptop
battery.
76 Battery

To enable or disable desktop mode:
1. Right-click the battery icon on the Windows notification area, and
then click Dell Extended Battery Life Options. The Battery Meter
dialog box is displayed.
2. Click the Desktop mode tab.
3. Click Enable or Disable based on your preference.
4. Click OK.
NOTE: When desktop mode is enabled, the battery charges only
between 50 percent and 100 percent of its capacity.
Keyboard
General Keyboard Shortcuts
<Ctrl><Shift><Esc> Opens the Task Manager window.
<Fn><F8> Displays icons representing all currently
available display options (display only,
external monitor or projector only,
both display and projector, and so on).
Highlight the desired icon to switch the
display to that option.
<Fn> and up-arrow key Increases brightness on an integrated
display.
<Fn> and down-arrow key Decreases brightness on the integrated
display only (not on an external display).
<Fn><Esc> Activates a power management mode.
You can reprogram this keyboard
shortcut to activate a different power
management mode using the Advanced
tab in the Power Options Properties
window.
<F2> Renames the selected item.
<F3> Searches for a file or folder.
<F4> Displays the Address bar list in Windows
Explorer.
<F5> Refreshes the active window.
Keyboard 77

<F6> Cycles through screen elements in a
window or on the desktop.
<F10> Activates the menu bar in the active
program.
<Ctrl><c> Copies a selected item.
<Ctrl><x> Cuts a selected item.
<Ctrl><v> Pastes a selected item.
<Ctrl><z> Undoes an action.
<Ctrl><a> Selects all items in a document or
window.
<Ctrl><F4> Closes the active window (in programs
that allow you to have multiple
documents open simultaneously).
<Ctrl><Alt><Tab> Uses the arrow keys to switch between
open items.
<Alt><Tab> Switches between open items.
<Alt><Esc> Cycles through items in the order in
which they were opened.
<Delete> Deletes a selected item and move it to
the Recycle Bin.
<Shift><Delete> Deletes the selected item without moving
it to the Recycle Bin first.
<Ctrl> and right-arrow key Moves the cursor to the beginning of the
next word.
<Ctrl> and left-arrow key Moves the cursor to the beginning of the
previous word.
<Ctrl> and down-arrow key Moves the cursor to the beginning of the
next paragraph.
<Ctrl> and up-arrow key Moves the cursor to the beginning of the
previous paragraph.
<Ctrl><Shift> with an arrow
key
<Shift> with any arrow key Selects more than one item in a window
Selects a block of text.
or on the desktop, or select text within a
document.
78 Keyboard

Windows logo key and <m> Minimizes all open windows.
Windows logo key and
<Shift><m>
Windows logo key and <e> Starts Windows Explorer.
Windows logo key and <r> Opens the Run dialog box.
Windows logo key and <f> Opens the Search Results dialog box.
Windows logo key and
<Ctrl><f>
Windows logo key and
<Pause>
Restores all minimized windows. This
key combination functions as a toggle to
restore minimized windows following the
use of the Windows logo key and <m>
combination.
Opens the Search Results-Computer
dialog box (if the computer is connected
to a network).
Opens the System Properties dialog box.
Customizing Your Keyboard
You can customize your keyboard as follows:
• Change the delay before keyboard characters repeat
• Change the speed at which keyboard characters repeat
• Change the cursor blink rate
• Customize key sequences for input languages
To customize your keyboard:
1. Click Start Control Panel→ Keyboard.
2. Adjust the keyboard settings you want to change and click OK.
Changing Keyboard Input Language
1. Click Start Control Panel→ Region and Language.
2. On the Keyboards and Languages tab, click Change keyboards.
3. Under Installed services, click Add.
4. Click the language you want to add, select the text services you want
to add, and then click OK.
Keyboard 79

Using Numeric Keypad on a Laptop Computer
1 Numeric Keypad
Your laptop computer may have a numeric keypad integrated into
the keyboard. The keypad corresponds to the keypad of an extended
keyboard
• To type a number or symbol, press and hold <Fn> and press the
desired key.
• To enable the numeric keypad, press <Num Lk>. The light indicates
that the keypad is active.
• To disable the numeric keypad, press <Num Lk> again.
80 Keyboard

Touchpad
Using Your Touchpad
You can use the touchpad to move the cursor or selected objects on the
computer screen:
• To move the cursor, gently slide your finger over the touchpad.
• To left-click or select an object, tap the left touchpad button or the
touchpad surface once.
• To right-click an object, tap the right touchpad button once.
• To select and move (or drag) an object, position the cursor on the
object and tap twice on the touchpad without removing your finger
from the touchpad after the second tap; then move the selected
object by sliding your finger over the surface.
• To double-click an object, tap twice on the touchpad or press the left
touchpad button twice.
Touchpad Gestures
NOTE: Some of the touchpad gestures may not be supported on your
computer.
NOTE: You can change the touchpad gestures settings by double-
clicking the touchpad icon in the notification area of your computer
desktop.
Your computer may support Scroll, Zoom, Rotate, Flick, My Favorites,
and Desktop gestures.
Scroll
Allows you to scroll through content. The scroll feature includes:
Pan – Allows you to move the focus on the selected object when the
entire object is not visible.
Move two fingers in the desired direction to pan scroll the selected
object.
Touchpad 81

Auto Scroll Vertical – Allows you to scroll up or down on the active
window.
Move two fingers up or down at a fast pace to activate vertical auto
scrolling. Tap on the touchpad to stop auto scrolling.
Auto Scroll Horizontal – Allows you to scroll left or right on the active
window.
Move two fingers to your left or right at a fast pace to activate horizontal
auto scrolling. Tap on the touchpad to stop auto scrolling.
Circular Scroll – Allows you to scroll up or down, and right or left.
To scroll up or down: Move a finger in the vertical scroll zone (extreme
right of the touchpad), in a clockwise circular motion to scroll up or
counterclockwise circular motion to scroll down.
To scroll right or left: Move a finger in the horizontal scroll zone (extreme
bottom of the touchpad), in a clockwise circular motion to scroll right or
counterclockwise circular motion to scroll left.
82 Touchpad

Zoom
Allows you to increase or decrease the magnification of the screen
content.
The zoom feature includes:
One finger zoom – Allows you to zoom in or out.
To zoom in: Move a finger up in the zoom zone (extreme left of the
touchpad).
To zoom out: Move a finger down in the zoom zone (extreme left of the
touchpad).
Pinch – Allows you to zoom in or zoom out by moving two fingers apart
or bringing them closer together on the touchpad.
To zoom in: Move two fingers apart to enlarge the view of the active
window.
To zoom out: Move two fingers close together to reduce the view of the
active window.
Touchpad 83

Rotate
Allows you to rotate the active content on the screen. The rotate feature
includes:
Twist – Allows you to rotate active content in 90° increments using two
fingers where one finger is anchored and the other rotates.
Keeping the thumb in place, move the index finger in an arced
direction right or left to rotate the selected item 90° clockwise or
counterclockwise.
Flick
Allows you to flip content forward or backward based on the direction of
the flick.
Move three fingers quickly in the desired direction to flip content in the
active window.
My Favorites
Allows you to open your favorite applications.
Tap three fingers on the touchpad. The applications that are configured in
the touchpad configuration tool launch.
Desktop
Allows you to minimize all open windows so that the desktop is visible.
Place your hand on the touchpad in any orientation and briefly hold in
place.
84 Touchpad

Touchscreen
Using a Touchscreen Display
The touchscreen feature converts your computer into an interactive
display.
The following are some of the basic tasks that you can perform using a
touchscreen display:
• Tap or double-tap a folder or an application to open it.
• Move a finger quickly in the desired direction to flip through content in
the active window like pages in a book.
• Zoom-in by moving two fingers apart to enlarge the view of the active
window.
• Zoom-out by moving two fingers close together to reduce the view of
the active window.
• Press and hold a finger on the touch screen to open context-sensitive
menus.
• Rotate the active content by keeping a finger or thumb in place and
moving the other finger in an arched direction to the right or left.
Touchscreen 85

86 Touchscreen

Ports and Connectors


Audio Connectors
Audio connectors allow you to connect to amplifiers, speakers,
headphones, microphones, sound systems, or TVs for digital audio
output.
Types of audio connectors
Headphone connector – Connect a pair of headphones,
powered speaker, or sound system.
Microphone connector – Connect a personal computer
microphone for voice or sound input.
Line-in connector – Connect a recording/playback
device such as a cassette player, CD player, or VCR.
Line-out connector – Connect headphones or speakers
with integrated amplifiers.
Rear surround out – Connect multichannel-capable
speakers.
Center/LFE surround out – Connect a single subwoofer.
NOTE: The Low Frequency Effects (LFE) audio channel,
found in digital surround sound audio schemes, carries
only frequency information (80 Hz and below). The LFE
channel drives a subwoofer to provide extremely low
bass extension. Systems not using subwoofers can shunt
the LFE information to the main speakers in the surround
sound setup.
Side surround sound connector – Connect additional
speakers.
RCA S/PDIF connector – Transmit digital audio without
the need of analog audio conversion.
Optical S/PDIF connector – Transmit digital audio
without the need of analog audio conversion.
Audio Connectors 89

5.1 Audio
5.1 refers to the number of audio channels in most surround-sound
configurations. A 5.1 audio system uses five main audio channels (front
left, front right, center, left surround, and right surround) and one lowfrequency audio channel.
7.1 Audio
7.1 refers to the number of audio channels in high-end surround-sound
configurations. A 7.1 audio system uses two additional speakers (rear left
and rear right) in combination with the 5.1 audio system.
NOTE: 5.1 or 7.1 audio may not be supported on all computers.
NOTE: On computers with a discrete sound card, connect the
speakers to the connectors on the card.
USB
Universal Serial Bus (USB) is a standard to establish communication
between a computer and different devices. USB allows high speed
connection of peripherals to a computer. Using USB, you can connect
devices like mice, keyboards, printers, external drives, digital cameras,
mobile phones, and so on. USB also supports Plug-and-Play installation
and hot swapping.
Plug-and-Play allows your computer to recognize that a device is
plugged in without restarting your computer.
Hot swapping allows you to remove and connect different USB devices
without restarting your computer.
USB Connectors
Mini-USB – A mini-USB connector is a small cable connector which is
used in electronic devices primarily used for data connectivity. Devices
such as cameras, MP3 players, mobile phones, and so on use Mini USB
connector.
Micro-USB – A micro-USB connector is smaller than mini-USB connector
and allows you to communicate directly amongst the devices without a
need for a computer.
90 USB

USB Standards
USB 3.0 – Referred to as SuperSpeed USB, USB 3.0 is the latest version of
the USB standard. It supports data transmission speed of up to 4.8 gbps,
which is ten times faster than its predecessor USB 2.0, yet consumes
lesser power. USB 3.0 is backward compatible with earlier USB standards
such as USB 1.x and USB 2.0.
Debug Port – The debug port enables a user to run the USB 3.0 ports
in USB 2.0 mode temporarily for troubleshooting purposes and also in
situations where an OS reinstallation is done using a USB optical or Flash
drive.
USB 2.0 – Referred to as Hi-Speed USB, it provides additional bandwidth
for multimedia and storage applications. USB 2.0 supports data
transmission speed up to forty times faster than USB 1.1.
USB 1.x – Legacy USB standard supporting data transfer speeds up to
11mbps.
USB PowerShare – The USB PowerShare feature allows you to charge
USB devices when the computer is powered off or is in sleep state.
icon indicates that the USB connector supports PowerShare feature.
NOTE: Certain USB devices may not charge when the computer is
powered off or in sleep state. In such cases, turn on the computer to
charge the device.
NOTE: If you turn off your computer while charging a USB device,
the device stops charging. To continue charging, disconnect the
USBdevice and connect it again.
NOTE: Charging through the USB PowerShare feature is automatically
disabled when the battery charge reaches 10%. You can configure this
limit using the system setup.
USB 91

Digital Visual Interface (DVI)
Digital Visual Interface (DVI) carries high-resolution video signals. You
can use DVI to connect your computer to displays such as flat-panel
monitors, LCD TVs, and so on.
There are three types of DVI connections:
• DVI-D (DVI-Digital) – DVI-D is used for direct digital connection
between the video card (source) and the digital display. This provides
fast and high-quality video output.
• DVI- A (DVI-Analog) – DVI-A is used to send video signals to an analog
display like a CRT monitor or analog LCD.
• DVI- I (DVI-Integrated) – DVI-I is an integrated connector that can
send either a digital-to-digital signal or analog-to-analog signal. This
makes it more versatile as it can be used in both analog and digital
environments.
DVI-D DVI-A DVI-I
DisplayPort/Mini–DisplayPort
DisplayPort is a digital display interface that defines a royalty-free, digital
audio/video interconnect. DisplayPort allows you to connect a computer
to a display or home-theater system.
Mini-DisplayPort is a smaller version of the DisplayPort. Dell provides
Mini-DisplayPorts in place of DisplayPorts on the Dell Inspiron Mini series
of computers.
NOTE: DisplayPorts and Mini-DisplayPorts vary in size. To connect
devices that support DisplayPort to a Mini-DisplayPort connector, you
must use a Mini-DisplayPort to DisplayPort adapter.
92 Digital Visual Interface (DVI)

Advantages of DisplayPort
• Natively supports high resolutions and high refresh rates
• Supports 3D stereo transmission making it an ideal gaming interface
• DisplayPort cables can extend up to 15 meters (49.21 feet) without
requiring signal boosters
• Delivers a bandwidth of up to 10.8 gbps over standard cables
• Natively supports fiber optic cables
• Blu-ray Disc ready with built-in support for HDCP. With its
unique direct drive capability, DisplayPort simplifies the design of
ultra-elegant HDTVs, enabling ultra-thin high definition display panels
with separate electronics units that can be hidden from view
• Supports plug-and-play adapters that allow you to connect displays
using older connection standards such as DVI, HDMI, and VGA
HDMI
High Definition Multimedia Interface (HDMI) transmit audio and video
signals in a single digital interface. HDMI connects audio and video
sources such as set-top boxes, DVD players, Blu-ray Disc players,
computers, and video game consoles to compatible digital audio devices,
such as computers, monitors, video projectors, and digital televisions. A
HDMI cable is similar to a USB cable that slides into the connector of the
source device.
Advantages of HDMI
• Delivers high quality audio and video without the loss in quality due to
the conversion or compression of a video or audio signal.
• Delivers smoother and sharper pictures with a distinct reduction in
video noise. Sound is crisp and distortion free.
• Since it is a digital interface, HDMI is compatible with fixed-pixel
displays such as LCDs, plasma displays, and projectors.
HDMI 93

eSATA Connector
eSATA is a bus technology designed to connect external mass storage
devices, such as hard drives and optical drives, to your computer. eSATA
provides considerably higher throughput as compared to USB 2.0 or
FireWire 800. eSATA cables can be up to 2 meters long.
eSATA ports can be standalone or can be present in the form of an
eSATA/USB combo port.
S/PDIF
S/PDIF is a standard for transferring audio in digital format.
You can connect the S/PDIF output from your computer to the S/PDIF
input on your home theater receiver. This connection allows you to set
up a 5.1 audio (also known as 6-channel audio) connection.
There are two kinds of S/PDIF connections:
• Optical – Set up by optical fiber with TOSLINK connectors
• Coaxial – Set up by coaxial cable with RCA connectors
IEEE 1394
The IEEE 1394 interface is a serial bus interface standard and enables
simple, low-cost, high-bandwidth isochronous (real-time) data
interaction between computers, peripherals, and consumer electronics
products such as camcorders, VCRs, printers, TVs, and digital cameras.
With IEEE 1394-compatible products and systems, you can transfer video
or still images without losing quality.
Key Features
• Digital – Provides better signal quality as it does not require
digital-analog-digital conversion.
• Connectivity – Uses a thin serial cable that, through the use of
repeaters, can be extended to 100 meters or more over CAT5,
fiberoptic, or coaxial cables.
• Easy to use – Eliminates the need for special drivers or perform
complicated set-ups.
• Hot pluggable – Enables devices to be added and removed while the
device and computer are turned on.
94 eSATA Connector

• Flexible – Allows you to connect devices to each other by daisychaining them together, without the need for hubs or switches. Also
supports branching, looping, and other topologies, which reduces
cabling complexity. Supports up to 64 devices on a single connection.
• Fast – Supports delivery of time-critical data at multiple speeds,
currently including 100, 200 400, and 800 Megabits per second over
a single continuous cable or bus. This enables high-quality audio and
video applications at low costs.
Types of IEEE 1394 Cables
4-pin connector
6-pin connector
9-pin connector
IEEE 1394 95

Comparing USB and IEEE 1394
Feature USB IEEE1394
Data transfer rate USB 1.1: 12 Mbps
USB 2.0: 480 Mbps
Number of devices 127 63
Plug and play Yes Yes
Hot-pluggable Yes Yes
Isochronous devices Yes Yes
Bus type Yes Yes
Network topology Hub Daisy chain
IEEE 1394a: 400 Mbps
IEEE 1394b: 800 Mbps
96 IEEE 1394

Network


Network
A computer network provides connectivity between your computer and
the Internet, another computer, or a peripheral such as a printer. For
example, with a network set up in a home or small office, you can:
• Print to a shared printer
• Access drives and files on another computer
• Share files
• Browse other networks
• Access the Internet
You can set up a local area network (LAN) using a broadband modem and
network cables, or you can set up a wireless LAN (WLAN) using a wireless
router or access point.
Network Connections Wizard guides you through the process of setting
up a computer network and connecting to other networks. For more
information, see Setting Up Your Network.
Local Area Network (LAN)
LAN connects two or more computers with each other through a
network cable connected to each computer. This type of computer
network generally covers a small area. A LAN can be connected to
another LAN over any distance through telephone lines and radio waves
to form a wide area network (WAN).
Network 99

Wireless Local Area Network (WLAN)
WLAN connects two or more computers with each other and the Internet
over the air waves rather than through a network cable connected to
each computer.
In a WLAN, a radio communications device (an access point or wireless
router) connects the networked computers and peripherals, and provides
Internet or network access. The access point or wireless router and the
wireless network card in the computer communicate by broadcasting
data from their antennas over the air waves.
Wireless Wide Area Network (WWAN)
WWAN is also known as Mobile Broadband network, is a high-speed
digital cellular network that provides Internet access over a much wider
geographical area than a WLAN, which typically covers only from 100
to 1000 feet. Your computer can maintain Mobile Broadband network
access as long as the computer is within a cellular-data coverage zone.
Contact your cellular/Internet service provider for coverage details.
Wireless Personal Area Network (WPAN)
WPAN helps interconnect wireless devices centered around your personal
workspace. WPAN technology supports communication over a short
distance. Bluetooth, used as the basis for a new standard, IEEE 802.15. is
an example of WPAN
100 Network
 Loading...