

Page 1

FILE LOCATION: C:\Documents and Settings\julie_Woodson\My
Documents\eDocs\Edocks\emby\en\source\title.fm
DELL CONFIDENTIAL – PRELIMINARY 7/22/08 – FOR PROOF ONLY
Template Last Updated - 2/21/2007
Dell™ External Media Bay
User’s Guide
www.dell.com | support.dell.com
Page 2
FILE LOCATION: C:\Documents and Settings\julie_Woodson\My
Notes, Notices, and Cautions
NOTE: A NOTE indicates important information that helps you make better use of
your computer.
NOTICE: A NOTICE indicates either potential damage to hardware or loss of data
and tells you how to avoid the problem.
CAUTION: A CAUTION indicates a potential for property damage, personal injury,
or death.
____________________
Information in this document is subject to change without notice.
© 2008 Dell Inc. All rights reserved.
Reproduction in any manner whatsoever without the written permission of Dell Inc. is strictly
forbidden.
Trademarks used in this text: Dell and the DELL logo are trademarks of Dell Inc.
Other trademarks and trade names may be used in this document to refer to either the entities claiming
the marks and names or their products. Dell Inc. disclaims any proprietary interest in trademarks and
trade names other than its own.
June 2008 Rev. A00
DELL CONFIDENTIAL – PRELIMINARY 7/22/08 – FOR PROOF ONLY
Page 3

FILE LOCATION: C:\Documents and Settings\julie_Woodson\My
Documents\eDocs\Edocks\emby\en\source\bookTOC.fm
Contents
1 About Your Dell™ External Media Bay . . . 5
2 Using the External Media Bay
Connecting the External Media Bay to the Computer. . . 7
Inserting a Media Bay Module Into the External Media Bay
Removing the Media Bay Module
Securing the External Media Bay
. . . . . . . . . . 7
. . . . . . . . . . . . . 9
. . . . . . . . . . . . 10
3 Specifications . . . . . . . . . . . . . . . . . . . . . 11
4 Finding Information
Glossary
. . . . . . . . . . . . . . . . . . . . . . . . . . . . . 15
. . . . . . . . . . . . . . . . . 13
8
Contents
3
Page 4

FILE LOCATION: C:\Documents and Settings\julie_Woodson\My
Documents\eDocs\Edocks\emby\en\source\bookTOC.fm
4 Contents
Page 5
About Your Dell™ External Media
Bay
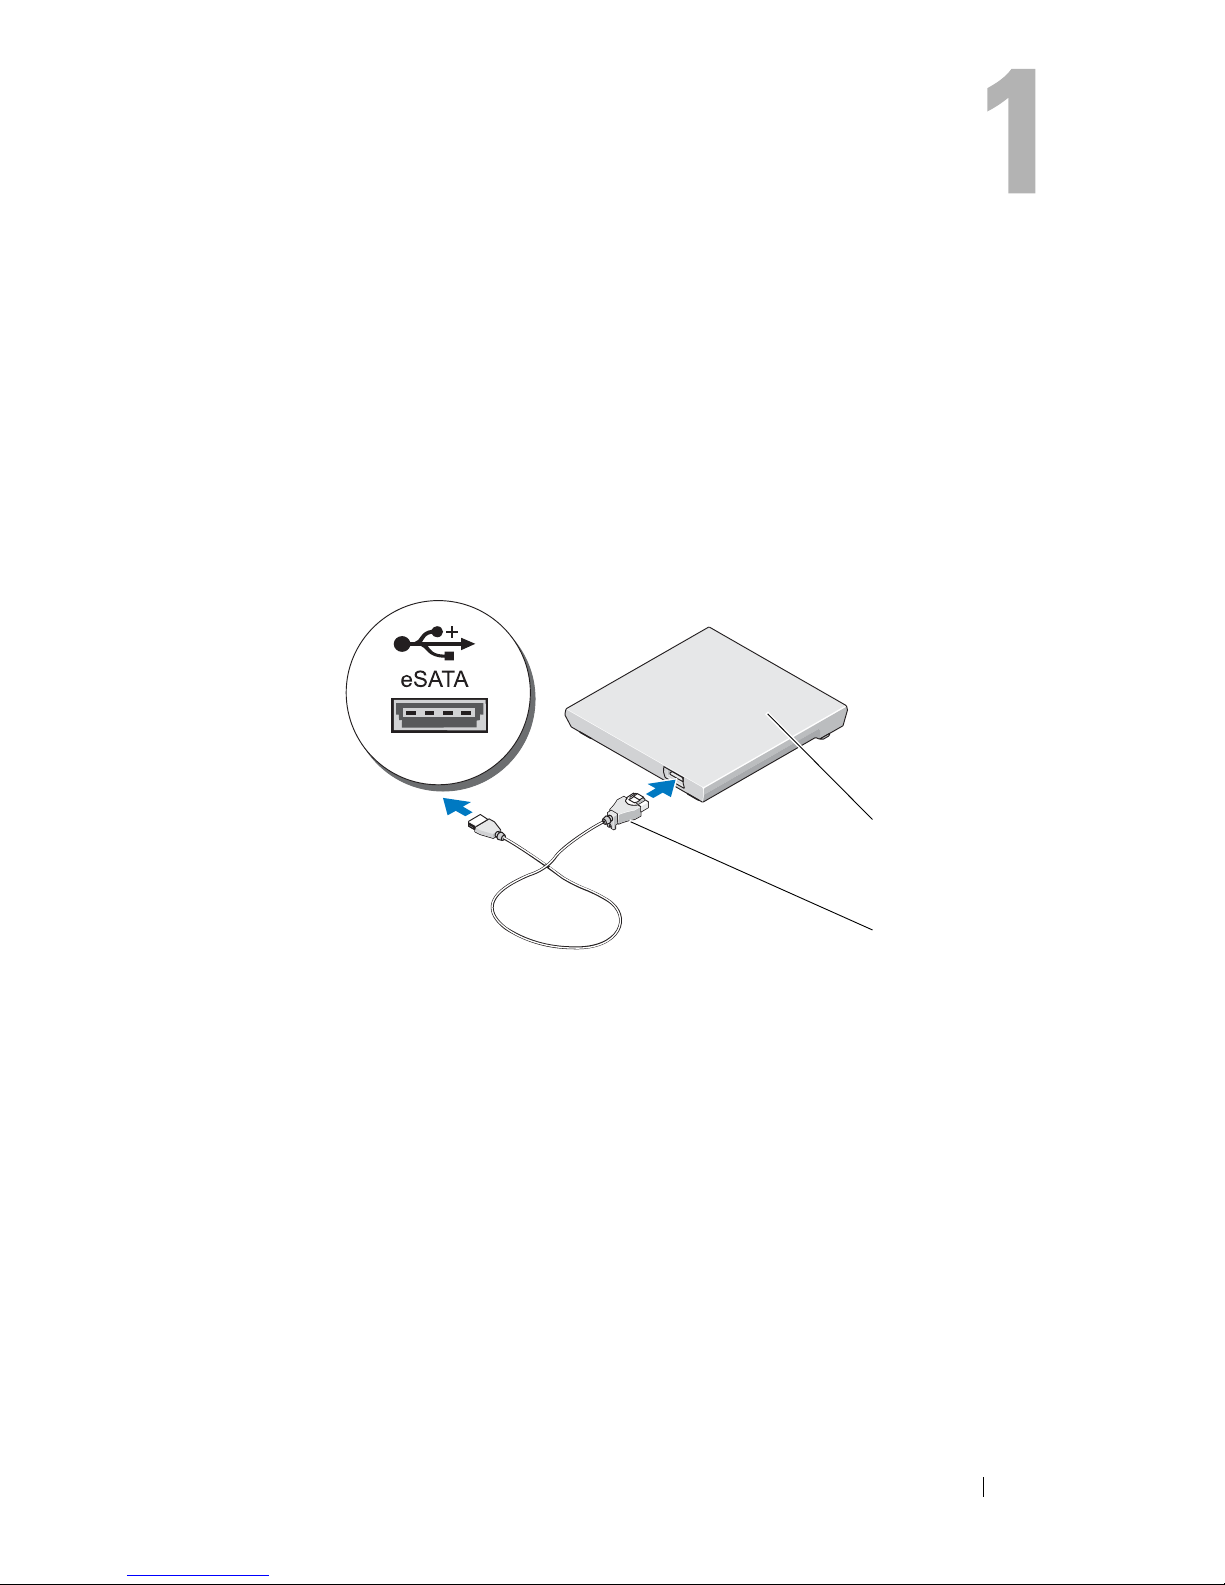
The external media bay supports the following devices for Dell E-Series
laptop computers:
• 9.5" eSATA optical drives
• 1.8" SATA HDD or SSD
1 external media bay 2 eSATA cable
(DVD, Combo, DVR +/-RW)
1
2
DELL CONFIDENTIAL – PRELIMINARY 7/22/08 - FOR PROOF ONLY
Template Last Updated - 2/7/2007 About Your Dell™ External Media Bay 5
Page 6

FILE LOCATION: C:\Documents and Settings\julie_Woodson\My
Documents\eDocs\Edocks\emby\en\source\about.fm
DELL CONFIDENTIAL – PRELIMINARY 7/22/08 - FOR PROOF ONLY
6 About Your Dell™ External Media Bay
Page 7
Using the External Media Bay
Connecting the External Media Bay to the
Computer
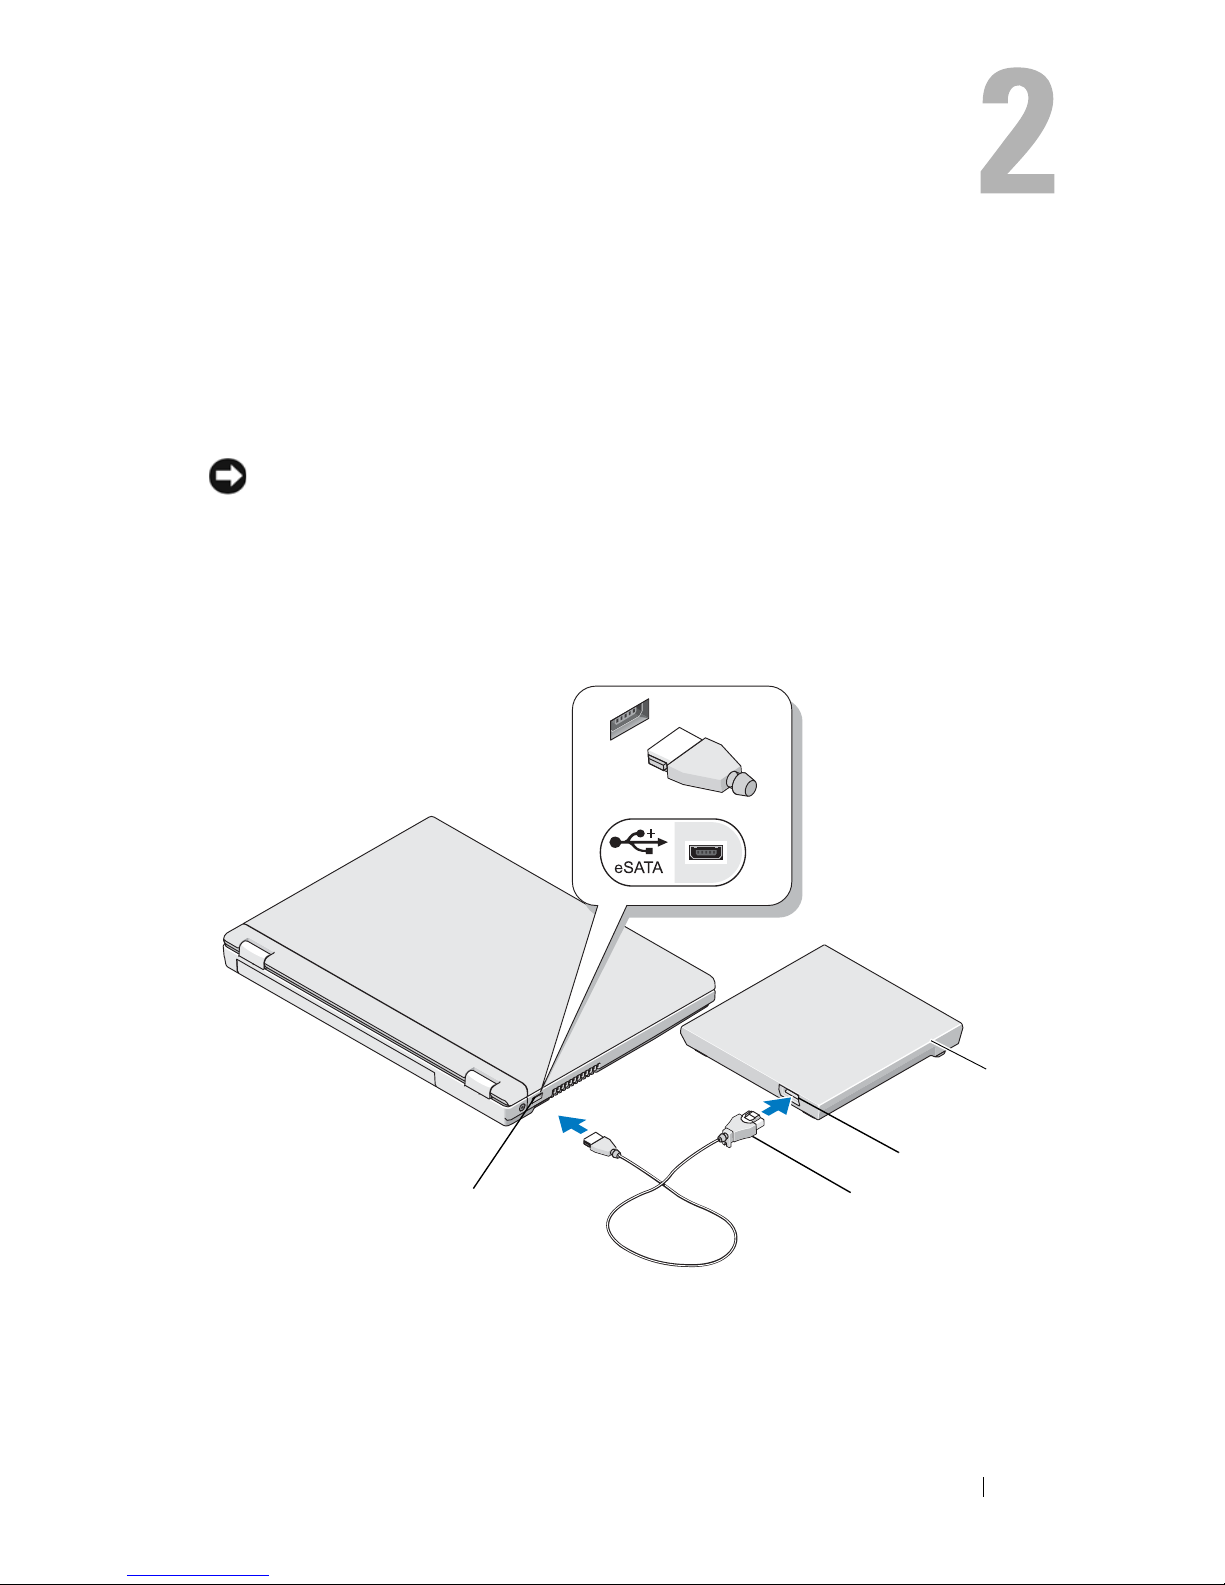
NOTICE: Only use the eSATA cable that shipped with your external media bay.
1
Connect the eSATA cable to the eSATA connector on your computer or
port replicator.
2
Connect the other end of your eSATA cable to the eSATA connector on
your external media bay.
1 external media bay 2 eSATA connector on external media bay
3 eSATA cable 4 eSATA connector on laptop
DELL CONFIDENTIAL – PRELIMINARY 7/22/08 - FOR PROOF ONLY
Template Last Updated - 2/7/2007 Using the External Media Bay 7
1
2
4
3
Page 8
FILE LOCATION: C:\Documents and Settings\julie_Woodson\My
Documents\eDocs\Edocks\emby\en\source\using.fm
Inserting a Media Bay Module Into the External
Media Bay
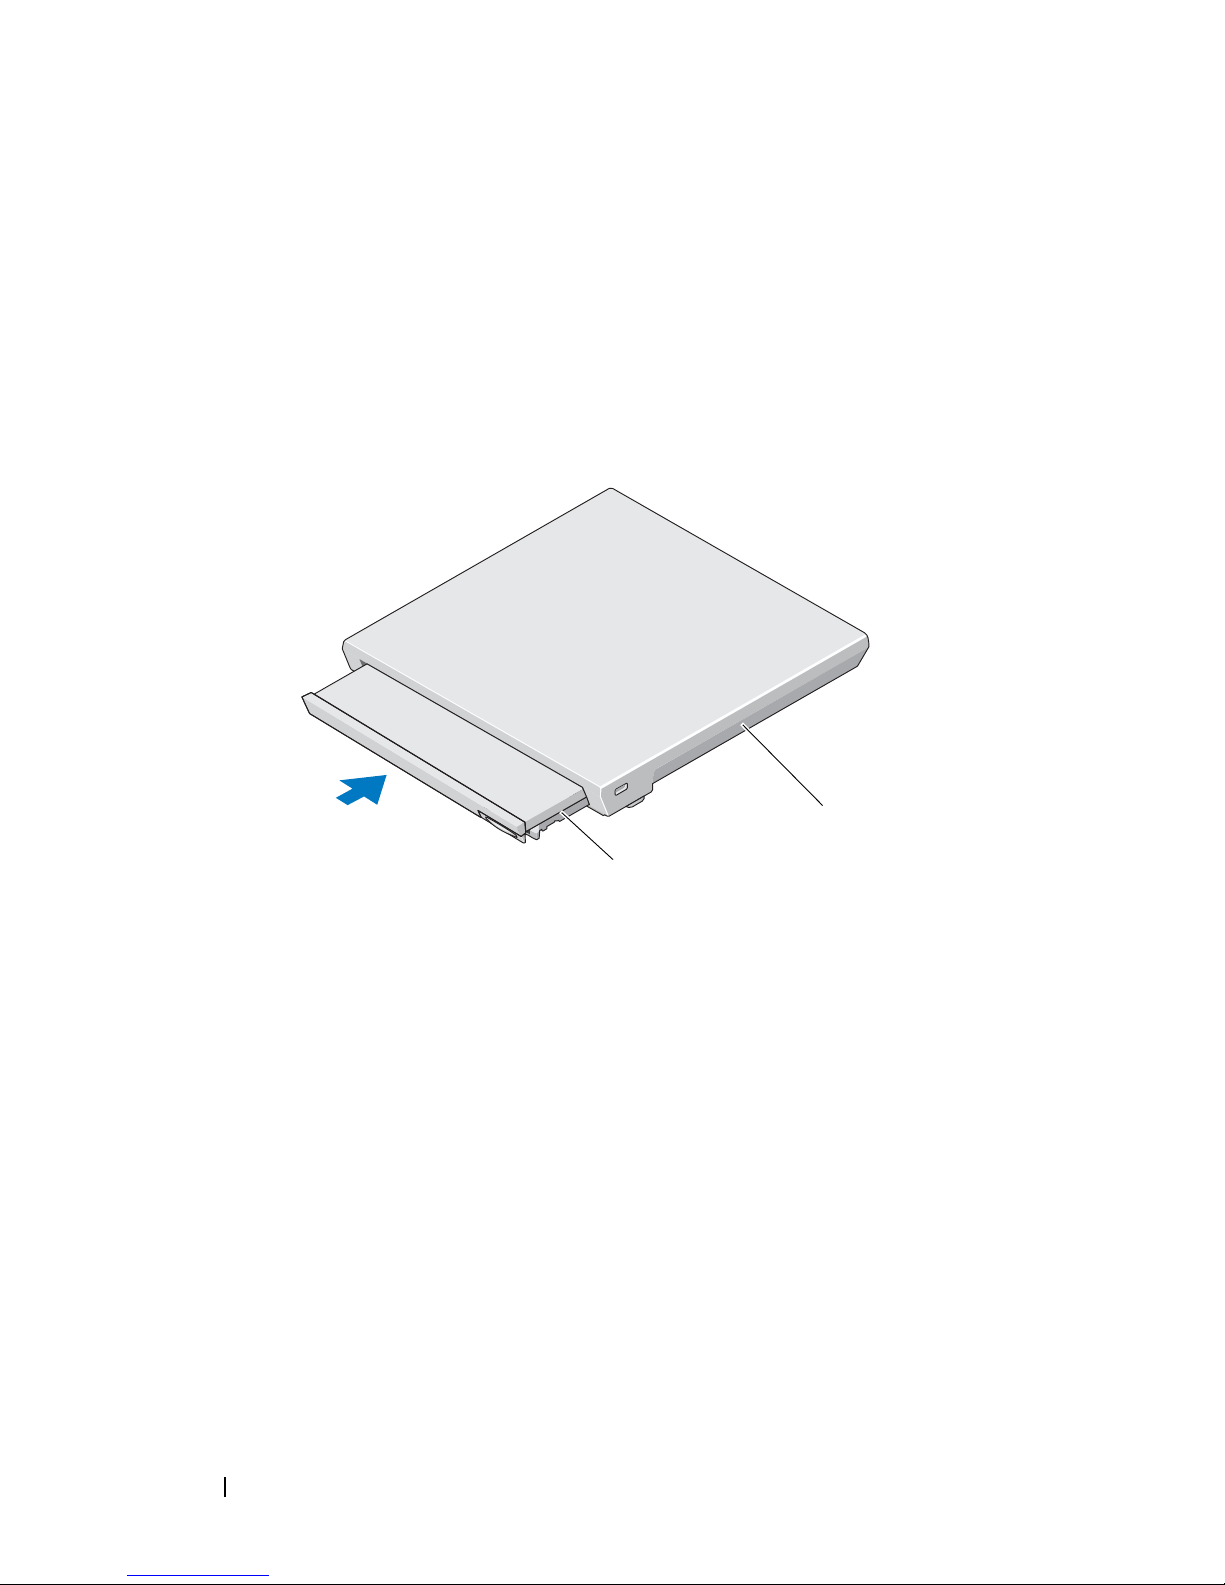
To insert a module into the external media bay:
1
Place the module in the media bay.
2
Push the module until it clicks into place and the release latch secures the
module in the bay.
2
1 external media bay 2 media bay module
1
DELL CONFIDENTIAL – PRELIMINARY 7/22/08 - FOR PROOF ONLY
8 Using the External Media Bay
Page 9
FILE LOCATION: C:\Documents and Settings\julie_Woodson\My
Documents\eDocs\Edocks\emby\en\source\using.fm
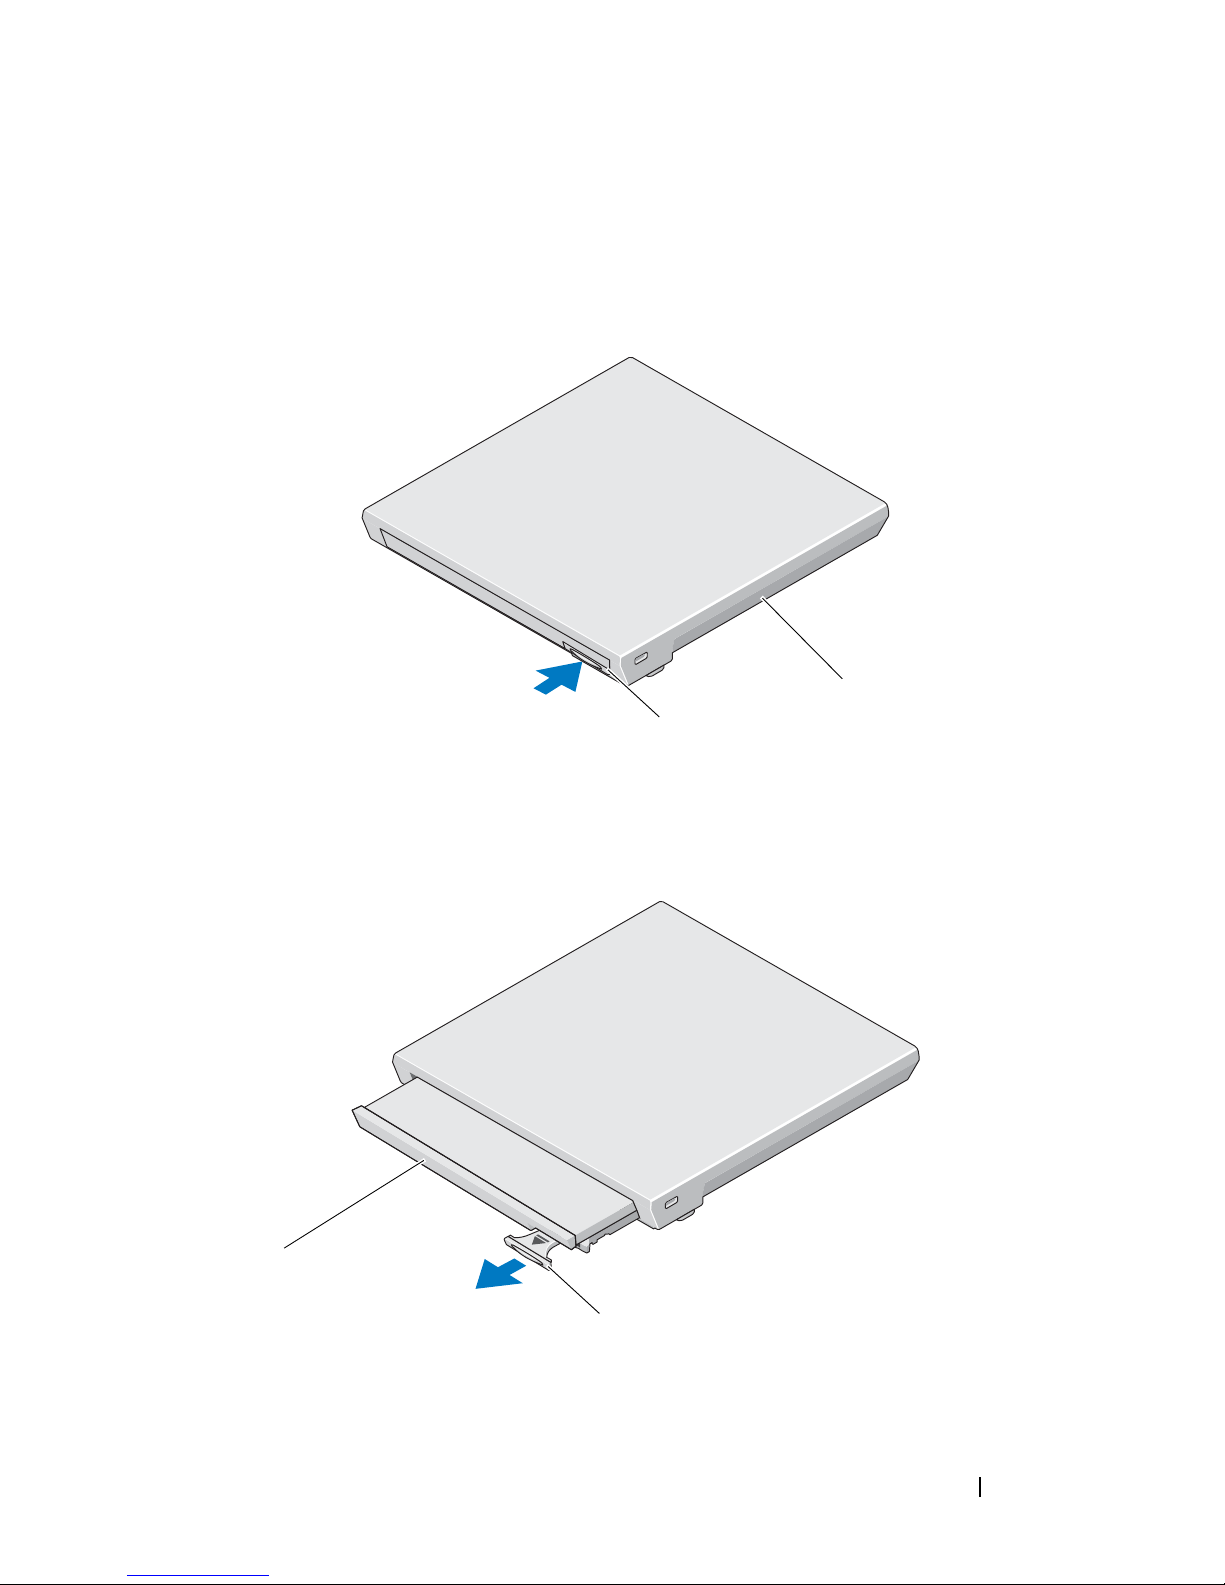
Removing the Media Bay Module
To remove a module from the media bay:
Push in on the release latch to eject it from the media bay.
1
1
2
1 external media bay 2 release latch
2
Pull the release latch to remove the media bay module from the media bay.
1
1 media bay module 2 release latch
DELL CONFIDENTIAL – PRELIMINARY 7/22/08 - FOR PROOF ONLY
2
Using the External Media Bay 9
Page 10
FILE LOCATION: C:\Documents and Settings\julie_Woodson\My
Documents\eDocs\Edocks\emby\en\source\using.fm
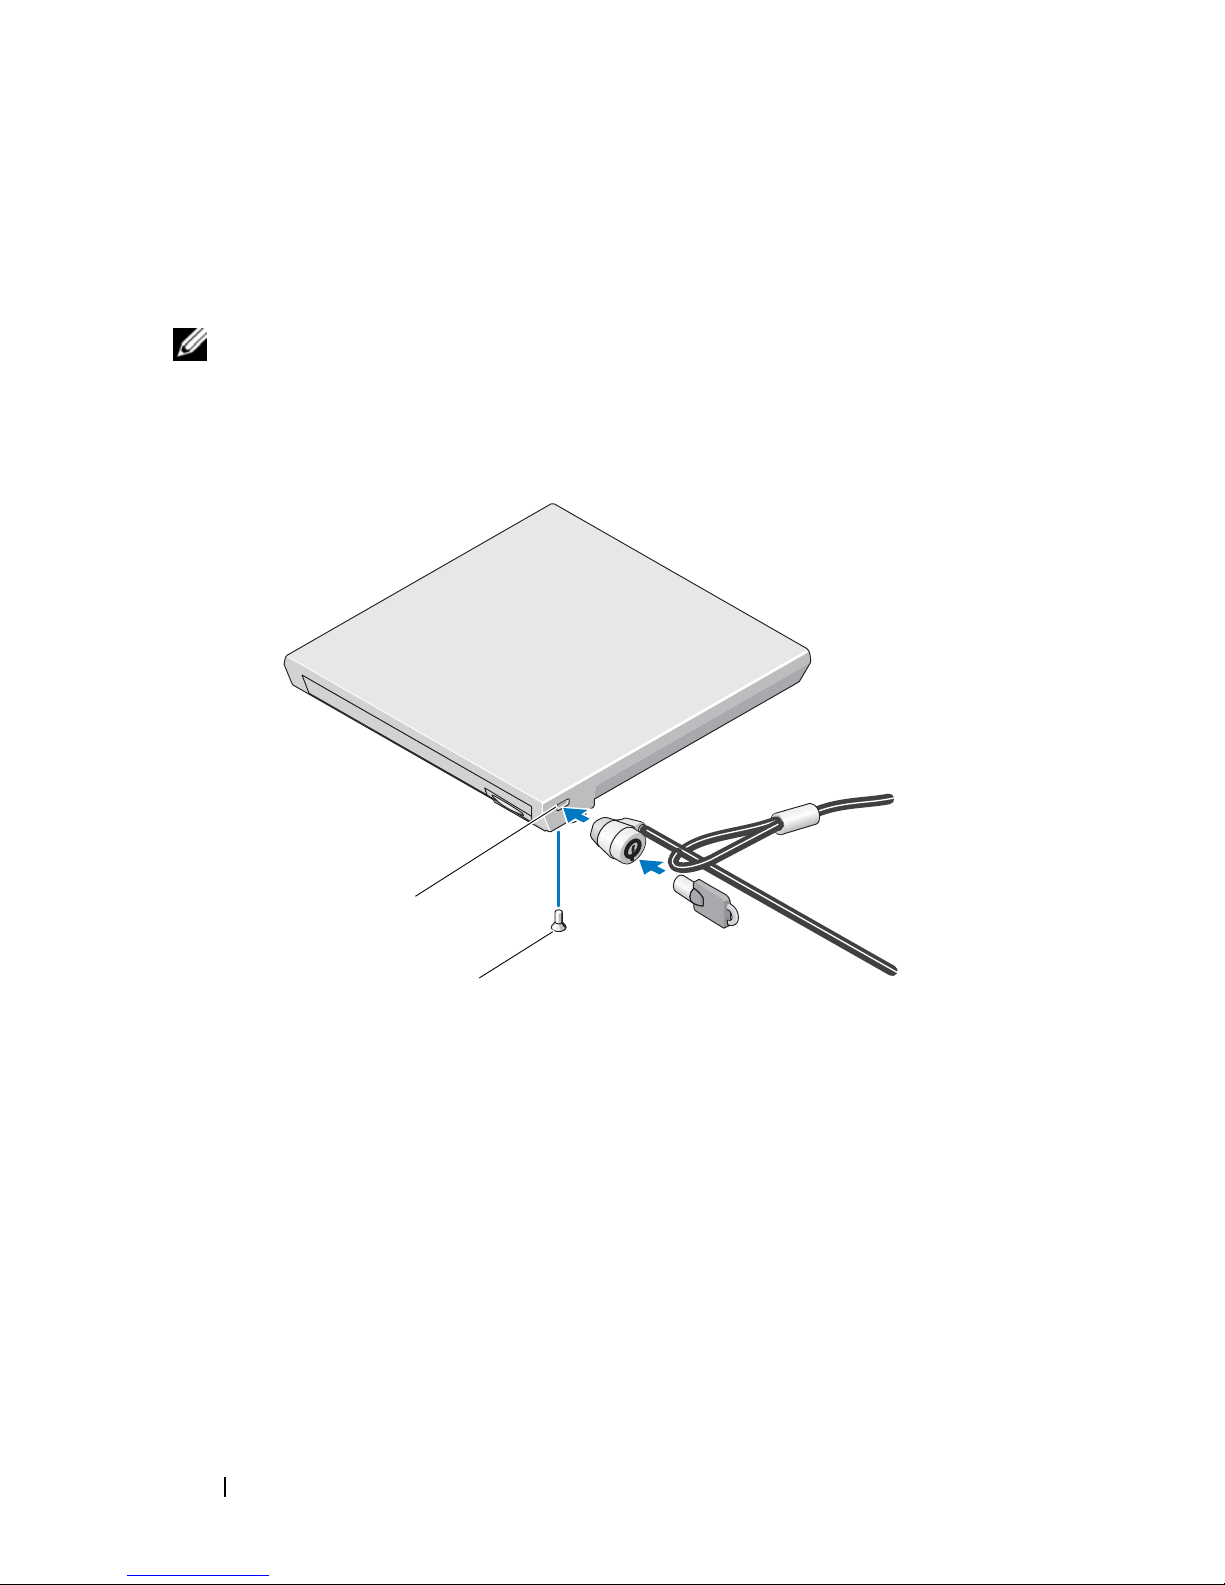
Securing the External Media Bay
1
Install the security screw provided with the external media bay.
2
Insert the security cable into the security cable slot.
NOTE: Antitheft devices usually include a segment of metal-stranded cable with an
attached locking device and associated key (available at dell.com). For instructions
on how to install this kind of antitheft device, see the documentation that came with
the device.
2
1
1 security screw 2 security cable slot
DELL CONFIDENTIAL – PRELIMINARY 7/22/08 - FOR PROOF ONLY
10 Using the External Media Bay
Page 11
Specifications
Physical
Length 160 mm (6.3 in)
Height 17.3 mm (0.68 in)
Width 152 mm (5.98 in)
I/0
eSATA
eSATA
connector one connector
cable
NOTICE: Only use the eSATA cable that shipped
with your external media bay.
DELL CONFIDENTIAL – PRELIMINARY 7/22/08 - FOR PROOF ONLY
Template Last Updated - 2/7/2007 Specifications 11
Page 12

FILE LOCATION: C:\Documents and Settings\julie_Woodson\My
Documents\eDocs\Edocks\emby\en\source\spec.fm
DELL CONFIDENTIAL – PRELIMINARY 7/22/08 - FOR PROOF ONLY
12 Specifications
Page 13
Finding Information
Documents Contents
Safety, Regulatory, Warranty, and Support
Documentation
This type of information may have
shipped with your computer. For
additional regulatory information, see the
Regulatory Compliance Homepage on
www.dell.com at the following location:
www.dell.com/regulatory_compliance.
• Warranty information
• Terms and Conditions (U.S. only)
• Safety instructions
• Regulatory information
• Ergonomics information
• End User License Agreement
DELL CONFIDENTIAL – PRELIMINARY 7/22/08 - FOR PROOF ONLY
Template Last Updated - 2/7/2007 Finding Information 13
Page 14

FILE LOCATION: C:\Documents and Settings\julie_Woodson\My
Documents\eDocs\Edocks\emby\en\source\findinfo.fm
DELL CONFIDENTIAL – PRELIMINARY 7/22/08 - FOR PROOF ONLY
14 Finding Information
Page 15

FILE LOCATION: C:\Documents and Settings\julie_Woodson\My
Documents\eDocs\Edocks\emby\en\source\glossary.fm
Glossary
D
docking device — Provides port replication, cable management, and security features
to adapt your laptop computer to a desktop workspace.
E
eSATA — External Serial Advanced Technology Attachment — An interface for
external Serial ATA devices.
M
media bay module — Allows user to swap media including optical drives (DVD,
DVD/CDRW combo, DVD+/-RW), second hard drives (1.8" 5400 SATA or SSD), and
lithium polymer batteries.
DELL CONFIDENTIAL – PRELIMINARY 7/22/08 - FOR PROOF ONLY
Glossary 15
Page 16

FILE LOCATION: C:\Documents and Settings\julie_Woodson\My
Documents\eDocs\Edocks\emby\en\source\glossary.fm
DELL CONFIDENTIAL – PRELIMINARY 7/22/08 - FOR PROOF ONLY
16 Glossary
 Loading...