

Page 1

9p915bk0.book Page 1 Thursday, April 4, 2002 9:26 AM
Dell™ Dimension™ 8200
Solutions Guide
www.dell.com | support.dell.com
Page 2
9p915bk0.book Page 2 Thursday, April 4, 2002 9:26 AM
Hints, Notices, and Cautions
Abbreviations and Acronyms
For a complete list o f abbr eviat ions and acrony ms, see the Tell Me How help
file. To access help files, see page 24.
HINT: A HINT indicates important information that helps you make better
use of your computer.
NOTICE: A NOTICE indicates either potential damage to hardware or loss of
data and tells you how to avoid the problem.
CAUTION: A CA UTION indicat es a po tenti al for proper ty dama ge,
personal injury, or death.
____________________
Information in this document is subject to change without notice.
© 2002 Dell Computer Corporation. All rights reserved.
Reproduction in any mann er whatsoever without the written permi ssion of D el l Co mputer
Corporation is s tr ictly forbi dden.
Trademarks used in this text: Dell, the DELL logo, Dimension, Inspiron, Latitude, OptiPlex, Dell
Precision, DellPlus, and DellNet are trademarks of Dell Computer Corporation; EMC is the
registered tradema rk of EMC Corporation; Intel and Pentium are registered tradem a r ks of Int el
Corporation; Microsoft and Windows are registered trademarks of Microsoft Corporation.
Other trademarks and trade names may be used in this document to refer to either the entities claiming
the marks and names or their products. Dell Computer Corporation disclaims any proprietary interest
in trademarks and trade name s oth er than its own.
This product incorporat es copyright protection techn ology that is protected by method claims of
certain U.S. patents and othe r in te ll ec tu al property rights owned by Macrovisi on Corporation and
other rights owners. Use of this copyright protection technology must be authorized by Macrovision
Corporation, and is intended for home and other limited viewing use s onl y unless otherwise
authorized by Macrovision Corporation. Reverse engineering or disassemb ly is prohibited.
April 2002 P/N 9P915 Rev. A00
Page 3

9p915bk0.book Page 3 Thursday, April 4, 2002 9:26 AM
Contents
Safety Instructions . . . . . . . . . . . . . . . . . . . . . . . . . 9
When Using Your Computer
Ergonomic Comput ing Habits . . . . . . . . . . . . . . . . . . 10
When Working Inside Your Com puter
Protecting Against Electrostatic Discharge
Battery Disposal . . . . . . . . . . . . . . . . . . . . . . . . 14
. . . . . . . . . . . . . . . . . . . 9
. . . . . . . . . . . . . . 12
. . . . . . . . . . . 13
1 Setting Up
Connecting a Printer . . . . . . . . . . . . . . . . . . . . . . . . 16
Parallel Printer
USB Printer . . . . . . . . . . . . . . . . . . . . . . . . . . 17
Installing the Printer Driver
Transferring Information to a New Computer
(Windows XP Only)
Setting Up a Home and Office Network
(Windows XP Only)
Turning Off the Computer
Windows XP
. . . . . . . . . . . . . . . . . . . . . . . . . . 20
Windows Me and Windows 2000
2 Solving Problems
Finding Solutions . . . . . . . . . . . . . . . . . . . . . . . . . . 22
. . . . . . . . . . . . . . . . . . . . . . . . . 16
. . . . . . . . . . . . . . . . . . . 18
. . . . . . . . . . . . . . . . . . . . . . . . . 19
. . . . . . . . . . . . . . . . . . . . . . . . . 19
. . . . . . . . . . . . . . . . . . . . . 20
. . . . . . . . . . . . . . . . 20
Accessing Help Files
Power Problems . . . . . . . . . . . . . . . . . . . . . . . . . . . 25
. . . . . . . . . . . . . . . . . . . . . . . . 24
Contents 3
Page 4

9p915bk0.book Page 4 Thursday, April 4, 2002 9:26 AM
Start-Up Error Messages . . . . . . . . . . . . . . . . . . . . . 25
Video and Monitor Problems . . . . . . . . . . . . . . . . . . . 26
If the screen is blank
If the screen is difficult to read . . . . . . . . . . . . . . . . . 27
Sound and Speaker Problems . . . . . . . . . . . . . . . . . . . 28
. . . . . . . . . . . . . . . . . . . . . . 26
Printer Problems
If you cannot print to a parallel port printer
If you cannot print to a USB printer
Scanner Problems
. . . . . . . . . . . . . . . . . . . . . . . . . 29
. . . . . . . . . . 29
. . . . . . . . . . . . . . 30
. . . . . . . . . . . . . . . . . . . . . . . . . 31
Modem Problems . . . . . . . . . . . . . . . . . . . . . . . . . 32
Mouse Problems . . . . . . . . . . . . . . . . . . . . . . . . . . 34
Keyboard Problems
. . . . . . . . . . . . . . . . . . . . . . . . 35
Drive Problems . . . . . . . . . . . . . . . . . . . . . . . . . . 36
If you cannot save a file to a floppy disk
. . . . . . . . . . . . 36
If you cannot play a music CD or install a program
from a CD
. . . . . . . . . . . . . . . . . . . . . . . . . . . 37
If you cannot play a DVD movie . . . . . . . . . . . . . . . . 38
If the CD-RW drive stops writing . . . . . . . . . . . . . . . . 38
If you have a hard drive problem
Network Problems
. . . . . . . . . . . . . . . . . . . . . . . . . 39
. . . . . . . . . . . . . . . . 39
®
Microsoft
Windows® Error Messages . . . . . . . . . . . . . . 40
General Program Problems . . . . . . . . . . . . . . . . . . . . 41
A program crashes
A program stops responding . . . . . . . . . . . . . . . . . . 41
A program error causes the system to lock up
A solid blue screen appears
A program is designed for an earlier Windows
operating system
4 Contents
. . . . . . . . . . . . . . . . . . . . . . . 41
. . . . . . . . . 41
. . . . . . . . . . . . . . . . . . 41
. . . . . . . . . . . . . . . . . . . . . . . . 42
Page 5

9p915bk0.book Page 5 Thursday, April 4, 2002 9:26 AM
Internet Connection Problems . . . . . . . . . . . . . . . . . . . 42
If you have a problem with your Internet connection
E-Mail Problems . . . . . . . . . . . . . . . . . . . . . . . . . . 44
. . . . . . . 42
Resolving Other Technical Problems
. . . . . . . . . . . . . . . . 44
Reinstalling Drivers . . . . . . . . . . . . . . . . . . . . . . . . . 44
Using the Windows XP Device Driver Rollback
Resolving Software and Hardware Incompatibilities
Windows XP
. . . . . . . . . . . . . . . . . . . . . . . . . . 47
. . . . . . . . . 46
. . . . . . . 47
Windows Me . . . . . . . . . . . . . . . . . . . . . . . . . . 48
Windows 2000 . . . . . . . . . . . . . . . . . . . . . . . . . 49
Using System Restore . . . . . . . . . . . . . . . . . . . . . . . 50
Creating a Restore Point
. . . . . . . . . . . . . . . . . . . . 51
Restoring the Computer to an Earlier Operating State . . . . . . 52
Undoing the Last System Restore
Reinstalling Windows XP
. . . . . . . . . . . . . . . . . . . . . . 53
. . . . . . . . . . . . . . . . 53
Reinstalling Windows Me . . . . . . . . . . . . . . . . . . . . . . 55
Reinstalling Windows 2000 . . . . . . . . . . . . . . . . . . . . 57
3 Adding Parts
Front and Back View of the C omputer . . . . . . . . . . . . . . . 62
Reattaching the Front Door and Hinge Arms
Reattaching the Front Door
Reattaching the Hinge Arms
Opening the Computer Cove r
Looking Inside Your Computer . . . . . . . . . . . . . . . . . . . 68
System Board
Adding Cards
. . . . . . . . . . . 64
. . . . . . . . . . . . . . . . . . . 64
. . . . . . . . . . . . . . . . . . 65
. . . . . . . . . . . . . . . . . . . 67
. . . . . . . . . . . . . . . . . . . . . . . . . . 70
. . . . . . . . . . . . . . . . . . . . . . . . . . . . 71
Contents 5
Page 6

9p915bk0.book Page 6 Thursday, April 4, 2002 9:26 AM
Removing Cards . . . . . . . . . . . . . . . . . . . . . . . . . . 73
Adding Memory . . . . . . . . . . . . . . . . . . . . . . . . . . 75
RDRAM Overview
. . . . . . . . . . . . . . . . . . . . . . . 76
Replacing the AGP Card
Adding a Second Hard Drive . . . . . . . . . . . . . . . . . . . 81
Adding Other Drives . . . . . . . . . . . . . . . . . . . . . . . . 84
5.25-Inch Devices
3.5-Inch Devices
Closing the Computer Cover . . . . . . . . . . . . . . . . . . . 90
4 Appendix
Specifications . . . . . . . . . . . . . . . . . . . . . . . . . . . 92
Standard Settings . . . . . . . . . . . . . . . . . . . . . . . . . 96
Viewing Settings
System Setup Program Screens . . . . . . . . . . . . . . . . 98
Clearing Forgotten Passwords . . . . . . . . . . . . . . . . . . . 98
Replacing the Battery . . . . . . . . . . . . . . . . . . . . . . . 99
. . . . . . . . . . . . . . . . . . . . . . 80
. . . . . . . . . . . . . . . . . . . . . . . 85
. . . . . . . . . . . . . . . . . . . . . . . . 87
. . . . . . . . . . . . . . . . . . . . . . . . 97
6 Contents
Dell Technical Support Policy (U.S. Only)
Definition of "Dell-Installed" Software and Peripherals
Definition of "Third-Party" Software and Peripherals
Contacting Dell
. . . . . . . . . . . . . . . . . . . . . . . . . . 102
Returning Items for Warranty Repair or Credit
Regulatory Information
. . . . . . . . . . . . . . . . . . . . . . 117
NOM Information (Mexico Only)
. . . . . . . . . . . . 101
. . . . . 101
. . . . . . 102
. . . . . . . . . 117
. . . . . . . . . . . . . . . . 119
Limited Warranties and Return Policy . . . . . . . . . . . . . . 120
One-Year Limited Warranty (U.S. Only)
. . . . . . . . . . . . 120
Two-Year Limited Warranty (U.S. Only) . . . . . . . . . . . . 122
Page 7

9p915bk0.book Page 7 Thursday, April 4, 2002 9:26 AM
Three-Year Limited Warranty (U.S. Only) . . . . . . . . . . . 126
Four-Year Limited Warranty (U.S. Only) . . . . . . . . . . . 129
One-Year Limited Warranty (Canada Only)
Two-Year Limited Warranty (Canada Only) . . . . . . . . . . 134
Three-Year Limited Warranty (Canada Only) . . . . . . . . . 137
"Total Satisfaction" Return Policy (U.S. Only)
One-Year End-User Manufacturer Guarantee
(Latin America and the Caribbean Only)
Index . . . . . . . . . . . . . . . . . . . . . . . . . . . . . . . . 145
. . . . . . . . . . 132
. . . . . . . . . 141
. . . . . . . . . . . . 142
Contents 7
Page 8

9p915bk0.book Page 8 Thursday, April 4, 2002 9:26 AM
8 Contents
Page 9
9p915bk0.book Page 9 Thursday, April 4, 2002 9:26 AM
Safety Instructions
As you use your computer, observe the following safe-handling guidelines.
When Using Your Computer
CAUTION: Do not operate your computer with any cover(s)
(including the computer cover , filler brackets, front-panel inserts,
and so on) removed or opened.
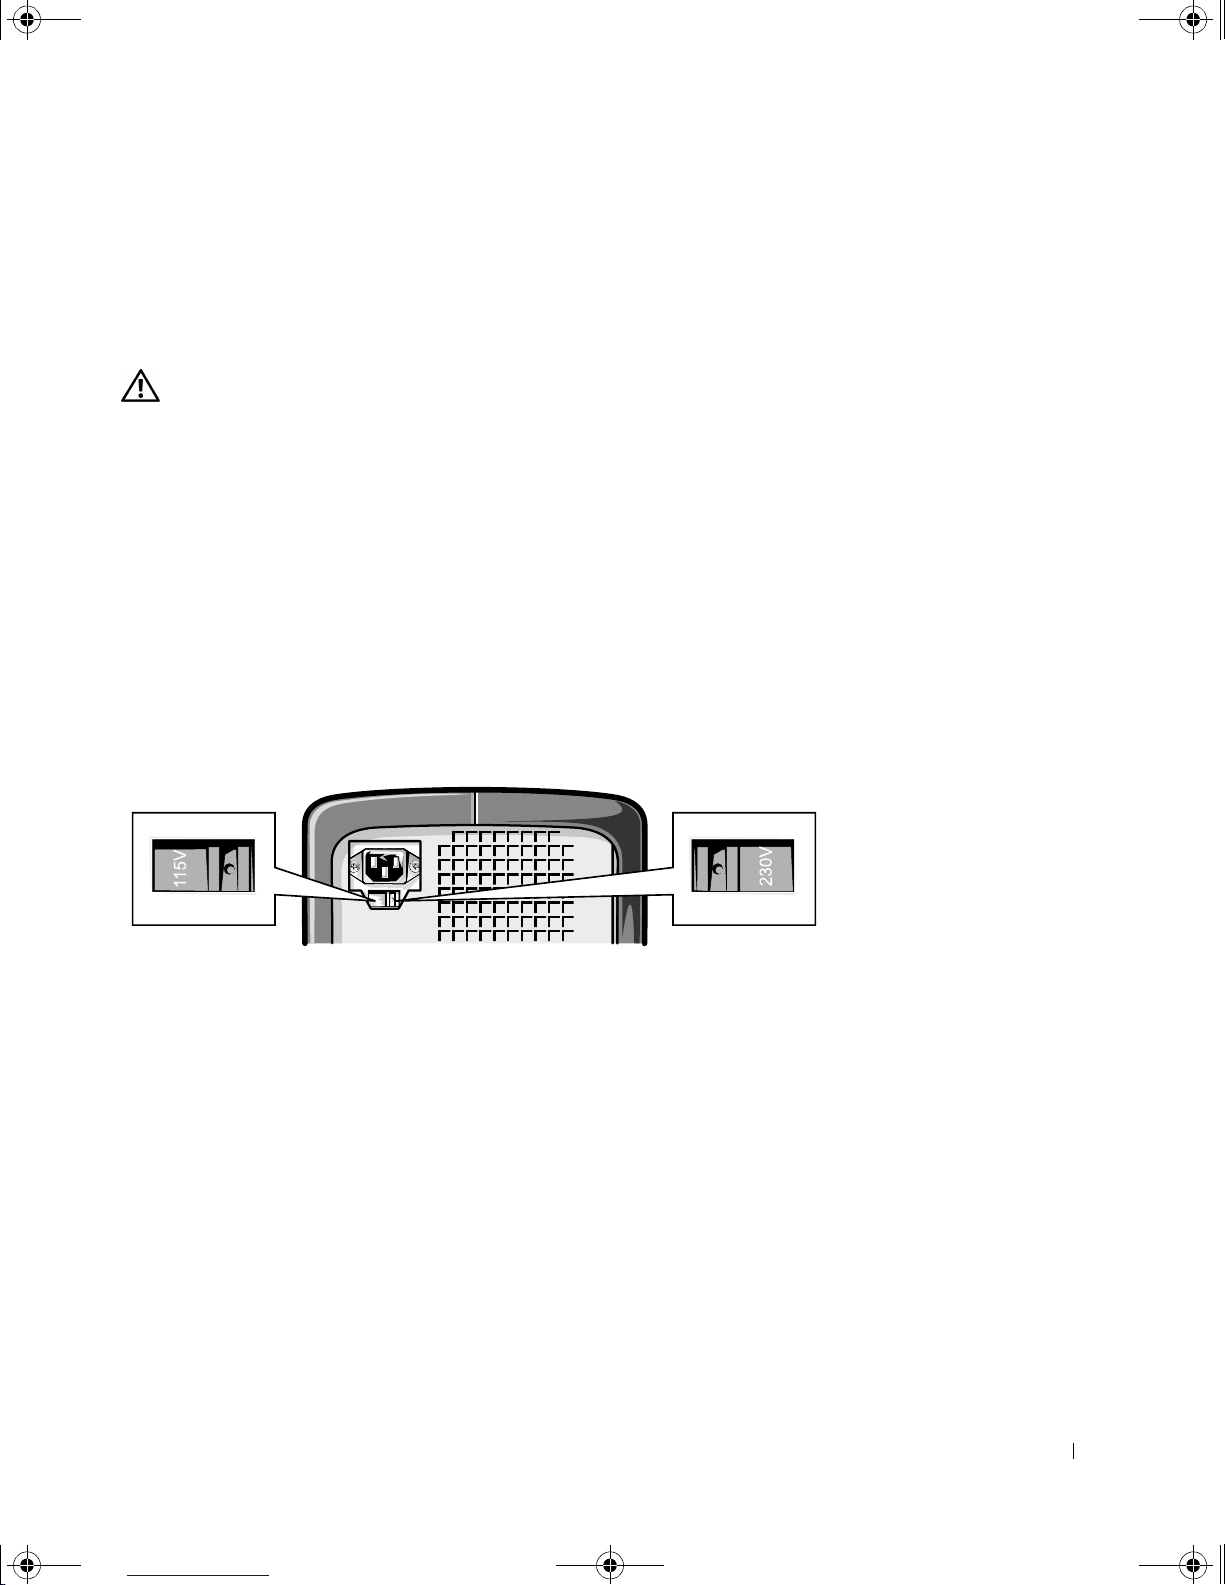
• To help avoid damaging your computer, be sure that the voltage
selection switch is set to match the AC power available at your
location:
– 115 V/60 Hz in most of North and South America and some Far
Eastern countries such as South Korea and Taiwan
– 100 V/50 Hz in eastern Japan and 100 V/60 Hz in western Japan
NOTE: The voltage selection switch must be set to the 115V position
even though the AC supply in Japan is 100 V.
– 230 V/50 Hz in most of Europe, the Middle East, and the Far East
Also be sure that your monitor and attached devices are electrically
rated to operate with the AC power available in your locati on.
• To avoid shorting out your computer whe n disconne cting a network
cable, first unplug the cable from the network adapter on the back of
your computer, and then from the network jack. When reconnecting a
network cable to your computer, first plug the cable into the network
jack, and then into the network adapter.
• To help avoid possible damage to the system board, wait 5 seconds
after turning off the computer before disconnecting or connecting a
non-USB device from the computer.
Safety Instructions 9
Page 10

9p915bk0.book Page 10 Thursday, April 4, 2002 9:26 AM
• To help prevent electric shock , pl ug the computer and device power
• To help protect your computer from sudden, transient increases and
• Be sure that nothing rests on your computer’s cables and that the
www.dell.com | support.dell.com
• Do not spill food or liquids on your computer. If the computer gets
cables into properly grounded power sources. These cables are
equipped with 3-prong plugs to help ensure proper grounding. Do not
use adapter plugs or remove the grounding prong from a cable. If you
must use an extension cable, use a 3-wire ca ble with properly grounded
plugs.
decreases in electrical power, use a surge suppressor, line conditioner,
or uninterruptible power supply.
cables are not located where they can be stepped on or tripped over.
wet, contact Dell (see page 102).
• Do not p ush an y ob jects into the o pen ings o f yo ur co mput er. Doing so
can cause fire or electric shock by shorting out interior components.
• Keep your co mputer away from radiators and heat sources. Als o , do not
block cooling vents. Avoid placing loose papers underneath your
computer; do not place your computer in a closed-in wall unit or on a
bed, sofa, or rug.
Ergonomic Computing Habits
CAUTION: Improper or prolong ed keyboard u se may resul t in
injury.
CAUTION: Viewing the monitor screen for extended periods of
time may result in eye strain.
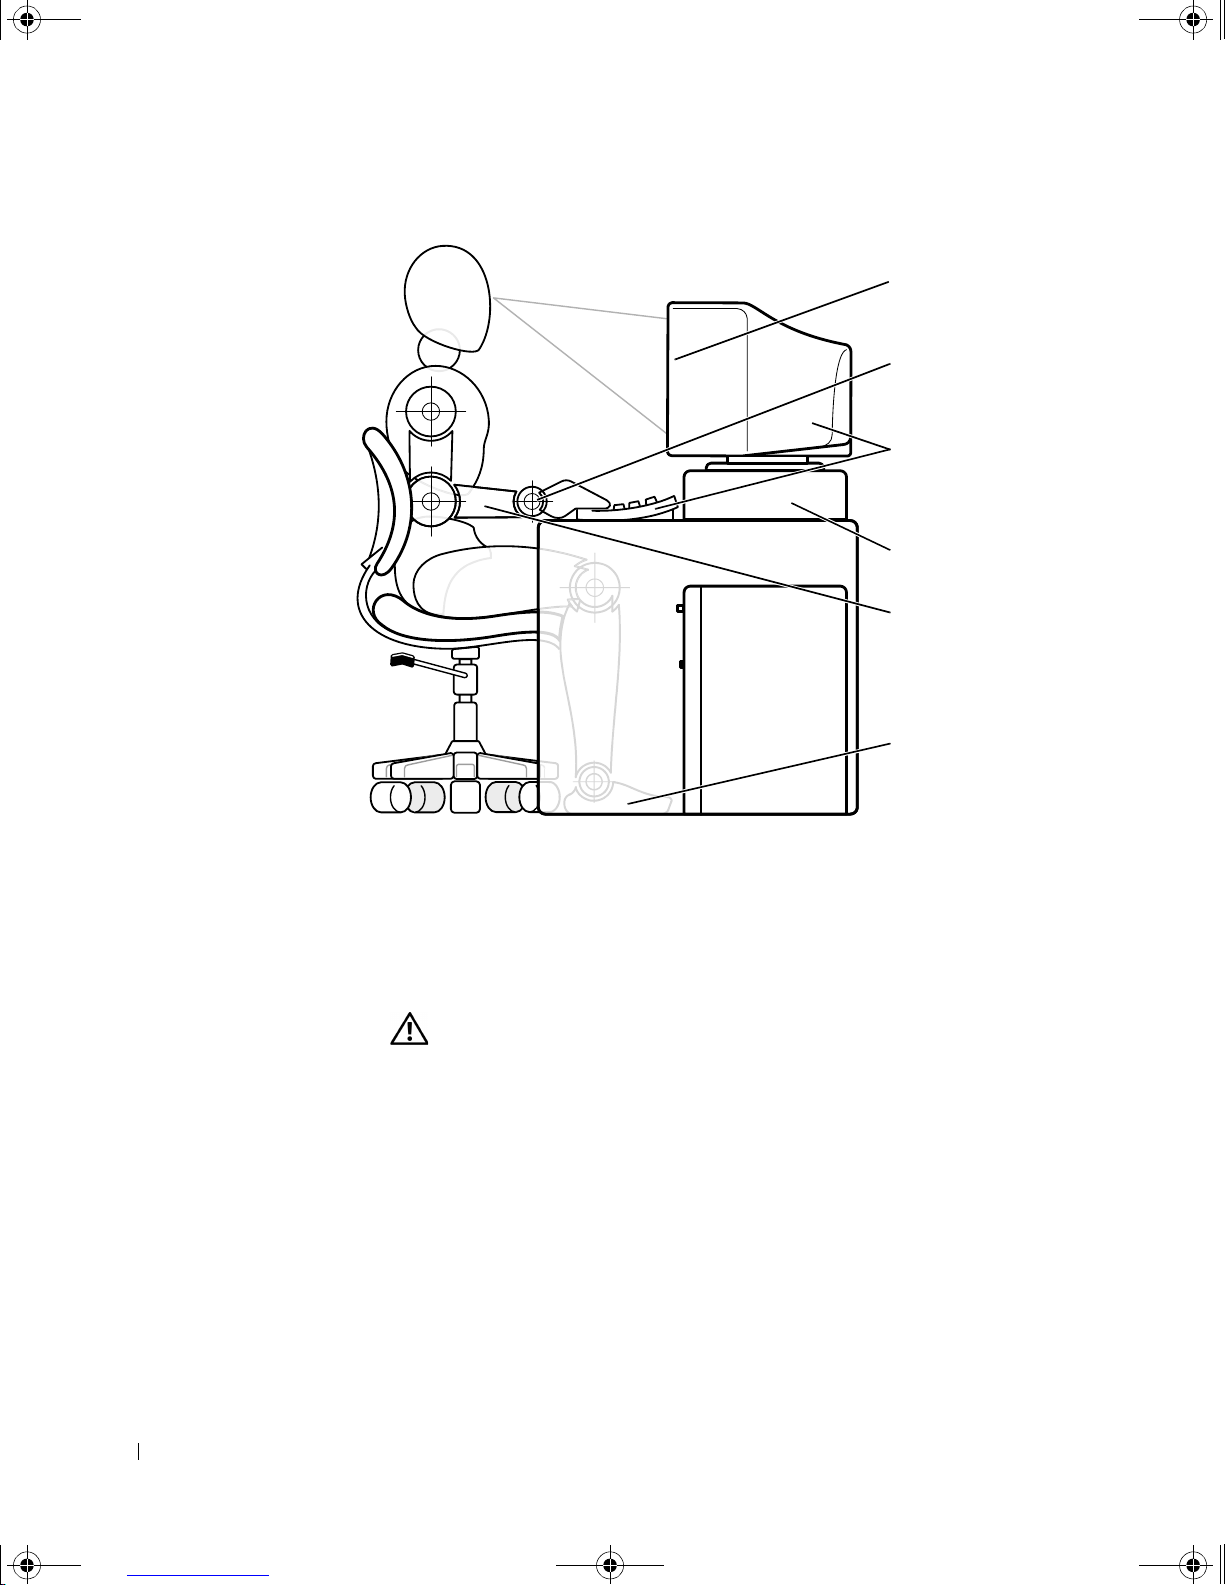
For comfort and efficiency, observe the following ergonomic guidelines
when setting up and using your computer:
• Position your computer so that the monitor and keyboard are directly
in front of you as you work. Special shelves are available (from Dell and
other sources) to help you correctly position your keyboard.
• Set the monitor at a comfortable viewing distance (usually 5 10 to
610 millimeters [20 to 24 inches] from your eyes).
• Make sure the monitor screen is at eye level or slightly lower when you
10 Safety Instructions
are sitting in front of the monitor.
Page 11

9p915bk0.book Page 11 Thursday, April 4, 2002 9:26 AM
• Adjust the tilt of the monitor, its contrast and brightness setting s, and
the lighting around you (such as overhead lights, desk lamps, and the
curtains or blinds on nearby windows) to minimize reflections and
glare on the monitor screen.
• Use a chair that provides good lower back support.
• Keep your forearms horizontal with your wrists in a neutral,
comfortable position while using the keyboard or mouse.
• Always leave space to rest your hands while using the keyboard or
mouse.
• Let your upper arms hang naturally at your sides.
• Sit erect with your feet resting on the floor and your thighs level.
• When sitting, make sure the weight of your legs is on your feet and not
on the front of your chair seat. Adjust your chair’s height or use a
footrest, if necessary, to maintain proper posture.
• Vary your work activities. Try to organize your work so that you do not
have to type for extended periods of time. When you stop typing, try
to do things that use both hands.
Safety Instructions 11
Page 12
9p915bk0.book Page 12 Thursday, April 4, 2002 9:26 AM
monitor screen at or
below eye level
wrists relaxed
and flat
computer positioned
directly in front of user
www.dell.com | support.dell.com
monitor stand
(optional)
arms at desk level
feet flat on the floor
When Working Inside Your Computer
Before you open the computer cover, perform the following steps in the
sequence indicated.
CAUTION: Do not attempt to service the computer yourself,
except as explained in this guide and elsewhe re in Dell
documentation. Always follow installation and service
instructions closely.
1
2 Turn off all devices.
12 Safety Instructions
Turn off the computer (see page 20).
Page 13

9p915bk0.book Page 13 Thursday, April 4, 2002 9:26 AM
3 Ground yourself by touching an unpainted metal surface at the back of
the computer before touching anything inside your computer.
While you work, periodically touch an unpainted metal surface on the
computer to dissipate any static electricity that might h arm internal
components.
4 Disconnect any devices connected to the computer, including the
monitor, from their electrical outlets to reduce the potential for
personal injury or shock. Also, disconnect any telephone or
telecommunication line s f r om the computer.
5 Disconnect the power cable to your computer, and then press the
power button to ground the system board.
In addition, take note of these safety guidelines when appropriate:
• When you disconnect a cable, pull on its connector, not on the cable
itself. As you pull connectors apart, keep them evenly aligned to avoid
bending any pins. Also, before you connect a cable, make sure that
both connectors are correctly oriented and aligned.
• Handle components and cards with car e. Don ’t touch t he components
on a card. Hold a card by its edges or by its metal bracket.
CAUTION: There is a danger of a new battery exploding if it is
incorrectly installe d. Replace the battery o nly with the same or
equivalent type recomme nded by the manufact urer. Discard used
batteries according to the manufacturer’s ins tructions.
Protecting Against Electrostatic Discharge
To prevent static damag e, discharge static e lectricit y from your body before
you touch anything inside your computer and periodically while you work
inside the computer. You can do so by touching an unpainted metal surface
on the back of the computer.
You can also take the following steps to prevent static damage:
• Do not remove items from their antistatic packing material unti l y o u
are ready to install them in your computer. Just before unwrapping the
antistatic packaging, be sure to discharge static electricity from your
body.
• When transporting a sensitive component, first place it in an antistatic
container or packaging.
Safety Instructions 13
Page 14

9p915bk0.book Page 14 Thursday, April 4, 2002 9:26 AM
Battery Disposal
Your computer uses a lithium-ion battery. For instructions about replacing
the lithium-ion battery in y our computer, refer to the section about
replacing the battery in your Dell computer documentation.
Do not dispose of the battery along with household wa ste. Contact your
local waste disposal agency for the address of the nearest battery deposit
site.
www.dell.com | support.dell.com
14 Safety Instructions
Page 15
9p915bk0.book Page 15 Thursday, April 4, 2002 9:26 AM
SECTION 1
Setting Up
Connecting a Printer
Transferring Information to a New Computer
(Windows XP Only)
Setting Up a Home and Office Network
(Windows XP Only)
Turning Off the Computer
Page 16

9p915bk0.book Page 16 Thursday, April 4, 2002 9:26 AM
Connecting a Printer
See the documentation that came with the printer for any recommended
preparation procedures, such as:
• Removing the packaging
• Installing the toner or ink cartridge
•Loading paper
Then follow the instructions that came with the printer to connect it to the
computer. If no information is provided, see the following sections.
www.dell.com | support.dell.com
Parallel Printer
Follow the instructions that came with the parallel printe r to connect it to
the computer. If no information is provided, then follow the instructions in
this section.
1 Turn off the computer (see page 20).
NOTICE: Use only a standard IEEE parallel cable measuring 3 m (10 ft) or
less to connect the printer to the co mputer. Use of a nonstandard cable may
prevent the printer from working.
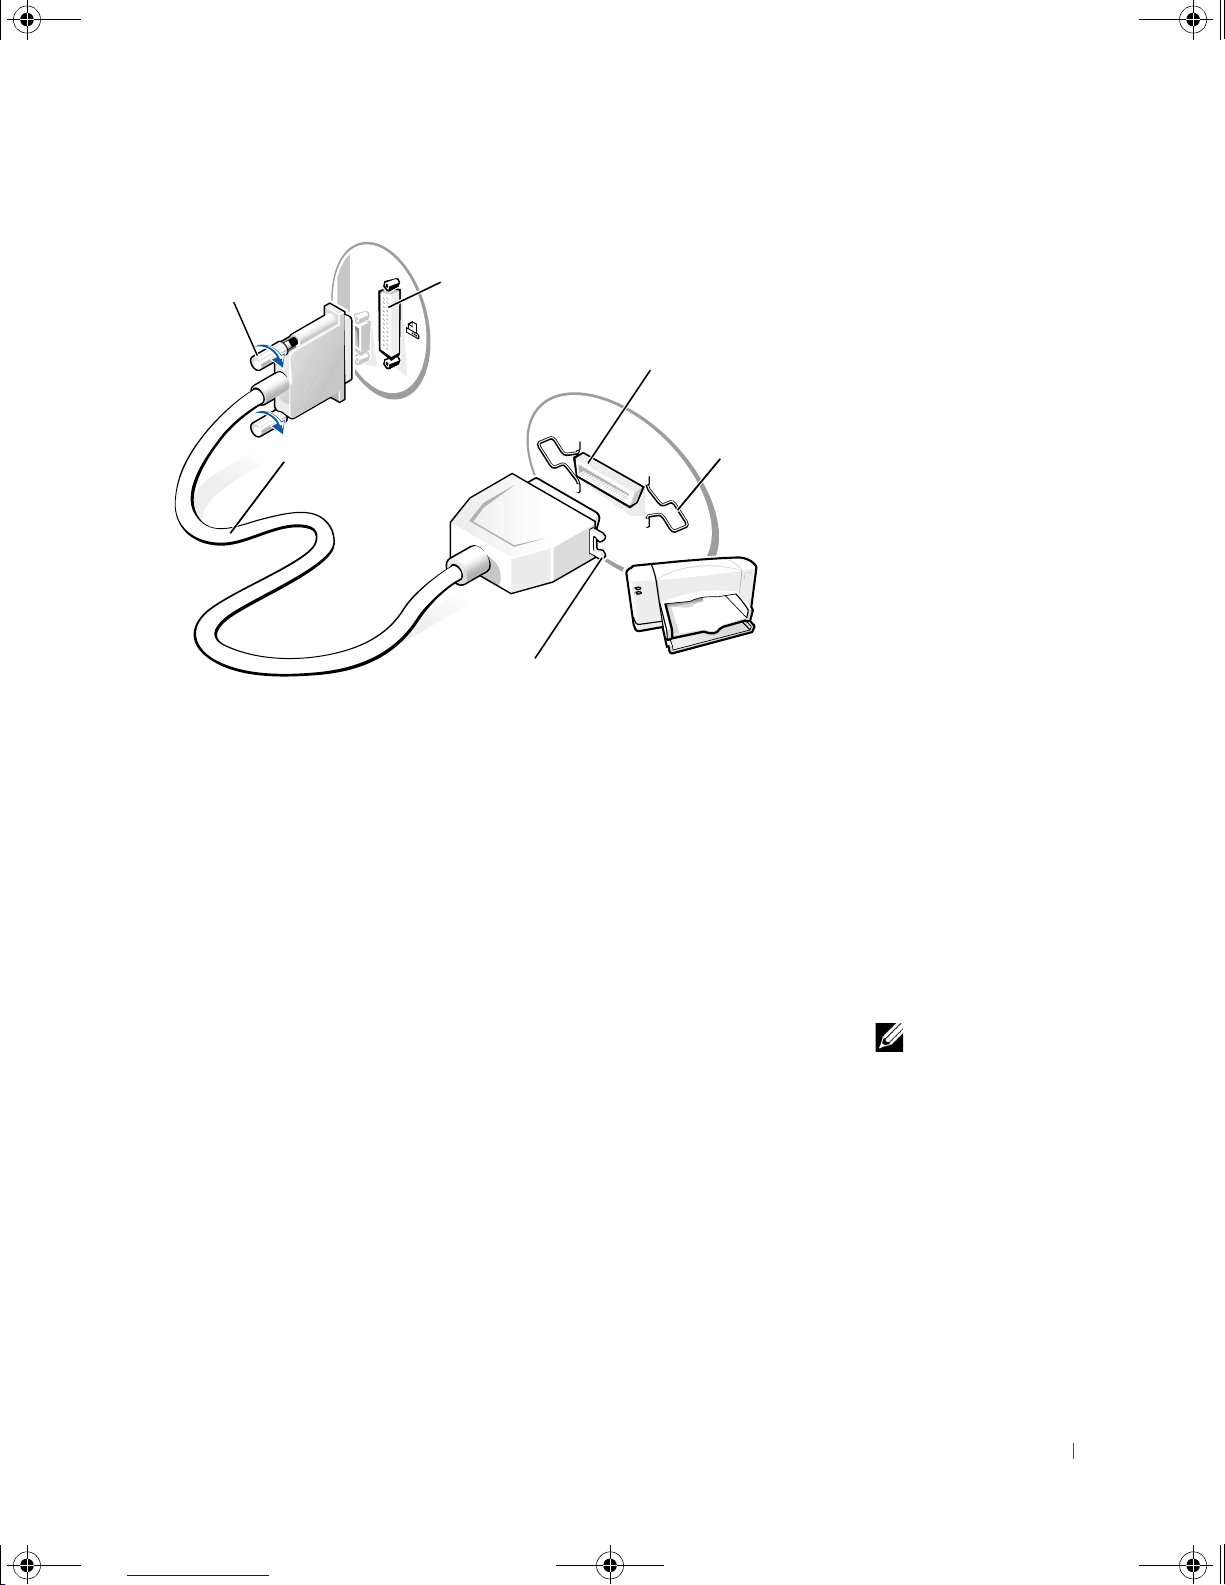
2
Attach the parallel printer cable to the parallel connector on the
computer and tighten the two screws. Attach the cable to the parallel
connector on the printer and sna p the two clips into the two notc hes.
16 Setting Up
Page 17
9p915bk0.book Page 17 Thursday, April 4, 2002 9:26 AM
screws (2)
parallel connector
on computer
parallel connector
on printer
parallel printer
cable
notches (2)
3 Turn on the printer a n d then turn on the computer. If the Add New
clips (2)
Hardware Wizard window appears, click Cancel.
4 Install the printer driver if necessary (se e "Installing the P rint er Driver"
on this page).
USB Printer
Follow the instructions that came with the USB prin ter to connect it to the
computer. If no information is provided, then follow the instructions in this
section.
1 Install the printer driver if necessary (see the following section).
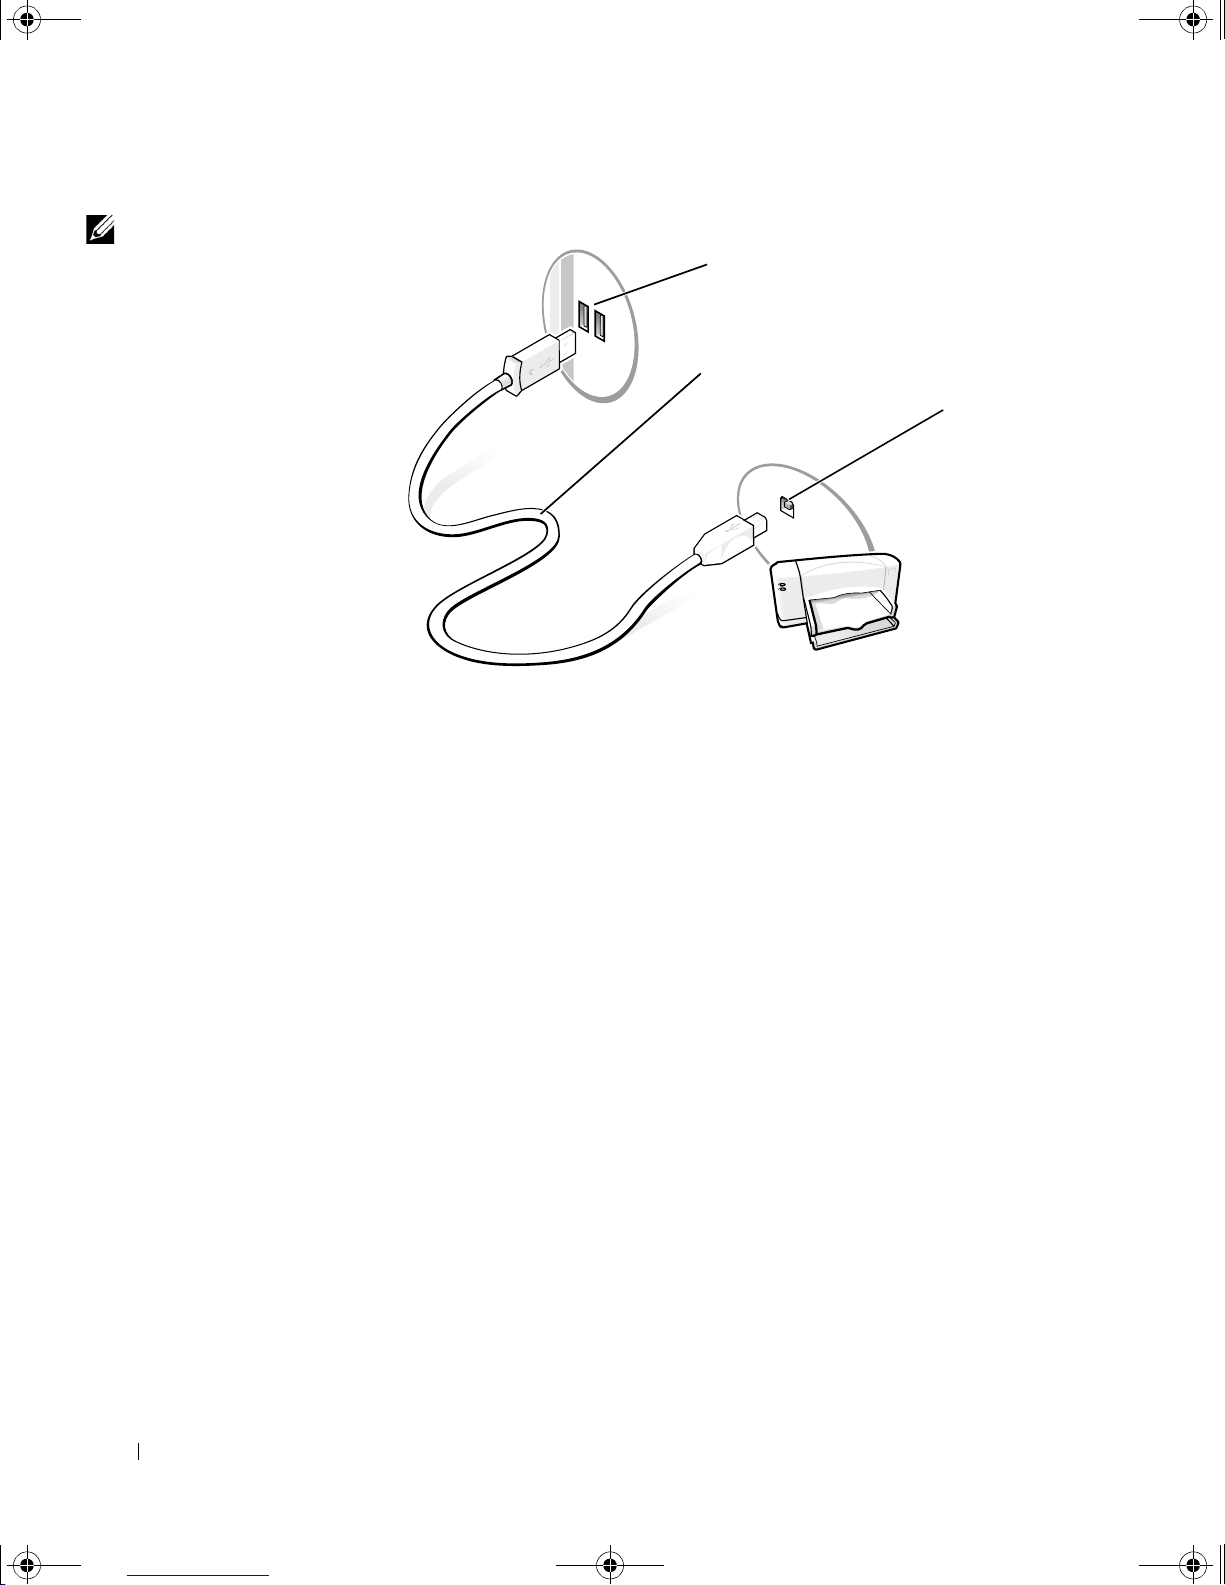
2 Attach the USB printer cable to the USB connector on the computer
and the printer. The USB connectors only fit one way.
HINT: You can connect
USB devices while the
computer is turned on.
Setting Up 17
Page 18
9p915bk0.book Page 18 Thursday, April 4, 2002 9:26 AM
HINT: Y our computer has
two USB connectors on
the back panel and t wo
USB connectors inside the
door on the front panel
(see page 63).
www.dell.com | support.dell.com
USB 1.1 connector
on computer
USB printer
cable
USB connector
on printer
Installing the Printer Drive r
Follow the instructions that came with the printer to instal l printer drivers.
If no was information was provided with the printer, then refer to the
following instructions.
If you need to install a printer driver, insert the printer installation CD into
the CD or DVD drive. Then follow the prompts on the screen using the
instructions that came with the printer.
If your printer install at ion CD does not automatically run, click the Start
®
button on the Mic r os o f t
x:\setup.exe (where x is the letter of your CD or DVD drive [usually
drive D]). Then click OK and follow the prompts on your screen. If your
printer installation CD still does not run, check the documentation that
came with your printer for instructions on how to start the printer
installation CD.
If you connect an older printer and it doesn’t work after you install the
driver, access the system setup program (see page 96) and ensure that the
parallel port is set to operate in bidirectional mode.
Windows® desktop, click Run, and type
18 Setting Up
Page 19

9p915bk0.book Page 19 Thursday, April 4, 2002 9:26 AM
To check if your printer driver is installed on a computer running the
Windows XP operating system, click the Start button, click Control Panel,
click Printers and Other Hardware, and then click View installe d printer s
or fax printers. If your computer runs either Windows 2000 or Windows
Millennium Edition (Me), click the Start button, point to Settings, and
then click Printers. If your printer is listed in the Printers window, the
printer is ready to use.
Transferring Information to a New
Computer (Windows XP Only)
Windows XP provides a Files and Settings Transfer Wizard to move data,
such as e-mails, window sizes, toolbar settings, and Internet bookmarks,
from one computer to another. First you collect the data from the source
computer, and then you import the data to the new computer.
If the source computer uses another Windows operating system, the wizard
can be launched from the Windows XP operating system CD or from a
floppy disk created on the Windows XP computer. You may transfer the
data to the new computer over a network or serial connection, or you may
store it on a removable medium, such as a floppy disk, a Zip disk, or a
writable CD.
1
On the computer running Windows XP, click the Start button, point
to All Programs—> Accessories—> System Tools, and then click
Files and Settings Transfer Wizard.
2 On the welcome screen, click Next.
3 On the Which compute r is this? screen, select New Computer, and
then click Next.
4 Follow the instructions on the screen.
Setting Up a Home and Office Network
(Windows XP Only)
Windows XP provides a Network Setup Wizard to guide you through the
process of sharing files, printers, or an Internet connection between
computers in a home or small office.
HINT: The CD that you
need to place in your CD
or DVD drive is titled
Operating Syste m
.
Setting Up 19
Page 20

9p915bk0.book Page 20 Thursday, April 4, 2002 9:26 AM
1 Click the Start button, point to All Programs—> Accessories—>
2 On the welcome screen, click Next.
3 Click checklist for creating a network.
Communications, and then click Network Setup Wizard.
www.dell.com | support.dell.com
HINT: Selecting the
connection method This
computer connects
directly to the Internet
enables the integrated
firewall provided with
Windows XP.
HINT: If you are having
difficulty turning off your
computer, see "General
Prog ram Problems” on
page 41.
Complete the checklist and required preparations, and then return to
4
the Network Setup Wizard.
5 Follow the instructions on the screen.
Turning Off the Computer
NOTICE: To prevent data loss, you must turn off your computer through the
Start menu rather than by pressing the power button.
Windows XP
1 Save and close any open files and exit any open programs.
2 Click the Start button and then click Turn off Computer.
3 Click Turn off.
The computer automatically turns off after the shutdown process
finishes.
4 Turn off your monitor and any other devices connected to power.
Windows Me and Windows 2000
20 Setting Up
1 Save and exit any programs and files you have open.
2 Click the Start button, and then click Shut Down.
3 Click the pull-down menu under What do you want the computer to
do?.
4 Click Shut down and th en click OK.
The computer automatically turns off after the shutdown process
finishes.
5 Turn off your monitor and any other devices connected to power.
Page 21
9p915bk0.book Page 21 Thursday, April 4, 2002 9:26 AM
SECTION 2
Solving Problems
Finding Solutions
Accessing Help Files
Power Problems
Start-Up Error Messages
Video and Monitor Problems
Sound and Speaker Problems
Printer Problems
Scanner Problems
Modem Problems
Mouse Problems
Keyboard Problems
Drive Problems
Network Pr oblems
Microsoft
General Program Problems
Internet Connection Problems
E-Mail Problem s
Resolving Other Technical Problems
Reinstalling Drivers
Resolving Software and Hardware Incompatibilities
Using System Restore
Reinstalling Windows XP
R einstalling Windows Me
Reinstalling Windows 2000
®
Windows® Error Messages
Page 22
9p915bk0.book Page 22 Thursday, April 4, 2002 9:26 AM
Finding Solutions
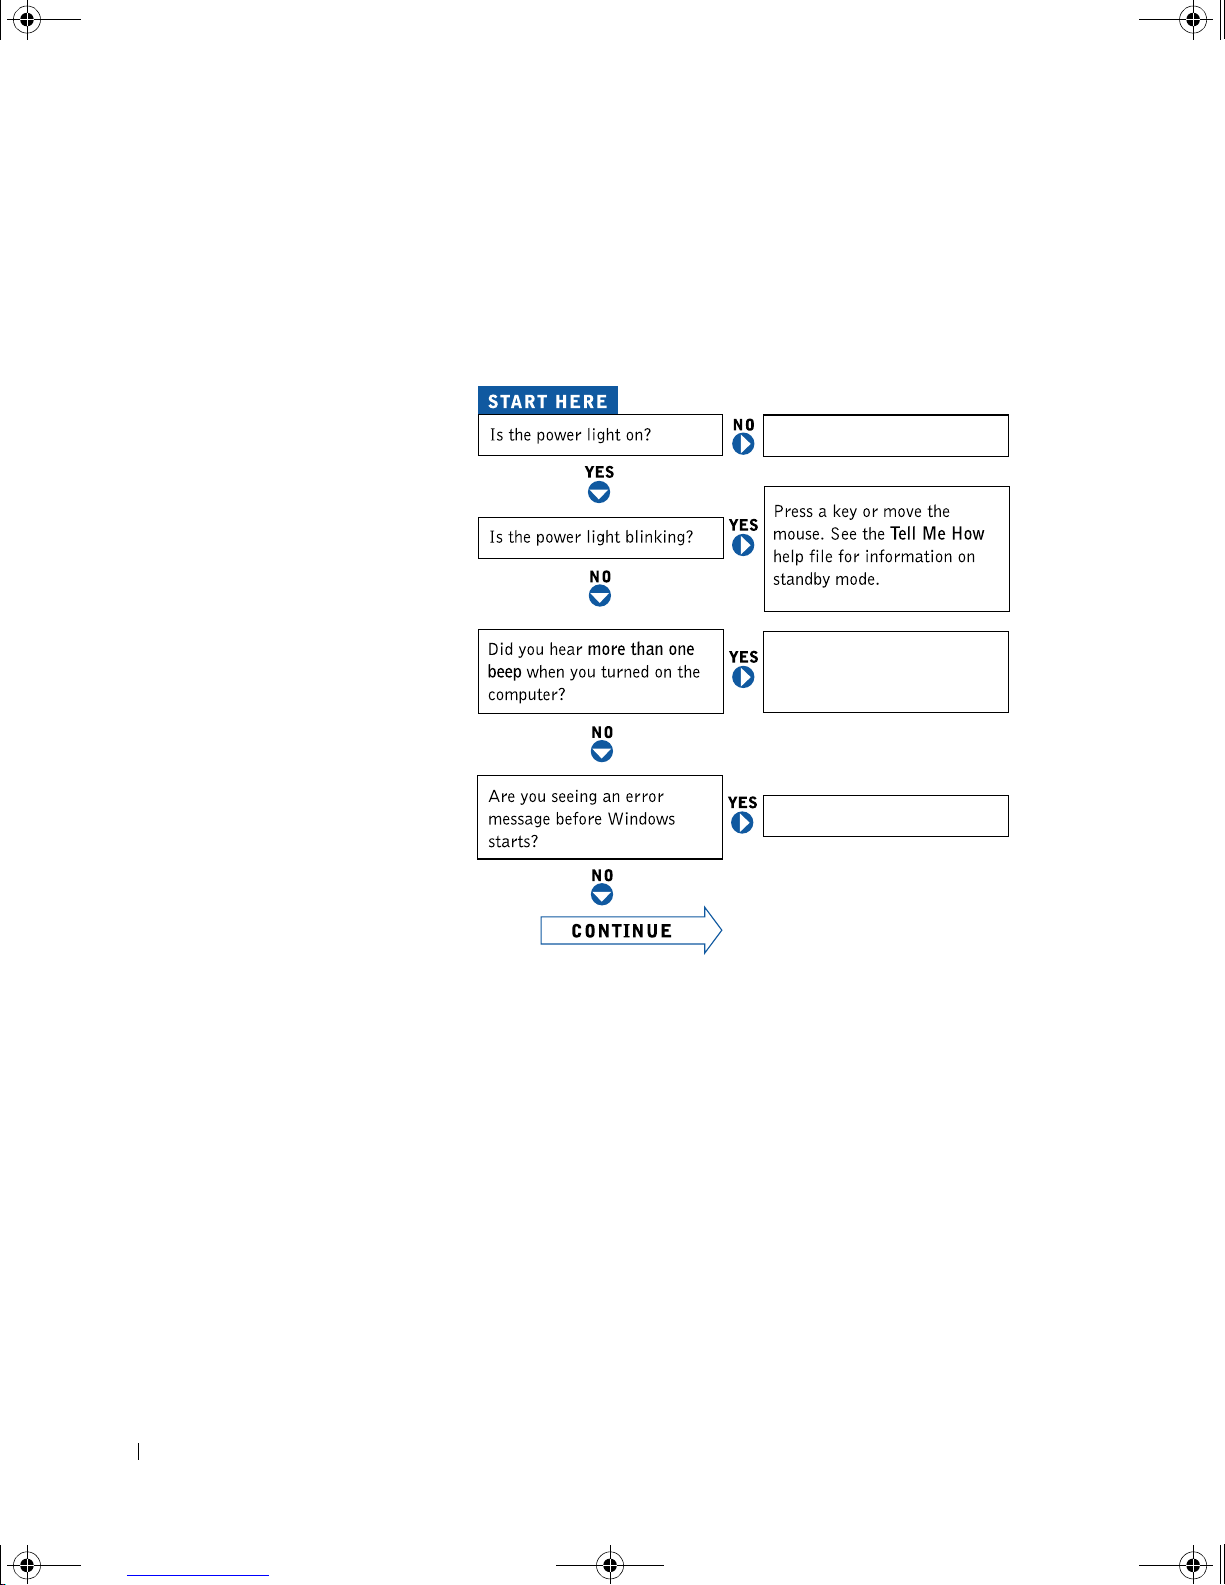
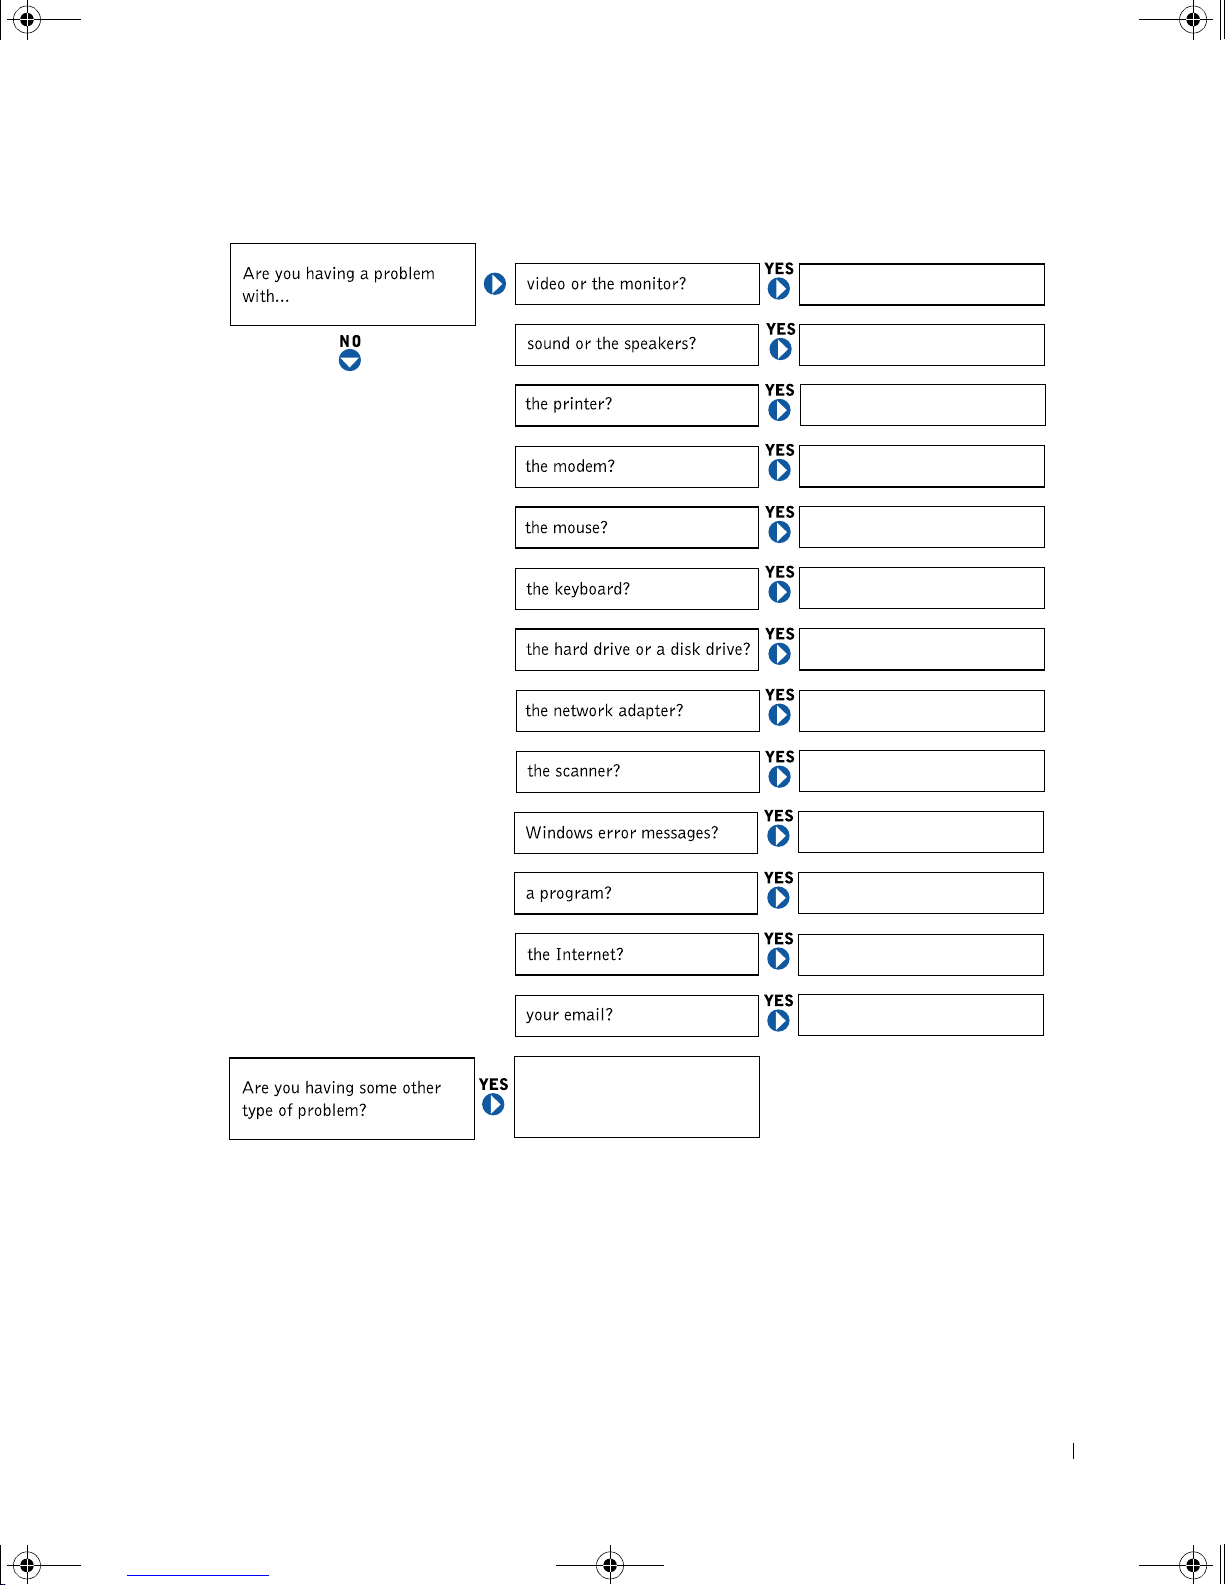
Sometimes it’s difficult to figure out where to go for answers. Use this chart
to help you quickly find the ans w ers to your questions.
www.dell.com | support.dell.com
See page 25.
Get technical assistance from
Dell. See page 102.
See page 25.
22 Solving Problems
Page 23
9p915bk0.book Page 23 Thursday, April 4, 2002 9:26 AM
See page 26.
See page 28.
See page 29.
See page 32.
See page 34.
See page 35.
See page 44.
See page 36.
See page 39.
See page 31.
See page 40.
See page 41.
See page 42.
See page 44.
Solving Problems 23
Page 24

9p915bk0.book Page 24 Thursday, April 4, 2002 9:26 AM
Accessing Help Files
www.dell.com | support.dell.com
TO ACCESS THE
Tell Me How
HELP FILE
Microsoft® Windows® XP
1 Click the Start button, and then click Help and Support.
2 Click User and system guides, and then click User’s guides.
3 Click Tell Me How.
Windows Millennium Edition (Me) and Windows 2000
Click the Start button, point to Programs, point to User’s Guides, and then click
Tell Me How.
TO ACCESS HELP IN WIND OWS XP
1 Click the Start button, and then click Help and Support.
2 Type a word or phrase that describes your problem, and then click the arrow
icon.
3 Click the topic that describes your problem.
4 Follow the instructions shown on the screen.
TO ACCESS HELP IN WIND OWS ME
1 Click the Start button, and then click Help.
2 Type a word or phrase that describes your problem in the Search box, and then
click Go.
3 Click the topic that describes your problem, and then click Display.
4 Follow the instructions shown on the screen.
TO ACCESS HELP IN WIND OWS 2000
24 Solving Problems
1 Click the Start button, and then click Help.
2 Click the Search tab.
3 Type a word or phrase that describes your problem, and then click List Topics.
4 Click the topic that describes your problem, and then click Display.
5 Follow the instructions shown on the screen.
Page 25

9p915bk0.book Page 25 Thursday, April 4, 2002 9:26 AM
Pow er Problems
CHECK THE POWER LIGHT — When the power light is lit or blinking, the
computer has power. If the power light is blinking, the computer is in standby
mode—press a key on the keyboard or move the mouse. If the power light is off,
the computer is either not turned on or is not receiving electrical power.
TEST THE ELECTRICAL OUTLET — Ensure that the electrical outlet is
working by testing it with another device, such as a lamp.
CHECK THE POWER CABLE CONNECTION — Be sure that the power cab le
is firmly inserted into the electrical outlet and the computer power connector.
CONNECT THE COMPUTER DIRECTLY TO AN ELECTRICAL OUTLET —
Bypass power protection devices, power strips, and the extension cable to verify
that the computer turns on.
SWAP THE COMPUTER AND MONITOR POWER CABLES — Swap the
computer and monitor power cables to determine if the power cable is defective.
CHECK FOR INTERFERENCE — Electrical appliances on the same circuit or
operating near the computer can caus e interference. Other causes of
interference: power extension cables, keyboard and mouse extension cables, too
many devices on a power strip, or multiple power strips connected to the same
electrical outlet.
HINT: See the
help file for
How
information on the
standby mode.
Tell Me
CHECK THE POWER PROPERTIES — See the Tell Me How help file or
search for the keyword standby in the Help and Support Center in Windows
XP and Windows Me (Help in Wind o ws 20 00). To access help files, see page24.
Start-Up Error Messages
OPERATING SYSTEM NOT F OUND — Call Dell for technical assistance (see
page 102).
Solving Problems 25
Page 26
9p915bk0.book Page 26 Thursday, April 4, 2002 9:26 AM
INSERT BOOTABLE MEDIA — The operating system i s trying to boot to a
nonbootable floppy disk or CD. Insert a bootable floppy disk or CD.
NON-SY STEM DISK ERROR — There is a floppy disk in the floppy drive.
Remove the floppy disk and restart the computer.
Video and Monitor Problems
If the screen is blank
www.dell.com | support.dell.com
HINT: See the
documentation that came
with your monitor for
fault indications and
troubleshooting
procedures specific to
your monitor.
CHECK THE VIDEO CABLE CONNECTION — Check for bent pins (most
video cable connectors have missing pins, but not bent pins). Ensure that the
video cable is connected as shown on the START HERE sheet for your computer.
PRESS THE MONITOR PO WER BUTTON — Be sure that you firmly pressed
the monitor power button.
CHECK THE POWER LIGHT — When the power light is lit or blinking, the
monitor has power. If the power light is blinking, press a key on the keyboard or
move the mouse.
TEST THE ELECTRICAL OUTLET — Ensure that the electrical outlet is
working by testing it with another device, such as a lamp.
SWAP THE COMPUTER AND MONITOR POWER CABLES — Swap the
computer and monitor power cables to determ ine if the power cable is defective.
TEST THE VIDEO EXT ENSI ON CABLE (IF USED)—If you are using a
video extension cable and removing the cable solves th e problem, the cable is
defective.
TEST THE MONITOR — If another monitor is available, connect it to the
computer .
26 Solving Problems
Page 27

9p915bk0.book Page 27 Thursday, April 4, 2002 9:26 AM
CHECK THE BACK PANEL LIGHTS — If all four lights below the serial
connector are not green, call Dell for technical assistance (see page 102).
CHECK THE POWER PROPERTIES — See the Tell Me How help file or
search for the keyword standby in the Help and Support Center in Windows XP
and Windows Me (Help in Windows 2000). To access help files, see page 24.
If the screen is difficult to read
ADJUST THE CONTRAST AND BRIGHTNESS — See the documentation
that came with your monitor for instructions on adjusting the co ntrast and
brightness.
MOVE THE SUBWOOFER AWAY FROM THE MONITOR — If your speaker
system includes a subwoofer, ensure that the subwoofer is at least 2 ft (60cm)
away from the monitor.
MOVE THE MONITOR AWAY FROM EXTERNAL POWER SOURCE S —
Fans, fluorescent lights, halogen lamps, and other electrical devices can cause the
screen image to appear "shaky." Turn off nearby devices to chec k for interference.
ROTATE THE MONITOR TO FACE A DIFFERENT DIRECTION — Eliminate
sunlight glare, which can cause poor picture quality.
DEGAUSS (DEMAGNETIZE) THE MONIT OR — See the documentation that
came with your monitor.
RUN THE MONITOR SELF-TEST — See the documentation that ca me with
your monitor.
RESTORE THE RECOMMENDED S ETTINGS — Restore the original
resolution and refresh rate settings. See the T ell Me How help file for instructions.
To access help file s, see page 24.
Solving Problems 27
Page 28
9p915bk0.book Page 28 Thursday, April 4, 2002 9:26 AM
CHECK FOR ADDITIONAL ADJUSTMENTS — See the documenta tion that
came with your monitor for any additional adjustments that your monitor may
require.
ADJUST THE WINDOWS DISPLAY SETTINGS
Windows XP
1 Click the Start button, and then click Control Panel.
2 Click Appearance and Themes.
3 Click Display, and then click the Settings tab.
4 Try different sett ings for Screen resolution and Color quality.
www.dell.com | support.dell.com
Windows Me and Windows 2000
1 Click the Start button, point to Settings, and then click Control Panel.
2 Double-click the Display icon, and then click the Settings tab.
Try different settings for Colors and Screen area.
HINT: The volume
control in some MP3
players overrides the
Windows volume setting.
If you have been listening
to MP3 songs, make sure
that you did not turn the
player volume down or off.
CHECK FOR INTERRUPT REQUEST CONFLICTS — See page 47.
Sound and Speaker Problems
ENSURE THAT THE SUBWOOFER AND THE SPEAKERS ARE TURNED
ON — See the setup diagram supplied with the speakers.
ADJUST THE SPEAKER CONTROLS — Adjust the volume, bass, or treble
controls to elim ina te distortion.
VER IFY THE SPEAKER CABLE CONNECTION S — Ensure that the speakers
are connected as shown on the START HERE sheet for your computer and the
setup diagram supplied with the speakers.
BE SURE THAT HEADPHO NES ARE NOT CONNEC TED TO THE FRONT-
PANEL HEADPHONE CONNECTOR — Sound from the sp eakers is
automati cally disabled when hea d p ho n e s are connected to the computer’s frontpanel headphone con nector.
28 Solving Problems
Page 29
9p915bk0.book Page 29 Thursday, April 4, 2002 9:26 AM
ADJUST THE WINDOWS VOLUME CON TROL — In Windows XP, click the
speaker icon in the lower-right corner of your screen. In Windows Me or 2000,
double-click the speaker icon in the lower-right corner of your screen. Be sure that
the volume is turned up and that the sound is not muted.
MOVE THE SUBWOOFER AWAY FROM THE MONITOR — If your speaker
system includes a subwoofer, ensure that the subwoofer is at least 2 ft (60 cm)
away from the monitor.
RUN THE SPEAKER DIA GNOSTICS — Some speaker systems have selfcontained diagnostics. See the speaker documentation for diagnostics
instructions.
ELIMINATE POSSIBLE INTERFERENCE — T urn off nearby fans, fluorescent
lights, or halogen lamps to check for interference.
TEST THE ELECTRICAL OUTLET — Ensure that the electrical outlet is
working by testing it with another device, such as a lamp.
REINSTALL THE S OUND (AUDIO) DRIVER — See page 44.
CHECK FOR INTERRUPT REQUEST CONFLICTS — See page 47.
Printer Problems
If you cannot print to a parallel port printer
VER IFY THE PRINTER CA BLE CONNECTIONS — E nsure that the printer
cable is conne c te d a s de sc r ibed on page 16.
ENSURE THAT THE PRINTER IS TURNED ON — See the documentation
supplied with the printer.
HINT: If you need
technical assistance for
your printer, call the
printer’s manufacturer
(see the documentation
that came with the printer
for the correct phone
number). Dell does not
cover the printer’s
warranty.
Solving Problems 29
Page 30

9p915bk0.book Page 30 Thursday, April 4, 2002 9:26 AM
VER IFY THAT THE PRINTER IS RECOGNIZ ED BY WINDOWS
Windows XP
1 Click the Start button.
2 Click Control Panel.
3 Click Printers and Other Hardware.
4 Click View installed printers or fax printers. If the printer is listed, right-clic k
5 Click Properties, and then select the Ports tab. Ensure that the Pri nt to the
Windows Me and Windows 2000
www.dell.com | support.dell.com
1 Click the Start button, point to Settings, and then click Printers.
2 Click Properties, and then select the Details tab in Windows Me and the
the printer icon.
following port(s): setting is LPT1 (Printer Port).
If the printer is listed, right-click the printe r ico n.
Ports tab in Windows 2000. Ens ure that the P r int to the following port(s):
setting is LPT1 (Printer Port).
TEST THE ELECTRICAL OUTLET — Ensure that the electrical outlet is
working by testing it with another device, such as a lamp.
REINSTALL THE PRINTER DRIVER — See page 18.
CHECK FOR INTERRUPT REQUEST CONFLICTS — See page 47.
If you cannot print to a USB printer
VER IFY THE PRINTER CA BLE CONNECTIONS — E nsure that the printer
cable is connected as described on page 17.
ENSURE THAT THE PRINTER IS TURNED ON — See the documentation
supplied with the printer.
30 Solving Problems
Page 31
9p915bk0.book Page 31 Thursday, April 4, 2002 9:26 AM
VER IFY THAT THE PRINTER IS RECOGNIZ ED BY WINDOWS
Windows XP
1 Click the Start button.
2 Click Control Panel.
3 Click Printers and Other Hardware.
4 Click View installed printers or fax printers. If the printer is listed, rig ht- cl ick
the printer name.
5 Click Properties, and then select the Ports tab. Ensure that the Print to the
following port(s): setting is USB.
Windows Me and Windows 2000
1 Click the Start button, poin t to Settings, and then click Printers.
If the printer is listed, right-click the printer icon.
2 Click Properties, and then select the Details tab in Windows Me and the
Ports tab in Windows 2000. Ens ure that the Print to the following port(s):
setting is USB.
TEST THE ELECTRICAL OUTLET — Ensure that the electrical outlet is
working by testing it with another device, such as a lamp.
REINSTALL THE PRINTER DRIVER — See page 18.
CHECK FOR INTERRUPT REQUEST CONFLICTS — See page 47.
Scanner Problems
CHECK THE POWER CABLE CONNECTION — Ensure that the scanner
power cable is firmly connected to a working electrical power source and that the
scanner is turned on.
CHECK THE SCANNER CABLE CONNECTION — Ens ure th a t the scanner
cable is fir mly co nnected to th e co mp uter and to the sc a nn e r.
UNLOCK THE SCANNER — Ensure that your scanner is unlocked if it has a
locking tab or button.
HINT: If you need
technical assistance for
your scanner, call the
scanner’s manufacturer
(see the documentation
that came with the
scanner for the correct
phone number). Dell does
not cover the scanner’s
warranty.
Solving Problems 31
Page 32
9p915bk0.book Page 32 Thursday, April 4, 2002 9:26 AM
REINSTALL THE SCANNER DR IVER — Reinstall the scanner driver. See the
scanner documentation for instructions.
CHECK FOR INTERRUPT REQUEST CONFLICTS — See page 47.
Modem Problems
HINT: Connect the
www.dell.com | support.dell.com
modem to an analog
telephone jack only. The
modem does not operate
while it is connected to a
digital telephone network.
CHECK THE CONNECTION — Verify that the telephone line is connected to
the green jack on the modem. (The green line-in jack has either a LINE IN label
or a connector-shaped icon next to it.) Make sure you hear a click when you insert
the telephone line connector.
CHECK THE TELEPHONE JACK — Disconnect the telephone line from the
modem and connect it to a telephone. Listen for a dial tone.
CONNECT THE MODEM DI RECTLY TO THE TELEPHONE WALL JACK —
If you have other telephone devices sharing the line, such as an answering
machine, fax machine, surge protector, or line splitter, then bypass them and
connect the modem directly to the telephone wall jack with the telephone line.
CHECK THE TELEPHONE LI NE — Try using a different telephone line. If you
are using a line that is 10 ft (3 m) or more in length, try a shorter one.
32 Solving Problems
Page 33

9p915bk0.book Page 33 Thursday, April 4, 2002 9:26 AM
VER IFY THAT THE MODEM IS COMMUNICATI NG WITH WINDOWS
Windows XP
1 Click the Start button, and then click Control Panel.
2 Click Printers and Other Hardware.
3 Click Phone and Modem Options.
4 Click the Modems tab.
5 Click the COM port for your modem.
6 Click Properties, click the Diagnostics tab, and then click Query Modem to
verify that the modem is communicating with Windows.
If all commands receive responses, the modem is operating properly.
Windows Me
1 Click the Start button, poin t to Settings, and click Control Panel.
2 In the Control Panel, double-click Modems.
If there are multiple entries for the same modem or modems listed that are
not installed, delete the entries and restart the computer.
3 Click the Diagnostics tab.
4 Click the COM port for your modem.
5 Click More Info to verify that the modem is communicating with Windows.
If all commands receive responses, the modem is operating properly.
Windows 2000
1 Click the Start button, poin t to Settings, and click Control Panel.
2 In the Control Panel, double-click Phone and Modem Options.
If there are multiple entries for the same modem or modems listed that are
not installed, delete the entries and restart the computer.
3 Click the Modems tab.
4 Click the COM port for your modem.
5 Click the Properties button.
6 Click the Diagnostics tab to verify that the modem is communicating with
Windows.
If all commands receive responses, the modem is operating properly.
Solving Problems 33
Page 34

9p915bk0.book Page 34 Thursday, April 4, 2002 9:26 AM
BE SURE THAT YOU HA VE SUBSCRIBED TO AN INTERNET SERVICE
PROVIDER — Contact an Internet service provider to subscribe.
CHECK FOR INTERRUPT REQUEST CONFLICTS — See page 47.
Mouse Problems
CONNECT A USB MOUSE ONLY TO THE USB CONNECTORS ON THE
www.dell.com | support.dell.com
BACK OF THE COMPUTER — The USB connectors on the front of the
computer are intended only for devices such as digital cameras and gaming
joysticks. Connecting a USB mouse to the front of the computer may cause
erratic operation, and an error message may appear when the computer is turned
on or restarted.
IF YOU CONNECTED THE MOUSE BEFORE TURNING ON THE
COMPUTER, RECONNECT THE MOUSE CA BLE
1 Press <Ctrl><Esc> to display the Start menu.
2 In Windows XP, type u, and then type u again. In Windows Me and
Windows 2000, use the keyboard arrow keys to highlight Shut Down, and then
press <Enter>.
3 After the computer turns off, reconnect the mouse cable as shown on the
START HERE sheet for your computer.
4 Start the computer.
IF YOU CONNECTED THE MOUSE AFTE R TURNING ON THE COMPUTER,
REMOVE THE POWER CABLE, AND THEN RECONNECT THE MOUSE
CABLE — If the mouse is connected after the pow er is turned on, the mouse
will appear to be nonfunctional. To make the mouse function properly:
1 While your computer is on, remove the power cable from the back of the
computer .
2 Connect the mouse to the compu te r.
3 Reconnect the power cable.
4 Turn on your computer.
Pr e ssing the powe r b ut to n do es not clear the co m p u te r’s sett in g s and does not
restore mouse functionality.
34 Solving Problems
Page 35

9p915bk0.book Page 35 Thursday, April 4, 2002 9:26 AM
CHECK THE MOUSE SETTINGS
Windows XP
1 Click the Start button, click Control Panel, and then click Printers and Other
Hardware.
2 Click Mouse.
Tr y adjusting the settings.
Windows Me and Windows 2000
1 Click the Start button, poin t to Settings, and then click Control Panel.
2 Double-click the Mouse icon.
Tr y adjusting the settings.
IF A WIRELESS DEVICE BEGINS TO OPE RATE IMPROPERL Y AND A
USB
DEVICE IS CONNECTE D TO A FRONT-PANEL USB CONNECTOR,
RECONNECT THE USB DEVICE TO THE FRONT-PANEL USB
CONNECTOR — Any USB device(s) connected to the front-panel USB
connector(s) can cause interference with a wireless device.
CHECK FOR INTERRUPT REQUEST CONFLICTS — See page 47.
Keyboard Problems
CONNECT A USB KEYBOARD ONLY TO THE USB CONNECTORS ON THE
BACK OF THE COMPUTER — The USB connectors on the front of the
computer are intended only for devices such as digital cameras and gaming
joysticks. Connecting a USB keyboard to the front of the computer may cause
erratic operation, and an error message may appear when the computer is turned
on or restarted.
RECONNECT THE KEYBOARD CABLE — Shut down th e computer (see
page 20), r econnect the k eyboar d cable as shown on t he
your computer, and then restart the computer.
STAR T HERE sheet for
Solving Problems 35
Page 36

9p915bk0.book Page 36 Thursday, April 4, 2002 9:26 AM
IF A WIRELESS DEVICE BEGINS TO OPERATE IM PROPERLY AND A
USB
RECONNECT THE USB DEVICE TO THE FRONT-PANEL USB
CONNECTOR — Any USB device(s) connected to t he front-panel USB
connector(s) can cause interference with a wireless device.
CHECK FOR INTERRUPT REQUEST CONFLICTS — See page 47.
Drive Problems
DEVICE IS CONNECTED TO A FRONT-PANEL USB CONNECTOR,
www.dell.com | support.dell.com
If you cannot save a file to a floppy disk
ENSURE THAT WINDOWS RECOGN IZES THE DRIVE — In Windows XP,
click the Start button, and then click My Computer. In Windows Me and
Win dows 2000 , dou ble -clic k th e My Computer icon on the Windows desktop. If
the floppy drive is not listed, perform a full scan with your anti vi rus software to
check for and remove viruses. Viruses can sometimes prevent Windows from
recognizing the drive.
TEST THE DRIVE WITH ANOTHER FLOPPY DISK — Insert another floppy
disk to eliminate the possibility that the original floppy disk is defective.
36 Solving Problems
Page 37
9p915bk0.book Page 37 Thursday, April 4, 2002 9:26 AM
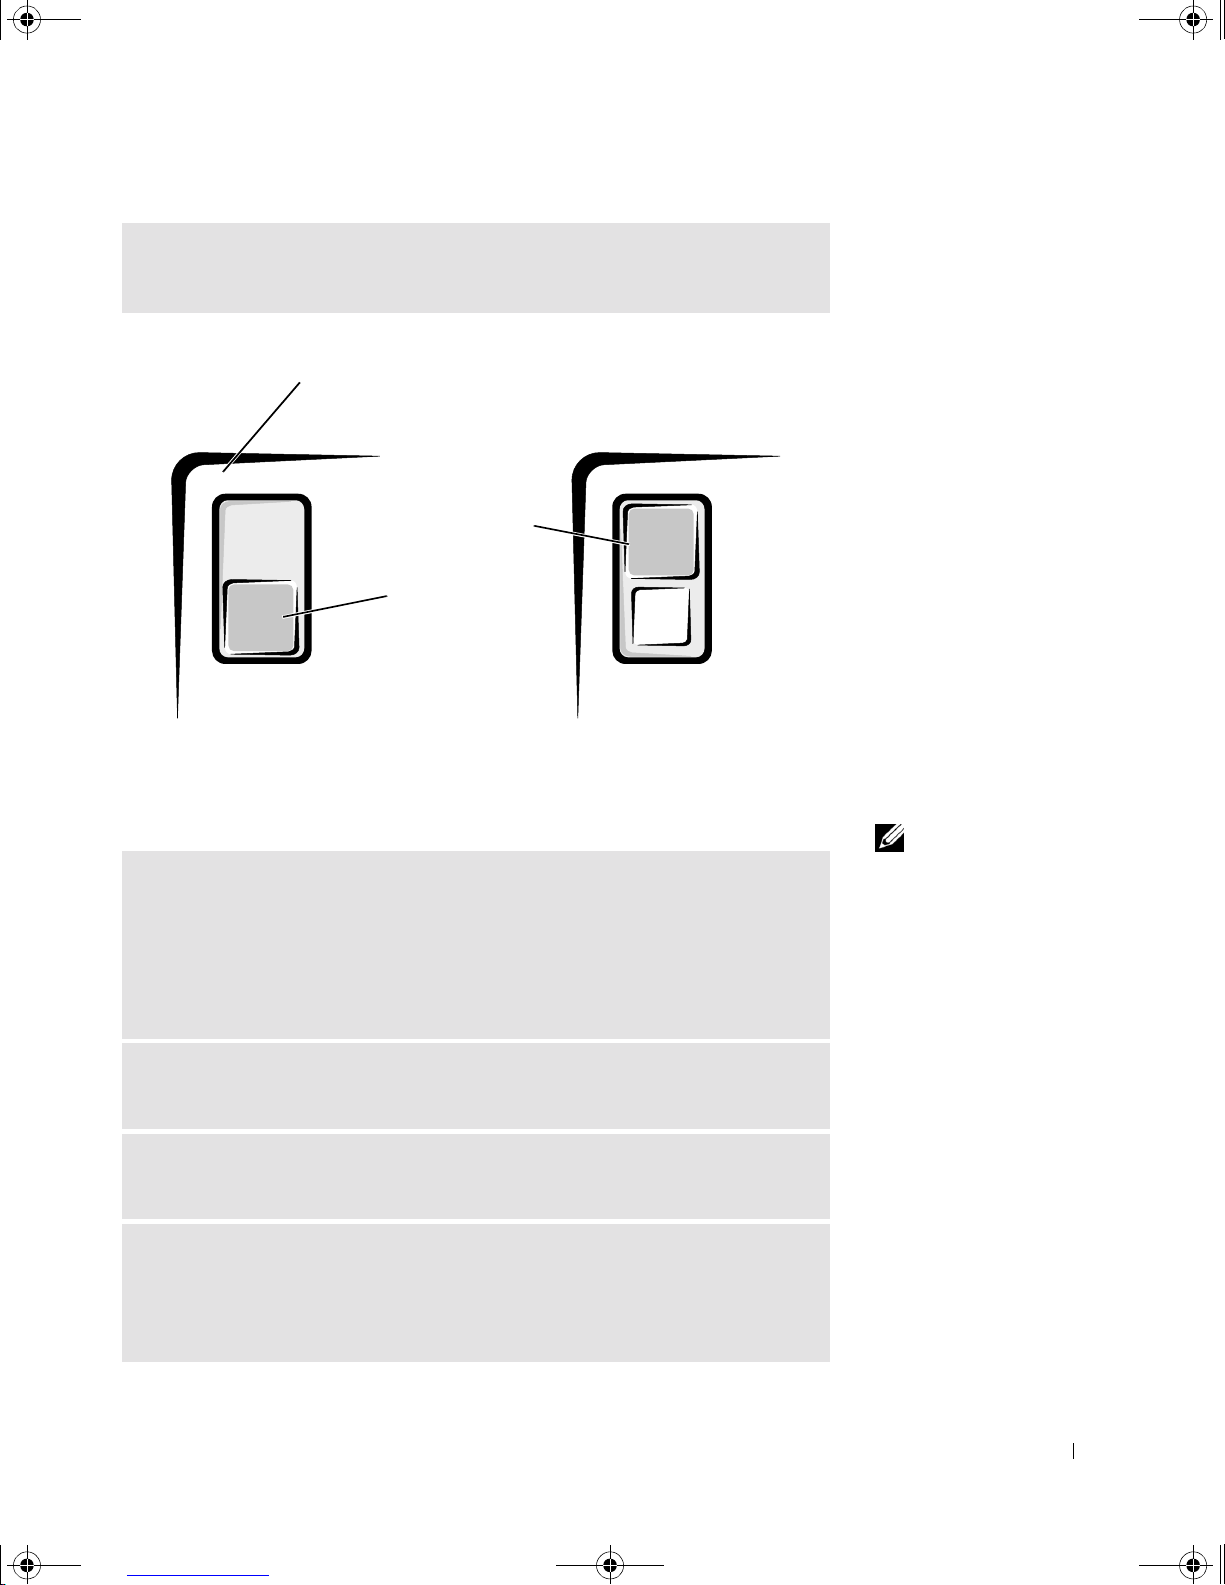
CANNOT SAVE FILES TO A FL OPPY DISK — Ensure that the floppy disk is
not full or write-protected (locked). See the following illustration.
back of floppy disk
write-protected
not writeprotected
If you cannot play a music CD or install a program from a CD
ENSURE THAT WINDOWS RECOGN IZES THE DRIVE — In Windows XP,
click the Start button, and then click My Computer. In Windows Me and
Win dows 2000 , dou ble -cli ck the My Computer icon on the Windows desktop. If
the CD drive is not listed, perform a full scan with your antivirus software to
check for and remove viruses. Viruses can sometimes prevent Windows from
recognizing the drive .
TEST THE DRIVE WITH AN OTHER CD — Insert another CD to eliminate
the possibility that the original CD is defective.
CLEAN THE DI SC — See the Tell Me How help file for instructions. To access
help files, see page 24.
ADJUST THE WINDOWS VOLUME CON TROL — In Windows XP, click the
speaker icon in the lower-right corner of your screen. In Windows Me or 2000,
double-click the speaker icon in the lower-right corner of your screen. Be sure that
the volume is turned up and that the sound is not muted.
HINT: High-speed CD
drive vibration is normal
and may cause noise. This
does not indica te a defect
in the drive or the CD.
Solving Problems 37
Page 38
9p915bk0.book Page 38 Thursday, April 4, 2002 9:26 AM
IF HEADPHONES AR E CONNECTED TO THE FRONT-PANEL HE ADPHONE
CONNECTOR, CHECK FOR SOUND FROM THE HEAD PHONES — Sound
from the speakers is automatically disabled w hen headphones are connected to
the computer’s front-panel headphone connector.
CHECK THE SPEAKERS AND SUBWOOFER — See page 28.
If you cann o t play a DVD mo vi e
HINT: Because of
www.dell.com | support.dell.com
different worldwide file
types, not all DVD titles
work in all DVD drives.
ENSURE THAT WINDOWS RECOGN IZES THE DRIVE — In Windows XP,
click the Start button, and then click My Computer. In Windows Me and
Win dows 2000 , dou ble -clic k th e My Computer icon on the Windows desktop. If
the DVD drive is not listed, perform a full scan with your antivirus software to
check for and remove viruses. Viruses can sometimes prevent Windows from
recognizing the drive.
HINT: If you disable
standby mode to write to a
CD-RW drive, remember
to reenable standby mode
when you finis h wr itin g to
the CD.
TEST THE DRIVE WITH ANOTHER DVD — Insert another DVD to
eliminate the poss ibility that the origi nal DVD is defective.
CLEAN THE DISC — See the Tell Me How help file for instructions.
If the CD-RW drive stops writing
TURN OFF STANDBY IN WINDOWS BEFORE WRITING TO A CD-RW
DISC — See the Tell Me How help file or search for the keyword standby in
the Help and Support Center in Windows XP and Windows Me (Help in
Windows 2000). To access help file s, see page 24.
CHANGE THE WRITE SPEED TO A SLO WER RATE — The CD-RW drive
must re ceive a stea dy str ea m of d ata wh en wr iting . If th e str eam is in terr upted, a n
error occurs. Closing all programs before writing to the CD-RW may also
alleviate the problem.
38 Solving Problems
Page 39

9p915bk0.book Page 39 Thursday, April 4, 2002 9:26 AM
If you have a hard drive problem
RUN S CANDISK
Windows XP and Windows 2000
1 In Windows XP click the Start button, and then click My Computer. In
Windows 2000 double-click the My Computer icon on the Windows desktop.
2 Right-click on t he dr ive letter ( local disk ) that you want to scan for errors, and
then click Properties.
3 Click the Tools tab.
4 Under Error-checking, click Check Now.
5 Click Start.
Windows Me
Click the Start button, point to Programs—> Accessories—> System Tools, and
then click ScanDisk.
CHECK FOR INTERRUPT REQUEST CONFLICTS — See page 47.
Network Problems
CHECK THE NETWORK CA BLE CONNECTOR — Ensure tha t th e network
cable connector is firmly connected to the connector on the computer and the
network wall jack as shown on the START HERE sheet for your computer.
CHECK THE NETWORK LI GHTS ON THE BACK OF THE COMPUTER — A
green light indicates a 10-Mbps network connection, and an orange light
indicates a 100-Mbps network connection. The light blinks amber when there is
any network traffic. If the light is dark, try replacing the network cable.
RESTART THE COMPUTER — Try to log on to the net w or k a gai n .
CONTACT YOUR NETWORK ADMINISTRATOR — Ver ify th at yo ur ne tw or k
settings are correct and that the network is functioning.
CHECK FOR INTERRUPT REQUEST CONFLICTS — See page 47.
Solving Problems 39
Page 40

9p915bk0.book Page 40 Thursday, April 4, 2002 9:26 AM
Microsoft® Windows® Error Messages
x
:\ IS NOT ACCESSIBLE. THE DEVICE IS NOT READY — Insert a disk
into the drive and try again.
A FILENAME CA NNOT CONTAIN ANY OF THE FOLLOWING
CHARACTERS: \ / : * ? “ < > | — Do not use these characters in
filenames.
NOT ENOUGH MEMORY OR RESOU RCES. CLOSE SOME PROGRAMS AND
www.dell.com | support.dell.com
TRY AGAIN — You have too many programs open. Close all windows and open
the program that you want to use. In some cases, you might have to restart your
computer to restore computer resources. If so, try running the program that you
want to use first.
THE FILE BEING COPIED IS TOO LARGE FOR THE DESTINATION
DRIVE — The file that you are trying to copy is too large to fit on the disk. Try
copying the file to a blank disk or use a larger-capacity disk.
A REQUIRED .D LL FILE WAS NOT FOUND — The program that you are
trying to open is missing an essential file. To remove and then reinstall the
program:
Windows XP
1 Click the Start button.
2 Click Control Panel.
3 Click Add or Remove Programs.
4 Select the program you want to remove.
5 Click the Change or Remove Program icon.
6 See the program documentation for installation instructions.
Windows Me and Windows 2000
1 Click the Start button, point to Settings, and then click Control Panel.
2 Double-click the Add/Remove Programs icon.
3 Select the program that you want to remove.
4 Click Add/Remove (click Change/Remove in Windows 20 00) and follow the
prompts on the screen.
5 See the program documentation for installation instructions.
40 Solving Problems
Page 41
9p915bk0.book Page 41 Thursday, April 4, 2002 9:26 AM
General Program Problems
A program crashes
SEE THE SOF TWARE DOCUMENTATION — Many software manufacturers
maintain websites with information that may help you to solve the problem.
A program stops responding
END THE P ROGRAM
1 Simultaneously press <Ctrl><Shift><Esc>.
2 In Windows XP and Windows 2000, click the Task Manager button, click the
Applications tab, and then select the program that is no longer responding. In
Windows Me, just select the program that is no longer responding.
Click the End Task button.
A program error causes the system to lock up
TURN THE COMPUTER OFF — If your computer locks up and y ou are unable
to get a response by pressing a key on your keyboard or moving your mouse, press
and hold the power but to n fo r at least 8 to 10 seconds until the computer turns
off. Then press the power button again to turn on the computer. You might lose
data if you are unable to perform a Microsoft Windows shutdown.
A solid blue screen appears
TURN THE COMPUTER OFF — If your computer locks up and y ou are unable
to get a response by pressing a key on your keyboard or moving your mouse, press
and hold the power but to n fo r at least 8 to 10 seconds until the computer turns
off. Then press the power button again to turn on the computer. The solid blue
screen appears because you were not able to perform a proper Windows
shutdown. Y ou might lose data if you are unable to perform a Microsoft Windows
shutdown.
HINT: ScanDisk may
run when you resta r t the
computer. Follow the
instructions on the screen.
HINT: ScanDisk may
run when you resta r t the
computer. Follow the
instructions on the screen.
Solving Problems 41
Page 42

9p915bk0.book Page 42 Thursday, April 4, 2002 9:26 AM
A program is designed for an earlier Windows operating system
RUN THE PROGRAM COMPATIBILITY WIZARD
Windows XP provides a Program Compatibility Wizard that configures a
program to run in an environment more similar to older Windows operating
system envi r o nm e nt s.
1 Click the Start button, point to All Programs—> Accessories, a nd then click
2 On the welcome screen, click Next.
www.dell.com | support.dell.com
Internet Connection Problems
Program Compatibility Wizard.
Follow the instructions on the screen.
If you have a problem with your Internet connection
REVIEW “MODEM PROB LEMS”—See page32.
42 Solving Problems
Page 43

9p915bk0.book Page 43 Thursday, April 4, 2002 9:26 AM
TURN OFF CALL WAITING (CATCH -PHONE)—See your telephone
directory for instructions on deactivating this feature. Then adjust the dial-up
networking connection properties.
Windows XP
1 Click the Start button, and then click Control Panel.
2 Click Printers and Other Hardware, and then click Phone and Modem
Options.
3 Click to highlight your connection type in the dis p layed list.
4 Click the Dialing Rules tab, and then click the Edit button.
5 Click to place a checkmark in the To Disable Call Waiting box.
6 Select the disable code from the drop down menu (for example, *70).
7 Click Apply, and then click OK.
Windows Me
1 Click the Start button, poin t to Settings, and then click Control Panel.
2 Double-click the Modems icon.
3 In the Modems Properties window, click Dialing Properties.
4 Ensure that To disable call waiting, dial: is chec ked, and then select the
proper code according to the information in your teleph o ne directory.
5 Click Apply, and then click OK.
6 Close the Modems Properties window.
7 Close the Control Panel.
Windows 2000
1 Click the Start button, poin t to Settings, and then click Control Panel.
2 Double-click the Phone and Modems Options icon.
3 In th e Locations wind ow, select th e loc atio n f or wh ich you w ant to dis able call
waiting, and the n click Edit.
4 Ensu re that To disable call waiting, dial: is checked and then select the proper
code according to the information in your telephone directory.
5 Click Apply and then click OK.
6 Close the Phone and Modems Options window.
7 Close the Control Panel.
BE SURE THAT YOU HA VE SU BSCRIBED TO AN INTERNET SERVICE
PROVIDER — Contact an Internet service provider to subscribe.
Solving Problems 43
Page 44

9p915bk0.book Page 44 Thursday, April 4, 2002 9:26 AM
E-Mail Problems
ENSURE THAT YOU ARE CONNECTED TO THE INTERNET — With the
Outlook Express e-mail program open, click File. I f Work Offline has a check
next to it, click the check to remove it and connect to the Internet.
Resolving Other Technical Problems
www.dell.com | support.dell.com
GO TO THE DELL | SUPPORT W EBSITE — Go to support.dell.com for
help with general usage, installation, and troubleshooting questions. See "Dell
Technical Support Policy" on page101 for a descripti on of the hardware and
software support provided by Dell.
E-MAIL DELL — Go to support.dell.com, and then click E-Mail Dell in the
Communicate list. Send an e-mail message to Dell about your problem; you can
expect to receive an e-mail mess a g e fro m Dell within hours. Se e "Dell Technical
Support Policy" on page 101 for a description of the hardware and software
support provided by Dell.
CALL DELL — If you cannot so lve your problem using the D ell | Support
website or e-mail service, call Dell for technical assistance (see page 102). See
"Dell T echnical Support P olicy" on page 101 for a description of the hardware and
software support provided by Dell.
Reinstalling Drivers
NOTICE: The Dell | Support website, support.dell.com, and the
Dimension ResourceCD
install drivers obtained from other sources, your computer might not work
correctly.
provide approved drivers for Dell™ computers. If you
Dell
Dell installed the following drivers on your computer:
• Intel
44 Solving Problems
®
Chip Set Update Utility Driver — Installs the Microsoft
Windows operating system device installation files (.inf) that tell the
operating system how certain chip set components should be
configured for proper operation.
Page 45

9p915bk0.book Page 45 Thursday, April 4, 2002 9:26 AM
• Intel Ultra ATA Storage Driver — Improves your computer's
performance by transferring certain functions from the microprocessor
during data transfers from storage devices.
• ADI 1885 Audio Driver — Enables the optional built-in sound
controller to produce sound.
• Other Drivers — Control the devices such as the modem and network
cards that might be installed in your computer. For information on
other drivers on computers running Windows XP, click the Start
button, click Help and Support, click User and system guides, and
then click Device guides. Click the appropriate guide from the list. F or
information on other drivers on computers running Windows 2000,
click the Start button, point to Programs—> User's Guides, and click
the appropriate guide from the list.
Sometimes you can fix a device problem by reinstalling its driver:
1 From the Windows desktop, insert the Dell Dimension ResourceCD
into the CD or DVD drive.
If this is your first time to use the ResourceCD, go to step 2. If not, go
to step 5.
2 When the ResourceCD Installation program starts, follow the
prompts on the screen.
3 When the InstallShield Wiz ar d Complete window appear s, remove
the ResourceCD and click Finish to restar t the computer.
4 When you see the Windows desktop, reinsert the ResourceCD into the
CD or DVD drive.
Solving Problems 45
Page 46

9p915bk0.book Page 46 Thursday, April 4, 2002 9:26 AM
5 At the Welcome Dell System Owner screen, click Next.
www.dell.com | support.dell.com
HINT: The
displays drivers only for
hardware that Dell
installed at the time of
purchase. If you installed
any additional hardware,
those drivers may not be
displayed by the
ResourceCD
drivers are not displayed,
exit the ResourceCD
program and refer to the
documentation and
drivers that came with
that product.
ResourceCD
. If those
A message appears that says the ResourceCD is detecting hardware in
your computer.
The drivers that are used by your computer are automatically displayed
in the My Drivers—The ResourceCD has identified these
components in your system window.
6 Click the driver that you want to reinstall and follow the ins tr u c tions
on the screen.
If a particular driver is not listed, then that driver is not required by
your operating system.
To view other contents on the ResourceCD:
1 Verify that your computer is selected in the System Model list.
2 Verify that your operating system is selected in the Operating System
list.
3 Select the type of device in the Device Type list.
NOTICE: The
your computer. Only reinstall the specific drivers for hardware included in your
computer. Otherwise, your computer might not work correctly.
4
Select a topic in the Topic list.
ResourceCD
contains drivers for devices that are not par t of
46 Solving Problems
If you select Drivers in the Topic list and a particular driver is not
listed, then that driver is not required by your operating system.
Using the Windows XP Device Driver Rollba ck
The Windows XP Device Driver Rollback can replace a device driver w ith
the previously installed version if you install a new device driver that causes
system instability. If you cannot reinstall your previous driver with the
Driver Rollback process, then use System Restore (see page 50) to attempt
to return your operating system to its p revious operating state before the
new device driver installation:
1 Click the Start button, and then right-click My Computer.
2 Click Properties.
3 Click the Hardware tab, and then click Device Manager.
Page 47

9p915bk0.book Page 47 Thursday, April 4, 2002 9:26 AM
4 In the Device Manager window, right-click the device for which the
new driver was installed, and then click Properties.
5 Click the Drivers tab.
6 Click Roll Back Driver.
Resolving Software and Hardware
Incompatibilities
Windows XP, Windows Me, and Windows 2000 IRQ conflicts occur if a
device either is not detected during the operating system setup o r is
detected but incorrectly configured.
Windows XP
To check for conflicts on a computer running Windows XP:
1 Click the Start button, and then click Control Panel.
2 Click Performance and Maintenance, and then click System.
3 Click the Hardware tab, and then click the Device Manager button.
4 In the Device Manager list, check for conflicts with the other devices.
Conflicts are indicated by a yellow exclamation point (
conflicting device or a red
5 Double-click any conflicting device listed to bring up the Properties
X if the device has been disabled.
window so you can determine what needs to be reconfigured or
removed from the Device Manager.
Resolve these conflicts before checking specific devices.
6 Double-click the malfunctioning device type in the Device Manager
list.
7 Double-click the icon for the specific device in the expanded list.
The Properties window appears.
!) beside the
8 Resolve any IRQ conflicts.
If there is an IRQ conflict, the Device status area in the Properties
window reports what cards or devices are sharing the device's IRQ.
Solving Problems 47
Page 48

9p915bk0.book Page 48 Thursday, April 4, 2002 9:26 AM
You can also use the Windows XP Hardware Troubleshooter. To use the
troubleshooter, click the Start button and click Help and Support. Type
hardware troubleshooter in the Search field, and then click the arrow
to start the sear c h. Click Hardware Troubleshooter in the Search Results
list. In the Hardware Troubleshooter list, click I need to resolve a hardware
conflict on my computer, and then click Next.
Windows Me
To check for conflicts on a computer running Windows Me:
1 Click the Start button, point to Settings, and click Control Panel.
www.dell.com | support.dell.com
2 In the Control Panel, double-click System.
3 Click the Device Manager tab.
4 In the Device Manager list, check for conflicts with the other devices.
Conflicts are indicated by a yellow exclamation point (
conflicting device or a red
5 Double-click any conflicting device listed to bring up the Properties
X if the device has been disabled.
!) beside the
window so you can determine what needs to be reconfigured or
removed from the Device Manager.
Resolve these conflicts before checking specific devices.
6 Double-click the malfunctioning device type in the Device Manager
list.
7 Double-click the icon for the specific device in the expanded list.
The Properties window appears.
8 Resolve any IRQ conflicts.
If there is an IRQ conflict, the Device status area in the Properties
window reports what cards or devices are sharing the device's IRQ.
You can also use the Windows Me Hardware Troubleshooter. To use the
troubleshooter, click the Start button and click Help. Click
Troubleshooting in the What would you like help with? list, click Hardware
& system device problems, click Hardware, memory, & others, and then
click Hardware Troubleshooter. In the Hardware Troubleshooter list, click I
need to resolve a hardware conflict on my computer, and then click Next.
48 Solving Problems
Page 49

9p915bk0.book Page 49 Thursday, April 4, 2002 9:26 AM
Windows 2000
To check for conflicts on a computer running Windows 2000:
1 Click the Start button, point to Settings, and click Control Panel.
2 In the Control Panel, double-click System.
3 Click the Hardware tab.
4 Click Device Manager.
5 Click View, and then click Resources by connection.
6 Double-click Interrupt request (IRQ) to view the IRQ assignments.
Conflicts are indicated by a yellow exclamation point (
conflicting device or a red
7 Double-click any conflicting device listed to bring up the Properties
X if the device has been disabled.
!) beside the
window so you can determine what needs to be reconfigured or
removed from the Device Manager. Resolve these conflicts before
checking specific devices.
8 Double-click the malfunctioning device type in the Device Manager
list.
9 Double-click the icon for the specific device in the expanded list.
The Properties window appears.
10 If there is an IRQ conflict, the Device status are a in the Properties
window reports what cards or devices are sharing the device's IRQ.
Resolve the IRQ conflicts.
You can also use the Windows 2000 Hardware Troubleshooter. To use the
troubleshooter, click the Start button and click Help. Click
Troubleshooting and Maintenance on the Contents tab, click
Windows 2000 troubleshooters, and then click Hardware. In the Hardware
Troubleshooter list, click I need to resolve a hardware conflict on my
computer, and then click Next.
Solving Problems 49
Page 50

9p915bk0.book Page 50 Thursday, April 4, 2002 9:26 AM
Using System Restore
Windows XP and Wi ndows Me provide a System Restore feature that allows
you to return your computer to an earlier operating state if changes to the
computer’s hardware or software (including new hardware or program
installations), or other system settings, have left the computer in an
undesirable operating state. You can also undo the last System Restore.
System Restore automatically creates system checkpoints. You can also
manually create your own checkpoints by creating Restore Points. To limit
the amount of hard disk space used, older restore points will be
automatically purged.
www.dell.com | support.dell.com
If your computer experiences an operating system problem, you can use
System Restore from Safe Mode or Normal Mode to return your computer
to an earlier operating state.
System Restore does not cause you to lose personal files stored in the My
Documents folder, data files, or e-mail messages after restoring the
computer to an earlier time. If you restore the computer to a point before
you installed a program, the program’s data files won’t be lost, but you will
have to reinstall the actual program again.
NOTICE: It is important to make regular backups of your data files. System
Restore does not monitor changes to or recover your data files. If the original
data on the hard disk is accidentally erased or overwritten, or becomes
inaccessible because of a hard disk malfunction, you will need your backup
files to recover the lost or damaged data.
System Restore is enabled on your new computer. However, if you reinstall
Windows XP or Windows Me with less than 200 MB of free har d-dis k sp ace
available, System Restore is automatically disabled. T o see if System Restore
is enabled:
Windows XP
1 Click the Start button, and then click Control Panel.
2 Click Performance and Maintenance.
3 Click System.
4 Click the System Restore tab.
5 Make sure that Turn off System Restore is unchecked.
50 Solving Problems
Page 51

9p915bk0.book Page 51 Thursday, April 4, 2002 9:26 AM
Windows Me
1 Click the Start button, point to Settings, and then click Control
Panel.
2 Double-click the System icon.
3 Click the Performance tab.
4 Click File Syst em.
5 Click the Troubleshooting tab, and make sure that Disable System
Restore is unchecked.
Before proceeding with any System Restore function, Dell recommends that
you thoroughly read Microsoft’s information about using System Restore.
To access this information:
1 Click the Start button, point to All Programs (Programs in
Windows Me)—> Accessories—> System Tools, and then click
System Restore.
2 Click Help in the upper-right corner of the Welco me to System
Restore screen.
Creating a Restore Point
Using the XP System Restore Wizard
In Windows XP you can manually create restore points or you can use the
System Restore Wizard to create the restore points for you. To use the
System Restore Wizard, click the Start button, click Help and Support,
click System Restore, and then follow the instructions on the screen. You
can also create and name a restore point if you are logged on as the
computer administrator or a user with administrator rights.
Manually Creating the Restore Points
1 Click the Start button, point to All Programs (Programs in
Windows Me)—> Accessories—> System Tools, and then click
System Restore.
2 Click Create a restore point.
3 Click Next.
Solving Problems 51
Page 52

9p915bk0.book Page 52 Thursday, April 4, 2002 9:26 AM
4 Type a name for your new restore point in the Restore point
5 Click Create (click Next in Windows Me).
6 Click OK (click Close in Windows Me).
Restoring the Computer to an Earlier Operating State
If problems occur after installing a device driver, first try using Device
Driver Rollback (see page 46). If that is unsuccessful, then use System
www.dell.com | support.dell.com
Restore.
description field.
The present date and time are automatically added to your restore
point.
NOTICE: Before restoring the computer to an earlier time, save and close all
open files and close all open programs. Do not alter , open, or delete any files or
programs until the system restoration is complete.
1
Click the Start button, point to All Programs (Programs in
Windows Me)—> Accessories—> System Tools, and then click
System Restore.
2 Be sure Restore my computer to an earlier time is selected, and then
click Next.
3 Click a calendar date to which you want to restore your computer.
The Select a Restore Point (Choose a Restore Point in Windows Me)
screen provides a calendar that allows you to see and select restore
points. All calendar dates with available restore points appear in bold.
4 Select a restore point, and then click Next.
If a calendar date has only one restore point, then that restore point is
automatically selected. If two or more restore points are available, click
the restore point that you want to use.
NOTICE: Save and close all open files and close all open programs. Do not
alter, open, or delete any files or programs until the system restoration is
complete.
5
52 Solving Problems
Click Next (click OK in Windows Me).
The Restoration Complete screen appears (the Restoration in
Progress screen in Windows Me) after System Restore completes
collecting data, and then the computer automa tically restarts.
Page 53

9p915bk0.book Page 53 Thursday, April 4, 2002 9:26 AM
6 After the computer restarts, click OK.
To change the restore point, you can either repeat the steps using a
different restore point, or you can undo the restoration.
Undoing the Last System Restore
NOTICE: Before undoing the last system restore, save and close all open files
and close all open programs. Do not alter, open, or delete any files or programs
until the system restoration is complete.
1
Click the Start button, point to All Programs (Programs in
Windows Me)—> Accessories—> System Tools, and then click
System Restore.
2 Select Undo my last restoration and click Next.
NOTICE: Save and close all open files and close all open programs. Do not
alter, o pen, or delete any files or programs until the system restoration is
complete.
3
Click Next (click OK in Windows Me).
4 The System Restore (Undoing Last Restoration in Windows Me )
screen appears, and then the computer automatically restarts.
5 After the computer restarts, click OK.
Reinstalling Windows XP
Before reinstalling the Windows XP operating system to correct a problem,
try correcting the problem by performing a Windows XP System Restore
(see page 50).
NOTICE: The
Windows XP operating system. The options can potentially overwrite files
installed by Dell and possibly affect programs installed on your hard drive.
Therefore, Dell does not recommend that you reinstall your operating system
unless instru cted to do so by a Dell technical support rep resentative.
NOTICE: To prevent conflicts with Windows XP, you must disable any
virus protection software installed on your computer before you reinstall
Windows XP.
Operating System
CD provides options for reinstalling your
1
Insert the Operating System CD into the CD or DVD drive.
Close any program or utility that may start to run after you insert the
CD into the drive.
HINT: The CD that you
need to place in your CD
or DVD drive is titled
Operating Syste m
Solving Problems 53
.
Page 54

9p915bk0.book Page 54 Thursday, April 4, 2002 9:26 AM
2 Turn off the computer (see page 20), and then turn the computer on
3 When the blue Dell logo appears, press <F12> immediately.
4 Use the arrow keys to select the CD-ROM option, and then press
5 When the Windows XP Setup screen appears, press <Enter> to
www.dell.com | support.dell.com
6 Read the information in the License Agreement window, and then
again.
If you wait too long and the operating system logo appears, continue to
wait until you see the Microsoft Windows desktop. Then shut down
the computer and try again.
<Enter>.
select To set up Windows now.
press <F8> on your keyboard to agree with the license information.
7 If your computer already has Windows XP installed and you want to
recover your current Windows XP data, type
R to select the repair
option, and then go to step 16.
If you want to install a new copy of Windows XP, press <Esc> to
select the fresh copy option, and then press <Enter> on the next
screen to select the highlighted partition (recommended). Then follow
the instructions on the screen.
8 The Windows XP Setup screen appears and Windows XP begins to
copy files and install the devices. The computer automatically restarts
multiple times before it requires additional input.
9 When the Welcome to Microsoft screen appears, click the green arrow
icon at the bottom of the screen to continue. Follow the on-screen
directions to finish.
10 When the Regional Settings screen appears, select the settings for
your locale, and then click Next.
11 Enter your name and organization in the Personalize Your Software
screen, and then click Next.
12 If you are reinstalling Windows XP Home Edition, enter a name for
your computer when the Computer Name window appears, and then
click Next.
54 Solving Problems
If you are reinstalling Windows XP Professional, enter a name for your
computer and a password when the Computer Name and
Administrator Password window appears, and then click Next.
Page 55

9p915bk0.book Page 55 Thursday, April 4, 2002 9:26 AM
13 If you have a modem installed, the Modem Dialing Information
screen appears. Enter the requested information, and then click Next.
14 Enter the date, time, and time zone in the Da te and Time Settings
window, and then click Next.
15 If you have a network card in your computer, select the appropriate
network settings. If you do not have a network card, you will not see
this opti on .
Windows XP begins to install its components and configure the
computer. The computer automatically restarts.
16 When the W elcome to Microsoft screen appears, click the green arrow
icon at the bottom of the sc reen to continue. Follow the on-screen
directions to finish.
17 Rem ove the CD from the drive.
18 Reinstall the app ropriate drivers (see page 44).
19 Reinstall your virus protection software.
Reinstalling Windows Me
Before reinst alling the Windows Me operating system to correct a prob lem,
try correcting the problem by performing a Windows Me System Restore
(see page 50).
NOTICE: The
Windows Me operating system. The options can potentially overwrite files
installed by Dell and possibly affect programs installed on your hard drive.
Therefore, Dell does not recommend that you reinstall your operating system
unless instru cted to do so by a Dell technical support rep resentative.
NOTICE: To prevent conflicts with Windows Me, you must disable any
virus protection software installed on your computer before you reinstall
Windows Me.
1
Insert the Operating System CD into the CD or DVD drive.
Close any program or utility that may start to run after you insert the
CD into the drive.
2 Turn off the computer (see page 20), and then turn the computer on
again.
Operating System
CD provides options for reinstalling your
HINT: The CD that you
need to place in your CD
or DVD drive is titled
Operating Syste m
.
Solving Problems 55
Page 56

9p915bk0.book Page 56 Thursday, April 4, 2002 9:26 AM
3 When the blue Dell logo appears, press <F12> immediately.
4 Use the arrow keys to select the CD-ROM option, and then press
5 Select Start Windows Setup from CD-ROM, and then press
6 Pre ss <Ente r> agai n.
If you wait too long and the operating system logo appears, continue to
wait until you see the Microsoft Windows desktop. Then shut down
the computer and try again.
<Enter>.
<Enter>.
www.dell.com | support.dell.com
7 Select Continue Setup and replace your current operating system,
and then press <Enter>.
8 Pre ss <Enter > agai n.
ScanDisk automatically starts and checks your hard drive.
9 Click Next in the Welcome to Windows Me window.
10 Select the directory in which Windows resides.
If C:\WINDOWS (recommended) is displayed, select it, and then
click Next.
If C:\WINDOWS.000 (recommended) is displayed, click Other,
change
11 Ensure that Typical is selected, and then click Next.
12 Specify a computer name, workgroup, and computer description, if
C:\WINDOWS.000 to C:\WINDOWS, and then click Next.
desired, and then click Next.
13 Select a country in the Country/Region window, and then click Next.
14 Specify a time zone in the Establish Time Zone window, and then
click Next.
15 Click Finish.
16 Select Boot From Hard Drive, and then press <Enter>.
56 Solving Problems
Windows Setup installs necessary files, and then re starts the computer.
Page 57

9p915bk0.book Page 57 Thursday, April 4, 2002 9:26 AM
17 In the User Informa tion window, type your name and, if applicable,
company name, and then click Next.
The Name field must be completed; the Company Name field is
optional.
The License Agreement window appears.
18 Click I accept the Agreement, and then click Next.
19 Type the Windows product key in the fields provided, and then click
Next.
The product key is the bar code number found on the Microsoft
Windows label, which is located behind the front-panel connector
door as shown on the START HERE sheet for your computer.
20 Click Finish.
Windows Setup installs additional files, and then restarts the
computer.
21 Select Boot From Hard Drive, and then press <Enter>.
Windows Setup installs additional files, and then restarts the
computer.
22 Select Boot From Hard Drive, and then press <Enter>.
23 Enter a password in the Enter Network Password window, if desired,
and then click Next.
24 Remove the Operating System CD from the CD or DVD drive.
25 Enter the system setup program as directed by a Dell technical support
representative.
26 In the system setup program Boot menu, change the boot sequence
back to the original boot sequence. Then, exit the system setup
program.
Reinstalling Windows 2000
NOTICE: The
Windows 2000 operating system. The options can potentially overwrite files
installed by Dell and possibly affect programs installed on your hard drive.
Therefore, Dell does not recommend that you reinstall your operating system
unless instru cted to do so by a Dell technical support rep resentative.
Operating System
CD provides options for reinstalling your
Solving Problems 57
Page 58

9p915bk0.book Page 58 Thursday, April 4, 2002 9:26 AM
NOTICE: To prevent conflicts with Windows 2000, you must disable any
virus protection software installed on your computer before you reinstall
Windows 2000.
www.dell.com | support.dell.com
HINT: The CD that you
need to place in your CD
or DVD drive is titled
Operating System
.
1
Insert the Operating System CD into the CD or DVD drive.
Close any program or utility that may start to run after you insert the
CD into the drive.
2 Turn off the computer (see page 20), and then turn the computer on
again.
3 When the blue Dell logo appears, press <F12> immediately.
If you wait too long and the operating system logo appears, continue to
wait until you see the Microsoft Windows desktop. Then shut down
the computer and try again.
4 Use the arrow keys to select the CD-ROM option, and then press
<Enter>.
5 When the Windows 2000 Setup screen appears, ensure that the To
setup Win2000 now, press ENTER option is highlighted. Then press
<Enter>.
6 Read the information in the License Agreement screen, and then press
<F8> to continue.
7 When the Windows 2000 Professional Setup screen appear s, use the
arrow keys to select the Windows 2000 partition option that you want.
To continue, press the key specified in the partition option that you
chose.
58 Solving Problems
8 When the Windows 2000 Professional Setup screen reappears, use the
arrow keys to select the type of filing system that you want
Windows2000 to use, and then press <Enter>.
9 Press <Enter> again to restart your computer.
10 Click Next when the Welcome to the Windows 2000 Setup Wizard
screen appears.
11 When the Regional Settings screen appears, select the settings for
your locale, and then click Next.
12 Enter your name and organization in the Personalize Your Software
screen, and then click Next.
Page 59

9p915bk0.book Page 59 Thursday, April 4, 2002 9:26 AM
13 Type the Windows product key in the fields provided, and then click
Next.
The product key is the bar code number found on the Microsoft
Windows label, which is located behind the front-panel connector
door as shown on the START HERE sheet for your computer.
14 When the Computer Name and Administ rator Password screen
appears, enter a name for your computer and a password, if desired.
Then click Next.
15 Enter the date and time in the Date and Time Settings screen, and
then click Next.
Windows 2000 now begins to install its components and configure the
computer.
16 When the Co mpl eti ng the Windows 200 0 Setup Wizard screen
appears, remove the CD from the drive, and then click Finish.
The computer automatically restarts.
Solving Problems 59
Page 60

9p915bk0.book Page 60 Thursday, April 4, 2002 9:26 AM
www.dell.com | support.dell.com
60 Solving Problems
Page 61
9p915bk0.book Page 61 Thursday, April 4, 2002 9:26 AM
SECTION 3
Adding Parts
Front and Back View of the Computer
Reattaching the Front Door and Hinge Arms
Opening the Computer Cover
Looking Inside Your Computer
Adding Cards
Removing Cards
Adding Memory
Replacing the AGP Card
Adding a Second Hard Drive
Adding Other Drives
Closing the Computer Cover
Page 62
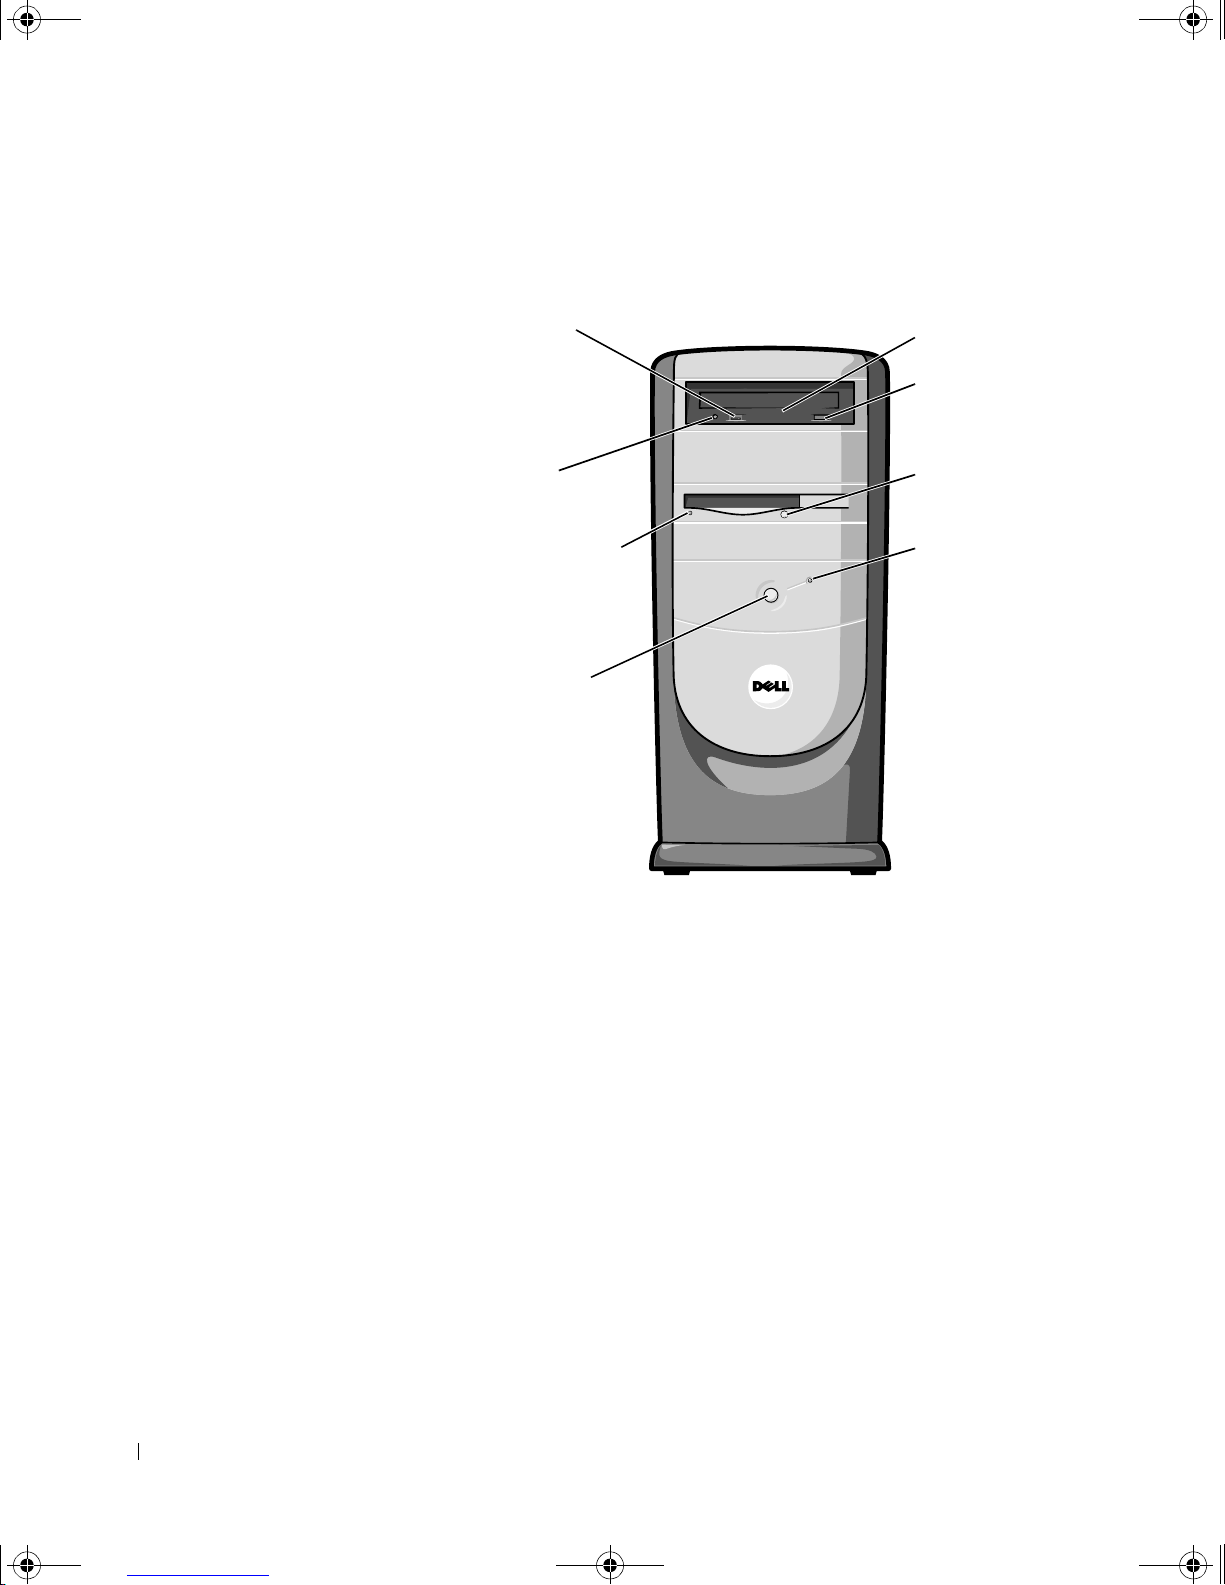
9p915bk0.book Page 62 Thursday, April 4, 2002 9:26 AM
Front and Back View of the Computer
CD volume
control dial
CD headphone
connector
CD activity light
CD drive eject
button
floppy drive
eject button
www.dell.com | support.dell.com
floppy drive light
power button
hard drive light
62 Adding Parts
Page 63
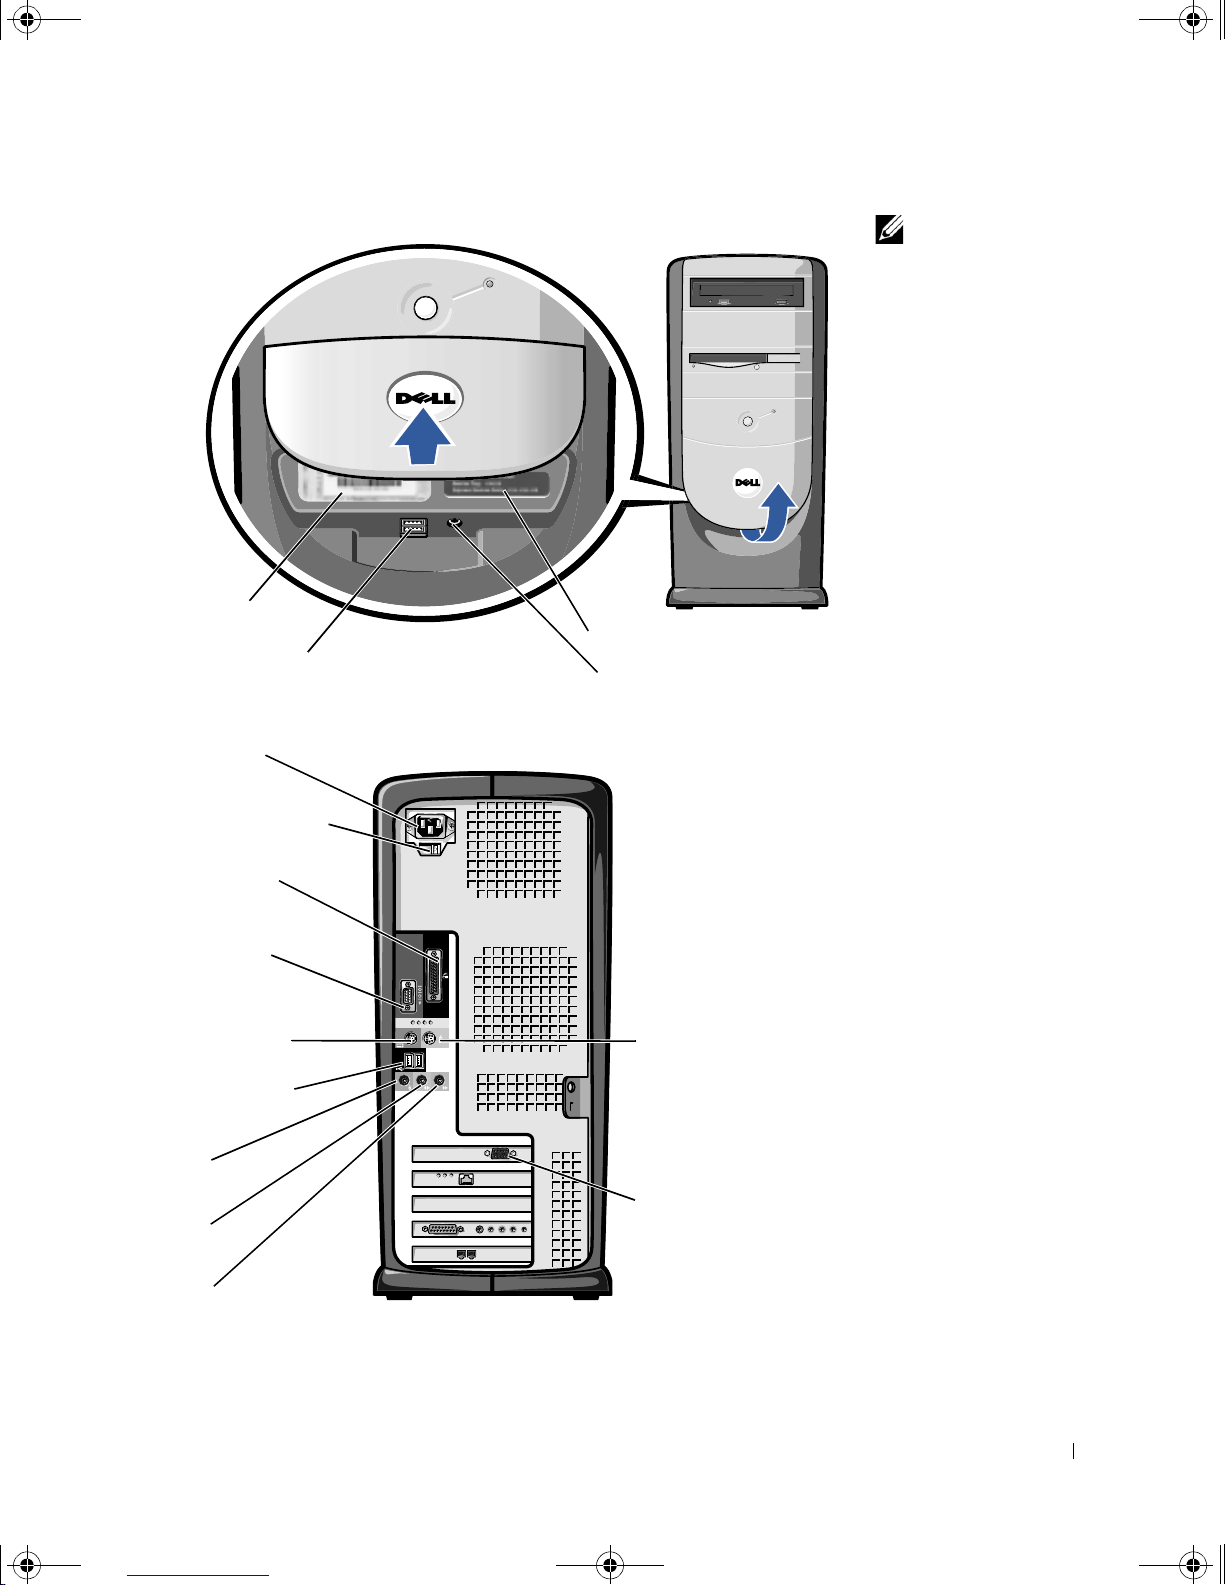
9p915bk0.book Page 63 Thursday, April 4, 2002 9:26 AM
Windows
license label*
USB 1.1 connectors
*The label may be located on the side of your computer
HINT: To prevent
damage to your computer,
the front door is designed
to "break away" if it is
lifted up too far. For
instructions on how to
reattach the door, see
page 64.
service tag
headphone connector
power connector
voltage selection switch
parallel connector
serial connector
keyboar d co nn ector
USB 1.1 connectors
microphone
connector
line-out
connector
line-in
connector
mouse connector
video conne c t or
Adding Parts 63
Page 64
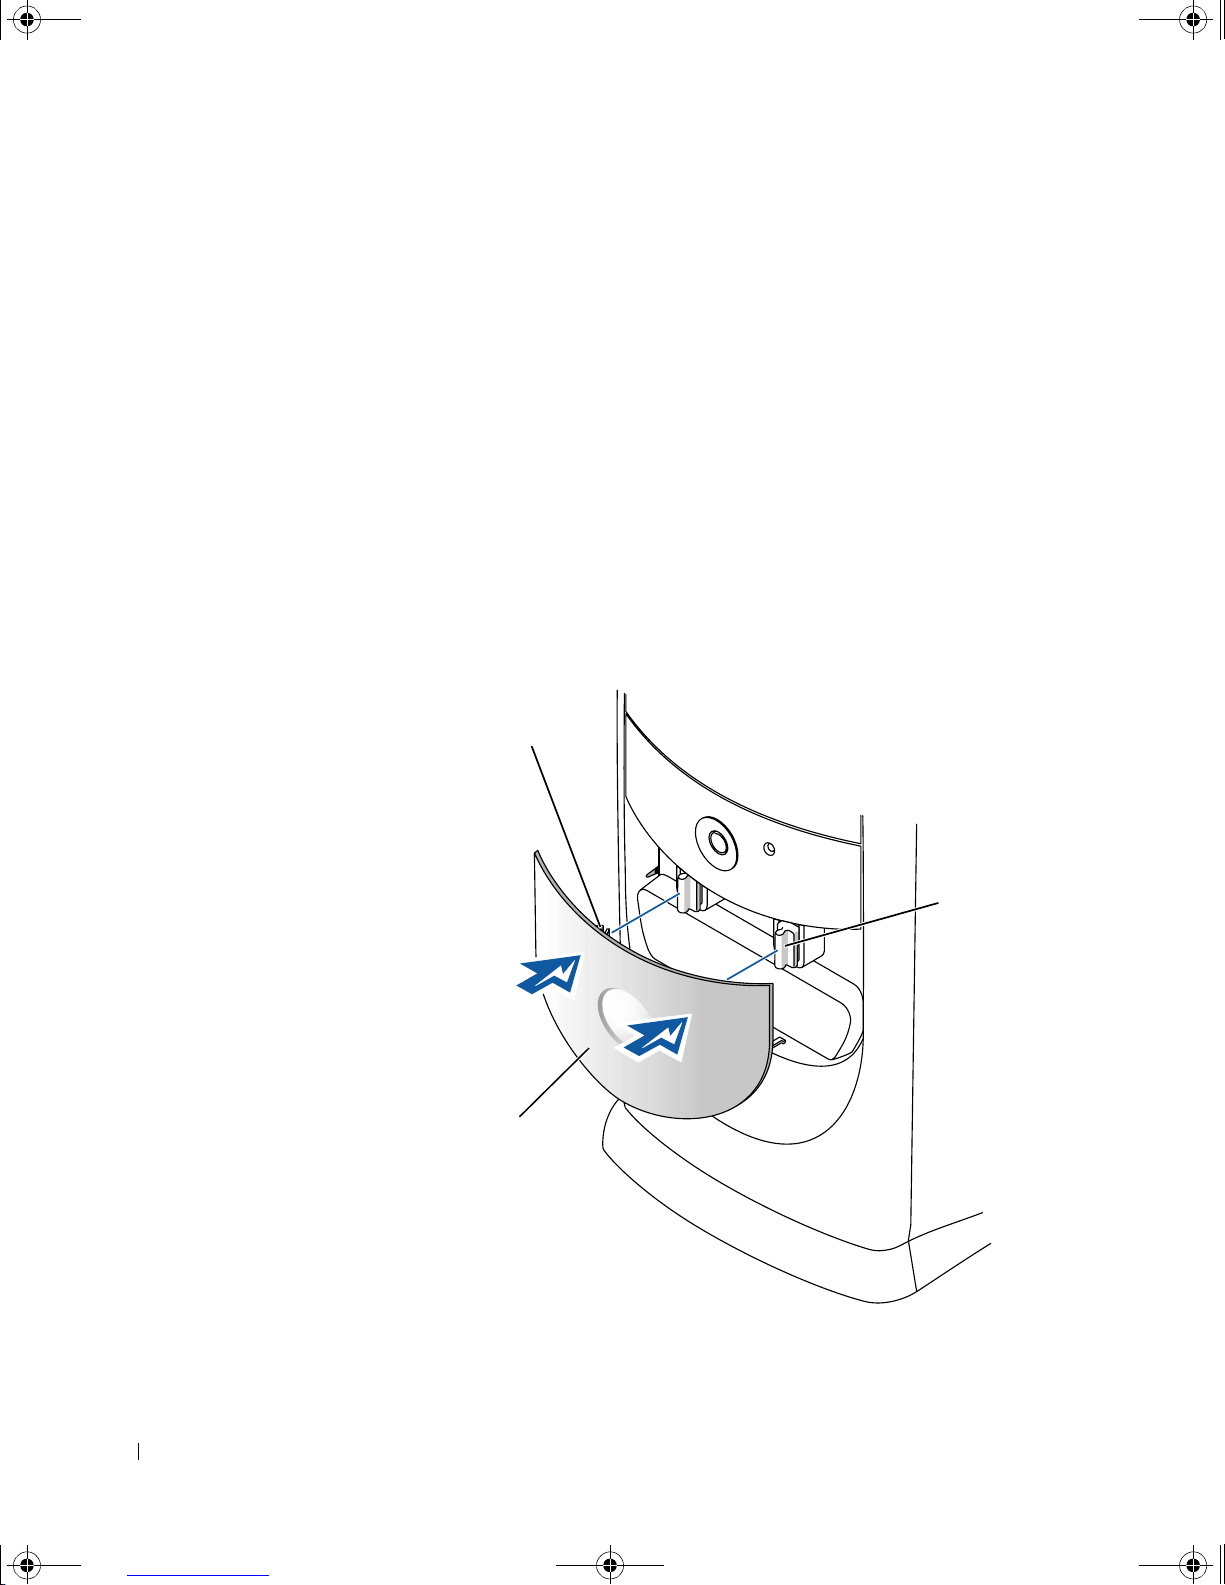
9p915bk0.book Page 64 Thursday, April 4, 2002 9:26 AM
Reattaching the Front Door and Hinge
Arms
To prevent damage to your computer, the front door is designed to "break
away" if it is lifted up too far. If the front door breaks away, you might need
to reattach both the front door a nd the hinge arms.
Reattaching the Front Door
1 Shut down the computer (see page 20).
2 Lower the hinge arms to the vertical posi tion.
www.dell.com | support.dell.com
3 Align the two clips on the inside of the front door with the two hinge
arms.
4 Press inward on the front door until it clips to both hinge arms.
front-door
clips (2)
hinge arms (2)
front door
64 Adding Parts
Page 65
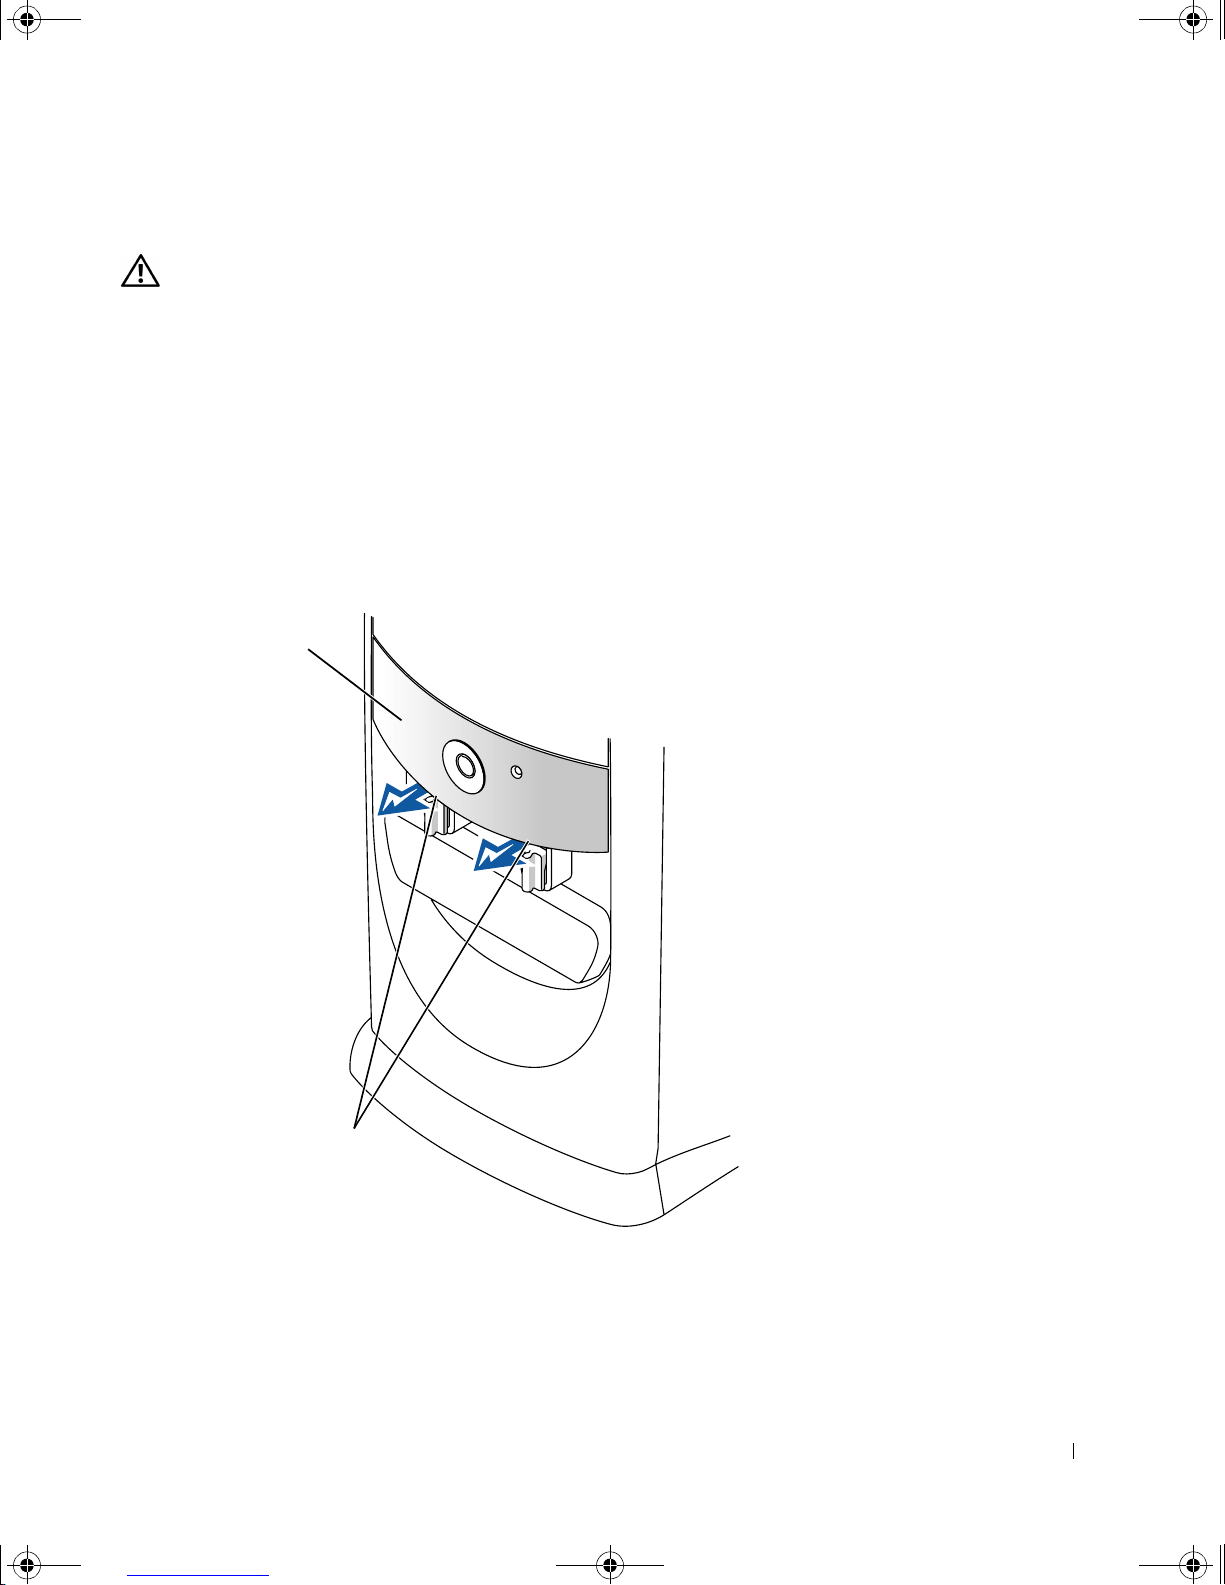
9p915bk0.book Page 65 Thursday, April 4, 2002 9:26 AM
Reattaching the Hinge Arms
CAUTION: Before you begin any of the procedures in this section,
follow the safety instructions listed in "When Working Inside Your
Computer" on page 12.
Shut down the computer (see page 20).
1
2 Disconnect the power cable from your computer.
3 Remove the front door, if it is attached.
The front door snaps off of the two hinge arms.
4 Remove the front-panel insert above the front-door bay area.
Pull the bottom of the insert with your f ingers to remove it.
front-panel
insert
use fingers
to pull here
5 Lift both hinge arms to the horizontal position.
Adding Parts 65
Page 66
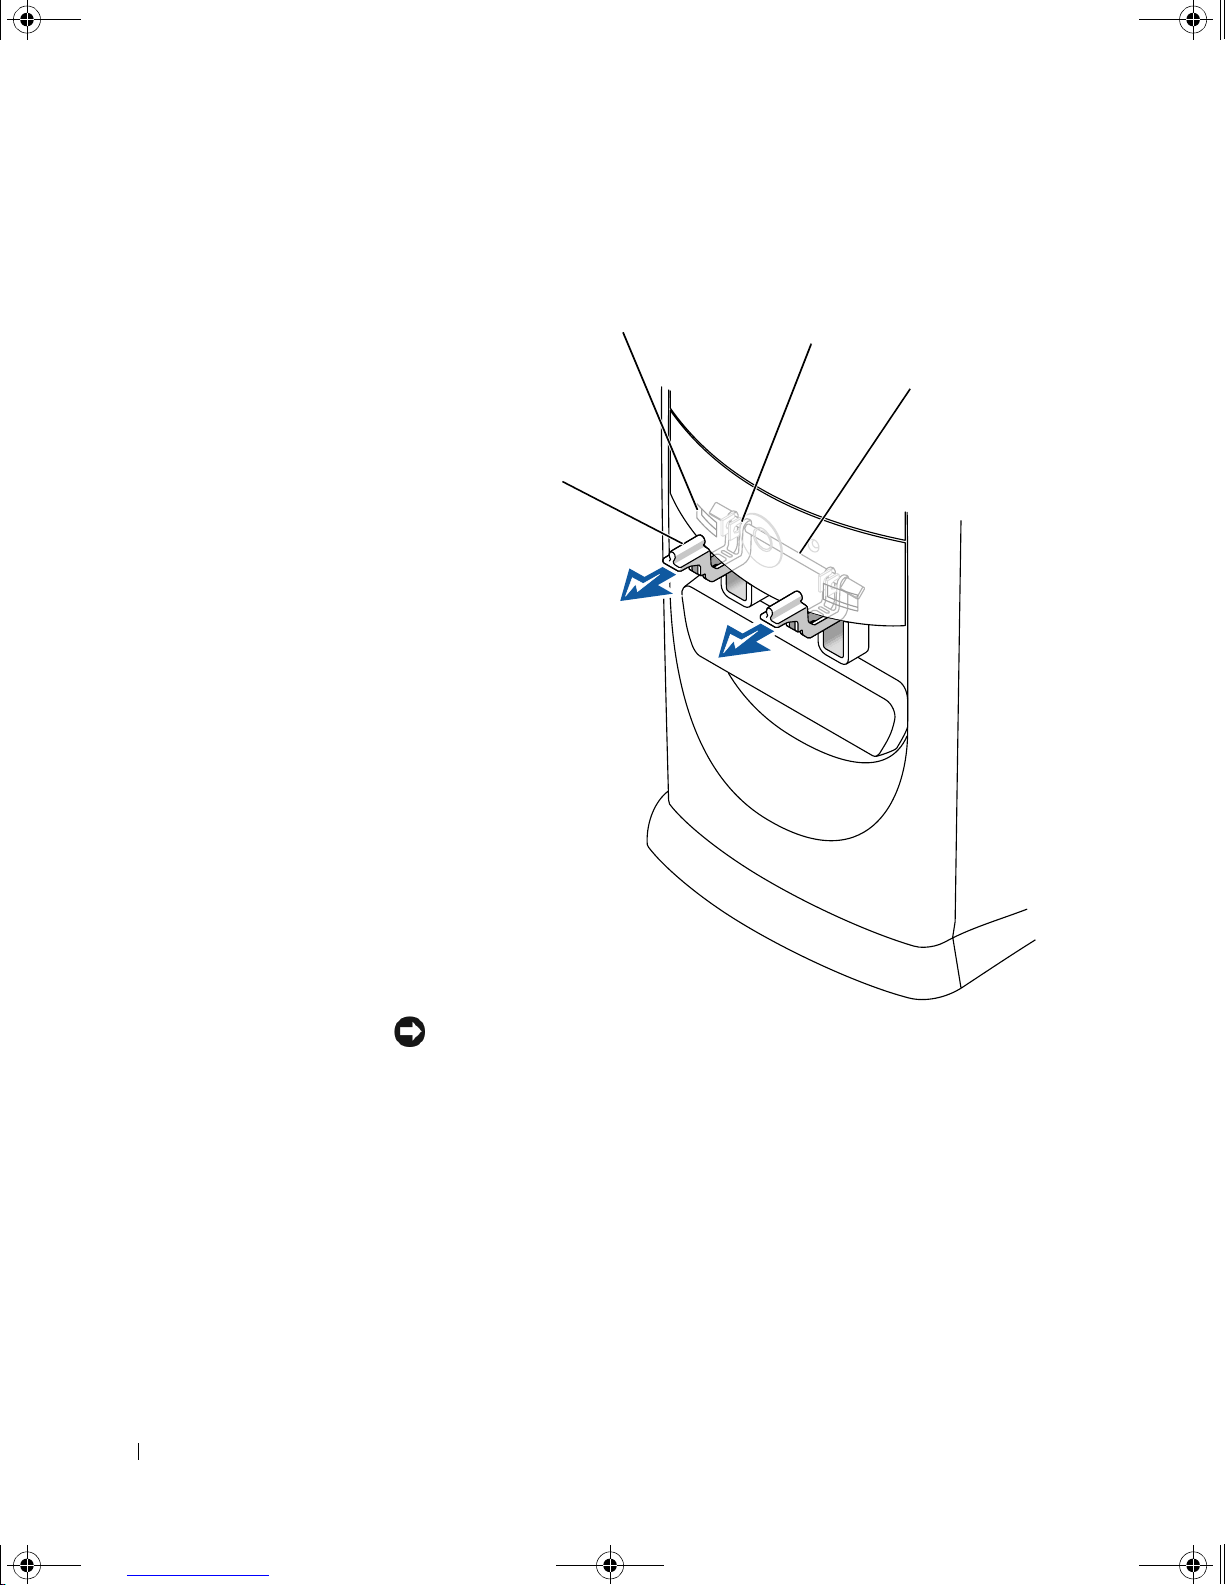
9p915bk0.book Page 66 Thursday, April 4, 2002 9:26 AM
6 Use the two view sl ots to align the pivot bar with the two pivot-bar
slots.
www.dell.com | support.dell.com
view slots (2)
hinge arms in
horizontal
position
pivot-bar slots (2)
pivot bar
7
8 After the hinge arms c lip into place, lower and raise the arms two or
9 Reattach the front-panel insert.
66 Adding Parts
NOTICE: Using excessive force to pull the hinge arms into place may damage
the arms or the front panel.
Pull the arms toward you until they snap into place.
If the hinge arms don’t snap back into place on the first attempt,
slightly reposition the arms and try again.
three times to properly seat them.
Page 67
9p915bk0.book Page 67 Thursday, April 4, 2002 9:26 AM
10 Reconnect the pow er cable to your computer.
11 Reattach the front door as described on page 64.
Opening the Computer Cover
CAUTION: Before yo u begin any of th e procedures in thi s secti on,
follow the safety instructions listed in "When Working Inside Your
Computer" on page 12.
CAUTION: To guard aga inst electrical shock, always unpl ug your
computer from the electrical outlet before opening the cover.
1 Shut down the computer (see page 20).
NOTICE: To disconnect a network cable, first unplug the cable from your
computer and the n unplug it from the n e twork wall jack.
Turn off any attached devices and disconnect them from their
2
electrical outlets.
3 Disconnect the computer power cable from the wall outlet, and then
press the power button to ground the system board.
NOTICE: Ensure that there is sufficient space to support the open cover—at
least 30 cm (1 ft) of desk top space.
4
Lay the computer on its side so that the arrow on the bottom of the
computer points up.
5 Open the cover:
a Facing the back of the computer, press the release button on the
right side of the computer with one hand while pulling up on the
top of the cover with the other hand.
b Press the release button on the left side of the computer with one
hand while pulling up on the top of the cover with the other hand.
c Hold the bottom of the computer with one hand, and then pull
open the cover with the other hand.
Adding Parts 67
Page 68
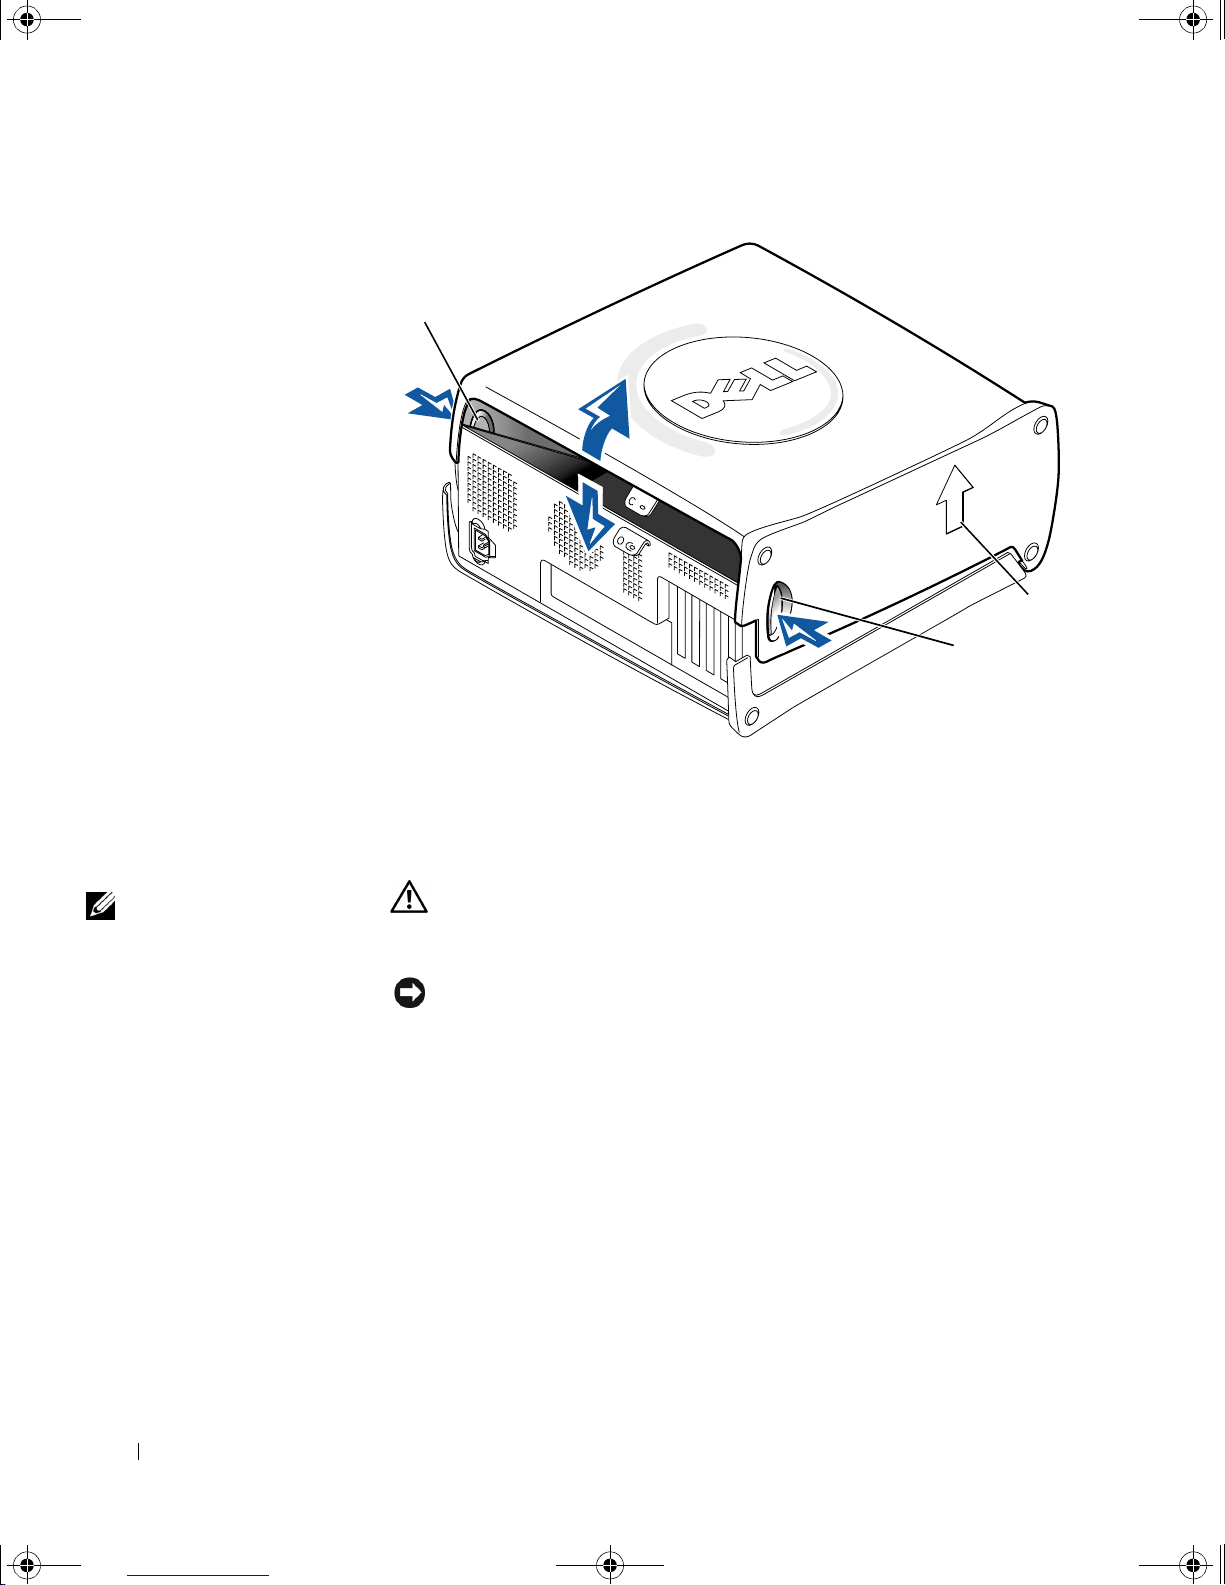
9p915bk0.book Page 68 Thursday, April 4, 2002 9:26 AM
release
button
www.dell.com | support.dell.com
arrow
HINT: The AGP card is
removed from the
following illustration to
provide a better view of
the inside of your
computer.
release button
back of computer
Looking Inside Your Computer
CAUTION: Befor e you be gin any of the proce dure s in this s ection,
follow the safety instructions listed in "When Working Inside Your
Computer" on page 12.
NOTICE: Be careful when opening the computer cover to ensure that you do
not inadvertently disconnect cables from the system board.
68 Adding Parts
Page 69
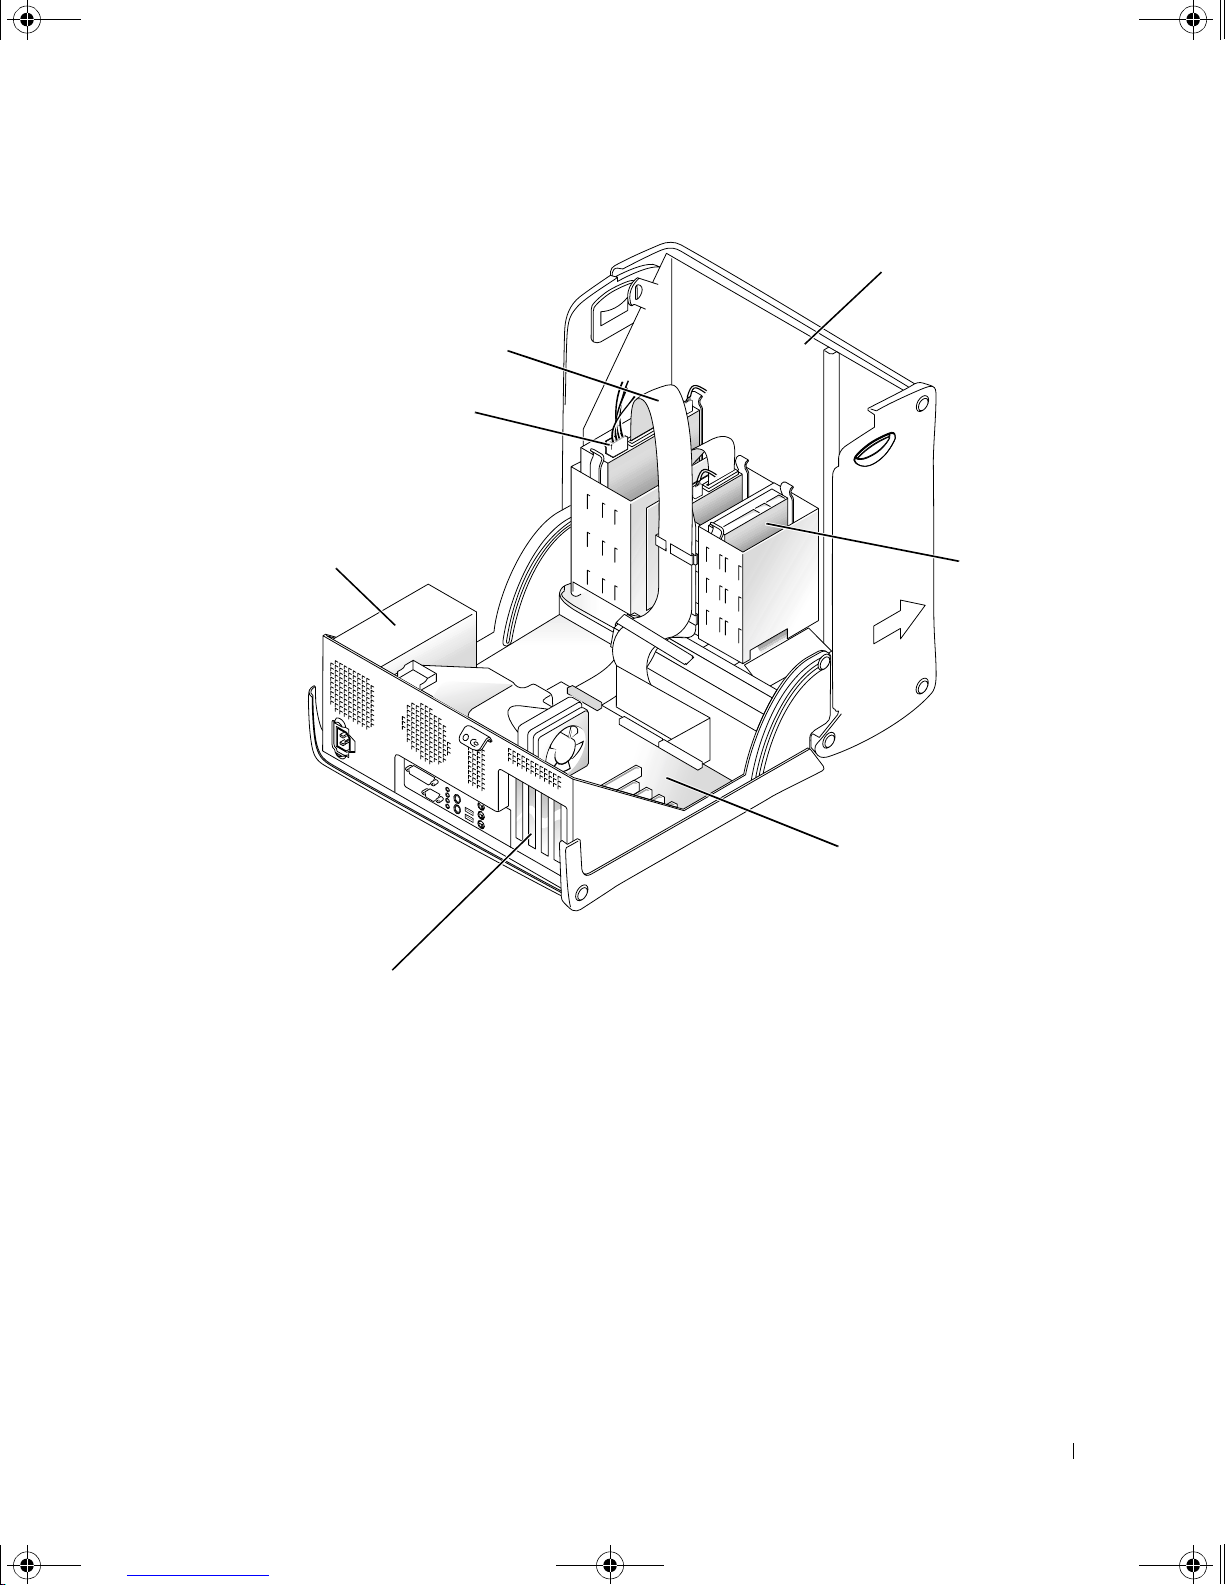
9p915bk0.book Page 69 Thursday, April 4, 2002 9:26 AM
power cabl es
(page 84)
drive cables
(page 84)
computer cover*
(page 67 and
page 90)
power supply
back of computer
filler brackets for empty
card-cage slots (4)
(page 71 and page 73)
* Depending on the types of drives installed in your computer, the cover
hard drive
(page 81)
system board
(page 70)
may not open as widely as shown in the figure .
Adding Parts 69
Page 70
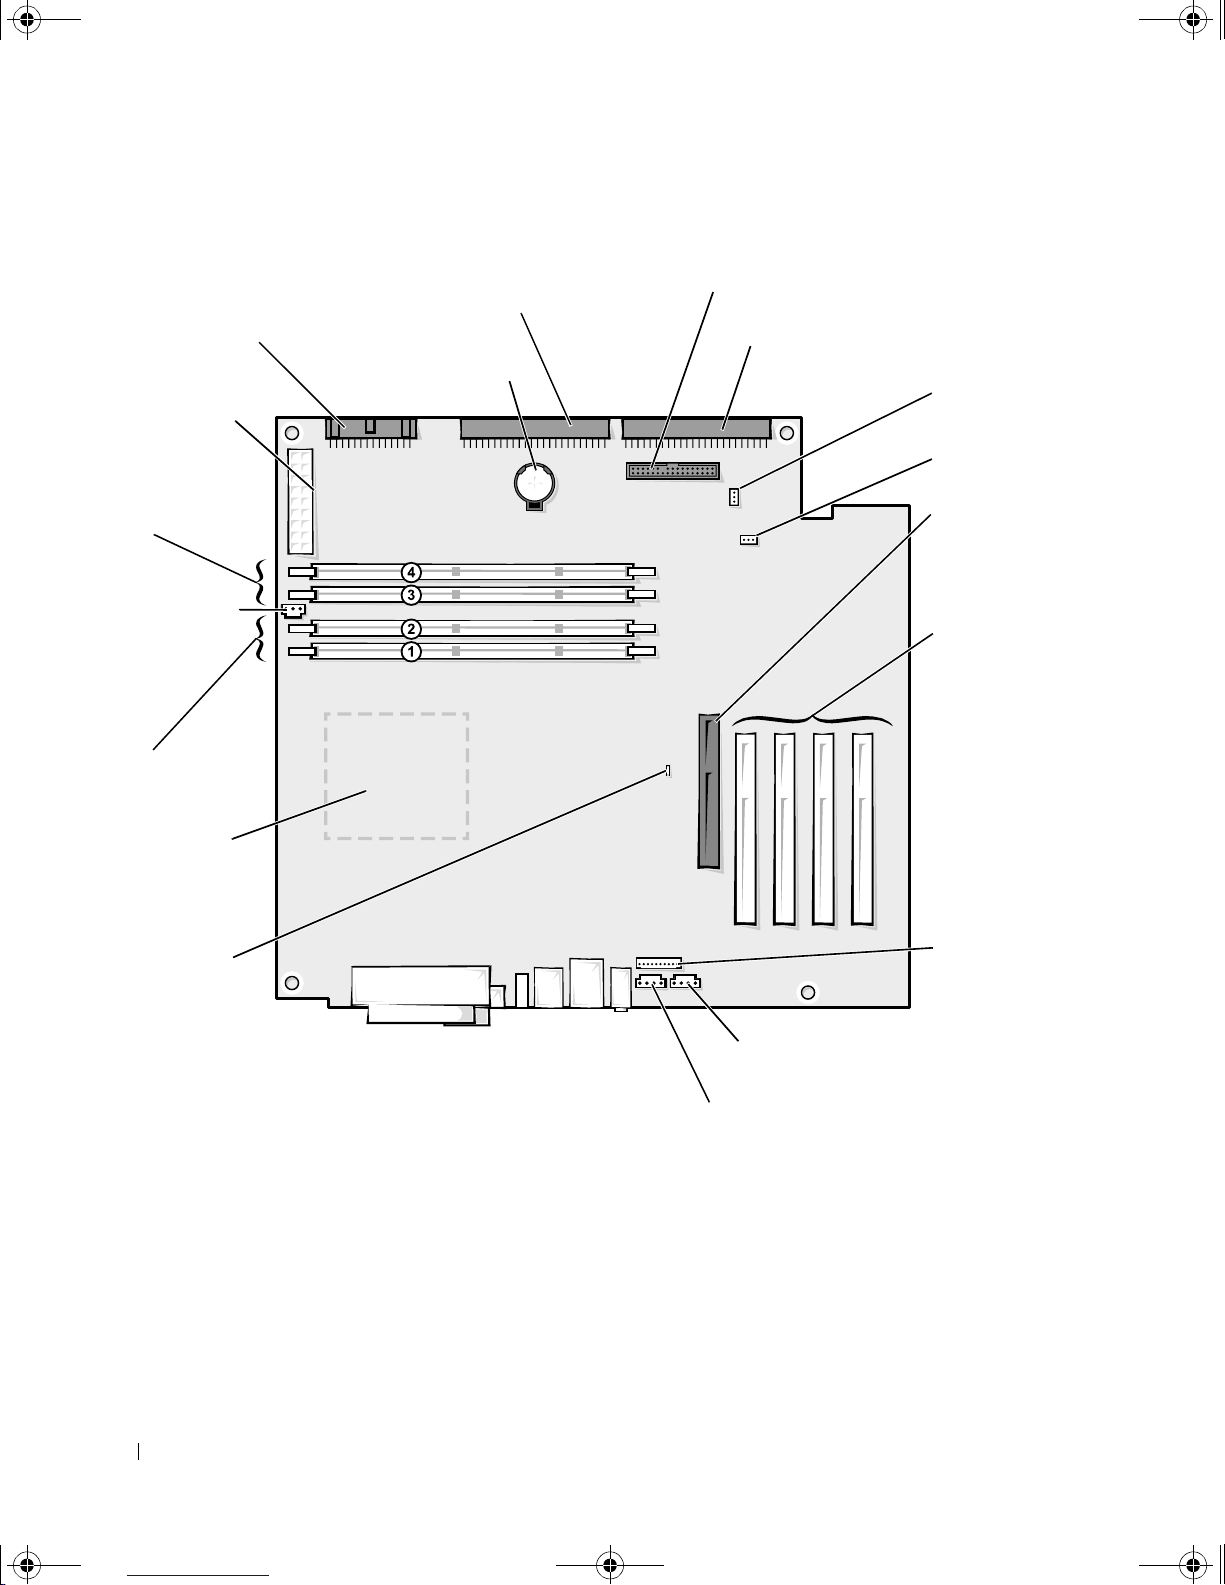
9p915bk0.book Page 70 Thursday, April 4, 2002 9:26 AM
System Board
floppy drive
connector (FLOPPY)
main power conn e cto r
(MAIN POWER)
memory module
connectors
(RIMM3, RIMM4)
page 75
www.dell.com | support.dell.com
microprocessor fan
connector (FAN2)
memory module
connectors
(RIMM1,
RIMM2)
page 75
microprocessor
connector (JE21)
CD drive connector
(IDE SEC) page 84
battery socket
(BA TTERY) page 99
front panel switch connector (FNT PNL)
hard drive connector
(IDE PRI) page 81
password jumper
(PSWD) page 98
configuration
jumper (CLR CM)
AGP slot
connector
(J7C1)
page 80
PCI card
connectors
(PCI1–PCI4)
page 71
system board power
light (PWR LED)
70 Adding Parts
telephony voice modem
connector (TELE)
CD audio connector (CD)
back of computer
*
On computers with optional integrated audio.
front panel audio
cable con ne c t or
(FNT PNL AUD)
*
*
Page 71

9p915bk0.book Page 71 Thursday, April 4, 2002 9:26 AM
Adding Cards
CAUTION: Before yo u begin any of th e procedures in thi s secti on,
follow the safety instructions listed in "When Working Inside Your
Computer" on page 12.
CAUTION: To guard aga inst electrical shock, always unpl ug your
computer from the electrical outlet before opening the cover.
The computer’s card connectors allow you to install different types of
devices such as modems, network adapters, and video cards.
1 Shut down the computer (see page 20).
2 Turn off any attached devices and disconnect them from their
electrical outlets.
NOTICE: To disconnect a network cable, first unplug the cable from your
computer and the n unplug it from the n e twork wall jack.
3
Disconnect the computer power cable from the wall outlet, and then
press the power button to ground the system board.
4 Open the computer cover (see page 67).
5 To raise the securi ng lever, press the tab until it is free from the latch
and then lift the lever.
6 Insert the card into the connector.
HINT: The AGP card is
removed from the
following two illustrations
to provide a better view of
the inside of your
computer.
Adding Parts 71
Page 72
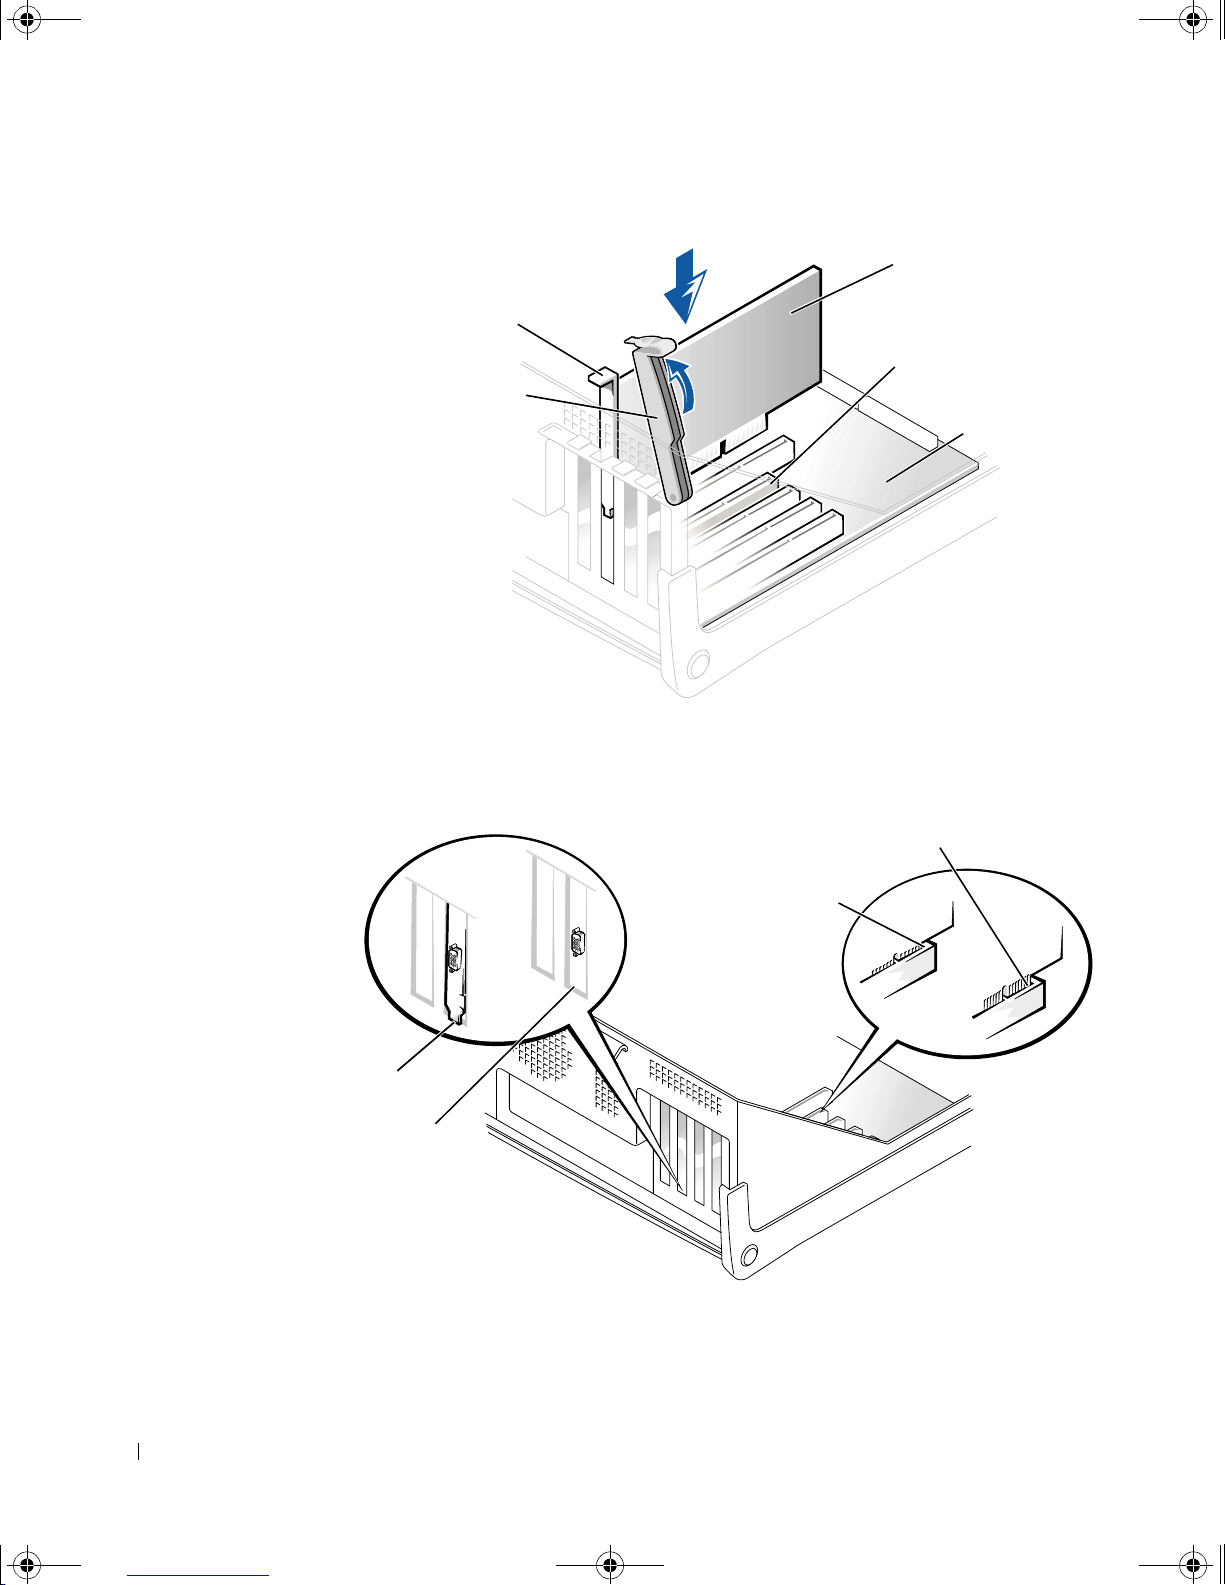
9p915bk0.book Page 72 Thursday, April 4, 2002 9:26 AM
card bracket
securing lever
www.dell.com | support.dell.com
card
slot connector
system board
back of computer
7 Ensure that the card is fully seated in the connector.
bracket caught
outside of slot
bracket within slot
back of computer
not fully seated
fully seated
72 Adding Parts
Page 73

9p915bk0.book Page 73 Thursday, April 4, 2002 9:26 AM
8 Lower the plastic securing lever.
9 Connect any cables that should be attached to the card.
See the documentation that came with the card for information about
the card cable connections.
10 Close the computer cover (see page 90).
11 Connect your computer and devices to their electrical outlets, and
turn them on.
NOTICE: To connect a network cable, first plug the cable in to the network
wall jack and then plug it in to the computer.
Install any drivers required for the card as described in the
12
documentation that came with the card.
Removing Cards
CAUTION: Before yo u begin any of th e procedures in thi s secti on,
follow the safety instructions listed in "When Working Inside Your
Computer" on page 12.
Shut down the computer (see page 20).
1
2 Turn off any attached devices and disconnect them from their
electrical outlets.
NOTICE: To disconnect a network cable, first unplug the cable from your
computer and the n unplug it from the n e twork wall jack.
Disconnect the computer power cable from the wall outlet, and then
3
press the power button to ground the system board.
4 Open the computer cover (see page 67).
5 If necessary, disconnect any cables connected to the card.
6 To raise the securi ng lever, press the tab until it is free from the latch
and then lift the lever.
Adding Parts 73
Page 74
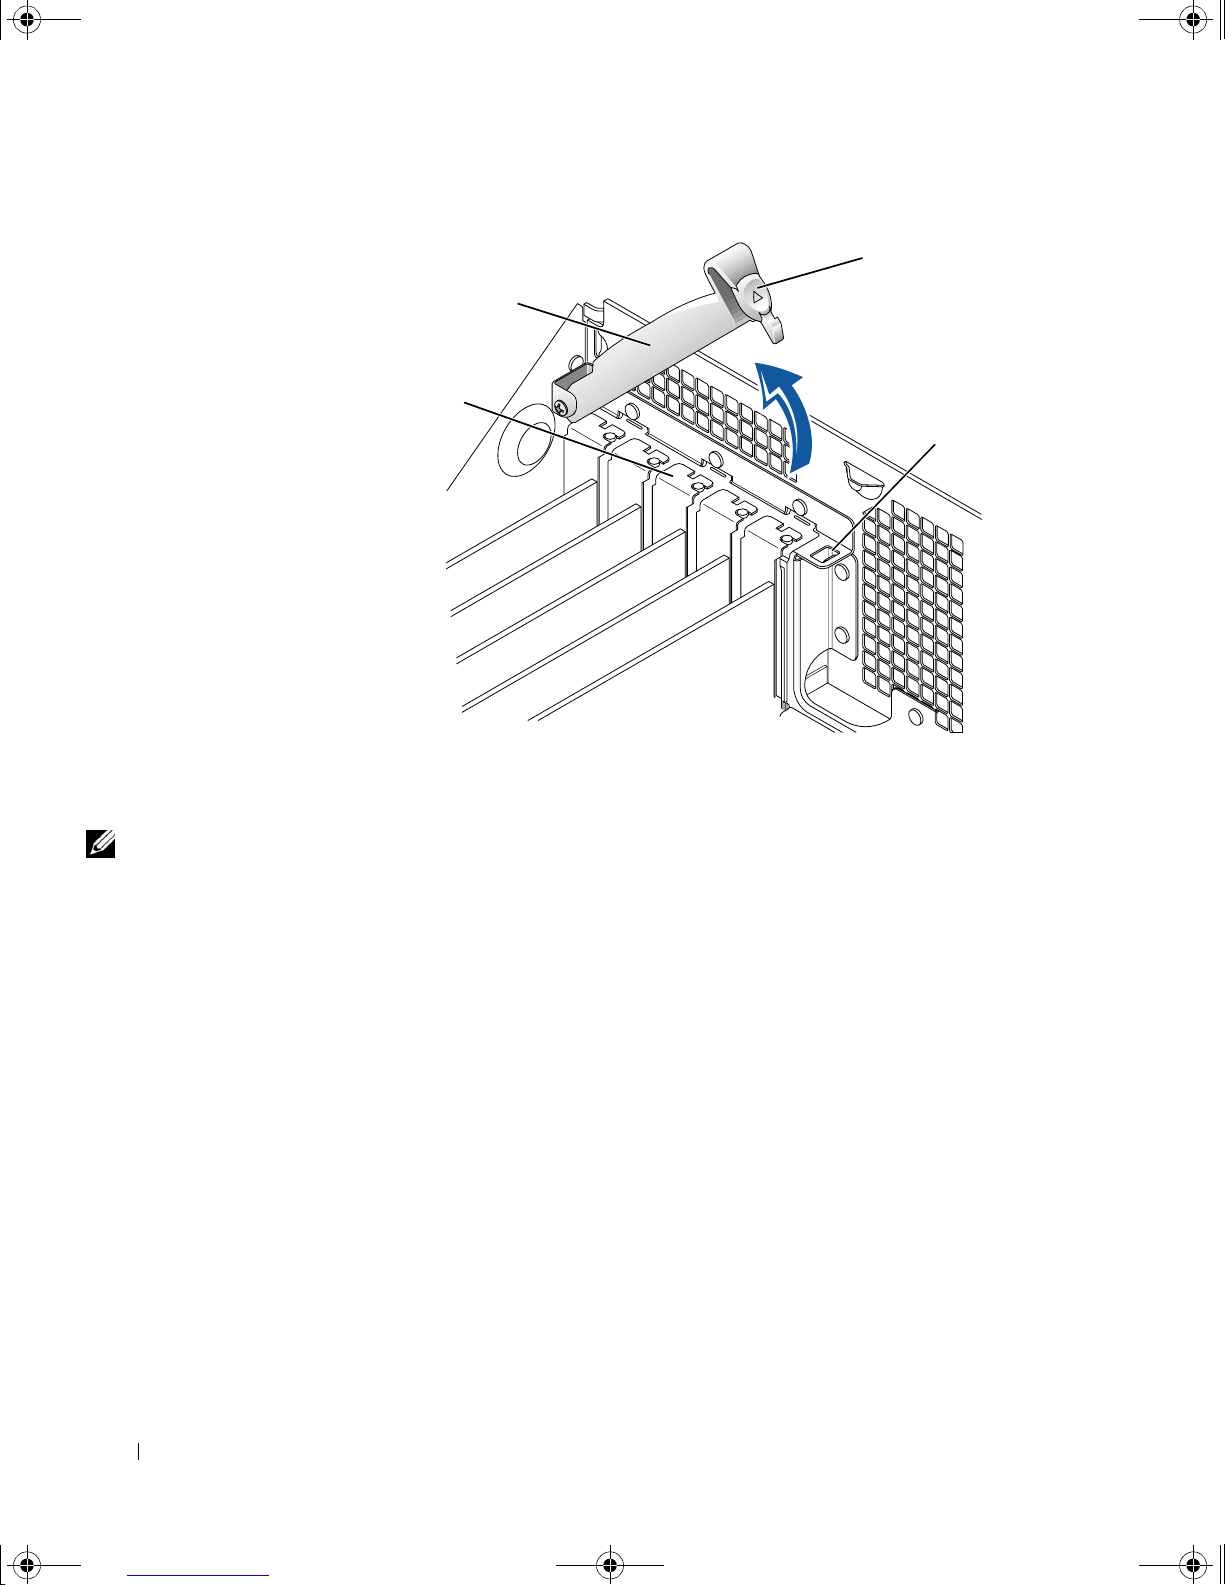
9p915bk0.book Page 74 Thursday, April 4, 2002 9:26 AM
securing lever
card
bracket
www.dell.com | support.dell.com
tab
back of computer
latch
HINT: The AGP card is
removed from the
following illustration to
provide a better view of
the inside of your
computer.
7 To remove the card, grasp the card by the top corners and lift it out.
If the card is difficult to remove, gently ease the card back and forth to
remove it from the connector.
74 Adding Parts
Page 75
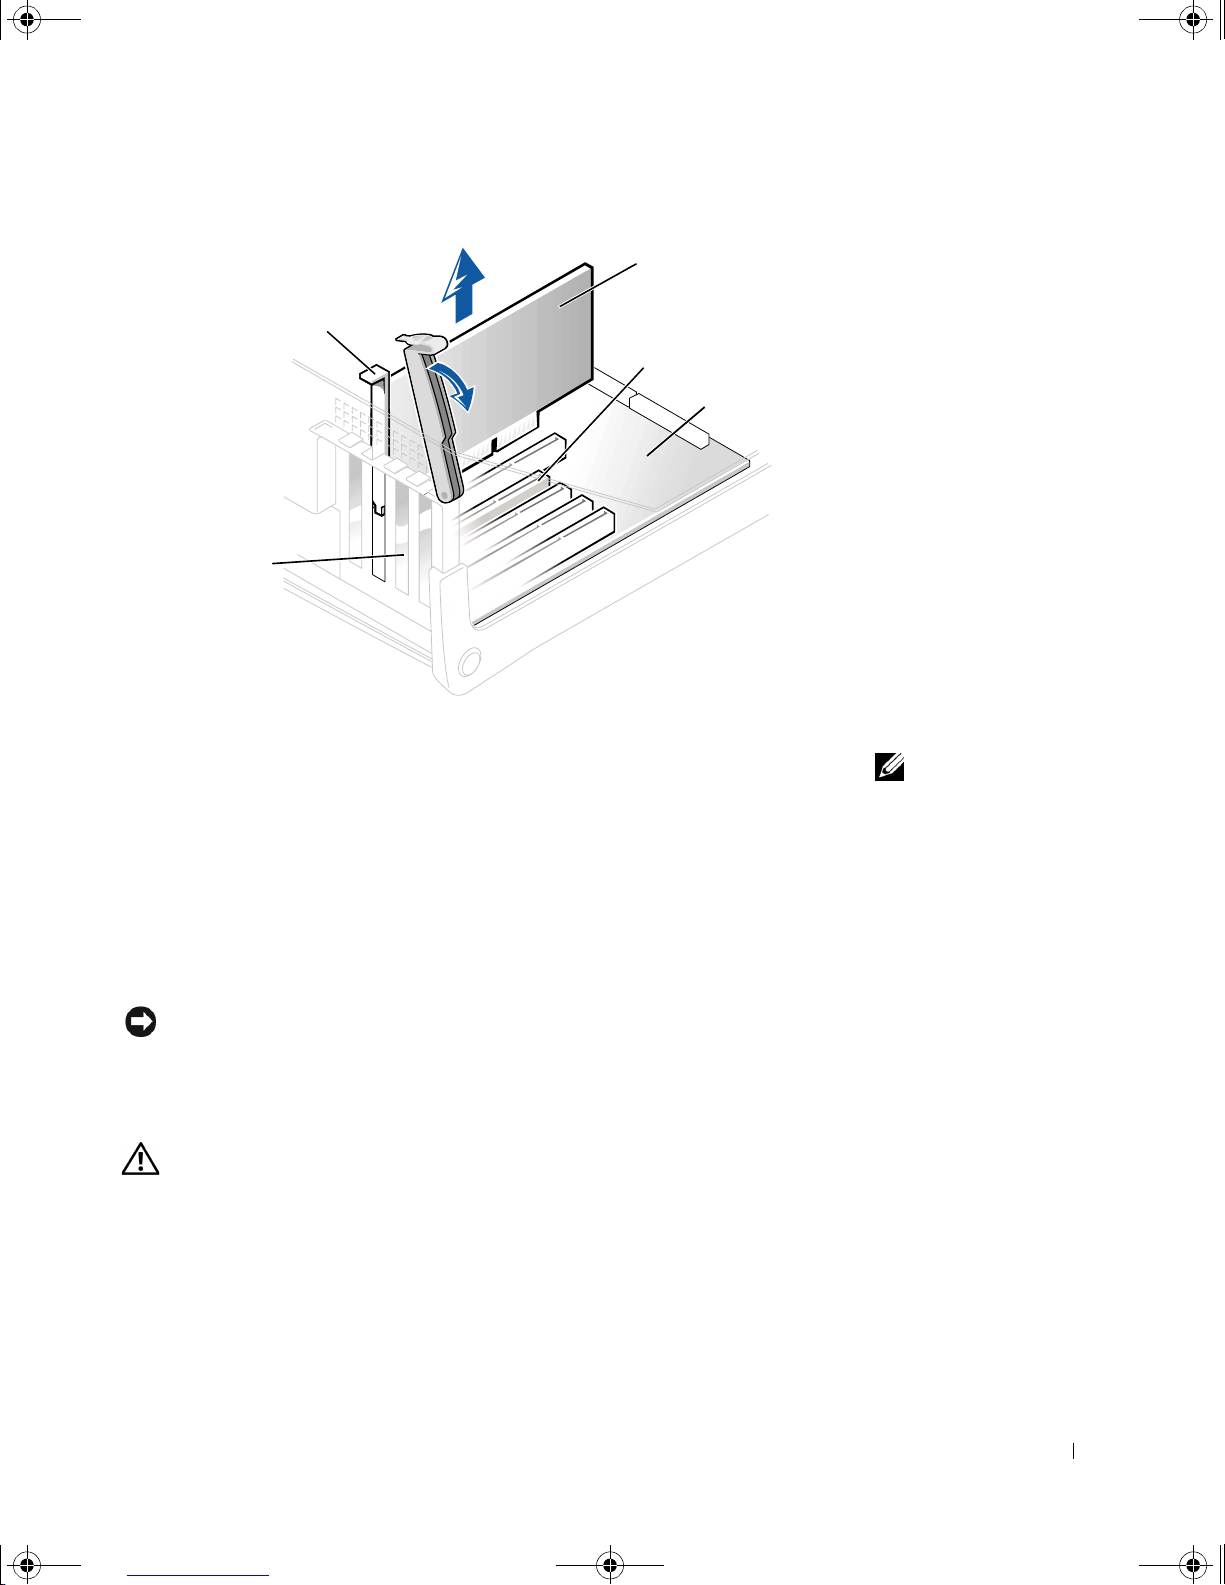
9p915bk0.book Page 75 Thursday, April 4, 2002 9:26 AM
securing lever
filler bracket in empty
card-slot opening
card
slot connec t or
system board
back of computer
If you are not replacing the card, install a filler bracket in the empty
8
card-slot opening.
If you are adding a card, see page 71.
9 Lower the securing lever.
10 Close the computer cover (see page 90).
11 Connect your computer and devices to their electrical outlets, and
turn them on.
NOTICE: To connect a network cable, first plug the cable in to the network
wall jack and then plug it in to the computer.
Adding Memory
CAUTION: Before yo u begin any of th e procedures in thi s secti on,
follow the safety instructions listed in "When Working Inside Your
Computer" on page 12.
HINT: Installing filler
brackets over empty cardslot openings is necessary
to maintain Federal
Communications
Commission (FCC)
certification of the
computer. The brackets
also keep dust and dirt out
of your computer.
You can increase your computer memory by installing memory modules on
the system boar d. For information on the type of memory s upported by your
computer, see "Memory type" under "Memory" on page 93.
Adding Parts 75
Page 76
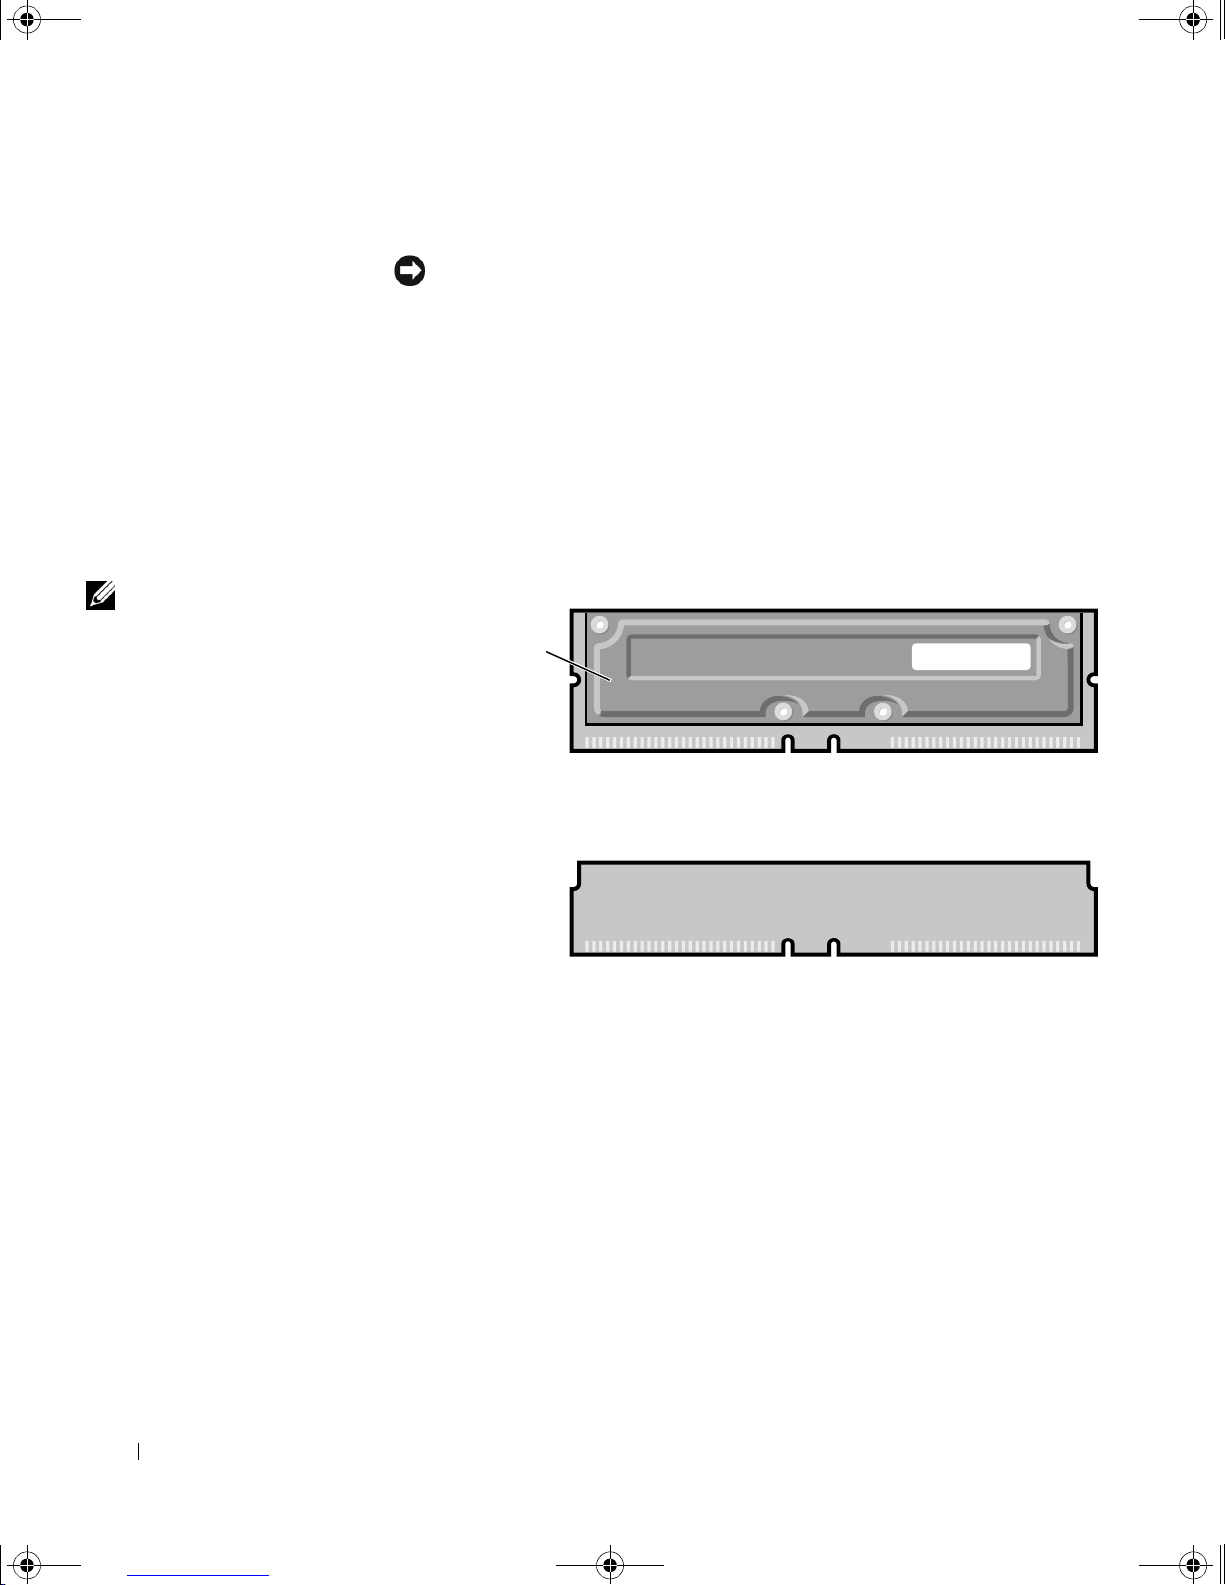
9p915bk0.book Page 76 Thursday, April 4, 2002 9:26 AM
RDRAM Overview
RDRAM technology requires that all memory connectors have either a
memory module or a continuity module installed. Memory modules and
continuity modules are easily identified—memory modules have a metal
www.dell.com | support.dell.com
HINT: The metal cover
on a memor y module is
manufactured in various
colors. The color of the
metal cover ha s no effe ct
on the module’s
performance.
cover on one side of the module and continuity modules do not.
NOTICE: If you remove your original memory modules from the computer
during a memory upgrade, keep them separate from any new modules that you
may have, even if the new modules were purchased from Dell. Your original
memory modules must be installed as a pair in either connectors RIMM1 and
RIMM 2 or RIMM 3 and RIMM4. Do not pair one original memory module
with one new memory module in connectors RIMM1 and RIMM2 or RIMM3
and RIMM4. Otherwise, your computer may not start properly.
metal cover
memory module
76 Adding Parts
continuity module
Memory modules are the actual components that provide memory for the
microprocessor; continuity modules are used only to complete the memory
circuit if memory modules are not installed i n all of the memory connectors.
Another RDRAM requirement is that memory modules must be install ed in
pairs of matched memory size. This means that if you purchased your
computer with 128 MB of memory installed and you want to add another
128 MB of memory, you must remove the two continuity modules and
replace them with two 64-MB memory modules.
Page 77
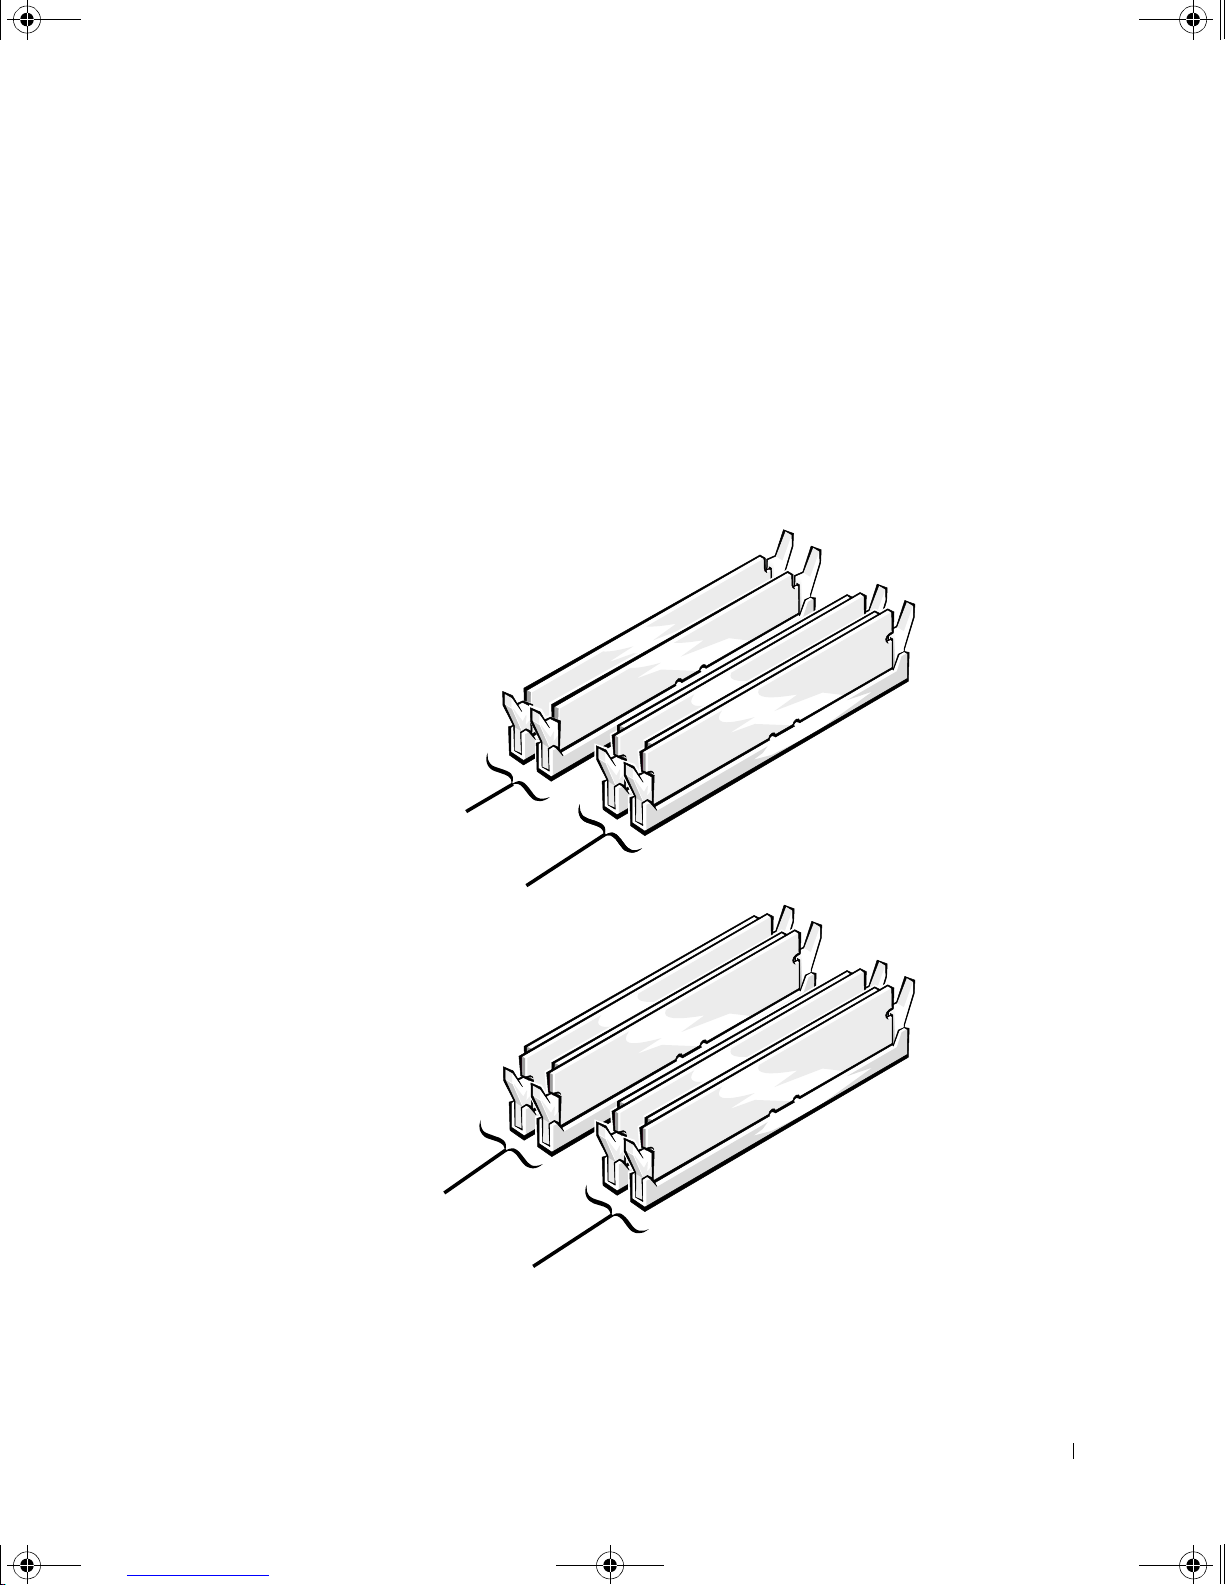
9p915bk0.book Page 77 Thursday, April 4, 2002 9:26 AM
The only two valid memory configurations are:
• A pair of matched memory modules installed in connectors RIMM1
and RIMM2 with continuity modules installed in connectors RIMM3
and RIMM4
or
• A pair of matched memory modules installed in connectors RIMM1
and RIMM2 and another matched pair installed in connectors RIMM3
and RIMM4
continuity modules in
connectors RIMM3 and RIMM4
matched pair of memory modules
in connectors RIMM1 and RIMM2
matched pair of memory modules
in connectors RIMM3 and RIMM4
matched pair of memory modules
in connectors RIMM1 and RIMM2
back of computer
back of computer
Adding Parts 77
Page 78

9p915bk0.book Page 78 Thursday, April 4, 2002 9:26 AM
To install memory modules:
1 Shut down the computer (see page 20).
www.dell.com | support.dell.com
HINT: Memory
purchased from Dell is
covered under your
computer warranty.
2 Turn off any attached devices and disconnect them from their
electrical outlets.
NOTICE: To disconnect a network cable, first unplug the cable from your
computer and then unplug it from the network wall jack.
Disconnect the computer power cable from the wall outlet, and then
3
press the power button to ground the system board.
4 Open the computer cover (see page 67).
NOTICE: If you upgrade the memory, the memory modules must be upgraded
in matched pairs of identical MB capacity in both memory connectors RIMM1
and RIMM2 or memory connectors RIMM3 and RIMM4 (see page 70).
NOTICE: Be sure to install memory modules in the first two memory
connectors (RIMM1 and RIMM2) nearest th e processor before installing
memory modules in the outer two memory connectors (RIMM3 and RIMM4)
(see page 70).
NOTICE: All memory connectors must be populated with either a memory
module or a continuity module. The computer will not operate if a memory
connector is unpopulated.
Remove a memory or a continuity module.
5
NOTICE: If you remove your original memory modules from the computer
during a memory upgrade, keep them separate from any new modules that you
may have, even if the new modules were purchased from Dell. Your original
memory modules must be installed as a pair in either connectors RIMM1 and
RIMM 2 or RIMM 3 and RIMM4. Do not pair one original memory module
with one new memory module in connectors RIMM1 and RIMM2 or RIMM3
and RIMM4. Otherwise, your computer may not start properly.
6 To insert a module, p ress out the securing clip at each end of the
78 Adding Parts
a Press out the securing clip at each end of the memory module
connector.
b Grasp the module and pull up.
If the module is difficult to remove, gently ease the module back
and forth to remove it from the connector.
memory module connector.
Page 79
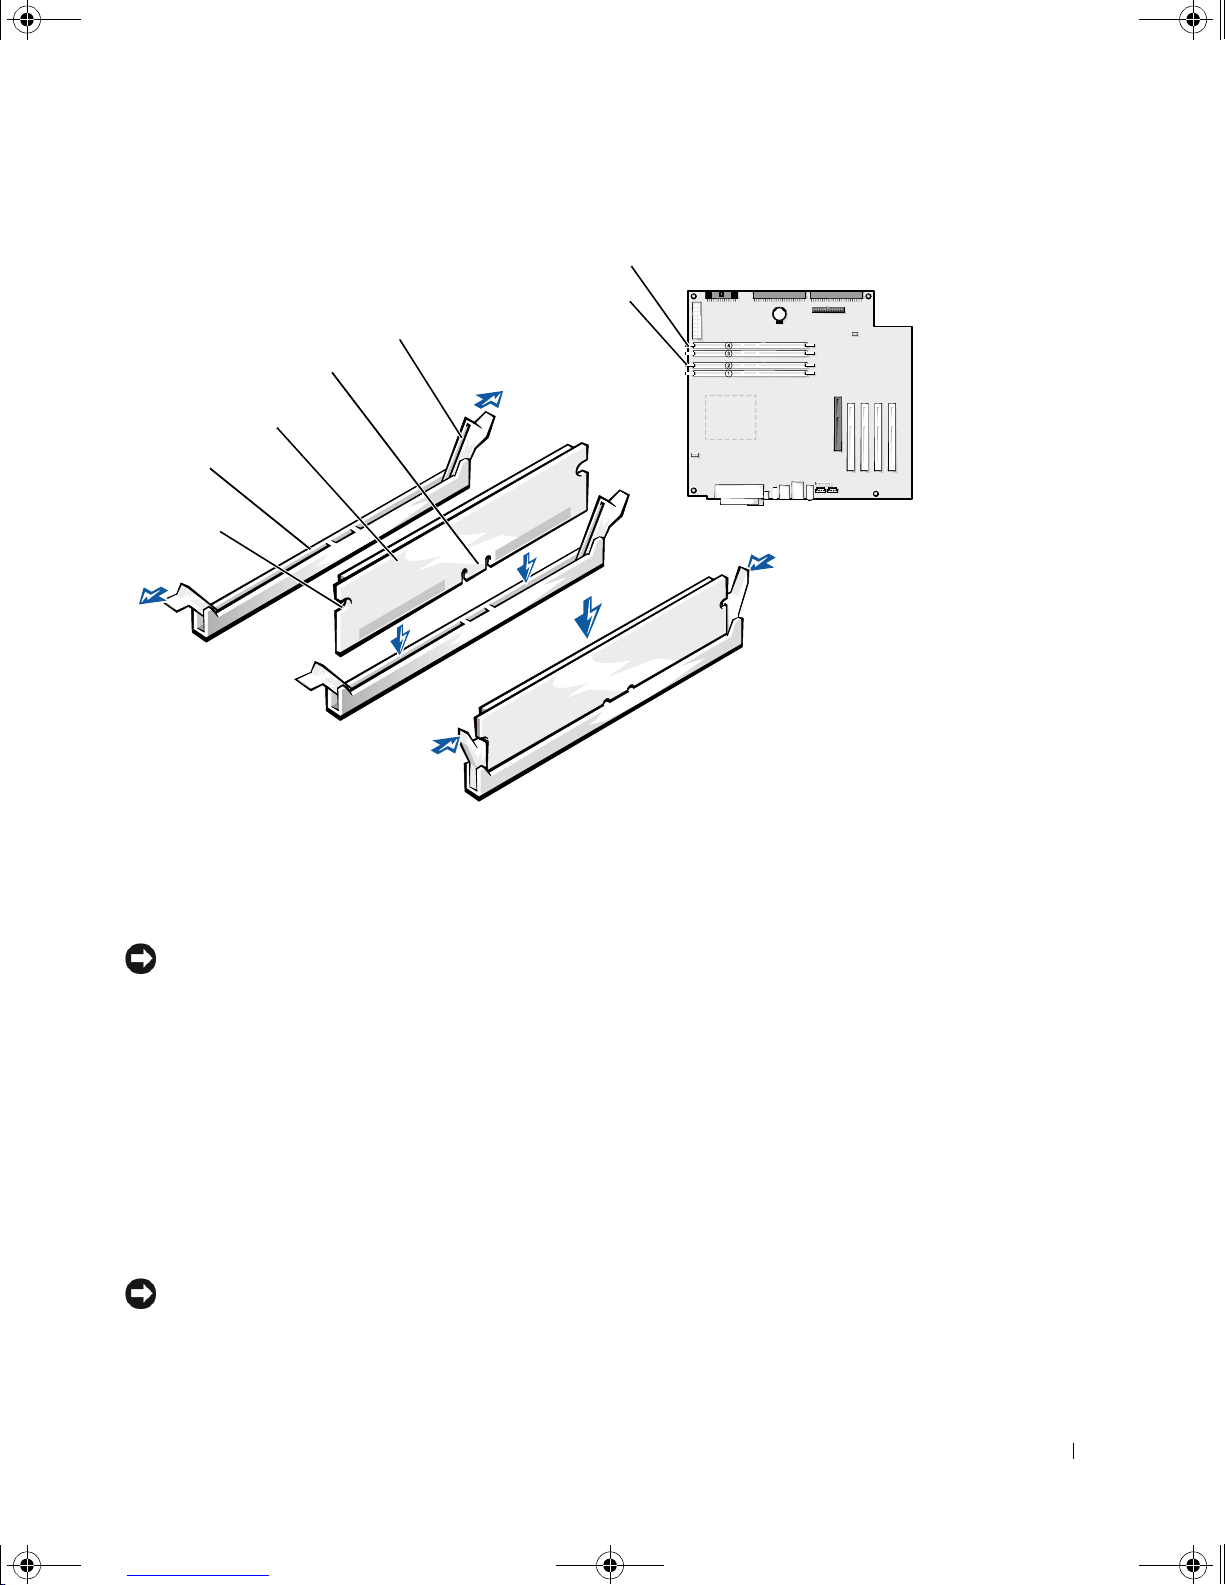
9p915bk0.book Page 79 Thursday, April 4, 2002 9:26 AM
memory connectors RIMM3 and RIMM4
memory connecto rs RIMM 1 and RIMM2
securing clips (2)
notches (2)
memory or
continuity module
connector
cutouts (2)
step 6
step 7
step 8
7 Align the notches on the bottom of the module with the cros sbars in
the connector.
NOTICE: To avoid breaking the memory module, do not press near the middle
of the module.
8
Insert the module straight down into the connector, ensuring that it
fits into the vertical guides at each end of the connector. Press firmly
on the ends of the module until it snaps into place.
If you insert the module correctly, the securing clips snap into the
cutouts at each end of the module.
9 Close the computer cover (see page 90).
10 Connect your computer and devices to their electrical outlets, and
turn them on.
NOTICE: To connect a network cable, first plug the cable into the network
wall jack and then plug it into the computer.
Adding Parts 79
Page 80
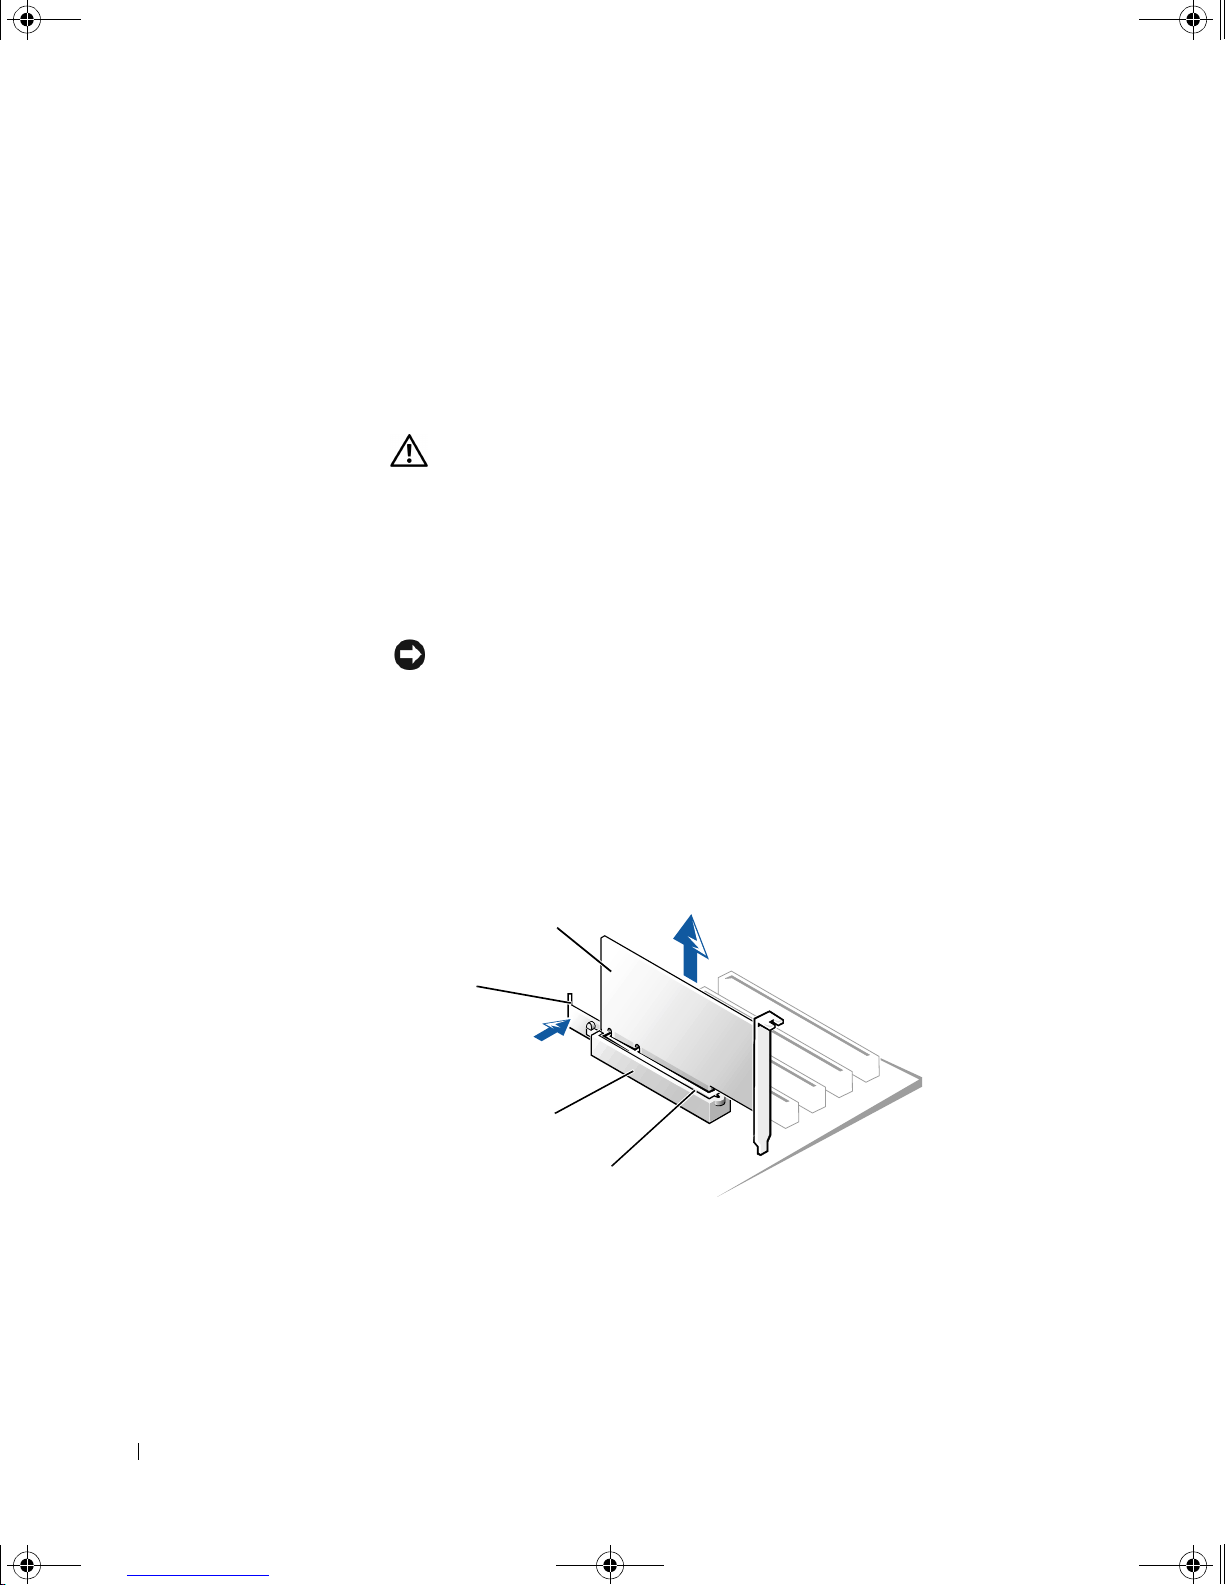
9p915bk0.book Page 80 Thursday, April 4, 2002 9:26 AM
11 Right-click the My Computer icon and then click Properties.
12 Click the General tab.
13 To verify that the memory is installed correctly, check the amount of
Replacing the AGP Card
www.dell.com | support.dell.com
1
2 Turn off any attached devices and disconnect them from their
memory (RAM) listed.
CAUTION: Befor e you be gin any of the proce dure s in this s ection,
follow the safety instructions listed in "When Working Inside Your
Computer" on page 12.
Shut down the computer (see page 20).
electrical outlets.
NOTICE: To disconnect a network cable, first unplug the cable from your
computer and then unplug it from the network wall jack.
Disconnect the computer power cable from the wall outlet, and then
3
press the power button to ground the system board.
4 Open the computer cover (see page 67).
5 Press the card clip lever on the side of the AGP card to release the card
from the slot connector, and remove the card.
AGP card
card clip
lever
AGP card clip
slot connector
back of computer
6 To replace the AGP card, gently press it down into the slot connector
80 Adding Parts
until it clicks into place. Press the card clip lever while inserting the
card into the slot connector.
Page 81
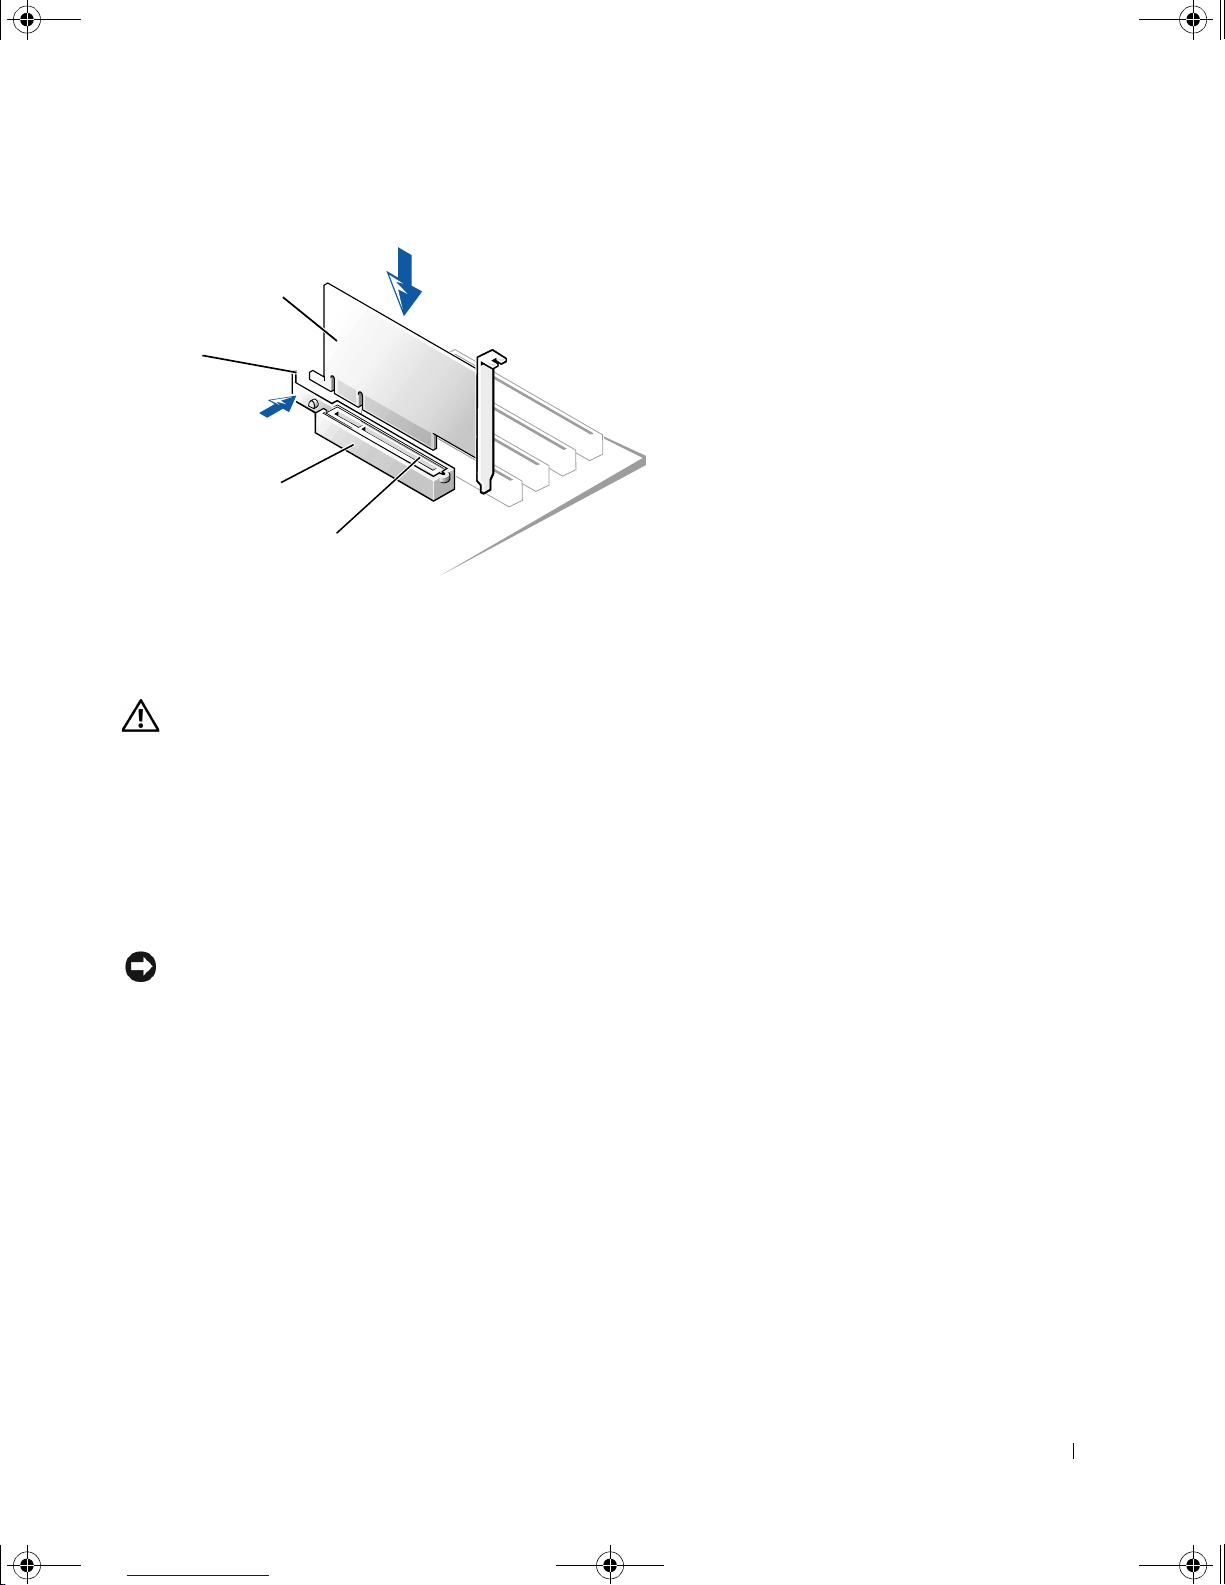
9p915bk0.book Page 81 Thursday, April 4, 2002 9:26 AM
AGP card
card clip
lever
AGP card clip
slot connector
back of computer
Adding a Second Hard Drive
CAUTION: Before yo u begin any of th e procedures in thi s secti on,
follow the safety instructions listed in "When Working Inside Your
Computer" on page 12.
Your computer includes one hard drive. To add a second hard drive:
1 Shut down the computer (see page 20).
2 Turn off any attached devices and disconnect them from their
electrical outlets.
NOTICE: To disconnect a network cable, first unplug the cable from your
computer and the n unplug it from the n e twork wall jack.
3
Disconnect the computer power cable from the wall outlet, and then
press the power button to ground the system board.
4 Unpack the drive and prepare it for installation.
See the drive documentation to ensure that the drive is set up for your
computer.
5 Open the computer cover (see page 67).
Adding Parts 81
Page 82

9p915bk0.book Page 82 Thursday, April 4, 2002 9:26 AM
www.dell.com | support.dell.com
HINT: Two sets of rails
are attached to the inside
of the comp u t e r co ver.
Use the two longer rails
on 5.25-inch drives.
Use the shorter rails for
3.5-inch drives. Rails for
a second hard drive are
attached inside th e harddrive bay.
Remove the two green plastic rails from the inside of the hard-drive
6
bay.
These rails are not attached to the inside of the hard-drive bay with
screws. To remove the rails, gently pull the rails up and out of the bay.
7 Attach the rails to the hard drive using the two screws attac h ed to the
rails.
Ensure that the rail tabs are positioned at the back of the hard drive.
NOTICE: Do not install any drive into the lower hard-drive bay until after you
have removed the green drive rails from the inside of the hard-drive cage.
Remove the first hard drive from the upper bay and install it in the
8
lower bay:
a Disconnect the power cable and the data cable from the back of
the first hard drive.
b Press in the two green rail tabs and pull the first hard drive out of
the upper bay.
c Gently slide the first hard drive into the lower bay until you hear a
click.
d Reconnect the power cable and the data ca ble to the back of the
first hard drive.
9 Gently slide the new hard drive into the upper bay until you hear a
click.
82 Adding Parts
Page 83
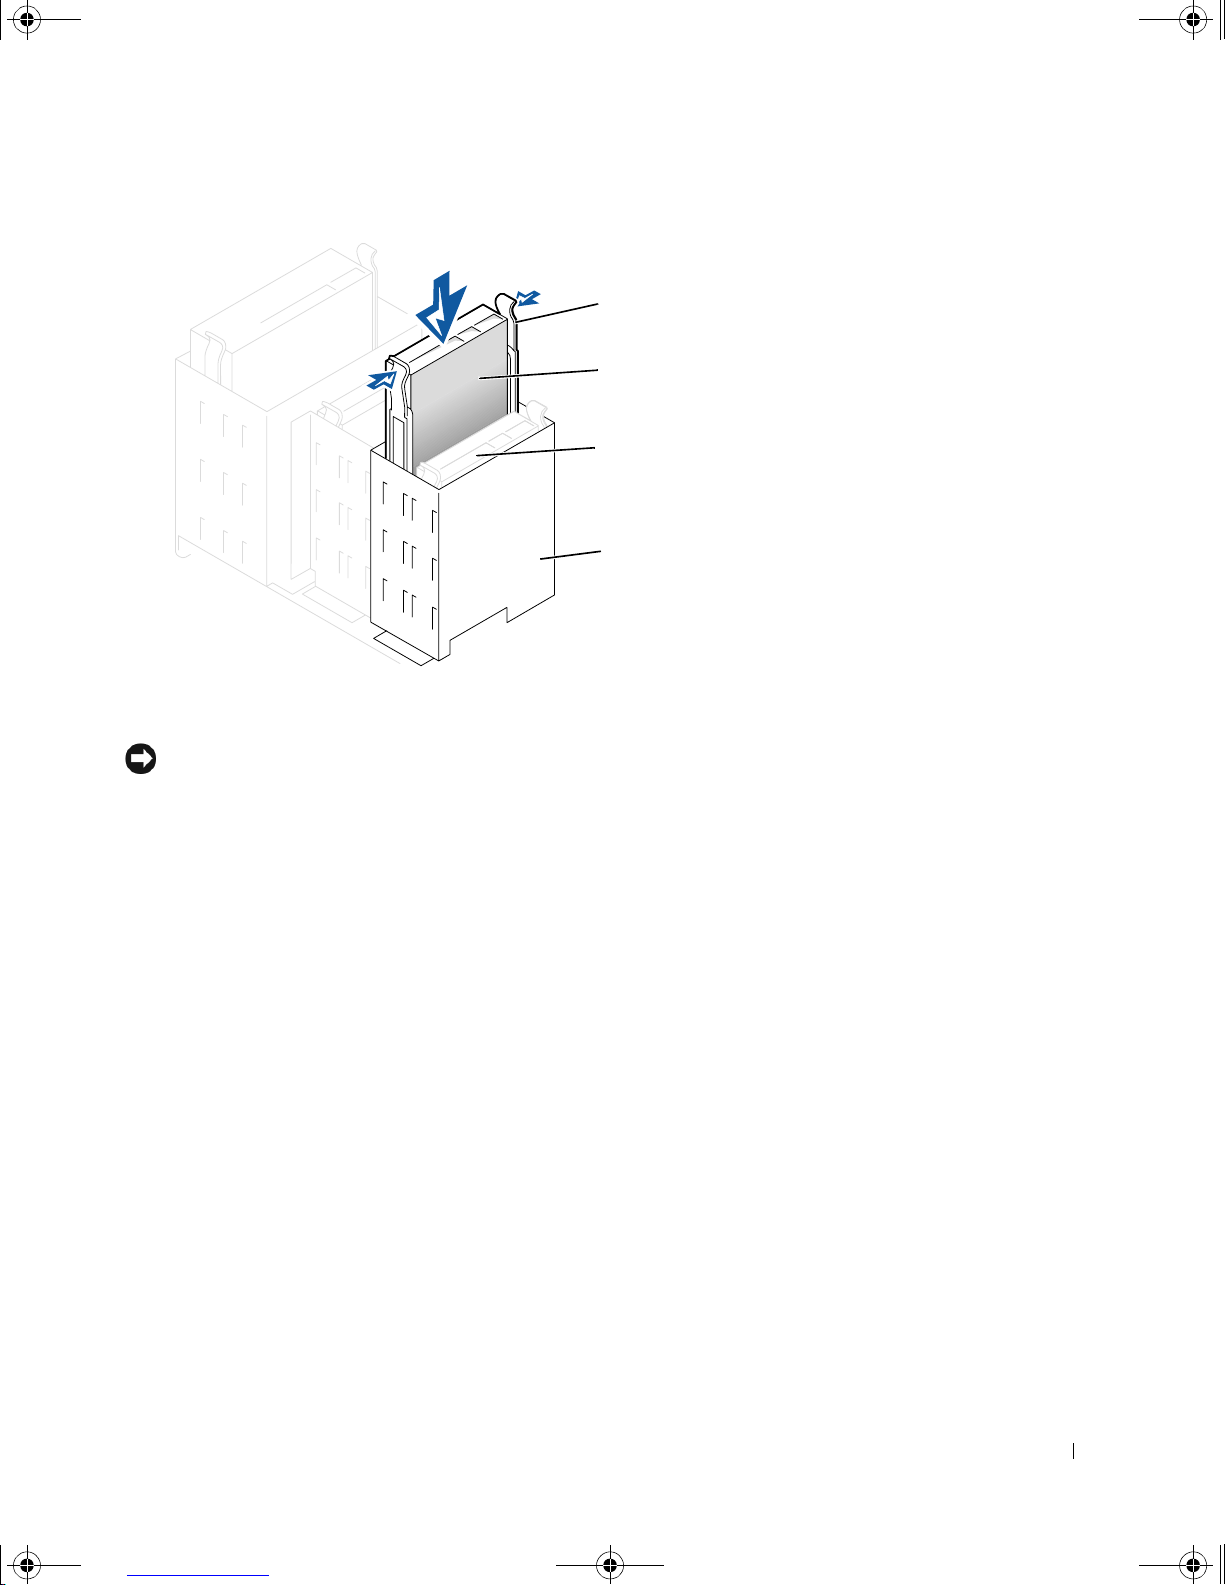
9p915bk0.book Page 83 Thursday, April 4, 2002 9:26 AM
rail tabs (2)
second hard drive
in upper bay
first hard drive in
lower bay
hard drive cage
10 Connect a pow er cabl e to the drive.
NOTICE: Match the colored strip on the cable with pin 1 on the drive.
11 Locate the extra connector on the drive cable that is attached to your
first hard drive and attach the connector to the second hard drive.
Adding Parts 83
Page 84
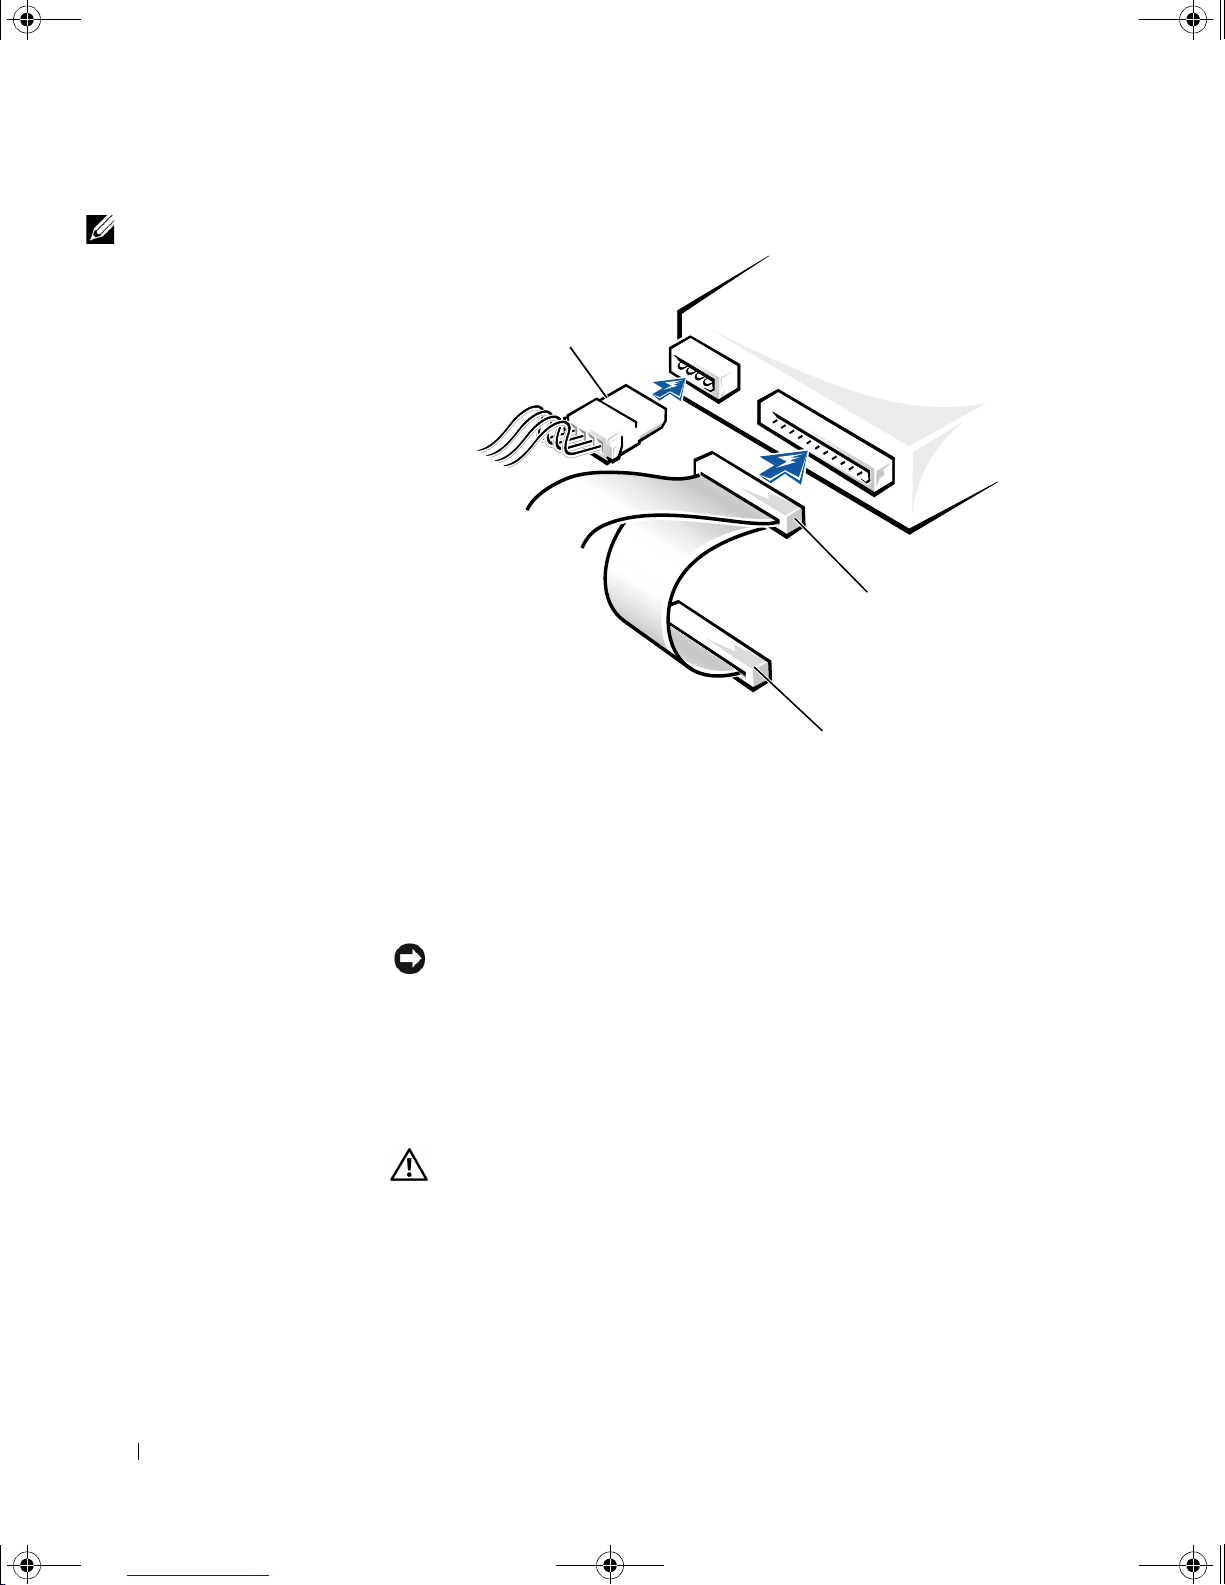
9p915bk0.book Page 84 Thursday, April 4, 2002 9:26 AM
HINT: Your computer
uses cable-select drive
cables. This means that
the device connected to
the end connector of the
drive cable is the master
device and the device
connected to the middle
connector is the slave
device. Be sure that the
jumper setting on the new
device is set for "cable
select" (see the
www.dell.com | support.dell.com
documentation that came
with the drive for
information).
power cable
second hard-drive
cable (secondary
drive)
first hard-drive
cable (primary
boot drive)
Close the computer cover (see page 90).
12
13 Connect your computer and devices to their electrical outlets, and
turn them on.
NOTICE: To connect a network cable, first plug the cable in to the network
wall jack and then plug it in to the computer.
See the documentation that came with the drive for instructions on
14
installing any software required for drive operation.
Adding Other Drives
CAUTION: Befor e you be gin any of the proce dure s in this s ection,
follow the safety instructions listed in "When Working Inside Your
Computer" on page 12.
84 Adding Parts
Page 85

9p915bk0.book Page 85 Thursday, April 4, 2002 9:26 AM
NOTICE: To avoid possibly damaging the drive by ele c trostatic discharge
(ESD), ground yourself by periodically touching an unpainted metal surface on
the back of the computer.
Your computer includes a floppy drive and a CD or DVD drive. You can add
other devices, such as a Zip drive, a CD-RW drive, or a tape drive.
5.25-Inch Devices
CAUTION: Before yo u begin any of th e procedures in thi s secti on,
follow the safety instructions listed in "When Working Inside Your
Computer" on page 12.
1 Shut down the computer (see page 20).
2 Turn off any attached devices and disconnect them from their
electrical outlets.
NOTICE: To disconnect a network cable, first unplug the cable from your
computer and the n unplug it from the n e twork wall jack.
3
Disconnect the computer power cable from the wall outlet, and then
press the power button to ground the system board.
4 Unpack the drive and prepare it for installation.
HINT: Drives sold by Dell
come with their own
operating software and
documentation. After you
install a drive, ref er to the
documentation that came
with the drive for
instructions on installing
and using the drive
software.
See the documentation that came with the drive to ensure that the
drive is set up for your computer.
5 Remove the two short, green plastic rails from the inside of the
computer cover.
These rails are not attached to the computer cover with screws. To
remove the rails, gently ease the rails up and out.
6 Attach the rails to the drive using the two screws supplied wi th the
drive.
Ensure that the rail tabs are positioned at the back of the drive.
7 Open the computer cover (see page 67).
8 To remove the front panel insert, carefully press the panel out from the
inside of the computer.
Adding Parts 85
Page 86
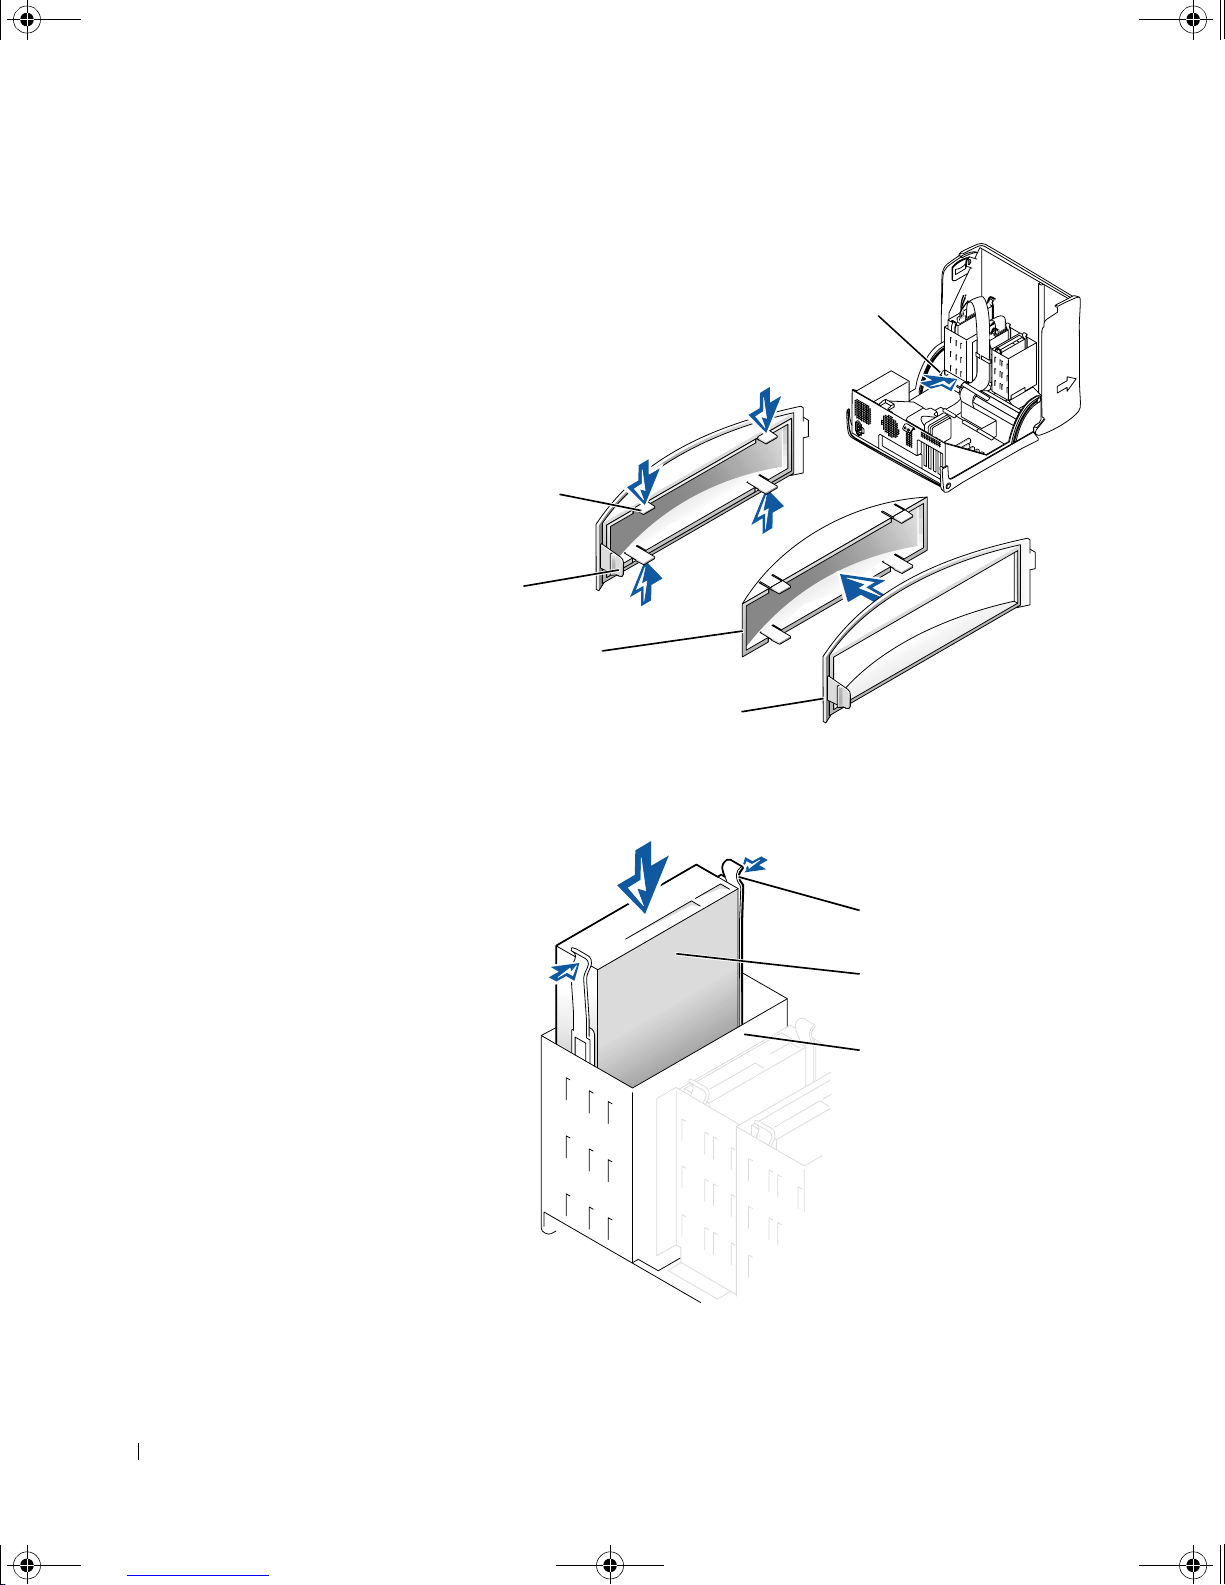
9p915bk0.book Page 86 Thursday, April 4, 2002 9:26 AM
securing tabs (4)
remove front panel
insert through here
www.dell.com | support.dell.com
front-panel insert
securing tab
drive-bay cover panel
front panel insert
9 Gently slide the drive into the bay until you hear a click.
tabs (2)
drive
drive bay
86 Adding Parts
Page 87
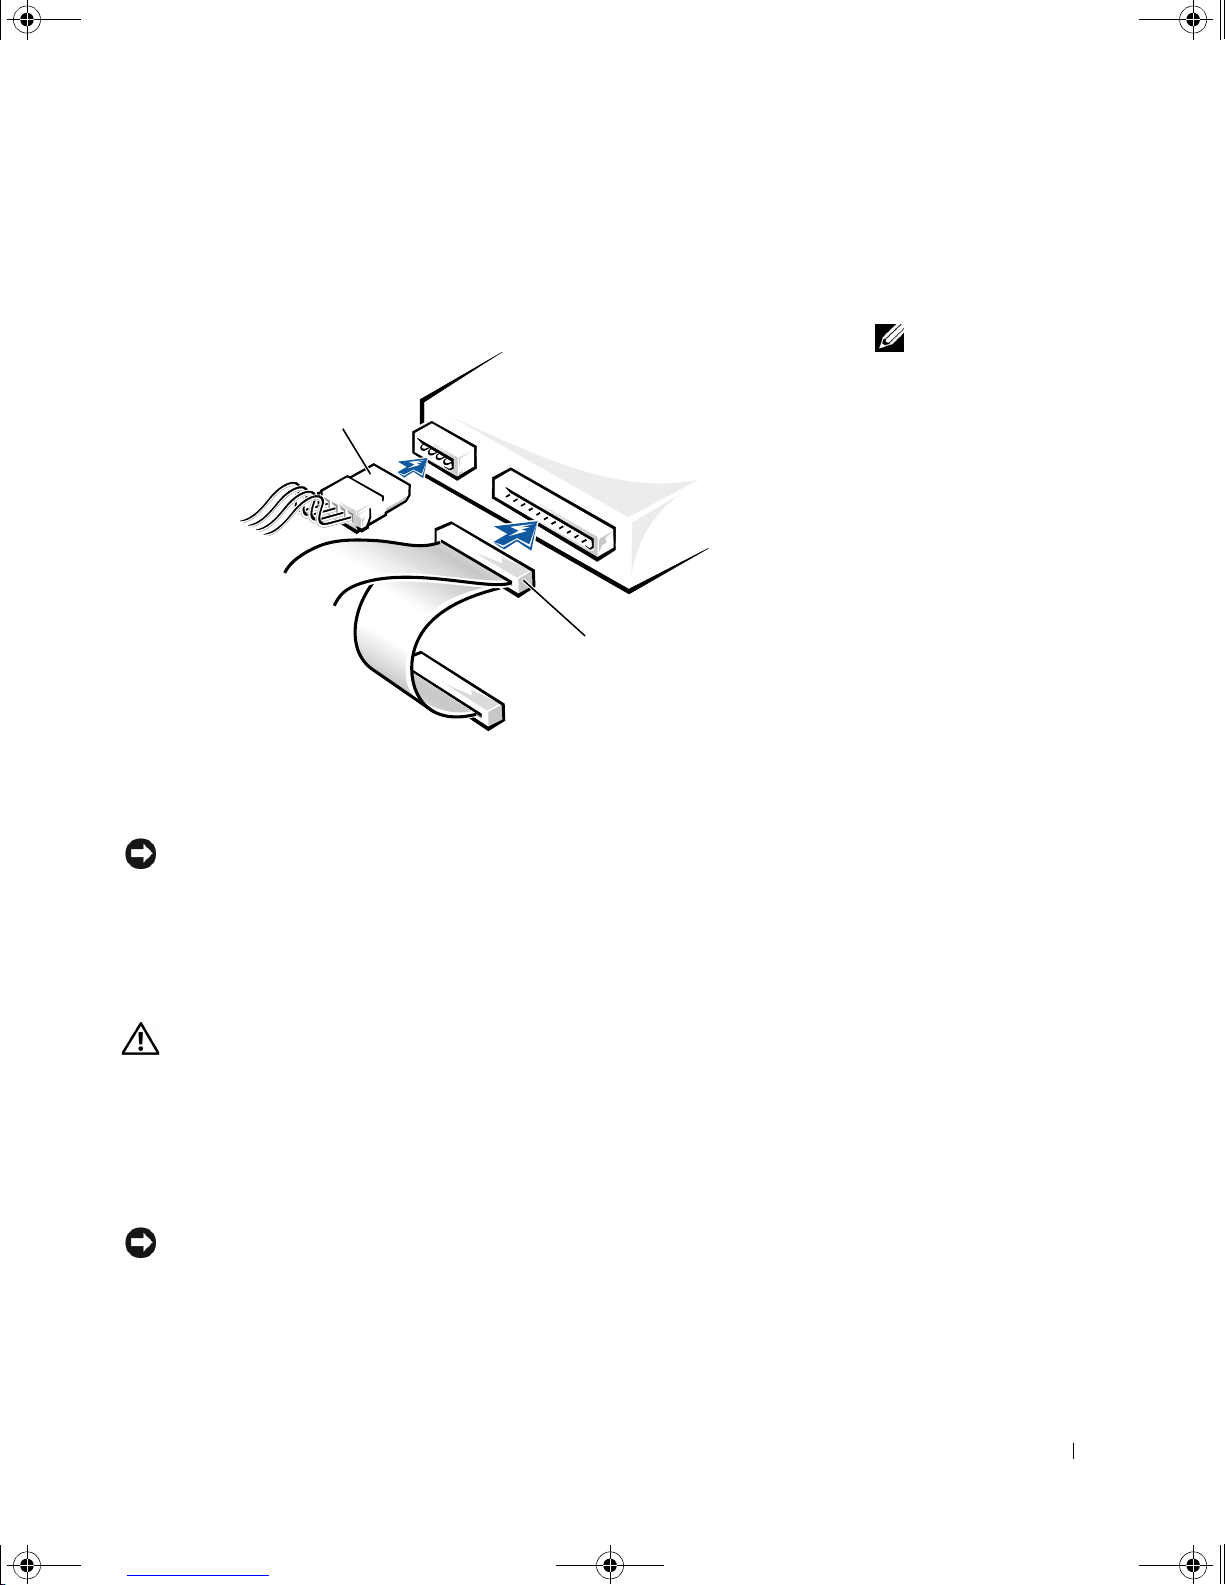
9p915bk0.book Page 87 Thursday, April 4, 2002 9:26 AM
10 Connect a pow er cabl e to the drive.
11 See the documentation that came with the drive for instructions on
connecting a drive cable to the drive and system board.
power cable
drive cable
HINT: Your computer
uses cable-select drive
cables. This means that
the device connected to
the end con ne c t or of the
drive cable is the master
device and the dev ice
connected to the middle
connector is the slave
device. Be sure the jumper
setting on the new device
is set for "cable select"
(see the documentation
that came with the drive
for information).
Connect your computer and devices to their electrical outlets, and
12
turn them on.
NOTICE: To connect a network cable, first plug the cable in to the network
wall jack and then plug it in to the computer.
See the documentation that came with the drive for instructions on
13
installing any software required for drive operation.
3.5-Inch Devices
CAUTION: Before yo u begin any of th e procedures in thi s secti on,
follow the safety instructions listed in "When Working Inside Your
Computer" on page 12.
Shut down the computer (see page 20).
1
2 Turn off any attached devices and disconnect them from their
electrical outlets.
NOTICE: To disconnect a network cable, first unplug the cable from your
computer and the n unplug it from the n e twork wall jack.
Disconnect the computer power cable from the wall outlet, and then
3
press the power button to ground the system board.
Adding Parts 87
Page 88
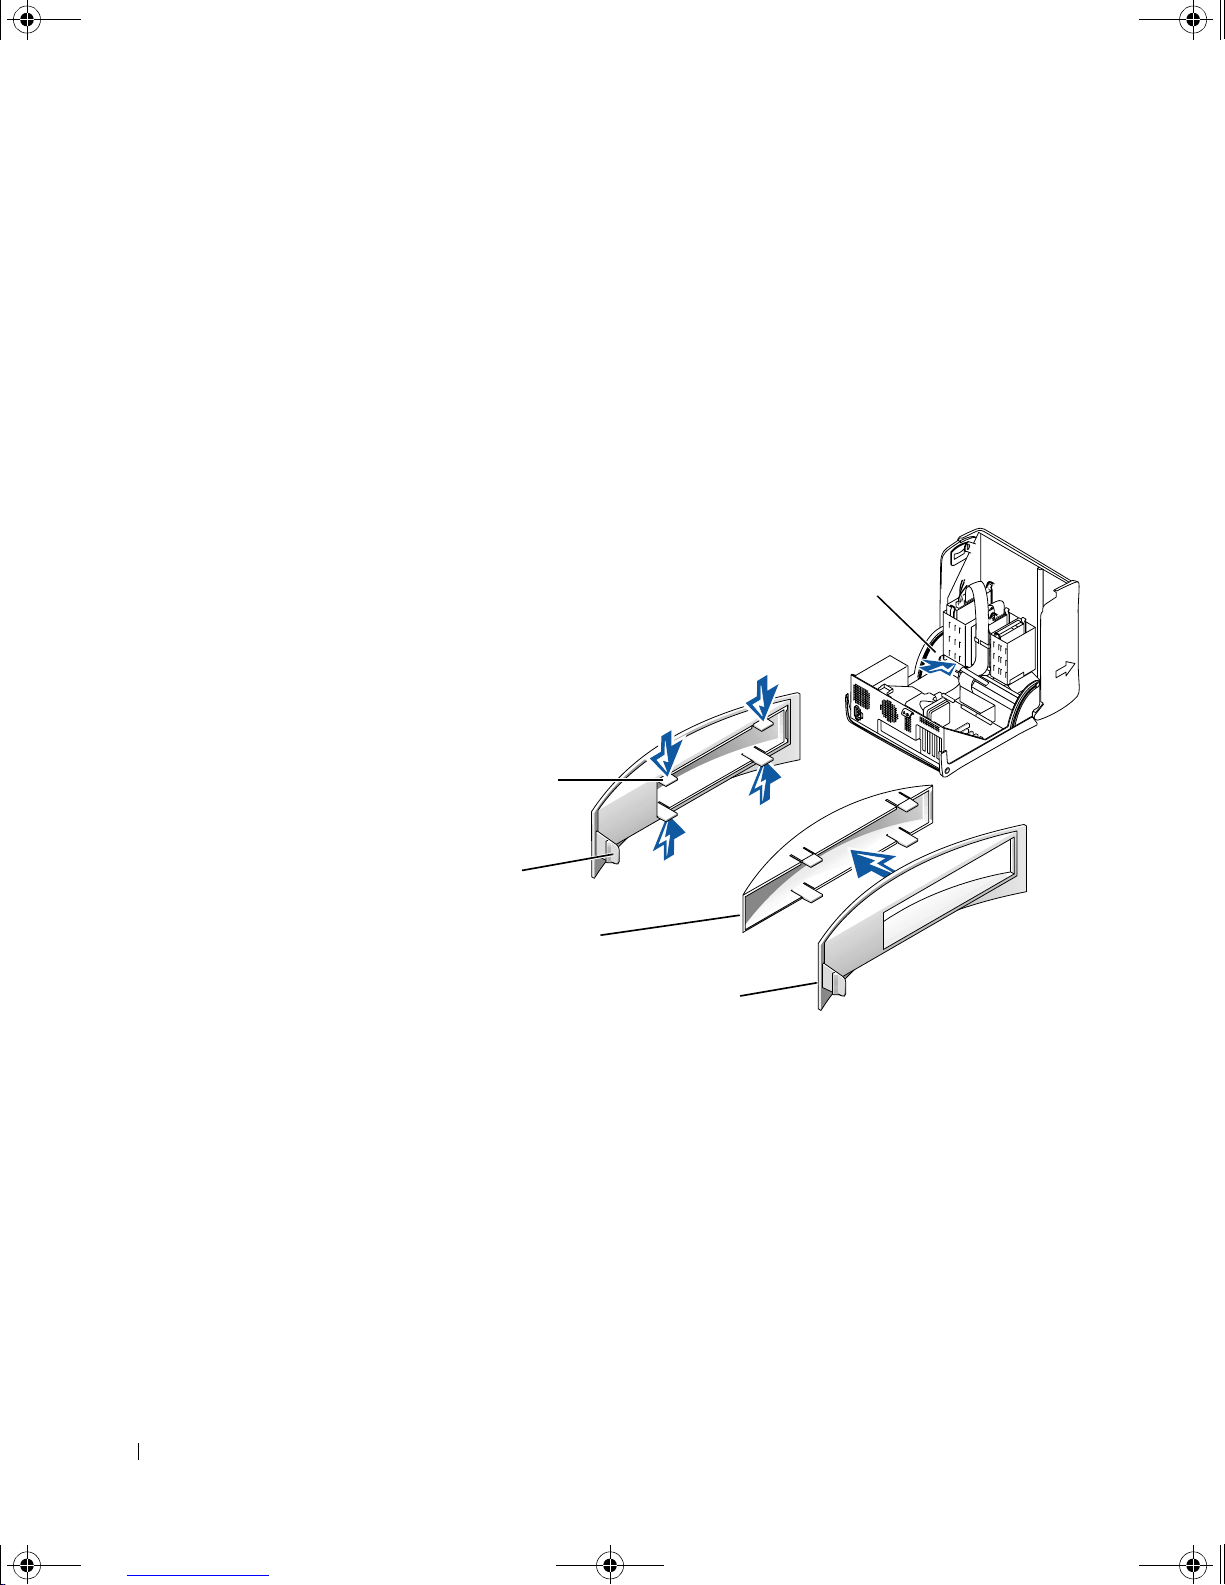
9p915bk0.book Page 88 Thursday, April 4, 2002 9:26 AM
4 Unpack the drive and prepare it for installation.
5 Open the computer cover (see page 67).
6 To remove the front panel insert, carefully press the panel out from the
7 To remove the drive-bay cover pan e l , p ress the four tabs and pull the
See the documentation that came with the drive to ensure that the
drive is setup for your computer.
inside of the computer.
insert aw ay from the p anel.
www.dell.com | support.dell.com
remove front panel
insert through here
securing tabs (4)
front panel insert
securing tab
drive- ba y co ver panel
front panel insert
8 Remove the two shor t, green plastic rails from the ins ide of the drive
cage.
These rails are not attached to the drive cage with screws. To remove
the rails, firmly pull the rails from the drive cage.
9 Attach the rails to the drive using the two captive screws on each rail.
10 Gently slide the drive into the bay until you hear a click.
88 Adding Parts
Ensure that the rail tabs are positioned at the back of the drive.
Page 89
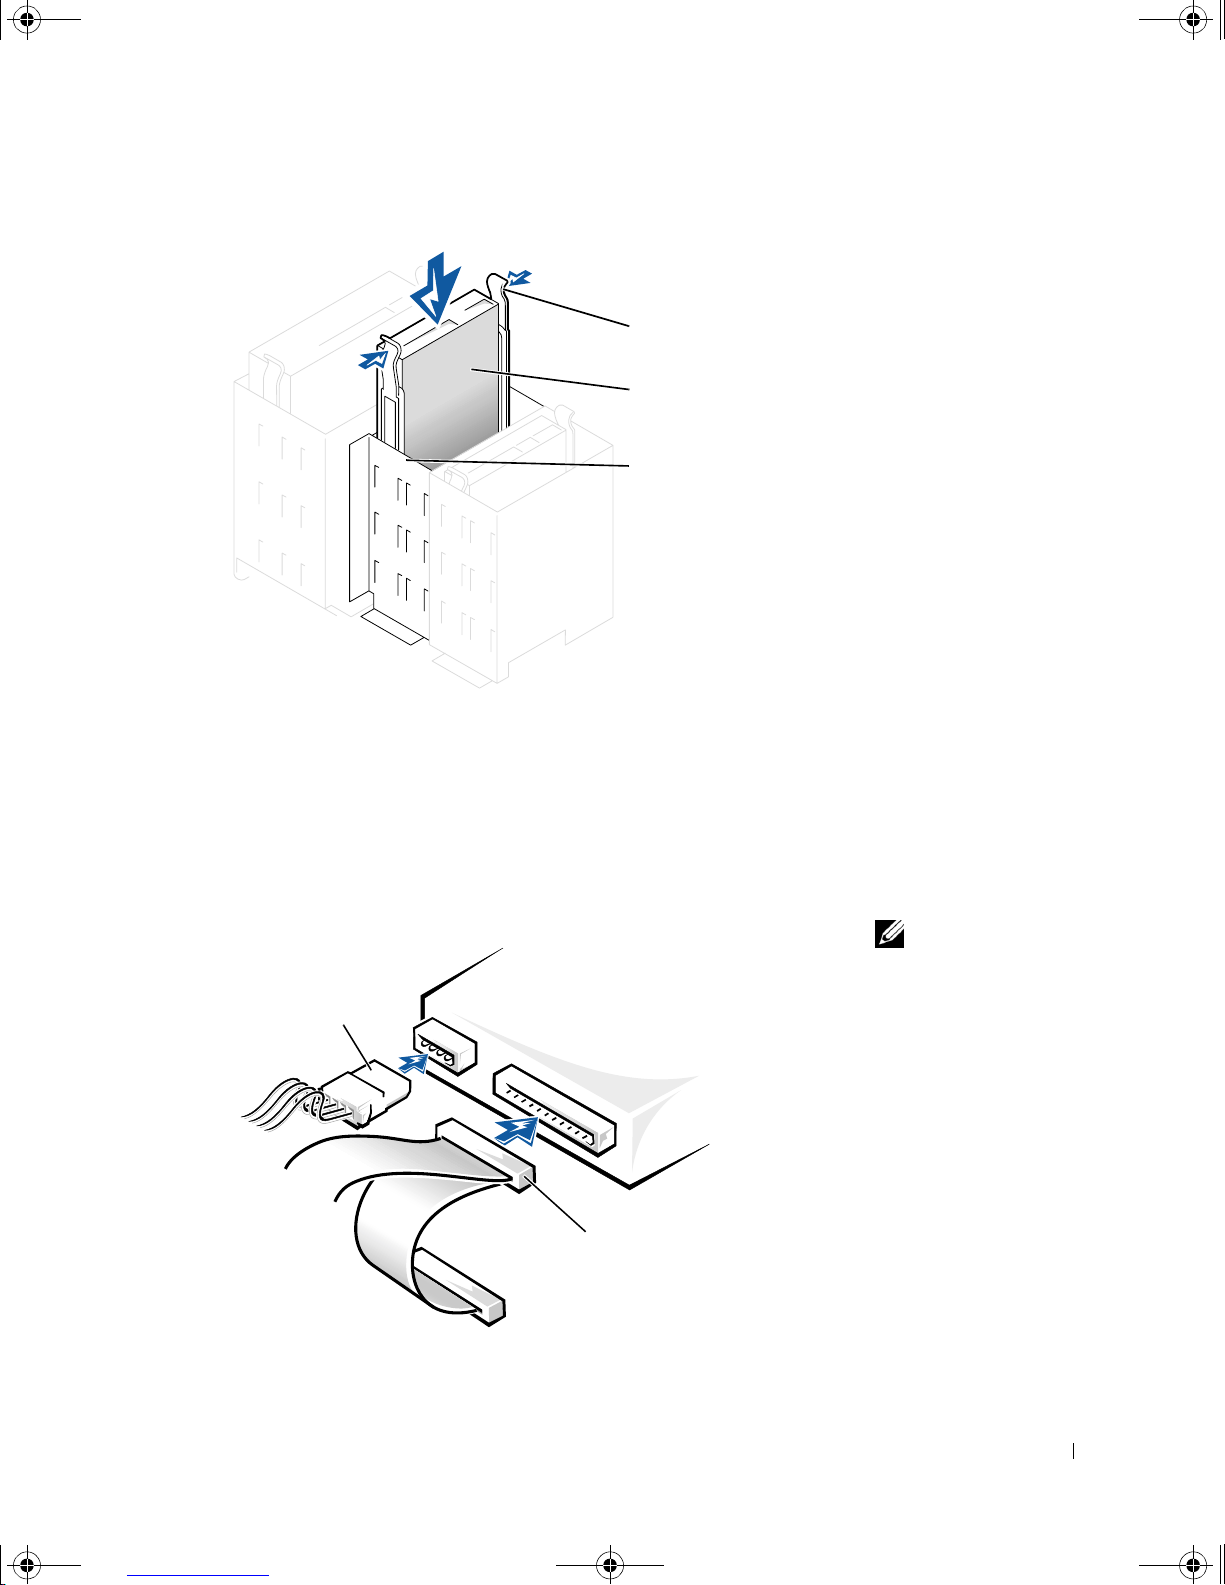
9p915bk0.book Page 89 Thursday, April 4, 2002 9:26 AM
tabs (2)
drive
drive bay
11 Carefully replace the front panel insert.
You do not need to replace the drive-bay cover panel.
12 Connect a pow er cabl e to the drive.
13 See the documentation that came with the drive for instructions on
connecting a drive cable to the drive.
power cable
drive cable
HINT: Your computer
uses cable-select drive
cables. This means that
the device connected to
the end con ne c t or of the
drive cable is the master
device and the dev ice
connected to the middle
connector is the slave
device. Be sure the jumper
setting on the new device
is set for "cable select"
(see the documentation
that came with the drive
for information).
Adding Parts 89
Page 90

9p915bk0.book Page 90 Thursday, April 4, 2002 9:26 AM
14 Connect your computer and devices to their electrical outlets, and
15
Closing the Computer Cover
1 Ensure that all cables are connected, and fold cables out of the way.
turn them on.
NOTICE: To connect a network cable, first plug the cable in to the network
wall jack and then plug it in to the computer.
Install any drivers required for the drive as described in the
documentation that came with the drive.
www.dell.com | support.dell.com
2 Ensure that no tools or extra parts are left inside the computer.
3 Pivot the cover down and ensure that the release buttons click into
place.
NOTICE: To connect a network cable, first plug the cable in to the network
wall jack and then plug it in to the computer.
Connect your computer and devices to their electrical outlets, and
4
turn them on.
90 Adding Parts
Page 91
9p915bk0.book Page 91 Thursday, April 4, 2002 9:26 AM
SECTION 4
Appendix
Specifications
Standard Settings
Clearing Forgotten Passwords
Replacing the Battery
Dell Technical Support Policy (U.S. Only)
Contacting Dell
Regulatory Information
Limited Warranties and Return Policy
Page 92

9p915bk0.book Page 92 Thursday, April 4, 2002 9:26 AM
Specifications
Microprocessor
Microprocessor type Intel® Pentium® 4; design provides for
L1 cache 8 KB first-level
L2 cache 256-KB or 512-KB ( displayed in the
www.dell.com | support.dell.com
future Dell-supported upgrades. A
slower compatibility speed can be set
through the system setup program.
system setup program) pipelined-burst,
eight-way set asso ciative, write-back
SRAM
System Information
System chip set Intel 850 or 850E
DMA channels eight
Interrupt levels 15
System BIOS chip 4 Mb (512 KB)
System clock 400- or 533-MHz data ra te
Expansio n Bus
Bus types PCI and AGP
Bus speed PCI: 33 MHz; AG P: 66 MHz
AGP connector one
AGP connector size 172 pins
AGP connector data width (maximum)
32 bits
AGP bus protocols 4x/2x modes at 1.5 V
PCI connectors four
92 Appendix
Page 93

9p915bk0.book Page 93 Thursday, April 4, 2002 9:26 AM
Expansio n Bus
(continued)
PCI connector size 120 pins
PCI connector data width
(maximum) 32 bits
Memory
Architecture RDRAM
Memory connectors four
Memory capacities 64-, 128-, 256-, a nd 512-MB non-ECC
or ECC RDRAM
Minimum memory 128 MB
Maximum memory 2 GB
Memory type PC800 (non-ECC or ECC)
Memory speed 40 ns or faster
BIOS address F8000h
Drives
Externally accessible two 5.25-inch bays
two 3.5-inch bays
Internally accessible two bays for 1-inch–high IDE hard
drives
Available devices ATA-66 or ATA-100 U ltra DMA hard
drive, CD drive, Zip drive, DVD drive,
and CD-RW drive
Ports and Connectors
Externally accessible:
Serial 9-pin connector; 16550C-compatible
Parallel 25-hole connector (bidirectional)
Video 15-hole connector
Appendix 93
Page 94

9p915bk0.book Page 94 Thursday, April 4, 2002 9:26 AM
www.dell.com | support.dell.com
Ports and Connectors
(continued)
Keyboard 6-pin mini-DIN connector or USB
connector
Mouse 6-pin mini-DIN connector or USB
connector
USB two front-panel and two back-panel
USB–compliant connectors
Headphone front-panel miniature connector
Audio
1
three miniature connectors for line-in,
line-out, and microphone
Internally accessible:
Primary IDE channel 40-pin connector on PCI local bus
Secondary IDE channel 40-pin connector on PCI local bus
Floppy drive 34-pin connector
2
Audio
Audio controller Analog Devices AD1885 AC97 Codec
Video
Video controller AGP 4X
Controls and Lights
Power control push button
Power light green
Hard-drive access light green
Diagnostic code lights four bicolor (amber and green) located
on back panel
1
Present only on computers with integrated audio capabilities.
2
Present only on computers with integrated audio capabilities.
94 Appendix
Page 95

9p915bk0.book Page 95 Thursday, April 4, 2002 9:26 AM
Power
DC power supply:
Wattage 250 W
Heat dissipation 534 BTU (fully-loaded computer
without monitor)
Voltage (switch-selectable
on back panel)
90 to 135 V at 60 Hz;180 to 26 5 V at 50
Hz;
100 V at 50 to 60 Hz for Japanese
computers
Backup battery 3-V CR2032 coin cell
Physical
Height x Width x Depth 42.5 x 18.1 x 44.7 cm
(16.7 x 7.13 x 17.6 inches)
Weight 12.7 kg (28 lb)
Environmental
Temperature:
3
Operating 10°to 35°C ( 50° to 95°F)
Storage –40°to 65°C (–40° to 149°F)
Relative humidity 20% to 80% (noncondensing)
Maximum vibration:
Operating 0.25 G at 3 to 200 Hz at 1/2 octave/min
Storage 0.5 G at 3 to 200 Hz at 1/2 octave/min
Maximum shock:
Operating bottom half-sine pulse with a change in
Storage 23-G faired-square wave with a velocity
velocity of 50.8 cm/sec (20 inches/sec)
change of 508 cm/sec (200 inches/sec)
Appendix 95
Page 96

9p915bk0.book Page 96 Thursday, April 4, 2002 9:26 AM
www.dell.com | support.dell.com
Environmenta l
(continued)
Altitude:
Operating –15.2 to 3048 m (–50 to 10,000 ft)
3
Storage –15.2 to 10 ,670 m (–50 to 35,000 ft)
3
At 35°C (95°F), the maximum operating altitude is 914 m (3000 ft).
Standard Settings
The system setup program contains the standard settings for your
computer.
NOTICE: Unless you are an expert computer user, don’t change the settings
for this program. Certain changes might make your computer work incorrectly.
See the following figure for an example of the main screen of the program.
96 Appendix
Page 97
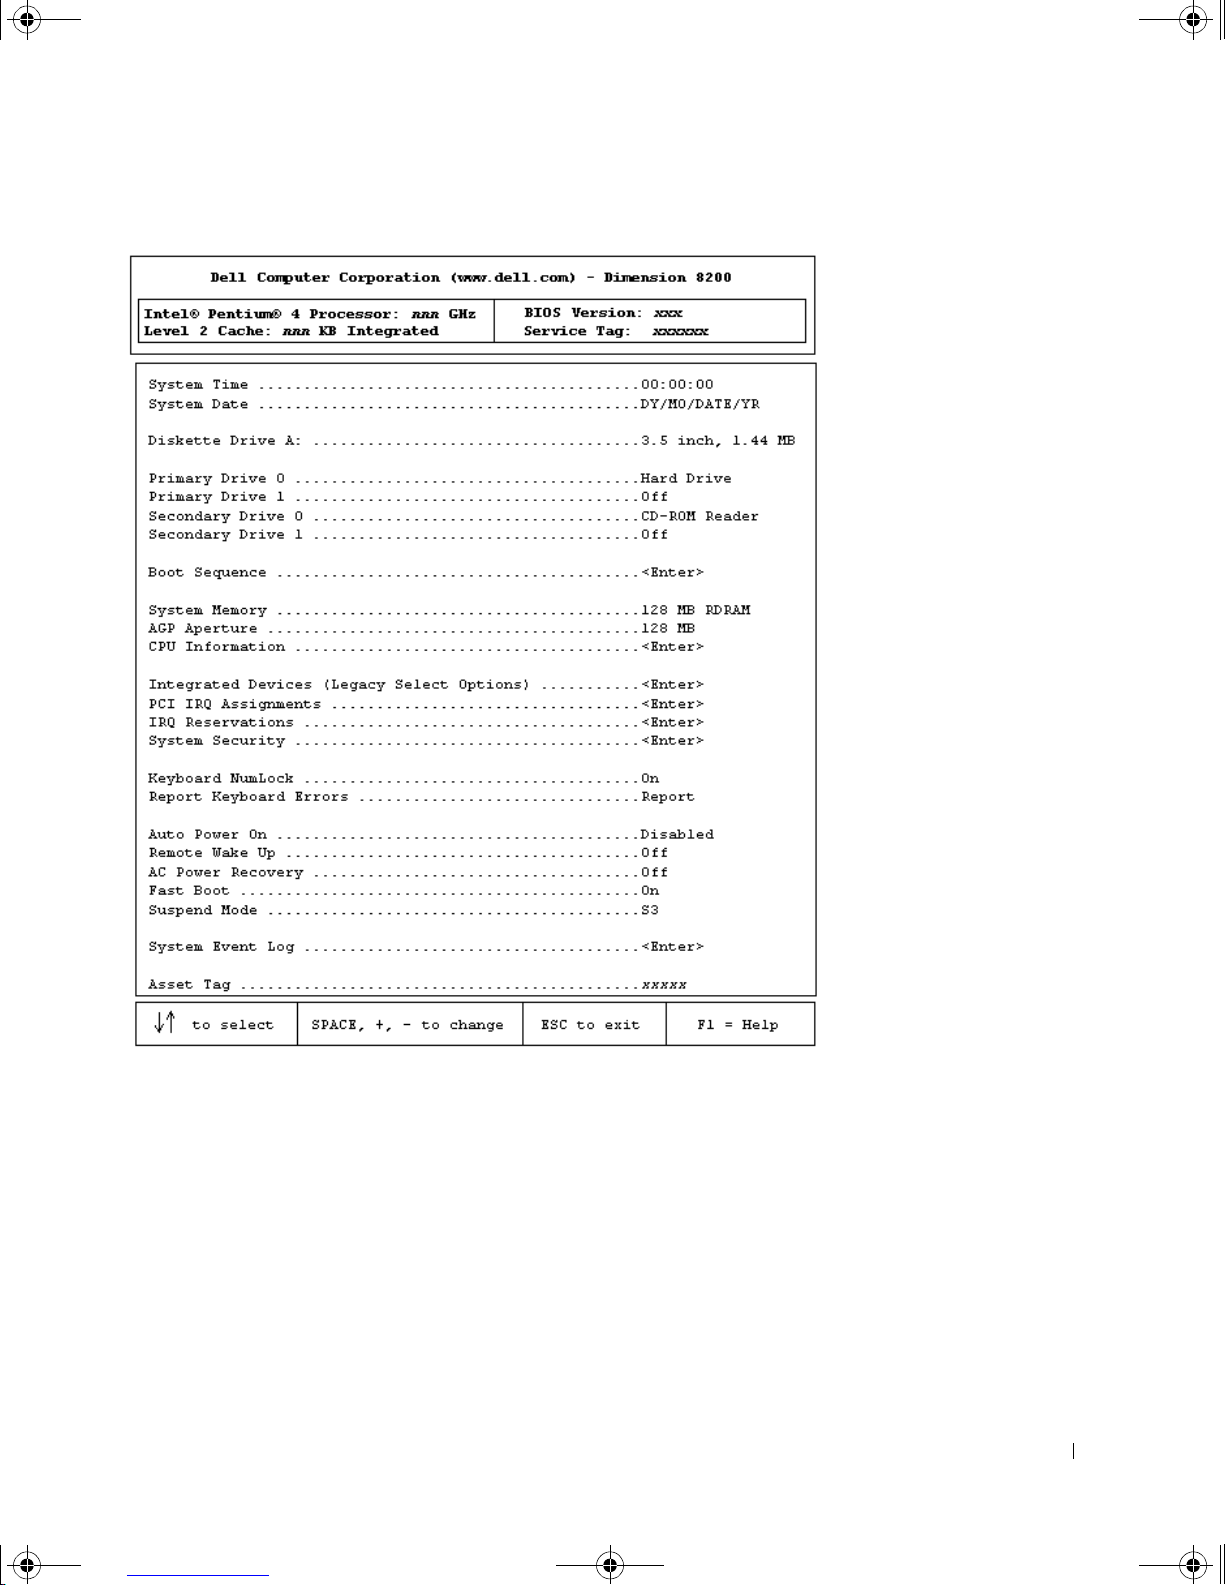
9p915bk0.book Page 97 Thursday, April 4, 2002 9:26 AM
Viewing Settings
1 Turn on (or restart) your computer.
2 When the blue Dell™ logo appears, press <F2> immediately.
If you wait too long and t he operating s ystem logo appea rs, continue to
wait until you see the Microsoft
your computer and try again.
®
Windows® desktop. Then shut down
Appendix 97
Page 98

9p915bk0.book Page 98 Thursday, April 4, 2002 9:26 AM
System Setup Program Screens
The system setup program screens display the current configuration
information for your computer. Information on the screen is divided into
five areas:
• Title – The area at the top of all system setup screens that displays
•Computer data – Two boxes bel ow the title that displa y the system
• Options – A scrollable box l isting options that define the configuration
www.dell.com | support.dell.com
your computer’s model number.
processor, L2 cache, service tag, and the version number of the BIOS.
of your computer (including installed hardware, power conservation,
and security features).
Fields to the right of the listed options contain settings or values. The
settings and values that you can change are brighter on the screen. All
other settings and values are set by the computer and cannot be
changed. When <Enter> ap pears to the right of an option, press
<Enter> to access a pop-up menu of additional options.
• Key functions – A line of boxes across the bottom of all system setup
screens that lists keys and their functions within the system setup
program.
• Help – Press <F1> for information on the option that is selected
(highlighted).
Clearing Forgotten Passwords
CAUTION: Before you begin this procedure, follow the safety
instructions listed in "When Working Inside Your Computer" on
page 12.
If you forget your system or setup password, you cannot operate your
computer or change settings in the system setup program until you clear the
forgotten pas sword(s).
1 Shut down the computer (see page 20).
2 Turn off any attached devices and disconnect them from their
98 Appendix
NOTICE: This process erases both the system and setup passwords.
electrical outlets.
Page 99

9p915bk0.book Page 99 Thursday, April 4, 2002 9:26 AM
NOTICE: To disconnect a network cable, first unplug the cable from your
computer and the n unplug it from the n e twork wall jack.
Disconnect the computer power cable from the wall outlet, and then
3
press the power button to ground the system board.
4 Open the computer cover (see page 67).
5 Locate jumper PSWD on the system board (see page 70) and remove
the jumper plug.
6 Close the computer cover (see page 90), plug your computer into an
electrical outlet, and turn on the computer.
This process erases the existing password(s).
7 Shut down the computer (see page 20).
8 Turn off any attached devices and disconnect them from their
electrical outlets.
NOTICE: To disconnect a network cable, first unplug the cable from your
computer and the n unplug it from the n e twork wall jack.
Disconnect the computer power cable from the wall outlet, and then
9
press the power button to ground the system board.
10 Open the computer cover (see page 67).
11 Reinstall the PSWD jumper plug on pins 2 and 3 (pin 1 is marked on
the system board).
12 Close the computer cover (see page 90), plug your computer into an
electrical outlet, and turn on the computer.
Turning on your computer with the PSWD jumper installed reenables
the password feature.
Replacing the Battery
A coin-cell battery maintains computer configuration, date, and time
information. The battery can last several years.
If you have to repeatedly reset time and date information after turning on
the computer, replace the battery.
Appendix 99
Page 100
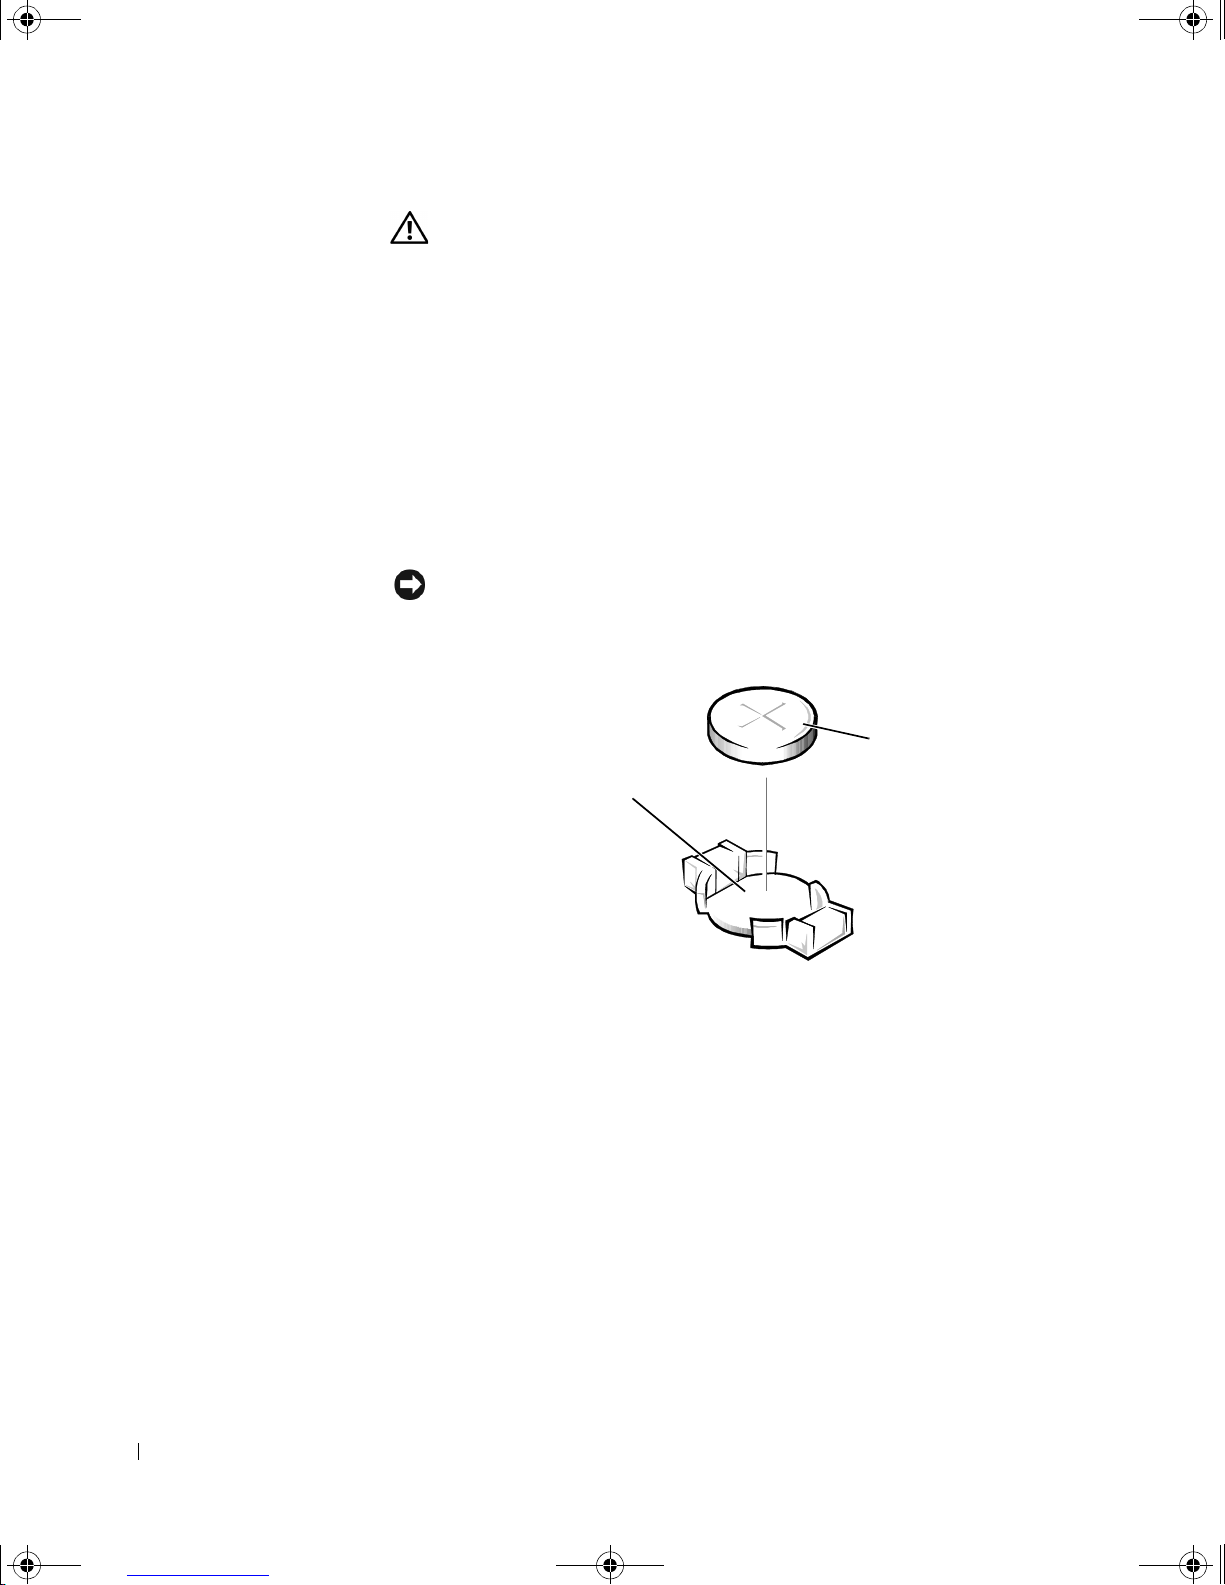
9p915bk0.book Page 100 Thursday, April 4, 2002 9:26 AM
CAUTION: A new battery ca n explode if it is in correctly instal led.
1
2 Open the computer cover (see page 67).
3 Locate the battery socket BATTERY (see page 70).
4 Remove the batte ry by c arefully pryi n g it out of its so c ket with your
www.dell.com | support.dell.com
NOTICE: To avoid damage to the system board while you pry the battery
Replace the 3-V CR2032 battery only with the same or equivalent
type recommended by the manufacturer. Discard used batteries
according to the manufacturer’s instructions.
Record all the screens in the system setup program so that you can
restore the correct settings in step 7.
fingers or with a blunt, nonconducting object such as a plastic
screwdriver.
loose, be sure to insert the plastic screwdriver between the battery and the
socket (not the system board ).
battery
battery so c k e t
(BATTERY)
5
Insert the new battery into the socket with the side labeled “+” facing
up and snap it into place.
6 Close the computer cover (see page 90), and plug your computer and
devices into their electrical outlets.
7 Access the system setup pr ogram (see page97) and restore the setting s
you recorded in step 1.
8 Properly dispose of the old battery (see page 99).
100 Appendix
 Loading...