

Page 1

Dell Wireless 360 Speaker System
AE715
User’s Guide
Regulatory model: AE715
Page 2

Notes, cautions, and warnings
NOTE: A NOTE indicates important information that helps
you make better use of your speaker.
CAUTION: A CAUTION indicates either potential damage
to hardware or loss of data and tells you how to avoid the
problem
WARNING: A WARNING indicates a potential for property
damage, personal injury, or death.
Copyright © 2017 Dell Inc. All rights reserved. This product is protected by U.S. and international copyright and
intellectual property laws. Dell™ and the Dell logo are trademarks of Dell Inc. in the United States and/or other
jurisdictions. All other marks and names mentioned herein may be trademarks of their respective companies.
2017 - 01
Rev. A00
Page 3

Contents
What’s in the box .............................................................................................. 4
Features ............................................................................................................ 5
Setting up your speaker .................................................................................... 7
Powering on your speaker....................................................................... 7
Powering off your speaker ...................................................................... 7
Connecting your speaker .................................................................................. 8
Bluetooth connection ............................................................................... 8
Bluetooth USB dongle and built-in Bluetooth connection .............. 9
Aux-in port ................................................................................................ 13
Headphone jack ....................................................................................... 14
Adjusting the volume ...................................................................................... 15
Answering a call .............................................................................................. 16
Troubleshooting .............................................................................................. 18
Specifications .................................................................................................. 21
Statutory information ..................................................................................... 22
Warranty ................................................................................................... 22
3
Page 4
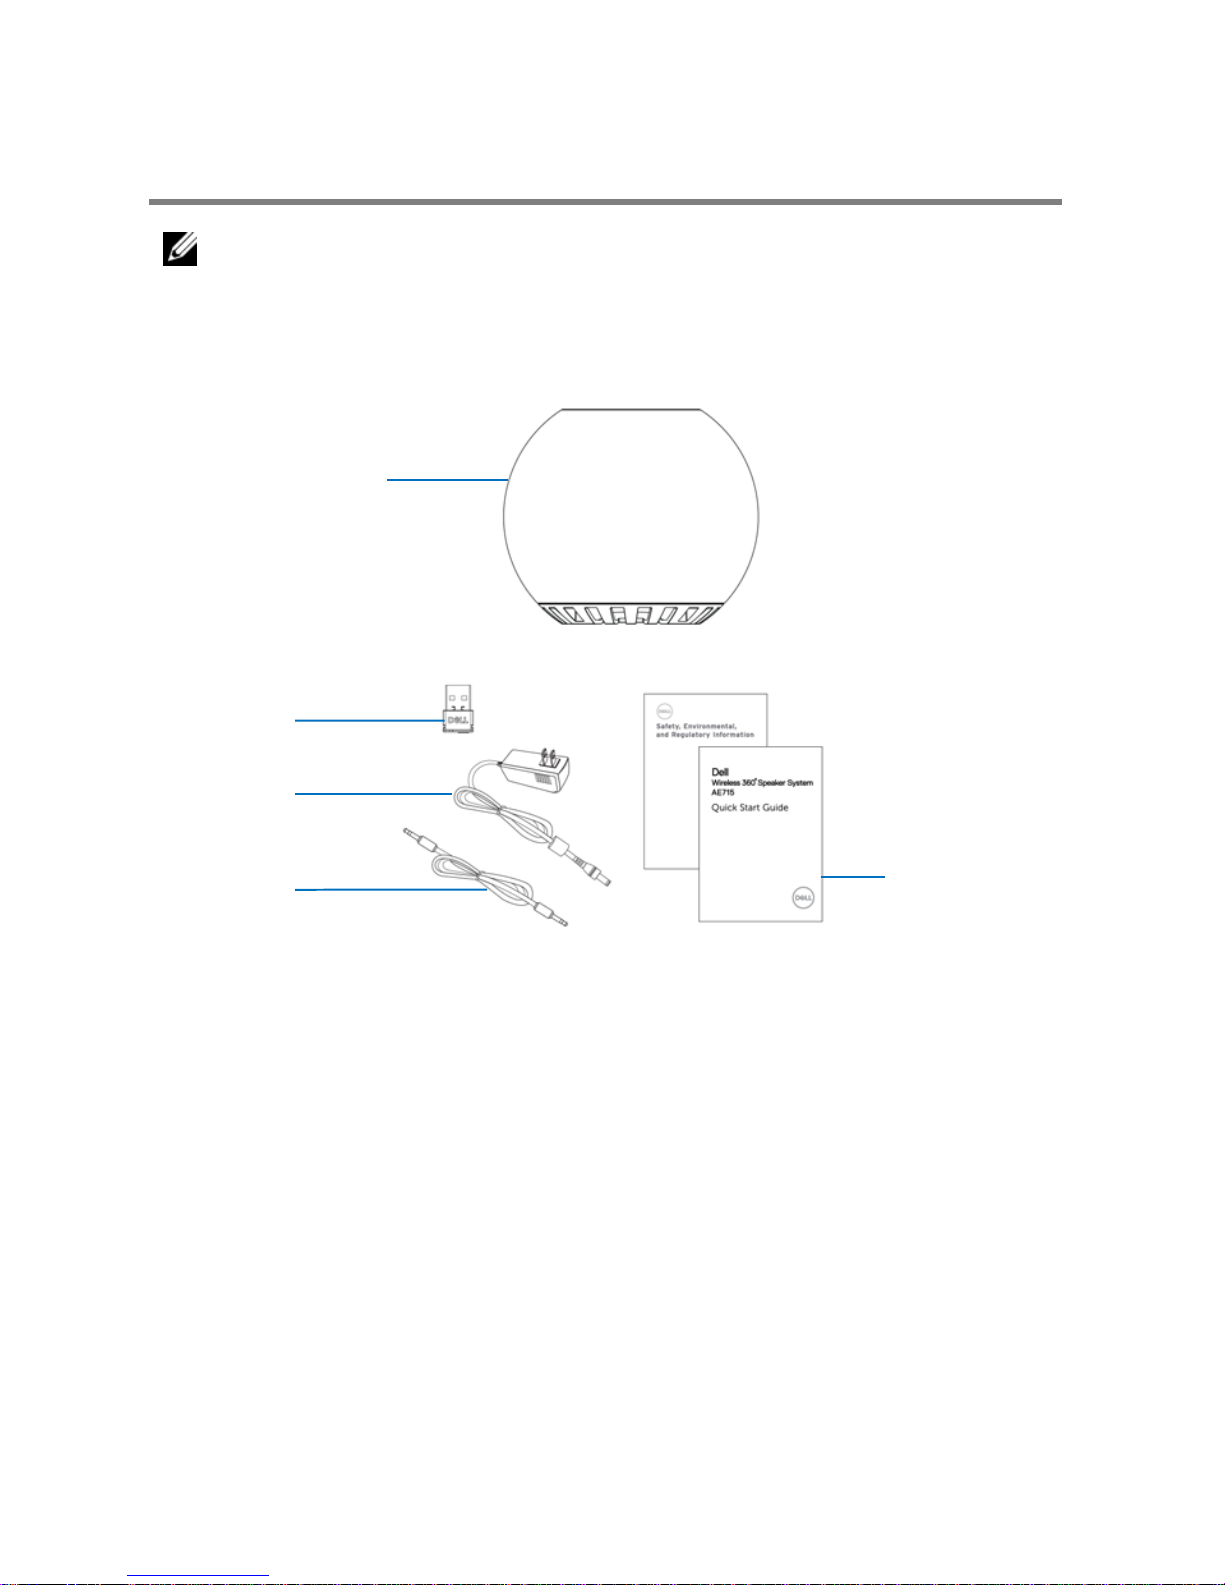
What’s in the box
NOTE: The documents that shipped with the speaker may
vary based on your region.
1 Speaker
3 Power adapter
5 Documentation
2 USB dongle
4 Aux-in cable
1
3 4 5
2
4
Page 5
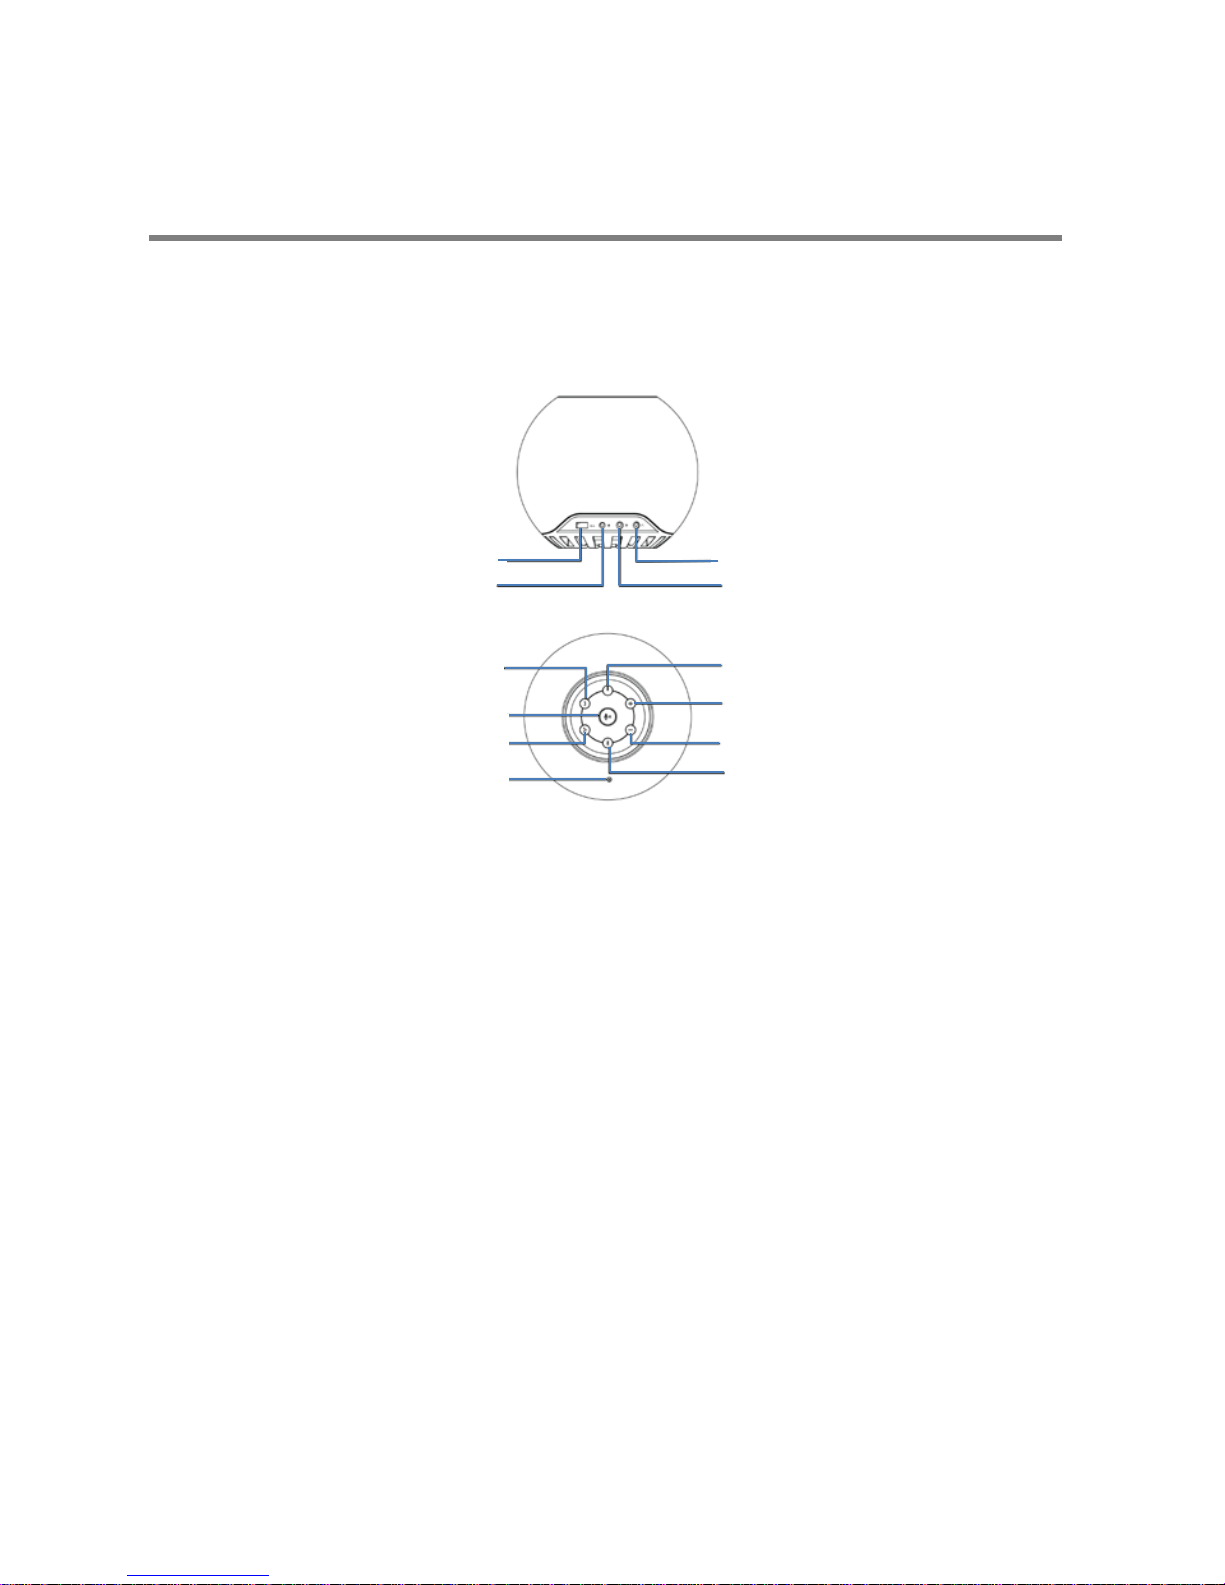
Features
Speaker
1
USB charging
2
DC power
3
Call pick up
4
Mic mute
5
Call hang up
6
Microphone
7
Bluetooth
8
Volume down
9
Volume up
10
Power button
11
Aux-in
12
Headphone
1
2
12
11
10
9
8
7
5
3
4
5
6
Page 6

USB dongle
1
1
USB light indicator
2
Button
2
6
Page 7
Setting up your speaker
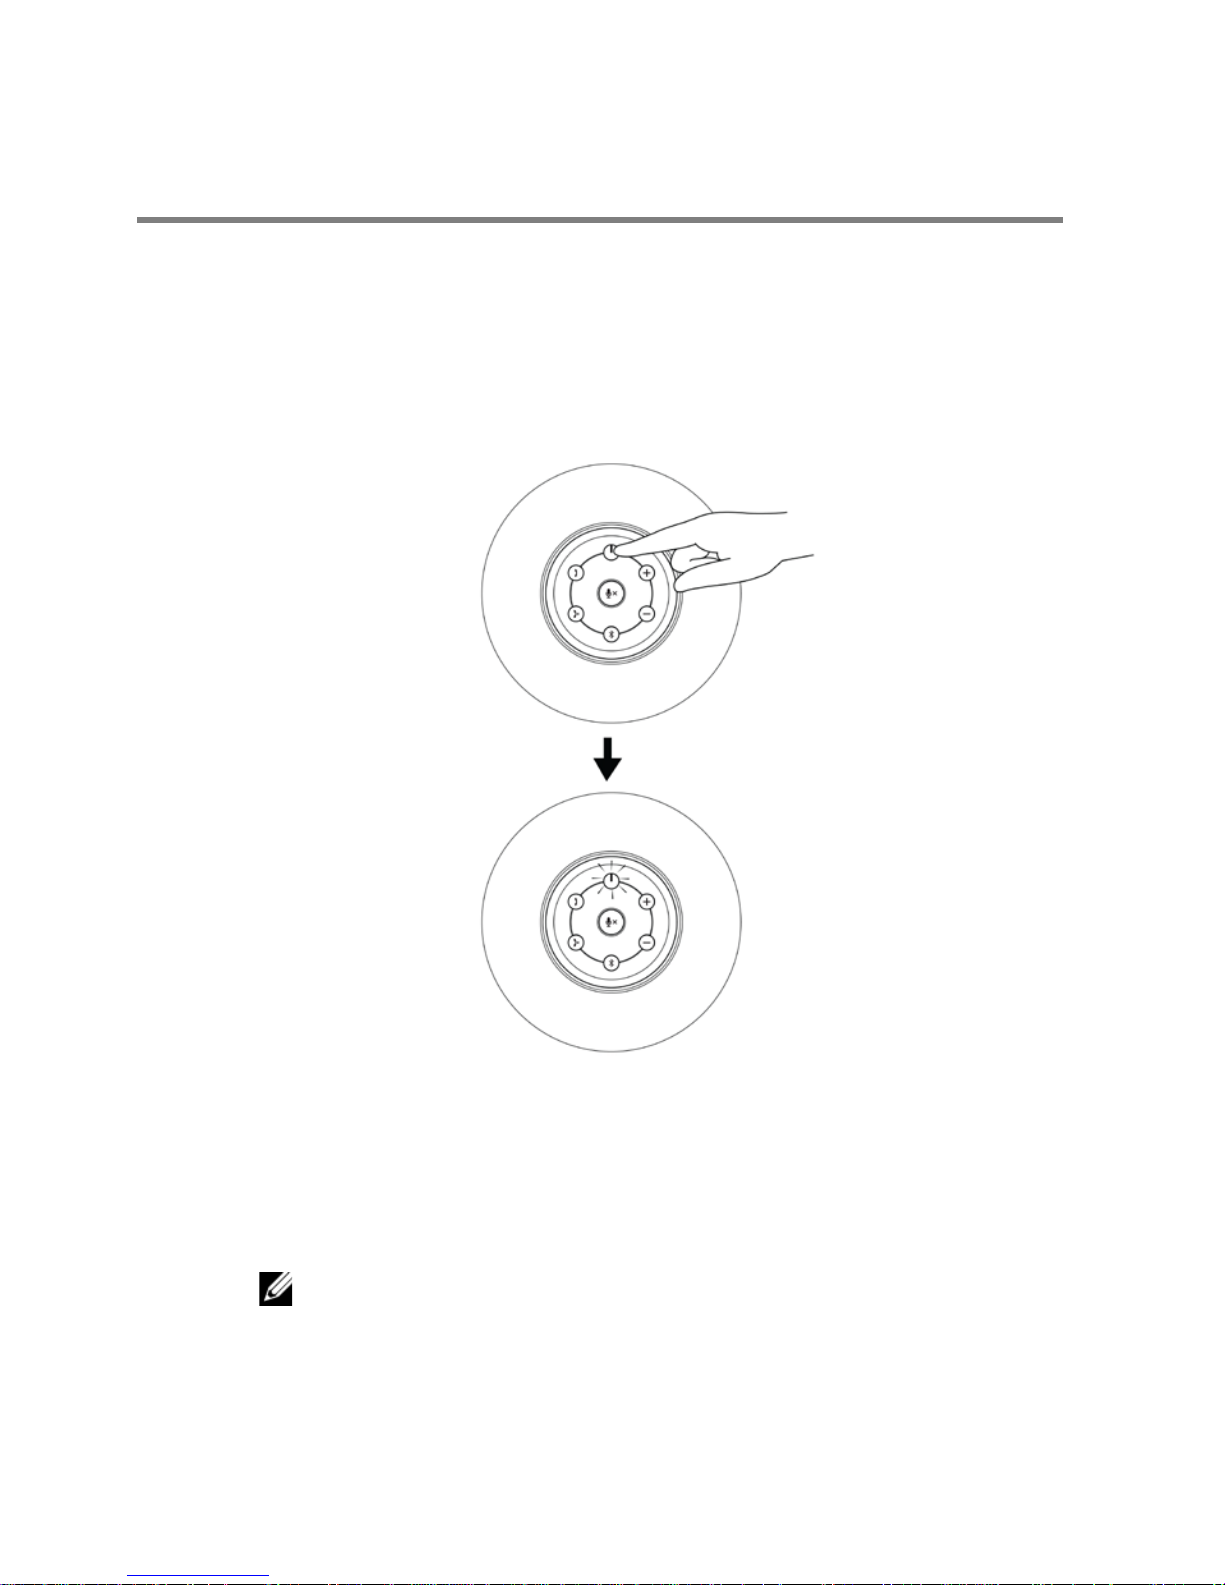
Powering on your speaker
1 The speaker has a built in battery. Press the power button to power on the
speaker. The power button light will light up.
2 The speaker will auto search for external Bluetooth (BT) devices.
Powering off your speaker
1 Press the power button to power off the speaker
2 The power button light turns off.
If DC power is supplied, the light remains on.
7
Page 8
Connecting your speaker
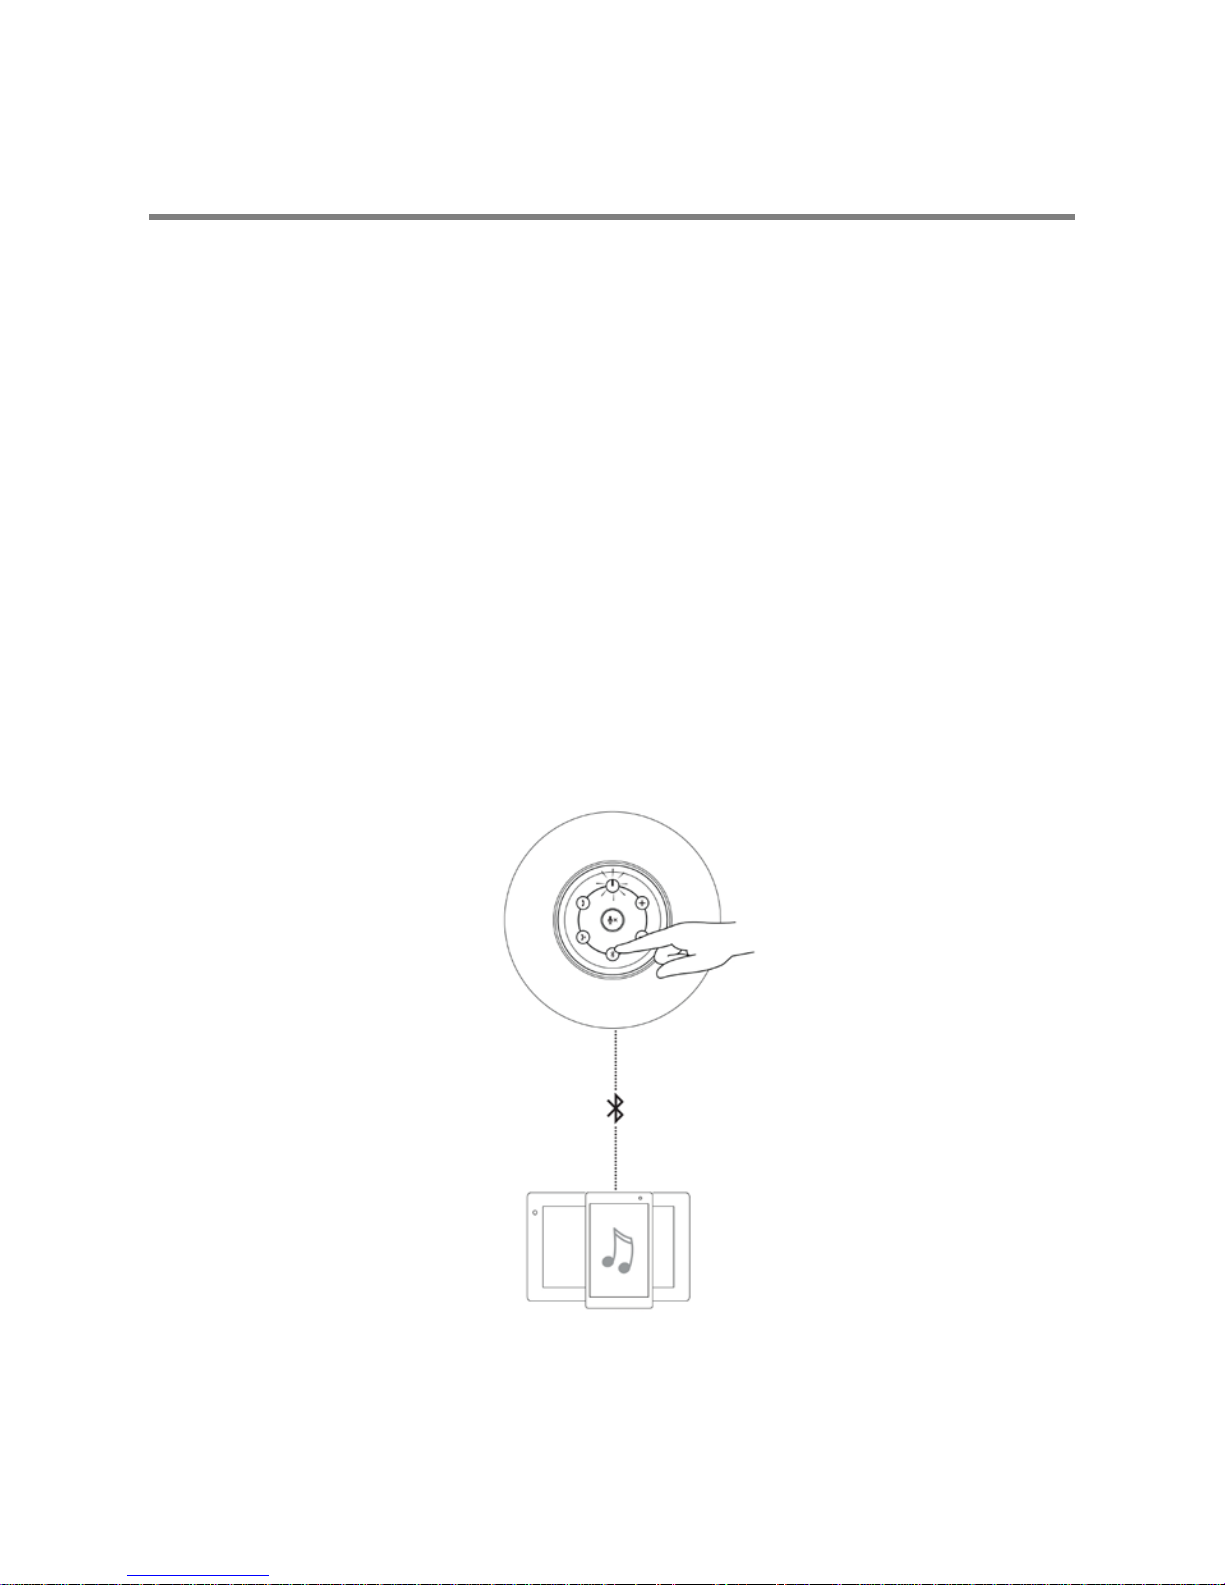
This speaker can be connected through Bluetooth (BT), headphone jack or aux-in
cable to your audio device (tablet, smart phone) or Dell computer.
Bluetooth connection
1 The speaker will automatically search for available Bluetooth device when
powered on.
2 In the Bluetooth devices list, select Dell Wireless 360 Speaker AE715 to
connect.
• Single press on the BT button:
o Initiates pairing if the speaker is not connected to any device.
o Doesn’t affect the current BT connection.
• Long press on BT button:
o Disconnects current BT connection and restarts pairing.
• Long press on the BT button when BT is searching or pairing turns off BT.
BT light will turn off.
8
Page 9
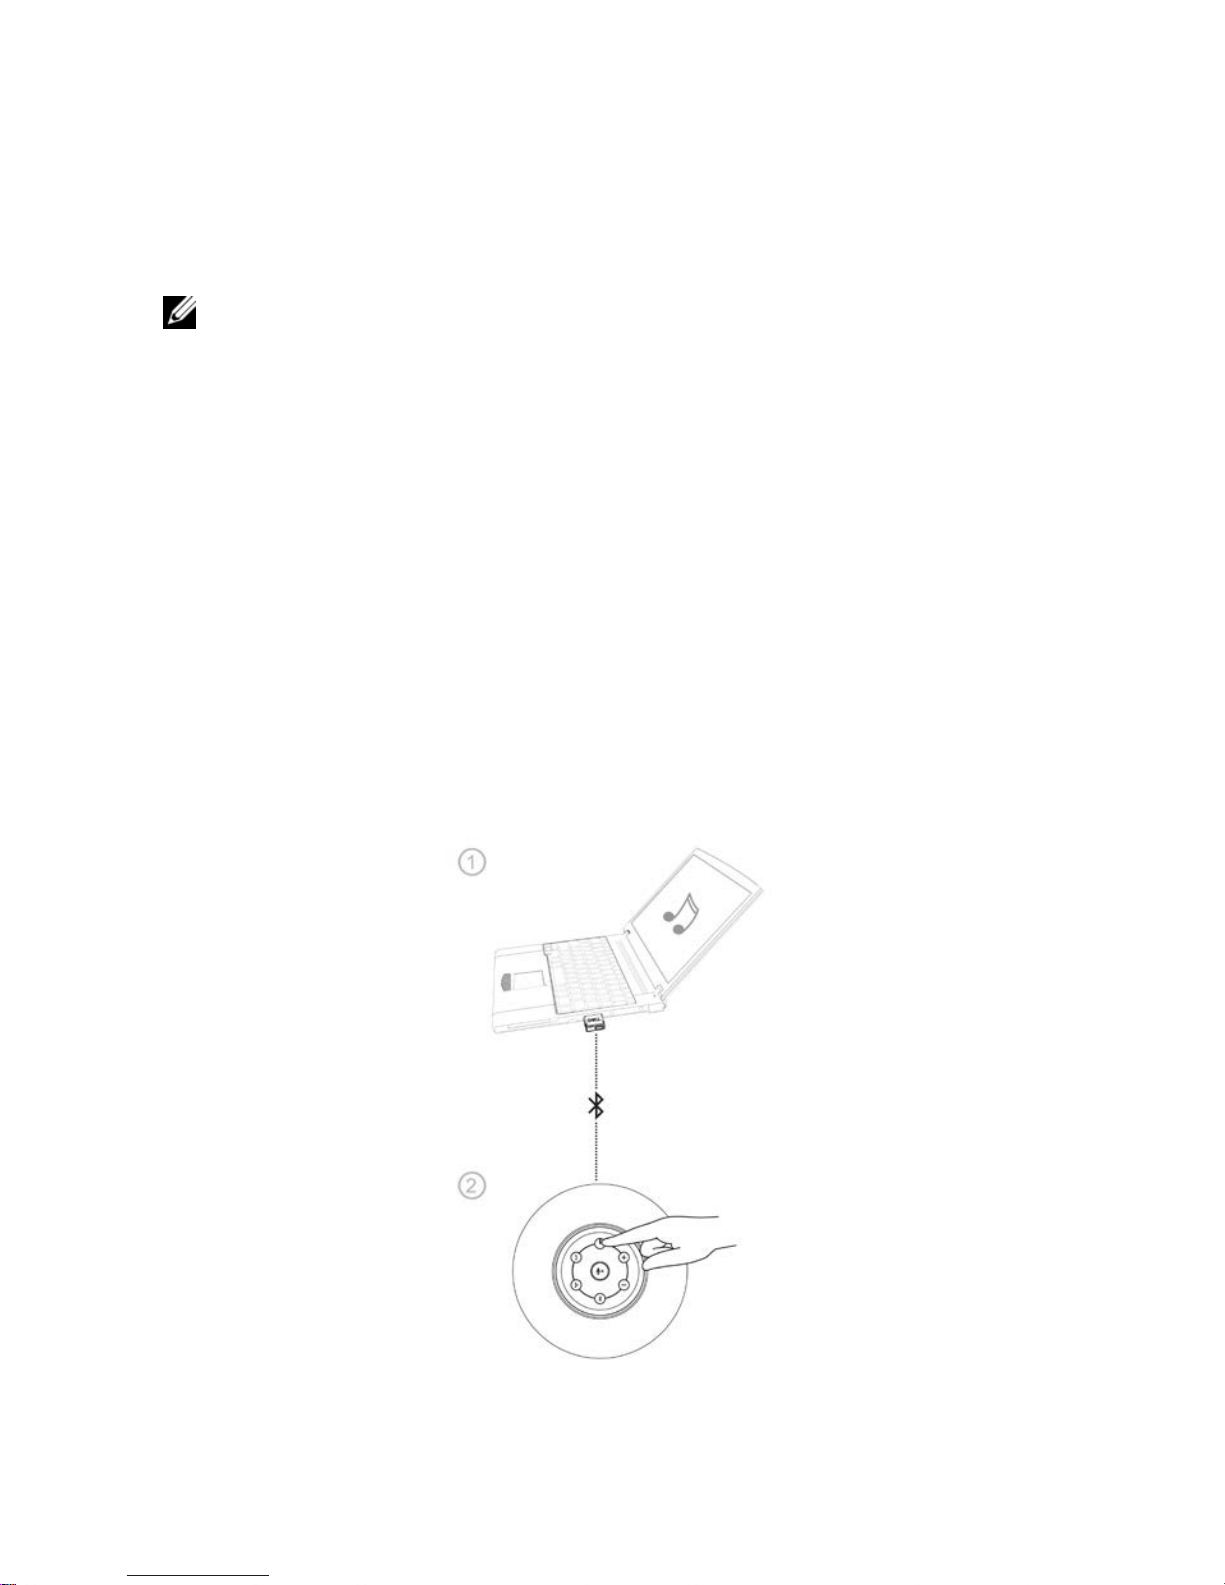
Bluetooth USB dongle and
built-in Bluetooth connection
NOTE:
1 USB dongle connection. The device name listed in Audio device panel is Dell
Wireless Receiver AE715
.
2 Built-in Bluetooth connection. The device name listed in Audio device panel is
Dell Wireless 360 Speaker AE715
.
1 Insert the USB dongle to the USB port on your computer.
2 Turn the speaker on. The speaker light flashes during search mode.
3 The USB dongle will automatically search for the speaker. The USB dongle light
indicator flashes during search mode.
4 The speaker’s Bluetooth button light and USB dongle light indicator turns solid white
when connected.
5 A single press less than 3 seconds on the USB dongle button:
• Activates the USB dongle for pairing, when dongle is off.
• Immediately reconnects to the speaker in a searching or pairing mode.
• Won’t affect the currently connected speaker.
6 A longer press more than 3 seconds on the dongle button will turn off the dongle and
disconnect from the speaker.
9
Page 10
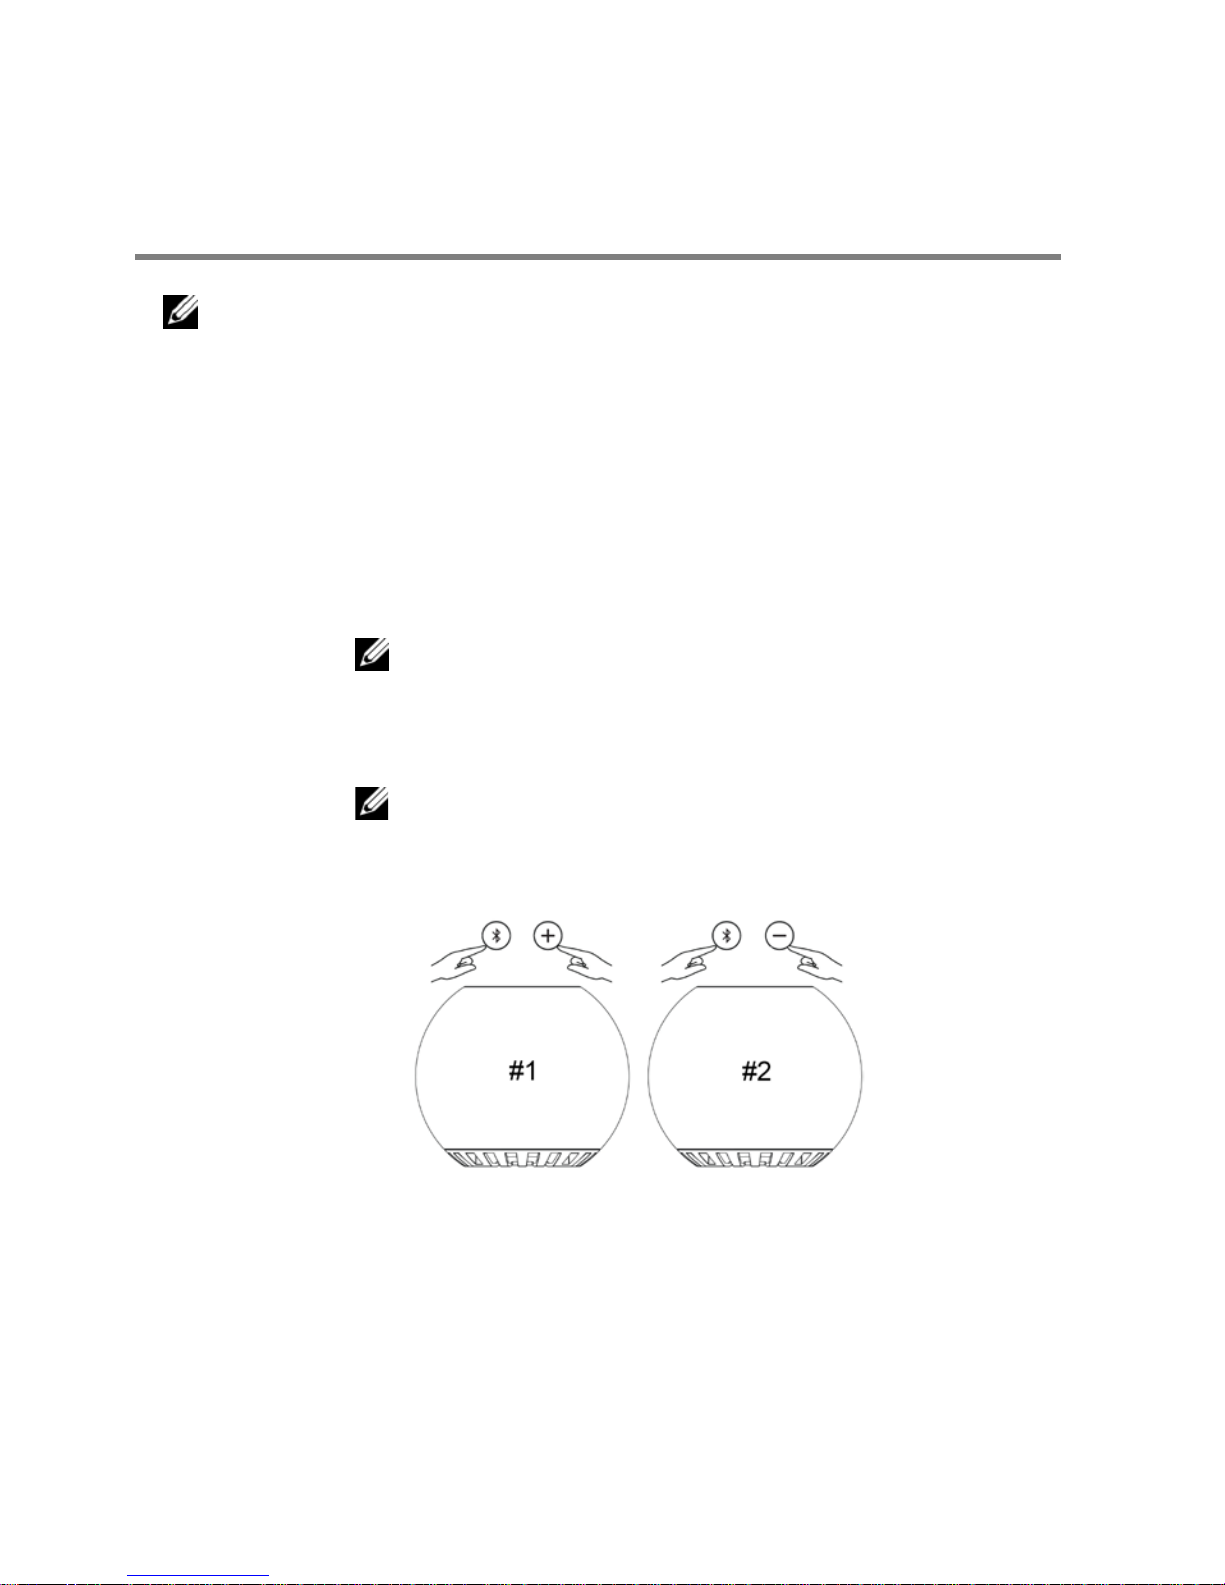
True Wireless Stereo (TWS)
Connection
NOTE: The speaker can be paired with another speaker using the TWS
connection. A TWS connection is possible only when two speakers are
connected to each other and the first speaker is connected to a Bluetooth
device.
1 Pair the first speaker to a Bluetooth device.
2 Press and hold the Bluetooth button and Volume + button to initiate TWS
pairing. The Bluetooth light will start slow blinking in Blue.
a. Press and hold the Bluetooth button and Volume + button to
connect speaker two to enter TWS Downmix mode. The
Bluetooth light will start slow blinking in blue.
NOTE: In Downmix mode, both lights of the right and the
left speaker turns solid blue.
b. Press and hold the Bluetooth button and Volume – button to
connect speaker two to enter TWS Stereo mode. The Bluetooth
light will start slow blinking in white.
NOTE:
1. The blue light indicates the left speaker.
2. The white light indicates the right speaker.
3 I
n TWS mode, press and hold the Bluetooth button and Volume – button to
toggle between Stereo and Downmix modes.
10
Page 11

4 In TWS mode, press and hold the Bluetooth button on either Left or Right
speaker to enable pairing to a new device and exit TWS mode.
5 To exit TWS mode:
a. Turn off either the left or right speaker, both speakers will turn
off.
b. Press and hold the Bluetooth button and Volume + button on
either left or right speaker. All previous pairing information is
cleared from the speaker.
11
Page 12
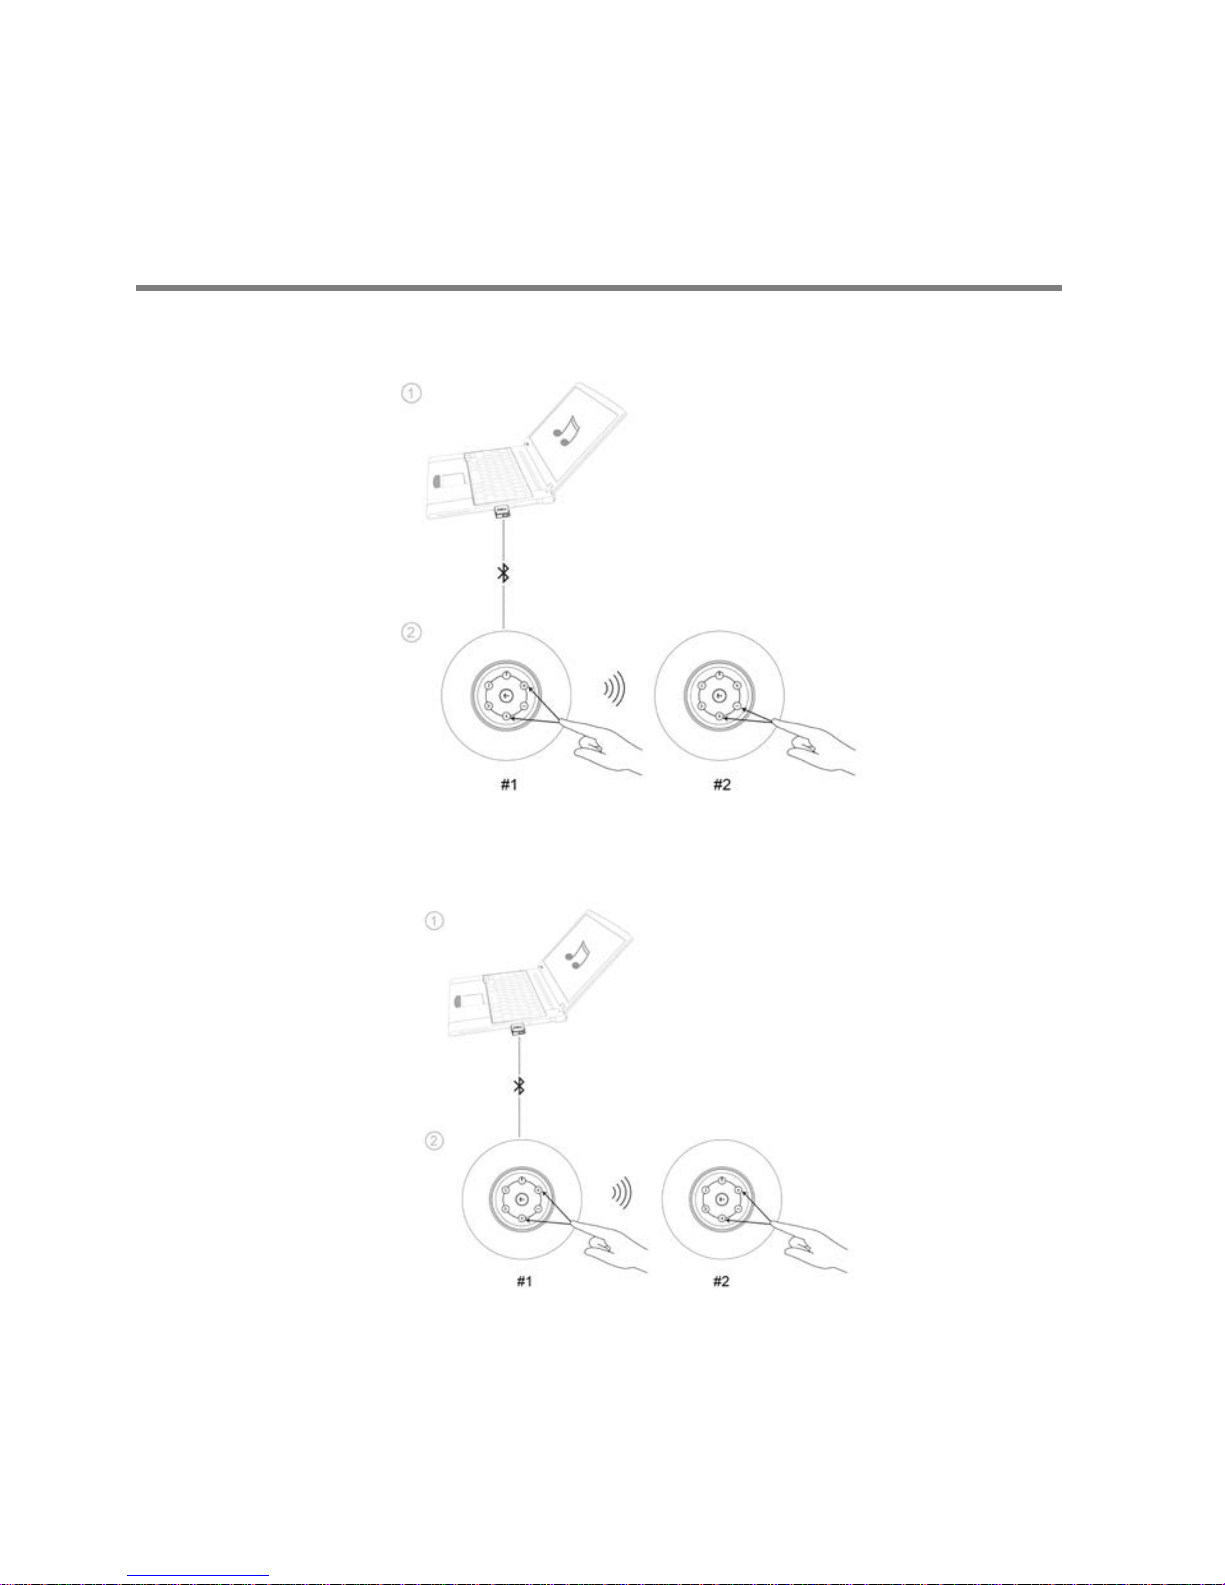
TWS connection
(Stereo and Downmix mode)
1. Stereo mode
2. Downmix mode
12
Page 13
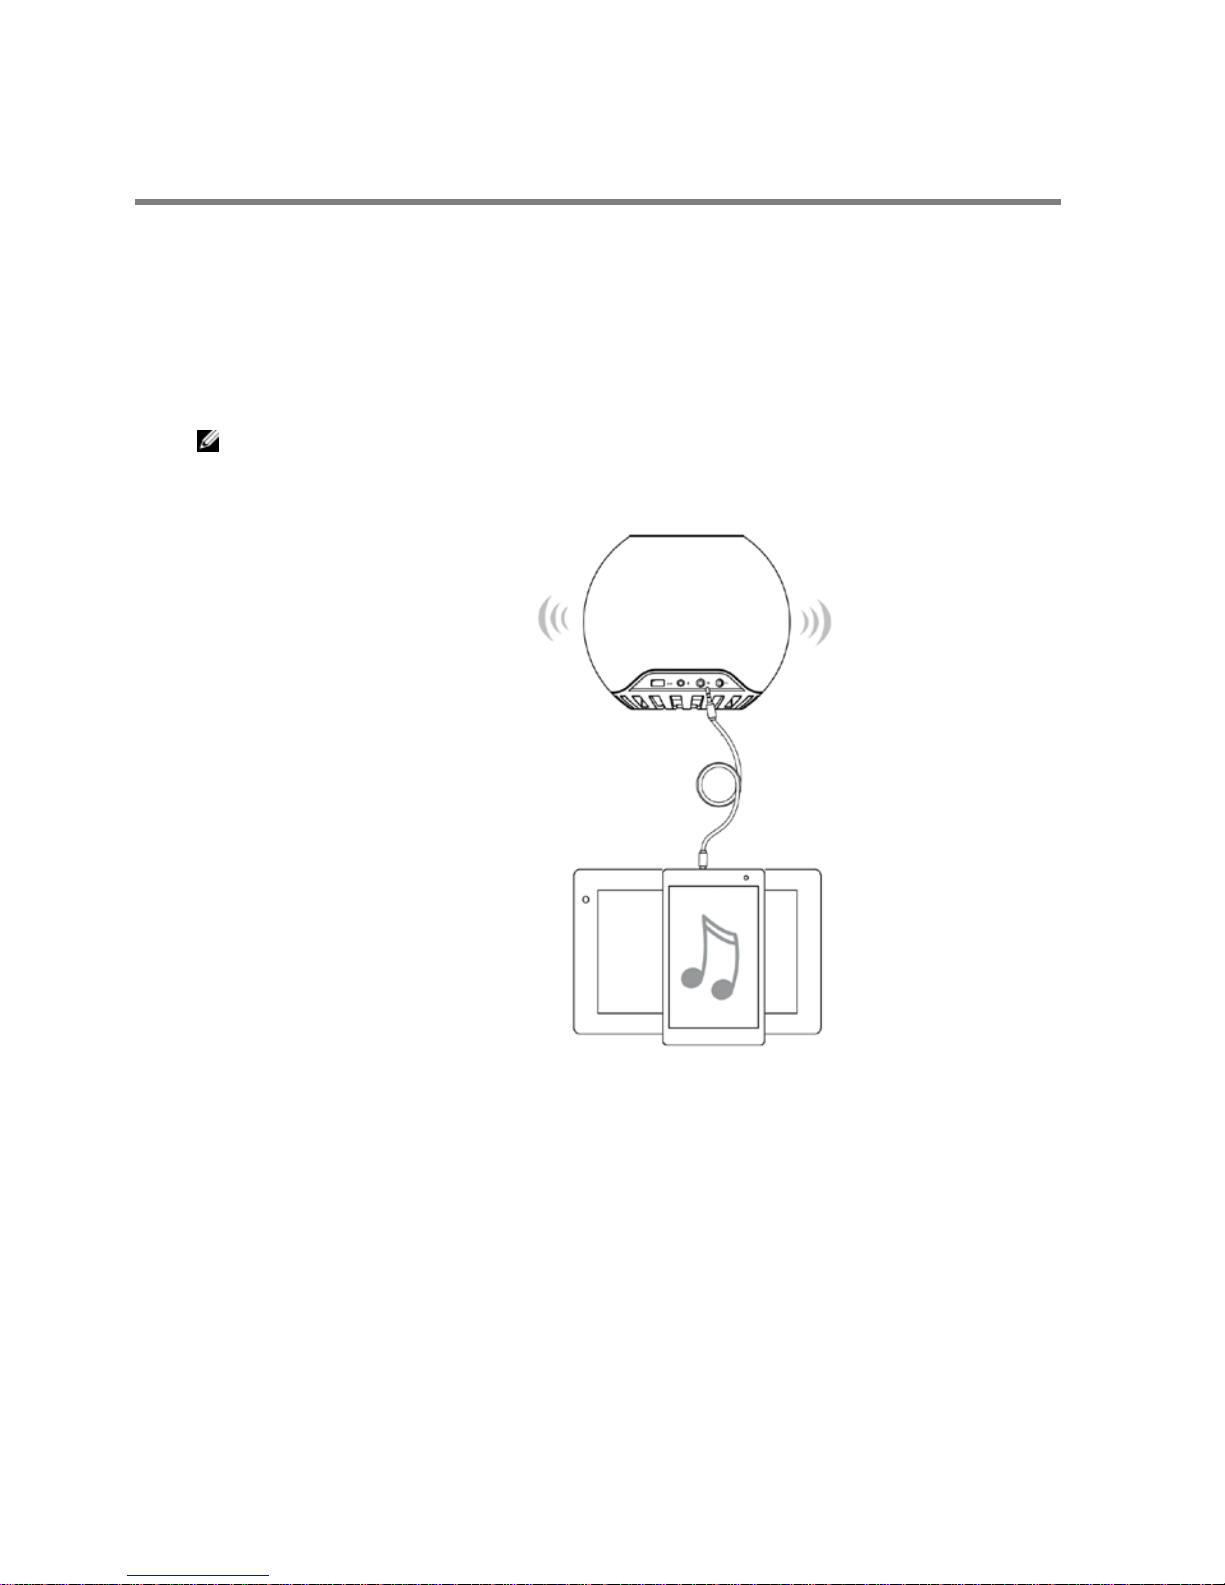
Aux-in port
You can play audio using the aux-in cable that came with your audio device and
with the speaker.
1 Connect the aux-in cable to the aux-in port of the speaker.
2 Connect the other end of the cable to the audio out port on your audio
device.
3 Play music and adjust the volume as desired.
NOTE: When aux-in cable is inserted into aux-in port, the Bluetooth
connection will be cut off.
13
Page 14
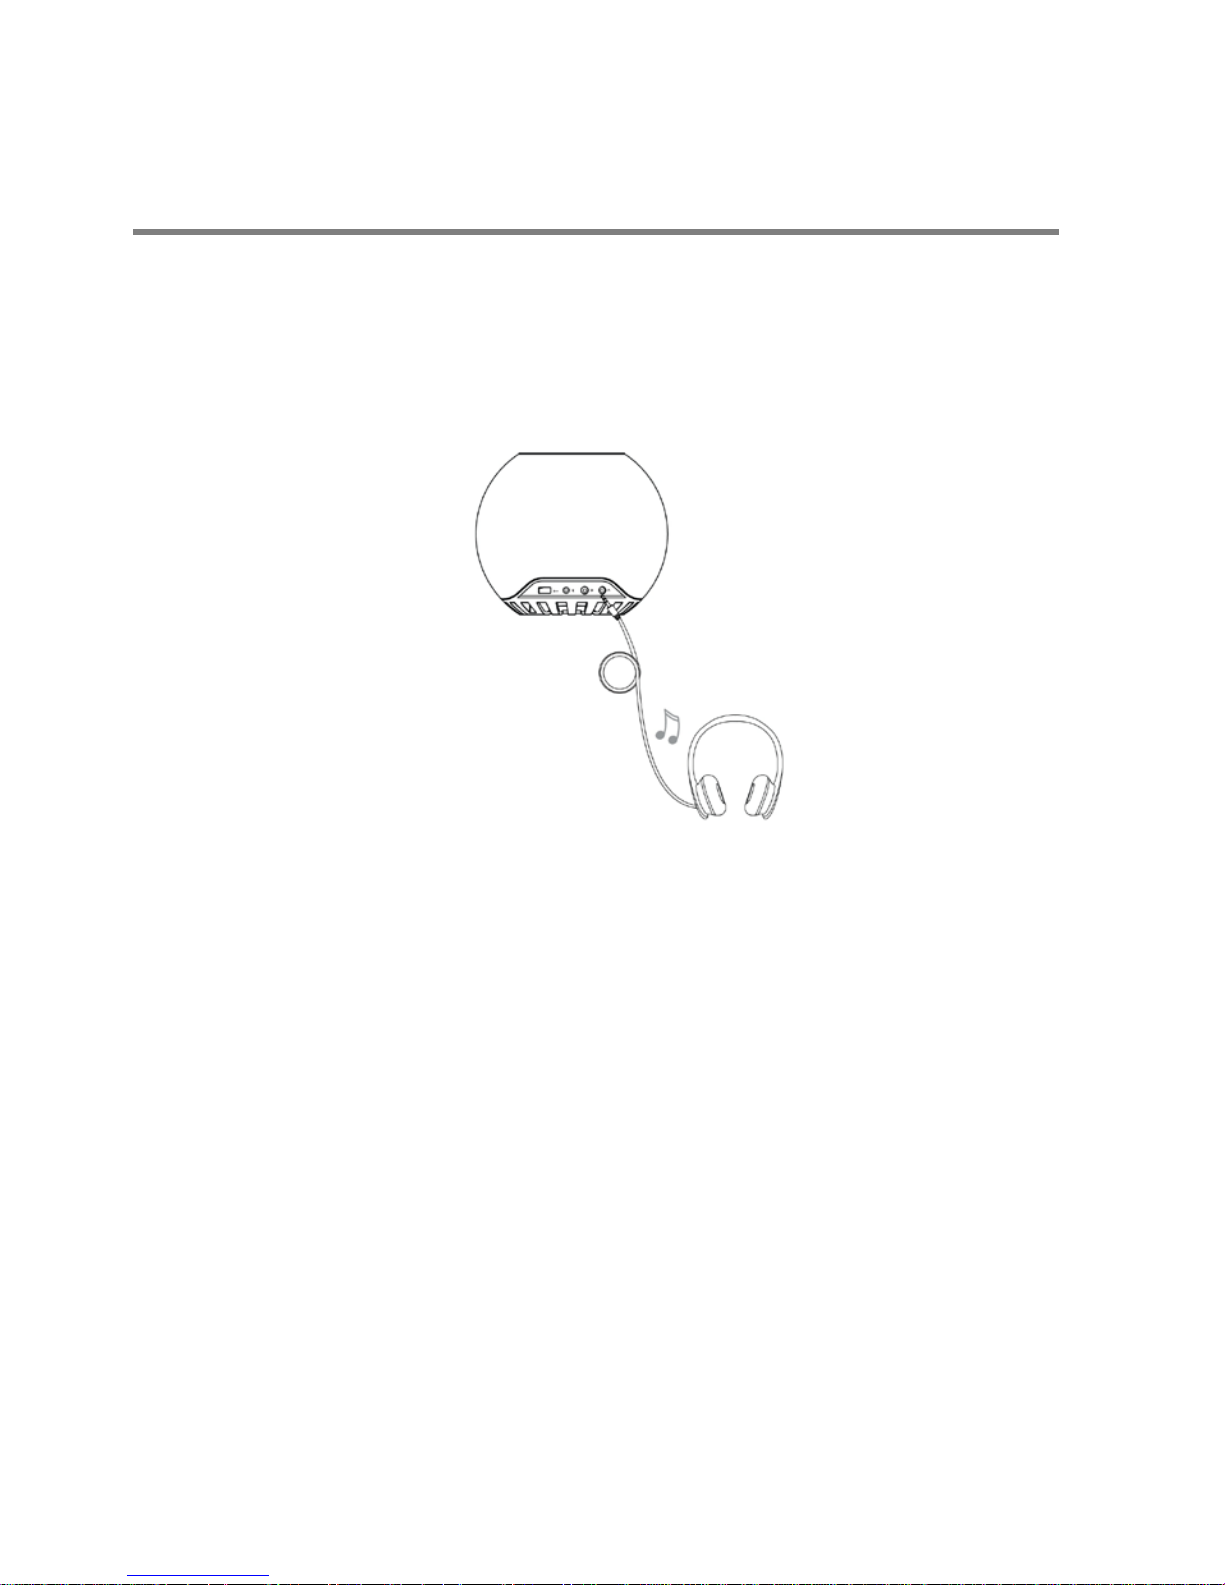
Headphone jack
1 Connect the headphone to the headphone jack on the speaker.
2 Play music and adjust the volume as desired.
14
Page 15
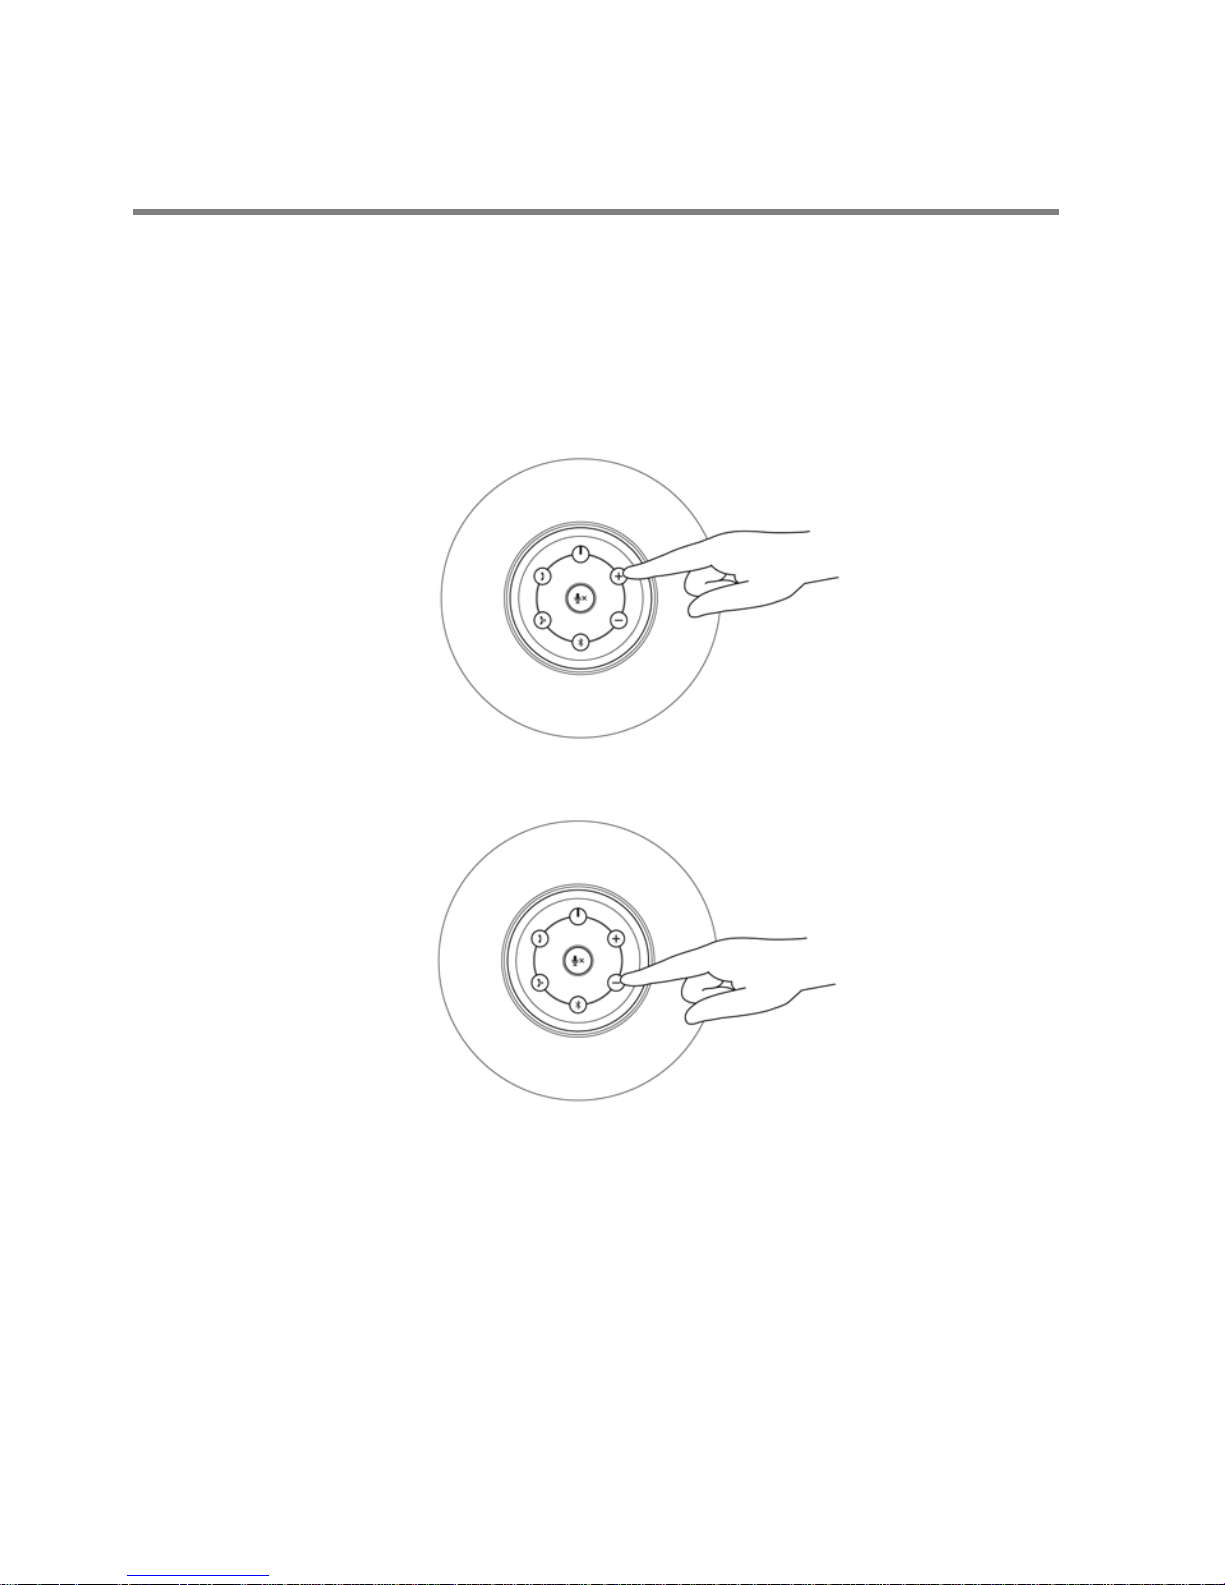
Adjusting the volume
1 Press the + button to adjust the volume up. A soft tone can be heard when
the speaker is at the maximum volume.
2 Press the – button to adjust the volume down. A soft tone can be heard when
the speaker is at the minimum volume.
15
Page 16
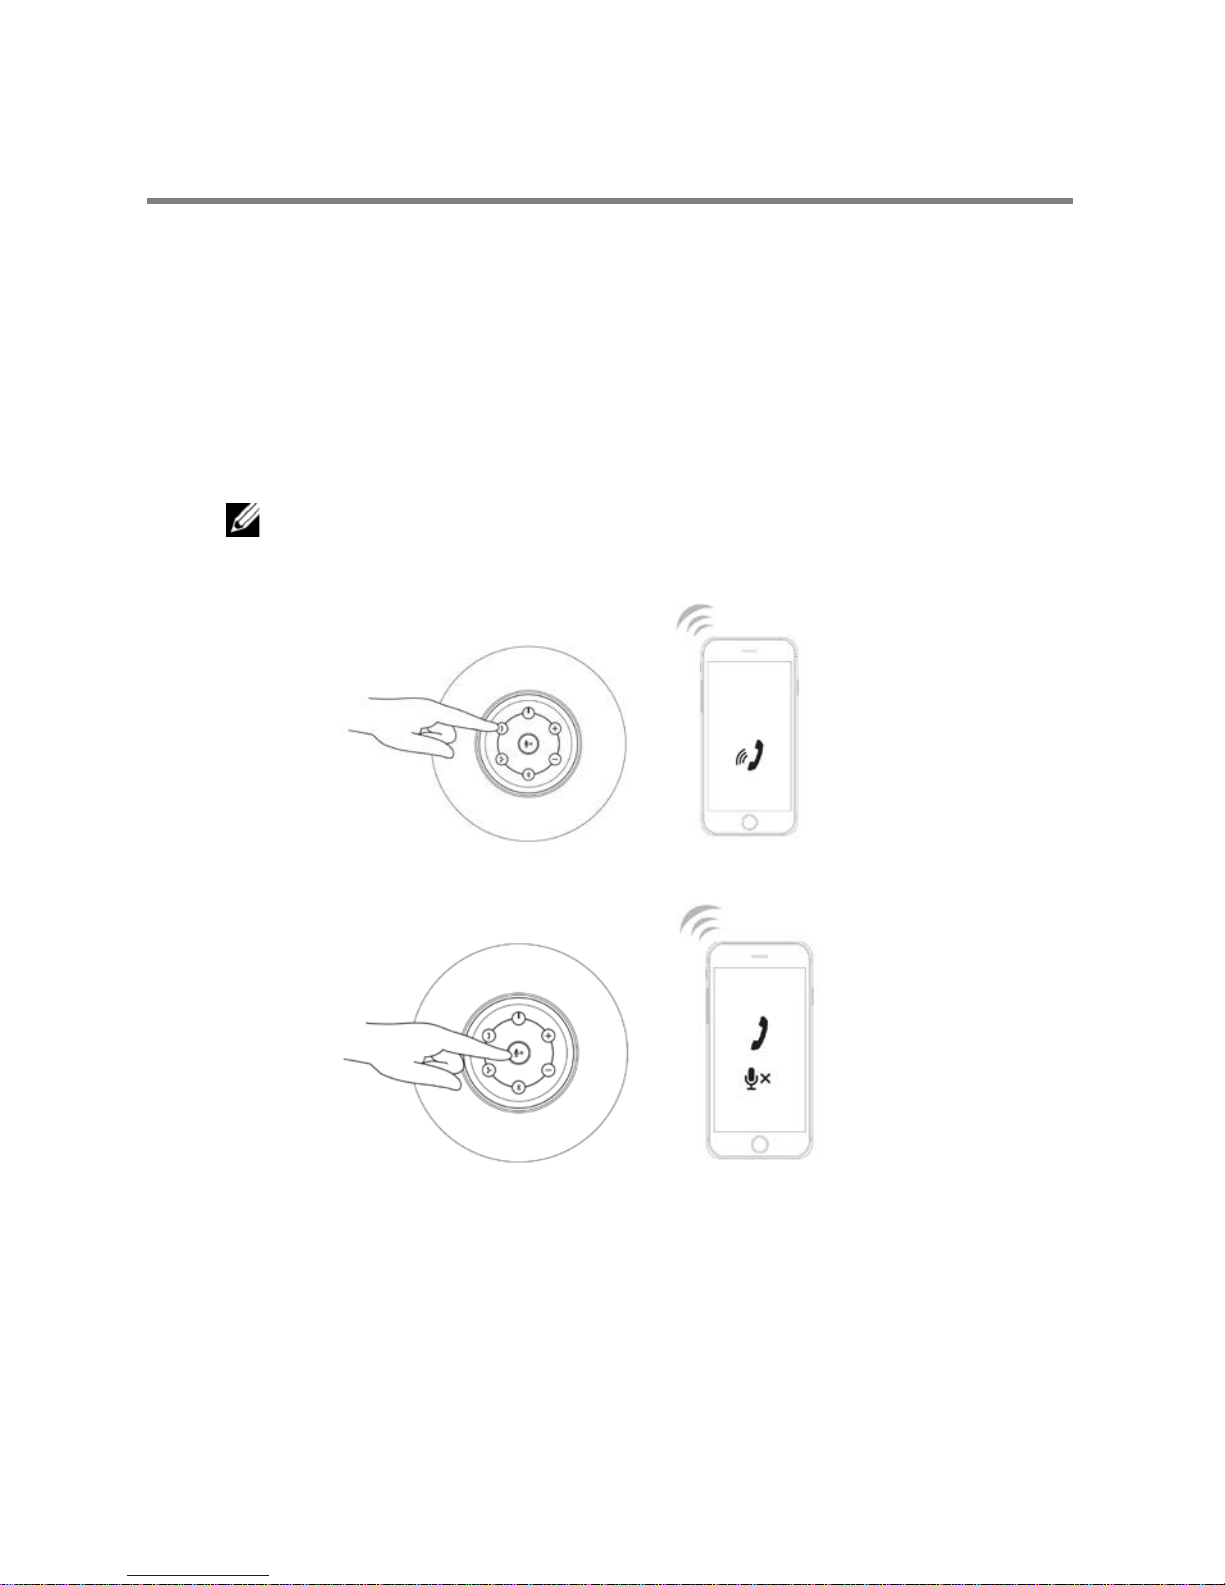
Answering a call
To answer an incoming call:
1. The call pick up button slow blinks when there is an incoming call.
Press the call pick up button to answer an incoming call.
2. When a call is ongoing, press the mute button to mute the mic. When the mic mute is
active during a call, press the mute button again to unmute the mic.
• The call pick up icon will stay solid white as long as the call is ongoing.
• The mute light icon will stay solid red as long as the mic on the speaker is
in the muted state.
• If an aux-in device is plugged in, the mic mute button is disabled.
NOTE: Some IP call applications might not notify the speaker when there is an
incoming call. You can s
till answer the call through the computer or mobile
device.
Call pick up button
Mic mute button
16
Page 17
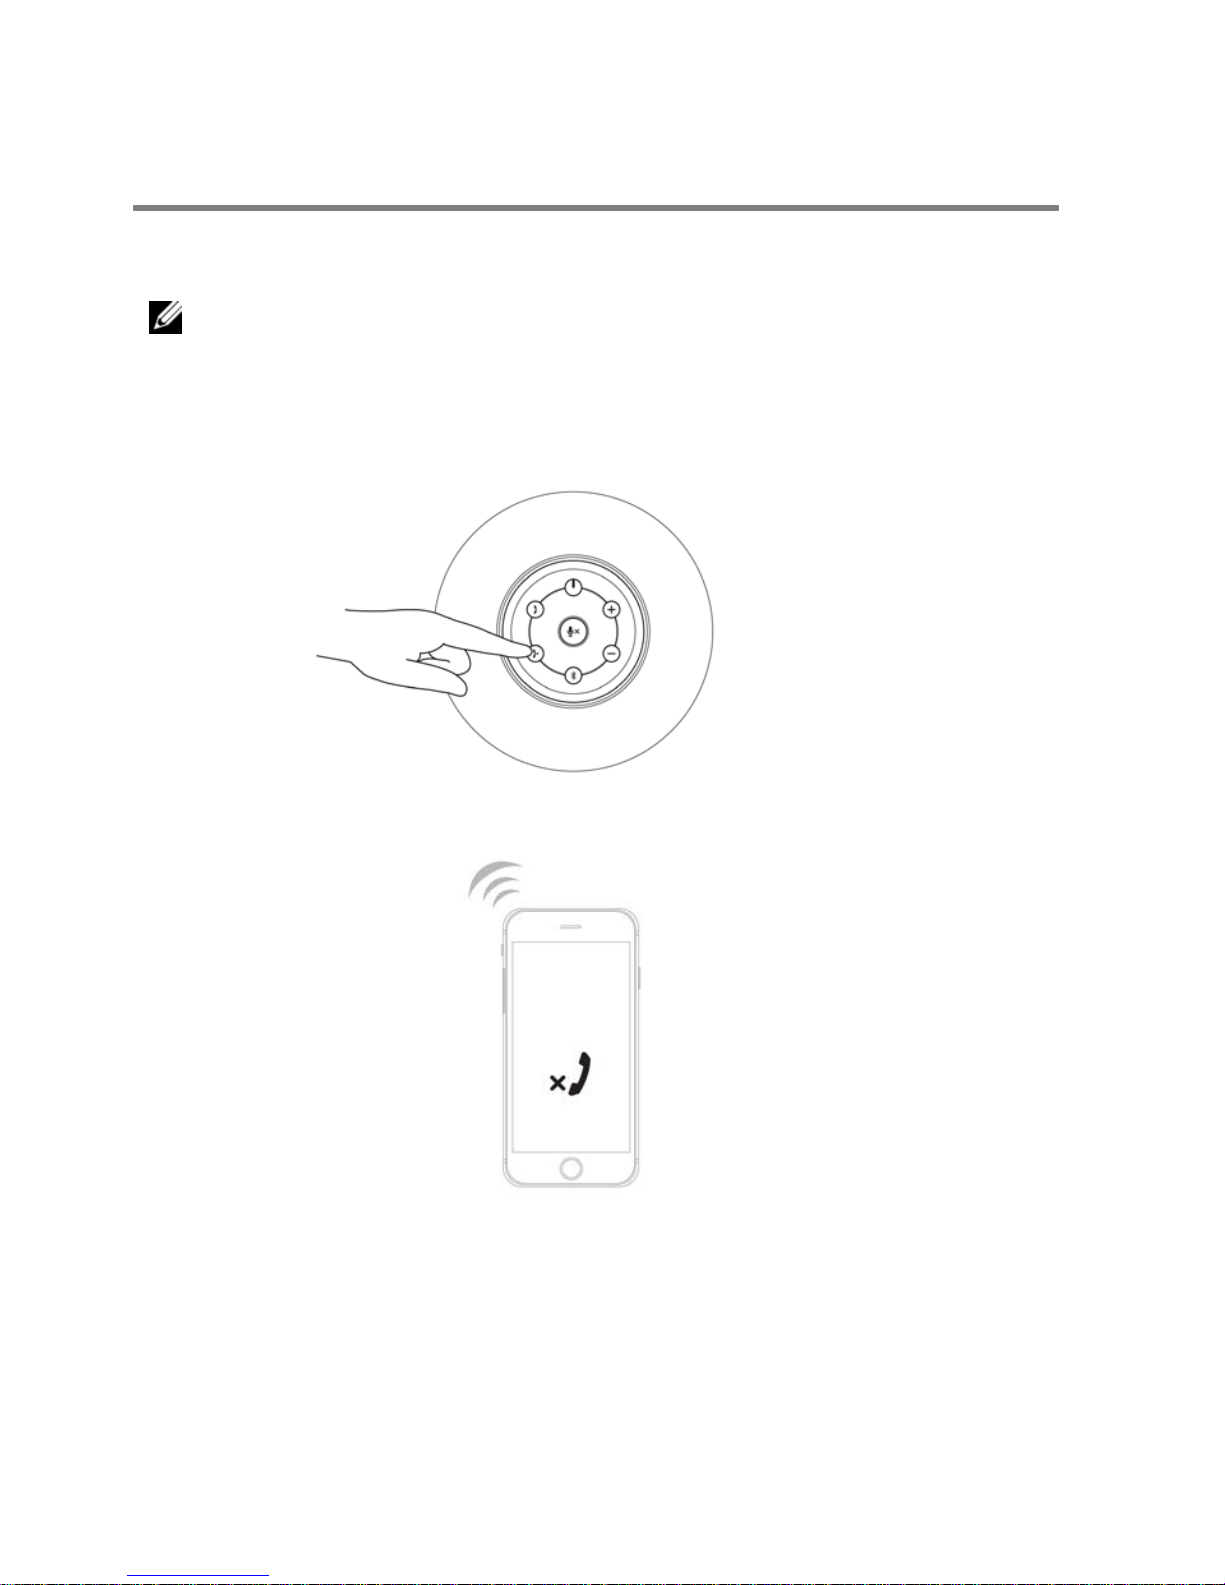
Ending a call
To end the call, press the call hang up button.
NOTE: IP call applications that doesn't notify the speaker when there is an
incoming call, will also not allow you to end the call through the hang up button.
You can still end the call through the computer or the mobile device.
17
Page 18

Troubleshooting
Problems
Possible causes
Possible solutions
No sound
No sound from the
external audio source
using aux
-in cable
• Check if the 3.5 mm aux-in cable
is inserted in the speaker aux-in
port.
•
Check if the audio source volume
is not 0%.
• Try a known good speaker or
audio source.
No sound from the
computer using aux
-in
cable
•
Check if the 3.5 mm aux-
in cable
is inserted in the speaker aux-in
port.
• Check if the Default Audio
output endpoint is connected to
analog out.
• Check if the audio so
urce volume
is not 0%.
• Try a known good speaker or
audio source.
No sound from the
computer using
a
Bluetooth USB dongle
connection
•
Check that correct default
Bluetooth device is set.
• Click on the hidden icon on the
task bar to show the speaker
icon. Right click on the speaker
icon to open the volume control
option.
• Select the Playback devices and
select the Default Playback
Device.
• In this set up select
Dell
Wireless Receiver AE715
in the
Playback devices list.
• Increase the volume level of the
speaker
and the computer sound
card.
18
Page 19

No sound from the
computer using built-in
Bluetooth connection
•
Check that correct default
Bluetooth device is set.
• Pair the speaker Dell Wireless
360 Speaker AE715.
• After pairing, select the headset
type
My hands-free device Dell
Wireless 360 Speaker AE715
.
• Select the Playback devices and
select the Default Playback
Device to
Speakers Bluetooth
Hands-free Audio
.
• Increase the volume level of the
speaker.
No sound in TWS
connection
• In TWS connectivity (Stereo and
Downmix mode), only one
speaker must be connected to a
BT device.
• Disconnect one speaker, if both
are connected to a BT device.
Low volume
Volume is too low
• Turn the volume to a higher level
by pressing the + button on the
speaker.
• Set all Windows volume controls
to maximum.
•
Increase the volume of the audio
application.
• Test the speaker using another
audio source (for example,
a portable CD player or an MP3
player).
Abnormal sound
Buzzing noise could be
heard from the
speaker
• Make sure that the speaker is on
a flat surface and no loose
objects are hanging or touching
the speaker.
• Reduce the volume to a lower
level by pressing the - button
and observe if the buzzing noise
level follows the volume level
19
Page 20

•
Try changing the music playing
and observe if the same buzzing
noise can be heard
Distortion could be
heard
•
Clear any obstructions between
the speaker and the user.
• When using a 3.5 mm aux-in
cable, check if the aux-in plug is
completely inserted into the jack
of the speaker and of the audio
source.
• Decrease the volume of the
audio source.
• Turn the volume level to a lower
setting by pressing the - button.
• Clean and reseat the cables.
Headphone jack is
connected, but no sound
is heard
External audio source
is connected as music
source
•
Check if the music player or
external audio source is playing
music.
• Check if the audio source and
the speaker volume are not set
to 0%.
Headphone jack
connected
Audio distortion
•
Check if the headphone plug is
properly inserted into the
speaker headphone jack.
• Check if the music file is not
distorted when playing without
the headphone or connected to
a known good headphone.
20
Page 21

Specifications
General
Model number AE715
Electrical
Operating voltage
12 V
Operating current 3.0 A
Audio input
Analog Audio Aux-in (3.5mm jack)
Bluetooth connection
Output power
3 x 8.5W @ ≤10% THD – Power adapter
3 x 6.5W @ ≤10% THD – Battery power
Sound pressure level 93dB ±3dB
Battery life 8 hrs
Microphone sensitivity -40dB ±3dB
Physical characteristic
Diameter 190 mm (7.48 in)
Height 160 mm (6.299 in)
Weight 1168 g (2.575 lb.)
21
Page 22

Statutory information
Warranty
Limited warranty and return policies
Dell-branded products carry a 1-year limited hardware warranty. If purchased
together with a Dell system, it will follow the system warranty.
For U.S. customers:
This purchase and your use of this product are subject to Dell’s end user
agreement, which you can find at
Dell.com/terms. This document contains a
binding arbitration clause.
For European, Middle Eastern and African customers:
Dell-branded products that are sold and used are subject to applicable national
consumer legal rights, the terms of any retailer sale agreement that you have
entered into (which will apply between you and the retailer) and Dell’s end user
contract terms.
Dell may also provide an additional hardware warranty—full details of the Dell end
user contract and warranty terms can be found by going to
Dell.com, selecting
your country from the list at the bottom of the “home” page and then clicking the
“terms and conditions” link for the end user terms or the “support” link for the
warranty terms.
For non-U.S. customers:
Dell-branded products that are sold and used are subject to applicable national
consumer legal rights, the terms of any retailer sale agreement that you have
entered into (which will apply between you and the retailer) and Dell’s warranty
terms. Dell may also provide an additional hardware warranty
—full details of Dell’s warranty terms can be found by going to
Dell.com, selecting
your country from the list at the bottom of the “home” page and then clicking the
“terms and conditions” link or the “support” link for the warranty terms.
22
 Loading...