

Dell 968w, 968, 968 All In One Photo Printer User Manual
Dell™ 968 All-In-One Printer User's Guide
To order ink or supplies from Dell:
1. Double-click the icon on your desktop.
2. Visit Dell's website, or order Dell printer supplies by phone.
www.dell.com/supplies
For the best service, make sure you have the Dell printer Service Tag available.
Finding Information Faxing
About Your Printer Understanding the Software
Understanding the Operator Panel Menus Networking
Loading Paper and Originals Maintenance
Printing Troubleshooting
Printing From a Memory Card or USB Key Specifications
Copying Appendix
Scanning Licensing Notice
Notes, Notices, and Cautions
Information in this document is subject to change without notice.
© 2007 Dell Inc. All rights reserved.
Reproduction in any manner whatsoever without the written permission of Dell Inc. is strictly forbidden.
Trademarks used in this text:
Dell
, the
DELL
logo, and
Dell Ink Management System
are trademarks of
Dell Inc.;
Microsoft
and
Windows
are registered trademarks of Microsoft Corporation in the United States
and/or other countries.
Windows Server
and
Windows NT
are registered trademarks of Microsoft
Corporation.
Windows Vista
is either a trademark or a registered trademark of Microsoft Corporation in
the United States and/or other countries.
Bluetooth
is a registered trademark owned by Bluetooth SIG,
Inc. and is used by Dell Inc. under license.
EMC
is a registered trademark of EMC Corporation.
Corel
Snapfire
and
WordPerfect
are trademarks or registered trademarks of Corel Corporation and/or its
subsidiaries in Canada, the United States and/or other countries.
Other trademarks and trade names may be used in this document to refer to either the entities claiming
the marks and names or their products. Dell Inc. disclaims any proprietary interest in trademarks and
trade names other than its own.
UNITED STATES GOVERNMENT RESTRICTED RIGHTS
NOTE: A NOTE indicates important information that helps you make better use of your printer.
NOTICE: A NOTICE indicates either potential damage to hardware or loss of data and tells you how
to avoid the problem.
CAUTION: A CAUTION indicates a potential for property damage, personal injury, or death.

This software and documentation are provided with RESTRICTED RIGHTS. Use, duplication or disclosure
by the Government is subject to restrictions as set forth in subparagraph (c)(1)(ii) of the Rights in
Technical Data and Computer Software clause at DFARS 252.227-7013 and in applicable FAR provisions:
Dell Inc., One Dell Way, Round Rock, Texas, 78682, USA.
Model 968
October 2007 SRV FY276 Rev. A00
Finding Information
What are you
looking for?
Find it here
Drivers for my
printer
My User's
Guide
Optional XPS
driver
Drivers and Utilities CD
If you purchased your Dell computer and printer at the same time, documentation
and drivers for your printer are already installed on your computer. You can use
the CD to uninstall/reinstall drivers or access your documentation. Readme files
may be included on your CD to provide last-minute updates about technical
changes to your printer or advanced technical reference material for experienced
users or technicians.
The XML Paper Specification (XPS) driver is an optional additional driver that allows
Windows Vista™ users to access the improved graphics and color features of XPS.
The driver is located in a zipped file on the CD. For more information, see Installing
the Optional XPS Driver.
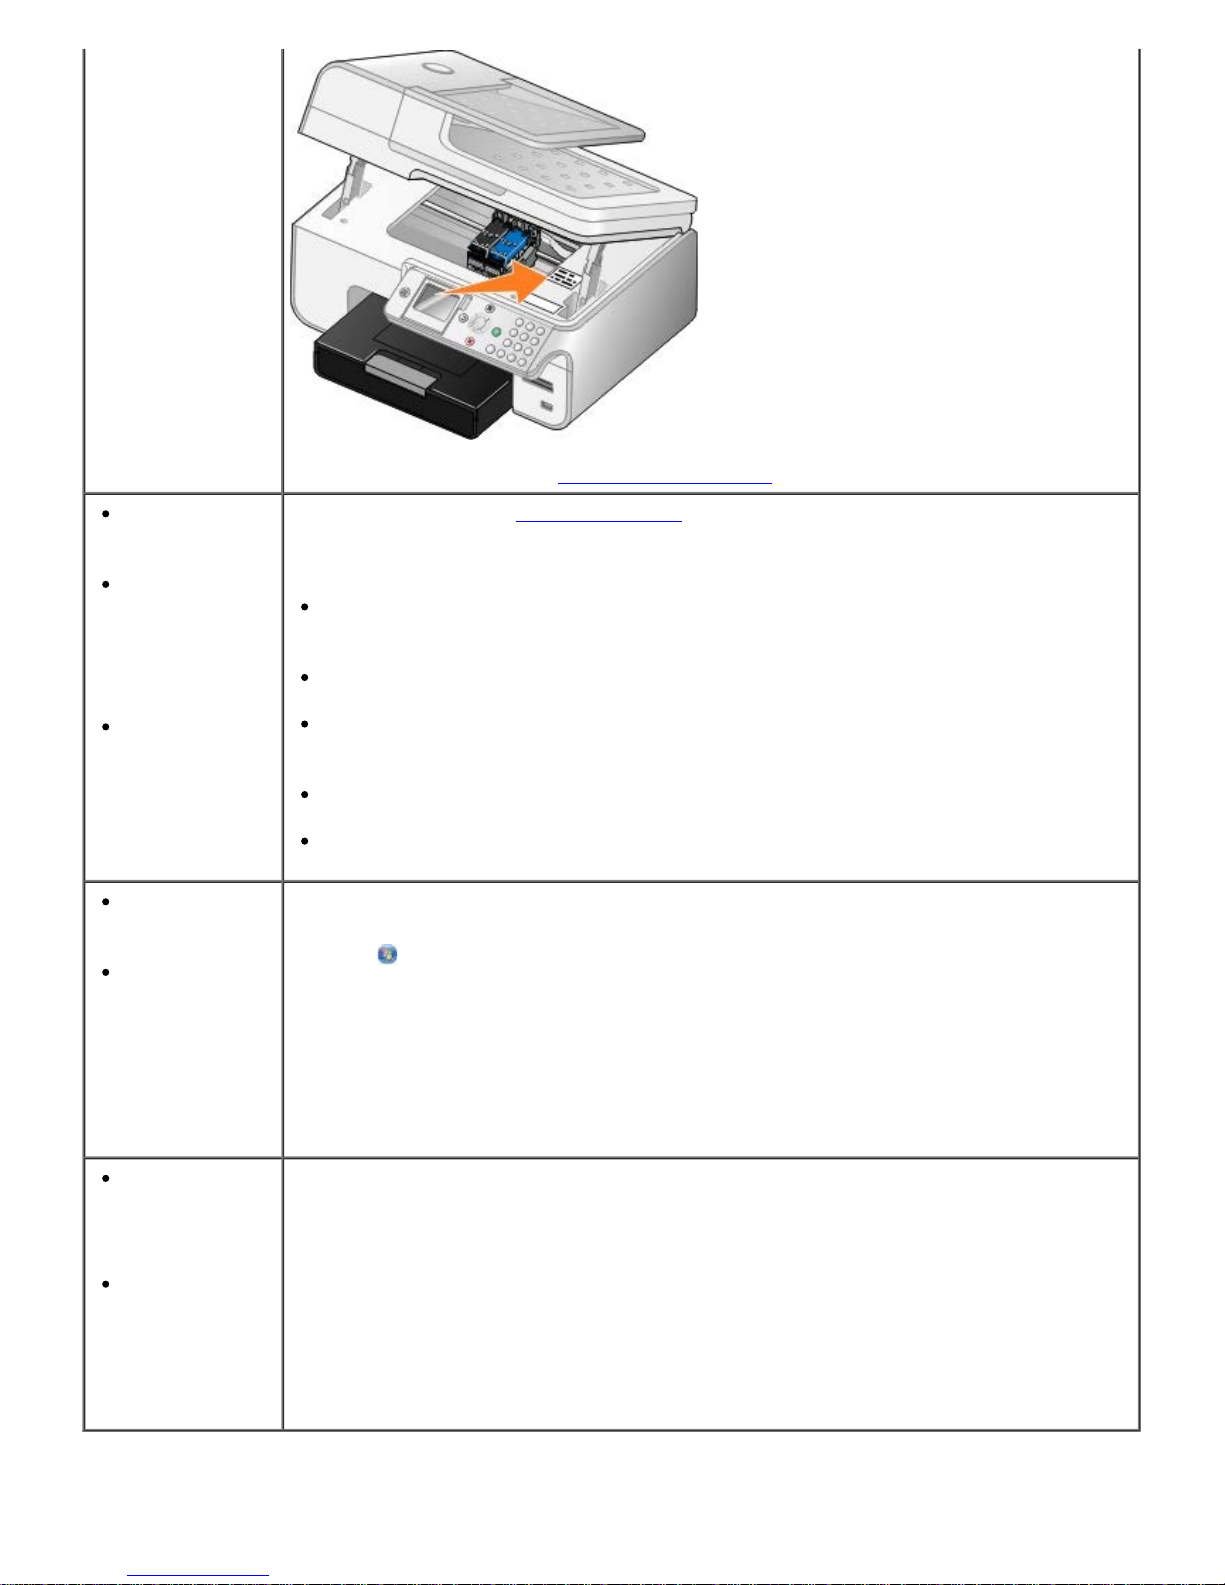
How to set up my
printer
Setting Up Your Printer poster
Safety
information
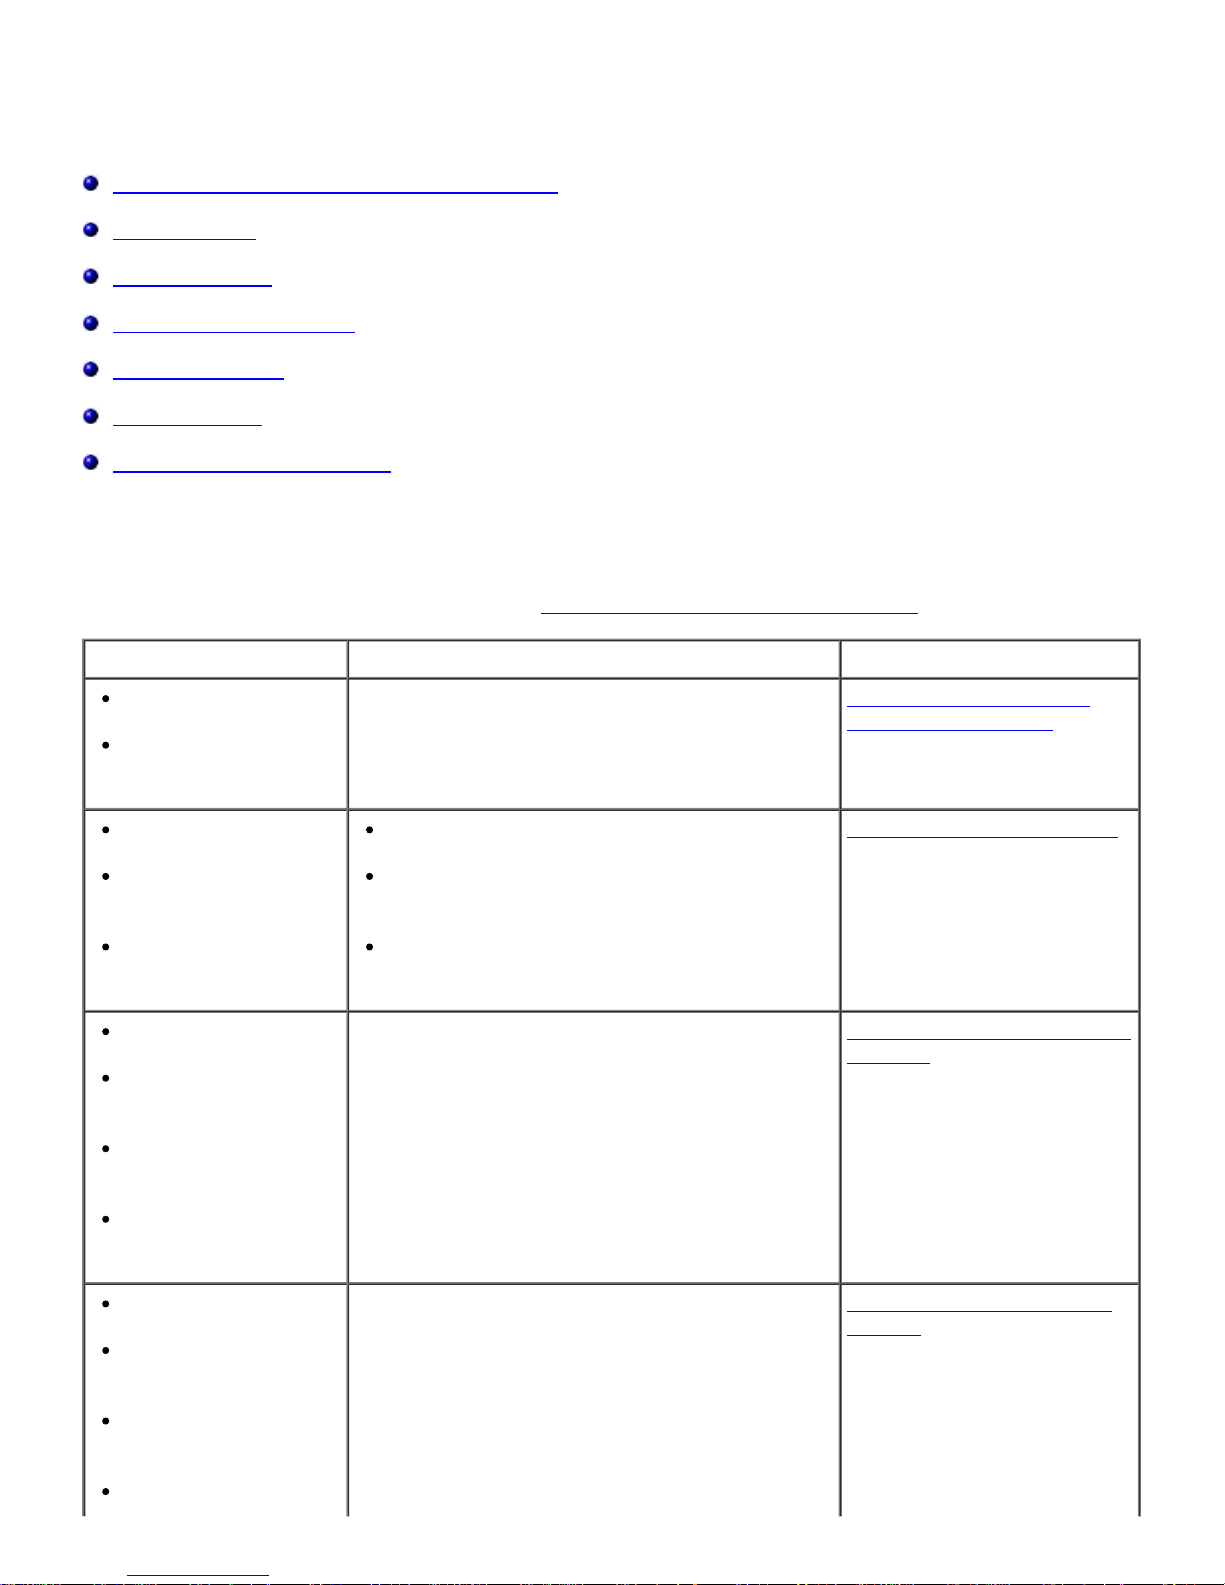
How to set up
and use my
printer
Warranty
information
Owner's Manual
Express Service
Code and Service
Tag number
Express Service Code and Service Tag number
For more information, see Express Service Code.
Latest drivers
for my printer
Answers to
technical
service and
support
questions
Documentation
for my printer
Dell Support Website: support.dell.com
The Dell Support website provides several online tools, including:
Solutions—Troubleshooting hints and tips, articles from technicians, and online
courses
Upgrades—Upgrade information for components, such as memory
Customer Care—Contact information, order status, warranty, and repair
information
Downloads—Drivers
Reference—Printer documentation and product specifications
How to use
Windows Vista
Documentation
for my printer
Windows Vista Help and Support Center
1. Click
® Help and Support.
2. Type a word or phrase that best describes your problem, and then click the
arrow icon.
3. Click the topic that describes your problem.
4. Follow the instructions shown on the screen.
How to use
Microsoft
®
Windows® XP
Documentation
for my printer
Windows XP Help and Support Center
1. Click Start® Help and Support.
2. Type a word or phrase that best describes your problem, and then click the
arrow icon.
3. Click the topic that describes your problem.
4. Follow the instructions shown on the screen.
Faxing
Setting Up the Printer With External Devices
Sending a Fax
Receiving a Fax
Changing the Fax Setup
Using Speed Dial
Blocking Faxes
Creating Fax Activity Report
You can use your printer to send and receive faxes without having to connect to a computer.
In addition, the Dell™ Fax Solutions Software is bundled in the
Drivers and Utilities
CD and should have
been installed when you installed your printer software. You can also use this faxing software to send
and receive faxes. For more information, see Using the Dell Fax Solutions Software
.
Equipment Benefits See this section
printer
phone cord
(provided)
Make copies and send and receive faxes
without the use of a computer.
Connecting Directly to a
Telephone Wall Jack
printer
telephone (sold
separately)
two phone cords
(one provided)
Use the fax line as a normal telephone line.
Set up your printer wherever your
telephone is.
Make copies and send and receive faxes
without the use of a computer.
Connecting to a Telephone
printer
telephone (sold
separately)
answering machine
(sold separately)
three phone cords
(one provided)
Receive both incoming voice messages and
faxes.
Connecting to an Answering
Machine
printer
telephone (sold
separately)
computer modem
(sold separately)
three phone cords
Increase the number of phone connection
outlets.
Connecting to a Computer
Modem
Setting Up the Printer With External Devices
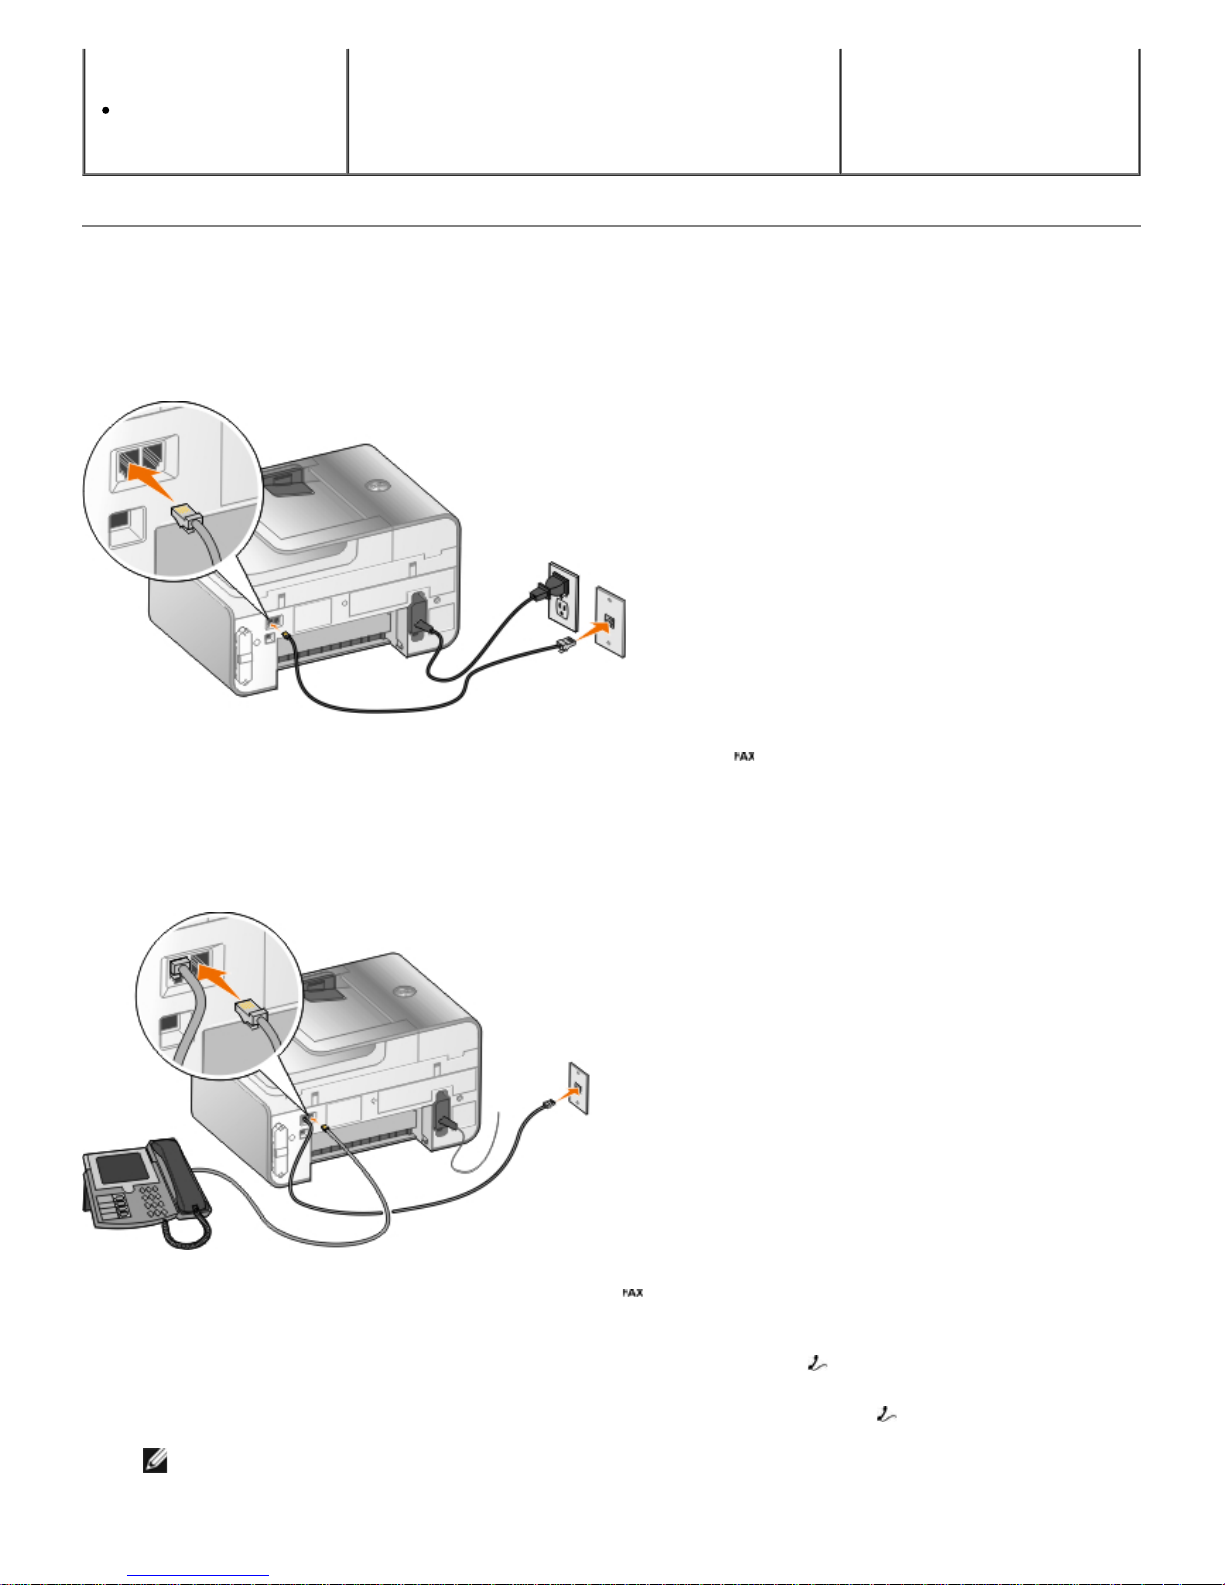
Connecting Directly to a Telephone Wall Jack
1. Connect one end of the phone cord to the FAX connector ( —left connector).
2. Connect the other end of the phone cord to an active telephone wall jack.
Connecting to a Telephone
1. Connect a phone cord from the FAX connector ( —left connector) on the printer to an active
telephone wall jack.
2. Remove the blue protective plug from the PHONE jack connector ( —right connector).
3. Connect a phone cord from the telephone to the PHONE jack connector ( —right connector).
NOTE: If phone communication is serial in your country (such as Germany, Sweden, Denmark,
Austria, Belgium, Italy, France, and Switzerland), remove the blue plug from the PHONE jack
(one provided)
USB cable (sold
separately)
connector ( —right connector), and insert the supplied yellow terminator for your fax to work
correctly. You will not be able to use this port for additional devices in these countries.
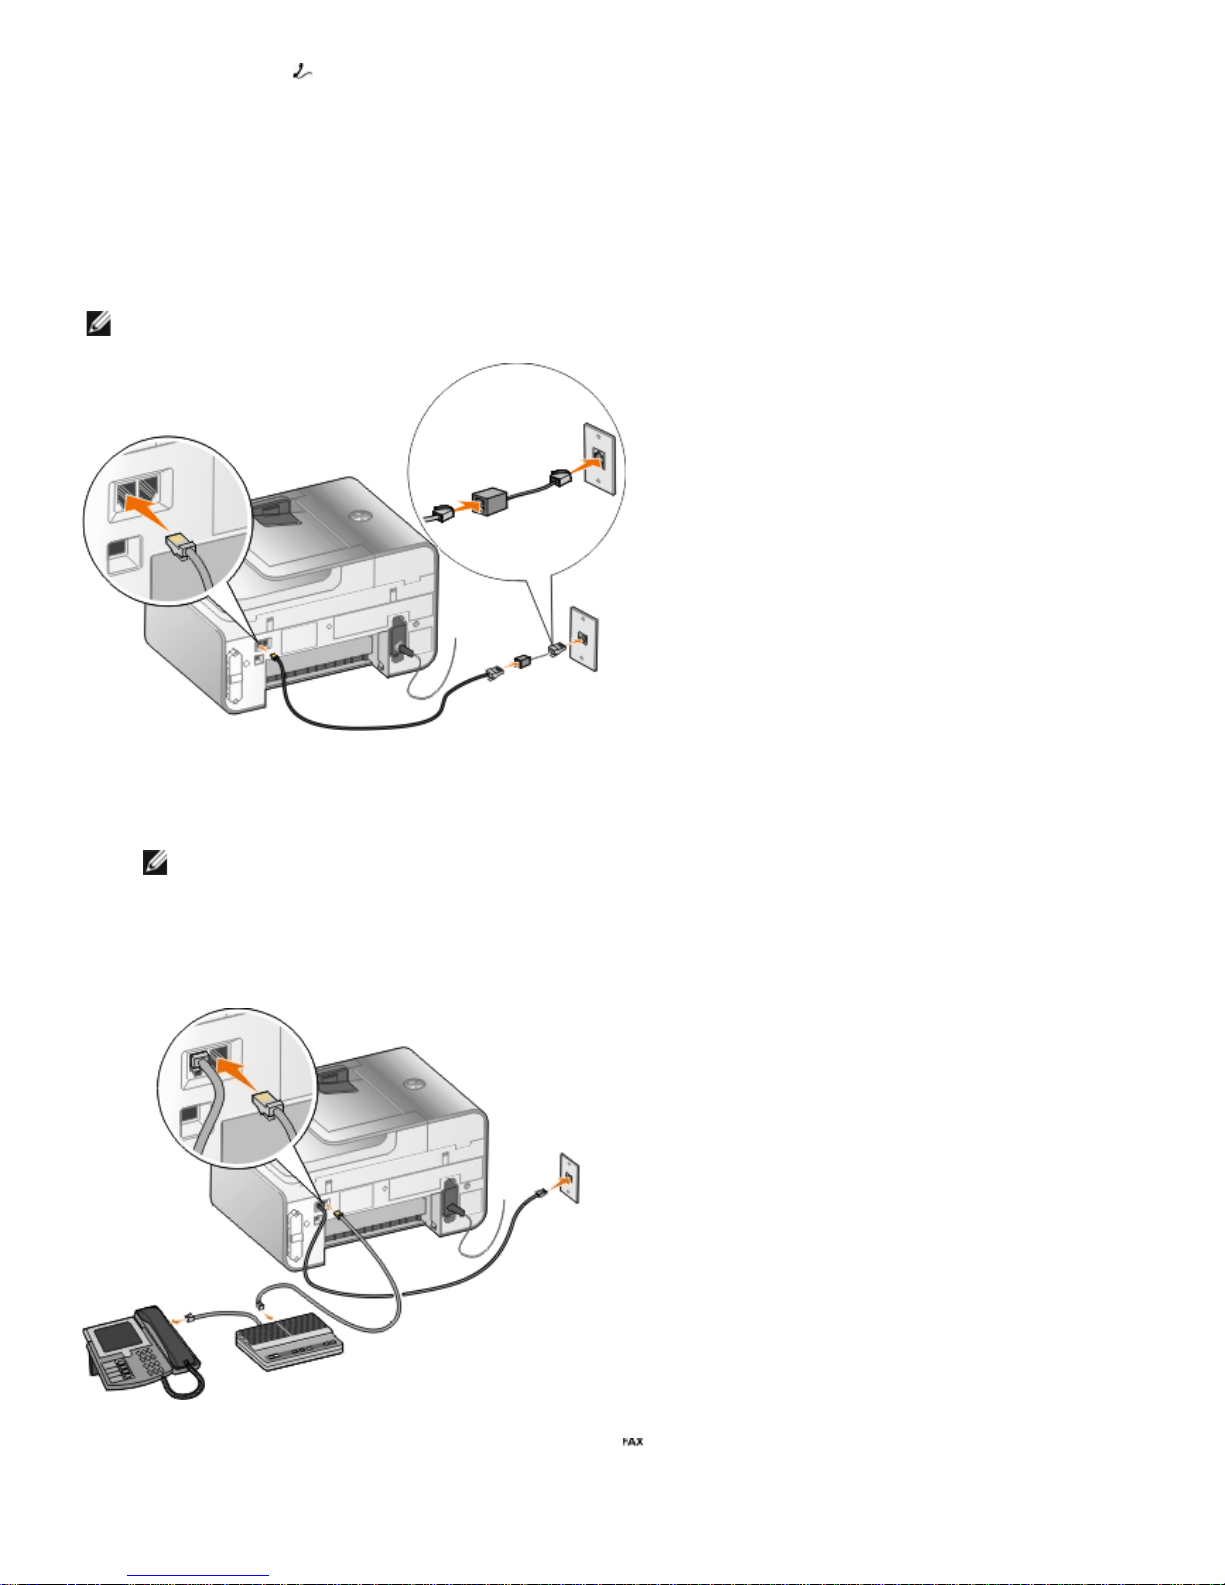
What if I have a Digital Subscriber Line (DSL) ?
DSL delivers digital data to a computer through a telephone line. Your printer is designed to work with
analog data. If you are faxing over a telephone line connected to a DSL modem, install a DSL filter to
avoid interference with the analog fax modem signal.
1. Connect the DSL filter to an active telephone line.
2. Connect the printer directly to the output on the DSL filter.
NOTE: Do not install any splitters between the DSL filter and the printer. Contact your DSL
service provider if you need more help.
Connecting to an Answering Machine
1. Connect a phone cord from the FAX connector ( —left connector) on the printer to an active
telephone wall jack.
2. Remove the blue protective plug from the PHONE jack connector ( —right connector).
NOTE: Integrated Services Digital Network (ISDN) and cable modems are not fax modems and are
not supported for faxing.

3. Connect a phone cord from the answering machine to a telephone.
4. Connect a phone cord from the answering machine to the PHONE jack connector (
—right
connector).
NOTE: If phone communication is serial in your country (such as Germany, Sweden, Denmark,
Austria, Belgium, Italy, France, and Switzerland), you must remove the blue plug from the
PHONE jack connector (
—right connector), and insert the supplied yellow terminator for your
fax to work correctly. You will not be able to use this port for additional devices in these
countries.
Connecting to a Computer Modem
1. Connect a phone cord from the FAX connector ( —left connector) on the printer to an active
telephone wall jack.
2. Remove the blue protective plug from the PHONE jack connector ( —right connector).
3. Connect a phone cord from the computer modem to the PHONE jack connector ( —right
connector).
4. Connect a phone cord from the computer modem to a telephone.
NOTE: If phone communication is serial in your country (such as Germany, Sweden, Denmark,
Austria, Belgium, Italy, France, and Switzerland), you must remove the blue plug from the
PHONE jack connector (
—right connector), and insert the supplied yellow terminator for your
fax to work correctly. You will not be able to use this port for additional devices in these
countries.
Sending a Fax
Sending a Quick Fax
Using the Operator Panel
1. Make sure your printer is properly set up to send and receive faxes. For more information, see

Setting Up the Printer With External Devices.
2. Load the original document. For more information, see Loading Original Documents.
3. Press the up or down Arrow button
to scroll to Fax.
4. Use the keypad to enter a fax number or a speed dial number.
5. Press the Start button
.
Using Your Computer
1. Turn on your computer and printer, and make sure they are connected.
2. Make sure your printer is properly set up to send and receive faxes. For more information, see
Setting Up the Printer With External Devices.
3. Load the original document. For more information, see Loading Original Documents
.
4.
In Windows Vista™:
a. Click ® Programs.
b. Click Dell Printers.
c. Click Dell 968 AIO Printer.
In Microsoft® Windows® XP or Windows 2000:
Click Start® Programs or All Programs® Dell Printers® Dell 968 AIO Printer.
5. Select Dell Fax Solutions.
The Dell Fax Solutions Software dialog box opens.
6. Click Send a new fax.
7. Follow the instructions on your computer screen to send a fax.
Entering a Fax Number
Using the Operator Panel
1. From the main menu, press the up or down Arrow button to scroll to Fax.
2. Enter a fax number.
Task Method
Sending to a fax number Use the keypad to enter a number. You can enter a maximum of 64
digits in a fax number.
Sending a fax to an entry
in the Phone Book
Enter the number that corresponds to the speed dial number of
the contact.
Use the Phone Book menu.
a. Press the up or down Arrow button to scroll to Fax,
Using Your Computer
1. Turn on your computer and printer, and make sure they are connected.
2. Make sure your printer is properly set up to send and receive faxes. For more information, see
Setting Up the Printer With External Devices.
3. Load the original document. For more information, see Loading Original Documents
.
4.
In Windows Vista:
a. Click ® Programs.
b. Click Dell Printers.
and then press the Select button .
b. From Phone Book, press the Select button .
c. Press the up or down Arrow button to scroll to Name
Search, Phone Number Search, or Group Search, and
then press the Select button
.
d. Press the up or down Arrow button to scroll to the
name or number you want to send the fax to.
Sending a fax to an
extension number
Press the asterisk (*) and pound (#) signs, and then use the keypad
to enter the extension number.
Sending a fax to an
outside line
Set a dial prefix:
a. From the main menu, press the up or down Arrow button
to scroll to Fax, and then press the Select button .
b. Press the down Arrow button to scroll to Fax Setup, and then
press the Select button
.
c. Press the down Arrow button to scroll to Dialing and Sending,
and then press the Select button
.
d. Press the up or down Arrow button to scroll to Dial Prefix,
and then press the left or right Arrow button
to scroll to
Create.
e. Press the Select button .
NOTE: If you are changing the dial prefix, scroll to Modify.
f. Use the keypad to enter the dial prefix. You can enter a
maximum of eight digits for the prefix.
g. Press the Select button
.
Dialing a fax extension
while listening to a
telephone line (On Hook)
Dial an additional 0 for a two-digit extension or an additional 0 0 for
a one-digit extension. For example, to dial extension 12, enter 120.
If the extension is 2, enter 200.

c. Click Dell 968 AIO Printer.
In Windows XP or Windows 2000:
Click Start® Programs or All Programs® Dell Printers® Dell 968 AIO Printer.
5. Select Dell Fax Solutions.
The Dell Fax Solutions Software dialog box opens.
6. Click Send a new fax.
The Send fax dialog box opens.
7. Enter the contact information for the recipient into the Name, Company, and Fax Number fields, or
click Select a recipient from phonebook to add existing contacts to the recipient list.
8. If you want to add the new contact to the phonebook, click Add this recipient to phonebook.
9. If you want to send the fax to more than one recipient, click Add another recipient.
a. Enter the contact information for the next recipient into the Name, Company, and Fax
Number fields, or click Select a recipient from phonebook to add existing contacts to the
recipient list.
b. If you want to add the new contact to the phonebook, click Add this recipient to
phonebook.
c. If you manually enter the contact information, click Add to add the contact to the Recipients
list.
d. To make changes to the Recipients information, select the recipient, and then click Edit.
e. To remove the contact from the Recipients list, select the recipient, and then click Remove.
f. Repeat step a
through step e until your Recipients list is complete.
10. Click Next.
11. Follow the instructions on your computer screen to send a fax.
Sending Advanced Faxes
Using the Operator Panel
If you are using your printer as a standalone fax machine, you can use the various Fax submenus to
customize your outgoing faxes. From the Fax Menu, you can:
Send a delayed fax
Send faxes using your Speed Dial list
Manage your phonebook to send faxes to individuals or groups
Personalize your fax cover page
Create and print a fax history

Create and print a fax report
For more information, see Fax Mode.
Using Your Computer
Use the Dell Fax Solutions Software to take advantage of advanced fax features. In addition to basic
faxing, the Dell Fax Solutions Software also allows you to:
Send a delayed fax
Send electronic files and paper documents in a single fax operation
Send faxes using your Speed Dial list
Manage your phonebook to easily send faxes to individuals or groups
Personalize and store various cover pages
Create and print a fax history
Create and print a fax report
For more information, see Using the Dell Fax Solutions Software
.
1.
In Windows Vista:
a. Click ® Programs.
b. Click Dell Printers.
c. Click Dell 968 AIO Printer.
In Windows XP and Windows 2000:
Click Start® Programs or All Programs® Dell Printers® Dell 968 AIO Printer.
2. Click Dell Fax Solutions.
The Dell Fax Solutions Software dialog box opens.
3. Click the appropriate links on the Dell Fax Solutions Software dialog box to accomplish your
task.
4. Follow the instructions on the computer screen.
Sending a Fax Through an Automated Answering System
Some companies have automated answering systems that require you to respond to a series of
questions to route you to the department you wish to call. After answering the questions by pressing the
appropriate buttons, you eventually get connected to the proper department. To send a fax to a
company that employs an automated answering system, set up your printer for On Hook dialing.
1. Make sure your printer is properly set up to send and receive faxes. For more information, see
Setting Up the Printer With External Devices
.
2. Load the original document facing down on the scanner glass. For more information, see Loading
Original Documents.
3. From the operator panel, press the up or down Arrow button to scroll to Fax, and then press

the Select button .
4. Press the up or down Arrow button to scroll to On Hook Dial, and then press the Select
button
.
5. Modify your cover page information if necessary, and then press the Back button .
6. Using the keypad, dial the telephone number of the company.
7. Using the keypad, navigate through the automated answering system.
8. When you hear the fax tone, press the Start button
to begin sending your fax.
To cancel the fax job, press the Cancel button
on your printer.
Receiving a Fax
Receiving a Fax Automatically
1. Make sure your printer is on and connected to an active telephone line.
2. Make sure Auto Answer is turned on or is currently within the scheduled on period.
a. From the main menu, press the up or down Arrow button
to scroll to Fax, and then
press the Select button
.
b. Press the up or down Arrow button to scroll to Auto Answer.
c. Press the left or right Arrow button
to scroll to On or Scheduled, and then press the
Select button
.
d. If you selected Scheduled, the Auto Answer Schedule screen appears. Use the keypad to
specify the time you want Auto Answer to be turned on and turned off.
e. Press the Back button .
3. Set the number of rings the printer should allow before answering the incoming fax.
a. From the main menu, press the up or down Arrow button
to scroll to Fax, and then
press the Select button
.
b. Press the down Arrow button to scroll to Fax Setup, and then press the Select button .
c. Press the up or down Arrow button to scroll to Ringing and Answering, and then press
the Select button
.
d. Press the up or down Arrow button to scroll to Pick-up On.
e. Press the left or right Arrow button
to select the number of rings you want to allow
before the printer receives the fax.
f. Press the Back button .
When the number of set rings is detected, the printer automatically receives the fax.
Receiving a Fax Manually
You can turn the Auto Answer feature off if you wish to control the faxes that you receive. This is useful
if you do not want to receive unsolicited faxes, if you rarely receive faxes, or if it is expensive to use
faxes in your area.
1. Make sure your printer is on and properly set up to receive faxes. For more information, see
Setting Up the Printer With External Devices
.
2. Turn Auto Answer off.
a. From the main menu, press the up or down Arrow button
to scroll to Fax, and then
press the Select button
.
b. Press the up or down Arrow button to scroll to Auto Answer.
c. Press the left or right Arrow button
to scroll to Off.
d. Press the Back button
.
3. When the telephone rings, pick up the telephone attached to the printer and listen for the fax
calling tone.
4. If you hear the fax calling tone, type DELL# (3355#) on the operator panel keypad or on the
telephone keypad.
Changing the Pickup Code
1. From the main menu, press the up or down Arrow button to scroll to Fax, and then press
the Select button
.
2. Press the down Arrow button to scroll to Fax Setup, and then press the Select button .
3. Press the up or down Arrow button to scroll to Ringing and Answering, and then press the
Select button
.
4. Press the up or down Arrow button to scroll to Manual Pickup Keycode, and then press the
Select button
.
5. Use the keypad to specify a new one- to seven-digit keycode.
NOTE: Valid characters for the pickup code are 0–9, pound (#), and star (*). Any other
characters entered are ignored.
6. Press the Select button
.
Printing a Long Fax
NOTE: DELL# is the default answer code. However, you can change this to any code. For
more information, see Changing the Pickup Code
.

Using the Operator Panel
1. From the main menu, press the up or down Arrow button to scroll to Fax, and then press the
Select button
.
2. Press the down Arrow button to scroll to Fax Setup, and then press the Select button .
3. Press the up or down Arrow button to scroll to Fax Printing, and then press the Select
button
.
4. From If Too Big, press the left or right Arrow button to choose an option.
5. Press the Back button
.
Using Your Computer
1. Turn on your computer and printer, and make sure they are connected.
2. Make sure your printer is properly set up to send and receive faxes. For more information, see
Setting Up the Printer With External Devices.
3.
In Windows Vista:
a. Click ® Programs.
b. Click Dell Printers.
c. Click Dell 968 AIO Printer.
In Windows XP or Windows 2000:
Click Start® Programs or All Programs® Dell Printers® Dell 968 AIO Printer.
4. Select Dell Fax Setup Utility.
The Dell Fax Setup Wizard Query dialog box opens.
5. Click No.
The Dell Fax Setup Utility dialog box opens.
6. Click the Fax Printing/Reports tab.
7. From the If fax is too big field, choose an option.
8. Click OK.
A confirmation dialog box opens.
9. Click OK to overwrite the fax settings on your printer.
10. Click Close.
Printing a Fax on Both Sides of the Page
Using the Operator Panel

1. From the main menu, press the up or down Arrow button to scroll to Fax, and then press
the Select button .
2. Press the down Arrow button to scroll to Fax Setup, and then press the Select button .
3. Press the up or down Arrow button to scroll to Fax Printing, and then press the Select
button
.
4. From the 2-Sided Print menu item, press the left or right Arrow button to scroll to 2 Sided
Print.
5. Press the Back button .
Using the Computer
1. Turn on your computer and printer, and make sure they are connected.
2. Make sure your printer is properly set up to send and receive faxes. For more information, see
Setting Up the Printer With External Devices.
3.
In Windows Vista:
a. Click ® Programs.
b. Click Dell Printers.
c. Click Dell 968 AIO Printer.
In Windows XP or Windows 2000:
Click Start® Programs or All Programs® Dell Printers® Dell 968 AIO Printer.
4. Select Dell Fax Setup Utility.
The Dell Fax Setup Wizard Query dialog box opens.
5. Click No.
The Dell Fax Setup Utility dialog box opens.
6. Click the Fax Printing/Reports tab.
7. From the 2-sided print field, choose Print duplex.
8. Click OK.
A confirmation dialog box opens.
9. Click OK to overwrite the fax settings on your printer.
10. Click Close.
Changing the Fax Setup
Using the Operator Panel
If you are using your printer as a standalone fax machine, you can change the fax settings from the Fax
Setup menu. Changes made on the Fax Setup menu are permanent and are applicable to all fax jobs.
For more information, see Fax Setup Menu
.
Using the Computer
You can access the Fax Setup Utility if you want to configure the printer's fax settings from your
computer.
1. For
Windows Vista
:
a. Click ® Programs.
b. Click Dell Printers.
c. Click Dell 968 AIO Printer.
For Windows XP and Windows 2000:
Click Start® Programs or All Programs® Dell Printers® Dell 968 AIO Printer.
2. Select Dell Fax Setup Utility.
The Dell Fax Setup Utility Wizard Query dialog box opens.
3. If you want to use the Fax Setup Utility Wizard to set up your printer for faxing, click Yes. The
Fax Setup Utility Wizard Welcome dialog box opens.
If you want to manually adjust your fax settings, click No. The Dell Fax Setup Utility dialog box
opens.
On this tab: You can:
Dialing and
Sending
Specify a dial method.
Enter a dial prefix.
Set the dial volume.
Enter your fax number and your name.
Specify the number of times you want the machine to redial and the time
between those attempts if the fax cannot be sent on the first try.
Choose whether to scan the entire document before or after dialing the number.
Specify a maximum send speed and a print quality for outgoing faxes.
Convert the fax automatically to be compatible with the receiving fax machine
regardless of the send settings.
Ringing and
Answering
Specify the number of rings before the machine receives the incoming fax.
NOTE: The number of rings set on the answering machine must always be less
than the number of rings set on the printer.
Specify a distinctive ring if your phone line has distinctive ring service activated.
Set the ring volume.

Using Speed Dial
To make sending faxes easier, you can assign a speed dial number to 89 individual contacts and 10
groups that can hold up to 30 phone numbers each using the printer operator panel.
To create a Speed Dial or Group Dial list using your computer, see Changing the Fax Setup.
Choose whether to use error correction.
Choose a Caller ID pattern (1 if telephones in your country have a detection
pattern using FSK or 2 if telephones in your country have a detection pattern
using DTMF). The Caller ID detection pattern is determined by the country or
region you selected during initial setup. If phones in your country use two
detection patterns, call your telecommunications company to know which pattern
it subscribes to.
Specify a manual answer code. The default code is DELL# (3355#).
Choose whether you want to answer incoming faxes automatically or at a
scheduled time.
Specify the time when incoming faxes are answered automatically.
Select whether you want to forward a fax, or print it and then forward it.
Specify a fax number to which faxes are forwarded.
Manage blocked faxes.
Fax
Printing/Reports
Choose to automatically resize oversize faxes so they print on one page, or keep
the oversized fax to scale and print on two pages.
Choose whether you want to print a footer (date, time, and page number) on
each page.
If an optional second paper tray is installed, choose from which tray the printer
picks paper. Choose Auto if you want the printer to pick the paper that matches
the size of the incoming fax.
If an optional duplex is installed, choose if you want to print on both sides of the
page.
Specify when to print a fax activity report.
Specify when you want to print a fax confirmation.
Speed Dial Add to, create, or edit the speed dial or group dial speed dial lists.
Cover Page Specify if you want to send a cover page for outgoing faxes.
Edit or update the information that will appear on your cover page.
Choose a priority for your outgoing fax.
Include a short message.

Creating a Speed or Group Dial List
Using the Operator Panel
Adding an Entry to the Speed Dial List
1. From the main menu, press the up or down Arrow button to scroll to Fax, and then press
the Select button
.
2. Press the up or down Arrow button to scroll to Phone Book, and then press the Select
button
.
3. Press the up or down Arrow button to scroll to Add Entry, and then press the Select button
.
4. Use the keypad to enter a Name and Fax Number.
NOTE: The lowest possible speed dial number is automatically assigned to this contact. You
cannot change the speed dial number.
5. Press the Back button
.
Adding an Entry to the Group Dial List
1. From the main menu, press the up or down Arrow button to scroll to Fax, and then press
the Select button
.
2. Press the up or down Arrow button to scroll to Phone Book, and then press the Select
button
.
3. Press the up or down Arrow button to scroll to Add Group, and then press the Select
button
.
4. Use the keypad to assign a name and fax numbers to the group. Press the down Arrow button
to enter another number. You can also use the Name Search, Phone Number Search, or
Redial History option to select phone numbers. Each number you select or enter is added to the
group dial list.
NOTE: The lowest possible group dial number is automatically assigned to this contact. You
cannot change the speed dial number.
5. Press the Back button
.
Using the Computer
1. Turn on your computer and printer, and make sure they are connected.
2. Make sure your printer is properly set up to send and receive faxes. For more information, see
Setting Up the Printer With External Devices.
3.
In Windows Vista:
a. Click ® Programs.

b. Click Dell Printers.
c. Click Dell 968 AIO Printer.
In Windows XP or Windows 2000:
Click Start® Programs or All Programs® Dell Printers® Dell 968 AIO Printer.
4. Select Dell Fax Setup Utility.
The Dell Fax Setup Wizard Query dialog box opens.
5. Click No.
The Dell Fax Setup Utility dialog box opens.
6. Click the Speed Dial tab.
7. To add a new entry to your Speed Dial list, click on an available number from 1 to 89, and enter
the fax number and name of your new contact.
To add a new group entry to your Group Dial list, click on an available number from 90 to 99. A
smaller group list appears below the main Speed Dial list. Enter the fax numbers and names of
your new group entry.
8. To add contacts from your phonebook, click Select from phonebook .
The Select from phonebook dialog box opens.
a. Select a contact from your phonebook.
b. If you want to add the contact to your list, click on an available number on the Speed or
Group Dial Settings section.
If you want to overwrite an existing entry on your list, click the entry you want to change.
c. Click Add to or change list.
d. After adding phonebook entries to your Speed or Group Dial list, click OK to return to the
Speed Dial tab.
9. Click OK.
A confirmation dialog box appears.
10. Click OK to overwrite the settings on your printer.
11. Click Close.
Using a Speed or Group Dial List
1. From the main menu, press the up or down Arrow button to scroll to Fax, and then press
the Select button
.
2. Use the keypad to enter the two-digit speed dial number.
3. Press the Start button
.
NOTE: When you are entering numbers, if you only enter two numbers and an entry corresponds to
this number, the printer assumes you are entering a speed dial entry. If the number you entered

Blocking Faxes
Creating a Blocked Fax List
Using the Operator Panel
1. From the main menu, press the up or down Arrow button to scroll to Fax, and then press
the Select button
.
2. Press the down Arrow button to scroll to Fax Setup, and then press the Select button .
3. Press the down Arrow button to scroll to Fax Blocking, and then press the Select button .
4. Press the down Arrow button to scroll to Blocked Fax Add Entry, and then press the Select
button
.
5. Use the keypad to specify a name.
6. Use the keypad to enter a fax number, and then press the Select button
.
Using Your Computer
1. Turn on your computer and printer, and make sure they are connected.
2. Make sure your printer is properly set up to send and receive faxes. For more information, see
Setting Up the Printer With External Devices.
3.
In Windows Vista:
a. Click ® Programs.
b. Click Dell Printers.
c. Click Dell 968 AIO Printer.
In Windows XP or Windows 2000:
Click Start® Programs or All Programs® Dell Printers® Dell 968 AIO Printer.
4. Select Dell Fax Setup Utility.
The Dell Fax Setup Wizard Query dialog box opens.
5. Click No.
The Dell Fax Setup Utility dialog box opens.
6. Click the Ringing and Answering tab.
does not correspond to any entry in the Phone Book, the printer assumes you are entering an
extension number.
NOTE: The lowest possible blocked fax number is automatically assigned to this contact. You
cannot change the blocked fax number.

7. Click Manage Blocked Faxes .
The Manage Blocked Faxes dialog box opens.
8. Enter the fax numbers that you want to block on the list.
9. Click OK to return to the Ringing and Answering tab.
10. Click OK.
A confirmation dialog box opens.
11. Click OK to overwrite the fax settings on your printer.
12. Click Close.
Turning on Fax Blocking
Using the Operator Panel
1. From the main menu, press the up or down Arrow button to scroll to Fax, and then press
the Select button
.
2. Press the down Arrow button to scroll to Fax Setup, and then press the Select button .
3. Press the down Arrow button to scroll to Fax Blocking, and then press the Select button .
4. From Block List, press the left or right Arrow button to choose On.
5. Press the Back button
.
If the printer detects a fax from one of the numbers on the Blocked Fax List, the transmission is
disconnected.
Using Your Computer
1. Turn on your computer and printer, and make sure they are connected.
2. Make sure your printer is properly set up to send and receive faxes. For more information, see
Setting Up the Printer With External Devices.
3.
In Windows Vista:
a. Click ® Programs.
b. Click Dell Printers.
c. Click Dell 968 AIO Printer.
In Windows XP or Windows 2000:
Click Start® Programs or All Programs® Dell Printers® Dell 968 AIO Printer.
4. Select Dell Fax Setup Utility.
The Dell Fax Setup Wizard Query dialog box opens.
5. Click No.

The Dell Fax Setup Utility dialog box opens.
6. Click the Ringing and Answering tab.
7. Click Manage Blocked Faxes .
The Manage Blocked Faxes dialog box opens.
8. Select Enable fax blocking.
9. Click OK to return to the Ringing and Answering tab.
10. Click OK.
A confirmation dialog box opens.
11. Click OK to overwrite the fax settings on your printer.
12. Click Close.
Blocking Faxes Without Caller ID
Using the Operator Panel
1. From the main menu, press the up or down Arrow button to scroll to Fax, and press the
Select
button.
2. Press the down Arrow button to scroll to Fax Setup, and press the Select button.
3. Press the down Arrow button to scroll to Fax Blocking, and press the Select button.
4. From Block No-ID, press the left or right Arrow button to choose On.
5. Press the Select
button.
If the printer detects a fax from a machine without Caller ID, the transmission is disconnected.
Using Your Computer
1. Turn on your computer and printer, and make sure they are connected.
2. Make sure your printer is properly set up to send and receive faxes. For more information, see
Setting Up the Printer With External Devices.
3.
In Windows Vista:
a. Click ® Programs.
b. Click Dell Printers.
c. Click Dell 968 AIO Printer.
In Windows XP or Windows 2000:
Click Start® Programs or All Programs® Dell Printers® Dell 968 AIO Printer.
4. Select Dell Fax Setup Utility.
The Dell Fax Setup Wizard Query dialog box opens.
5. Click No.
The Dell Fax Setup Utility dialog box opens.
6. Click the Ringing and Answering tab.
7. Click Manage Blocked Faxes .
The Manage Blocked Faxes dialog box opens.
8. Select Always block faxes from senders missing a valid Caller ID.
9. Click OK to return to the Ringing and Answering tab.
10. Click OK.
A confirmation dialog box opens.
11. Click OK to overwrite the fax settings on your printer.
12. Click Close.
Creating Fax Activity Report
Using the Operator Panel
1. From the main menu, press the up or down Arrow button to scroll to Fax, and then press
the Select button
.
2. Press the down Arrow button to scroll to Fax Setup, and then press the Select button .
3. Press the up or down Arrow button to scroll to History and Reports, and then press the
Select button
.
4. From the History and Reports menu, you can view or print your fax activity.
Using the Computer
1.
In Windows Vista
:
a. Click ® Programs.
b. Click Dell Printers.
c. Click Dell 968 AIO Printer.
In Windows XP and Windows 2000:
Click Start® Programs or All Programs® Dell Printers® Dell 968 AIO Printer.
2. Click Dell Fax Solutions.

The Dell Fax Solutions Software dialog box opens.
3. Click Print Activity Report.
4. From the Display drop-down menu, select which faxes you would like to print a report.
5. Select a date range for your report.
6. Click the Print icon in the upper-left corner of the dialog box to print the fax report.

About Your Printer
Understanding the Printer Parts
Understanding the Operator Panel
You can use your printer to do a variety of things. A few important things to note:
If the printer is connected to a computer, you can use either the printer operator panel or the
printer software to produce quality documents.
You do need to connect your printer to a computer to print, scan, or use the Save Photos to
Computer function or the Print Files mode.
You
do not
need to connect your printer to a computer to make photocopies, send faxes, or print
from memory cards or a PictBridge-enabled camera.
Understanding the Printer Parts
NOTE: The printer (whether it is connected to a computer or not) must be connected to a telephone
line before you can send a fax.
NOTE: If you use a DSL modem for your computer, you must install a DSL filter on the telephone
line attached to your computer.
Number: Part: Description:
1 Automatic
Document
Feeder
(ADF)
Part that feeds original documents into the printer.
2 Scanner
base unit
Unit you lift to gain access to the ink cartridges.
3 Operator
panel
Panel you use to control copying, scanning, faxing, and printing. For more
information, see Understanding the Operator Panel
.
4 Paper tray Tray that holds blank paper.
5 Optional Tray that you can purchase separately to increase the amount of blank paper
paper tray that your printer can hold.
6 Paper exit
tray
Tray that holds the paper as it exits the printer.
NOTE: Pull the paper exit tray stop straight out to extend it.
7 PictBridge
connector
The connector you use to connect your PictBridge-enabled digital camera or a
USB key to your printer.
8 Memory
card slots
Slots into which you insert a memory card containing digital pictures.
NOTE: The LCD only displays JPG and a limited set of TIFF files found on the
memory card. To view other image types stored on the memory card, open the
Memory Card Manager. For more information, see Using Memory Card
Manager.
9 Top cover
with
integrated
ADF exit
tray
Top of printer that holds your document or photo flat while you scan it. You
can also pick up your original document here after it has gone through the
ADF.
10 ADF input
tray
Tray that holds original documents. Use it to scan, copy, or fax multiple-page
documents.
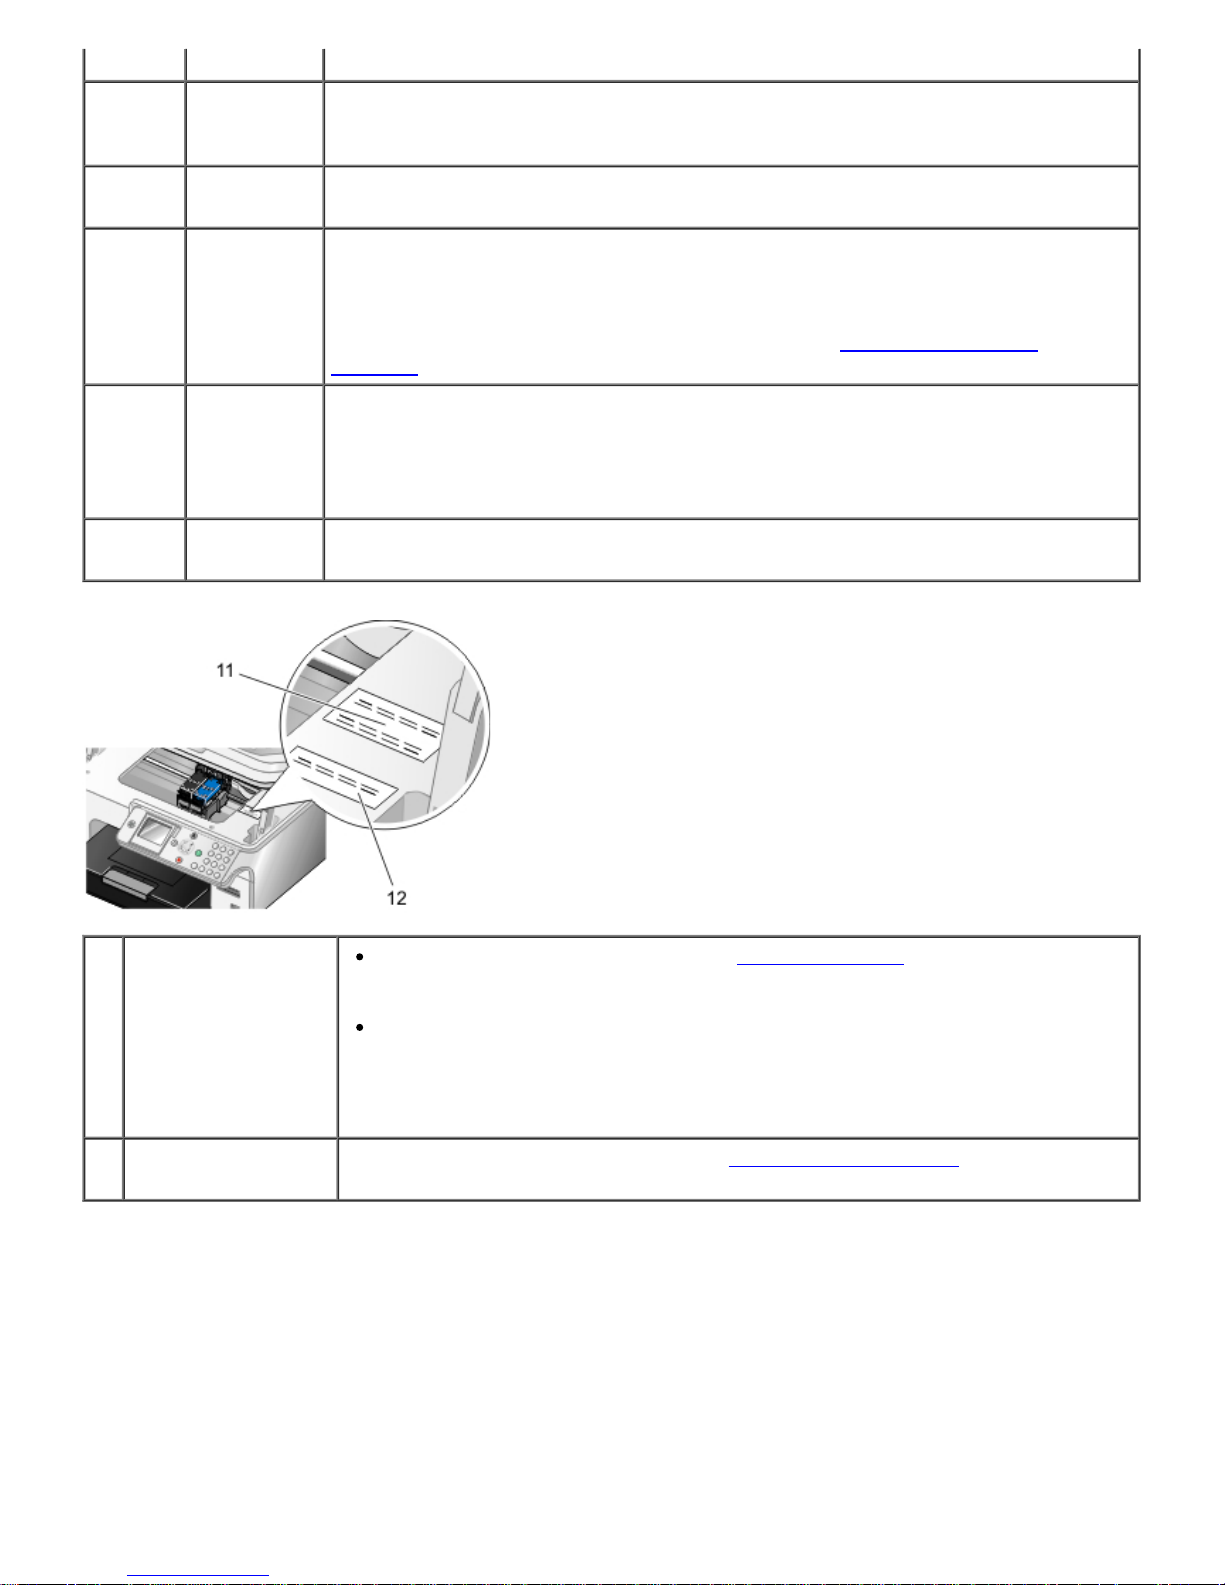
11 Express Service
Code
Identify your printer when you use support.dell.com or contact technical
support.
Enter the Express Service Code to direct your call when contacting
technical support.
NOTE: The Express Service Code is not available in all countries.
12 Supplies Reorder
Label
To order ink cartridges or paper, visit www.dell.com/supplies
.
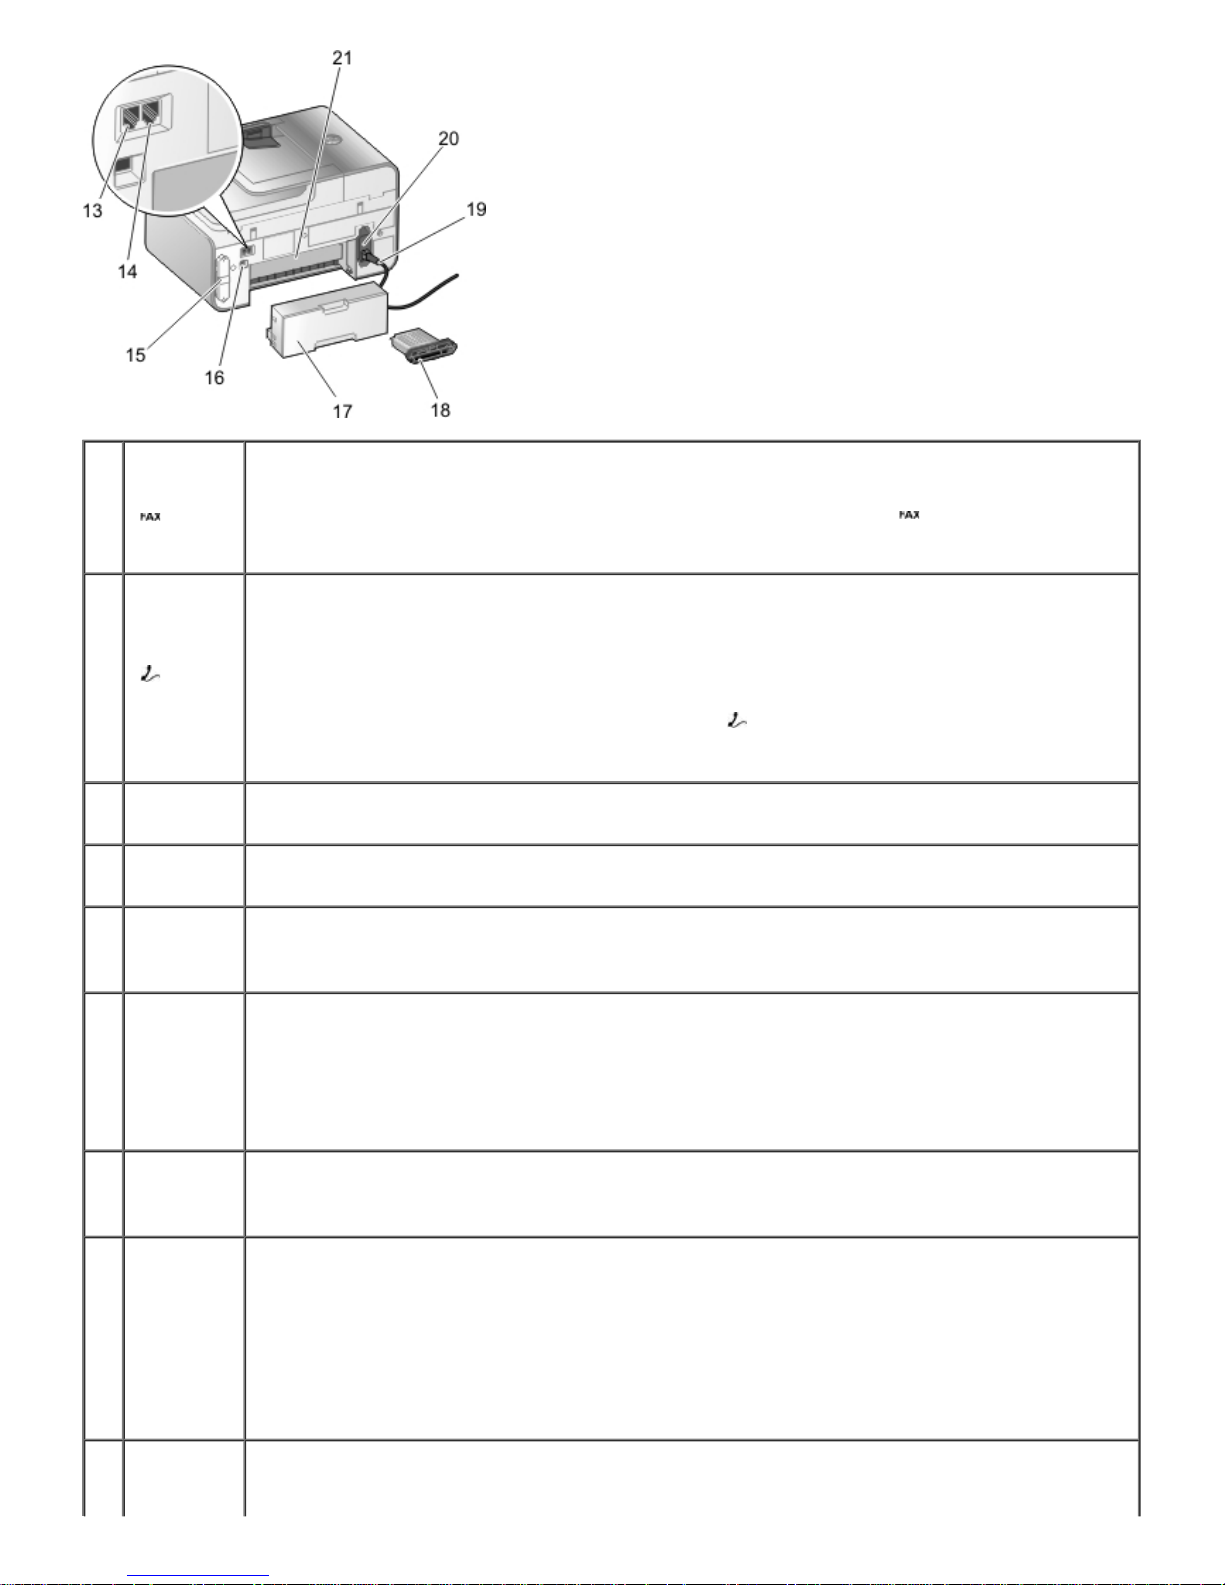
13 FAX
connector
(
— left
connector)
Slot into which you plug an active telephone line to send and receive faxes.
NOTE: Do not connect additional devices to the FAX connector (
— left connector),
and do not connect a DSL (digital subscriber line) or ISDN (integrated services digital
network) to the printer without using a digital line filter.
14 PHONE
jack
connector
(
— right
connector)
Slot into which you plug additional devices, such as a data/fax modem, telephone, or
answering machine. Remove the blue plug before use.
NOTE: If the phone communication is serial in your country (such as Germany,
Sweden, Denmark, Austria, Belgium, Italy, France, and Switzerland), you must remove
the blue plug from the PHONE jack connector (
— right connector), and then insert
the supplied yellow terminator for faxing to work correctly. You will not be able to use
this port for additional devices in these countries.
15 Back
cover
Cover that you have to remove to install the Dell™ Internal Network Adapter 1150.
16 USB
connector
Slot into which you plug the USB cable (sold separately). The other end of the USB
cable plugs into your computer.
17 Optional
duplex
unit
Part that you can purchase separately to print on both sides of the paper.
18 Optional
Dell
Internal
Network
Adapter
1150
A networking device that you can purchase separately to set up your printer on a
wireless or Ethernet network.
19 Power
cord
connector
Connects the printer power supply to the power outlet using the supplied countryspecific power cord.
20 Power
supply
Supplies power to the printer.
NOTE: The power supply is removable. When the power supply is removed from the
printer, but remains plugged into a power outlet, an LED is illuminated to notify you
that power is present.
NOTE: If the power is off when you unplug your printer, the power will be off when
you plug it back in.
21 Rear
access
Part that you have to open to clear paper jams.
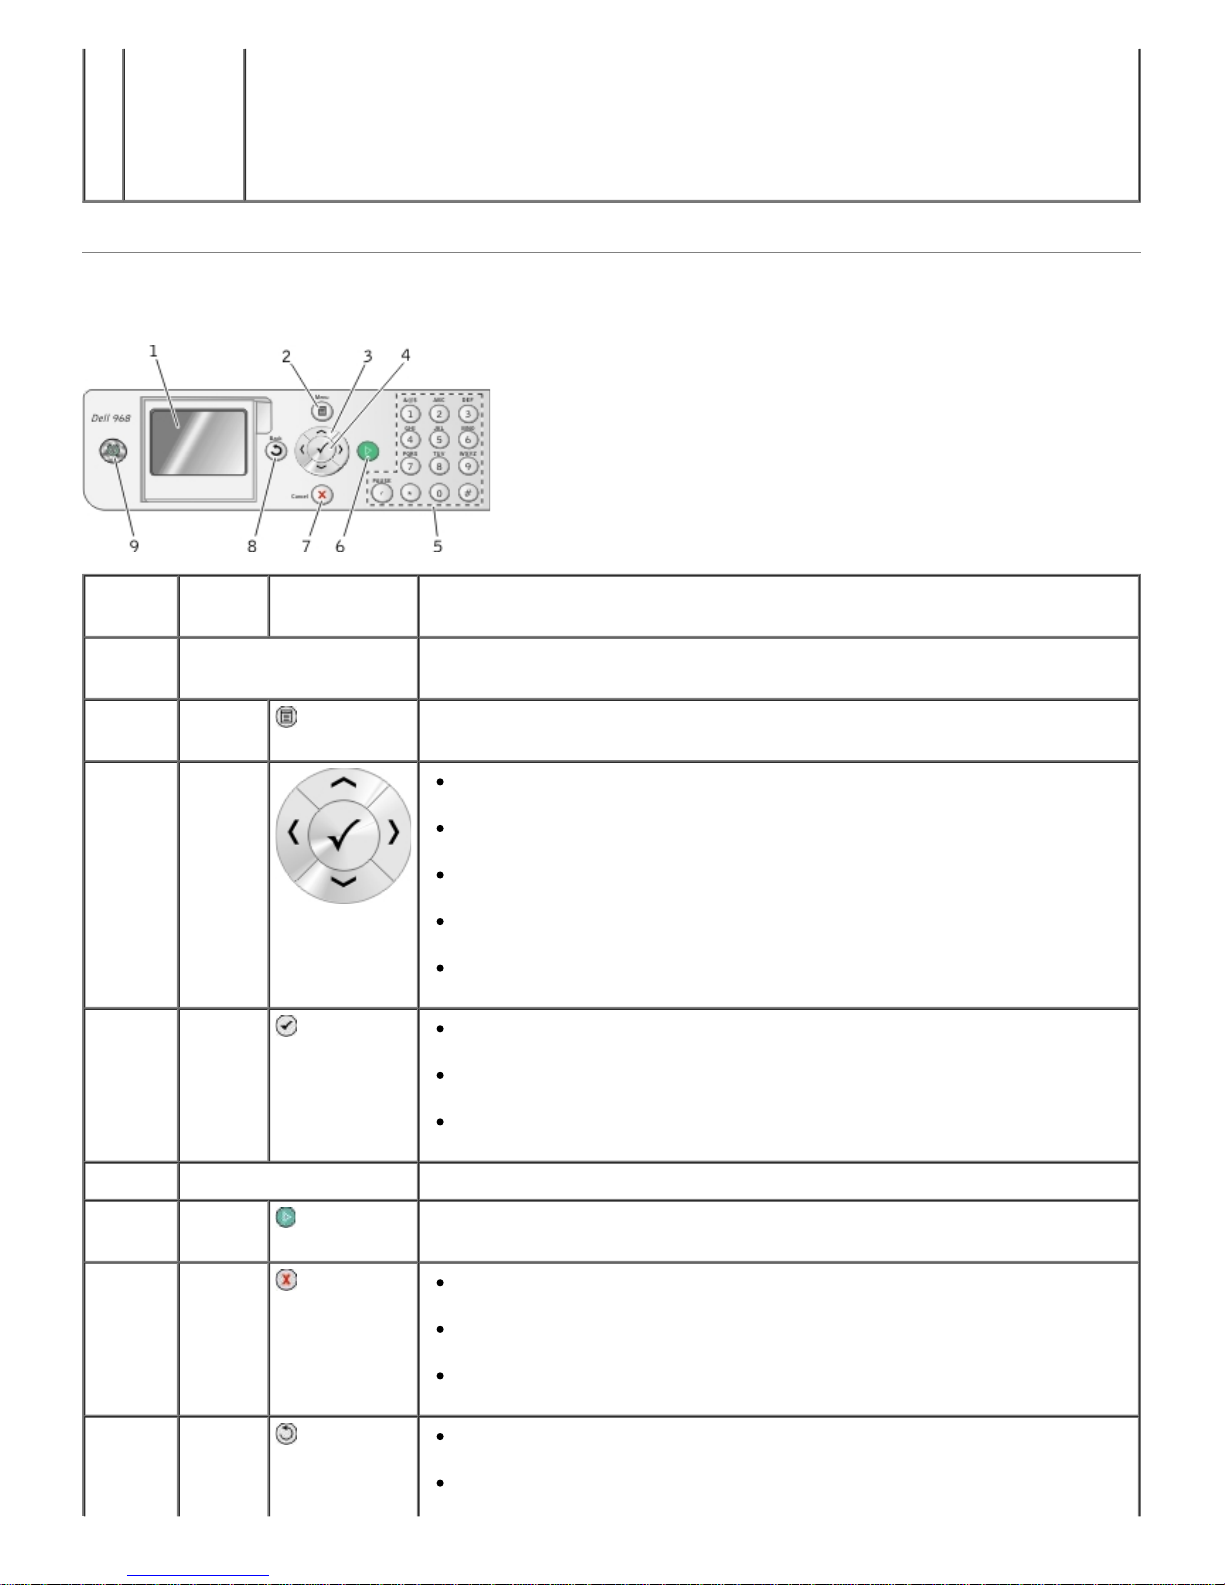
Understanding the Operator Panel
door
(beneath
the
optional
duplex
unit)
Number Use
the:
To:
1 LCD display Display scanning, copying, faxing, and printing options as well as
status and error messages.
2 Menu
button
Enter a menu or a submenu.
3 Arrow
buttons
Navigate menus and menu items.
Decrease/increase the number of copies.
Change the selected modes.
Navigate photos on a memory card or digital camera.
Increase or decrease the values when setting the date and time.
4 Select
button
Select a menu item.
Select an image to be printed (in Photo mode).
Initiate a paper feed by holding the button for three seconds.
5 Keypad Enter numerical data or text.
6 Start
button
Initiate a copy, scan, or fax.
7 Cancel
button
Cancel a scan, print, or copy job in progress.
Cancel a copy job (using only the printer), and eject the page.
Exit a menu, and return to the default settings.
8 Back
button
Return to the previous menu or screen.
Save the changes made on a sub-menu temporarily.
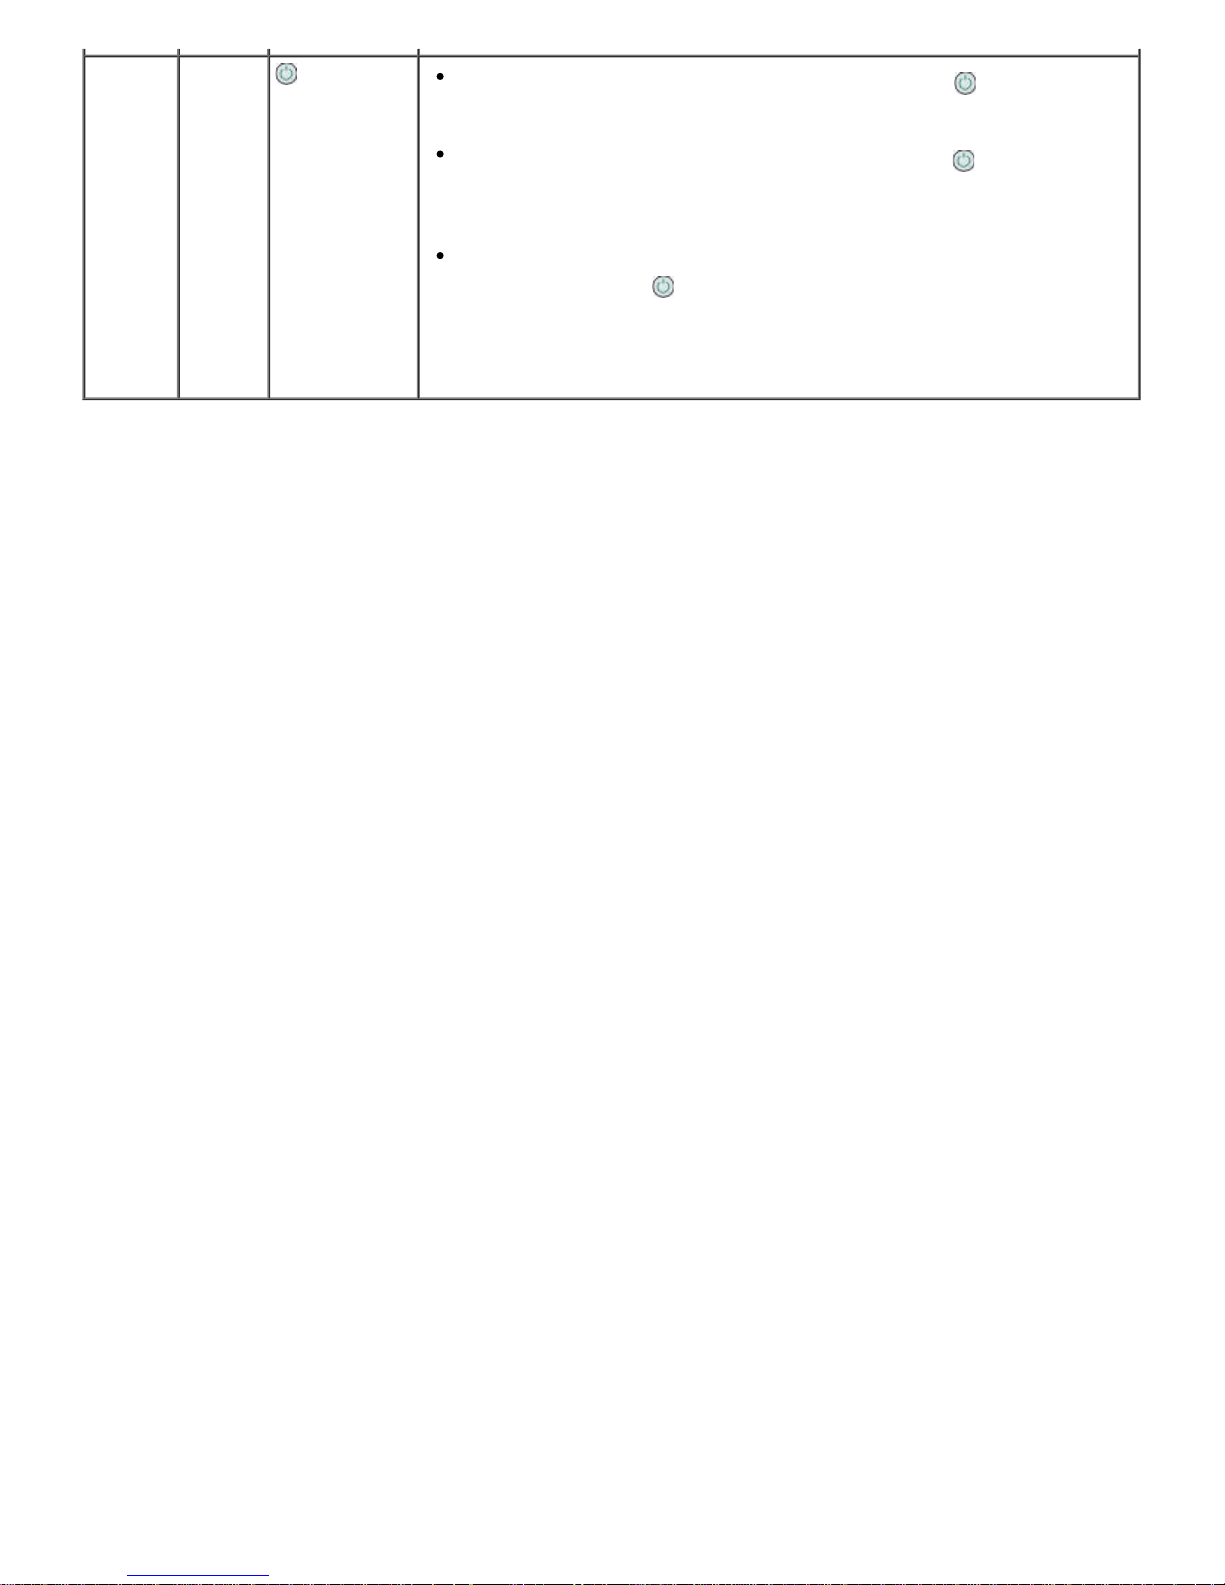
9 Power
button
When the printer is off, press the Power button to turn your
printer on.
When the printer is on, press the Power button to put your
printer in a Power Save state. Your printer consumes minimal
power in this state.
When the printer is on or in the Power Save state, press and hold
the Power button
for 2 seconds to turn your printer off.
NOTE: Do
not
unplug your printer from the electrical outlet when not
in use. When the printer is off, it requires up to 1 watt of power to
perform regular maintenance on cartridges.
 Loading...