

Page 1
Dell™ 968 All-In-One Printer User's Guide
To order ink or supplies from Dell:
1. Double-click the icon on your desktop.
2. Visit Dell's website, or order Dell printer supplies by phone.
www.dell.com/supplies
For the best service, make sure you have the Dell printer Service Tag available.
Finding Information Faxing
About Your Printer Understanding the Software
Understanding the Operator Panel Menus Networking
Loading Paper and Originals Maintenance
Printing Troubleshooting
Printing From a Memory Card or USB Key Specifications
Copying Appendix
Scanning Licensing Notice
Notes, Notices, and Cautions
NOTE: A NOTE indicates important information that helps you make better use of your printer.
NOTICE: A NOTICE indicates either potential damage to hardware or loss of data and tells you how
to avoid the problem.
CAUTION: A CAUTION indicates a potential for property damage, personal injury, or death.
Information in this document is subject to change without notice.
© 2007 Dell Inc. All rights reserved.
Reproduction in any manner whatsoever without the written permission of Dell Inc. is strictly forbidden.
Dell
, the
DELL
Trademarks used in this text:
Dell Inc.;
and/or other countries.
Corporation.
the United States and/or other countries.
Inc. and is used by Dell Inc. under license.
Snapfire
subsidiaries in Canada, the United States and/or other countries.
Other trademarks and trade names may be used in this document to refer to either the entities claiming
the marks and names or their products. Dell Inc. disclaims any proprietary interest in trademarks and
trade names other than its own.
Microsoft
Windows Vista
and
WordPerfect
and
Windows
Windows Server
is either a trademark or a registered trademark of Microsoft Corporation in
are trademarks or registered trademarks of Corel Corporation and/or its
are registered trademarks of Microsoft Corporation in the United States
logo, and
and
Windows NT
Bluetooth
EMC
is a registered trademark of EMC Corporation.
Dell Ink Management System
are registered trademarks of Microsoft
is a registered trademark owned by Bluetooth SIG,
are trademarks of
Corel
UNITED STATES GOVERNMENT RESTRICTED RIGHTS
Page 2

This software and documentation are provided with RESTRICTED RIGHTS. Use, duplication or disclosure
by the Government is subject to restrictions as set forth in subparagraph (c)(1)(ii) of the Rights in
Technical Data and Computer Software clause at DFARS 252.227-7013 and in applicable FAR provisions:
Dell Inc., One Dell Way, Round Rock, Texas, 78682, USA.
Model 968
October 2007 SRV FY276 Rev. A00
Page 3
Finding Information
What are you
looking for?
Drivers for my
printer
My User's
Guide
Optional XPS
driver
Find it here
Drivers and Utilities CD
If you purchased your Dell computer and printer at the same time, documentation
and drivers for your printer are already installed on your computer. You can use
the CD to uninstall/reinstall drivers or access your documentation. Readme files
may be included on your CD to provide last-minute updates about technical
changes to your printer or advanced technical reference material for experienced
users or technicians.
The XML Paper Specification (XPS) driver is an optional additional driver that allows
Windows Vista™ users to access the improved graphics and color features of XPS.
The driver is located in a zipped file on the CD. For more information, see Installing
the Optional XPS Driver.
How to set up my
printer
Safety
information
How to set up
and use my
printer
Warranty
information
Setting Up Your Printer poster
Owner's Manual
Express Service
Code and Service
Tag number
Express Service Code and Service Tag number
Page 4
For more information, see Express Service Code.
Latest drivers
for my printer
Answers to
technical
service and
support
questions
Documentation
for my printer
How to use
Windows Vista
Documentation
for my printer
Dell Support Website: support.dell.com
The Dell Support website provides several online tools, including:
Solutions—Troubleshooting hints and tips, articles from technicians, and online
courses
Upgrades—Upgrade information for components, such as memory
Customer Care—Contact information, order status, warranty, and repair
information
Downloads—Drivers
Reference—Printer documentation and product specifications
Windows Vista Help and Support Center
1. Click
® Help and Support.
2. Type a word or phrase that best describes your problem, and then click the
arrow icon.
How to use
Microsoft
®
Windows® XP
Documentation
for my printer
3. Click the topic that describes your problem.
4. Follow the instructions shown on the screen.
Windows XP Help and Support Center
1. Click Start® Help and Support.
2. Type a word or phrase that best describes your problem, and then click the
arrow icon.
3. Click the topic that describes your problem.
4. Follow the instructions shown on the screen.
Page 5
Faxing
Setting Up the Printer With External Devices
Sending a Fax
Receiving a Fax
Changing the Fax Setup
Using Speed Dial
Blocking Faxes
Creating Fax Activity Report
You can use your printer to send and receive faxes without having to connect to a computer.
In addition, the Dell™ Fax Solutions Software is bundled in the
been installed when you installed your printer software. You can also use this faxing software to send
and receive faxes. For more information, see Using the Dell Fax Solutions Software
Equipment Benefits See this section
printer
phone cord
(provided)
printer
telephone (sold
separately)
two phone cords
(one provided)
printer
telephone (sold
separately)
Make copies and send and receive faxes
without the use of a computer.
Use the fax line as a normal telephone line.
Set up your printer wherever your
telephone is.
Make copies and send and receive faxes
without the use of a computer.
Receive both incoming voice messages and
faxes.
Drivers and Utilities
Connecting Directly to a
Telephone Wall Jack
Connecting to a Telephone
Connecting to an Answering
Machine
CD and should have
.
answering machine
(sold separately)
three phone cords
(one provided)
printer
telephone (sold
separately)
computer modem
(sold separately)
three phone cords
Increase the number of phone connection
outlets.
Connecting to a Computer
Modem
Page 6
(one provided)
USB cable (sold
separately)
Setting Up the Printer With External Devices
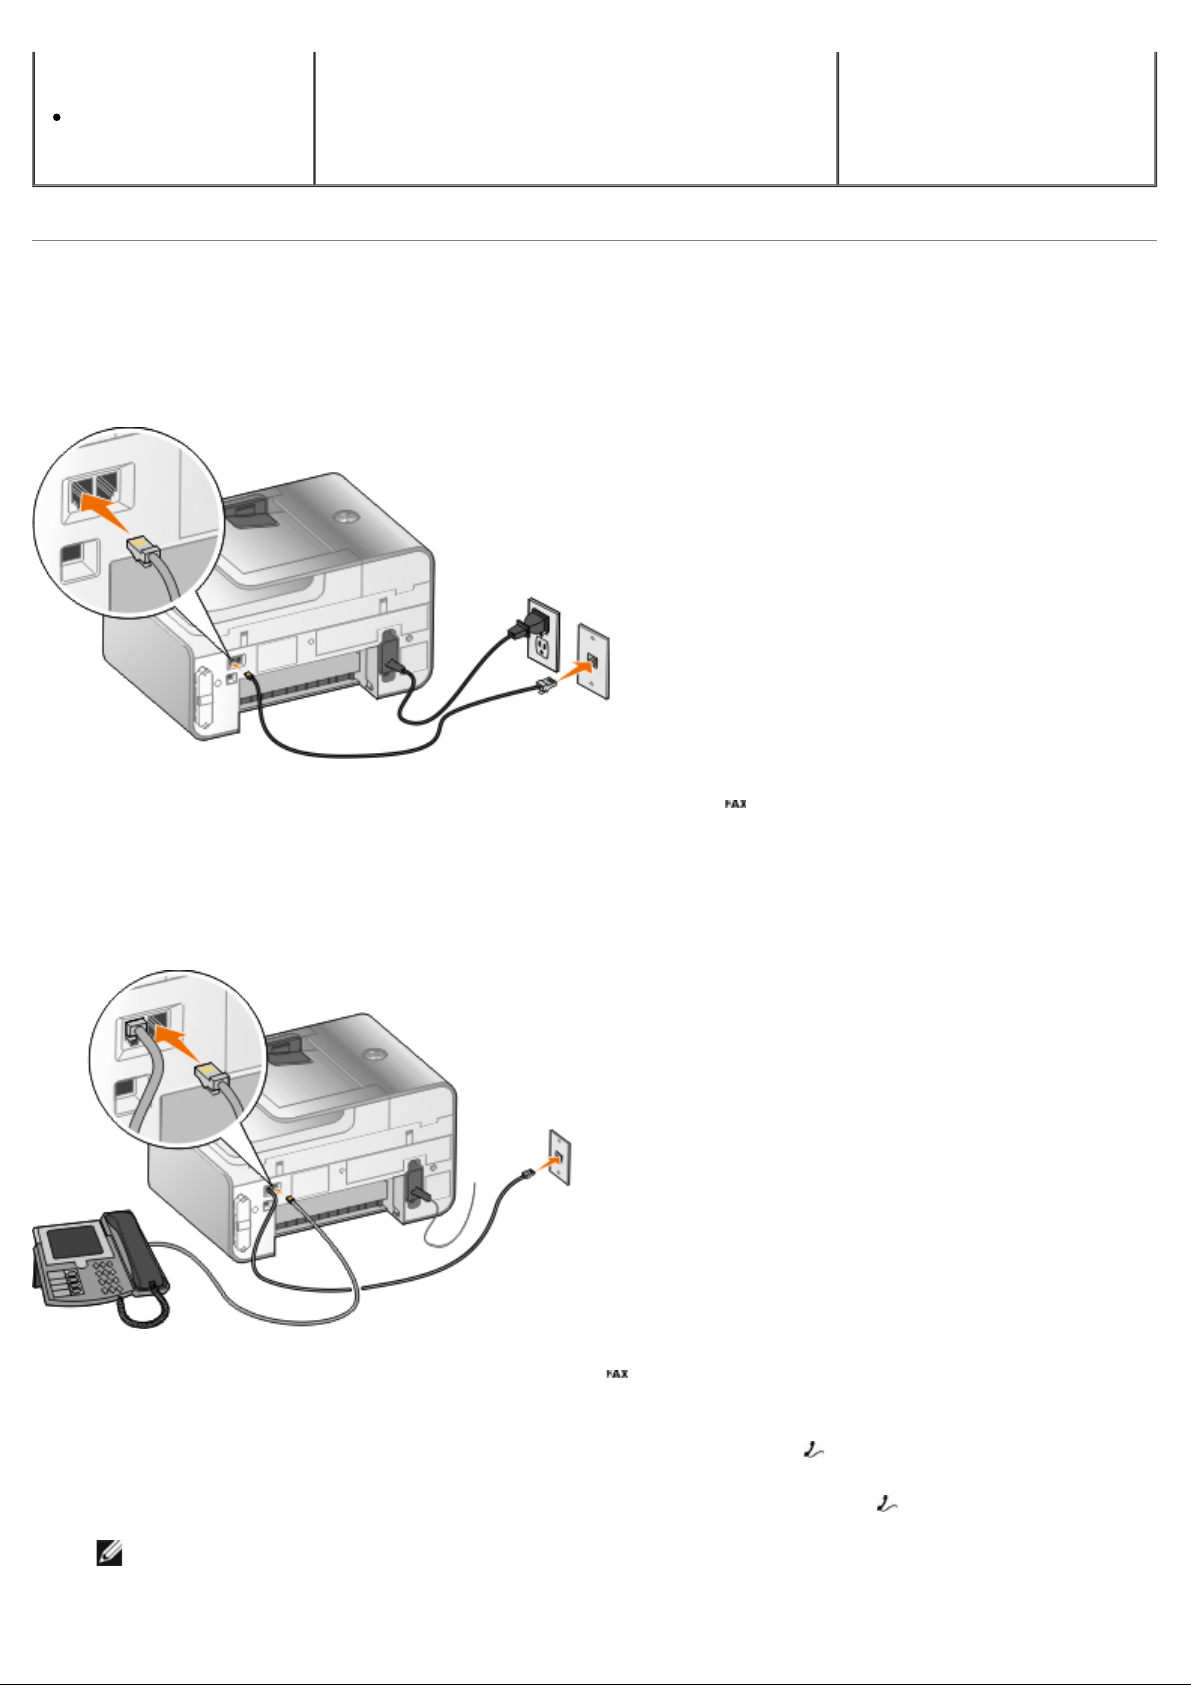
Connecting Directly to a Telephone Wall Jack
1. Connect one end of the phone cord to the FAX connector ( —left connector).
2. Connect the other end of the phone cord to an active telephone wall jack.
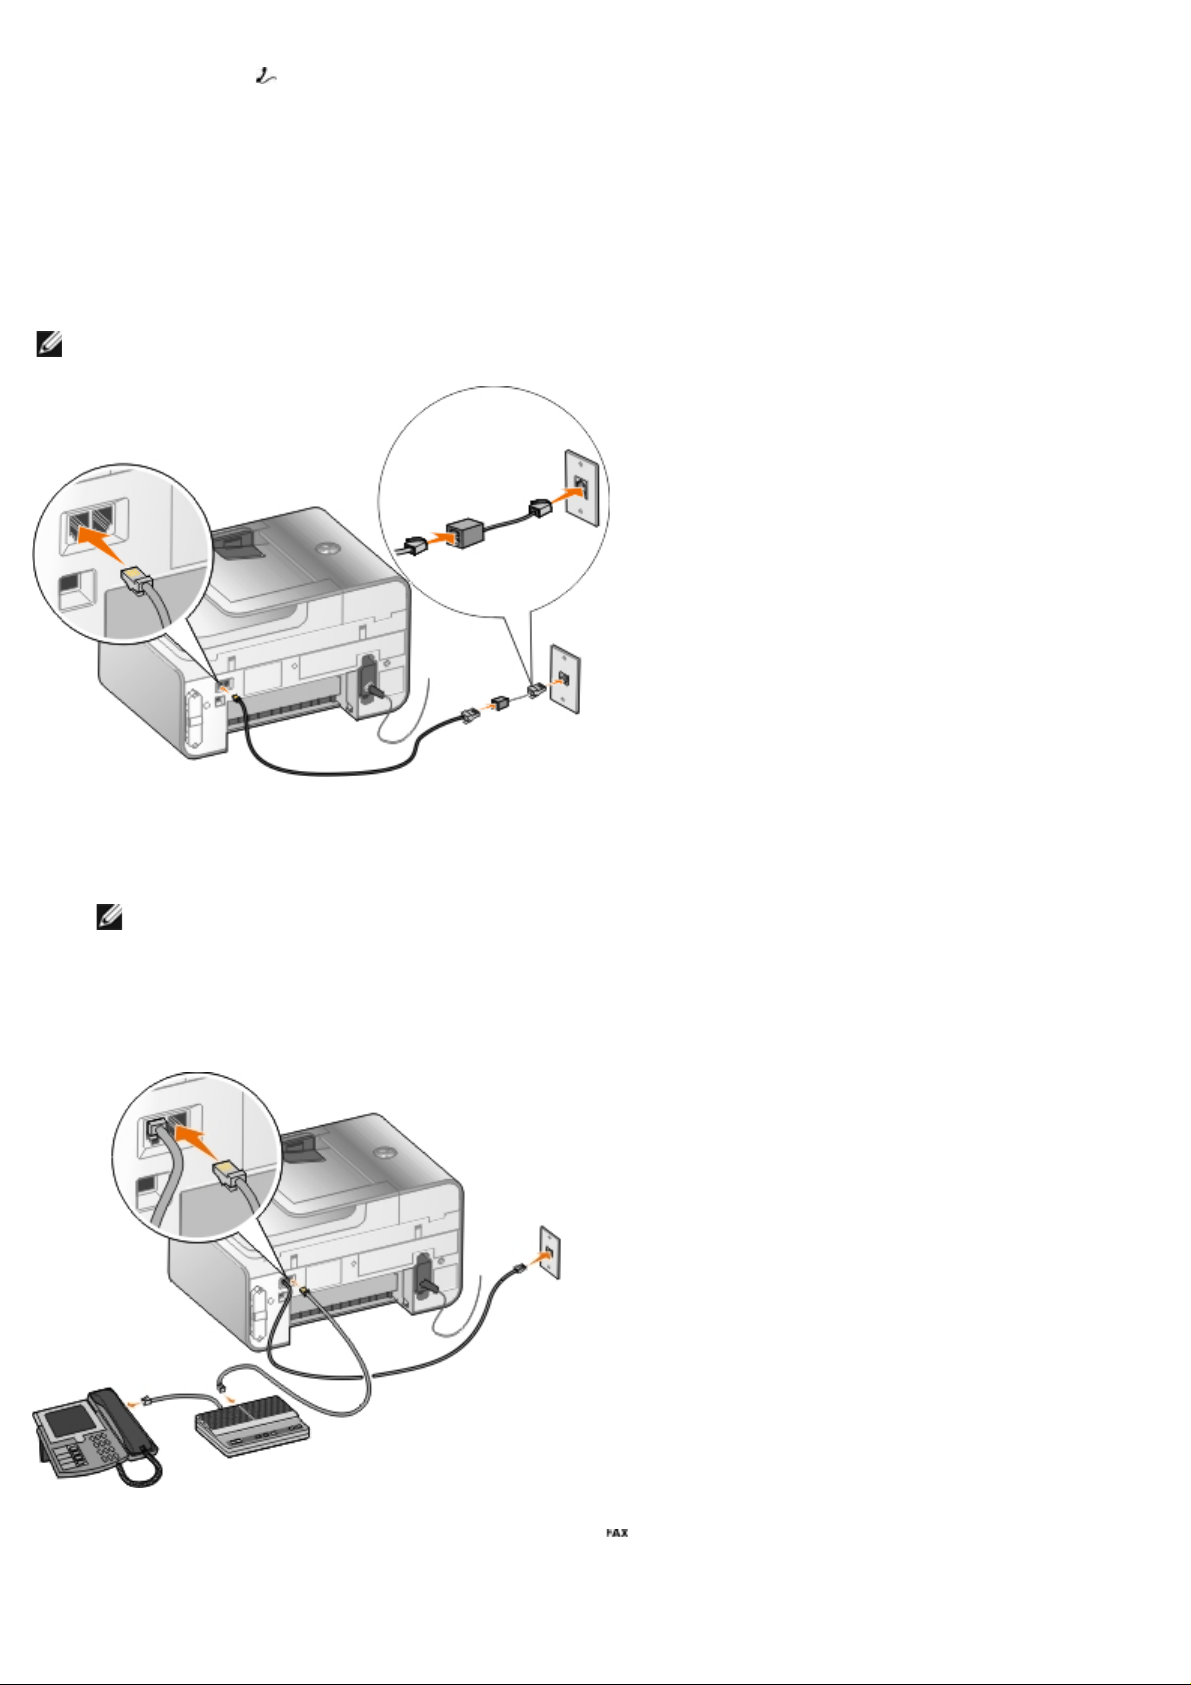
Connecting to a Telephone
1. Connect a phone cord from the FAX connector ( —left connector) on the printer to an active
telephone wall jack.
2. Remove the blue protective plug from the PHONE jack connector ( —right connector).
3. Connect a phone cord from the telephone to the PHONE jack connector ( —right connector).
NOTE: If phone communication is serial in your country (such as Germany, Sweden, Denmark,
Austria, Belgium, Italy, France, and Switzerland), remove the blue plug from the PHONE jack
Page 7
connector ( —right connector), and insert the supplied yellow terminator for your fax to work
correctly. You will not be able to use this port for additional devices in these countries.
2. Remove the blue protective plug from the PHONE jack connector ( —right connector).
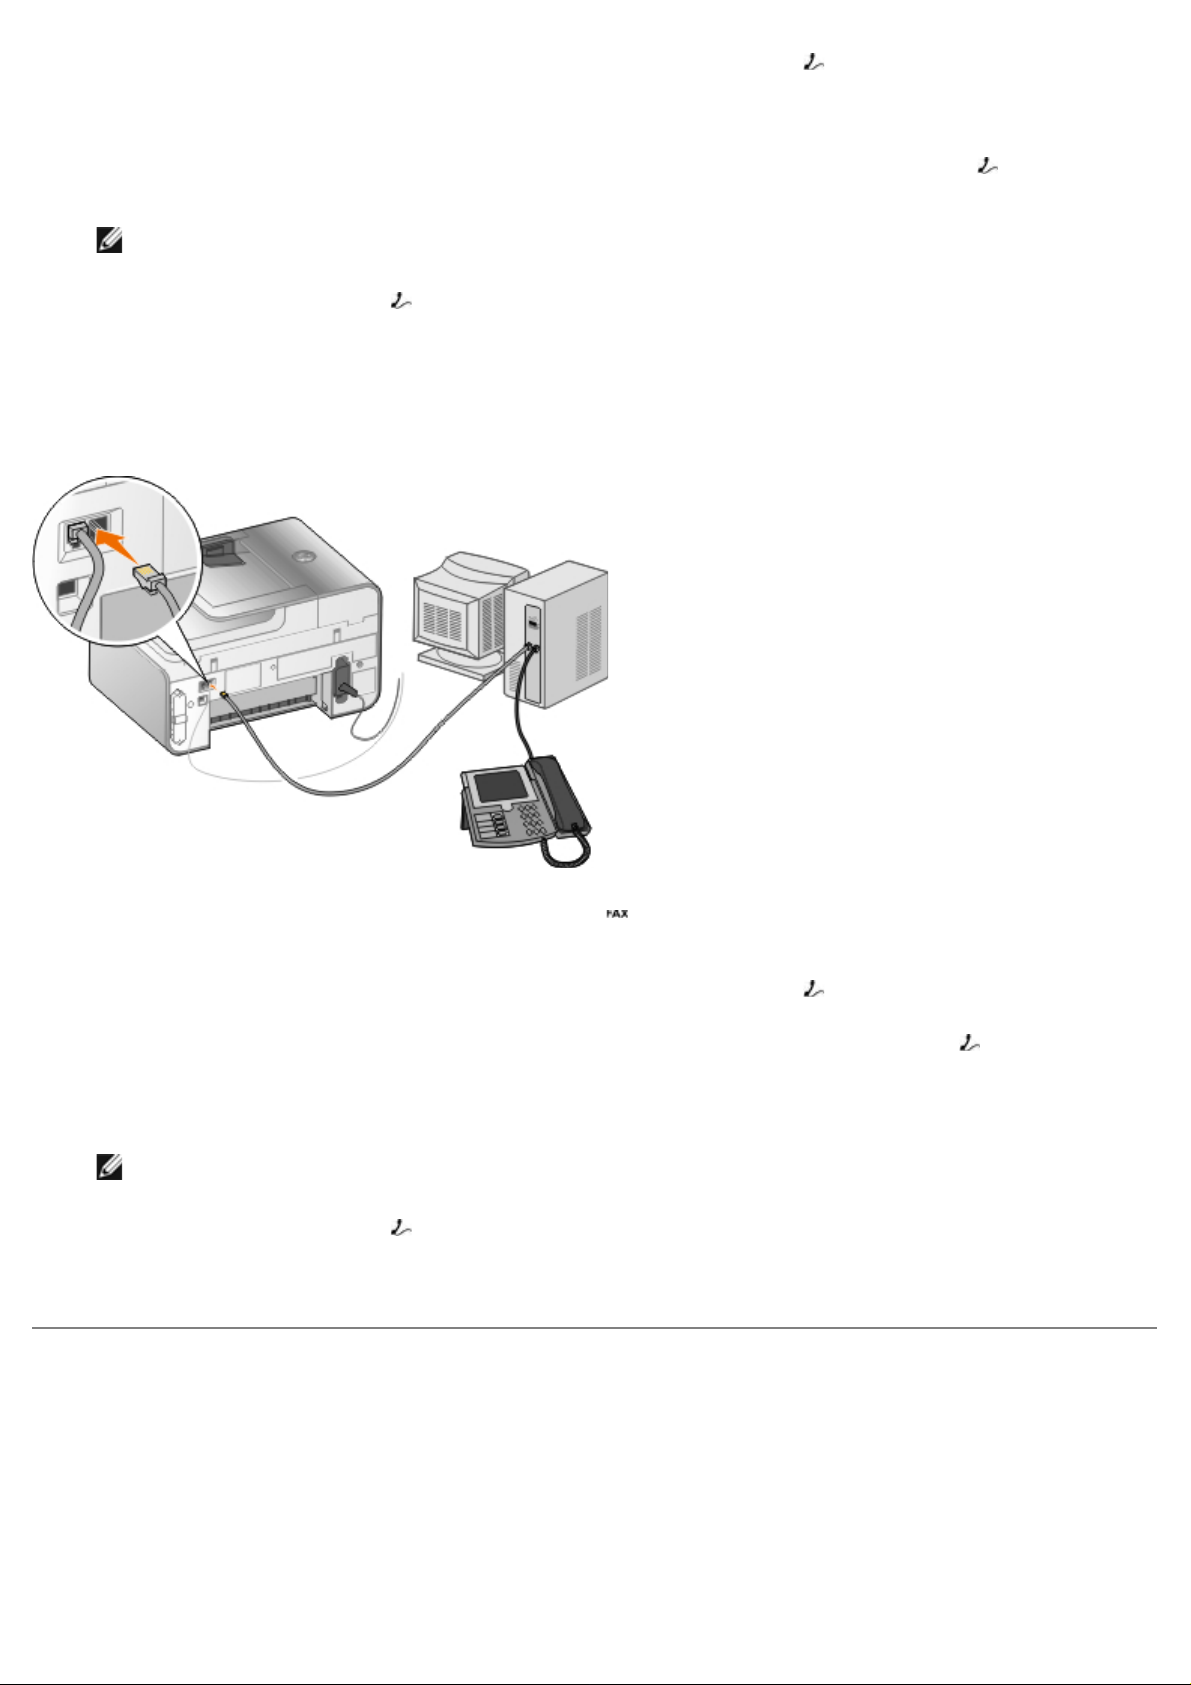
What if I have a Digital Subscriber Line (DSL) ?
DSL delivers digital data to a computer through a telephone line. Your printer is designed to work with
analog data. If you are faxing over a telephone line connected to a DSL modem, install a DSL filter to
avoid interference with the analog fax modem signal.
NOTE: Integrated Services Digital Network (ISDN) and cable modems are not fax modems and are
not supported for faxing.
1. Connect the DSL filter to an active telephone line.
2. Connect the printer directly to the output on the DSL filter.
NOTE: Do not install any splitters between the DSL filter and the printer. Contact your DSL
service provider if you need more help.
Connecting to an Answering Machine
1. Connect a phone cord from the FAX connector ( —left connector) on the printer to an active
telephone wall jack.
Page 8
3. Connect a phone cord from the answering machine to a telephone.
4. Connect a phone cord from the answering machine to the PHONE jack connector (
connector).
NOTE: If phone communication is serial in your country (such as Germany, Sweden, Denmark,
Austria, Belgium, Italy, France, and Switzerland), you must remove the blue plug from the
PHONE jack connector (
fax to work correctly. You will not be able to use this port for additional devices in these
countries.
—right connector), and insert the supplied yellow terminator for your
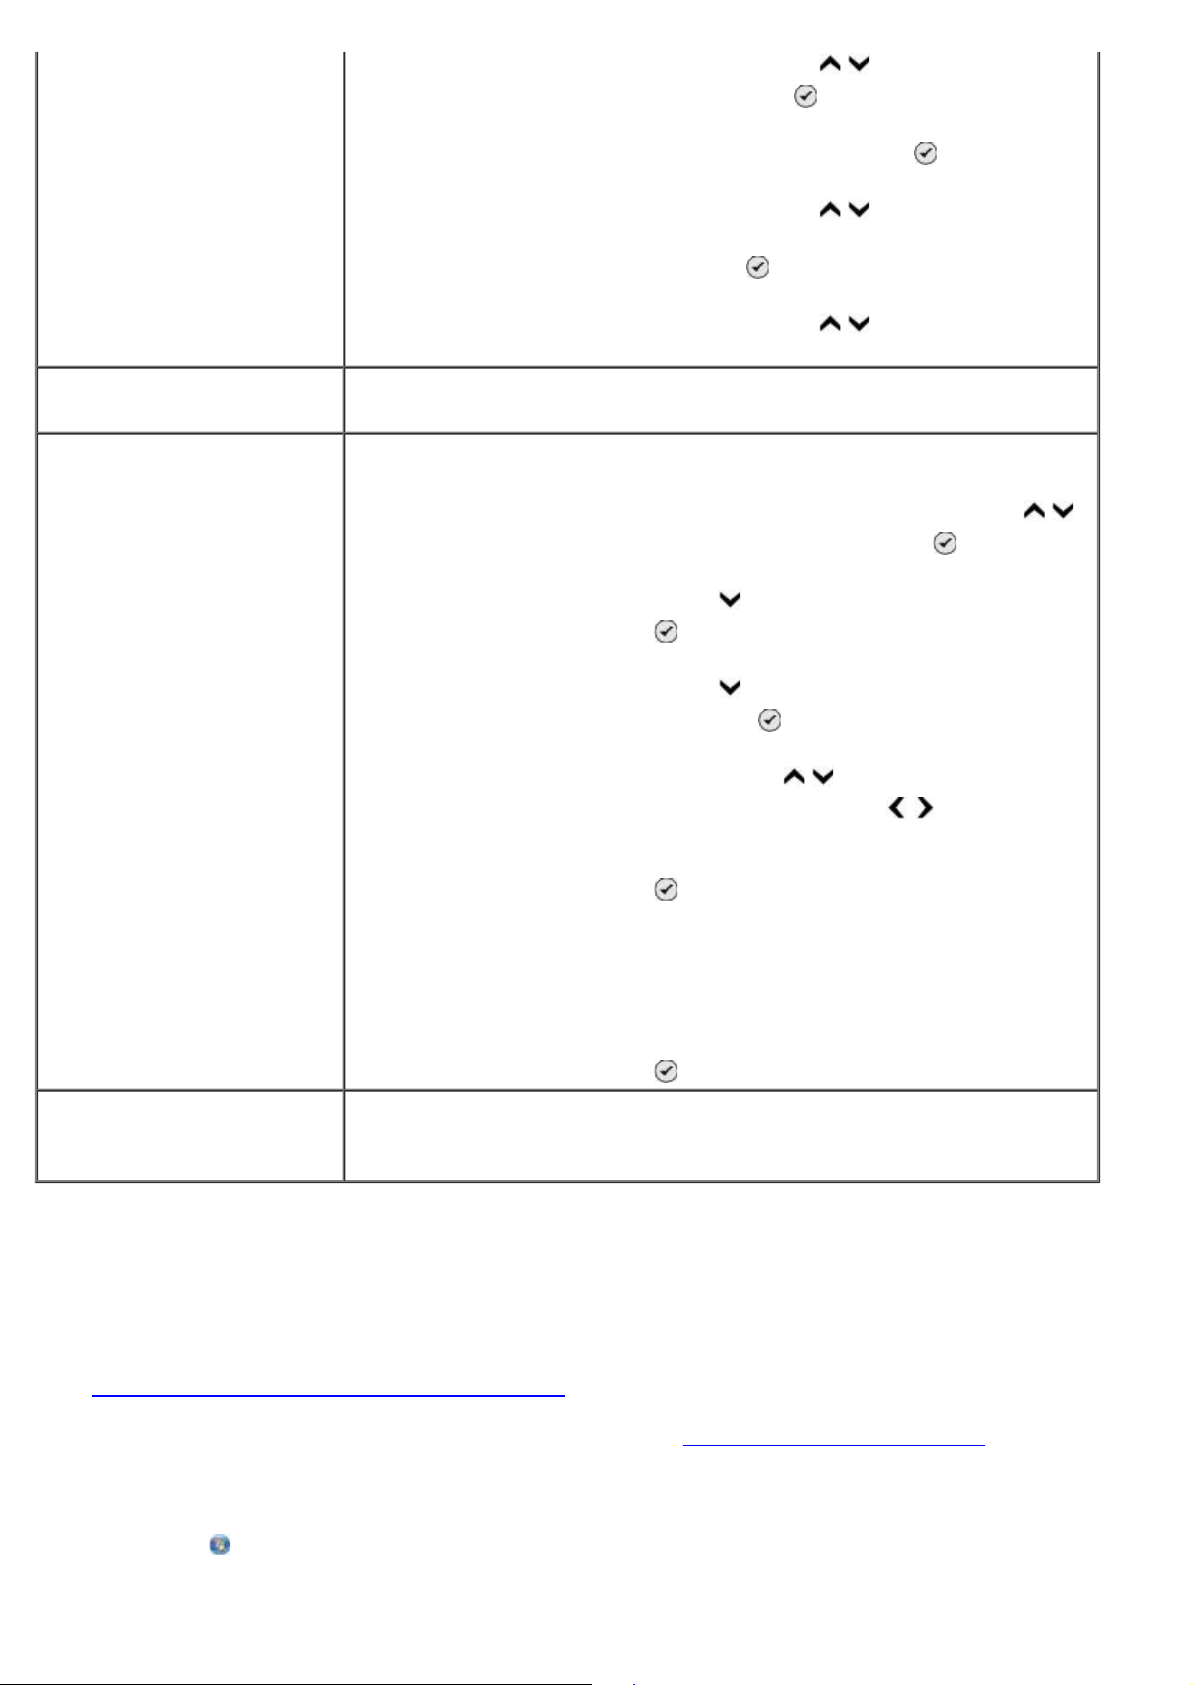
Connecting to a Computer Modem
—right
1. Connect a phone cord from the FAX connector ( —left connector) on the printer to an active
telephone wall jack.
2. Remove the blue protective plug from the PHONE jack connector ( —right connector).
3. Connect a phone cord from the computer modem to the PHONE jack connector ( —right
connector).
4. Connect a phone cord from the computer modem to a telephone.
NOTE: If phone communication is serial in your country (such as Germany, Sweden, Denmark,
Austria, Belgium, Italy, France, and Switzerland), you must remove the blue plug from the
PHONE jack connector (
fax to work correctly. You will not be able to use this port for additional devices in these
countries.
—right connector), and insert the supplied yellow terminator for your
Sending a Fax
Sending a Quick Fax
Using the Operator Panel
1. Make sure your printer is properly set up to send and receive faxes. For more information, see
Page 9

Setting Up the Printer With External Devices.
2. Load the original document. For more information, see Loading Original Documents.
3. Press the up or down Arrow button
to scroll to Fax.
4. Use the keypad to enter a fax number or a speed dial number.
5. Press the Start button
Using Your Computer
.
1. Turn on your computer and printer, and make sure they are connected.
2. Make sure your printer is properly set up to send and receive faxes. For more information, see
Setting Up the Printer With External Devices.
3. Load the original document. For more information, see Loading Original Documents
In Windows Vista™:
4.
.
a. Click ® Programs.
b. Click Dell Printers.
c. Click Dell 968 AIO Printer .
In Microsoft® Windows® XP or Windows 2000:
Click Start® Programs or All Programs ® Dell Printers® Dell 968 AIO Printer.
5. Select Dell Fax Solutions .
The Dell Fax Solutions Software dialog box opens.
6. Click Send a new fax.
7. Follow the instructions on your computer screen to send a fax.
Entering a Fax Number
Using the Operator Panel
1. From the main menu, press the up or down Arrow button to scroll to Fax.
2. Enter a fax number.
Task Method
Sending to a fax number Use the keypad to enter a number. You can enter a maximum of 64
digits in a fax number.
Sending a fax to an entry
in the Phone Book
Enter the number that corresponds to the speed dial number of
the contact.
Use the Phone Book menu.
a. Press the up or down Arrow button to scroll to Fax,
Page 10
and then press the Select button .
b. From Phone Book , press the Select button .
c. Press the up or down Arrow button to scroll to Name
Search, Phone Number Search, or Group Search, and
then press the Select button
.
d. Press the up or down Arrow button to scroll to the
name or number you want to send the fax to.
Sending a fax to an
extension number
Sending a fax to an
outside line
Press the asterisk (*) and pound (#) signs, and then use the keypad
to enter the extension number.
Set a dial prefix:
a. From the main menu, press the up or down Arrow button
to scroll to Fax, and then press the Select button .
b. Press the down Arrow button to scroll to Fax Setup, and then
press the Select button
.
c. Press the down Arrow button to scroll to Dialing and Sending,
and then press the Select button
.
d. Press the up or down Arrow button to scroll to Dial Prefix,
and then press the left or right Arrow button
to scroll to
Create.
e. Press the Select button .
NOTE: If you are changing the dial prefix, scroll to Modify.
f. Use the keypad to enter the dial prefix. You can enter a
maximum of eight digits for the prefix.
.
Dialing a fax extension
while listening to a
telephone line (On Hook)
Using Your Computer
g. Press the Select button
Dial an additional 0 for a two-digit extension or an additional 0 0 for
a one-digit extension. For example, to dial extension 12, enter 120.
If the extension is 2, enter 200.
1. Turn on your computer and printer, and make sure they are connected.
2. Make sure your printer is properly set up to send and receive faxes. For more information, see
Setting Up the Printer With External Devices.
3. Load the original document. For more information, see Loading Original Documents
In Windows Vista:
4.
.
a. Click ® Programs.
b. Click Dell Printers.
Page 11

c. Click Dell 968 AIO Printer .
In Windows XP or Windows 2000:
Click Start® Programs or All Programs ® Dell Printers® Dell 968 AIO Printer.
5. Select Dell Fax Solutions .
The Dell Fax Solutions Software dialog box opens.
6. Click Send a new fax.
The Send fax dialog box opens.
7. Enter the contact information for the recipient into the Name, Company, and Fax Number fields, or
click Select a recipient from phonebook to add existing contacts to the recipient list.
8. If you want to add the new contact to the phonebook, click Add this recipient to phonebook .
9. If you want to send the fax to more than one recipient, click Add another recipient.
a. Enter the contact information for the next recipient into the Name, Company, and Fax
Number fields, or click Select a recipient from phonebook to add existing contacts to the
recipient list.
b. If you want to add the new contact to the phonebook, click Add this recipient to
phonebook.
c. If you manually enter the contact information, click Add to add the contact to the Recipients
list.
d. To make changes to the Recipients information, select the recipient, and then click Edit.
e. To remove the contact from the Recipients list, select the recipient, and then click Remove.
f. Repeat step a
through step e until your Recipients list is complete.
10. Click Next.
11. Follow the instructions on your computer screen to send a fax.
Sending Advanced Faxes
Using the Operator Panel
If you are using your printer as a standalone fax machine, you can use the various Fax submenus to
customize your outgoing faxes. From the Fax Menu, you can:
Send a delayed fax
Send faxes using your Speed Dial list
Manage your phonebook to send faxes to individuals or groups
Personalize your fax cover page
Create and print a fax history
Page 12

Create and print a fax report
For more information, see Fax Mode.
Using Your Computer
Use the Dell Fax Solutions Software to take advantage of advanced fax features. In addition to basic
faxing, the Dell Fax Solutions Software also allows you to:
Send a delayed fax
Send electronic files and paper documents in a single fax operation
Send faxes using your Speed Dial list
Manage your phonebook to easily send faxes to individuals or groups
Personalize and store various cover pages
Create and print a fax history
Create and print a fax report
For more information, see Using the Dell Fax Solutions Software
In Windows Vista:
1.
.
a. Click ® Programs.
b. Click Dell Printers.
c. Click Dell 968 AIO Printer .
In Windows XP and Windows 2000:
Click Start® Programs or All Programs ® Dell Printers® Dell 968 AIO Printer.
2. Click Dell Fax Solutions.
The Dell Fax Solutions Software dialog box opens.
3. Click the appropriate links on the Dell Fax Solutions Software dialog box to accomplish your
task.
4. Follow the instructions on the computer screen.
Sending a Fax Through an Automated Answering System
Some companies have automated answering systems that require you to respond to a series of
questions to route you to the department you wish to call. After answering the questions by pressing the
appropriate buttons, you eventually get connected to the proper department. To send a fax to a
company that employs an automated answering system, set up your printer for On Hook dialing.
1. Make sure your printer is properly set up to send and receive faxes. For more information, see
Setting Up the Printer With External Devices
2. Load the original document facing down on the scanner glass. For more information, see Loading
Original Documents.
3. From the operator panel, press the up or down Arrow button to scroll to Fax, and then press
.
Page 13
the Select button .
4. Press the up or down Arrow button to scroll to On Hook Dial, and then press the Select
button
5. Modify your cover page information if necessary, and then press the Back button .
6. Using the keypad, dial the telephone number of the company.
7. Using the keypad, navigate through the automated answering system.
.
8. When you hear the fax tone, press the Start button
To cancel the fax job, press the Cancel button
to begin sending your fax.
on your printer.
Receiving a Fax
Receiving a Fax Automatically
1. Make sure your printer is on and connected to an active telephone line.
2. Make sure Auto Answer is turned on or is currently within the scheduled on period.
a. From the main menu, press the up or down Arrow button
press the Select button
b. Press the up or down Arrow button to scroll to Auto Answer.
c. Press the left or right Arrow button
Select button
.
.
to scroll to On or Scheduled, and then press the
to scroll to Fax, and then
d. If you selected Scheduled, the Auto Answer Schedule screen appears. Use the keypad to
specify the time you want Auto Answer to be turned on and turned off.
e. Press the Back button .
3. Set the number of rings the printer should allow before answering the incoming fax.
a. From the main menu, press the up or down Arrow button
press the Select button
b. Press the down Arrow button to scroll to Fax Setup, and then press the Select button .
c. Press the up or down Arrow button to scroll to Ringing and Answering, and then press
the Select button
d. Press the up or down Arrow button to scroll to Pick-up On.
e. Press the left or right Arrow button
before the printer receives the fax.
f. Press the Back button .
.
.
to select the number of rings you want to allow
to scroll to Fax, and then
Page 14
When the number of set rings is detected, the printer automatically receives the fax.
Receiving a Fax Manually
You can turn the Auto Answer feature off if you wish to control the faxes that you receive. This is useful
if you do not want to receive unsolicited faxes, if you rarely receive faxes, or if it is expensive to use
faxes in your area.
1. Make sure your printer is on and properly set up to receive faxes. For more information, see
Setting Up the Printer With External Devices
2. Turn Auto Answer off.
.
a. From the main menu, press the up or down Arrow button
press the Select button
b. Press the up or down Arrow button to scroll to Auto Answer.
c. Press the left or right Arrow button
d. Press the Back button
3. When the telephone rings, pick up the telephone attached to the printer and listen for the fax
calling tone.
4. If you hear the fax calling tone, type DELL# (3355#) on the operator panel keypad or on the
telephone keypad.
NOTE: DELL# is the default answer code. However, you can change this to any code. For
more information, see Changing the Pickup Code
.
to scroll to Off.
.
.
to scroll to Fax, and then
Changing the Pickup Code
1. From the main menu, press the up or down Arrow button to scroll to Fax, and then press
the Select button
.
2. Press the down Arrow button to scroll to Fax Setup, and then press the Select button .
3. Press the up or down Arrow button to scroll to Ringing and Answering, and then press the
Select button
4. Press the up or down Arrow button to scroll to Manual Pickup Keycode, and then press the
Select button
5. Use the keypad to specify a new one- to seven-digit keycode.
NOTE: Valid characters for the pickup code are 0–9, pound (#), and star (*). Any other
characters entered are ignored.
6. Press the Select button
.
.
.
Printing a Long Fax
Page 15

Using the Operator Panel
1. From the main menu, press the up or down Arrow button to scroll to Fax, and then press the
Select button
.
2. Press the down Arrow button to scroll to Fax Setup, and then press the Select button .
3. Press the up or down Arrow button to scroll to Fax Printing, and then press the Select
button
.
4. From If Too Big, press the left or right Arrow button to choose an option.
5. Press the Back button
Using Your Computer
.
1. Turn on your computer and printer, and make sure they are connected.
2. Make sure your printer is properly set up to send and receive faxes. For more information, see
Setting Up the Printer With External Devices.
In Windows Vista:
3.
a. Click ® Programs.
b. Click Dell Printers.
c. Click Dell 968 AIO Printer .
In Windows XP or Windows 2000:
Click Start® Programs or All Programs ® Dell Printers® Dell 968 AIO Printer.
4. Select Dell Fax Setup Utility .
The Dell Fax Setup Wizard Query dialog box opens.
5. Click No.
The Dell Fax Setup Utility dialog box opens.
6. Click the Fax Printing/Reports tab.
7. From the If fax is too big field, choose an option.
8. Click OK.
A confirmation dialog box opens.
9. Click OK to overwrite the fax settings on your printer.
10. Click Close.
Printing a Fax on Both Sides of the Page
Using the Operator Panel
Page 16

1. From the main menu, press the up or down Arrow button to scroll to Fax, and then press
the Select button .
2. Press the down Arrow button to scroll to Fax Setup, and then press the Select button .
3. Press the up or down Arrow button to scroll to Fax Printing, and then press the Select
button
4. From the 2 -Sided Print menu item, press the left or right Arrow button to scroll to 2 Sided
Print.
5. Press the Back button .
Using the Computer
1. Turn on your computer and printer, and make sure they are connected.
2. Make sure your printer is properly set up to send and receive faxes. For more information, see
Setting Up the Printer With External Devices.
In Windows Vista:
3.
.
a. Click ® Programs.
b. Click Dell Printers.
c. Click Dell 968 AIO Printer .
In Windows XP or Windows 2000:
Click Start® Programs or All Programs ® Dell Printers® Dell 968 AIO Printer.
4. Select Dell Fax Setup Utility .
The Dell Fax Setup Wizard Query dialog box opens.
5. Click No.
The Dell Fax Setup Utility dialog box opens.
6. Click the Fax Printing/Reports tab.
7. From the 2 -sided print field, choose Print duplex.
8. Click OK.
A confirmation dialog box opens.
9. Click OK to overwrite the fax settings on your printer.
10. Click Close.
Changing the Fax Setup
Using the Operator Panel
Page 17
If you are using your printer as a standalone fax machine, you can change the fax settings from the Fax
Setup menu. Changes made on the Fax Setup menu are permanent and are applicable to all fax jobs.
For more information, see Fax Setup Menu
.
Using the Computer
You can access the Fax Setup Utility if you want to configure the printer's fax settings from your
computer.
1. For
Windows Vista
a. Click ® Programs.
b. Click Dell Printers.
c. Click Dell 968 AIO Printer .
:
For Windows XP and Windows 2000:
Click Start® Programs or All Programs ® Dell Printers® Dell 968 AIO Printer.
2. Select Dell Fax Setup Utility .
The Dell Fax Setup Utility Wizard Query dialog box opens.
3. If you want to use the Fax Setup Utility Wizard to set up your printer for faxing, click Yes. The
Fax Setup Utility Wizard Welcome dialog box opens.
If you want to manually adjust your fax settings, click No. The Dell Fax Setup Utility dialog box
opens.
On this tab: You can:
Dialing and
Sending
Ringing and
Answering
Specify a dial method.
Enter a dial prefix.
Set the dial volume.
Enter your fax number and your name.
Specify the number of times you want the machine to redial and the time
between those attempts if the fax cannot be sent on the first try.
Choose whether to scan the entire document before or after dialing the number.
Specify a maximum send speed and a print quality for outgoing faxes.
Convert the fax automatically to be compatible with the receiving fax machine
regardless of the send settings.
Specify the number of rings before the machine receives the incoming fax.
NOTE: The number of rings set on the answering machine must always be less
than the number of rings set on the printer.
Specify a distinctive ring if your phone line has distinctive ring service activated.
Set the ring volume.
Page 18
Choose whether to use error correction.
Choose a Caller ID pattern (1 if telephones in your country have a detection
pattern using FSK or 2 if telephones in your country have a detection pattern
using DTMF). The Caller ID detection pattern is determined by the country or
region you selected during initial setup. If phones in your country use two
detection patterns, call your telecommunications company to know which pattern
it subscribes to.
Specify a manual answer code. The default code is DELL# (3355#) .
Choose whether you want to answer incoming faxes automatically or at a
scheduled time.
Specify the time when incoming faxes are answered automatically.
Select whether you want to forward a fax, or print it and then forward it.
Specify a fax number to which faxes are forwarded.
Manage blocked faxes.
Fax
Printing/Reports
Speed Dial Add to, create, or edit the speed dial or group dial speed dial lists.
Cover Page Specify if you want to send a cover page for outgoing faxes.
Choose to automatically resize oversize faxes so they print on one page, or keep
the oversized fax to scale and print on two pages.
Choose whether you want to print a footer (date, time, and page number) on
each page.
If an optional second paper tray is installed, choose from which tray the printer
picks paper. Choose Auto if you want the printer to pick the paper that matches
the size of the incoming fax.
If an optional duplex is installed, choose if you want to print on both sides of the
page.
Specify when to print a fax activity report.
Specify when you want to print a fax confirmation.
Edit or update the information that will appear on your cover page.
Choose a priority for your outgoing fax.
Include a short message.
Using Speed Dial
To make sending faxes easier, you can assign a speed dial number to 89 individual contacts and 10
groups that can hold up to 30 phone numbers each using the printer operator panel.
To create a Speed Dial or Group Dial list using your computer, see Changing the Fax Setup.
Page 19

Creating a Speed or Group Dial List
Using the Operator Panel
Adding an Entry to the Speed Dial List
1. From the main menu, press the up or down Arrow button to scroll to Fax, and then press
the Select button
.
2. Press the up or down Arrow button to scroll to Phone Book, and then press the Select
button
.
3. Press the up or down Arrow button to scroll to Add Entry, and then press the Select button
.
4. Use the keypad to enter a Name and Fax Number.
NOTE: The lowest possible speed dial number is automatically assigned to this contact. You
cannot change the speed dial number.
5. Press the Back button
Adding an Entry to the Group Dial List
.
1. From the main menu, press the up or down Arrow button to scroll to Fax, and then press
the Select button
.
2. Press the up or down Arrow button to scroll to Phone Book, and then press the Select
button
.
3. Press the up or down Arrow button to scroll to Add Group, and then press the Select
button
.
4. Use the keypad to assign a name and fax numbers to the group. Press the down Arrow button
to enter another number. You can also use the Name Search, Phone Number Search, or
Redial History option to select phone numbers. Each number you select or enter is added to the
group dial list.
NOTE: The lowest possible group dial number is automatically assigned to this contact. You
cannot change the speed dial number.
5. Press the Back button
Using the Computer
.
1. Turn on your computer and printer, and make sure they are connected.
2. Make sure your printer is properly set up to send and receive faxes. For more information, see
Setting Up the Printer With External Devices.
In Windows Vista:
3.
a. Click ® Programs.
Page 20

b. Click Dell Printers.
c. Click Dell 968 AIO Printer .
In Windows XP or Windows 2000:
Click Start® Programs or All Programs ® Dell Printers® Dell 968 AIO Printer.
4. Select Dell Fax Setup Utility .
The Dell Fax Setup Wizard Query dialog box opens.
5. Click No.
The Dell Fax Setup Utility dialog box opens.
6. Click the Speed Dial tab.
7. To add a new entry to your Speed Dial list, click on an available number from 1 to 89, and enter
the fax number and name of your new contact.
To add a new group entry to your Group Dial list, click on an available number from 90 to 99. A
smaller group list appears below the main Speed Dial list. Enter the fax numbers and names of
your new group entry.
8. To add contacts from your phonebook, click Select from phonebook .
The Select from phonebook dialog box opens.
a. Select a contact from your phonebook.
b. If you want to add the contact to your list, click on an available number on the Speed or
Group Dial Settings section.
If you want to overwrite an existing entry on your list, click the entry you want to change.
c. Click Add to or change list .
d. After adding phonebook entries to your Speed or Group Dial list, click OK to return to the
Speed Dial tab.
9. Click OK.
A confirmation dialog box appears.
10. Click OK to overwrite the settings on your printer.
11. Click Close.
Using a Speed or Group Dial List
1. From the main menu, press the up or down Arrow button to scroll to Fax, and then press
the Select button
2. Use the keypad to enter the two-digit speed dial number.
3. Press the Start button
NOTE: When you are entering numbers, if you only enter two numbers and an entry corresponds to
this number, the printer assumes you are entering a speed dial entry. If the number you entered
.
.
Page 21

does not correspond to any entry in the Phone Book, the printer assumes you are entering an
extension number.
Blocking Faxes
Creating a Blocked Fax List
Using the Operator Panel
1. From the main menu, press the up or down Arrow button to scroll to Fax, and then press
the Select button
2. Press the down Arrow button to scroll to Fax Setup, and then press the Select button .
3. Press the down Arrow button to scroll to Fax Blocking, and then press the Select button .
4. Press the down Arrow button to scroll to Blocked Fax Add Entry, and then press the Select
button
.
.
5. Use the keypad to specify a name.
6. Use the keypad to enter a fax number, and then press the Select button
NOTE: The lowest possible blocked fax number is automatically assigned to this contact. You
cannot change the blocked fax number.
Using Your Computer
1. Turn on your computer and printer, and make sure they are connected.
2. Make sure your printer is properly set up to send and receive faxes. For more information, see
Setting Up the Printer With External Devices.
In Windows Vista:
3.
a. Click ® Programs.
b. Click Dell Printers.
c. Click Dell 968 AIO Printer .
.
In Windows XP or Windows 2000:
Click Start® Programs or All Programs ® Dell Printers® Dell 968 AIO Printer.
4. Select Dell Fax Setup Utility .
The Dell Fax Setup Wizard Query dialog box opens.
5. Click No.
The Dell Fax Setup Utility dialog box opens.
6. Click the Ringing and Answering tab.
Page 22

7. Click Manage Blocked Faxes.
The Manage Blocked Faxes dialog box opens.
5. Click No.
8. Enter the fax numbers that you want to block on the list.
9. Click OK to return to the Ringing and Answering tab.
10. Click OK.
A confirmation dialog box opens.
11. Click OK to overwrite the fax settings on your printer.
12. Click Close.
Turning on Fax Blocking
Using the Operator Panel
1. From the main menu, press the up or down Arrow button to scroll to Fax, and then press
the Select button
.
2. Press the down Arrow button to scroll to Fax Setup, and then press the Select button .
3. Press the down Arrow button to scroll to Fax Blocking, and then press the Select button .
4. From Block List, press the left or right Arrow button to choose On.
5. Press the Back button
.
If the printer detects a fax from one of the numbers on the Blocked Fax List, the transmission is
disconnected.
Using Your Computer
1. Turn on your computer and printer, and make sure they are connected.
2. Make sure your printer is properly set up to send and receive faxes. For more information, see
Setting Up the Printer With External Devices.
In Windows Vista:
3.
a. Click ® Programs.
b. Click Dell Printers.
c. Click Dell 968 AIO Printer .
In Windows XP or Windows 2000:
Click Start® Programs or All Programs ® Dell Printers® Dell 968 AIO Printer.
4. Select Dell Fax Setup Utility .
The Dell Fax Setup Wizard Query dialog box opens.
Page 23

The Dell Fax Setup Utility dialog box opens.
6. Click the Ringing and Answering tab.
7. Click Manage Blocked Faxes.
The Manage Blocked Faxes dialog box opens.
8. Select Enable fax blocking.
9. Click OK to return to the Ringing and Answering tab.
10. Click OK.
A confirmation dialog box opens.
11. Click OK to overwrite the fax settings on your printer.
12. Click Close.
Blocking Faxes Without Caller ID
Using the Operator Panel
1. From the main menu, press the up or down Arrow button to scroll to Fax, and press the
Select
button.
2. Press the down Arrow button to scroll to Fax Setup, and press the Select button.
3. Press the down Arrow button to scroll to Fax Blocking, and press the Select button.
4. From Block No-ID, press the left or right Arrow button to choose On.
5. Press the Select
button.
If the printer detects a fax from a machine without Caller ID, the transmission is disconnected.
Using Your Computer
1. Turn on your computer and printer, and make sure they are connected.
2. Make sure your printer is properly set up to send and receive faxes. For more information, see
Setting Up the Printer With External Devices.
In Windows Vista:
3.
a. Click ® Programs.
b. Click Dell Printers.
c. Click Dell 968 AIO Printer .
In Windows XP or Windows 2000:
Click Start® Programs or All Programs ® Dell Printers® Dell 968 AIO Printer.
4. Select Dell Fax Setup Utility .
Page 24

The Dell Fax Setup Wizard Query dialog box opens.
5. Click No.
The Dell Fax Setup Utility dialog box opens.
6. Click the Ringing and Answering tab.
7. Click Manage Blocked Faxes.
The Manage Blocked Faxes dialog box opens.
8. Select Always block faxes from senders missing a valid Caller ID.
9. Click OK to return to the Ringing and Answering tab.
10. Click OK.
A confirmation dialog box opens.
11. Click OK to overwrite the fax settings on your printer.
12. Click Close.
Creating Fax Activity Report
Using the Operator Panel
1. From the main menu, press the up or down Arrow button to scroll to Fax, and then press
the Select button
2. Press the down Arrow button to scroll to Fax Setup, and then press the Select button .
3. Press the up or down Arrow button to scroll to History and Reports, and then press the
Select button
4. From the History and Reports menu, you can view or print your fax activity.
Using the Computer
1.
In Windows Vista
a. Click ® Programs.
.
.
:
b. Click Dell Printers.
c. Click Dell 968 AIO Printer .
In Windows XP and Windows 2000:
Click Start® Programs or All Programs ® Dell Printers® Dell 968 AIO Printer.
2. Click Dell Fax Solutions.
Page 25

The Dell Fax Solutions Software dialog box opens.
3. Click Print Activity Report .
4. From the Display drop-down menu, select which faxes you would like to print a report.
5. Select a date range for your report.
6. Click the Print icon in the upper-left corner of the dialog box to print the fax report.
Page 26
About Your Printer
Understanding the Printer Parts
Understanding the Operator Panel
You can use your printer to do a variety of things. A few important things to note:
If the printer is connected to a computer, you can use either the printer operator panel or the
printer software to produce quality documents.
You do need to connect your printer to a computer to print, scan, or use the Save Photos to
Computer function or the Print Files mode.
You
do not
from memory cards or a PictBridge-enabled camera.
NOTE: The printer (whether it is connected to a computer or not) must be connected to a telephone
line before you can send a fax.
NOTE: If you use a DSL modem for your computer, you must install a DSL filter on the telephone
line attached to your computer.
need to connect your printer to a computer to make photocopies, send faxes, or print
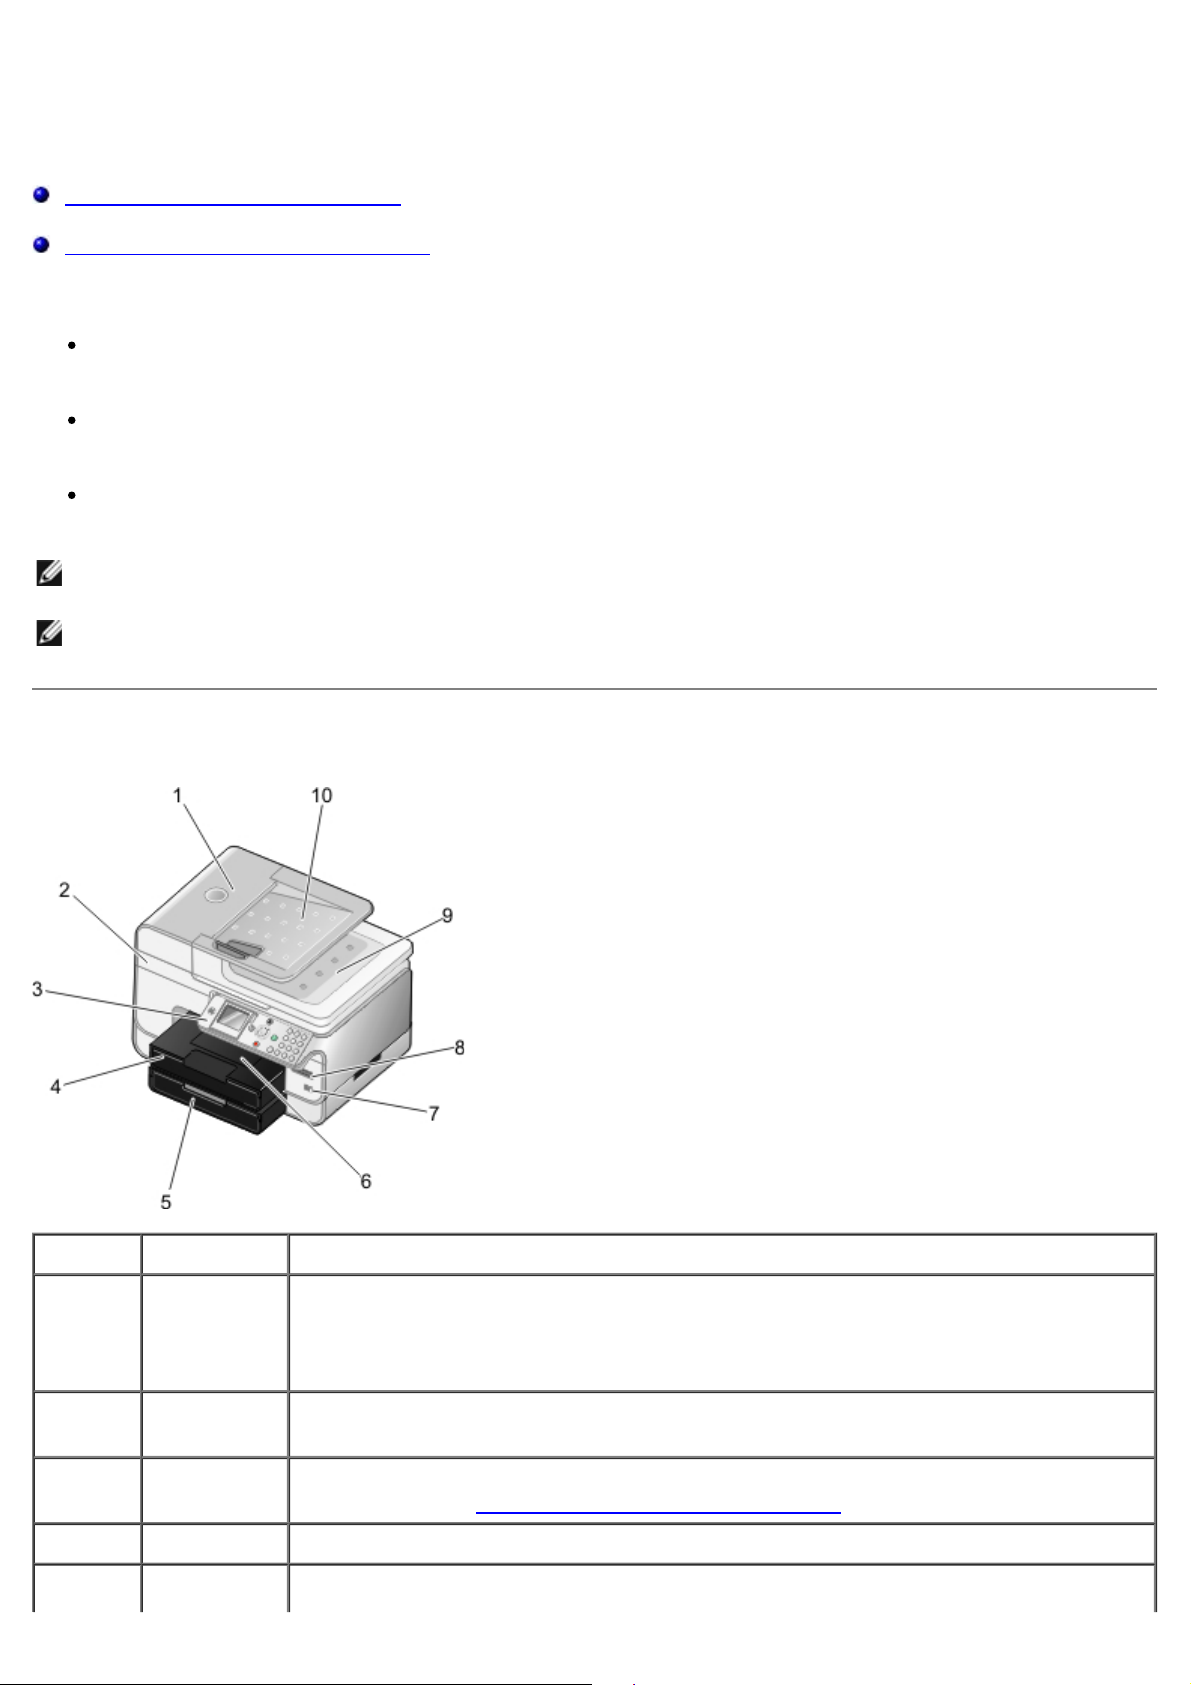
Understanding the Printer Parts
Number: Part: Description:
1 Automatic
Document
Feeder
(ADF)
Part that feeds original documents into the printer.
2 Scanner
base unit
3 Operator
panel
4 Paper tray Tray that holds blank paper.
5 Optional Tray that you can purchase separately to increase the amount of blank paper
Unit you lift to gain access to the ink cartridges.
Panel you use to control copying, scanning, faxing, and printing. For more
information, see Understanding the Operator Panel
.
Page 27
paper tray that your printer can hold.
6 Paper exit
tray
Tray that holds the paper as it exits the printer.
NOTE: Pull the paper exit tray stop straight out to extend it.
7 PictBridge
connector
8 Memory
card slots
9 Top cover
with
integrated
ADF exit
tray
10 ADF input
tray
The connector you use to connect your PictBridge-enabled digital camera or a
USB key to your printer.
Slots into which you insert a memory card containing digital pictures.
NOTE: The LCD only displays JPG and a limited set of TIFF files found on the
memory card. To view other image types stored on the memory card, open the
Memory Card Manager. For more information, see Using Memory Card
Manager.
Top of printer that holds your document or photo flat while you scan it. You
can also pick up your original document here after it has gone through the
ADF.
Tray that holds original documents. Use it to scan, copy, or fax multiple-page
documents.
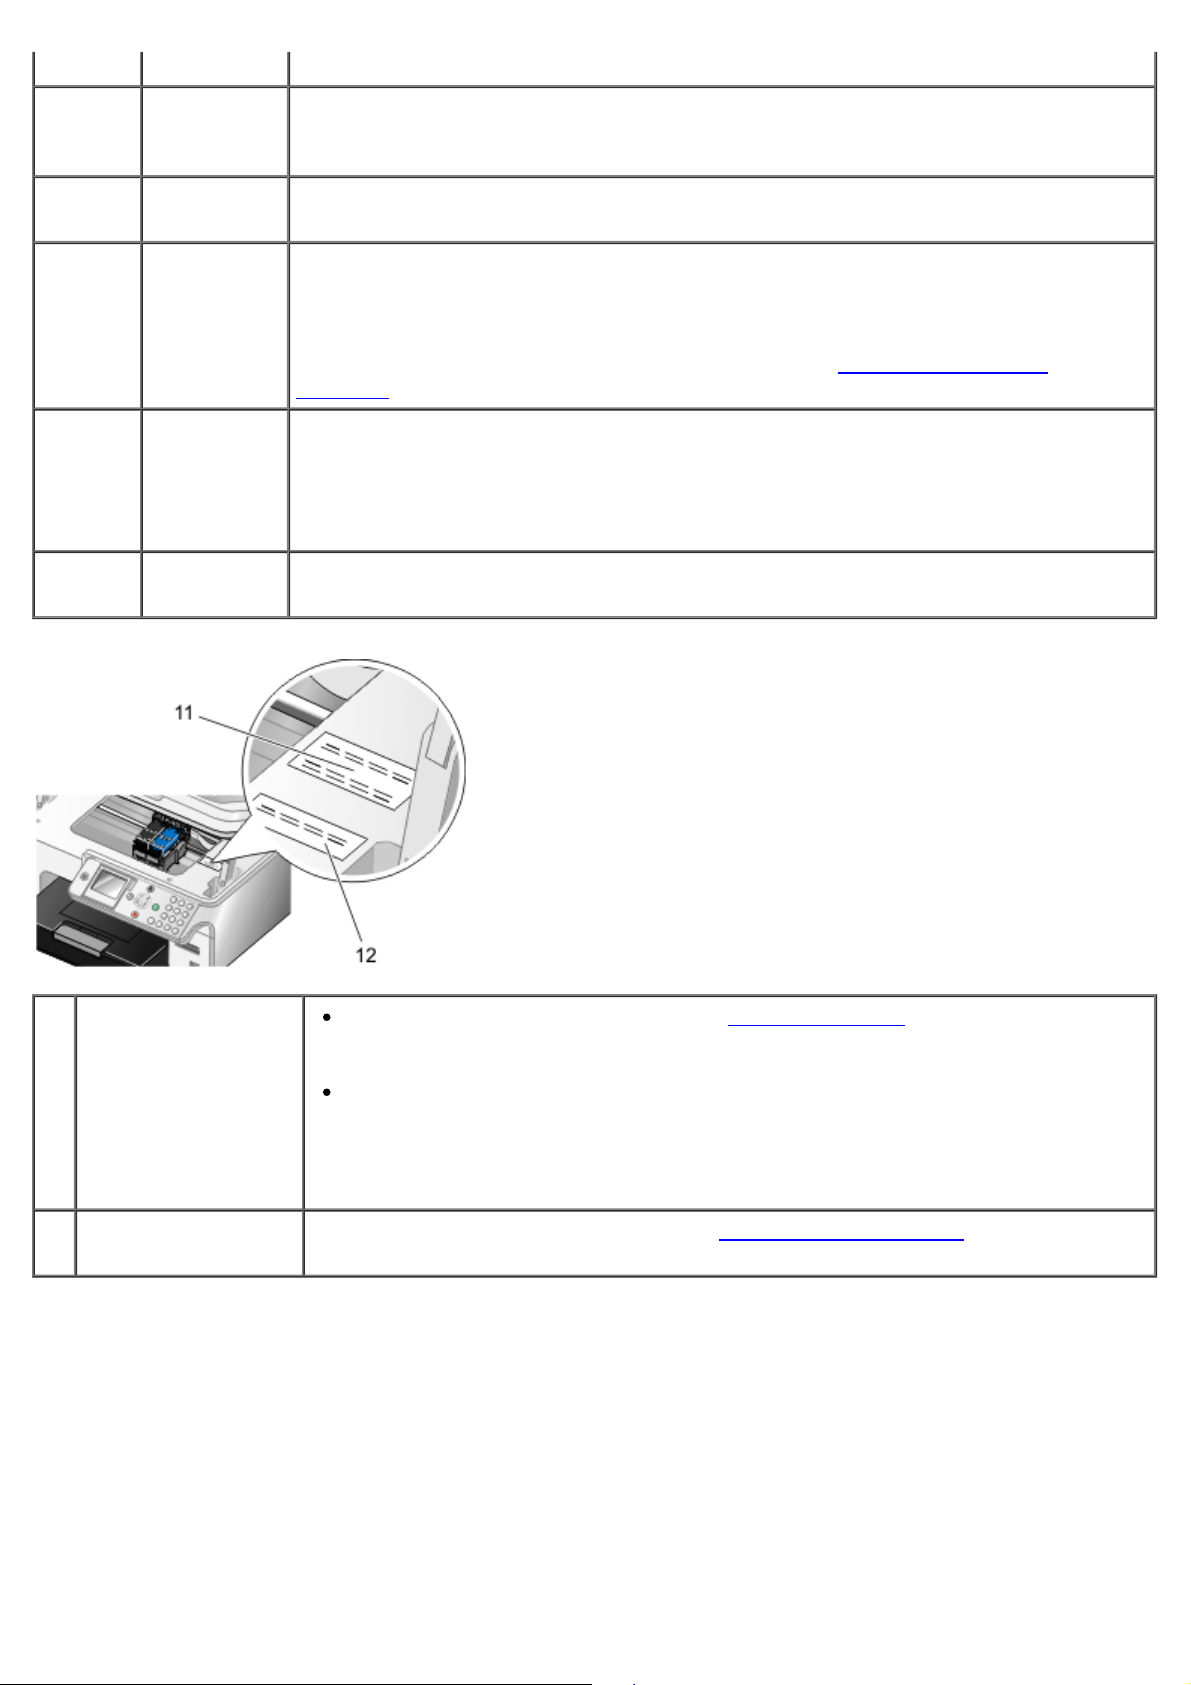
11 Express Service
Code
12 Supplies Reorder
Label
Identify your printer when you use support.dell.com or contact technical
support.
Enter the Express Service Code to direct your call when contacting
technical support.
NOTE: The Express Service Code is not available in all countries.
To order ink cartridges or paper, visit www.dell.com/supplies
.
Page 28
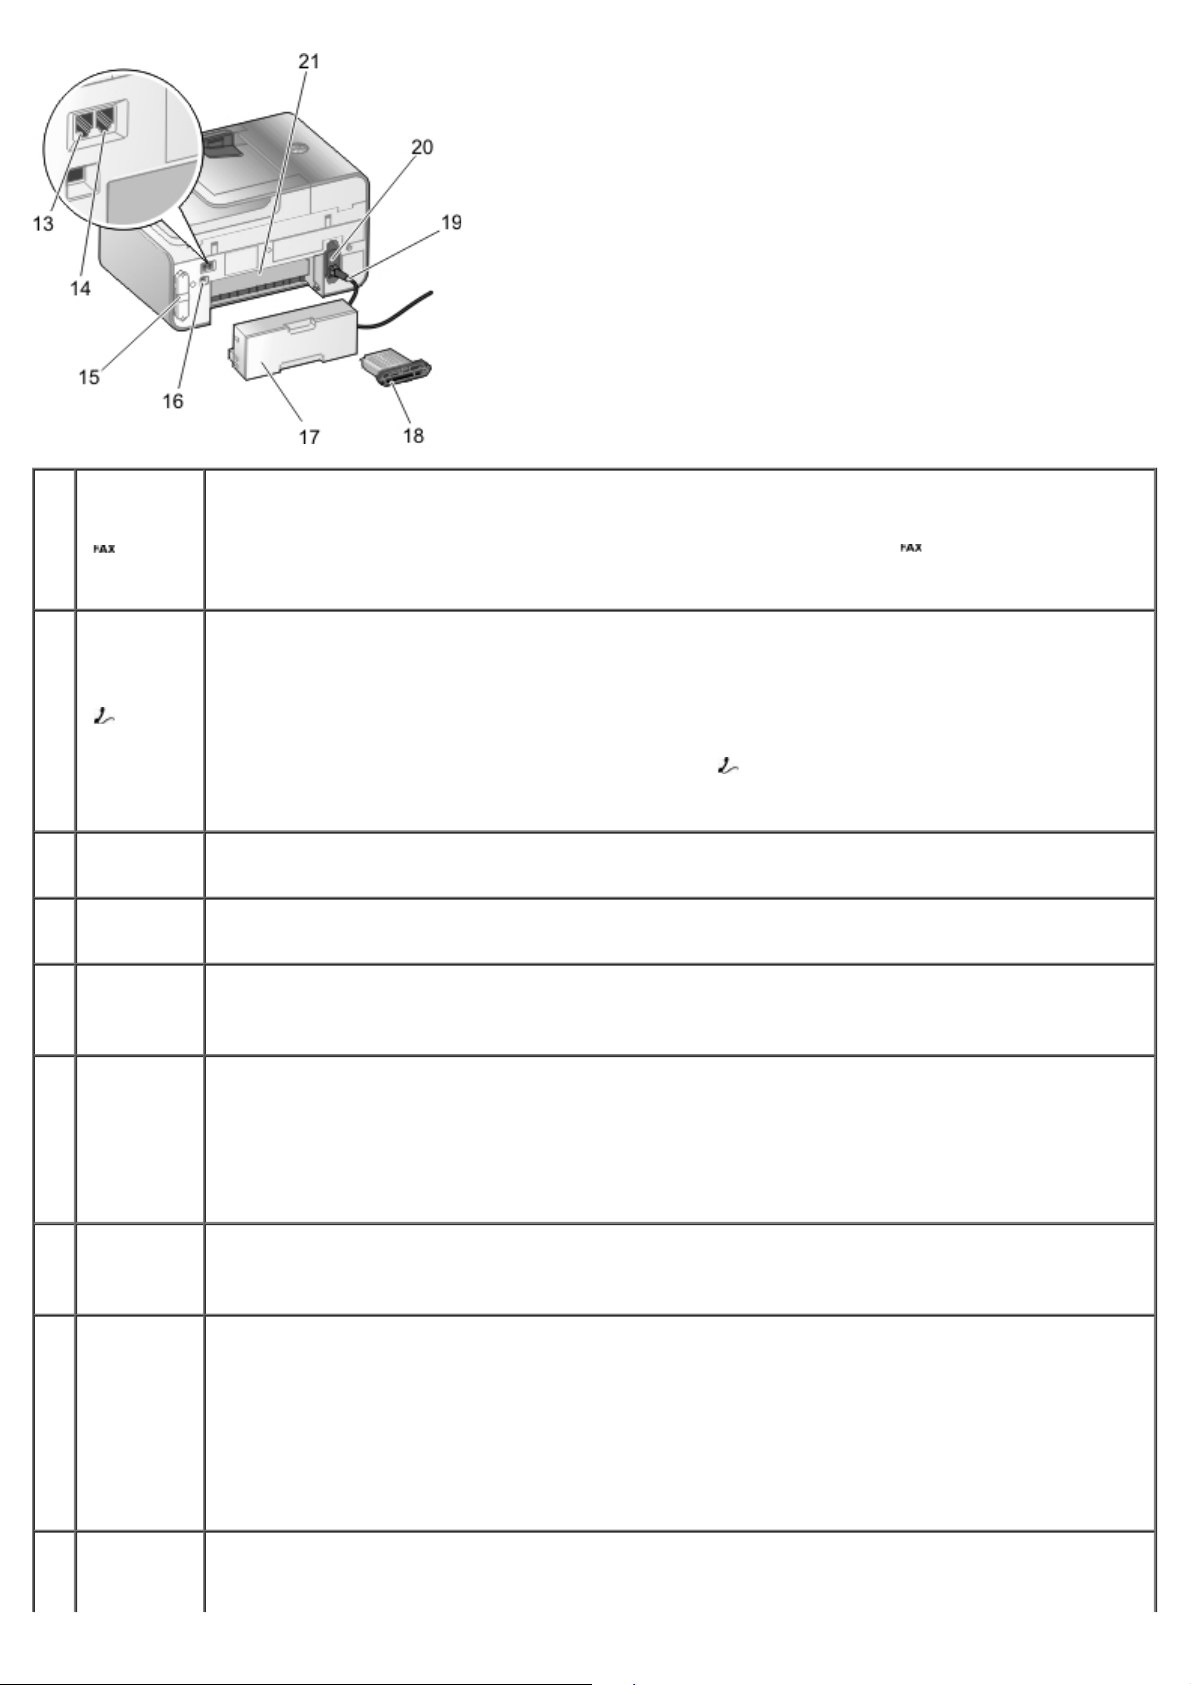
13 FAX
connector
(
connector)
— left
Slot into which you plug an active telephone line to send and receive faxes.
NOTE: Do not connect additional devices to the FAX connector (
and do not connect a DSL (digital subscriber line) or ISDN (integrated services digital
network) to the printer without using a digital line filter.
— left connector),
14 PHONE
jack
connector
(
— right
connector)
15 Back
cover
16 USB
connector
17 Optional
duplex
unit
18 Optional
Dell
Internal
Network
Adapter
1150
Slot into which you plug additional devices, such as a data/fax modem, telephone, or
answering machine. Remove the blue plug before use.
NOTE: If the phone communication is serial in your country (such as Germany,
Sweden, Denmark, Austria, Belgium, Italy, France, and Switzerland), you must remove
the blue plug from the PHONE jack connector (
the supplied yellow terminator for faxing to work correctly. You will not be able to use
this port for additional devices in these countries.
Cover that you have to remove to install the Dell™ Internal Network Adapter 1150.
Slot into which you plug the USB cable (sold separately). The other end of the USB
cable plugs into your computer.
Part that you can purchase separately to print on both sides of the paper.
A networking device that you can purchase separately to set up your printer on a
wireless or Ethernet network.
— right connector), and then insert
19 Power
cord
connector
20 Power
supply
21 Rear
access
Connects the printer power supply to the power outlet using the supplied countryspecific power cord.
Supplies power to the printer.
NOTE: The power supply is removable. When the power supply is removed from the
printer, but remains plugged into a power outlet, an LED is illuminated to notify you
that power is present.
NOTE: If the power is off when you unplug your printer, the power will be off when
you plug it back in.
Part that you have to open to clear paper jams.
Page 29
door
(beneath
the
optional
duplex
unit)
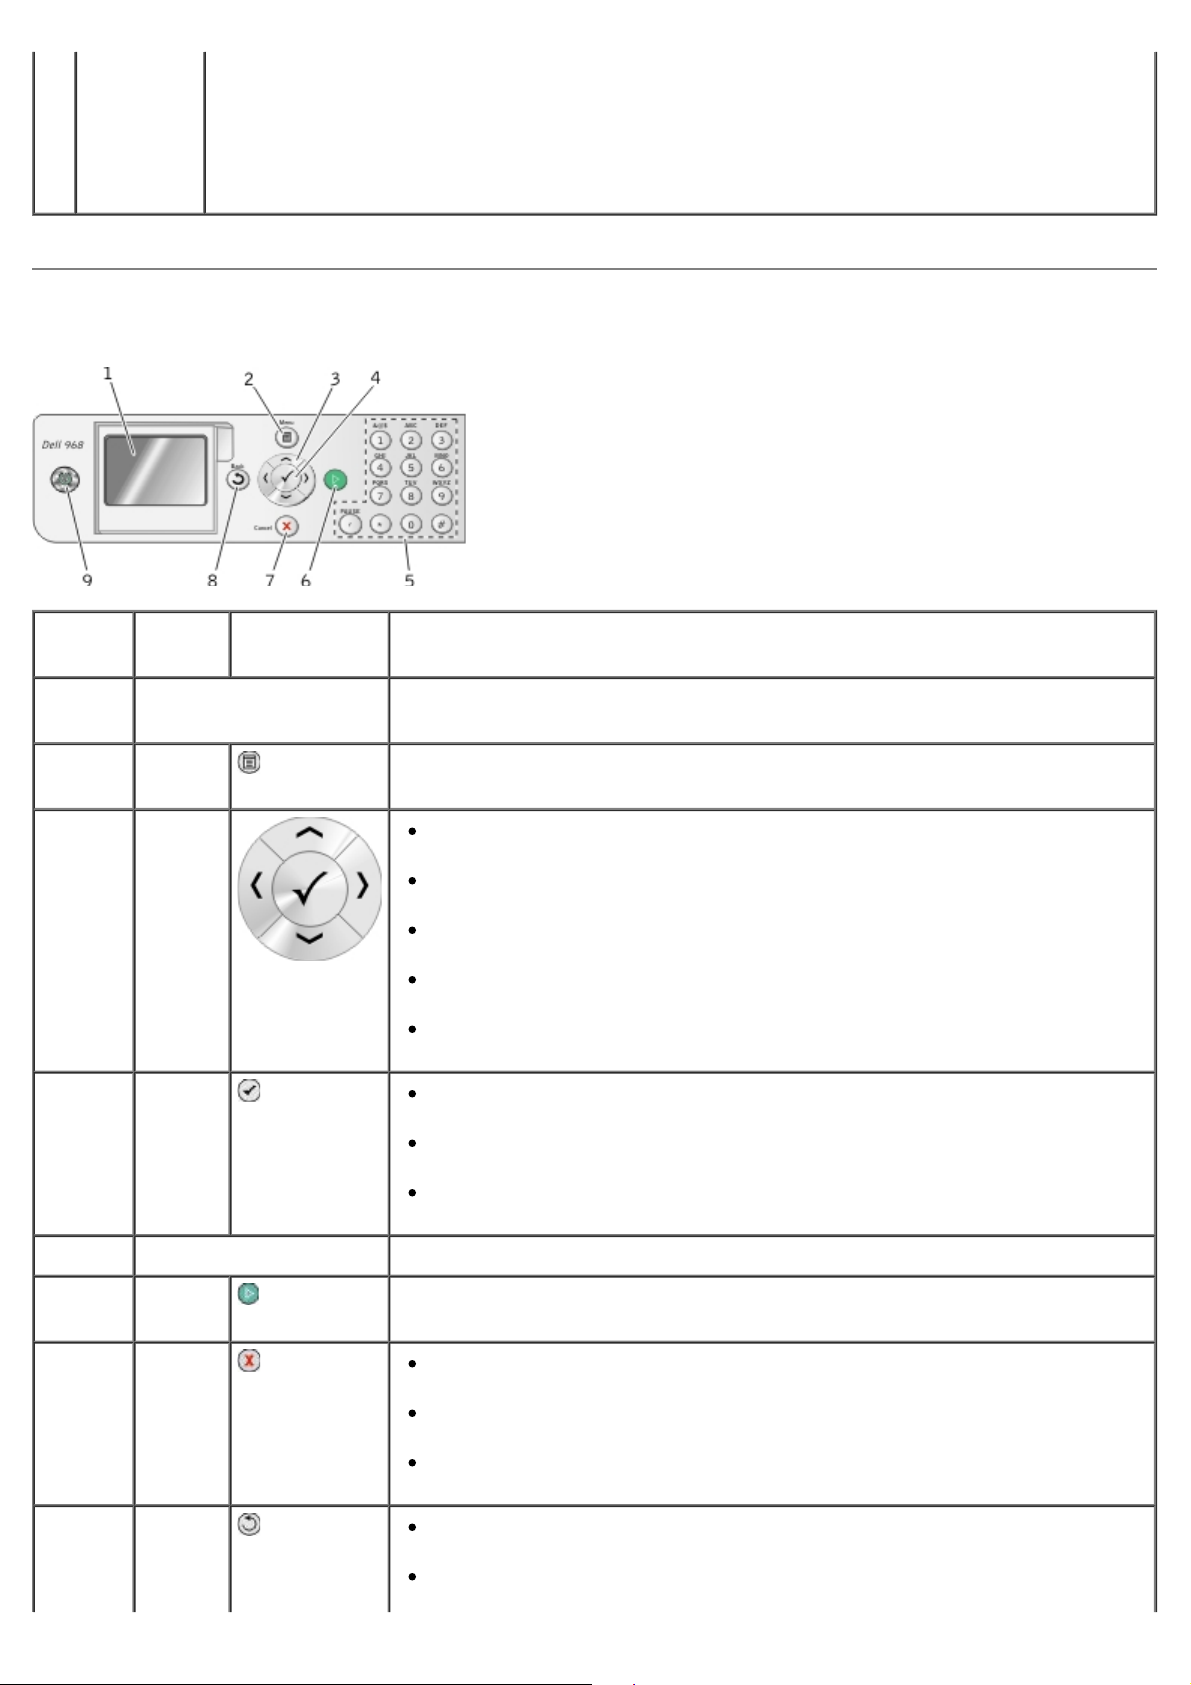
Understanding the Operator Panel
Number Use
the:
1 LCD display Display scanning, copying, faxing, and printing options as well as
2 Menu
button
3 Arrow
buttons
4 Select
button
To:
status and error messages.
Enter a menu or a submenu.
Navigate menus and menu items.
Decrease/increase the number of copies.
Change the selected modes.
Navigate photos on a memory card or digital camera.
Increase or decrease the values when setting the date and time.
Select a menu item.
Select an image to be printed (in Photo mode).
Initiate a paper feed by holding the button for three seconds.
5 Keypad Enter numerical data or text.
6 Start
button
7 Cancel
button
8 Back
button
Initiate a copy, scan, or fax.
Cancel a scan, print, or copy job in progress.
Cancel a copy job (using only the printer), and eject the page.
Exit a menu, and return to the default settings.
Return to the previous menu or screen.
Save the changes made on a sub-menu temporarily.
Page 30

9 Power
button
When the printer is off, press the Power button to turn your
printer on.
When the printer is on, press the Power button to put your
printer in a Power Save state. Your printer consumes minimal
power in this state.
When the printer is on or in the Power Save state, press and hold
the Power button
for 2 seconds to turn your printer off.
NOTE: Do
in use. When the printer is off, it requires up to 1 watt of power to
perform regular maintenance on cartridges.
not
unplug your printer from the electrical outlet when not
Page 31

Understanding the Software
Using the Dell All-In-One Center
Using the Dell Fax Solutions Software
Using Printing Preferences
Using Memory Card Manager
Dell Ink Management System
Removing and Reinstalling Software
Installing the Optional XPS Driver
The printer software includes:
Dell All -In- One Center – Allows you to perform various scan, copy, fax, and print operations
with newly scanned and previously saved documents and images.
Dell Fax Solutions Software– Allows you to fax electronic or scanned documents.
Printing Preferences– Allows you to adjust printer settings.
Memory Card Manager– Allows you to display, manage, edit, print, and scan photos from your
memory card or USB memory key to your computer.
Dell Ink Management System™ – Warns you when your printer is running low on ink.
Corel® Snapfire™ Plus – Allows you to view, manage, and edit photos stored on your computer.
Using the Dell All-In-One Center
The Dell All -In- One Center allows you to:
Scan, copy, fax, and use productivity tools.
Page 32

Select where you want to send the scanned image.
Select the quantity and color of your copies.
Access troubleshooting and maintenance information.
Preview images you want to print or copy.
Manage photos (copy them to folders, print them, perform creative copying).
NOTE: If your printer is connected to a network using a wireless or Ethernet connection, you must
start all scan and copy tasks from the printer operator panel instead of the Dell All-In-One Center.
To access the Dell All-In- One Center :
1.
In Windows Vista™:
a. Click ® Programs.
b. Click Dell Printers.
c. Click Dell 968 AIO Printer .
In Windows® XP and Windows 2000:
Click Start® Programs or All Programs ® Dell Printers® Dell 968 AIO Printer.
2. Select Dell All -In- One Center .
The Dell All-In-One Center includes four main sections:
In this section: You can:
Preview Now
Scan and Fax
Select a portion of the preview image to scan or copy.
View an image of what will be printed or copied.
Select the program where you want to send the scanned image.
Select the type of image being scanned.
Select a quality setting for your scan.
Select Scan Now to scan your document or photo.
Select Fax Now to scan, and then fax a copy of your document or photo.
NOTE: Click See More Scan Settings to view all settings.
Copy Select the number of copies.
Select the quality and color of your copies.
Select a quality setting for your copies.
Specify the blank paper size.
Specify the size of the original document being copied.
Lighten or darken your copies (this can also be accomplished using the operator
panel).
Page 33

Resize your copies.
Select Copy Now to create copies.
NOTE: Click See More Copy Settings to view all settings.
Productivity
Tools
Fax an image or document.
Access the Dell Fax Setup Utility.
E-mail an image or document.
Repeat an image several times on one page.
Resize an image.
Print an image as a multi-page poster.
Print more than one page on a sheet of paper.
Save an image on your computer.
Save multiple photos.
Scan and save to PDF.
Edit text found in a scanned document (Optical Character Recognition).
Modify an image with a photo editor.
For more information, click Help in the Dell All -In-One Center.
Using the Dell Fax Solutions Software
The Dell Fax Solutions Software allows you to:
Send a fax.
Click Send a new fax, and then follow the instructions on the computer screen.
Adjust other fax settings.
Click Adjust speed dial list and other fax settings to customize various fax settings.
View and manage your phonebook.
Click View phonebook to open the Phone book. You can add, edit, or delete contact and group
information. You can also add a contact or group to your speed dial list.
View and customize cover page.
Page 34

Click View cover pages to open the Cover Pages dialog. You can customize, add logos to, or
choose from a variety of different ready-made cover pages for your fax.
View fax history.
Click View full activity log to see or print a detailed list of all fax activity.
Create a fax report.
Click Print activity report to see a detailed report of all fax activity. Click the Print icon to print
your activity report.
NOTE: If your printer is connected to a network using a wireless or Ethernet connection, you
must start a scanned fax from the printer operator panel instead of the Dell Fax Solutions
Software.
To access the Dell Fax Solutions Software:
In Windows Vista:
1.
a. Click ® Programs.
b. Click Dell Printers.
c. Click Dell 968 AIO Printer .
In Windows XP and 2000:
Click Start® Programs or All Programs ® Dell Printers® Dell 968 AIO Printer.
2. Click Dell Fax Solutions.
The Dell Fax Solutions Software dialog box opens.
Using Printing Preferences
You can change your printer settings in Printing Preferences depending on the type of project you want
to create.
To access Printing Preferences when a document is open:
Page 35

1. Click File® Print .
The Print dialog box opens.
2. Click Preferences, Properties, Options, or Setup (depending on the program or operating
system).
The Printing Preferences dialog box opens.
To access Printing Preferences when a document is not open:
In Windows Vista
1.
a. Click ® Control Panel.
b. Click Hardware and Sound .
c. Click Printers.
In Windows XP
Printers and Faxes .
In Windows 2000
2. Right-click the Dell 968 AIO Printer icon.
3. Click Printing Preferences .
NOTE: Changes made to the printer settings from the Printers folder become the default
settings for most programs.
The Printing Preferences dialog box has three sections:
Tab Options
:
, click Start® Settings® Control Panel ® Printers and Other Hardware®
, click Start® Settings® Printers.
Print Setup Quality/Speed — Select Automatic, Draft, Normal, or Photo depending on your
desired output quality. Draft is the fastest option but should not be selected if you have
a photo cartridge installed. If you select Photo, you can choose between 4800 dpi and
1200 dpi for glossy photo printing.
Media Type — Allows you to set the paper type manually, or have the printer detect the
paper type automatically.
Paper Size — Select the size of your paper.
Paper Source — Select Automatic, Tray 1/Bypass, or Tray 2.
NOTE: Paper Source is only available if an optional 2nd paper tray is attached to the
printer.
Print in black and white — Print your color images in black and white to save the ink in
your color cartridge.
NOTE: You cannot select this setting if you have selected Use Color Cartridge for all
Black Printing .
Borderless — Select the check box if you want to print borderless photos.
Orientation — Select how the document is arranged on the printed page. You can print
using portrait or landscape orientation.
Envelope — Select the check box if you want to print an envelope. The Paper Size area
lists the envelope sizes available for printing.
Page 36

Copies — Customize how the printer prints several copies of a single print job: Collated,
Normal, or Print Last Page First.
Advanced 2-sided printing — Select this to print on both sides of the paper. Select from
Maintenance Install Ink Cartridges
Automatic, Manual, or Print Duplex .
Extend dry time — Select this option if you notice ink is smeared on the bottom of the
pages of your duplex print jobs. This allows the ink on the paper to dry before the
duplex unit feeds it back into the printer, and prints on the other side.
NOTE: You will need to wait a few seconds longer for your duplex jobs to finish if your
turn this feature on.
Layout — Select Normal, Banner, Mirror, N-up, Poster, Booklet, or Borderless.
Automatic Image Sharpening — Automatically select the best image-sharpening level
based on image content.
Dell Customer Experience Improvement Program — Allows you to access information
about, and change your status in, the Dell Customer Experience Improvement Program.
More Options — Allows you to specify Appearance Mode and Complete-A-Print
settings. You can also view the paper type that the printer detects.
Clean Ink Cartridges
Align Ink Cartridges
Print a Test Page
Network Support
Using Memory Card Manager
Memory Card Manager allows you to display, manage, edit, print, and save photos from your memory
card or USB memory key to your computer.
To launch Memory Card Manager:
1. Insert a memory card into the memory card slot or a USB key into the PictBridge port on the front
Page 37

of the printer.
If your color ink cartridge is out of ink, you can choose to print color documents in grayscale by
NOTICE: Do not remove the memory card or USB key, or touch the printer near the area of
the memory card or USB key while actively reading, writing, or printing from these devices.
Data corruption can occur.
2.
In Windows Vista:
a. Click ® Programs.
b. Click Dell Printers.
c. Click Dell 968 AIO Printer .
In Windows XP and 2000:
Click Start® Programs or All Programs ® Dell Printers® Dell 968 AIO Printer.
3. Select Activate Memory Card Manager.
Dell Ink Management System
Each time you print a job, a printing progress screen appears, which shows the progress of the print job
as well as the amount of ink remaining and the approximate number of pages remaining in the
cartridge. The page counter is hidden during the first 50 pages of cartridge use, until printing habits are
learned and a more accurate count can be given. The number of pages remaining changes as a result of
the type of print jobs the printer completes.
When your ink cartridge levels are low, a Low Ink Warning appears on your screen when you try to
print. This warning is displayed every time you print until you install a new ink cartridge. For more
information, see Replacing Ink Cartridges
When one or both of your ink cartridges are empty, the Reserve Tank window appears on your screen
when you try to print. If you continue printing, the print job may not print as you expect.
If your black ink cartridge is out of ink, you can choose to print black from the color ink cartridge
(Process Black) by selecting Complete-A-Print before clicking the Continue Printing button. If you
select Complete-A-Print and click Continue Printing , Process Black is used for all black printing until
the black cartridge is replaced, or the option is cleared from More Options, located on the Advanced
tab of the Printing Preferences. The Reserve Tank dialog does not display again until after the low
ink cartridge has been replaced. The Complete-A-Print check box is automatically reset when a new
or different cartridge is installed.
.
Page 38

selecting Complete-A-Print before clicking the Continue Printing button. If you select Complete-A-
Print, and click Continue Printing, all color documents will print in black and white until the color
cartridge is replaced or the option is cleared from More Options, located on the Advanced tab of the
Printing Preferences. The Reserve Tank dialog does not display again until after the low ink
cartridge has been replaced. The Complete-A-Print check box is automatically reset when a new or
different cartridge is installed.
Removing and Reinstalling Software
If your printer does not function properly, or communication error messages appear when using your
printer, you can remove and reinstall the printer software.
1.
In Windows Vista:
a. Click ® Programs.
b. Click Dell Printers.
c. Click Dell 968 AIO Printer .
In Windows XP and WIndows 2000:
Click Start® Programs or All Programs ® Dell Printers® Dell 968 AIO Printer.
2. Click Uninstall Dell 968 AIO Printer.
3. Follow the instructions on the screen.
4. Restart your computer.
5. Insert the Drivers and Utilities CD, and then follow the instructions on the screen.
If the installation screen does not appear:
In Windows Vista
a.
In Windows XP
In Windows 2000
b. Double-click the CD-ROM drive icon, and then double-click setup.exe.
c. When the printer software installation screen appears, click Using a USB cable , Using a
wireless network, or Using an Ethernet cable .
, click ® Computer.
, click Start® My Computer.
, double-click My Computer from your desktop.
d. Follow the instructions on your screen to complete the installation.
Installing the Optional XPS Driver
The XML Paper Specification (XPS) driver is an optional printer driver designed to make use of the
advanced XPS color and graphics features that are only available for Windows Vista users. In order to
use XPS features, you must install the XPS driver as an additional driver after you install your printer.
NOTE: Before installing the XPS driver, complete the steps on the Setting Up Your Printer poster to
install the printer on your computer.
NOTE: Before installing the XPS driver, you must install the Microsoft QFE Patch and extract the
Page 39

driver files from the Drivers and Utilities CD. To install the patch, you must have administrator
privileges on the computer.
To install the Microsoft QFE Patch and extract the driver:
1. Insert the Drivers and Utilities CD, and then click Cancel when the Setup Wizard appears.
2. Click
3. Double-click the CD-ROM drive icon, and then double-click Drivers.
4. Double-click xps, and then double-click setupxps.
XPS driver files are copied to your computer, and any required Microsoft XPS files are launched.
Follow the instructions on the screen to finish installing the patch.
To install the driver:
1. Click
2. Under Hardware and Sound , click Printer, and then click Add a Printer .
3. From the Add Printer dialog box, choose one of the following:
® Computer.
® Control Panel.
If you are using a USB connection, make sure the USB cable is connected to the computer
and printer, and then do the following:
a. Click Add a local printer .
b. From the Use an existing port: drop-down menu, select Virtual printer port for
USB, and then click Next.
If you are using an Ethernet or wireless connection, make sure the printer is connected to
the network, and then do the following:
a. Click Add a network, wireless or Bluetooth printer.
b. Select your printer from the list.
c. If your printer is not in the list, click The printer that I want isn't listed.
d. Select Add a printer using a TCP/IP address or hostname , and then click Next.
e. To locate your printer IP address, print a Network Setup Page from the Network
Setup menu under the Setup menu on the printer.
f. Type your printer IP address in the Hostname or IP address: box, and then click
Next.
4. Click Have disk .
The Install From Disk dialog box opens.
5. Click Browse, and then navigate to the XPS driver files on your computer:
a. Click Computer, and then double-click (C:).
b. Double-click Drivers, and then double-click PRINTER.
c. Double-click the folder that has your printer model number, and then double-click Drivers.
Page 40

d. Double-click xps, and then click Open.
e. From the Install From Disk dialog box, click OK.
6. Click Next on the following two dialog boxes.
For more information on the XPS driver, see the XPS readme file on the Drivers and Utilities CD. The
file is located in the xps folder with the setupxps batch file (D:\Drivers\xps\readme).
Page 41

Understanding the Operator Panel Menus
Copy Mode Setup Mode
Photo Mode Maintenance Mode
Print Files Mode PictBridge Mode
Fax Mode Bluetooth Mode
Scan Mode
Copy Mode
Main Menu Mode Main Menu Mode Submenu
Copy Color
Copies
Reduce/Enlarge
Quality
Lighter/Darker
Paper Handling
Collate
2-Sided Copies
N-up
Layout
Original Size
Content Type
Change Default Settings Paper Handling
NOTE: The 2 -Sided Copies menu only appears if the optional duplex unit is attached to the
printer.
To view or change the Copy Mode menu:
1. From the main menu, press the up or down Arrow button
2. Press the Select button
.
to scroll to Copy.
Copy menu
item
Color Specify the color of your copies.
Copies Specify the number of copies.
Settings
Color*
Black & White
Page 42

1–99
Reduce/Enlarge Specify the size of the copies compared to the original document.
50%
100%*
200%
Custom%
Fit to Page
2 x 2 Poster
3 x 3 Poster
4 x 4 Poster
Borderless
Quality Specify the copy quality.
Auto*
Draft
Normal
Photo
Lighter/Darker Press the left or right Arrow button
Paper Handling Press the Select button
size and type of the blank paper loaded in the input tray. If you have an optional
input tray, you can also specify the paper source. For more information, see Paper
Handling Menu.
Collate Specify whether or not the printer should collate the copies.
Off*
On
2-Sided Copies Select your preferred option for printing on both sides of the paper.
1-->1 (1-Sided Original, 1-Sided Copy)*
to enter the Paper Handling menu, and then select the
to adjust the brightness.
1-->2 (1-Sided Original, 2-Sided Copy)
2-->1 (2-Sided Original, 1-Sided Copy)
2-->2 (2-Sided Original, 2-Sided Copy)
N-up Specify how many different images or pages of a document to print on a single page.
1-up*
2-up
Page 43

4-up
Layout Specify how many times to repeat an image on a single page.
Original Size Specify the size of your original document.
1 Per Page*
4 Per Page
9 Per Page
16 Per Page
Auto Detect*
8.5x11”
2.25x3.25”
3x5”
3.5x5”
4x6”
4x8”
5x7”
8x10”
L
2L
Hagaki
A6
A5
B5
A4
60x80 mm
9x13 cm
10x15 cm
10x20 cm
13x18 cm
20x25 cm
Content Type Specify the type of document you are copying.
Auto*
Page 44

Text & Graphics
Photo
Text Only
Line Drawing
For more information, see Smart Copy
Change Default
Settings
* Factory default setting
Smart Copy
Your printer is equipped with Smart Copy , a technology that enables the printer to automatically adjust
the Content Type settings to improve the quality of your copies. When the Content Type is set to
Auto (the default setting), the printer pre-scans each document before copying, and then optimizes the
settings to provide richer colors, more neutral grays, sharper text, and more detailed pictures.
Press the Select button
information, see Copy Default Settings Menu.
to enter the Copy Default Settings menu. For more
.
Photo Mode
Main Menu Mode Main Menu Mode Submenu Mode Submenu
Photo Browse and Print Photos Edit Photo
View Full Screen
Change Print Settings Paper Handling
Print Preview
Select Computer
Photo Proof Sheet Print Sheet with All X Photos
Print most recent 25 photos
Print Sheet Using Date Range
Scan Proof Sheet
Print All Photos
View Slide Show
Save Photos to Computer
Change Default Settings Paper Handling
NOTE: The Select Computer menu only appears if the printer is connected to a network.
NOTE: The Print most recent 25 photos option only appears if more than 25 photos are on your
memory card or USB key.
Most digital cameras use a memory card to store photos. Your printer supports the following digital
media:
CompactFlash Type I and II
Page 45

Memory Stick
Memory Stick PRO
Memory Stick Duo (with adapter)
Microdrive
Secure Digital
Secure Digital High Capacity
Mini SD (with adapter)
MultiMedia Card
xD-Picture Card
To view or change the Photo mode settings:
1. Insert a memory card. The printer automatically switches to Photo mode after the card is read.
NOTICE: Do
while the light is blinking.
2. Press the Select button
Menu
item
Browse
and Print
Photos
Select
Computer
Photo
Proof
Sheet
Print All
Photos
not
remove the memory card or touch the printer in the area of the memory card
Settings
Press the Select button
button to browse photos, or press the Start button to print photos directly from
the preview screen.
Press the Select button
NOTE: This menu is only available if the network adapter is attached and configured.
Press the Select button
information, see Photo Proof Sheet Menu.
Press the Select button
the number of photos printed on a page.
.
Photo Card Mode menu
to enter Photo Preview mode. Press the left or right Arrow
to view a list of computers available on your network.
to enter the Photo Proof Sheet submenu. For more
to enter the Print All Photos screen where you can specify
View
Slideshow
Save
Photos to
Computer
Change
Default
Settings
NOTE: Only photos stored in the JPG and a limited selection of TIFF formats can be printed
directly from the memory card. If you want to print photos stored on the memory card in a
different file format, the photos must be transferred to your computer before printing.
Press the Select button
of the slideshow of the photos on the memory card. Highlight the speed you want, and
then press the Select button
Press the Select button
the memory card to your computer or USB key, or you can save photos stored on the USB
key to your computer or a memory card.
Press the Select button
information, see Photo Print Settings Menu or Photo Default Settings Menu.
to enter the Slideshow menu where you can specify the speed
to start the slideshow.
to enter Save to PC mode. You can save the photos stored on
to enter the Photo Default Settings menu. For more
Page 46

Print
Camera
Press the Select button twice to display the selections that you made using your
camera. For more information, see Camera Selection Preview.
Selection
NOTE: This item is displayed only if there is a DPOF (Digital Print Order Format) selection in
your memory card.
Photo More Options Menu
The Photo More Options menu is accessed by pressing the Menu button while you have selected a
photo in the Photo Preview mode.
Menu item Settings
Edit Photo Press the Select button
to enter the Photo Edit Mode menu. For more information,
see Photo Edit Mode Menu.
View Full
Press the Select button
to view the photo full-screen.
Screen
Change
Print
Press the Select button
to enter the Photo Default Settings menu. For more
information, see Photo Print Settings Menu or Photo Default Settings Menu.
Settings
Print
Press the Select button
to see a preview of the print job for the selected photo.
Preview
Photo Edit Mode Menu
You can access the Photo Edit Mode menu by selecting Edit Photo from the Photo More Options
menu.
Menu
Settings
item
Brightness Press the left or right Arrow button to specify a darkness setting (middle setting is
default).
Rotate Rotate the image 90° in the specified direction.
Clockwise *
Counter Clockwise
Crop Press the Select button , and then press the left or right Arrow button to choose
the Shrink or Expand option . Press the Select button repeatedly to
shrink or expand the area of interest box.
Auto
Specify whether or not the printer automatically adjusts the image.
Enhance
Off*
On
Remove
Specify whether or not the printer adjusts color in the image to eliminate red eye.
Red Eye
Page 47

No*
Yes
* Factory default setting
Photo Print Settings Menu or Photo Default Settings Menu
You can access the Photo Print Settings menu by selecting Change Default Settings from the Photo
Card Mode main menu or by selecting Change Print Settings from the Photo More Options menu.
Menu
item
Photo
Size
Settings
Specify the size of your original photos.
Automatic
NOTE: The setting changes to Automatic if the selected photo size cannot fit onto the
layout specified.
Hagaki
L
2L
60x80 mm
A6
10x15 cm
13x18 cm
A5
B5
A4
2.25x3.25”
3.5x5"
4x6"*
5x7"
8x10"
8.5x11"
Layout Specify the size of the printed photos.
Automatic*
Borderless (1 per page)
Page 48

One Photo Centered
1 per page
2 per page
3 per page
4 per page
6 per page
8 per page
16 per page
Quality Specify the quality of your printed photos.
Auto*
Draft
Normal
Photo
Paper
Handling
Press the Select button
and type of the blank paper loaded in the input tray. If you have an optional input tray, you
can also specify the paper source. For more information, see Paper Handling Menu
to enter the Paper Handling menu, and then select the size
.
* Factory default setting
Photo Proof Sheet Menu
The Photo Proof Sheet menu is accessed by selecting Photo Proof Sheet from the Photo Card Mode
main menu.
Menu item Settings
Print Sheet with All X
Photos
Press the Select button
memory card or USB key.
to print a proof sheet with all photos on the
“X” is the number of photos detected on the memory card or USB key.
Print most recent 25
photos
Print Sheet Using Date
Press the Select button to print a proof sheet with the most recent 25
photos.
Print only photos created in a certain date range.
Range
1. Press the Select button , and then choose a date range.
2. Press the Select button to print the proof sheet.
Scan Proof Sheet Press the Select button to scan a proof sheet after making your
selections.
Page 49

Camera Selection Preview
The Camera Selection Preview is accessed by pressing the Select button from the Print Camera
Selections menu.
To navigate through the camera selections, press the left or right Arrow button
button
To alter the print settings, press the Menu button
Change Photo Print Settings, and press the Select button .
to print the photos using the current print settings.
. From the Photo Card Mode menu, scroll to
. Press the Start
Print Files Mode
Main Menu Mode Main Menu
Print Files Paper Handling
Use the Print Files mode to print documents stored on your USB key or memory card.
The printer recognizes files that have the following file extensions:
.doc (Microsoft® Word)
.xls (Microsoft Excel®)
.ppt (Microsoft PowerPoint®)
.pdf (Adobe® Portable Document Format)
.rtf (Rich Text Format)
.docx (Microsoft Word Open Document Format)
.xlsx (Microsoft Excel Open Document Format)
.pptx (Microsoft PowerPoint Open Document Format)
.wps (Microsoft Works)
.wpd (WordPerfect®)
To view or change the Print Files Mode menu settings:
1. Make sure that the printer is connected to your computer that has Microsoft Office installed.
2. Insert a memory card into the card slots or a USB key into the PictBridge port.
3. Press the up or down Arrow button
.
Menu
item
Paper Press the Select button
Settings
to scroll to Print Files, and then press the Select button
Print Files Mode Menu
to enter the Paper Handling menu, and then select the size
Page 50

Handling
and type of the blank paper loaded in the input tray. If you have an optional input tray, you
can also specify the paper source. For more information, see Paper Handling Menu
* Factory default settings
Fax Mode
Main Menu Mode Main Menu Mode Submenu Mode Submenu
Fax Phone Book Name Search
Phone Number Search
Add Entry
Group Search
Add Group Name Search
Phone Number Search
Redial History
.
Redial History
On Hook Dial
Delay Sending Fax
Auto Answer
Edit Fax Settings
Fax Setup Speed Dial Phone Book Phone Book
History and Reports
Ringing and Answering Auto Answer Schedule
Fax Printing Paper Handling
Dialing and Sending
Fax Blocking Blocked Fax Name Search
To view or change the Fax Mode menu:
Blocked Fax Add Entry
Print Blocked Fax Entry Number Search
1. From the main menu, press the up or down Arrow button
2. Press the Select button
In order for faxing to function properly:
The printer's FAX connector ( —left connector) must be connected to an active analog telephone
line. See Setting Up the Printer With External Devices
NOTE: You cannot fax with a DSL (digital subscriber line) or ISDN (integrated signature digital
network) unless you purchase a digital line filter. Contact your Internet Service Provider for
more details.
.
for setup details.
to scroll to Fax.
Page 51

If you are using the Fax Dell 968 AIO Printer to send a fax from within an application, the
printer must be connected to a computer with a USB cable.
Fax Options Menu
Menu item Action
Fax
Number
Use the keypad to enter the number to which you want to send a fax. The number
displays in the window.
Window
NOTE: If you have already entered a number on the Fax main menu, then you can also
use this window to enter another number and send a broadcast fax.
Phone
Book
Redial
History
On Hook
Press the Select button
Phone Book Menu.
Press the Select button
displayed on the screen.
Press the Select button
to enter the Phone Book menu. For more information, see
to view the redial history. The last five numbers dialed are
to enter the On Hook Dial mode.
Dial
Delay
Sending
Press the Select button
to view the Delay Sending Fax screen. On this screen, use
the keypad to specify the time you want the fax to be sent.
Fax
Auto
Set your printer to answer incoming calls.
Answer
Off*
On
Scheduled—Press the Select button to enter the Auto Answer Schedule menu.
For more information, see Auto Answer Schedule Menu.
Edit Fax
Settings
Press the Select button
see Edit Fax Settings Menu.
Fax Setup Press the Select button
to enter the Edit Fax Settings menu. For more information,
to enter the Fax Setup menu. For more information, see Fax
Setup Menu.
* Factory default settings
Phone Book Menu
The Phone Book menu is accessed by selecting Phone Book from the Fax Mode menu. You can also
access this menu by selecting Speed Dial Phone Book from the Fax Setup menu.
You can specify up to 99 speed dial numbers—89 individual fax speed dial numbers and 10 group dial
entries of up to 30 numbers each.
Menu item Action
Name Search Press the Select button
see Name Search Menu.
Phone
Number
Press the Select button
information, see Phone Number Search Menu.
Search
Add Entry Press the Select button
to enter the Name Search menu. For more information,
to enter the Phone Book Search menu. For more
to enter the Phone Book: Add Entry menu. For more
Page 52

information, see Phone Book Add Entry Menu.
Group Search Press the Select button to enter the Group Search menu. For more information,
see Group Search Menu.
Add Group Press the Select button
to enter the Phone Book: Add Group menu. For more
information, see Phone Book Add Group Menu.
Print List Press the Select button
Name Search Menu
to print the phone book stored on your printer.
You can access the Name Search menu by selecting Name Search from the Phone Book menu.
Menu item Action
Search
Criteria
Use the keypad to enter a letter. The list automatically scrolls to the appropriate place in
the phone book.
Window
Speed dial The names for the speed dial entries are shown. The number of speed dials listed
depends on the number of speed dials you specified on your printer.
Phone Number Search Menu
You can access the Phone Book Search menu by selecting Phone Number Search from the Phone
Book menu.
Menu item Action
Search
Criteria
Use the keypad to enter a number. The list automatically scrolls to the appropriate place
in the phone book.
Window
Speed dial The fax numbers for the speed dial entries are shown. The number of speed dials listed
depends on the number of speed dials you specified on your printer.
Phone Book Edit Entry Menu
You can access the Phone Book: Edit Entry menu by pressing the Menu button when a speed dial
number is highlighted in either the Phone Number Search or Name Search menus.
Menu item Action
Name Use the keypad to edit the name for the contact.
Fax Number Use the keypad to edit the fax number for the contact.
Speed Dial
The speed dial number assigned to this contact is displayed.
Number
NOTE: The speed dial number is automatically assigned. You cannot modify the
speed dial number.
Delete Entry Press the Select button
Phone Book Add Entry Menu
to delete the entry from the phone book.
Page 53

You can access the Phone Book: Add Entry menu by selecting Add Entry from the Phone Book
menu.
Menu item Action
Name Use the keypad to enter the name for the contact.
Fax Number Use the keypad to enter the fax number for the contact.
Speed Dial
The lowest available speed dial number is assigned for the contact.
Number
NOTE: The speed dial number is automatically assigned. You cannot modify the
speed dial number.
Group Search Menu
You can access the Group Search menu by selecting Group Search from the Phone Book menu.
Menu item Action
Search
Use the keypad to enter a letter.
Criteria
Window
Speed dial The fax numbers for the group entries are shown. The number of groups listed
depends on the number of groups specified in your printer.
Phone Book Edit Group Menu
You can access the Phone Book: Edit Group menu by pressing the Menu button when a speed
dial number is highlighted in the Group Search menu.
Menu item Action
Name Use the keypad to edit the name for the group.
Fax Number Use the keypad to edit the fax numbers for the group.
Speed Dial
The speed dial number assigned to this group is displayed.
Number
NOTE: The speed dial number is automatically assigned. You cannot modify the
speed dial number.
Delete Entry Press the Select button
Phone Book Add Group Menu
to delete the entry from the phone book.
You can access the Phone Book: Add Group menu by selecting Add Group from the Phone book
menu.
Menu item Action
Name Use the keypad to enter a name for the group.
Fax number
Use the keypad to enter the fax numbers for the group.
window
Page 54

Name Search Press the Select button to enter the Name Search menu. For more information,
see Name Search Menu.
Phone Number
Search
Press the Select button
to enter the Phone Book Search menu. For more
information, see Phone Number Search Menu.
Redial History Press the Select button
to display the redial history. The last five numbers dialed
are displayed on the screen.
Speed Dial
The lowest available speed dial number is assigned to this group.
Number
NOTE: The speed dial number is automatically assigned. You cannot modify the speed
dial number.
Auto Answer Schedule Menu
You can access the Auto Answer Schedule menu by selecting Scheduled from the Auto Answer option
on the Fax Mode menu or by selecting Auto Answer Schedule from the Ringing and Answering
menu.
When Auto Answer is turned on, the fax machine answers incoming faxes without user intervention.
When Auto Answer is turned off, incoming faxes must be answered manually.
Menu item Action
Current Time Displays the current time.
Turn Auto Answer OnatUse the keypad to specify the time when you would like to turn Auto Answer
on.
Turn Auto Answer OffatUse the keypad to specify the time when you would like to turn Auto Answer
off.
Edit Fax Settings Menu
You can access the Edit Fax Settings menu by selecting Edit Fax Settings from the Fax Mode menu.
The settings changed on this menu are temporary and will only be applicable to the fax job that you are
sending at the time. They will not apply to your subsequent faxes.
Menu item Action
Cover Page Specify whether or not to send a cover page with your fax.
No*
Yes
Color Specify the color of your sent fax.
Black & White*
Color
Quality Specify the scan quality of your fax.
Standard*
Page 55

Fine
Superfine
Please Reply
Ultrafine
Lighter/Darker Press the left or right Arrow button
to specify a darkness setting (middle setting
is default).
Original Size Specify the size of your original document.
8.5x11”*
A4
* Factory default settings
Cover Page Menu
You can access the Cover Page menu by pressing the Menu button when Cover Page is highlighted
in the Edit Fax Settings menu. From the Cover Page menu, press the Menu button to edit the
contents of your cover page.
Menu
Action
item
From # Specify your fax number.
Your
Name
Your
Phone #
Your
Fax #
Leave Blank*
From #1
From #2
From #3
From #4
From #5
NOTE: To assign or change information in the From menu, scroll to the option that you
want to edit, and then press the Menu button . Use the keypad to enter information
about the sender.
Displays the name of the sender.
Displays the phone number of the sender.
Use the keypad to enter your fax number.
Priority Specify a priority level to display on your cover page.
None*
FYI
Page 56

Urgent
Message Use the keypad to enter your message for the recipient.
* Factory default settings
Fax Setup Menu
You can access the Fax Setup menu by selecting Fax Setup from the Fax Mode menu or by selecting
Change Fax Default Settings from the Setup menu. The settings made on this menu apply to all fax
jobs that you will send or receive, unless you restore the settings to factory defaults.
Menu item Action
Speed Dial
Phone Book
History and
Reports
Ringing and
Answering
Fax Printing Press the Select button
Press the Select button
to enter the Phone Book menu. For more information,
see Phone Book Menu.
Press the Select button
to enter the History and Reports menu. For more
information, see History and Reports Menu.
Press the Select button
to enter the Ringing and Answering menu. For more
information, see Ringing and Answering Menu.
to enter the Fax Printing menu. For more information,
see Fax Printing Menu.
Dialing and
Sending
Fax Blocking Press the Select button
Press the Select button
to enter the Dialing and Sending menu. For more
information, see Dialing and Sending Menu.
to enter the Fax Blocking menu. For more information,
see Fax Blocking Menu.
History and Reports Menu
You can access the History and Reports menu by selecting History and Reports from the Fax Setup
menu.
Menu item Action
View History on
Press the Select button
to display the fax history on the screen.
Screen
Print Sent History Press the Select button to print a history of sent faxes.
Print Received History Press the Select button to print a history of received faxes.
View Pending Faxes Press the Select button to display information about pending faxes on the
screen.
Report Specify when to print a fax history report.
Manual Print*
Every 40 Jobs
Print Fax Activity
Press the Select button
to print a history of your fax activity.
History
Page 57

Confirmation Specify when to print a confirmation page for a fax.
On Error*
For All
Off
* Factory default settings
Fax History More Options Menu
You can access the Fax History More Options menu by highlighting one of the numbers shown on the
Fax History screen and pressing the Select button
.
Menu item Action
Redial This
Number
Add Number to
Phone Book
Add Number to
Blocked Faxes
Clear All History Press the Select button
Ringing and Answering Menu
Press the Select button
to enter the Fax Mode menu with the selected number
displayed in the Fax Number Window.
Press the Select button
to enter the Phone Book: Add Entry menu with the fax
number field automatically populated with the current fax number.
Press the Select button
to enter the Blocked Fax: Add Entry menu with the
fax number field automatically populated with the current fax number.
to clear the fax activity log.
You can access the Ringing and Answering menu by selecting Ringing and Answering from the Fax
Setup menu.
Menu
Action
item
Ring
Specify the volume of the fax modem ringer.
Volume
Low*
Pick-up
On
Distinctive
Ring
High
Off
Specify the number of rings before your printer answers an incoming call.
1st Ring
2nd Ring
3rd Ring*
5th Ring
Specify the distinctive ring setting that matches the option your phone service provides.
Page 58

Any Ring*
Single Ring
Double Ring
Triple Ring
Auto
Answer
Schedule
Fax
Forward
Manual
Pickup
Key Code
Caller ID
Pattern
Press the Select button
to enter the Auto Answer Schedule menu. For more
information, see Auto Answer Schedule Menu.
Set your printer to forward faxes or forward them and print a copy.
Off*
Forward
Print & Forward
Press the Select button
to display the Pickup Code menu. To change the code, use
the keypad to specify a new code, and then press the Select button .
NOTE: The default code is DELL# (3355#) .
Pattern 1 (FSK)*
Pattern 2 (DTMF)
NOTE: The Caller ID detection pattern is determined by the country or region you
selected during initial setup. If phones in your country use two detection patterns, call
your telecommunications company to know which pattern it subscribes to.
* Factory default setting
Fax Printing Menu
You can access the Fax Printing menu by selecting Fax Printing from the Fax Setup menu.
Menu
Action
item
If Too
Specify how the printer handles incoming faxes that are too big to print on one page.
Big
Fit to Page*
Use Two Pages
Fax
Specify whether or not to include a footer on printed faxes.
Footer
On*
Off
2-Sided
Print
Specify your duplex printing preference.
1 Sided Print*
Page 59

2 Sided Print
Paper
Handling
Press the Select button to enter the Paper Handling menu, and then select the size
and type of the blank paper loaded in the input tray. If you have an optional input tray, you
can also specify the paper source. For more information, see Paper Handling Menu
.
* Factory default settings
Dialing and Sending Menu
You can access the Dialing and Sending menu by selecting Dialing and Sending from the Fax Setup
menu.
Menu item Action
Your Fax
Number
Your Fax
Name
Use the keypad to enter your fax number. This number is shown on the cover page of
outgoing faxes.
Use the keypad to specify the name for the printer. This is the name shown on the fax
header of outgoing faxes.
Cover Page Specify whether or not to include a cover page on outgoing faxes.
No*
Yes
Color Specify the color of your outgoing faxes.
Black & White*
Color
Quality Specify the scan quality of your outgoing faxes.
Standard*
Fine
Superfine
Ultrafine
Lighter/Darker Press the left or right Arrow button
to specify a darkness setting (middle setting
is default).
Dial Method Specify the dialing method that matches your phone system.
Touch-tone*
Pulse
Behind PBX (Dial Tone Detect Off)
Redial Time Specify the time the printer waits before redialing failed faxes.
1 Minute
Page 60

2 Minutes*
3 Minutes
4 Minutes
5 Minutes
6 Minutes
7 Minutes
8 Minutes
Redial Tries Specify the number of times the printer redials failed faxes.
0 Times
1 Time
2 Times
3 Times*
4 Times
5 Times
Dial Prefix
Dial Volume Specify the dial volume of the fax modem.
Scan
None*—Press the Select button to change defaults.
Create—Press the Select button to create a prefix if one is necessary to obtain
an outside line.
Modify—Press the Select button to modify your existing prefix.
Off
Low*
High
Before Dial*—the fax is scanned to memory before dialing the fax number.
After Dial—the fax number is dialed, communication with receiving fax is
established, and then the fax is scanned.
Max Send
Speed
Specify the maximum data speed your phone system will allow.
33,600 bps*
31,200 bps
28,800 bps
26,400 bps
Page 61

24,000 bps
21,600 bps
19,200 bps
16,800 bps
14,400 bps
12,000 bps
9,600 bps
7,200 bps
4,800 bps
2,400 bps
Auto Fax
Conversion
On*—the fax is automatically converted to be compatible with the receiving fax
machine regardless of the send settings.
Off—an unsupported fax error is given if there is a mismatch between send settings
and those on the receiving fax machine.
Error
Correction
Specify whether or not the printer should attempt to automatically correct data errors
in faxes.
On*
Off
Original Size Specify the original size of your faxes.
8.5x11”*
A4
* Factory default settings
Fax Blocking Menu
You can access the Fax Blocking menu by selecting Fax Blocking from the Fax Setup menu.
When fax blocking is on, calls received from fax machines that have a caller ID that matches one
specified on the block list or have blocked their caller ID are disconnected.
Menu item Action
Block List Turn the fax blocking feature on or off.
Off*
On
Block No-ID Specify whether or not the printer accepts faxes from unknown senders.
Page 62

Off*
On
Blocked Fax Name
Search
Blocked Fax Entry
Number Search
Blocked Fax Add
Entry
Print Blocked Fax
Press the Select button
more information, see Blocked Fax Name Search Menu.
Press the Select button
more information, see Blocked Fax Entry Number Search Menu.
Press the Select button
more information, see Blocked Fax Add Entry Menu.
Press the Select button
to enter the Blocked Fax Name Search menu. For
to enter the Blocked Fax Number Search menu. For
to enter the Blocked Fax: Add Entry menu. For
to print the contents of the blocked fax list.
List
* Factory default settings
Blocked Fax Name Search Menu
You can access the Blocked Fax Name Search menu by selecting Blocked Fax Name Search from the
Fax Blocking menu.
Menu item Action
Search
Window
Use the keypad to enter a letter. The list automatically scrolls to the appropriate place
in the phone book.
Criteria
Blocked Fax
List Value
Blocked Fax Entry Number Search Menu
The contact being blocked is displayed. The number of contacts on the list depends on
the number of fax numbers you have blocked.
You can access the Blocked Fax Entry Number Search menu by selecting Blocked Fax Entry Number
Search from the Fax Blocking menu.
Menu item Action
Search
Criteria
Use the keypad to enter a number. The list automatically scrolls to the appropriate place
in the phone book.
Window
Blocked Fax
List Number
The number assigned to the fax number being blocked is displayed. The number
assigned to the blocked fax list depends on the number of fax numbers you have
blocked.
Blocked Fax Edit Entry Menu
You can access the Blocked Fax Edit Entry menu by pressing the Menu button while a number is
highlighted in the Blocked Fax Name Search or Blocked Fax Entry Number Search menus.
Menu item Action
Name Use the keypad to edit the name for the contact.
Page 63

Fax Number Use the keypad to edit the fax number for the contact.
Blocked Fax # A number is assigned to this blocked fax number.
Delete Entry Press the Select button to delete this entry from the blocked fax list.
Blocked Fax Add Entry Menu
You can access the Blocked Fax Add Entry menu by selecting Blocked Fax Add Entry from the Fax
Blocking menu.
You can add up to 50 numbers to the blocked fax list.
Menu item Action
Name Use the keypad to edit the name for the contact.
NOTE: The number is automatically assigned. You cannot modify the assigned number.
Fax
Number
Blocked
Fax #
Use the keypad to edit the fax number for the contact. It is required to enter a number to
add an entry from this menu.
A number is assigned to this blocked fax number.
NOTE: The number is automatically assigned. You cannot modify the assigned number.
Scan Mode
Main Menu Mode Main Menu
Scan Scan To
Color
Quality
Original Size
Change Scan Default Settings
To view or change the Scan Mode menu settings:
1. Ensure your printer and computer are connected via a USB cable.
2. From the main menu, press the up or down Arrow button
the Select button
3. If your computer is connected to a network, select a host from the Host Selection screen, and
enter a four-digit PIN number, if necessary, for the selected host.
4. Press the Select button .
Menu item Settings
Scan To Select the program to which to send your scan.
.
Scan Mode Menu
to scroll to Scan, and then press
Page 64

Preview
Email
File
software installed on your computer
Color Specify the color of your scan.
Color*
Black & White
Quality Specify the quality (resolution) of your scan.
Automatic*
150 dpi
300 dpi
600 dpi
Original Size Specify the size of your original document or image.
Auto Detect*
L
2L
A6
A5
B5
A4
2.25x3.25”
3x5”
4x6”
5x7”
8x10”
8.5x11”
Change Default
Settings
* Factory default settings
Press the Select button
information, see Scan Default Settings Menu.
to enter the Scan Default Settings menu. For more
Page 65

Setup Mode
Main
Menu
Setup Paper Handling
Mode Main Menu Mode Submenu Mode Submenu
Change Printer Default Settings Set Date and Time
Paper Handling
Change Copy Default Settings Paper Handling
Change Photo Default Settings Paper Handling
Change Fax Default Settings Speed Dial Phone
Book
History and Reports
Ringing and
Answering
Fax Printing Paper Handling
Dialing and Sending
Fax Blocking Blocked Fax Name Search
Blocked Fax Add Entry
Change Scan Default Settings
Change Bluetooth Default
Settings
Change PictBridge Default
Settings
Print Settings List
Paper Handling
Paper Handling
Phone Book
Auto Answer Schedule
Blocked Fax Entry Number
Search
Network Setup Wireless Menu Wireless Signal Quality
TCP/IP Set IP Address
Network Time Menu
To access the Setup menu:
1. From the main menu, press the up or down Arrow button
2. Press the Select button
Menu item Action
Paper Handling Press the Select button
information, see Paper Handling Menu.
Change Printer Press the Select button
.
Setup Mode Menu
to enter the Paper Handling menu. For more
to enter the Printer Default Settings menu. For
Set IP Netmask
Set IP Gateway
to scroll to Setup.
Page 66

Default Settings
more information, see Printer Default Settings Menu.
Change Copy
Default Settings
Change Photo
Default Settings
Change Fax Default
Settings
Change Scan
Default Settings
Change Bluetooth
Default Settings
Change PictBridge
Default Settings
Press the Select button
information, see Copy Default Settings Menu.
Press the Select button
more information, see Photo Default Settings Menu.
Press the Select button
see Fax Setup Menu.
Press the Select button
information, see Scan Default Settings Menu.
Press the Select button
more information, see Bluetooth Default Settings Menu.
Press the Select button
For more information, see PictBridge Default Settings Menu.
Print Settings List Press the Select button
operator panel.
Network Setup Press the Select button
information, see Network Setup Menu.
to enter the Copy Default Settings menu. For more
to enter the Photo Default Settings menu. For
to enter the Fax Setup menu. For more information,
to enter the Scan Default Settings menu. For more
to enter the Bluetooth Default Settings menu. For
to enter the PictBridge Default Settings menu.
to print a list of the options that were set using the
to enter the Network Setup menu. For more
Paper Handling Menu
You can select the size and type of the blank paper loaded in the input tray from the Paper Handling
menu. If you have an optional input tray, you can also specify the paper source.
You can view or change the Paper Handling menu by selecting Paper Handling from the Setup menu,
Copy Mode menu, Photo Print Settings menu, Photo Default Settings menu, Print File Default
Settings menu, Fax Printing menu, or Bluetooth Default Settings menu.
Paper Handling menu for printer with one input tray
Menu
Settings
item
Size Specify the size of the paper loaded in the input tray.
8.5x11”*
8.5x14”
A4*
B5
A5
A6
L
2L
Hagaki
3x5”
Page 67

3.5x5”
4x6”
4x8”
5x7”
10x15 cm
10x20 cm
13x18 cm
NOTE: Size is determined by the country you selected during initial setup. Changing size from
any menu changes the option selected in all other menus.
Type Specify the type of paper loaded in the input tray.
Auto Detect*
Plain
Matte
Photo
Transparency
* Factory default setting
Additional options available when a second paper tray is attached
Menu
item
SizeTray 2
TypeTray 2
Tray
Linking
Settings
Tray 1 and Tray 2 have the same default paper size during the initial setup. You can load
different sizes of paper into these two trays and choose the corresponding paper size
options for them.
Tray 2 has the same size options as Tray 1.
Tray 2 has the same paper type options as Tray 1.
Specify whether or not the printer pulls paper from the second tray if the first tray is
empty.
Copy
Source
Photo
Source
Off*
Auto
For more information, see Understanding Tray Linking
Specify the paper source for making copies.
Tray1*
Tray2
Specify the paper source for printing photos.
.
Page 68

Tray1*
Tray2
Print Files
Source
Fax
Source
PictBridge
Source
Specify the paper source for printing files.
Tray1*
Tray2
Specify the paper source for printing faxes.
Tray1*
Tray2
Auto
NOTE: Select Auto if you want the printer to pick from the tray containing the paper
that matches the size of the incoming fax. You also need to specify the correct paper
size for both trays.
Specify the paper source for printing photos from a PictBridge-enabled camera.
Tray1*
Tray2
Bluetooth
Specify the paper source for printing files from a Bluetooth-enabled device.
Source
Tray1*
Tray2
* Factory default setting
Printer Default Settings Menu
You can view or change the Printer Default Settings by selecting Change Printer Default Settings
from the Setup menu.
Menu
Settings
item
Set Date
and Time
Paper
Handling
Press the Select button , and then use the keypad to enter the current date and time.
Press the left or right Arrow button to move to the next entry field.
Press the Select button
to enter the Paper Handling menu. For more information, see
Paper Handling Menu.
Language Press the left or right Arrow button
Country Press the left or right Arrow button
Key Press
Specify whether or not a tone sounds when you press the operator panel buttons.
Tone
Off
to scroll through the language options.
to scroll through the country options.
Page 69

On*
Power
Original Specify the size of your original documents.
Save
Specify when the printer enters Power Save mode.
Now
After 10 min
After 30 min*
After 60 min
After 120 min
After 240 min
Block
Off*
Host
Settings
On
NOTE: Set Block Host Settings to On if you want to prevent other users from
changing the settings of your printer.
Speaker
Specify the volume level for the printer speaker.
Volume
Off
Low*
High
* Factory default setting
Copy Default Settings Menu
You can view or change the Copy Default Settings by selecting Copy Default Settings from the Setup
menu or by selecting Change Default Settings from the Copy Mode menu.
Menu item Settings
Color Specify the color of copies.
Color*
Black & White
Quality Specify the copy quality.
Auto*
Draft
Normal
Photo
Page 70

Size
Auto Detect*
8.5x11”
2.25x3.25”
3x5”
3.5x5”
4x6”
4x8”
5x7”
8x10”
L
2L
Hagaki
A6
Content
Type
A5
B5
A4
60x80 mm
9x13 cm
10x15 cm
10x20 cm
13x18 cm
20x25 cm
Specify the type of document you are copying.
Text & Graphics*
Photo
2-sided
Original
Text Only
Line Drawing
Specify whether your original document is printed on one or both sides of the page.
Off*
On
Page 71

Paper
Handling
Press the Select button to enter the Paper Handling menu. For more information,
see Paper Handling Menu.
* Factory default setting
Photo Default Settings Menu
You can view or change the Photo Default Settings by selecting Change Photo Default Settings from
the Setup menu or by selecting Change Default Settings from the Photo Card Mode menu. The
settings made on this menu apply to all photos that will be printed, unless you restore the settings to
factory defaults.
Menu item Settings
Photo Size Specify the size of your original photos.
Hagaki
L
2L
60x80 mm
A6
10x15 cm
13x18 cm
A5
B5
A4
2.25x 3.25”
3.5x 5"
4x6"
5x7"
8x10"
8.5x11"
Layout Specify the size of the printed photos.
Automatic*
Borderless (1 per page)
One Photo Centered
1 per page
2 per page
Page 72

3 per page
4 per page
6 per page
8 per page
16 per page
Quality Specify the quality of your printed photos.
Auto*
Draft
Normal
Photo
Paper
Handling
Press the Select button
see Paper Handling Menu.
to enter the Paper Handling menu. For more information,
* Factory default setting
Fax Setup Menu
You can access the Fax Setup menu by selecting Change Fax Default Settings from the Setup menu or
by selecting Fax Setup from the Fax Mode menu. For more information, see Fax Setup Menu
Scan Default Settings Menu
.
You can view or change the Scan Default Settings by selecting Change Scan Default Settings from the
Setup menu or by selecting Change Default Settings from the Scan Mode menu.
Menu item Settings
Color Specify the color of your scans.
Color*
Black & White
Quality Specify the quality (resolution) of your scans.
Automatic*
150 dpi
300 dpi
600 dpi
Original Size Specify the size of your original documents or images.
Auto Detect*
Page 73

L
2L
A6
A5
B5
A4
2.25x3.25”
3x5”
4x6”
4x8”
5x7”
8x10”
8.5x11”
* Factory default setting
Bluetooth Default Settings Menu
You can view or change the Bluetooth Default Settings by selecting Change Bluetooth Default
Settings from the Setup menu. For more information, see Bluetooth Mode
PictBridge Default Settings Menu
.
You can view or change the PictBridge Default Settings by selecting Change PictBridge Default
Settings from the Setup menu. For more information, see PictBridge Mode
Network Setup Menu
.
You can access Setup menu by selecting Network Setup from the Setup menu.
Menu item Settings
Reset Network
Press the Select button
to reset all wireless settings to default.
Adapter
Defaults
Print Network
Press the Select button
to print a list of network settings.
Setup Page
Wireless Menu Press the Select button to enter the Wireless Setup Menu. For more
information, see Wireless Menu.
TCP/IP Press the Select button
to enter the TCP/IP Menu. For more information, see
TCP/IP Menu.
Network Time
Press the Select button
to enter Network Time Menu .
Menu
Page 74

From the Network Time Menu, press the left or right Arrow button to enable or
disable the Time Server, and then press the Back button to save the settings.
Netmask
NOTE: When Time Server is enabled, the wireless Ethernet card updates the
printer's time once a day or every time the printer is powered on.
Active Network Specify which network connection the adapter should use.
Auto*
Ethernet 10/100
Wireless 802.11b/g
* Factory default setting
Wireless Menu
You can view or change the settings in the Wireless Setup Menu by selecting Wireless Menu from the
Network Setup menu.
Menu item Settings
Network Name Reflects the current SSID being used.
NOTE: You cannot change the value of Network Name.
Wireless Signal Quality Press the Select button
to view the current signal quality.
* Factory default setting
TCP/IP Menu
You can view or change the settings in the TCP/IP Menu by selecting TCP/IP from the Network
Setup menu.
Menu
Settings
item
Enable
Specify whether or not your network automatically assigns IP settings.
DHCP
Yes*
No
Set IP
Address
Set IP
NOTE: You cannot change or set an IP Address, IP Netmask, and IP Gateway if DHCP is
enabled.
Press the Select button
to enter the Set IP Address menu.
From the Set IP Address menu, use the keypad to enter an IP address. Press the right
Arrow button
to enter a set of numbers in the next field, or press the left Arrow button
to erase an entry. Press the Back button to save the settings.
NOTE: The IP address cannot be changed if DHCP is enabled.
Press the Select button to enter the Set IP Netmask menu.
Page 75

From the Set IP Netmask menu, use the keypad to enter an IP address. Press the right
Arrow button to enter a set of numbers in the next field, or press the left Arrow button
to erase an entry. Press the Back button to save the settings.
NOTE: The IP netmask cannot be changed if DHCP is enabled.
Set IP
Gateway
* Factory default setting
Press the Select button
From the Set IP Gateway menu, use the keypad to enter an IP address. Press the right
Arrow button
to erase an entry. Press the Back button to save the settings.
NOTE: The IP gateway cannot be changed if DHCP is enabled.
to enter a set of numbers in the next field, or press the left Arrow button
to enter the Set IP Gateway menu.
Maintenance Mode
Main Menu Mode Main Menu
Maintenance View Ink Levels
Clean Cartridges
Align Cartridges
Change Print Cartridges
Print Test Page
Call Diagnostics
Reset Defaults
To access Maintenance mode options:
1. From the main menu, press the up or down Arrow button
2. Press the Select button
Menu item Action
View Ink Levels Press the Select button
the screen.
Clean Cartridges Press the Select button
Align Cartridges Press the Select button to align the ink cartridges.
Change Print
Cartridges
Press the Select button to view steps detailing how to change ink cartridges.
.
Maintenance Mode Menu
to display the current ink level for each cartridge on
to clean the ink cartridges.
to scroll to Maintenance.
Print Test Page Press the Select button to print a test page.
Call Diagnostics Specify how your printer treats automatic calls for diagnostic support.
Off*
Page 76

Audio on
Print T30 Signals Report
Both Audio and Report
Reset Defaults Press the Select button
* Factory default setting
to reset all settings to factory default settings.
PictBridge Mode
Main Menu Mode Main Menu
PictBridge Default Print Settings Photo Size
Layout
Quality
Paper Handling
Your printer automatically switches to PictBridge mode when you connect a PictBridge-enabled
camera. You can print pictures using the controls of the camera. For more information, see Printing
Photos From a PictBridge-Enabled Camera.
To view or change the PictBridge default print settings, press the Menu button
PictBridge Default Print Settings Menu
Menu
item
Photo
Size
Settings
Specify the size of your original photos.
Hagaki
L
2L
60x80mm
A6
10x15cm
13x18cm
A5
.
B5
A4
2.25x 3.25”
3.5x5"
Page 77

4x6"
5x7"
8x10"
8.5x11"
NOTE: Photo Size is determined by the country or region you selected during initial
setup.
Layout Specify the size of the printed photos.
Automatic*
Borderless (1 per page)
One Photo Centered
1 per page
2 per page
3 per page
4 per page
6 per page
8 per page
16 per page
Quality Specify the quality of your printed photos.
Auto*
Draft
Normal
Photo
Paper
Handling
* Factory default setting
Press the Select button
and type of the blank paper loaded in the input tray. If you have an optional input tray, you
can also specify the paper source. For more information, see Paper Handling Menu
to enter the Paper Handling menu, and then select the size
.
Bluetooth Mode
Main Menu Mode Main Menu
Bluetooth Default Settings Bluetooth Enabled
Discovery Mode
Security
Page 78

Pass Key
Trusted Devices–Clear All
Device Name
Device Address
Paper Handling
To print from an external Bluetooth-enabled device, you must attach a USB Bluetooth adapter to the
PictBridge port. The Bluetooth icon
To view or change Bluetooth Default Settings:
appears on the display once the USB Bluetooth adapter is active.
1. Press the up or down Arrow button
2. Press the up or down Arrow button to scroll to Change Bluetooth Default Settings, and then
press the Select button
Menu
item
Bluetooth
Enabled
Discovery
Mode
Settings
On*
Off
NOTE: When Bluetooth Enabled is set to On, the printer accepts Bluetooth
connections and allows the USB Bluetooth adapter to communicate with other Bluetoothenabled devices.
On*
Off
NOTE: Set the Discovery Mode to On if you want other Bluetooth-enabled devices to
detect the USB Bluetooth adapter attached to your printer.
.
Bluetooth Default Settings Menu
to scroll to Setup, and then press the Select button .
Security Specify your preferred security level.
Low*
High
Pass Key Specify a pass key. Any external Bluetooth-enabled device needs to enter this pass key
before it sends a print job.
NOTE: You only need to specify a pass key if the Security Level is set to High.
Trusted
DeviceClear All
Device
Name
Device The address of your USB Bluetooth adapter. When printing from an external Bluetooth-
Press the Select button
NOTE: Your printer stores a maximum of eight external Bluetooth-enabled devices (trusted
devices). When the printer detects more than eight devices, the least recently used device is
removed from the list.
The name assigned to the USB Bluetooth adapter. When printing from an external
Bluetooth-enabled device, the Device Name or Device Address should be selected.
to clear the list of trusted devices.
Page 79

Address enabled device, the Device Name or Device Address should be selected.
NOTE: You cannot change the Device Address.
Paper
Handling
*Factory default setting
Press the Select button
and type of the blank paper loaded in the input tray. If you have an optional input tray, you
can also specify the paper source. For more information, see Paper Handling Menu
to enter the Paper Handling menu, and then select the size
.
Page 80

Networking
Minimum Requirements for Setup
Wireless Network Settings
Wireless Encryption
Installing and Configuring the Dell Internal Network Adapter 1150
Configuring the Adapter Using the Wireless Setup Utility
The optional Dell™ Internal Network Adapter 1150 enables you to connect your printer to a network
using a wireless or Ethernet connection.
NOTE: The Dell Internal Network Adapter 1150 may not be available in all regions. Check with your
local Dell Sales Representative to determine availability.
Minimum Requirements for Setup
The Dell Internal Network Adapter 1150
The Dell All-In-One Printer
An existing wireless network
The Drivers and Utilities CD that shipped with your printer
A computer running one of the following operating systems:
Windows Vista™
Microsoft® Windows® XP
Microsoft Windows 2000
Wireless Network Settings
Some wireless network settings may be needed to configure the adapter that has been installed in the
printer. Here are some of the settings that you may need:
Network Name, also known as SSID (Service Set ID)
BSS (Basic Service Set) Type (the type of wireless network you use—Ad-Hoc or Infrastructure)
Wireless Channel Number
Network Authentication and encryption type
Security Key(s)
Wireless Encryption
Page 81

The following security types are supported:
No security
WEP with either 64-bit or 128-bit key
WPA with 128-bit TKIP encryption engine
WPA2 with 128-bit AES-CCMP encryption engine
A WPA (WiFi Protected Access) pre-shared key is like a password and must meet the following criteria:
If you are using Hexadecimal characters, valid keys are 64 characters long.
If you are using ASCII, valid keys are at least 8 characters long.
The wireless network may use anywhere from one to four WEP keys. A WEP key is like a password and
must meet the following criteria:
If you are using Hexadecimal characters, valid keys are either 10 or 26 characters long.
If you are using ASCII, valid keys are either 5 or 13 characters long.
Installing and Configuring the Dell Internal Network Adapter
1150
Installing the Adapter
NOTE: If your printer came with the Dell Internal Network Adapter 1150 pre-installed, go to
Configuring the Adapter for a Wireless Connection
Connection.
1. Turn off your printer, and then unplug the power cable from the wall outlet.
or Configuring the Adapter for an Ethernet
NOTICE: Failure to unplug the printer can cause damage to your printer and adapter.
2. Remove the back cover.
Page 82

NOTICE: Your wireless adapter is easily damaged by static electricity. Touch a grounded metal
object before you touch the adapter.
3. Remove the Dell Internal Network Adapter 1150 from the packaging.
Callout Item
1 Dell Internal Network Adapter 1150
2 USB cable
3 MAC address label
4 Dell Internal Network Adapter 1150 Installation Guide
4. Attach the MAC address label to the back of your printer.
5. Insert the adapter into the slot until it is pressed evenly against the back of the printer.
You are now ready to configure your adapter to work on your network.
Page 83

NOTE: Have your USB cable ready for wireless configuration or your Ethernet cable (sold separately)
ready for Ethernet configuration.
Configuring the Adapter for a Wireless Connection
1. Plug the printer power cable into the wall outlet.
2. Press the Power button
The wireless icon appears in the main menu on the operator panel.
If you are using your printer with a new Dell computer:
3.
If you are using your printer with an existing computer:
4. Make sure your computer is on, and then insert the Drivers and Utilities CD that came with your
printer. The CD launches automatically.
NOTE: If you do not have your Drivers and Utilities CD, you can download the appropriate
software from support.dell.com
5. Select Using a wireless network, and then click Next.
6. Select I Agree with the terms of this License Agreement , and then click Next.
7. Read the Firewall Exception information, and then click Next.
8. Connect the USB cable between the port on the back of the printer and the port on the computer.
.
Go to step 8.
Go to the next step.
.
9. On the Configure Your Wireless Printer Adapter dialog box, select Create or modify the
printer's wireless settings, and then click Next.
The Dell Wireless Setup Utility launches. Follow the instructions on your screen to complete the
installation process.
NOTE: The network name (SSID) and the security settings for the wireless network you want
to connect to may be needed to complete this setup wizard. For more information, see the
wireless network administrator or your network documentation.
For additional information on configuring your adapter, see Configuring the Adapter Using the
Wireless Setup Utility.
Configuring the Adapter for an Ethernet Connection
1. Connect your printer to your network using an Ethernet cable (sold separately).
Page 84

2. Connect the power cable to the wall, and then press the Power button .
The Ethernet wired icon appears in the main menu on the operator panel.
3. Make sure your computer is on, and then insert the Drivers and Utilities CD that came with your
printer. The CD launches automatically.
NOTE: If you do not have your Drivers and Utilities CD, you can download the appropriate
software from support.dell.com
.
4. Select Using an Ethernet Cable , and then click Next.
5. Click I Agree to the terms of this License Agreement , and then click Next.
6. Read the Firewall Exceptions information, and then click Next.
7. Your printer should appear in the list and it should already be selected. Click Next to begin the
installation process.
If your printer is not in the list, you may need to manually configure your adapter's IP address to
work with your network. For more information, see Manually Configuring the IP Address
Manually Configuring the IP Address
.
1. Print a Network Setup Page to locate your adapter IP address:
a. From the main menu of the printer operator panel, press the up or down Arrow button
to scroll to Setup, and then press the Select button .
b. Press the down Arrow button to scroll to Network Setup, and then press the Select
button
.
c. Press the up or down Arrow button to scroll to Print Network Setup Page, and then
press the Select button
.
The Network Setup Page prints.
The IP address of the adapter is labeled Address: under the TCP/IP heading.
2. From the computer, click Enter IP Address.
The Configure Network Printers dialog box opens.
3. If your printer appears in the list, click Configure, and then select Configure IP Address
Manually.
If your printer is not in the list, click Add Printer, and then select One New Printer .
4. Type the IP address of the adapter into the space provided, and then click OK.
5. Your printer should appear in the list. Click Close to return to the printer selection dialog box.
6. Select your printer from the list, and then click Next.
Follow the instructions on the screen to complete the installation process.
For additional information on configuring your adapter to work on your network, see your network
administrator or the documentation for your network.
Page 85

Connecting the Printer to Another Network Computer
Using a Wireless Connection
NOTE: To perform the following steps, the printer must already be connected to a computer or
router using a wireless connection.
1. Make sure your printer and the additional computer are on and connected to your network.
2. From the additional computer, insert the Drivers and Utilities CD.
The CD launches automatically.
3. Select Using a wireless network, and then click Next.
4. Select I Agree with the terms of this License Agreement , and then click Next.
5. Read the Firewall Exceptions information, and then click Next.
6. On the Configure Your Wireless Printer Adapter dialog box, select Keep the current
wireless settings of the printer, and then click Next.
7. Choose your printer port from the list or manually enter an IP address, and then follow the
instructions on your screen. For more information, see Manually Configuring the IP Address
Using an Ethernet Connection
NOTE: To perform the following steps, the printer must already be connected to your network using
an Ethernet connection.
.
1. Make sure your printer and the additional computer are on and connected to your network.
2. From the additional computer, insert the Drivers and Utilities CD.
3. Select Using an Ethernet cable, and then click Next.
4. Select I Agree with the terms of this License Agreement , and then click Next.
Page 86

5. Read the Firewall Exceptions information, and then click Next.
6. Choose your printer from the list or manually enter an IP address, and then follow the instructions
on your screen. For more information, see Manually Configuring the IP Address.
Removing and Reinstalling the Adapter
If your adapter is not functioning properly, you might need to remove the adapter and reinstall it.
NOTE: The following instructions do not apply if you purchased your printer with the network
adapter pre-installed.
1. Turn off your printer, and then unplug the power cable from the wall outlet.
NOTICE: Failure to unplug the printer can cause damage to your printer and adapter.
2. Firmly grasp the Dell Internal Network Adapter 1150 by the side tabs, and then pull to remove.
NOTICE: Your network adapter is easily damaged by static electricity. Touch a grounded metal
object before you touch the adapter.
NOTICE: Do not grasp the antenna when removing the adapter. Pulling the antenna could
damage the adapter.
3. Reinstall the adapter following the installation instructions. For more information, see Installing the
Adapter.
Configuring the Adapter Using the Wireless Setup Utility
NOTE: If you are using the Drivers and Utilities CD to set up your network connection, you do not
need to launch the Wireless Setup Utility. It launches automatically when you select Create or
Page 87

modify the printer's wireless settings from the Configure Your Wireless Printer Adapter
dialog box. Skip the Configuration Overview and go to the heading that best describes your
network.
Configuration Overview
Configuring the adapter using the Wireless Setup Utility involves connecting the printer in which the
adapter has been installed to a computer by USB cable, and launching the Drivers and Utilities CD.
If you need to adjust the wireless adapter settings after installation, the CD is not required. Launch the
Wireless Setup Utility.
In Windows Vista:
1. Click ® Programs.
2. Click Dell Printers.
3. Click Dell 968 AIO Printer .
4. Click Wireless Setup Utility.
In Windows XP and Windows 2000:
1. Click Start® Programs or All Programs ® Dell Printers® Dell 968 AIO Printer.
2. Click Wireless Setup Utility.
The Wireless Setup Utility steps you through the configuration process. The wizard can automatically
detect wireless network settings or allow you to manually enter the network configuration settings.
Before configuring the adapter, make sure your printer has been set up correctly:
The adapter has been installed correctly in the printer.
The ink cartridges are installed correctly.
Paper has been loaded into the printer.
The USB cable is attached to the printer and the computer.
The printer is turned on and ready to be installed.
Using an Available Wireless Network Configuration
1. From the Wireless Networks Found In Your Area screen, select the appropriate Network
Name (SSID) from the list, and then click Next.
2. Select the appropriate security method, and then click Next. If no security was detected, go to
step 5
3. Enter the appropriate security key(s) for the network, and then click Next.
4. On the Apply and Verify Wireless Settings screen, check each network attribute to make sure
the settings are correct, and then click Next to apply the settings.
.
NOTE: Clicking Next prompts the setup utility to verify wireless communication with the
printer. The verification process can take up to 120 seconds.
Page 88

5. Verify that the adapter can communicate over the network. For more information, see Verifying
Network Communication.
Entering a Different Wireless Network Configuration
1. From the Wireless Networks Found In Your Area screen, select I want to enter a different
configuration, and then click Next.
2.
If the Network Name (SSID) you want to use is available,
Next.
If the Network Name (SSID) is not available
a. Select I want to enter a different network name , and then click Next.
b. Enter the Network Name (SSID) .
c. Select the appropriate Channel from the drop-down list. (Auto is the default.)
d. Select your Wireless Mode .
select it from the list, and then click
For Infrastructure Mode,
router (Infrastructure Mode) - Typical , and then click Next.
For additional setup instructions, see Manually Configuring the Adapter in Infrastructure
Mode.
For Ad-Hoc Mode,
wireless router (Ad-Hoc Mode), and then click Next.
For additional setup instructions, see Manually Configuring the Adapter in Ad-Hoc Mode.
3. Select the appropriate security method, and then click Next. If no security was detected, go to
step 5.
4. Enter the appropriate security key(s) for the network, and then click Next.
5. On the Apply and Verify Wireless Settings screen, check each network attribute to make sure
the settings are correct, and then click Next to apply the settings.
NOTE: Clicking Next prompts the setup utility to verify wireless communication with the
printer. The verification process can take up to 120 seconds.
select Access other computers directly without using a
select Access an existing network through a wireless
6. Verify that the adapter can communicate over the network. For more information, see Verifying
Network Communication.
Manually Configuring the Adapter in Infrastructure Mode
To set up the adapter in Infrastructure Mode, the setup steps vary based on the security settings you
select.
If you don't want any security
1. From the Wireless Security Settings screen, select No Security, and then click Next.
2. On the Apply and Verify Wireless Settings screen, check each network attribute to make
sure the settings are correct, and then click Next to apply the settings.
Page 89

3. Verify that the adapter can communicate over the network. For more information, see
Verifying Network Communication.
If you want to use Wired Equivalent Privacy (WEP) security
1. From the Wireless Security Settings screen, select Wired Equivalent Privacy (WEP),
and then click Next.
The WEP Security Information screen opens.
2. Enter the appropriate Network Key , and then click Next.
3. On the Apply and Verify Wireless Settings screen, check each network attribute to make
sure the settings are correct, and then click Next to apply the settings.
4. Verify that the adapter can communicate over the network. For more information, see
Verifying Network Communication
.
If you want to use Wi-Fi Protected Access (WPA) security
1. From the Wireless Security Settings screen, select Wi -Fi Protected Access (WPA) and
then click Next.
The WPA Security Information screen opens.
2. Enter the appropriate WPA Network Key , and then click Next.
3. On the Apply and Verify Wireless Settings screen, check each network attribute to make
sure the settings are correct, and then click Next to apply the settings.
4. Verify that the adapter can communicate over the network. For more information, see
Verifying Network Communication
.
If you only want to connect to access points that support WPA2 security
1. From the Wireless Security Settings screen, select Wi -Fi Protected Access (WPA),
and then click Advanced WPA Settings .
The Advanced WPA Options dialog box opens.
2. Select the Use WPA2 authentication only check box, and then click OK.
You are returned to the Wireless Security Settings screen.
3. Click Next.
4. Enter the appropriate WPA Network Key , and then click Next.
5. On the Apply and Verify Wireless Settings screen, check each network attribute to make
sure the settings are correct, and then click Next to apply the settings.
6. Verify that the adapter can communicate over the network. For more information, see
Verifying Network Communication
.
Manually Configuring the Adapter in Ad- Hoc Mode
To set up the adapter in Ad-Hoc Mode, the setup steps vary based on the security settings you select.
The security options are more limited in Ad-Hoc Mode than they are in Infrastructure Mode.
If you don't want any security
Page 90

1. From the Wireless Security Settings screen, select No Security, and then click Next.
2. On the Apply and Verify Wireless Settings screen, check each network attribute to make
sure the settings are correct, and then click Next to apply the settings.
3. Verify that the adapter can communicate over the network. For more information, see
Verifying Network Communication
.
If you want to use Wired Equivalent Privacy (WEP) security
1. From the Wireless Security Settings screen, select Wired Equivalent Privacy (WEP),
and then click Next.
2. Enter the appropriate Network Key .
3. If you have additional network keys, select the My network requires more than one
network key check box, and then enter the additional network keys.
4. Click Next.
5. On the Apply and Verify Wireless Settings screen, check each network attribute to make
sure the settings are correct, and then click Next to apply the settings.
6. Verify that the adapter can communicate over the network. For more information, see
Verifying Network Communication
.
Verifying Network Communication
You should verify that your adapter can communicate over the network before completing installation of
the printer software.
If the adapter was successfully configured and is available on the network,
and click Next to continue with printer software installation.
If the adapter was not able to join the wireless network,
Click View Settings to verify the settings are correct.
Select I want to change the settings I entered, and then click Next.
Follow the instructions on your screen to update the wireless settings.
Select I have moved my wireless printer closer to the wireless router. I would like
to try connecting again, and then click Next.
try one of the following suggestions:
remove the USB cable,
Page 91

Loading Paper and Originals
Loading Paper Into Trays
Understanding the Automatic Paper Type Sensor
Loading Original Documents
Loading Paper Into Trays
Loading Paper
1. Fan the paper.
2. Remove the paper tray. Push the lever in, and then extend the tray until it is long enough to
accommodate the length of the paper.
3. Load paper in the paper tray, and then adjust the paper guides.
NOTE: You can only load letter size, legal size, or A4 paper in the optional paper tray.
4. Replace the paper tray.
Page 92

5. Extend the paper support on the paper tray, and then lift the paper stop.
NOTE: The paper exit tray can hold up to 100 sheets of paper.
Print Media Guidelines
Load up to: Make sure:
150 sheets of plain paper
10 envelopes in the paper
tray
1 envelope into the small
media feeder
The paper guides rest against the edges of the paper.
You load the paper with the print side facing down and the top going
into the printer first.
You select Automatic, Draft, Normal, or Photo print quality. Do not
select Draft if you have a Photo cartridge installed.
The print side of the envelope faces down.
You can also insert envelopes into the small media feeder one at a
time.
You print the envelopes with Landscape orientation with the return
address on the left.
NOTE: If you are mailing within Japan, the envelope can be printed in
Portrait orientation with the stamp in the lower right corner or in
Landscape orientation with the stamp in the lower left corner. If you
are mailing internationally, print Landscape orientation with the stamp
in the upper left corner.
You select the correct envelope size. Select the next biggest size if the
exact envelope size is not listed, and set the left and right margins so
your envelope text is correctly positioned.
20 sheets of banner paper
You remove all paper from the paper input tray before inserting banner
paper.
You use banner paper designed for inkjet printers.
You select A4 Banner or Letter Banner paper size.
Page 93

NOTE: For more information on how to load banner paper, see Loading
Banner Paper.
25 greeting cards, index
cards, postcards, or photo
cards in the paper tray
1 greeting card, index
card, postcard, or photo
card into the small media
feeder
30 sheets of Hagaki or
Hagaki photo cards in the
paper tray
50 sheets of glossy/photo
or heavyweight matte
paper
The print side of the cards faces down.
You can also insert cards into the small media feeder one at a time.
You select Automatic, Normal or Photo print quality.
The print side of the paper faces down.
The paper guides rest against the edges of the paper.
10 mm stack of iron-on
transfers
50 sheets of
transparencies
25 sheets of labels
You select Automatic, Normal or Photo print quality.
You follow the loading instructions on the iron-on transfer packaging.
The print side of the transfer faces down.
The paper guides rest against the edges of the transfer.
You select Automatic, Normal or Photo print quality.
The rough side of the transparencies faces down.
The paper guides rest against the edges of the transparencies.
You select Automatic, Draft, Normal or Photo print quality.
The print side of the labels faces down.
The top of the labels feeds into the printer first.
The paper guides rest against the edges of the paper.
150 sheets of letterhead
paper
150 sheets of custom size
paper
The print side of the letterhead faces down.
The top of the letterhead feeds into the printer first.
The paper guides rest against the edges of the paper.
The paper fits within these dimensions:
Width: 3.0 – 8.5 inches (76 – 216 mm)
Page 94

Length: 5.0 – 17.0 inches (127 – 432 mm)
The print side of the paper faces down.
The paper guides rest against the edges of the paper.
Loading Banner Paper
1. Remove the paper tray.
2. Remove any paper from the tray.
3. Push the lever in, and then extend the tray until it is long enough to accommodate legal size
paper.
4. Replace the paper tray.
5. Tear off only the number of banner pages needed for the banner.
6. Set the stack of paper on a flat surface in front of the printer.
7. Slide the first sheet of the banner over the handle and all the way into the back of the paper tray.
Understanding Tray Linking
If you purchased an optional paper tray, you can set the trays to link to each other. Tray linking enables
the automatic linking feature for trays when you load the same size and type of paper in the standard
and optional paper trays. The printer automatically links the trays; when one tray is empty, paper feeds
from the next linked tray.
For example, if you have the same size and type of paper in Tray 1 (standard paper tray) and Tray 2
Page 95

(optional tray), the printer selects print media from Tray 1 until it becomes empty, and then the printer
automatically feeds print paper from Tray 2.
In addition, you can load a different size of paper for each tray so that the printer picks the paper that
matches the size of the fax you received. For example, if letter size is loaded in Tray 1 and legal size is
loaded in Tray 2, if you receive a legal size fax, the printer picks from Tray 2.
NOTE: You can only load letter size, legal size, or A4 paper in the optional paper tray.
You can enable Tray Linking after you have installed the optional paper tray. You can also turn this
option on and off, as needed.
Enabling Tray Linking for Print Jobs Using the Computer
1. Turn on your computer and printer, and make sure they are connected.
2. Load paper of the same type and size in both paper trays.
3. With your document open, click File® Print.
The Print dialog box opens.
4. Click Preferences, Properties, Options, or Setup (depending on the program or operating
system).
The Printing Preferences dialog box opens.
5. On the Print Setup tab, select Automatic from the Paper Source drop-down list.
6. On the Print Setup and Advanced tabs, make any necessary changes for your document.
7. When you finish customizing your settings, click OK.
The Printing Preferences dialog box closes.
8. Click OK or Print.
Enabling Tray Linking for Print Jobs Using the Operator Panel
1. From the main menu, use the up or down Arrow button to scroll to Setup, and then press
the Select button
.
2. From Paper Handling, press the Select button .
3. Press the up or down Arrow button to scroll to Tray Linking, and then press the left or right
Arrow button
to scroll to Auto.
4. Press the Back button
Enabling Tray Linking For Copying Jobs
.
1. Load paper of the same type and size in both paper trays.
2. From the Main menu , press the up or down Arrow button
press the Select button
.
to scroll to Setup, and then
3. From the Setup menu, press the up or down Arrow button to scroll to Change Copy Default
Page 96

Settings, and then press the Select button .
4. From the Copy Default Settings menu, press the down Arrow button to scroll to Paper
Handling, and then press the Select button
5. From the Paper Handling menu, specify the size and type of paper loaded in both paper trays.
.
6. Press the up or down Arrow button
Arrow button
7. Press the Back button
Enabling Tray Linking to Print Received Faxes
1. Load paper of the same type but of different sizes in both trays.
2. From the Main menu , press the up or down Arrow button
press the Select button
3. From the Setup menu, press the up or down Arrow button to scroll to Change Fax Default
Settings, and then press the Select button
4. From the Fax Setup menu, press the up or down Arrow button to scroll to Fax Printing,
and then press the Select button
5. From the Fax Printing menu, press the down Arrow button to scroll to Paper Handling, and
then press the Select button
to select Auto.
to save the settings and return to the previous menu.
.
.
to scroll to Tray Linking, and then press the left or right
to scroll to Setup, and then
.
.
6. From the Paper Handling menu, specify the size and type of paper loaded in both paper trays.
7. Press the up or down Arrow button
Arrow button
8. Press the up or down Arrow button
Arrow button
9. Press the Back button
NOTE: If you load media of the same type and size in both trays, the printer picks from the
next tray once the paper source you specified for faxing is empty.
to select Auto.
to select the paper source.
to save the settings and return to the previous menu.
to scroll to Tray Linking, and then press the left or right
to scroll to Fax Source, and then press the left or right
Understanding the Automatic Paper Type Sensor
Your printer has an automatic paper type sensor that detects the following paper types:
Plain/heavyweight matte
Transparency
Photo/glossy
If you load one of these paper types, the printer detects the paper type and automatically adjusts the
Quality/Speed settings.
Page 97

Paper type Quality/Speed settings
Black and Color Cartridges Installed Photo and Color Cartridges Installed
Plain/heavyweight matte Normal Photo
Transparency Normal Photo
Photo/glossy Photo Photo
NOTE: Your printer cannot detect paper size.
To choose paper size:
1. With your document open, click File® Print .
The Print dialog box opens.
2. Click Preferences, Properties, Options, or Setup (depending on the program or operating
system).
The Printing Preferences dialog box opens.
3. On the Print Setup tab, select the paper size.
4. Click OK.
The automatic paper type sensor is always on, unless you turn it off. To turn off the automatic paper
type sensor for a specific print job:
1. With your document open, click File® Print .
The Print dialog box opens.
2. Click Preferences, Properties, Options, or Setup (depending on the program or operating
system).
The Printing Preferences dialog box opens.
3. On the Print Setup tab, select the paper type.
4. Click OK.
To turn off the automatic paper type sensor for all print jobs:
In Windows Vista™:
1.
a. Click ® Control Panel.
b. Click Hardware and Sound .
c. Click Printers.
In Windows
®
XP, click Start® Control Panel ® Printers and Other Hardware® Printers and
Faxes.
In Windows 2000
, click Start® Settings® Printers.
2. Right-click the printer icon.
3. Click Printing Preferences .
Page 98

4. On the Print Setup tab, select the paper type.
5. Click OK.
Loading Original Documents
Into the ADF
You can load up to 50 sheets of an original document into the ADF for scanning, copying, and faxing.
The ADF is recommended for loading multiple-page documents.
1. Load an original document text side up into the ADF.
NOTE: Do not load postcards, photos, small items, or thin media (such as magazine clippings)
into the ADF. Place these items on the scanner glass.
2. Adjust the paper guide on the ADF against the edges of the paper.
ADF Paper Capacity
Load up to Make sure
50 sheets of letter size paper
50 sheets of legal size paper
50 sheets of A4 size paper
50 sheets of two-, three-, or
four-hole pre-punched media
The document is loaded text side up.
The paper guide rests against the edge of the paper.
The document is loaded text side up.
The paper guide rests against the edge of the paper.
The document is loaded text side up.
The paper guide rests against the edge of the paper.
The paper fits within these dimensions: Width: 8.27 – 8.5 inches
(210.0 – 215.9 mm) Length: 11.0 – 14.0 inches (279.4 – 355.6 mm)
50 sheets of edge-reinforced
three-hole copier media
The document is loaded text side up.
The paper guide rests against the edge of the paper.
The paper fits within these dimensions: Width: 8.27 – 8.5 inches
(210.0 – 215.9 mm) Length: 11.0 – 14.0 inches (279.4 – 355.6 mm)
The document is loaded text side up.
The paper guide rests against the edge of the paper.
Page 99

50 sheets of preprinted forms
and letterhead media
The paper fits within these dimensions: Width: 8.27 – 8.5 inches
(210.0 – 215.9 mm) Length: 11.0 – 14.0 inches (279.4 – 355.6 mm)
50 sheets of custom size
paper
On the Scanner Glass
The document is loaded text side up.
The paper guide rests against the edge of the paper.
You allow the preprinted media to dry thoroughly before use in the
ADF.
You do
You avoid embossed designs.
The paper fits within these dimensions: Width: 8.27 – 8.5 inches
(210.0 – 215.9 mm) Length: 11.0 – 14.0 inches (279.4 – 355.6 mm)
The document is loaded text side up.
The paper guide rests against the edge of the paper.
not
use media printed with metallic ink particles in the ADF.
1. Open the top cover.
2. Place the document face down on the scanner glass.
NOTE: Make sure the upper left corner of the front of the item aligns with the arrow on the
printer.
Page 100

3. Close the top cover.
 Loading...