

Page 1
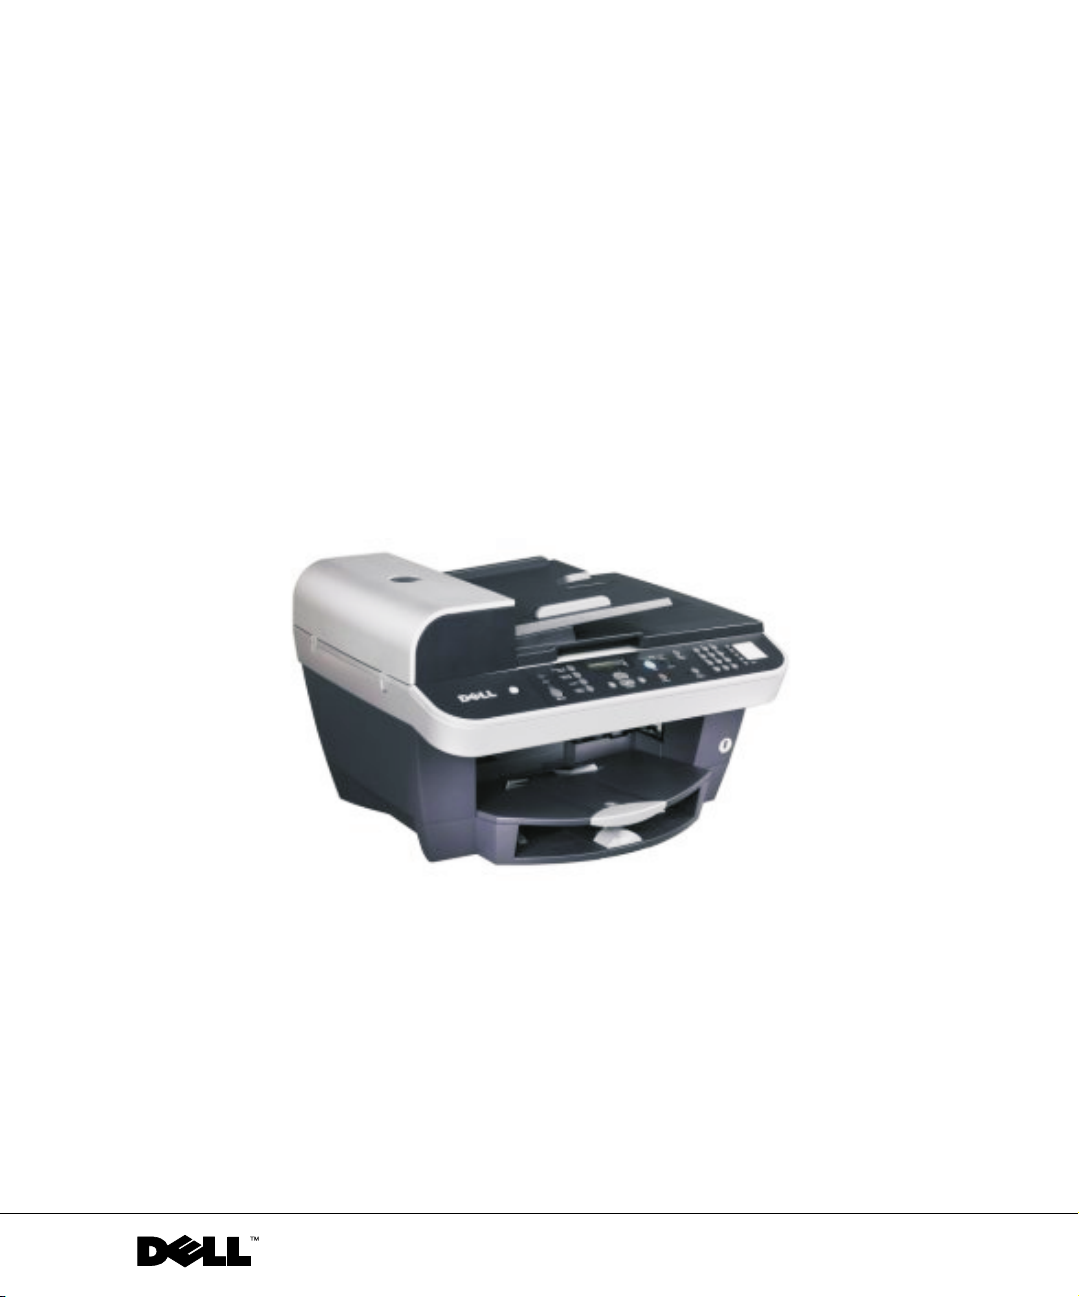
Dell™ Photo All-in-One Printer 962
Owner’s Manual
Look Inside For:
• Ordering Supplies
• Getting Started
• Using Your Printer
• Understanding the Software
• Maintenance and Troubleshooting
www.dell.com/supplies | support.dell.com
Page 2

Ordering Ink Cartridges and Supplies
Your Dell™ Photo All-In-One Printer 962 includes software installed to detect the ink levels in the
printer. During a print job, a screen appears on your computer to warn you of low ink levels. You can order
ink online at www.dell.com/supplies or by phone.
United States 877-INK-2YOU Netherlands 020 - 674 4881
Algeria Contact your local distributor Norway 231622 64
Argentina Contact your local distributor Oman Contact your local distributor
Austria 08 20 - 24 05 30 35 Paraguay Contact your local distributor
Belgium 02.713 1590 Peru Contact your local distributor
Canada 877-501-4803 Poland 022 579 59 65
Caribbean Islands Contact your local distributor PRC 800-858-0888
Chile CTC number 800-202874
1230-020-3947
Colombia 01800-9-155676 Russia Contact your local distributor
Denmark 3287 5215 Saudi Arabia Contact your local distributor
Egypt Contact your local distributor Singapore 1 800 394 7486
Finland 09 2533 1411 South Africa Contact your local distributor
France 825387247 Spain 902120385
Germany 0800 2873355 Sweden 08 587 705 81
Ireland 1850 707 407 Switzerland 0848 335 599
Israel Contact your local distributor Tunisia Contact your local distributor
Italy 800602705 Turkey Contact your local distributor
Jordan Contact your local distributor UAE Contact your local distributor
Kuwait Contact your local distributor UK 0870 907 4574
Lebanon Contact your local distributor Uruguay Contact your local distributor
Luxembourg 02.713 1590 Venezuela Contact your local distributor
Malaysia 1800 88 0301 Yemen Contact your local distributor
Mexico 001 866 851 1754
Puerto Rico 866 851 1760
Qatar Contact your local distributor
Your printer has been designed to print using the following ink cartridges.
Item: Part number: Item: Part number:
High capacity black ink cartridge M4640 Standard capacity black ink cartridge J5566
High capacity color ink cartridge M4646 Standard capacity color ink cartridge J5567
Photo ink cartridge J4844
Page 3

Notes, Notices, and Cautions
NOTE: A NOTE indicates important information that helps you make better use of your printer.
NOTICE: A NOTICE indicates either potential damage to hardware or loss of data and tells you
how to avoid the problem.
CAUTION: A CAUTION indicates a potential for property damage, personal
injury, or death.
Information in this document is subject to change without notice.
© 2004 Dell Inc. All rights reserved.
Reproduction in any manner whatsoever without the written permission of Dell Inc. is strictly forbidden.
Trademarks used in this text: Dell and the DELL logo are trademarks of Dell Inc.; Microsoft and Windows are registered
trademarks of Microsoft Corporation.
Other trademarks and trade names may be used in this document to refer to either the entities claiming the marks and
names or their products. Dell Inc. disclaims any proprietary interest in trademarks and trade names other than its own.
UNITED STATES GOVERNMENT RESTRICTED RIGHTS
This software and documentation are provided with RESTRICTED RIGHTS. Use, duplication or disclosure by the
Government is subject to restrictions as set forth in subparagraph (c)(1)(ii) of the Rights in Technical Data and Computer
Software clause at DFARS 252.227-7013 and in applicable FAR provisions: Dell Inc., One Dell Way, Round Rock,
Texas, 78682, USA.
Page 4

www.dell.com/supplies | support.dell.com
Page 5

Contents
1 Getting Started
Understanding the Printer Parts . . . . . . . . . . . . . . . . . . 11
Accessing Your
Setting Up Your Printer . . . . . . . . . . . . . . . . . . . . . . 14
Understanding the Operator Panel . . . . . . . . . . . . . . . . . 15
Installing the Operator Panel
Using the Operator Panel . . . . . . . . . . . . . . . . . . . . 15
Operator Panel Menus . . . . . . . . . . . . . . . . . . . . . . 18
Understanding the Automatic Paper Type Sensor . . . . . . . . . 32
Loading Paper . . . . . . . . . . . . . . . . . . . . . . . . . . . 34
Load Plain Paper Into the Paper Support
Load an Original Document Into the ADF . . . . . . . . . . . . 36
Placing Your Original Document on the Scanner Glass . . . . . . 38
User’s Guide
2 Using the Printer
Printing . . . . . . . . . . . . . . . . . . . . . . . . . . . . . . . 39
Printing a Document
Printing Collated Copies of Your Document . . . . . . . . . . . 39
Printing Photos
Printing More Than one Page on a Sheet of Paper . . . . . . . . 41
Printing an Image as a Multi-page Poster
Printing Last Page First
Printing a Banner
Printing Other Projects
. . . . . . . . . . . . . . . . . . . . 14
. . . . . . . . . . . . . . . . . . 15
. . . . . . . . . . . . 34
. . . . . . . . . . . . . . . . . . . . . . 39
. . . . . . . . . . . . . . . . . . . . . . . . . 40
. . . . . . . . . . . . 42
. . . . . . . . . . . . . . . . . . . . . 42
. . . . . . . . . . . . . . . . . . . . . . . . 42
. . . . . . . . . . . . . . . . . . . . . 43
Contents 5
Page 6

Copying . . . . . . . . . . . . . . . . . . . . . . . . . . . . . . 43
Copying Documents Using the Operator Panel
. . . . . . . . . 43
Copying Documents Using Your Computer . . . . . . . . . . . 43
Copying Photos Using the Operator Panel
. . . . . . . . . . . 44
Copying Photos Using Your Computer . . . . . . . . . . . . . 44
Collating Copies Using the Operator Panel . . . . . . . . . . . 45
Changing Copy Settings
. . . . . . . . . . . . . . . . . . . . 45
Scanning
. . . . . . . . . . . . . . . . . . . . . . . . . . . . . . 46
Using the Operator Panel
Using the Printer Software
. . . . . . . . . . . . . . . . . . . 46
. . . . . . . . . . . . . . . . . . . 47
Scanning Photos . . . . . . . . . . . . . . . . . . . . . . . . 47
Scanning to Your Computer Over a Network . . . . . . . . . . 48
Scanning Multiple Pages or Images
. . . . . . . . . . . . . . 48
Editing Scanned Text Using Optical Character Recognition
. . . . . . . . . . . . . . . . . . . . . . . . . . . . . 49
(OCR)
Editing Scanned Images
. . . . . . . . . . . . . . . . . . . . 50
Saving an Image on Your Computer . . . . . . . . . . . . . . 50
E-mailing a Scanned Image or Document . . . . . . . . . . . 50
Enlarging or Reducing Images or Documents
Faxing
. . . . . . . . . . . . . . . . . . . . . . . . . . . . . . . 52
Setting up the Printer With Equipment
Faxing Using the Printer Operator Panel
. . . . . . . . . . 51
. . . . . . . . . . . . . 52
. . . . . . . . . . . . 55
Sending a Fax From the Computer . . . . . . . . . . . . . . . 57
Speed Dial . . . . . . . . . . . . . . . . . . . . . . . . . . . 62
Manually Dialing a Fax While Listening to a Telephone Line
(On Hook Dial)
. . . . . . . . . . . . . . . . . . . . . . . . . 64
Broadcast Send . . . . . . . . . . . . . . . . . . . . . . . . 64
Adding Fax Numbers From Which to Block Faxes
. . . . . . . 65
Using Auto Fax Convert . . . . . . . . . . . . . . . . . . . . 65
3 Understanding the Software
Using the Dell Printer Solution Center . . . . . . . . . . . . . . 67
Using the Dell All-In-One Center
6 Contents
. . . . . . . . . . . . . . . . . 68
Page 7

Using Printing Preferences . . . . . . . . . . . . . . . . . . . . . 69
Printing Preferences Tabs
. . . . . . . . . . . . . . . . . . . . 70
Using Dell Picture Studio v2.0 . . . . . . . . . . . . . . . . . . . 70
4 Ink Cartridge Maintenance
Replacing Ink Cartridges . . . . . . . . . . . . . . . . . . . . . . 71
Aligning Ink Cartridges . . . . . . . . . . . . . . . . . . . . . . . 74
Cleaning the Ink Cartridge Nozzles . . . . . . . . . . . . . . . . 75
5 Troubleshooting
Setup Problems . . . . . . . . . . . . . . . . . . . . . . . . . . . 77
Computer Problems
Removing and Reinstalling Software
Printer Problems . . . . . . . . . . . . . . . . . . . . . . . . 79
General Problems . . . . . . . . . . . . . . . . . . . . . . . . . . 80
Fax Problems
Paper Problems . . . . . . . . . . . . . . . . . . . . . . . . . 81
. . . . . . . . . . . . . . . . . . . . . . . 77
. . . . . . . . . . . . . . . . . . . . . . . . . . 80
. . . . . . . . . . . . . . 78
Error Messages and Lights . . . . . . . . . . . . . . . . . . . . . 84
Improving Print Quality
6 Contacting Dell
Technical Assistance . . . . . . . . . . . . . . . . . . . . . . . . 89
Automated Order-Status Service
Contacting Dell
. . . . . . . . . . . . . . . . . . . . . . 86
. . . . . . . . . . . . . . . . . . 90
. . . . . . . . . . . . . . . . . . . . . . . . . . . 90
Contents 7
Page 8

7 Appendix
U.S. Terms and Conditions of Sale . . . . . . . . . . . . . . . . 107
Limited Warranties and Return Policy
Limited Warranty for Dell-Branded Hardware Products
(U.S. Only) . . . . . . . . . . . . . . . . . . . . . . . . . . . 110
Total Satisfaction Return Policy (U.S. Only) . . . . . . . . . . 113
Dell Inc. Ink and Toner Cartridges Limited Warranties . . . . . 114
Dell Software License Agreement
Regulatory Notices . . . . . . . . . . . . . . . . . . . . . . . . 116
. . . . . . . . . . . . . . 110
. . . . . . . . . . . . . . . . . 114
Index . . . . . . . . . . . . . . . . . . . . . . . . . . . . . . . . . . 119
8 Contents
Page 9

CAUTION: SAFETY INSTRUCTIONS
Use the following safety guidelines to help ensure your own personal safety and to help protect
your printer and working environment from potential damage.
• Use only the power cable provided with this product or the manufacturer’s authorized
replacement power cable.
• Connect the power cable to an electrical outlet that is near the product and easily
accessible.
• Refer service or repairs, other than those described in the user documentation, to a
professional service person.
CAUTION: Do not use the fax feature during a lightning storm. Do not set up this
product or make any electrical or cabling connections, such as the power cable or
telephone, during a lightning storm.
CAUTION: SAFETY INSTRUCTIONS 9
Page 10

www.dell.com | support.dell.com
10 CAUTION: SAFETY INSTRUCTIONS
Page 11
Getting Started
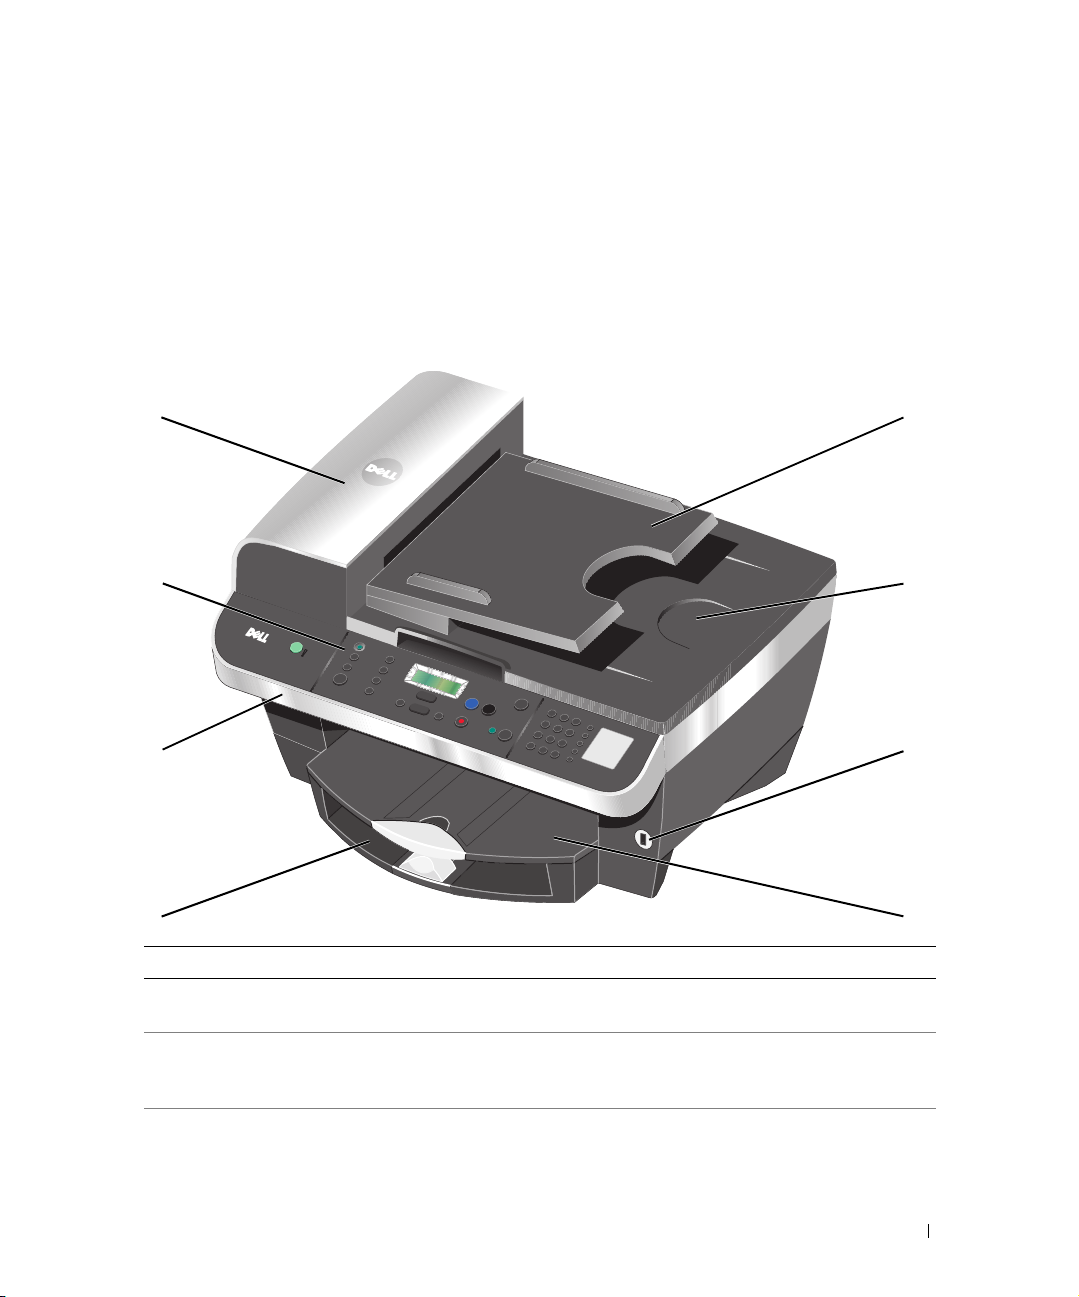
Understanding the Printer Parts
1
1
2
3
4
Number: Part: Description:
1 Automatic Document
Feeder (ADF)
2 Operator panel Panel on the printer you use to control copying, scanning,
3 Printer unit Unit you lift to gain access to the ink cartridges.
Scan, copy, or fax multiple page documents and/or legal
sized documents.
faxing, and printing. For more information, see “Using the
Operator Panel” on page 15.
5
6
7
8
Getting Started 11
Page 12
www.dell.com | support.dell.com
Number: Part: Description:
4 Paper input tray Where you load paper into the printer.
5 ADF input tray Load original documents in the printer. Recommended for
scanning, copying, or faxing multiple page documents.
6 Top cover with
integrated ADF exit tray
Top of printer that holds your document or photo flat while
you scan it. You can also pick up your original document
after it has gone through the ADF here.
7 PictBridge connector The connector you use to connect your
PictBridge-compatible digital camera to your printer.
8 Paper exit tray Tray that holds the paper as it exits the printer.
NOTE: Pull the paper exit tray stop straight out to extend
it.
9
9 Supplies Reorder Label To order ink cartridges or paper, visit www.dell.com/supplies.
10 Express Service Code • Identify your printer when you use support.dell.com or
12 Getting Started
10
contact technical support.
• Enter the Express Service Code to direct your call when
contacting technical support. The Express Code is not
available in all countries.
Page 13
11
12
13
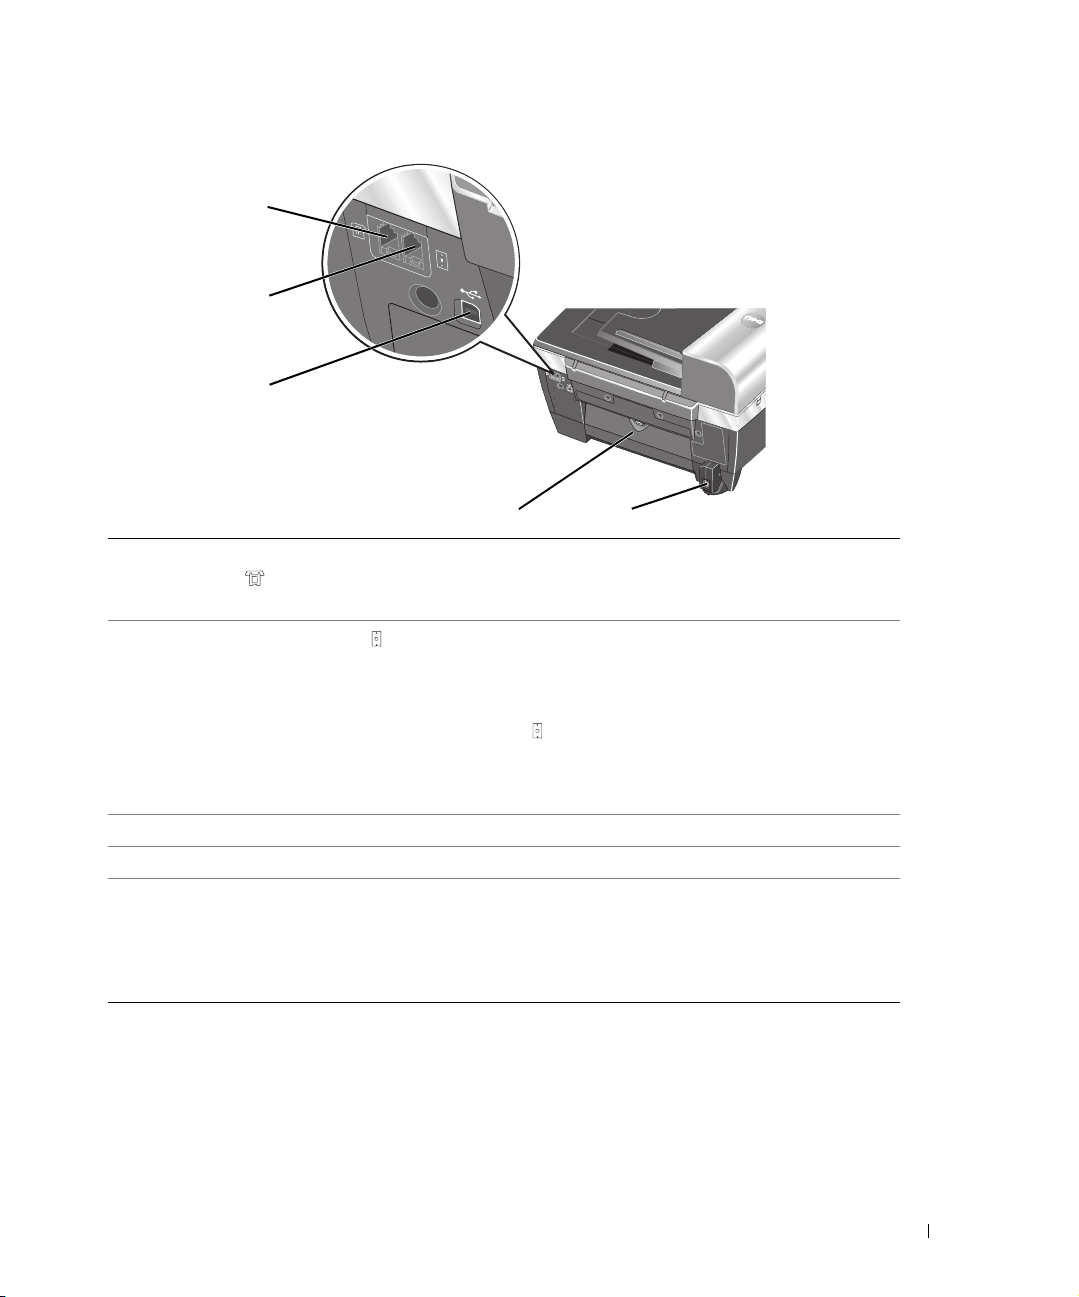
14
11 PHONE jack connector
( — left side
connector)
12
LINE connector
( —
right side connector)
13 USB connector Connects your printer to a computer.
14 Rear access door Open to remove paper jams.
15 Power cord connector Supplies power to the printer.
Remove the plug to connect additional devices, such as a
data/fax modem, telephone, or answering machine to your
printer.
Connect your printer to an active telephone line to send and
receive faxes. Your printer must be connected to this
telephone line to receive incoming fax calls.
NOTE: Do not connect additional devices to the LINE
connector ( —right side connector) and do not connect a
DSL (digital subscriber line) or ISDN (integrated services
digital network) without using a digital line filter to the
printer.
NOTE: The power supply is removable. Also, if the power is
off when you unplug your machine, the power will be off
when you plug it back in. If the power is on when you unplug
it, the power will resume as soon as you plug it back in.
15
Getting Started 13
Page 14

Accessing Your
Click Start→Programs or All Programs→ Dell Printers→ Dell Photo AIO Printer 962→View
Dell User’s Guide.
User’s Guide
www.dell.com | support.dell.com
NOTE: You can also access the
User’s Guide
on your
Drivers and Utilities
CD.
Setting Up Your Printer
NOTE: The Dell Photo All-In-One Printer 962 supports Microsoft® Windows® 2000 and Windows
XP.
To setup your printer, follow the steps on your Setting Up Your Printer poster. If you encounter
problems during setup, see "Troubleshooting" on page 77.
NOTE: The Dell Photo AIO Printer 962 is an analog device that only works when directly connected
to a wall jack. Other devices such as a telephone or answering machine can be attached to the
PHONE jack connector to pass through the printer as described in the setup steps. If you have a
digital connection such as ISDN, DSL, or ADSL, a digital line filter is required. Please contact your
Internet Service Provider for details.
You can use the Dell Photo AIO Printer 962 to do a variety of things. A few important things to
note:
• If your printer is connected to a computer, you can use either the printer operator panel or
the printer software to produce quality documents quickly.
•You do need to connect your printer to a computer to print. However, printing photos from
your digital camera using the Pictbridge connector does not require a computer.
•You do not need to connect your printer to a computer to make photocopies or send faxes.
NOTE: The printer (whether it is connected to a computer or not) must be connected to a telephone
line before you can send a fax.
14 Getting Started
Page 15
Understanding the Operator Panel
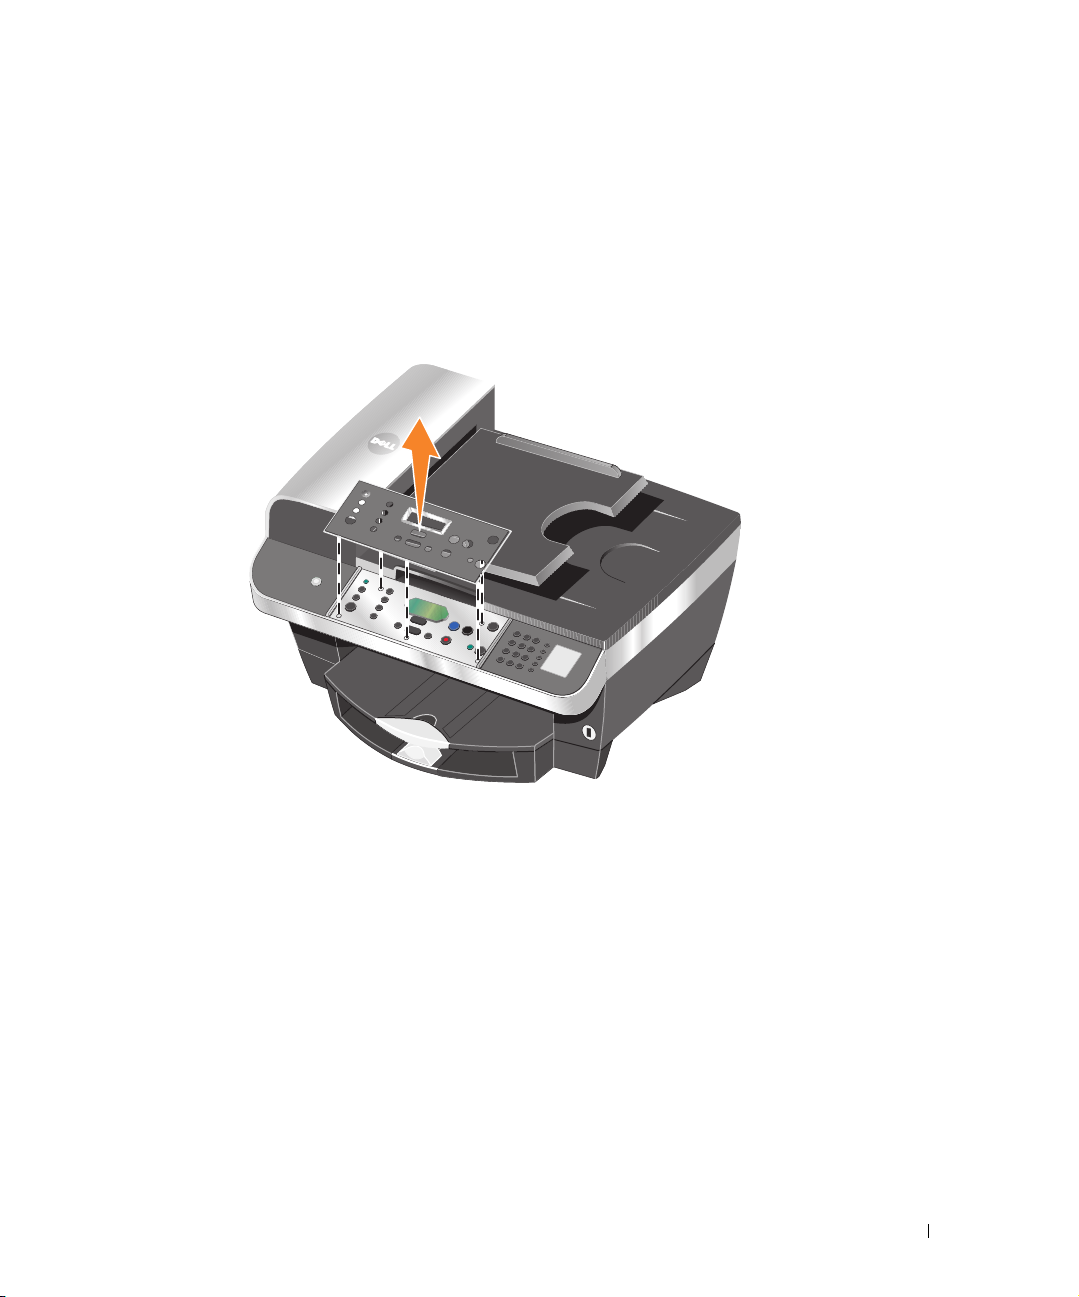
Installing the Operator Panel
The following instructions apply only if you received an additional language operator panel with
your printer.
1 Remove the operator panel (if one is installed).
2 Choose the correct operator panel for your language.
3 Position the clips on the printer, and then press down.
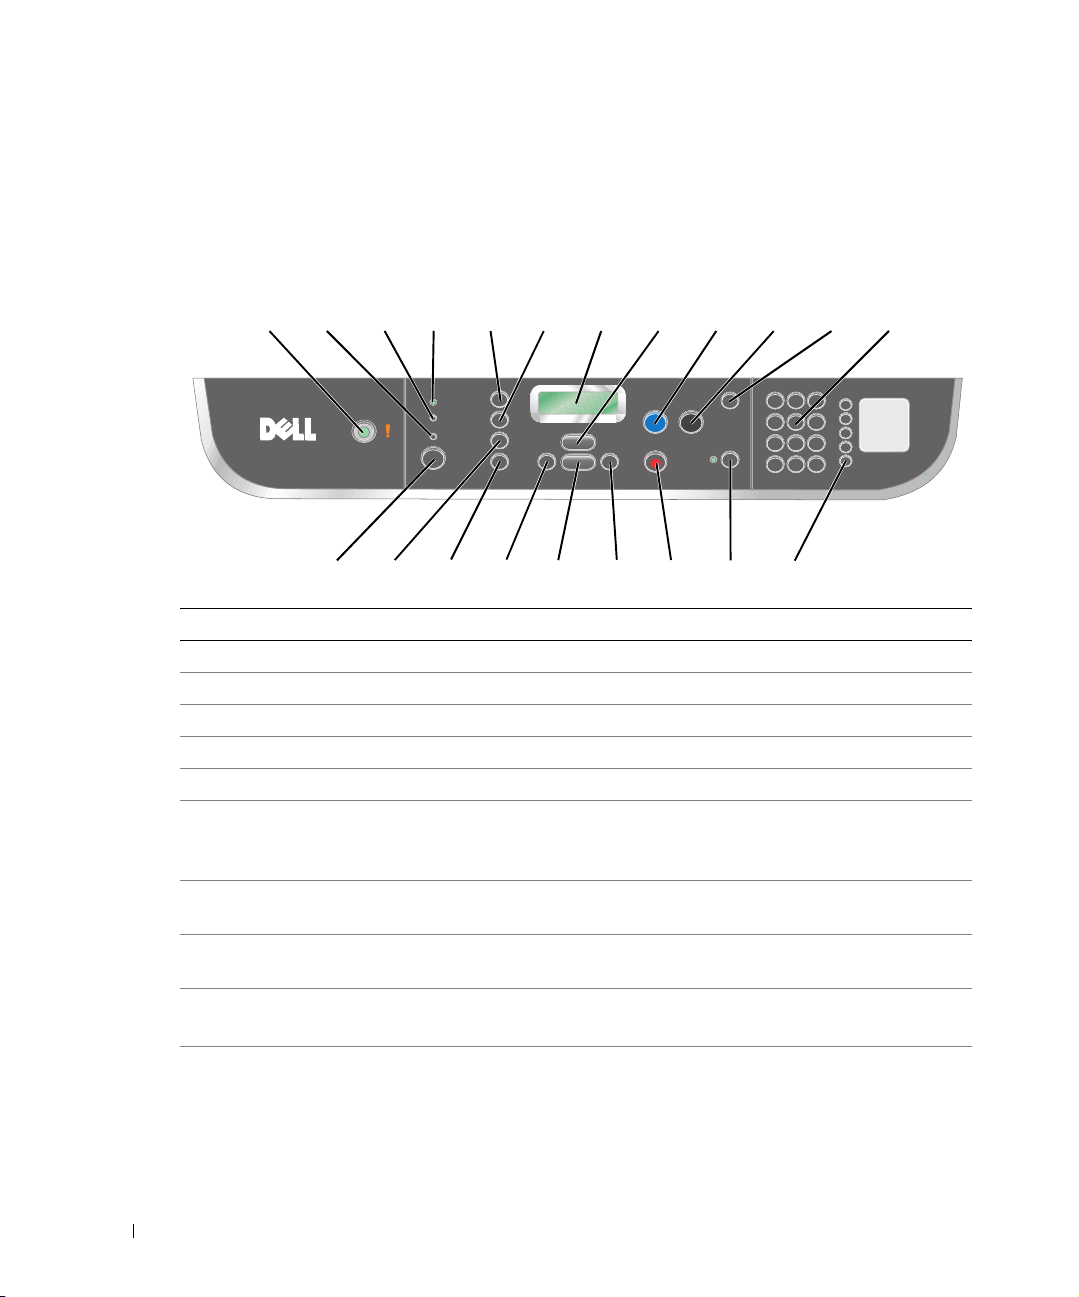
Using the Operator Panel
The operator panel buttons allow you to scan, copy, fax and customize documents without
connecting to a computer. The printer is on when Power is illuminated. You can select a mode
with the Mode button, which will illuminate an LED corresponding to the selected mode;
change settings using the Menu, Select, and < > buttons; and initiate a scan, copy, or fax using
one of the start buttons.
Getting Started 15
Page 16
www.dell.com | support.dell.com
The display features:
• Printer status
•Messages
• Menus
1 2 3 4 567 8 9 10 11 12
13 14 15 16 17 18 19 20 21
Number Part: Purpose:
1 Power To turn your printer on or off.
2 Fax LED Illuminates when machine is in Fax Mode.
3 Scan LED Illuminates when machine is in Scan Mode.
4 Copy LED Illuminates when machine is in Copy Mode.
5 Number of Copies Specify a number (1-99) of copies.
6 Reduce/Enlarge Customize the size of your original document by a
percentage, Fit to Page, or to poster size.
NOTE: Fit to Page is not available when using the ADF.
7 LCD (Liquid Crystal
Display)
8 Menu Scroll through the available menus. Each time you press
9 Color Start a color scan, copy, or fax job.
10 Black Start a black and white scan, copy, or fax job.
To show options available to you.
this button, the next item on the display appears.
NOTE: Make sure the correct mode is lit.
NOTE: Make sure the correct mode is lit.
16 Getting Started
Page 17

Number Part: Purpose:
11 Redial/Pause • Recall the last number entered.
• Insert a three-second pause in the number to be dialed to
wait for an outside line or get through an automated
answering system.
NOTE: Enter a pause only when you have already begun
entering the number.
12 A keypad number or
symbol
13 Mode To select a mode for your printer
14 Quality You can:
15 Lighter/Darker To lighten or darken a copy or received fax.
16 Left arrow You can:
17 Select Press to choose the option that appears on the display.
18 Right arrow You can:
•In fax mode:
– Enter fax numbers.
– Select letters when creating a speed dial list.
– Type numbers to enter or edit the date and time shown
on the printer display.
•In copy mode:
Select the number of copies you want to make.
• Copy
•Fax
•Scan
NOTE: The selected mode is lit.
• Select from the following copy qualities: Draft, Normal,
or Photo.
• Select a fax resolution: Standard, Fine, Superfine, or
Ultrafine.
• Select a scan resolution when the printer is connected to
a computer.
• Decrease a number on the display.
• Scroll through a list on the display.
• Increase a number on the display.
• Scroll through a list on the display.
Getting Started 17
Page 18

www.dell.com | support.dell.com
Number Part: Purpose:
19 Cancel Press to:
• Cancel a scan, print, or copy job in progress.
• Exit a menu.
• Clear a fax number or end a fax transmission and return
the display to the fax default.
• Clear current settings and return to default settings.
20 Auto Answer Press to answer all incoming calls.
The number of rings before the machine will answer
incoming phone calls should be set in the Answer Fax
When options menu.
21 Speed Dial buttons Access any of the programmed Speed Dial numbers (1-99).
Operator Panel Menus
See this section for help accessing the Scan, Copy, Fax, and Advanced Fax mode menu items.
Selecting Scan Mode Menu Items
1 On the operator panel, press the Mode button repeatedly until Scan is selected.
2 Press Menu repeatedly until the menu heading you want appears on the display.
3 Press < or > to scroll through the available menu items.
4 Press Select when the menu item you want appears on the display to save the setting.
18 Getting Started
Page 19
Scan Mode Menu Items
ORIGINAL SIZE
Auto Detect
Letter
B5
A4
A5
A6
Wallet
3x5
4x6
5x7
8x10
L
2L
POWER SAVE
After 30 min
After 60 min
Never
Immediately
After 10 min
CLEAR SETTINGS
After 2 min
Never
SET DEFAULTS
Use Factory
Use Current
LANGUAGE
English
French
German
Spanish
Italian
Dutch
Brazilian Portuguese
Polish
Russian
Greek
Simplified Chinese
Traditional Chinese
Japanese
From this menu: You can:
Original Size Specify the size of the document on the scanner glass.
NOTE: Leave this on Auto Detect (default) unless the size of the document
you printed is not satisfactory.
Getting Started 19
Page 20

www.dell.com | support.dell.com
From this menu: You can:
Power Save Select a time to begin reducing power:
• After 30 min (default)
•After 60 min
• Never
• Immediately
•After 10 min
Clear Settings Select when you want your All-In-One to return to the default settings:
• After 2 min (default)
• Never
Set Defaults Set your default settings to:
• Use Factory (default)
•Use Current
Language Select a language for all display text.
Selecting Copy Mode Menu Items
1 On the operator panel, press the Mode button repeatedly until Copy is selected.
2 Press Menu repeatedly until the menu heading you want appears on the display.
3 Press < or > to scroll through the available menu items.
4 Press Select when the menu item you want appears on the display to save the setting.
20 Getting Started
Page 21
Copy Mode Menu Items
BLANK PAPER SIZE
Letter
Legal
B5
A4
A5
A6
3x5
4x6
L
2L
CONTENT TYPE
Text&Graphics
Photo
Text Only
Line Drawing
COLLATE
Off
On
KEY PRESS TONE
Low
High
Off
BLANK PAPER TYPE
Auto Detect
Plain
Coated
Photo
Transparency
ORIGINAL SIZE
Auto Detect
Letter
B5
A4
A5
A6
Wallet
3x5
4x6
5x7
8x10
L
2L
POWER SAVE
After 30 min
After 60 min
Never
Immediately
After 10 min
MAINTENANCE
Align Cartridges
Clean Cartridges
Print Test Page
REPEAT IMAGE
1x per page
4x per page
9x per page
16x per page
COLOR
Press < or > to adjust
the color intensity of
the copy.
CLEAR SETTINGS
After 2 min
Never
SET DEFAULTS
Use Factory
Use Current
LANGUAGE
English
French
German
Spanish
Italian
Dutch
Brazilian Portuguese
Polish
Russian
Greek
Simplified Chinese
Traditional Chinese
Japanese
Getting Started 21
Page 22

www.dell.com | support.dell.com
From this menu: You can:
Blank Paper Size Specify the size of the paper loaded in the paper tray:
• Letter (default)
•Legal
•B5
•A4
•A5
•A6
•3x5
•4x6
•L
•2L
NOTE: For other specialty sizes, see the All-In-One Center.
Blank Paper Type Specify the type of paper loaded in the paper tray:
• Auto Detect (default)
•Plain
• Coated
•Photo
• Transparency
Auto Detect optimizes the setting according to the type of paper loaded.
NOTE: For other specialty types, see the All-In-One Center.
Repeat Image Specify how many copies of one image you want on one page:
• 1x per page (default)
• 4x per page
• 9x per page
• 16x per page
Color Press
< or > to adjust the color intensity of the copy.
Original Size Specify the size of the document on the scanner glass. Auto Detect is the
default.
NOTE: Specify an original size other than Auto Detect to confine the scan
area to the size of the original selected.
Content Type Specify the type of document on the scanner glass.
• Text&Graphics (default)
•Photo
•Text Only
• Line Drawing
22 Getting Started
Page 23

From this menu: You can:
Collate Scan multiple pages to memory and print them out in reverse order.
• Off (default)
•On
Key Press Tone Turn on or off the sound that is made when you press a control panel button.
The options are:
• Low (default)
•High
•Off
Maintenance • Align Cartridges
• Clean Cartridges
• Print Test Page
Power Save Select a time to begin reducing power:
• After 30 min (default)
•After 60 min
• Never
• Immediately
•After 10 min
Clear Settings Select when you want your All-In-One to return to the default settings:
• After 2 min (default)
• Never
Set Defaults Set your default settings to:
• Use Factory (default)
•Use Current
Language Select a language for all display text.
Selecting Fax Mode Menu Items
Use the operator panel to customize your fax jobs.
1 On the operator panel, press the Mode button repeatedly until Fax is selected.
2 Press Menu repeatedly until the menu heading you want appears on the display.
3 Press < or > to scroll through the available menu items.
4 Press Select when the menu item you want appears on the display to save the setting.
In order for faxing to function properly:
• The printer’s LINE connector ( —right side connector) must be connected to an active
phone line. See “Setting up the Printer With Equipment” on page 52 for setup details.
Getting Started 23
Page 24
NOTE: You cannot fax with a DSL (digital subscriber line) or ISDN (integrated signature digital
network) unless you purchase a digital line filter. Contact your Internet Service Provider for more
details.
• If you are using fax software to fax, the printer must be connected to a computer with a
USB cable.
Fax Mode Menu Items
PENDING FAXES
None
<#>
www.dell.com | support.dell.com
RINGER TONE
Low
High
Off
KEY PRESS TONE
Low
High
Off
BLANK PAPER SIZE
Letter
A4
Legal
BLANK PAPER TYPE
Auto Detect
Plain
Coated
Photo
Transparency
PRINT REPORTS
Activity report (the
last 40 sent and
received faxes)
Send log
Receive log
Settings list
ON HOOK DIAL
Press Select
SPEAKER VOLUME
Low
High
Off
PERSONALIZE FAX
Name
Number
ANSWER FAX WHEN
After 3 rings
After 5 rings
After 1 ring
After 2 rings
DELAY UNTIL
Do not delay
Time
EDIT SPEED DIAL
Add
Remove
Modify
Print
EDIT DATE/TIME
Date
Time
FAX FORWARD
Off
Forward
Print & Forward
ADVANCED FAX
See “Advanced Fax
Mode Menu Items” on
page 27.
24 Getting Started
Page 25

From this menu: You can:
Pending Faxes Cancel any faxes that have not been sent.
Print Reports Print:
• An Activity Report (the last 40 sent and received faxes)
•A Send log
•A Receive log
• A Settings list (lists settings such as ringer volume, fax quality, and redial
attempts)
Answer Fax When Select how a fax is received.
When the Auto Answer light on the operator panel is on, the All-In-One will
receive a fax automatically:
• After 1 ring
• After 2 rings
• After 3 rings (default)
• After 5 rings
When the Auto Answer light is off, receive the fax manually by pressing
DELL# (3355#) on the keypad.
Delay Until Enter a specific time to send a fax. For help, see “Send a Delayed Broadcast
Fax” on page 64.
NOTE: Make sure the date and time are entered correctly before you set a
specific time to send a fax.
On Hook Dial Press Select to use On Hook Dial and dial the number when you hear a dial
tone.
For more information, see “Manually Dialing a Fax While Listening to a
Telephone Line (On Hook Dial)” on page 64.
Ringer Tone Choose a tone for incoming rings:
•Off
• Low (default)
•High
Key Press Tone Turn on or off the sound that is made when you press a control panel button.
The options are:
• Off
• Low (default)
•High
Speaker Volume Turn the All-In-One speaker volume (affects All-In-One fax sounds) to:
•Off
• Low (default)
•High
Getting Started 25
Page 26

www.dell.com | support.dell.com
From this menu: You can:
Edit Speed Dial Make the following changes to your speed dial list:
• Add to it
• Remove a number from it
• Modify it
• Print it
NOTE: For more information, see “Speed Dial” on page 62.
Edit Date/Time Edit the date and time.
NOTE: Make sure you enter a number into each of the available spaces. For
example, 01:00 for 1:00. Once you have entered the time, press
for PM or
3 for 24-hour mode.
1 for AM, 2
Personalize Fax Enter your name or the name of your business and your number. This
information appears as a heading to identify you and your fax machine to the
fax recipient.
NOTE: Not available for double-byte languages.
Blank Paper Size Specify the size of the paper loaded in the paper tray.
•Letter
•A4
•Legal
NOTE: If no asterisk (
*) is present, a paper size that is not supported by fax
has been selected through the copy menu.
Blank Paper Type Specify the type of paper loaded in the paper tray:
• Auto Detect (default): optimizes the setting according to the type of
paper loaded.
•Plain
• Coated
•Photo
• Transparency
Fax Forward • Turn this feature Off (default).
• Enter a number to Forward the fax to.
• Print&Forward the fax.
Advanced Fax Press Select to see a menu of advanced fax options. For more information, see
“Advanced Fax Mode Menu Items” on page 27.
Selecting Advanced Fax Menu Items
1 On the operator panel, press the Mode button repeatedly until Fax is selected.
2 Press Menu repeatedly until Advanced Fax appears on the display.
3 Press Select.
26 Getting Started
Page 27
4 Press < or > to scroll through the available items.
5 Press Select when the menu item you want appears on the display to save the setting.
Advanced Fax Mode Menu Items
REDIAL ATTEMPTS
0 times
1 time
2 times
3 times
4 times
5 times
DIAL PREFIX
None
Create
SCAN BEFORE
DIAL
No
Yes
BLOCKED FAXES
Off
On
REDIAL INTERVAL
1 minute
2 minutes
3 minutes
4 minutes
5 minutes
6 minutes
7 minutes
8 minutes
RING PATTERN
Single
Double
Triple
Any
AUTO FAX
CONVERT
On
Off
BLOCK “NO ID”
CALLS
No
Yes
DIALING METHOD
Touch-Tone
Pulse
Behind a PBX
BLOCK HOST
FAX
SETTING
Off
On
FAX CONFIRMATION
Off
Print for all
Print for errors
ACTIVITY REPORT
On request
After 40 faxes
FIT FAX TO PAGE
Try to fit
Two pages
FAX FOOTER
On
Off
EDIT BLOCKED FAX
LIST
Add
Enter another #
Remove
Modify
Print
Getting Started 27
Page 28

www.dell.com | support.dell.com
From this Advanced
You can select:
Fax option:
Redial Attempts The number of times you want the machine to try again if your fax does not
go through:
•0 times
•1 time
• 2 times (default)
•3 times
•4 times
•5 times
Redial Interval The time the machine waits before attempting a fax call again:
• 1 minute
• 2 minutes
• 3 minutes (default)
• 4 minutes
• 5 minutes
• 6 minutes
• 7 minutes
• 8 minutes
Fax Confirmation • Off — no status page is printed
• Print for all — prints a status report after each fax you send, including jobs
that have errors
• Print for errors (default) — prints a status report only after jobs that did
not send
Activity Report
Generation
• On request (default) — you can ask for the report to print
• After 40 faxes — report is automatically generated after 40 faxes print
Fit Fax To Page How the received fax will be printed.
• Try to fit (default)
•Two pages
Fax Footer • On (default) — the All-In-One automatically inserts the time, date, and
page number at the bottom of each incoming fax
•Off
Dialing Method • Touch Tone (default)
•Pulse
• Behind a PBX (Dial tone detect off) — Send a fax without waiting for a
dial tone.
28 Getting Started
Page 29

From this Advanced
Fax option:
Ring Pattern • Any (default)
Dial Prefix • None (default)
Scan Before Dial • No
Blocked Faxes • Off (default)
Block “No ID” Calls • Yes
Edit Blocked Fax List • Add
Block Host Fax
Settings
Auto Fax Convert To convert color faxes to mono or convert to a lower quality setting for faxes.
You can select:
•Single
•Double
• Triple
NOTE: You can choose distinctive rings if they are available from your local
telephone service. If they are not available, select Any.
• Create — You can create an up to 8-character prefix to be added to the
beginning of each number dialed.
• Yes (default)
•On
NOTE: You may enter up to 50 numbers from which to block faxes.
•No (default)
•Remove
•Modify
• Print
Avoid unwanted changes from users on the network.
• Off (default)
•On
•Off
• On (default)
For more information, see “Using Auto Fax Convert” on page 65.
Getting Started 29
Page 30

www.dell.com | support.dell.com
From this Advanced
You can select:
Fax option:
Max Send Speed A bps speed:
• 33,600 (default)
• 31,200
• 28,800
• 26,400
• 24,000
• 21,600
• 19,200
• 16,800
• 14,400
• 12,000
•9,600
•7,200
•4,800
•2,400
Error Correction • On (default)
•Off
NOTE: Turn error correction off if you have trouble sending a fax to an older
fax machine.
Language Select a language for all display text.
Country Code • Denmark
•Ecuador
•Egypt
•Emirates (UAE)
•Estonia
•Finland
•France
•Germany
•Greece
•Guam
•Hong Kong
•Hungary
• India
•Indonesia
•Ireland
•Israel
•Italy
30 Getting Started
Page 31

From this Advanced
Fax option:
Country Code
(continued)
You can select:
• Japan
•Jordan
•Korea
•Kuwait
•Latvia
•Lebanon
• Lithuania
•Luxembourg
• Malaysia
•Mexico
• Morocco
•Netherlands
• New Zealand
• Nigeria
•Norway
•Oman
• Paraguay
•Peru
• Philippines
•Poland
•Portugal
•Puerto Rico
• Qatar
•Romania
•Russia
• Saudi Arabia
• Serbia
•Singapore
•Slovakia
•Slovenia
•South Africa
•Spain
•Sri Lanka
•Sweden
•Switzerland
•Taiwan
•Thailand
• Tunisia
Getting Started 31
Page 32

www.dell.com | support.dell.com
From this Advanced
Fax option:
Country Code
(continued)
Call Diagnostics • Off (default)
You can select:
•Turkey
•UK
•USA
•Uruguay
•US Virgin Islands
• Venezuela
• Vietnam
•Yemen
• Audio on
• Print T.30 signals report
• Both audio and report
NOTE: This feature is intended for advanced troubleshooting only.
Understanding the Automatic Paper Type Sensor
Your printer has an automatic paper type sensor that detects the following paper types:
•Plain
• Transparency
• Glossy/photo
•Coated
If you load one of these paper types, the printer detects the paper type and automatically adjusts
the Quality/Speed settings.
Paper type Quality/Speed settings
Plain Normal Photo
Transparency Normal Photo
Glossy/photo Photo Photo
Coated Normal Photo
NOTE: Your printer cannot detect the paper size.
32 Getting Started
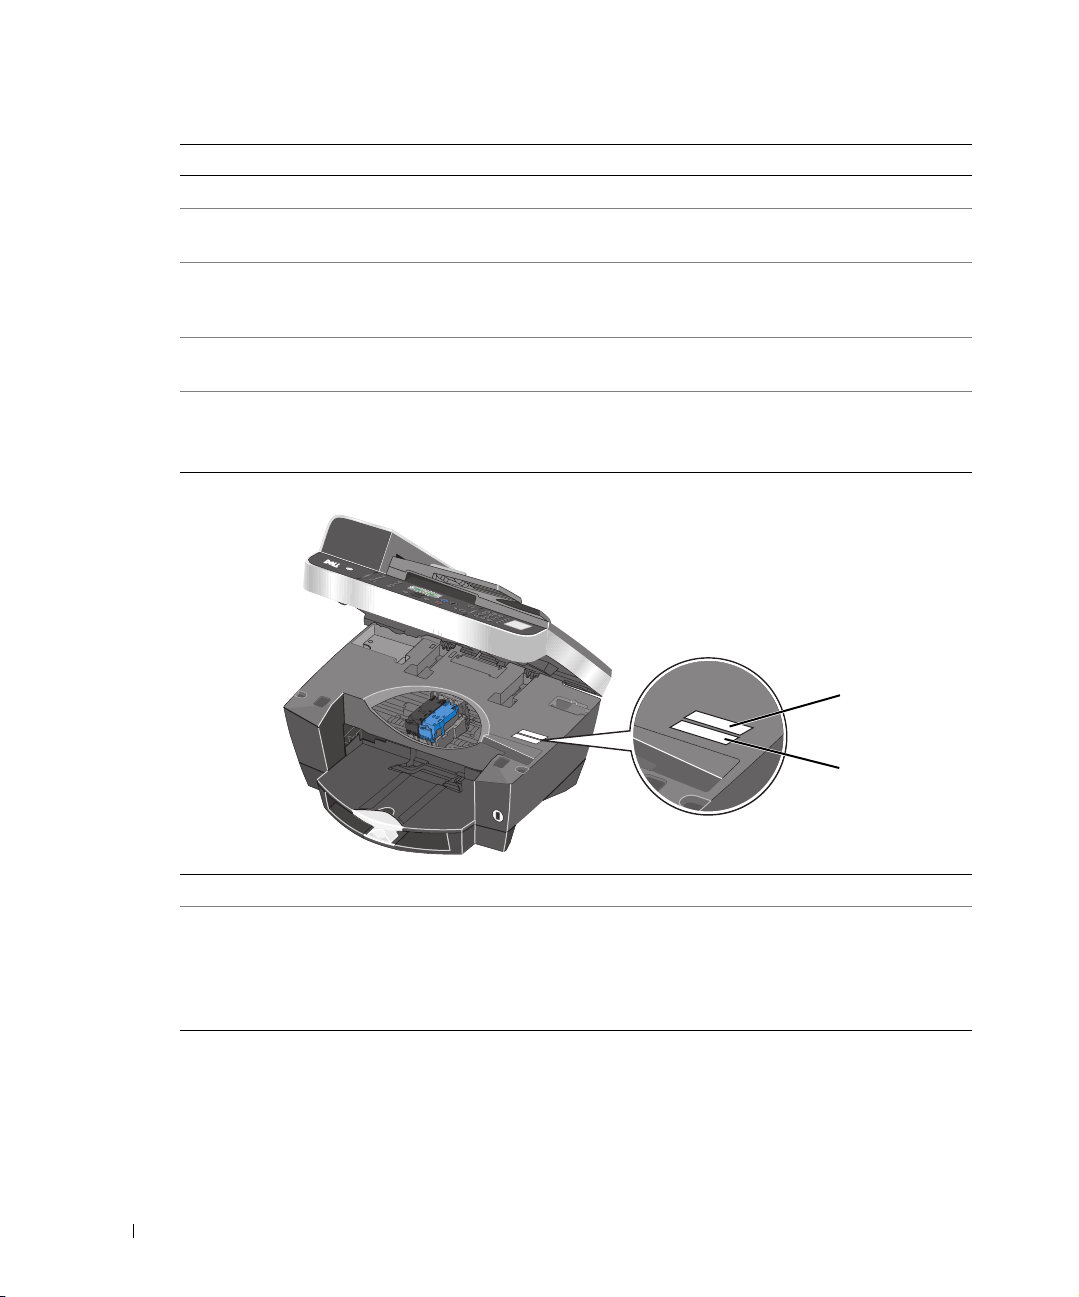
Black and Color Cartridges
Installed
Photo and Color Cartridges
Installed
Page 33

To ch oo se paper si ze :
1 With your document open, click File→Print.
2 In the Print dialog box, click Preferences or Properties (depending on your program or
operating system).
The Printing Preferences screen appears.
3 On the Paper Setup tab, select the paper size.
4 Click OK.
Unless you turn off the automatic paper type sensor, it always remains on. To turn off the
automatic paper type sensor for a specific print job:
1 With your document open, click File→Print.
2 In the Print dialog box, click Preferences or Properties (depending on your program or
operating system).
The Printing Preferences screen appears.
3 Click the Quality/Copies tab.
4 Click the Use my choice button.
5 Select the paper type in the drop-down menu.
6 Click OK.
To turn off the automatic paper type sensor for all print jobs:
1 In Windows XP, click Start→Control Panel→ Printers and Other Hardware→ Printers and
Faxes.
In Windows 2000, click Start→Settings→ Printers.
2 Right-click the printer icon.
3 Click Printing Preferences.
4 Click the Quality/Copies tab, and then click Paper Type Sensor Options.
5 Click the Use my choice button.
6 Select the paper type in the drop-down menu.
7 Click OK.
Getting Started 33
Page 34

Loading Paper
Load Plain Paper Into the Paper Support
1 Lift the paper exit tray and extend the paper support.
2 Insert paper into the paper support.
3 Squeeze and slide the paper guides to rest against the left and right edges and bottom of
the paper.
4 Lower the paper exit tray.
www.dell.com | support.dell.com
5 Extend the paper exit tray stop to catch paper as it exits the printer.
NOTE: Do not force the paper into the printer.
Print Media Guidelines for the Paper Support
Follow these guidelines when loading specialty print media in the paper support.
Load up to: Make sure:
150 sheets of
plain paper
20 sheets of
banner paper
• The paper is centered in the paper support.
• The paper guides rest against the right and left edges of the paper.
NOTE: Load letterhead paper with the front of the letterhead face down, and the
top of the letterhead going into the printer first.
• The paper guide rests against the bottom edge of the paper.
•You select Draft (select Photo if a photo cartridge is installed), Normal, or Photo
print quality.
• You remove any paper from the paper support before inserting banner paper.
• You place a stack of banner paper (20 sheets or less) on the top cover of the
printer and feed in the first sheet.
NOTE: You must select A4 Banner or Letter Banner paper size in Print Properties.
Failure to do so will cause a paper jam. See "Paper Problems" on page 81.
• You load the leading edge of the banner paper into the printer against the right
side of the paper support.
• You squeeze and slide the paper guide to the left edge of the banner paper.
• You use banner paper designed for inkjet printers.
34 Getting Started
Page 35

Load up to: Make sure:
15 envelopes • The print side of the envelopes faces down.
• The envelopes are centered in the paper support.
• The stamp location is in the lower left corner.
• The paper guides rest against the right and left edges of the envelopes.
• The paper guide rests against the bottom edge of the paper.
• You print the envelopes with Landscape orientation.
• You select the correct envelope size. Select the next biggest size if the exact
envelope size is not listed, and set the left and right margins so that your
envelope text will be correctly positioned on the envelope.
NOTE: Only one envelope can be inserted in the top envelope feeder at a time.
Insert multiple envelopes in the bottom paper feeder.
35 greeting
cards, index
cards,
postcards, or
photo cards
75 sheets of
photo, coated,
or glossy paper
25 iron-on
transfer
75
transparencies
35 sheets of
labels
• The print side of the cards faces down.
• The cards are centered in the paper support.
• The paper guides rest against the right and left edges of the cards.
• The paper guide rests against the bottom edge of the paper.
•You select Normal or Photo print quality.
• The glossy or coated side of the paper faces down.
• The paper is centered in the paper support.
•You select Normal or Photo print quality.
• The paper guides rest against the right and left edges of the paper.
• The paper guide rests against the bottom edge of the paper.
• You follow the loading instructions on the iron-on transfer packaging.
• The print side of the transfer faces down.
• The paper guides rest against the right and left edges of the paper.
• The paper guide rests against the bottom edge of the paper.
• The transfers are centered in the paper support.
•You select Normal or Photo print quality.
• The rough side of the transparencies faces down.
• The paper guides rest against the right and left edges of the transparencies.
• The paper guide rests against the bottom edge of the paper.
NOTE: You can load a single transparency into the paper support without removing
plain paper.
•You select Normal or Photo print quality.
• The transparencies are centered in the paper support.
• The print side of the labels faces down into the paper support.
• The top of the labels feeds into the printer first.
• The paper guides rest against the right and left edges of the paper.
• The paper guide rests against the bottom edge of the paper.
Getting Started 35
Page 36

www.dell.com | support.dell.com
Load up to: Make sure:
150 sheets of
custom size
paper
150 sheets of
letterhead
paper
NOTE: The paper exit tray can hold up to 50 sheets of paper.
• The print side of the paper faces down.
• Your paper fits within these dimensions:
Width
• 76-216 mm
• 3.0-8.5 inches
Length
• 127-432 mm
•5.0-17.0 inches
• The paper is centered in the paper support.
• The paper guides rest against the right and left edges of the paper.
• The paper guide rests against the bottom edge of the paper.
• The front of the letterhead faces down.
• The top of the letterhead feeds into the printer first.
• The paper guides rest against the right and left edges of the paper.
• The paper guide rests against the bottom edge of the paper.
Load an Original Document Into the ADF
You can load up to 50 sheets of your original document (text side up) into the ADF for
scanning, copying, and faxing. The ADF is recommended for loading multiple page documents.
NOTE: Do not load postcards, photo cards, photo paper, or small images in the ADF. Place these
items on the scanner glass.
NOTE: The paper exit tray can hold up to 50 sheets of paper.
Paper Guidelines for the ADF
Load up to: Make sure:
50 sheets of
letter size paper
50 sheets of A4
size paper
50 sheets of
legal size paper
36 Getting Started
• The document is loaded text side up
• The paper guide is against the edge of the paper.
• The document is loaded text side up.
• The paper guide is against the edge of the paper.
• The document is loaded text side up.
• The paper guide is against the edge of the paper.
Page 37

Load up to: Make sure:
50 sheets of
two-, three-, or
four-hole
pre-punched
media
50 sheets of
edge-reinforced
three-hole
copier media
50 sheets of
preprinted
forms and
letterhead
media
50 sheets of
custom size
paper
• The document is loaded text side up.
• The paper guide is against the edge of the paper.
• Your paper size fits within the dimensions allowable.
• The document is loaded text side up.
• The paper guide is against the edge of the paper.
• Your paper size fits within the dimensions allowable.
• The document is loaded text side up.
• The paper guide is against the edge of the paper.
• Your paper size fits within the dimensions allowable.
• You choose a media that absorbs ink well.
• You allow the preprinted media to dry thoroughly before use in the ADF.
•You do not use media printed with metallic ink particles in the ADF.
• You avoid embossed designs.
• The document is loaded text side up.
• The paper guide is against the edge of the paper.
• Your paper size fits within these dimensions:
Width
• 210.0 mm - 215.9 mm
• 8.27 in. - 8.5 in.
Length
• 279.4 mm - 355.6 mm
• 11.0 in. - 14.0 in.
Getting Started 37
Page 38

Placing Your Original Document on the Scanner Glass
1 Open the top cover.
2 Place the original document face down on the scanner glass in the upper left corner.
www.dell.com | support.dell.com
To get a copy with portrait
(vertical) orientation
3 Close the top cover
To get a copy with landscape
(horizontal) orientation
top of your original
38 Getting Started
Page 39

Using the Printer
Printing
Printing a Document
1 Turn on your computer and printer, and make sure they are connected.
2 Load paper with the print side facing down. For more information, see "Loading Paper" on
page 34.
3 With your document open, click File→Print.
4 Customize your print settings:
a Click Preferences, Properties, Options, or Setup (depending on the program or
operating system).
The Printing Preferences dialog box appears.
b On the Quality/Copies tab, select a Quality/Speed, the paper type, the number of
copies, and black and white or color printing.
2
c On the Paper Setup tab, select the paper size and orientation.
d On the Print Layout tab, select the layout and duplexing settings.
NOTE: To see details about a setting, right-click the setting on the screen, and then select What’s
This?.
e After making the changes in Printing Preferences, click OK at the bottom of the
screen to return to the Print dialog box.
5 Click OK or Print (depending on the program).
Printing Collated Copies of Your Document
When your printer is attached to your computer, you can print black and white or color collated
copies. To print collated copies:
1 Make sure you have paper loaded in the paper support.
2 With your document open, click File→Print.
Using the Printer 39
Page 40

3 Click Properties, Options, Setup, or Preferences (depending on the program or operating
system).
The Printing Preferences dialog box appears along with the I Want To menu.
4 From the Quality/Copies tab, select the number of copies to print.
5 Activate the Collate Copies check box.
6 Click OK or Print.
Printing Photos
www.dell.com | support.dell.com
From Your Computer
1 Load the photo paper with the print (glossy) side facing down. For more information, see
"Print Media Guidelines for the Paper Support" on page 34.
2 Make sure you have a color cartridge and a photo cartridge (sold separately) installed. For
more information, see "Replacing Ink Cartridges" on page 71.
3 With your document open, click File→Print.
4 To customize your print settings, click Preferences, Properties, Options, or Setup
(depending on the program or operating system).
The Printing Preferences dialog box appears.
5 On the Quality/Copies tab, select Photo and the paper type.
NOTE: Photo/glossy or coated paper is recommended for printing photos.
6 On the Paper Setup tab, select the paper size and orientation.
7 On the Print Layout tab, select the photo layout.
8 When finished customizing your photo, click OK.
9 Click OK or Print (depending on the program or operating system).
10 To prevent your photos from sticking together or smudging, remove each photo after it
exits the printer.
NOTE: Before placing your prints in a nonadhesive photo album or frame, allow sufficient time for
the prints to dry thoroughly (12 to 24 hours, depending on the ambient conditions). This maximizes
the life of your prints.
40 Using the Printer
Page 41

From a PictBridge-Enabled Camera
Your printer supports PictBridge-compatible cameras.
To use your printer with a digital camera:
1 Insert the rectangular end of the USB cable that came with your Pictbridge-compatible
digital camera into the Pictbridge connector of the printer.
2 Insert the other end of the USB cable into the digital camera.
3 Refer to the instructions included with your camera for usage information.
Printing Borderless Photos
1 For best results, load photo/glossy paper in the paper support and make sure the print side
is facing down. For more information, see "Print Media Guidelines for the Paper Support"
on page 34.
2 Make sure you have a color cartridge and a photo cartridge (sold separately) installed. For
more information, see "Replacing Ink Cartridges" on page 71
3 With your document open, click File→Print.
4 To customize your print settings, click Preferences, Properties, Options, or Setup
(depending on the program or operating system).
The Printing Preferences dialog box appears.
5 On the Print Layout tab, click Borderless.
6 When finished customizing your photo, click OK.
7 Click OK or Print (depending on the program or operating system).
Printing More Than one Page on a Sheet of Paper
1 Make sure you have paper loaded in the paper support. For help, see "Load Plain Paper Into
the Paper Support" on page 34.
2 With your document open, click File→Print.
3 Click Properties, Options, Setup, or Preferences (depending on the program or operating
system).
The Printing Preferences screen displays along with the I Want To menu.
4 From the Print Layout tab, select N-up.
5 Select the number of pages to print on each page.
Using the Printer 41
Page 42

Printing an Image as a Multi-page Poster
1 Make sure you have paper loaded in the paper support. For help, see "Load Plain Paper Into
the Paper Support" on page 34.
2 With your image open, click File→ Print.
3 Click Properties, Options, Setup, or Preferences (depending on the program or operating
system).
The Printing Preferences screen displays along with the I Want To menu.
4 From the Layout tab, select Poster.
www.dell.com | support.dell.com
5 Click OK or Print.
Printing Last Page First
1 Make sure you have paper loaded in the paper support. For help, see "Load Plain Paper Into
the Paper Support" on page 34.
2 With your document open, click File→Print.
3 Click Properties, Options, Setup, or Preferences (depending on the program or operating
system).
4 From the Quality/Copies tab, activate the Print Last Page First check box.
5 Click OK.
6 Click OK to print your document.
Printing a Banner
1 Place a stack of banner paper (20 sheets or less) in front of the printer, and feed in the first
sheet.
2 With your document open, click File→Print.
3 Click Properties.
4 From the I Want To menu, click Print a banner.
5 Follow the instructions on your screen.
6 Click OK.
7 Click OK.
8 Click OK.
NOTE: Once the printer begins printing, wait until you can see the leading edge of the banner exiting
the printer, and then carefully unfold the paper down to the floor in front of the printer.
42 Using the Printer
Page 43

Printing Other Projects
The I Want To menu provides wizards for creating projects. You may want to print on an
envelope, create a booklet, or print a greeting card.
1 With your document open, click File→Print.
2 To customize print settings, click Preferences, Properties, Options, or Setup (depending
on the program or operating system).
The Printing Preferences dialog box appears along with the I Want To menu.
3 Select one of the available projects or click See more printing ideas.
4 Follow the instructions on the screen to complete your project.
Copying
To make copies, you can use the printer operator panel or your computer. For easy one-touch
color or black and white copies, press Color or Black on the operator panel.
Copying Documents Using the Operator Panel
1 Tur n o n yo u r pr int e r.
2 Load paper in the paper support. For more information, see "Loading Paper" on page 34.
3 Load your original document. For help, see "Load an Original Document Into the ADF" on
page 36 or "Placing Your Original Document on the Scanner Glass" on page 38.
4 On the operator panel, press the Mode Selector repeatedly until Copy is selected.
5 To make more than one copy, press the numbers on the keypad that correspond with the
number of copies you want to make.
6 From the Start area on the operator panel, press the Color button to create a color copy of
a color image, or press the Black button to create a black and white copy. For more
information, see "Operator Panel Menus" on page 18.
NOTE: If you are using the Dell software on a computer instead of the operator panel buttons, see
"Changing Copy Settings" on page 45.
Copying appears on the display.
Copying Documents Using Your Computer
1 Turn on your computer and printer, and make sure they are connected.
2 Load the paper. For more information, see "Loading Paper" on page 34.
Using the Printer 43
Page 44

3 Open the top cover.
4 Place your document on the scanner glass. Make sure the upper left corner of the front of
the item aligns with the arrow on the printer. For more information, see "Placing Your
Original Document on the Scanner Glass" on page 38 or "Load an Original Document Into
the ADF" on page 36.
5 Close the top cover.
6 Click Start→Programs or All Programs→Dell Printers→ Dell Photo AIO Printer
962→Dell All-In-One Center.
The Dell All-In-One Center appears.
www.dell.com | support.dell.com
7 Select a copy quantity (1-99) and color.
8 Click See More Copy Settings to:
– Choose a copy quality.
– Select the blank paper size.
– Select the original document size.
– Lighten or darken your document.
Copying Photos Using the Operator Panel
1 Load photo paper. For more information, see "Print Media Guidelines for the Paper
Support" on page 34.
2 Open the top cover.
3 Place the photo on the glass.
4 Close the top cover.
5 Select the copy quality. For more information, see "Operator Panel Menus" on page 18.
6 Press the Color button.
Copying Photos Using Your Computer
1 Turn on your computer and printer, and make sure they are connected.
2 Load photo paper with the print side facing up. For more information, see "Print Media
Guidelines for the Paper Support" on page 34.
3 Place your document face down on the scanner glass. Make sure the upper left corner of
the front of the item aligns with the arrow on the printer. For more information, see
"Placing Your Original Document on the Scanner Glass" on page 38.
44 Using the Printer
Page 45

4 Click Start→Programs or All Programs→Dell Printers→ Dell Photo AIO Printer
962→Dell All-In-One Center.
The Dell All-In-One Center appears.
5 Click Preview Now.
6 Adjust the dotted lines to fit around the portion of the image you want to print.
7 In the Copy section, select Photo.
8 Select a copy quantity and color.
9 To customize your photo, click See More Copy Settings.
10 When you finish customizing your settings, click Copy Now.
Collating Copies Using the Operator Panel
When you are using your printer without a computer, you can print collated copies:
1 Load paper in the paper support. For help, see "Load Plain Paper Into the Paper Support"
on page 34.
2 Load your original document. For help, see "Load an Original Document Into the ADF" on
page 36 or "Placing Your Original Document on the Scanner Glass" on page 38.
3 Press the Mode Selector button repeatedly until Copy is selected.
4 Press Menu repeatedly until Collate appears.
5 Press > to scroll to the amount of pages you want to collate.
6 Press Select.
Changing Copy Settings
1 Click Start→Programs or All Programs→Dell Printers→ Dell Photo AIO Printer
962→Dell All-In-One Center.
The Dell All-In-One Center appears.
2 Select a copy quantity and color.
3 Click See More Copy Settings to:
– Choose a copy quality.
– Select the blank paper size.
– Select the original document size.
– Lighten or darken your document.
– Reduce or enlarge your document.
Using the Printer 45
Page 46

www.dell.com | support.dell.com
4 Click the Advanced button to change options such as paper size and quality.
5 To make any changes, click the following tabs.
.
Click this tab: To:
Print • Select the paper size and type.
• Select borderless printing options.
• Select the print quality.
Scan • Select the color depth and scan resolution.
• Auto-crop the scanned image.
Image Enhancements • Sharpen your blurry images.
• Adjust the brightness of your image.
• Adjust the color correction curve (gamma) of your image.
Image Patterns • Smooth the conversion of a gray image to a black and white dot pattern
(dither).
• Remove image patterns from magazines or newspapers (descreen).
Select whether to process with Best quality or Best speed.
• Reduce the background noise on your color document.
6 When you finish customizing your copy settings, click OK, and then click Copy Now.
Scanning
You can use your printer to scan using the operator panel or the printer software.
NOTE: Scanning cannot be done on printers connected to a network.
Using the Operator Panel
1 Turn on your computer and printer, and make sure they are connected.
2 Load your original document. For help, see "Load an Original Document Into the ADF" on
page 36 or "Placing Your Original Document on the Scanner Glass" on page 38.
3 Press the Mode Selector on the operator panel repeatedly until Scan is selected.
4 Press > to scroll through the list of possible programs to which you can scan.
5 Press Select when the program to which you want to scan appears.
6 From the Start area on the operator panel, press Black to begin a black and white scan or
Color to being a color scan.
46 Using the Printer
Page 47

Using the Printer Software
NOTE: Some programs do not support multiple page scanning.
1 Turn on your computer and printer, and make sure they are connected.
2 Load your original document. For help, see "Load an Original Document Into the ADF" on
page 36 or "Placing Your Original Document on the Scanner Glass" on page 38.
3 Press Scan on the operator panel.
The Dell All-In-One Center appears on your computer screen.
4 Click Preview Now to see your scanned image.
NOTE: If the size of the scan (found in the lower right of the preview window) appears in red, you do
not have the system resources available to perform the scan at the resolution or size you have
selected. To correct this problem, either reduce your resolution or the size of your scan area.
5
Adjust the dotted lines to fit around the part of the image you want to print.
6 From the Send scanned image to drop-down menu, select your scan destination.
7 To further customize your scan job, click See More Scan Settings.
8 When you are finished customizing your image, click Scan Now.
Scanning Photos
1 Turn on your computer and printer, and make sure they are connected.
2 Load your original document. For help, see "Placing Your Original Document on the
Scanner Glass" on page 38.
3 Press Scan on the operator panel.
The Dell All-In-One Center appears.
4 Click Preview Now to view your scanned image.
NOTE: If the size of the scan (found in the lower right of the preview window) appears in red, you do
not have the system resources available to perform the scan at the resolution or size you have
selected. To correct this problem, either reduce your resolution or the size of your scan area.
5
Adjust the dotted lines to fit around the portion of the photo you want to print.
6 In the Send scanned image to: drop-down menu, select the photo program you want to
use.
NOTE: If the program you want to use is not listed, select Search for more... in the drop-down menu.
On the next screen, click Add to locate and add your program to the list.
Using the Printer 47
Page 48

7 To further customize your scan job, click See More Scan Settings.
8 Change any settings.
9 When you finish customizing your image, click Scan Now.
When your document has finished processing, it will open in the program you chose.
Scanning to Your Computer Over a Network
1 Make sure your computer is attached to the network.
2 Make sure your computer and printer are on.
www.dell.com | support.dell.com
3 Load your original. For help, see "Load an Original Document Into the ADF" on page 36 or
"Placing Your Original Document on the Scanner Glass" on page 38.
4 Press the Mode Selector repeatedly until Scan is selected.
5 Press Menu until PC appears on the display.
6 Press > to scroll through the list of possible computers to which you can scan.
7 When your PC name appears on the display, press Select.
8 Enter your four-digit PIN number.
NOTE: This can be found in the upper right corner of the All-In-One Main Page. For help, see "Using
the Dell All-In-One Center" on page 68.
Press Select.
9
10 Press Select.
Scanning Multiple Pages or Images
NOTE: This feature is only available when scanning from the flatbed scanner.
You can scan multiple images at once to save time:
1 Place the first sheet on the scanner glass. For more information, see "Placing Your Original
Document on the Scanner Glass" on page 38.
2 Click Start→Programs or All Programs→Dell Printers→Dell Photo AIO Printer
962→Dell All-In-One Center.
The Dell All-In-One Center appears.
3 In the Send scanned image to: drop-down menu, select the program you want to use. For
example, you might want to fax or e-mail multiple pages to someone.
4 In the Scan section, click See More Scan Settings.
48 Using the Printer
Page 49

5 Click the Advanced button.
6 Click Display Advanced Scan Settings to change advanced options.
The Advanced Scan Settings dialog box appears.
7 On the Scan tab, click the Scan multiple items before output box.
8 Click OK.
9 When you finish customizing your settings, click Scan Now.
After you scan the first page, a prompt appears requesting the next page.
10 Place the next sheet on the scanner glass and click Ye s . Repeat until you finish scanning all
pages.
11 When finished, click No. The program appears with the multiple pages scanned.
Editing Scanned Text Using Optical Character Recognition (OCR)
Optical Character Recognition (OCR) is a software feature that converts a scanned image into
editable text within a word processing program.
NOTE: Japanese customers should use E-Typist OCR software. This software is located on a separate
CD.
1
Load your original document. For help, see "Load an Original Document Into the ADF" on
page 36 or "Placing Your Original Document on the Scanner Glass" on page 38.
2 Click Start→Programs or All Programs→Dell Printers→ Dell Photo AIO Printer
962→Dell All-In-One Center.
The Dell All-In-One Center appears.
3 In the Send scanned images to: drop-down menu, select a word processing or text-editing
program.
4 In the How will the scan be used? drop-down menu, select To edit text (OCR and 300
DPI).
5 Click Scan Now.
The scanned text appears.
6 Edit your document.
7 Save your document.
Using the Printer 49
Page 50

Editing Scanned Images
With most graphics programs, you can customize your image.
1 Click Start→Programs or All Programs→Dell Printers→ Dell Photo AIO Printer
962→Dell All-In-One Center.
The Dell All-In-One Center appears.
2 From the Send scanned image to drop-down menu, select your scan destination.
3 Click Scan Now.
When the image has finished processing, it opens in the program you selected.
www.dell.com | support.dell.com
4 Edit the image using the tools available in your program.
You may be able to:
– Remove red eye
–Crop your image
– Add text to your image
– Adjust the brightness and contrast of your image
For help, see the documentation that came with your graphics program.
Saving an Image on Your Computer
1 Click Start→Programs or All Programs→ Dell Printers→ Dell Photo AIO Printer
962→Dell All-In-One Center.
The Dell All-In-One Center appears.
2 In the Creative Tasks section, click Save an image on my computer.
3 Follow the instructions on your computer screen to save an image on your computer.
E-mailing a Scanned Image or Document
To send scanned photographs or documents through e-mail:
1 Load your original document. For help see, "Load an Original Document Into the ADF" on
page 36 or "Placing Your Original Document on the Scanner Glass" on page 38.
2 Click Start→Programs or All Programs→Dell Printers→ Dell Photo AIO Printer
962→Dell All-In-One Center.
The Dell All-In-One Center appears.
3 Click Preview Now.
50 Using the Printer
Page 51

NOTE: If the size of the scan (found in the lower right of the preview window) appears in red, you do
not have the system resources available to perform the scan at the resolution or size you have
selected. To correct this problem, either reduce your resolution or the size of your scan area.
4 In the Creative Tasks section, click E-mail an image or document.
5 In the What is being scanned? menu, make a selection.
6 Follow the instructions on the screen to prepare the photograph or document for e-mail.
7 Click Attach Now.
8 Write a note to accompany the attached photo, and then send it.
NOTE: If you have questions about how to do this, consult the Help for your e-mail program.
Enlarging or Reducing Images or Documents
If you are using your printer with a computer, you can enlarge or reduce your document between
25-400 percent using the Dell All-In-One Center.
If you are using your printer without a computer, you can enlarge or reduce your document by a
percent and Fit-to options using the operator panel.
1 Load paper in the paper support. For help, see "Load Plain Paper Into the Paper Support"
on page 34.
2 Load your original document. For help, see "Placing Your Original Document on the
Scanner Glass" on page 38 or "Load an Original Document Into the ADF" on page 36.
3 Click Start→Programs or All Programs→Dell Printers→ Dell Photo AIO Printer
962→Dell All-In-One Center.
The Dell All-In-One Center appears.
4 Click Preview Now.
NOTE: If the size of the scan (found in the lower right of the preview window) appears in red, you do
not have the system resources available to perform the scan at the resolution or size you have
selected. To correct this problem, either reduce your resolution or the size of your scan area.
In the Creative Tasks section, select Enlarge or reduce an image.
5
6 Follow the instructions on the screen to select the size of your new image.
7 When you finish customizing your image, click Print Now.
Using the Printer 51
Page 52

www.dell.com | support.dell.com
Faxing
You do not need to connect your printer to a computer in order to fax. Use the printer operator
panel for basic faxing. See “Faxing Using the Printer Operator Panel” on page 55.
NOTE: For advanced faxing instructions using the computer software, see “Sending a Fax From the
Computer” on page 57.
Setting up the Printer With Equipment
Equipment Benefits See this section
• printer
• phone cord (provided)
• printer
• telephone
• two phone cords (provided)
• printer
• telephone
• answering machine
• three phone cords (provided)
• printer
• telephone
• computer modem
• three phone cords (provided)
• USB cable (sold separately)
Make copies and send and
receive faxes without the use of a
computer.
• Use the fax line as a normal
telephone line.
• Set up your printer wherever
your telephone is.
• Make copies and send and
receive faxes without the use
of a computer.
Receive both incoming voice
messages and faxes.
Increase the number of phone
connection outlets.
"Connecting directly to a
telephone wall jack" on page 53
"Connecting to a telephone" on
page 53
"Connecting to an answering
machine" on page 54
"Connecting to a computer
modem" on page 55
NOTE: The phone cord (provided) must be plugged into the correct connector.
52 Using the Printer
Page 53

Connecting directly to a telephone wall jack
Connect a phone cord from the LINE connector ( - right side connector) on the printer to the
telephone wall jack.
1 Connect one end of the phone cord to the LINE connector ( - right side connector) of
the printer.
2 Connect the other end of the phone cord to an active telephone wall jack.
Connecting to a telephone
If your printer does not have a handset, you can connect a telephone to your printer to use the
fax line as a normal telephone line.
1 Connect a phone cord from the LINE connector ( - right side connector) on the printer
to the telephone wall jack.
2 Remove the protective plug from the PHONE jack connector ( - left side connector) on
the back of the printer.
Using the Printer 53
Page 54

www.dell.com | support.dell.com
3 Connect a phone cord from the telephone to the PHONE jack connector ( - left side
connector) on the printer.
Connecting to an answering machine
1 Connect a phone cord from the LINE connector ( - right side connector) on the printer
to the telephone wall jack.
2 Remove the protective plug from the PHONE jack connector ( - left side connector) on
the back of the printer.
3 Connect a phone cord from the telephone to the answering machine.
4 Connect a phone cord from the answering machine to the PHONE jack connector ( -
left side connector) on the printer.
54 Using the Printer
Page 55

Connecting to a computer modem
1 Connect a phone cord from the LINE connector ( - right side connector) on the printer
to the telephone wall jack.
2 Remove the protective plug from the PHONE jack connector ( - left side connector) on
the back of the printer.
3 Connect a phone cord from the telephone to the computer modem.
4 Connect a phone cord from the computer modem to the PHONE jack connector ( - left
side connector) on the printer.
Faxing Using the Printer Operator Panel
What if I Have a Digital Subscriber Line (DSL)?
DSL delivers digital data to a computer through a telephone line. Your Dell Photo AIO Printer
962 is designed to work with analog data. If you are faxing over a telephone line connected to a
DSL modem, install a DSL filter to avoid interference with the analog fax modem signal.
1 Connect the DSL filter to an active telephone line.
2 Connect the printer directly to the output of the DSL filter.
NOTE: Do not install any splitters between the DSL filter and the printer. Contact your DSL service
provider if you need more help.
Using the Printer 55
Page 56

www.dell.com | support.dell.com
NOTE: ISDN (integrated services digital network) and cable modems are not fax modems and are
not supported for faxing.
Send a Fax
1 Make sure your printer is on and an active telephone line is connected to the LINE
connector ( ) on the printer.
2 Load your document on the scanner glass or into the ADF. For help, see “Placing Your
Original Document on the Scanner Glass” on page 38 or “Load an Original Document
Into the ADF” on page 36.
3 Press Mode until the Fax LED is lit.
4 Use the keypad numbers to enter the fax number.
5 Press Black or Color.
The printer scans your document and sends your fax to the number you entered.
NOTE: In order to send a color fax, the machine to which you are sending the fax must also support
color faxes.
Receive a Fax Automatically
NOTE: In order to receive a color fax, the machine from which you are receiving the fax must also
support color faxes and send the fax as a color fax.
1
Make sure your printer is on and an active telephone line is connected to the LINE
connector ( — right side connector) on the printer.
2 Press Mode until the Fax LED is lit.
3 Press Auto Answer until the Auto Answer LED is lit.
4 Press Menu until Answer fax when appears.
5 Press > to scroll through the available options (After 1 ring, After 2 rings,
After 3 rings, or After 5 rings), and press Select when the option you want
appears.
When the number of set rings is detected, the printer automatically receives the fax.
Receive a Fax Manually
1 Make sure your printer is on and an active telephone line is connected to the LINE
connector ( — right side connector) on the printer.
2 Make sure the Auto Answer LED is off.
3 When the printer rings, pick up a telephone and listen for the fax calling tone.
56 Using the Printer
Page 57

4 Press DELL# (3355#) on the printer operator panel.
5 Hang up the telephone, and the printer receives the fax.
Receive a Fax With an Answering Machine Connected to the Printer
Make sure your printer is on, the answering machine is connected to the PHONE jack connector
( — left side connector) on the printer, and the Auto Answer LED is on. When a ring is
detected, the answering machine picks up the call.
• If a fax is detected, the printer receives the fax and disconnects the answering machine.
•If a fax is not detected, the answering machine completes the call.
NOTE: For more information, see “Advanced Fax Mode Menu Items” on page 27.
Sending a Fax From the Computer
Send faxes from computer files through the printer modem or the computer modem. Any file
that can be printed can be faxed.
NOTE: You can send and receive color faxes using the printer operator panel only. See “Faxing
Using the Printer Operator Panel” on page 55.
Connecting Cables
• Connect the printer to the computer with a USB cable (sold separately) in order to scan
documents to fax.
• If you want to fax through the printer modem, connect an active telephone line to the LINE
connector ( ) on the printer.
If you want to fax through the computer modem, connect an active telephone line to the
LINE connector ( ) on the computer’s fax modem.
NOTE: If you want the ability to fax from both the printer modem and the computer modem at
different times without reconnecting cables, Dell recommends purchasing a splitter in order to
connect two phone lines to one wall jack.
What if I Have a Digital Subscriber Line (DSL)?
DSL delivers digital data to a computer through a telephone line. Your Dell Photo AIO Printer
962 is designed to work with analog data. If you are faxing over a telephone line connected to a
DSL modem, install a DSL filter to avoid interference with the analog fax modem signal.
1 Connect the DSL filter to an active telephone line.
2 Connect the printer directly to the output of the DSL filter.
Using the Printer 57
Page 58

NOTE: Do not install any splitters between the DSL filter and the printer. Contact your DSL service
provider if you need more help.
NOTE: ISDN (integrated services digital network) and cable modems are not fax modems and are
not supported for faxing.
Faxing Through the Printer Modem
Send a Fax Using the Dell All-In-One Center
1
Make sure the printer is on and that the printer is connected to the computer with a USB
cable.
www.dell.com | support.dell.com
2 Load your document on the scanner glass or into the ADF. For help, see “Placing Your
Original Document on the Scanner Glass” on page 38 or “Load an Original Document
Into the ADF” on page 36.
3 Click Start → All Programs (or Programs) → Dell Printers → Dell Photo AIO Printer
962
→ Dell All-In-One Center.
4 Place the document you want to fax face down under the lid of the printer.
5 Select Fax from the Scan drop-down menu.
6 Click Scan Now.
7 Follow the instructions on the computer screen to send your fax.
Receive a Fax
The Dell Photo AIO Printer 962 modem only receives hardcopy documents. See “Faxing Using
the Printer Operator Panel” on page 55 for information about receiving a fax.
If you need to save soft copies of the faxes you receive, you must scan the received document to
a file (see “Send a Fax Using the Dell All-In-One Center” on page 58), or receive faxes using
your computer modem (see “” on page 59).
Access the Printer Setup Utility
Access the Printer Setup Utility if you want to configure the printer modem for your specific
faxing needs.
1 Click Start →All Programs (or Programs) → Dell Printers → Dell Photo AIO Printer
962
→ Dell All-In-One Center.
2 From the Dell All-In-One Center, click the Maintain/Troubleshoot tab, and then click
Display the Printer Setup Utility.
58 Using the Printer
Page 59

Printer Setup Utility Tabs
On this tab: You can:
Send • Enter your name and fax number.
• Select a maximum send speed and a print quality for outgoing faxes.
• Choose whether to scan the entire document before dialing the number.
• Choose whether to use error correction.
• Select when to print a fax usage report.
• Select when to print a fax activity report.
Receive • Choose whether you want to print a footer (date, time, and page number)
on each page.
• Automatically reduce an incoming fax to fit to the paper size loaded, or print
it on two sheets of paper.
• Select whether you want to forward a fax or print it, and then forward it.
Connection/Dialing • Select the number of times you want the machine to redial and the time
between those attempts if the fax cannot be sent on the first try.
• Select the phone line format you want to use (Pulse, Touch-tone, Behind a
PBX).
• Enter a dialing prefix.
• Choose how (manually, if fax tones are detected, or after a certain amount of
rings) you want to answer incoming calls.
• Choose a distinctive ring if your phone line has distinctive ring service
activated.
Speed Dial Add to, create, or edit the speed dial list.
Group Speed Dial Create a group number and name and add phone numbers to the group.
Faxing Through the Computer Modem
If an active telephone line is connected to the LINE connector ( ) on your computer modem,
use Fax Console (Windows XP Only) or Fax Service Management (Windows 2000 Only) to
send and receive faxes:
•Use Fax Console or Fax Service Management to print and receive files as faxes, or
•Use the Dell All-In-One Center to first scan a document to a file, and then use Fax
Console or Fax Service Management to print the file to fax.
Install Fax Console (Windows XP Only)
1 Click Start → Control Panel.
2 Click Add or Remove Programs.
3 Click Add/Remove Windows Components.
Using the Printer 59
Page 60

www.dell.com | support.dell.com
4 Click to select Fax Services.
5 Click Next.
If prompted, insert the Microsoft Windows XP CD, and then click OK. Close the Welcom e
to Microsoft Windows XP window when it opens.
6 Click Finish.
7 Close the Add/Remove Programs window.
Configure Fax Console (Windows XP Only)
1 Click Start → All Programs (or Programs) → Accessories → Communications → Fax →
Fax Console.
The Fax Configuration Wizard appears.
2 Click Next.
3 Enter any appropriate information, and then click Next.
4 Select your data/fax modem in the drop-down menu under Please select the fax device.
5 Select the Enable Receive check box.
NOTE: Selecting the Enable Receive check box allows you to receive faxes but may cause the
computer modem to answer all phone calls, in which case you may not receive voice mail.
a Select Manual answer or specify the number of rings, and click Next.
b Enter your TSID information, and click Next.
c Enter your CSID information, and click Next.
d Click to select Print it on. If you want to print all received faxes, Use the drop-down
menu to the right of this field to select Dell Photo AIO Printer 962.
e To create an archive copy of each fax, click to select Store a copy in a folder, and then
use the Browse button to select the desired archive location.
6 Click Next, confirm your settings, and click Finish.
Configure Fax Service Management (Windows 2000 Only)
1 Click Start → Programs → Accessories → Communications → Fax → Fax Service
Management.
The Fax Configuration Wizard appears.
2 Click Next.
3 Enter any appropriate information, and then click Next.
60 Using the Printer
Page 61

4 Select your data/fax modem from the drop-down menu.
5 Follow the instructions on your computer screen to complete the configuration.
Send an Electronic Copy Fax Using Fax Console or Fax Service Management
1 Open your file to be faxed.
2 Click File →Print.
3 In the printer list, select Fax.
4 Click Print.
5 Follow the instructions on the computer screen to send your fax.
Send a Hardcopy Document Fax Using the Dell All-In-One Center
1 Make sure the printer is on and that the printer is connected to the computer with a USB
cable.
2 Load your document on the scanner glass or into the ADF. For help, see “Placing Your
Original Document on the Scanner Glass” on page 38 or “Load an Original Document
Into the ADF” on page 36.
3 Click Start → All Programs (or Programs) → Dell Printers → Dell Photo AIO Printer
962
→ Dell All-In-One Center.
4 Place the document you want to fax face down under the lid of the printer.
5 Select File from the Scan drop-down menu.
6 Save your file to a desired location.
7 Open the file you just scanned and saved.
8 Click File → Print.
9 In the printer list, select Fax.
10 Click Print.
11 Follow the instructions on the computer screen to send your fax.
Receive a Fax Using Fax Console or Fax Service Management
1 Make sure that an active telephone line is connected to the LINE connector ( ) on the
computer modem.
2 Click Start → All Programs (or Programs) → Accessories → Communications → Fax.
3 Click Fax Console or Fax Service Management.
Using the Printer 61
Page 62

www.dell.com | support.dell.com
If you selected the Enable Receive check box when configuring Fax Console, you are now
ready to receive a fax.
NOTE: Selecting the Enable Receive check box allows you to receive faxes but may cause the
computer modem to answer all phone calls, in which case you may not receive voice mail.
View Sent and Received Faxes Using Fax Console or Fax Service Management
NOTE: Only faxes sent and received by Fax Console can be seen by Fax Console.
Click Start →All Programs (or Programs) →Accessories →Communications →Fax.
1
2 Click Fax Console or Fax Service Management.
View received faxes in the Inbox; view sent faxes in Sent Items.
View the Status of a Fax Using Fax Console or Fax Service Management
1 Click Start →All Programs (or Programs) → Accessories → Communications → Fax.
2 Click Fax Console or Fax Management Services.
3 The following folders appear.:
•Incoming
•Inbox
•Outbox
• Sent Items
4 Click the folder of your choice.
5 Click the fax in the right pane for which you want to view the status, and then click
— faxes currently being received
— faxes that have been received
— faxes scheduled to be sent
— faxes successfully sent
Preferences or Properties.
6 Click the General tab and view the Status line.
7 Click Close when you are finished.
Speed Dial
To make sending faxes easier, you can enter up to 99 speed dial numbers. Up to 79 individual fax
numbers can be stored, or 20 groups that can hold up to five phone numbers each.
Create a Speed Dial List From the Operator Panel
1 Press Mode until the Fax LED is lit.
2 Press Menu until you see EDIT SPEED DIAL.
3 If the current option is Add, press Select. Press > to scroll, if necessary.
62 Using the Printer
Page 63

4 Enter a two-digit speed dial number from 01 to 79, and then press Select.
5 Enter the fax number, and then press Select.
6 Enter the name using the keypad.
a Find the number button that corresponds to the letter you want to enter, and press it
repeatedly until the correct letter appears.
b Press > to move to the next character space.
NOTE: To enter a space between words, press > twice.
c Repeat the previous steps until you are finished entering text.
7 Press Select when you are finished.
Saved appears on the display.
Create a Speed Dial List From the Computer
1 Click Start → All Programs (or Programs) → Dell Printers → Dell Photo AIO Printer
962
→ Printer Setup Utility.
2 Click the Speed Dial tab.
3 Follow the instructions on the Speed Dial tab to add a new number to your speed dial list.
Create a Group Dial List From the Operator Panel
1 Press Mode until the Fax LED is lit.
2 Press Menu until you see EDIT SPEED DIAL.
3 If the current option is Add, press Select. Press > to scroll, if necessary.
4 Enter a two-digit speed dial number from 80 to 99, and then press Select.
5 Enter the first fax number, and then press Select.
6 Press 1 to enter another number.
7 Enter the next fax number, and then press Select.
8 After you have entered all of the group fax numbers (up to five), press 2 to enter the group
list name.
9 Enter the name using the keypad.
a Find the number button that corresponds to the letter you want to enter and press it
repeatedly until the correct letter appears.
b Press > to move to the next character space.
Using the Printer 63
Page 64

www.dell.com | support.dell.com
10 Press Select to save the list.
Use a Speed or Group Dial List
1 Press Speed Dial, and then press > to scroll through the speed dial list to find the desired
fax number. Press the keypad buttons to enter a two-digit speed dial number.
2 Press Black to send your fax as black and white, or press Color to send your fax as a color
fax.
Manually Dialing a Fax While Listening to a Telephone Line (On Hook Dial)
1 Press Mode until the Fax LED is lit.
2 Press Menu repeatedly until On Hook Dial appears.
3 Press Select to make the printer go off hook.
4 Enter the number to which you want to send a fax.
5 Press Black or Color when you are ready to send a fax.
Broadcast Send
You can send a fax of up to 20 pages to as many as five people at once.
Send a Broadcast Fax Immediately
1 Load your original document. For help, see "Load an Original Document Into the ADF" on
page 36.
2 On the operator panel, press Mode repeatedly until the Fax LED is lit.
3 Enter a fax number or press Speed Dial to select numbers from the speed dial list.
4 Press Select to enter another fax number.
5 Continue this procedure until all of the fax numbers (up to 5 numbers) have been entered.
6 Press Black or Color to send the fax to the numbers you entered.
Send a Delayed Broadcast Fax
On the operator panel, press Mode until the Fax LED is lit.
1
2 When the default screen appears, press Menu until Delay Until appears.
3 Press > to scroll to Time.
4 Press Select.
5 Enter the time you want your fax to send.
64 Using the Printer
Page 65

6 Press Select.
7 Press 1 for AM, 2 for PM, or 3 for 24 hour mode.
8 Enter the fax number.
9 Press Black or Color to send your fax to this number, or press Select to enter another fax
number (you can do this up to five times and the delayed fax will be sent to as many
numbers as you entered).
NOTE: At the designated time, the fax numbers are dialed and the fax is transmitted to all of the
designated fax numbers. If the fax transmission is unsuccessful to any of the numbers on the
broadcast list, the unsuccessful numbers are tried again at the end of the list.
Adding Fax Numbers From Which to Block Faxes
Fax Blocking helps you regulate who you receive faxes from.
To cr eate a bl ocked fax li st :
1 On the operator panel, press Mode repeatedly until Fax is selected.
2 Press Menu until ADVANCED FAX appears on the display, and then press Select.
3 Press Menu until EDIT BLOCKED FAX LIST appears on the display.
4 Press > until Add appears on the display, and then press Select.
5 Enter a two-digit number, and then press Select.
6 Enter a telephone number, and then press Select.
7 Enter a name, and then press Select.
8 If you would like to add another phone number to the list, press 1. If you do not want to
add another phone number, press 2.
9 Press Menu until BLOCKED FAXES appears on the display.
10 Press > until On appears on the display, and then press Select.
Your printer will no longer accept faxes from the fax numbers you entered.
Using Auto Fax Convert
If you are faxing a color document to a fax machine that can only print black and white, or if you
are faxing high-resolution document to a fax machine that prints at a lower resolution, the Dell
Photo AIO 962 can automatically adjust the fax you send.
To tu rn on Auto Fax Convert:
1 On the operator panel, press Mode repeatedly until Fax is selected.
Using the Printer 65
Page 66

www.dell.com | support.dell.com
2 Press Menu until ADVANCED FAX appears on the display, and then press Select.
3 Press Menu until AUTO FAX CONVERT appears on the display.
4 Press > until On appears on the display, and then press Select.
66 Using the Printer
Page 67

Understanding the Software
The printer software includes:
• Dell Printer Solution Center (for troubleshooting, maintenance, and cartridge ordering
information)
• Dell All-In-One Center (for scanning, copying, and faxing)
• Printing Preferences (for printing)
• Dell Picture Studio v2.0 (for managing, editing, displaying, printing, and converting
photos and other types of images)
Using the Dell Printer Solution Center
Three tabs on the Dell Printer Solution Center provide you with a variety of printing options.
Advanced tab
• Printing Status button - Click this button to see your options for displaying printing status
information on your screen.
3
• About button - Click this button to view software version information.
• Networking button - Click this button to see your networking options.
Maintenance tab
• Use Color Cartridge for all Black printing icon - Click this icon and follow the
instructions on the screen to use your color cartridge for black printing.
NOTE: You cannot do this if a photo cartridge (sold separately) is installed.
Contacts tab
• Customer support website - www.support.dell.com.
• Order ink or supplies - directs you to Dell’s cartridge ordering website,
www.dell.com/supplies.
• Dell Printer Service Tag number - displays your printer Service Tag number.
Understanding the Software 67
Page 68

www.dell.com | support.dell.com
To access the Dell Printer Solution Center:
Click Start→Programs or All Programs→Dell Printers→ Dell Photo AIO Printer 962→ Dell
Printer Solution Center.
Using the Dell All-In-One Center
The Dell All-In-One Center allows you to:
• Scan, copy, fax, and perform creative tasks.
• Select where you want to send the scanned image.
• Select the quantity and color of your copies.
• Access troubleshooting and maintenance information.
• Preview images you want to print or copy.
• Manage photos (copy them to folders, print them, perform creative copying).
To access the Dell All-In-One Center:
Click Start→Programs or All Programs→Dell Printers→ Dell Photo AIO Printer 962→ Dell
All-In-One Center.
The Dell All-In-One Center includes four main sections: Scan or Fax, Copy, Creative Tasks, and
Preview.
In this section: You can:
Scan or Fax • Select the program where you want to send the scanned image.
Copy • Select the quantity and color of your copies.
68 Understanding the Software
• Select the type of image being scanned.
• Select how you will use the scan.
• Select Fax Now.
NOTE: Click See More Scan Settings to view all settings.
• Select a quality setting for your copies.
• Adjust the size of the scanned area.
• Lighten or darken your copies.
• Enlarge or reduce your copies.
NOTE: Click See More Copy Settings to view all settings.
Page 69

In this section: You can:
Creative Tasks Select from a variety of creative ideas.
• Enlarge or reduce an image.
• Repeat an image several times on one page.
• Print an image as a multi-page poster.
• E-mail an image.
• Fax using your computer’s modem.
• Save an image on your computer.
• Edit text found in a scanned document (Optical Character Recognition).
• Modify an image with a photo editor.
Preview • Select a portion of the preview image to scan.
• View an image of what will be printed or copied.
For more information about the Dell All-In-One Center, click Help in the Dell All-In-One
Center.
Using Printing Preferences
Printing Preferences allows you to change the various printer settings. You can change your
printer settings in Printing Preferences depending on the type of project you want to create.
To access Printing Preferences:
1 With your document open, click File→Print.
The Print dialog box appears.
2 In the Print dialog box, click Preferences, Properties, Options, or Setup (depending on the
program or operating system).
The Printing Preferences screen appears along with the I Want To menu.
To access Printing Preferences when a document is not open:
1 In Windows XP, click Start→Control Panel→Printer and Other Hardware→Printers and
Faxes.
In Windows 2000, click Start→Settings→Printers.
2 Right-click on the printer icon, and then select Printing Preferences.
NOTE: Changes made to the printer settings from the Printers folder become the default settings for
most programs.
Understanding the Software 69
Page 70

www.dell.com | support.dell.com
Printing Preferences Tabs
Printing Preferences includes three main tabs.
From this tab: You can change these settings:
Quality/Copies Quality/Speed — Select Automatic, Draft, Normal, or Photo depending on
your desired output quality. Draft is the fastest option but should not be
selected if you have a photo cartridge (sold separately) installed.
Multiple Copies — Customize how the printer prints several photocopies of a
single print job: Collated, Normal, or Print Last Page First.
Print Color Images in Black and White — Print your color images in black and
white to save the ink in your color ink cartridge.
NOTE: You cannot select this setting if you have selected Color Cartridge for
all Black Printing.
Automatic Image Sharpening — Automatically select the best image
sharpening level based on image content.
Paper Setup Paper Size — Select the size and type of paper.
Orientation — Select how the document is arranged on the printed page. You
can print using portrait or landscape orientation.
Print Layout Layout — Select Normal, Banner, Borderless, Mirror, N-up, Poster, or Booklet.
Duplexing — Select this to print on both sides of the paper.
Using Dell Picture Studio v2.0
In Dell Picture Studio v2.0, you can explore digital photography and learn how to organize,
create, or print photos. There are three components to the Dell Picture Studio:
• Paint Shop Photo Album
Click Start→Programs→Dell Picture Studio v2.0→ Paint Shop Photo Album 4→Pa int
Shop Photo Album
• Dell Picture Studio Home
Click Start→Programs→Dell Picture Studio v2.0→Dell Picture Studio Home
• Dell.Shutterfly.com - Online Print Service
Click Start→Programs→Dell Picture Studio v2.0→Dell.Shutterfly.com - Online Print
Service
70 Understanding the Software
Page 71

Ink Cartridge Maintenance
Replacing Ink Cartridges
CAUTION: Before performing any of the procedures listed in this section, read and
follow the "CAUTION: SAFETY INSTRUCTIONS" on page 9.
Dell ink cartridges are available only through Dell. You can order more ink online at
www.dell.com/supplies or by phone. To order by phone, see "Ordering Ink Cartridges and
Supplies" on page 2.
Dell recommends Dell ink cartridges for your printer. Dell does not provide warranty coverage
for problems caused by using accessories, parts, or components not supplied by Dell.
1 Tur n o n yo u r pr int e r.
2 Lift the printer unit
4
The ink cartridge carrier moves and stops at the loading position unless the printer is busy.
Ink Cartridge Maintenance 71
Page 72

www.dell.com | support.dell.com
3 Press down on the ink cartridge lever to raise each ink cartridge lid.
4 Remove the old ink cartridges.
5 Store the cartridges in an air-tight container (one is included with each photo cartridge you
purchase) or dispose of them.
6 If you are installing new ink cartridges, remove the sticker and transparent tape from the
back and bottom of each ink cartridge.
72 Ink Cartridge Maintenance
Page 73

NOTE: The illustration below shows a black cartridge and a color cartridge (use for normal
printing). For photo printing, use a photo cartridge (sold separately) and a color cartridge.
Insert the new ink cartridges. Make sure the black or photo ink cartridge is secure in the
7
left ink cartridge carrier and the color ink cartridge is secure in the right ink cartridge
carrier
.
photo or black
cartridge
Ink Cartridge Maintenance 73
Page 74

www.dell.com | support.dell.com
8 Snap each lid closed.
9 Close the printer unit
.
An alignment page prints.
Aligning Ink Cartridges
Your printer automatically aligns the ink cartridges when they are installed or replaced. To verify
your ink cartridges are aligned, you can print an alignment page. After you close the printer unit,
press the Select button. The alignment page begins printing. During printing, the operator
panel display reads Alignment Page Printing. When complete, the message reads Auto
Alignment Complete. Your ink cartridges are now aligned for optimal print quality.
74 Ink Cartridge Maintenance
Page 75

You may also need to align ink cartridges when characters are not properly formed or are not
aligned at the left margin, or when vertical or straight lines appear wavy.
To align the ink cartridges:
1 Load paper in the paper support. For more information, see "Loading Paper" on page 34.
2 Click Start→Programs or All Programs→Dell Printers→Dell Photo AIO Printer
962→Dell Printer Solution Center.
3 Click the Maintenance tab
4 Click Align to fix blurry edges.
5 Click Print.
The ink cartridges align when the page prints.
Cleaning the Ink Cartridge Nozzles
You may need to clean the nozzles when:
• White lines appear in graphics or solid black areas.
• Print appears smudged or too dark.
• Colors fade, do not print, or do not print completely.
• Vertical lines appear jagged or edges appear rough.
To clean the ink cartridge nozzles:
1 Load the paper. For more information, see "Loading Paper" on page 34.
2 Click Start→Programs or All Programs→Dell Printers→ Dell Photo AIO Printer
962→Dell Printer Solution Center.
3 Click the Maintenance tab.
4 Click Clean to fix horizontal streaks.
5 Click Print.
When the page prints it forces ink through the clogged nozzles to clean them.
6 Print your document again to verify the improved print quality.
7 If you are not satisfied with the print quality, wipe the ink cartridge nozzles, and then print
your document again.
Ink Cartridge Maintenance 75
Page 76

www.dell.com | support.dell.com
76 Ink Cartridge Maintenance
Page 77

Troubleshooting
Follow these tips when you troubleshoot your printer:
• If the printer does not work, ensure that the printer is properly connected to the electrical
outlet and computer, if using a computer.
• If an error message appears on the operator panel display, write down the exact message.
Setup Problems
Computer Problems
5
VERIFY THAT YOUR PRINTER IS COMPATIBLE WITH YOUR COMPUTER — The
AIO Printer 962
MAKE SURE YOU TURNED ON BOTH YOUR PRINTER AND YOUR COMPUTER.
CHECK THE USB CABLE —
• Ensure that the USB cable is firmly connected to your printer and your computer.
• Shut down the computer, reconnect the USB cable as shown on the setup diagram for your printer,
and then restart the computer.
IF THE SOFTWARE INSTALLATION SCREEN DOES NOT APPEAR AUTOMATICALLY, INSTALL
THE SOFTWARE MANUALLY —
1 Insert the Drivers and Utilities CD.
2 In Windows XP. click Start→My Computer.
In Windows 2000, double-click My Computer from your desktop.
3 Double-click the CD-ROM drive icon. If necessary, double-click setup.exe.
4 When the printer software screen appears, click Install or Install Now.
5 Follow the instructions on your screen to complete the installation.
supports Windows 2000 and Windows XP.
Dell Photo
Troubleshooting 77
Page 78

www.dell.com | support.dell.com
DETERMINE IF THE PRINTER SOFTWARE IS INSTALLED — Click Start→Programs or All
Programs→ Dell Printers→ Dell Photo AIO Printer 962. If the Dell Photo AIO Printer 962 does not
appear in the list of programs, the printer software is not installed. Install the printer software. For more
information, see "Removing and Reinstalling Software" on page 78.
CORRECT COMMUNICATION PROBLEMS BETWEEN THE PRINTER AND THE COMPUTER —
• Remove the USB cable from your printer and your computer. Reconnect the USB cable to your
printer and your computer.
• Turn off the printer. Unplug the printer power cable from the electrical outlet. Reconnect the printer
power cable into the electrical outlet and turn on the printer.
• Restart your computer.
SET YOUR PRINTER AS THE DEFAULT PRINTER —
Windows XP
1 Click Start→Control Panel→Printers and Other Hardware→Printers and Faxes.
2 Right-click Dell Photo AIO Printer 962 and select Set as Default.
Windows 2000
1 Click Start→Settings→Printers.
2 Right-click Dell Photo AIO Printer 962 and select Set as Default.
Removing and Reinstalling Software
If your printer does not function properly or communication error messages appear when using
your printer, you can remove and reinstall the printer software.
1 Click Start→ Programs or All Programs→ Dell Printers→ Dell Photo AIO Printer
962
→ Uninstall Dell AIO Printer 962.
2 Follow the instructions on the computer screen to remove the printer software.
3 Restart your computer before installing the software again.
4 Insert the Drivers and Utilities CD, and then follow the instructions on the computer
screen to install the software.
If the installation screen does not appear:
a In Windows XP, click Start→ My Computer.
In Windows 2000, double-click My Computer from your desktop.
b Double-click the CD-ROM drive icon. If necessary, double-click setup.exe.
78 Troubleshooting
Page 79

c When the printer software installation screen appears, click Install or Install Now.
d Follow the instructions on your screen to complete the installation.
Printer Problems
ENSURE THAT THE PRINTER POWER CABLE IS FIRMLY CONNECTED TO THE PRINTER AND
THE ELECTRICAL OUTLET.
DETERMINE IF THE PRINTER HAS BEEN HELD OR PAUSED
Windows XP
1 Click Start→ Control Panels→ Printers and Other Hardware→Printers and Faxes.
2 Double-click Dell Photo AIO Printer 962, and then click Printer.
3 Make sure a check mark is not next to Pa use Printing. If a check mark is next to Pause Printing, click
it to deselect the option.
Windows 2000
1 Click Start→Settings→Printers.
2 Double-click Dell Photo AIO Printer 962, and then click Printer.
3 Make sure a check mark is not next to Pa use Printing. If a check mark is next to Pause Printing, click
Pause Printing to deselect it.
CHECK FOR FLASHING LIGHTS ON THE PRINTER — For more information, see "Error
Messages and Lights" on page 84.
ENSURE YOU INSTALLED THE INK CARTRIDGES CORRECTLY AND REMOVED THE STICKER
AND TAPE FROM EACH CARTRIDGE.
MAKE SURE YOU LOADED THE PAPER CORRECTLY — For more information, see "Loading
Paper" on page 34.
Troubleshooting 79
Page 80

www.dell.com | support.dell.com
PRINTER WON’ T PRINT AND PRINT JOBS ARE STUCK IN PRINT QUEUE — Print jobs may be
stuck in the print queue if you have multiple instances of your Dell printer installed on your computer.
To check for multiple entries of the printer:
1 Click Start→Settings→Printers and Faxes and if you see multiple printer objects for your Dell
printer - might be shown as Dell 962, Dell 962 (Copy 1), and Dell 962 (Copy 2), and so on.
2 Print a job to each one of these print objects to see which print object is active.
3 Set the active print object as the default printer. by right-clicking on it in the Printers and Faxes
window.
4 Delete the other copies of the print object by left clicking on each and pressing the Delete button.
NOTE: Be careful not to delete any printers you still want to use. If you accidentally delete printer that
you want to use, reinstall it using the CD or web drivers for that specific printer. To prevent multiple
instances of your Dell printer in your Printers and Faxes folder, make sure when disconnecting and
reconnecting the printer from your computer’s USB connector that you always plug the USB cable back
into the same USB connector that was originally used for the Dell printer. Also, do not install the Dell
printer drivers multiple times from your printer CD.
General Problems
Fax Problems
When you have trouble sending or receiving faxes, try these things to fix the problem.
.
MAKE SURE YOU TURNED ON BOTH YOUR PRINTER AND YOUR COMPUTER AND THE USB
CABLE IS PROPERLY CONNECTED.
MAKE SURE AN ACTIVE TELEPHONE LINE IS CONNECTED TO THE LINE CONNECTOR ( )
ON THE BACK OF YOUR PRINTER.
MAKE SURE THE FAX NUMBER, COUNTRY CODE, AND DATE/TIME ARE SET CORRECTLY.
MAKE SURE THAT IF YOU ARE USING A DSL OR ISDN LINE, THAT YOU ARE USING A
DIGITAL LINE FILTER ON THE TELEPHONE LINE CONNECTING YOUR WALL JACK TO THE
WALL.
MAKE SURE THE TELEPHONE LINE IS NOT IN USE BY ANOTHER DEVICE SUCH AS A
DIALUP MODEM INTERNET SERVICE. IF IT IS, WAIT UNTIL THE OTHER DEVICE IS
FINISHED BEFORE SENDING YOUR FAX.
80 Troubleshooting
Page 81

MAKE SURE THE ORIGINAL DOCUMENT IS LOADED CORRECTLY (FACE DOWN IN THE BACK
LEFT CORNER OF THE SCANNER GLASS OR TEXT-SIDE UP ON THE ADF) AND THE PAPER
IS LOADED CORRECTLY (FOR HELP, SEE"LOAD PLAIN PAPER INTO THE PAPER SUPPORT"
ON PAGE 34).
MAKE SURE THE PRINTER DOESN’T HAVE A PAPER JAM. IF IT DOES, SEE "CHECK FOR A
PAPER JAM" ON PAGE 82.
MAKE SURE THE MEMORY IS NOT FULL. DIAL THE RECEIVING NUMBER FIRST, AND
THEN SCAN YOUR ORIGINAL DOCUMENT ONE PAGE AT A TIME.
MAKE SURE THE POWER SUPPLY, TELEPHONE, HANDSET, AND ANSWERING MACHINE
CONNECTIONS ARE SECURE.
MAKE SURE THE SPEED DIAL IS SET CORRECTLY.
MAKE SURE THE PRINTER DETECTS THE DIAL TONE.
Paper Problems
MAKE SURE YOU LOADED THE PAPER CORRECTLY — For more information, see "Loading
Paper" on page 34.
USE ONLY PAPER RECOMMENDED FOR YOUR PRINTER — For more information, see "Print
Media Guidelines for the Paper Support" on page 34.
USE A SMALLER AMOUNT OF PAPER WHEN PRINTING MULTIPLE PAGES — For more
information, see "Print Media Guidelines for the Paper Support" on page 34.
MAKE SURE THE PAPER IS NOT WRINKLED, TORN OR DAMAGED.
MAKE SURE THE PAPER GUIDES REST AGAINST THE LEFT AND RIGHT EDGES AND
BOTTOM OF THE PAPER.
Troubleshooting 81
Page 82

www.dell.com | support.dell.com
CHECK FOR A PAPER JAM
Near the ADF
1 Lift the ADF cover or ADF unit located to the left of the ADF input tray.
2 Pull firmly on the paper to remove it.
3 Close the ADF cover or unit.
4 Press the Select button.
5 Resend your print job to print any missing pages.
NOTE: To avoid paper jams, do not force paper into the All-In-One.
Near the paper input tray
1 Lift the paper exit tray.
2 Pull firmly on the paper to remove it.
3 Lower the paper exit tray.
4 Press the Select button.
5 Resend your print job to print any missing pages.
82 Troubleshooting
Page 83

Near the paper exit tray
1 Raise the printer unit.
2 Pull firmly on the paper to remove it.
3 Close the printer unit.
4 Press the Select button.
5 Resend your print job to print any missing pages.
Near the rear access door
1 Open the rear access door.
2 Pull firmly on the paper to remove it.
3 Close the rear access door.
4 Press the Select button.
5 Resend your print job to print any missing pages.
Troubleshooting 83
Page 84

www.dell.com | support.dell.com
TO PREVENT JAMS AND MISFEEDS, MAKE SURE:
• You use a paper recommended for inkjet printers.
• You do not force the paper into the printer.
• You do not load too much paper in the printer.
• The paper guide rests against the edges of the paper and does not cause the paper to bow in the
paper support.
• You place the printer on a flat, level surface.
• You select the correct paper type and size.
If you are printing a banner, you select Letter Banner or A4 Banner in Printing Preferences.
Error Messages and Lights
The following error messages can be found on your computer screen or operator panel display.
Error Message: What it indicates: Solution:
Black Ink Low
Color Ink Low
Clear paper
jam
Clear ADF jam A paper jam exists in the ADF. Clear the paper jam, and then
Load Paper
then Press
Select
Left
cartridge
missing.
Insert Black
or Photo
cartridge
An ink cartridge is running low on ink. The Low
Ink warning occurs when your ink cartridges are
about 25 percent full, 15 percent full, and 5
percent full.
A paper jam exists in the printer. Clear the paper jam, and then
Your printer is out of paper. Follow the instructions on the
The Black or Photo ink cartridge is missing. Install a Black or Photo ink
Replace the ink cartridge. For
more information, see
“Replacing Ink Cartridges” on
page 71.
press Select on the operator
panel. For more information,
see “Check for a paper jam”
on page 82.
press Select on the operator
panel. For more information,
see “Check for a paper jam”
on page 82.
display to clear the message,
and then print your
document.
cartridge. For more
information, see “Replacing
Ink Cartridges” on page 71.
84 Troubleshooting
Page 85

Error Message: What it indicates: Solution:
Right
cartridge
missing.
Insert Color
cartridge
Left
cartridge
incorrect
Right
cartridge
incorrect
Cartridge
error
Data error Data error or incomplete data. Press the Power button to
Scan error Scan carrier error. Turn off the printer, wait a few
Paper feed
error
Device Not
Supported.
Please
Disconnect
The Color ink cartridge is missing. Install a Color ink cartridge.
For more information, see
“Replacing Ink Cartridges” on
page 71.
The wrong ink cartridge is installed in the left
cartridge carrier.
The wrong ink cartridge is installed in the right
cartridge carrier.
There is a problem with the ink cartridges or the
print heads.
A paper feed error has occurred. Check the paper paths for
The attached device is not supported, or the
Pictbridge-enabled digital camera is not set to the
correct USB mode.
Remove the cartridge and
install the correct Black or
Photo cartridge for your
printer. For more information,
see “Replacing Ink
Cartridges” on page 71.
Remove the cartridge and
install the correct Color
cartridge for your printer. For
more information, see
“Replacing Ink Cartridges” on
page 71.
• Reinstall the ink cartridges.
For more information, see
“Replacing Ink Cartridges”
on page 71.
• Disconnect and then
reconnect the printer
power cable.
reset, and then resend your
print job.
seconds, and then turn on the
printer.
obstructions, and then press
the Powe r button to reset. For
more information, see “Check
for a paper jam” on page 82.
Disconnect the device or
check the USB mode setup.
Refer to the documentation
that came with your digital
camera for more information.
Troubleshooting 85
Page 86

www.dell.com | support.dell.com
Error Message: What it indicates: Solution:
Communications
error message
The printer is not communicating with the
computer.
• Disconnect and then
reconnect the USB cable.
• Disconnect and then
reconnect the printer
power cable.
• Restart the computer.
• Remove and reinstall the
printer software. See
“Removing and
Reinstalling Software” on
page 78.
Improving Print Quality
If you are not satisfied with the print quality of your documents, there are several different ways
to improve the print quality.
• Use the appropriate paper. For example, use Dell Premium Photo Paper if you are printing
photos with a photo ink cartridge.
• Use paper that is a heavier weight, bright white, or coated. Use Dell Premium Photo Paper
if you are printing photos.
• Select a higher print quality.
To select a higher print quality:
1 With your document open, click File→Print.
The Print dialog box appears.
2 From the Print dialog box, click Preferences, Properties, or Options (depending on your
program or operating system).
3 From the Quality/Speed area, select a higher quality setting.
4 Print your document again.
5 If the print quality does not improve, try aligning or cleaning the ink cartridges. For more
information on aligning, see "Aligning Ink Cartridges" on page 74. For more information on
cleaning ink cartridges, see "Cleaning the Ink Cartridge Nozzles" on page 75.
For additional solutions, check your Dell Printer Solution Center or go to support.dell.com.
86 Troubleshooting
Page 87

To access the Dell Printer Solution Center:
1 Click Start→ Programs or All Programs→ Dell Printers→ Dell Photo AIO Printer
962
→ Dell Printer Solution Center.
2 Click the Troubleshooting tab.
Troubleshooting 87
Page 88

www.dell.com | support.dell.com
88 Troubleshooting
Page 89

Contacting Dell
Technical Assistance
If you need help with a technical problem, Dell is ready to assist you.
1 Call technical support from a telephone near or at the printer so that technical support can
assist you with any necessary procedures. When calling Dell, use your Express Service
Code to help expedite the routing of your call to the proper support personnel.
The Express Service Code label is located on the right side on top of the cover.
6
NOTE: Dell's Express Service Code system may not be available in all countries.
2 In the U.S., Business customers should call 1-877-459-7298, and Consumer (Home and
Home Office) customers should call 1-800-624-9896.
If you are calling from a different country or are in a different Service area, see "Contacting
Dell" on page 90 for your local telephone number.
3 Follow the menu prompts in the automated telephone system to speak with a technical
support representative.
Contacting Dell 89
Page 90

Automated Order-Status Service
To check on the status of any Dell products that you have ordered, you can go to
support.dell.com, or you can call the automated order-status service. A recording prompts you
for the information needed to locate and report on your order. See "Contacting Dell" on page 90
for the telephone number to call for your region.
Contacting Dell
To contact Dell electronically, you can access the following websites:
www.dell.com | support.dell.com
• www.dell.com
• support.dell.com (technical support)
• premiersupport.dell.com (technical support for educational, government, healthcare, and
medium/large business customers, including Premier, Platinum, and Gold customers)
For specific web addresses for your country, find the appropriate country section in the table
below.
NOTE: Toll-free numbers are for use within the country for which they are listed.
When you need to contact Dell, use the electronic addresses, telephone numbers, and codes
provided in the following table. If you need assistance in determining which codes to use,
contact a local or an international operator.
90 Contacting Dell
Page 91

Country (City)
International Access Code
Country Code
City Code
U.S.A. (Austin, Texas)
International Access Code: 011
Country Code: 1
Anguilla General Support toll-free: 800-335-0031
Antigua and Barbuda General Support 1-800-805-5924
Department Name or Service Area,
Website and E-Mail Address
Automated Order-Status Service toll-free: 1-800-433-9014
AutoTech (portable and desktop computers) toll-free: 1-800-247-9362
Consumer (Home and Home Office)
Technical Support toll-free: 1-800-624-9896
Customer Service toll-free: 1-800-624-9897
DellNet™ Service and Support toll-free: 1-877-Dellnet
Employee Purchase Program (EPP) Customers toll-free: 1-800-695-8133
Financial Services website: www.dellfinancialservices.com
Financial Services (lease/loans) toll-free: 1-877-577-3355
Financial Services (Dell Preferred Accounts [DPA]) toll-free: 1-800-283-2210
Business
Customer Service and Technical Support toll-free: 1-877-459-7298
Employee Purchase Program (EPP) Customers toll-free: 1-800-695-8133
Printers and Projectors Technical Support toll-free: 1-877-459-7298
Public (government, education, and healthcare)
Customer Service and Technical Support toll-free: 1-800-456-3355
Employee Purchase Program (EPP) Customers toll-free: 1-800-234-1490
Dell Sales toll-free: 1-800-289-3355
Dell Outlet Store (Dell refurbished computers) toll-free: 1-888-798-7561
Software and Peripherals Sales toll-free: 1-800-671-3355
Spare Parts Sales toll-free: 1-800-357-3355
Extended Service and Warranty Sales toll-free: 1-800-247-4618
Fax toll-free: 1-800-727-8320
Dell Services for the Deaf, Hard-of-Hearing, or
Speech-Impaired
Local Numbers, and
or toll-free: 1-800-879-3355
toll-free: 1-877-DELLTTY
Area Codes,
Toll-Free Num b ers
(1-877-335-5638)
(1-877-335-5889)
Contacting Dell 91
Page 92

Country (City)
International Access Code
Country Code
Department Name or Service Area,
Website and E-Mail Address
Area Codes,
Local Numbers, and
Toll-Free Numbers
City Code
Argentina (Buenos Aires)
International Access Code: 00
Country Code: 54
City Code: 11
We bs it e : www.dell.com.ar
Tech Support and Customer Care toll-free: 0-800-444-0733
Sales 0-810-444-3355
Tech Support Fax 11 4515 7139
Customer Care Fax 11 4515 7138
Aruba General Support toll-free: 800-1578
Australia (Sydney)
www.dell.com | support.dell.com
International Access Code: 0011
Country Code: 61
City Code: 2
E-mail (Australia): au_tech_support@dell.com
E-mail (New Zealand): nz_tech_support@dell.com
Home and Small Business 1-300-65-55-33
Government and Business toll-free: 1-800-633-559
Preferred Accounts Division (PAD) toll-free: 1-800-060-889
Customer Care toll-free: 1-800-819-339
Corporate Sales toll-free: 1-800-808-385
Transaction Sales toll-free: 1-800-808-312
Fax toll-free: 1-800-818-341
Austria (Vienna)
International Access Code: 900
Country Code: 43
City Code: 1
We bs it e : support.euro.dell.com
E-mail: tech_support_central_europe@dell.com
Home/Small Business Sales 0820 240 530 00
Home/Small Business Fax 0820 240 530 49
Home/Small Business Customer Care 0820 240 530 14
Preferred Accounts/Corporate Customer Care 0820 240 530 16
Home/Small Business Technical Support 0820 240 530 14
Preferred Accounts/Corporate Technical Support 0660 8779
Switchboard 0820 240 530 00
Bahamas General Support toll-free: 1-866-278-6818
Barbados General Support 1-800-534-3066
92 Contacting Dell
Page 93

Country (City)
International Access Code
Country Code
City Code
Belgium (Brussels)
International Access Code: 00
Country Code: 32
City Code: 2
Bermuda General Support 1-800-342-0671
Bolivia General Support toll-free: 800-10-0238
Brazil
International Access Code: 00
Country Code: 55
City Code: 51
British Virgin Islands General Support toll-free: 1-866-278-6820
Brunei
Country Code: 673
Canada (North York, Ontario)
International Access Code: 011
Cayman Islands General Support 1-800-805-7541
Department Name or Service Area,
Website and E-Mail Address
We bs it e : support.euro.dell.com
E-mail: tech_be@dell.com
E-mail for French Speaking Customers:
support.euro.dell.com/be/fr/emaildell/
Technical Support 02 481 92 88
Customer Care 02 481 91 19
Corporate Sales 02 481 91 00
Fax 02 481 92 99
Switchboard 02 481 91 00
We bs it e : www.dell.com/br
Customer Support, Technical Support 0800 90 3355
Tech Support Fax 51 481 5470
Customer Care Fax 51 481 5480
Sales 0800 90 3390
Customer Technical Support (Penang, Malaysia) 604 633 4966
Customer Service (Penang, Malaysia) 604 633 4949
Transaction Sales (Penang, Malaysia) 604 633 4955
Online Order Status: www.dell.ca/ostatus
AutoTech (automated technical support) toll-free: 1-800-247-9362
TechFax toll-free: 1-800-950-1329
Customer Care (Home Sales/Small Business) toll-free: 1-800-847-4096
Customer Care (med./large business, government) toll-free: 1-800-326-9463
Technical Support (Home Sales/Small Business) toll-free: 1-800-847-4096
Technical Support (med./large bus., government) toll-free: 1-800-387-5757
Sales (Home Sales/Small Business) toll-free: 1-800-387-5752
Sales (med./large bus., government) toll-free: 1-800-387-5755
Spare Parts Sales & Extended Service Sales 1 866 440 3355
Local Numbers, and
Area Codes,
Toll-Free Num b ers
Contacting Dell 93
Page 94

Country (City)
International Access Code
Country Code
Department Name or Service Area,
Website and E-Mail Address
Area Codes,
Local Numbers, and
Toll-Free Numbers
City Code
Chile (Santiago)
Sales, Customer Support, and Technical Support toll-free: 1230-020-4823
Country Code: 56
City Code: 2
China (Xiamen)
Country Code: 86
City Code: 592
www.dell.com | support.dell.com
Tech Support website: support.ap.dell.com/china
Tech Support E-mail: cn_support@dell.com
Tech Support Fax 818 1350
Home and Small Business Technical Support toll-free: 800 858 2437
Corporate Accounts Technical Support toll-free: 800 858 2333
Tech Support (projectors, PDAs, printers, switches,
toll-free: 800-858-2920
routers, and so on)
Customer Experience toll-free: 800 858 2060
Home and Small Business toll-free: 800 858 2222
Preferred Accounts Division toll-free: 800 858 2557
Large Corporate Accounts GCP toll-free: 800 858 2055
Large Corporate Accounts Key Accounts toll-free: 800 858 2628
Large Corporate Accounts North toll-free: 800 858 2999
Large Corporate Accounts North Government and
toll-free: 800 858 2955
Education
Large Corporate Accounts East toll-free: 800 858 2020
Large Corporate Accounts East Government and
toll-free: 800 858 2669
Education
Large Corporate Accounts Queue Team toll-free: 800 858 2222
Large Corporate Accounts South toll-free: 800 858 2355
Large Corporate Accounts West toll-free: 800 858 2811
Large Corporate Accounts Spare Parts toll-free: 800 858 2621
Colombia General Support 980-9-15-3978
Costa Rica General Support 0800-012-0435
94 Contacting Dell
Page 95

Country (City)
International Access Code
Country Code
City Code
Czech Republic (Prague)
International Access Code: 00
Country Code: 420
City Code: 2
Denmark (Copenhagen)
International Access Code: 00
Country Code: 45
Dominica General Support toll-free: 1-866-278-6821
Dominican Republic General Support 1-800-148-0530
Ecuador General Support toll-free: 999-119
El Salvador General Support 01-899-753-0777
Department Name or Service Area,
Website and E-Mail Address
We bs it e : support.euro.dell.com
E-mail: czech_dell@dell.com
Technical Support 02 2186 27 27
Customer Care 02 2186 27 11
Fax 02 2186 27 14
TechFax 02 2186 27 28
Switchboard 02 2186 27 11
We bs it e : support.euro.dell.com
E-mail Support (portable computers):
den_nbk_support@dell.com
E-mail Support (desktop computers):
den_support@dell.com
E-mail Support (servers):
Nordic_server_support@dell.com
Technical Support 7023 0182
Customer Care (Relational) 7023 0184
Home/Small Business Customer Care 3287 5505
Switchboard (Relational) 3287 1200
Fax Switchboard (Relational) 3287 1201
Switchboard (Home/Small Business) 3287 5000
Fax Switchboard (Home/Small Business) 3287 5001
Local Numbers, and
Area Codes,
Toll-Free Num b ers
Contacting Dell 95
Page 96

Country (City)
International Access Code
Country Code
City Code
Finland (Helsinki)
International Access Code: 990
Country Code: 358
City Code: 9
www.dell.com | support.dell.com
France (Paris) (Montpellier)
International Access Code: 00
Country Code: 33
City Codes: (1) (4)
Department Name or Service Area,
Website and E-Mail Address
Local Numbers, and
Area Codes,
Toll-Free Numbers
We bs it e : support.euro.dell.com
E-mail: fin_support@dell.com
E-mail Support (servers):
Nordic_support@dell.com
Technical Support 09 253 313 60
Technical Support Fax 09 253 313 81
Relational Customer Care 09 253 313 38
Home/Small Business Customer Care 09 693 791 94
Fax 09 253 313 99
Switchboard 09 253 313 00
We bs it e : support.euro.dell.com
E-mail: support.euro.dell.com/fr/fr/emaildell/
Home and Small Business
Technical Support 0825 387 270
Customer Care 0825 823 833
Switchboard 0825 004 700
Switchboard (calls from outside of France) 0499754000
Sales 0825 004 700
Fax 0825 004 701
Fax (calls from outside of France) 0499754001
Corporate
Technical Support 0825 004 719
Customer Care 0825 338 339
Switchboard 0155947100
Sales 0155947100
Fax 0155947101
96 Contacting Dell
Page 97

Country (City)
International Access Code
Country Code
City Code
Germany (Langen)
International Access Code: 00
Country Code: 49
City Code: 6103
Greece
International Access Code: 00
Country Code: 30
Grenada General Support toll-free: 1-866-540-3355
Guatemala General Support 1-800-999-0136
Guyana General Support toll-free: 1-877-270-4609
Hong Kong
International Access Code: 001
Country Code: 852
Department Name or Service Area,
Website and E-Mail Address
We bs it e : support.euro.dell.com
E-mail: tech_support_central_europe@dell.com
Technical Support 06103 766-7200
Home/Small Business Customer Care 0180-5-224400
Global Segment Customer Care 06103 766-9570
Preferred Accounts Customer Care 06103 766-9420
Large Accounts Customer Care 06103 766-9560
Public Accounts Customer Care 06103 766-9555
Switchboard 06103 766-7000
We bs it e : support.euro.dell.com
E-mail: support.euro.dell.com/gr/en/emaildell/
Technical Support 080044149518
Gold Technical Support 08844140083
Switchboard 2108129800
Sales 2108129800
Fax 2108129812
We bs it e : support.ap.dell.com
E-mail: ap_support@dell.com
Technical Support (Dimension™ and Inspiron™) 2969 3189
Technical Support (OptiPlex™, Latitude™, and
Dell Precision™)
Technical Support (PowerApp™, PowerEdge™,
PowerConnect™ and PowerVault™)
Gold Queue EEC Hotline 2969 3187
Customer Advocacy 3416 0910
Large Corporate Accounts 3416 0907
Global Customer Programs 3416 0908
Medium Business Division 3416 0912
Home and Small Business Division 2969 3105
Local Numbers, and
Area Codes,
Toll-Free Num b ers
2969 3191
2969 3196
Contacting Dell 97
Page 98

Country (City)
International Access Code
Country Code
Department Name or Service Area,
Website and E-Mail Address
Area Codes,
Local Numbers, and
Toll-Free Numbers
City Code
India Technical Support 1600 33 8045
Sales 1600338044
Ireland (Cherrywood)
International Access Code: 16
Country Code: 353
City Code: 1
www.dell.com | support.dell.com
We bs it e : support.euro.dell.com
E-mail: dell_direct_support@dell.com
Technical Support 1850 543 543
U.K. Technical Support (dial within U.K. only) 0870 908 0800
Home User Customer Care 01 204 4014
Small Business Customer Care 01 204 4014
U.K. Customer Care (dial within U.K. only) 0870 906 0010
Corporate Customer Care 1850 200 982
Corporate Customer Care (dial within U.K. only) 0870 907 4499
Ireland Sales 01 204 4444
U.K. Sales (dial within U.K. only) 0870 907 4000
Fax/SalesFax 01 204 0103
Switchboard 01 204 4444
Italy (Milan)
International Access Code: 00
Country Code: 39
City Code: 02
We bs it e : support.euro.dell.com
E-mail: support.euro.dell.com/it/it/emaildell/
Home and Small Business
Technical Support 02 577 826 90
Customer Care 02 696 821 14
Fax 02 696 821 13
Switchboard 02 696 821 12
Corporate
Technical Support 02 577 826 90
Customer Care 02 577 825 55
Fax 02 575 035 30
Switchboard 02 577 821
Jamaica General Support (dial from within Jamaica only) 1-800-682-3639
98 Contacting Dell
Page 99

Country (City)
International Access Code
Country Code
City Code
Japan (Kawasaki)
International Access Code: 001
Country Code: 81
City Code: 44
Korea (Seoul)
International Access Code: 001
Country Code: 82
City Code: 2
Latin America Customer Technical Support (Austin, Texas,
Luxembourg
International Access Code: 00
Country Code: 352
Macao
Country Code: 853
Department Name or Service Area,
Website and E-Mail Address
We bs it e : support.jp.dell.com
Technical Support toll-free: 0120-981-690
Technical Support outside of Japan 044-556-3468
Customer Care 044-556-4240
Technical Support toll-free: 080-200-3800
Sales toll-free: 080-200-3600
Customer Service (Seoul, Korea) toll-free: 080-200-3800
Customer Service (Penang, Malaysia) 604 633 4949
Fax 2194-6202
Switchboard 2194-6000
U.S.A.)
Customer Service (Austin, Texas, U.S.A.) 512 728-3619
Fax (Technical Support and Customer Service)
(Austin, Texas, U.S.A.)
Sales (Austin, Texas, U.S.A.) 512 728-4397
SalesFax (Austin, Texas, U.S.A.) 512 728-4600
We bs it e : support.euro.dell.com
E-mail: tech_be@dell.com
Technical Support (Brussels, Belgium) 3420808075
Home/Small Business Sales (Brussels, Belgium) toll-free: 080016884
Corporate Sales (Brussels, Belgium) 02 481 91 00
Customer Care (Brussels, Belgium) 02 481 91 19
Fax (Brussels, Belgium) 02 481 92 99
Switchboard (Brussels, Belgium) 02 481 91 00
Technical Support toll-free: 0800 582
Customer Service (Penang, Malaysia) 604 633 4949
Tran sac tio n Sa les tol l-f ree: 080 0 5 81
Area Codes,
Local Numbers, and
Toll-Free Num b ers
512 728-4093
512 728-3883
or 512 728-3772
Contacting Dell 99
Page 100

Country (City)
International Access Code
Country Code
Department Name or Service Area,
Website and E-Mail Address
Area Codes,
Local Numbers, and
Toll-Free Numbers
City Code
Malaysia (Penang)
International Access Code: 00
Country Code: 60
City Code: 4
Mexico
International Access Code: 00
Country Code: 52
www.dell.com | support.dell.com
Technical Support toll-free: 1 800 888 298
Customer Service 04 633 4949
Transaction Sales toll-free: 1 800 888 202
Corporate Sales toll-free: 1 800 888 213
Customer Technical Support 001-877-384-8979
or 001-877-269-3383
Sales 50-81-8800
or 01-800-888-3355
Customer Service 001-877-384-8979
or 001-877-269-3383
Main 50-81-8800
or 01-800-888-3355
Montserrat General Support toll-free: 1-866-278-6822
Netherlands Antilles General Support 001-800-882-1519
100 Contacting Dell
 Loading...