

Page 1

Dell Precision™ Workstations
Setup and Quick Reference Guide
www.dell.com | support.euro.dell.com
Page 2

Notes, Notices, and Cautions
NOTE: A NOTE indicates important information that helps you make better use of your computer.
NOTICE: A NOTICE indicates either potential damage to hardware or loss of data and tells you
how to avoid the problem.
CAUTION: A CAUTION indicates a potential for property damage, personal injury,
or death.
____________________
Information in this document is subject to change without notice.
© 2001–2002 Dell Computer Corporation. All rights reserved.
Reproduction in any manner whatsoever without the written permission of Dell Computer Corporation is strictly
forbidden.
Trademarks used in this text: Dell, the DELL logo, and Dell Precision are trademarks of Dell Computer Corporation;
Microsoft, Windows, and Windows NT are registered trademarks of Microsoft Corporation.
Other trademarks and trade names may be used in this document to refer to either the entities claiming the marks and
names or their products. Dell Computer Corporation disclaims any proprietary interest in trademarks and trade names
other than its own.
December 2002 P/N 8F765 Rev. A03
Page 3

Contents
Finding Information and Assistance . . . . . . . . . . . . . . . . 5
Setting Up Your Mini-Tower Computer
Dual Monitors
. . . . . . . . . . . . . . . . . . . . . . . . . 18
. . . . . . . . . . . . . . . 9
Setting Up Your Small Desktop Computer
Dual Monitors
. . . . . . . . . . . . . . . . . . . . . . . . . 28
Safety First—For You and Your Computer
Opening the Computer Cover
Opening the Cover
. . . . . . . . . . . . . . . . . . . . . . . 30
Inside Your Computer
Removing and Installing Parts
Adding Devices and Software
. . . . . . . . . . . . . . . . . . . 29
. . . . . . . . . . . . . . . . . . . . . . . 32
. . . . . . . . . . . . . . . . . . 34
. . . . . . . . . . . . . . . . . 34
Problems With Additional Devices and Software
Frequently Asked Questions
Solving Problems
. . . . . . . . . . . . . . . . . . . . . . . . . 39
. . . . . . . . . . . . . . . . . . . . 36
Using the Dell Precision ResourceCD
When to Use the Dell Diagnostics
Starting the Dell Diagnostics
Messages and Codes
. . . . . . . . . . . . . . . . . . . . . . 44
. . . . . . . . . . . . . . . 40
. . . . . . . . . . . . . . . . . . 41
. . . . . . . . . . . . 19
. . . . . . . . . . . . 29
. . . . . . . . 35
. . . . . . . . . . . . . . 40
Contents 3
Page 4

4 Contents
Page 5

Finding Information and Assistance
The following table lists the resources that Dell provides as support tools.
Additional resources may be shipped with your computer.
What Are You Looking For? Find it Here
• A diagnostic program for my computer
• Drivers for my computer
• My computer documentation
• My device documentation
• How to set up my computer
• Troubleshooting information
• Tools and utilities
Drivers and Utilities CD (also known as the
ResourceCD)
You can use this CD to access documentation, reinstall drivers, or run
diagnostics tools.
Setup and Quick Reference Guide
Setup and Quick Reference Guide 5
Page 6

What Are You Looking For? Find it Here
• Express Service Code and Service
Express Service Code and Product Key
Ta g N um b e r
• Microsoft
®
Windows® License Label
The labels are located on your computer under the front-panel door.
• How to reinstall my operating system Operating System CD and Installation Guide
www.dell.com | support.euro.dell.com
If you reinstall your operating system, use the Drivers and Utilities CD
to reinstall drivers for the devices that came with your computer.
6 Setup and Quick Reference Guide
Page 7

What Are You Looking For? Find it Here
• How to remove and replace parts
• Technical specifications
• How to configure system settings
• How to troubleshoot and solve problems
• Latest drivers for my computer
• Answers to technical service and support
questions
• Online discussions with other users and
technical support
• Documentation for my computer
• Service call status
• Top technical issues for my computer
• Frequently asked questions
• File downloads
• Details on my computer’s configuration
• Service contract for my computer
User’s Guide Icon
Depending on your operating system, double-click the User’s Guides
icon on your desktop or click the Start button and then click Help and
Support to access the electronic documentation stored on your
hard drive.
Dell Support Website — support.euro.dell.com
The Dell Support website provides several online tools, including:
• Knowledge Base — Hints, tips, and online courses
• Customer Forum — Online discussion with other Dell customers
• Upgrades — Upgrade information for components, such as memory,
the hard drive, and the operating system
• Customer Care — Contact information, order status, warranty, and
repair information
• Downloads — Drivers, patches, and software updates
• Reference — Computer documentation, product specifications, and
white papers
Dell Premier Support Website —
premiersupport.dell.com
The Dell Premier Support website is customized for corporate,
government, and education customers. This website may not be
available in all regions.
Setup and Quick Reference Guide 7
Page 8

What Are You Looking For? Find it Here
• System board connectors System Information Label
• Warranty Information Dell System Information Guide
www.dell.com | support.euro.dell.com
• How to use Windows XP
• Documentation for my computer
and devices
8 Setup and Quick Reference Guide
Windows XP Help and Support Center
1 Click the Start button and then click Help and Support.
2 Type a word or phrase that describes your problem and click the
arrow icon.
3 Click the topic that describes your problem.
4 Follow the instructions shown on the screen.
Page 9

Setting Up Your Mini-Tower Computer
You must complete all steps to properly set up your computer.
Mini-Tower Computer Features
5
1
4
NOTE: The numbers in
the figures correspond to
the setup tasks.
7
6
2
3
Setup and Quick Reference Guide 9
Page 10

Connect the keyboard and mouse as shown. Do not connect a Universal
Serial Bus (USB) mouse or keyboard to the USB connectors on the front of
the computer.
NOTE: Do not attempt
to operate a PS/2 mouse
and a USB mouse
simultaneously.
www.dell.com | support.euro.dell.com
Keyboard and Mouse
1
10 Setup and Quick Reference Guide
USB connectors (2)
headphones/speakers
connector
Page 11

Network Adapter and Modem
2
Insert the network cable, not the phone line, into the network connector.
If you have an optional modem, connect the phone line to the modem.
NOTICE: Do not connect a modem cable to the network adapter. Voltage
from telephone communications can cause damage to the network adapter.
NOTE: If your computer
has a network expansion
card installed, connect the
network cable to the
network card, not to the
connector on the
computer back panel.
Setup and Quick Reference Guide 11
Page 12
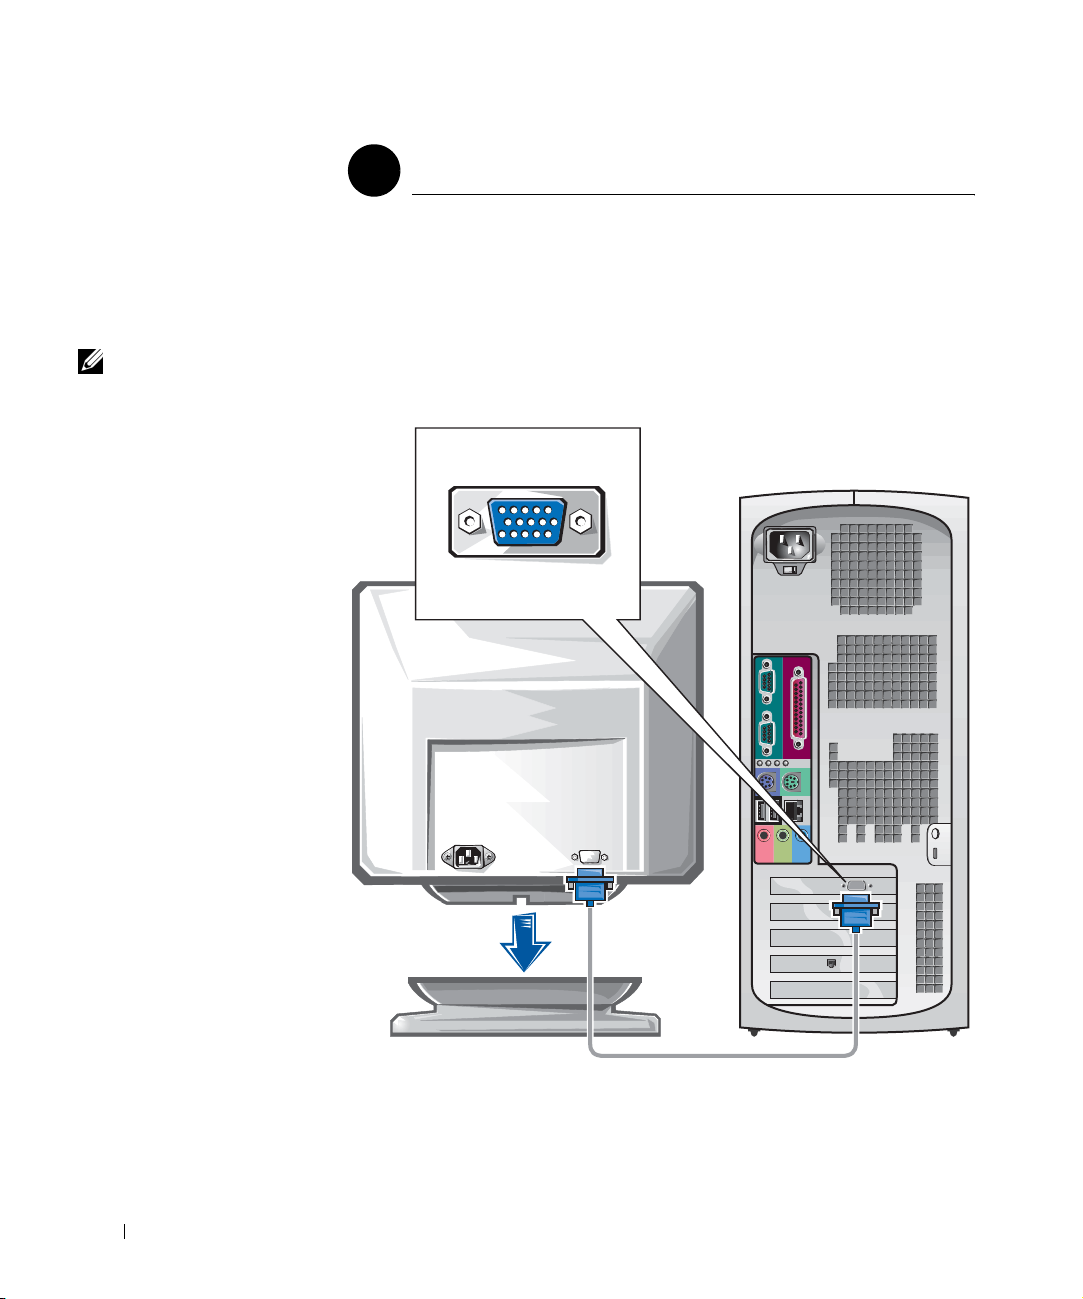
Monitor
3
Align and gently insert the monitor cable to avoid bending connector pins.
Then tighten the thumbscrews on the cable connectors.
Use the primary port if you are using one monitor with an optional
dual-monitor card.
NOTE: Some flat-panel
displays and graphic
cards support Digital
Visual Interface (DVI).
If your monitor and card
www.dell.com | support.euro.dell.com
have DVI connectors, Dell
recommends that you use
DVI instead of VGA.
For setting up dual monitors, see "Dual Monitors" on page 18.
12 Setup and Quick Reference Guide
Page 13
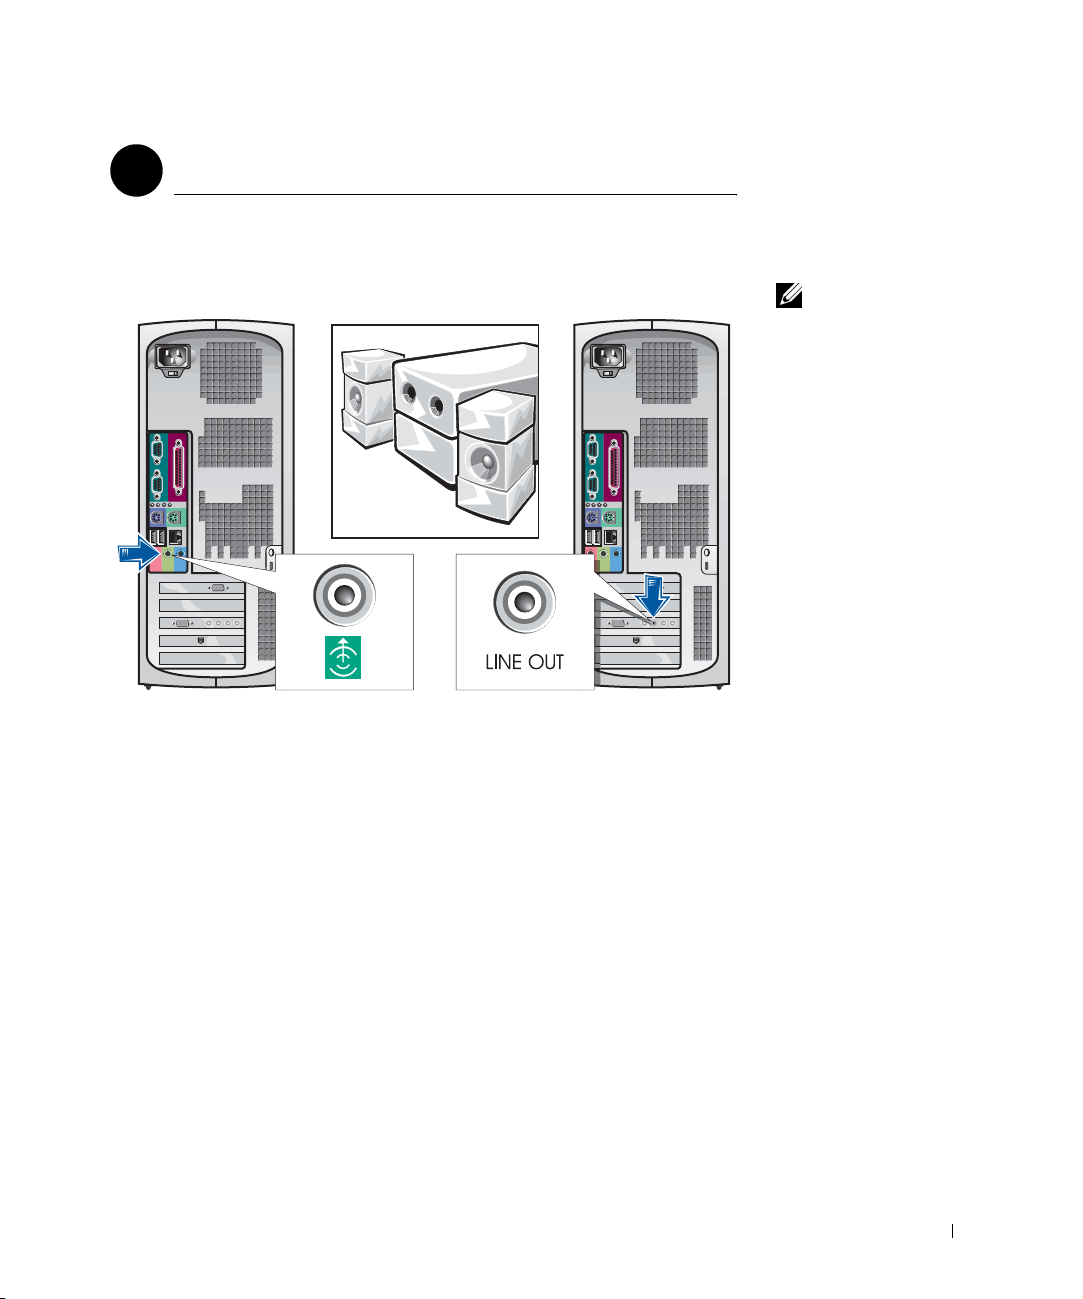
Speakers
4
Connect the speakers to the computer as shown on the instructions
supplied with the speakers.
NOTE: If your computer
has an audio expansion
card installed, connect
external audio devices to
the sound card, not to the
connectors on the
computer back panel.
Setup and Quick Reference Guide 13
Page 14
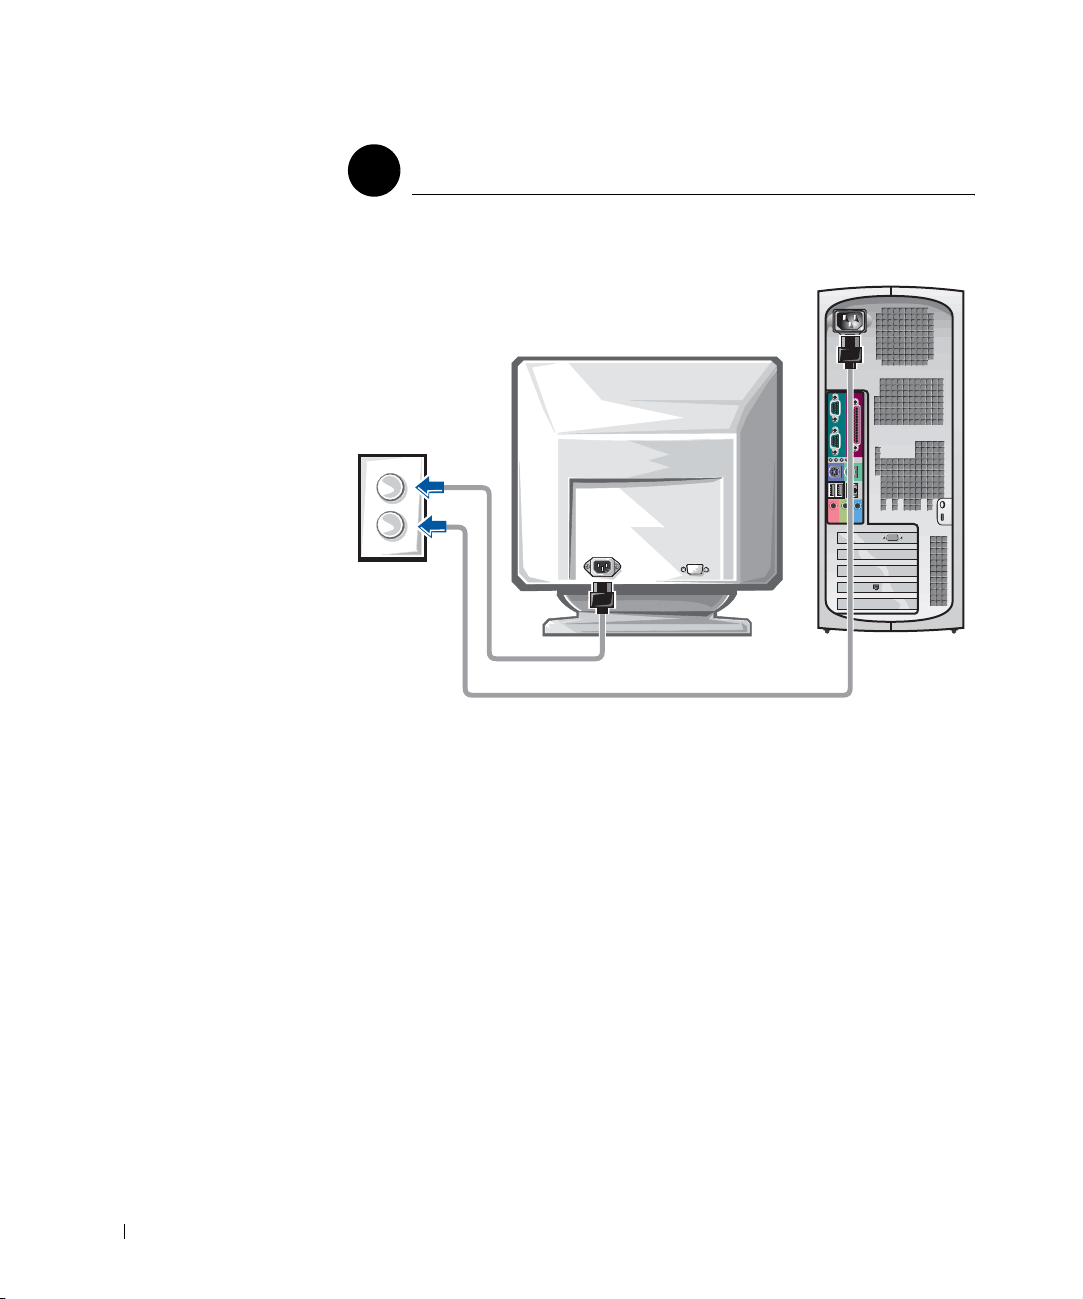
Plug in the computer and the monitor to their electrical outlets.
www.dell.com | support.euro.dell.com
Power Connection
5
14 Setup and Quick Reference Guide
Page 15

Power On
6
Press the power button on your computer and monitor to turn them on.
hard-drive
access light
power light
Setup and Quick Reference Guide 15
Page 16

When you start the computer for the first time, a few system start-up
messages may appear, including one that shows your Service Tag and
Express Service Code.
Your computer is preconfigured with the operating system already installed.
Before turning on your computer for the first time, you must complete all
the previous setup steps, connecting all devices for your computer.
The initial setup of the operating system is automatic and may take several
minutes. Additional setup time may be required, depending on your
system’s internal and external devices.
www.dell.com | support.euro.dell.com
Follow the operating system prompts to complete setup. You may be
prompted to enter the Windows Product Key (also called the Product ID or
COA) to complete the registration. You can find this above the service tag
on your computer.
Operating System
7
NOTE: For more
information on setting up
the operating system, see
the operating system
installation guide.
For future reference, write the number below:
Product Key (ID or COA): ________________________________________
16 Setup and Quick Reference Guide
Page 17

Additional Devices and Software
8
Before you install any devices or software that did not ship with your
computer, read the documentation that came with the software or device or
contact the vendor to verify that the software or device is compatible with
your computer and operating system. See "Adding Devices and Software" on
page 34.
Congratulations! You have completed the setup for your computer.
Setup and Quick Reference Guide 17
Page 18

Dual Monitors
NOTICE: Do not use any other cables or attach the monitor cable directly to
the dual-monitor graphic card.
NOTE: Some flat-panel
displays and graphic
cards support Digital
Visual Interface (DVI).
If your monitor and card
have DVI connectors, Dell
recommends that you use
DVI instead of VGA.
NOTE: A second monitor
is optional and requires a
www.dell.com | support.euro.dell.com
multimonitor graphics
adapter card.
The dual-monitor cable is color coded; the blue connector is for the primary
monitor, and the black connector is for the secondary monitor. Attach
the appropriate monitor cable to the dual-monitor cable. To enable
dual-monitor support, both monitors must be attached when the computer
starts. See "Frequently Asked Questions" on page 36 for more information.
OR
18 Setup and Quick Reference Guide
Page 19

Setting Up Your Small Desktop Computer
You must complete all steps to properly set up your computer.
Small Desktop Computer Features
2
1
6
NOTE: The numbers in
the figures correspond to
the setup tasks.
34 5
7
Setup and Quick Reference Guide 19
Page 20

Connect the keyboard and mouse as shown. Do not connect a USB mouse
or keyboard to the USB connectors on the front of the computer.
NOTE: Do not attempt
to operate a PS/2 mouse
and a USB mouse
simultaneously.
www.dell.com | support.euro.dell.com
Keyboard and Mouse
1
20 Setup and Quick Reference Guide
headphone/speaker
connector
USB connectors (2)
Page 21

Network Adapter and Modem
2
Insert the network cable, not the phone line, into the network connector.
If you have an optional modem, connect the phone line to the modem.
NOTICE: Do not connect a modem cable to the network adapter. Voltage
from telephone communications can cause damage to the network adapter.
NOTE: If your computer
has a network expansion
card installed, connect the
network cable to the
network card, not to the
connector on the
computer back panel.
Setup and Quick Reference Guide 21
Page 22

Monitor
3
Align and gently insert the monitor cable to avoid bending connector pins.
Then tighten the thumbscrews on the cable connectors.
Use the primary port if you are using one monitor with an optional
dual-monitor card.
NOTE: Some flat-panel
displays and graphic
cards support Digital
Visual Interface (DVI).
If your monitor and card
www.dell.com | support.euro.dell.com
have DVI connectors, Dell
recommends that you use
DVI instead of VGA.
For setting up dual monitors, see "Dual Monitors" on page 28.
22 Setup and Quick Reference Guide
Page 23

Speakers
4
Connect the speakers to the computer as shown on the instructions
supplied with the speakers.
NOTE: If your computer
has an audio expansion
card installed, connect
external audio devices to
the sound card, not to the
connectors on the
computer back panel.
Setup and Quick Reference Guide 23
Page 24

Plug in the computer and the monitor to their electrical outlets.
www.dell.com | support.euro.dell.com
Power Connection
5
24 Setup and Quick Reference Guide
Page 25

Power On
6
Press the power button on your computer and monitor to turn them on.
power light
hard-drive
access light
Setup and Quick Reference Guide 25
Page 26

When you start the computer for the first time, a few system start-up
messages may appear, including one that shows your Service Tag and
Express Service Code.
Your computer is preconfigured with the operating system already installed.
Before turning on your computer for the first time, you must complete all
the previous setup steps, connecting all devices for your computer.
The initial setup of the operating system is automatic and may take several
minutes. Additional setup time may be required, depending on your
system’s internal and external devices.
www.dell.com | support.euro.dell.com
Follow the operating system prompts to complete setup. You may be
prompted to enter the Windows Product Key (also called the Product ID or
COA) to complete the registration. You can find this above the service tag
on your computer.
Operating System
7
NOTE: For more
information on setting up
the operating system, see
the operating system
installation guide.
For future reference, write the number below:
Product Key (ID or COA): ________________________________________
26 Setup and Quick Reference Guide
Page 27

Additional Devices and Software
8
Before you install any devices or software that did not ship with your
computer, read the documentation that came with the software or device or
contact the vendor to verify that the software or device is compatible with
your computer and operating system. See "Adding Devices and Software" on
page 34.
Congratulations! You have completed the setup of your computer.
Setup and Quick Reference Guide 27
Page 28

Dual Monitors
NOTICE: Do not use any other cables or attach the monitor cable directly to
the dual-monitor graphic card.
NOTE: Some flat-panel
displays and graphic
cards support Digital
Visual Interface (DVI).
If your monitor and card
have DVI connectors, Dell
recommends that you use
DVI instead of VGA.
NOTE: A second monitor
is optional and requires a
www.dell.com | support.euro.dell.com
multimonitor graphics
adapter card.
The dual-monitor cable is color coded; the blue connector is for the primary
monitor, and the black connector is for the secondary monitor. Attach
the appropriate monitor cables to the dual-monitor cable. To enable
dual-monitor support, both monitors must be attached when the computer
starts. See "Frequently Asked Questions" on page 36 for more information.
OR
28 Setup and Quick Reference Guide
Page 29

Safety First—For You and Your Computer
While working inside your computer, do not attempt to service the
computer except as explained in this guide and elsewhere in Dell
documentation. Always follow the instructions closely.
Working inside your computer is safe—if you observe the following
precautions.
CAUTION: FOR YOUR PERSONAL SAFETY AND PROTECTION OF
THE EQUIPMENT
Before you start to work on the computer, perform the following steps in the
sequence indicated:
1 Tu r n o f f the computer and all devices.
2 Touch an unpainted metal surface on the computer, such as the metal
around the card-slot openings at the back of your computer, before
touching anything inside your computer.
3 Disconnect the computer and devices from their electrical outlets.
Doing so reduces the potential for personal injury or shock. Also
disconnect any telephone or telecommunication lines from the
computer.
While you work, periodically touch an unpainted metal surface on the
computer to dissipate any static electricity that might harm internal
components.
In addition, Dell recommends that you periodically review the safety
instructions in the documentation that came with your computer.
Opening the Computer Cover
You may need to open the computer cover if you are going to remove or
install a part, reset a forgotten password, or diagnose a computer problem.
CAUTION: Before you perform this procedure, see "Safety First—
For You and Your Computer" on page 29.
Setup and Quick Reference Guide 29
NOTE: Before
disconnecting a device
from the computer or
removing a component
from the system board,
verify that the standby
power light on the system
board has turned off. See
the interior service label
located on the inside of
the cover to locate the
standby power light.
Page 30

Opening the Cover
1 Turn off the computer and devices, disconnect them from their
electrical outlets, and wait 10 to 20 seconds.
2 If you have installed a padlock through the padlock ring on the back
panel, remove the padlock.
3 Open the computer cover:
NOTE: On the small
desktop computer, remove
the stand before you open
the cover. On the minitower computer, place the
computer on its side
www.dell.com | support.euro.dell.com
before you open the cover.
Mini-Tower Computer
a Press the two release buttons until the cover is free to swing up.
b Raise the back of the cover, and pivot it toward the front of the
computer.
NOTICE: To prevent damage to the system board of the mini-tower computer,
open the cover until it catches at a 45-degree angle. Then remove the optical
drive data cable and/or the hard-drive data cable from the system board and
open the cover to a 90-degree angle.
30 Setup and Quick Reference Guide
Page 31

Small Desktop Computer
Setup and Quick Reference Guide 31
Page 32

Inside Your Computer
Mini-Tower Computer
removable media drive
floppy drive
hard drive
www.dell.com | support.euro.dell.com
padlock ring
AC power
connector
power supply
back-panel
connectors
speaker
chassis intrusion
switch
system board
microprocessor airflow shroud
PCI expansion-card slots
32 Setup and Quick Reference Guide
Page 33

Small Desktop Computer
floppy drive
system board
removable media drive
hard drive
memory modules
microprocessor
back-panel
connectors
padlock ring
low profile AGP slot
AC power connector PCI expansion-card slots
speaker
chassis intrusion
switch
power supply
expansion-card cage
Setup and Quick Reference Guide 33
Page 34

Removing and Installing Parts
Instructions for removing and installing various parts are located in the
User’s Guide. You can replace such parts as:
•memory
• hard drive or other externally accessible drive
• PCI expansion card
•graphic card
• microprocessor
To access the User’s Guide from your hard drive:
www.dell.com | support.euro.dell.com
NOTE: You can also
access the User’s Guide
from the Dell Precision
ResourceCD or
support.euro.dell.com.
See "Finding Information
and Assistance" on
page 5.
To print the entire User’s Guide from Internet Explorer, select Print all
linked documents in the Print window.
Adding Devices and Software
Before you install any devices or software that did not ship with your
computer, read the documentation that came with the software or device or
contact the vendor to verify that the software or device is compatible with
your computer and operating system.
1 Depending on your operating system, double-click the User’s Guides
icon or click the Start button and select Help and Support.
Click Removing and Installing Parts.
2
3 Select Print from the File menu to print the procedure before you
begin working.
34 Setup and Quick Reference Guide
Page 35

Problems With Additional Devices and Software
If you have installed additional software or devices and are experiencing
problems with your computer, use the following procedures to solve
the problem:
• Remove or uninstall the device or software.
See the documentation that came with the device or software for
information on removing and uninstalling.
• Set your computer to Last Known Good Configuration.
®
For Windows NT
spacebar NOW to invoke Hardware Profile/Configuration
Recovery Menu
Profile/Configuration Recovery Menu, press <L> to switch to the
last known good setting, and then select your operating system.
For Windows 2000 and Windows XP, restart your computer and press
<F8> when the message
to start
appears. Highlight Last Known Good Setting, press
<Enter>, press <L>, and then select your operating system when
prompted.
See your operating system installation guide for more information.
• For Windows NT, if the first two procedures did not work, run ZZTop.
, press the spacebar when the message Press the
appears during system startup. In the Hardware
Please select the operating system
NOTICE: The following process has the potential to erase some or all of the
information on the hard drive.
To run ZZTOP, insert the ResourceCD, select Start
Resource CD Menu from the main menu, and then select
Start ZZTOP Imaging SW.
See "Using the Dell Precision ResourceCD" on page 40 for more
information on using the ResourceCD.
NOTICE: The following process erases all of the information on your
hard drive.
• If the previous procedures did not work, run a low-level format of your
hard drive.
See your operating system installation guide for more information.
• Reinstall your operating system using the operating system installation
guide and operating system CD.
See "Finding Information and Assistance" on page 5.
Setup and Quick Reference Guide 35
Page 36

NOTE: Your operating
system may have a
compatibility mode, which
may help resolve issues
between older
applications and your
operating system. See
your operating system
documentation for more
information.
If you have verified that the device or software that you want to install is
compatible with your computer and operating system, reinstall the device
or software.
Frequently Asked Questions
www.dell.com | support.euro.dell.com
Problem? Try... Or try the Dell Precision
ResourceCD
How do I use my Dell
Precision ResourceCD?
Where can I find a
detailed User’s Guide
for my computer?
Where can I find a
warranty statement for
my computer?
See "Using the Dell Precision
ResourceCD" on page 40 for
more information.
Depending on your
operating system, doubleclick the User’s Guides icon
or click the Start button and
select Help and Support.
Documentation such as the
User’s Guide is available on
your hard drive.
Depending on your
operating system, doubleclick the User’s Guides icon
or click the Start button and
select Help and Support.
See the "Limited Warranty
and Return Policy" section in
your User’s Guide.
Go to the main menu on the
Dell Precision ResourceCD.
Click User’s Guides in the
Topic pull-down menu and
click Dell Precision
ResourceCD Guide.
Go to the main menu on the
Dell Precision ResourceCD.
Click User’s Guides in the
Topic pull-down menu and
click the user’s guide
appropriate for your computer.
Go to the main menu on the
Dell Precision ResourceCD.
Click User’s Guides in the
Topic pull-down menu, click
the user’s guide appropriate
for your computer, and then
see "Limited Warranty and
Return Policy."
Or try the Dell Support Site
Go to support.euro.dell.com. At
the Welcome page, click Dell
Documents. Make selections
appropriate for your computer to
access your User’s Guide.
Go to support.euro.dell.com. At
the Welcome page, click Dell
Documents. Make selections
appropriate for your computer to
access your User’s Guide. See
"Limited Warranty and Return
Policy" in the User’s Guide.
36 Setup and Quick Reference Guide
Page 37

Problem? Try... Or try the Dell Precision
ResourceCD
Where can I find the
Product Key (also
called the Product ID
or Certificate of
Authenticity [COA])
See page 16 of this
document for the minitower computer or page 26
of this document for the
small desktop computer.
for the operating
system registration?
How do I find
technical
specifications for my
computer?
Depending on your
operating system, double-
click the User’s Guides icon
or click the Start button, and
then select Help and
Support.
See the "Technical
Go to the main menu on the
Dell Precision ResourceCD.
Click User’s Guides in the
To pi c pull-down menu, click
the user’s guide appropriate
for your computer, and then
see "Technical Specifications."
Specifications" section in
your User’s Guide.
I have a computer with
a dual-monitorcapable graphics card.
How do I set up my
second monitor?
Depending on your
operating system, double-
click the User’s Guides icon
or click the Start button and
select Help and Support and
search for dual monitor.
Go to the main menu on the
Dell Precision ResourceCD.
Click User’s Guides in the
To pi c pull-down menu and
click the user’s guide
appropriate for your computer.
A step-by-step procedure for
setting up dual monitors is
located in the video
controller User’s Guide.
If I need a driver for
my graphics card,
network adapter,
sound card, small
computer system
interface (SCSI)
software, or some
other device, where
See "Drivers for Your
Computer" on page 40.
You may also have a CD
specifically for the device. If
so, search the contents of the
CD for documentation and
appropriate driver(s).
See the Dell Precision
ResourceCD Guide for more
information.
do I locate it?
Or try the Dell Support Site
Go to support.euro.dell.com. At
the Welcome page, click Ask
Dudley! and search using the
keywords Product Key.
Go to support.euro.dell.com. At
the Welcome page, click Dell
Documents. Make selections
appropriate for your computer to
access your User’s Guide. See
"Technical Specifications" in the
User’s Guide.
Go to support.euro.dell.com.
At the Welcome Page, click
Downloads for Your Dell. Enter
your System Service Tag or make
the appropriate selections for your
computer and operating system to
locate drivers.
Setup and Quick Reference Guide 37
Page 38

Problem? Try... Or try the Dell Precision
ResourceCD
How do I open the
computer?
See "Opening the Computer
Cover" on page 29.
Go to the main menu on the
Dell Precision ResourceCD.
Click User’s Guides in the
Topic pull-down menu, click
the user’s guide appropriate
for your computer, and then
see "Removing and Installing
Parts."
The monitor is blank
and the power light is
blinking green. How
do I resume operations
with my computer?
www.dell.com | support.euro.dell.com
The computer is in a
reduced power or sleep state.
Depending on your
operating system you can
wake the computer by
moving the PS/2 mouse or
pressing the power button.
Go to the main menu on the
Dell Precision ResourceCD.
Click User’s Guides in the
Topic pull-down menu, click
the appropriate user’s guide
for your computer, and then
see "Power Management."
To learn more about power
management mode see your
User’s Guide. Depending on
your operating system,
double-click the User’s
Guides icon or click the
Start button and select Help
and Support.
How do I install
additional hardware on
my computer?
See "Removing and
Installing Parts" on page 34.
Go to the main menu on the
Dell Precision ResourceCD.
Click User’s Guides in the
Topic pull-down menu, click
the user’s guide appropriate
for your computer, and then
see "Removing and Installing
Parts."
How do I reinstall my
operating system?
See the operating system
installation guide for
information on reinstalling
your operating system.
Or try the Dell Support Site
Go to support.euro.dell.com
for help with general usage,
installation, and troubleshooting
instructions.
Go to support.euro.dell.com. At
the Welcome page, click Dell
Documents. Make selections
appropriate for your computer to
access your User’s Guide. See
"Power Management" in the
User’s Guide.
Go to support.euro.dell.com. At
the Welcome page, click Dell
Documents. Make selections
appropriate for your computer to
access your User’s Guide. See
"Removing and Installing Parts" in
the User’s Guide.
38 Setup and Quick Reference Guide
Page 39

Solving Problems
Your computer includes the following tools that can help you solve a
problem:
DELL DIAGNOSTICS — The Dell Precision ResourceCD contains Dell
Diagnostics that tests various components on your computer and helps identify
the cause of computer problems. For more information, see "When to Use the
Dell Diagnostics" on page 40.
SYSTEM LIGHTS — Located on the front of the computer, these lights can
indicate a computer problem. For more information, see "System Lights" on
page 44.
DIAGNOSTIC LIGHTS — Located on the front of the computer, these lights
can indicate a computer problem. For more information, see "Diagnostic Lights"
on page 46.
SYSTEM MESSAGES — The computer reports these messages to warn you of
current or possible failure. For more information, see "System Messages" on
page 49.
BEEP CODES — A series of audible beep codes emitted by your computer can
help identify a problem. For more information, see "Beep Codes" on page 49.
If a computer problem occurs that you are unable to resolve through the
steps in this section or the procedures in "Finding Solutions" in your
User’s Guide, complete the following steps before you contact Dell:
1 Write a detailed description of the error, beep code, or diagnostic
light problem.
2 Record your Express Service Code and Service Tag Number.
3 Contact Dell from the same location as your computer.
See "Finding Information and Assistance" on page 5 for an example of the
express service code and the service tag numbers.
Setup and Quick Reference Guide 39
Page 40

Using the Dell Precision ResourceCD
To use the Dell Precision ResourceCD from within the Windows operating
system:
NOTE: To access device
drivers and user
documentation, you must
use the ResourceCD while
you are running Windows.
www.dell.com | support.euro.dell.com
To access the Dell Precision ResourceCD Guide, click User’s Guides in the
Topic pull-down menu and click Dell Precision ResourceCD.
Drivers for Your Computer
To display a list of device drivers for your computer:
1 Insert the Dell Precision ResourceCD into the CD drive.
If you are using the Dell Precision ResourceCD for the first time on this
computer, the ResourceCD Installation window opens to inform you
that the ResourceCD is about to begin installation.
2 Click OK to continue.
To complete the installation, respond to the prompts offered by the
installation program.
3 Click Next at the Welcome Dell System Owner screen.
4 Select the appropriate System Model, Operating System, Device
Ty p e , and Topic.
1 Click My Drivers in the Topic pull-down menu.
The ResourceCD scans your computer’s hardware and operating
system, and then a list of device drivers for your system configuration
is displayed on the screen.
2 Click the appropriate driver and follow the instructions to download
the driver for your computer.
To view a list of all the available drivers for your computer, click Drivers
from the To pi c pull-down menu.
When to Use the Dell Diagnostics
If you experience a problem with your computer, perform the checks in
"Finding Solutions" in your User’s Guide and run the Dell Diagnostics
before you contact Dell for technical assistance. Running the Dell
Diagnostics may help you resolve the problem without contacting Dell. If
you do contact Dell, the test results can provide important information for
Dell's service and support personnel.
40 Setup and Quick Reference Guide
Page 41

The Dell Diagnostics allows you to:
• Perform express, extended, or custom tests on one or all devices
• Select tests based on a symptom of the problem you are having
• Choose how many times a test is run
• Display test results
• Suspend testing if an error is detected
• Access online help information that describes the tests and devices
• Receive status messages that tell you whether tests completed
successfully
• Receive error messages if problems are detected
Starting the Dell Diagnostics
It is recommended that you print these procedures before you begin.
NOTICE: Only use the Dell Diagnostics to test your Dell™ computer. Using
this program with other computers can result in error messages.
Enter system setup, review your computer’s configuration information, and
ensure that the device you want to test displays in system setup and
is active.
Start the Dell Diagnostics from either your hard drive or from the
Drivers and Utilities CD (also known as the ResourceCD).
Starting the Dell Diagnostics From Your Hard Drive
1 Shut down and restart the computer.
2 When the DELL logo appears, press <F12> immediately.
If you wait too long and the Windows logo appears, continue to wait
until you see the Windows desktop. Then shut down your computer
through the Start menu and try again.
3 When the boot device list appears, highlight Boot to Utility Partition
and press <Enter>.
4 When the Dell Diagnostics Main Menu appears, select the test you
want to run.
Setup and Quick Reference Guide 41
NOTE: If you receive a
message stating that no
Diagnostics utility
partition has been found,
follow the instructions to
run the Dell Diagnostics
from your Drivers and
Utilities CD.
Page 42

Starting the Dell Diagnostics From the Drivers and Utilities CD
1 Insert the Drivers and Utilities CD into the CD drive.
2 Shut down and restart the computer.
When the DELL logo appears, press <F12> immediately.
If you wait too long and the Windows logo appears, continue to wait
until you see the Windows desktop. Then shut down your computer
through the Start menu and try again
NOTE: This feature
changes the boot sequence
for one time only. On the
next start-up, the
computer boots according
www.dell.com | support.euro.dell.com
to the devices specified in
system setup.
Dell Diagnostics Main Menu
NOTE: The Service Tag
number for your computer
is located at the top of
each test screen.
3 When the boot device list appears, highlight IDE CD-ROM Device
and press <Enter>.
4 Select the IDE CD-ROM Device option from the CD boot menu.
5 Select the Boot from CD-ROM option from the menu that appears.
6 Type 1 to start the ResourceCD menu.
7 Type 2 to start the Dell Diagnostics.
8 Select Run the 32 Bit Dell Diagnostics from the numbered list. If
multiple versions are listed, select the version appropriate for your
platform.
9 When the Dell Diagnostics Main Menu appears, select the test you
want to run.
1 After the Dell Diagnostics loads and the Main Menu screen appears,
click the button for the option you want.
Option Function
Express
Te st
Extended
Te st
Custom
Te st
Symptom
Tr ee
Performs a quick test of devices. This test typically takes 10
to 20 minutes and requires no interaction on your part.
Run Express Test first to increase the possibility of tracing
the problem quickly.
Performs a thorough check of devices. This test typically
takes an hour or more and requires you to answer questions
periodically.
Tests a specific device. You can customize the tests you
want to run.
Lists the most common symptoms encountered and allows
you to select a test based on the symptom of the problem
you are having.
42 Setup and Quick Reference Guide
Page 43

2 If a problem is encountered during a test, a message displaying the
error code and a description of the problem appear. Write down the
error code and problem description and follow the instructions on
the screen.
If you cannot resolve the error condition, contact Dell.
3 If you run a test from the Custom Test or Symptom Tree option, click
the applicable tab described in the following table for more
information.
Tab Function
Results Displays the results of the test and any error conditions
encountered.
Errors Displays error conditions encountered, error codes, and
problem description.
Help Describes the test and may indicate requirements for
running the test.
Configuration Displays your hardware configuration for the selected
device.
The Dell Diagnostics obtains your configuration
information for all devices from system setup, memory,
and various internal tests and displays it in the device
list in the left pane of the screen. The device list may
not display the names of all the components installed on
your computer or all devices attached to your computer.
Parameters Allows you to customize the test by changing the test
settings.
4 When the tests are completed, if you are running the Dell Diagnostics
from the Drivers and Utilities CD, remove the CD.
5 Close the test screen to return to the Main Menu screen. To exit the
Dell Diagnostics and restart the computer, close the Main Menu
screen.
Setup and Quick Reference Guide 43
Page 44

Messages and Codes
Your application programs, operating system, and computer can identify
problems and alert you to them. When a problem occurs, a message may
appear on your monitor screen, a beep code may sound, or a light code may
be generated. The following subsections present information about
messages, beep codes, and light codes.
When a message appears, write it down; if possible, look up the message in
your User’s Guide. Report the message if you need to call technical support.
System Lights
Your computer has a number of lights that can help you analyze and solve
problems. To locate these lights, see "Mini-Tower Computer Features" on
www.dell.com | support.euro.dell.com
System Light Codes
Power Light Hard-Drive Light Cause Corrective Action
Solid green N/A Power is on, and the computer is
Blinking green Blank The computer is in the suspended
Blinks green several
times and then
turns off
N/A A configuration error exists. Check the diagnostic lights to see if
page 9 or "Small Desktop Computer Features" on page 19.
The following table lists the codes for the system lights, gives probable
causes, and suggests corrective actions.
No corrective action is required.
operating normally.
Press the power button, move the
state (Windows 2000 and XP).
mouse, or press a key on the keyboard
to wake the computer. See "Power
Management" in the User’s Guide for
more information.
the specific problem is identified. See
the User’s Guide for more
information.
44 Setup and Quick Reference Guide
Page 45

System Light Codes (continued)
Power Light Hard-Drive Light Cause Corrective Action
Solid yellow N/A The Dell Diagnostics is running a
test, or a device on the system board
may be faulty or incorrectly installed.
Blinking yellow Blank A power supply or system board
failure exists.
Blinking yellow Solid green A system board failure exists. Check the diagnostic lights to see if
Solid green and a
beep code during
POST
Solid green power
light and no beep
code and no video
during POST
Solid green power
light and no beep
code but the
computer locks up
during POST
N/A A problem was detected while the
BIOS was executing.
N/A The monitor or the graphics card may
be faulty or incorrectly installed.
N/A An integrated system board device
may be faulty.
If the Dell Diagnostics is running,
allow the testing to complete.
Check the diagnostic lights to see if
the specific problem is identified.
Also, see "System Board Problems" in
the User’s Guide.
If the computer does not boot,
contact Dell for technical assistance.
Check the diagnostic lights to see if
the specific problem is identified. See
"Power Problems" and "System Board
Problems" in the User’s Guide.
the specific problem is identified.
Also, see "System Board Problems" in
the User’s Guide.
See "Beep Codes" on page 49 for
instructions on diagnosing the beep
code. Also, check the diagnostic lights
to see if the specific problem is
identified.
Check the diagnostic lights to see if
the specific problem is identified.
Also, see "Video Problems" in the
User’s Guide.
Check the diagnostic lights to see if
the specific problem is identified. If
the problem is not identified, contact
Dell for technical assistance.
Setup and Quick Reference Guide 45
Page 46

Diagnostic Lights
When you turn on your computer, it performs a series of self-diagnostic
tests. A successful power-on self-test (POST) ends with a single beep that
signifies the start of normal operation. If the computer fails to complete the
POST, a series of lights located on the computer can help you understand
which test failed or why the computer stopped responding. These lights
communicate problems encountered before and during POST only, not
during normal operation. To locate the diagnostic lights, see "Back Panel" on
page 46.
The following table lists the code for the diagnostic lights, gives probable
causes, and suggests corrective actions. The lights are labeled to help you
match the pattern on your computer with ones shown in the table.
www.dell.com | support.euro.dell.com
Back Panel
diagnostic lights
Diagnostic Light Codes During POST
Light Pattern Cause
A
B
C
D
off
off
off
off
= yellow
= green
= off
46 Setup and Quick Reference Guide
No electrical power is supplied to the computer.
Page 47

Diagnostic Light Codes During POST (continued)
Light Pattern Cause
A
B
C
D
A
B
C
D
A
B
C
D
A
B
C
D
A
B
C
D
A
B
C
D
yellow
yellow
green
yellow
yellow
yellow
green
green
yellow
green
yellow
yellow
yellow
green
yellow
green
yellow
green
green
yellow
green
green
green
yellow
Possible microprocessor failure.
Possible memory failure.
Possible expansion card failure or conflict.
Possible video card failure.
Possible floppy drive or hard drive failure.
After video initialization, an alert was found. Check
the computer screen for an error message.
= yellow
= green
= off
Setup and Quick Reference Guide 47
Page 48

Diagnostic Light Codes During POST (continued)
Light Pattern Cause
A
B
C
D
A
B
C
D
www.dell.com | support.euro.dell.com
A
B
C
D
A
B
C
D
green
yellow
yellow
green
green
yellow
green
green
green
green
yellow
yellow
yellow
green
green
green
Possible system board resource and/or hardware failure.
Possible system board resource and/or hardware failure.
Possible expansion card failure or conflict.
Possible USB failure.
A
B
C
D
= yellow
= green
= off
48 Setup and Quick Reference Guide
green
green
green
green
Normal operating condition after POST.
Page 49

System Messages
If an error occurs during start-up, a message may be reported on the
monitor identifying the problem. If a system message is displayed, look it up
under "System Messages" in the User’s Guide for suggestions on resolving
any problems. The system messages are listed alphabetically.
Beep Codes
If an error occurs during start-up that cannot be reported on the monitor,
your computer may emit a beep code that identifies the problem. The beep
code is a pattern of sounds: for example, one beep, followed by a second
beep, and then a burst of three beeps (code 1-1-3) means that the computer
was unable to read the data in nonvolatile random-access memory
(NVRAM).
If a beep code is emitted, write it down and look it up under "System Beep
Codes" in the User’s Guide.
NOTE: If the system
message you received is
not listed in the User’s
Guide, check the
documentation for the
application program that
you were running at the
time the message
appeared and/or the
operating system
documentation for an
explanation of the
message and a
recommended action.
Setup and Quick Reference Guide 49
Page 50

www.dell.com | support.euro.dell.com
50 Setup and Quick Reference Guide
Page 51

Workstation Dell Precision™
Guida all'installazione ed alla consultazione rapida
www.dell.com | support.euro.dell.com
Page 52

Note, avvisi e messaggi di attenzione
NOTA: Una NOTA indica informazioni importanti che contribuiscono a migliorare l'utilizzo del
computer.
AVVISO: Un AVVISO indica la possibilità di danni all'hardware o perdita di dati e spiega come
evitare il problema.
ATTENZIONE: Un messaggio di ATTENZIONE indica la possibilità di danni agli
oggetti, lesioni personali o morte.
____________________
Le informazioni contenute in questo documento sono soggette a modifica senza preavviso.
© 2001 –2002 Dell Computer Corporation. Tutti i diritti riservati.
È rigorosamente vietata qualsiasi riproduzione senza l'autorizzazione scritta della Dell Computer Corporation.
Marchi utilizzati in questo testo: Dell, l'emblema della DELL e Dell Precision sono marchi di fabbrica della
Dell Computer Corporation; Microsoft Windows e Windows NT sono marchi depositati della Microsoft Corporation.
In questo documento possono essere utilizzati altri marchi di fabbrica e denominazioni di marca per riferirsi sia alle
ditte che rivendicano i marchi o denominazioni sia ai loro prodotti. La Dell Computer Corporation declina qualsiasi
interesse proprietario in marchi di fabbrica e denominazioni di marca diversi da quelli che le appartengono.
Dicembre 2002 P/N 8F765 Rev. A03
Page 53

Indice
Come ottenere informazioni e assistenza . . . . . . . . . . . . . 55
Configurazione del computer minitorre
Monitor duali
. . . . . . . . . . . . . . . . . . . . . . . . . 68
. . . . . . . . . . . . . . 59
Configurazione del computer desktop di dimensioni ridotte
Monitor duali
La sicurezza prima di tutto—personale e del computer
Come aprire il coperchio del computer
Come aprire il coperchio
Dentro il computer
Rimozione e installazione pezzi
Aggiunta di periferiche e software
Problemi con periferiche e software supplementari
Domande frequenti
Risoluzione dei problemi
Uso del Dell Precision ResourceCD
Quando utilizzare la Diagnostica della Dell
Avvio della Diagnostica della Dell
Messaggi e codici
. . . . . . . . . . . . . . . . . . . . . . . . . 78
. . . . . 79
. . . . . . . . . . . . . . 79
. . . . . . . . . . . . . . . . . . . . 80
. . . . . . . . . . . . . . . . . . . . . . . . 82
. . . . . . . . . . . . . . . . . . 84
. . . . . . . . . . . . . . . 84
. . . . . . . 85
. . . . . . . . . . . . . . . . . . . . . . . . 86
. . . . . . . . . . . . . . . . . . . . . 90
. . . . . . . . . . . . . . . 91
. . . . . . . . . . . 92
. . . . . . . . . . . . . . . 92
. . . . . . . . . . . . . . . . . . . . . . . 95
. . . 69
Indice 53
Page 54

54 Indice
Page 55

Come ottenere informazioni e assistenza
La seguente tabella elenca le risorse che Dell fornisce quale strumento di
supporto. Risorse supplementari potrebbero essere in corredo al computer
in dotazione.
Che cosa si sta cercando? Trovatelo qui
• Un programma diagnostico per il computer
in dotazione
• Driver per il computer in dotazione
• Documentazione del computer in dotazione
• Documentazione delle periferiche in
dotazione
• Come configurare il computer
• Informazioni sulla risoluzione dei problemi
• Tool e utilità
CD dei driver e delle utilità (anche noto come
ResourceCD)
Utilizzare questo CD per accedere alla documentazione, reinstallare i
driver, o eseguire i tool diagnostici.
Guida all'installazione ed alla consultazione
rapida
Guida all'installazione ed alla consultazione rapida 55
Page 56

Che cosa si sta cercando? Trovatelo qui
• Codice del servizio espresso e numero di
Codice del servizio espresso e Chiave del prodotto
servizio
• Etichetta della licenza di
Microsoft
®
Windows
®
Le etichette sono poste sotto lo sportello del pannello anteriore del
computer.
• Come reinstallare il sistema operativo CD del sistema operativo e Guida per
www.dell.com | support.euro.dell.com
l'installazione
Se si reinstalla il sistema operativo, utilizzare il CD Drivers and Utility
(Driver e utilità) per reinstallare i driver delle periferiche fornite con il
computer.
56 Guida all'installazione ed alla consultazione rapida
Page 57

Che cosa si sta cercando? Trovatelo qui
• Come rimuovere e sostituire componenti
• Specifiche tecniche
• Come configurare le impostazioni di
sistema
• Come individuare e risolvere i problemi
• Driver aggiornati per il computer in
dotazione
• Risposte a domande relative all'assistenza e
al supporto tecnico
• Discussioni in linea con altri utenti e
supporto tecnico
• Documentazione per il computer in
dotazione
• Stato della chiamata di assistenza
• Principali aspetti tecnici del computer
• Domande frequenti
• Area download file
• Informazioni sulla configurazione del
computer in dotazione
• Contratto di assistenza per il computer in
dotazione
Icona Guida dell'utente
In base al sistema operativo, fare doppio clic sull'icona User’s Guides
(Guide dell'utente) sul desktop o fare clic sul pulsante Avvio e quindi
selezionare Help and Support (Guida e assistenza) per accedere alla
documentazione elettronica memorizzata sul disco rigido.
Sito Web di supporto Dell — support.euro.dell.com
Il sito Web di supporto Dell fornisce vari strumenti in linea, tra cui:
• Knowledge Base — suggerimenti, consigli e corsi in linea
• Forum clienti — discussioni in linea con altri clienti Dell
• Aggiornamenti — informazioni sugli aggiornamenti dei componenti
quali memoria, dischi rigidi e sistema operativo
• Assistenza clienti — informazioni su recapiti telefonici, stato degli
ordini, garanzia e riparazioni
• Area download — aggiornamenti di driver, patch e software
• Riferimenti — documentazione per computer, specifiche tecniche
dei prodotti e note informative
Sito Web di supporto Dell Premier —
premiersupport.dell.com
Il sito Web di supporto Dell Premier è personalizzato per i clienti di
società, istituzioni governative e dell'istruzione. Questo sito Web
potrebbe non essere disponibile in tutte le zone.
Guida all'installazione ed alla consultazione rapida 57
Page 58

Che cosa si sta cercando? Trovatelo qui
• Connettori della scheda di sistema Etichetta di informazioni sul sistema
• Informazioni sulla garanzia Informazioni di sistema Dell
www.dell.com | support.euro.dell.com
• Come utilizzare Windows XP
• Documentazione per il computer e le
periferiche in dotazione
Centro di assistenza per Windows XP
1 Fare clic sul pulsante Avvio, quindi selezionare Help and Support
(Guida e assistenza).
2 Digitare una parola o frase che descriva il problema e quindi fare clic
sulla freccia.
3 Fare clic sull'argomento che descrive il problema.
4 Seguire le istruzioni visualizzate sullo schermo.
58 Guida all'installazione ed alla consultazione rapida
Page 59

Configurazione del computer minitorre
È necessario completare tutte le fasi per configurare correttamente il
computer.
Computer minitorre Funzioni
5
1
4
NOTA: I numeri riportati
in figura corrispondono
alle operazioni di
installazione.
7
6
2
3
Guida all'installazione ed alla consultazione rapida 59
Page 60

Collegare la tastiera e il mouse come mostrato. Non collegare il mouse o la
tastiera USB (Universal Serial Bus) ai connettori USB sulla parte anteriore
del computer.
NOTA: Evitare che un
mouse PS/2 ed un mouse
USB funzionino
contemporaneamente.
www.dell.com | support.euro.dell.com
Tastiera e mouse
1
Connettori USB (2)
Connettore
cuffie/altoparlanti
60 Guida all'installazione ed alla consultazione rapida
Page 61

Scheda di rete e modem
2
Inserire il cavo di rete, non quello telefonico, nel connettore di rete.
Se l'utente ha in dotazione un modem opzionale, collegare il cavo telefonico
al modem.
AVVISO: Non collegare il cavo del modem all'adattatore di rete; la tensione
delle trasmissioni telefoniche può danneggiare l'adattatore.
NOTA: Tuttavia, se è
installata sul computer
una scheda di espansione
di rete, collegare il cavo
di rete alla scheda di rete,
non al connettore del
pannello posteriore del
computer.
Guida all'installazione ed alla consultazione rapida 61
Page 62

Monitor
3
Per evitare di piegare i piedini del connettore, allineare e delicatamente
inserire il cavo del monitor. Quindi serrare i prigionieri a testa zigrinata sul
connettore del cavo.
Se si sta utilizzando un unico monitor con una scheda monitor duale
opzionale, usare la porta primaria.
NOTA: Alcuni display a
schermo piatto e schede
grafiche supportano DVI
(Digital Visual Interface
www.dell.com | support.euro.dell.com
[interfaccia visiva
digitale]). Se il monitor e
la scheda in dotazione
dispongono di connettori
DVI, Dell raccomanda di
prediligerli ai VGA.
Per impostare un monitor duale, consultare "Monitor duali" a pagina 68.
62 Guida all'installazione ed alla consultazione rapida
Page 63

Altoparlanti
4
Collegare gli altoparlanti al computer come illustrato nelle istruzioni in
corredo agli altoparlanti.
NOTA: Se sul computer
in dotazione è stata
installata una scheda di
espansione audio,
collegare le periferiche
audio esterne alla scheda
audio, non ai connettori
sul pannello posteriore del
computer.
Guida all'installazione ed alla consultazione rapida 63
Page 64

Inserire il computer e il monitor nelle rispettive prese elettriche.
www.dell.com | support.euro.dell.com
Collegamento all'alimentazione
5
64 Guida all'installazione ed alla consultazione rapida
Page 65

Accensione
6
Premere il pulsante d'alimentazione del computer e del monitor per
accenderli.
Spia di accesso
al disco rigido
Spia d'alimentazione
Guida all'installazione ed alla consultazione rapida 65
Page 66

Al primo avvio del computer, potrebbero essere visualizzati alcuni messaggi
d'avvio del sistema, compreso quello relativo al numero di servizio ed al
codice del servizio espresso.
Il computer è preconfigurato col sistema operativo preinstallato. Prima di
accendere il computer per la prima volta, è necessario completare tutte le fasi
di impostazione precedenti, collegando tutte le periferiche del computer.
La configurazione iniziale del sistema operativo è automatica e può
richiedere diversi minuti. Altro tempo potrebbe essere necessario, in base
alle periferiche interne ed esterne del sistema.
www.dell.com | support.euro.dell.com
Seguire le richieste del sistema operativo per portare a termine
l'impostazione. Per completare la registrazione, sarà necessario che l'utente
immetta la Chiave del prodotto (detta anche ID del prodotto o Certificato
d'autenticità [COA]) di Windows. È possibile rintracciare ciò in cima al
numero di servizio del computer in dotazione.
Sistema operativo
7
NOTA: Per ottenere
ulteriori informazioni
su come installare il
sistema operativo, fare
riferimento alla guida di
installazione del sistema
operativo.
66 Guida all'installazione ed alla consultazione rapida
Per una successiva consultazione, annotare il codice sottostante:
Chiave del prodotto (ID o COA): __________________________________
Page 67

Periferiche e software supplementari
8
Prima di installare qualsiasi periferica o software non a corredo del
computer, leggere la documentazione allegata al software o alla periferica o
rivolgersi al rivenditore per verificare che siano compatibili con il computer
e il sistema operativo in dotazione. Consultare "Aggiunta di periferiche e
software" a pagina 84.
Congratulazioni! È stata completata la configurazione del computer.
Guida all'installazione ed alla consultazione rapida 67
Page 68

Monitor duali
AVVISO: Non usare cavi supplementari oltre quelli forniti nonché collegare il
cavo del monitor direttamente alla scheda grafica del monitor duale.
NOTA: Alcuni display a
schermo piatto e schede
grafiche supportano DVI
(Digital Visual Interface
[interfaccia visiva
digitale]). Se il monitor e
la scheda in dotazione
dispongono di connettori
DVI, Dell raccomanda di
prediligerli ai VGA.
NOTA: Il secondo
www.dell.com | support.euro.dell.com
monitor è opzionale e
necessita di una scheda
grafica multimonitor.
Gli elementi del cavo del monitor duale sono riconoscibili dal colore: il
connettore blu è per il monitor primario e quello nero per il monitor
secondario. Collegare il cavo del monitor appropriato al cavo del monitor
duale. Per attivare il supporto monitor duale, all'avviarsi del computer è
necessario che entrambi i monitor siano collegati. Per ulteriori informazioni,
consultare "Domande frequenti" a pagina 86.
OR
68 Guida all'installazione ed alla consultazione rapida
Page 69

Configurazione del computer desktop di dimensioni ridotte
È necessario completare tutte le fasi per configurare correttamente il
computer.
Funzioni del computer Desktop di dimensioni ridotte
2
1
34 5
6
NOTA: I numeri riportati
in figura corrispondono
alle operazioni di
installazione.
7
Guida all'installazione ed alla consultazione rapida 69
Page 70

Collegare la tastiera e il mouse come mostrato. Non collegare il mouse o la
tastiera USB ai connettori USB sulla parte anteriore del computer.
NOTA: Evitare che un
mouse PS/2 ed un mouse
USB funzionino
contemporaneamente.
www.dell.com | support.euro.dell.com
Tastiera e mouse
1
Connettore
cuffie/altoparlanti
Connettori USB (2)
70 Guida all'installazione ed alla consultazione rapida
Page 71

Scheda di rete e modem
2
Inserire il cavo di rete, non quello telefonico, nel connettore di rete.
Se l'utente ha in dotazione un modem opzionale, collegare il cavo telefonico
al modem.
AVVISO: Non collegare il cavo del modem all'adattatore di rete; la tensione
delle trasmissioni telefoniche può danneggiare l'adattatore.
NOTA: Tuttavia, se è
installata sul computer
una scheda di espansione
di rete, collegare il cavo
di rete alla scheda di rete,
non al connettore del
pannello posteriore del
computer.
Guida all'installazione ed alla consultazione rapida 71
Page 72

Monitor
3
Per evitare di piegare i piedini del connettore, allineare e delicatamente
inserire il cavo del monitor. Quindi serrare i prigionieri a testa zigrinata sul
connettore del cavo.
Se si sta utilizzando un unico monitor con una scheda monitor duale
opzionale, usare la porta primaria.
NOTA: Alcuni display a
schermo piatto e schede
grafiche supportano DVI
(Digital Visual Interface
www.dell.com | support.euro.dell.com
[interfaccia visiva
digitale]). Se il monitor e
la scheda in dotazione
dispongono di connettori
DVI, Dell raccomanda di
prediligerli ai VGA.
Per impostare un monitor duale, consultare "Monitor duali" a pagina 78.
72 Guida all'installazione ed alla consultazione rapida
Page 73

Altoparlanti
4
Collegare gli altoparlanti al computer come illustrato nelle istruzioni in
corredo agli altoparlanti.
NOTA: Se sul computer
in dotazione è stata
installata una scheda di
espansione audio,
collegare le periferiche
audio esterne alla scheda
audio, non ai connettori
sul pannello posteriore del
computer.
Guida all'installazione ed alla consultazione rapida 73
Page 74

Inserire il computer e il monitor nelle rispettive prese elettriche.
www.dell.com | support.euro.dell.com
Collegamento all'alimentazione
5
74 Guida all'installazione ed alla consultazione rapida
Page 75

Accensione
6
Premere il pulsante d'alimentazione del computer e del monitor per
accenderli.
Spia
d'alimentazione
Spia di accesso
al disco rigido
Guida all'installazione ed alla consultazione rapida 75
Page 76

Al primo avvio del computer, potrebbero essere visualizzati alcuni messaggi
d'avvio del sistema, compreso quello relativo al numero di servizio ed al
codice del servizio espresso.
Il computer è preconfigurato col sistema operativo preinstallato. Prima di
accendere il computer per la prima volta, è necessario completare tutte le
fasi di impostazione precedenti, collegando tutte le periferiche del
computer.
La configurazione iniziale del sistema operativo è automatica e può
richiedere diversi minuti. Altro tempo potrebbe essere necessario, in base
www.dell.com | support.euro.dell.com
alle periferiche interne ed esterne del sistema.
Seguire le richieste del sistema operativo per portare a termine
l'impostazione. Per completare la registrazione, sarà necessario che l'utente
immetta la Chiave del prodotto (detta anche ID del prodotto o Certificato
d'autenticità [COA]) di Windows. È possibile rintracciare ciò in cima al
numero di servizio del computer in dotazione.
Sistema operativo
7
NOTA: Per ottenere
ulteriori informazioni
su come installare il
sistema operativo, fare
riferimento alla guida di
installazione del sistema
operativo.
76 Guida all'installazione ed alla consultazione rapida
Per una successiva consultazione, annotare il codice sottostante:
Chiave del prodotto (ID o COA): __________________________________
Page 77

Periferiche e software supplementari
8
Prima di installare qualsiasi periferica o software non a corredo del
computer, leggere la documentazione allegata al software o alla periferica o
rivolgersi al rivenditore per verificare che siano compatibili con il computer
e il sistema operativo in dotazione. Consultare "Aggiunta di periferiche e
software" a pagina 84.
Congratulazioni! È stata completata la configurazione del computer.
Guida all'installazione ed alla consultazione rapida 77
Page 78

Monitor duali
AVVISO: Non usare cavi supplementari oltre quelli forniti nonché collegare il
cavo del monitor direttamente alla scheda grafica del monitor duale.
NOTA: Alcuni display a
schermo piatto e schede
grafiche supportano DVI
(Digital Visual Interface
[interfaccia visiva
digitale]). Se il monitor e
la scheda in dotazione
dispongono di connettori
DVI, Dell raccomanda di
prediligerli ai VGA.
NOTA: Il secondo
www.dell.com | support.euro.dell.com
monitor è opzionale e
necessita di una scheda
grafica multimonitor.
Gli elementi del cavo del monitor duale sono riconoscibili dal colore: il
connettore blu è per il monitor primario e quello nero per il monitor
secondario. Collegare i cavi del monitor appropriati al cavo del monitor
duale. Per attivare il supporto monitor duale, all'avviarsi del computer è
necessario che entrambi i monitor siano collegati. Per ulteriori informazioni,
consultare "Domande frequenti" a pagina 86.
OR
78 Guida all'installazione ed alla consultazione rapida
Page 79

La sicurezza prima di tutto—personale e del computer
Quando si lavora nel computer, ripararlo soltanto come illustrato in questa
guida o altrove nella documentazione Dell. Attenersi sempre alle istruzioni.
È possibile operare all'interno del computer con sicurezza —se si osservano
le seguenti precauzioni.
ATTENZIONE: PER LA SICUREZZA PERSONALE E LA
PROTEZIONE DELL'APPARECCHIATURA
Prima di intervenire sul computer, procedere nel modo e nell'ordine indicati:
1 Spegnere il computer e tutte le periferiche.
2 Toccare una superficie metallica non verniciata del telaio del computer,
quale il metallo intorno alle aperture degli slot schede sul retro del
computer, prima di toccare qualsiasi cosa all'interno del computer.
3 Scollegare il computer e le periferiche dalle rispettive prese elettriche.
Facendo ciò si riduce la possibilità di lesioni personali o di scosse
elettriche. Inoltre scollegare dal computer eventuali linee telefoniche o
di telecomunicazione.
Ogni tanto, mentre si lavora, toccare una superficie metallica non
verniciata del computer per scaricare eventuale elettricità statica, che
potrebbe danneggiare i componenti interni.
Inoltre, Dell raccomanda di rivedere periodicamente le istruzioni di
sicurezza nella documentazione pervenuta con il computer in dotazione.
Come aprire il coperchio del computer
Potrebbe essere necessario aprire il coperchio del computer per rimuovere o
installare un pezzo, ripristinare una password dimenticata o diagnosticare
un problema del computer.
ATTENZIONE: Prima di eseguire questa procedura, consultare "La
sicurezza prima di tutto—personale e del computer" a pagina 79.
Guida all'installazione ed alla consultazione rapida 79
NOTA: Prima di
scollegare una periferica
dal computer o di
rimuovere un componente
dalla scheda di sistema,
verificare che la spia di
alimentazione d'attesa
sulla scheda di sistema si
sia spenta. Consultare
l'etichetta di servizio
interna collocata
all'interno della copertura
per individuare il LED di
alimentazione d'attesa.
Page 80

Come aprire il coperchio
1 Spegnere il computer e le periferiche, scollegare il tutto dalle rispettive
prese elettriche e attendere dai 10 ai 20 secondi.
2 Se è presente un lucchetto nell'anello del lucchetto sul pannello
posteriore, rimuoverlo.
3 Aprire il coperchio del computer:
NOTA: Nel caso del
computer desktop di
dimensioni ridotte,
rimuovere il piedistallo
prima di aprire il
coperchio del computer;
www.dell.com | support.euro.dell.com
mentre per il computer
minitorre, appoggiarlo su
un lato prima di aprire il
coperchio.
Computer minitorre
a Tenere premuti i due pulsanti di rilascio finché il coperchio non è
libero di oscillare.
b Sollevare il retro del coperchio e dirigerlo verso la parte anteriore
del computer.
AVVISO: Per prevenire danni alla scheda di sistema di un computer
minitorre, aprire il coperchio a 45 gradi. Quindi rimuovere il cavo dati
dell'unità ottica e/o del disco rigido dalla scheda di sistema e aprire il
coperchio fino a formare un angolo di 90 gradi.
80 Guida all'installazione ed alla consultazione rapida
Page 81

Computer desktop di dimensioni ridotte
Guida all'installazione ed alla consultazione rapida 81
Page 82

Dentro il computer
Computer minitorre
Unità disco rimovibile
Unità floppy
Unità del disco rigido
www.dell.com | support.euro.dell.com
Connettore
alimentazione c.a.
Alimentatore
Anello del
lucchetto
Connettori del
pannello posteriore
Altoparlante
Interruttore
d'apertura del telaio
Scheda di sistema
Manicotto della portata
d'aria del microprocessore
Slot per scheda d'espansione PCI
82 Guida all'installazione ed alla consultazione rapida
Page 83

Computer desktop di dimensioni ridotte
Unità floppy
Scheda di sistema
Moduli di memoria
Microprocessore
Connettori del
pannello posteriore
Anello del lucchetto
Slot AGP a profilo basso
Unità disco rimovibile
Unità del
disco rigido
Altoparlante
Interruttore
d'apertura
del telaio
Alimentatore
Gabbia della scheda d'espansione
Connettore alimentazione c.a.
Slot per scheda d'espansione PCI
Guida all'installazione ed alla consultazione rapida 83
Page 84

Rimozione e installazione pezzi
Le istruzioni per rimuovere e installare componenti sono riportate nella
Guida dell'utente. I componenti che è possibile sostituire sono:
•memoria
• disco rigido o altra unità accessibile dall'esterno
• scheda d'espansione PCI
• scheda grafica
• microprocessore
Per accedere alla Guida dell'utente dal disco rigido:
www.dell.com | support.euro.dell.com
NOTA: È possibile,
inoltre, accedere alla
Guida dell'utente
dal Dell Precision
ResourceCD o all'indirizzo
support.euro.dell.com.
Consultare "Come
ottenere informazioni e
assistenza" a pagina 55.
Per stampare la completa Guida dell'utente con Internet Explorer,
selezionare Print all linked documents (Stampa tutti i documenti
collegati) nella finestra Stampa.
Aggiunta di periferiche e software
Prima di installare qualsiasi periferica o software non a corredo del
computer, leggere la documentazione allegata al software o alla periferica o
rivolgersi al rivenditore per verificare che siano compatibili con il computer
e il sistema operativo in dotazione.
1 Fare doppio clic sull'icona Guide dell'utente o fare clic sul pulsante
Avvio e selezionare Guida e assistenza, in base al sistema operativo.
Fare clic su Removing and Installing Parts (Rimozione e installazione
2
componenti)
3 Selezionare Print (Stampa) dal menu File per stampare la procedura
prima di iniziare a lavorare.
84 Guida all'installazione ed alla consultazione rapida
Page 85

Problemi con periferiche e software supplementari
Nel caso di problemi a seguito dell'installazione di un software o di una
periferica supplementare, utilizzare le seguenti procedure risolutive:
• Rimuovere o disinstallare la periferica o il software.
Per informazioni in merito, consultare la documentazione allegata alla
periferica o al software.
• Impostare il computer su Last Known Good Configuration
(Ultima configurazione nota come corretta).
®
Per Windows NT
del messaggio, all'avvio del sistema,
invoke Hardware Profile/Configuration Recovery Menu
(Premere la BARRA SPAZIATRICE ADESSO per richiamare il
menu Profilo hardware/Ripristino configurazione)
Menu Hardware Profile/Configuration Recovery (Profilo
hardware/Ripristino configurazione), premere <L> per passare
all'ultima configurazione corretta e quindi selezionare il sistema
operativo in dotazione.
Per Windows 2000 e Windows XP, riavviare il computer e al
visualizzarsi del messaggio
system to start (Selezionare il sistema operativo da
avviare)
premere <F8>. Evidenziare Last Known Good Setting
(Ultima configurazione nota come corretta) e premere <Invio>,
quindi <L> e, quando richiesto, selezionare il sistema operativo in
dotazione.
Per ulteriori informazioni fare riferimento alla guida all'installazione
del sistema operativo in dotazione.
, premere la BARRA SPAZIATRICE al visualizzarsi
Press the spacebar NOW to
. Nel
Please select the operating
• Per Windows NT, se le prime due procedure non hanno funzionato,
eseguire ZZTop.
AVVISO: Potenzialmente la seguente procedura è in grado di cancellare parte
o la totalità delle informazioni contenute sul disco rigido.
Per eseguire ZZTOP, inserire il ResourceCD, dal menu principale
selezionare Start Resource CD Menu (Menu Avvia ResourceCD) e
quindi Start ZZTOP Imaging SW (Avvia il SW di imaging ZZTOP).
Per ulteriori informazioni sull'uso del ResourceCD, consultare "Uso del
Dell Precision ResourceCD" a pagina 91.
AVVISO: La seguente procedura consente di cancellare tutte le informazioni
contenute sul disco rigido.
Guida all'installazione ed alla consultazione rapida 85
Page 86

• Se le procedure precedenti non hanno funzionato, eseguire una
formattazione a basso livello del disco rigido.
Per ulteriori informazioni fare riferimento alla guida all'installazione
del sistema operativo in dotazione.
• Reinstallare il sistema operativo usando la guida all'installazione del
sistema operativo e il CD del sistema operativo.
NOTA: Il sistema
operativo potrebbe
disporre di una modalità
di compatibilità, in grado
di risolvere alcune
problematiche di
conflittualità tra
www.dell.com | support.euro.dell.com
applicazioni meno recenti
e il sistema operativo
stesso. Per ulteriori
informazioni fare
riferimento alla
documentazione del
sistema operativo in
dotazione.
Consultare "Come ottenere informazioni e assistenza" a pagina 55.
Una volta accertato che la periferica o il software da installare è compatibile
con il computer e il sistema operativo, reinstallarli.
Domande frequenti
Problema? Tentare... Oppure tentare con il Dell
Precision ResourceCD
Come usare il Dell
Precision ResourceCD?
Per ulteriori informazioni,
consultare "Uso del Dell
Precision ResourceCD" a
pagina 91.
Recarsi al menu principale del
Dell Precision ResourceCD.
Selezionare User’s Guides
(Guide dell'utente) dal menu
a discesa Topic (Argomento) e
fare clic su Dell Precision
ResourceCD Guide
(Guida del Dell Precision
ResourceCD).
Oppure tentare con il sito di
supporto Dell
86 Guida all'installazione ed alla consultazione rapida
Page 87

Problema? Tentare... Oppure tentare con il Dell
Precision ResourceCD
Dove è possibile
trovare una dettagliata
Guida dell'utente per il
computer in
dotazione?
Fare doppio clic sull'icona
Guide dell'utente o fare clic
sul pulsante Avvio e
selezionare Guida e
assistenza, in base al sistema
operativo.
La documentazione quale la
Guida dell'utente è
Recarsi al menu principale del
Dell Precision ResourceCD.
Selezionare User’s Guides
(Guide dell'utente) nel menu
a discesa Topic (Argomento) e
fare clic sulla guida dell'utente
idonea al computer in
dotazione.
disponibile sul disco rigido.
Dove è possibile
reperire le
dichiarazioni di
garanzia per il
computer in
dotazione?
Per registrare il sistema
operativo, dove è
possibile reperire la
Chiave del prodotto
(anche detta ID del
prodotto o Certificato
d'autenticità [COA])?
Come è possibile
trovare le specifiche
tecniche per il
computer in
dotazione?
Fare doppio clic sull'icona
Guide dell'utente o fare clic
sul pulsante Avvio e
selezionare Guida e
assistenza, in base al sistema
operativo.
Consultare la sezione
"Garanzia limitata e regole di
ritorno" nella Guida
dell'utente in dotazione.
Consultare pagina 66 di
questo documento per i
computer minitorre o
pagina 76 di questo
documento per i computer
desktop di dimensioni
ridotte.
Fare doppio clic sull'icona
Guide dell'utente o fare clic
sul pulsante Avvio e quindi
selezionare Guida e
assistenza, in base al sistema
operativo.
Consultare la sezione
"Specifiche tecniche" nella
Guida dell'utente in
dotazione.
Recarsi al menu principale del
Dell Precision ResourceCD.
Fare clic su User’s Guides
(Guide dell'utente) nel menu
a discesa Topic (Argomento),
fare clic sulla guida dell'utente
relativa al computer in
dotazione e ivi consultare
Garanzia limitata e norme per
la restituzione.
Recarsi al menu principale del
Dell Precision ResourceCD.
Fare clic su User’s Guides
(Guide dell'utente) nel menu
a discesa Topic (Argomento),
fare clic sulla guida dell'utente
relativa al computer in
dotazione e ivi consultare
"Technical Specifications"
(Specifiche tecniche).
Oppure tentare con il sito di
supporto Dell
Recarsi al sito
support.euro.dell.com. Alla
pagina Welcome (Iniziale), fare
clic su Documenti Dell. Scegliere
le opzioni che si riferiscono al
computer in dotazione per
accedere alla relativa
Guida dell'utente.
Recarsi al sito
support.euro.dell.com. Alla
pagina Iniziale, fare clic su
Documenti Dell. Scegliere le
opzioni che si riferiscono al
computer in dotazione per
accedere alla relativa Guida
dell'utente. Consultare "Garanzia
limitata e regole di ritorno" nella
Guida dell'utente.
Recarsi al sito
support.euro.dell.com. Alla
pagina Iniziale, fare clic su
Ask Dudley! ed eseguire una
ricerca usando le parole chiave
Product Key (Chiave del
prodotto).
Recarsi al sito
support.euro.dell.com. Alla
pagina Iniziale, fare clic su
Documenti Dell. Scegliere le
opzioni che si riferiscono al
computer in dotazione per
accedere alla relativa Guida
dell'utente. Consultare "Specifiche
tecniche" nella Guida dell'utente
in dotazione.
Guida all'installazione ed alla consultazione rapida 87
Page 88

Problema? Tentare... Oppure tentare con il Dell
Precision ResourceCD
Il computer è dotato di
una scheda grafica con
capacità di monitor
duale. Come s'imposta
il secondo monitor?
Fare doppio clic sull'icona
Guide dell'utente o clic sul
pulsante Avvio, selezionare
Guida e supporto e
cercare dual monitor
(monitor duale), in
base al sistema operativo.
Una procedura passo-passo
Recarsi al menu principale del
Dell Precision ResourceCD.
Selezionare User’s Guides
(Guide dell'utente) nel menu
a discesa Topic (Argomento) e
fare clic sulla guida dell'utente
idonea al computer in
dotazione.
per l'installazione dei
monitor duali è collocata
nella Guida dell'utente del
controllore video.
www.dell.com | support.euro.dell.com
Dove è possibile
rintracciare il driver
per la scheda grafica,
l'adattatore di rete, la
scheda audio, il
software SCSI (small
computer system
interface [interfaccia
per piccoli sistemi
Consultare "Driver per il
computer" a pagina 91.
È probabile vi sia a corredo
un CD specifico per la
periferica. In tal caso,
ricercare ivi la
documentazione e gli
appropriati driver.
Per ulteriori informazioni,
consultare Guida del Dell
Precision WorksStations
ResourceCD.
informatici]), o altra
periferica?
Come si apre il
computer?
Consultare "Come aprire il
coperchio del computer" a
pagina 79.
Recarsi al menu principale del
Dell Precision ResourceCD.
Fare clic su User’s Guides
(Guide dell'utente) nel menu
a discesa Topic (Argomento),
fare clic sulla guida dell'utente
relativa al computer in
dotazione e ivi consultare
"Removing and Installing
Parts" (Rimozione e
installazione di componenti).
Oppure tentare con il sito di
supporto Dell
Recarsi al sito
support.euro.dell.com. Alla
pagina di Benvenuto, fare clic su
Downloads for Your Dell
(Download per il Dell in
dotazione). Per individuare i
driver, immettere il numero di
servizio del sistema o selezionare
opportunamente il computer e il
sistema operativo.
Recarsi al sito
support.euro.dell.com per
ricevere istruzioni riguardo l'uso
generico, l'installazione e la
risoluzione dei problemi.
88 Guida all'installazione ed alla consultazione rapida
Page 89

Problema? Tentare... Oppure tentare con il Dell
Precision ResourceCD
Il monitor è vuoto e la
spia d'alimentazione è
verde lampeggiante.
Come è possibile
ripristinare il
funzionamento del
computer?
Il computer è in uno stato di
alimentazione limitata o
"sospensione".
In base al sistema operativo
è possibile riattivare il
computer spostando il
mouse PS/2 o premendo il
pulsante di alimentazione.
Per ulteriori informazioni
Recarsi al menu principale del
Dell Precision ResourceCD.
Fare clic su User’s Guides
(Guide dell'utente) nel menu
a discesa Topic (Argomento),
fare clic sulla guida dell'utente
relativa al computer in
dotazione e ivi consultare
"Power Management"
(Gestione dell'alimentazione).
sulla modalità di gestione
dell'alimentazione
consultare la Guida
dell'utente. Fare doppio clic
sull'icona Guide dell'utente
o fare clic sul pulsante Avvio
e selezionare Guida e
assistenza, in base al
sistema operativo.
Come si installa
hardware
supplementare sul
computer?
Consultare "Rimozione e
installazione pezzi" a
pagina 84.
Recarsi al menu principale del
Dell Precision ResourceCD.
Fare clic su User’s Guides
(Guide dell'utente) nel menu
a discesa Topic (Argomento),
fare clic sulla guida dell'utente
relativa al computer in
dotazione e ivi consultare
"Removing and Installing
Parts" (Rimozione e
installazione di componenti).
Come si reinstalla il
sistema operativo?
Consultare la guida di
installazione del sistema
operativo per informazioni
su come reinstallare il
sistema operativo.
Oppure tentare con il sito di
supporto Dell
Recarsi al sito
support.euro.dell.com. Alla
pagina Iniziale, fare clic su
Documenti Dell. Scegliere le
opzioni che si riferiscono al
computer in dotazione per
accedere alla relativa Guida
dell'utente. Consultare "Gestione
dell'alimentazione" nella Guida
dell'utente.
Recarsi al sito
support.euro.dell.com. Alla
pagina Iniziale, fare clic su
Documenti Dell. Scegliere le
opzioni che si riferiscono al
computer in dotazione per
accedere alla relativa Guida
dell'utente. Consultare
"Rimozione e installazione pezzi"
nella Guida dell'utente.
Guida all'installazione ed alla consultazione rapida 89
Page 90

Risoluzione dei problemi
Il computer comprende i seguenti strumenti d'ausilio nella risoluzione dei
problemi:
www.dell.com | support.euro.dell.com
DIAGNOSTICA DELLA DELL — Il Dell Precision ResourceCD contiene la
Diagnostica della Dell in grado di esaminare i componenti del computer nonché
di aiutare a identificare l'origine di problemi del computer. Per ulteriori
informazioni, consultare "Quando utilizzare la Diagnostica della Dell" a
pagina 92
SPIE DEL SISTEMA — Collocate sulla parte anteriore del computer, queste
spie possono indicare eventuali problemi del computer. Per ulteriori
informazioni, consultare "Spie di sistema" a pagina 96.
SPIE DIAGNOSTICHE — Collocate sulla parte anteriore del computer, queste
spie possono indicare eventuali problemi del computer. Per ulteriori
informazioni, consultare "Spie diagnostiche" a pagina 98.
MESSAGGI DI SISTEMA — Questi messaggi sono riportati dal computer per
avvertire l'utente della presenza di un guasto effettivo od eventuale. Per ulteriori
informazioni, consultare "Messaggi di sistema" a pagina 101.
CODICI BIP — Una serie di codici bip sonori emessi dal computer possono
aiutare a identificare un problema. Per ulteriori informazioni, consultare "Codici
bip" a pagina 101.
Se il computer presenta un problema che non si riesce a risolvere tramite
quanto proposto in questa sezione o le procedure di "Ricerca soluzioni"
nella Guida dell'utente, completare le seguenti fasi prima di rivolgersi
alla Dell:
1 Riportare per iscritto una descrizione dettagliata dell'errore, il codice
bip o la spia diagnostica problematica.
2 Annotare il codice del servizio espresso e il numero di servizio.
3 Contattare la sede Dell per il Paese in cui è installato il computer.
Consultare "Come ottenere informazioni e assistenza" a pagina 55 per
ottenere un esempio del codice del servizio espresso e dei numeri di servizio.
90 Guida all'installazione ed alla consultazione rapida
Page 91

Uso del Dell Precision ResourceCD
Per utilizzare il Dell Precision ResourceCD in ambiente operativo Windows:
Inserire il Dell Precision ResourceCD nell'unità dei CD.
1
Al primo utilizzo del Dell Precision ResourceCD sul computer in
dotazione, si apre la finestra ResourceCD Installation (Installazione
del ResourceCD) informando che l'installazione sta per avere inizio.
2 Fare clic su OK per continuare.
Per completare l'installazione, rispondere alle richieste del programma
di installazione.
3 Fare clic su Next (Avanti) nello schermo Welcome Dell System Owner
(Benvenuto al cliente del sistema Dell).
4 Scegliere il System Model (Modello del computer), Operating
System (Sistema operativo), Device Type (Tipo di periferica) e
Topic (Argomento) appropriati.
Per accedere alla Dell Precision ResourceCD Guide (Guida di Dell Precision
ResourceCD), selezionare User’s Guides (Guide dell'utente) dal menu a
discesa Topic (Argomento) e fare clic su Dell Precision ResourceCD.
Driver per il computer
Per visualizzare un elenco dei driver di periferica per il computer in
dotazione:
1 Nel menu a discesa Topic (Argomento), fare clic su My Drivers
(Driver del computer).
NOTA: Per accedere ai
driver di periferica ed
alla documentazione
dell'utente, è necessario
usare il ResourceCD da
Windows.
Il ResourceCD ricerca l'hardware e il sistema operativo del computer,
quindi visualizza un elenco dei driver di periferica per la
configurazione del sistema.
2 Fare clic sul driver e seguire le istruzioni per trasferire il driver nel
computer in dotazione.
Per visualizzare una lista di tutti i driver disponibili per il computer in
dotazione, dal menu a discesa Topic (Argomento) fare clic su
Drivers (Driver).
Guida all'installazione ed alla consultazione rapida 91
Page 92

Quando utilizzare la Diagnostica della Dell
Se il computer evidenzia un problema, prima di rivolgersi all'assistenza
tecnica eseguire i controlli descritti in "Ricerca di soluzioni" nella Guida
dell'utente ed eseguire la Diagnostica della Dell. La Diagnostica della Dell
può essere d'ausilio nella risoluzione del problema senza dover contattare
necessariamente l'assistenza Dell. Se ci si rivolge alla Dell, i risultati delle
prove possono fornire importanti informazioni al personale tecnico.
La Diagnostica della Dell consente di:
www.dell.com | support.euro.dell.com
• eseguire test rapidi, completi o personalizzati su una o su tutte le
periferiche
• selezionare dei test in base ai sintomi del problema riscontrato
• scegliere quante volte eseguire una prova
• visualizzare i risultati delle prove
• sospendere le prove se viene rilevato un errore
• accedere alle informazioni della guida in linea che descrivono le prove
e le periferiche
• ricevere messaggi di stato che informano se le prove si sono concluse
correttamente
• ricevere messaggi di errore se è stato rilevato un problema
Avvio della Diagnostica della Dell
Si consiglia di stampare queste procedure prima di cominciare.
AVVISO: Utilizzare la Diagnostica della Dell solo per esaminare il computer
Dell™. L'utilizzo di questo programma con altri computer provoca l'emissione
di messaggi di errore.
Entrare nella configurazione del sistema, rivedere le informazioni sulla
configurazione del computer ed accertarsi che la periferica che si desidera
controllare sia presente nella configurazione e sia attiva.
Avviare la Diagnostica della Dell dal disco rigido o dal CD Driver and
Utilities (driver e utilità), (definito anche ResourceCD).
92 Guida all'installazione ed alla consultazione rapida
Page 93

Esecuzione della Diagnostica della Dell dal disco rigido
1 Spegnere e riavviare il computer.
2 Quando viene visualizzato il logo DELL, premere subito <F12>.
Se si attende troppo, apparirà il logo Windows; a questo punto si dovrà
attendere che sia visualizzato il desktop di Windows. Quindi, spegnere
il computer dal menu Start (Avvio)e tentare di nuovo.
3 Quando viene visualizzato l'elenco delle unità d'avvio, evidenziare
Boot to Utility Partition (Avvia da partizione delle utilità) e premere
<Invio>.
4 Quando viene visualizzato il menu principale della Diagnostica della
Dell, selezionare il test che si desidera eseguire.
Avvio della Diagnostica della Dell dal CD dei driver e delle utilità
1 Inserire il CD dei driver e delle utilità nell'unità CD.
2 Spegnere e riavviare il computer.
Quando viene visualizzato il logo DELL, premere subito <F12>.
Se si attende troppo e appare l'emblema di Windows, continuare ad
attendere che sia visualizzato il desktop di Windows. Quindi, spegnere
il computer dal menu Avvio e tentare di nuovo.
Quando viene visualizzato l'elenco delle unità d'avvio, evidenziare IDE
3
CD-ROM Device (Unità CD-ROM IDE) e premere <Invio>.
4 Selezionare l'opzione Unità CD-ROM IDE dal menu di avvio del CD.
5 Selezionare l'opzione Boot from CD-ROM (Avvia da CD-ROM) dal
menu visualizzato.
6 Digitare 1 per aprire il menu del ResourceCD.
7 Digitare 2 per avviare la Diagnostica della Dell.
NOTA: Se si riceve un
messaggio che informa
che non è stato trovato il
programma di diagnostica
sul disco rigido, seguire le
istruzioni per avviare la
Diagnostica della Dell dal
CD Driver e utilità.
NOTA: Questa funzione
modifica la sequenza
d'avvio solo per
l'immediato. Al successivo
avvio, il computer si
avvierà in base a quanto
specificato nella
configurazione del
sistema.
8 Selezionare Run the 32 Bit Dell Diagnostics (Esegui la Diagnostica
della Dell a 32 bit) dall'elenco numerato. Se sono presenti più
versioni, selezionare quella appropriata alla piattaforma utilizzata.
9 Quando viene visualizzato il menu principale della Diagnostica della
Dell, selezionare il test che si desidera eseguire.
Guida all'installazione ed alla consultazione rapida 93
Page 94

Menu principale della Diagnostica della Dell
NOTA: nella parte
superiore delle schermate
delle prove viene riportato
il numero di servizio del
computer.
www.dell.com | support.euro.dell.com
1 Dopo che la Diagnostica della Dell è stata avviata ed è stato
visualizzato il Main Menu (Menu Principale), fare clic sul pulsante
dell'opzione desiderata.
Opzione Funzione
Express Test
(Prova rapida)
Extended Test
(Prova
completa)
Custom Test
(Prova
personalizzata)
Symptom Tree
(Strutturazione
dei sintomi)
Se durante una prova viene rilevato un problema, comparirà un
2
Esegue un rapido esame delle periferiche. Questa prova
dura generalmente da 10 a 20 minuti e non richide
intervento da parte dell'utente. Eseguire innanzitutto
Prova rapida per tentare di individuare il problema
rapidamente.
Esegue un controllo completo delle periferiche. Questa
prova dura generalmente un'ora o più e richiede che
l'utente risponda ad alcune domande.
Esegue il controllo di una periferica specifica.
È possibile personalizzare le prove da eseguire.
Elenca i sintomi più comuni e consente di selezionare
una prova in base ai sintomi del problema riscontrato.
messaggio contenente il codice dell'errore e una descrizione del
problema stesso. Prendere nota del codice dell'errore e della
descrizione del problema e seguire le istruzioni sullo schermo.
Se non è possibile correggere l'errore, rivolgersi alla Dell.
94 Guida all'installazione ed alla consultazione rapida
Page 95

3 Se si esegue un test dalle opzioni Custom Test (Prova personalizzata)
o Symptom Tree (Strutturazione dei sintomi), selezionare una delle
schede descritte nella seguente tabella per ottenere maggiori
informazioni.
Scheda Funzione
Results (Risultati) Riporta i risultati delle prove e gli errori rilevati.
Errors (Errori) Riporta gli errori rilevati, i codici d'errore e la
descrizione del problema.
Help (Guida) Descrive la prova e indica eventuali requisiti per il suo
svolgimento.
Configuration
(Configurazione)
Parameters
(Parametri)
Visualizza la configurazione hardware della periferica
selezionata.
La Diagnostica della Dell riceve le informazioni sulla
configurazione di tutte le periferiche dalla
configurazione del sistema, dalla memoria e da una
serie di test interni, visualizzandole nel riquadro a
sinistra dell'elenco delle periferiche. L'elenco delle
periferiche può non riportare i nomi di tutti i
componenti installati sul computer o di tutte le
periferiche ad esso collegate.
Consente di personalizzare la prova, modificandone
le impostazioni.
4 Una volta completate le prove, se la Diagnostica della Dell è stata
eseguita dal CD Driver e utilità, rimuovere il CD.
5 Chiudere la schermata dei test per ritornare al Main Menu
(Menu principale). Per uscire dalla Diagnostica della Dell e riavviare
il computer, chiudere la schermata del Menu principale.
Messaggi e codici
I programmi applicativi, il sistema operativo e il computer sono in grado di
identificare ed avvisare l'utente della presenza di un problema. In tale
evenienza, un messaggio potrebbe essere visualizzato sullo schermo del
monitor, potrebbe essere emesso un codice bip o potrebbe essere generato
un codice luminoso. La sottosezione successiva riporta le informazioni
relative ai messaggi, ai codici bip e ai codici luminosi.
Guida all'installazione ed alla consultazione rapida 95
Page 96

Quando si visualizza un messaggio, annotarlo; se possibile, ricercarlo nella
Guida dell'utente. Riferire il messaggio al servizio di supporto tecnico, nel
caso lo si contatti.
Spie di sistema
Il computer è dotato di una serie di spie che possono essere d'ausilio
nell'analizzare e risolvere problemi. Per individuare queste spie, consultare
"Funzioni del computer Desktop di dimensioni ridotte" a pagina 69 o
"Computer minitorre Funzioni" a pagina 59.
La seguente tabella mostra un elenco di codici per le spie di sistema, offre le
possibili cause e suggerisce le azioni correttive.
www.dell.com | support.euro.dell.com
Codici luminosi di sistema
Spia
d'alimentazione
Verde costante N/D Il computer è alimentato e funziona
Verde lampeggiante Vuoto Il computer è nello stato di
Lampeggia verde
diverse volte prima
di spegnersi
Giallo costante N/D La Diagnostica della Dell sta
Spia del disco
rigido
N/D Si è verificato un errore di
Causa Azione correttiva
regolarmente.
sospensione (solo Windows 2000
eXP).
configurazione.
eseguendo una prova oppure è
possibile che un dispositivo della
scheda di sistema sia guasto o
installato in maniera errata.
Non è necessaria alcuna azione
correttiva.
Per attivare il computer, premere il
pulsante di alimentazione, spostare il
mouse o premere un tasto sulla
tastiera. Per ulteriori informazioni,
consultare "Gestione
dell'alimentazione" nella
Guida dell'utente.
Verificare le spie diagnostiche prima
di controllare se è stato identificato
un problema specifico. Per ulteriori
informazioni, consultare la
Guida dell'utente in dotazione.
Se la Diagnostica della Dell è in
esecuzione, completare la prova.
Verificare le spie diagnostiche prima
di controllare se è stato identificato
un problema specifico. Consultare,
inoltre "Problemi della scheda di
sistema" nella Guida dell'utente.
Se il computer non si avvia, contattare
la Dell per assistenza tecnica.
96 Guida all'installazione ed alla consultazione rapida
Page 97

Codici luminosi di sistema (segue)
Spia
d'alimentazione
Giallo lampeggiante Vuoto Guasto dell'alimentatore o della
Giallo lampeggiante Verde costante Si è verificato un guasto della scheda
Verde fisso e un
codice bip durante
il POST
Spia
d'alimentazione
verde fissa e nessun
codice bip né video
durante il POST
Spia
d'alimentazione
verde fisso e nessun
codice bip ma il
computer si blocca
durante il POST
Spia del disco
rigido
N/D Rilevato un problema durante
N/D Possibile guasto o installazione errata
N/D Possibile guasto di un dispositivo della
Causa Azione correttiva
scheda di sistema.
di sistema.
l'esecuzione del BIOS.
del monitor o della scheda grafica.
scheda di sistema integrata.
Verificare le spie diagnostiche prima
di controllare se è stato identificato
un problema specifico. Consultare,
inoltre "Problemi dell'alimentazione"
e "Problemi della scheda di sistema"
nella Guida dell'utente.
Verificare le spie diagnostiche prima
di controllare se è stato identificato
un problema specifico. Consultare,
inoltre "Problemi della scheda di
sistema" nella Guida dell'utente.
Consultare "Codici bip" a pagina 101
per istruzioni su come diagnosticare
un codice bip. Verificare, inoltre, le
spie diagnostiche prima di controllare
se è stato identificato un problema
specifico.
Verificare le spie diagnostiche prima
di controllare se è stato identificato
un problema specifico. Consultare,
inoltre "Problemi video" nella Guida
dell'utente.
Verificare le spie diagnostiche prima
di controllare se è stato identificato
un problema specifico. Se non è
possibile identificare il problema,
contattare la Dell per assistenza
tecnica.
Guida all'installazione ed alla consultazione rapida 97
Page 98

Spie diagnostiche
All'accensione il computer esegue una serie di prove di autoverifica. Un
POST (power-on self test [autoverifica all'accensione]) corretto termina con
un unico segnale acustico, segnalando che il sistema inizia a funzionare
regolarmente. Se il computer non completa il POST, una serie di spie
situate sul computer può essere d'ausilio nell'interpretare quale prova sia
fallita o perché il computer non risponda. Queste spie comunicano solo i
problemi incorsi prima e durante il POST, non durante il regolare
funzionamento. Per individuare le spie diagnostiche, consultare "Pannello
posteriore" a pagina 98.
La seguente tabella elenca i codici per le spie diagnostiche, individua
probabili cause e suggerisce possibili azioni correttive. Le spie sono
www.dell.com | support.euro.dell.com
etichettate per facilitare l'abbinamento tra lo schema sul computer e quelli
riportati nella tabella.
Pannello posteriore
Spie diagnostiche
Codici delle spie diagnostiche durante il POST
Combinazione di spie Causa
A
B
C
D
off
off
off
off
Assenza di alimentazione del computer.
= giallo
= verde
= off
98 Guida all'installazione ed alla consultazione rapida
Page 99

Codici delle spie diagnostiche durante il POST (segue)
Combinazione di spie Causa
A
B
C
D
A
B
C
D
A
B
C
D
A
B
C
D
A
B
C
D
A
B
C
D
giallo
giallo
verde
giallo
giallo
giallo
verde
verde
giallo
verde
giallo
giallo
giallo
verde
giallo
verde
giallo
verde
verde
giallo
verde
verde
verde
giallo
Possibile guasto al microprocessore.
Possibile guasto alla memoria.
Possibile guasto o conflitto della scheda d'espansione.
Possibile guasto alla scheda video.
Possibile guasto dell'unità floppy o del disco rigido.
Dopo l'inizializzazione del video si è verificato un
allarme. Controllare sullo schermo il messaggio di
errore.
= giallo
= verde
= off
Guida all'installazione ed alla consultazione rapida 99
Page 100

Codici delle spie diagnostiche durante il POST (segue)
Combinazione di spie Causa
A
B
C
D
A
B
C
D
www.dell.com | support.euro.dell.com
A
B
C
D
A
B
C
D
verde
giallo
giallo
verde
verde
giallo
verde
verde
verde
verde
giallo
giallo
giallo
verde
verde
verde
Possibile guasto di una risorsa della scheda di sistema
e/o hardware.
Possibile guasto di una risorsa della scheda di sistema
e/o hardware.
Possibile guasto o conflitto della scheda d'espansione.
Possibile guasto USB.
A
B
C
D
= giallo
= verde
= off
100 Guida all'installazione ed alla consultazione rapida
verde
verde
verde
verde
Condizione di funzionamento regolare dopo il POST.
 Loading...