

Page 1

Dell™ Photo Printer 540 User's Guide
Click the links to the left for information on the features and operation of your printer. For information on
other documentation included with your printer, see Finding Information.
To order supplies from Dell, double-click the icon on your desktop, visit Dell's website
(www.dell.com/supplies), or order by phone.
For the best service, make sure you have the Dell printer Service Tag available. See Express Service Code.
Notes, Notices, and Cautions
NOTE: A NOTE indicates important information that helps you make better use of your printer.
NOTICE: A NOTICE indicates either potential damage to hardware or loss of data and tells you how to
avoid the problem.
CAUTION: A CAUTION indicates a potential for property damage, personal injury, or death.
Information in this document is subject to change without notice.
© 2004 Dell Inc. All rights reserved.
Reproduction in any manner whatsoever without the written permission of Dell Inc. is strictly forbidden.
Trademarks used in this text: Dell and the DELL logo are trademarks of Dell Inc.; Microsoft and Windows are registered
trademarks of Microsoft Corporation.
Other trademarks and trade names may be used in this document to refer to either the entities claiming the marks and names or
their products. Dell Inc. disclaims any proprietary interest in trademarks and trade names other than its own.
Model 540
March 2004 P/N 4J1412 Rev. A00
Page 2

CAUTION: SAFETY INSTRUCTIONS
Use the following safety guidelines to help ensure your own personal safety and to help protect your Dell™
Photo Printer 540 and working environment from potential damage.
CAUTION: Do not set up this product or make any electrical or cabling connections, such as
the power supply cord, during a lightning storm.
CAUTION: Do not expose this product to liquid, moisture, or extreme temperatures. Power
supplies and battery chargers are intended for indoor use only. The use of controls,
adjustments, or procedures other than those specified herein may result in exposure to
shock and/or electrical or mechanical hazards.
NOTICE: Do not disassemble this product; there are no user-serviceable parts inside. Refer servicing
to qualified service personnel.
Use only the power supply provided with this product or the manufacturer's authorized replacement
power supply.
Connect the power cable to an electrical outlet that is near the product and easily accessible.
Refer service or repairs, other than those described in the user documentation, to a professional
service person.
Read and follow these instructions before using Dell products. Always follow basic safety procedures.
The use of an accessory attachment that is not recommended by Dell, such as an AC adapter, may
cause fire, electric shock, or injury.
Do not allow chemicals, such as suntan lotion, to come into contact with the painted surface of the
printer.
If the printer has been subjected to inclement weather or you suspect water has gotten inside the
printer, turn off the printer and remove the paper tray and photo cartridge. Allow all components to
air-dry for at least 24 hours before using the printer again.
The printer and the power supply contain a small amount of lead in the circuit board. Disposal of this
material may be regulated due to environmental considerations.
Disposal of the photo cartridge is not regulated and should not be subject to state or local landfill,
incineration, or recycling requirements.
For more disposal or recycling information, contact your local authorities. In the US, visit the
Electronics Industry Alliance website at www.eaie.org.
Page 3
Finding Information
What Are You Looking For?
Find It Here
Drivers for my printer
My printer documentation
Drivers and Utilities CD
Documentation and drivers are already installed on your computer. You
can use the CD to reinstall drivers or access your documentation.
Readme files may be included on your CD to provide last-minute
updates about technical changes to your printer or advanced technicalreference material for technicians or experienced users.
NOTE: The latest drivers and documentation updates can be found at
support.dell.com.
Safety information
How to set up and use my
printer
How to care for my printer
Troubleshooting
information
How to contact Dell
Warranty Information
Owner's Manual
NOTE: This document is available as a PDF at support.dell.com.
How to set up my printer
Setup Diagram
Service Tag and Express
Service Code
Service Tag and Express Service Code
Page 4
This label is located on the bottom of the printer near the serial
number. Use the Service Tag to identify your printer when you use
support.dell.com or contact technical support.
Latest drivers for my
printer
Answers to technical
service and support
questions
Online discussions with
other users and technical
support
Documentation for my
printer
Dell Support Website - support.dell.com
NOTE: Select your region to view the appropriate support site.
The Dell Support website provides several online tools, including:
Solutions - Troubleshooting hints and tips, articles from
technicians, and online courses
Community - Online discussion with other Dell customers
Upgrades - Upgrade information for components
Customer Care - Contact information, order status, warranty,
and repair information
Downloads - Drivers
Reference - Printer documentation and product specifications
Page 5
Getting Started
Understanding the Printer Parts
Setting Up Your Printer
Loading the Photo Cartridge
Loading the Photo Paper
Changing Settings-Press Menu
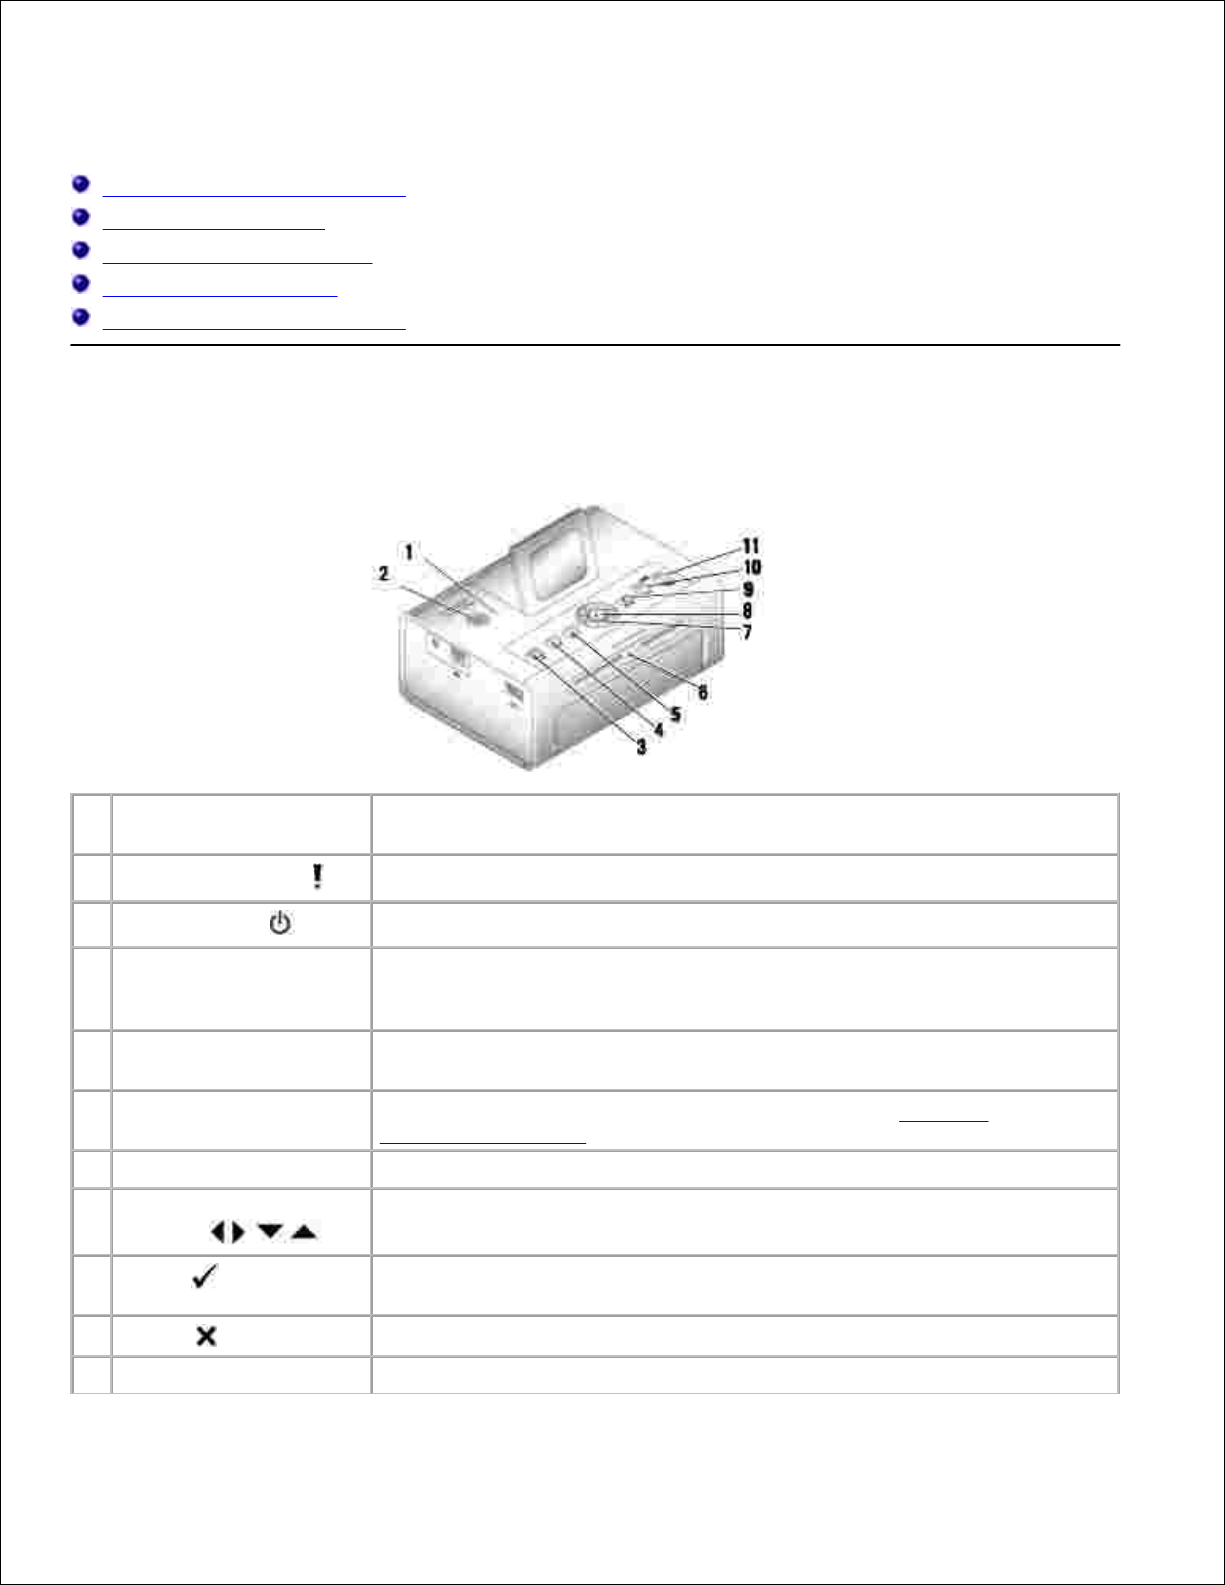
Understanding the Printer Parts
Lights and Buttons
Description
1
Error indicator light
Glows amber when an error condition exists.
2
Power button
Turn your printer on or off; button is lit when power is on.
3
Save to PC
Establishes a connection with your computer that allows you to save photos
from your memory card, USB storage device, or camera directly to the
computer.
4
Rotate
Rotates a photo 90 degrees each time button is pressed. (For display
purposes only. Does not change orientation of a printed photo.)
5
Menu
Change settings and customize printing options. (See Changing
Settings-Press Menu.)
6
Memory card light
Light blinks while checking card, then glows steady green.
7
Navigation (Arrow)
buttons
Navigate through photos and menus.
8
Select
Choose the photo or option that appears on the Liquid Crystal Display
(LCD).
9
Cancel
Cancel the current print job or back out of the menus.
10
Print Color
Print color copy of the selected photo(s).
Page 6
11
Print Black & White
Print black and white copy of the selected photo(s).
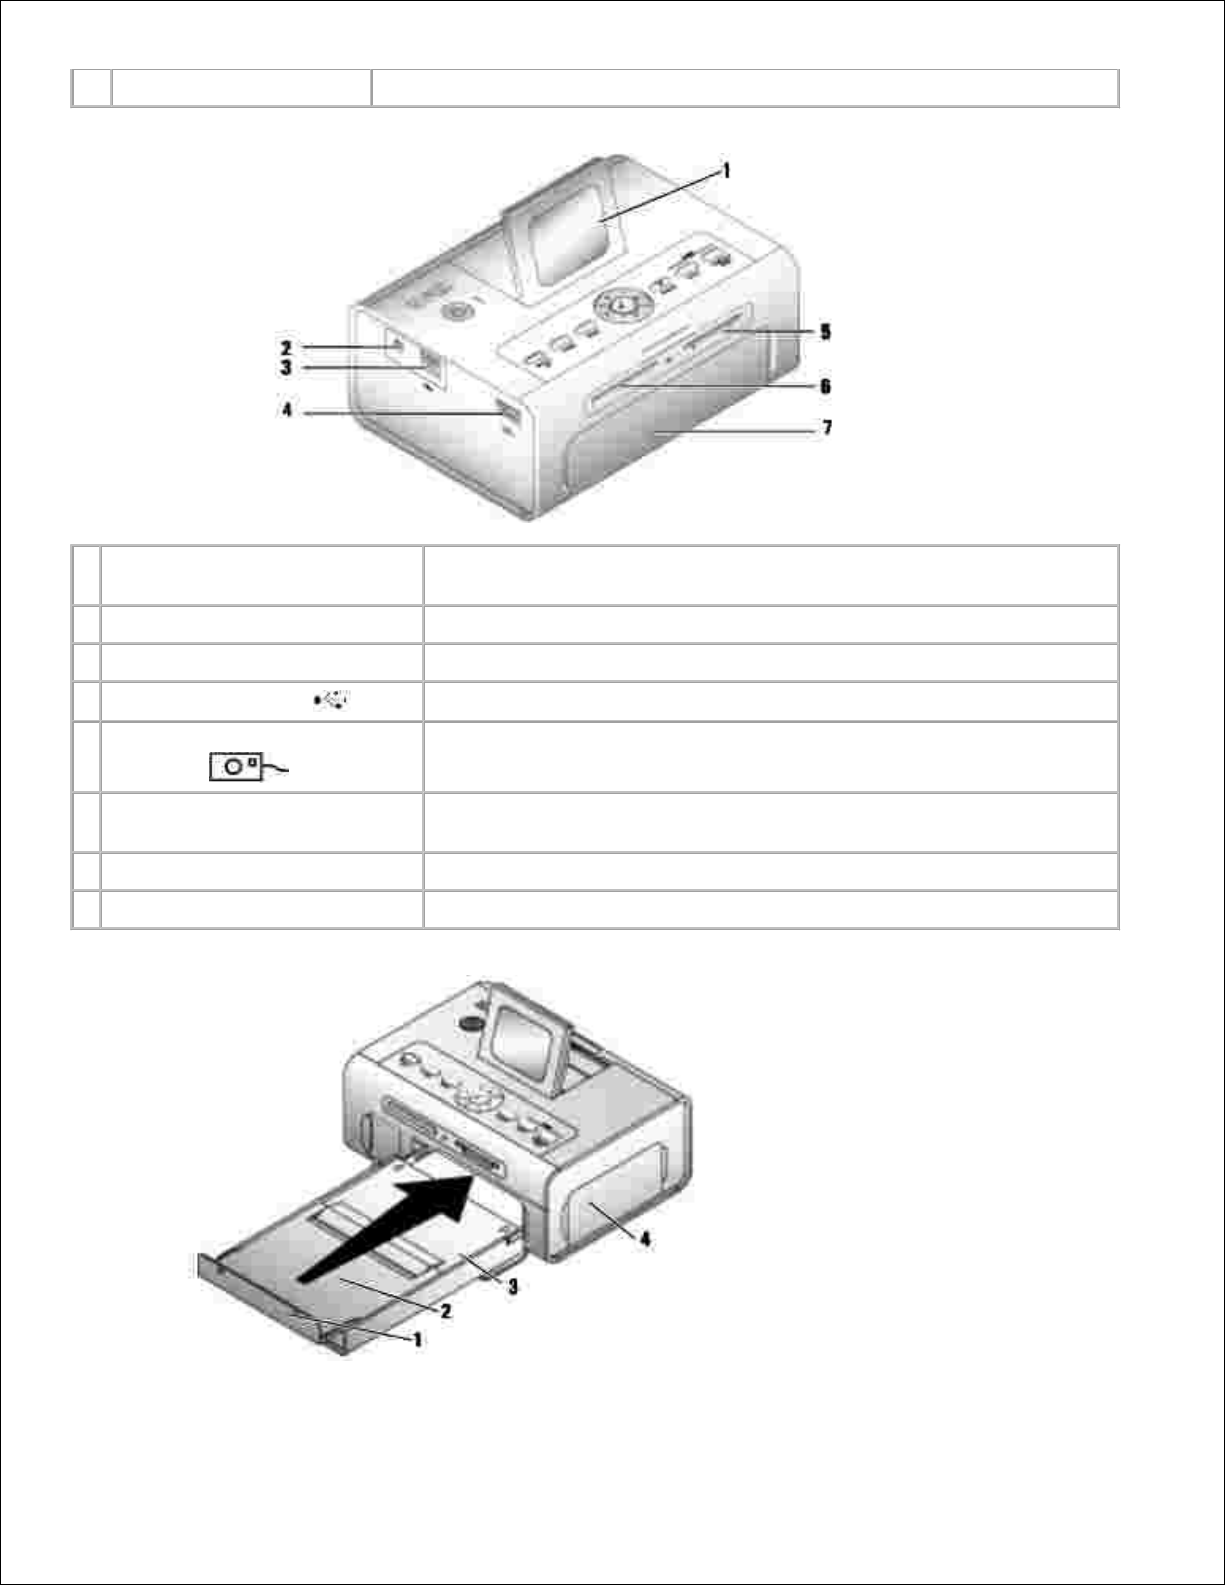
Part
Description
1
LCD
Display photos, printer status, messages, menu options, or settings.
2
Power connector
Supply power to the printer.
3
USB connector to PC
Connect your printer to a computer.
4
Camera or USB storage device
connector
Connect a PictBridge-enabled or other compatible camera or USB
storage device.
5
Memory card slot
Memory card slot for Secure Digital (SD), Memory Stick (MS), MMC
(MultiMedia Card), and Smart Media (SM) cards.
6
Memory card slot
Memory card slot for CompactFlash (CF).
7
Paper tray door
Provides access to insert the paper tray
Page 7
Part
Description
1
Paper stop
Maintains orderly stack of finished prints.
2
Top paper tray cover
Finished prints are stacked here.
3
Bottom paper tray cover
Keeps dust off photo paper.
4
Photo cartridge door
Provides access to load photo cartridge.
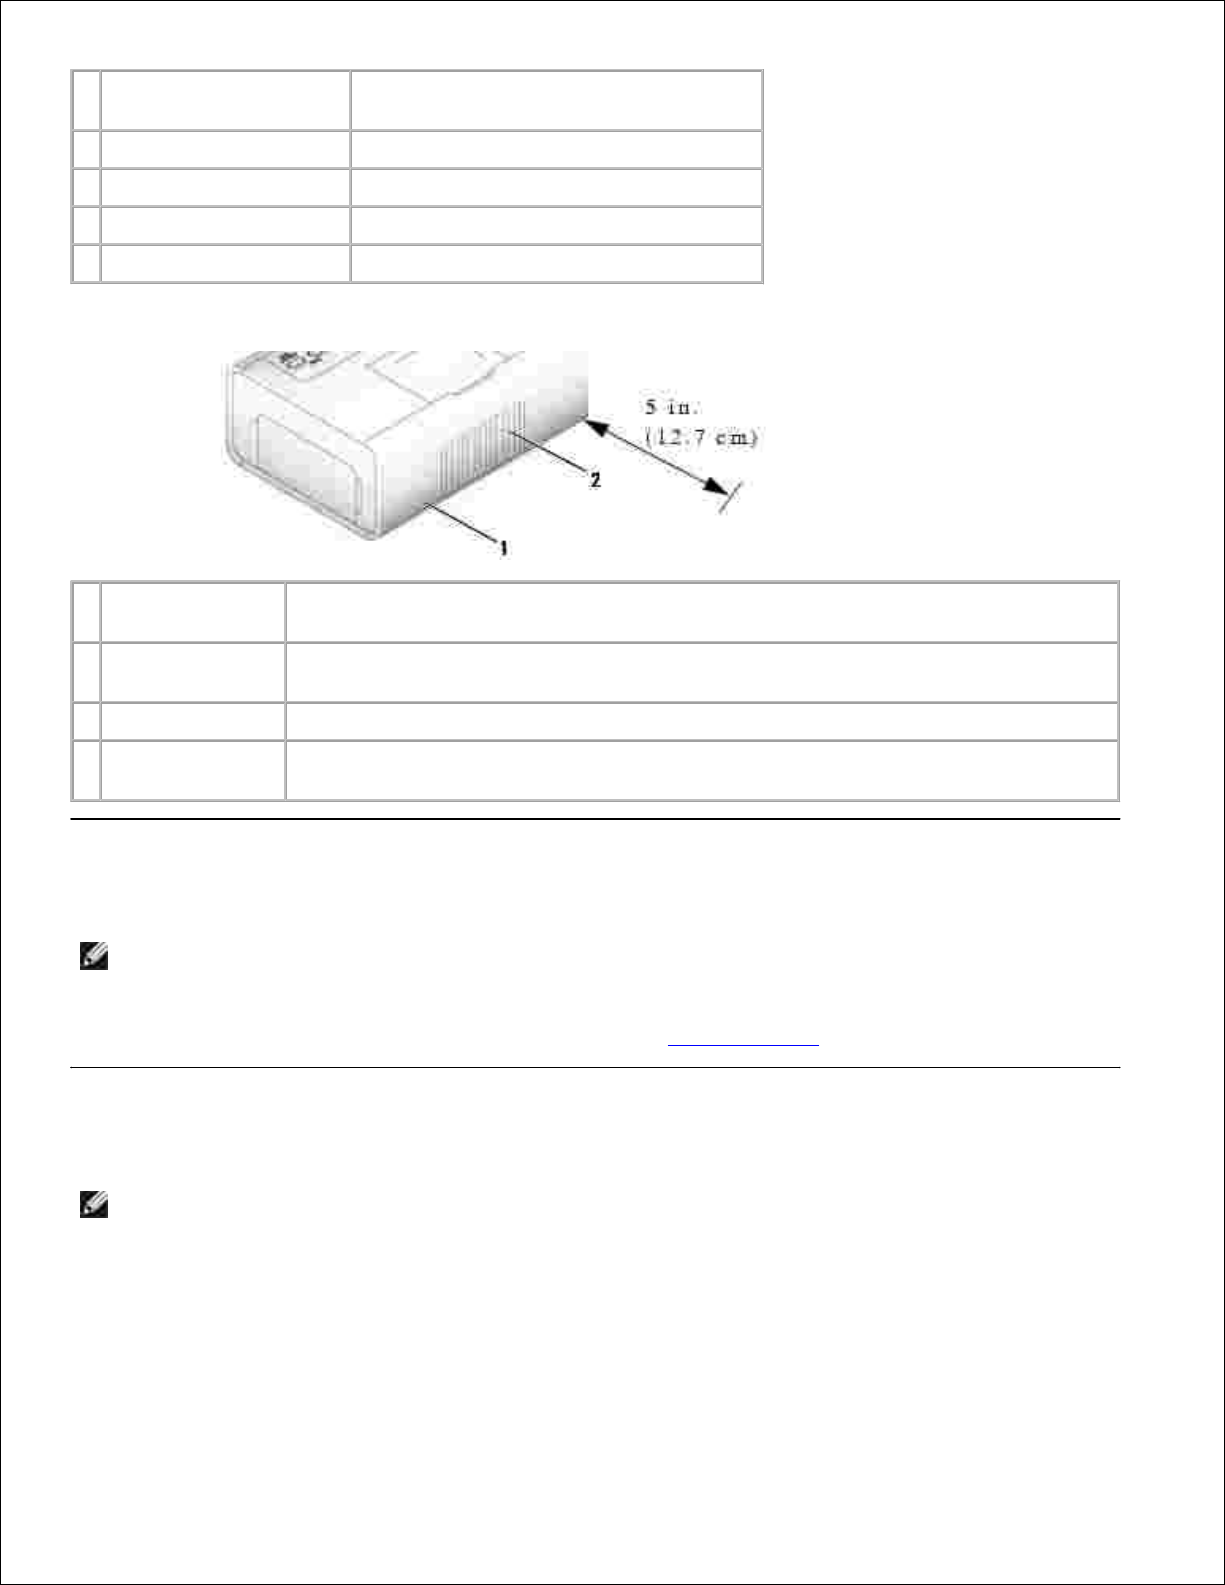
Part
Description
1
Slot for photo
paper path
Photo paper exits here during printing passes. Do not block the slot. 5 in. (12.7 cm)
clearance is required.
2
Air vents
Provide ventilation and cooling to the printer. Do not block the vents.
3
Express Service
Code
Located on the bottom of the printer. This is used to identify your printer when you
use support.dell.com or contact technical support.
Setting Up Your Printer
NOTE: The Dell Photo Printer 540 supports Microsoft® Windows® 2000 and Windows XP.
Follow the instructions on your Setting Up Your Printer poster to install the hardware (and software, if using
your printer with a computer). For setup troubleshooting, see Setup Problems.
Loading the Photo Cartridge
NOTE: Use only the photo cartridge from a Dell Photo Print Pack. Do not use any other type of photo
cartridge in your printer. Do not expose your photo cartridge to extreme temperatures. (See
information on photo print pack packaging.)
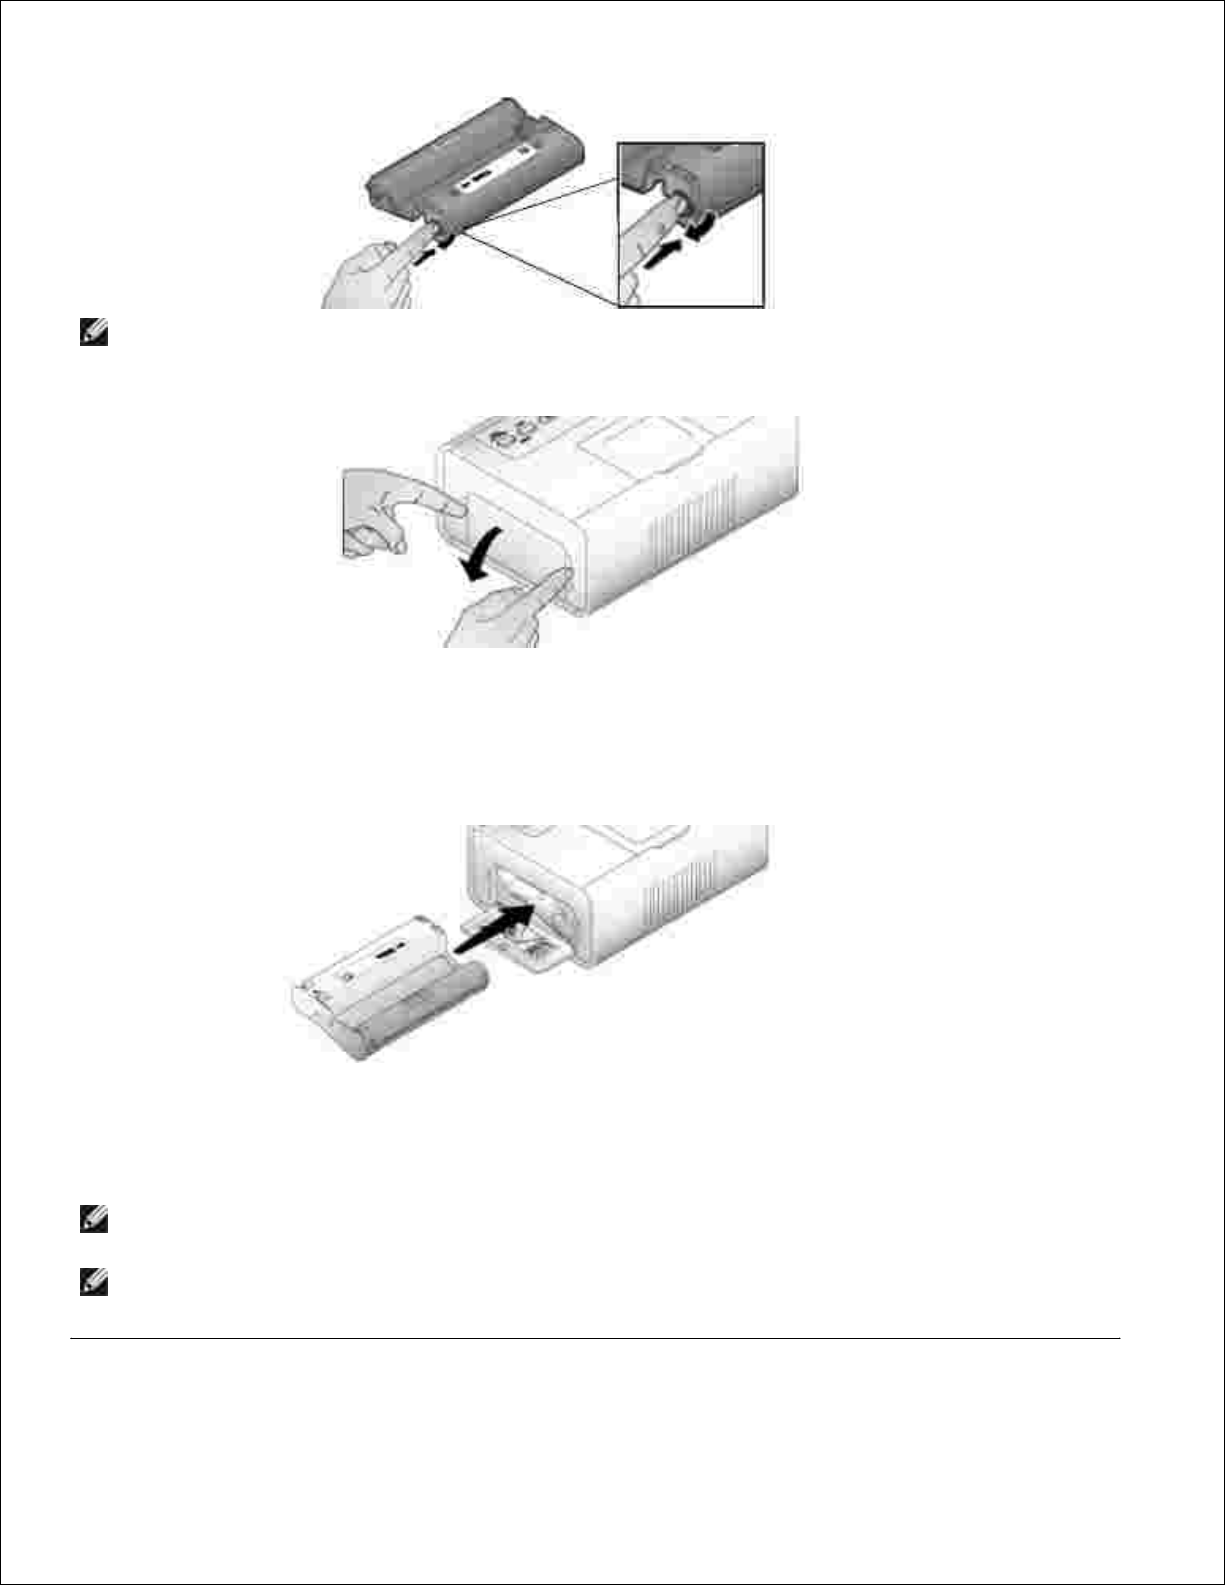
If there is slack in the print ribbon, remove it by pushing in on the spool, then rotating the spool
clockwise a maximum of one half turn.
1.
Page 8
NOTE: Be careful not to rotate the spool more than necessary. Doing so could reduce the number of
prints you are able to make.
Open the photo cartridge door.2.
Slide the photo cartridge in, label side up, with the arrow pointing toward the printer. Push the photo
cartridge until it clicks into place.
3.
Close the photo cartridge door.4.
To remove the photo cartridge, push up on the green lever and slide the photo cartridge out.5.
NOTE: The photo cartridge may lock in place if there is a paper jam. Do not attempt to remove the
photo cartridge without first clearing the paper jam.
NOTE: Warning messages and reorder instructions are displayed on the LCD when the photo cartridge
is low. When there are 5 or fewer prints remaining, the error light blinks
Page 9

Loading the Photo Paper
NOTE: Use only the perforated photo paper from a Dell Photo Print Pack. Do not use inkjet paper or
any other photo paper. Do not remove perforated tabs from the photo paper until a photo is printed.
If the paper tray is in the printer, pull it out.1.
Open the top paper tray cover.2.
Open the bottom paper tray cover by grasping the sides as indicated by the arrows. Do not insert your
fingers under the cover to open it.
3.
Fan the photo paper to keep the sheets from sticking together.4.
Load the photo paper into the paper tray, with the glossy side up and the Dell logo side down.5.
NOTE: Do not load more than 20 sheets of photo paper in the paper tray. Do not load photo paper
that is missing perforated tabs. To avoid fingerprints, hold the photo paper by the edges and do not
touch the glossy side of the paper.
Close the bottom paper tray cover. The top paper tray cover must remain open; it catches finished
prints.
6.
Page 10
6.
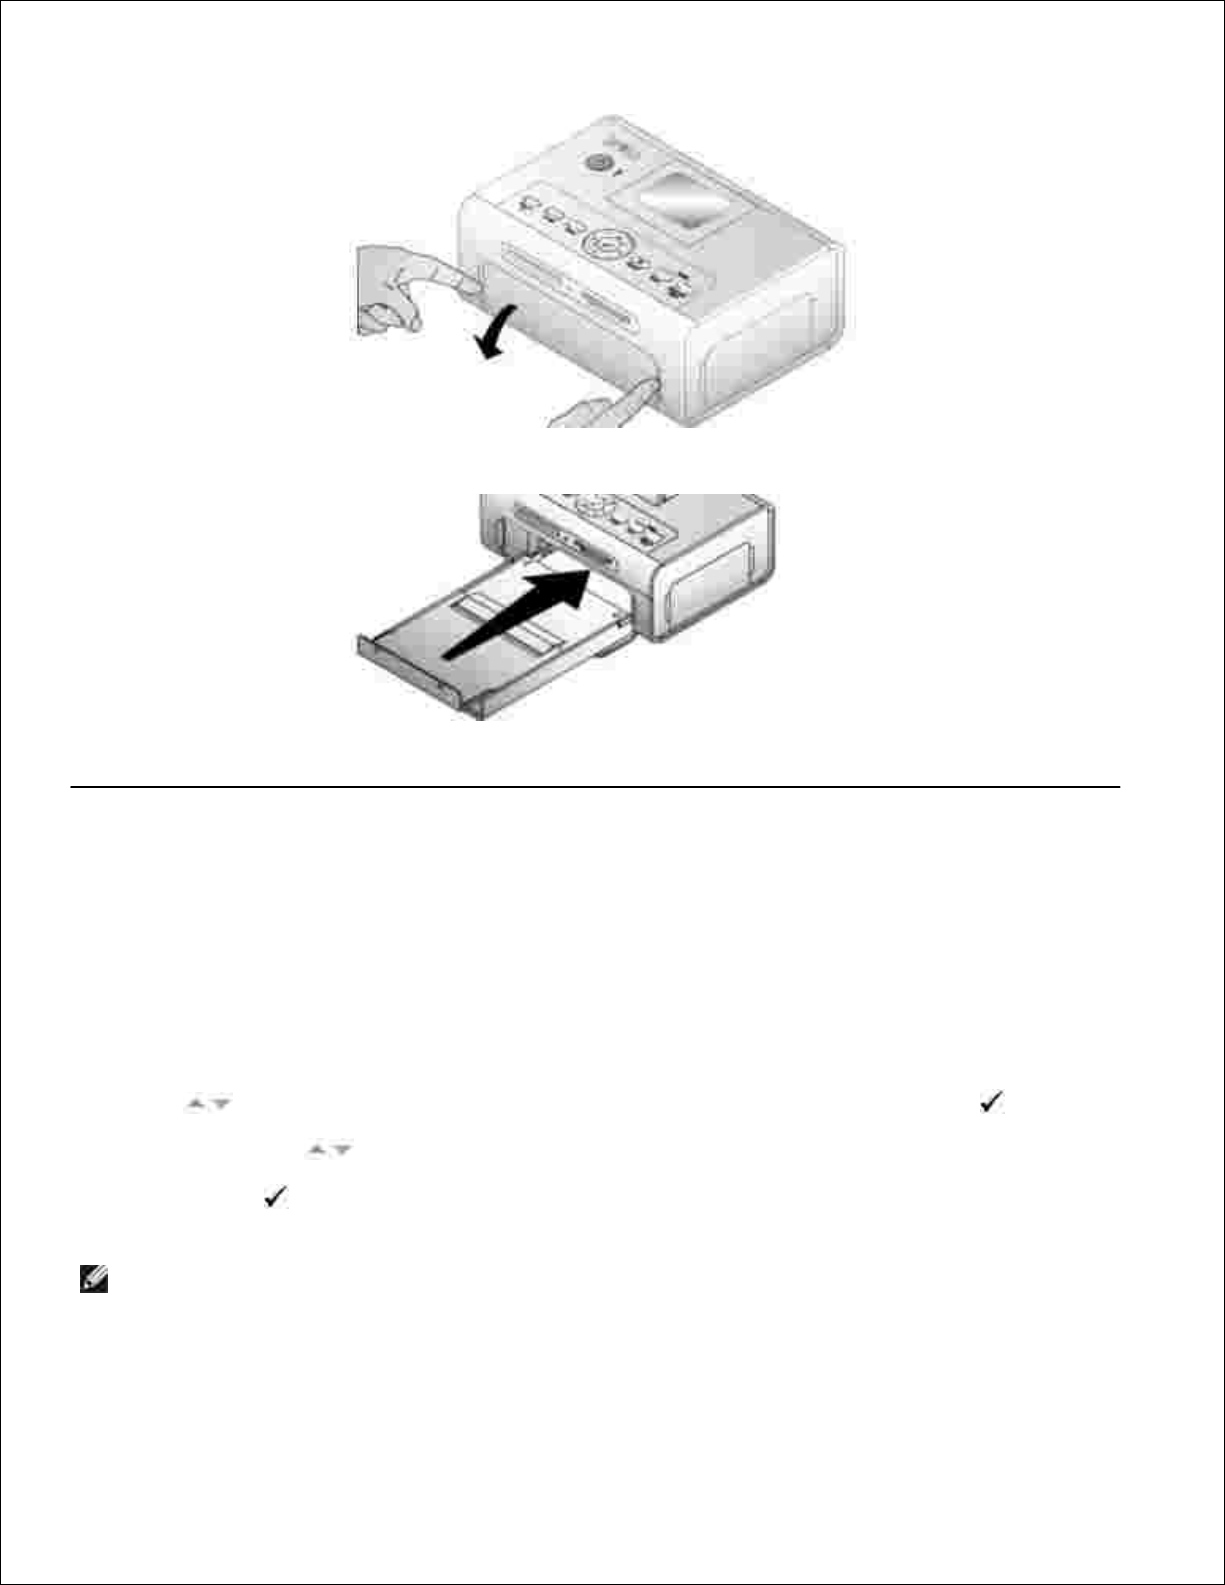
Open the paper tray door.7.
With the top paper tray cover open, insert the paper tray into the printer.8.
Changing Settings-Press Menu
Press the Menu button to customize your photo and printer settings.
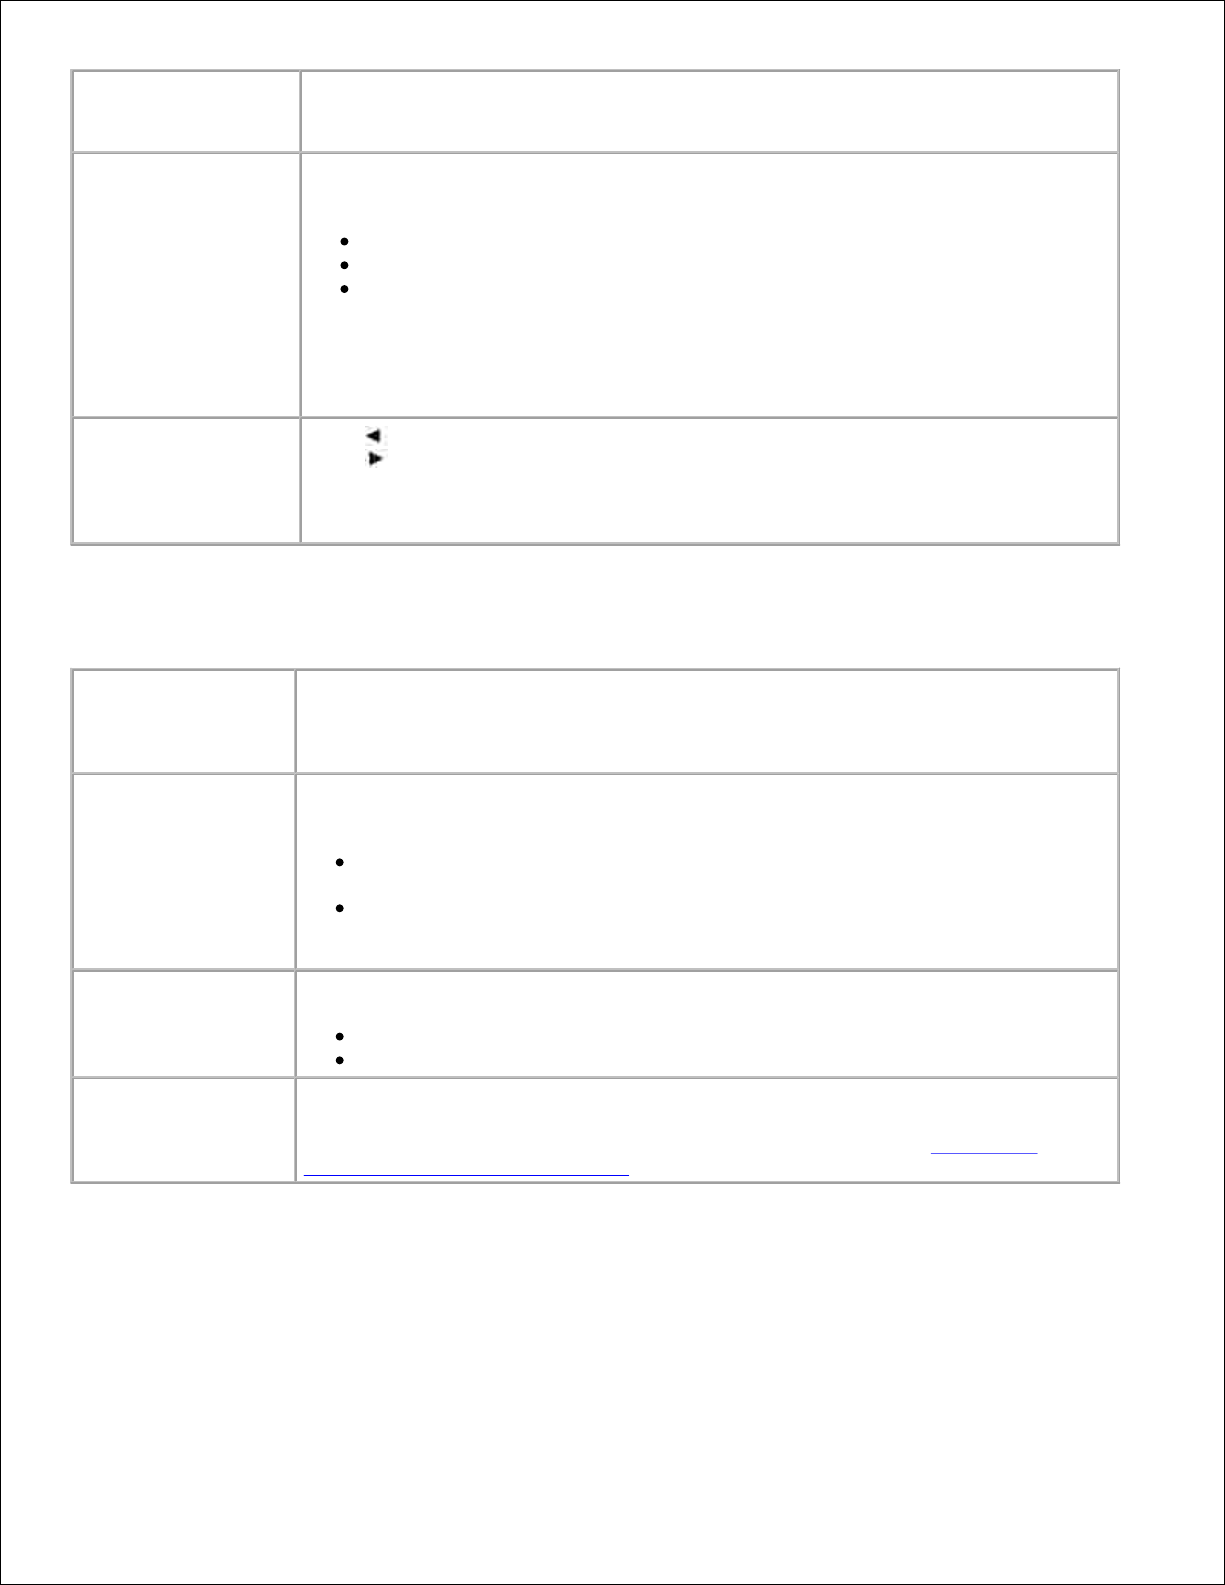
Select Menu Items
Press the Menu button.1.
Press until the menu heading you want appears on the display, then press Select ( ).2.
Continue scrolling until the option you want is highlighted.3.
Press Select ( ) and follow the directions on the LCD.4.
NOTE: The option currently selected is noted with a checkmark.
Print Options Menu
Page 11
From the Print Options submenu:
You can:
PRINT
Specify a print mode:
Color (default)
Black and White
LAYOUT
Specify a print layout for an entire print job:
1 4x6 (10 x 15 cm) photo/sheet (default)
1 3.5x5 (9 x 13 cm) photo/sheet
2 photos/sheet (54 x 85 mm)
4 photos/sheet (wallet setting, 51 x 76 mm)
9 photos/sheet (34 x 50.7 mm)
PRINT INDEX
Prints an index (thumbnail) of all photos on your card (maximum 25
thumbnails per sheet).
PRINT ALL
Print all photos on your memory card.
Photo Quality Menu
From the Photo Quality sub-menu:
You can:
AUTO BRIGHTNESS
Specify automatic brightness control for all your photos:
On (default)
Off
PHOTO BRIGHTNESS
Change the brightness level (for the current photo only).
Press :
Brightest
Brighter
Normal (default)
Darker
Darkest
COLOR MODE
Specify natural or vivid colors:
Natural (default)
Vivid
Photo Display Menu
Page 12
From the Photo
Display sub-menu:
You can:
SLIDE SHOW
Sequentially display all photos on the installed card. Specify how long each photo is
displayed. The slide show begins with the photo most recently displayed
3 seconds (default)
5 seconds
10 seconds
Press Cancel to stop the slide show.
NOTE: To print any photo while it is displayed, press Print Color or Print Black and
White. Follow the directions on the display to cancel or resume the slide show.
ROTATE
Press to rotate the current photo counterclockwise.
Press to rotate the current photo clockwise.
NOTE: The Rotate feature changes the orientation of the photo on the screen, not
in print.
Photo Management Menu
From the Photo
Management submenu:
You can:
PHOTO NAVIGATION
Specify what is displayed on the LCD when you install a card or camera: the main
photo view or your card/camera folder structure.
Photo View (default)-display individual photos on the installed card or
camera, starting with the current or most recent photo.
Folder View-displays the folder structure on the installed card, if present.
Navigate as you would on a computer. If there are no folders, navigation
defaults to Photo View.
ERASE ALL PHOTOS
NOTE: This function permanently erases all photos from your card.
Erase All Photos from Memory
Cancel
SAVE TO PC
Establishes a connection with your computer that allows you to save photos from
your memory card, USB storage device, or camera directly to the computer. Same
functionality as pressing the Save to PC button. For details, see Saving and
Copying Photos to Your Computer.
Printer Settings Menu
Page 13
From the Printer Settings submenu:
You can:
RESTORE DEFAULTS
Reset all photo and printer settings to the defaults.
Yes
No
LANGUAGE
Select a language for the display.
COUNTRY
Select your country; this provides a number to order Dell photo print
packs.
POWER SAVE
Specify how long the printer remains inactive before entering auto
sleep mode.
1 Minute
5 Minutes
10 Minutes (default)
15 Minutes
Maintenance Menu
From the sub-menu:
You can:
PRINTS REMAINING
Check if the photo cartridge is low; if so, directions are displayed.
6-15 prints remaining
1-5 prints remaining
0 prints remaining
CHANGE CARTRIDGE
Display directions for changing the photo cartridge.
ADD PHOTO PAPER
Display directions for adding photo paper.
PRINTER DIAGNOSTICS
Help diagnose print quality problems and provide printer identification information.
Test Print
Service Tag-display your printer's service tag identification information.
Page 14

Using Your Printer
Printing Without a Computer
Printing With a Computer
Printing Without a Computer
This section describes how to print directly from a memory card, USB storage device, or PictBridge-enabled
or other compatible camera.
Printing Tips
Before you print, make sure the power is connected, and the photo cartridge and photo paper are
loaded. For help, see your Setting Up Your Printer poster.
Printing starts when you press Print. The photo paper cycles 4 times during the printing process. The
first 3 passes apply layers of yellow, magenta, and cyan color. The fourth pass applies the Dell Clear
Life Coating that protects and preserves the photo.
NOTE: If you remove the card or disconnect the camera during printing, then printing will stop when
the current photo is printed.
For advanced print options (color and auto brightness, layouts, index prints, etc.), press the Menu
button. For help, see Changing Settings-Press Menu.
NOTICE: Wait until a print is finished before removing it from the paper tray. Failure to do so can
cause paper misfeeds or jams and can damage the printer.
NOTICE: Do not load more than 20 sheets into the paper tray.
Printing From a Memory Card
You can print directly from a CF (CompactFlash), SD (Secure Digital), MS (Memory Stick), MMC (MultiMedia
Card), or SM (Smart Media), or a USB memory key.
NOTE: Your printer reads only one memory source at a time. Printing is disabled if multiple sources
(cards or camera) are loaded or connected.
Inserting Memory Cards
NOTICE: Insert memory cards with the memory card label facing up.
Page 15

NOTE: When you insert a memory card, a drive will appear on your computer. The photos on the
memory card will not appear in this drive until you press Save to PC.
NOTE: Only photos within the first five levels of folders are displayed in Photo View mode. Use Folder
View mode to navigate photos at deeper levels.
Selecting Photos to Print
Press to scroll through photos. Press to select a photo for printing. (Press a second time
to deselect that photo.)
1.
For more than one copy of any photo, press to increase or decrease the number of copies.
Selecting zero (0) deselects the photo for printing.
2.
To select more photos to print, repeat Steps 1 and 2.
To deselect all photos, press Cancel for 2 seconds.
3.
Press Print Color or Print Black and White to begin printing all selected photos.
After the print job is complete, all photos are deselected.
4.
Choosing a Layout Option
Press the Menu button, then select Print Options Layout.1.
Press to scroll through photo layouts. Press to select a layout.2.
Page 16

1.
2.
Press Print Color or Print Black and White to begin printing all selected photos.
The selected layout applies to this print job only. The layout then reverts to the default
1-up 4x6 photo.
3.
Printing a Print Order (Pre-Selected Photos)
When you pre-select, or tag, photos for printing on your camera, you create a print order (DPOF: Digital
Print Order File). Your printer detects the print order and automatically displays the set of photos, allowing
one-touch printing.
Insert your memory card.1.
If your card contains a print order, this message is displayed:
A print order was found. View camera photo selections?
View Selected (Displays selected photos only.)
View All (Displays all photos on the card.)
Highlight a choice, then press Select ( ).2.
If View Selected was the selected choice, all photos in the print order are displayed as already
selected. Press Print Color or Print Black and White to print the photo selections defined by the
print order or use the button to make changes to the print order. If View All was the selected
choice, select photos to print as described in Selecting Photos to Print.
3.
Printing From Your Pictbridge-enabled or Other Compatible
Camera
Page 17

You can print photos from any PictBridge-enabled camera or other compatible device. Make sure the card
slots are empty before you plug in the camera cable.
Plug the USB cable from the camera into the camera port connector on the side of the printer.1.
If a photo is printing when you plug the camera cable in, the camera is detected when printing is
completed.
If your camera is PictBridge enabled, then use your camera display to review photos, choose printing
options, and print. (If your camera is not PictBridge enabled, then use your printer LCD.)
2.
Canceling Printing
To stop printing, press Cancel and follow the directions on the LCD.
Printing is canceled upon completion of the current printing pass. The unfinished print is ejected into the
paper tray.
Removing Perforated Tabs From Prints
NOTE: Remove perforated tabs from prints only after printing. Photo paper missing perforated tabs
will not feed properly.
Fold the tabs up, then down.1.
Remove and discard each tab.2.
Page 18

Printing With a Computer
Printing Tips
See Printing Tips for helpful printing tips.
Windows-Based Operating System Requirements
Minimum
Recommended
Windows 2000 Professional, Service
Pack 2 and 3
Windows XP Home Edition and
Home Edition, Service Pack 1.
Windows XP Professional and
Professional, Service Pack 1
Pentium II processor
Pentium IV processor
200 MHz
2.0 GHz
48 MB RAM
256 MB RAM
100 MB available free space
500 MB available free space
USB port
USB port
CD-ROM
CD-ROM
800 x 600 display [16 bit]
1024 x 768 (32 bit)
Installing Printer Drivers and Software
Make sure the power cable is connected to the printer and the printer is on.1.
Insert the Drivers and Utilities CD into your computer.2.
Plug the USB cable (sold separately) into the USB connector on your computer.3.
Plug the other end of the USB cable into the square USB connector on the printer.4.
Page 19

3.
4.
Follow the on-screen instructions to install the printer drivers and printer documentation. Select
Typical to install all components. Select Custom to install specific components.
5.
Insert the remaining two CDs, one at a time, to install your photo editing software programs. Follow
the on-screen instructions on the printer.
6.
Printing From a Computer
To Print
Turn on your computer and printer, and make sure they are connected with a USB cable.1.
Using your preferred application, open the photos you want to print.2.
Access printer settings by selecting Print or Page Setup from the File menu (depending on your
application and operating system).
3.
Make sure the printer is selected as the current printer and that the paper size is set to
4 x 6 in. (102 x 152 mm).
4.
Change any other settings as needed, then click OK or Print. (Depending on your application and
operating system, you may first need to return to the main menu and select Print from the File
menu.)
5.
NOTE: Print selections made from the printer in standalone mode (use of printer without a computer)
are not used when you send a print job from the computer.
Choosing a Color Mode
Color mode is an automatic color correction feature that helps you easily create high-quality prints in no
time. The Dell Photo Printer 540 features three color mode options:
Natural
Page 20

high-quality, natural color for everyday photo-making (default).
Vivid
richer, more vivid colors.
None
to disable automatic color correction.
Change the color mode:
From the Start menu, select Settings, then select Printers.1.
Right-click the Photo Printer icon, then select Printing Preferences.2.
Click the Advanced button.3.
Under Document Options, select Printer Features, then select Color Mode.4.
Select a color mode option, then click OK.5.
Click OK when complete.6.
Canceling printing
You can cancel printing from the printer or from the computer.
Canceling Printing From the Printer
Press the Cancel button on the printer.
Canceling Printing From a Computer:
Double-click the Printer icon in the system tray.1.
Click the print job you want to cancel.2.
Select Document, then select Cancel.3.
Saving and Copying Photos to Your Computer
With the printer turned on, insert a memory card in the appropriate slot or connect a camera (not
PictBridge enabled) via the camera port connector .
1.
Press the Save to PC button on the printer.2.
Page 21

If you have loaded Photo Manager software, the Photo Manager Wizard launches. Follow the prompts
to transfer photos to your computer using the Photo Manager software.
2.
If Using Windows Explorer
Double-click the My Computer icon on your desktop (or right-click the Start button and select
Explore).
1.
Double-click the Removable Disk icon. (The exact drive letter depends on your system.)2.
Navigate to the appropriate directory for your photos. (If the card came from a digital camera, the
photos are stored in /DCIM/<camera name>/.)
3.
Double-click a photo to open it in your default application.4.
Page 22

Care and Maintenance
General Care of the Printer
Cleaning the Paper Feed Roller
Handling and Storing the Photo Paper and Photo Cartridge
CAUTION: Before performing any of the procedures listed in this section, read and follow
the Safety Instructions at CAUTION: SAFETY INSTRUCTIONS.
General Care of the Printer
NOTICE: Always disconnect the power before cleaning. Do not use harsh or abrasive cleaners or
organic solvents on the printer or any of its parts.
To clean the printer, wipe the outside of the printer with a clean, dry cloth.
Support the printer and tray by placing it on a flat, level surface. Do not block the air vents.
Avoid blocking the back of the printer and paper tray exit.
Keep power cables and USB cables away from the paper path.
Keep the surrounding area vacuumed and litter-free.
Protect the printer from tobacco smoke, dust, sand, and liquid spills.
Avoid placing objects on the printer.
Keep the printer, accessories, and supplies away from direct sunlight and out of high-temperature
environments such as a vehicle parked in the sun.
When storing, remove the paper tray, then close the paper tray cover (see Loading the Photo Paper)
and paper tray door to keep out dust and debris. Store photo paper flat.
Cleaning the Paper Feed Roller
To prevent misfeeds and to make sure your photos are the best quality, keep the feed roller clean. Inspect
the roller weekly for debris particles, and clean if necessary.
Unplug the AC power adapter.1.
Remove the paper tray from the printer, and leave the paper tray door open.2.
Lightly moisten a lint-free cloth with water.3.
Page 23

2.
3.
NOTICE: Do not use cotton or cotton swabs to clean the feed roller.
Use the moistened cloth to gently wipe clean the surface of the feed roller. Advance the feed roller with
your thumb as necessary, and continue cleaning.
4.
Allow the feed roller to fully dry before plugging the AC power adapter back in.5.
Handling and Storing the Photo Paper and Photo
Cartridge
For best quality prints, store the photo paper and photo cartridge in a location where the temperature
does not exceed 85 °F (30 °C).
To avoid getting fingerprints on the ribbon, handle the photo cartridge by the spool ends.
To avoid fingerprints on your prints, handle the photo paper by the edges or by the perforated tabs. Do
not touch the glossy side of the paper.
When storing the printer, remove the paper tray, then close the paper tray cover and paper tray door
to keep out dust and debris. Store paper flat.
Keep the photo paper and photo cartridge away from direct sunlight and out of high-temperature
environments such as a vehicle parked in the sun.
Page 24

Troubleshooting
Setup Problems
General Problems
Error Messages
Printing Problems
Transfer/communication problems
More Troubleshooting Options
Setup Problems
If you experience problems while setting up your printer, make sure:
You select your language and default country, and then press Select on the operator panel. If you
skipped selecting your language or default country during the setup process, see Default Country Was
Not Set.
Your operating system is compatible with your printer. The Dell Photo Printer 540 supports Windows XP
and 2000.
Printer Does Not Print
Make sure the photo cartridge is properly installed and there is photo paper in the tray.
Use an undamaged USB cable.
Check your printer status to make sure your photo is not being held in the print queue or
paused. To check printer status:
Click Start Control Panel Printers and Other Hardware Printers and
Faxes (Windows XP). Click Start Settings Printers (Windows 2000).
Double-click the Dell Photo Printer 540 icon, and then click Printer.
Click Printer, and make sure no check mark appears next to Pause Printing.
A camera is properly connected.
A memory card is properly inserted (label side up, fully inserted into the proper slot).
Print a test page:
Click Start All Programs (or Programs) Dell Printers Dell Photo
Printer 540 Printing Preferences.
Click the Maintenance tab.
From the Maintenance tab, click Print Test Page.
Display Language Is Incorrect -
If the language on the printer display is not the language you prefer, change the language:
Click Menu Printer Settings Language.1.
Use the navigation arrow buttons until Language appears on the display, then press .2.
Use the navigation arrows and buttons to set your language as the default.3.
Page 25

Default Country Was Not Set -
If you did not select the default country during the setup process:
Click Menu Printer Settings Country.1.
Use the navigation arrow buttons until the desired country appears on the display,
then press .
2.
Use the navigation arrows and buttons to set your country as the default.3.
Camera and printer do not communicate.
Make sure camera is in the correct file transfer mode. See your camera Owner's Manual.
General Problems
Anytime your printer has a problem, make sure:
Your printer is on.
The photo paper is loaded correctly. For help, see Loading the Photo Paper.
Unplug the power supply from the electrical outlet. Reconnect the power supply (see your
Setup Diagram). Turn the power on.
If your printer is not attached to a computer, make sure:
You read and follow any messages on the LCD.
The power supply is plugged into your printer and an electrical outlet.
If your printer is attached to a computer, make sure:
The USB cable is securely attached to your computer and to your printer. For help, see the
Setting Up Your Printer poster.
Both your computer and your printer are on.
The Dell Photo Printer 540 is the selected printer. (It should not be set as the default if
there is another printer connected.)
Restart your computer.
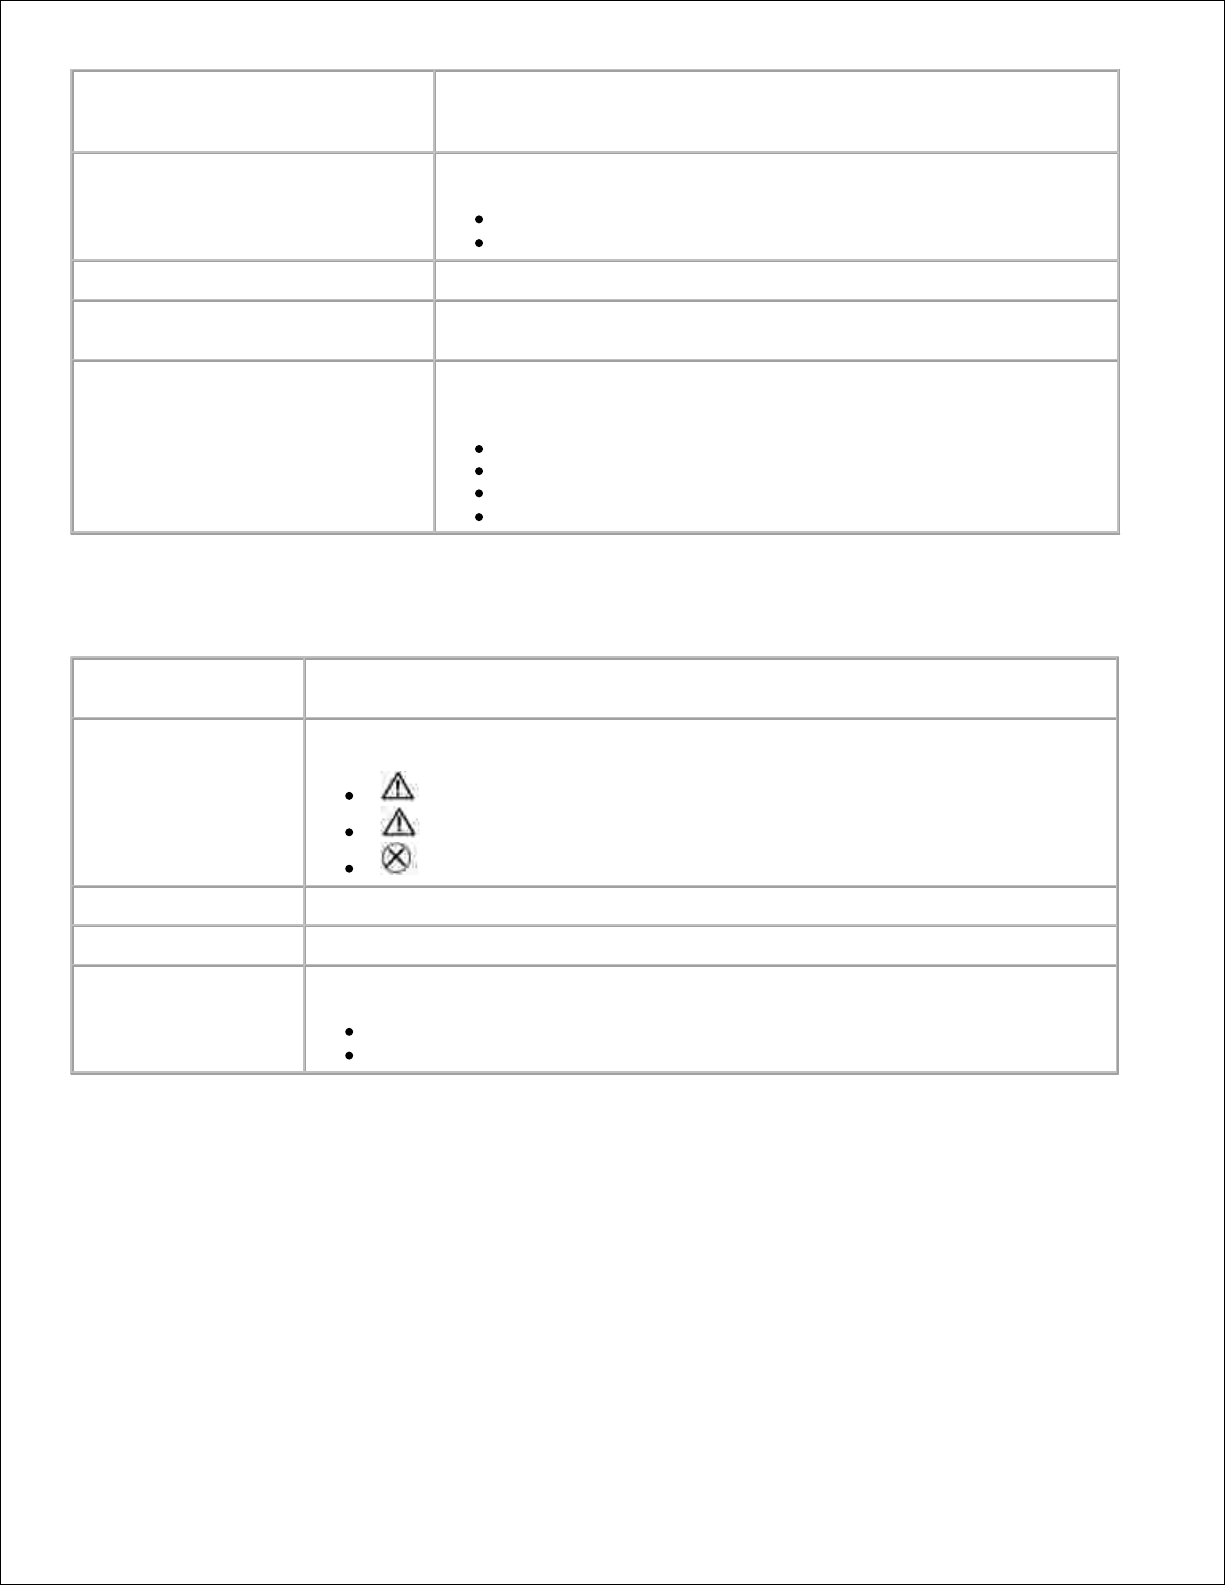
Error Messages
If an error occurs, the Error light glows amber and an error message is displayed on the printer LCD. Follow
the directions on the LCD to resolve the problem.
Printing Problems
Page 26

Photo paper does not feed
NOTE:
Use only Dell photo paper from a Dell Photo Print Pack for your printer. Do not use inkjet paper
or any other paper.
The paper tray may be empty. Load photo paper (Loading the Photo Paper) and re-install the
paper tray. Check the photo paper:
Remove the paper tray (Loading the Photo Paper).1.
Inspect the paper supply: make sure photo paper is not damaged in any way, or
removable tabs have not been detached. Replace with new photo paper if necessary.
2.
Carefully "fan" the photo paper to keep the sheets from sticking together.3.
Reload the paper tray using no more than 20 sheets.4.
Re-install the paper tray, then press to resume printing.5.
Clean the paper feed roller (Cleaning the Paper Feed Roller).
Multiple sheets of photo paper are pulled through printer -
Remove the paper tray (Loading the Photo Paper).
Remove the paper supply from the paper tray.1.
Carefully "fan" the photo paper to keep the sheets from sticking together.2.
Reload the paper tray using no more than 20 sheets.3.
Re-install the paper tray, then press Print to resume printing.4.
Printer is jammed
NOTE:
Use only Dell photo paper from a Dell Photo Print Pack for your printer. Do not use inkjet paper
or any other photo paper.
If the Error indicator light is lit:
Remove the paper tray (Loading the Photo Paper).1.
Disconnect the AC power adapter, wait 5 seconds, then plug it back in.2.
If the paper does not automatically eject, carefully remove the paper manually.
NOTE:
Always check the paper slot on the back of the printer for jammed paper:
Remove the paper supply from the paper tray. Carefully "fan" the paper to keep the
sheets from sticking together.
3.
Reload the paper tray using no more than 20 sheets.4.
Re-install the paper tray, then press to resume printing.5.
If the Error light is still lit, check the photo cartridge:
Page 27

4.
5.
NOTE:
The photo cartridge may lock in place if there is a paper error. Do not attempt to remove the
photo cartridge without first clearing the paper jam.
Remove the photo cartridge, remove any slack from the ribbon, then re-install the photo
cartridge (Loading the Photo Cartridge). Press Print to resume printing.
Printing stops during mid-print (paper stops feeding, and Error indicator light is on)
NOTE:
Use only Dell photo paper from a Dell Photo Print Pack for your printer. Do not use inkjet paper
or any other photo paper.
Check the photo paper:
Remove the paper tray.1.
Check the paper slot on the back of the printer.2.
Remove loose paper from the printer.3.
Inspect the paper supply: make sure removable tabs have not been detached from the
photo paper. Reload with new photo paper if necessary.
4.
Carefully "fan" the photo paper to keep the sheets from sticking together.5.
Reload the paper tray using no more than 20 sheets.6.
Re-install the paper tray, then press to resume printing.7.
Clean the paper feed roller (Cleaning the Paper Feed Roller).
Print is smudged
Fingerprints may be on glossy side of paper. Handle paper by the edges or by the removable
tabs.
Print is spotted
Check to see if the photo paper is dirty, and use a dry, lint-free cloth to wipe clean. For
excessive dirt or debris, thoroughly clean the paper tray, and load new photo paper (Loading
the Photo Paper).
NOTE:
When storing photo paper, remove and close the paper tray and close the paper tray door on
the printer. These steps keep dust and debris from collecting on the photo paper or inside the
printer.
Print is too light
NOTE:
Use only Dell photo paper from a Dell Photo Print Pack for your printer. Do not use inkjet paper
Page 28

or any other photo paper.
Photo brightness can be changed by selecting Photo Quality--> Photo Brightness (Photo
Quality Menu) or --> Automatic photo brightness.
Make sure the photo paper is loaded with the Dell logo facing down. Reload if necessary
(Loading the Photo Paper).
Try re-taking the photo with the flash off. See your camera user's guide for details.
Adjust the exposure compensation on your camera (if available), and try re-taking the
photo. See your camera user's guide for details.
Edit the photo using Dell Photo Imaging software on your computer. See the Photo
Imaging software Help for details.
Print is too dark or is discolored
Photo brightness can be changed by selecting Photo Quality--> Photo Brightness (Photo
Quality Menu) or --> Automatic photo brightness.
Try re-taking the photo with the flash on, or move within the flash range of the camera.
See your camera user's guide for details.
Adjust the exposure compensation on your camera (if available), and try re-taking the
photo. See your camera user's guide for details.
Edit the photo using Dell Photo Imaging software on your computer. See the Photo
Imaging software Help for details.
Make sure the printer is not placed in direct sunlight or is not operating in a hightemperature environment.
Make sure the cooling vents are not blocked or dirty (Air vents).
Photos are cropped
Set your camera to Best (3:2) photo quality, if available. See your camera user's guide for
details.
Adjust cropped photos using Dell Photo Imaging software on your computer.
If you are printing from an application on your computer, select the proper paper size in
print options.
A selected photo does not print
The image file may be corrupt. Review the photo on the camera, LCD, or computer and delete if
necessary.
Nothing happens when you try to print from a memory card
Check the power connections. See the Setting Up Your Printer poster.
Remove the paper tray, check that photo paper is properly loaded, and re-install (Loading
the Photo Paper).
Make sure the photo cartridge is properly installed (Loading the Photo Cartridge).
Make sure a memory card is inserted and that there is at least one photo on the memory
card (Printing From a Memory Card).
Nothing happens when you try to print from PictBridge or other compatible camera
Check the USB connections from the camera to the printer (Printing From Your Pictbridge-
enabled or Other Compatible Camera).
Re-establish the connection: disconnect, then reconnect the USB cable from the camera to
the printer.
Make sure there is at least one photo in the camera's internal memory or memory card.
Page 29

Nothing happens when you try to print (from computer)
Check the USB connections from the printer to the computer (Make sure the power cable
is connected to the printer and the printer is on.).
The computer may be transferring images. Wait a few seconds, then try again.
Access the printer menu for your system. Remove check marks next to Pause Printing and
Offline, if checked.
Close unnecessary software applications. Disconnect then reconnect the USB cable from
the printer to the computer (Make sure the power cable is connected to the printer and
the printer is on.).
Make sure Drivers and Utilities software is installed (Installing Printer Drivers and
Software). Install if necessary.
Uninstall, then reinstall Drivers and Utilities software (Installing Printer Drivers and
Software).
Make sure your computer meets the minimum system requirements (Windows-Based
Operating System Requirements). Upgrade your system if necessary.
Printing is slow -
NOTE:
When printing a large number of prints, printing may slow down to prevent the print head from
overheating.
Make sure the printer is not placed in direct sunlight or is not operating in a hightemperature environment.
Make sure the cooling vents are not blocked or dirty (Air vents).
Close unnecessary software applications.
Make sure your computer meets the minimum system requirements (Windows-Based
Operating System Requirements). Upgrade your system if necessary.
Unable to remove photo cartridge (Error light glows steady.)
NOTE:
The photo cartridge may lock in place if there is a paper error. Do not attempt to remove the
photo cartridge without first clearing the paper error.
Check to see if the paper tray is empty or if paper is missing perforated tabs. Reload
photo paper if necessary (Loading the Photo Paper), then try again.
Make sure photo paper is not jammed. Clear the jam if necessary, then try again.
Photo paper runs out before the photo cartridge (or vice versa)
Supply mismatch can result from several different situations, including:
Scrapping of photo paper as a result of jams or other errors
Gradual advancement of the print ribbon as a result of removing ribbon slack or
clearing jams
Supply mismatch is likely to occur as you continue to use your printer. If you wish to keep your
photo cartridge and photo paper supply synchronized, discard unused photo cartridge or photo
paper when one or the other is fully depleted.
Page 30

Transfer/communication problems
Nothing happens when you try to transfer photos to the computer
Press the Save to PC button on the printer.
Check the power and USB connections from the printer to computer (Make sure the power
cable is connected to the printer and the printer is on.).
If you are trying to transfer photos from a PictBridge-enabled camera (Printing From Your
Pictbridge-enabled or Other Compatible Camera), check the USB connections between the
printer and the camera.
Close unnecessary software applications, and minimize remaining application windows.
Follow any messages on the screen that may have been hidden by other windows.
Disconnect then reconnect the USB cable from the printer to the computer (Make sure the
power cable is connected to the printer and the printer is on.).
Make sure Drivers and Utilities software is installed (Installing Printer Drivers and
Software). Install if necessary.
Uninstall, then reinstall Drivers and Utilities software (Installing Printer Drivers and
Software).
Make sure your computer meets the minimum system requirements (Windows-Based
Operating System Requirements). Upgrade your system if necessary.
More Troubleshooting Options
Go to support.dell.com for help.
Page 31

Printer Specifications
Printing process
Thermal dye transfer
Operating environment (for
optimum photo quality)
Temperature: 50 to 95 °F (10 to 35
°C)
Humidity: 10% to 86% RH
Power
Output: 24V DC
Input:
90V to 132V AC @ 50/60 Hz,
connection via in-line AC
power adapter (US and
Canada only)
90V to 260V AC @ 50/60 Hz,
connection via AC power
adapter (all other countries)
Consumption while printing: 50
watts maximum
Print speed
Standalone: 75 sec. for first print (<
60 sec. for prints 2-5)
Via computer: 60 sec. (< 60 sec. for
prints 2-5)
NOTE: Print speed is dependent on
photo size, number of continuous
prints, and environmental
conditions.
Size (Depth, width, height)
Without paper tray: 5.4 x 7.4 x 3.2
in. (137 x 189 x 81 mm)
With paper tray: 13.2 x 7.4 x 3.2 in.
(336 x 189 x 81 mm)
Weight
Without paper tray: 2.69 lbs (1.22
Kg)
With paper tray: 3.2 lbs (1.45 Kg)
Print size
4 x 6 in. (102 x 152 mm)
Photo paper size
4 x 7.25 in. (102 x 184 mm) with
perforated tabs
Photo resolution
300 ppi, continuous tone
Page 32

Regulatory Information
Electromagnetic Interference (EMI) is any signal or emission, radiated in free space or conducted along
power or signal leads, that endangers the functioning of a radio navigation or other safety service or
seriously degrades, obstructs, or repeatedly interrupts a licensed radio communications service. Radio
communications services include but are not limited to AM/FM commercial broadcast, television, cellular
services, radar, air-traffic control, pager, and Personal Communication Services (PCS). These licensed
services, along with unintentional radiators such as digital devices, including computers, contribute to the
electromagnetic environment.
Electromagnetic Compatibility is the ability of items of electronic equipment to function properly together in
the electronic environment. While this computer has been designed and determined to be compliant with
regulatory agency limits for EMI, there is no guarantee that interference will not occur in a particular
installation. If this equipment does cause interference with radio communications services, which can be
determined by turning the equipment off and on, you are encouraged to try to correct the interference by
one or more of the following measures:
Reorient the receiving antenna.
Relocate the computer with respect to the receiver.
Move the computer away from the receiver.
Plug the computer into a different outlet so that the computer and the receiver are on different branch
circuits.
If necessary, consult a Dell Technical Support representative or an experienced radio/television technician
for additional suggestions.
Dell™ computers are designed, tested, and classified for their intended electromagnetic environment. These
electromagnetic environment classifications generally refer to the following harmonized definitions:
Class A is typically for business or industrial environments.
Class B is typically for residential environments.
Information Technology Equipment (ITE), including devices, expansion cards, printers, input/output (I/O)
devices, monitors, and so on, that are integrated into or connected to the computer should match the
electromagnetic environment classification of the computer.
A Notice About Shielded Signal Cables: Use only shielded cables for connecting devices to any Dell
device to reduce the possibility of interference with radio communications services. Using
shielded cables ensures that you maintain the appropriate Electromagnetic Compatibility
classification for the intended environment. For parallel printers, a cable is available from Dell. If
you prefer, you can order a cable from Dell on the World Wide Web at
accessories.us.dell.com/sna/category.asp?category_id=4117.
Page 33

Most Dell computers are classified for Class B environments. However, the inclusion of certain options can
change the rating of some configurations to Class A. To determine the electromagnetic classification for your
computer or device, see the following sections specific for each regulatory agency. Each section provides
country-specific Electromagnetic Compatibility/EMI or product safety information.
FCC Notices (U.S. Only)
For FCC information, see the appropriate documentation for your computer:
Dell Printer Owner's Manual
Modem Regulatory Information
This equipment complies with Part 68 of the FCC Rules. On the bottom of your computer is a label that
contains, among other information, the FCC registration number and ringer equivalence number (REN) for
your equipment. If requested, you must provide this information to the telephone company.
The REN is used to determine the quantity of devices that may be connected to the telephone line. Excessive
RENs on the telephone line may result in the devices not ringing in response to an incoming call. In most
areas, the sum of all the RENs on your telephone line should be less than five to ensure proper service from
the telephone company. To be certain of the number of devices that you may connect to a line, as
determined by the total RENs, contact your local telephone company.
The registration jack Universal Service Order Code (USOC) used by this equipment is RJ-11C. An FCC
compliant telephone cord and modular plug is provided with this equipment. This equipment is designed to
be connected to the telephone network or premises wiring using a compatible modular jack that is Part 68
compliant.
This equipment cannot be used on public coin-phone service provided by the telephone company. Connection
to party line service is subject to state tariffs.
There are no user serviceable parts on the modem contained in your computer.
If your telephone equipment causes harm to the telephone network, the telephone company will notify you
in advance that service may be temporarily discontinued. If advance notice is not practical, the telephone
company will notify you as soon as possible. Also, you will be advised of your right to file a complaint with
the FCC if you believe it is necessary.
The telephone company may make changes in its facilities, equipment, operations, or procedures that could
affect the operation of this equipment. If this happens, the telephone company will provide advance notice in
order for you to make necessary modifications to maintain uninterrupted service.
If you experience trouble with this telephone equipment, see "Getting Help" in your computer's
troubleshooting documentation or, for some computers, the section titled "Contacting Dell" in your
computer's online guide to find the appropriate telephone number for obtaining customer assistance. If the
equipment is causing harm to the telephone network, the telephone company may request that you
disconnect the equipment until the problem is resolved.
Page 34

Fax Branding
The Telephone Consumer Protection Act of 1991 makes it unlawful for any person to use a computer or other
electronic device, including fax machines, to send any message unless such message clearly contains in a
margin at the top or bottom of each transmitted page or on the first page of the transmission, the date and
time it is sent, identification of the business, other entity, or individual sending the message, and the
telephone number of the sending machine or such business, other entity, or individual. The telephone
number provided may not be a 900 number or any other number for which charges exceed local or longdistance transmission charges.
IC Notice (Canada Only)
Most Dell computers (and other Dell digital apparatus) are classified by the Industry Canada (IC)
Interference-Causing Equipment Standard #3 (ICES-003) as Class B digital devices. To determine which
classification (Class A or B) applies to your computer (or other Dell digital apparatus), examine all
registration labels located on the bottom, side, or the back panel of your computer (or other digital
apparatus). A statement in the form of "IC Class A ICES-003" or "IC Class B ICES-003" will be located on one
of these labels. Note that Industry Canada regulations provide that changes or modifications not expressly
approved by Dell could void your authority to operate this equipment.
This Class B (or Class A, if so indicated on the registration label) digital apparatus meets the requirements of
the Canadian Interference-Causing Equipment Regulations.
Cet appareil numérique de la Classe B (ou Classe A, si ainsi indiqué sur l'étiquette d'enregistration) respecte
toutes les exigences du Reglement sur le Materiel Brouilleur du Canada.
Modem Regulatory Information
The IC label identifies certified equipment. This certification means that the equipment meets
telecommunications network protective, operational, and safety requirements as prescribed in the
appropriate Terminal Equipment Technical Requirements document(s). The IC label does not guarantee that
the equipment will operate to the user's satisfaction.
Before installing this equipment, users should ensure that it is permissible to be connected to the facilities of
the local telecommunications company. The equipment must also be installed using an acceptable method of
connection. The customer should be aware that compliance with the above conditions may not prevent
degradation of service in some situations.
Repairs to certified equipment should be coordinated by a representative designated by the supplier. Any
repairs or alteration made by a user to this equipment, or equipment malfunctions, may give the telephone
communications company cause to request the user to disconnect the equipment.
Users should ensure for their own protection, that the electrical ground connections of the power utility,
telephone lines, and internal metallic water-pipe system, if present, are connected together. This precaution
may be particularly important in rural areas.
Page 35

NOTICE: Users should not attempt to make such connections themselves. Contact the appropriate
electric inspection authority, or electrician, as appropriate.
NOTE: The REN assigned to each terminal device provides an indication of the maximum number of
terminals allowed to be connected to a telephone interface. The termination on an interface may consist of
any combination of devices subject only to the requirement that the sum of the RENs of all the devices does
not exceed the number five.
The following information is provided in compliance with IC regulations:
Dell Inc.
One Dell Way
Round Rock, TX 78682 USA
512-338-4400
CE Notice (European Union)
Marking by the symbol indicates compliance of this Dell computer to the Electromagnetic Compatibility
Directive 89/336/EEC and the Low Voltage Directive 73/23/EEC of the European Union. Such marking is
indicative that this Dell system meets the following technical standards:
EN 55022 - "Information Technology Equipment - Radio Disturbance Characteristics - Limits and
Methods of Measurement."
EN 55024 - "Information Technology Equipment - Immunity Characteristics - Limits and Methods of
Measurement."
EN 61000-3-2 - "Electromagnetic Compatibility - Part 3: Limits - Section 2: Limits for Harmonic
Current Emissions (Equipment Input Current Up to and Including 16 A Per Phase)."
EN 61000-3-3 - "Electromagnetic Compatibility - Part 3: Limits - Section 3: Limitation of Voltage
Fluctuations and Flicker in Low-Voltage Supply Systems for Equipment With Rated Current Up to and
Including 16 A."
EN 60950 - "Safety of Information Technology Equipment."
NOTE: EN 55022 emissions requirements provide for two classifications:
Class A is for typical commercial areas.
Class B is for typical domestic areas.
To determine which classification applies to your computer, examine the FCC or ICES information on the
regulatory label located on the back, side, or bottom panel of the computer. If the FCC or ICES information
on the label indicates a Class A rating, the following Class A warning applies to your computer:
RF INTERFERENCE WARNING: This is a Class A product. In a domestic environment this product
may cause radio frequency (RF) interference, in which case the user may be required to take
adequate measures.
Page 36

If the FCC or ICES information on the label indicates a Class B rating, the following Class B statement applies
to your computer:
This Dell device is classified for use in a typical Class B domestic environment.
A "Declaration of Conformity" in accordance with the preceding directives and standards has been made and
is on file at Dell Inc. Products Europe BV, Limerick, Ireland.
CE Mark Notice
This equipment complies with the essential requirements of the European Union Directive 1999/5/EC.
Page 37

New Zealand Telecom Warnings
General
"The grant of a Telepermit for any item of terminal equipment indicates only that Telecom has accepted that
the item complies with minimum conditions for connection to its network. It indicates no endorsement of the
product by Telecom, nor does it provide any sort of warranty. Above all, it provides no assurance that any
item will work correctly in all respects with another item of Telepermitted equipment of a different make or
model, nor does it imply that any product is compatible with all of Telecom's network services."
"This equipment does not fully meet Telecom impedance requirements. Performance limitations may occur
when used in conjunction with some parts of the network. Telecom will accept no responsibility should
difficulties arise in such circumstances."
"This equipment shall not be set up to make automatic calls to the Telecom `111' Emergence Service."
"If a charge for local calls is unacceptable, the `Dial' button should NOT be used for local calls. Only the 7digits of the local number should be dialed from your telephone. DO NOT dial the area code digit or the `0'
prefix."
"This equipment may not provide for the effective hand-over of a call to another device connected to the
same line."
Important Notice
"Under power failure conditions, this telephone may not operate. Please ensure that a separate telephone,
not dependent on local power, is available for emergency use."
"Some parameters required for compliance with Telecom's Telepermit requirements are dependent on the
equipment (PC) associated with this device. The associated equipment shall be set to operate within the
following limits for compliance with Telecom's Specification:
There shall be no more than 10 call attempts to the same number within any 30-minute period for any
single manual call initiation, and the equipment shall go on-hook for a period of not less than 30
seconds between the end of one attempt and the beginning of the next attempt.
1.
Where automatic calls are made to different numbers, the equipment shall go on-line for a period of
not less than 5 seconds between the end of one attempt and the beginning of the next attempt.
2.
The equipment shall be set to ensure that calls are answered between 3 and 30 seconds of receipt of
ringing."
3.
"All persons using this device for recording telephone conversations shall comply with New Zealand law. This
requires that at least one party to the conversation is to be aware that it is being recorded. In addition, the
Page 38

Principles enumerated in the Privacy Act of 1993 shall be complied with in respect to the nature of the
personal information collected, the purpose for its collection, how it is used and what is disclosed to any
other party."
Simplified Chinese Class A Warning Notice (China Only)
On Class A systems, the following warning will appear near the regulatory label:
Warning: This is a Class A product. In a domestic environment this product may cause radio
interference, in which case the user may be required to take adequate measures.
VCCI Notice (Japan Only)
Most Dell computers are classified by the Voluntary Control Council for Interference (VCCI) as Class B
information technology equipment (ITE). However, the inclusion of certain options can change the rating of
some configurations to Class A. ITE, including devices, expansion cards, printers, input/output (I/O) devices,
monitors, and so on, integrated into or connected to the computer should match the electromagnetic
environment classification (Class A or B) of the computer.
To determine which classification applies to your computer, examine the regulatory labels/markings located
on the bottom, side, or back panel of your computer. Once you have determined your computer's VCCI
classification, read the appropriate VCCI notice (see "VCCI Class A ITE Regulatory Mark" or "VCCI Class B ITE
Regulatory Mark").
Class A ITE
This is a Class A product based on the standard of the Voluntary Control Council for Interference (VCCI) for
information technology equipment. If this equipment is used in a domestic environment, radio disturbance
may arise. When such trouble occurs, the user may be required to take corrective actions.
VCCI Class A ITE Regulatory Mark
If the regulatory label includes the following marking, your computer is a Class A product:
Page 39

VCCI
Class B ITE
This is a Class B product based on the standard of the Voluntary Control Council for Interference (VCCI) for
information technology equipment. If this equipment is used near a radio or television receiver in a domestic
environment, it may cause radio interference. Install and use the equipment according to the instruction
manual.
VCCI Class B ITE Regulatory Mark
If the regulatory label includes the following marking, your computer is a Class B product:
MIC Notice (Republic of Korea Only)
To determine which classification (Class A or B) applies to your computer (or other Dell digital device),
examine the Republic of Korean Ministry of Information and Communications (MIC) registration labels
located on your computer (or other Dell digital device). The MIC label may be located separately from the
other regulatory marking applied to your product. Line two of the label identifies the emissions class for the
product-"(A)" for Class A products or "(B)" for Class B products.
NOTE: MIC emissions requirements provide for two classifications:
Class A devices are for business purposes.
Class B devices are for nonbusiness purposes.
Class A Device
Page 40

Please note that this device has been approved for business purposes with regard to electromagnetic
interference. If you find that this device is not suitable for your use, you may exchange it for a nonbusinesspurpose device.
MIC Class A Regulatory Label
If the regulatory label includes the following marking, your computer is a Class A product:
Class B Device
Please note that this device has been approved for nonbusiness purposes and may be used in any
environment, including residential areas.
MIC Class B Regulatory Label
If the regulatory label includes the following marking, your computer is a Class B product:
BSMI Notice (Taiwan Only)
If you find a or mark on the regulatory label on the bottom, side, or back panel of your
computer, the following section is applicable:
Page 41

NOM Information (Mexico Only)
The following information is provided on the device(s) described in this document in compliance with the
requirements of the official Mexican standards (NOM):
Page 42

Exporter:
Dell Inc.
One Dell Way
Round Rock, TX 78682
Importer:
Dell Computer de México, S.A. de C.V.
Paseo de la Reforma 2620 - 11° Piso
Col. Lomas Altas
11950 México, D.F.
Ship to:
Dell Computer de México, S.A. de C.V.
al Cuidado de Kuehne & Nagel de México S. de R.L.
Avenida Soles No. 55
Col. Peñon de los Baños
15520 México, D.F.
ENERGY STAR® Compliance
Certain configurations of Dell computers comply with the requirements set forth by the Environmental
Protection Agency (EPA) for energy-efficient computers. If the front panel of your computer bears the
ENERGY STAR® emblem, your original configuration complies with these requirements and all ENERGY
STAR® power management features of the computer are enabled.
NOTE: Any Dell computer bearing the ENERGY STAR® emblem on the computer or on a start-up screen is
certified to comply with EPA ENERGY STAR® requirements as configured when shipped by Dell. Any changes
you make to this configuration (such as installing additional expansion cards or drives) may increase the
computer's power consumption beyond the limits set by the EPA's ENERGY STAR® Computers program.
ENERGY STAR® Emblem
The EPA's ENERGY STAR® Computers program is a joint effort between the EPA and computer
manufacturers to reduce air pollution by promoting energy-efficient computer products. The EPA estimates
that use of ENERGY STAR® computer products can save computer users up to two billion dollars annually in
electricity costs. In turn, this reduction in electricity usage can reduce emissions of carbon dioxide, the gas
primarily responsible for the greenhouse effect, and sulfur dioxide and nitrogen oxides, the primary causes of
acid rain.
You can also help reduce electricity usage and its side effects by turning off your computer when it is not in
use for extended periods of time, particularly at night and on weekends.
 Loading...