

Page 1

™5330dn Mono Laser Printer User's Guide
Dell™5330dn Mono Laser Printer User's Guide
Click the links on the left for information on the features, options, and operation of your printer. For information on other documentation included with your
printer, see "Finding Information".
To order replacement toner cartridges or supplies from Dell:
1. Double-click the Dell Toner Reorder Program icon on your desktop. (Windows only)
OR
2. Order Dell printer supplies at www.dell.com/supplies or by phone.
Contacting Dell
Information in this document is subject to change without notice.
2008 Dell Inc. All rights reserved.
Reproduction in any manner whatsoever without the written permission of Dell Inc. is strictly forbidden.
Trademarks used in this text: Dell, the DELL logo and Dell Toner Management System are trademarks of Dell Inc.; Microsoft, Windows, and Windows Vista are
either trademarks or registered trademarks of Microsoft Corporation; Macintosh, MacOS, EtherTalk and TrueType are trademarks of Apple Inc., registered in the
NOTE: If you do not have an active Internet connection, you can find contact information on your purchase invoice, packing slip, bill, or Dell product
catalog. Dell provides several online and telephone-based support and service options. Availability varies by country and product, and some services
may not be available in your area. To contact Dell for sales, technical support, or customer service issues:
1. Visit www.support.dell.com.
2. Verify your country or region in the choose A Country/Region drop-down menu at the bottom of the page.
3. Click Contact Us on the left side of the page.
4. Select the appropriate service or support link based on your need.
5. Choose the method of contacting Dell that is convenient for you.
NOTE: A NOTE indicates important information that helps you make better use of your printerprinter.
NOTICE: A NOTICE indicates either potential damage to hardware or loss of data and tells you how to avoid the problem.
CAUTION: A CAUTION indicates a potential for property damage, personal injury, or death.
U.S. and other countries; Linux is a trademark or registered trademark of Linus Torvalds in the United States and other countries; The Common UNIX Printing
System, CUPS, and the CUPS logo are the trademarks of Easy Software Products; ENERGY STAR is a registered trademark of the U.S. Environmental Protection
Agency. As an ENERGY STAR Partner, Dell Inc. has determined that this product meets the ENERGY STAR guidelines for energy efficiency.
PCL is US registered trademark of Hewlett-Packard Company.
Sun, Sun Microsystems, Solaris, and the Solaris
logo are trademarks or registered trademarks of Sun Microsystems, Inc. in the U.S. and other countries, and are
under license.
SUSE is a registered trademark of Novell, Inc. in the United States and other countries.
Red Hat is a registered trademark of Red Hat, Inc. in the United States and other countires.
Adobe and PhotoShop are registered trademarks of Adobe Systems Incorporated.
Other trademarks and trade names may be used in this document to refer to either the entities claiming the marks and names of their products. Dell Inc.
disclaims any proprietary interest in trademarks and trade names other than its own.
Page 2
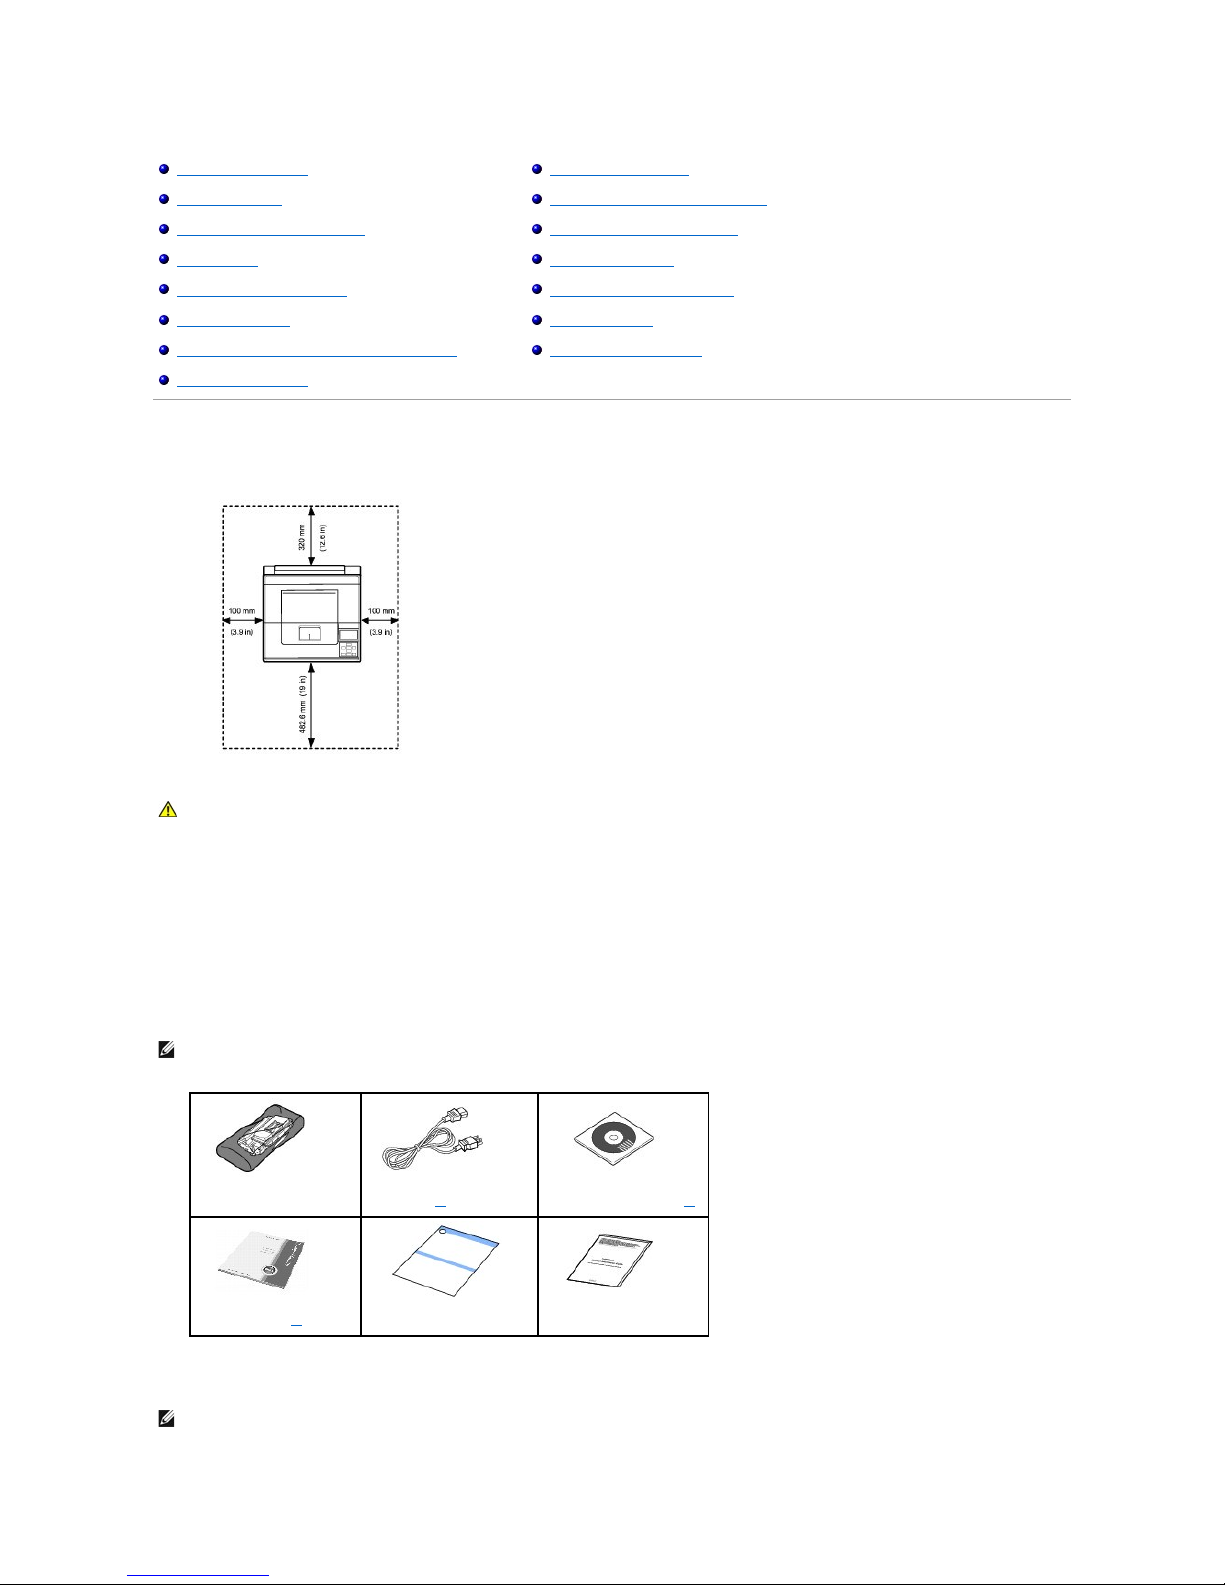
Unpacking Your Printer
1. Select a location for your printer.
l Leave enough room to open the printer tray, covers, doors, and additional options. It is also important to allow enough space around the printer for
proper ventilation.
l Provide the proper environment:
l A firm, level surface
l Away from the direct airflow of air conditioners, heaters, or ventilators
l Away from sunlight, extreme humidity, or high fluctuations in temperature
l A clean, dry, and dust-free location
2. In addition to the Dell™5330dn Mono Laser Printer, ensure that you have the following items in the box. If there is a missing item, contact Dell:
a.The appearance of the power cord differs according each country’s specifications.
b.TheDriversandUtilitiesCDcontainsDellprinterdrivers,PrinterSettingsUtility,SetIPAddressUtility,Macintoshdriver,Linuxdriver,Dell™Toner
Management System, Firmware Update Utility and HTML User’s Guide.
c.Owner’s manual may not be supplied depending on model and country.
Unpacking Your Printer
About Your Printer
Operator Panel Button Functions
Internal Fonts
Installing the Toner Cartridge
Loading Print Media
Changing the size of the paper in the paper tray
Setting up Your Printer
Powering On the Printer
Understanding Operator Panel Menus
Accessing Operator Panel Menus
Printing a Demo Page
Changing the Display Language
Power Save Mode
Changing the Font Setting
CAUTION: The printer requires at least two people to lift it safely.
NOTE: Leave the printer in the box until you are ready to install it.
toner cartridge
power cord
*a
drivers and Utilities CD
*b
owner's manual
*C
setup diagram
product Information Guide
NOTE: The power cord must be plugged into a grounded power socket.
Page 3
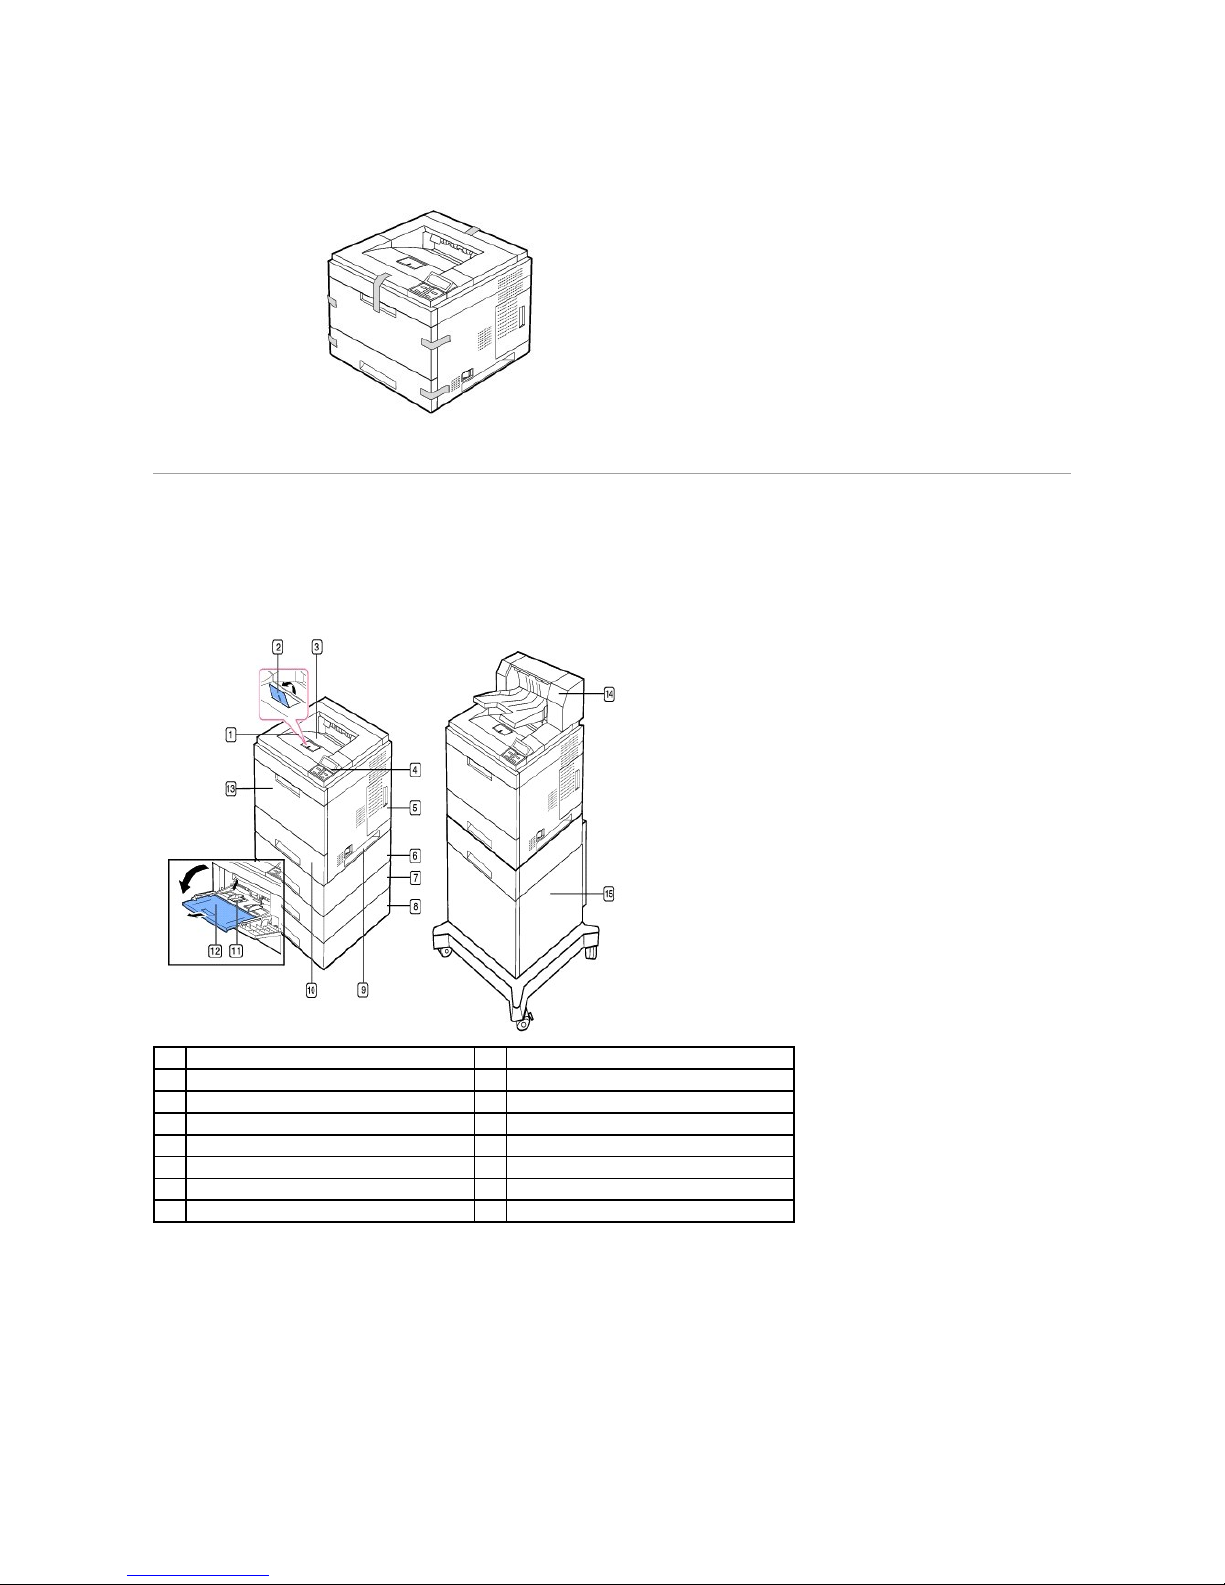
3. Save the carton and packing material in case the printer needs to be repacked.
4. Remove the packing tape from the front, back and sides of the printer.
About Your Printer
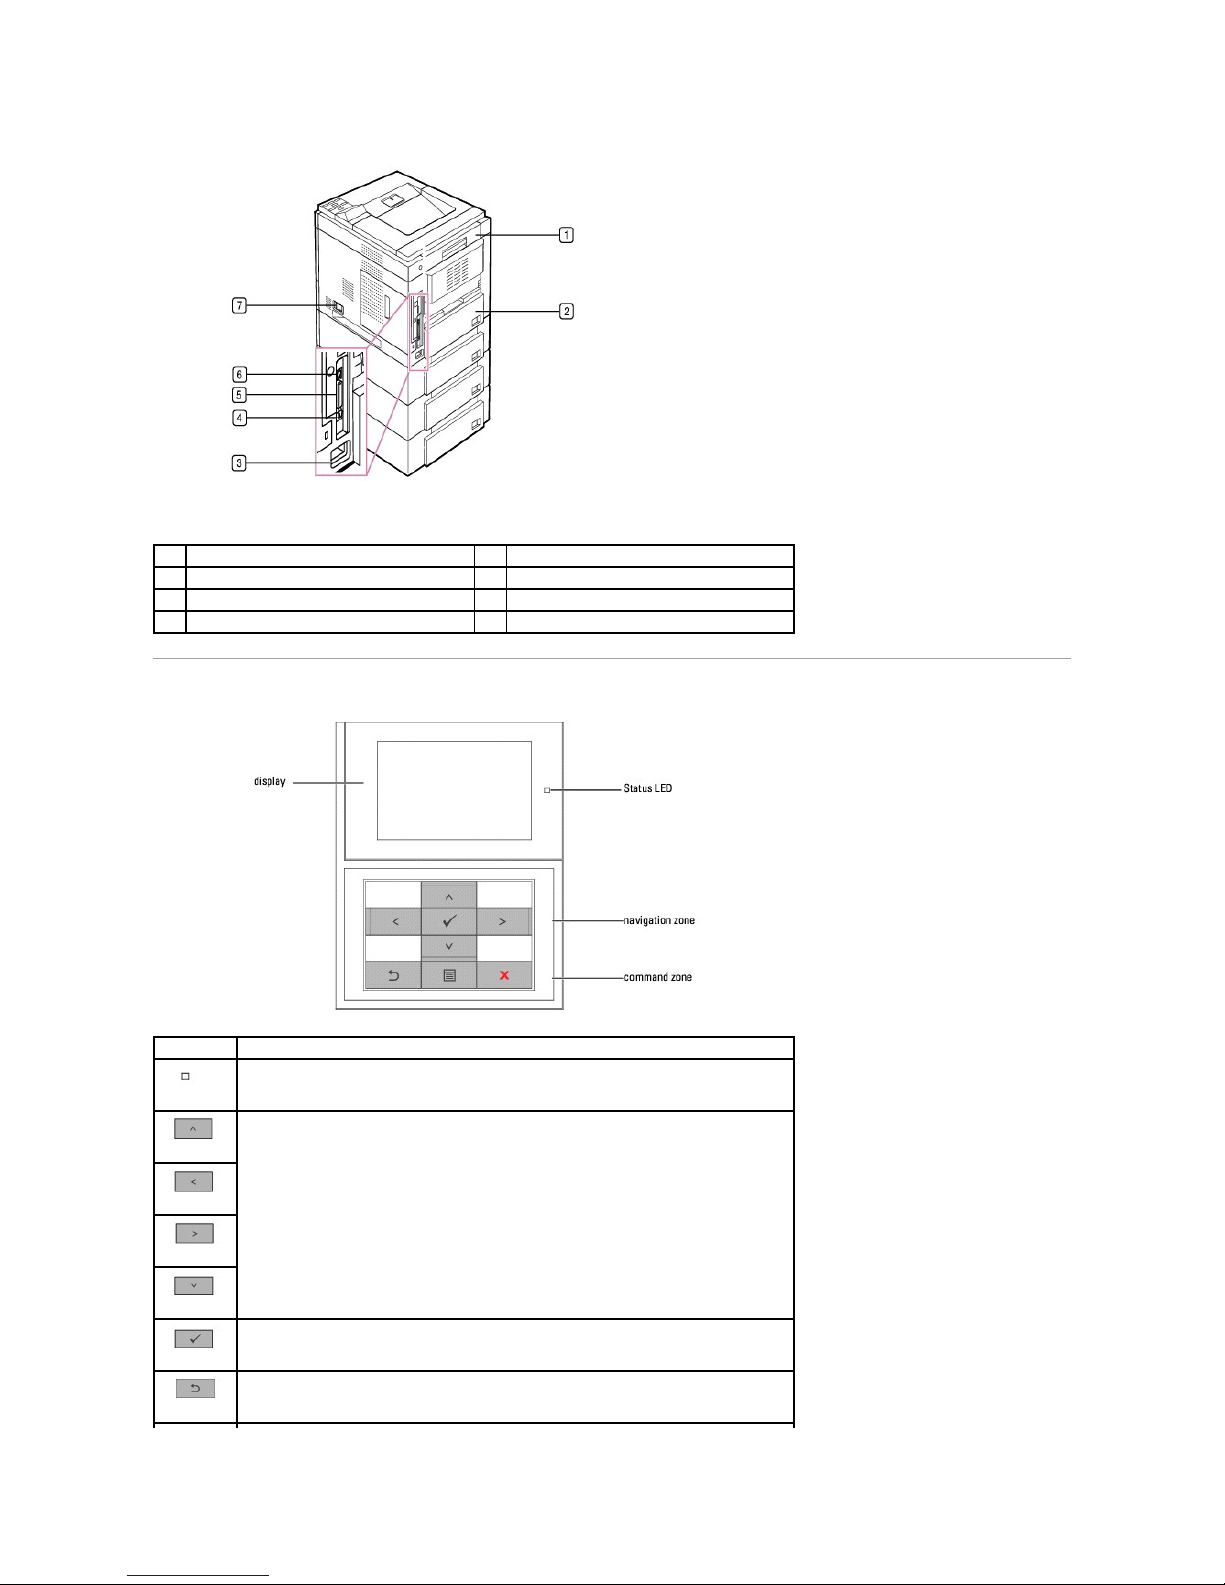
These are the main components of your printer. The following illustrations show the standard Dell 5330dn Mono Laser Printer and optional trays attached:
Front View
Rear View
1
top cover
9
handle
2
output support
10
tray 1 (500-sheet paper feeder)
3
output tray
11
multi-purpose feeder paper width guides
4
control panel
12
multi-purpose feeder extension
5
control board cover
13
multi-purpose feeder
6
optional tray 2 (500-sheet paper feeder)
14
Output Expander
7
optional tray 3 (500-sheet paper feeder)
15
High Capacity Feeder
8
optional tray 4 (500-sheet paper feeder)
Page 4
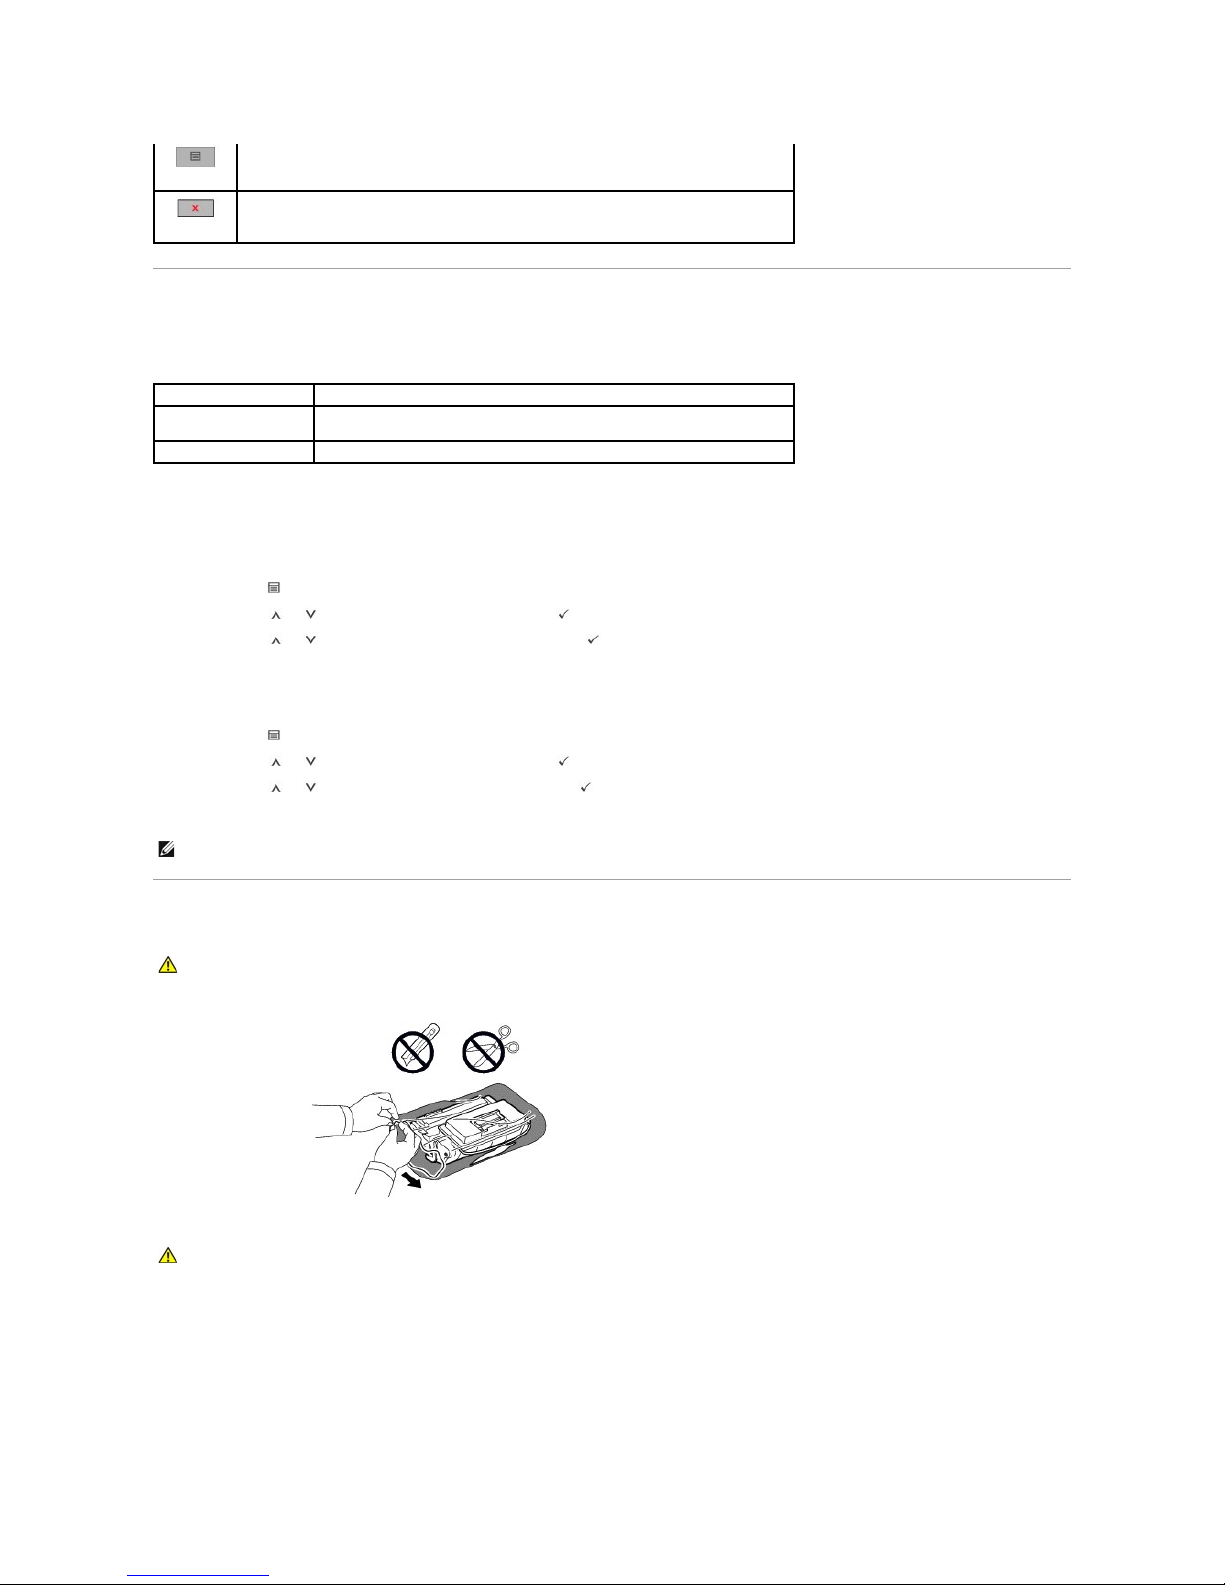
Operator Panel Button Functions
1
rear door
5
parallel port
2
duplex unit
6
USB port
3
power receptacle
7
power switch
4
network port
Button:
Discription:
Dual Color LED Shows the Printer status.
4-way Scroll, increasing or decreasing values.
Confirms screen selection.
Goes back to the upper menu level.
Page 5
Internal Fonts
The Dell 5330dn Mono Laser Printer supports PCL and PS fonts.
If you want to see the PCL and PS font list, follow these steps:
Printing the PCL Font list
1. Press Menu ( ).
2. Press Scroll ( to ) to highlight Reports and press Select ( ).
3. Press Scroll ( to ) to highlight PCL Font list and press Select ( ).
4. PCL Font list pages print out.
Printing the PS Font list
1. Press Menu ( ).
2. Press Scroll ( to ) to highlight Reports and press Select ( ).
3. Press Scroll ( to ) to highlight PS Font list and press Select ( ).
4. PCL Font list pages print out.
Installing the Toner Cartridge
1. Remove the toner cartridge from its bag.
2. Locate the sealing tape at the end of the toner cartridge. Carefully pull the tape completely out of the cartridge and discard it.
Enter Menu mode and scroll through the available menus.
Stops an operation at any time.
Font
Supported List
Standard Font List
PCL93 scalable fonts, 1 bitmapped fonts.
PostScript® Level 3 Emulation: 136 scalable fonts
Additional Fonts
Can be added by installing optional USB font card.
NOTE: Optional Fonts: Add additional PCL fonts, Barcodes, PCL Logos by installing the optional USB font card or harddisk. Please contact your local Dell
sales team in your region for further details.
CAUTION: Do not touch the green underside of the toner cartridge. Use the handle on the cartridge to avoid touching this area.
CAUTION: To prevent damage, do not expose the toner cartridge to light for more than a few minutes.
Page 6
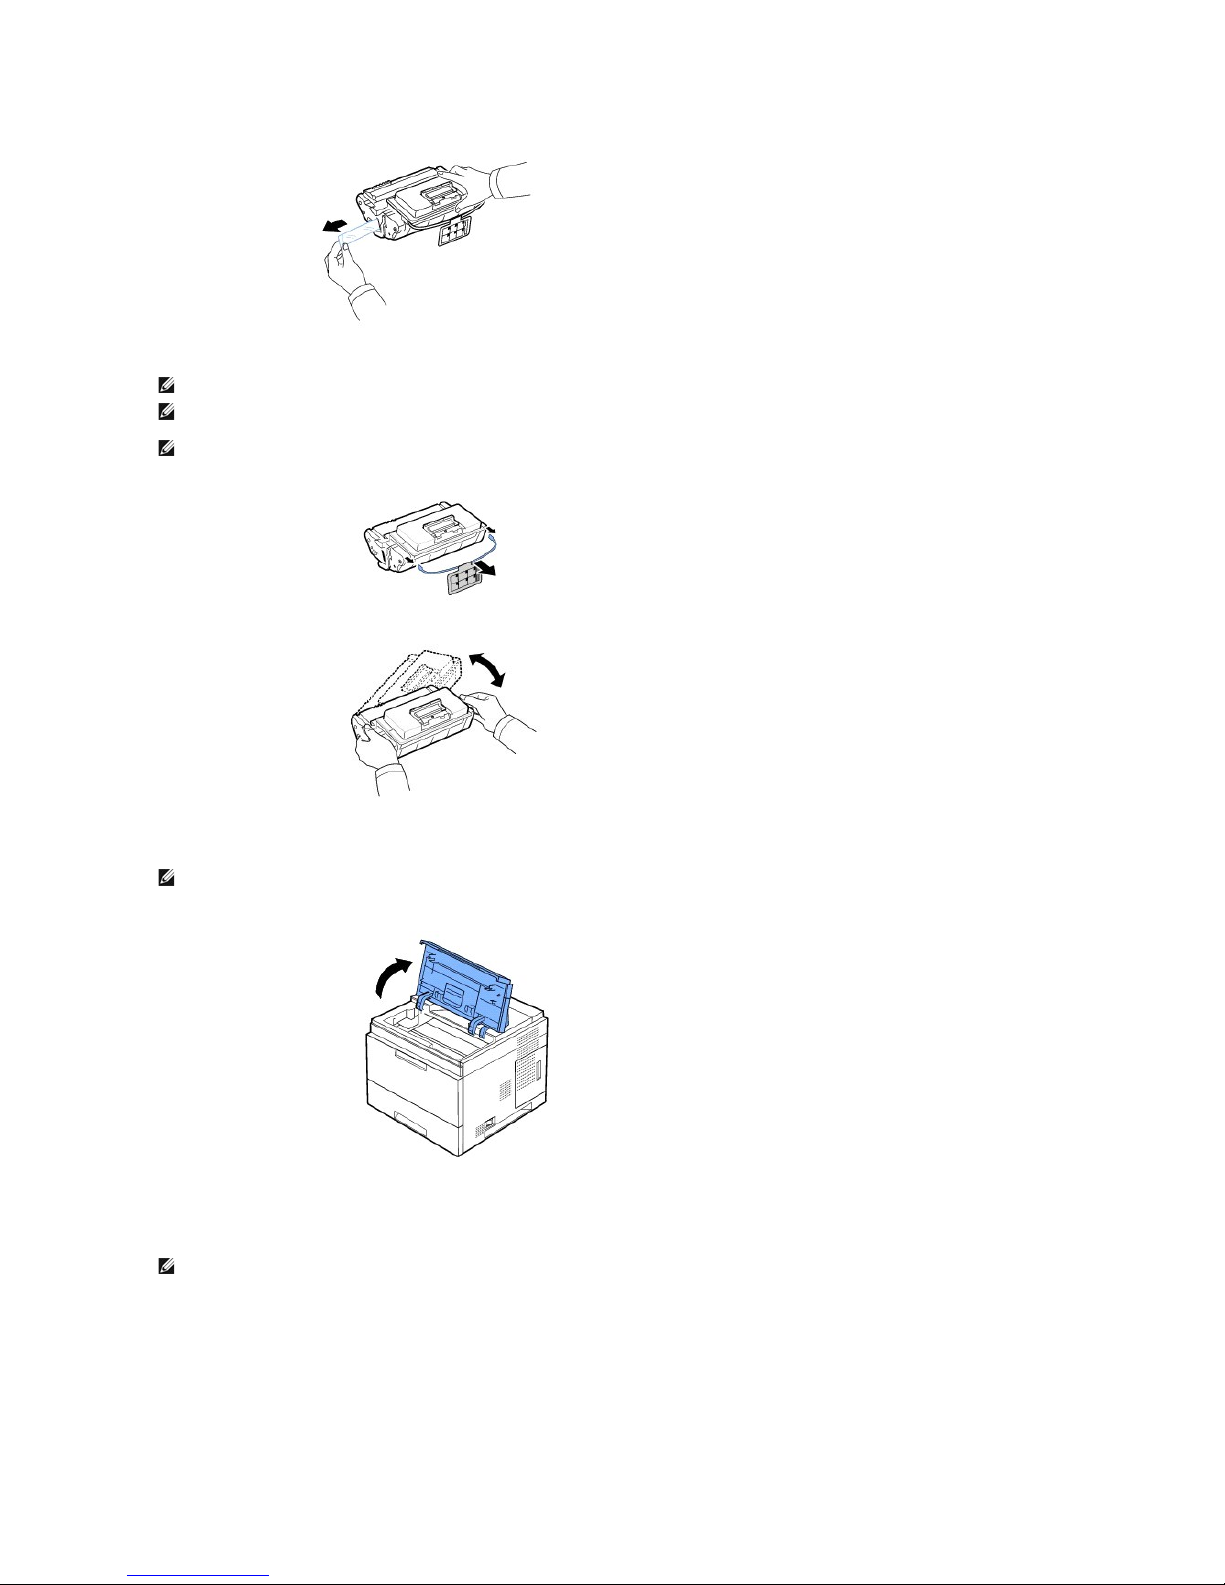
3. Remove the flexible plastic holder from the toner cartridge.
4. Thoroughly shake the cartridge 5 or 6 times to distribute the toner evenly inside the cartridge.
Thoroughly roll the cartridge to assure maximum copies per cartridge. Save the box and the plastic bag for shipping.
5. Open the top cover.
6. Hold the toner cartridge by the handle and slowly insert the cartridge into the printer opening.
Tabs on the sides of the cartridge and corresponding grooves within the printer guide the cartridge into the correct position until it locks firmly into place.
NOTE: The sealing tape should be longer than 60 cm when correctly removed.
NOTE: Holding the toner cartridge, pull the sealing tape straight to remove it from the cartridge. Be careful not to cut the tape. If this happens, you
cannot use the toner cartridge.
NOTE: See the help pictures on the cartridge wrapping paper.
NOTE: If toner comes into contact with your clothing, wipe the toner off with a dry cloth and wash your clothing in cold water. Hot water sets toner into
fabric.
NOTE: Do not use excessive force when inserting the cartridge into the printer. Ensure cartridge is placed correctly according to the tabs and grooves
before applying any pressure.
Page 7
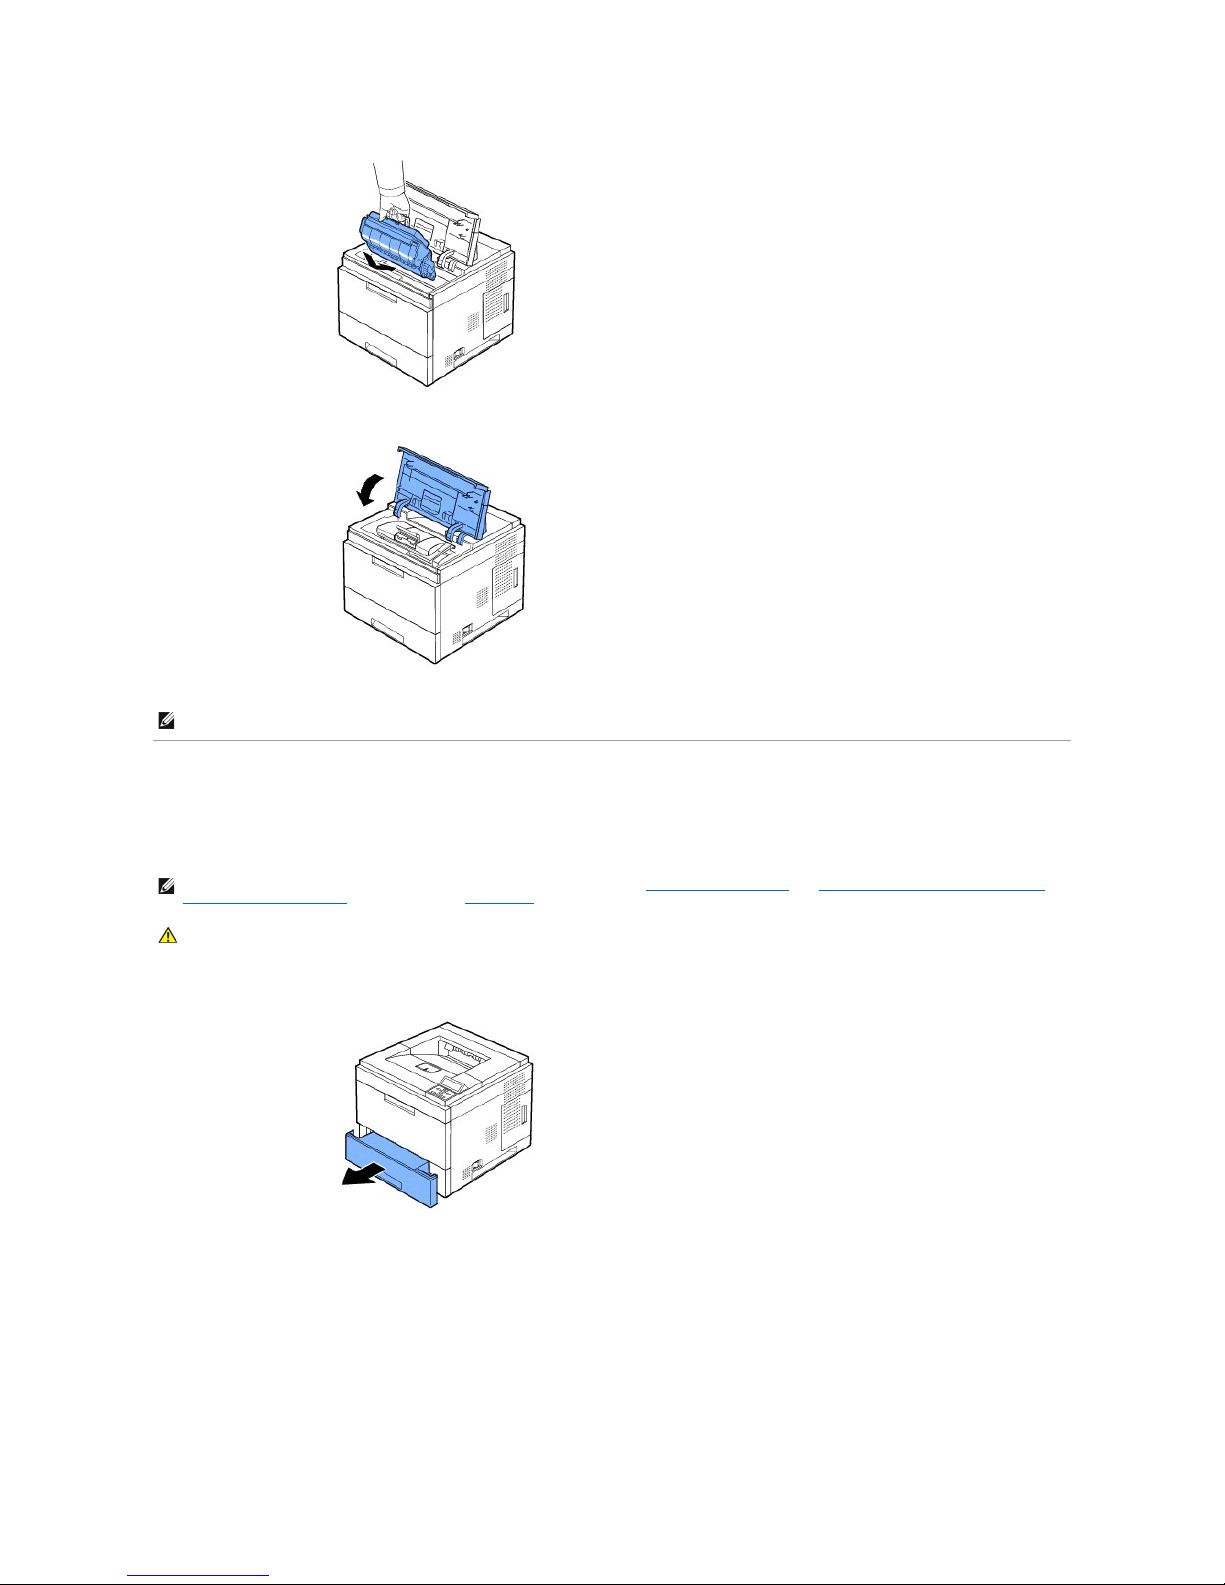
7. Close the top cover. Ensure cover is securely closed.
Loading Print Media
Load up to 500 sheets of plain paper in tray 1.
To load a stack of A4 or Letter-sized paper:
1. Pull open tray 1 and remove from the printer.
2. Squeeze the paper width guide and slide it to the desired paper size marked at the bottom of the tray.
NOTE: When a new cartridge is in its first use, wait about 15 seconds before the first printed paper comes out.
NOTE: Set the paper type and size after loading paper into the paper tray. See "Setting the Paper Type" and "For standard, Optional 500 Sheet Tray
and HCF Setting Paper Size" for DOS printing, or "Paper Tab" for PC printing.
CAUTION: Do not use glued paepr or pad note. It could cause damage to the printer.
Page 8
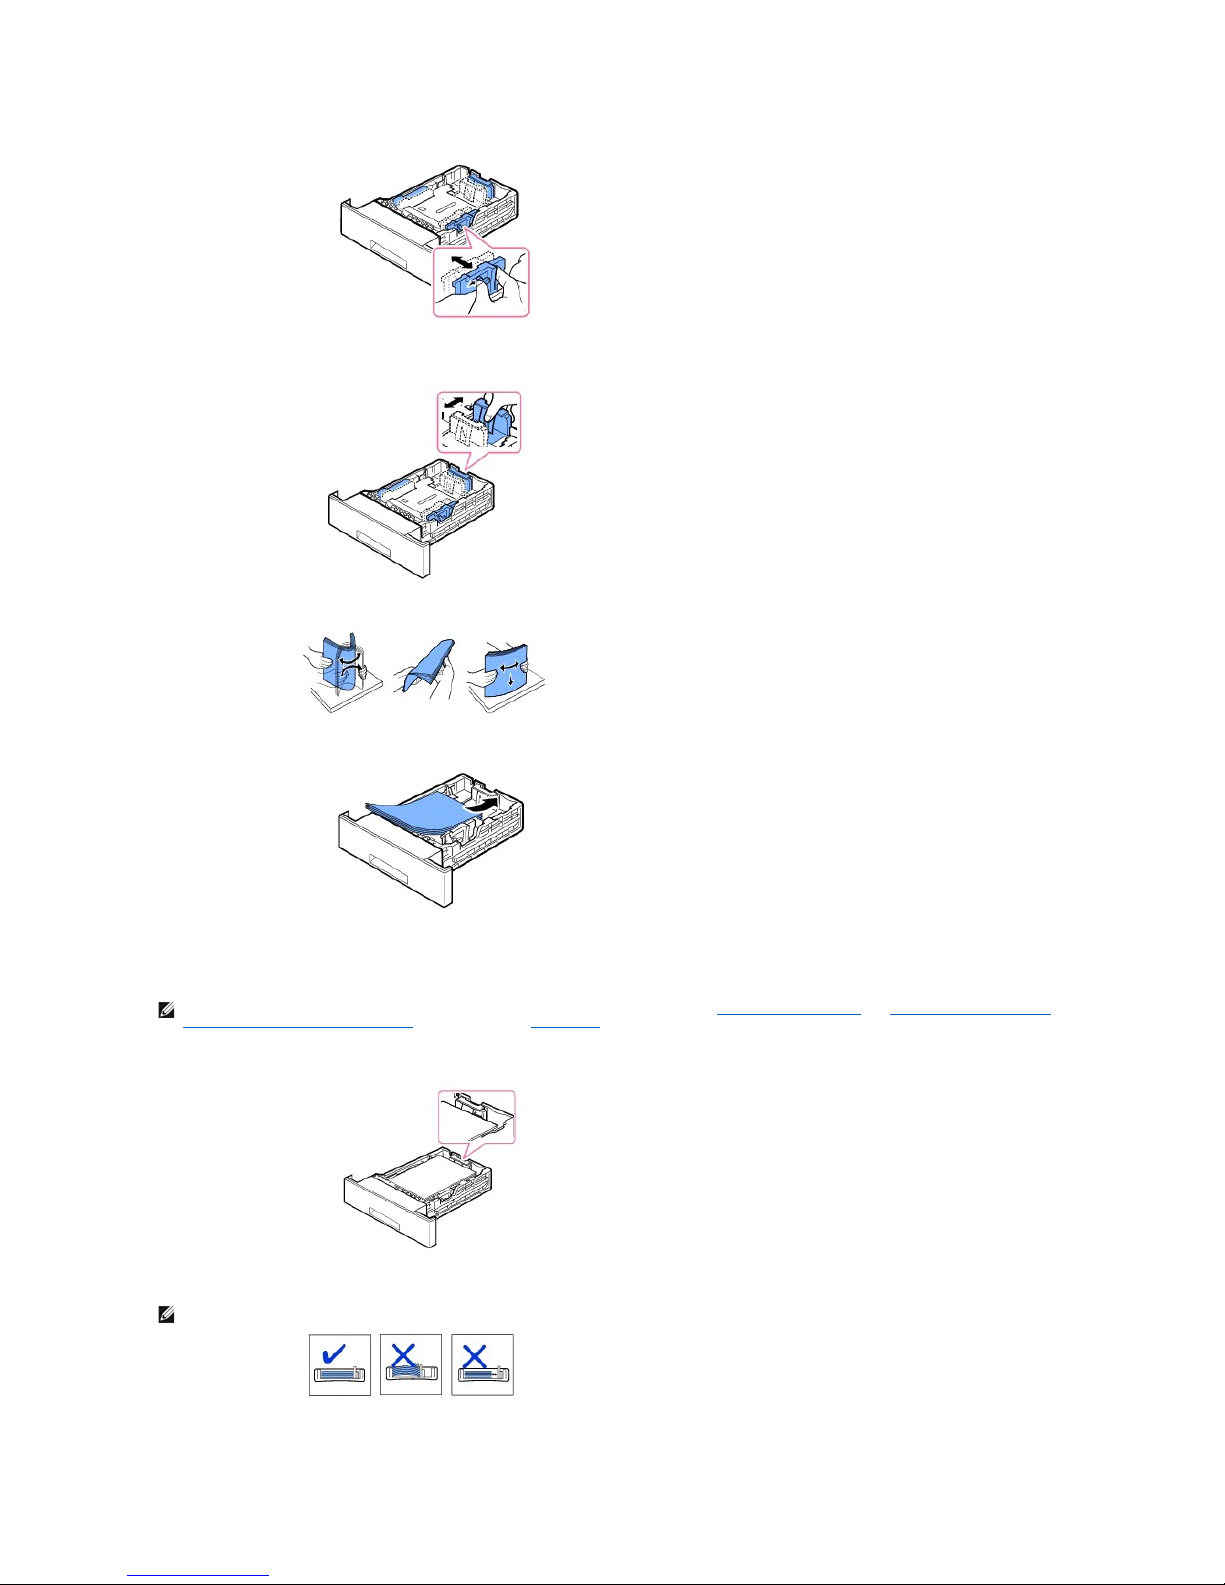
3. Squeeze the paper length guide and slide it to the desired paper size marked at the bottom of the tray.
4. Flex the sheets back and forth to loosen them, and then fan them out. Do not fold or crease the print media. Align the edges on a level surface.
5. Insert the paper stack into the tray with the print side facing down.
You can use previously printed paper. The printed side should be facing up with an uncurled edge at the top side. If you experience problems with the
paper feed, turn the paper around.
6. Ensure that the tray is not overfilled and that all four corners of the paper are flat in the tray and placed under the paper length guide bracket, as
shown below. Overfilling the tray may cause a paper jam.
NOTE: You need to adjust the paper guides when loading paper of a different size. Refer to "Setting the Paper Type" and "For standard, Optional 500
Sheet Tray and HCF Setting Paper Size" for DOS printing, or "Paper Tab" for PC printing.
NOTE: Improper adjustment of paper guides can result in paper jams.
Page 9
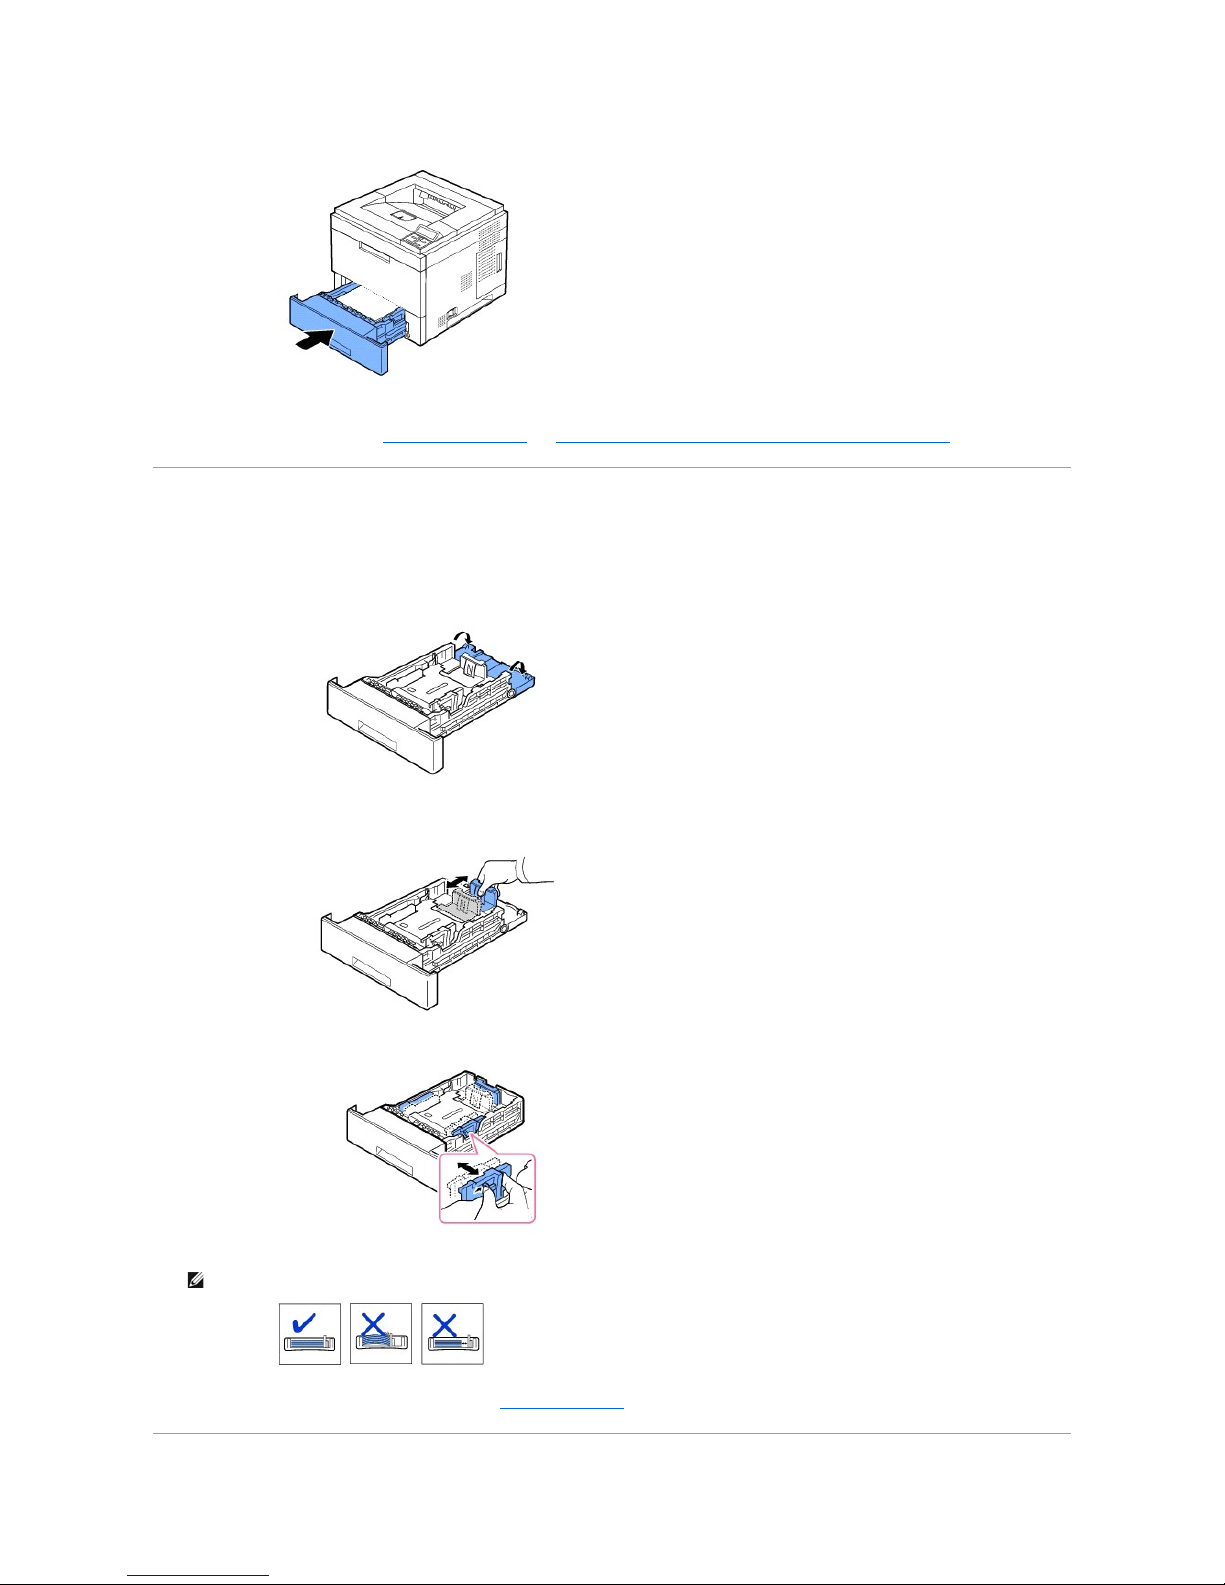
7. Insert and slide tray 1 back into the printer.
8. Set the paper type and size. See "Setting the Paper Type" and "For standard, Optional 500 Sheet Tray and HCF Setting Paper Size".
Changing the size of the paper in the paper tray
The tray is preset to Letter or A4 size, depending on country specifications. To change the size, you need to adjust the Paper guides.
1. Push the back plate of the tray outwards completely so that the length of the tray can be extended.
2. Squeeze the paper length guide and slide it to the required paper size you are loading, which is marked at the bottom of the tray.
3. Squeeze the paper width guide and slide it to the required paper size. The sizes are marked at the bottom of the tray.
Improper adjustment of paper guides could result in paper jams.
4. Load paper with the print side down. For details, see "Loading Print Media".
Page 10
Setting up Your Printer
Connecting the Printer Cable
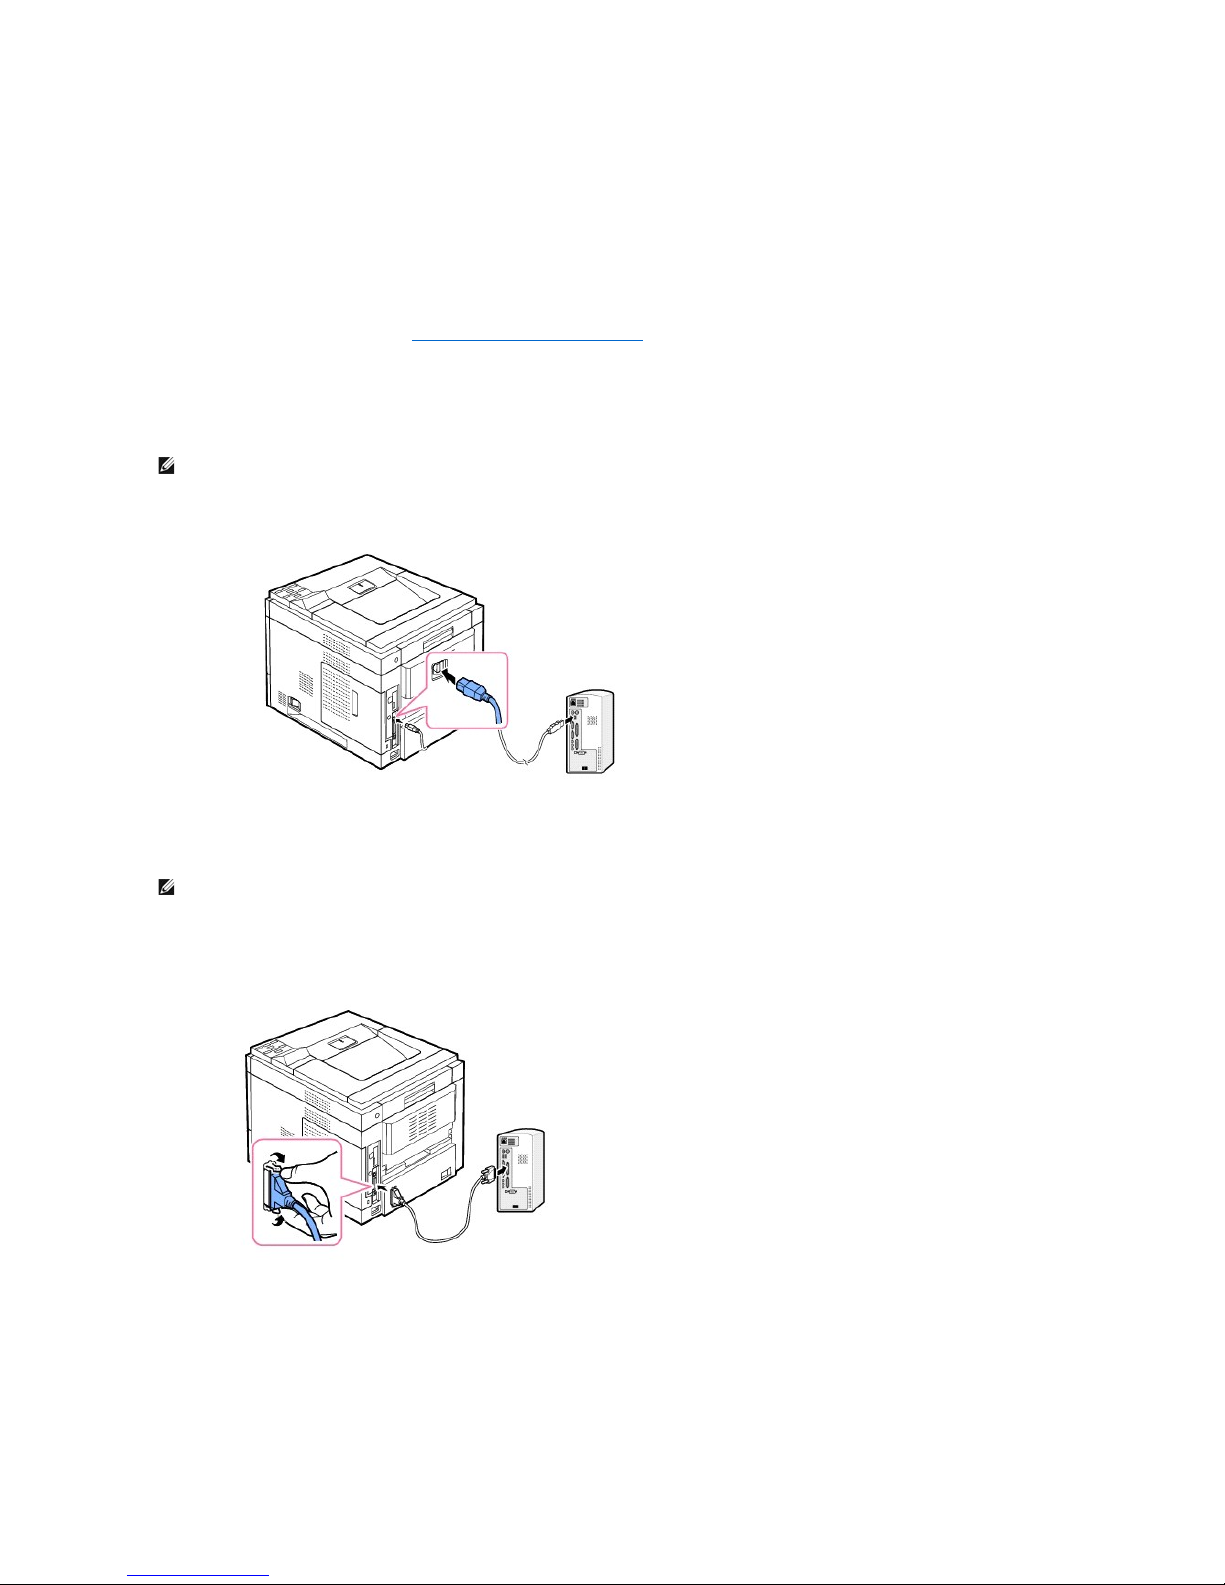
Connecting the Printer Locally
A local printer is a printer connected to your computer using USB or Parallel (IEEE1284 compatible) cable. If your printer is attached to a network instead of your
computer, skip the following steps and go to "Connecting the Printer to the Network".
USB and Parallel cables are sold separately. Contact Dell to purchase printer cable.
Using a USB cable:
1. Ensure the printer, computer, and any other attached devices are powered off and unplugged.
2. Connect a USB cable to the USB port on your printer
.
3. Connect the other end of the cable into an available USB port on the computer. Ensure that it is not plugged into the USB keyboard.
Using a Parallel cable:
1. Ensure the printer, computer, and any other attached devices are powered off and unplugged.
2. Connect a Parallel cable to the Parallel port on your printer.
Push the metal clips down fit inside the notches on the cable plug.
3. Connect the other end of the cable to the parallel interface port on your computer and tighten the screws. If you need help, please refer to your
computer's User's Guide.
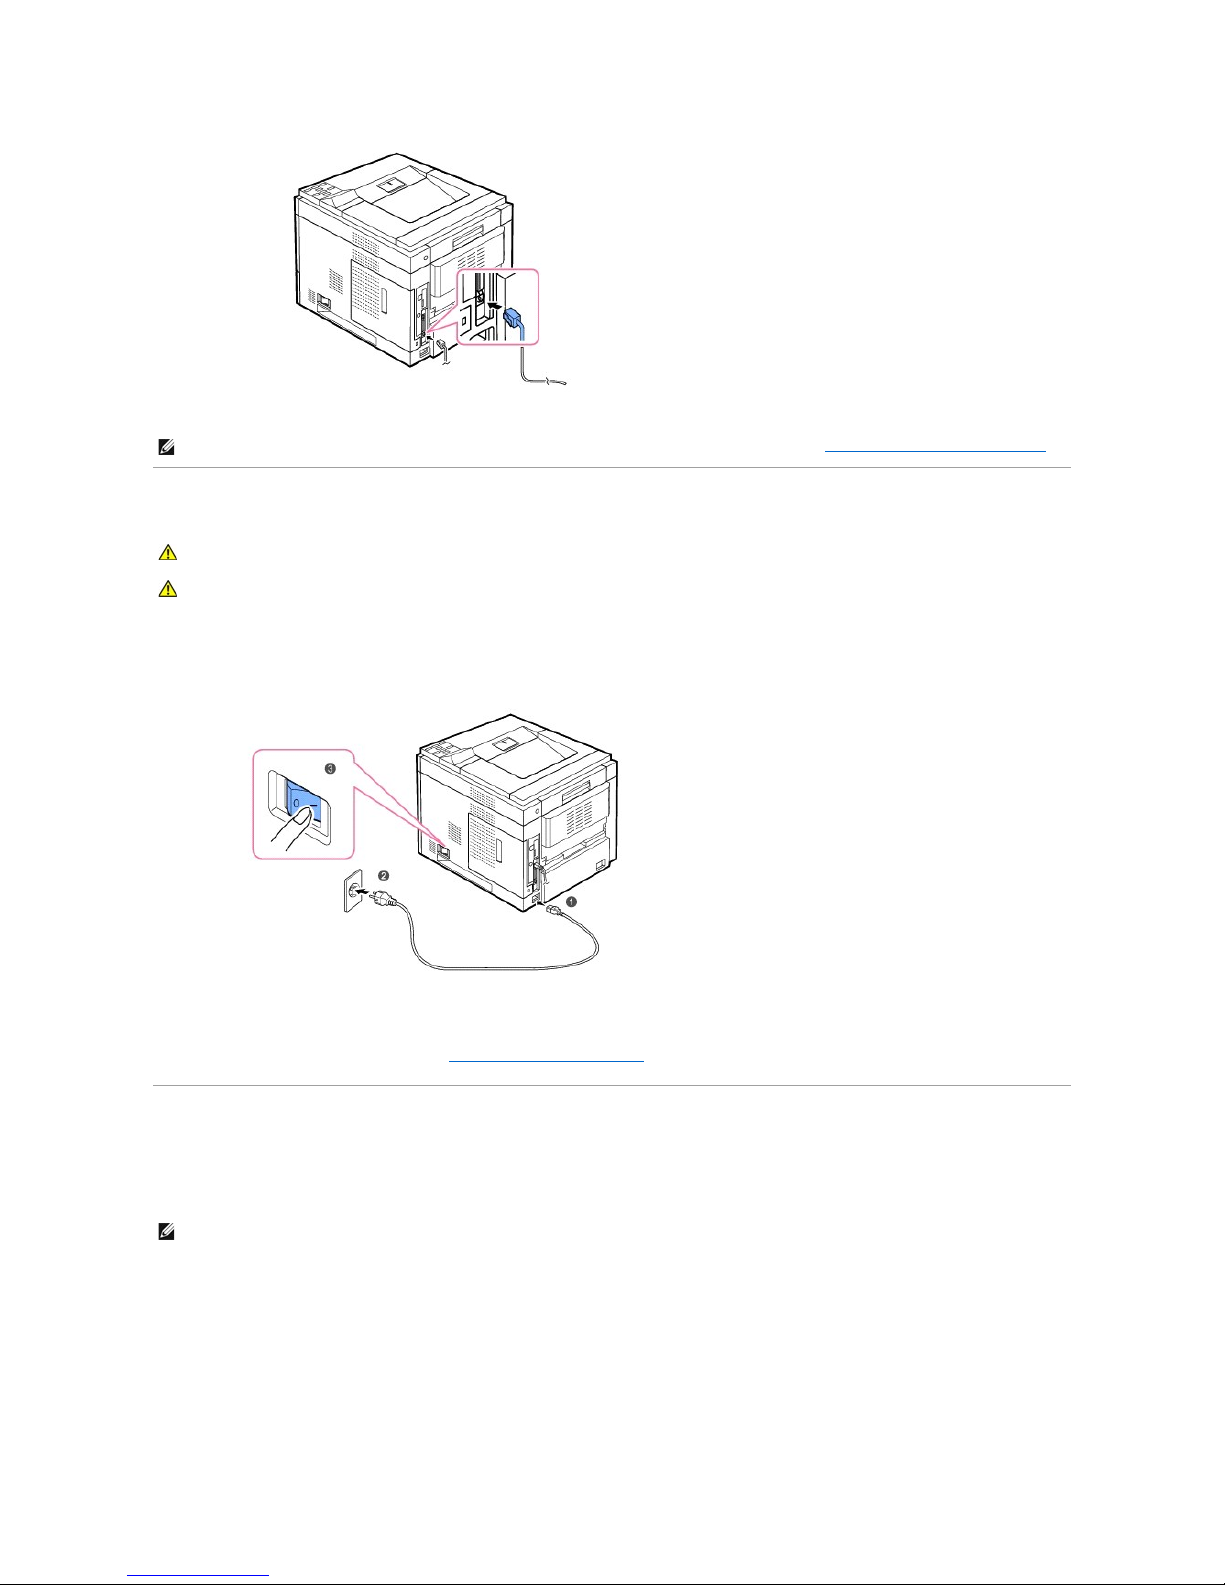
Connecting the Printer to the Network
1. Ensure the printer, computer, and any other attached devices are powered off and unplugged.
2. Connect one end of a standard category 5 Unshielded Twisted Pair (UTP) network cable into a LAN drop or hub and the other end into the Ethernet
network port at the back of the printer. The printer automatically adjusts to the network speed
NOTE: Connecting the printer to the USB port of the computer requires a certified USB cable. You will need to buy a USB 2.0-compliant cable which is
about 10 feet (3 meters) in length.
NOTE: Connecting the printer to the Parallel port of the computer requires a certified Parallel cable. You will need to buy a IEEE1284-compliant cable
which is about 10 feet (3 meters) in length.
Page 11
.
Powering On the Printer
To turn on the printer:
1. Plug one end of the power cord into the power connector at the back of the printer and the other end into a properly grounded power outlet.
2. Press the power switch to power on the printer. The message SYSTEM INITIALIZING appears on the display indicating that the printer is now on.
To view your display text in another language, see "Changing the Display Language".
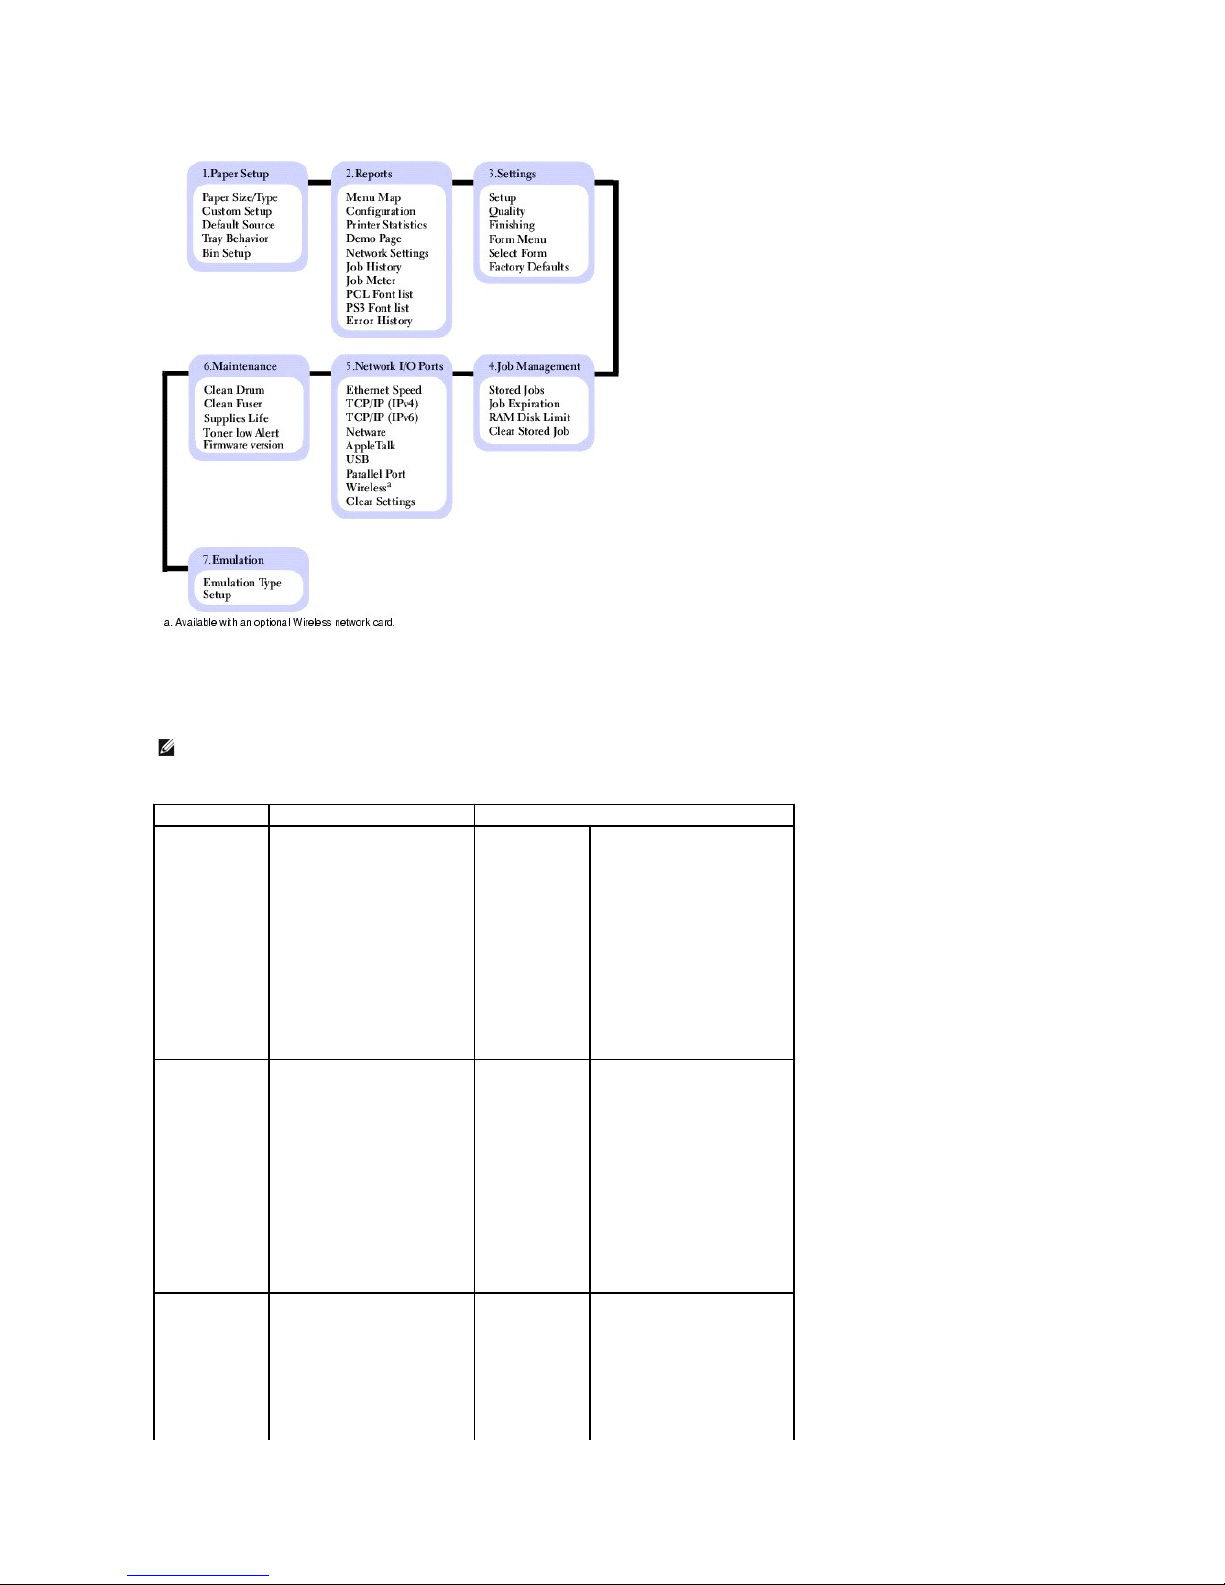
Understanding Operator Panel Menus
A number of menus are available to assist in changing printer settings. The diagram below shows the menus and items available in each menu.
Dell 5330dn Mono Laser Printer Menu Function
NOTE: After connecting the printer, you need to configure the network parameters on the operator panel. See "Printing a Network Information Page".
CAUTION: The fusing area inside your printer becomes hot once the printer is powered on. To avoid injuries or burns, access this area only when
the system is powered off and has cooled down.
CAUTION: Do not disassemble the printer when it is powered on. If you do, it may give you an electric shock.
NOTE: Some menus may not appear in the display depending on options or models. If so, it is not applicable to your machine.
Page 12
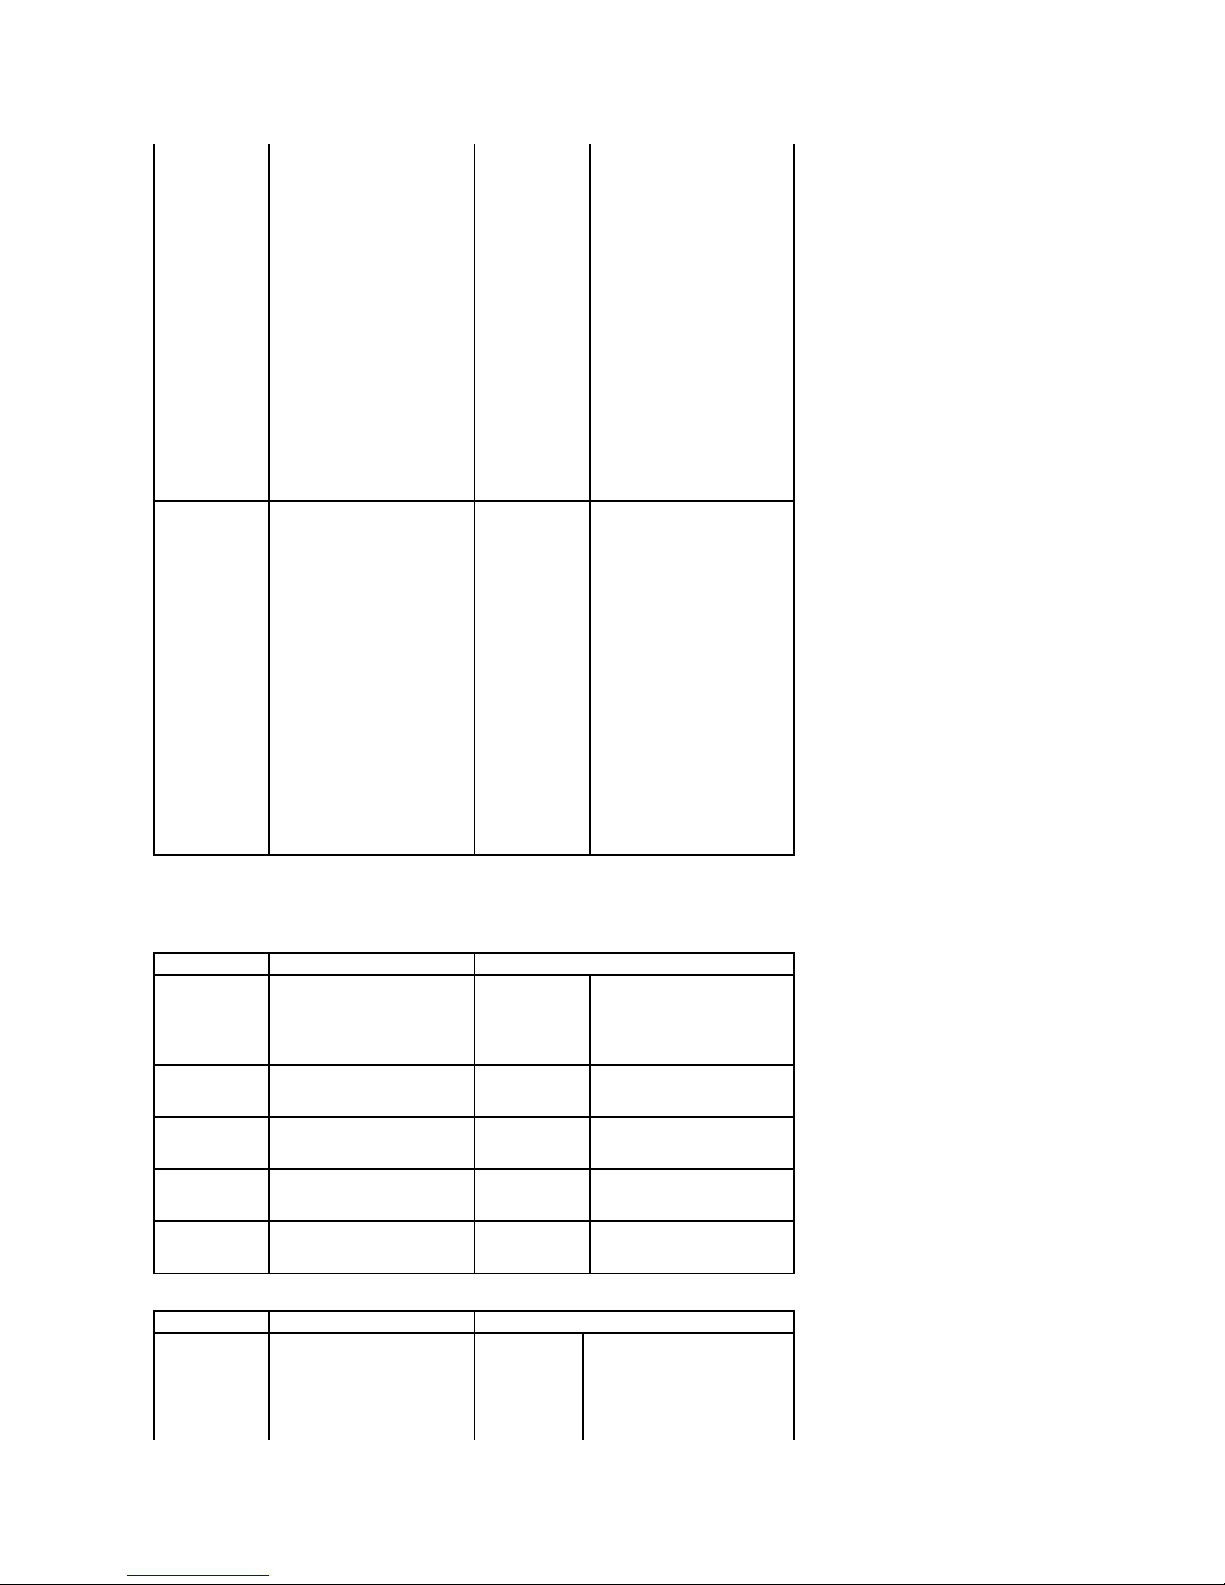
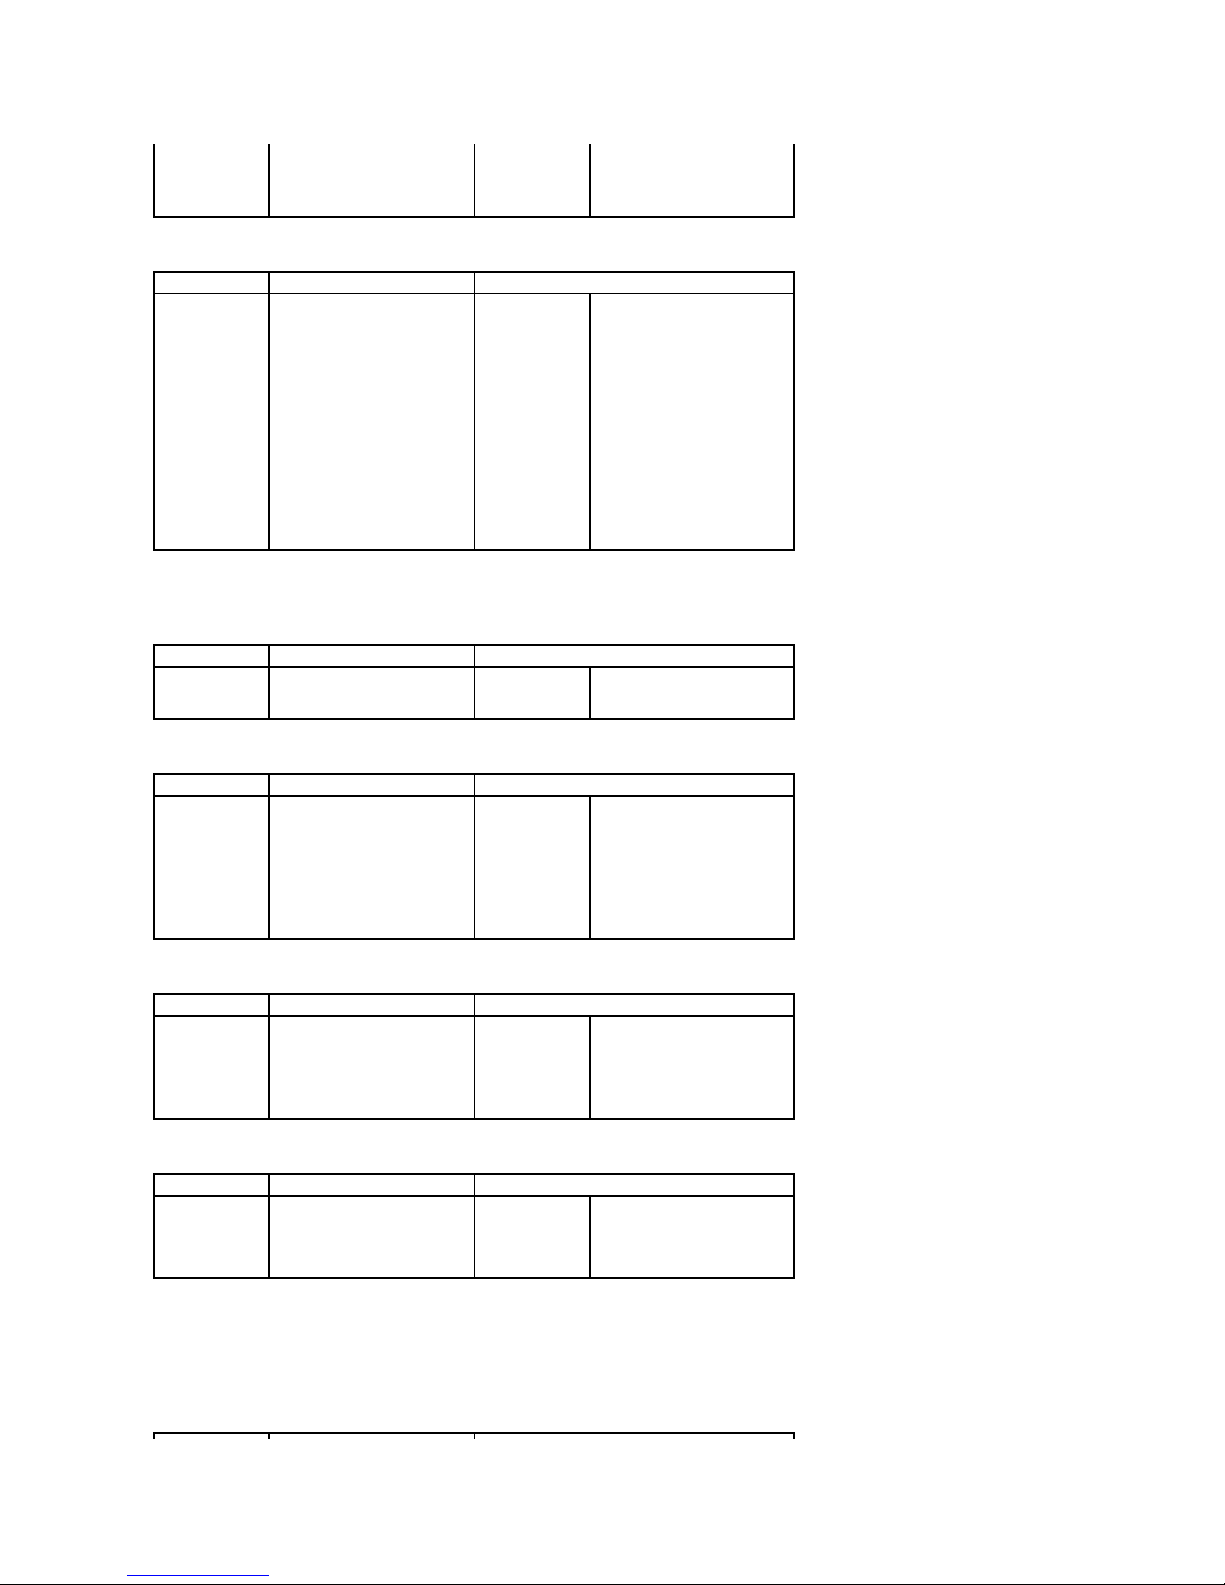
1.Paper Setup
Paper Size/Type
This menu selection is used to set the size and type of media loaded into an input tray.
NOTE: Only installed paper sources are displayed.
Menu selection:
Purpose:
Values:
Tray <x>
Size
Depending on the paper source
or duplex setting, available
options vary. Select the paper
size currently loaded in the tray.
NOTE: For trays with automatic
size sensing, only the value
detected by the hardware
appears.
Letter* (US)
Legal
Folio
A4* (non-US)
JIS B5
Executive
A5
Custom
If you loaded the same size and
type of paper in two paper
sources, the trays are
automatically linked. When one
paper source is empty, paper
automatically feeds from the next
linked source.
Tray <x>
Type
Select the paper type currently
loaded in the tray.
Plain Paper*
Thick
Thin
Colored
Printed
Recycled
Bond
Letter Head
Use this menu item to:
Optimize print quality for the
specified paper.
Select paper sources through
your software application by
selecting type and size.
Automatically link paper sources.
Any sources containing the same
type and size of paper are
automatically linked by the printer
if you have set the Paper Size
and the Paper Type to the correct
values.
MPF
Size
Select the paper size currently
loaded in the multi-purpose
feeder.
Letter (US)
Legal
Oficio
Folio
A4 (non-US)
Page 13
Custom Setup
This menu selection is used to specify the width and length of the custom media.
Default Source
ISO B5
JIS B5
Statement
Executive
A5
A6
Monarch Env.
DL Env.
C5 Env.
C6 Env.
10 Env.
Custom
MPF
Type
Select the paper type currently
loaded in the multi-purpose
feeder.
Plain Paper
Thick
Thicker
Thin
Colored
Preprinted
Recycled
Transparency
Labels
Card Stock
Bond
Letter Head
Menu selection:
Purpose:
Values:
Units
Switches measurements between
millimeters and inches.
INCH
Millimeters
l INCH: displays paper
width and length in inches.
l Millimeters: displays paper
width and length in
millimeters.
Tray <x>
Width
Set the paper width of custom
media.
148 - 216 mm
Set the custom width from 148 to
216 mm
Tray <x>
Length
Set the paper length of custom
media.
210 - 355 mm
Set the custom length from 210
to 355 mm
MPF
Width
Set the paper width of custom
media.
76 - 216 mm
Set the custom width from 76 to
216 mm
MPF
Length
Set the paper length of custom
media.
127 - 355 mm
Set the custom length from 127
to 355 mm
Menu selection:
Purpose:
Values:
Default Source
Identifies the default paper
source.
Tray <x>
MP Feeder
If you loaded the same size and
type of paper in two paper
sources (and the Paper Size and
Paper Type menu items are
correctly set), the trays are
automatically linked. When one
paper source is empty, paper
automatically feeds from the next
Page 14
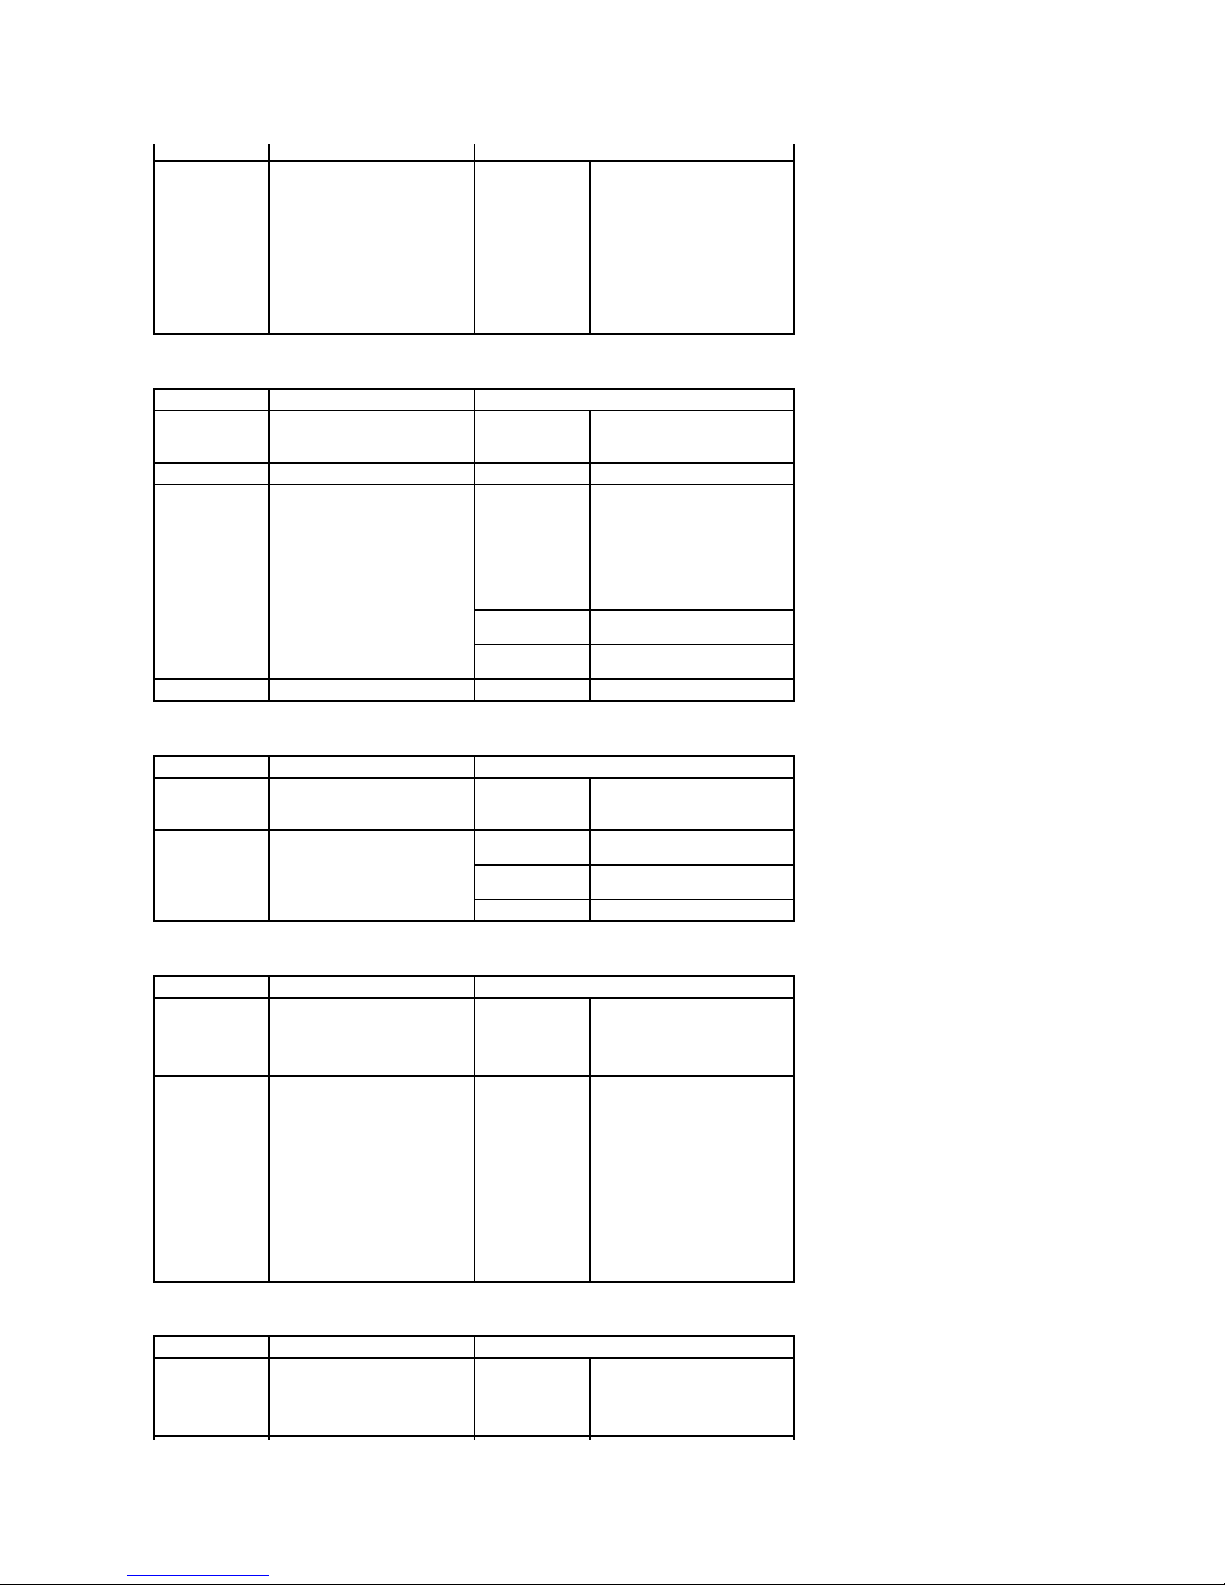
Tray Behavior
Bin Setup
2.Report
linked source.
Menu selection:
Purpose:
Values:
Tray Linking
When you select any other value
except Auto from Paper
Size/Type and the selected tray
is empty, you can set the printer
automatically to print from other
trays.
On
Off
If this menu item is set to Off,
the printer doesn't work until you
insert paper into the specified
tray.
Substitute Size
Substitutes the specified paper
size if the requested size is not
loaded.
Nearest Size
Off
Substitute size set to Off means
no substitution is allowed for the
requested paper size. See
"Substitute Size".
Configure MPF
Determines when the printer
selects paper loaded in the multipurpose feeder.
Bypass
Tray Mode
l Bypass: Paper loaded in
the multi-purpose feeder is
used first when printing a
job, even though there is
paper in other trays.
l Tray Mode: Paper loaded
in the multi-purpose feeder
is used last when printing
a job.
NOTE: Bin Setup is only displayed when at least one optional output expander is installed.
Menu selection:
Purpose:
Values:
Bin Setup
An output expander increases
the capacity of paper output.
Link
De-Link
l Link: The printer continues
to print using the output
expander after the
standard output tray is full.
l De-Link: The printer stops
printing when standard
output tray is full.
Menu selection:
Purpose:
Values:
Report
Menu Map
Configuration
Demo page
Network Settings
Job History
Job Meter
PCL Font List
PS Font List
Error History
After selecting each item, the
page will print, and the printer
will return to Ready.
l Menu Map: Shows the
layout and current settings
of the control panel menu
items.
l Configuration: Shows the
printer's current
configuration.
l Demo page: Allows you to
check if your printer
properly performs printing.
l Network Settings: Prints
information relating to
network settings and
verifies the network
connection. Also provides
information to configure
printer for network
printing.
l Job History: Shows the list
of completed print jobs.
The list contains up to 25
files from the latest print
jobs.
l Job Meter: Contains the
total number of pages
printed by person or group.
This page can be used for
cost accounting.
l PCL Font List: Prints a
sample of all printer fonts
available for PCL
emulation.
l PS Font List: Prints a
sample of all printer fonts
available for PostScript
emulation.
l Error History: Shows the
list of errors occured.
Page 15
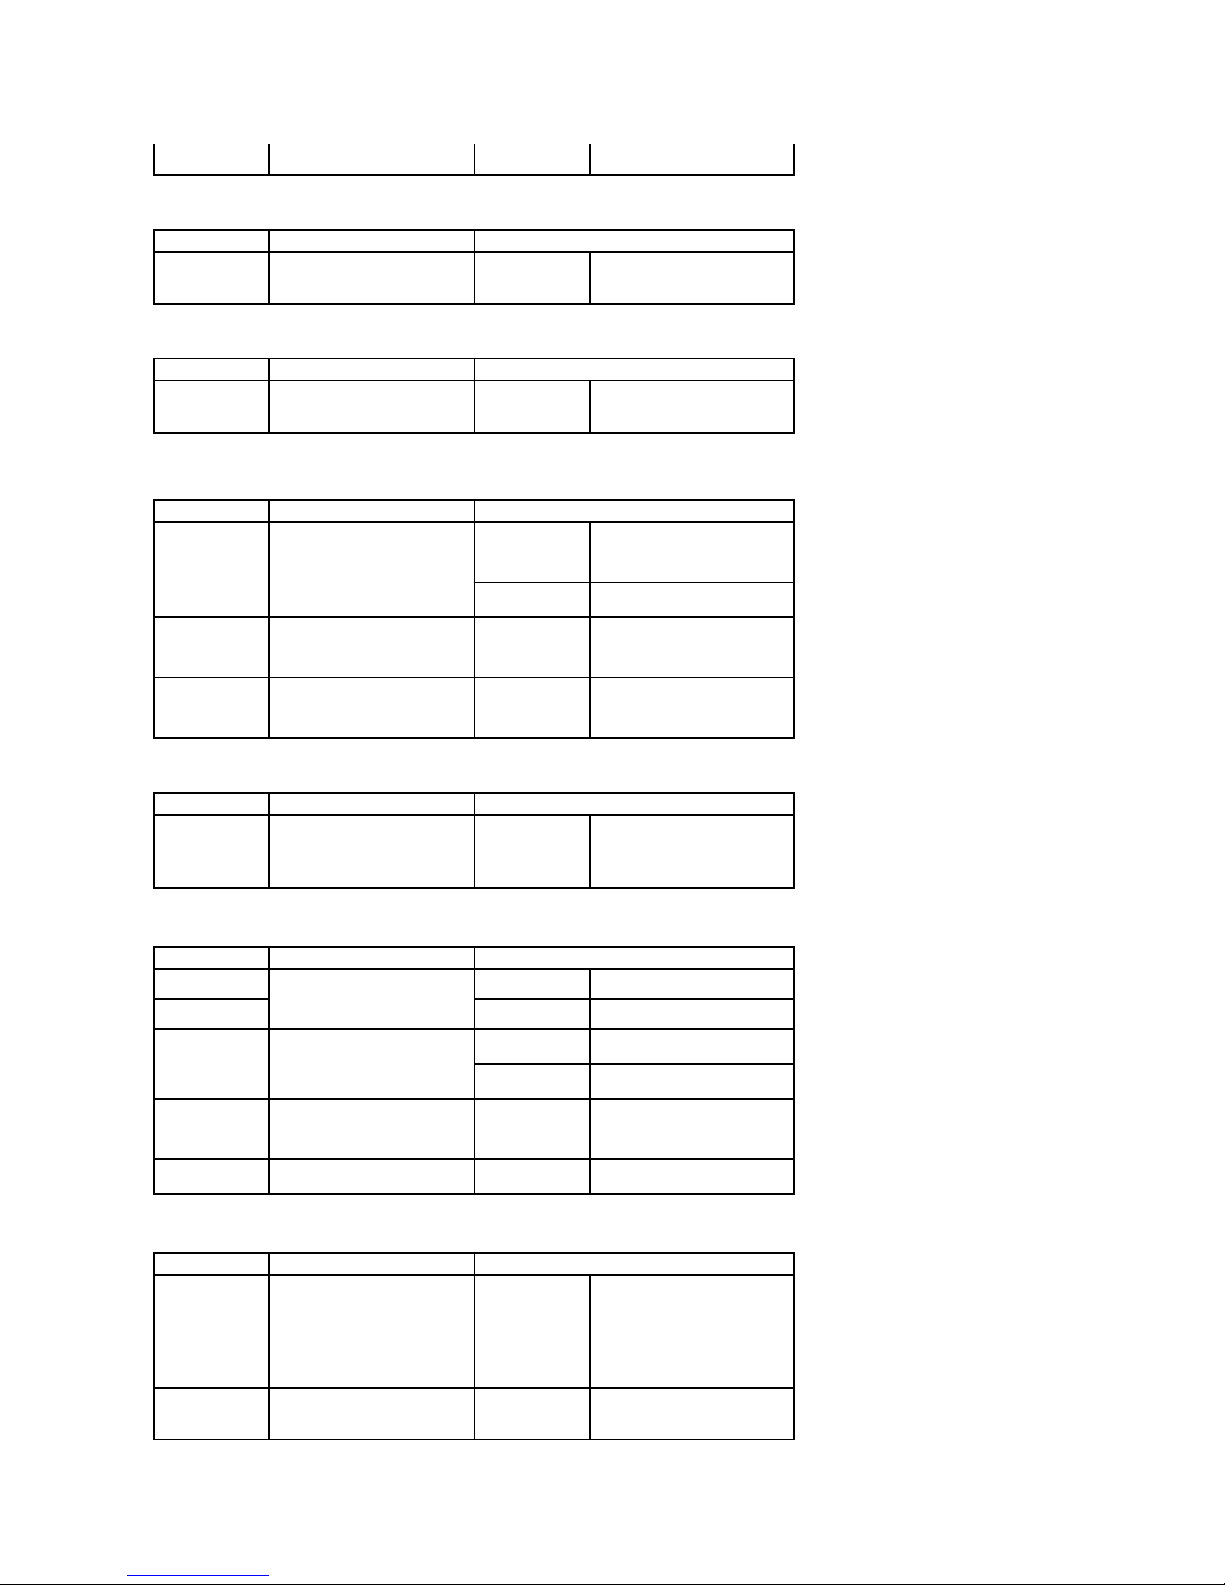
3.Settings
Setup
Use this menu selection to configure a variety of printer features.
Menu selection:
Purpose:
Values:
Language
Determines the text language
displayed on the operator panel.
English
Deutsch
Espanol
FRANCAIS
Italiano
Nederlands
After selecting each item, the
page will print, and the printer
will return to Ready.
Power save
Specifies the number of minutes
the printer waits after a job is
printed before it goes into a
reduced power state.
5 min
10 min
15 min
30 min
60 min
120 min
Specifies the number of minutes
after a print job before the
printer goes into Power Save
mode. (Your printer may not
support the entire range of
values.)
The factory default Power Save
setting depends on your printer
model. Print the menu settings
page to determine the current
Power Save setting. When the
printer is in Power Save mode, it
is still ready to receive print jobs.
Select a high value if your printer
is in constant use. Under most
circumstances, this keeps the
printer ready to print with
minimum warm-up time.
Altitude Adjust
Optimizes print quality according
to your altitude.
Plain
High
Higher
Highest
l Plain: 0 m ~ 1,000 m
l High: 1,000 m ~ 2,000 m
l Higher: 2,000 m ~ 3,000 m
l Highest: 3,000 m ~ 4,000
m
Timeout
Specifies the amount of time (in
seconds) the printer waits to
return to the home screen,
receive an end-of-job message,
or receive additional bytes of
data from the computer.
NOTE: Wait Timeout is only
available when you use
PostScript emulation. This menu
value has no effect on PCL
emulation print jobs.
Print Time Out
15, 30, 60, 90*,
180
15-180 - Specifies the amount of
time the printer waits for an endof-job message before canceling
the remainder of the print job.
When the timer expires, any
partially formatted page still in
the printer is printed, and other
input ports are examined to see if
data exists.
90* is the default setting.
Print Recovery
Auto Continue
On
Off
Determines whether or not the
printer continues printing when it
detects the paper unmatched to
your paper setting.
l On: If the paper mismatch
occurs, an error message
will display. The printer
goes offline for 30 seconds,
then automatically clears
the message and
continues printing.
l Off: If a paper mismatch
occurs, an error message
remains on the display,
and the printer remains offline until you insert the
correct paper.
Jam Recovery
On
Off
Specifies whether the printer
reprints jammed pages.
l On: Printer reprints
jammed pages.
l Off: Printer does not
reprint jammed pages.
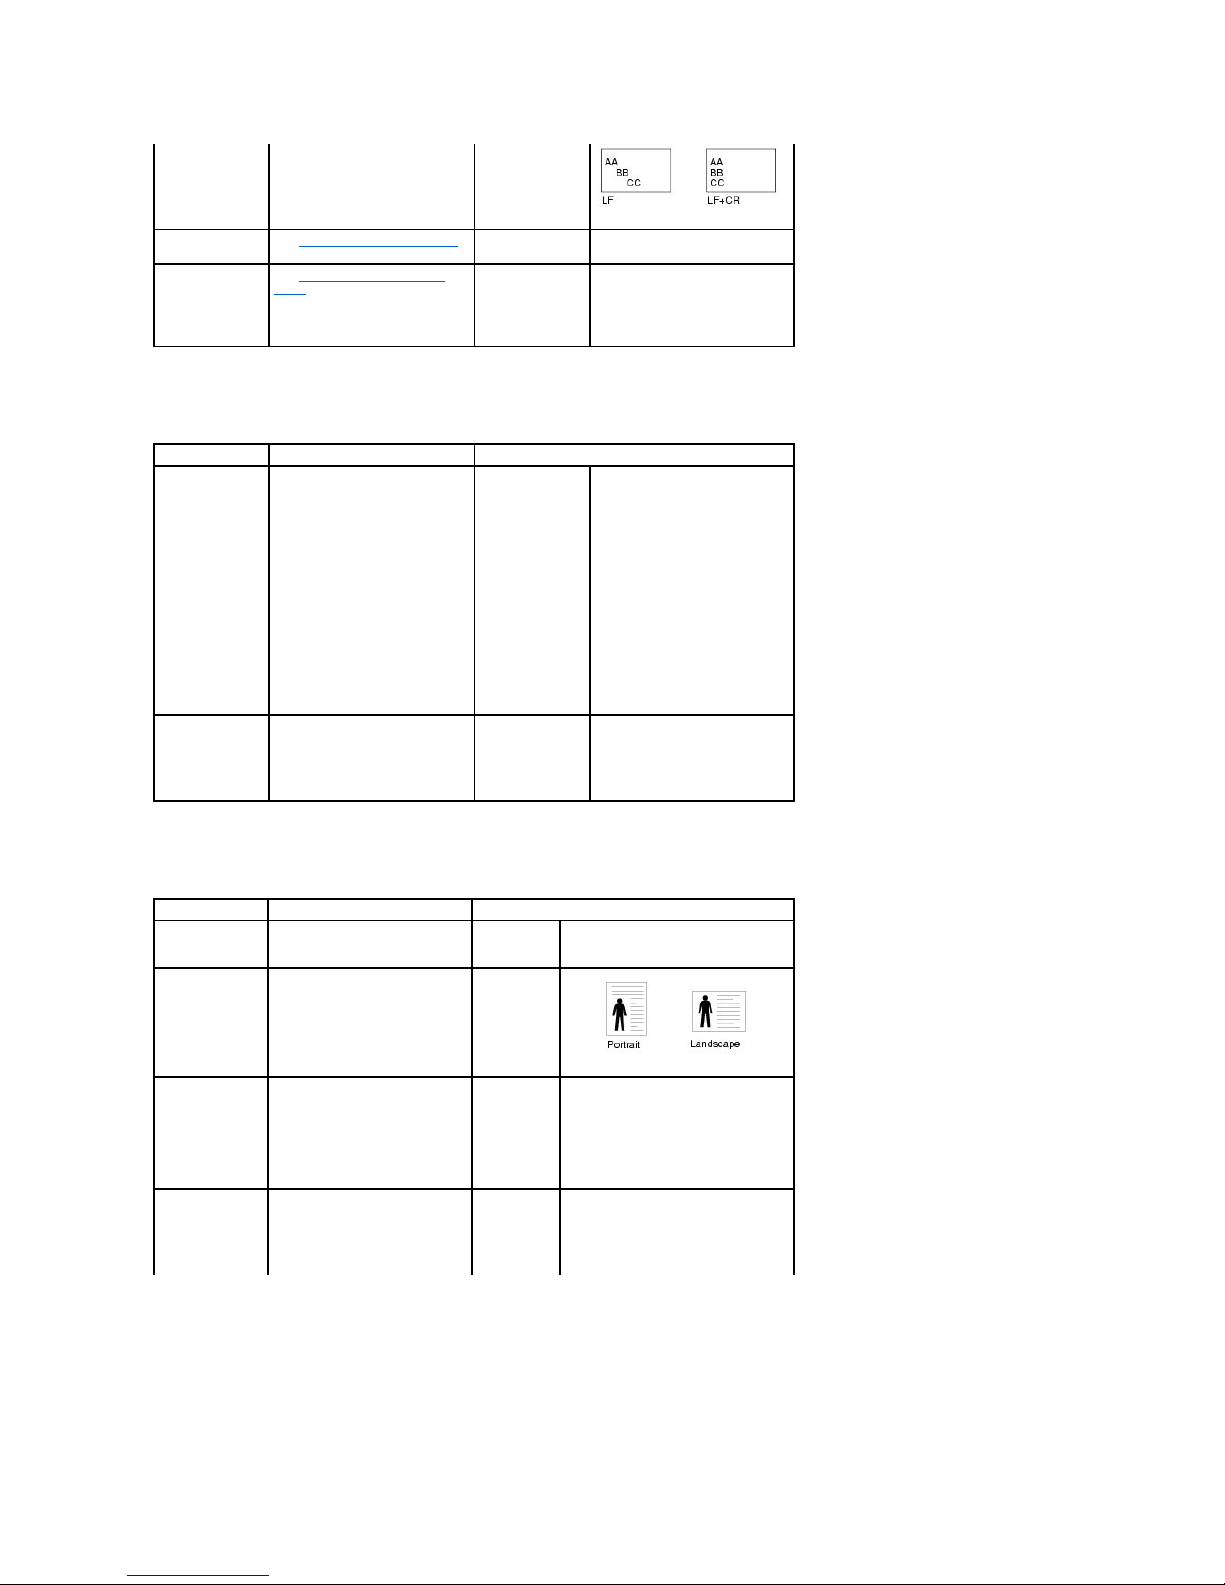
Auto CR
Allows you to append the
LF
Refers to the following samples:
Page 16
Quality
Use this menu selection to change settings that affect print quality and save toner.
Finishing
Use this menu selection to define how the printer delivers the printed output.
required carriage return to each
line feed.
LF+CR
Date & Time (Only
if HDD is installed)
See "Setting the time and date".
DayLight Saving
(Only if HDD is
installed)
See "Setting Daylight Savings
Time".
Manual
Auto
Off
Menu selection:
Purpose:
Values:
Resolution
Selects printed output resolution.
600dpi
1200dpi
Draft Mode
Specifies the number of dots
printed per inch (dpi). The higher
the setting, the sharper the
printed characters and graphics
appear.
l If the print jobs are mostly
text, select 600dpiNormal for the highest
quality printing.
l Select 1200dpi-Best when
your job contains
bitmapped images, such as
scanned photos or some
graphics, that will benefit
from enhanced line
screening.
Darkness
Lightens or darkens printed
output and conserves toner.
Normal
Light
Dark
Lighten or darken the print on
the page by changing the toner
density setting. The Normal
setting usually produces the best
result. Use the Light toner
density setting to save toner.
Menu selection:
Purpose:
Values:
Copies
Set the default number of copies
by selecting any number from 1
to 999.
1 - 999
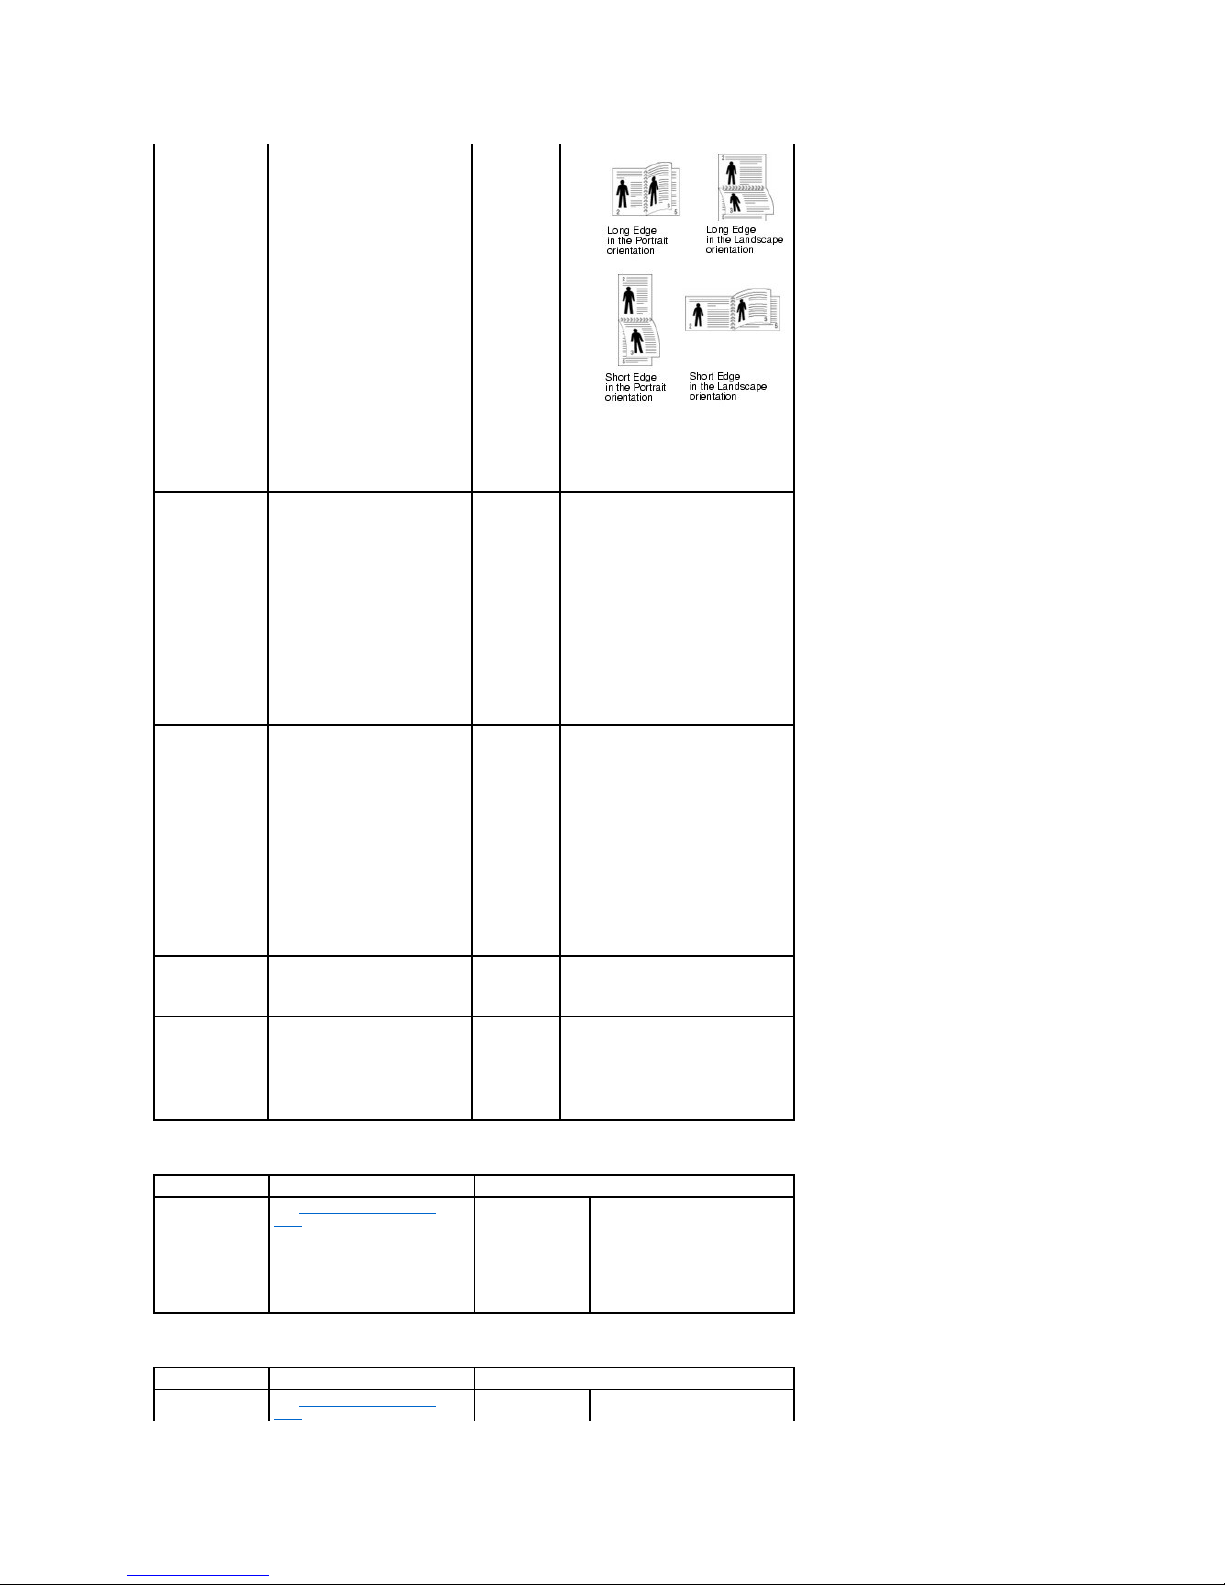
Orientation
Choose the default orientation of
the print image on the page.
Portrait
Landscape
Margin Shift
Set the margin of print materials
for one-sided printing. Increase
or decrease the value in 0.1 mm
increments.
Top Margin
[0-250]
Left Margin
[0-164]
l Top Margin: Set the top margin,
from 0 to 250 mm.
l Left Margin: Set the left margin,
from 0 to 164 mm.
Duplex
To print on both sides of paper.
Off
Long Edge
Short Edge
Choose the binding edge as follows.
l Long Edge: Flip on the long
edge.
l Short Edge: Flip on the short
edge.
Page 17
Form Menu (Only if HDD is installed)
Select Form (Only if HDD is installed)
Select Off to print on one side of the
paper.
Duplex Margin
Set the margins for double-sided
printing. Increase or decrease
the value by 0.1 mm increments.
Top Margin
[0.0-9.9]
Left Margin
[0.0-9.9]
Short Binding
[0-22]
Long Binding
[0-22]
l Top Margin: Set the top margin,
from 0.0 to 9.9 mm.
l Left Margin: Set the left margin,
from 0.0 to 9.9 mm.
l Short Binding: Set the bottom
margin of the back of the page
for short binding, from 0 to 22
mm.
l Long Binding: Set the right
margin of the back of the page
for long binding, from 0 to 22
mm.
Collation
Keeps the pages of a print job
stacked in sequence when
printing multiple copies of the
job.
On
Off
l On: Prints entire job according
to the number of times specified
by the Copies menu item. For
example, if you set Copies to 2
and send three pages to print,
the printer prints page 1, page
2, page 3, page 1, page 2, page
3.
l Off: Prints each page of a job
the number of times specified by
the Copies menu item. For
example, if you set Copies to 2,
and send three pages to print,
the printer prints page 1, page
1, page 2, page 2, page 3, page
3.
Separator Sheet
Inserts blank separator sheets
between jobs, between multiple
copies of a job, or between each
page of a job.
On
Off
If this menu item is set to Off, the
printer does not insert separator
sheets.
Print Blank Pages
Specifies whether to include
application-generated blank
pages as part of your printed
output.
Print
Do Not Print
l Print: Prints application-
generated blank pages as part
of your job.
l Single Form: Does not print
application-generated blank
pages as part of your job.
Menu selection:
Purpose:
Values:
Form Menu
See "Printing using the form
files".
Off
Single Form
Double Form
l Off: Prints in normal mode.
l Single Form: Prints all
pages using the first form.
l Double Form: Prints the
front page using the first
form and the back page
using the second form.
Menu selection:
Purpose:
Values:
Select Form (Only
if HDD is installed)
See "Printing using the form
files".
1st Form
l 1st Form: Displays the
stored form list.
Page 18
Factory Defaults
4.Job Management
Stored jobs
Job Expiaration
RAM Disk Limit
Clear Stored Job
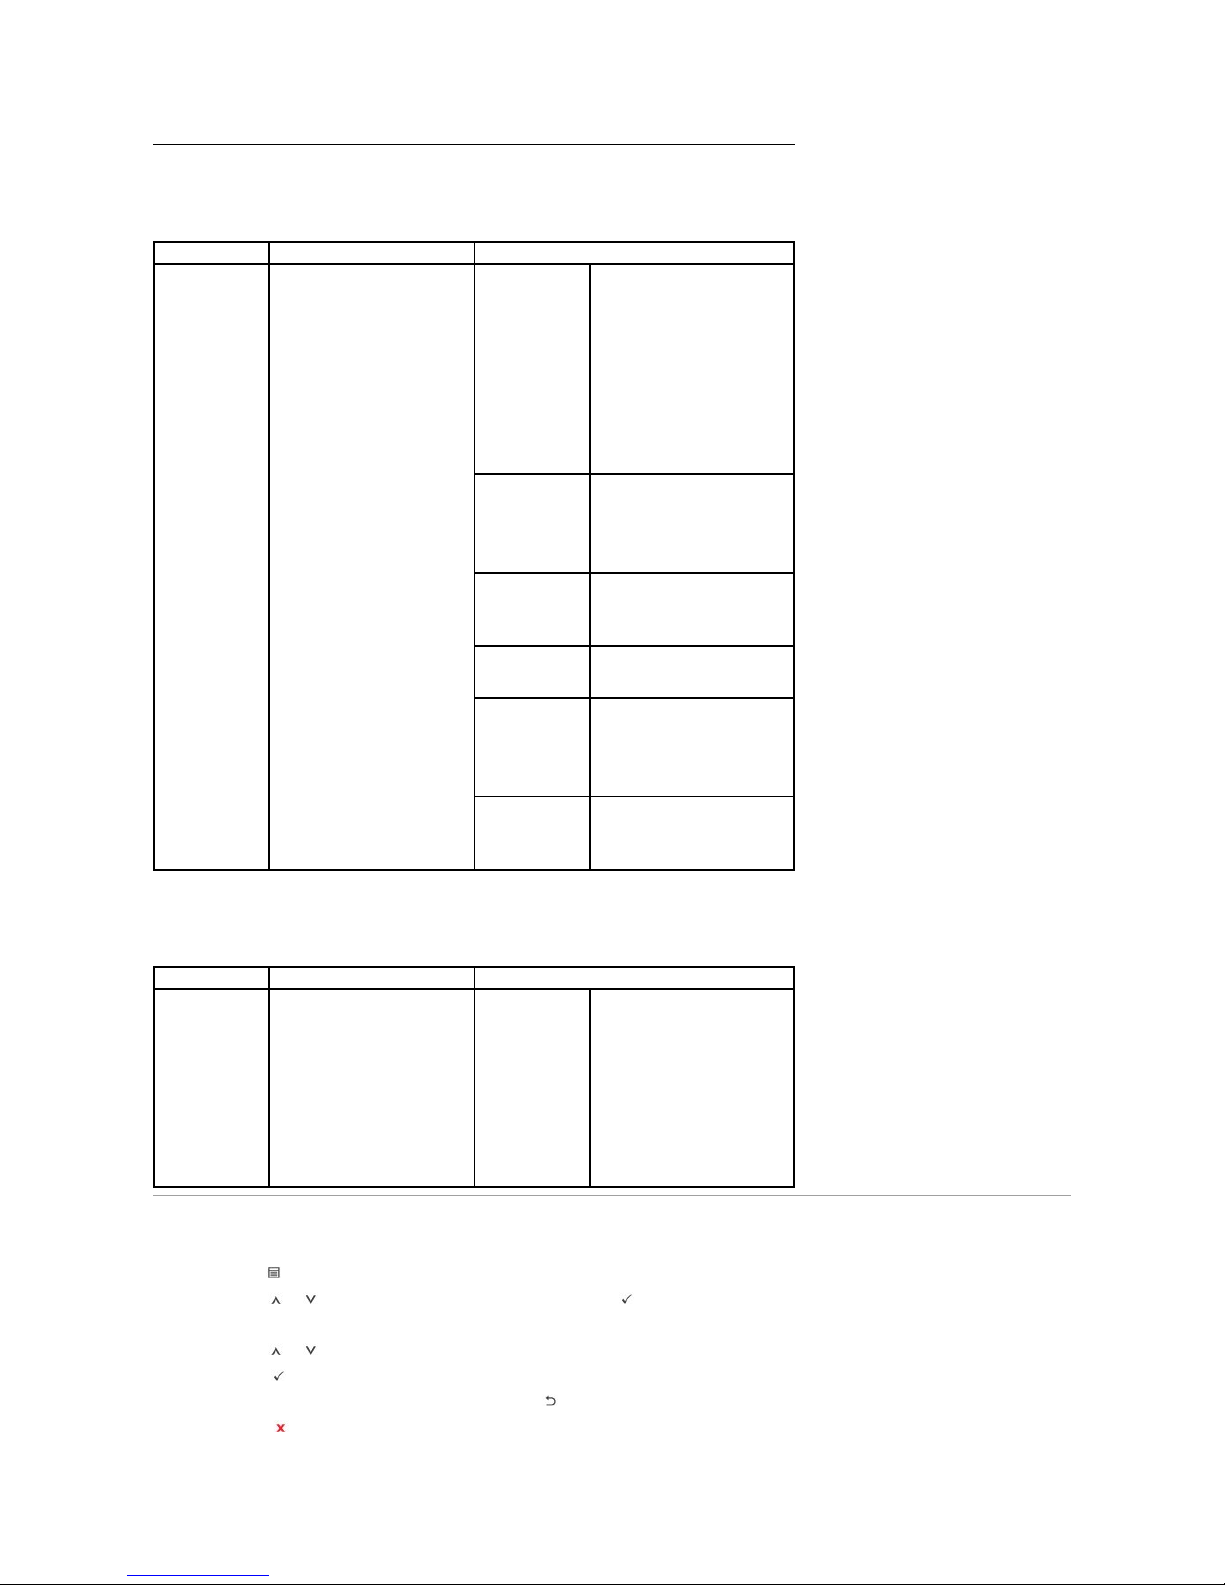
5.Network I/O Ports
This menu lets you configure the network interface installed in your printer. You can reset the network interface and print a configuration page.
Ethernet Speed
2nd Form
l 2nd Form: When you
select Double Form in
Form Menu, this menu is
displayed.
Menu selection:
Purpose:
Values:
Factory Defaults
Returns printer settings to the
factory default values.
Do Not Restore
Restore Now
l Do not Restore: User-
defined settings remain.
l Restore Now: All menu
items are returned to the
factory-default values
except:
l Display Language
l All settings in the
Parallel Menu, Serial
Menu, Network
Menu, and USB Menu
l Resource residing in
flash memory or on
the hard disk
NOTE: All downloaded resources
(fonts, macros, and symbols sets)
in printer memory (RAM) are
deleted.
Menu selection:
Purpose:
Values:
Stored jobs
Print jobs currently stored in the
hard disk
User ID1
User ID2
Menu selection:
Purpose:
Values:
Job Expiration
Limits the amount of time a
confidential job stays in the
printer before it is deleted.
Off
1 hour
4 hour
24 hour
1 week
Menu selection:
Purpose:
Values:
RAM Disk Limit
Uses up to 96 MB of printer’s
memory for Secure print.
NOTE: If you install an additional
printer memory, you can use your
printer's memory up to 288 MB for
Secure print.
0 MB ~ 96 MB
Menu selection:
Purpose:
Values:
Clear Stored Job
Delete jobs currently stored in
the hard disk and RAM disk.
Secure Job
Stored Print
ALL
ALL: All Secure Jobs
and Stored Prints are deleted.
Page 19
TCP/IP (IPv4)
TCP/IP (IPv6)
Netware
AppleTalk
Menu selection:
Purpose:
Values:
Ethernet Speed
Allows selection of ethernet
speed.
Auto
10M Half
10M Full
100M Half
100M Full
Giga Full
Menu selection:
Purpose:
Values:
IPv4 Activate
Activates or deactivates the IPv4.
On
Off
l On: Activates the IPv4.
l Off: Deactivates the IPv4.
View Host name
Displays the Host name.
View only
Set IP Address
Allows you to manually set the
TCP/IP addresses or receive the
addresses from the network.
Manual
IP Address
Subnet
Mask
Gateway
You can enter IP Address, Subnet
Mask, and Gateway manually.
DHCP
The DHCP server allots the IP
address to you automatically
BOOTP
The BOOTP server allots the IP
address to you automatically.
Show IP Address
Displays the assigned IP Address.
View only
Menu selection:
Purpose:
Values:
IPv6 Activate
Activates or deactivates the IPv6.
On
Off
l On: Activates the IPv6.
l Off: Deactivates the IPv6.
DHCPv6 Config
This item lets you select the
DHCPv6 operation.
Router
Use DHCPv6, as directed by a
router.
DHCPv6
addresses
Always use DHCPv6 regardless of
router request.
DHCPv6 Off
Deactivates the DHCPv6.
Menu selection:
Purpose:
Values:
Activate
Activates or deactivates the
Netware feature.
On
Off
l On: Activates the Netware
feature.
l Off: Deactivates the
Netware feature.
Frame Type
Lets you select the IPX frame
type.
Auto
802.2
802.3
Ethernet II
SNAP
l Auto: Set the printer to
select the frame type
automatically.
l 802.2: Select this value to
use the IEEE 802.2 frame
type.
l 802.3: Select this value to
use the IEEE 802.3 frame
type.
l Ethernet II: Select this
value to use the Ethernet 2
frame type.
l SNAP: Select this value to
use the SNAP frame type.
Menu selection:
Purpose:
Values:
Activate
Activates or deactivates the
Netware feature.
On
Off
l On: Activates the AppleTalk
feature.
l Off: Deactivates the
AppleTalk feature.
Page 20
USB
Parallel Port
Wireless(Only if wireless network interface card installed)
Clear Settings
6.Maintenance
7.Emulation
View Name
Displays the assigned AppleTalk
name.
View only
Menu selection:
Purpose:
Values:
USB
Enable or disable the USB port.
Enable
Disable
If this menu item is set to
Disable, the printer does not
work using USB port.
Menu selection:
Purpose:
Values:
Parallel Port
Enable or disable the Parallel
port.
Enable
Disable
Disable: The printer does not
work using Parallel port.
Menu selection:
Purpose:
Values:
WLAN Settings
You must configure the
appropriate network parameters
to use your printer in a wireless
network.
Search List
The wireless network interface
card in your printer searches for
wireless networks in the area
and shows the results.
Custom
You can configure the wireless
settings according to your needs.
WLAN Default
Performs a simple reset and
restores the factory-default
settings for the wireless network
configuration.
On
Off
WLAN Signal
Displays the signal sensitivity of
wireless.
View only
You can see any one of the
following: Excellent, Very Good,
Good, Low, Very Low and
Disconnected.
Menu selection:
Purpose:
Values:
Clear Settings
Performs a simple reset and
restores the factory-default
settings for the network
configuration. Requires restarting
printer to take effect.
Yes
No
Menu selection:
Purpose:
Values:
Clean Drum
If printouts are blurred, faded, or
smeared, correct the problem by
printing a cleaning sheet
provided with your printer.
Printing...
Clean Fuser
Printing...
Supplies Life
Allows you to check how many
pages have been printed and
how much toner is left in the
cartridge.
Total
Displays the total number of
pages printed.
Toner Remains
Displays the percentage of toner
remaining in the toner cartridge.
Toner Low Alert
When the toner cartridge is
almost empty, the printer
displays a shortage of the toner
message.
On
Off
Firmware Version
Displays the current firmware
version of the printer.
View only
Menu selection:
Purpose:
Values:
Emulation Type
The printer language defines how
the computer communicates with
the printer.
Auto
PCL
PostScript
HEXDUMP
Auto: Select to have printer can
change the printer language
automatically.
Setup
See the following tables to
configure properties of the printer
language.
PCL
PostScript
Page 21
PCL
This menu sets the PCL emulation configuration. You can set the font type, symbol type, lines per page, and font size.
PostScript
This menu provides you with the Print PS Error menu item.
Accessing Operator Panel Menus
1. Press Menu ( ).
2. Press Scroll ( to ) to highlight the desired setting and press Select ( ).
3. If the setting item has sub menus, repeat step 2.
4. Press Scroll ( to ) to access the required value.
5. Press Select ( ) to save the selection.
6. If you want to move to the upper level menus, press Select ( ).
7. Press Cancel ( ) to return to Standby mode.
Menu selection:
Purpose:
Values:
PCL
Sets the PCL emulation
configuration: font type, symbol
type, lines per page, and font
size.
Typeface
PCL1 ~ PCL56
Select the standard font to be
used in PCL emulation.
l PCL1~PCL7's interval
between letters is fixed,
and PCL8~PCL45's interval
is proportional to the font
type and font size. Adjust
the font size of PCL1~PCL7
using the Pitch item, and
PCL8~PCL45 using the
Point Size item.
l PCL46~PCL56's interval
and font size are fixed.
Symbol
ROMAN8 ~ OCR B
Selects the symbol set to be used
in PCL emulation. The symbol set
is the group of numbers, marks,
and special signs used when
printing letters. Available symbol
sets vary depending on the
Typeface setting.
Point Size
4.00 ~ 999.75
(0.25 unit)
By selecting between PCL8 and
PCL45 from the Typeface menu,
you can determine the font size
by setting the height of the
characters in the font.
Courier
Regular, Dark
Select the version of Courier font
to use.
Pitch
0.44 ~ 99.99
(0.01 unit)
By selecting between PCL1 and
PCL7 from the Typeface menu,
you can determine the font size
by setting the number of
characters that will print in one
horizontal inch of type. The
default value 10 is the best size.
Lines
5 ~ 128
Set vertical spacing from 5 to 128
lines for the default paper size.
The default number of lines may
differ according to the paper size
and printing orientation.
Menu selection:
Purpose:
Values:
PostScript
Provides the Print PS Error
menu items.
Print PS Error
On
Off
Select whether or not your
printer prints an error list when a
PS error occurs.
l On: Prints PS 3 emulation
errors. If an error occurs,
the job stops processing,
the error message prints,
and the printer flushes the
job.
l Off: The job is flushed
without an indication of
any error.
Page 22

Printing a Demo Page
After setting up your printer, print a demo page to ensure that the printer is operating correctly.
1. Press Menu ( ).
2. Press Scroll ( to ) to highlight Reports and press Select ( ).
3. Press Scroll ( to ) to highlight Demo Page and press Select ( ).
4. A demo page prints out.
Changing the Display Language
To change the displayed language that the operator panel displays, follow these steps:
1. Press Menu ( ).
2. Press Scroll ( to ) to highlight Settings and press Select ( ).
3. Press Scroll ( to ) to highlight Setup and press Select ( ).
4. Press Scroll ( to ) to highlight Language and press Select ( ).
5. Press Scroll ( to ) to display the language you want.
The available languages are English, Deutsch, Espanol, FRANCAIS, Italiano, and Nederlands.
6. Press Select ( ) to save the selection.
7. Press Cancel ( ) to return to Standby mode.
Power Save Mode
The Power Save mode allows your printer to reduce power consumption when it is not in actual use. When the printer does not receive data for an extended
period of time, power consumption is automatically lowered. To set how long the printer waits before going to power save:
1. Press Menu ( ).
2. Press Scroll ( to ) to highlight Settings and press Select ( ).
3. Press Scroll ( to ) to highlight Setup and press Select ( ).
4. Press Scroll ( to ) to highlight Power Save and press Select ( ).
5. Press Scroll ( to ) to display the time settings you want.
The available options are 5, 10, 15, 30, 60 and 120(minutes).
6. Press Select ( ) to save the selection.
7. Press Cancel ( ) to return to Standby mode.
Changing the Font Setting
Your printer has preset the font for your region or country. To change the font or to set the font under special conditions, such as the DOS:
1. Press Menu ( ).
2. Press Scroll ( to ) to highlight Emulation and press Select ( ).
3. Press Scroll ( to ) to highlight Setup and press Select ( ).
4. Press Scroll ( to ) to highlight PCL and press Select ( ).
5. Press Scroll ( to ) to access the required value.
6. Press Select ( ) to save the selection.
7. Press Cancel ( ) to return to Standby mode.
Page 23

Page 24
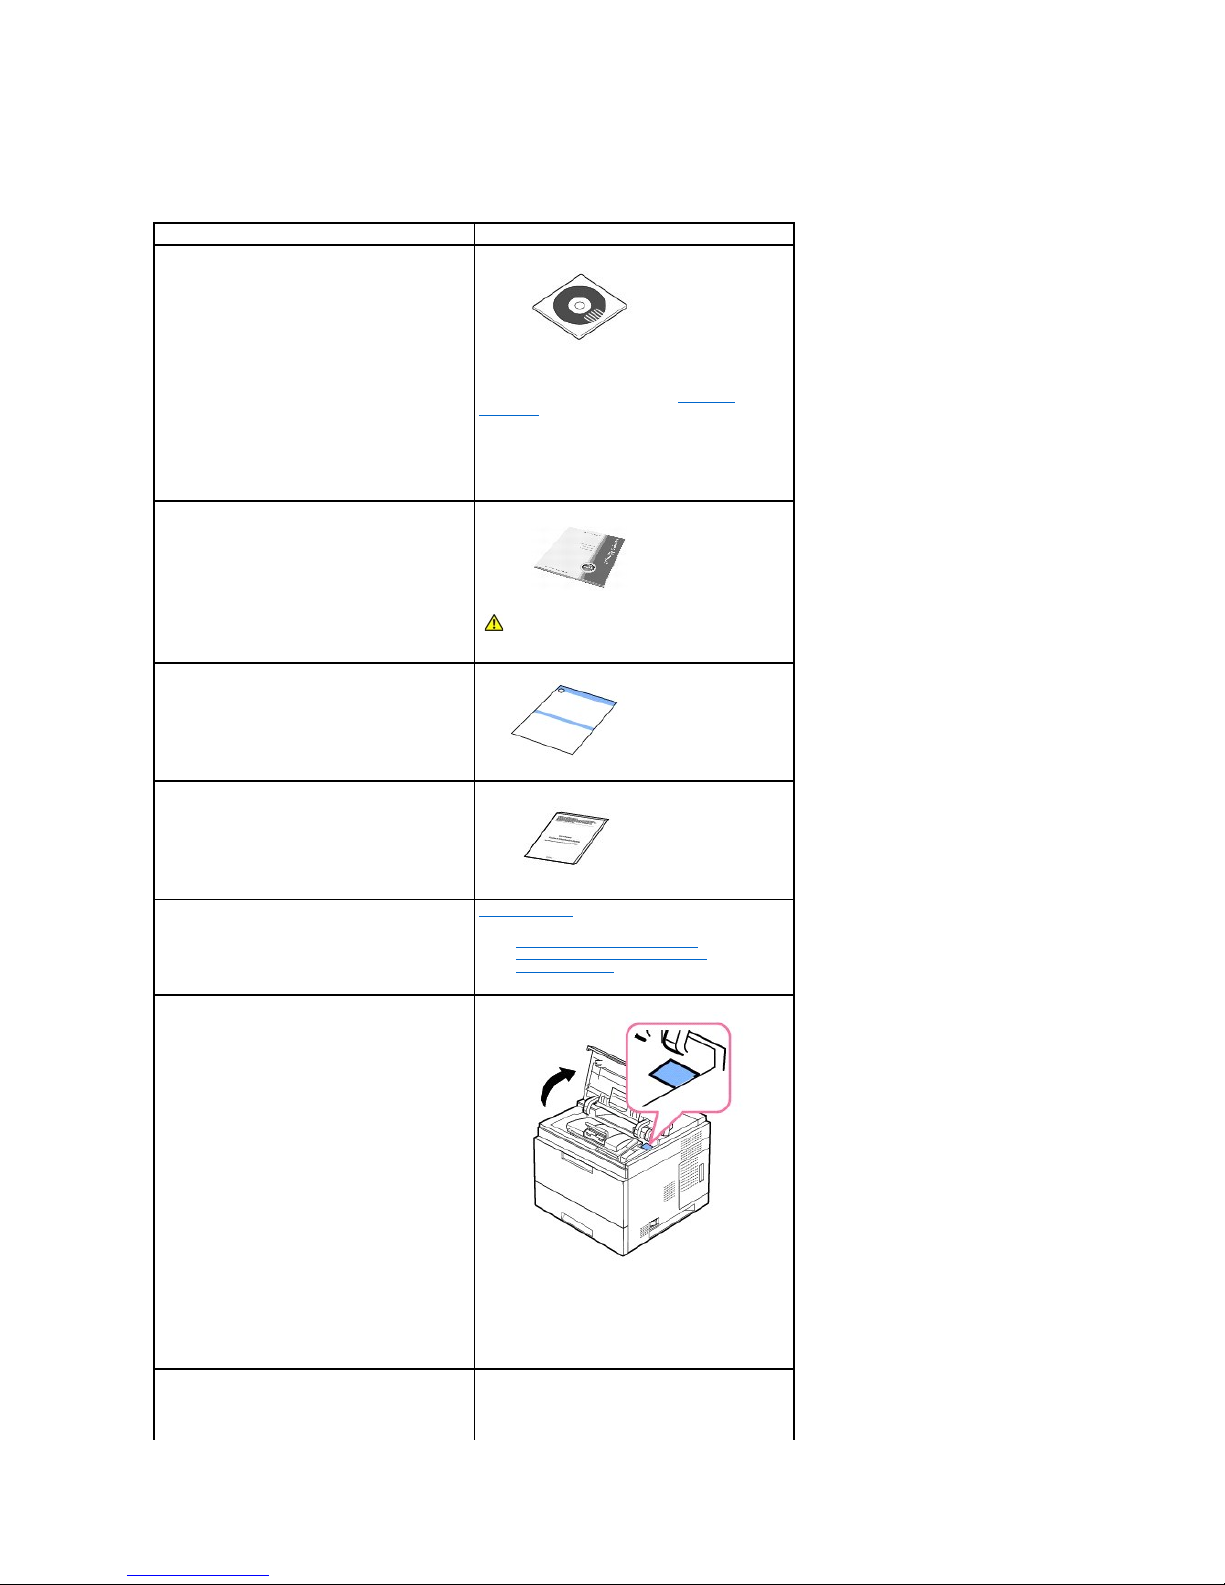
Finding Information
What Are You Looking For?
Find It Here
l Drivers for my printer
l My User's Guide
Drivers and Utilities CD
You can use the Drivers and Utilities CD to
install/uninstall/reinstall drivers and utilities or access
your User's Guide. For details, see "Software
Overview".
Readme files may be included on your Drivers and
Utilities CD to provide last-minute updates about
technical changes to your printer or advanced
technical reference material for experienced users or
technicians.
l How to use my printer
Owner's manual
CAUTION: Read and follow all safety
instructions in your Owner's Manual prior to
setting up and operating your printer.
l How to set up my printer?
Setup diagram
l Safety Information
l Warranty Information
Product Information Guide
l Troubleshooting Guide
Troubleshooting:
l Clearing Jams in the Paper Tray
l Understanding display messages
l Solving Problems
Express Service Code
Express Service Code
Identify your printer when you use support.dell.com
or contact technical support.
Enter the Express Service Code to direct your call
when contacting technical support. The Express
Service Code is not available in all countries.
l Latest drivers for my printer
l Answers to technical service and support
questions
l Documentation for my printer
Dell Support Website
The Dell Support Website provides several online
tools, including:
Page 25

l Solutions - Troubleshooting hints and tips,
articles from technicians, and online courses
l Upgrades - Upgrade information for
components, such as memory
l Customer Care - Contact information, order
status, warranty, and repair information
l Downloads - Drivers
l Reference - Printer documentation and product
specifications
You can access Dell Support at support.dell.com.
Select your region on the WELCOME TO DELL
SUPPORT page and fill in the requested details to
access help tools and information.
Page 26
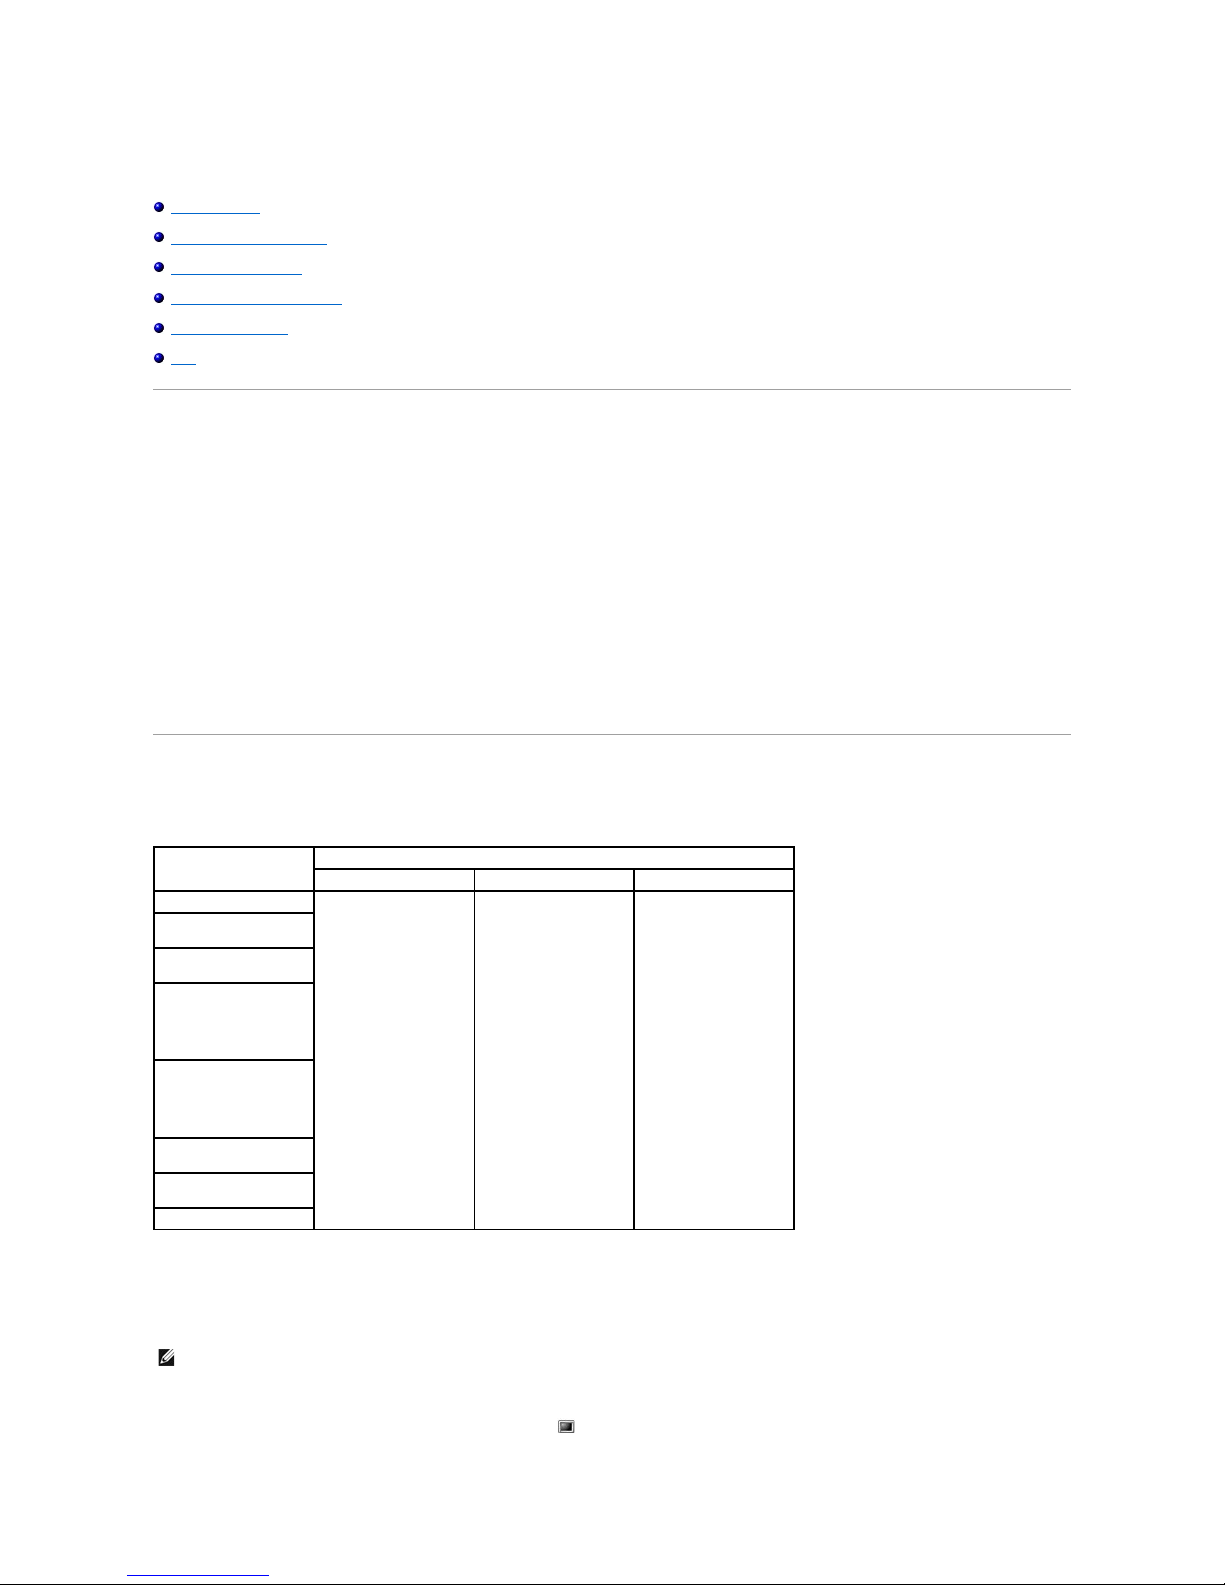
Linux/Unix
Getting Started
Installing the Printer Driver
Using the Configurator
Configuring Printer Properties
Printing a Document
Unix
Getting Started
The supplied Drivers and Utilities CD provides you with Dell's printer driver package for use with a Linux-based computer.
Dell's printer driver package provides the ability to print documents. The package also delivers powerful applications for configuring your printer.
After the driver is installed on your Linux system, the driver package allows you to monitor a number of printer devices via a USB port.
The printer driver package is supplied with a smart and flexible installation program. You do not need to search for additional components necessary for the
printer software: all required packages will be carried onto your system and installed automatically. This is possible on a wide set of the most popular Linux
clones.
Installing the Printer Driver
System Requirements
Installing the Printer Driver
1. Ensure that you connect your printer to your computer. Turn both the computer and the printer on.
2. When the Administrator Login window appears, type in root in the Login field and enter the system password.
1. Insert the Drivers and Utilities CD. The Drivers and Utilities CD will run automatically.
If the Drivers and Utilities CD does not run automatically, click the icon at the bottom of the desktop. When the Terminal screen appears, type in:
Operating system
Requirements (Recommended)
CPU
RAM
Free HDD space
RedHat 8.0, 9.0 (32bit)
Pentium 4 2.4GHz
(IntelCore2)
512MB (1024MB)
1GB (2GB)
RedHat Enterprise Linux
WS 4, 5 (32/64bit)
Fedora Core 1~7
(32/64bit)
Mandrake 9.2 (32bit),
10.0, 10.1 (32/64bit)
Mandriva 2005, 2006,
2007 (32/64bit)
SuSE Linux 8.2, 9.0, 9.1
(32bit)
SuSE Linux 9.2, 9.3, 10.0,
10.1, 10.2 (32/64bit)
SuSE Linux Enterprise
Desktop 9, 10 (32/64bit)
Ubuntu 6.06, 6.10, 7.04
(32/64bit)
Debian 3.1, 4.0 (32/64bit)
NOTE: To install the printer software, you must log in as a super user (root). If you are not a super user, ask your system administrator.
Page 27
[root@localhost root]#cd /mnt/cdrom/Linux
[root@localhost root]#./install.sh
If you still failed to run the CD-ROM, type the following in sequence:
[root@localhost root]#umount /dev/hdc
[root@localhost root]#mount -t iso9660/dev/hdc/mnt/cdrom
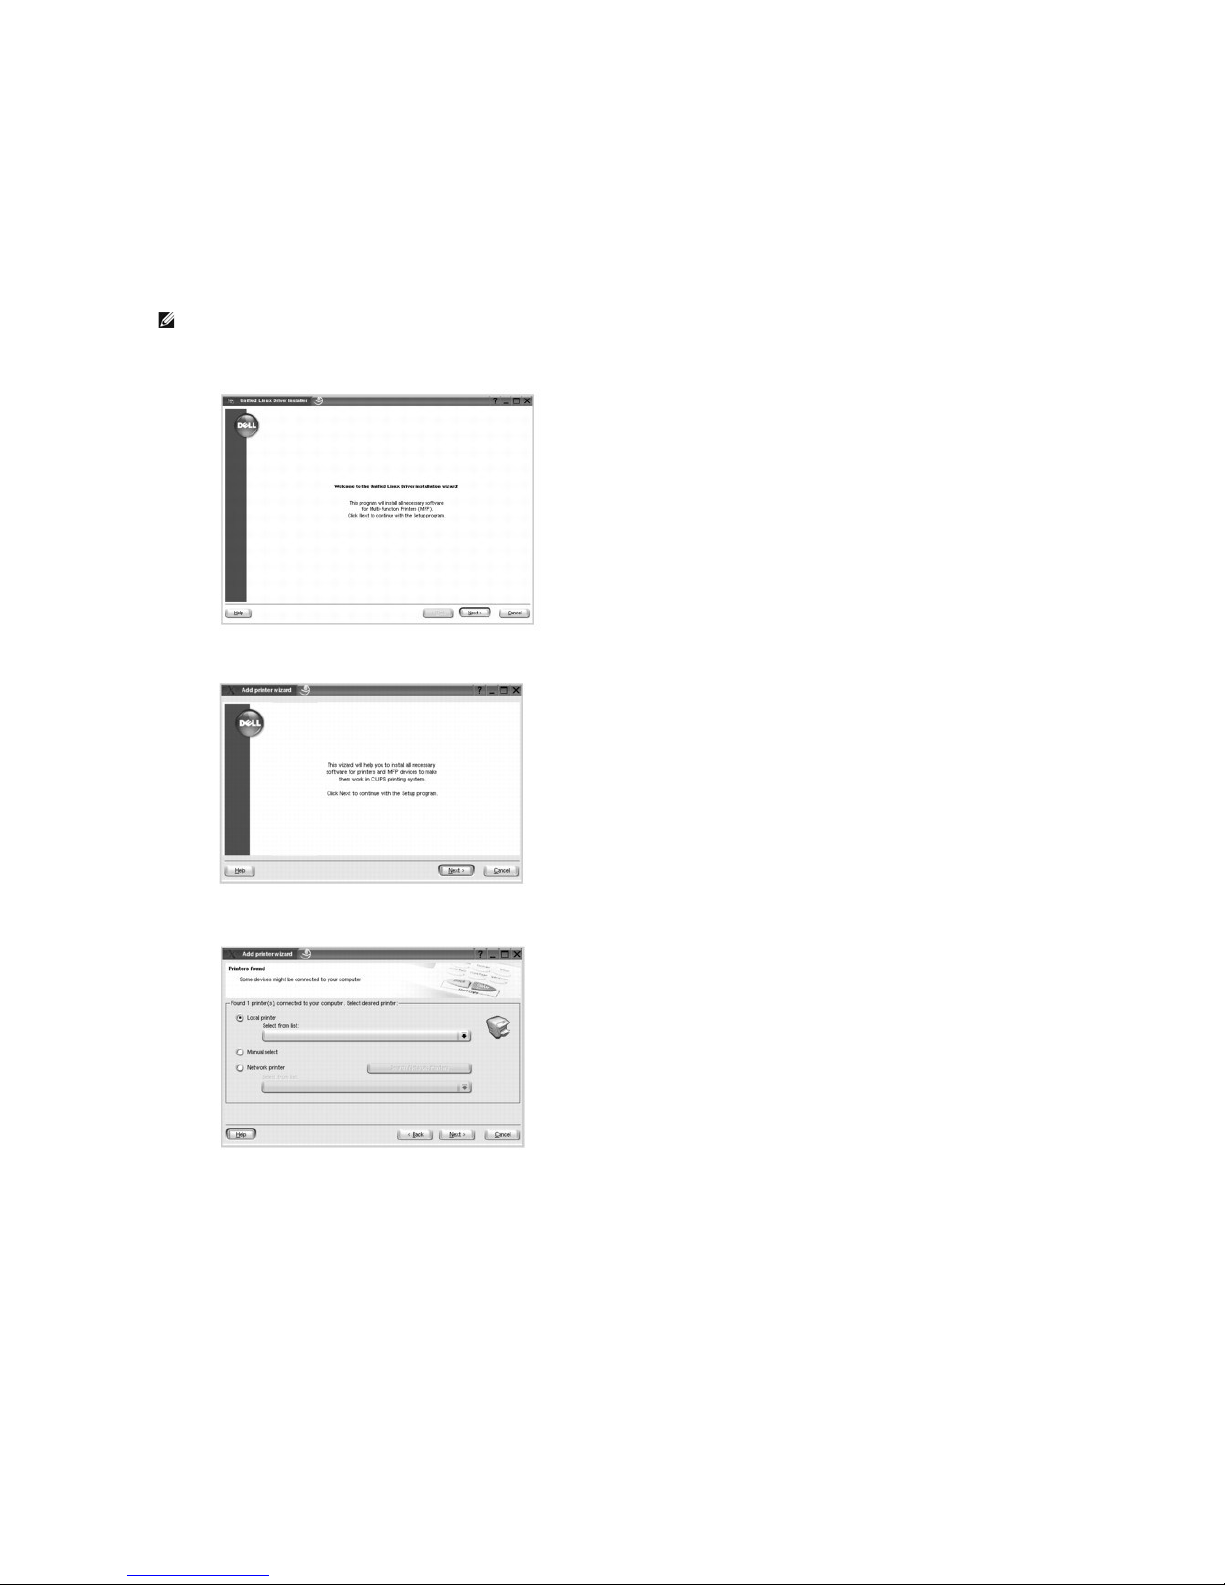
2. Click Install.
3. When the welcome screen appears, click Next.
4. Installation starts. When the installation is almost complete, the Add printer wizard appears automatically. Click Next.
5. If you connect your printer using the USB cable, the following window appears. Select your printer from the drop-down list and click Next.
OR
If you connect your printer using the network cable, the following window appears.
NOTE: The installation program runs automatically if you have an autorun software package installed and configured.
Page 28
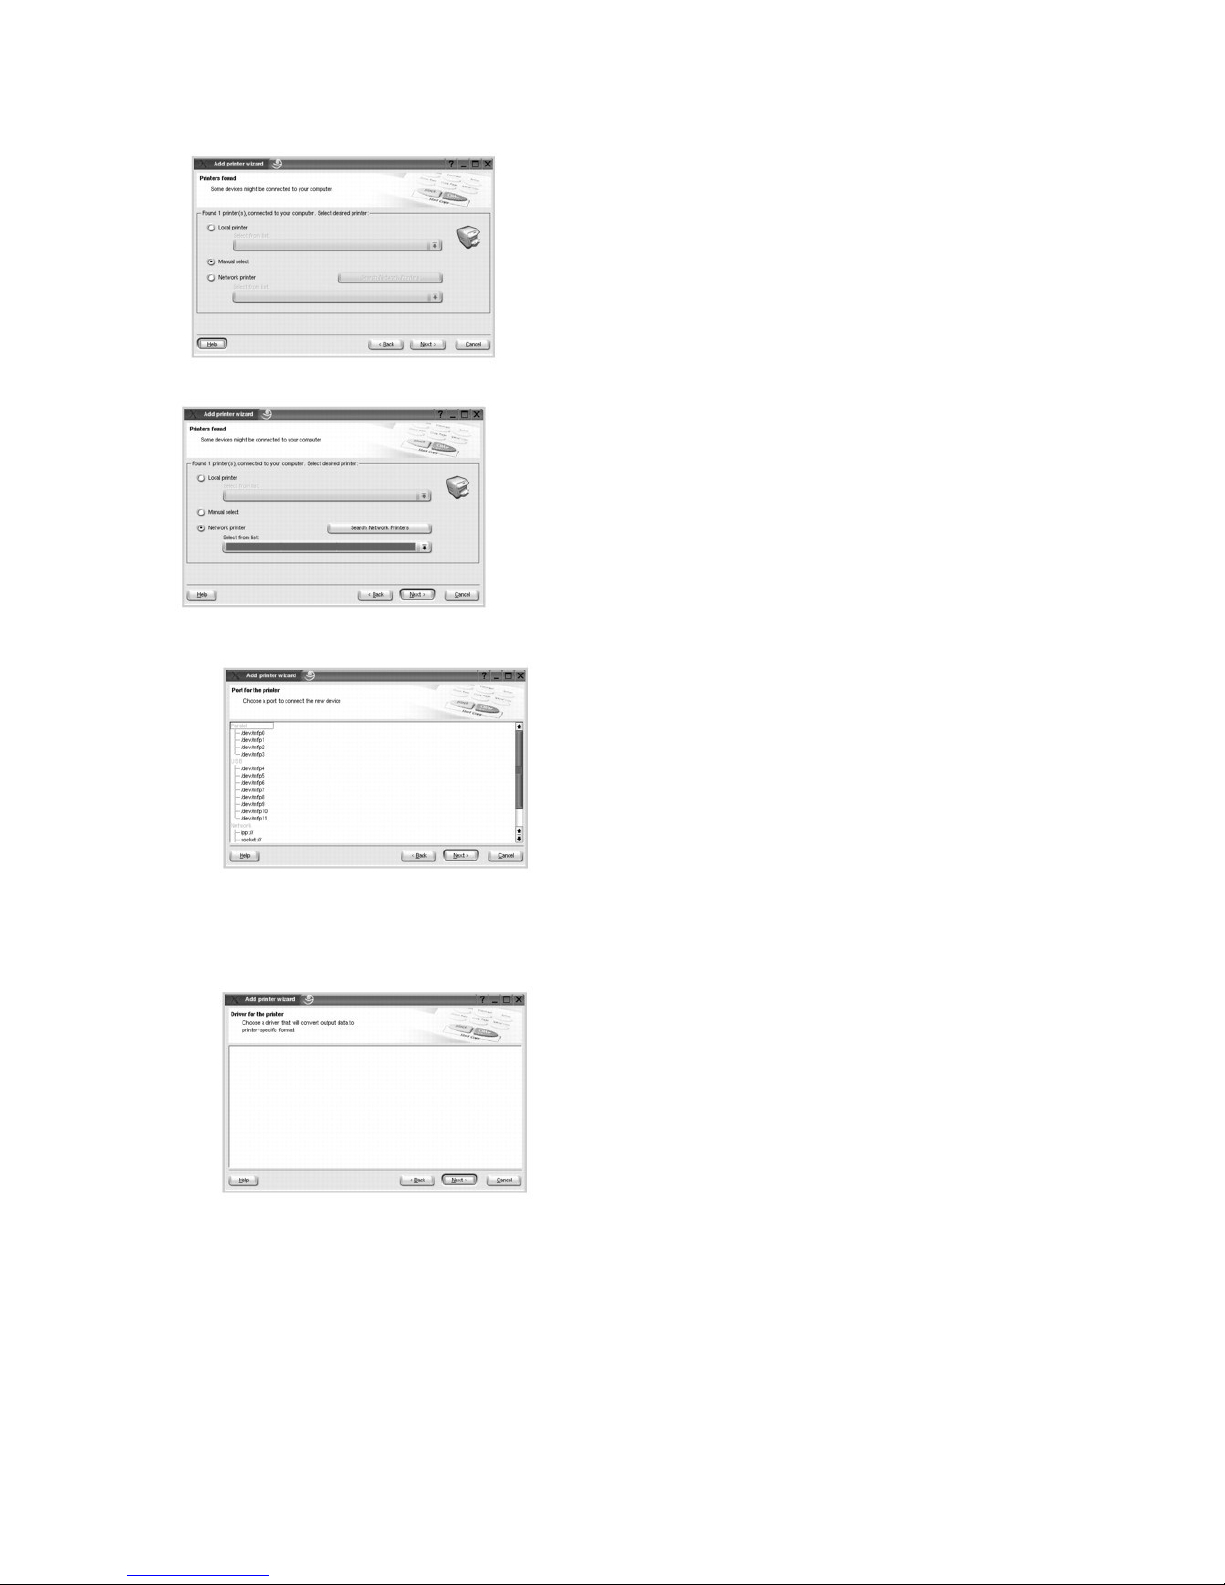
Check the Network printer and select your printer from the drop-down list. Click Next.
6. If you connect your printer using the USB cable, choose a port you will use with your printer. After choosing the port, click Next.
OR
If you connect your printer using the network cable, skip to the next step.
7. Select the driver and click Next.
8. Enter your printer's name, location, and description. Click Next.
Page 29
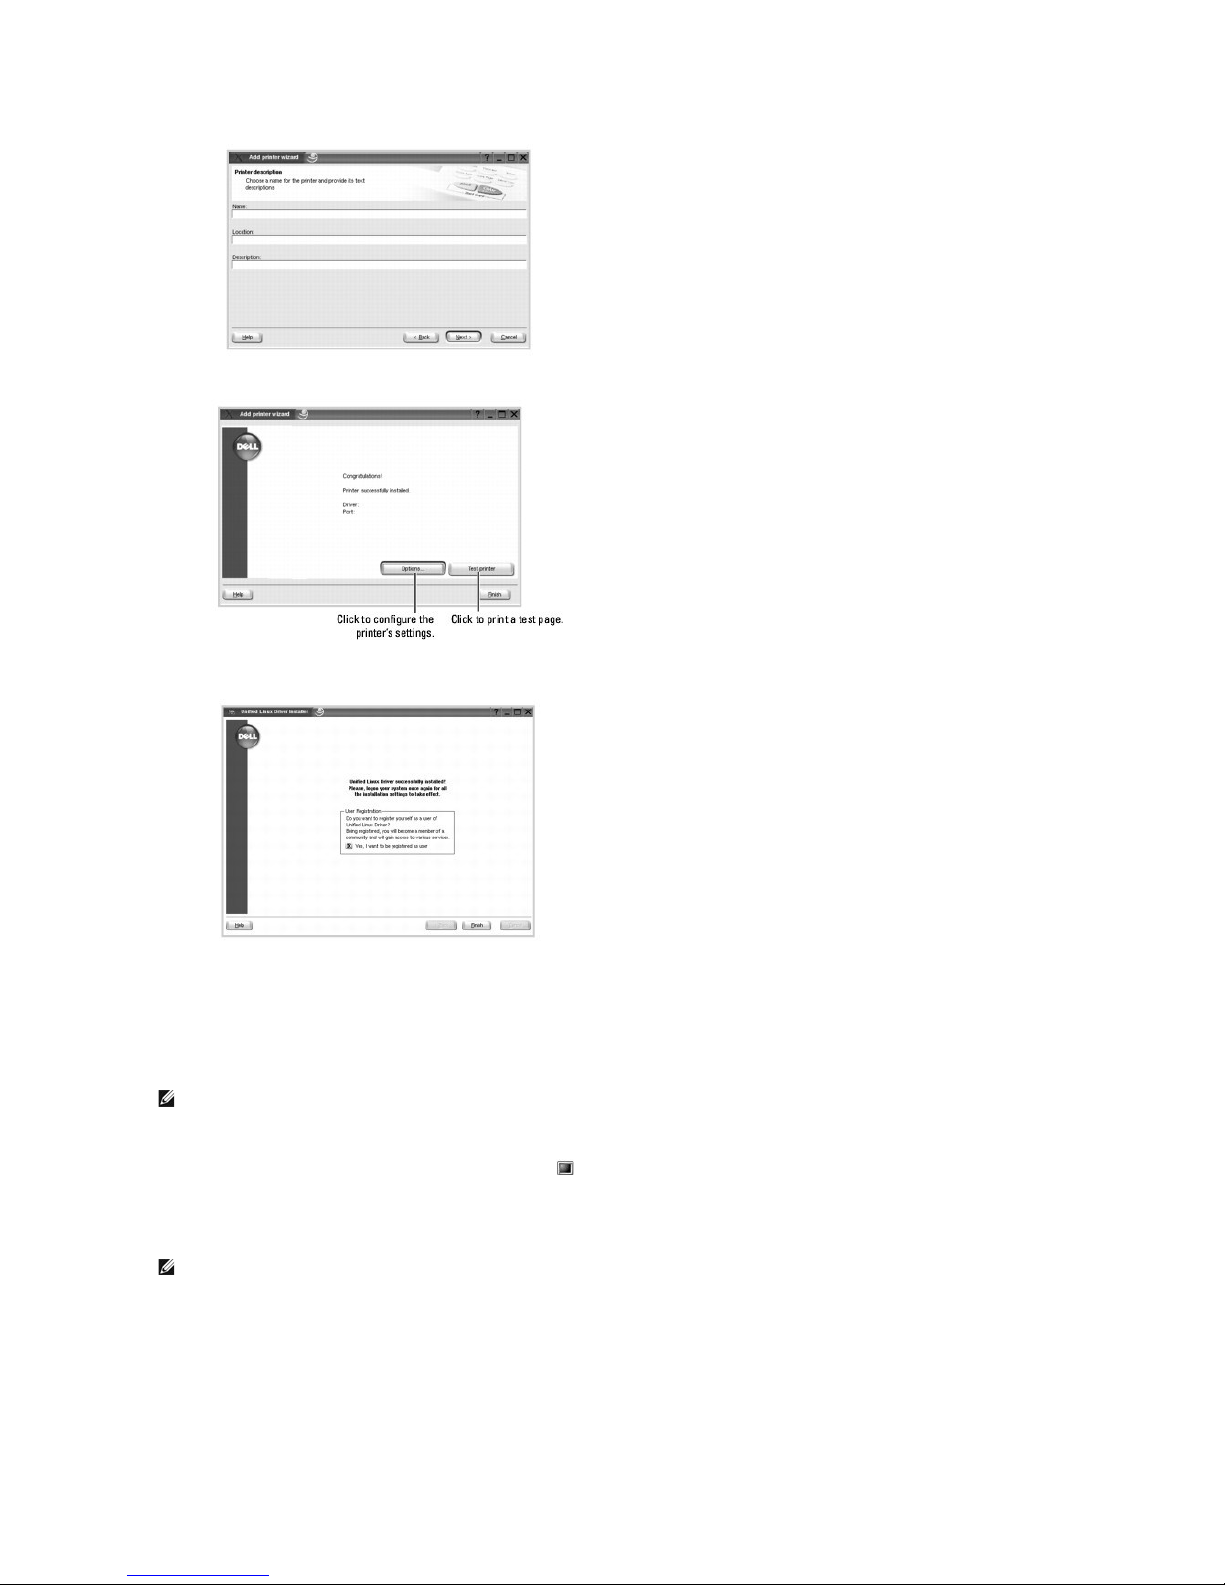
9. To complete installation, click Finish.
10. When the following window appears, click Finish.
The installation program has added the Configurator desktop icon and Dell Printer group to the system menu for your convenience. If you have any
difficulties, consult the on-screen help available through your system menu or from the driver package windows applications.
Uninstalling the Printer Driver
1. When the Administrator Login window appears, type root in the Login field and enter the system password.
2. Insert the Drivers and Utilities CD. The Drivers and Utilities CD will run automatically.
If the Drivers and Utilities CD does not automatically run, click the icon at the bottom of the desktop. When the Terminal screen appears, type in:
[root@localhost root]#cd /mnt/cdrom/Linux
[root@localhost root]#./uninstall.sh
3. Click Uninstall.
4. Click Next.
NOTE: To install the printer software, you must log in as a super user (root). If you are not a super user, ask your system administrator.
NOTE: The installation program runs automatically if you have an autorun software package installed and configured.
Page 30
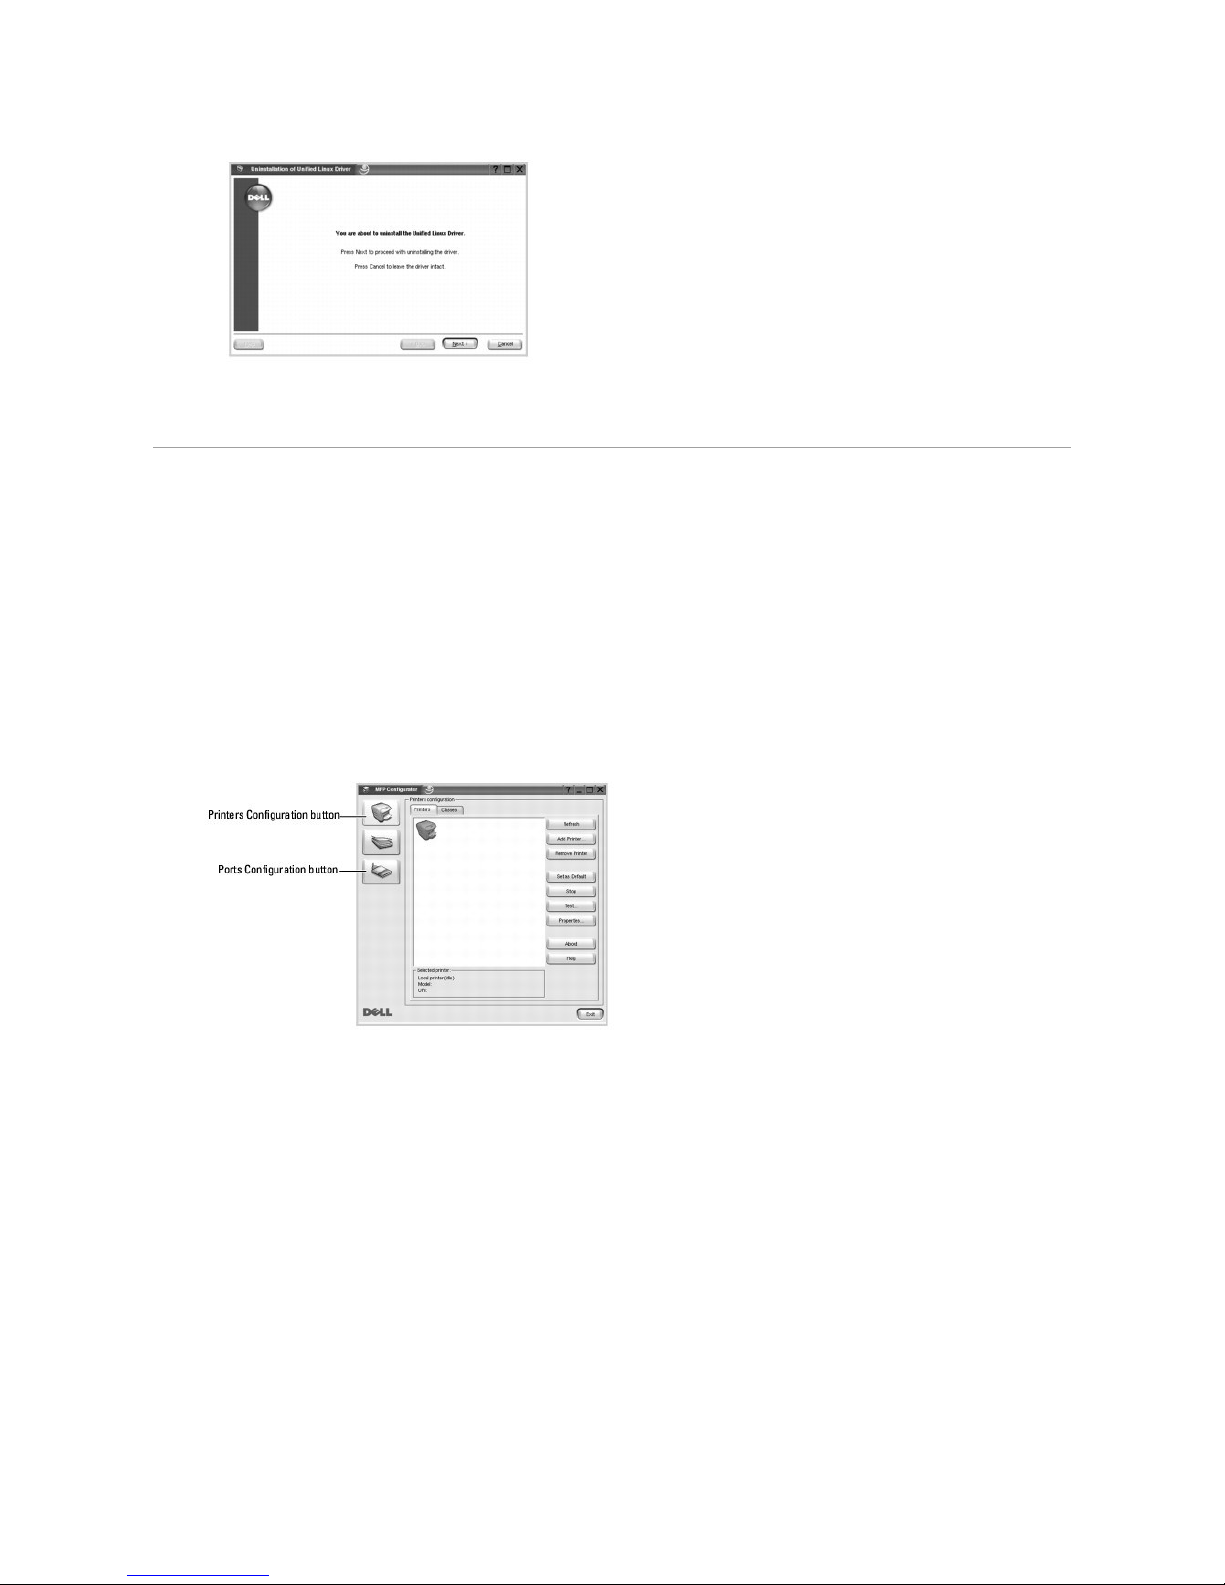
5. Click Finish.
Using the Configurator
Configurator is a tool intended primarily for configuring printer devices. Since a device combines the printer, Configurator provides options logically grouped for
printer. There is also a special port option responsible for the regulation of access to a printer via a single I/O channel.
After installing the printer driver, the Configurator icon will automatically be created on your desktop.
Opening the Configurator
1. Double-click Configurator on the desktop.
You can also click the Startup Menu icon, select Dell printer, and then Configurator.
2. Press each button on the Modules pane to switch to the corresponding configuration window.
You can use the on-screen help by clicking Help.
3. After changing the configurations, click Exit to close the Configurator.
Printers Configuration
Printers configuration has two tabs: Printers and Classes.
Printers Tab
You can see the current system's printer configuration by clicking on the printer icon button on the left side of the MFP Configurator window.
Page 31
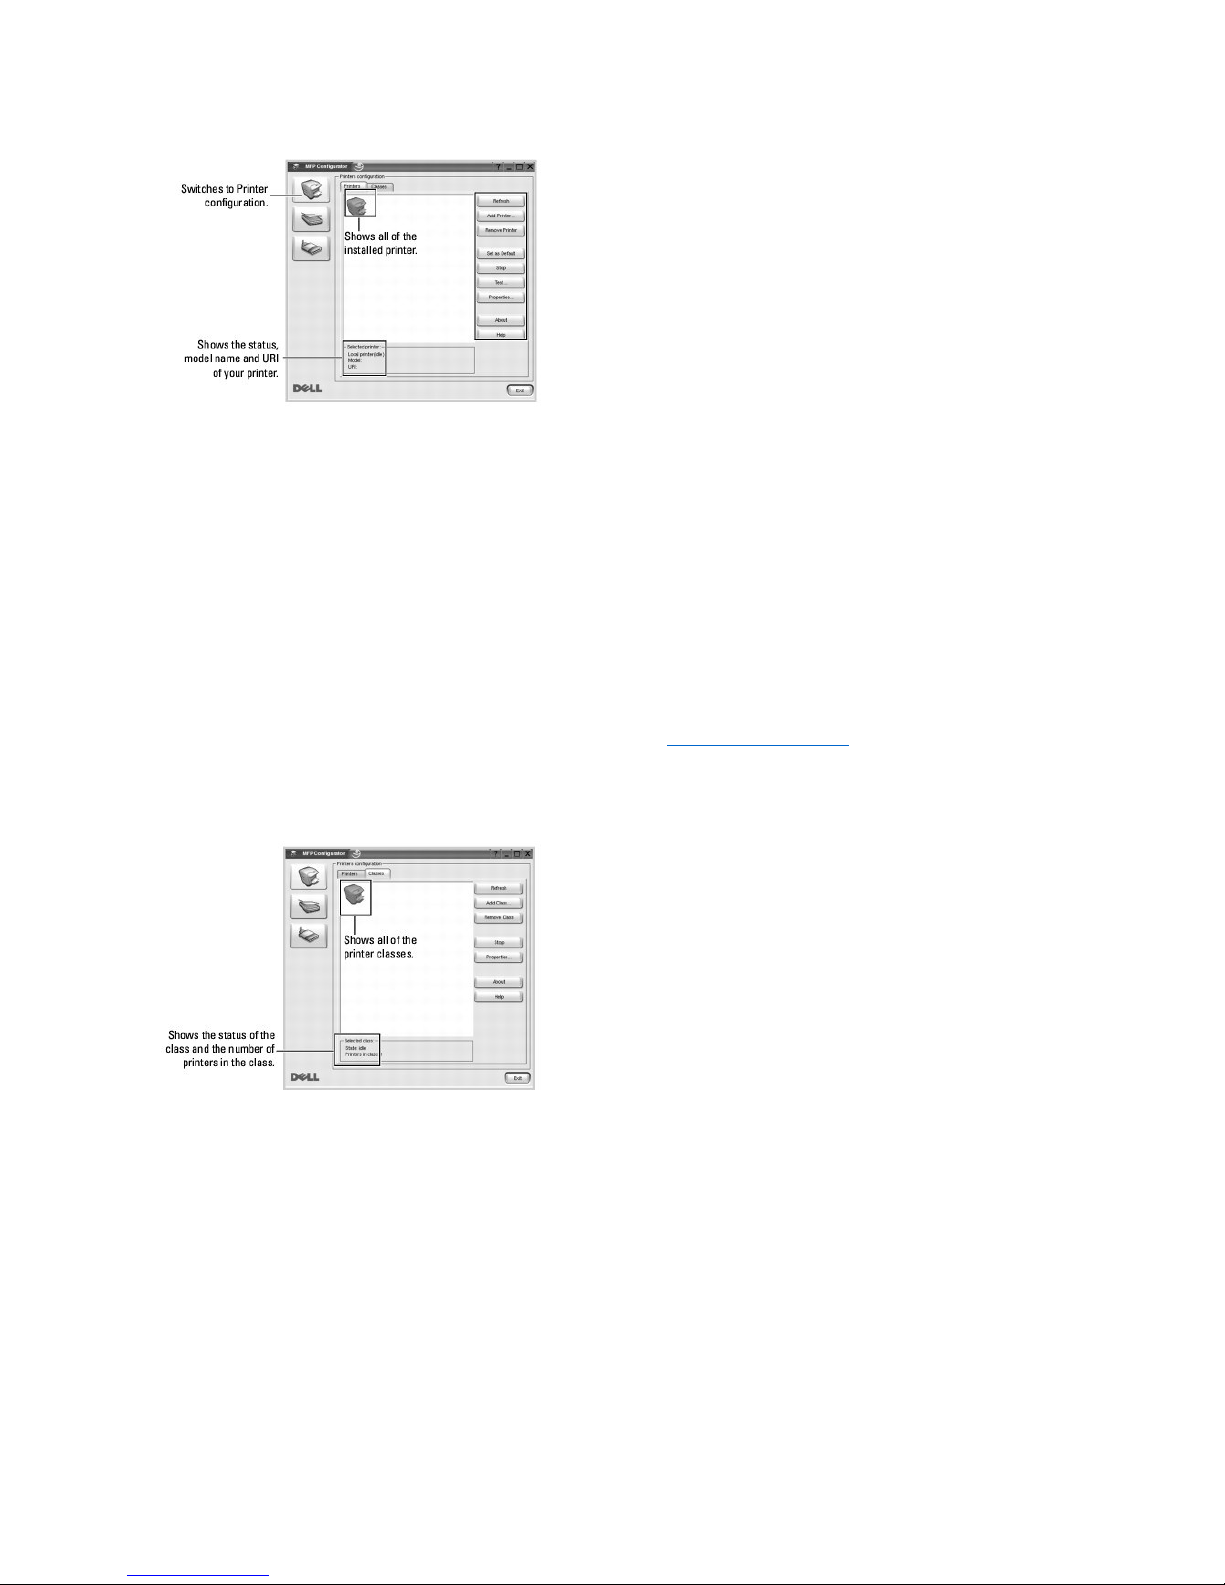
You can use the following printer control buttons:
l Refresh: renews the available printers list.
l Add Printer: allows you to add a new printer.
l Remove Printer: removes the selected printer.
l Set as Default: sets the current printer as a default printer.
l Stop/Start: stops/starts the printer.
l Test: allows you to print a test page to check if the machine is working properly.
l Properties: allows you to view and change the printer properties. For details, see "Configuring Printer Properties".
Classes Tab
The Classes tab shows a list of available printer classes.
l Refresh: renews the classes list.
l Add Class...: allows you to add a new printer class.
l Remove Class: removes the selected printer class.
Ports Configuration
In this window, you can view the list of available MFP ports, check the status of each port, and release a port that is stalled in a busy state after its owner has
terminated for any reason.
Page 32
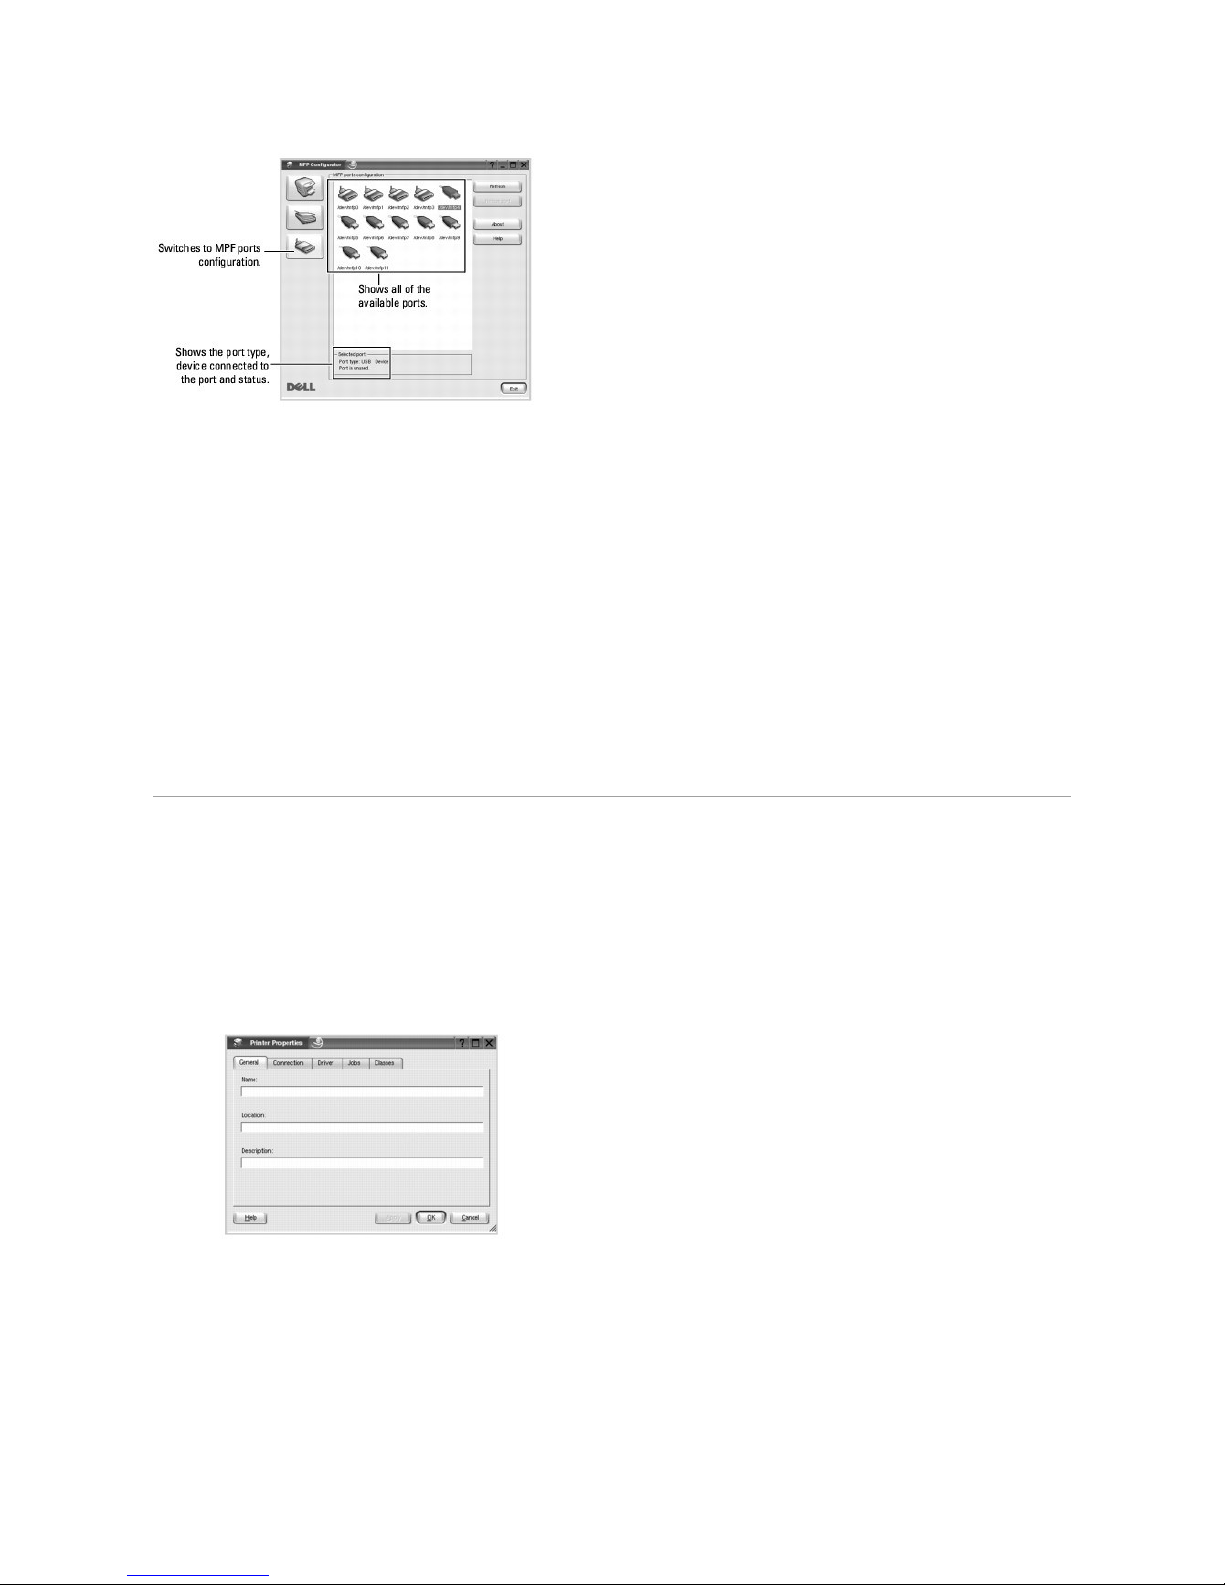
l Refresh: renews the available ports list.
l Release port: releases the selected port.
Sharing Ports Between Printers
Your printer may be connected to a host computer via the parallel port or USB port. Since the printer device contains more than one device, it is necessary to
organize proper access of "consumer" applications to these devices via the single I/O port.
The Dell Printer driver package provides an appropriate port-sharing mechanism that is used by Dell printer and scanner drivers. The drivers address their
devices via so-called ports. The current status of any port can be viewed via the Ports Configuration
. Post sharing prevents you from accessing one functional
block of the printer device, while another block is in use.
When you install a new printer onto your system, it is strongly recommended you do this with the assistance of a Configurator. In this case, you will be asked
to choose an I/O port for the new device. This choice provides the most suitable configuration for the printer's functionality.
Configuring Printer Properties
Using the properties window provided by the Printers configuration, you can change the various printer properties for your machine.
1. Open the Configurator.
If necessary, switch to Printers configuration.
2. Select your printer on the available printers list and click Properties.
3. The Printer Properties window opens.
The following five tabs display at the top of the window:
l General: allows you to change the printer location and name. The name entered in this tab displays on the printer list in Printers configuration.
l Connection: allows you to view or select another port. If you change the printer port from USB to parallel or vice versa while in use, you must re-
configure the printer port in this tab.
l Driver: allows you to view or select another printer driver. By clicking Options, you can set the default device options.
l Jobs: shows the list of print jobs. Click Cancel Job to cancel the selected job; select the Show completed jobs check box to see previous jobs on
the job list.
Page 33
l Classes: shows the class that your printer is in. Click Add to Class to add your printer to a specific class or click Remove from Class
to remove the
printer from the selected class.
l Click OK to apply the changes and close the Printer Properties Window.
Printing a Document
Printing from Applications
There are many Linux applications from which you are allowed to print using the Common UNIX Printing System (CUPS). You can print from any of these
application on your machine.
1. From the application you are using, select Print from the File menu.
2. Select Print directly using lpr.
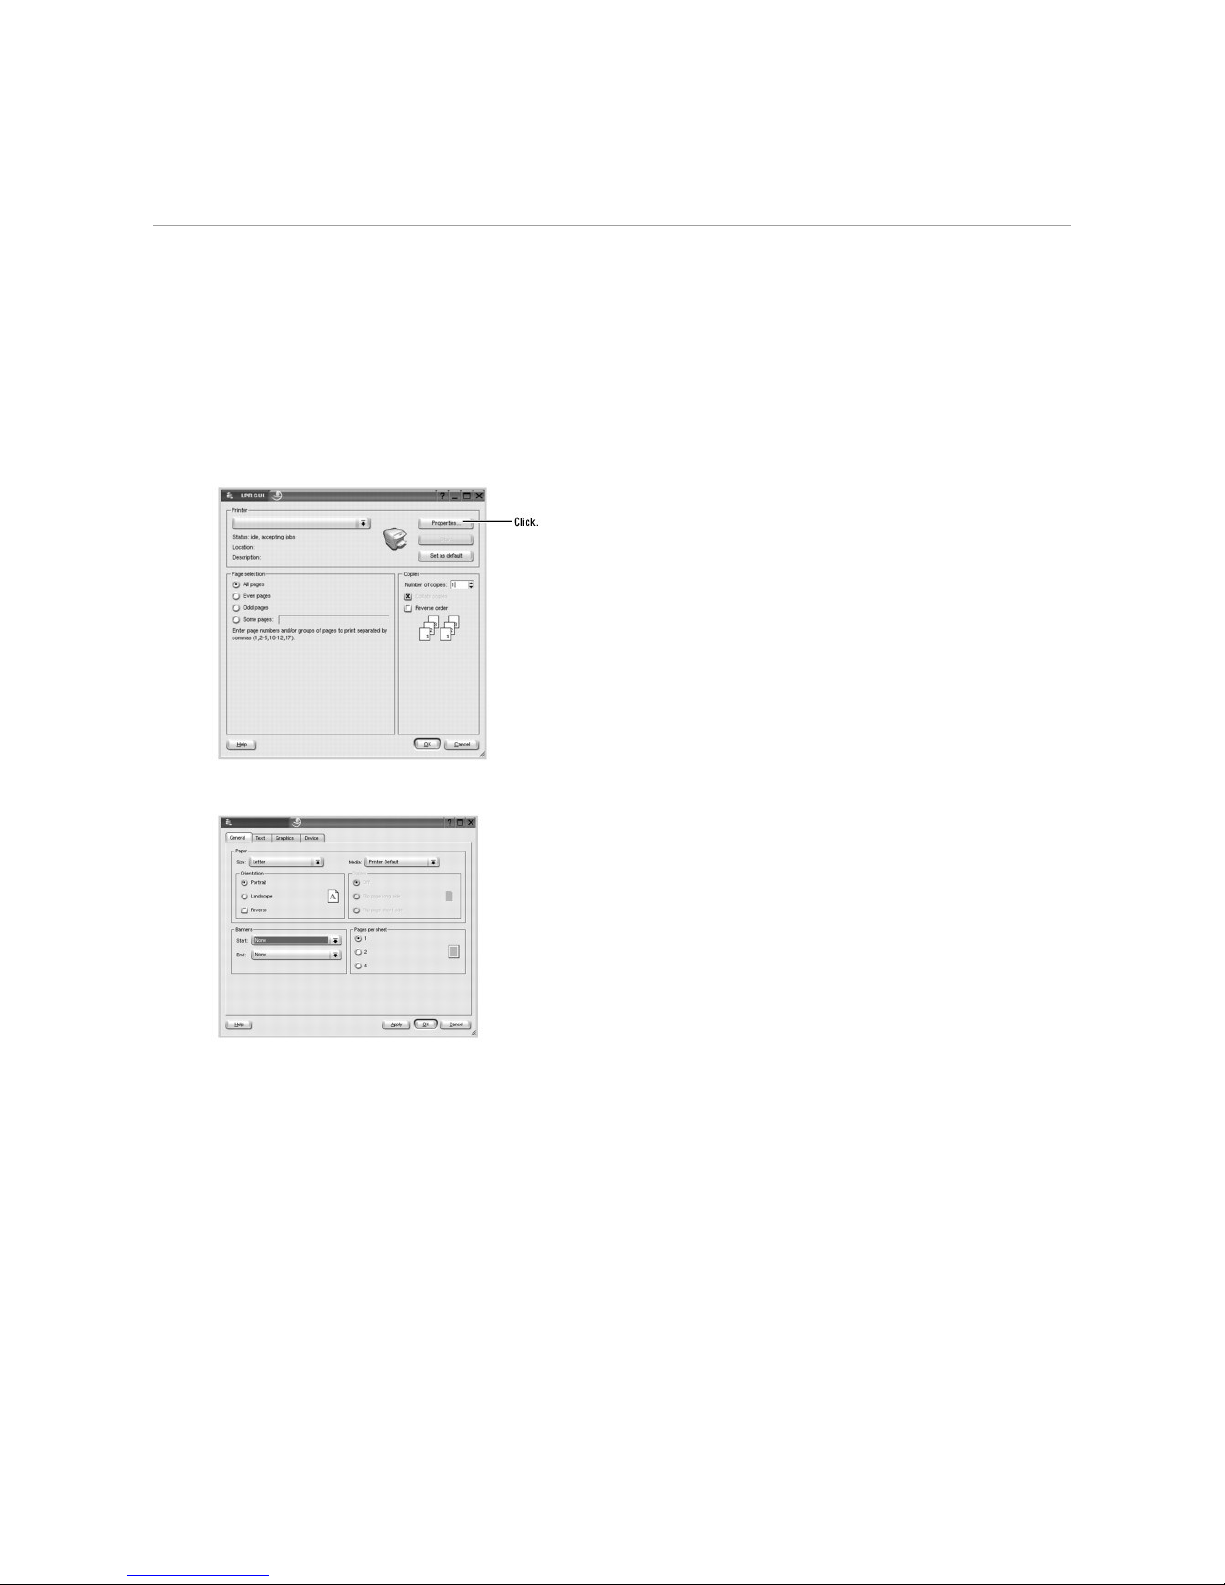
3. In the Dell LPR window, select the model name of your machine from the Printer list and click Properties.
4. Change the printer and print job properties.
The following four tabs display at the top of the window.
l General: allows you to change the paper size, paper type, and orientation of the documents, enables the duplex feature, adds start and end
banners, and changes the number of pages per sheet.
l Text: allows you to specify the page margins and set the text options, such as spacing or columns.
l Graphics: allows you to set image options used when printing images/files, such as color options, image size, or image position.
l Device: allows you to set the print resolution, paper source, and destination.
5. Click OK to apply the changes and close the Properties window.
6. Click OK in the Dell LPR window to start printing.
7. The Printing window appears allowing you to monitor the status of your print job.
To abort the current job, click Cancel.
Printing Files
You can print many different types of files on the Dell printer device directly from the command line interface using the standard CUPS way. The CUPS lpr utility
allows you do that, but the driver's package replaces the standard lpr tool with a much more user-friendly Dell LPR program.
Page 34

To print any document file:
1. Type lpr <file_name> from the Linux shell command line and press Enter. The Dell LPR window appears.
When you type only lpr and press Enter, the Select file(s) to print window appears first. Select the files you want to print and click Open.
2. In the Dell LPR window, select your printer from the list and change the printer and print job properties.
For details about the properties window, see "Printing a Document".
3. Click OK to start printing.
Unix
Printer driver packages and installation instructions are available on the Drivers and Utilities CD.
To launch the installation instructions for UNIX:
1. Insert the Drivers and Utilities CD. If the Drivers and Utilities CD automatically launches, click Cancel .
2. Browse to D:\unix\docs\<your language>\UNIX_Printer_Driver_User_Manual.doc, where D:\ is the letter of your CD-ROM drive.
Page 35
Macintosh
Installing Software for Macintosh
Setting Up the Printer
Printing
Your printer supports Macintosh systems with a built-in USB interface or 10/100 Base-TX network interface card. When you print a file from a Macintosh
computer, you can use the PostScript driver by installing the PPD file.
Installing Software for Macintosh
The printer's Drivers and Utilities CD provides you with the PPD file that allows you to use the PostScript driver for printing from a Macintosh computer.
Verify the following before you install the printer software:
Install the printer driver
1. Ensure that you connect your printer to the computer. Turn on your computer and printer.
2. Insert the printer's Drivers and Utilities CD into the CD-ROM drive.
3. Double-click the CD-ROM icon that appears on your Macintosh desktop.
4. Double-click the MAC_Installer folder.
5. Double-click the MAC_Printer folder.
6. For Mac OS 8.6 ~ 9.2, double-click the Dell 5330dn Installer Classic icon.
For Mac OS 10.1, double-click the Dell 5330dn Installer 10.1 icon.
For Mac OS 10.2 ~ 10.5, double-click the Dell 5330dn Installer OSX icon.
7. Enter the password and click OK.
8. Select destination and Continue.
9. Click Install.
10. After the installation is finished, click Quit.
Uninstall the printer driver
1. Ensure that you connect your printer to the computer. Turn on your computer and printer.
2. Insert the printer's Drivers and Utilities CD into the CD-ROM drive.
3. Double-click the CD-ROM icon that appears on your Macintosh desktop.
4. Double-click the MAC_Installer folder.
5. Double-click the MAC_Printer folder.
6. For Mac OS 8.6 ~ 9.2, double-click the Dell 5330dn Installer Classic icon.
For Mac OS 10.1, double-click the Dell 5330dn Installer 10.1 icon.
For Mac OS 10.2 ~ 10.5, double-click the Dell 5330dn Installer OSX icon.
7. Enter the password and click OK.
8. Select destination and Continue.
9. Select Uninstall and click Uninstall.
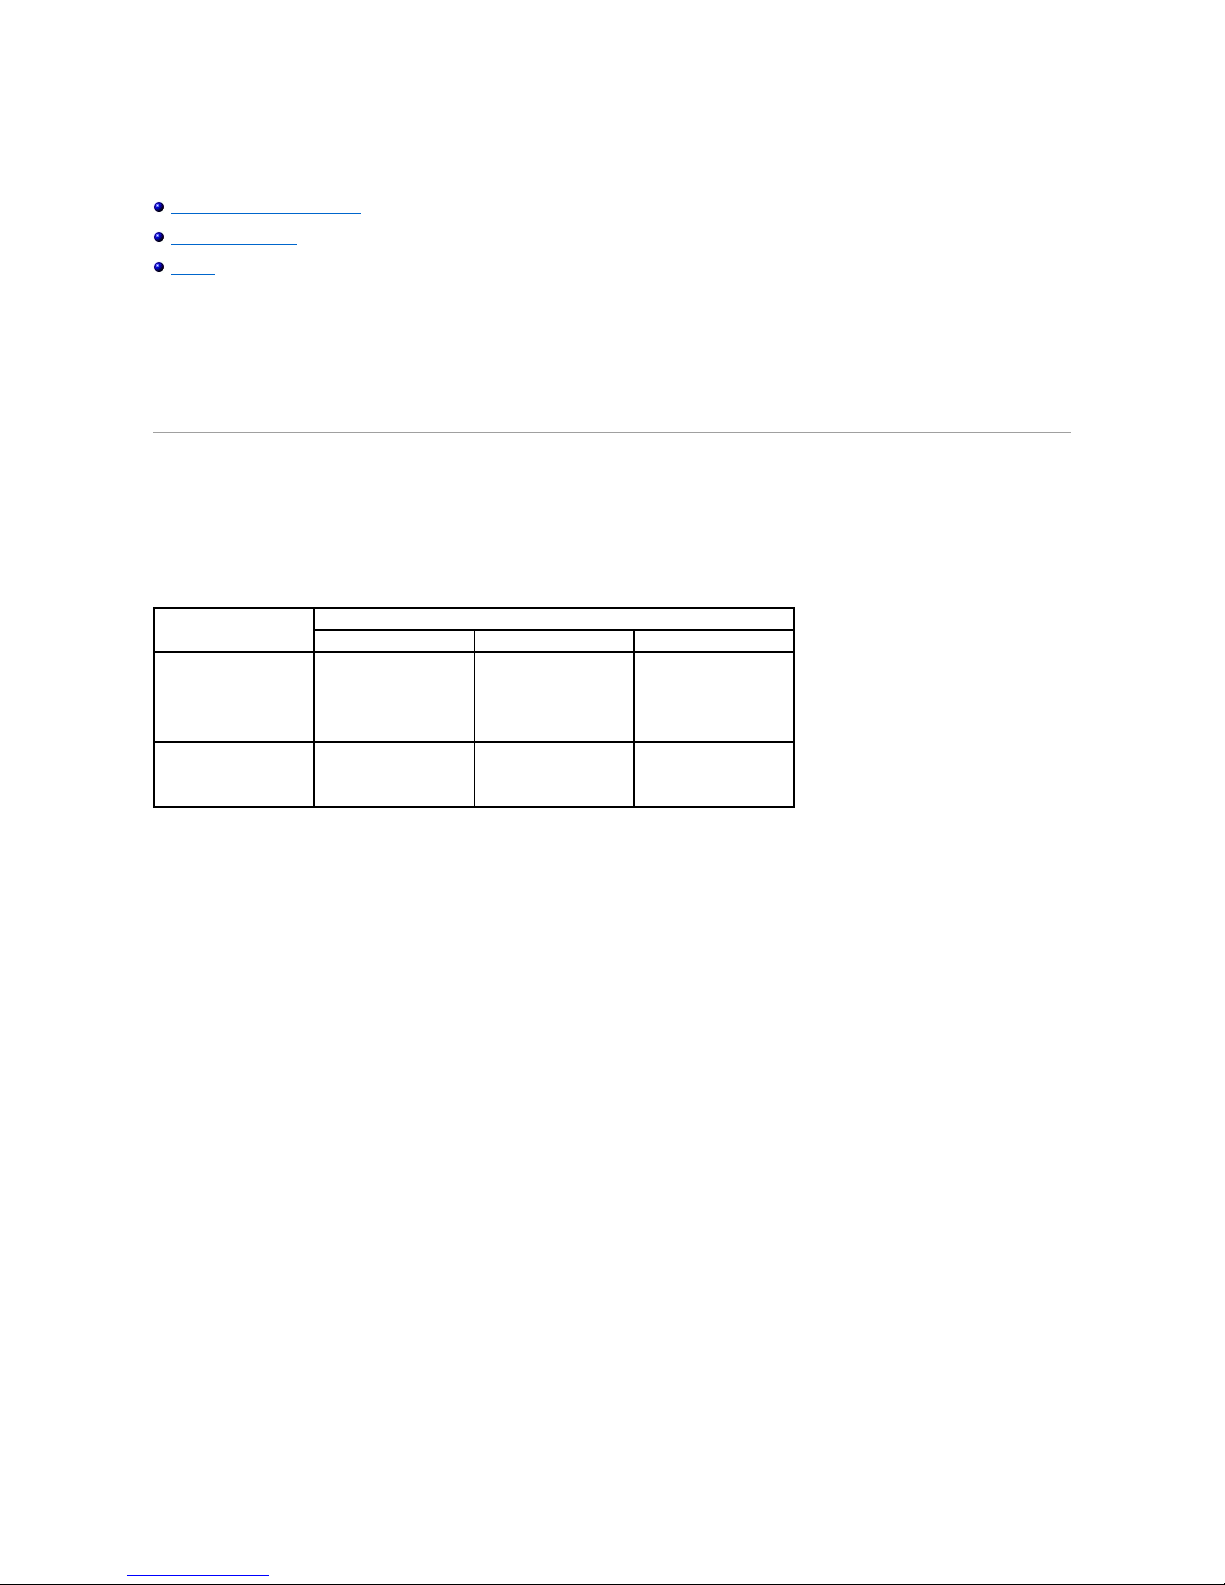
Operating System
Requirements (recommended)
CPU
RAM
Free Disk space
Mac OS X 10.4 or lower
l Intel Processor
l Power PC G4 /G5
l 128 MB for a
Power-PC based
Mac (512 MB).
l 512 MB for an Intel-
based Mac (1 GB)
1 GB
Mac OS X 10.5
l Intel Processor
l 867 MHz or faster
Power PC G4 /G5
512 MB (1 GB)
1 GB
Page 36

10. After the installation is finished, click Quit.
Setting Up the Printer
Set up for your printer will be different depending on which cable you use to connect the printer to your computer — the network cable or the USB cable.
For a Network-connected Macintosh
Mac OS 8.6 ~ 9.2
1. From the Apple menu, select Chooser.
2. Click LaserWriter 8 (the PostScript driver provided with your Macintosh).
The name of your printer appears in the list.
3. Select DEL000xxxxxxxxx from the printer box (where the xxxxxxxxx varies depending on each of the products) and click Select
. If Auto Setup does not
work properly, click Select PPD, choose DELL 5330dn Mono Laser Printer, and click OK.
4. When the setup is completed, your printer icon is created as a desktop printer.
5. Close Chooser.
6. When a message window appears telling you that you have changed your current printer, click OK.
Mac OS 10.1 or higher
1. Follow the instructions on "Installing Software for Macintosh" to install the PPD and Filter files on your computer.
2. Open the Applications folder Utilities, and Print Setup Utility.
For MAC OS 10.5, open System Preferences from the Applications folder, and click Print & Fax.
3. Click Add on the Printer List.
For MAC OS 10.5, press the "+" icon; a display window appears.
4. For MAC OS 10.3, select the IP Printing tab.
For MAC OS 10.4, click Printer Address.
For MAC OS 10.5, click IP.
5. In the Printer Address field, enter the printer’s IP address..
For MAC OS 10.5, enter the printer's IP address in the Address field.
6. Enter the queue name in the Queue Name field. If you cannot determine the queue name for your printer server, try using the default queue first.
For MAC OS 10.5, enter the queue name in the Queue field.
7. For MAC OS 10.3, if Auto Select does not work properly, select Dell in Printer Model and your printer name in Model Name.
For MAC OS 10.4, if Auto Select does not work properly, select Dell in Print Using and your printer name in Model.
For MAC OS 10.5, if Auto Select does not work properly, select Select a driver to use... and your printer name in Print Using.
8. Click Add.
9. Your printer's IP address appears on the Printer List and is set as the default printer.
For a USB-connected Macintosh
Mac OS 8.6 ~ 9.2
1. Open the Macintosh HD and double-click Application.
2. Double-click Utilities.
3. Double-click Desktop Printer Utility.
4. Select LaserWriter 8 and Printer (USB) in the list box. Click OK.
5. Click Change in the USB Printer Selection section. The name of your printer appears in the list.
6. Click DELL 5330dn Mono Laser Printer and click OK.
7. Click Auto Setup in the PostScript Printer Description (PPD) File section. If Auto Setup does not work properly, click Select PPD and choose DELL
5330dn Mono Laser Printer.
8. When the setup is completed, click Create.
Page 37
9. Click Save.
Mac OS 10.1 or higher
1. Follow the instructions on "Installing Software for Macintosh" to install the PPD and Filter files on your computer.
2. Open the Applications folder Utilities, and Print Setup Utility.
For MAC OS 10.5, open System Preferences from the Applications folder, and click Print & Fax.
3. Click Add on the Printer List.
For MAC OS 10.5, press the "+" icon; a display window appears.
4. For MAC OS 10.3, select the USB tab.
For MAC OS 10.4, click Default Browser and find the USB connection.
For MAC OS 10.5, click Default and find the USB connection.
5. For MAC OS 10.3, if Auto Select does not work properly, select Dell in Printer Model and your printer name in Model Name.
For MAC OS 10.4, if Auto Select does not work properly, select Dell in Print Using and your printer name in Model.
For MAC OS 10.5, if Auto Select does not work properly, select Select a driver to use... and your printer name in Print Using.
6. Click Add.
Your printer appears on the Printer List and is set as the default printer.
Printing
Printing a Document
When you print with a Macintosh, you need to check the printer software setting in each application you use. To print from a Macintosh, follow these steps:
1. Open a Macintosh application and select the file you want to print.
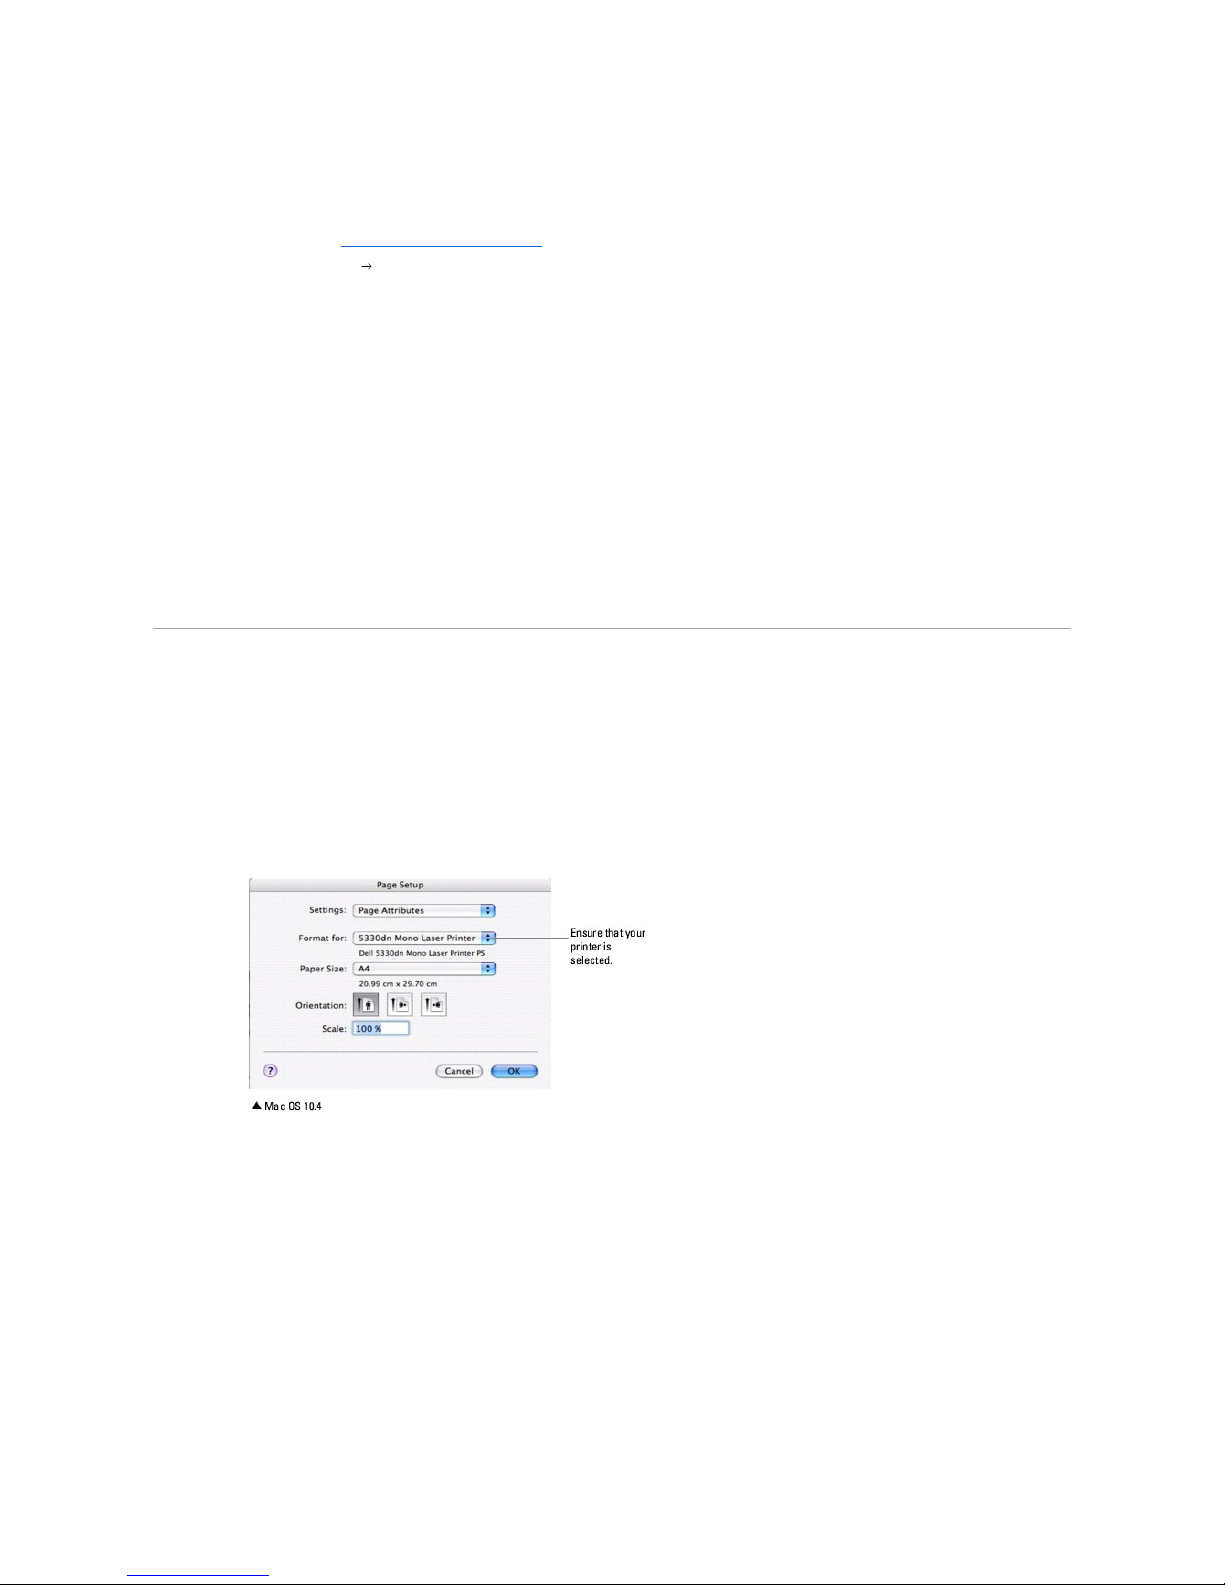
2. Open the File menu and click Page Setup (Document Setup in some applications).
3. Choose your paper size, orientation, scaling, and other options, then click OK.
4. Open the File menu and click Print.
5. Choose the number of copies you want and indicate which pages you want to print.
6. Click Print when you finish setting the options.
Changing Printer Settings
You can use advanced printing features when using your printer.
From your Macintosh application, select Print from the File menu.
Layout Setting
Page 38
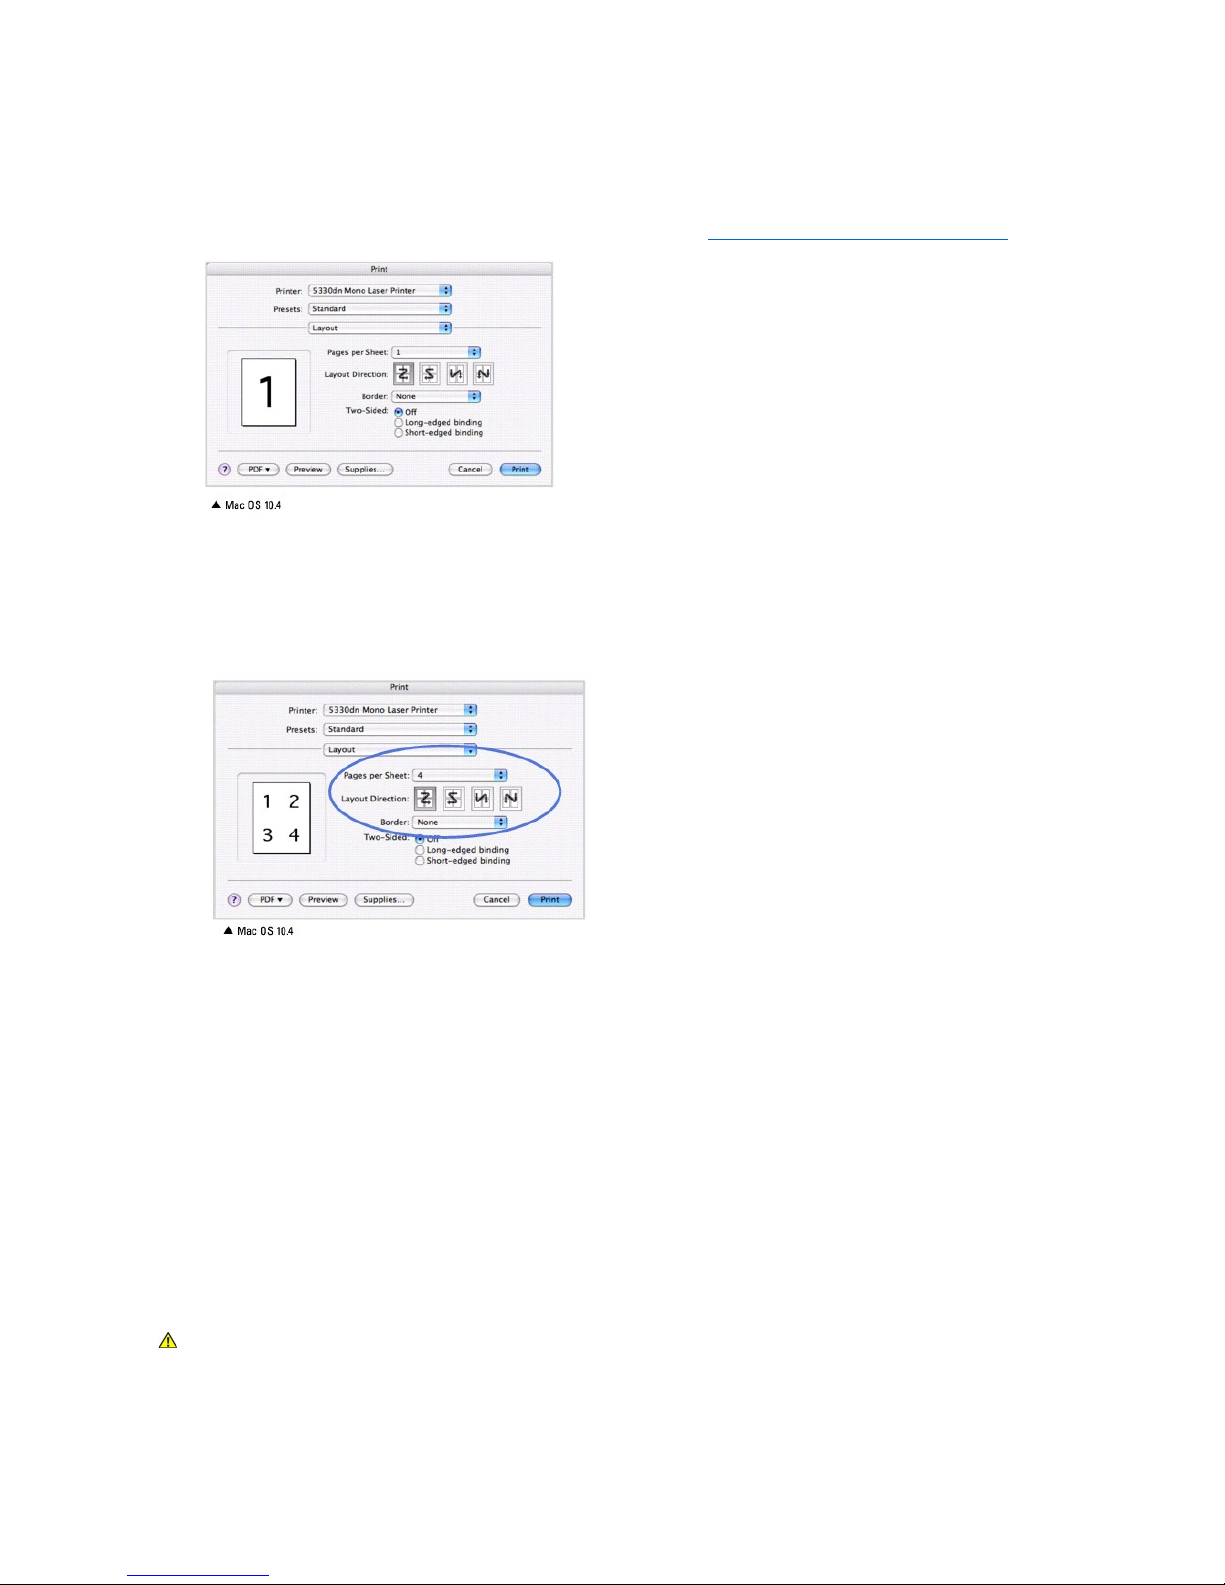
The Layout tab provides options to adjust how the document appears on the printed page. You can print multiple pages on one sheet of paper.
Select Layout from the Presets drop-down list to access the following features. For details, see "Printing Multiple Pages on One Sheet of the Paper" and
"Duplex Printing".
Printing Multiple Pages on One Sheet of Paper
You can print more than one page on a single sheet of paper. This feature provides a cost-effective way to print draft pages.
1. From your Macintosh application, select Print from the File menu.
2. Select Layout.
3. Select the number of pages you want to print on one sheet of paper on the Pages per Sheet drop-down list.
4. Select the page order from the Layout Direction option.
To print a border around each page on the sheet, select the option you want from the Border drop-down list.
5. Click Print. The printer prints the selected number of pages on one side of each page.
Duplex Printing
You can print on both sides of the paper. Before printing in the duplex mode, decide on which edge you will be binding your finished document. The binding
options are:
Long-Edge Binding: this is the conventional layout used in book binding.
Short-Edge Binding: this is the type often used with calendars.
1. From your Macintosh application, select Print from the File menu.
CAUTION: If you need multiple copies of a document and you want those copies on both sides of the paper, you must print them one at a time, as
separate print jobs. Regarding "Collated copy", if your document has odd pages, the last page of the first copy and the first page of the next copy
will be printed on the front and back of one sheet. Regarding "Uncollated copy", the same page will be printed on the front and back of one sheet.
Therefore, if you need multiple copies of a document and you want those copies on both sides of the paper, you must print them one at a time, as
separate print jobs.
Page 39
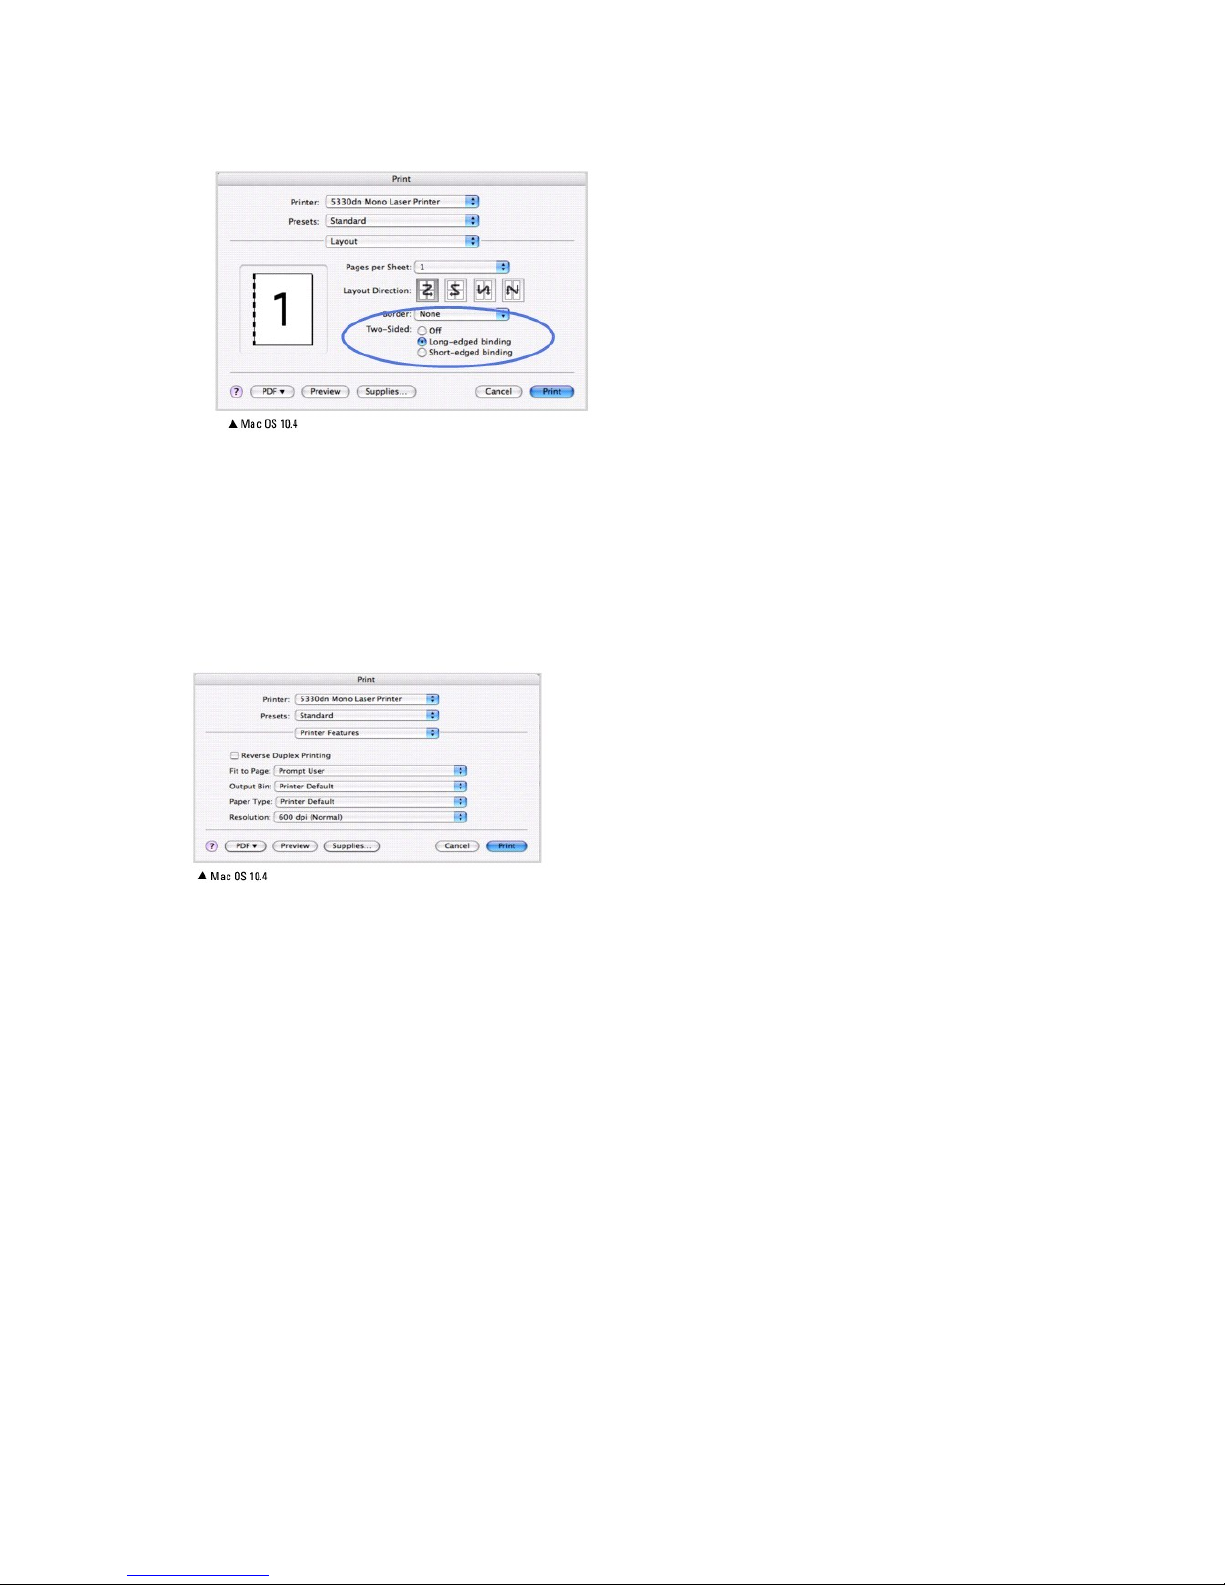
2. Select the Layout.
3. Select a binding orientation from Two Sided option.
4. Click Print. The printer prints on both sides of the paper.
Printer Features Setting
The Printer Features tab provides options for selecting the paper type and adjusting print quality.
Select Printer Features from the Presets drop-down list to access the following features:
Reverse Duplex Printing
Allows you to select general print order compared to duplex print order.
Fit to Page
Allows you to scale your print job to any selected paper size regardless of the digital document size. This can be useful when you want to check fine details on
a small document.
Output Bin
If you install the Optional Output Bin 1, you can choose the exit bin for the printed document.
Paper Type
Ensure that Paper Type is set to Printer Default. If you load a different type of print material, select the corresponding paper type.
Resolution
You can select the printing resolution. The higher the setting, the sharper the clarity of the printed characters and graphics. The higher setting may also
increase the time it takes to print a document.
Page 40

Maintenance
Clearing the Setting and Restoring Setting to Factory Default
Cleaning Your Printer
Maintaining the Toner Cartridge
Replacement parts
Ordering Supplies
Clearing the Setting and Restoring Setting to Factory Default
To restore the printer's factory default settings:
1. Press Menu ( ).
2. Press Scroll ( to ) to highlight Settings and press Select ( ).
3. Press Scroll ( to ) to highlight Factory Defaults and press Select ( ).
4. Press Scroll ( to ) to highlight Restore Now and press Select ( ).
5. Press Cancel ( ) to return to Standby mode.
Clearing the printer NVRAM
To selectively clear information stored in your printer's memory:
1. Press Menu ( ).
2. Press Scroll ( to ) to highlight Maintenance and press Select ( ).
3. Press Scroll ( to ) to highlight Clear Settings and press Select ( ).
4. Press Scroll ( to ) until you see the item you want to clear.
l All Settings: clears all of the data stored in memory and resets all settings to factory default.
l Paper Setup: restores all the Paper Setting options to factory default.
5. Press Select ( ). The selected memory is cleared and the display asks you to continue clearing the next item.
6. Repeat steps 4 and 5 to clear another item.
OR
Press Cancel ( ) to return to Standby mode.
Cleaning Your Printer
During the printing process, paper, toner, and dust particles accumulate inside the printer. This buildup causes print quality problems, such as toner specks or
smearing. Your printer has a cleaning mode that corrects and prevents these types of problems.
Cleaning the Exterior
Clean the printer cabinet with a soft, damp, lint-free cloth. Do not let water drip onto or inside the printer.
Cleaning the Interior
Paper, toner, and dust particles accumulate inside the printer and cause print quality problems, such as smearing or toner specks. Clean inside the printer to
prevent these problems.
CAUTION: Cleaning solvents containing alcohol or other strong substances may discolor or crack the printer cabinet.
Page 41
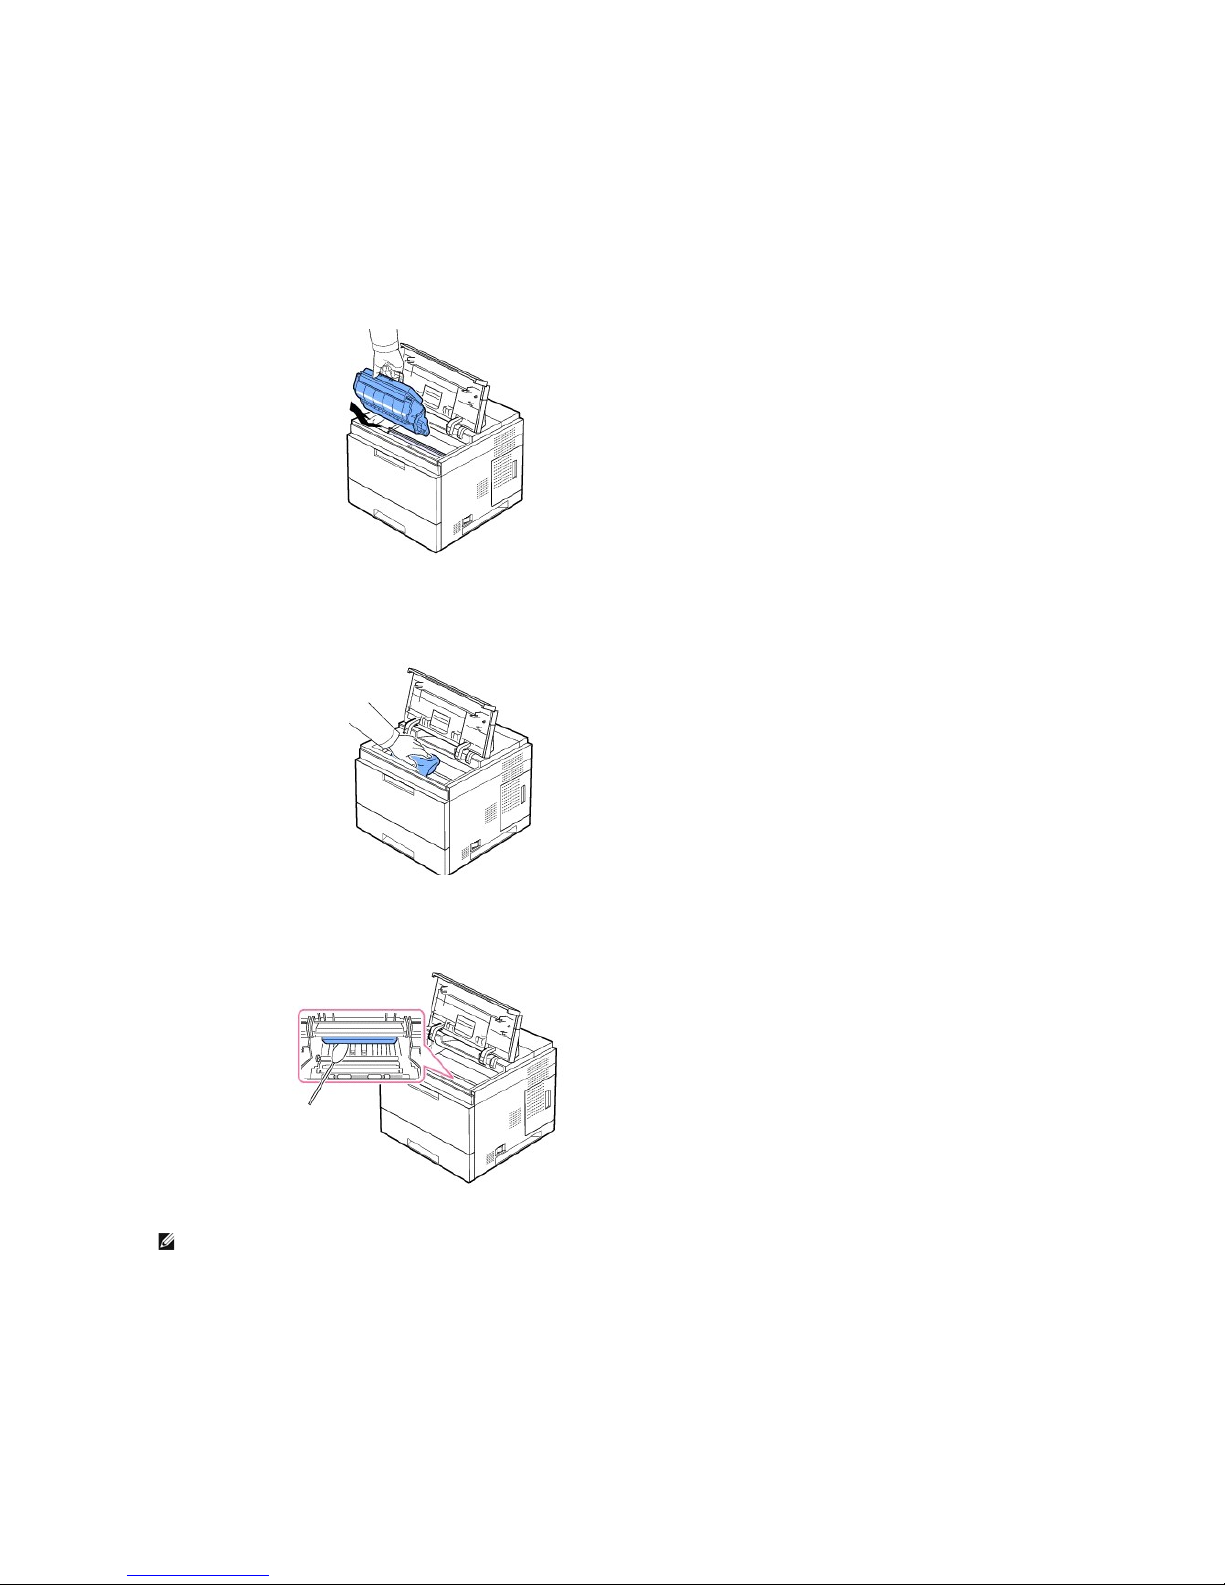
There are two methods to clean the inside of the printer:
l Clean the inside manually
l Print a cleaning sheet, which can be done from the control panel.
Cleaning the inside of the printer manually
1. Power the printer off and unplug the power cord. Note the length of time it takes for the printer to cool down.
2. Open the top cover and pull the toner cartridge out. Set it on a clean flat surface.
CAUTION: To prevent damage, do not expose the toner cartridge to light for more than a few minutes.
CAUTION: Do not touch the green underside of the toner cartridge. Use the handle on the cartridge to avoid touching this area.
3. With a dry and lint-free cloth, wipe away any dust and spilled toner from the toner cartridge area and from the toner cartridge cavity.
CAUTION: While cleaning the inside of the printer, be careful not to touch the transfer roller located underneath the toner cartridge. Oil from your fingers can
cause print quailty problems.
4. Gently swab the long strip of glass (Laser Scanning Unit) inside the top of the cartridge cavity and check for dirt or dust.
5. Locate the PTL lens by flipping up the feed guide and gently swab the lens with a cotton swab.
NOTE: The long strip of glass is hard to locate.
Page 42
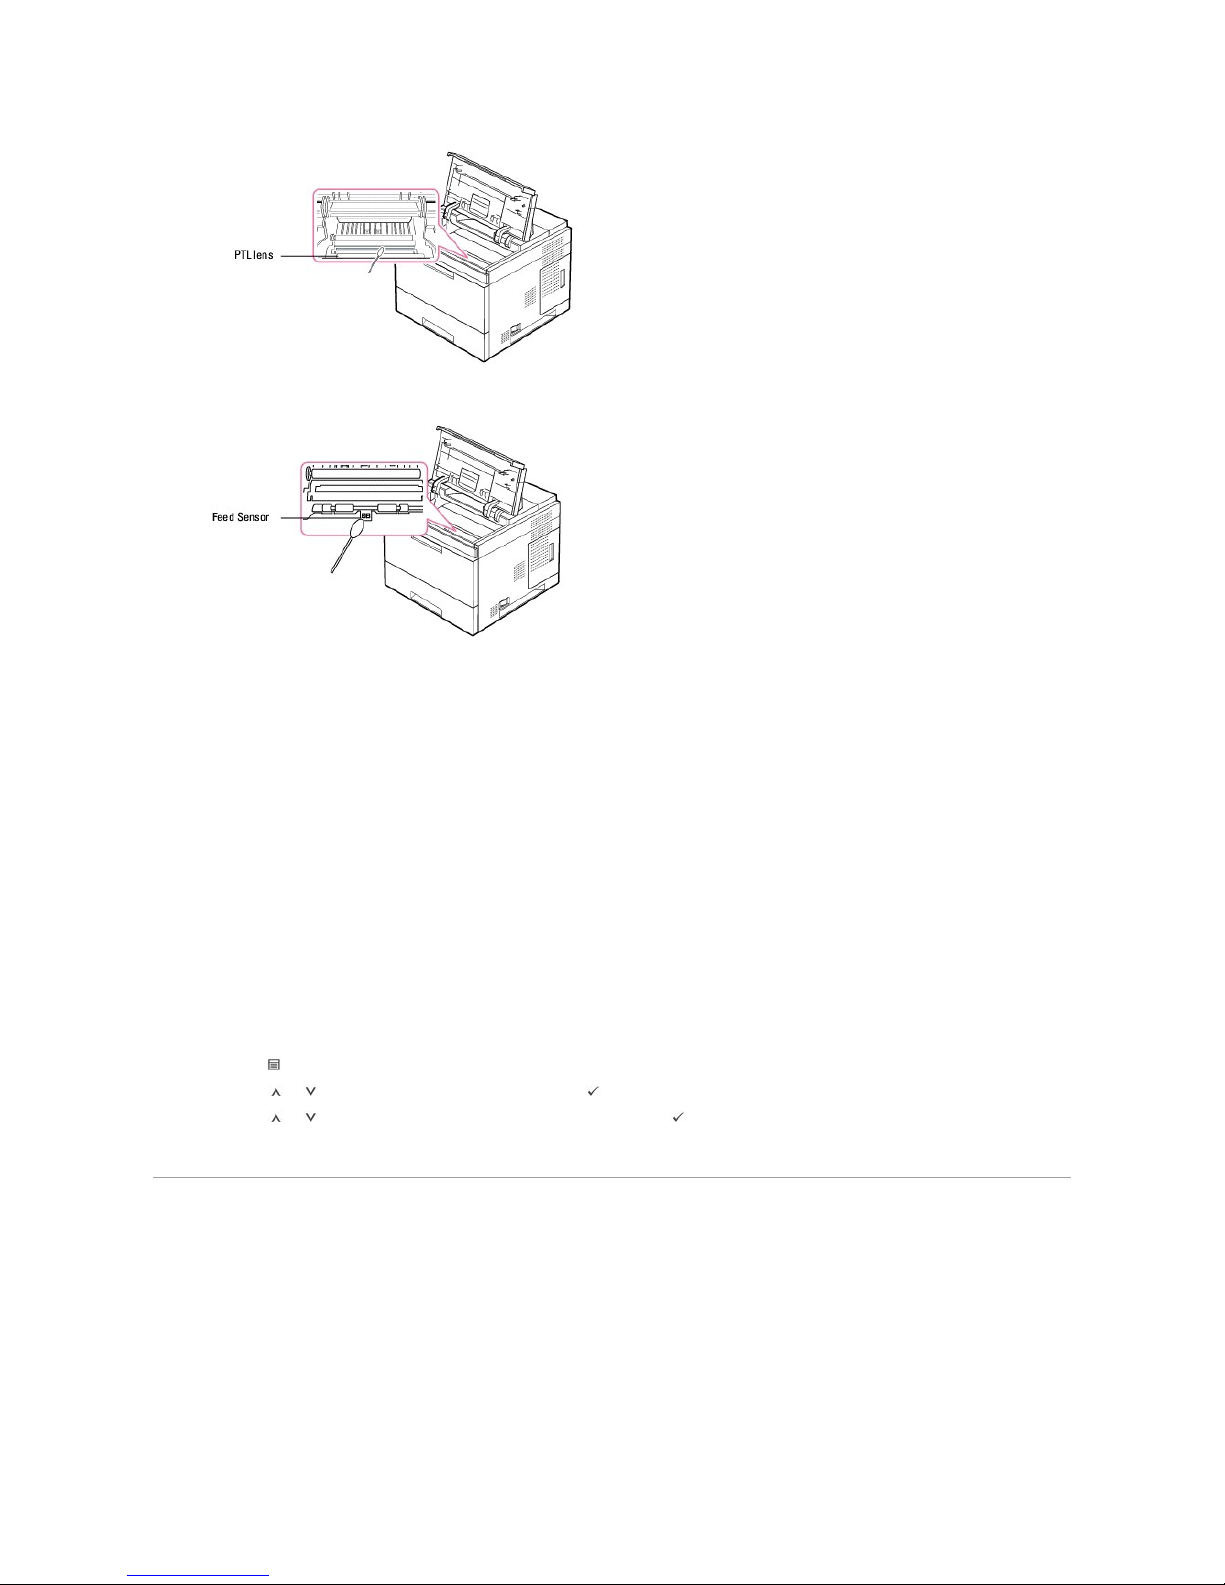
6. Clean the feed sensor with a cotton swab.
7. Reinsert the toner cartridge and close the top cover.
8. Plug in the power cord and turn the printer on.
Printing a cleaning sheet
If you are experiencing blurred, faded, or smeared printouts, you can clear the problem by printing a cleaning sheet provided with your printer.
You can print:
l OPC cleaning sheet: cleans the OPC drum of the toner cartridge.
l Fuser cleaning sheet: cleans the fuser unit inside the printer.
This process will produce a page with toner debris, which should be discarded.
1. Ensure that the printer is turned on with paper loaded in the tray.
2. Press Menu ( ).
3. Press Scroll ( to ) to highlight Maintenance and press Select ( ).
4. Press Scroll ( to ) to highlight Clean Drum or Clean Fuser and press Select ( ).
Your printer automatically picks up a sheet of paper from the tray and prints out a cleaning sheet with dust or toner particles on it.
Maintaining the Toner Cartridge
Storing the Toner Cartridge
Store the toner cartridge in the original packaging until you are ready to install it.
Do not store the toner cartridge in:
l Temperaturesgreaterthan40°C(104° F)
Page 43
l An environment with extreme changes in humidity or temperature
l Direct sunlight
l Dusty places
l A car for a long period of time
l An environment where corrosive gases are present
l An environment with salty air
Checking the Remaining Toner
You can check the level of toner left in the cartridge.
If you are having print quality problems, this can help you determine if the problem is caused by low toner.
1. Press Menu ( ).
2. Press Scroll ( to ) to highlight Maintenance and press Select ( ).
3. Press Scroll ( to ) to highlight Supplies Life and press Select ( ).
4. Press Scroll ( to ) to highlight Toner Remains and press Select ( ).
The display shows the percentage of the remaining toner.
Redistributing Toner
When the toner cartridge is near the end of its life, white streaks or light print occurs. The LCD displays the warning message, Toner Low. Thoroughly shake
the toner cartridge from side-to-side to distribute the toner evenly and temporarily improve print quality.
This is not intended to be a long-term method of correction, but only to assist your printing needs until you obtain a new cartridge assembly.
CAUTION: Do not touch the green underside of the toner cartridge. Use the handle on the cartridge to avoid touching this area.
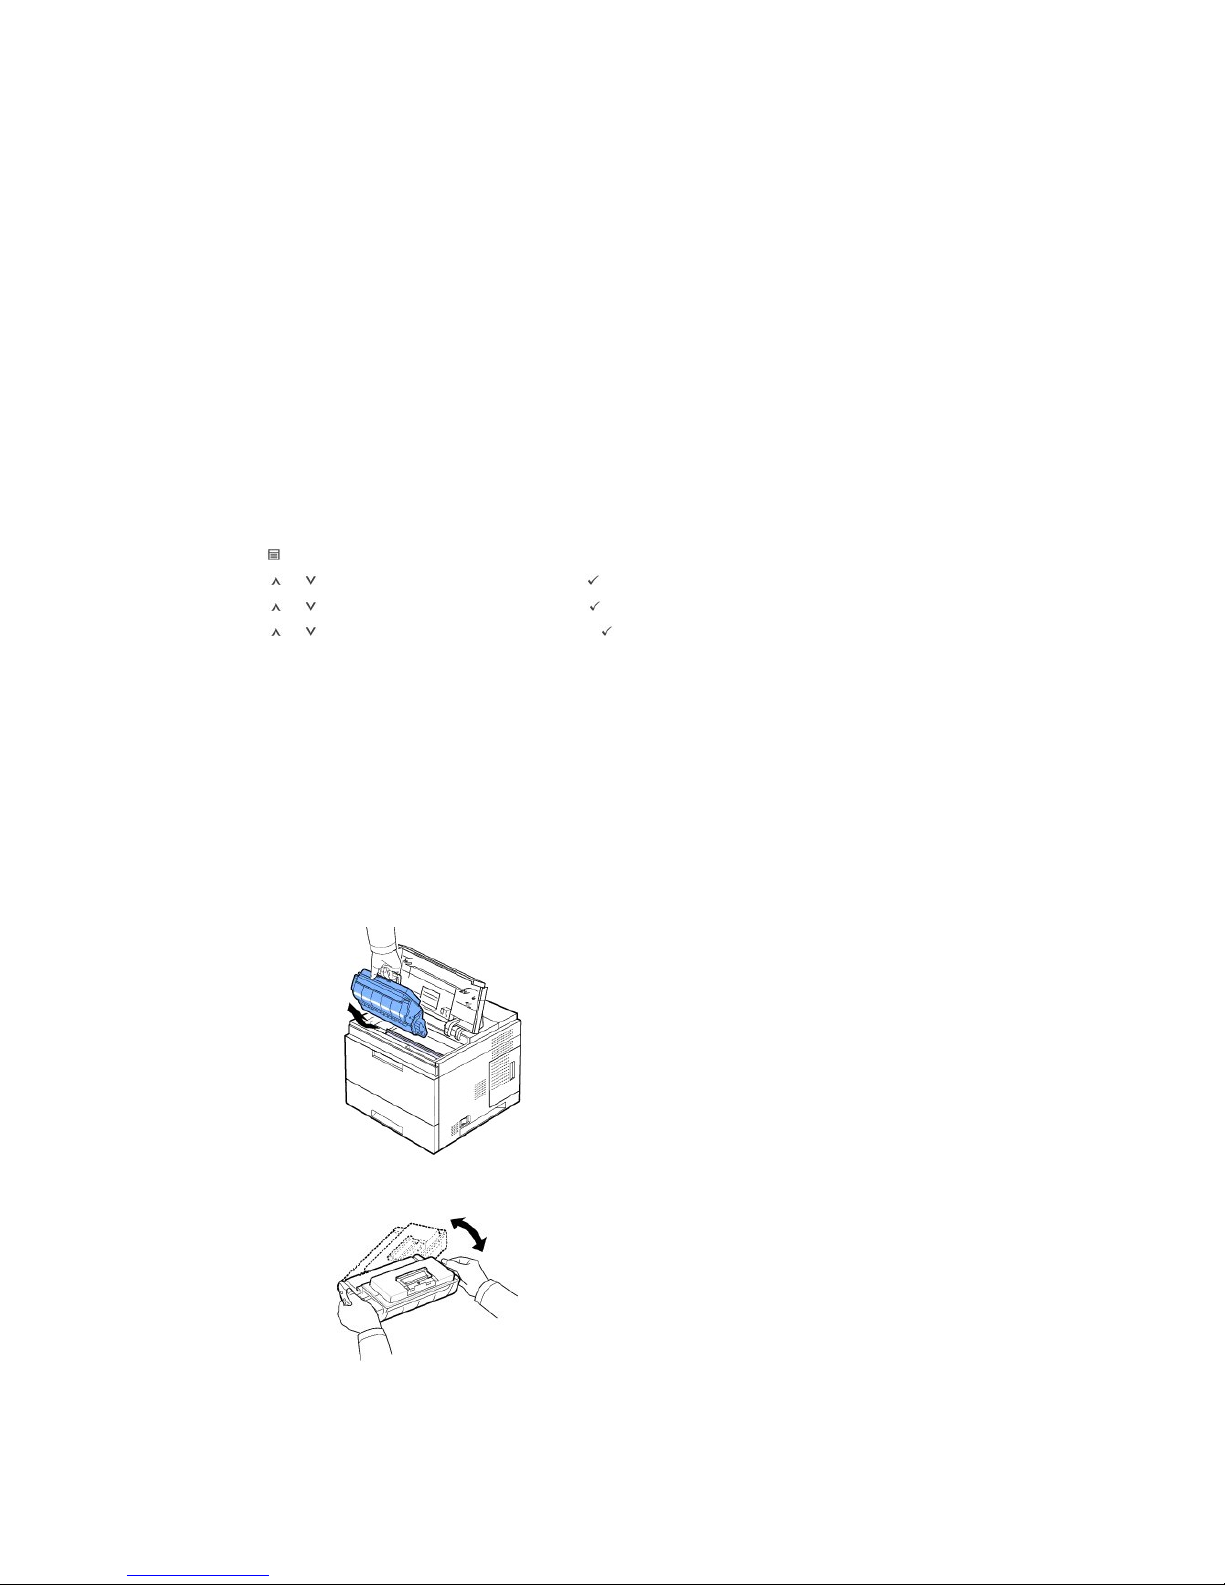
1. Open the top cover.
2. Pull the toner cartridge out.
3. Thoroughly shake the cartridge 3-4 times to distribute the toner evenly inside the cartridge.
NOTE: If toner comes into contact with your clothing, wipe the toner off with a dry cloth and wash your clothing in cold water. Hot water sets toner into
fabric.
Page 44
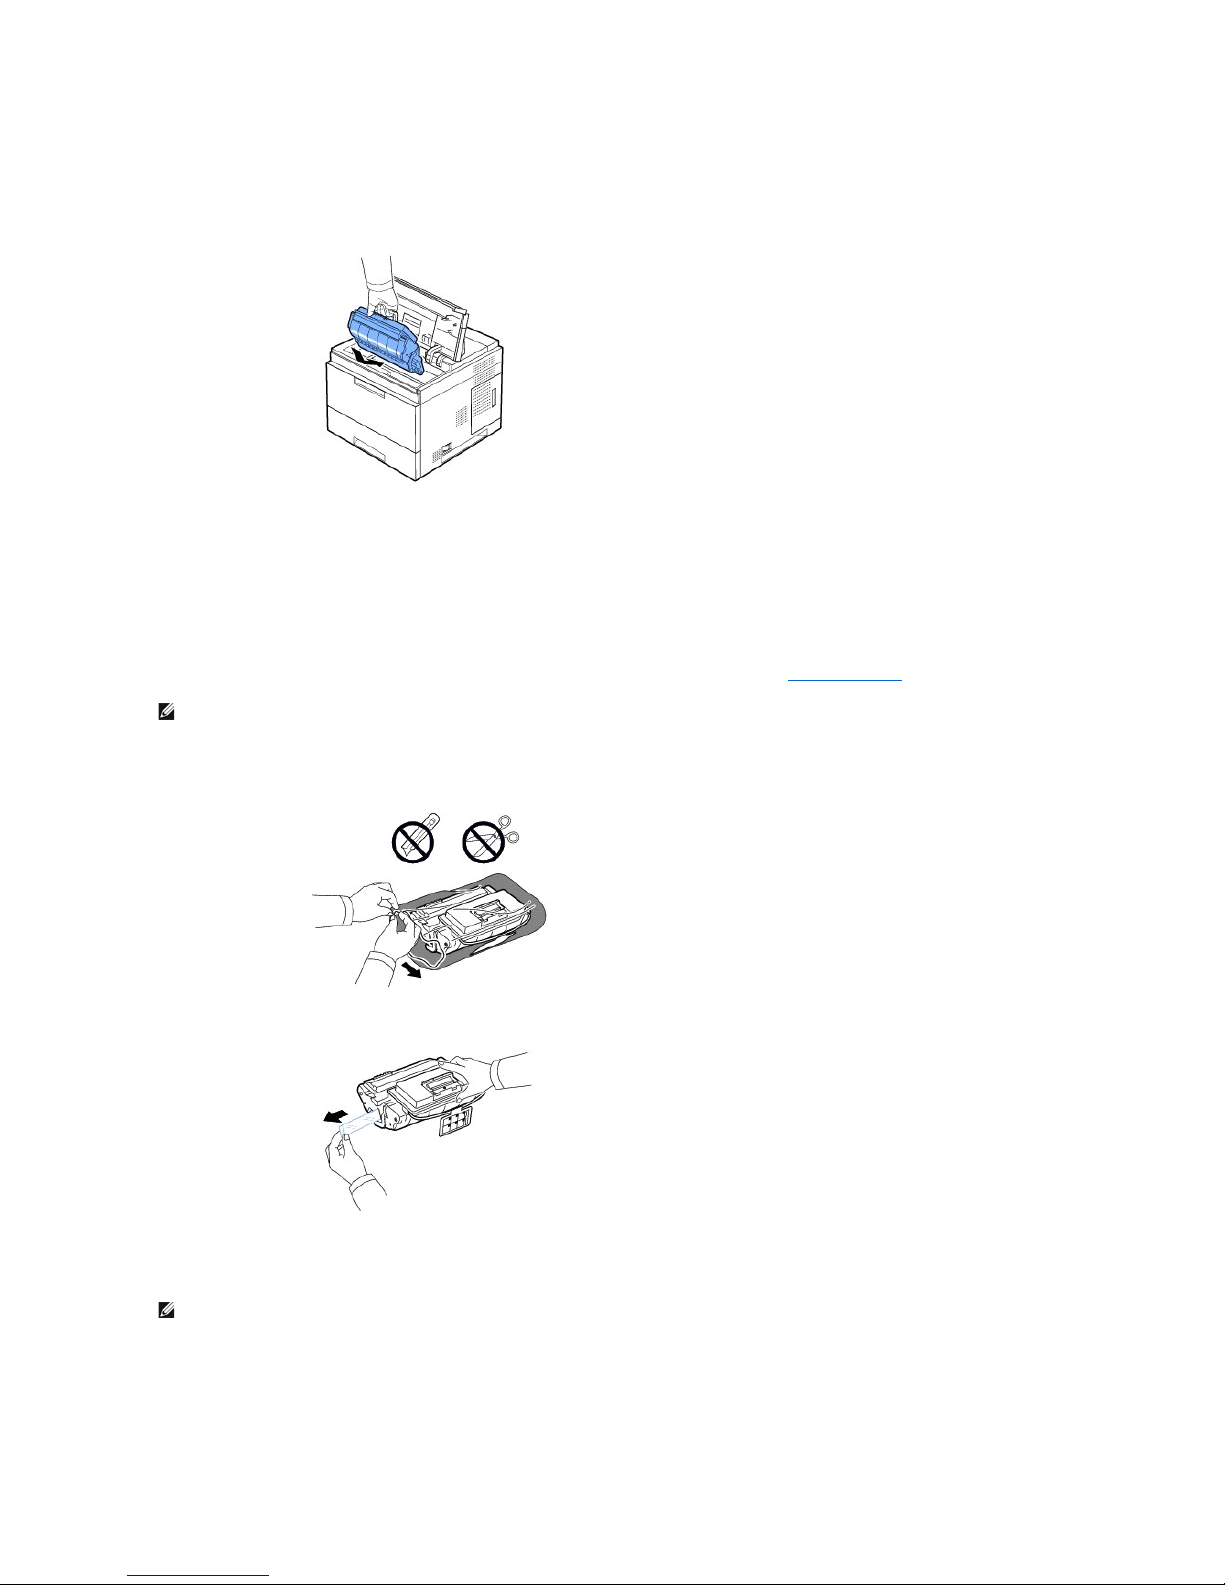
4. Hold the toner cartridge by the handle and slowly insert the cartridge into the printer opening.
5. Tabs on the sides of the cartridge and corresponding grooves within the printer guide the cartridge into the correct position until it locks into place
completely.
NOTE: Do not use excessive force when inserting the cartridge into the printer. Ensure cartridge is placed correctly according to the tabs and grooves
before applying any pressure.
6. Close the top cover. Ensure that the cover is surely closed.
Replacing the Toner Cartridge
At this stage, the toner cartridge needs to be replaced.
Order an extra toner cartridge to have on hand when the current cartridge no longer prints satisfactorily. See "Ordering Supplies" to order toner cartridges.
To replace the toner cartridge:
1. Remove the new toner cartridge from its bag.
2. Locate the sealing tape at the end of the toner cartridge. Carefully pull the tape completely out of the cartridge and discard it.
NOTE: The sealing tape should be longer than 60 cm when correctly removed.
NOTE: Holding the toner cartridge, pull the sealing tape straight to remove it from the cartridge. Be careful not to cut the tape. If this happens, you cannot
use the toner cartridge.
3. Remove the flexible plastic holder out of the toner cartridge.
NOTE: For best results, use Dell toner cartridge. If you do not use Dell supplies, Dell does not guarantee print quality and printer reliability.
NOTE: Refer to the helpful pictures on the cartridge wrapping paper.
Page 45
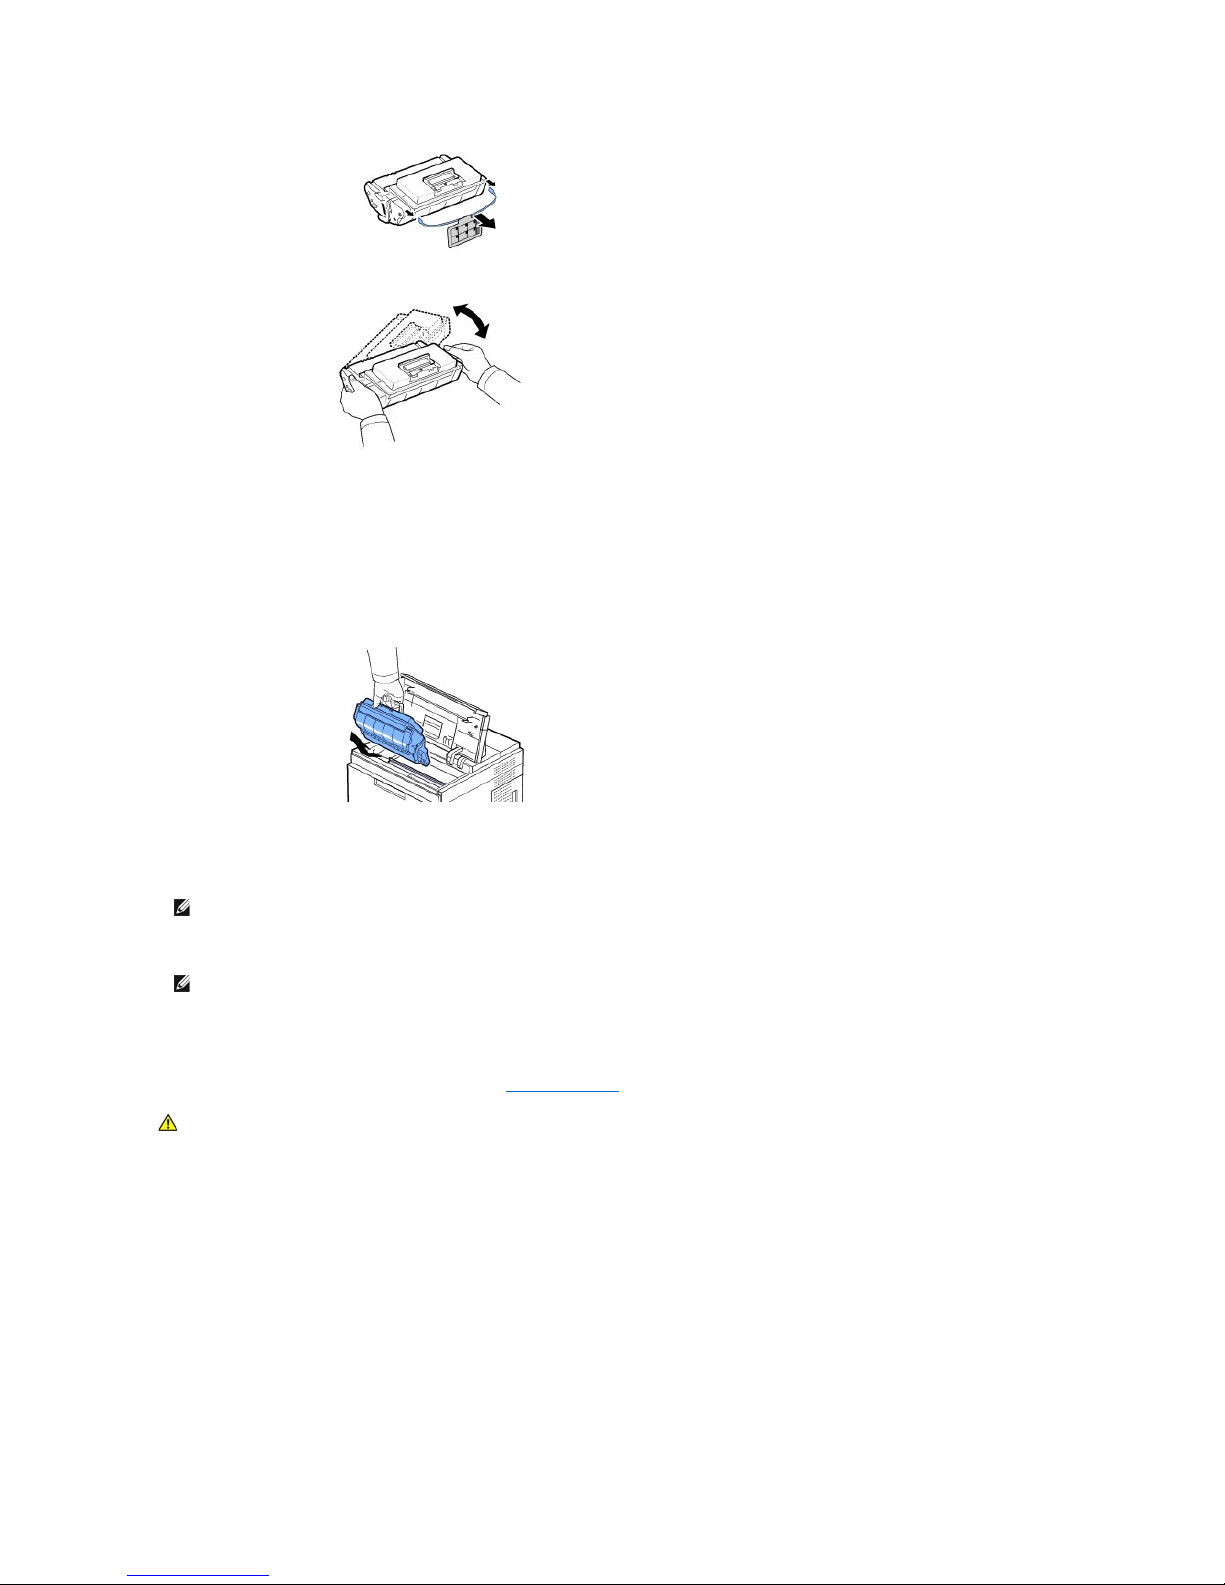
4. Thoroughly shake the cartridge 5 or 6 times to distribute the toner evenly inside the cartridge.
Thoroughly roll the cartridge to assure maximum copies per cartridge. Save the box and the plastic bag for shipping.
NOTE: If toner comes into contact with your clothing, wipe the toner off with a dry cloth and wash your clothing in cold water. Hot water sets toner into
fabric.
CAUTION: To prevent damage, do not expose the toner cartridge to light for more than a few minutes.
CAUTION: Do not touch the green underside of the toner cartridge. Use the handle on the cartridge to avoid touching this area.
5. Open the top cover.
6. Pull the toner cartridge out.
7. Hold the toner cartridge by the handle and slowly insert the cartridge into the opening in the printer.
8. Tabs on the sides of the cartridge and corresponding grooves within the printer will guide the cartridge into the correct position until it locks into place
completely.
NOTE: Do not use excessive force when inserting the cartridge into the printer. Ensure cartridge is placed correctly according to the tabs and grooves
before applying any pressure..
9. Close the top cover. Ensure that the cover is securely closed.
NOTE: When a new cartridge is in its first use, wait about 15 seconds before the first comes printed paper out.
Replacing the Fuser unit
At this stage, the toner cartridge needs to be replaced. See "Ordering Supplies" to order toner cartridges.
1. Turn off the printer and wait 30 minutes for the fuser to cool down before removal.
2. Open the rear door by pulling it.
3. Pull the rear door strap.
CAUTION: To avoid burns, do not replace the fuser immediately after printing; as the fuser gets very hot during this the printing process.
Page 46
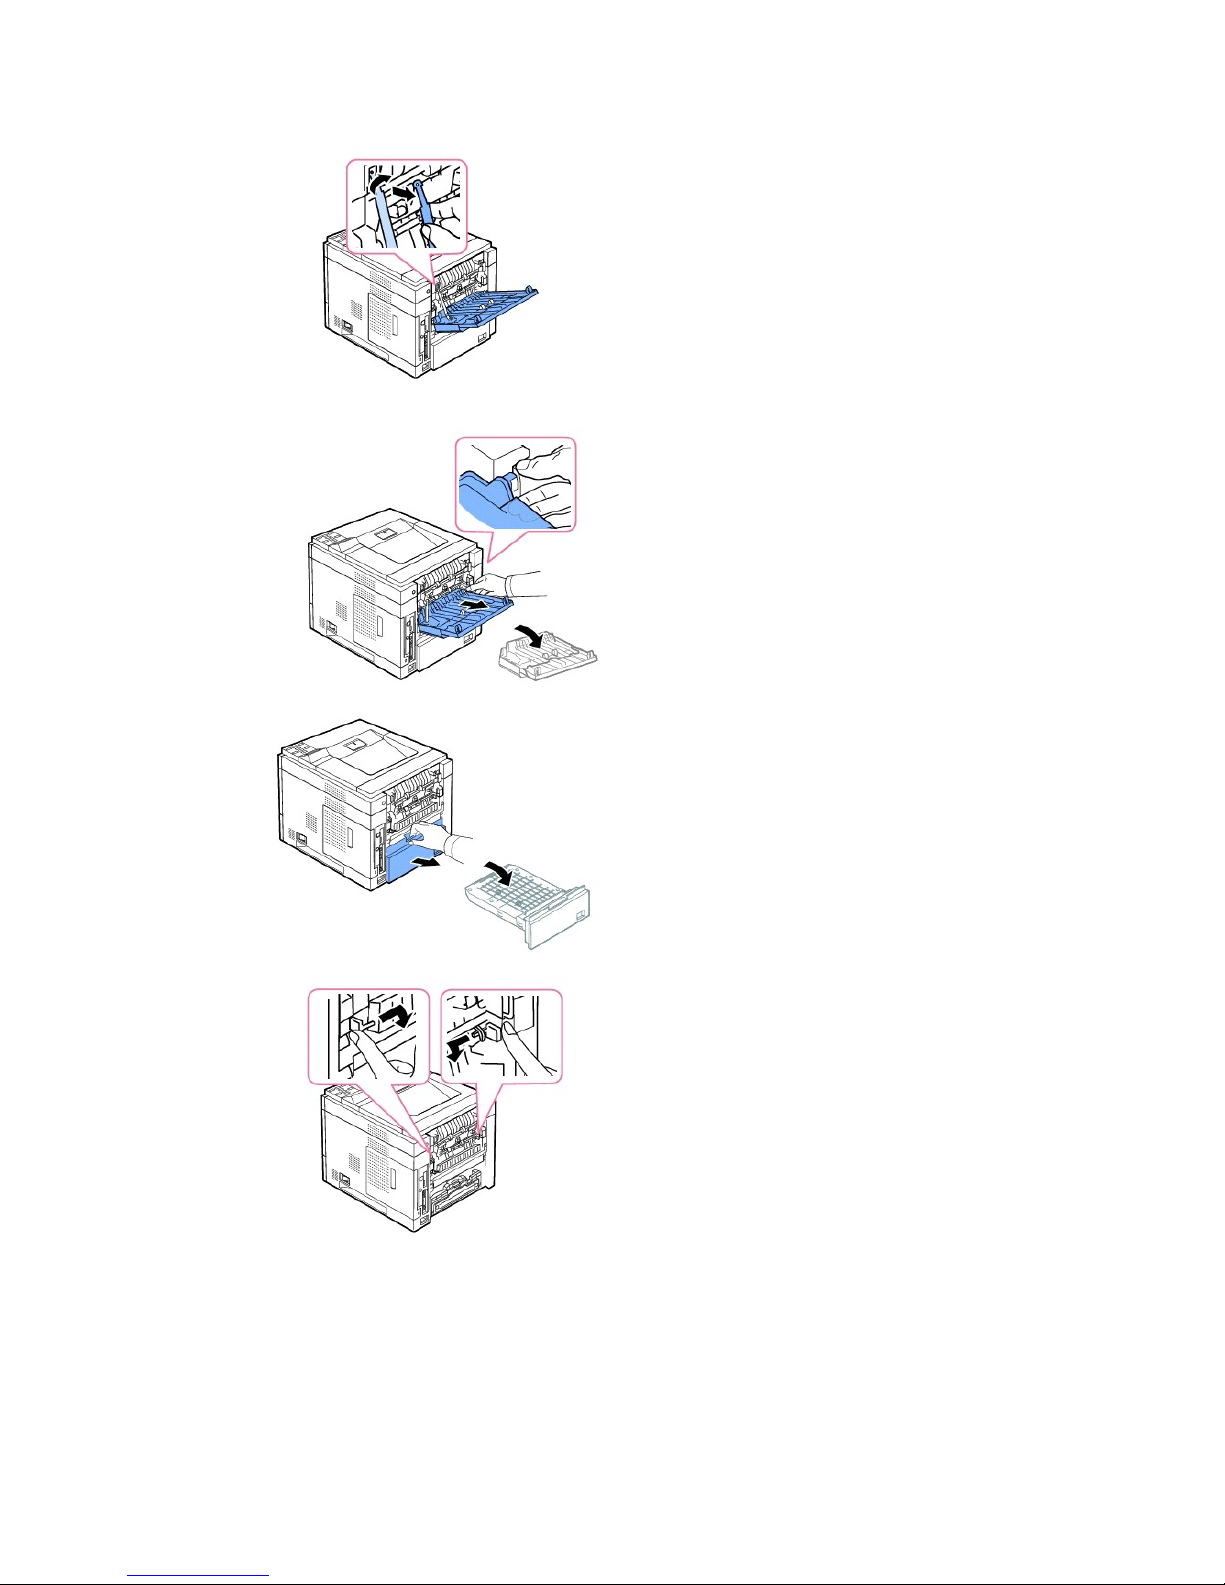
4. Pull the rear door out of the printer.
5. Pull the duplex unit out of the printer.
6. Push both the levers of the fuser and downward both levers of the fuser.
7. Pull the Fuser unit straight out.
Page 47
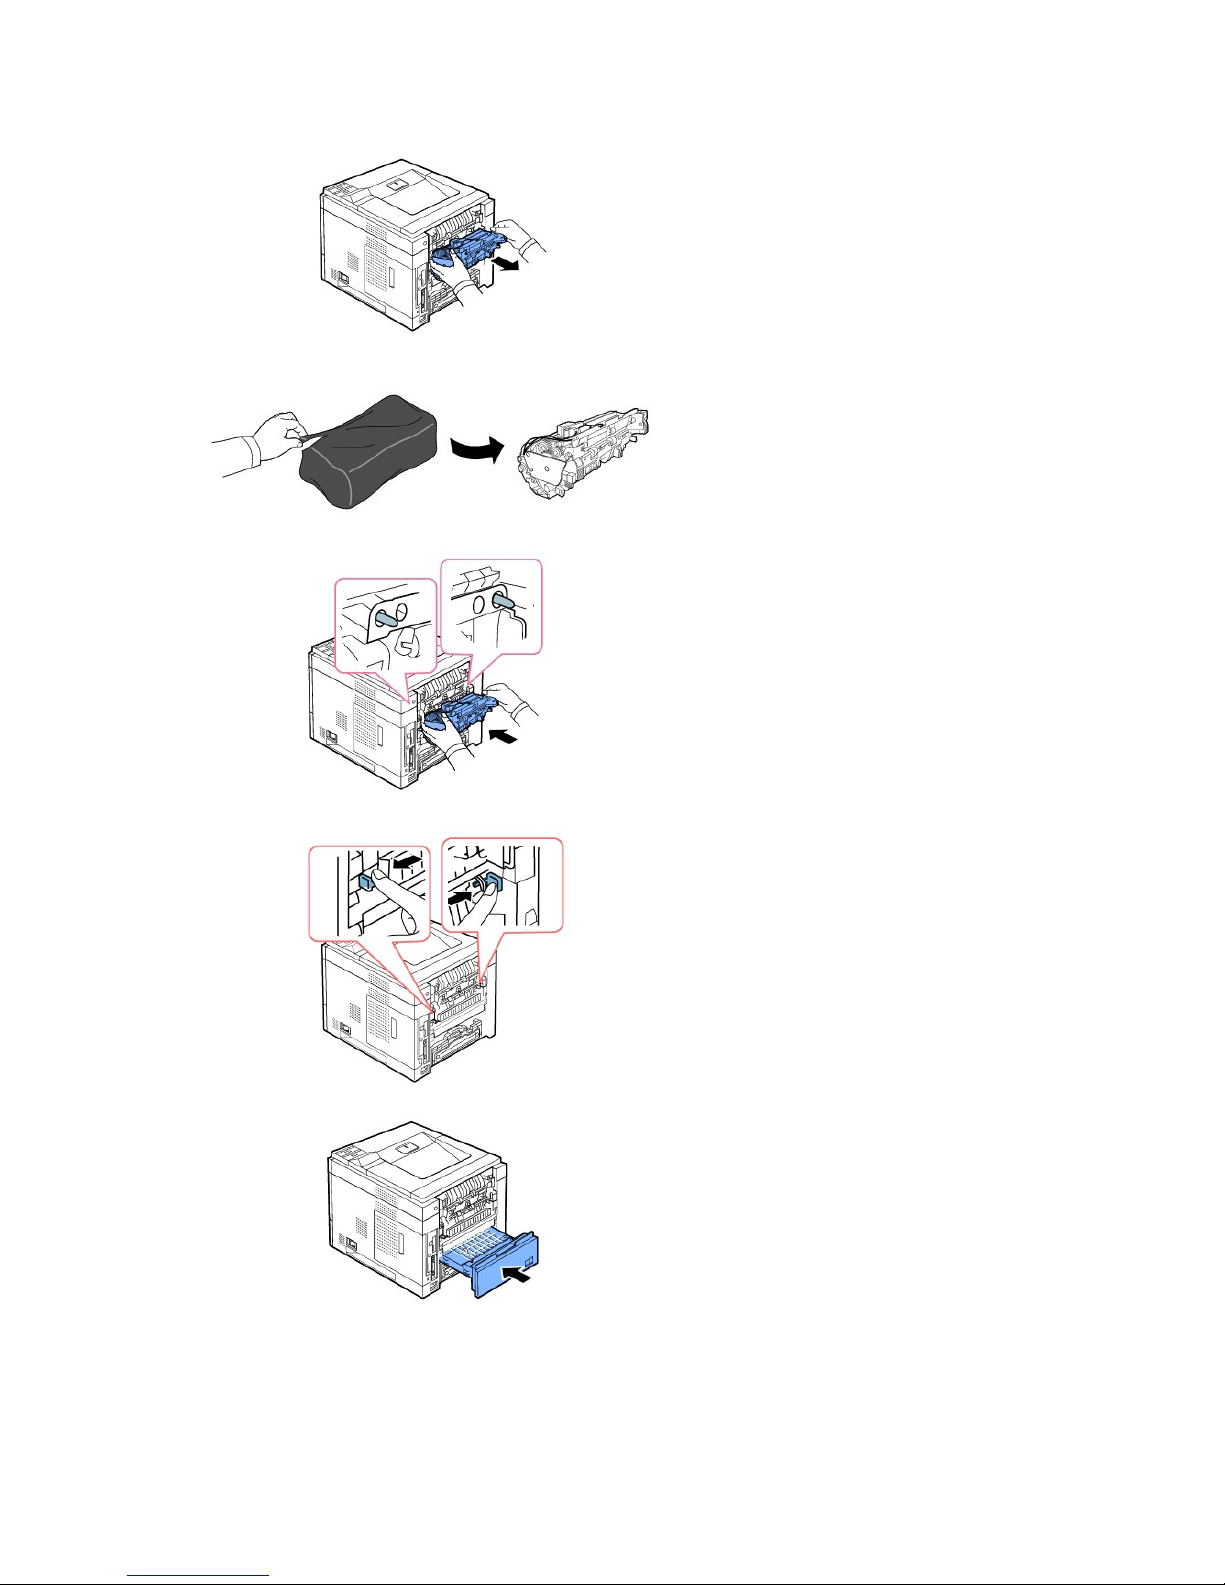
8. Remove the new Fuser unit from its bag.
9. Insert Fuser unit completely into the printer.
If Fuser unit is not completely inserted, the printer will not operate. Make sure that both levers of the fuser are securely latched onto the printer.
10. Insert the duplex unit into the slot.
11. Put the rear door back on and insert the rear door strap to the printer.
Page 48
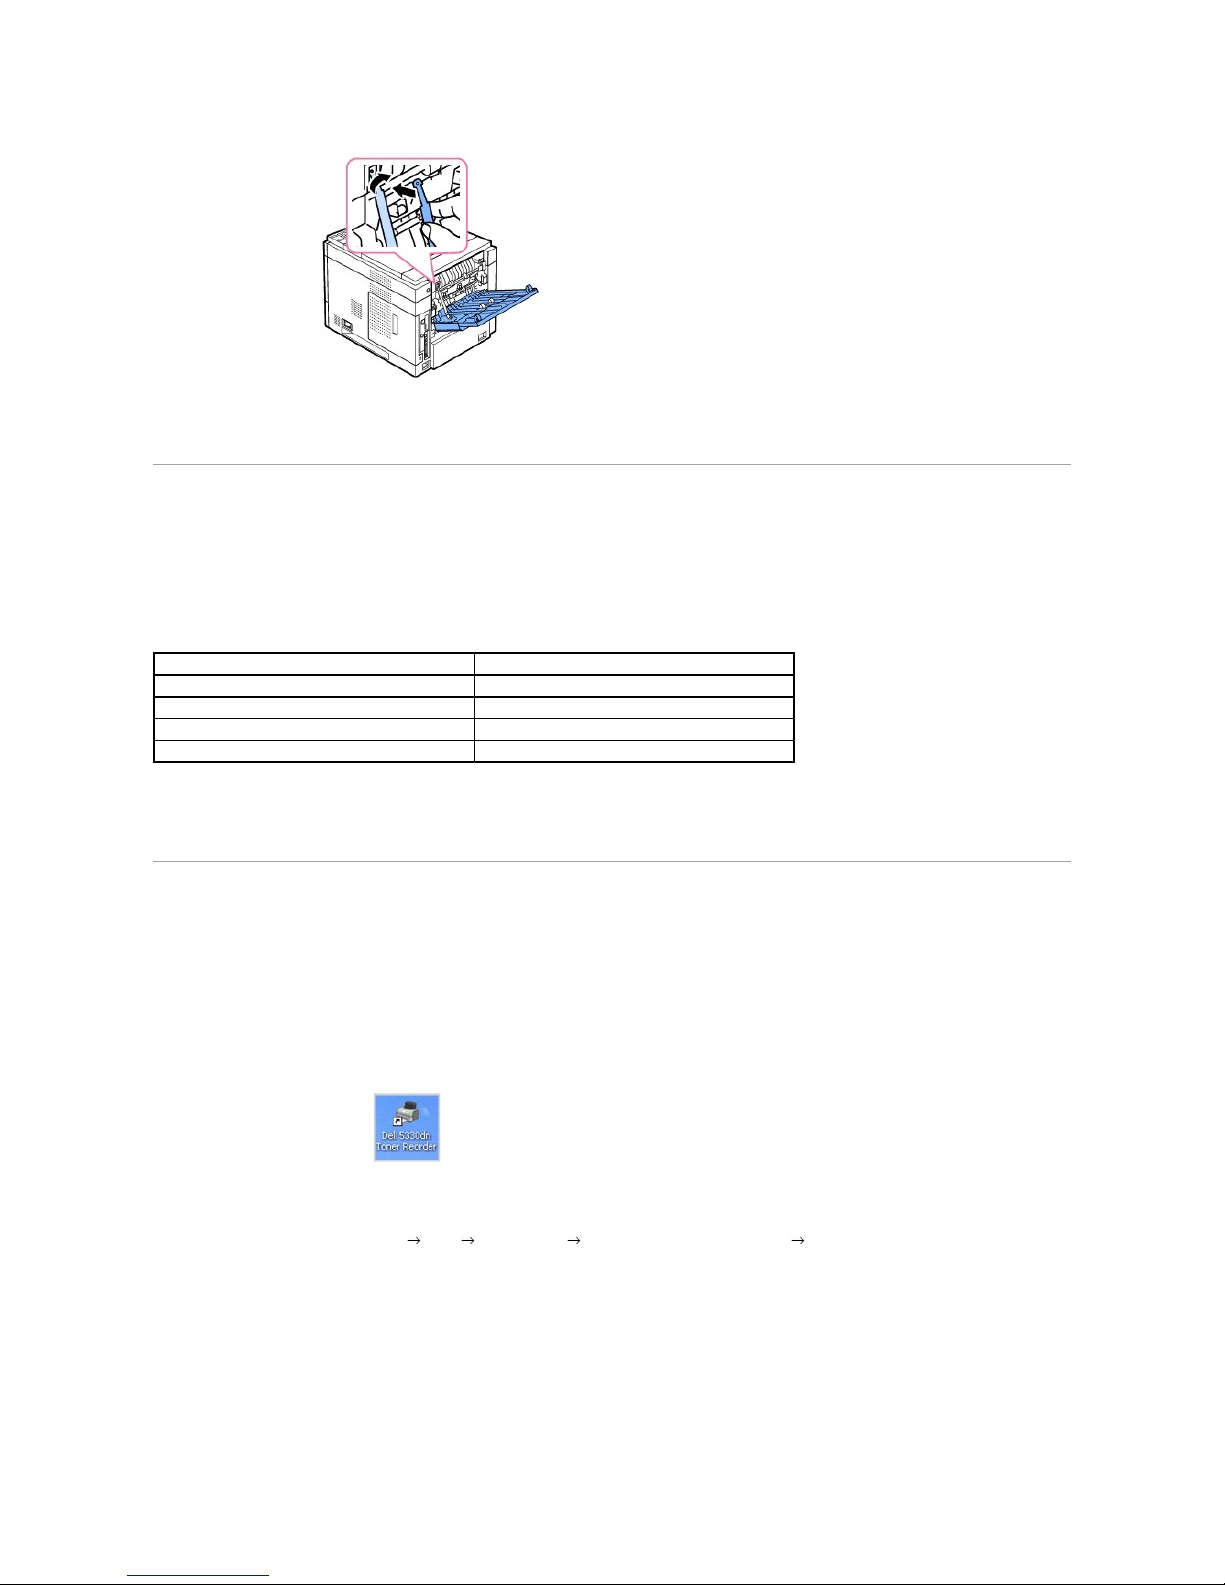
12. Close the rear door.
13. Reconnect the power cord and printer cable, and turn the printer on.
Replacement parts
From time to time, you need to replace the rollers and fuser unit to maintain top performance and to avoid print quality
and paper feed problems resulting from
worn parts.
The following items should be replaced after you have printed the specified number of pages.
To purchase replacement parts, contact your Dell dealer or the retailer where you bought your printer. We strongly recommend that these items be installed
by a trained service professional.
Ordering Supplies
YoucanordersuppliesusingtheDell™TonerManagementSystemortheDellPrinterConfigurationWebTool.
If your printer is connected to a network, type your printer's IP address in your Web browser to launch the Dell Printer Configuration Web Tool and click the
toner supplies link.
1. Double-click the Dell Toner Reorder Program icon on your desktop.
OR
2. From the Start menu, click Programs DELL DELL Printers DELL 5330dn Mono Laser Printer Dell 5330dn Toner Reorder
The Order Toner Cartridges window appears.
Item
Yield (Average)
Transfer roller
Approx. 150,000 pages
Fuser unit
Approx. 150,000 pages
Paper feeding roller
Approx. 150,000 pages
Rubber pad
Approx. 150,000 pages
Page 49
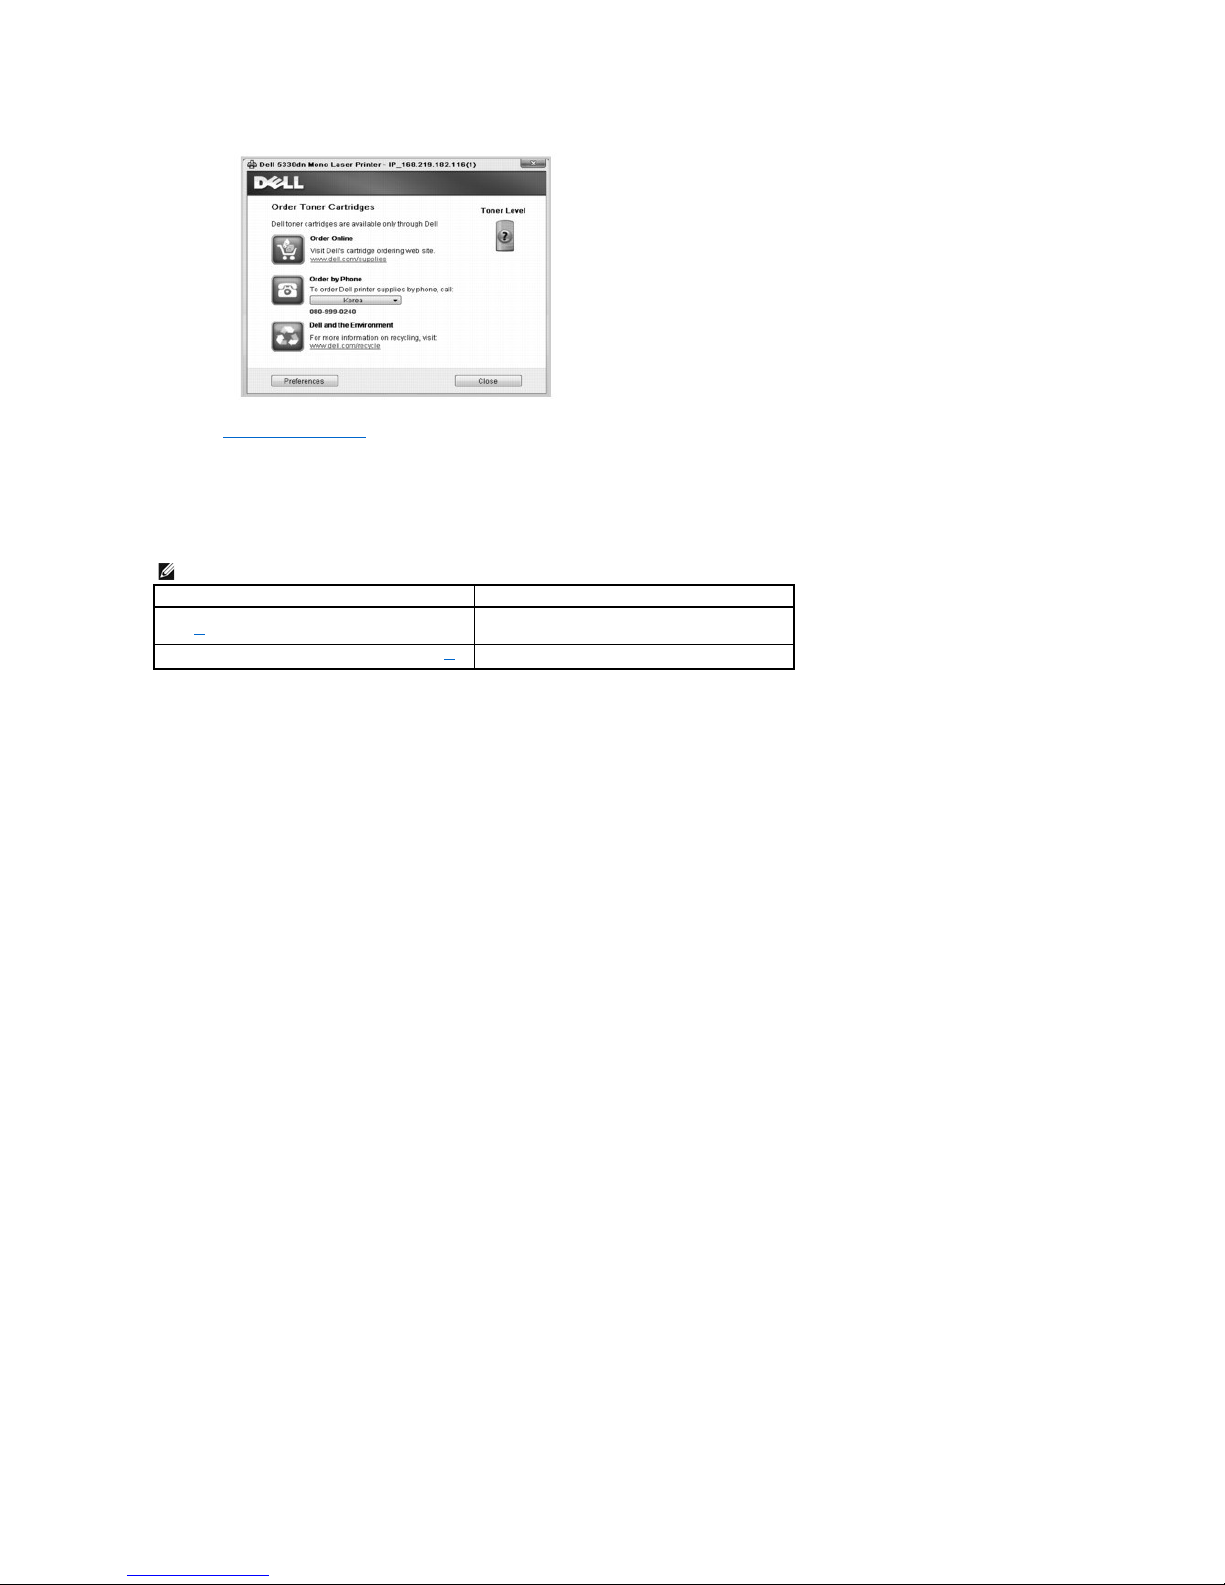
Go to www.dell.com/supplies to order supplies online.
If ordering by phone, call the number that appears under the By Telephone heading.
OR
3. If your printer is connected to a network,
type the printer's IP address in your Web browser to launch the Dell Printer Configuration Web Tool and click the
supplies link.
a. Page coverage in accordance with ISO/IEC 19752 testing methodology.
NOTE: Refer to the following table to order toner cartridges.
Toner cartridge
Part number
Dell Standard Capacity Toner Cartridge (10,000
pages*a)
NY312
Dell High Capacity Toner Cartridge (20,000 pages*a)
NY313
Page 50
Networking
Setting Up a Network-connected Printer
Sharing the Printer on a Network
OpenSSL License
Original SSLeay License
Setting Up a Network-connected Printer
To use this printer as your network printer, you must set up network parameters on it. Network parameters can be set up by the following two methods:
Via Network Administration Programs
You can configure your printer's print server settings and manage it via the following programs:
l Embedded Web Service: A web server embedded to your network print server, which allows you to:
Configure the network parameters necessary for the printer to connect to various network environments.
l SetIP Address: A utility program allowing you to select a network interface card and manually configure the addresses for use with the TCP/IP protocol.
See "Set IP Address Utility".
Via the Operator Panel
You can configure the basic network parameters through the printer's operator panel. Use the printer operator panel to do the following:
l Print a Network Configuration Page
l Configure TCP/IP
l Configure EtherTalk
l Configure IPX/SPX
l Configure a Wireless Network
Configuring Network Parameters on the Operator Panel
NOTE: For details on how to access the Embedded Web Service please refer to the chapter, "Dell Printer Configuration Web tool."
Item
Requirements
Network Interface
l Gigabit Ethernet
l 802.11 b/g Wireless LAN (Optional)
Network Operating System
l Windows: WinNT4.0/2000/XP(32/64bits)/Vista
(32/64bits)/2003 Server(32/64bits)/2008
Server(32/64bits)
l Netware OS: 5.x, 6.x (NDS, Bindery Mode),
iPrint Support
l Mac OS 9.x, 10.1~10.5
l Various Linux OS including Red Hat 8~9,
Fedora Core 1~4, Mandrake 9.2~10.1, SuSE
8.2~9.2, Suse linux Enterprise Version 10,
Redhat WS Linux 5.0
l UNIX(SUN 8,9,10, HP-UX 11i, IBM AIX 5.2, 5.3)
l Citrix, Windows Terminal Server, SAP
Network Protocols
l TCP/IPv4, IPv6(DHCP, DNS, 9100, LPR, SNMP,
HTTP, IPSec), EtherTalk, Novell NetWare (NDS,
Bindery, iPrint), DHCP, BOOTP, SLP, SSDP,
Page 51

Printing a Network Information Page
The Network Information page shows how the network interface card on your printer is configured. The default settings are suitable for most applications. To
print a network information page:
1. Press Menu ( ).
2. Press Scroll ( to ) to highlight Reports and press Select ( ).
3. Press Scroll ( to ) to highlight Network Settings and press Select ( ).
Setting Network Protocols
When you first install the printer, all supported network protocols are enabled when you power on the printer. If a network protocol is enabled, the printer may
actively transmit on the network even when the protocol is not in use. This may slightly increase network traffic. To eliminate unnecessary traffic, disable
unused protocols.
1. Press Menu ( ).
2. Press Scroll ( to ) to highlight Network I/O Ports and press Select ( ).
3. Press Scroll ( to ) until you see the desired protocol and press Select ( ).
4. If you selected Ethernet Speed, select a network speed.
If you selected TCP/IP(IPv4) or TCP/IP(IPv6), assign a TCP/IP address. For details, see "Configuring TCP/IP".
If you selected AppleTalk.
a. Press Scroll ( to ) to highlight Activate and press Select ( ).
b. Press Scroll ( to ) to change the setting to On (enable) or Off (disable).
If you selected Wireless, assign a wireless network environment. For details, see "Configuring TCP/IP".
5. Press Select ( ) to save the selection.
Configuring TCP/IP
l Static Addressing: TCP/IP address is assigned manually by the system administrator.
l Dynamic Addressing BOOTP/DHCP(default): TCP/IP address is assigned automatically by a DHCP or BOOTP server on your network.
Setting TCP/IP
To enter the TCP/IP address from your printer's operator panel, take the following steps:
1. Press Menu ( ).
2. Press Scroll ( to ) to highlight Network I/O Ports and press Select ( ).
3. Press Scroll ( to ) to select the network protocol you want to use and press Select ( ).
If you selected TCP/IP(IPv4):
a. Press Scroll ( to ) to highlight IPv4 Activate and press Select ( ).
b. Press Scroll ( to ) to change the setting to On (enable) or Off (disable).
If you selected TCP/IP(IPv6):
a. Press Scroll ( to ) to highlight IPv6 Activate and press Select ( ).
b. Press Scroll ( to ) to change the setting to On (enable) or Off (disable).
d. Press Cancel ( ) to return to Standby mode.
Static Addressing
Bonjour(Rendezvous), DDNS, WINS, TCP (Port
2000), LPR(Port 515), Raw(Port 9100), IPP Port
Printing/Secure-IPP, SNMPv1/2/3, HTTP/HTTPs,
Telnet, SMTP(E-mail Notification).
NOTE: When you set AppleTalk, you must restart your machine to apply new settings.
Page 52

To enter the TCP/IP address from your printer's operator panel, take the following steps:
1. Press Menu ( ).
2. Press Scroll ( to ) to highlight Network I/O Ports and press Select ( ).
3. Press Scroll ( to ) to highlight TCP/IP(IPv4) and press Select ( ).
4. Press Scroll ( to ) to highlight Set IP Address and press Select ( ).
5. Press Scroll ( to ) to highlight Manual and press Select ( ).
6. The first available menu item, IP Address displays.
7. To enter the numbers, use Scroll ( to ) and Scroll ( to ) to move between octets and press Select ( ).
8. Enter other parameters, such as the Subnet Mask or GateWay, and press Select ( ).
9. After entering all parameters, press Cancel ( ) to return to Standby mode.
Dynamic Addressing (BOOTP/DHCP)
To assign the TCP/IP address automatically using a DHCP or BOOTP server on your network, perform the following steps:
1. Press Menu ( ).
2. Press Scroll ( to ) to highlight Network I/O Ports and press Select ( ).
3. Press Scroll ( to ) to highlight TCP/IP(IPv4) and press Select ( ).
4. Press Scroll ( to ) to highlight Set IP Address and press Select ( ).
5. Press Scroll ( to ) to highlight DHCP and press Select ( ).
To assign the address from the BOOTP server, press Select ( ) when BOOTP displays.
Restoring the Network Configuration
You can return the network configuration to its default settings.
1. Press Menu ( ).
2. Press Scroll ( to ) to highlight Network I/O Ports and press Select ( ).
3. Press Scroll ( to ) to highlight Clear Settings and press Select ( ).
4. Press Scroll ( to ) to highlight Yes and press Select ( ).
5. Power the printer off and back on.
Setting a Wireless network (Optional wireless network card)
To use the Dell 5330dn Mono Laser Printer in both wired and wireless network environments, you can install an optional wireless network card. For details
of Wireless setup, please refer to "Quick Install Guide" for the wireless network interface card.
Sharing the Printer on a Network
Shared Printing
You can use Microsoft's Point and Print or Peer-to-
Peer methods to share a printer on the network with a USB or parallel cable connection. To use one of these
methods, you must first share the printer and then install the shared printer on client computers.
However, if you use one of these Microsoft methods, you will not have all the Dell features, such as the Status Monitor, that are installed with the Drivers and
Utilities CD.
NOTE: Windows 2000, Windows XP Professional, Windows NT, and Windows Vista require administrative access to share a printer.
Page 53

Share the Printer
1. In Windows XP (default Start menu):
a. Click Start Control Panel.
b. Double-click Printers and Other Hardware.
c. Click Printers and Faxes.
In Windows XP (Classic Start menu): Click Start Settings Printers and Faxes.
In Windows Vista (Classic Start menu), Windows 2000, and Windows NT:
Click Start Settings Printers.
In Windows Vista (default Start menu):
a. Click Start Control Panel.
b. Click Hardware and Sound.
c. Click Printers.
2. Right-click on your printer icon.
3. Click Sharing.
4. If you are using Windows Vista, you may be prompted to change the sharing options before you can continue. Press the Change Sharing Options
button and press Continue on the next dialog box.
5. Select Share this printer and type a name for the printer.
6. Click Additional Drivers and select the operating systems of all network clients printing to this printer.
7. Click OK.
If you are missing files, you are prompted to insert the server operating system CD.
a. Insert the Drivers and Utilities CD, ensure that the drive letter is correct for your CD-ROM drive, and click OK.
b. If you are using Windows Vista: Browse to a client computer running the operating system, and click OK.
c. If you are using any other Windows version: Insert the operating system CD, ensure that the drive letter is correct for your CD-ROM drive, and click OK.
8. Click Close.
To check that the printer was successfully shared:
l Make sure the printer object in the Printers folder shows it is shared. For example, in Windows 2000, a hand is shown underneath the printer icon.
l Browse My Network Places or Network Neighborhood. Find the host name of the server, and look for the shared name you assigned to the printer.
Now that the printer is shared, you can install the printer on network clients using the Point and Print method or the Peer-to-Peer method.
Install the Shared Printer on Client Computers
Point and Print
This method is the best use of system resources. The print server handles driver modifications and print job processing. This lets network clients return to their
programs much faster.
If you use the Point and Print method, a subset of driver information is copied from the print server to the client computer. This is just enough information to
send a print job to the printer.
1. On the Windows desktop of the client computer, double-click My Network Places or Network Neighborhood.
2. Double-click the host name of the print server computer.
3. Right-click the shared printer name and click Install or Connect.
Wait for the driver information to copy from the print server computer to the client computer and for a new printer object to be added to the Printers folder.
The time this takes varies based on network traffic and other factors.
4. Close My Network Places or Network Neighborhood.
Page 54

5. Print a test page to verify print installation.
When a test page prints successfully, printer installation is complete.
To print a test page:
1. In Windows XP (default Start menu):
a. Click Start Control Panel.
b. Double-click Printers and Other Hardware.
c. Click Printers and Faxes.
In Windows XP (Classic Start menu): Click Start Settings Printers and Faxes.
In Windows Vista (Classic Start menu), Windows 2000, and Windows NT:
Click Start Settings Printers.
In Windows Vista (default Start menu):
a. Click Start Control Panel.
b. Click Hardware and Sound.
c. Click Printers.
2. Select the printer you just created.
3. Click File Properties.
4. From the General tab, click Print Test Page.
Peer-to-Peer
If you use the Peer-to-Peer method, the printer driver is fully installed on each client computer. Network clients retain control of driver modifications. The client
computer handles the print job processing.
1. In Windows XP (default Start menu):
a. Click Start Control Panel.
b. Double-click Printers and Other Hardware.
c. Click Printers and Faxes.
In Windows XP (Classic Start menu): Click Start Settings Printers and Faxes.
In Windows Vista (Classic Start menu), Windows 2000, and Windows NT:
Click Start Settings Printers.
In Windows Vista (default Start menu):
a. Click Start Control Panel.
b. Click Hardware and Sound.
c. Click Printers.
2. Click Add Printer to launch the Add Printer wizard.
3. Click Network Print Server.
4. Select the network printer from the Shared printers list. If the printer is not listed, type the path of the printer in the text box.
For example: \\<print server host name>\<shared printer name>
The print server host name is the name of the print server computer that identifies it to the network. The shared printer name is the name assigned
during the print server installation process.
5. Click OK.
If this is a new printer, you may be prompted to install a printer driver. If no system driver is available, you will need to provide a path to available
drivers.
6. Select whether you want this printer to be the default printer for the client, and then click Finish.
7. Print a test page to verify printer installation.
When a test page prints successfully, printer installation is complete.
Page 55

To print a test page:
1. In Windows XP (default Start menu):
a. Click Start Control Panel.
b. Double-click Printers and Other Hardware.
c. Click Printers and Faxes.
In Windows XP (Classic Start menu): Click Start Settings Printers and Faxes.
In Windows Vista (Classic Start menu), Windows 2000, and Windows NT:
Click Start Settings Printers.
In Windows Vista (default Start menu):
a. Click Start Control Panel.
b. Click Hardware and Sound.
c. Click Printers.
2. Select the printer you just created.
3. Click File Properties.
4. From the General tab, click Print Test Page.
OpenSSL License
Copyright (c) 1998-2001 The OpenSSL Project. All rights reserved.
Redistribution and use in source and binary forms, with or without modification, are permitted provided that the following conditions are met:
1. Redistributions of source code must retain the above copyright notice, this list of conditions and the following disclaimer.
2. Redistributions in binary form must reproduce the above copyright notice, this list of conditions and the following disclaimer in the documentation and/or
other materials provided with the distribution.
3. All advertising materials mentioning features or use of this software must display the following acknowledgment: "This product includes software
developed by the OpenSSL Project for use in the OpenSSL Toolkit. (http://www.openssl.org/)"
4. The names "OpenSSL Toolkit" and "OpenSSL Project" must not be used to endorse or promote products derived from this software without
5. prior written permission. For written permission, please contact [email protected].
6. Products derived from this software may not be called "OpenSSL" nor may "OpenSSL" appear in their names without prior written permission of the
OpenSSL Project.
7. Redistributions of any form whatsoever must retain the following acknowledgment: "This product includes software developed by the OpenSSL Project
for use in the OpenSSL Toolkit (http://www.openssl.org/)"
THIS SOFTWARE IS PROVIDED BY THE OpenSSL PROJECT ``AS IS'' AND ANY EXPRESSED OR IMPLIED WARRANTIES, INCLUDING, BUT NOT LIMITED TO, THE
IMPLIED WARRANTIES OF MERCHANTABILITY AND FITNESS FOR A PARTICULAR PURPOSE ARE DISCLAIMED. IN NO EVENT SHALL THE OpenSSL PROJECT OR ITS
CONTRIBUTORS BE LIABLE FOR ANY DIRECT, INDIRECT, INCIDENTAL, SPECIAL, EXEMPLARY, OR CONSEQUENTIAL DAMAGES (INCLUDING, BUT NOT LIMITED TO,
PROCUREMENT OF SUBSTITUTE GOODS OR SERVICES; LOSS OF USE, DATA, OR PROFITS; OR BUSINESS INTERRUPTION) HOWEVER CAUSED AND ON ANY THEORY
OF LIABILITY, WHETHER IN CONTRACT, STRICT LIABILITY, OR TORT (INCLUDING NEGLIGENCE OR OTHERWISE) ARISING IN ANY WAY OUT OF THE USE OF THIS
SOFTWARE, EVEN IF ADVISED OF THE POSSIBILITY OF SUCH DAMAGE.
This product includes cryptographic software written by Eric Young([email protected]). This product includes software written by Tim Hudson
([email protected]).
Original SSLeay License
Copyright (C) 1995-1998 Eric Young ([email protected]) All rights reserved.
This package is an SSL implementation written by Eric Young ([email protected]). The implementation was written so as to conform with Netscapes SSL.
This library is free for commercial and non-
commercial use as long as the following conditions are aheared to. The following conditions apply to all code found in
this distribution, be it the RC4, RSA, lhash, DES, etc., code; not just the SSL code. The SSL documentation included with this distribution is covered by the same
Page 56

copyright terms except that the holder is Tim Hudson ([email protected]). Copyright remains Eric Young's, and as such any Copyright notices in the code are
not to be removed. If this package is used in a product, Eric Young should be given attribution as the author of the parts of the library used. This can be in the
form of a textual message at program startup or in documentation (online or textual) provided with the package.
Redistribution and use in source and binary forms, with or without modification, are permitted provided that the following conditions are met:
1. Redistributions of source code must retain the copyright notice, this list of conditions and the following disclaimer.
2. Redistributions in binary form must reproduce the above copyright notice, this list of conditions and the following disclaimer in the documentation and/or
other materials provided with the distribution.
3. All advertising materials mentioning features or use of this software must display the following acknowledgement: "This product includes cryptographic
software written by Eric Young ([email protected])" The word 'cryptographic' can be left out if the rouines from the library being used are not
cryptographic related:-).
4. If you include any Windows specific code (or a derivative thereof) from the apps directory (application code) you must include an acknowledgement:
"This product includes software written by Tim Hudson ([email protected])"
THIS SOFTWARE IS PROVIDED BY ERIC YOUNG ``AS IS'' AND ANY EXPRESS OR IMPLIED WARRANTIES, INCLUDING, BUT NOT LIMITED TO, THE IMPLIED
WARRANTIES OF MERCHANTABILITY AND FITNESS FOR A PARTICULAR PURPOSE ARE DISCLAIMED. IN NO EVENT SHALL THE AUTHOR OR CONTRIBUTORS BE
LIABLE FOR ANY DIRECT, INDIRECT, INCIDENTAL, SPECIAL, EXEMPLARY, OR CONSEQUENTIAL DAMAGES (INCLUDING, BUT NOT LIMITED TO, PROCUREMENT OF
SUBSTITUTE GOODS OR SERVICES; LOSS OF USE, DATA, OR PROFITS; OR BUSINESS INTERRUPTION) HOWEVER CAUSED AND ON ANY THEORY OF LIABILITY,
WHETHER IN CONTRACT, STRICT LIABILITY, OR TORT (INCLUDING NEGLIGENCE OR OTHERWISE) ARISING IN ANY WAY OUT OF THE USE OF THIS SOFTWARE,
EVEN IF ADVISED OF THE POSSIBILITY OF SUCH DAMAGE.
The licence and distribution terms for any publically available version or derivative of this code cannot be changed. i.e. this code cannot simply be copied and
put under another distribution licence [including the GNU Public Licence.]
Page 57
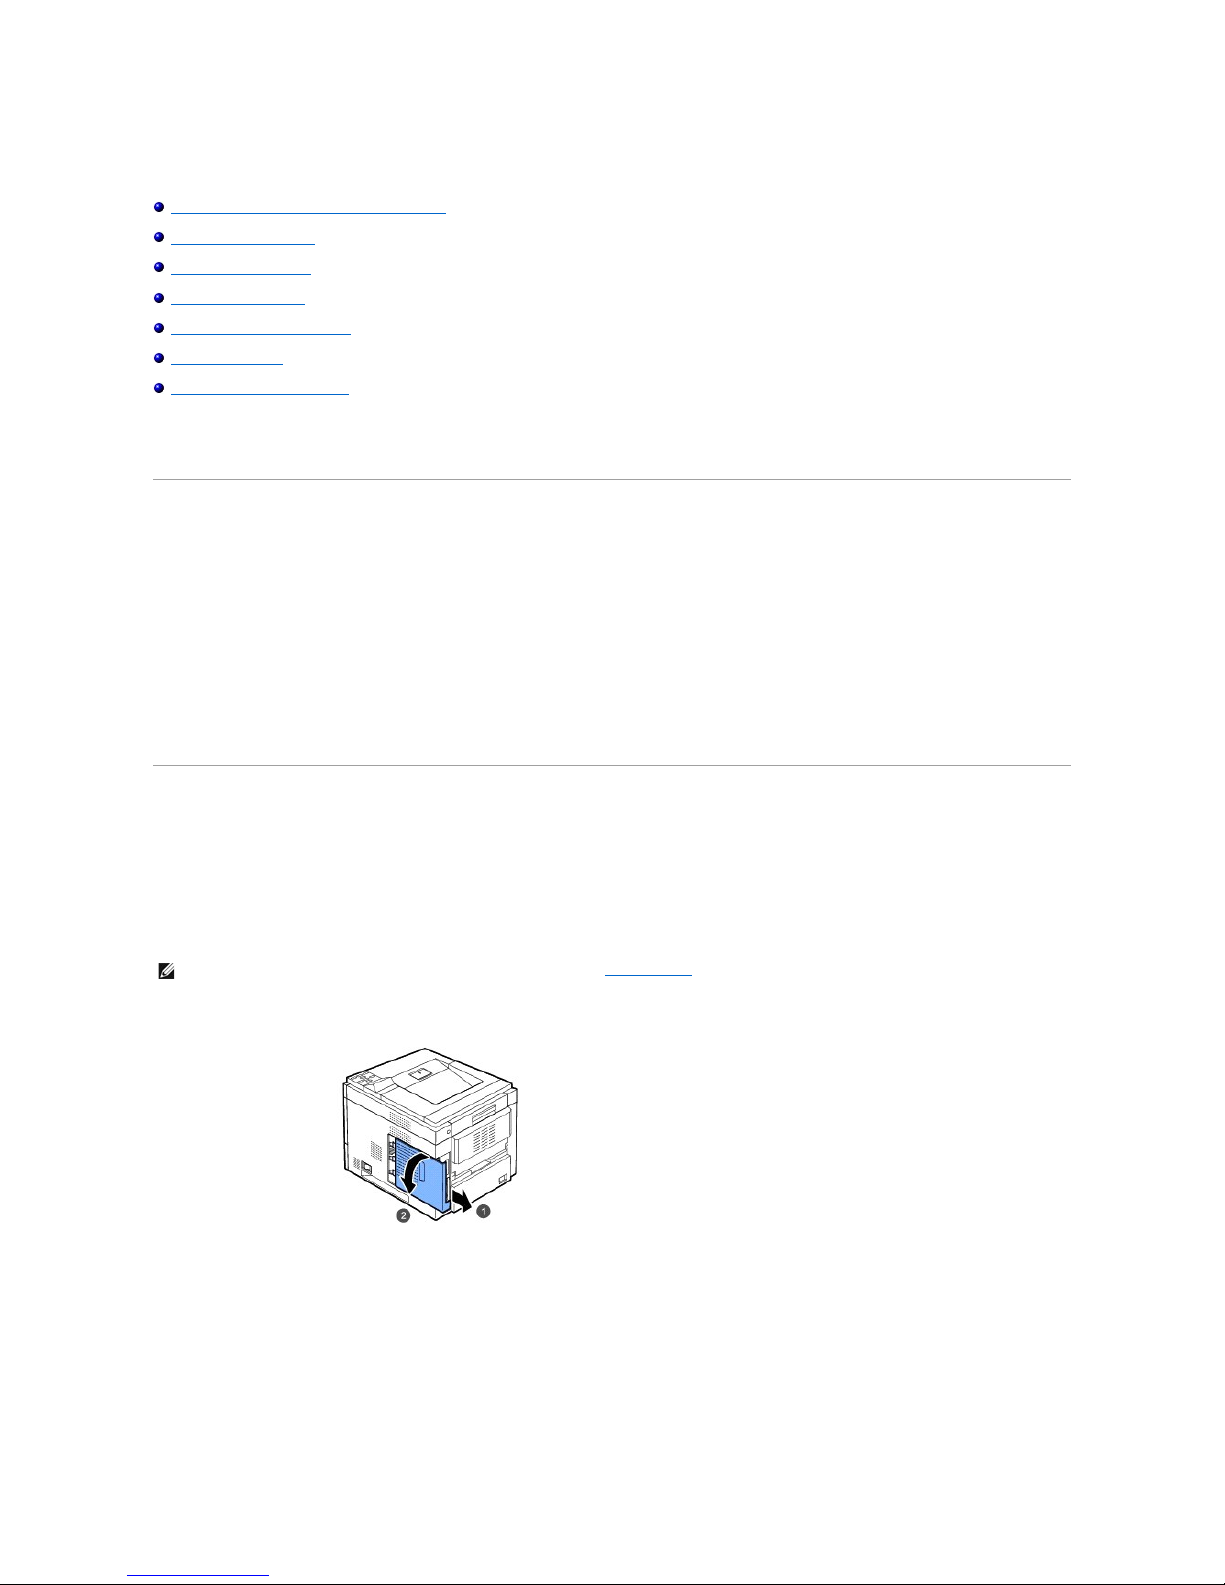
Installing Accessories
Precautions When Installing Printer Accessories
Installing Printer Memory
Installing USB Font Card
Installing Optional Tray
Installing High Capacity Feeder
Using the hard disk
Installing an Output Expander.
Precautions When Installing Printer Accessories
Never remove the control board cover while the printer is plugged in.
To avoid the possibility of an electrical shock, always disconnect the power cord when installing or removing ANY internal or external printer option.
The control board and internal accessories (wireless network interface card, DIMM, and hard disk) are sensitive to static electricity. Before installing or
removing internal accessories, discharge static electricity from your body by touching something metal, such as the metal back plate on any device plugged
into a grounded power source. If you walk around before finishing installation, discharge any static electricity once again.
Installing Printer Memory
Additional printer memory is provided on a Dual In-line Memory Module (DIMM).
The Dell 5330dn Mono Laser Printer has 256 MB of memory. It can be expanded to 768 MB.
1. Power the printer off and unplug all cables from the printer.
2. Grasp the control board cover and remove it.
3. Remove a new memory DIMM from its antistatic package.
4. Locate the extra DIMM slot and align the notch on the DIMM with the groove at the DIMM slot, holding the DIMM by its edges.
NOTE: Your printer supports only Dell DIMMs. Order Dell DIMMs online at www.dell.com.
Page 58
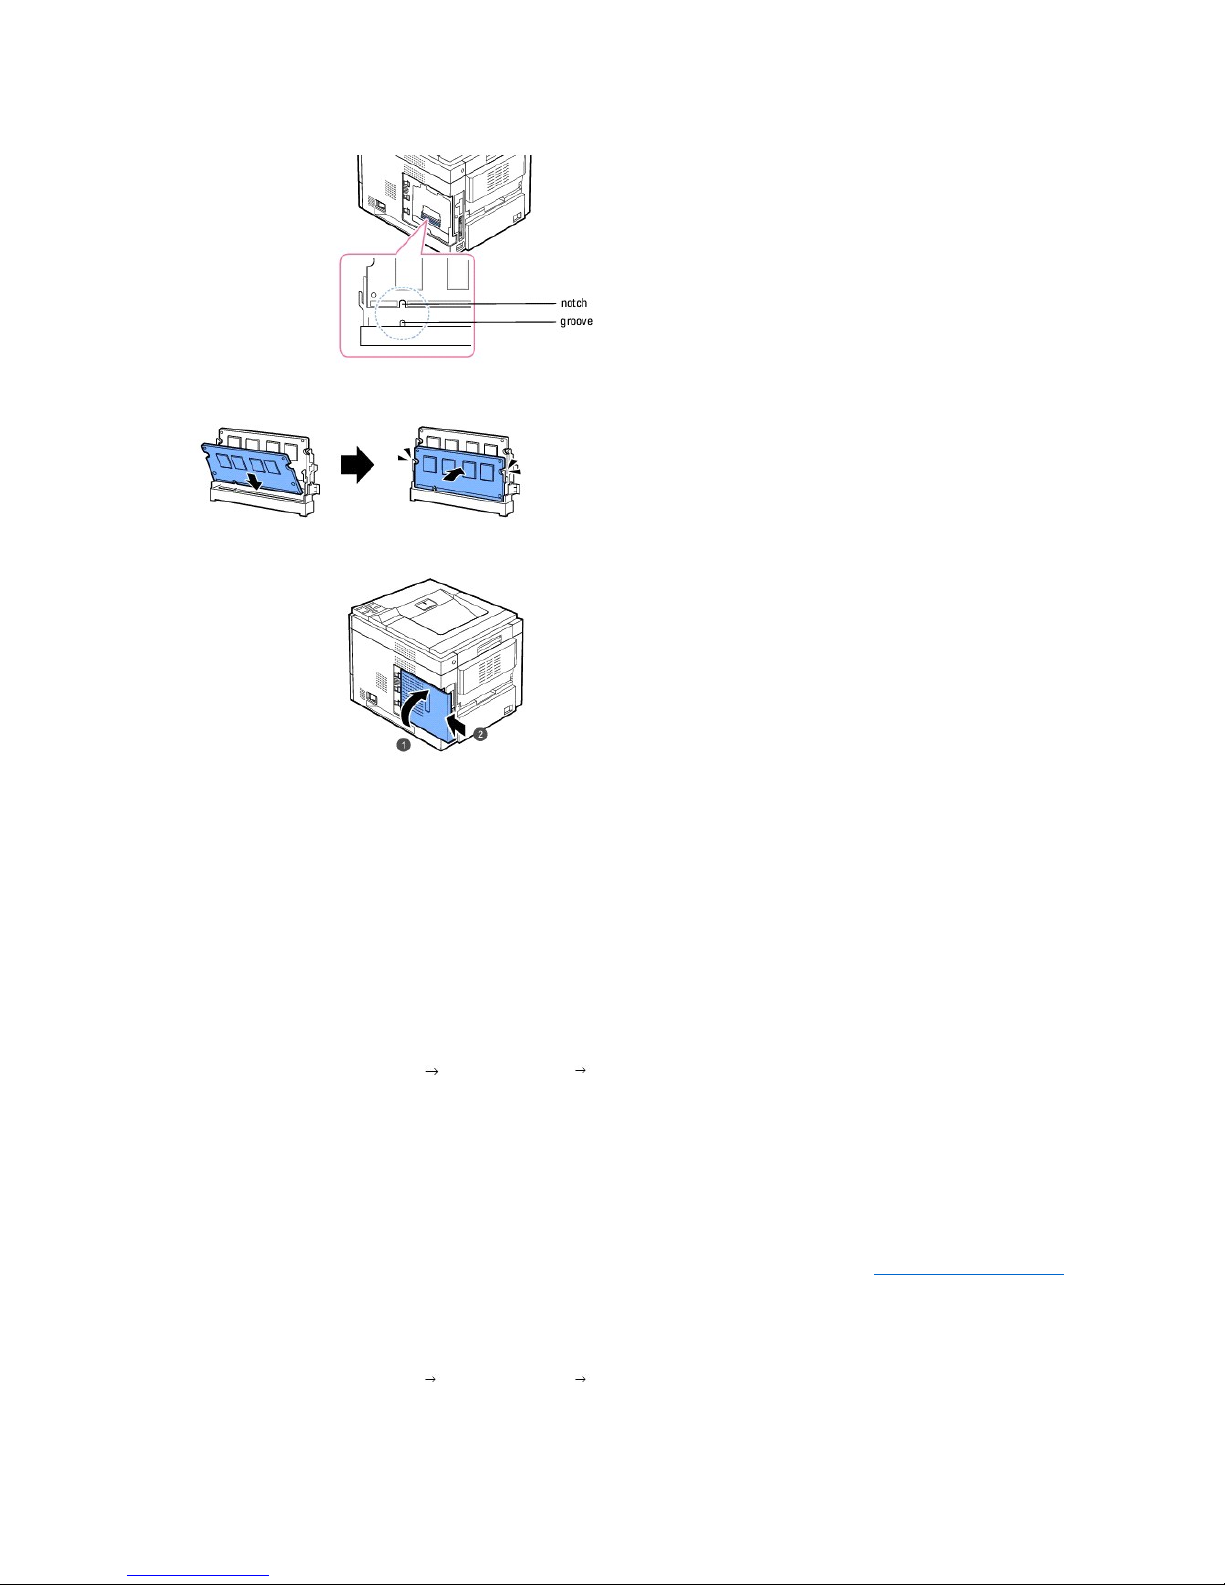
5. Push the DIMM into the printer until it snaps into place. Ensure that the latches fit over the notches located on either side of the DIMM.
6. Close the control board cover by aligning the groove on it with the notch on the printer and sliding it.
7. Reconnect the power cord and printer cable, and turn the printer on.
Activating the added memory in the printer properties
After installing the memory DIMM, you need to select it in the printer properties of the printer driver so that you can use it:
Dell 5330dn Mono Laser Printer
1. Click the Windows Start menu.
2. For Windows NT 4.0/2000, select Settings and then Printers.
For Windows XP/2003, select Printers and Faxes.
For Windows Vista, select Control Panel Hardware and Sound Printers.
3. Select the Dell 5330dn Mono Laser Printer.
4. Right-click the printer icon and select Properties.
5. Click the Printer tab and select 768 from the Memory Size drop-down list in the Printer Memory section.
6. Click OK.
Dell 5330dn Mono Laser Printer PS
1. Ensure the PostScript printer driver is installed on your computer. For details about installing the PS printer driver, see "Installing Software in Windows".
2. Click the Windows Start menu.
3. For Windows 2000, select Settings and then Printers.
For Windows XP/2003, select Printers and Faxes.
For Windows Vista, select Control Panel Hardware and Sound Printers.
4. Select the Dell 5330dn Mono Laser Printer PS printer.
Page 59
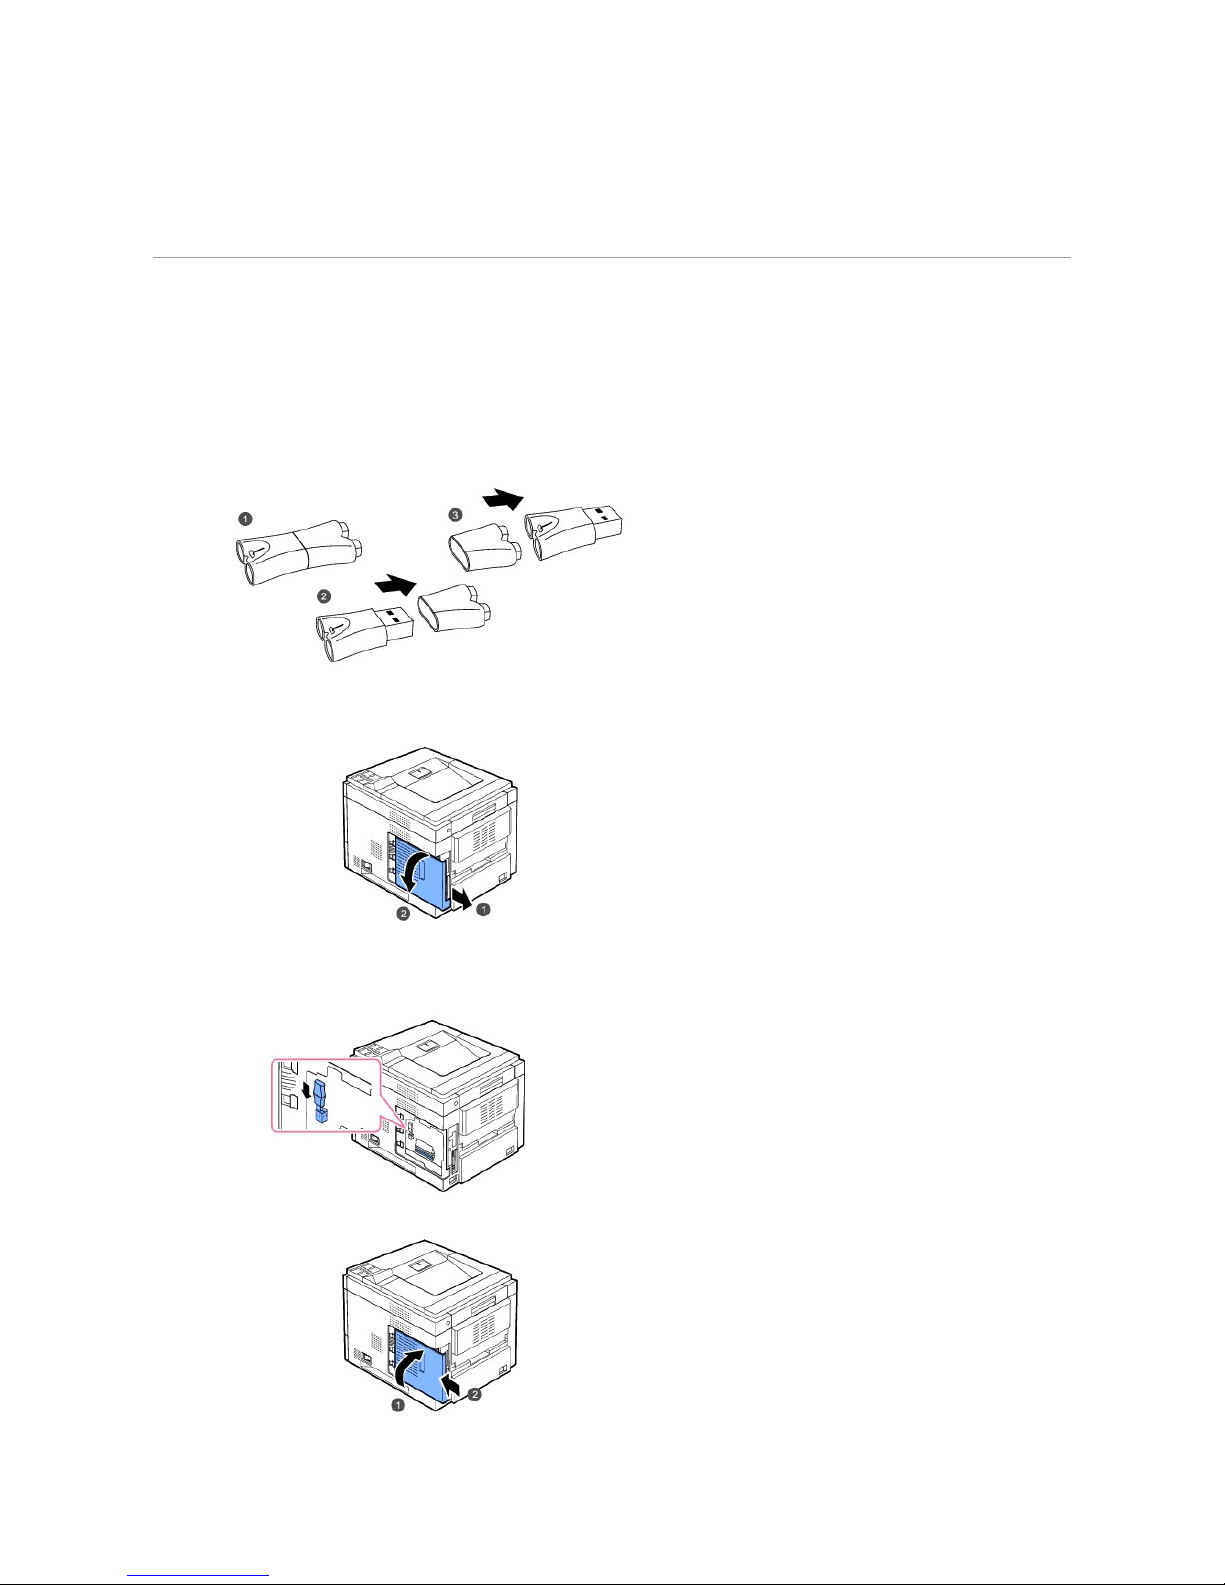
5. Right-click the printer icon and select Properties.
6. Click Device Settings.
7. Select 768 MB from the Printer Memory drop-down list in the Installable Option section.
8. Click OK.
Installing USB Font Card
USB font cards can be used to permanently store additional Fonts and forms. This card can be used to enable the printer to print barcodes and logos. Once
the card is installed, the printer automatically detects the additional fonts in the card.
Please contact Dell sales team in your region for the USB font card.
1. Remove the new USB Font Card from its package, as shown in the following figure.
2. Power the printer off and unplug all cables from the printer.
3. Grasp the control board cover and remove it.
4. Insert a USB Font Card into the outer USB slot on the contol board.
CAUTION: Do not insert a USB Font Card into the inner USB memory slot. You could damage the control board of the printer.
5. Close the control board cover by aligning the groove on it with the notch on the printer and sliding it.
Page 60
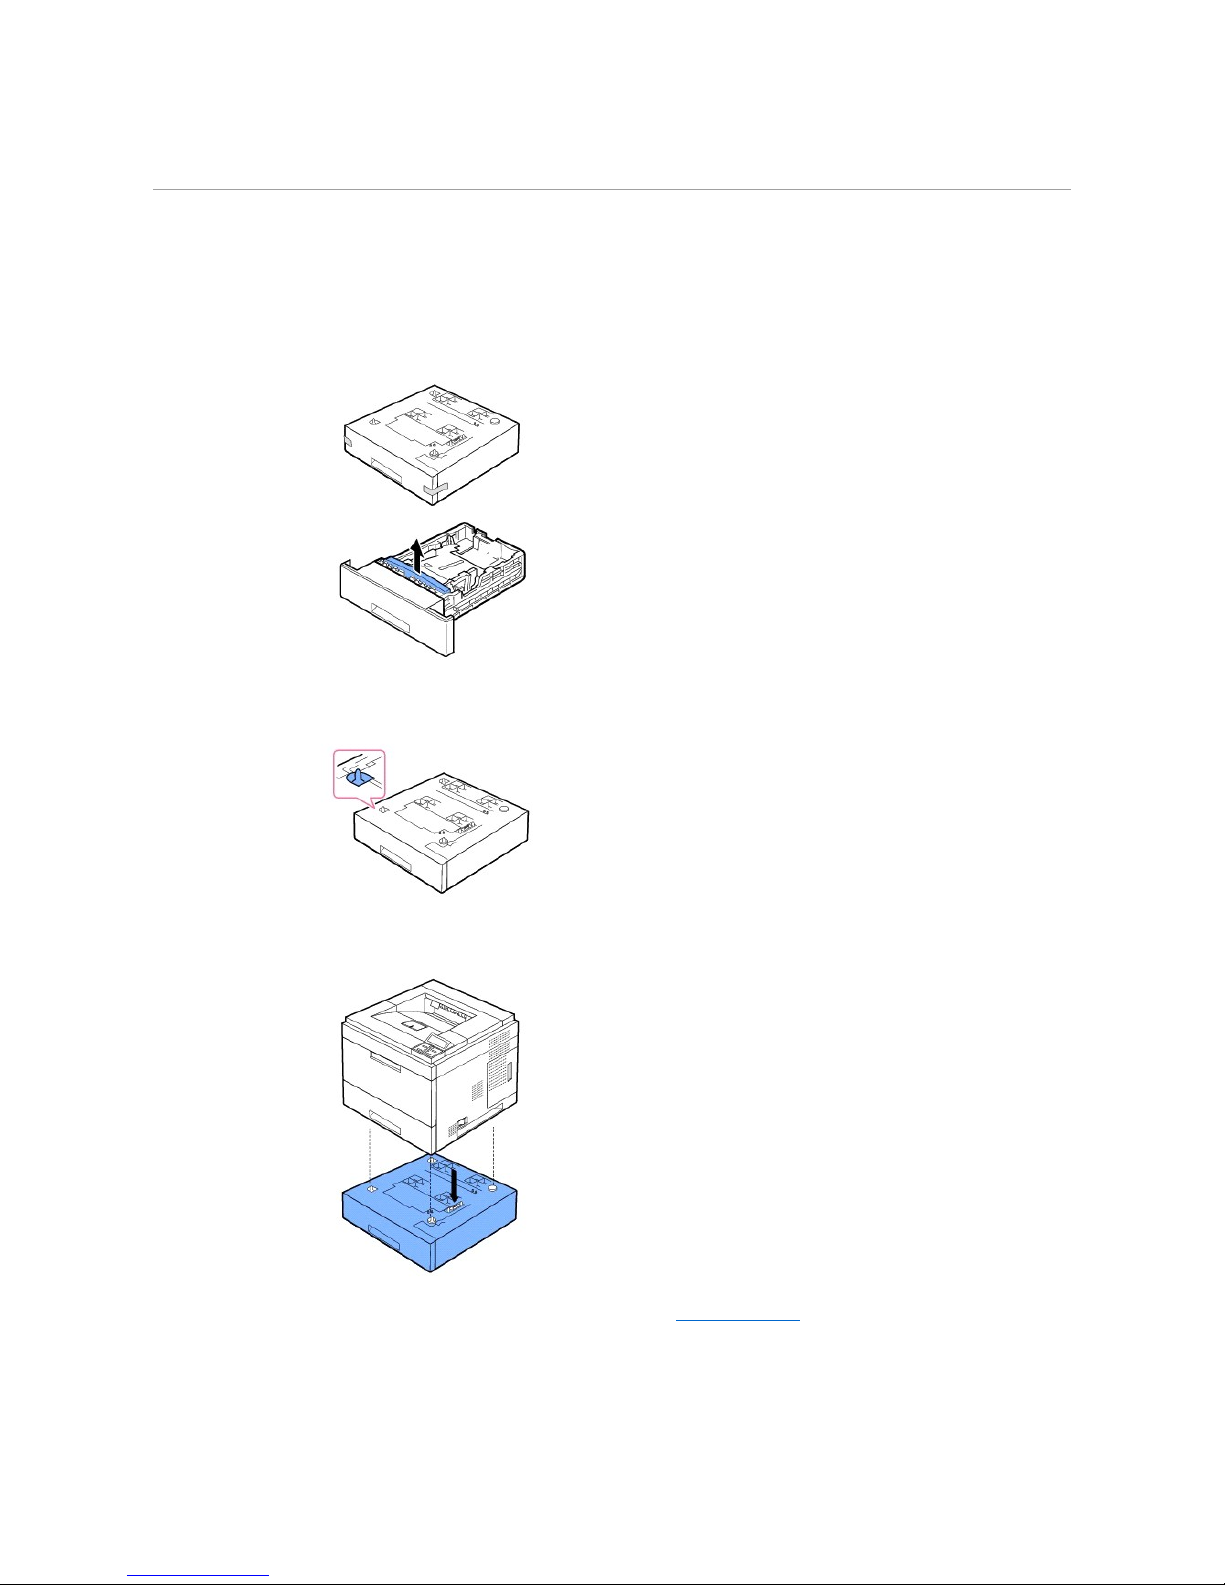
6. Reconnect the power cord and printer cable, and turn the printer on.
Installing Optional Tray
You can increase the paper handling capacity of your printer by installing optional trays. Each tray holds 500 sheets of paper.
1. Power the printer off and unplug all cables from the printer.
2. Remove the packing tape and the packing material inside the optional tray.
3. Find the location of the paper option tray connector and alignment pins.
4. Place the printer over the tray aligning the feet on the printer with the alignment pins in the optional tray.
5. Load paper in the optional tay. For information about loading paper in this tray, see "Loading Print Media".
6. Reconnect the power cord and cables and then power on the printer.
When you print a document on paper loaded in the optional tray, you must configure the properties of the printer driver.
Page 61
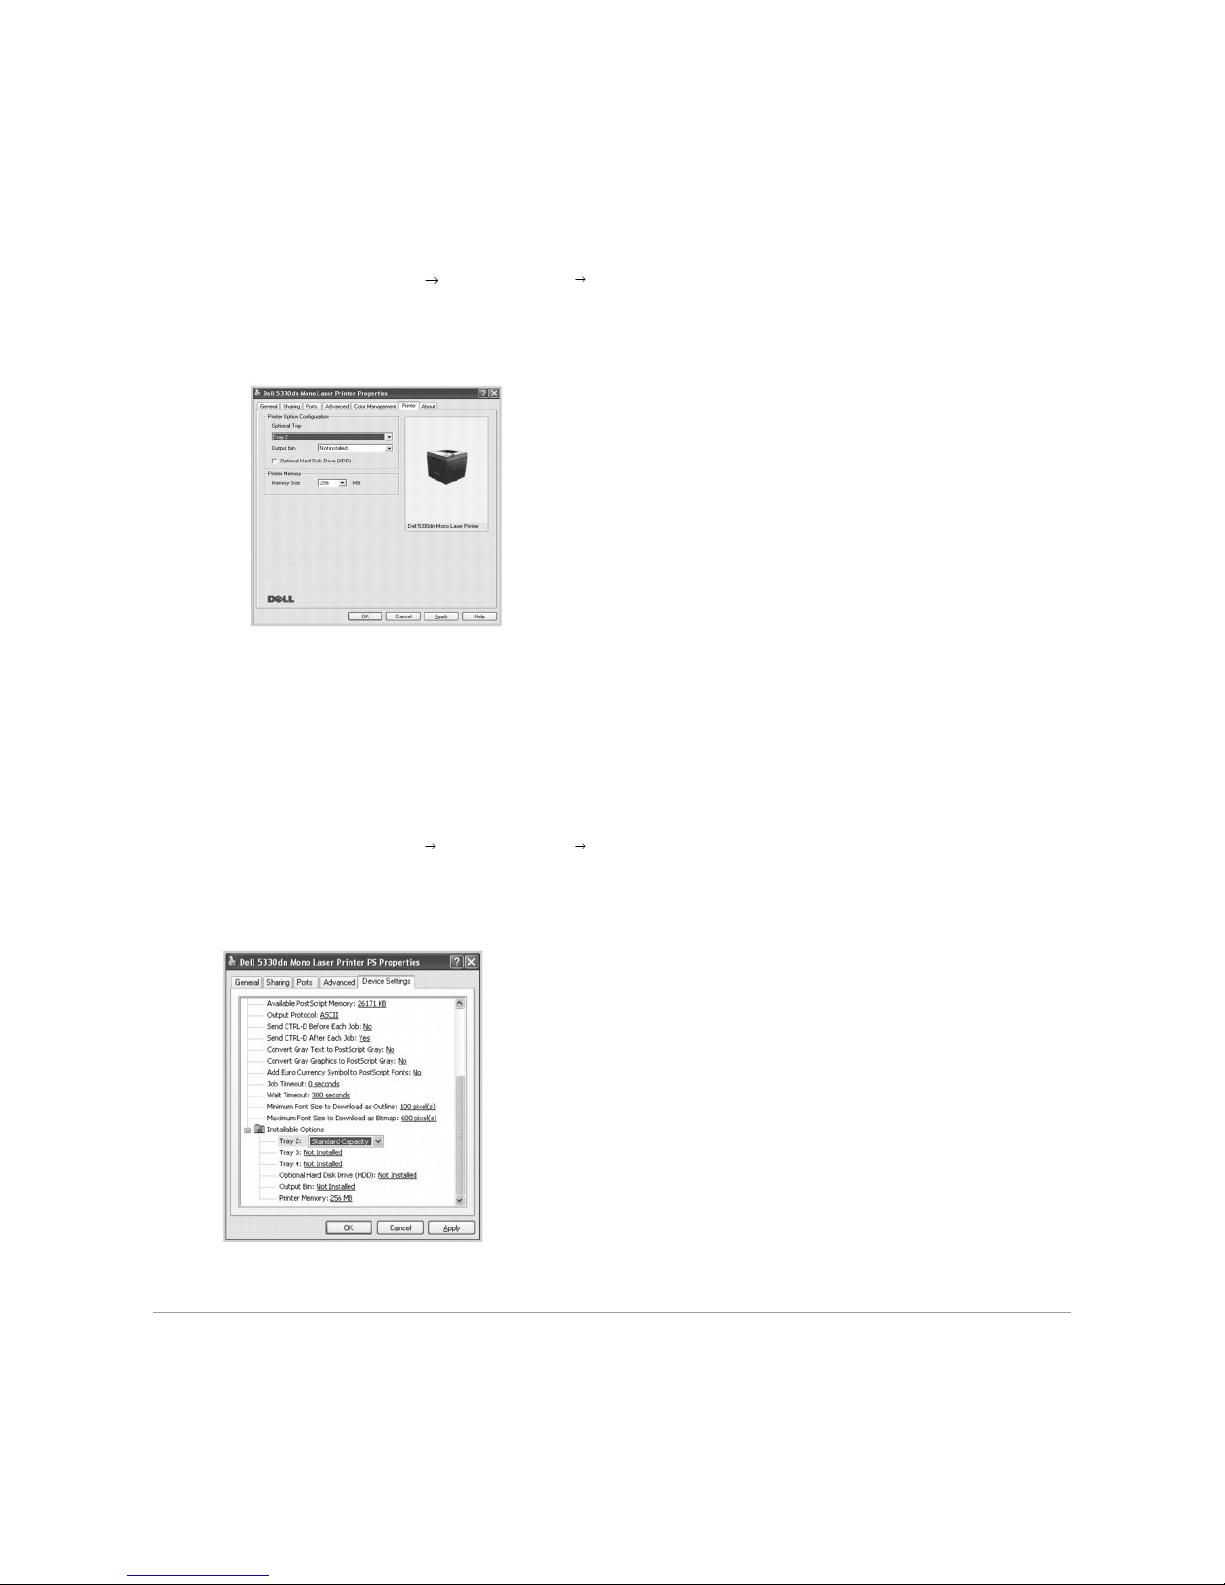
To access the properties of the printer driver:
1. Click the Windows Start button.
2. For Windows NT 4.0/2000, select Settings and then Printers.
For Windows XP/2003, select Printers and Faxes.
For Windows Vista, select Control Panel Hardware and Sound Printers.
3. Select the Dell 5330dn Mono Laser Printer.
4. Right-click the printer icon and select Properties.
5. Click the Printer tab and select your Optional Tray from the Optional Tray drop-down list.
6. Click OK and print the document.
To set the tray in the printer properties of the PostScript printer driver.
1. Click the Widows Start button.
2. For Windows 2000, select Settings and then Printers.
For Windows XP/2003, select Printers and Faxes.
For Windows Vista, select Control Panel Hardware and Sound Printers.
3. Select Dell 5330dn Mono Laser Printer PS.
4. Right-click the printer icon and select Properties.
5. Click the Device Settings tab and select Standard Capacity from the Tray 2 drop-down list.
6. Click OK.
Installing High Capacity Feeder
To increase the paper handling capacity of your printer, install a High Capacity Feeder. A High Capacity Feeder holds 2100 sheets of plain paper.
Page 62
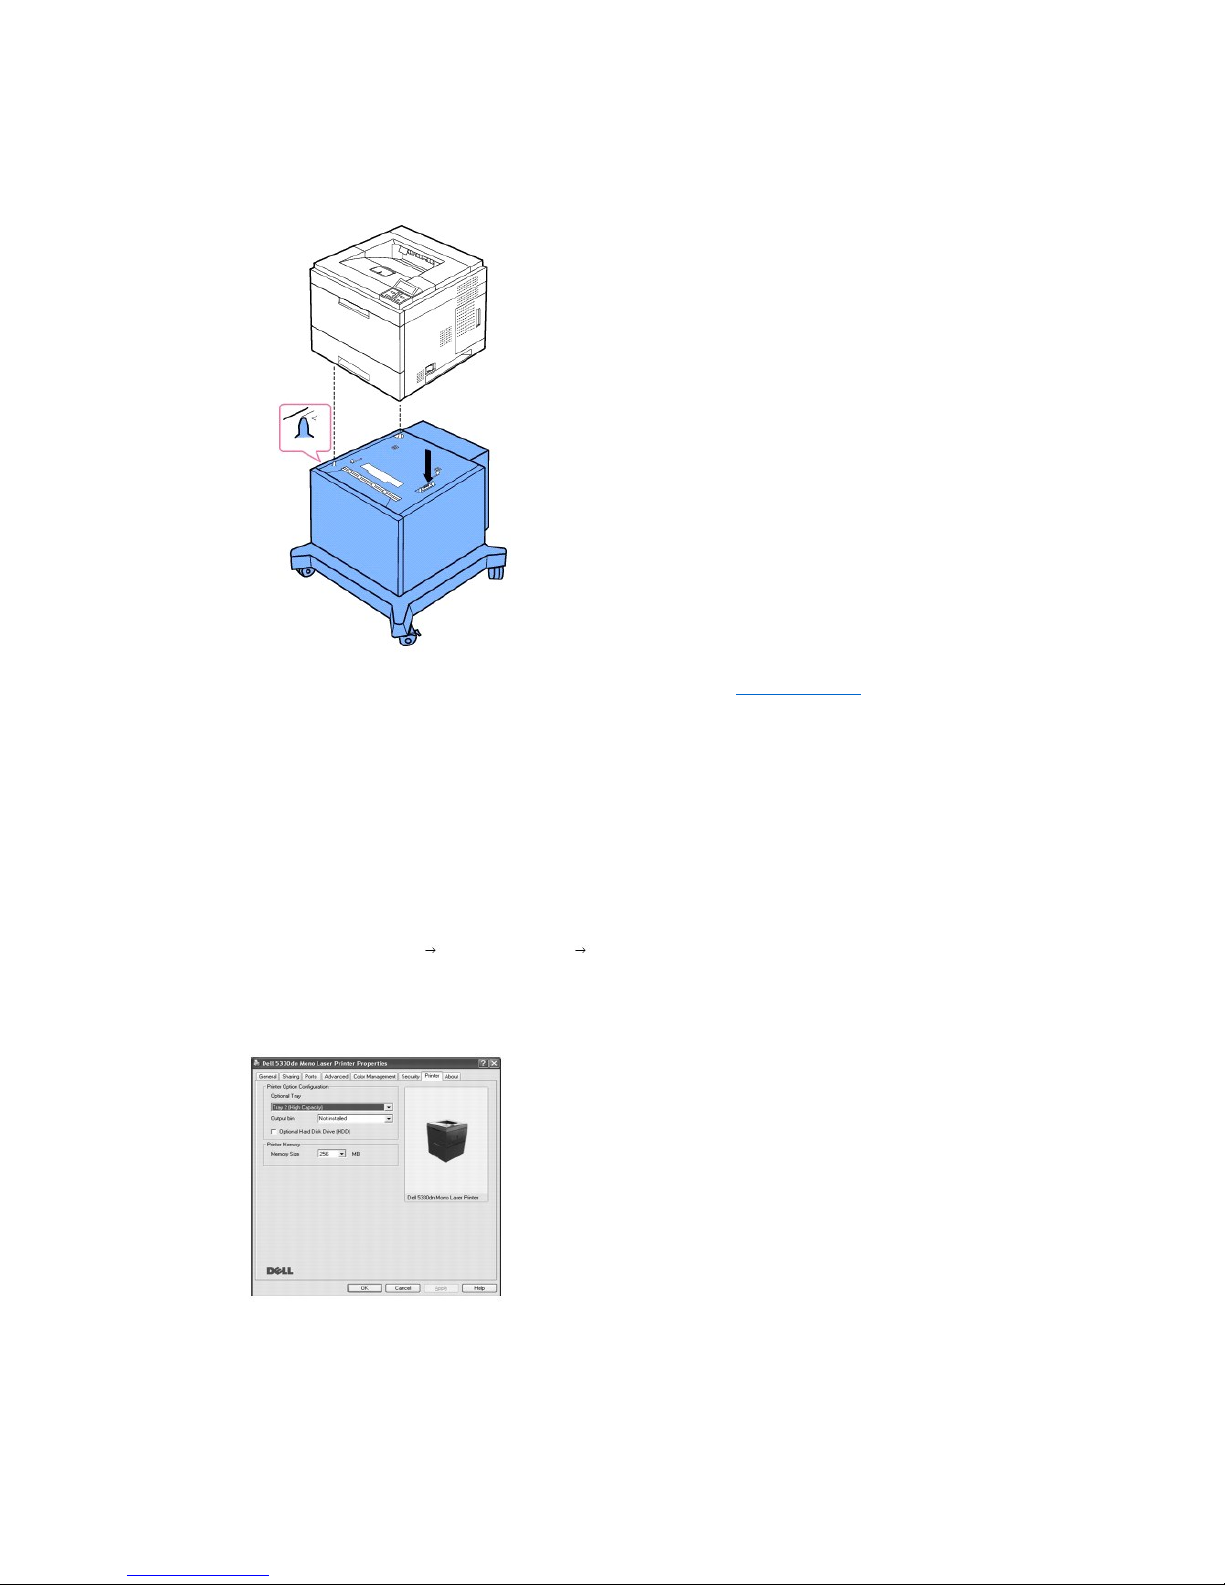
1. Power off the printer and unplug all cables from the printer.
2. Find the location of the High Capacity Feeder connector and alignment pins.
3. Place the printer over the High Capacity Feeder aligning the feet on the printer with the alignment pins in the High Capacity Feeder.
4. Load paper in the High Capacity Feeder. For information about loading paper in this tray, see "Loading Print Media".
5. Reconnect the power cord and cables, then power on the printer.
When you print a document on paper loaded in the High Capacity Feeder, you must configure the properties of the printer driver.
To access the properties of the printer driver:
1. Click the Windows Start button.
2. For Windows NT 4.0/2000, select Settings and then Printers.
For Windows XP/2003, select Printers and Faxes.
For Windows Vista, select Control Panel Hardware and Sound Printers.
3. Select the Dell 5330dn Mono Laser Printer.
4. Right-click the printer icon and select Properties.
5. Click the Printer tab and select your Optional Tray from the Optional Tray drop-down list.
6. Click OK and print the document.
To set the tray in the printer properties of the PostScript printer driver.
1. Click the Widows Start button.
Page 63
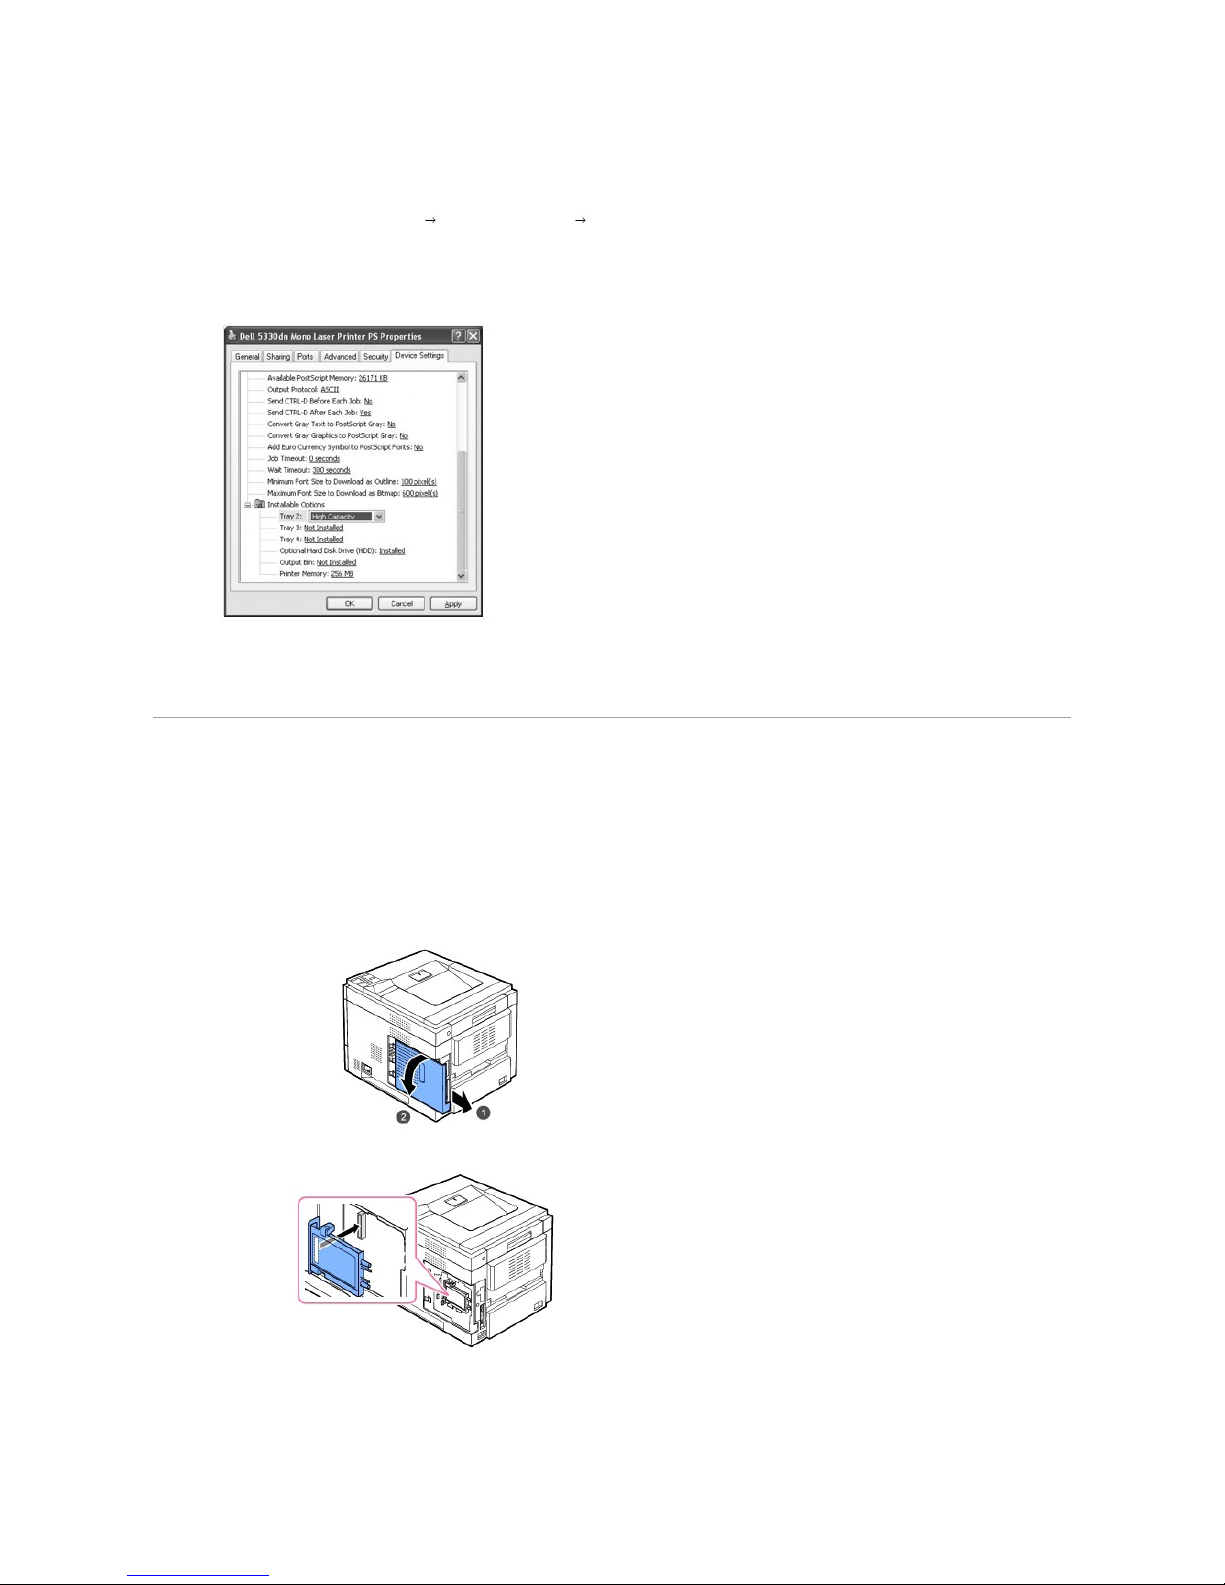
2. For Windows 2000, select Settings and then Printers.
For Windows XP/2003, select Printers and Faxes.
For Windows Vista, select Control Panel Hardware and Sound Printers.
3. Select Dell 5330dn Mono Laser Printer PS.
4. Right-click the printer icon and select Properties.
5. Click the Device Settings tab and select High Capacity from the Tray 2 drop-down list.
6. Click OK.
Using the Hard Disk
Installing the hard disk allows the data from your computer to be sent to the printer's hard disk print queue. This decreases the computer's workload. You can
also use various print features, such as storing a job in the hard disk, proofing a job, and printing private documents.
Installing the Hard Disk
1. Turn the printer power off and unplug the power cord and printer cable from the printer.
2. Grasp the control board cover and remove it.
3. Align the connector on the hard disk with the connector on the control board. Push the hard disk in until it is locked into place.
4. Fasten the three screws supplied with your new hard disk.
Page 64
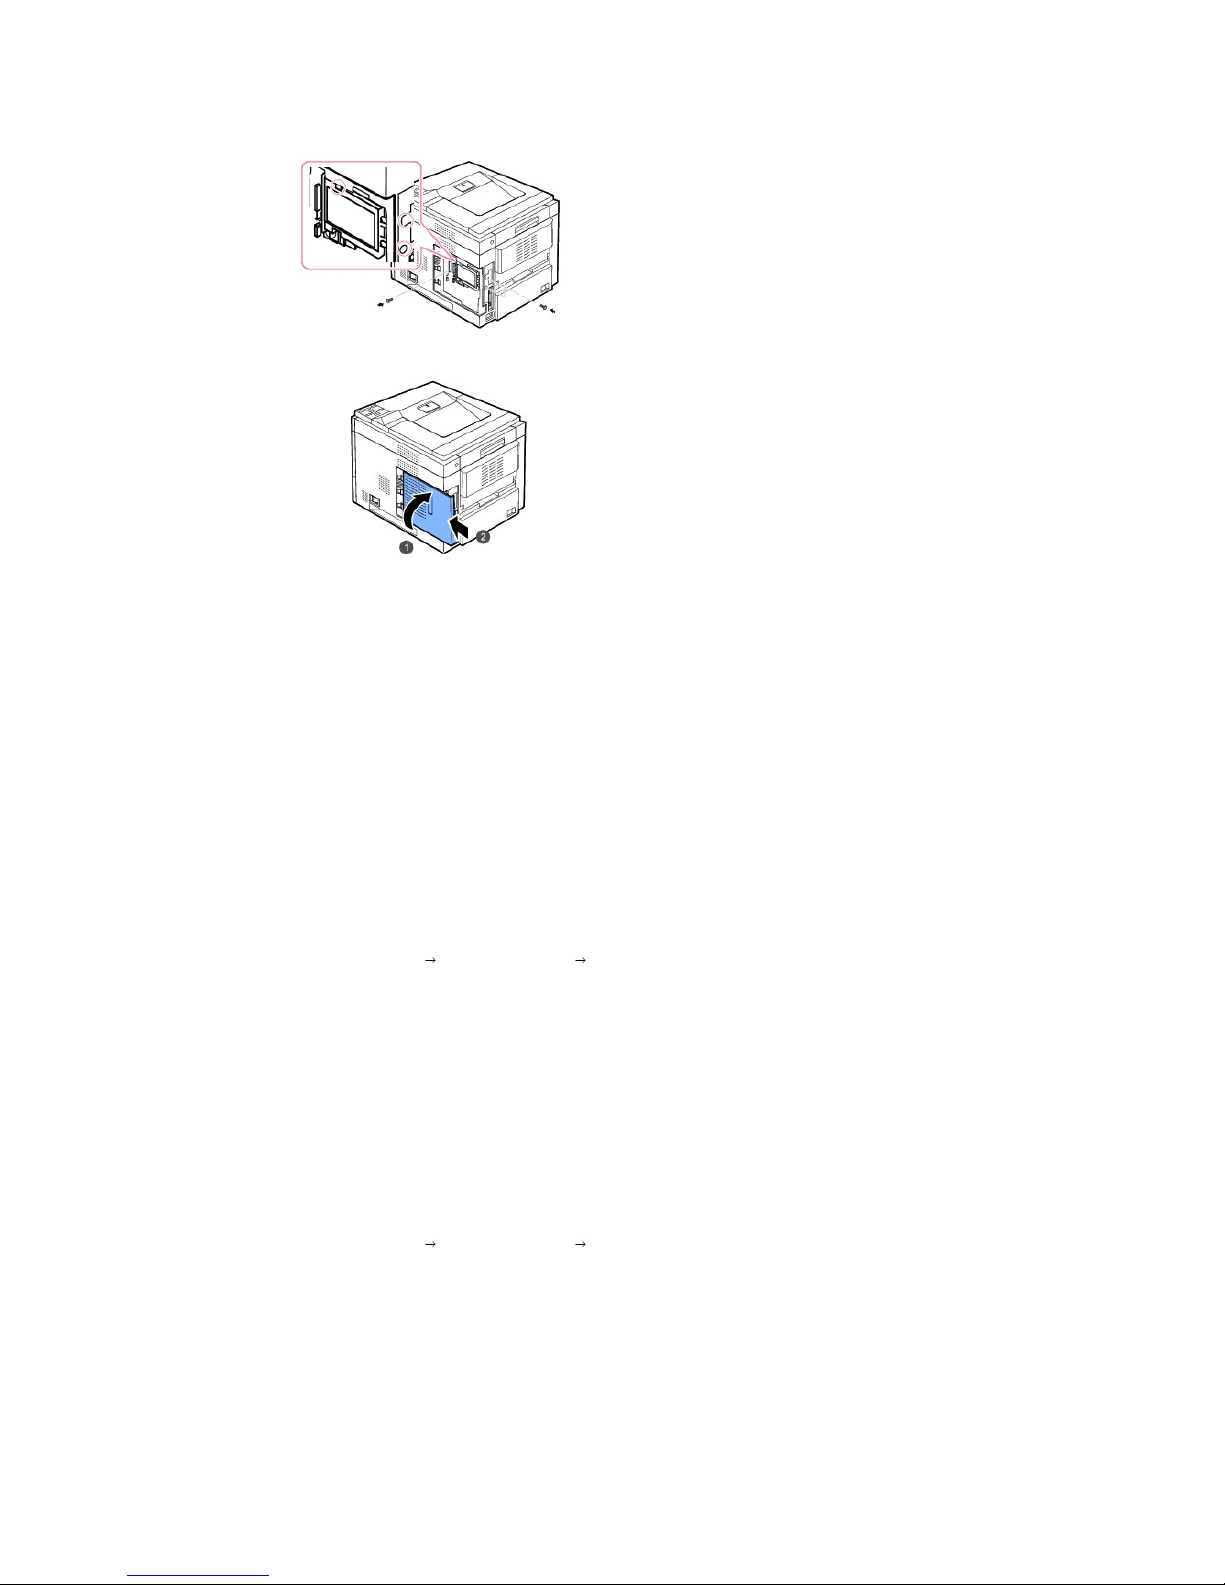
5. Close the control board cover by aligning the groove on it with the notch on the printer and sliding it.
6. Reconnect the power cord and printer cable, and turn the printer on.
7. Print a configuration page from the control panel to ensure the hard disk is correctly installed.
Setting the Hard Disk in the Printer Properties
After installing the hard disk, you need to select it in the printer properties to enable its use.
To access the properties of the printer driver:
Dell 5330dn Mono Laser Printer
1. Click the Windows Start button.
2. For Windows NT 4.0/2000, select Settings and then Printers.
For Windows XP/2003, select Printers and Faxes.
For Windows Vista, select Control Panel Hardware and Sound Printers.
3. Select the Dell 5330dn Mono Laser Printer.
4. Right-click the printer icon and select Properties.
5. Click the Printer tab, and check Optional Hard Disk Driver (HDD)
6. Click OK.
Dell 5330dn Mono Laser Printer PS
1. Click the Widows Start button.
2. For Windows 2000, select Settings and then Printers.
For Windows XP/2003, select Printers and Faxes.
For Windows Vista, select Control Panel Hardware and Sound Printers.
3. Select Dell 5330dn Mono Laser Printer PS.
4. Right-click the printer icon and select Properties.
5. Click the Device Settings tab and select Installed from the Optional Hard Disk Drive (HDD) in the Installable Options section.
6. Click OK.
Printing with the Optional Hard Disk
Page 65

After installing the optional hard disk, you can use the advanced printing features, such as storing or spooling a print job to the hard disk, proofing a job, and
specifying the printing of a private job in the printer properties window.
Once you have stored files in the hard disk, you can easily print or delete the stored files using the control panel of your printer.
Setting the time and date
1. Press Menu ( ).
2. Press Scroll ( to ) to highlight Settings and press Select ( ).
3. Press Scroll ( to ) to highlight Setup and press Select ( ).
4. Press Scroll ( to ) to highlight Date & Time and press Select ( ).
5. Enter the correct time and date using Scroll ( to ) or Scroll ( to ).
Month = 01 to 12
Day = 01 to 31
Year = requires four digits
Hour = 01 to 12
Minute = 00 to 59
and you can also select AM or PM.
6. Press Select ( ) to save the selection.
7. Press Cancel ( ) to return to Standby mode.
Setting Daylight Savings Time
If your country switches to Daylight Savings Time each year, use this procedure to automatically switch to Daylight Savings Time and to Standard time.
1. Press Menu ( ).
2. Press Scroll ( to ) to highlight Settings and press Select ( ).
3. Press Scroll ( to ) to highlight Setup and press Select ( ).
4. Press Scroll ( to ) to highlight Day Light Saving and press Select ( ).
5. Press Scroll ( to ) to highlight Manual and press Select ( ).
6. Enter the correct Start date using Scroll ( to ) or Scroll ( to ) and press Select ( ).
7. Enter the correct End date using Scroll ( to ) or Scroll ( to ) and press Select ( ).
8. Press Cancel ( ) to return to Standby mode.
Storing a job
You can store jobs in the installed hard disk.
1. Open the file you want to store.
2. Select Print from the File menu. The Print window displays.
3. Click Properties.
4. Click the Other Options tab and click Job type.
5. Select the Job type you want from the drop-down list.
l Normal: prints in normal mode
l Confidential: stores the files, securing them with a password.
l Proof: prints the first file, and after a pause, prints the next file.
l Store: stores the file to the hard disk.
l Spool: spools the file into the hard disk and prints it from the hard disk queue.
l Print Schedule: prints the file at a specified time.
6. Enter the User ID and Job Name.
7. Click OK until the print window is displayed.
8. Click OK or Print to start printing.
Printing a stored job
Page 66
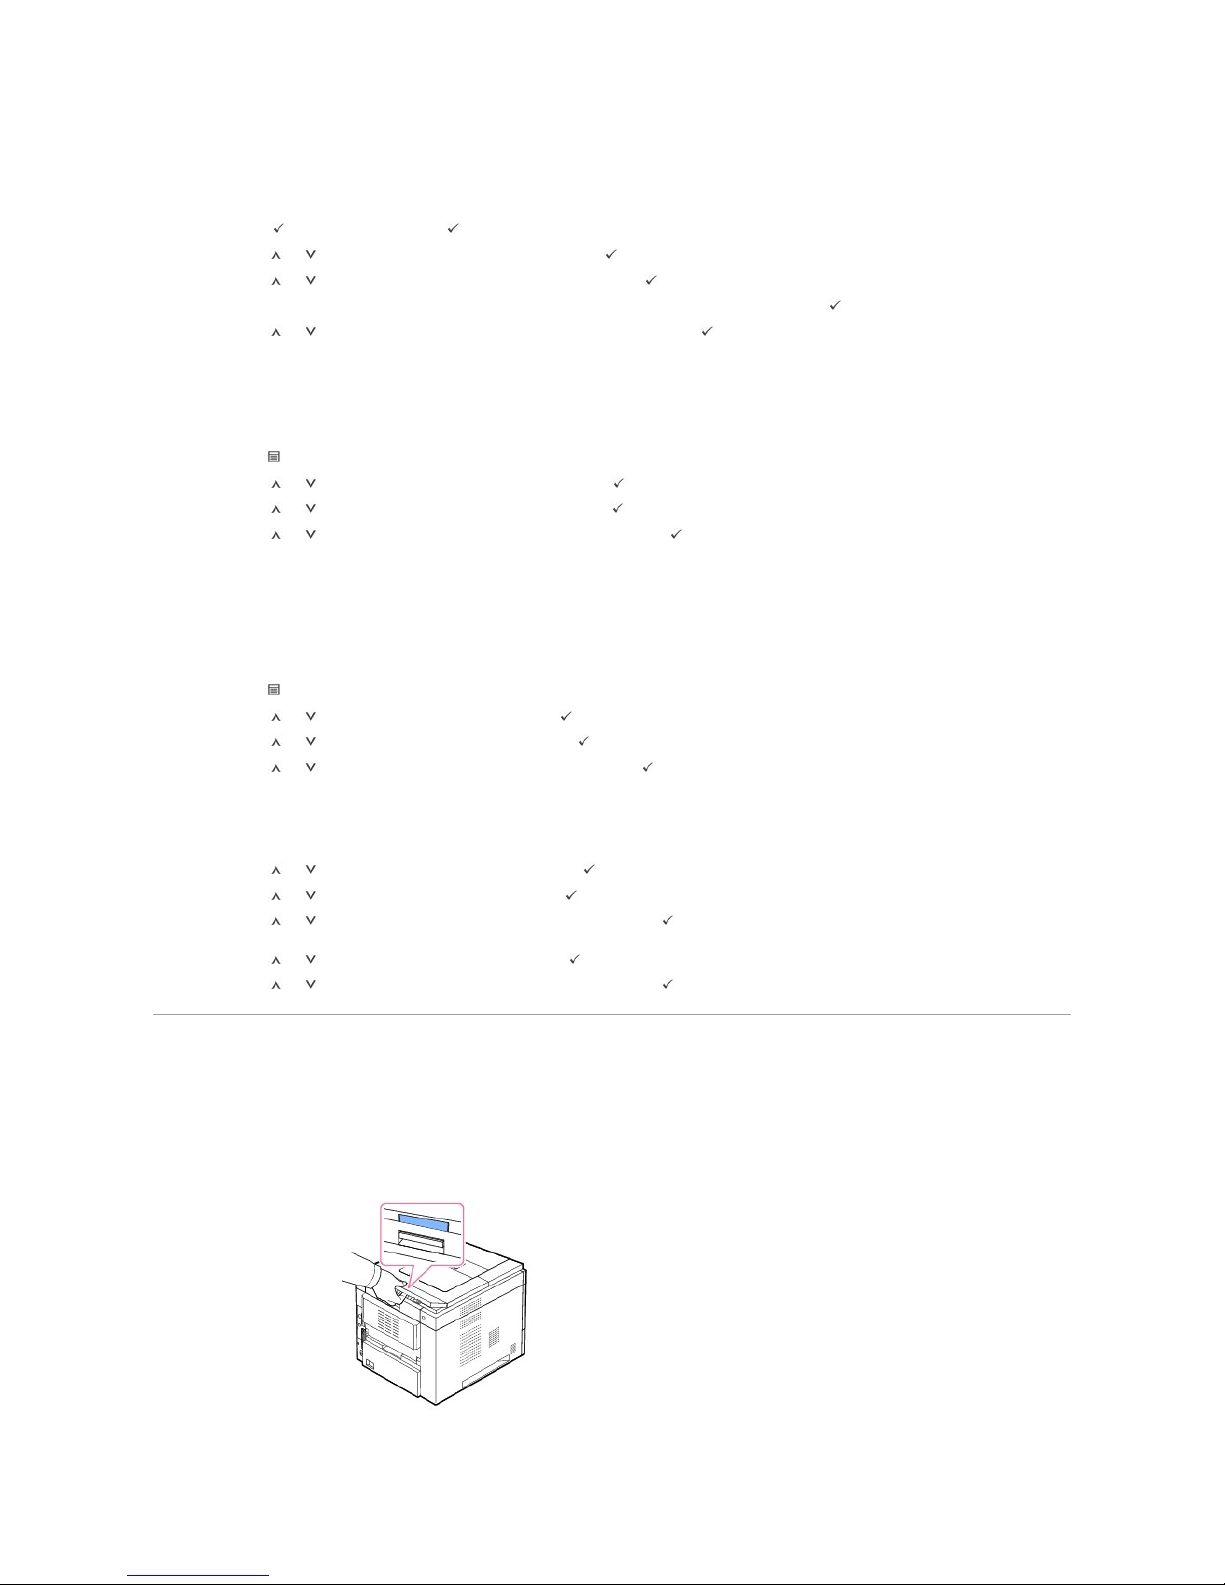
You can print jobs currently stored in the hard disk.
1. Press Select ( ) when Stored job, press ( ) appears on the bottom line of the display.
2. Press Scroll ( to ) to highlight the your user ID and press Select ( ).
3. Press Scroll ( to ) to highlight the job name you want and press Select ( ).
4. If you select Confidential or Store in Job type when you storing a job, enter the password and press Select ( ).
5. Press Scroll ( to ) to highlight the Print 1 Copy or Print Copies and press Select ( ).
Deleting a stored job
You can delete jobs currently stored in the hard disk.
1. Press Menu ( ).
2. Press Scroll ( to ) to highlight Job Management and press Select ( ).
3. Press Scroll ( to ) to highlight Clear Stored Job and press Select ( ).
4. Press Scroll ( to ) to highlight Secure Job or Stored Print and press Select ( ).
If you select ALL, all of the stored jobs in the hard disk will be deleted.
Printing using the form files
You can store up to 10 form files in the hard disk and have them printed with your document. First, you need to create a form file using the printer driver.
1. Press Menu ( ).
2. Press Scroll ( to ) to highlight Settings and press Select ( ).
3. Press Scroll ( to ) to highlight Form Menu and press Select ( ).
4. Press Scroll ( to ) to select the form you want to use and press Select ( ).
l Off: prints in normal mode.
l Single Form: prints all pages using the first form.
l Double Form: prints the front page using the first form and the back page using the second form.
5. Press Scroll ( to ) to highlight Select Form and press Select ( ).
6. Press Scroll ( to ) to highlight 1st Form and press Select ( ).
7. Press Scroll ( to ) to select the form file you want to use and press Select ( ).
If you select Double Form in Form Menu, continue the next step.
8. Press Scroll ( to ) to highlight 2nd Form and press Select ( ).
9. Press Scroll ( to ) to select the form file you want to use and press Select ( ).
Installing an Output Expander.
To increase the paper output capacity of your printer, install an Output Expander. An Output Expander holds 600 sheets of plain paper.
1. Power off the printer off and unplug all cables from the printer.
2. Face the back of the printer as shown, grasp the dummy cover,and remove it.
3. Remove the packing tape from the Output Expander.
Page 67
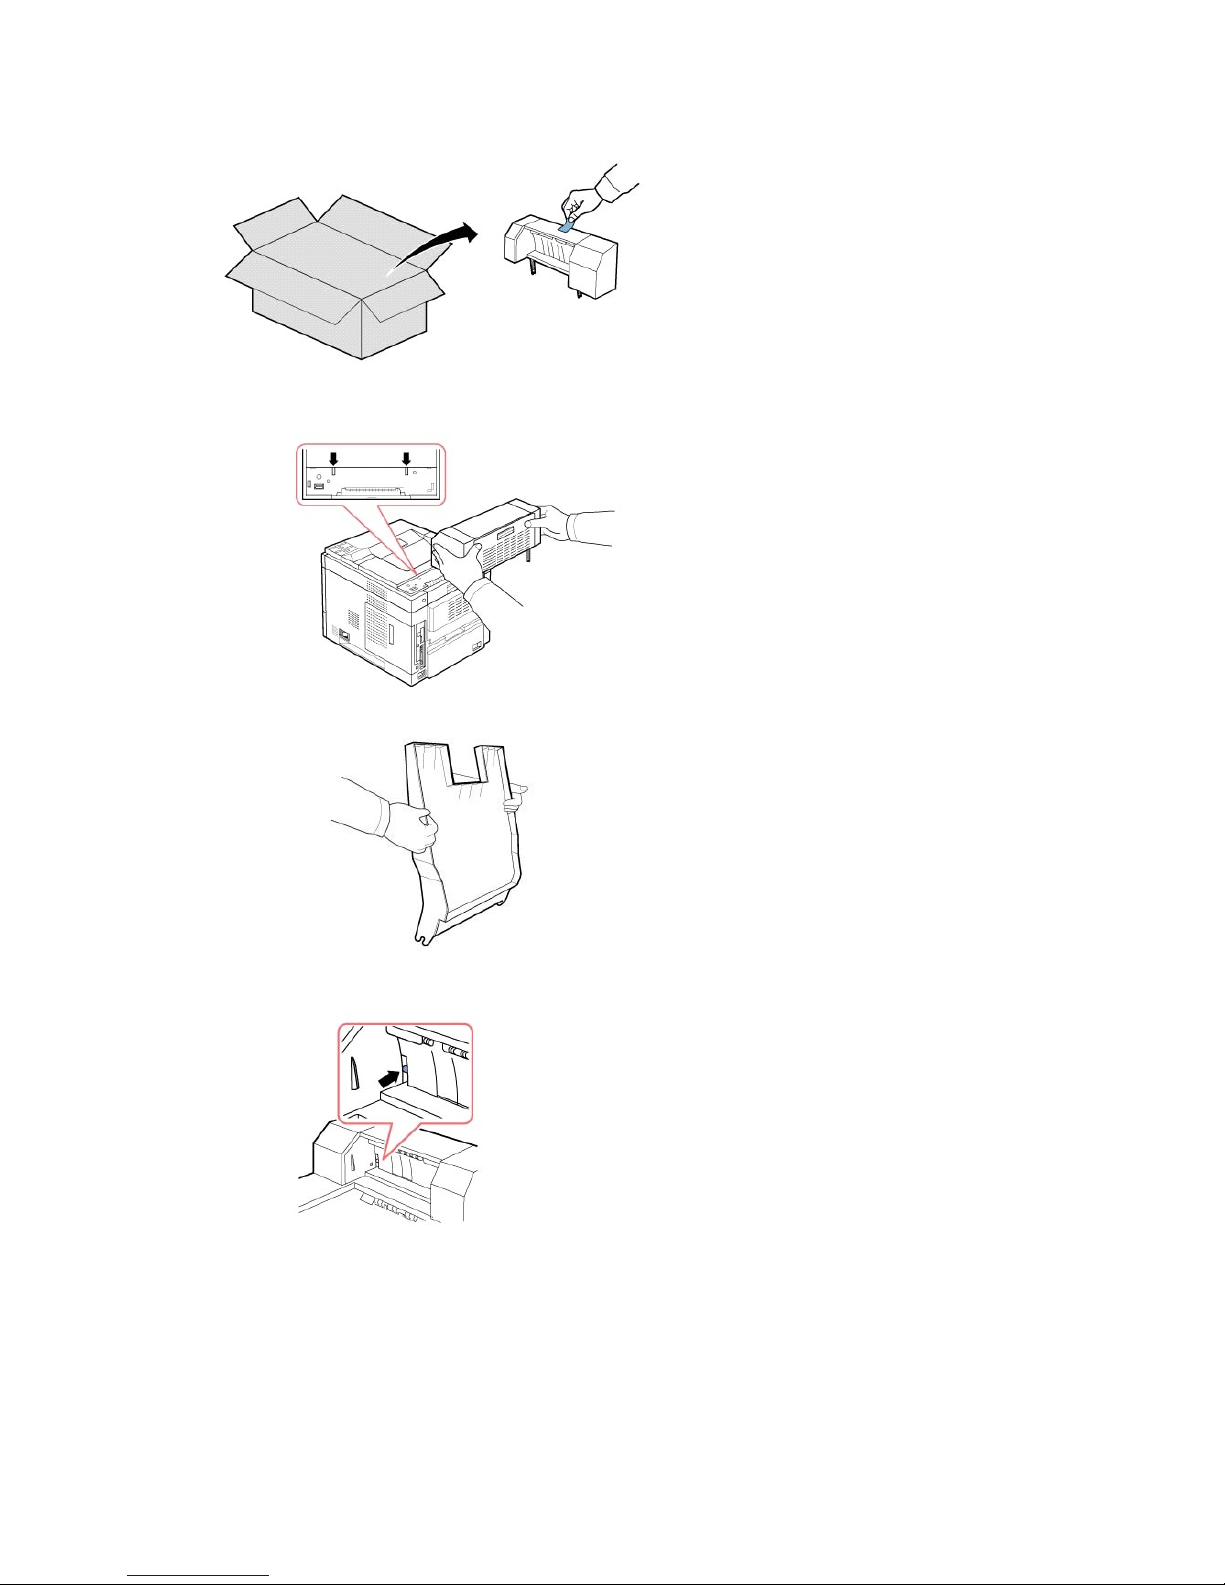
4. Locate the Output Expander alignment pins and insertion slots on the printer. Align the pins on the output expander with the slots on the printer and
place the Output Expander on top.
5. Grasp the Output Expander stacker as shown.
6. Locate the slots on the Output Expander where the stacker will be inserted.
7. Align the stacker, as shown.
Page 68
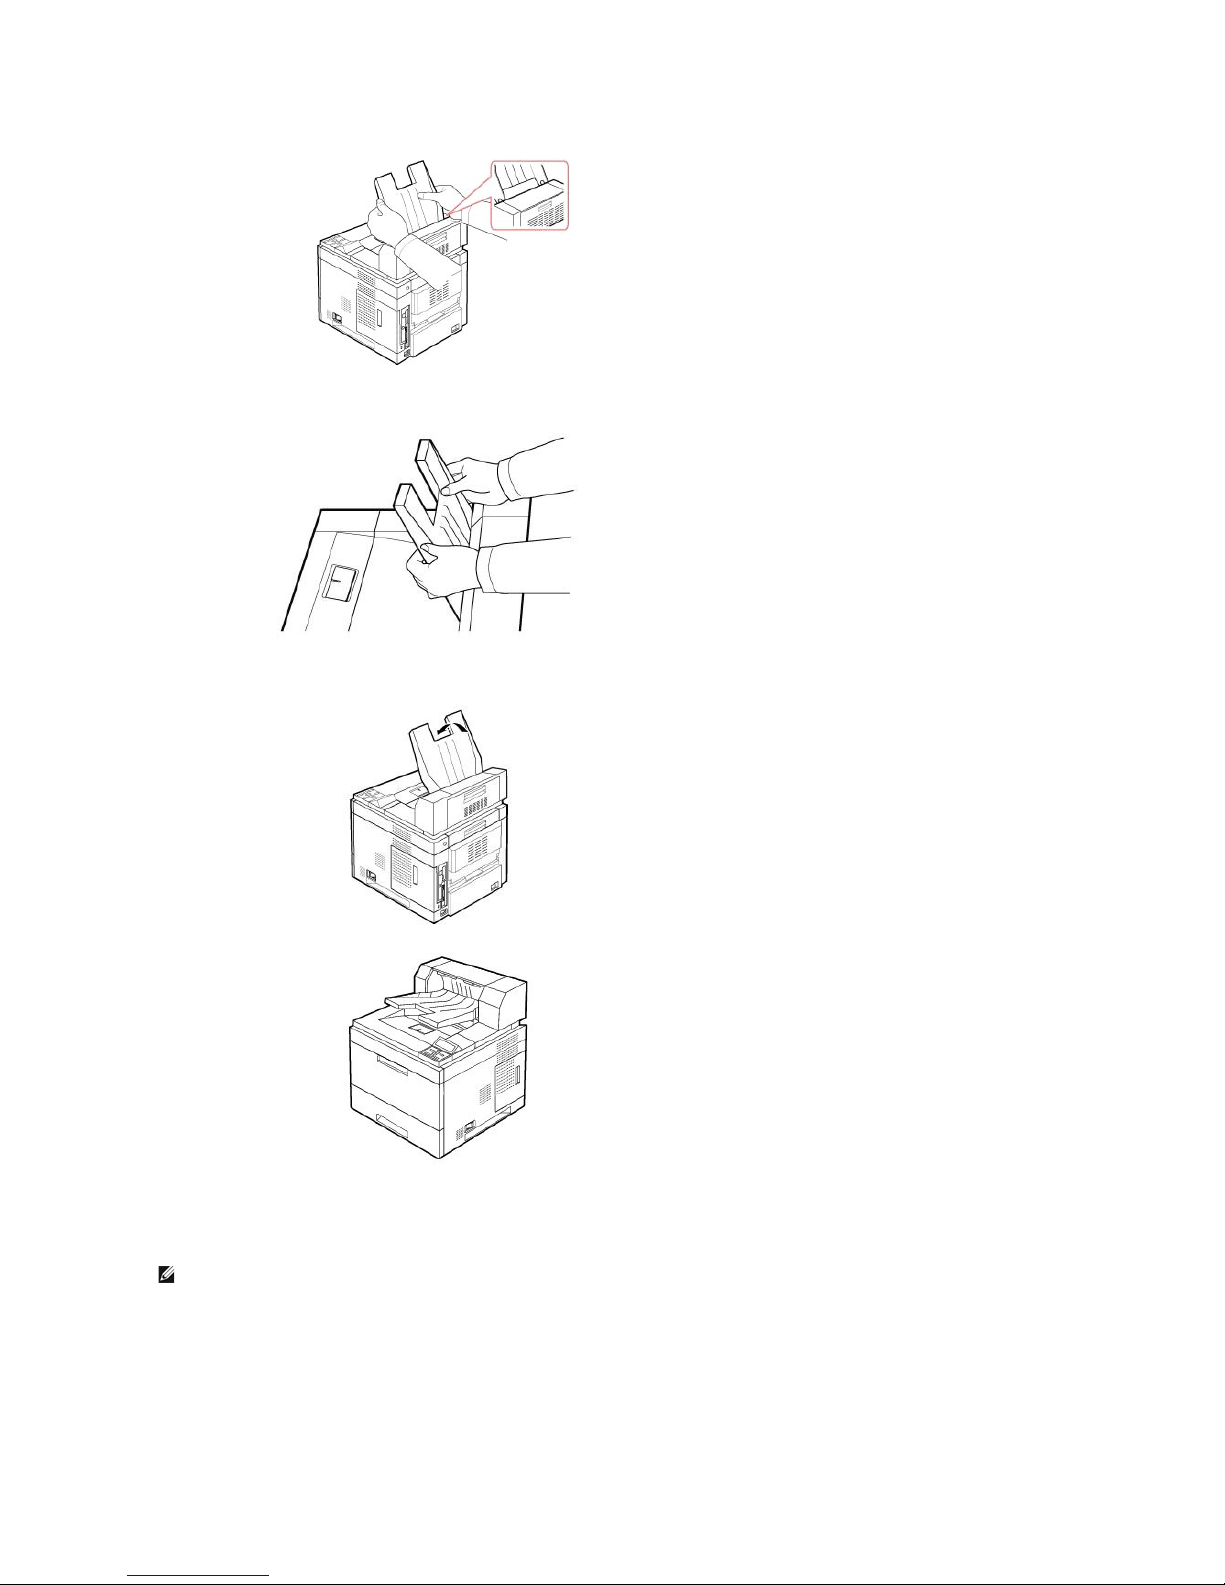
8. Slide the stacker into the slots on the Output Expander. For easy insertion, ensure there is contact between the rib on the stacker and the top edge of
the Output Expander.
9. Flip the Output Expander stacker down.
10. Reconnect the power cord and cables to the printer and power on the printer.
To use Output Expander when you print a document,, you must configure the properties of the printer driver.
To access the properties of the printer driver:
1. Click the Windows Start button.
2. For Windows NT 4.0/2000, select Settings and then Printers.
For Windows XP/2003, select Printers and Faxes.
NOTE: When printing a document using the output expander, remember to configure the printer driverproperties.
Page 69
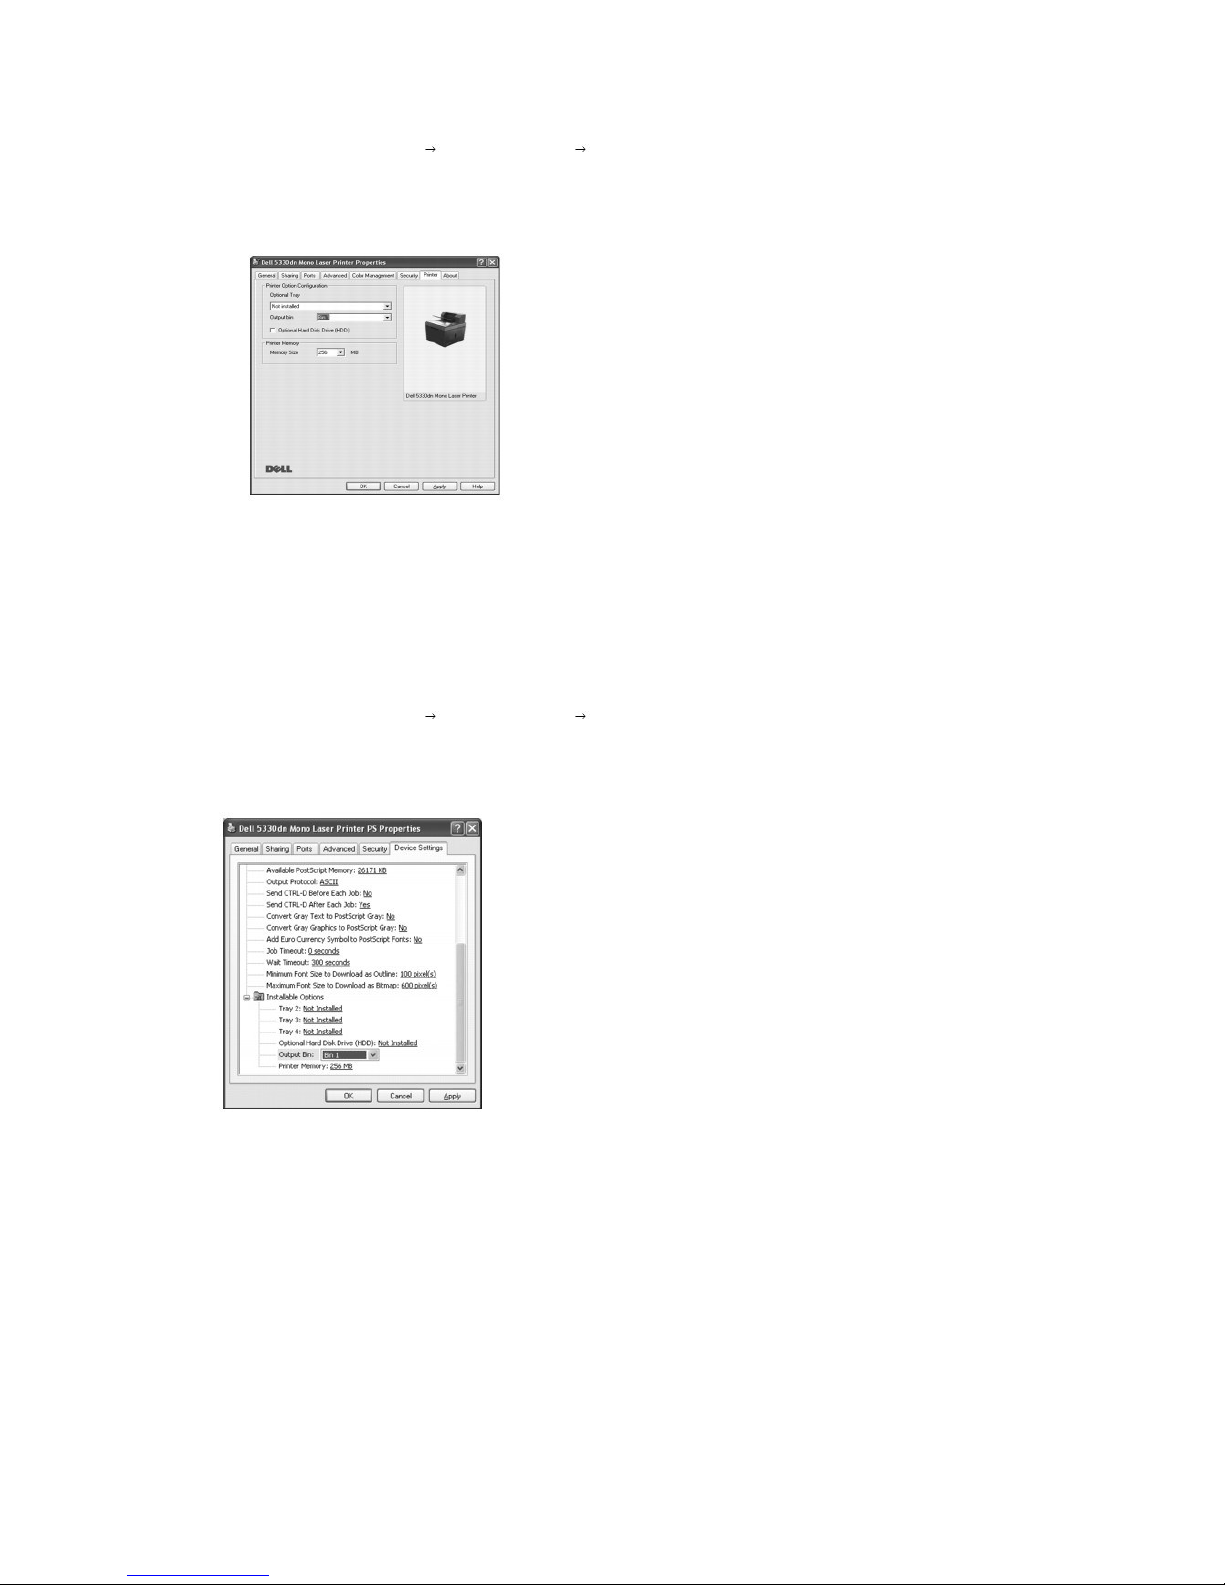
For Windows Vista, select Control Panel Hardware and Sound Printers.
3. Select the Dell 5330dn Mono Laser Printer.
4. Right-click the printer icon and select Properties.
5. Click the Printer tab and select Bin 1 from the Output Bin drop-down list.
6. Click OK and print the document.
To set the tray in the printer properties of the PostScript printer driver.
1. Click the Widows Start button.
2. For Windows 2000, select Settings and then Printers.
For Windows XP/2003, select Printers and Faxes.
For Windows Vista, select Control Panel Hardware and Sound Printers.
3. Select Dell 5330dn Mono Laser Printer PS.
4. Right-click the printer icon and select Properties.
5. Click the Device Settings tab and select Bin 1 from the Output Bin drop-down list.
6. Click OK.
Page 70

Paper Handling
Print Media Guidelines
Print media is paper, card stock, transparencies, labels, and envelopes. Your printer provides high quality printing on a variety of print media. Selecting the
appropriate print media for your printer helps avoid printing problems. This chapter provides information on how to make print media selections, how to care
for the print media, and how to load them in the Standard Tray, Optional Trays or Multi-purpose Feeder and High Capacity Feeder.
Paper
For the best print quality, use 75 g/m2 (20 lb) xerographic, long grain paper. Try a sample of any paper you are considering using with the printer before
buying large quantities.
When loading paper, note the recommended print side on the paper package, and load paper accordingly. See "Loading Print Media in the Paper Tray" and
"Using the Multi-purpose Feeder" for detailed loading instructions.
Paper Characteristics
The following paper characteristics affect print quality and reliability. We recommend that you follow these guidelines when evaluating new paper stock:
Weight
The printer can automatically feed paper weights from 60 to 120 g/m2 (16 to 32 lb bond) long grain in the paper tray. Paper lighter than 60 g/m2 (16 lb) may
not be substantial enough to feed properly, causing jams. For best performance, use 75 g/m2 (20 lb bond) long grain paper.
For duplex printing, use 60 to 120 g/m2 (16 to 32 lb bond) paper.
Curl
Curl is the tendency of print media to curve at its edges. Excessive curl can cause paper feeding problems. Curl usually occurs after the paper passes through
the printer, where it is exposed to high temperatures. Storing paper unwrapped in humid conditions, even in the paper tray, can contribute to paper curling
prior to printing and can cause feeding problems.
Smoothness
The degree of smoothness of paper directly affects print quality. If the paper is too rough, the toner does not fuse to the paper properly, resulting in poor print
quality. If the paper is too smooth, it can cause paper feeding problems. Smoothness should be between 100 and 300 Sheffield points; however, smoothness
between 150 and 250 Sheffield points produces the best print quality.
Moisture Content
The amount of moisture in the paper affects both print quality and the ability of the printer to feed the paper properly. Leave the paper in its original wrapper
until you are ready to use it. This limits the exposure of the paper to moisture changes that can degrade its performance.
Grain Direction
Print Media Guidelines
Storing Print Media
Identifying Print Media Sources and Specifications
Selecting an Output Location
Loading Print Media in the Paper Tray
Using the Multi-purpose Feeder
Using the High Capacity Feeder
For Standard, Optional 500 Sheet Tray and HCF Setting Paper Size
Setting the Paper Type
Tray Behavior
Page 71

Grain refers to the alignment of the paper fibers in a sheet of paper. Grain is either long grain, running the length of the paper, or short grain, running the
width of the paper.
For 60 to 90 g/m2 (16 to 24 lb bond) paper, long grain fibers are recommended. For papers heavier than 90 g/m
2
(24 lb bond), short grain fibers are preferred.
For the Multi-purpose Feeder, 60 to 90 g/m2 (16 to 24 lb bond) paper, long grain fibers are recommended.
Fiber Content
Most high-quality xerographic paper is made from 100% chemically pulped wood. This content provides the paper with a high degree of stability resulting in
fewer paper feeding problems and better print quality. Paper containing fibers, such as cotton, possess characteristics that can result in degraded paper
handling.
Recommended Paper
To ensure the best print quality and feed reliability, use 75 g/m2 (20 lb) xerographic paper. Business papers designed for general business use may also
provide acceptable print quality.
Always print several samples before buying large quantities of any type of print media. When choosing any print media, consider the weight, fiber content, and
color.
Use only paper able to withstand these temperatures without discoloring, bleeding, or releasing hazardous emissions. Check with the paper manufacturer or
vendor to determine whether the paper you have chosen is acceptable for laser printers.
Unacceptable Paper
The following papers are not recommended for use with the printer:
l Chemically treated papers used to make copies without carbon paper, also known as carbonless papers, carbonless copy paper (CCP), or no carbon
required (NCR) paper
l Preprinted papers with chemicals that may contaminate the printer
l Preprinted papers that can be affected by the temperature in the printer fuser
l Preprinted papers that require a registration (the precise print location on the page) greater than 0.09 in., such as optical character recognition (OCR)
forms
l Coated papers (erasable bond), synthetic papers, thermal papers
l Rough-edged, rough or heavily textured surface papers, or curled papers
l Recycled papers containing more than 25% post-consumer waste that do not meet DIN 19 309
l Recycled paper having a weight less than 60 g/m
2
(16 lb)
l Multiple-part forms or documents
Selecting Paper
Proper paper loading helps prevent jams and ensures trouble-free printing.
To help avoid jams or poor print quality:
l Always use new, undamaged paper.
l Before loading paper, know the recommended print side of the paper you are using. This information is usually indicated on the paper package.
l Do not use paper that you have cut or trimmed yourself.
l Do not mix print media sizes, weights, or types in the same source. Mixing results in jams.
Page 72
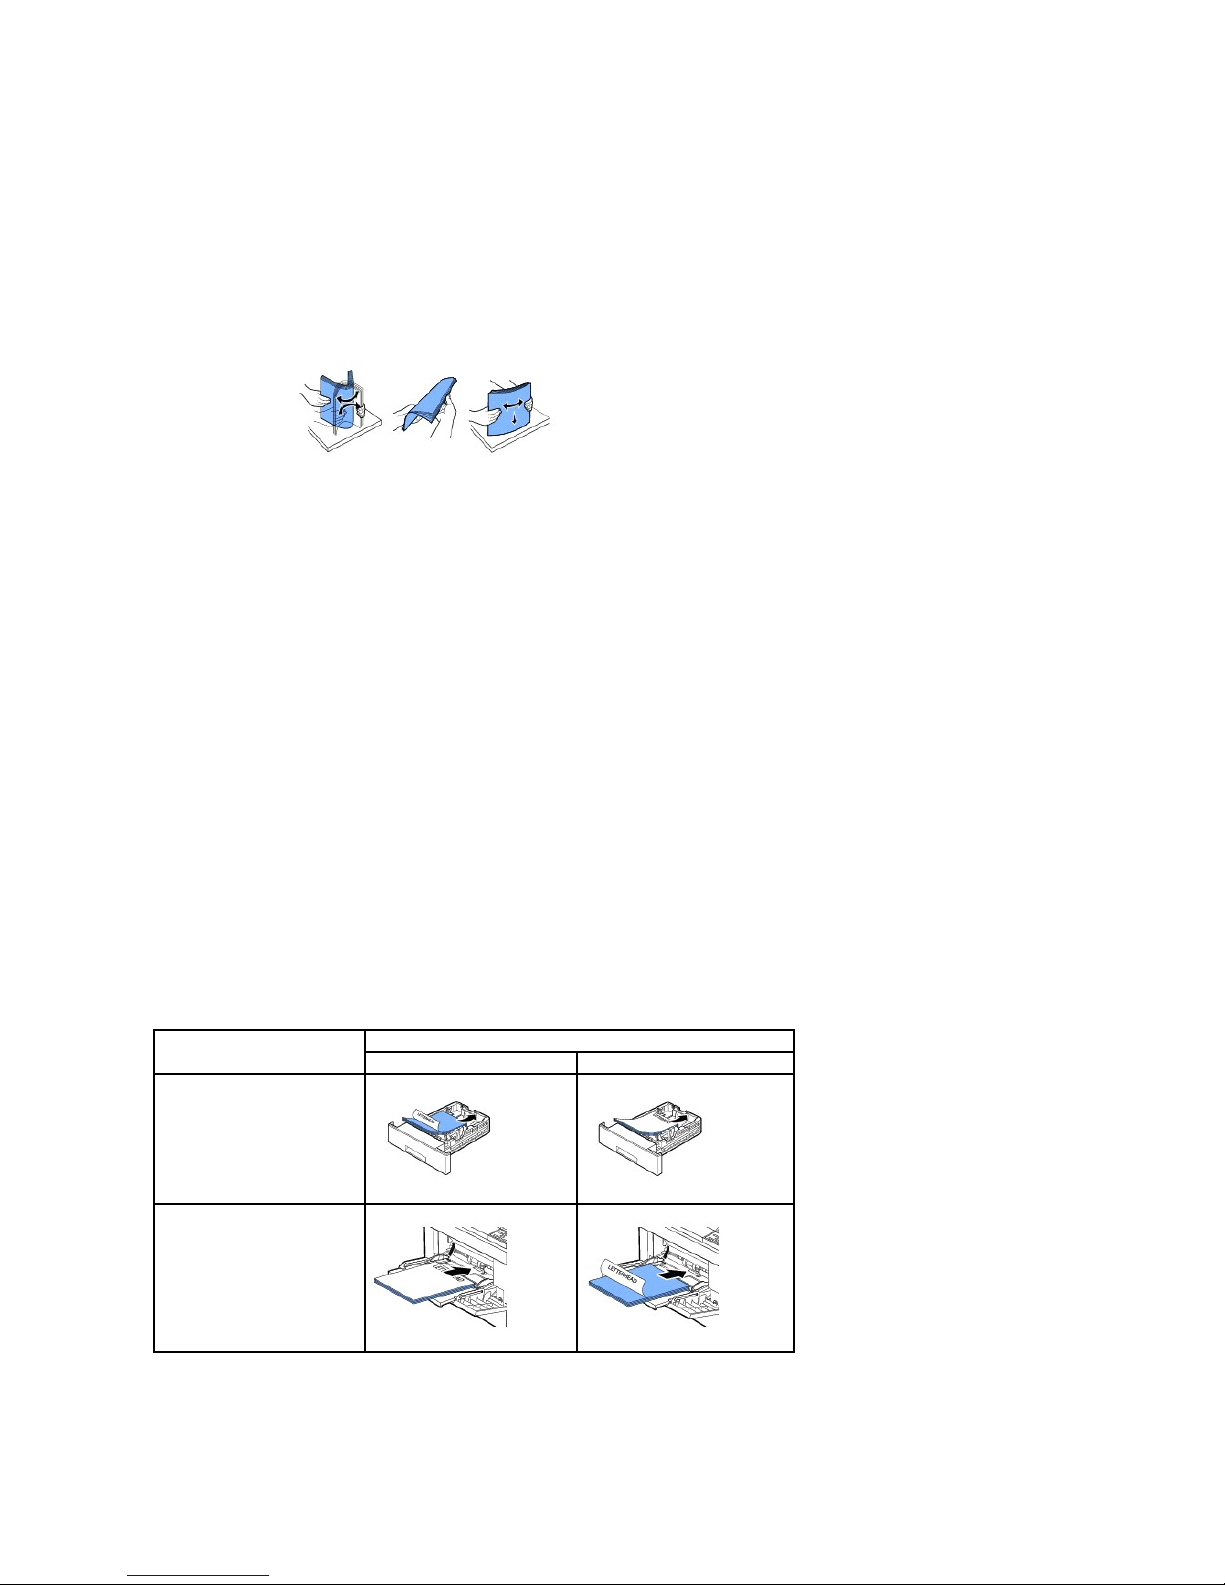
l Do not use coated papers.
l Remember to change the paper size setting when using a source that does not support auto size sensing.
l Do not remove trays while a job is printing or Busy is displayed on the operator panel.
l Ensure the paper is properly loaded in the source.
l Before purchasing large quantities of paper, it is recommended that initially a small quantity be purchased, and tested in the printer to verify suitable
results.
l Flex paper back and forth. Do not fold or crease the paper. Straighten the edges on a level surface.
Selecting Preprinted Forms and Letterhead
Use the following guidelines when selecting preprinted forms and letterhead paper for the printer:
l Use long grain paper for best results.
l Use only forms and letterhead printed using an offset lithographic or engraved printing process.
l Choose papers that absorb ink but do not bleed.
l Avoid papers with rough or heavily textured surfaces.
Use papers printed with heat-resistantinksdesignedforuseinxerographiccopiers.Theinkmustwithstandtemperaturesupto180°C(356° F) without
melting or releasing hazardous emissions. Use inks that are not affected by the resin in toner or the silicone in the fuser. Oxidation-set or oil-based inks
should meet these requirements; latex inks might not. If you are in doubt, contact your paper supplier.
Preprintedpapers,suchasletterhead,mustbeabletowithstandtemperaturesupto180°C(356° F) without melting or releasing hazardous emissions.
Printing on Letterhead
Check with the manufacturer or vendor to determine if the preprinted letterhead you have chosen is acceptable for laser printers.
Page orientation is important when printing on letterhead. Use the following table for help when loading letterhead in the print media sources.
Selecting Prepunched Paper
Print Media Source
Top of Page
Simplex (single-sided) printing
Duplex (double-sided) printing
Standard 500-sheet tray
Optional 500-sheet tray
or High Capacity Feeder
Face down
Face up
Multi-purpose Feeder
Face up
Face down
Page 73

Prepunched paper brands can differ in the number and placement of holes and in manufacturing techniques.
Use the following guidelines to select and use prepunched paper:
l Test paper from several manufacturers before ordering and using large quantities of prepunched paper.
l Paper should be punched at the paper manufacturer and not drilled into paper already packaged in a ream. Drilled paper can cause jams when multiple
sheets feed through the printer.
l Prepunched paper could include more paper dust than standard paper. Your printer may require more frequent cleaning, and feed reliability may not be
as good as that of standard paper.
Transparencies
Try samples of any transparencies you are considering using with the printer before buying large quantities:
l Usetransparenciesdesignedspecificallyforlaserprinters.Transparenciesmustbeabletowithstandtemperaturesupto195°C(383° F) without
melting, discoloring, offsetting or releasing hazardous emissions.
l Avoid getting fingerprints on the transparencies, which could result in poor print quality.
l Before loading transparencies, fan the stack to prevent sheets from sticking together.
l Transparencies are supported in Multi-purpose Feeder only.
Selecting Transparencies
The printer can print directly on to transparencies designed for use in laser printers. Print quality and durability depend on the transparency used. Always print
samples on the transparencies you are considering before buying large quantities.
Checkwiththemanufacturerorvendortodeterminewhetheryourtransparenciesarecompatiblewithlaserprintersthatheattransparenciesupto195° C
(383° F). Use only transparencies that are able to withstand these temperatures without melting, discoloring, offsetting, or releasing hazardous emissions.
Envelopes
Envelopes are supported in Multi-purpose Feeder only. Try a sample of any envelopes you are considering using with the printer before buying large
quantities. See "Using the Multi-purpose Feeder" for instructions on loading an envelope.
When printing on envelopes:
l To achieve the best possible print quality, use only high-quality envelopes that are designed for use in laser printers.
l For best performance, use envelopes made from 75 g/m
2
(20 lb bond) paper. You can use up to 90 g/m2 (24 lb bond) weight for the Multi-purpose
Feeder with cotton content 25 percent or less.
l Use only new, undamaged envelopes.
l For best performance and to minimize jams, do not use envelopes that:
¡ Have excessive curl or twist
¡ Are stuck together or damaged in any way
¡ Contain windows, holes, perforations, cutouts, or embossing
¡ Have metal clasps, string ties, or metal folding bars
¡ Have an interlocking design
¡ Have postage stamps attached
¡ Have any exposed adhesive when the flap is in the sealed or closed position
¡ Have nicked edges or bent corners
¡ Have rough, cockle, or laid finishes
l Useenvelopesthatcanwithstandtemperaturesupto195°C(383° F) without sealing, excessive curling, wrinkling, or releasing hazardous emissions.
If
Page 74
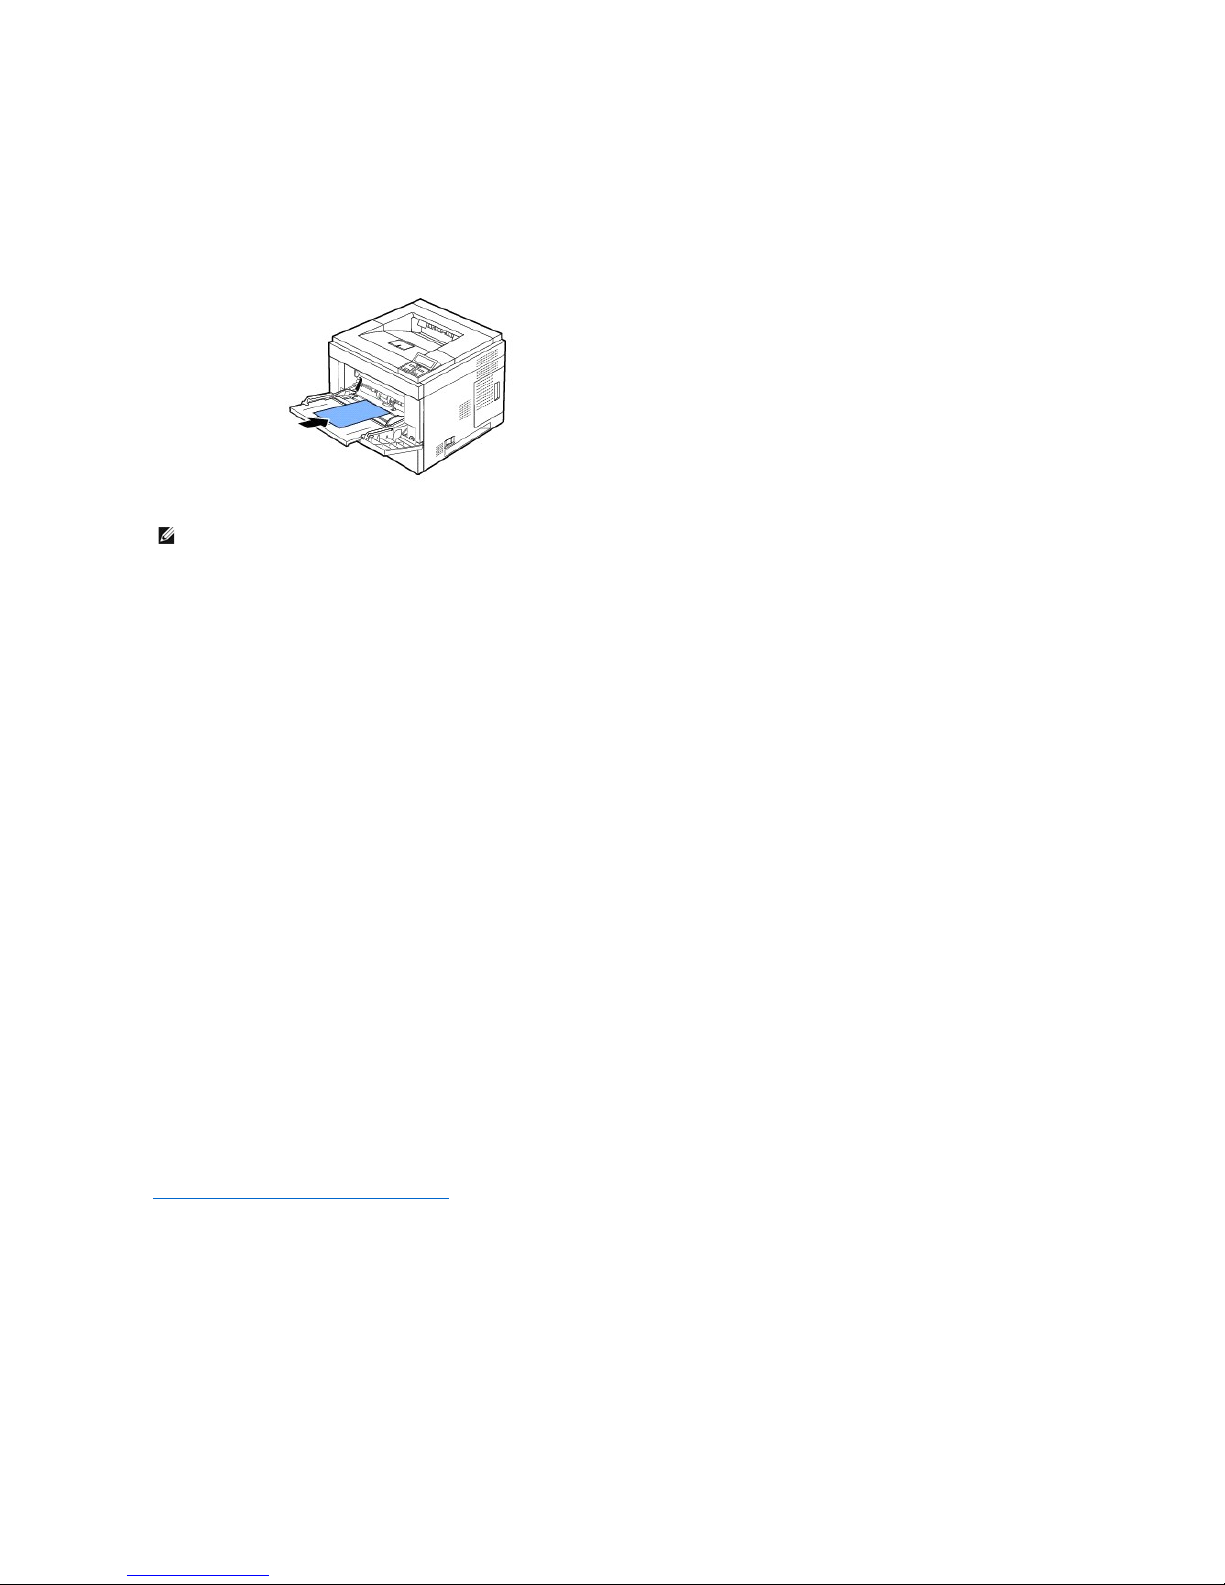
you have any doubts about the envelopes you are considering using, check with the envelope supplier.
l Adjust the width guide to fit the width of the envelopes.
l Load an envelope with the flap side down and with the stamp area on the top left side. The end of the envelope with the stamp area enters the Multi-
purpose Feeder first.
See "Using the Multi-purpose Feeder" for instructions on loading an envelope.
Labels
Your printer can print on many labels designed for use with laser printers. These labels are supplied in letter-, A4-, and legal-
size sheets. Label adhesives, face
sheet(printablestock),andtopcoatsmustbeabletowithstandtemperaturesupto195°C(383° F) and pressure up to 25 pounds per square inch (psi). You
can load one label sheet at a time in the Multi-purpose Feeder.
Try a sample of any label you are considering using with the printer before purchasing a large quantity:
l Use full label sheets. Partial sheets may cause labels to peel off during printing, resulting in a jam. Partial sheets also contaminate your printer and your
cartridge with adhesive, and could void your printer and cartridge warranties.
l Uselabelsthatcanwithstandtemperaturesupto195°C(383° F) without sealing, excessive curling, wrinkling, or releasing hazardous emissions.
l Do not print within 0.04 in. (1 mm) of the edge of the label, of the perforations, or between die-cuts of the label.
l Do not use label sheets that have adhesive up to the edge of the sheet. We recommend zone coating of the adhesive at least 0.04 in. (1 mm) away
from edges. Adhesive material contaminates your printer and could void your warranty.
l If zone coating of the adhesive is not possible, a 0.125-in. (3-mm) strip should be removed on the leading and driver edge, and replaced with a non-
oozing
adhesive.
l Remove a 0.125-in. (3-mm) strip from the leading edge to prevent labels from peeling inside the printer.
l Portrait orientation is preferred, especially when printing bar codes.
l Do not use labels that have exposed adhesive.
Card Stock
Card stock is single ply and has a large array of properties, such as moisture content, thickness, and texture, that can significantly affect print quality. See
"Identifying Print Media Sources and Specifications" for information on the preferred weight and grain direction of print media.
Try a sample of any card stock you are considering using with the printer before purchasing a large quantity:
l Be aware that preprinting, perforation, and creasing can significantly affect the print quality causing print media handling or jamming problems.
l Avoid using card stock that may release hazardous emissions when heated.
l Do not use preprinted card stock manufactured with chemicals that may contaminate the printer. Preprinting introduces semi-liquid and volatile
components into the printer.
l We recommend the use of long grain card stock.
NOTE: A combination of high humidity (over 60%) and high printing temperatures may seal the envelopes.
Page 75
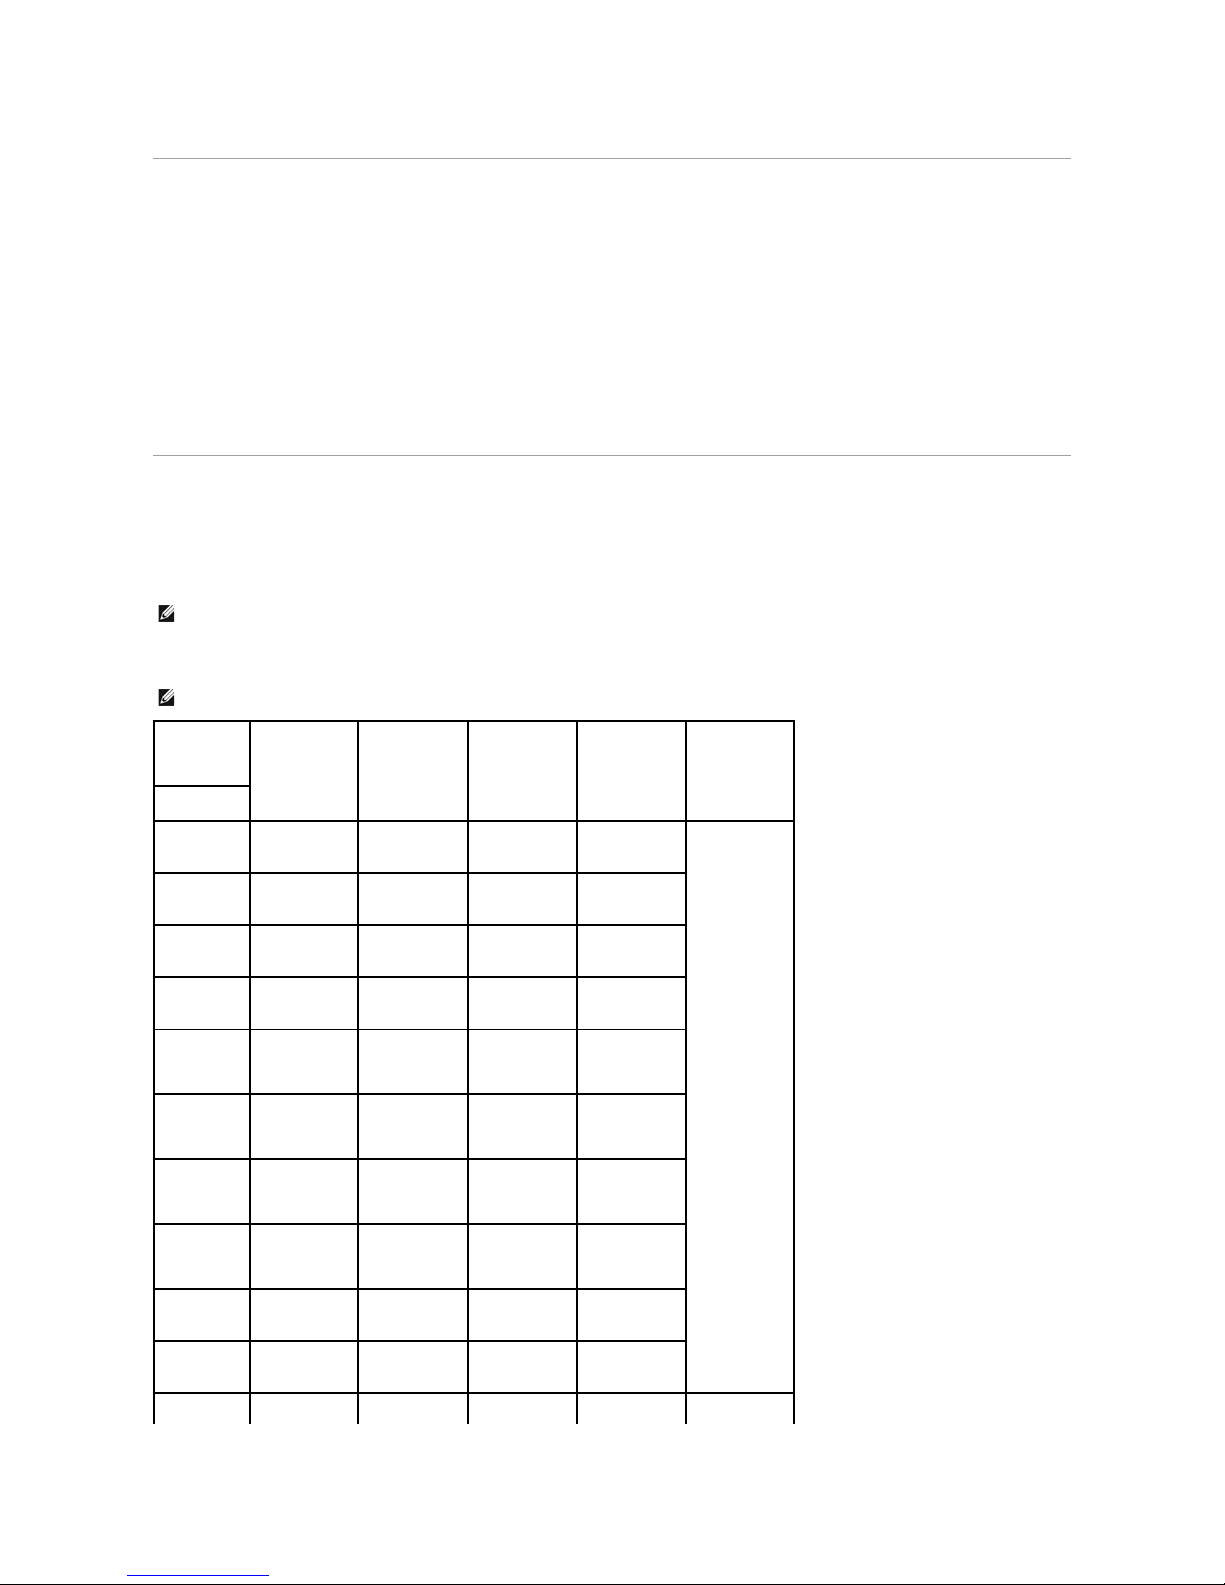
Storing Print Media
Use the following guidelines for proper print media storage. These help avoid print media feeding problems and uneven print quality:
l Forbestresults,storeprintmediainanenvironmentwherethetemperatureisapproximately21°C(70° F) and the relative humidity is 40%.
l Store cartons of print media on a pallet or shelf, rather than directly on the floor.
l When storing individual packages of print media out of the original carton, ensure they rest on a flat surface so the edges do not buckle or curl.
l Do not place anything on top of the print media packages.
Identifying Print Media Sources and Specifications
The following tables provide information on standard and optional sources, including the print media sizes available from the paper size menu and supported
weights.
Print Media Sizes and Support
NOTE: If you use a print media size not listed, select the next larger size.
NOTE: Paper Tray includes Standard Tray, 500-sheet Optional Tray, and High Capacity Feeder.
High Capacity Feeder supports only A4, Letter, Legal and Folio.
Legend
Y- indicates
Support
Dimensions
Paper Tray
Multi-purpose
Feeder
Duplex printing
Capacity
Print Media
Size
A4
8.27 x 11.69 in.
(210 x 297 mm)
Y Y Y
l 500
sheets of
75 g/m2
(20 lb)
paper for
the tray.
l 100
sheets of
75 g/m2
(20 lb)
paper for
the multipurpose
feeder.
l 2100
sheets of
75 g/m2
(20 lb)
paper for
the High
Capacity
Feeder.
A6
4.13 x 5.85 in.
(105 x 148 mm)
- Y -
JIS B5
7.17 x 10.12 in.
(182 x 257 mm)
Y Y -
ISO B5
6.93 x 9.84 in.
(176 x 250 mm)
Y Y -
Letter
8.5 x 11 in.
(215.9 x 279
mm)
Y Y Y
Legal
8.5 x 14 in.
(215.9 x 355.6
mm)
Y Y Y
Executive
7.25 x 10.5 in.
(184.2 x 266.7
mm)
Y Y -
Oficio
8.5 x 13.5 in.
(215.9 x 342.9
mm)
Y Y Y
Statement
5.5 x 8.5
(139.7 x 215.9)
-Y-
Folio
8.5 x 13 in.
(216 x 330 mm)
Y Y Y
A5
5.85 x 8.27 in.
Y Y -
l 250
sheets of
Page 76
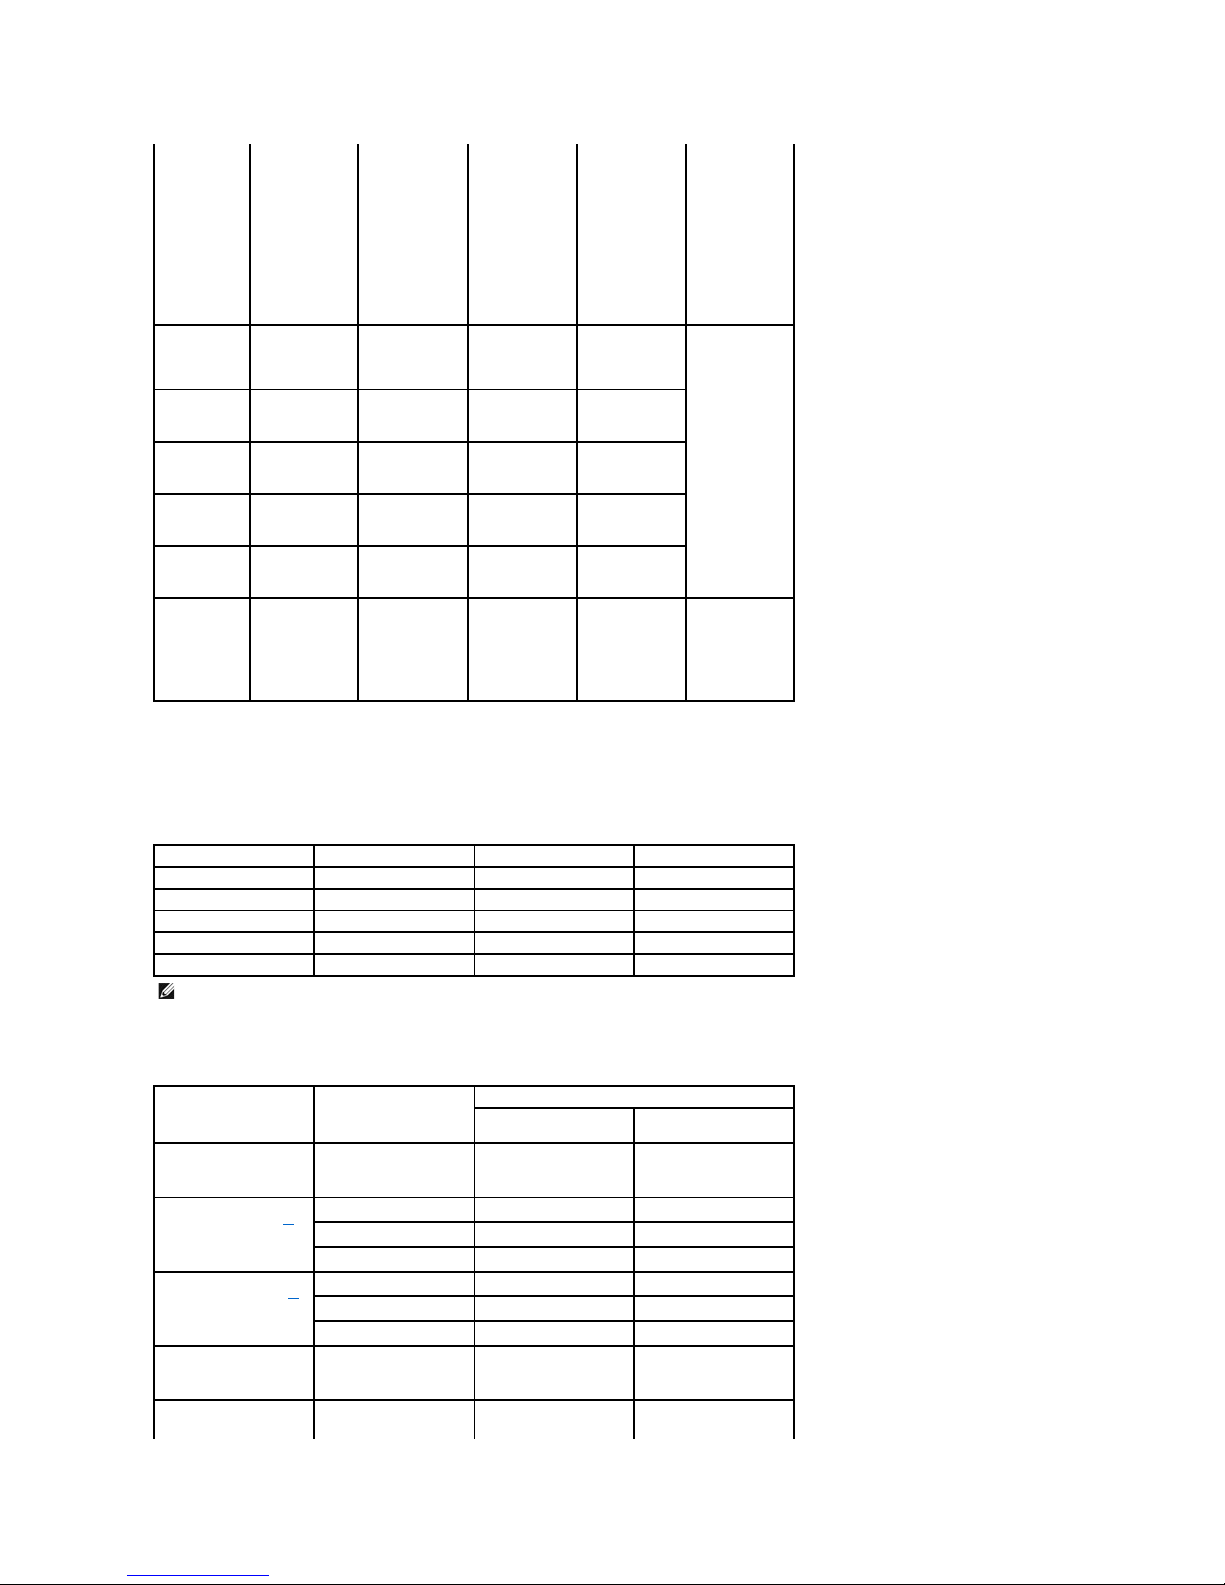
Print Media Supported
Print Media Types and Weights
NOTE: Ensure
the A5 paper
is NOT A4
paper that has
been cut in
half.
(148.5 x 210
mm)
75 g/m2
(20 lb)
paper for
the tray.
l 100
sheets of
75 g/m2
(20 lb)
paper for
the multipurpose
feeder.
Envelope 73/4
(Monarch)
3.88 x 7.5 in.
(98.4 x 190.5
mm)
- Y -
10 sheets of 75
g/m2 (20 lb) in
the multipurpose feeder.
Envelope
COM-10
4.12 x 9.5 in.
(105 x 241 mm)
- Y -
Envelope DL
4.33 x 8.66 in.
(110 x 220 mm)
- Y -
Envelope C5
6.38 x 9.02 in.
(162 x 229 mm)
- Y -
Envelope C6
4.49 x 6.38 in.
(114 x 162 mm)
- Y -
Custom
NOTE: Paper
Tray supports
custom paper
from A5 to
Legal size.
3x 5 in. to 8.5 x
14 in.
(76 x 127 mm to
215.9 x 355.6
mm)
- Y -
Refer to the
above Capacity
sections
Print Media
Paper Tray
Multi-purpose feeder
Standard output tray
Paper Y Y Y Card Stock
- Y Y
Transparencies
- Y -
Labels
- Y Y
Envelopes
- Y Y
NOTE: To use recycled paper, click "paper" tab then select recycled paper in driver's paper tab.
Print Media
Type
Print Media Weight
Tray 1 and Optional
Trays
Multi-purpose Feeder
Paper
Xerographic or business
paper
60-120 g/m2 grain long
(16-32 lb bond)
60-210 g/m2 grain long
(16 to 56 lb bond)
Card stock maximum (long grain)
*a
Index Bristol
-
Up to 210 g/m2 (56 lb)
Tag
-
Up to 210 g/m2 (56 lb)
Cover
-
Up to 210 g/m2 (56 lb)
Card stock maximum (grain short)
*a
Index Bristol
-
Up to 210 g/m2 (56 lb)
Tag
-
Up to 210 g/m2 (56 lb)
Cover
-
Up to 210 g/m2 (56 lb)
Transparencies
Laser printer
-
138-146 g/m
2
(37-39 lb bond)
Labels - maximum
Paper
-
176 g/m
2
Page 77
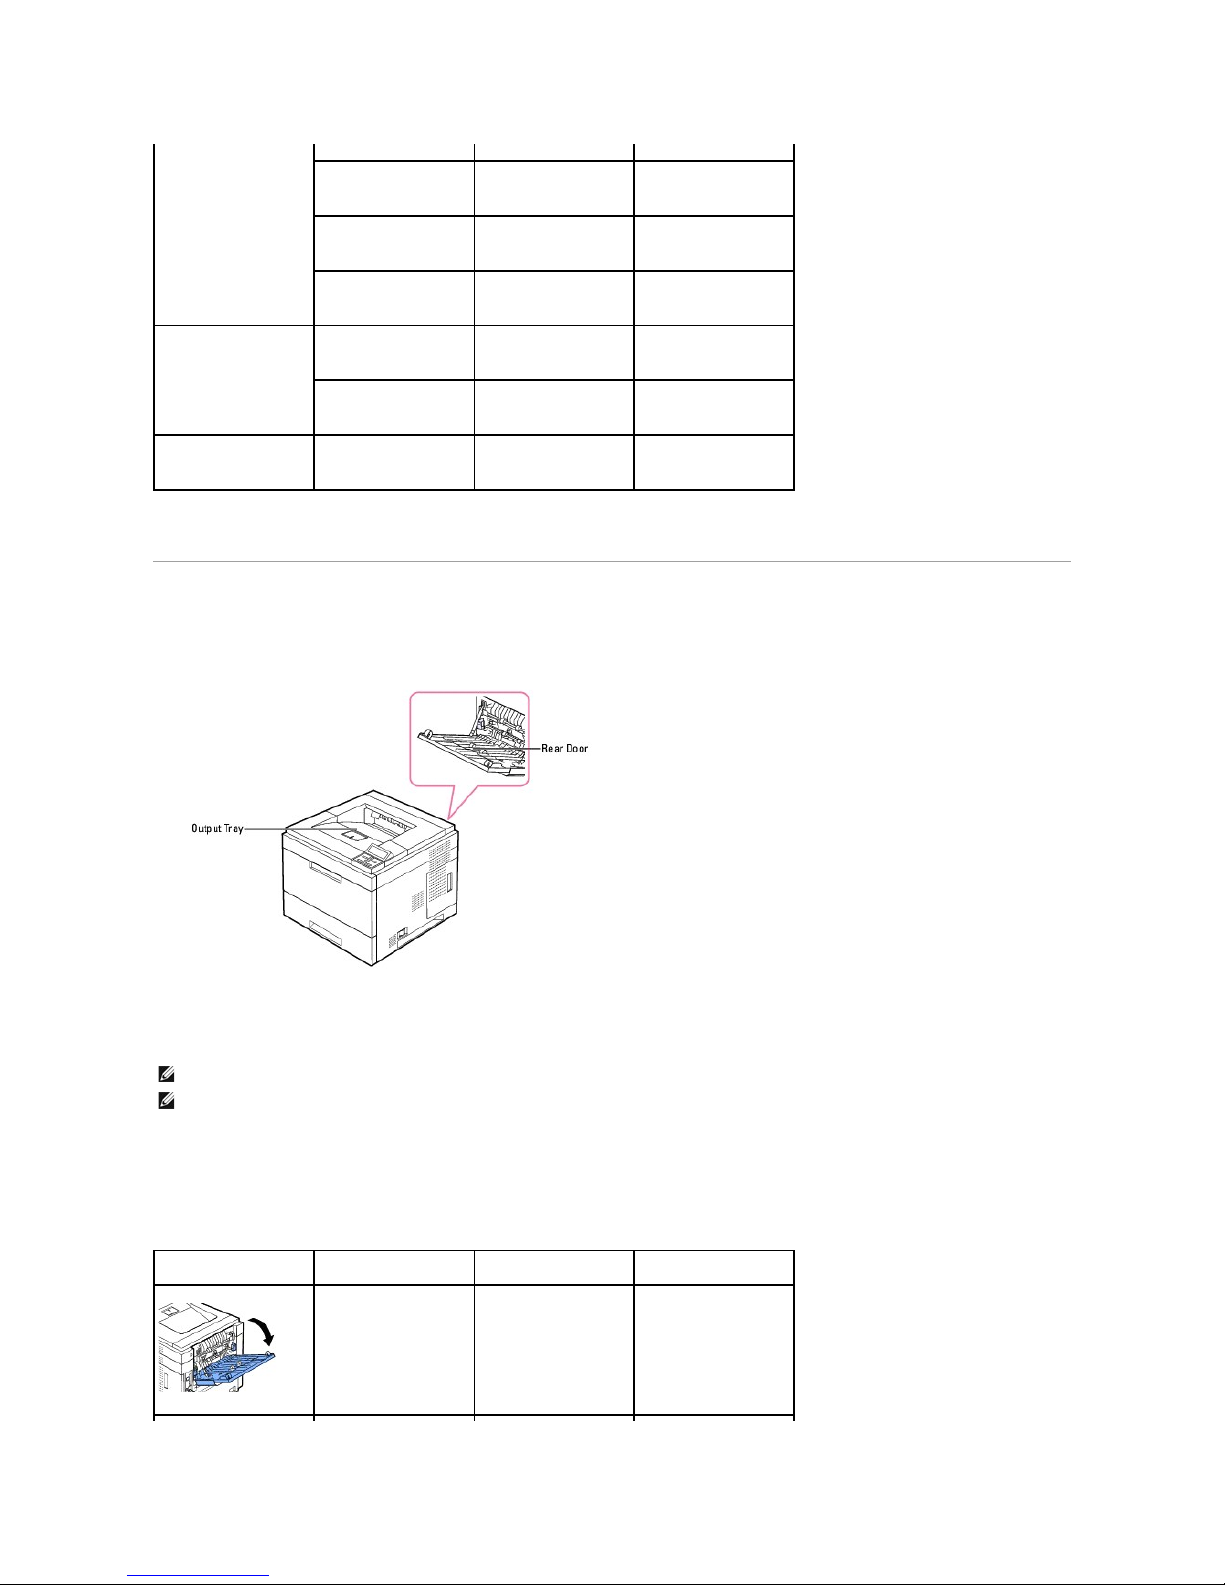
a.Short grain is preferred for papers over 135 g/m2.
Selecting an Output Location
The printer has two output locations: the output tray (face down) and the rear door (face up).
To use the output tray, ensure that the rear door is closed. To use the rear door, open it.
Printing to the Output Tray
Output bins available
The following table provides information on standard and optional output bin capability and connectivity.
(47 lb bond)
Dual-web paper
-
176 g/m
2
(47 lb bond)
Polyester
-
176 g/m
2
(47 lb bond)
Vinyl
-
176 g/m
2
(47 lb bond)
Integrated Forms
Pressure-sensitive area
(must enter the printer
first)
-
135-140 g/m2
(36-40 lb bond)
Paper base (long grain)
-
75-135 g/m
2
(20-36 lb bond)
Envelopes 25% Cotton
Content Maximum
Weight- 24 lb
Sulfite, wood-free or up
to 25% cotton bonds
-
75-105 g/m
2
(20-28 lb)
NOTE: If paper coming out of the output tray has problems, such as excessive curl, try printing to the rear door.
NOTE: To avoid paper jams, do not open or close the rear door while the printer is printing.
Output Bin Name
Capacity
Maximum Weight &
Media Type Supported
How Many Can Be
Installed on the Printer?
Rear output Tray
100 sheets of 75 g/m2
paper
Plain paper 60-216 g/m2,
Label, Envelopes,
Cardstock,
Transparencies.
N/A - One is standard on
the printer and located at
the rear side.
Page 78
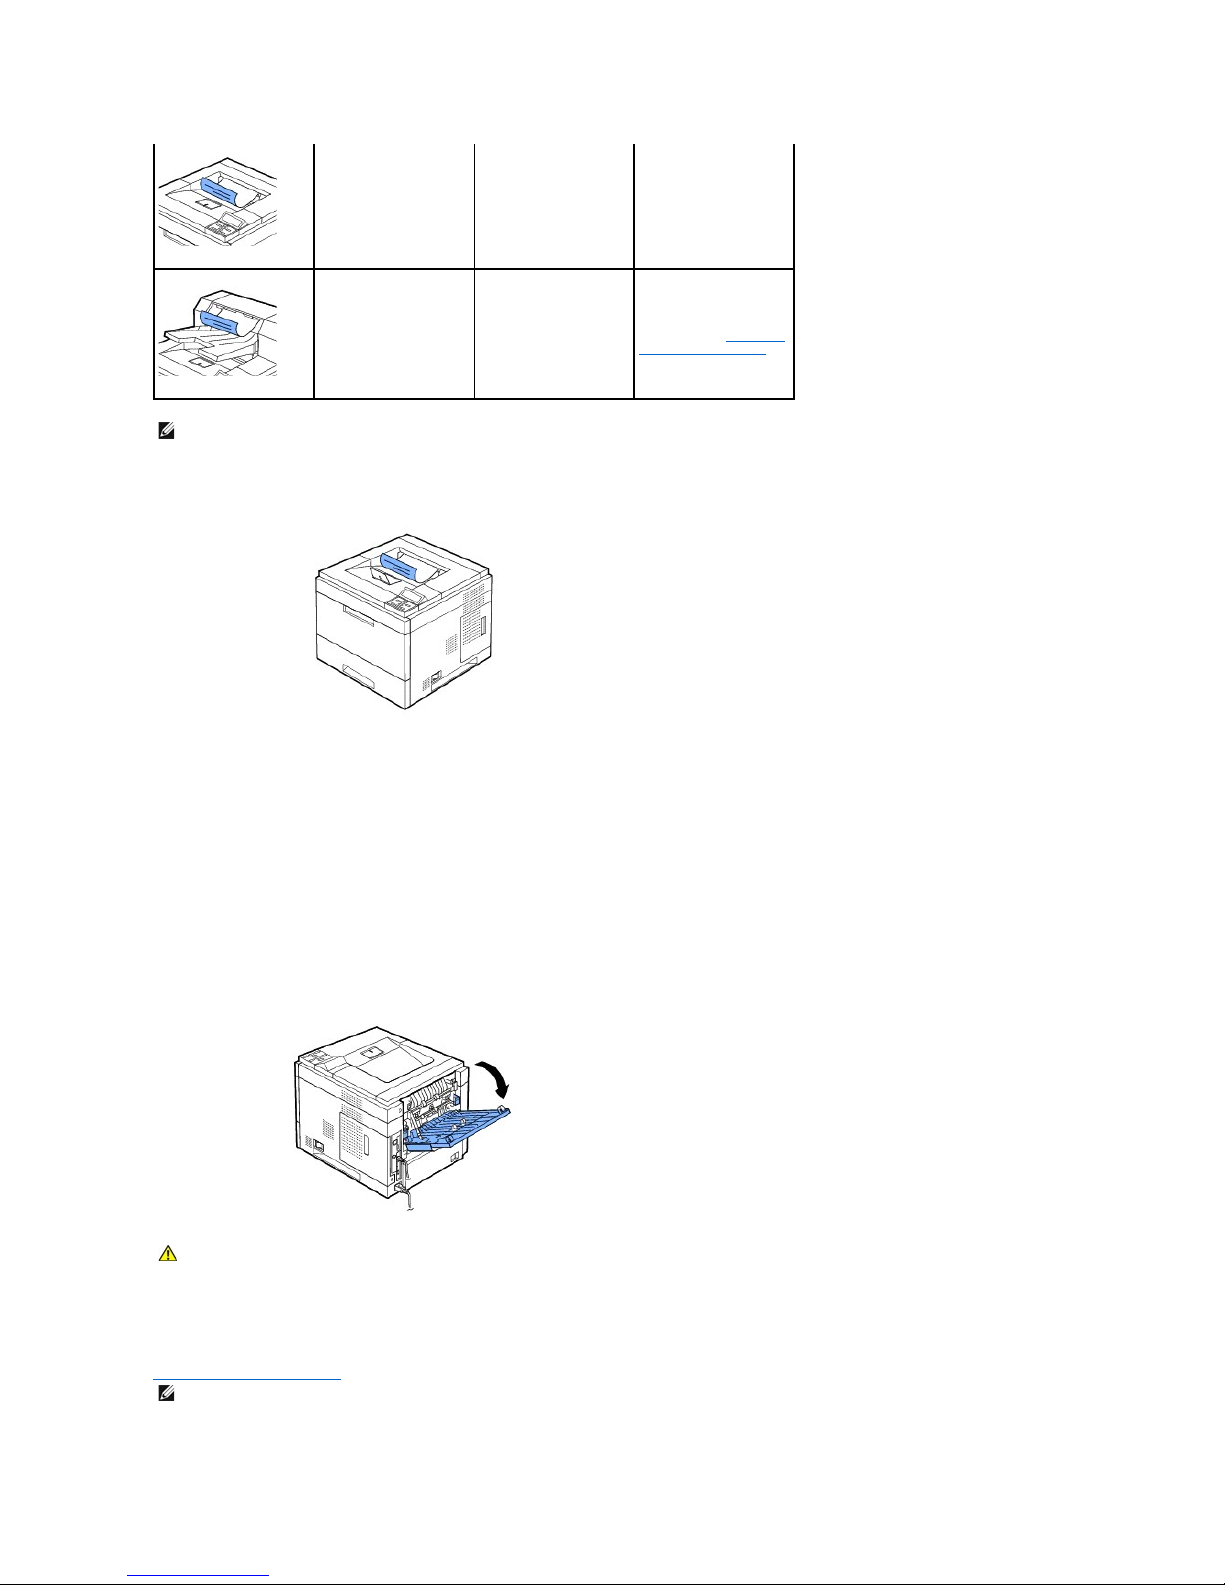
If necessary, expand the paper output extension to prevent print media from falling off the output tray.
Standard bin
250 sheets of 75 g/m2
plain paper
Plain paper up to 163
g/m2, Envelopes (Short -
edge Feed Only), Labels.
N/A - One is standard on
the printer and located on
the top of the printer.
Output expander-bin 1
600 sheets of 75 g/m2
paper
Plain paper up to 163
g/m
2
1
For information on
installing an output
expander, see "Installing
an Output Expander."
NOTE: For printing to the Standard bin, Output Expander and Duplexer, close the rear output tray. Use the rear output tray only for special media, such
as like envelope, labels and transparencies.
Printing to the Rear Door (face up)
When using the rear door, paper comes out of the printer face up.
Printing from the Multi-purpose Feeder to the rear door provides a straight paper path. Using the rear door might improve the output quality with special
materials.
To use the rear door:
Open the rear door by pulling it down.
CAUTION: The fuser area inside the rear door of your printer becomes very hot when in use. Use caution when accessing this area.
Printing to the Optional Output Expander (face down)
You can increase the paper output capacity of your printer by installing an Output Expander. An Output Expander holds 600 sheets of plain paper. See
"Installing an Output Expander." for installation instructions.
NOTE: Paper with a smaller size of width of 3"(76.2mm) and length of 5.82"(148.5mm) cannot be print out in the ouput expander.
Page 79
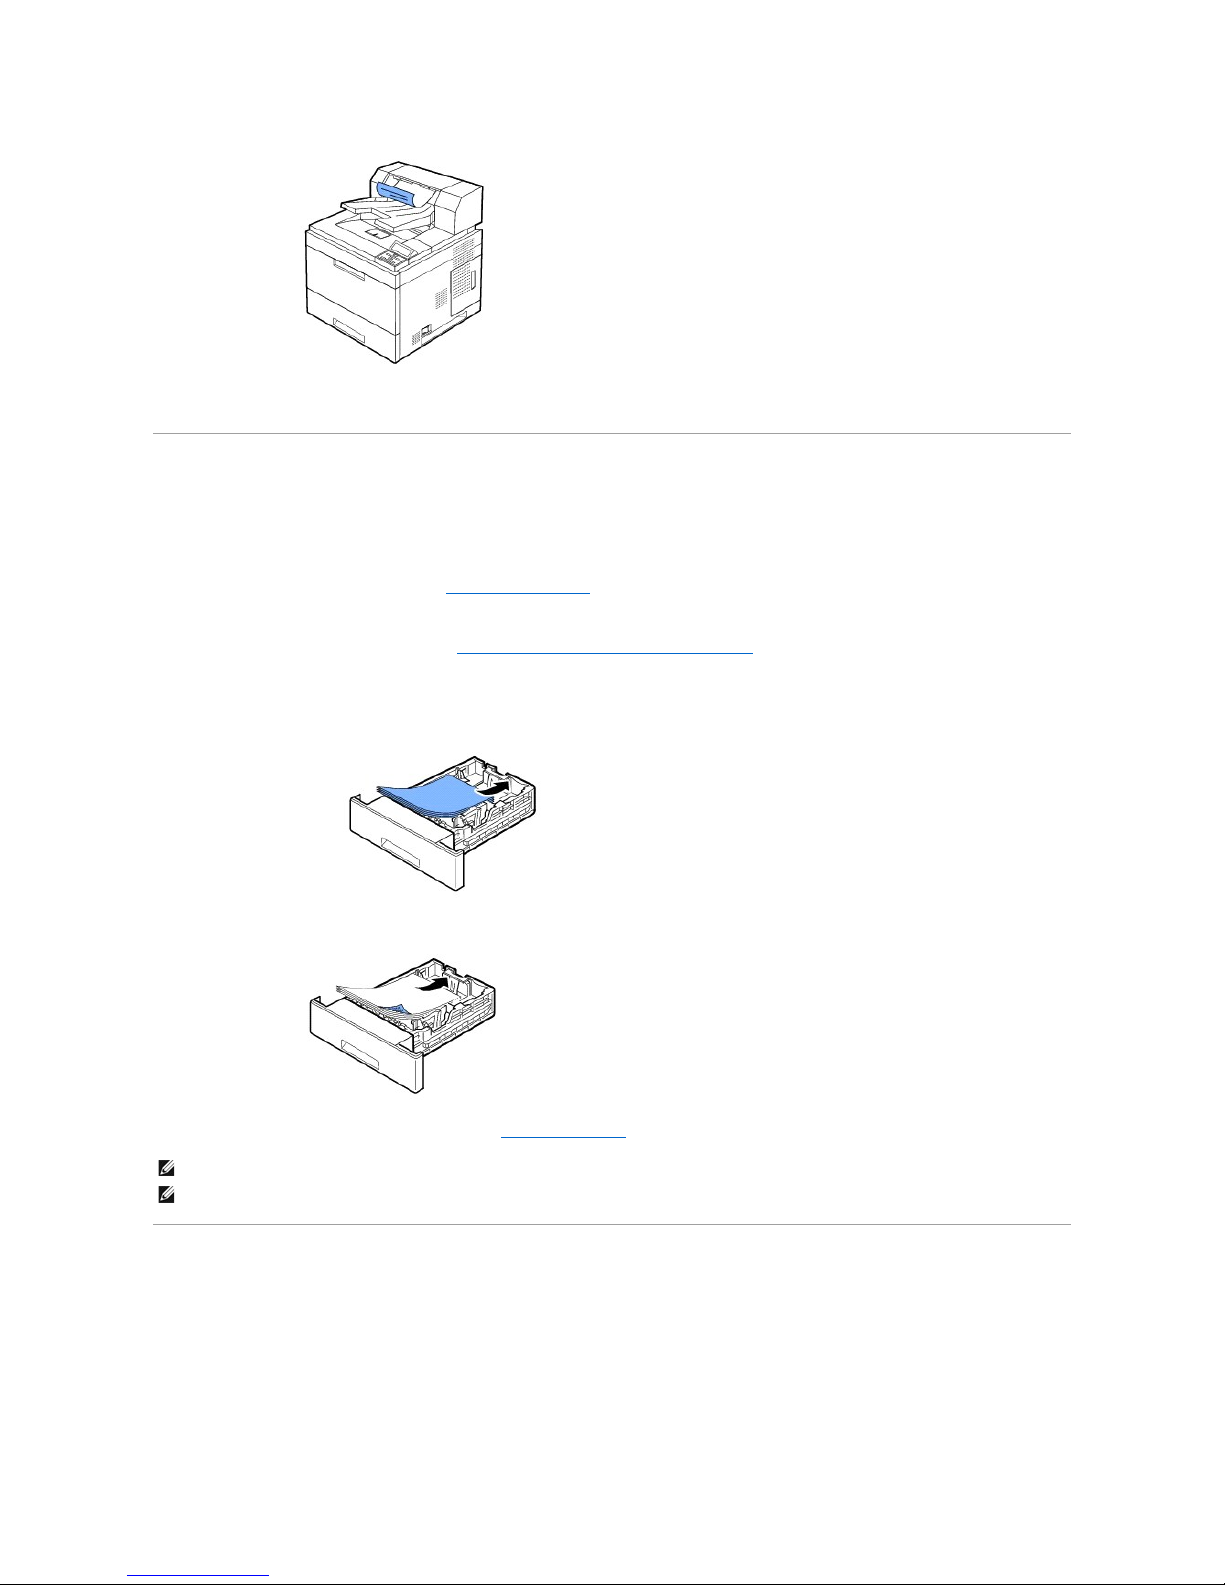
Loading Print Media in the Paper Tray
For the majority of your print jobs, load the print media in tray 1. Tray 1 can hold a maximum of 500 sheets of 75 g/m2 (20 lb) plain paper.
For added capacity of 500 sheets per tray, you can purchase optional trays and attach them below the standard tray. You can attach up to three additional
trays. For order information for optional trays, see "Installing Optional Tray" for installation instructions.
To use many different types and sizes of paper, see "Identifying Print Media Sources and Specifications".
To load print media into tray 1 or optional trays (both are loaded the same way), follow these instructions .
1. Pull open the paper tray and load paper with the print side face down.
Load letterhead paper with the design side face down. The top edge of the sheet with the logo should be placed at the front side of the tray.
For details about loading paper in the paper tray, see "Loading Print Media".
Using the Multi-purpose Feeder
Use the Multi-purpose Feeder to print transparencies, labels, envelopes, or postcards, in addition to making quick runs of paper types or sizes that are not
currently loaded in the paper tray.
Acceptable print materials are plain paper ranging from 3.0 by 5.0 in. (76 by 127 mm) to Legal, 8.5 by 14 in. (216 by 356 mm) - the largest size acceptable and weighing 16 lb - 56 lb.
NOTE: If you experience problems with paper feed, place the paper in the Multi-purpose Feeder.
NOTE: You can load previously printed paper. The printed side should be facing up with an uncurled edge at the front. If you experience problems with
paper feed, turn the paper around. Note that the print quality is not guaranteed.
Page 80
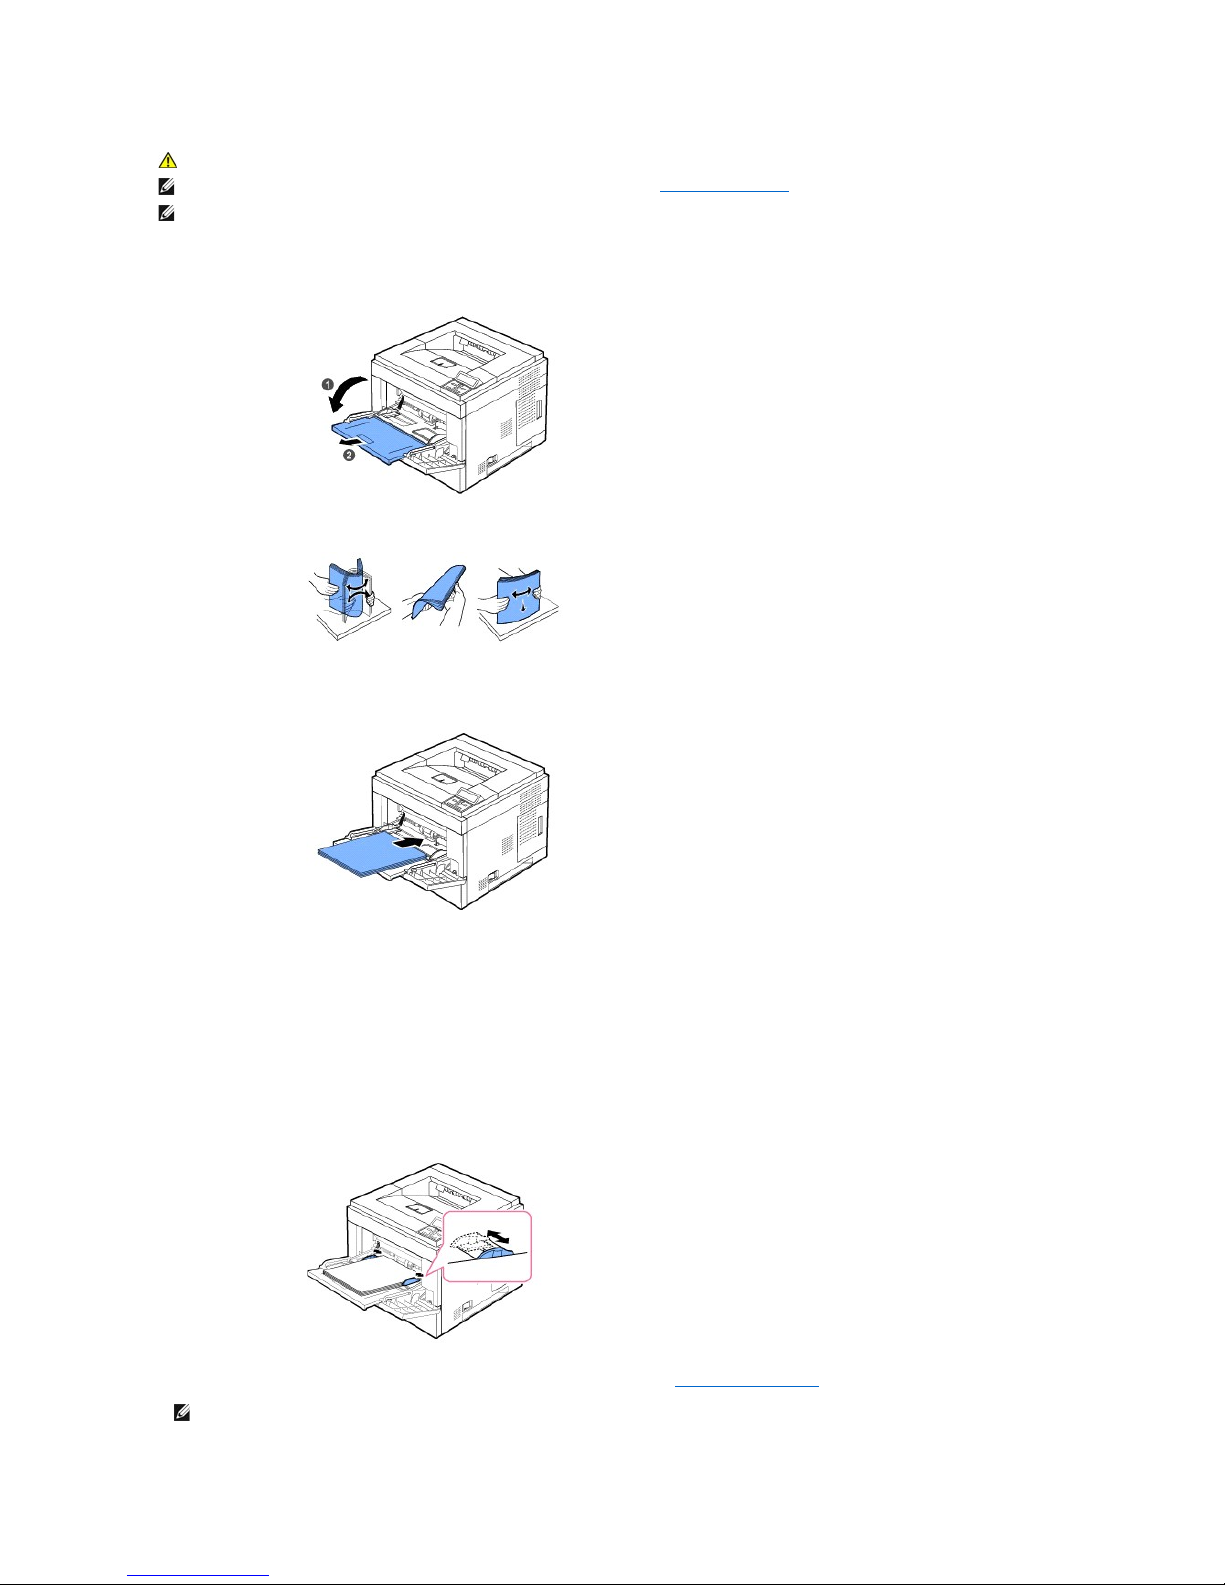
To use the Multi-purpose Feeder:
1. Pull the Multi-purpose Feeder down towards you; pull its extension to hold longer paper.
2. If you are using paper, flex or fan the edge of the paper stack to separate the pages before loading.
For transparencies, hold them by the edges and avoid touching the print side. Oils from your fingers can cause print-quality problems.
3. Load the print material with the side to be printed on facing up.
Depending on the paper type being used, adhere to the following loading method:
l Envelopes: load with the flap side down and stamp area on the top left side.
l Transparencies: load with the print side up and the top with the adhesive strip entering the printer first.
l Labels: load with the print side up and top short edge entering the printer first.
l Preprinted paper: load with the design face up, top edge towards the printer.
l Card stock: load with the print side up and the short edge entering the printer first.
l Previously Printed Paper (re-use): the printed side should be facing down with an uncurled edge toward the printer.
4. Squeeze the multi-purpose feeder paper width guides and adjust them to the width of the paper. Do not use force, or the paper will buckle resulting in
a paper jam or skew.
5. After loading paper, set the paper type and size for the Multi-purpose Feeder. See "Setting the Paper Type".
NOTE: The printer driver settings override the settings on the operator panel.
CAUTION: Ensure the rear door is open when printing on transparencies. If not, the transparencies may tear when exiting the machine.
NOTE: To avoid paper jams and print quality problems, load only print media listed"Paper Specifications".
NOTE: Flatten any curl on postcards, envelopes, and labels before loading them into the Multi-purpose Feeder.
Page 81
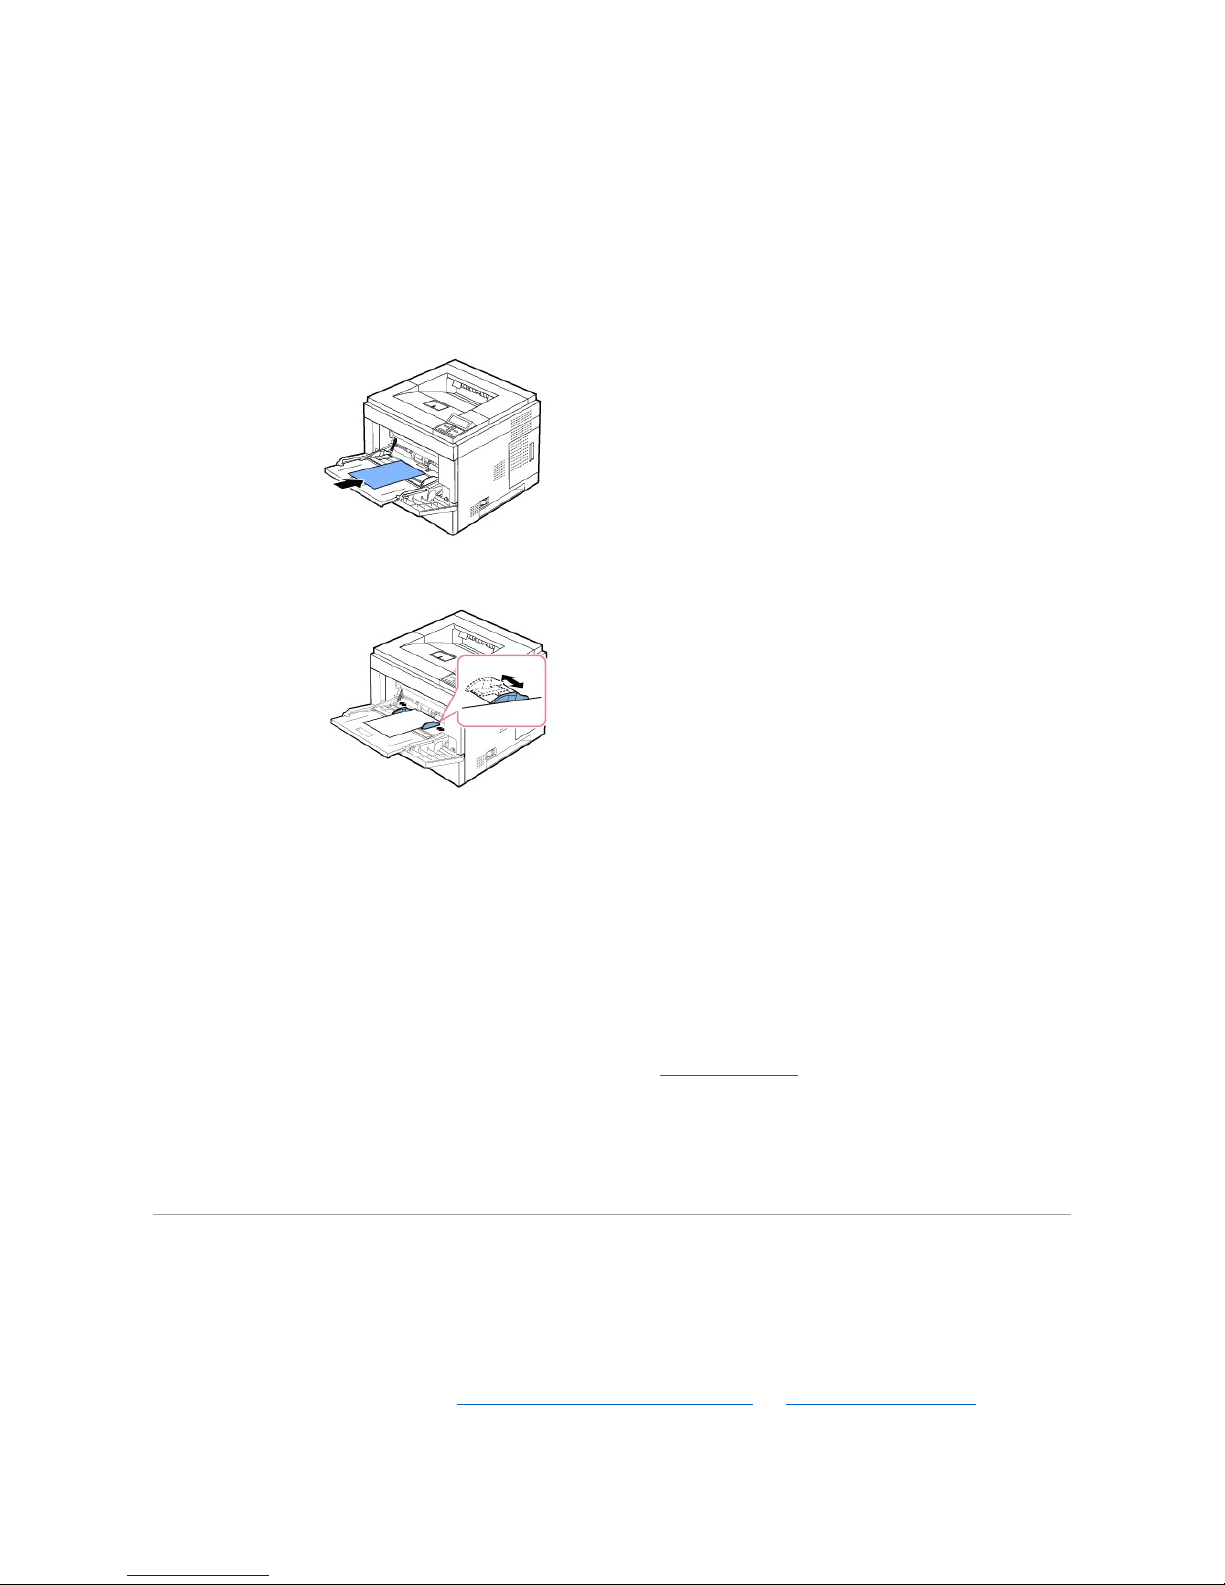
6. After printing, return the multi-purpose feeder extension back to its place and close the Multi-purpose Feeder.
Printing on special print materials
To load special print materials in the Multi-purpose Feeder. To change print settings for printing a document, click on Paper tab, Source, and MP Feeder.
This loading procedure is almost the same as the procedure for loading the Multi-purpose Feeder.
1. Load the paper with the side to be printed on facing up.
2. Squeeze the multi-purpose feeder width guides and adjust them to the width of the paper. Do not use too much force; the paper will buckle resulting in
a paper jam or skew.
3. To print a document, set the paper source to MP Feeder and select the appropriate paper size and type in the software application.
4. Print the document.
5. After printing, return the multi-purpose feeder extension back to its place and close the Multi-purpose Feeder.
Tips on using the Multi-purpose Feeder
l Load only one size of print material at a time in the Multi-purpose Feeder.
l To prevent paper jams, do not add paper when there is still paper in the Multi-purpose Feeder. This also applies to other types of print materials.
l Print materials should be loaded face up with the top edge going into the Multi-purpose Feeder first and be placed in the center of the tray.
l To avoid paper jams and print quality problems, load only print materials listed in "Print Media Guidelines".
l Flatten any curl on postcards, envelopes, and labels before loading them into the Multi-purpose Feeder.
l To avoid paper jams when using print media 3 by 5 in. (76 by 127 mm) in the Multi-purpose Feeder, open the rear door for straight paper path.
l Open rear door of printer when printing on transparencies. If not, they may tear when exiting the machine.
Using the High Capacity Feeder
To increase the paper handling capacity of your printer, install a High Capacity Feeder. A High Capacity Feeder can hold up to 2100 sheets of 75 g/m2 (20 lb)
plain paper.
To use many different types and sizes of paper, see "Identifying Print Media Sources and Specifications". See "Installing High Capacity Feeder" for installation
instructions.
Page 82
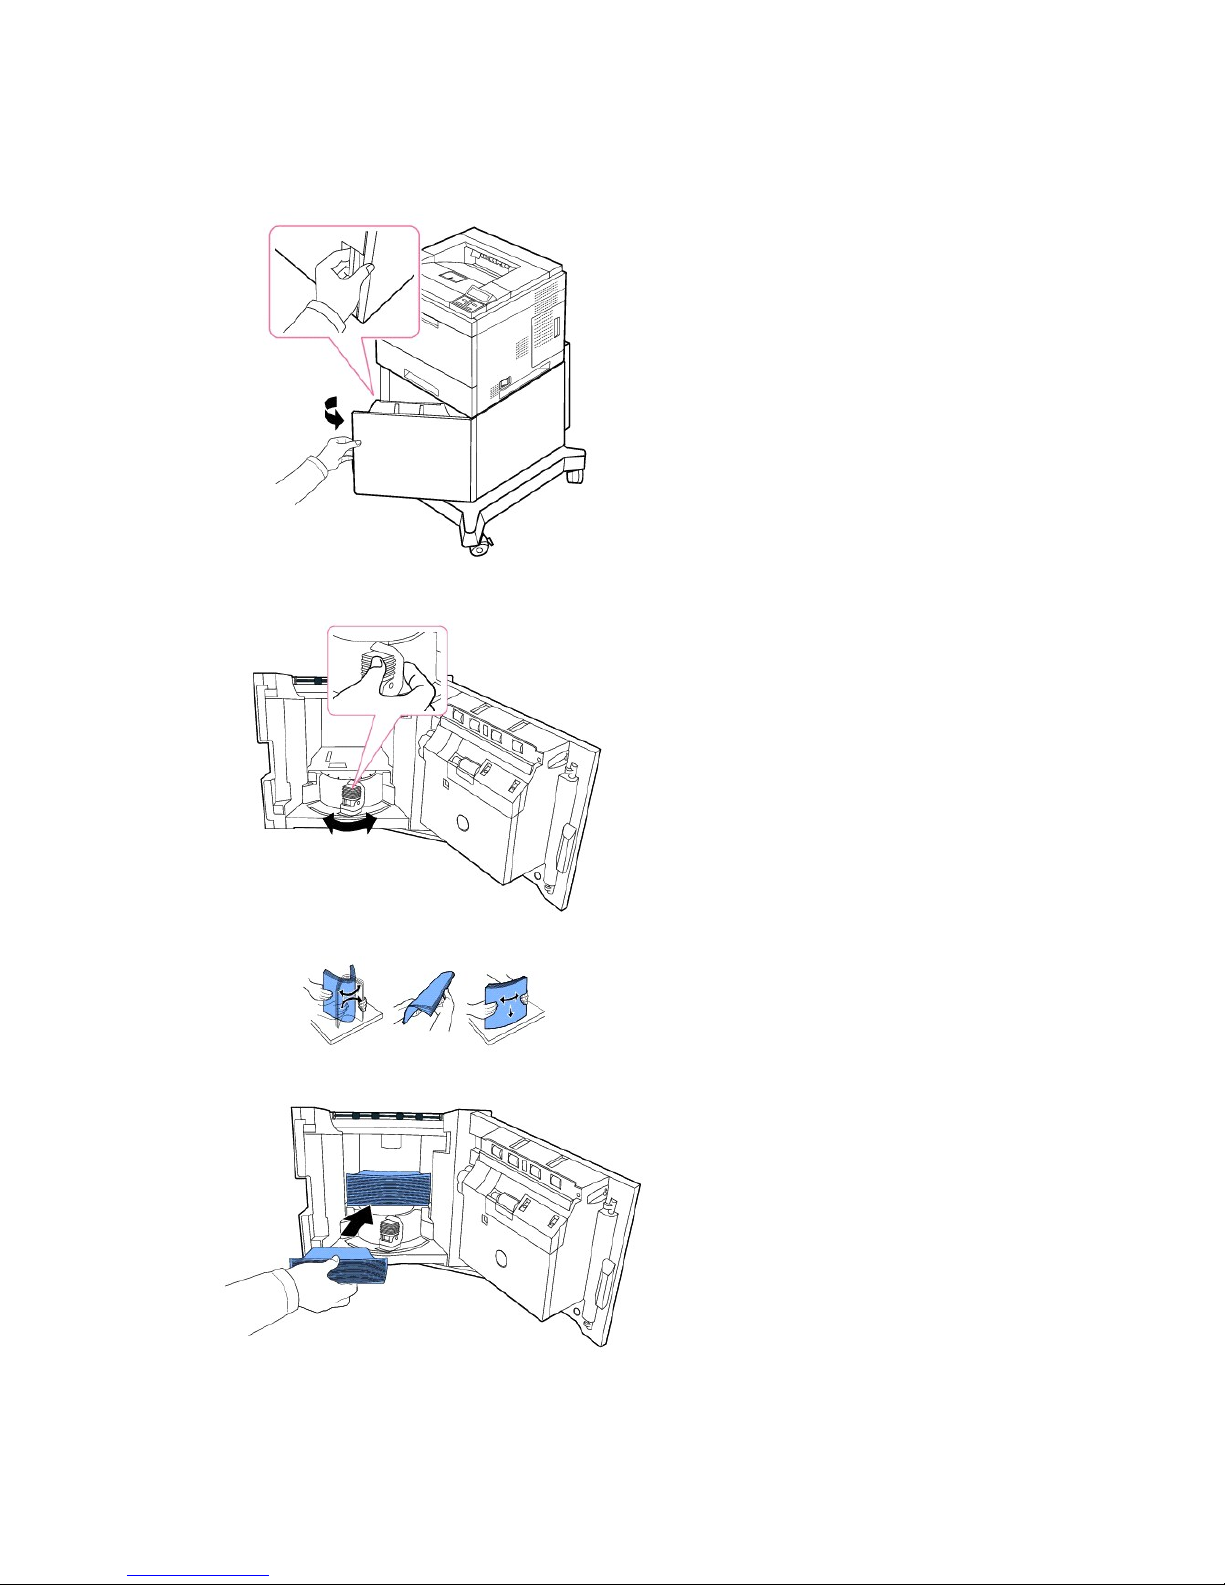
To load print media into the High Capacity Feeder, follow these instructions:
1. Open the High Capacity Feeder.
2. Squeeze the paper size guide and slide it to the desire paper size marked.
3. Flex the sheets back and forth to loosen them, and fan them out. Do not fold or crease the print media. Align the edges on a level surface.
4. Insert the paper stack into the High Capacity Feeder with the print side facing down.
5. Close the High Capacity Feeder completely.
Page 83
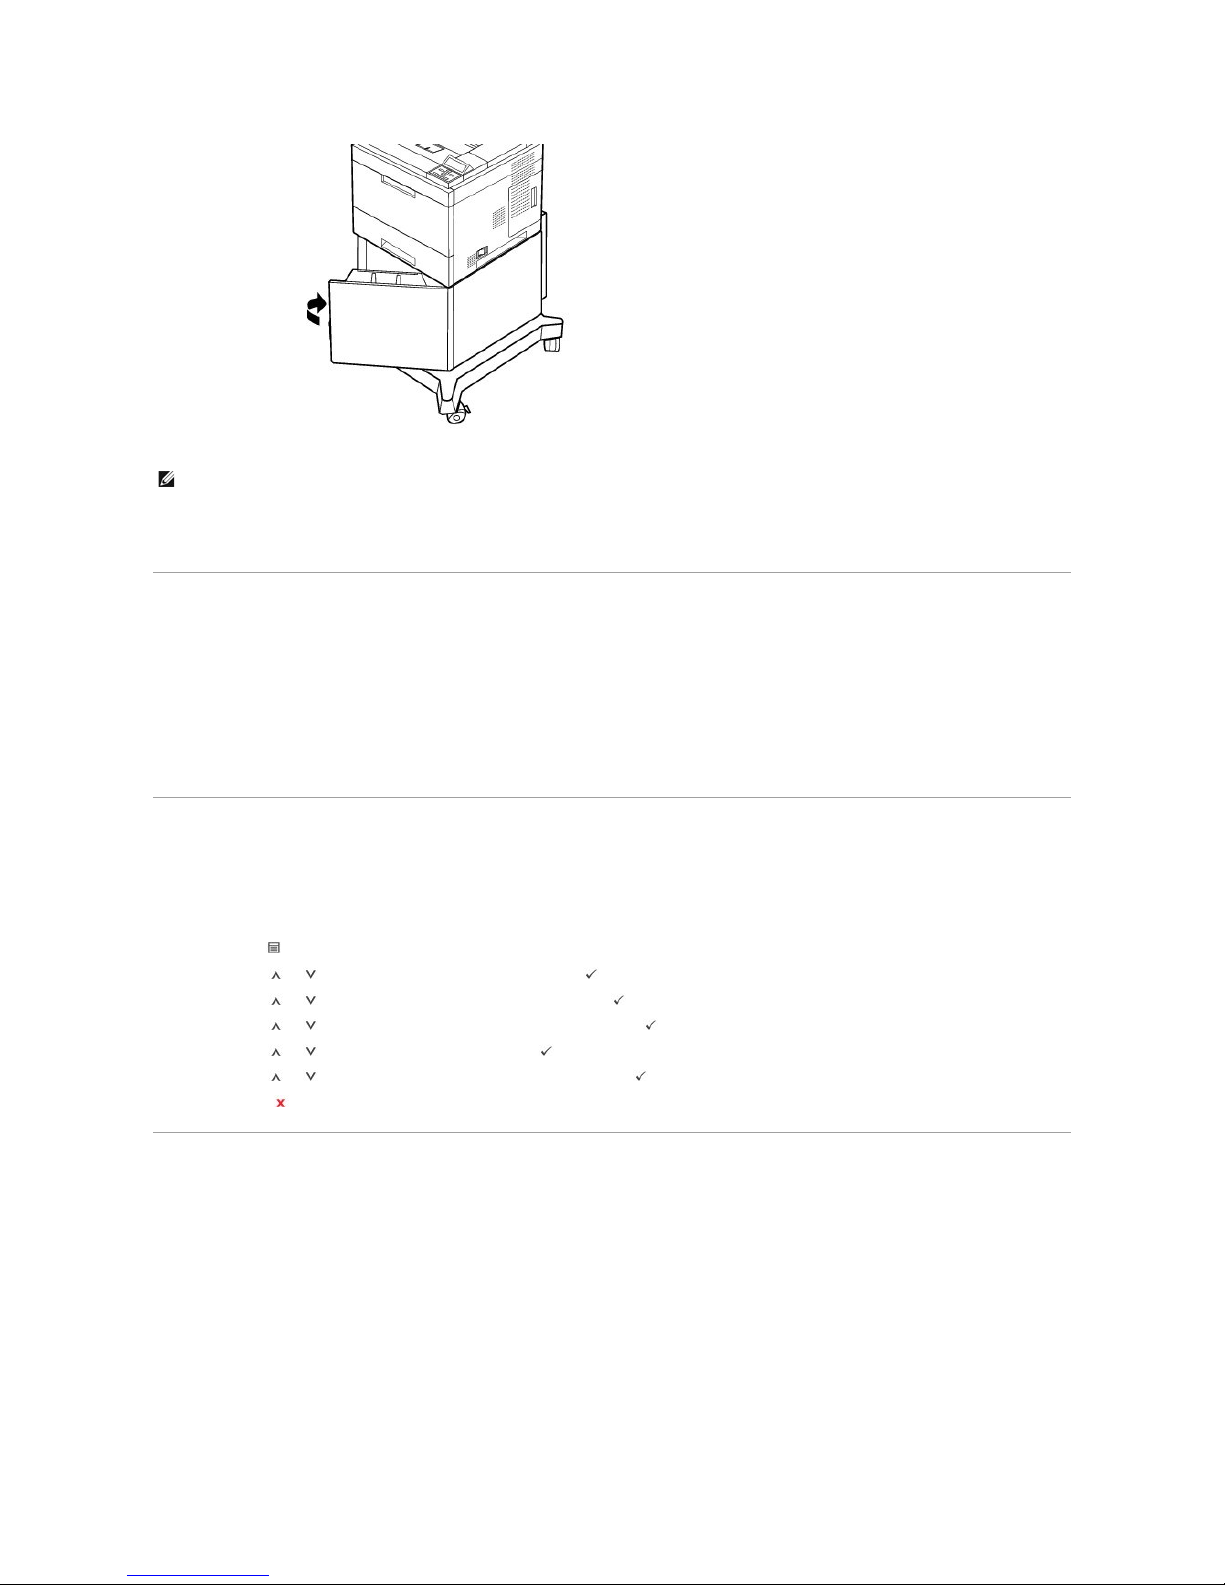
You can load previously printed paper. The printed side should be facing up with an uncurled edge at the front. If you experience problems with paper feed, turn
the paper around. Note that the print quality is not guaranteed.
For Standard, Optional 500 Sheet Tray and HCF Setting Paper Size
Standard, Optional 500-sheet trays, and High Capacity Feeder: Standard paper sizes are automatically detected if the media is loaded correctly in the tray
and the guides are adjusted correctly. When the tray is closed, the operator panel shows the paper size selected.
Standard and Optional trays support custom paper sizes from A5 to Legal. To set the custom size, use the operator panel to enter length and width
dimensions by the following steps.
Setting the Paper Type
After loading paper in the paper tray or the Multi-purpose Feeder, set the paper type using the operator panel buttons. For PC-printing, select the paper
type in the application program you use.
1. Press Menu ( ).
2. Press Scroll ( to ) to highlight Paper Setup and press Select ( ).
3. Press Scroll ( to ) to highlight Paper Size/Type and press Select ( ).
4. Press Scroll ( to ) to select the paper tray to be used and press Select ( ).
5. Press Scroll ( to ) to highlight Type and press Select ( ).
6. Press Scroll ( to ) to find the paper type to be used and press Select ( ).
7. Press Cancel ( ) to return to Standby mode.
Tray Behavior
Tray Linking
Tray linking enables the automatic linking feature for trays. The print media in the multiple sources must be the same size and type. The printer automatically
links the trays: when one tray is empty, print media feeds from the next linked tray.
For example, if the same size and type of print media are loaded in tray 2 and tray 4, the printer selects print media from tray 2 until it becomes empty and
then automatically feeds print media from the next linked tray, tray 4.
By linking all trays (standard and optional), a single source with a capacity of up to 3,100 sheets is created.
NOTE: If you experience problems with paper feed, place the paper in the Multi-purpose Feeder.
Page 84

To link the trays, load only the same size and type of print media in each tray. Set the paper size and type for each tray.
To disable tray linking, choose either a unique paper size/ type for each tray or use the operator panel, as follows:
1. Press Menu ( ).
2. Press Scroll ( to ) to highlight Paper Setup and press Select ( ).
3. Press Scroll ( to ) to highlight Tray Behavior and press Select ( ).
4. Press Scroll ( to ) to highlight Tray Linking and press Select ( ).
5. Press Scroll ( to ) to Off to disable tray linking
and press Select ( ).
6. Press Cancel ( ) to return to Standby mode.
Substitute Size
This setting is used to determine whether the printer can substitute another paper size when the requested paper size is not available in any of the input
trays. The Printer will substitute A4/Letter, A5/Statement, and B5/JIS B5. For example, if A4 is the requested paper size and there is no A4 paper in any of the
input source, then the printer will print on Letter size paper, if available.
When the substitute size is set to Off, it means no substitution is allowed for the requested paper size.
Configure MPF
Multi-purpose Feeder can be configured to behave in Tray mode or in Bypass mode by setting the Configure MPF menu in the operator Panel.
Bypass Mode
In this mode, the printer pulls the paper from the Multi-purpose Feeder first unless it is closed or empty. The Multi-purpose Feeder gets the highest priority
and pulls whatever material is in the Multi-purpose Feeder.
Tray Mode
In this mode, the Multi-purpose Feeder is treated as another papertray; the printer pulls paper from the tray that matches the size and type. First preference
goes to the default source.
Page 85
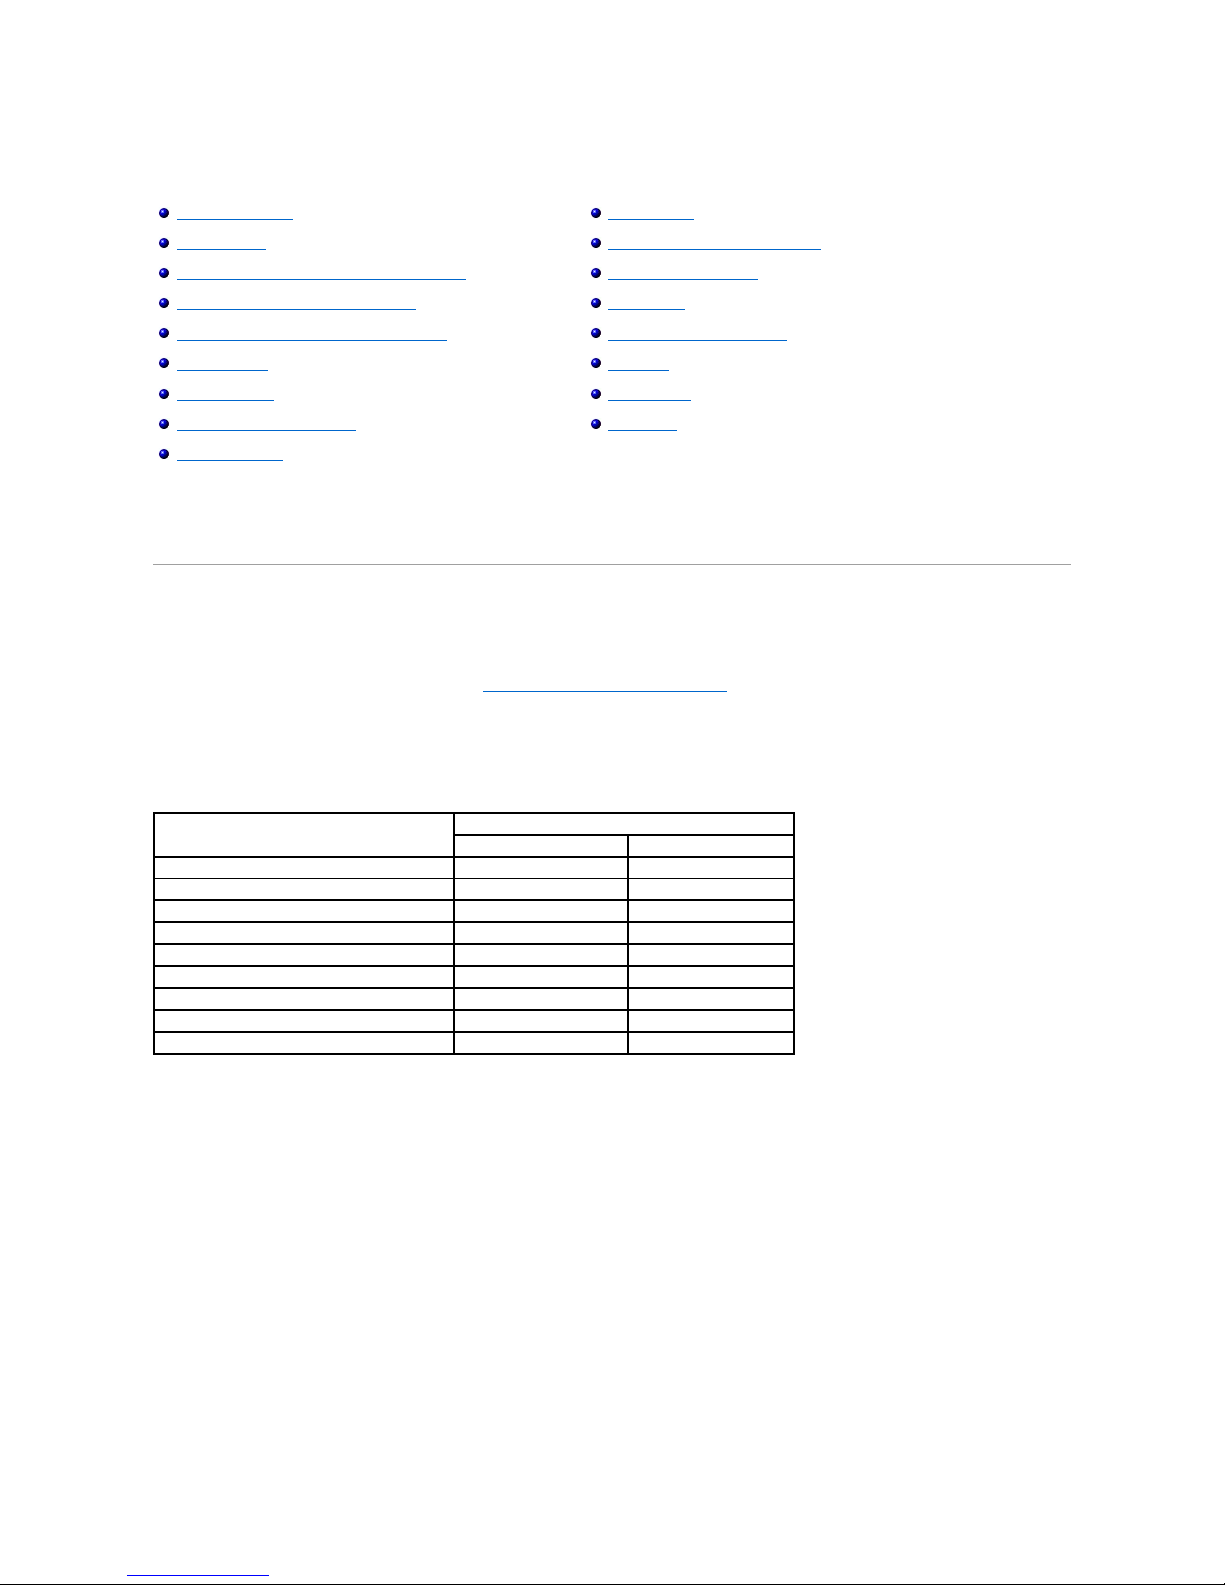
Printing
Printing a Document
Your printer prints documents using the Printer Control Language (PCL) or Postscript (PS) printer driver. When you install the Dell software, your printer
automatically installs the PCL and PS printer drivers. See "Installing Dell Software for Local Printing".
The drivers provided with your printer allow a wide variety of options. Use the chart below to determine which print driver is best suited for the job.
The features provided by each printer driver are as follows:
The following procedure describes the general steps required for printing from various Windows applications. The exact steps for printing a document may vary
depending on the application program being used. Refer to software application's User's Guide for the exact printing procedure.
1. Open the document you want to print.
2. Select Print from the File menu.
The Print window displays. It may look slightly different depending on your application.
The basic print settings are selected within the Print window. These settings include the number of copies and print range.
Printing a Document
Printer Settings
Printing Multiple Pages on One Sheet of the Paper
Printing a Reduced or Enlarged Document
Fitting Your Document to a Selected Paper Size
Printing Posters
Printing Booklets
Printing on Both Sides of Paper
Using Watermarks
Using Overlays
Printing Confidential and Stored Jobs
Printing a Confidential Job
At the printer
Printing and Deleting Held jobs
Proof Print
Print Schedule
Stored Print
Feature
Printer Driver
PCL
PS
Print Quality Option
Y Y Multiple Pages per Side
Y Y Poster
Y N Booklet
Y Y Fit to Page
Y Y Reduce/Enlarge
Y Y Watermark
Y N Overlay
Y N Double-sided
Y
Y
Page 86
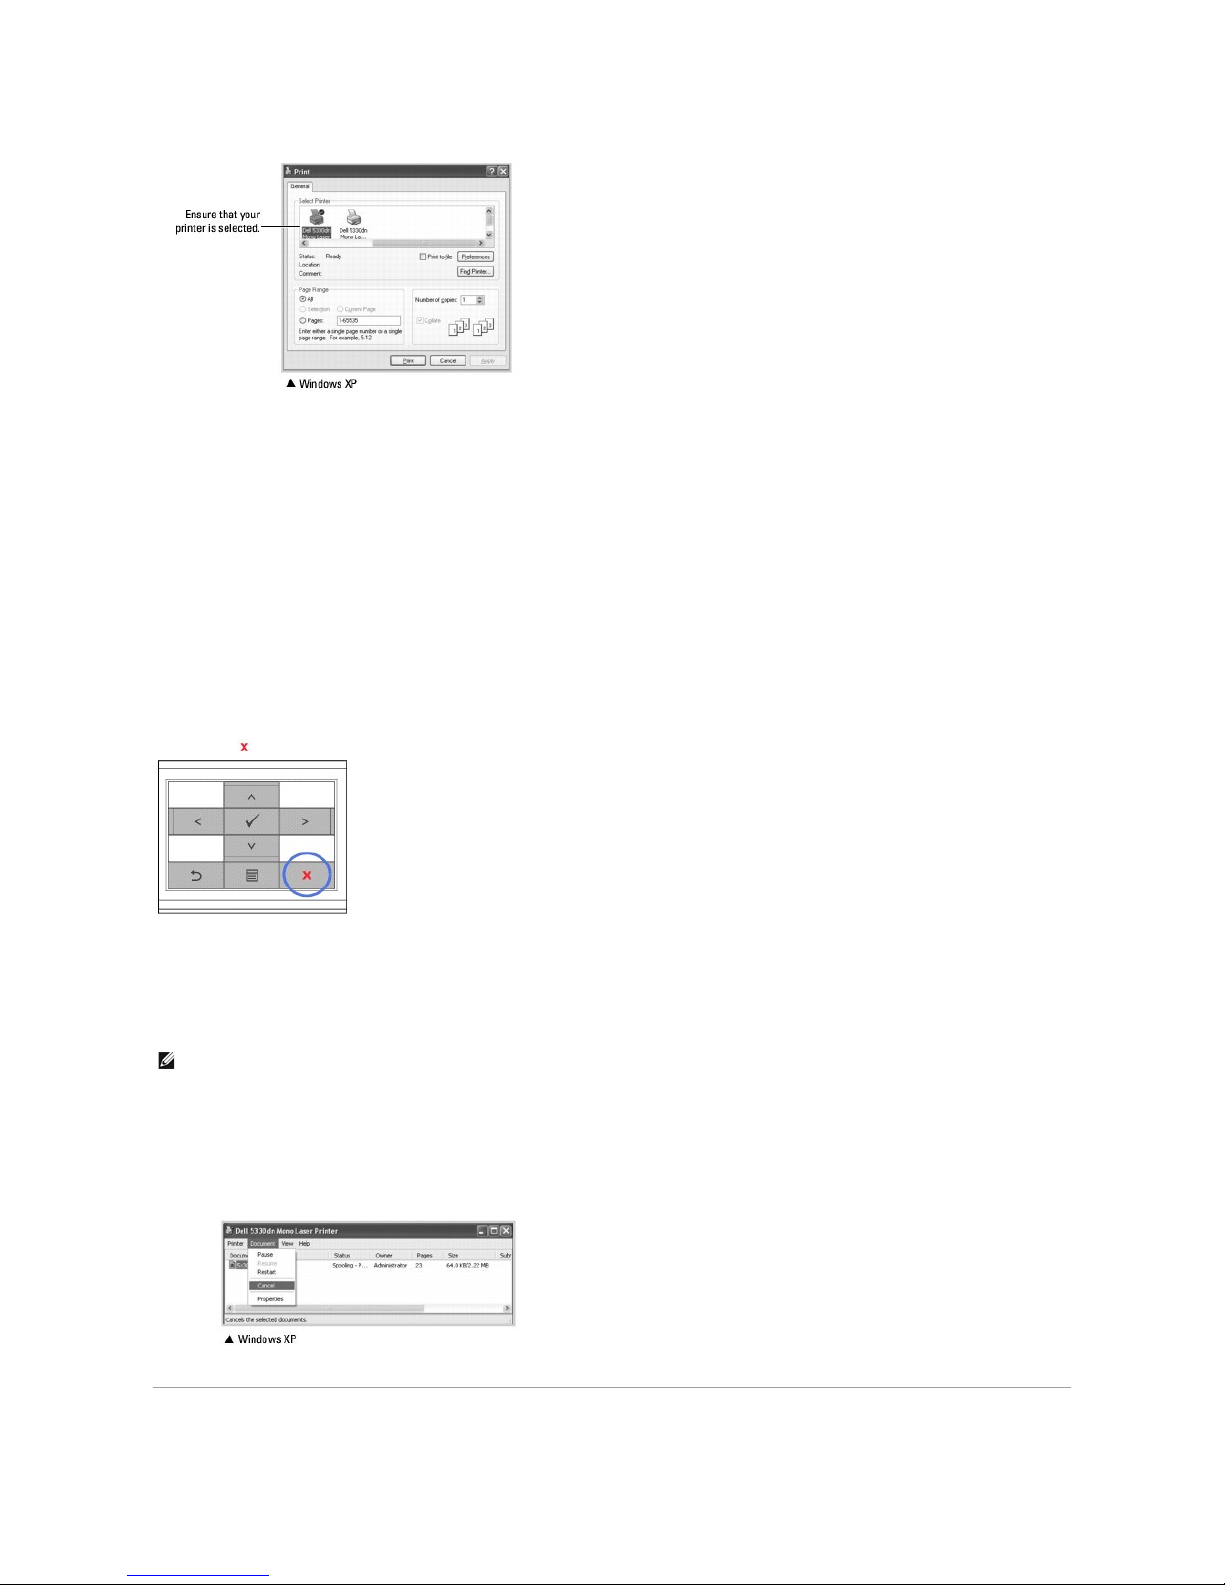
3. Select the printer driver you want to use from the Print window.
4. To take advantage of the printer features provided by your printer, click Preferences or Properties, depending on the program or operating system in
the above window, and go to step 5.
If you see Setup, Printer or Options, click that button instead. Then click Properties on the next screen.
5. Click OK to close the printer properties window.
6. To start the print job, click Print or OK, depending on the program or operating system in the Print window.
Canceling a Print Job
There are two ways to cancel a print job:
To stop a print job from the operator panel:
Press Cancel ( ).
Your printer finishes printing the page that is moving through the printer and deletes the rest of the print job. Pressing the button cancels only the current job.
If more than one print job is in the printer's memory, you need to press the button once for each job.
To stop a print job from the Printers folder:
1. Click the Windows Start button.
2. For Windows NT4.0/2000, select Settings and then Printers.
For Windows XP/2003, select Printers and Faxes.
For Windows Vista, select Control Panel and Hardware and Sound and Printers.
3. Double-click the Dell 5330dn Mono Laser Printer icon.
4. From the Document menu, click Cancel.
NOTE: You can access this window simply by double-clicking the printer icon at the bottom right corner of the Windows desktop.
Page 87
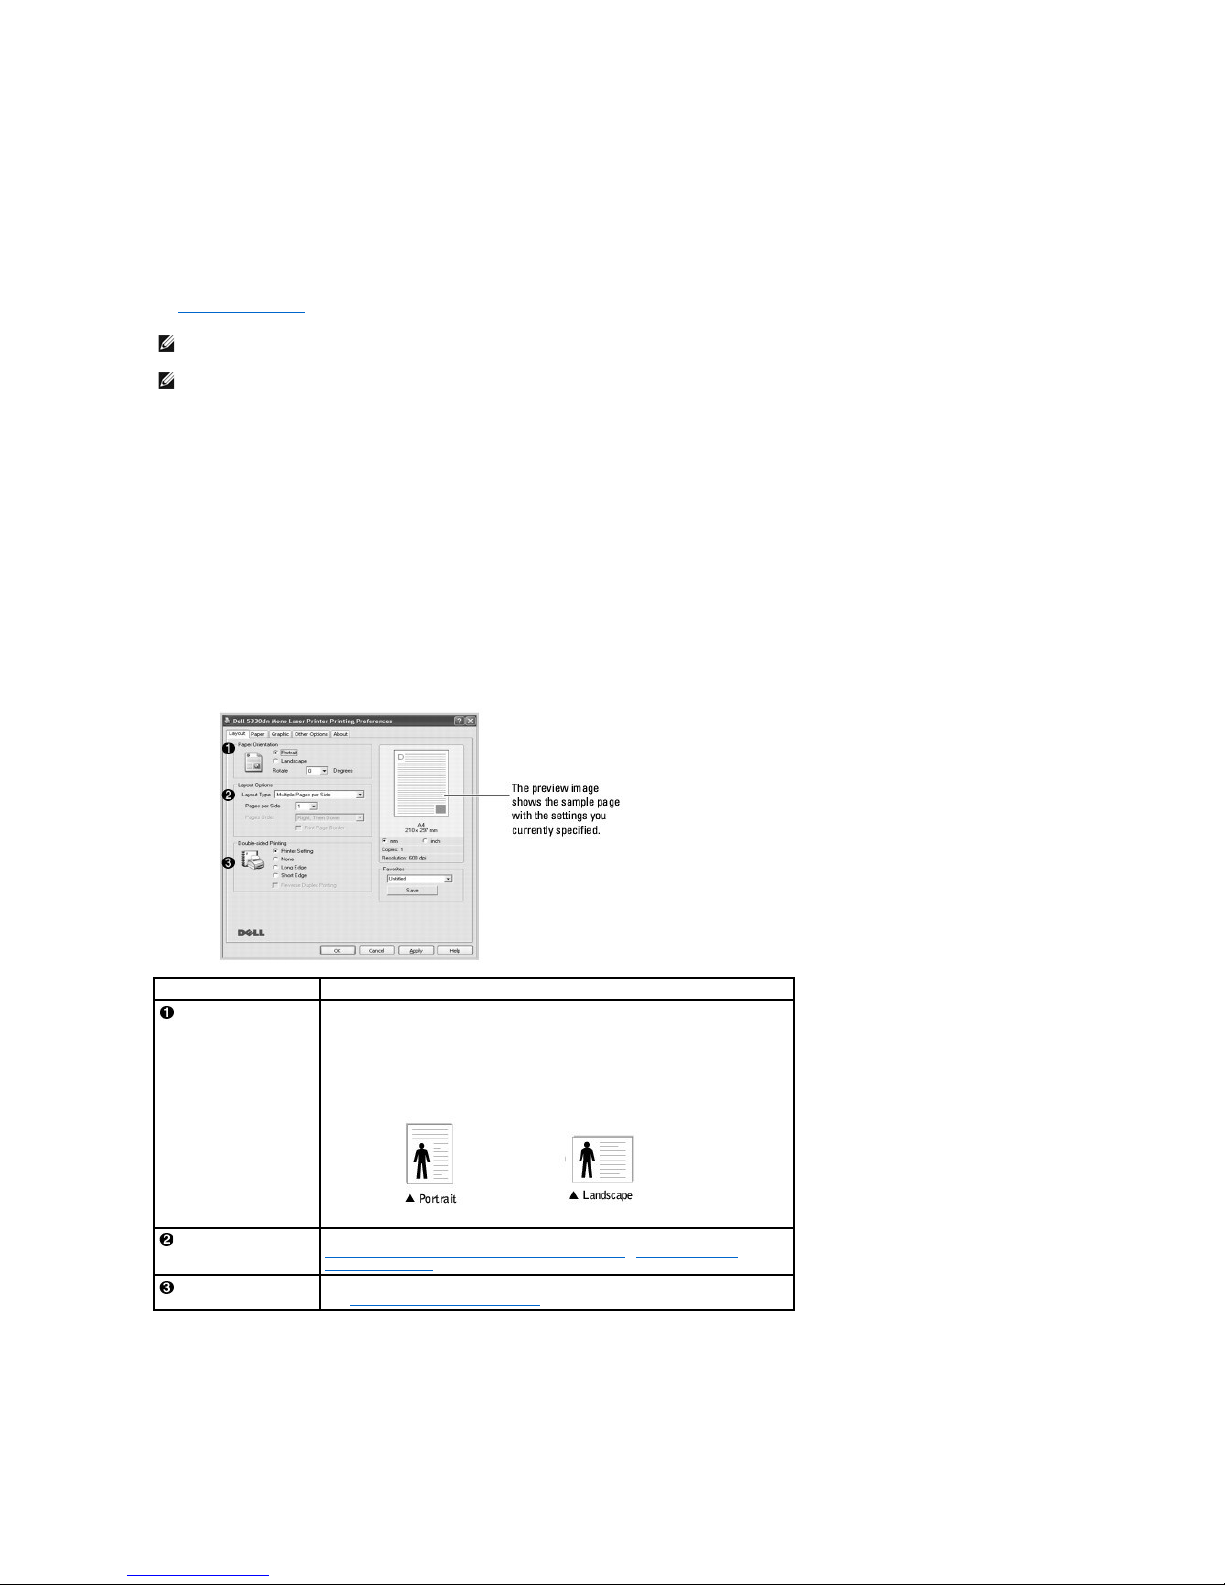
Printer Settings
You can use the printer properties window, which allows you to access all of the printer options required to use your printer. When the printer properties are
displayed, you can review and change any settings needed for your print job.
Printer properties window may differ depending on both the printer driver you select and your operating system. For details about selecting a printer driver,
see "Printing a Document". The User's Guide shows the Printing Preferences window of the printer driver on Windows XP.
a. Click the Windows Start button.
b. For Windows NT4.0/2000, select Settings and then Printers.
For Windows XP/2003, select Printers and Faxes.
For Windows Vista, select Control Panel and Hardware and Sound and Printers.
c. Point to the Dell 5330dn Mono Laser Printer.
d. Right-click on the printer icon.
e. Click Print Setup or Properties and point to Printing Preferences.
f. Change the settings on each tab and click OK.
Layout Tab
The Layout tab provides options for you to adjust how the document appears on the printed page. The Layout Options section includes advanced printing
options, such as Multiple Pages per Side, Poster Printing and Booklet Printing.
Paper Tab
To set the paper handling needs when accessing the printer properties, use the following options. Click the Paper tab to access the paper properties.
NOTE: Most Windows applications override settings you specified in the printer driver. First change all the print settings available in the software
application, then change any remaining settings using the printer driver.
NOTE: The settings you change remain in effect only while you are using the current program. To make your changes permanent, apply the changes in
the Printers folder by following these steps:
Property
Description
Paper Orientation
Orientation allows you to select the direction in which information is printed on
a page.
l Portrait prints across the width of the page, letter style.
l Landscape prints across the length of the page, spreadsheet style.
If you want to rotate the page 180-degrees, select 180 from the Rotate drop-
down list.
Layout Options
Layout Options allows you to select advanced printing options. For details, see
"Printing Multiple Pages on One Sheet of the Paper" , "Printing Posters" and
"Printing Booklets".
Double-sided Printing
Double-sided Printing allows you to print on both sides of paper. For details,
see "Printing on Both Sides of Paper".
Page 88
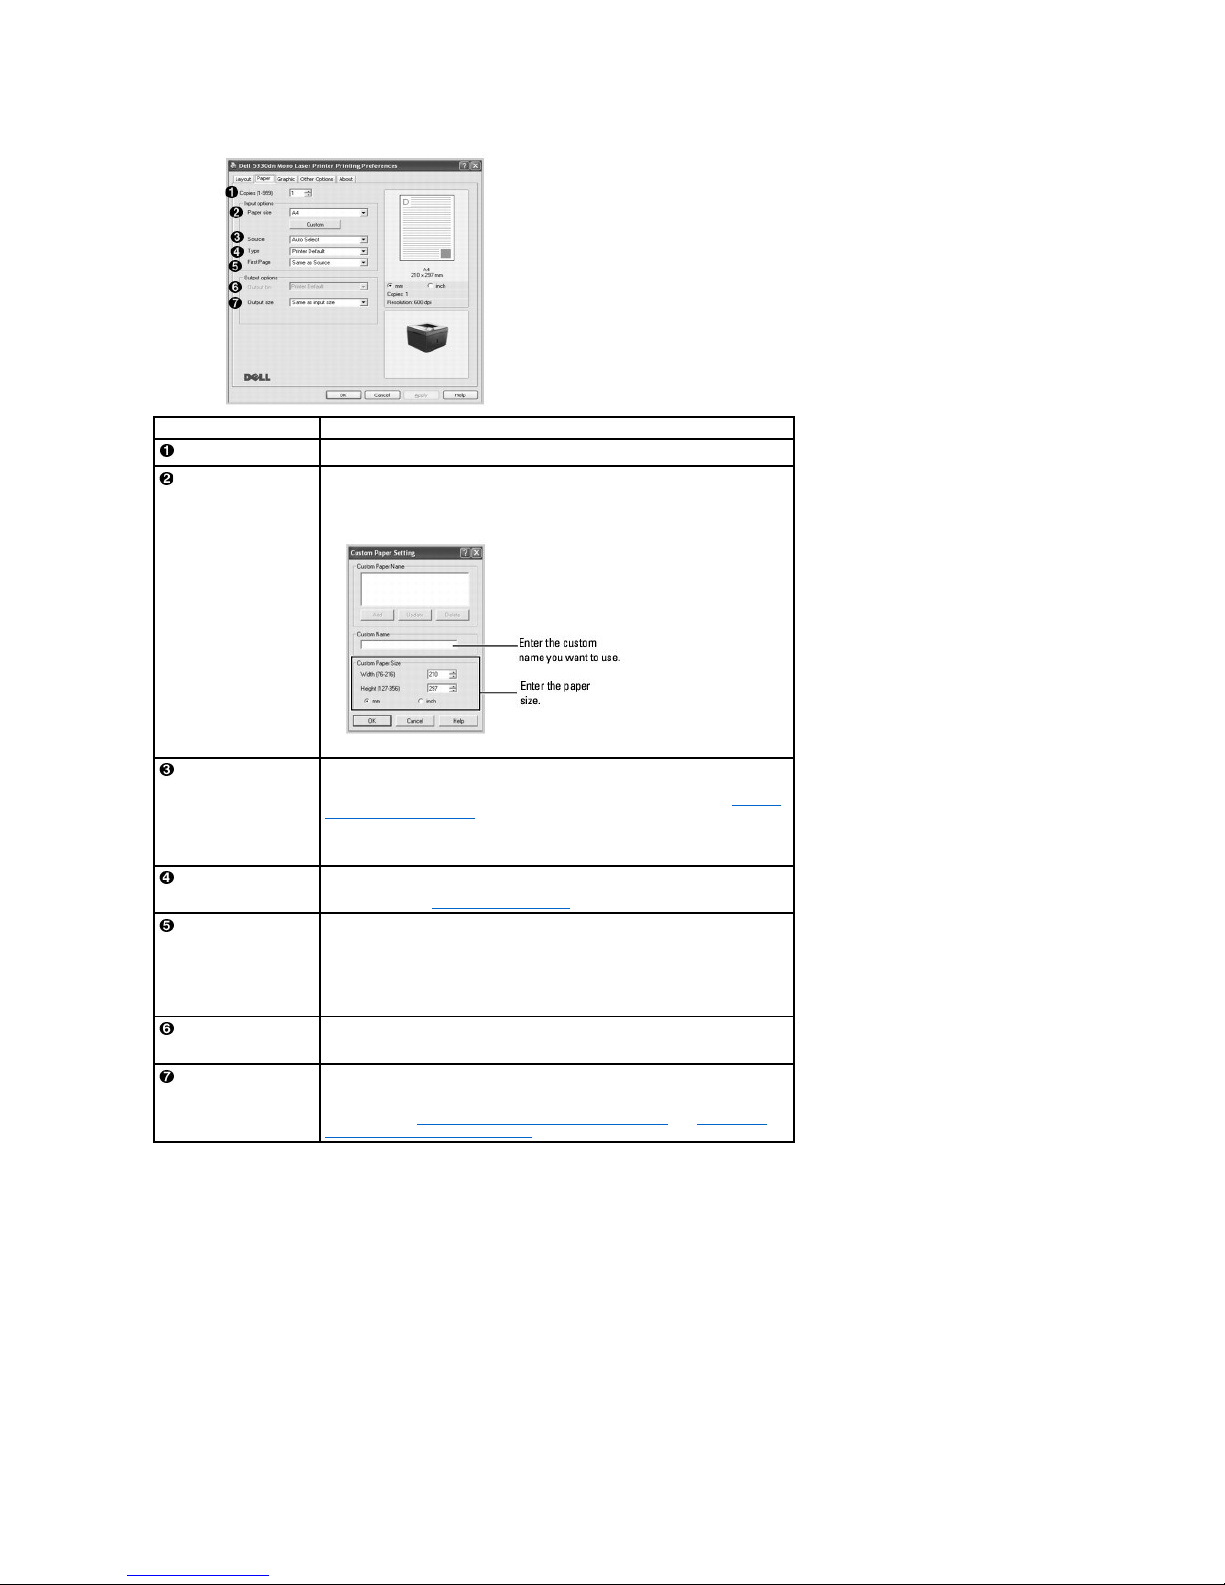
Graphic Tab
To adjust the print quality for your specific printing needs,use the following graphic options: Click the Graphic tab to display the properties shown below.
Property
Description
Copies
Copies allows you to choose the number of copies to be printed up to 999.
Size
The Size option allows you to choose the size of paper loaded in the paper tray.
If the required size is not listed in the Size box, click Custom. When the Custom
Paper Setting window appears, set the paper size and click OK. The setting
appears on the list so that you can select it.
Source
Ensure that Source is set to the corresponding paper tray.
The MP Feeder source is used when printing to special materials. See "Printing
on special print materials".
If the paper source is set to Auto Selection, the printer automatically picks up
print materials from the Multi-purpose Feeder first and then the paper tray.
Type
Ensure that Type is set to Printer Default. If you load a different type of print
material, select the corresponding paper type. For more information about print
materials, refer to "Print Media Guidelines".
First Page
This property allows you to print the first page using a different paper type from
the rest of the document. You can select the paper source specifically for the
first page.
For example, load thick stock for the first page into the Multi-purpose Feeder,
and plain paper into Tray n. Then, select Tray in the Source option and Multi-
purpose Feeder in the First page option.
Output bin
Optional Output Bin 1 allows you to choose the output destination for the
printed document. But, paper with a smaller size of width of 3"(76.2mm) and
length of 5.82"(148.5mm) are automatically printed out in the Standard Bin.
Output size
Allows you to automatically or manually scale your print job on a page. Choose
from Same as input size, Fit to Page or Reduce /Enlarge.
For details, see "Printing a Reduced or Enlarged Document" and "Fitting Your
Document to a Selected Paper Size".
Page 89
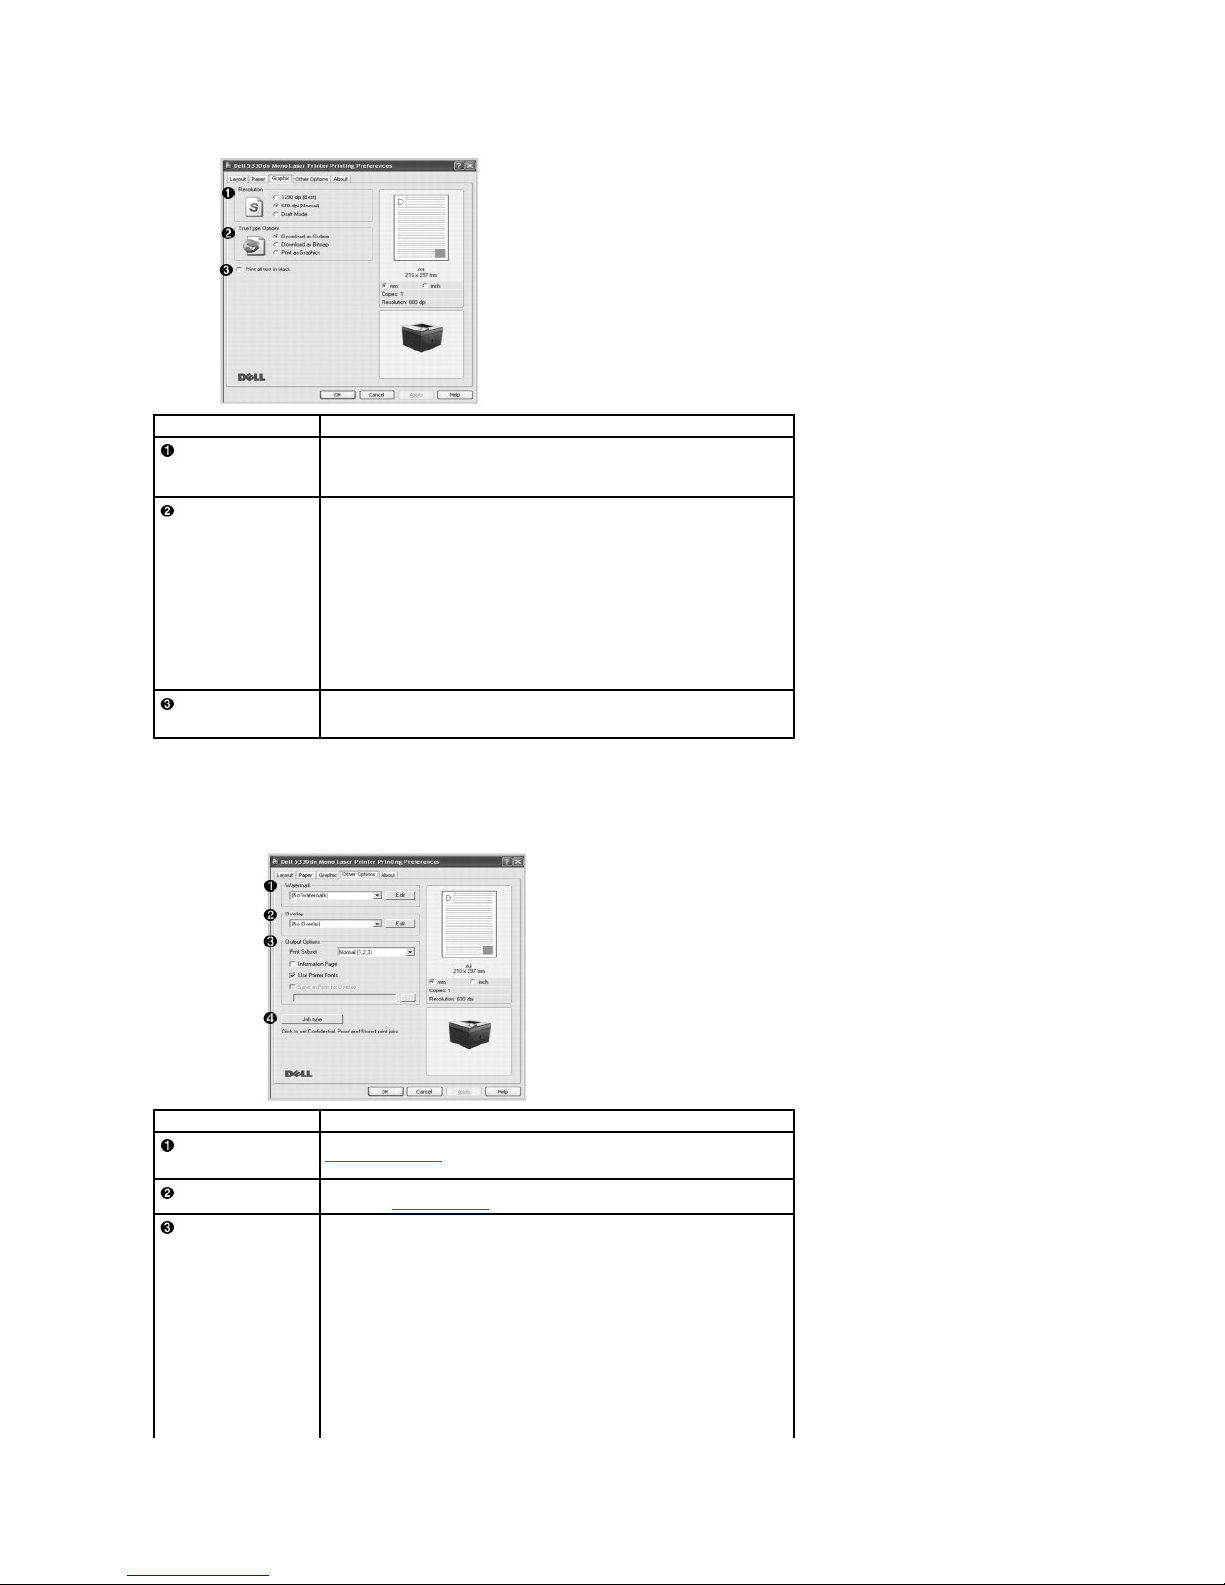
Other OptionsTab
Click the Other Options tab to access the following features:
Property
Description
Resolution
Select the printing resolution by choosing 1200 dpi (Best), 600 dpi (Normal)
or Draft Mode. The higher the setting, the sharper the clarity of the printed
characters and graphics. Higher settings may increase the time it takes to print
a document.
TrueType Options
l Download as Outline: When this option is selected, the driver will
download any TrueType fonts used in your document but not already
stored(resident) on your printer. If, after printing a document, you find
that the fonts did not print correctly, choose Download ad Bitmap and
resubmit your print job. The Download as Bitmap setting is often useful
when printing Adobe.
l Download as Bitmap: When this option is selected, the driver downloads
the font data as bitmap images. Documents with complicated fonts, such
as Korean or Chinese, print faster in this setting.
l Print as Graphics: When this option is selected, the driver downloads
any fonts as graphics. When printing documents with high graphic content
and relatively few TrueType fonts, printing performance (speed) may be
enhanced in this setting.
Print all text in black
When the Print All Text To Black option is checked, all text in the document
prints solid black, regardless of the color it appears on the screen. When it is
not checked, colored text prints in shades of gray.
Property
Description
Watermark
Create a background image of text to print on each page of your document. See
"Using Watermarks". This feature is not available when using the Postscript (PS)
driver.
Overlay
Overlays are often used to take the place of preprinted forms and letterhead
paper. See "Using Overlays".
Output Option
Print Subset: You can set the sequence for the pages to print. Select the print
order from the drop-down list.
l Normal (1, 2, 3): Your printer prints all pages from the first page to the
last page.
l Reverse All Pages (3, 2, 1): Your printer prints all pages from the last
page to the first page.
l Print Odd Pages: Your printer prints only the odd pages of the document.
l Print Even Pages: Your printer prints only the even pages of the
document.
Information Page: Before printing a document, select Information Page to print
a cover sheet containing the printer name, the network user ID, and job name.
When several users send a print job to the printer, this option allows you to
easily find your documents in the output tray.
Page 90
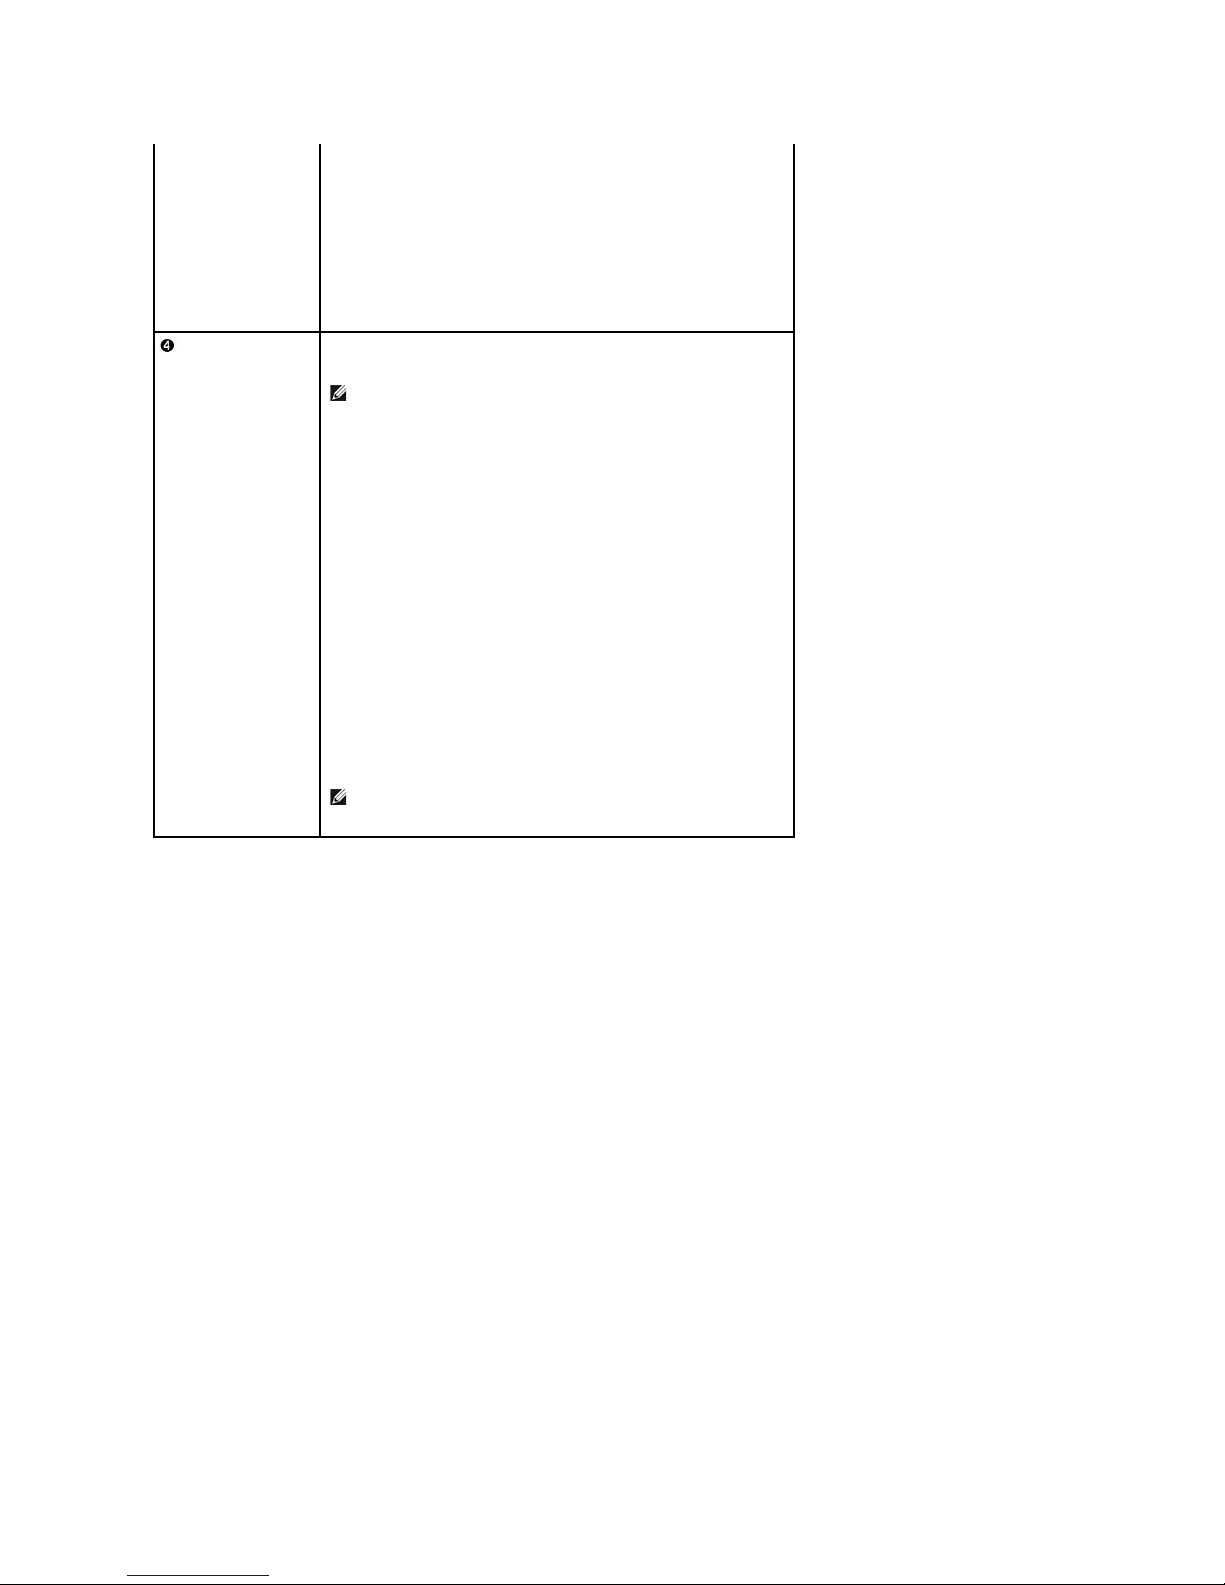
About Tab
Use the About tab to display the copyright notice and version number of the driver. If you have an Internet browser, connect to the Internet by clicking the
website button.
Using a Favorite Setting
The Favorites option, which is visible on each properties tab, allows you to save the current properties settings for future use.
To save a Favorites item:
1. Change the settings on each tab, as needed.
2. Enter a name for the item in the Favorites input box.
User Printer Fonts: When Use Printer Fonts is checked, the printer uses the
fonts that are stored in its memory(resident fonts) to print your document,
rather than downloading the fonts used in your document. Because
downloading fonts takes time, selecting this option can speed up your printing
time. When using Printer fonts, the printer tries to match the fonts used in your
document to those stored in its memory. If, however, you use fonts in your
document that are very different from those resident in the printer, your printed
output will appear very different from what it looks like on the screen.
Save as Form for Overlay: Select Save as Form for Overlay to save the
document as a form file (C:\FORMOVER\*.FOM). Once this option is selected, the
printer driver requires the file name and destination path each time you print. If
you want to preset the file name and specify the path, click on the button in the
Output to area, type the file name, and specify the path.
Job type
Job type dialog allows you to select how to print or save the printing file by
using the RAM Disk or optional HDD. Select one of the following settings:
l Normal: Select this setting for normal printing without storing your
documents in the RAM Disk. If you install the optional HDD, check the
Store to HDD check box to save your document in the hard disk after
printing. The saved document can be printed any time from the printer's
control panel, as well as from your PC.
l Proof: This setting is available when you make more than two copies. The
printer prints the first copy, then waits so that you can check the printing
if there is any problem. After checking, you can continue printing the
remaining copies. If you want to save the file in the hard disk after proof
printing, check Store to HDD check box.
l Confidential: Select this setting to send your private or confidential
document with a specified password to the RAM Disk so that you can
prevent other users from accessing it. To print the document, you must
enter the password. After printing, the document is cleared from the RAM
Disk. If you want to save the file in the hard disk after printing, check
Store to HDD check box.
l Store: Select this setting to save a document in the hard disk without
printing. When you print the saved document using the control panel, you
must enter a password. Use this setting when you store a private or a
confidential document. Check Store to Public HDD to save a document in
the hard disk without printing. By using this setting, the saved document
can be printed by any users without entering a password. Use this
setting when you store public documents.
l Print Schedule: Select this setting to print the document at a specified
time. If you set the time for 11 PM when the printer is hardly used, the
printer stores the document in the hard disk and prints it at 11 PM.
NOTE: Store, Print Schedule, Store to HDD and Store to Public HDD
appear only when you install the optional HDD.
NOTE: For more information about Job type, click Help. The Job type
window opens and allows you to view onscreen help supplied on the Job
type.
Page 91
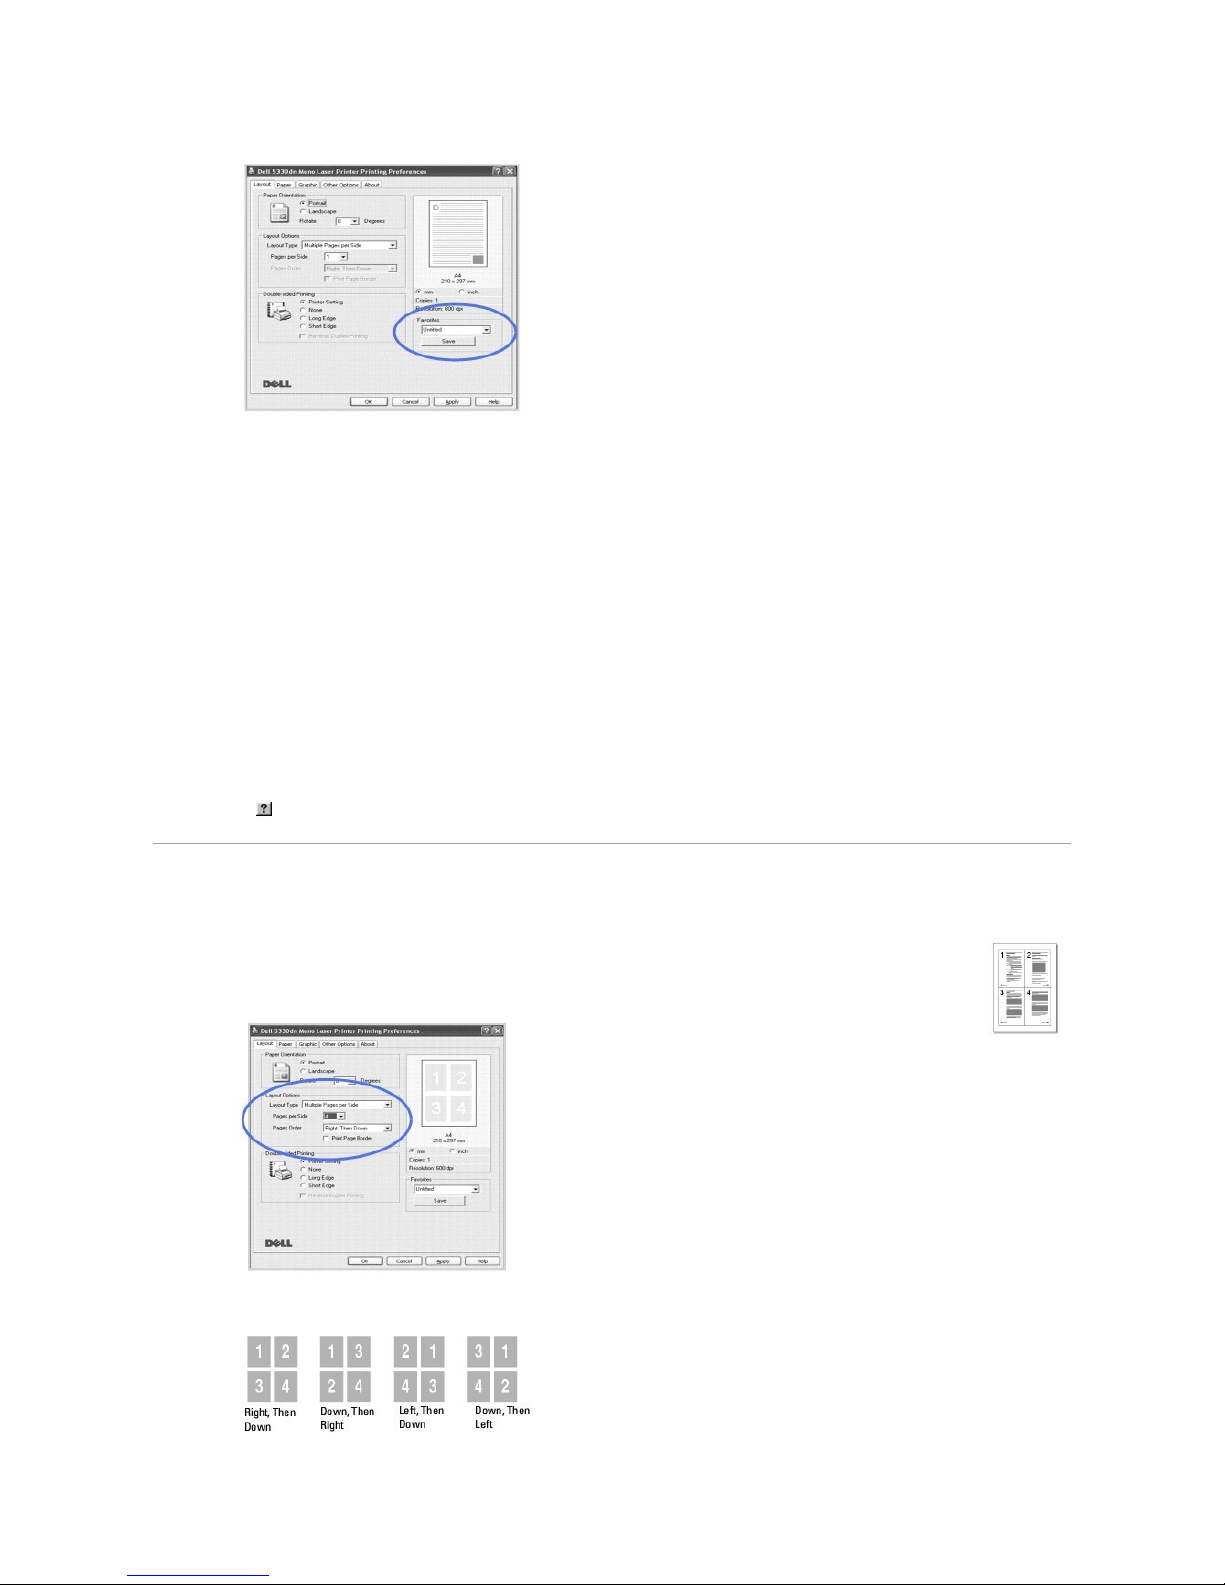
3. Click Save.
To use a saved setting, select it from the Favorites drop-down list.
To delete a favorite setting item, select it from the list and click Delete.
To restore the printer driver's default settings, select Printer Default from the list.
Using Help
Your printer has a help screen that can be activated by the Help
button in the printer's properties window. These help screens give detailed information about
the printer features provided by the printer driver.
You can also click from the upper right-hand corner, and then click on any setting.
Printing Multiple Pages on One Sheet of the Paper
You can select the number of pages to print on a single sheet of paper. You can print up to 16 pages on one sheet.
1. To change the print settings from your software application, go to printer properties.
2. From the Layout tab, choose Multiple Pages per Side on the Layout Type drop-down list.
3. Select the number of pages you want to print per sheet (1, 2, 4, 6, 9, or 16) on the Pages per Side drop-down list.
4. If necessary, select the page order on the Page Order drop-down list.
Page 92
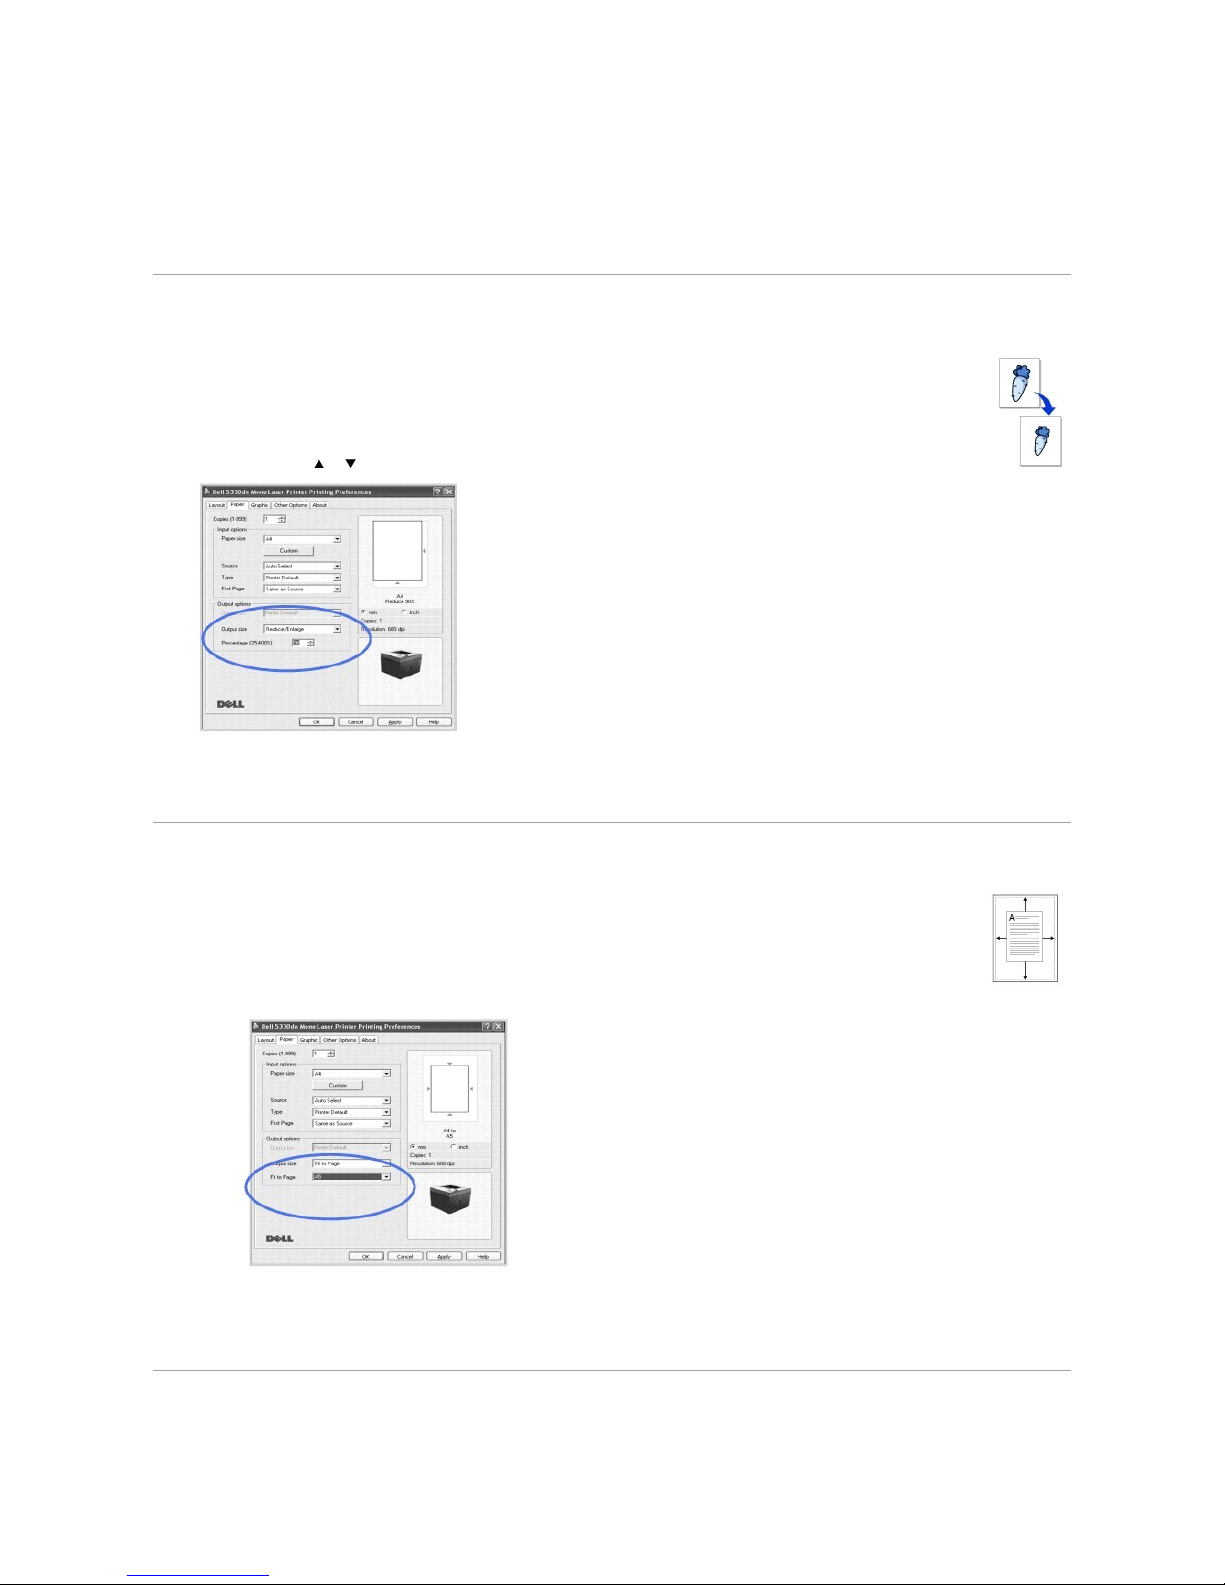
To print a border around each page on the sheet, check Print Page Border. Print Page Border is enabled only if the Pages per Side setting is set to a
number greater than one.
5. Click the Paper tab and select the paper source, size and type.
6. Click OK and print the document.
Printing a Reduced or Enlarged Document
You can scale your print job on a page.
1. To change the print settings from your software application, go to printer properties.
2. From the Paper tab, select Reduce/Enlarge on the Output size drop-down list.
3. Enter the scaling rate in the Percentage input box.
You can also click the or button.
4. Select the paper source, size and type.
5. Click OK and print the document.
Fitting Your Document to a Selected Paper Size
You can scale your print job to any selected paper size regardless of the change to the original document size. This can be useful when you
want to check fine details on a small document.
1. To change the print settings from your software application, go to printer properties.
2. From the Paper tab, select Fit to Page on the Output size drop-down list.
3. Select the correct size from the Fit to Page drop-down list.
4. Select the paper source, size and type.
5. Click OK and print the document.
Printing Posters
Page 93
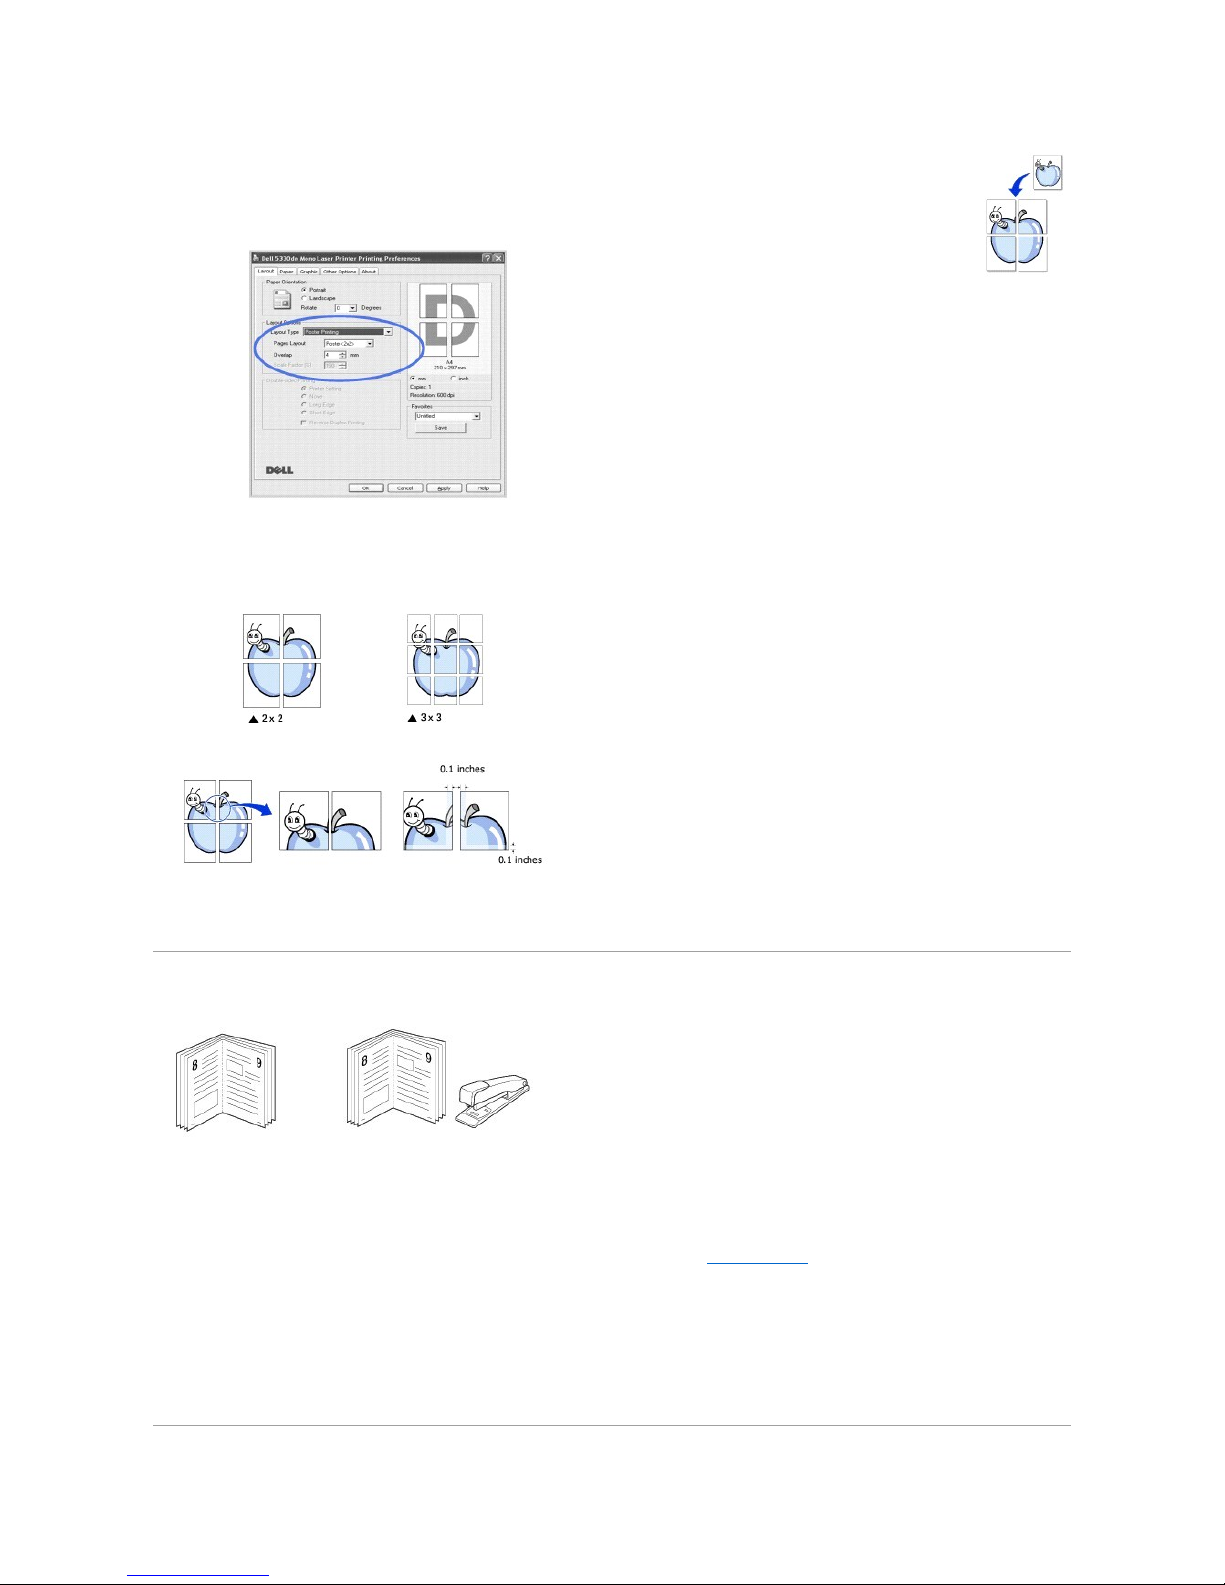
To form one poster-size document, you can print a single-page document onto 4, 9, or 16 sheets of paper, then paste the sheets together.
1. To change the print settings from your software application, go to printer properties.
2. From the Layout tab, select Poster Printing on the Layout Type drop-down list.
3. Configure the poster option:
Select the page layout from Poster<2x2>, Poster<3x3>, Poster<4x4>, or Custom. If you select Poster<2x2>, the output automatically stretches to
cover 4 physical pages.
Specify an overlap in millimeters or inches to make it easier to reconstruct the resulting poster.
4. Click the Paper tab and select the paper source, size and type.
5. Click OK and print the document. Complete the poster by reconstructing the results.
Printing Booklets
This printer feature allows you to print your document on both sides of the paper and arranges the pages so that the paper can be folded in half after printing
to produce a booklet.
1. To change the print settings from your software application, go to printer properties. See "Printer Settings".
2. From the Layout tab, choose Booklet Printing from the Type drop-down list.
NOTES: The booklet printing option is available when A4, Letter, Legal, Folio, or Oficio size is selected in the Size option on the Paper tab.
3. Click the Paper tab and select the paper source, size, and type.
4. Click OK and print the document.
5. After printing, fold and staple the pages.
Page 94
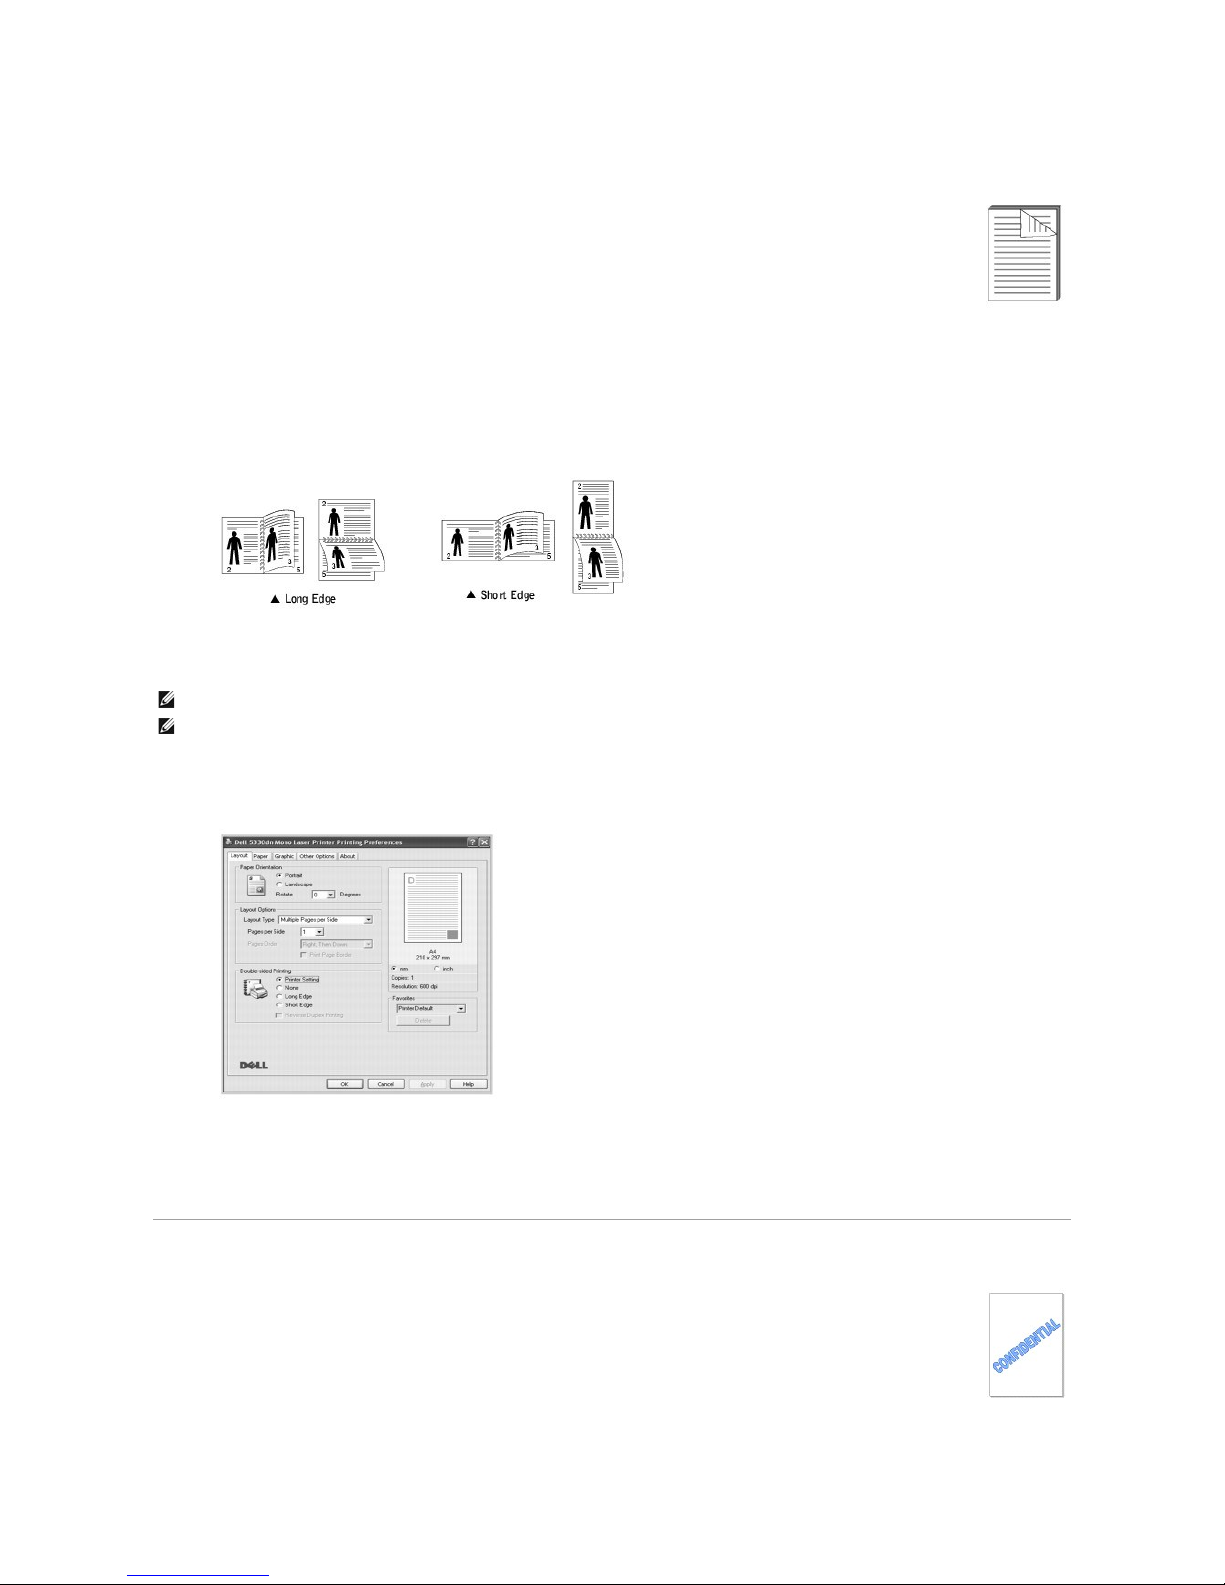
Printing on Both Sides of Paper
You can print on both sides of a sheet of paper. Before printing, decide how you want your document oriented.
The options are:
l Printer Setting - this feature is determined by the setting you have made on the control panel of the printer.
l None
l Long Edge - this is the conventional layout used in book binding.
l Short Edge - this is the type often used with calendars.
l Reverse Duplex - allows you to select general print order compared to duplex print order.
1. To change the print settings from your software application, go to printer properties.
2. From the Layout tab, select the paper orientation.
3. From the Double-sided Printing section, select the desired binding option.
4. Click the Paper tab and select the paper source, size and type.
5. Click OK and print the document.
The printer prints on both sides of paper.
Using Watermarks
The Watermark option allows you to print text over an existing document. For example, you may want to have large gray letters reading "TOP
SECRET","DRAFT", or "CONFIDENTIAL" printed diagonally across the first page or all pages of a document.
There are several predefined watermarks that come with your printer. They can be modified or new ones can be added to the list.
Using an Existing Watermark
NOTE: Do not print on both sides of labels, transparencies, envelopes, or thick paper. Damage to the printer and paper jamming might result.
NOTE: To use the double-sided printing, use only the following paper size: A4, Letter, Legal, Folio and Oficio.
Page 95
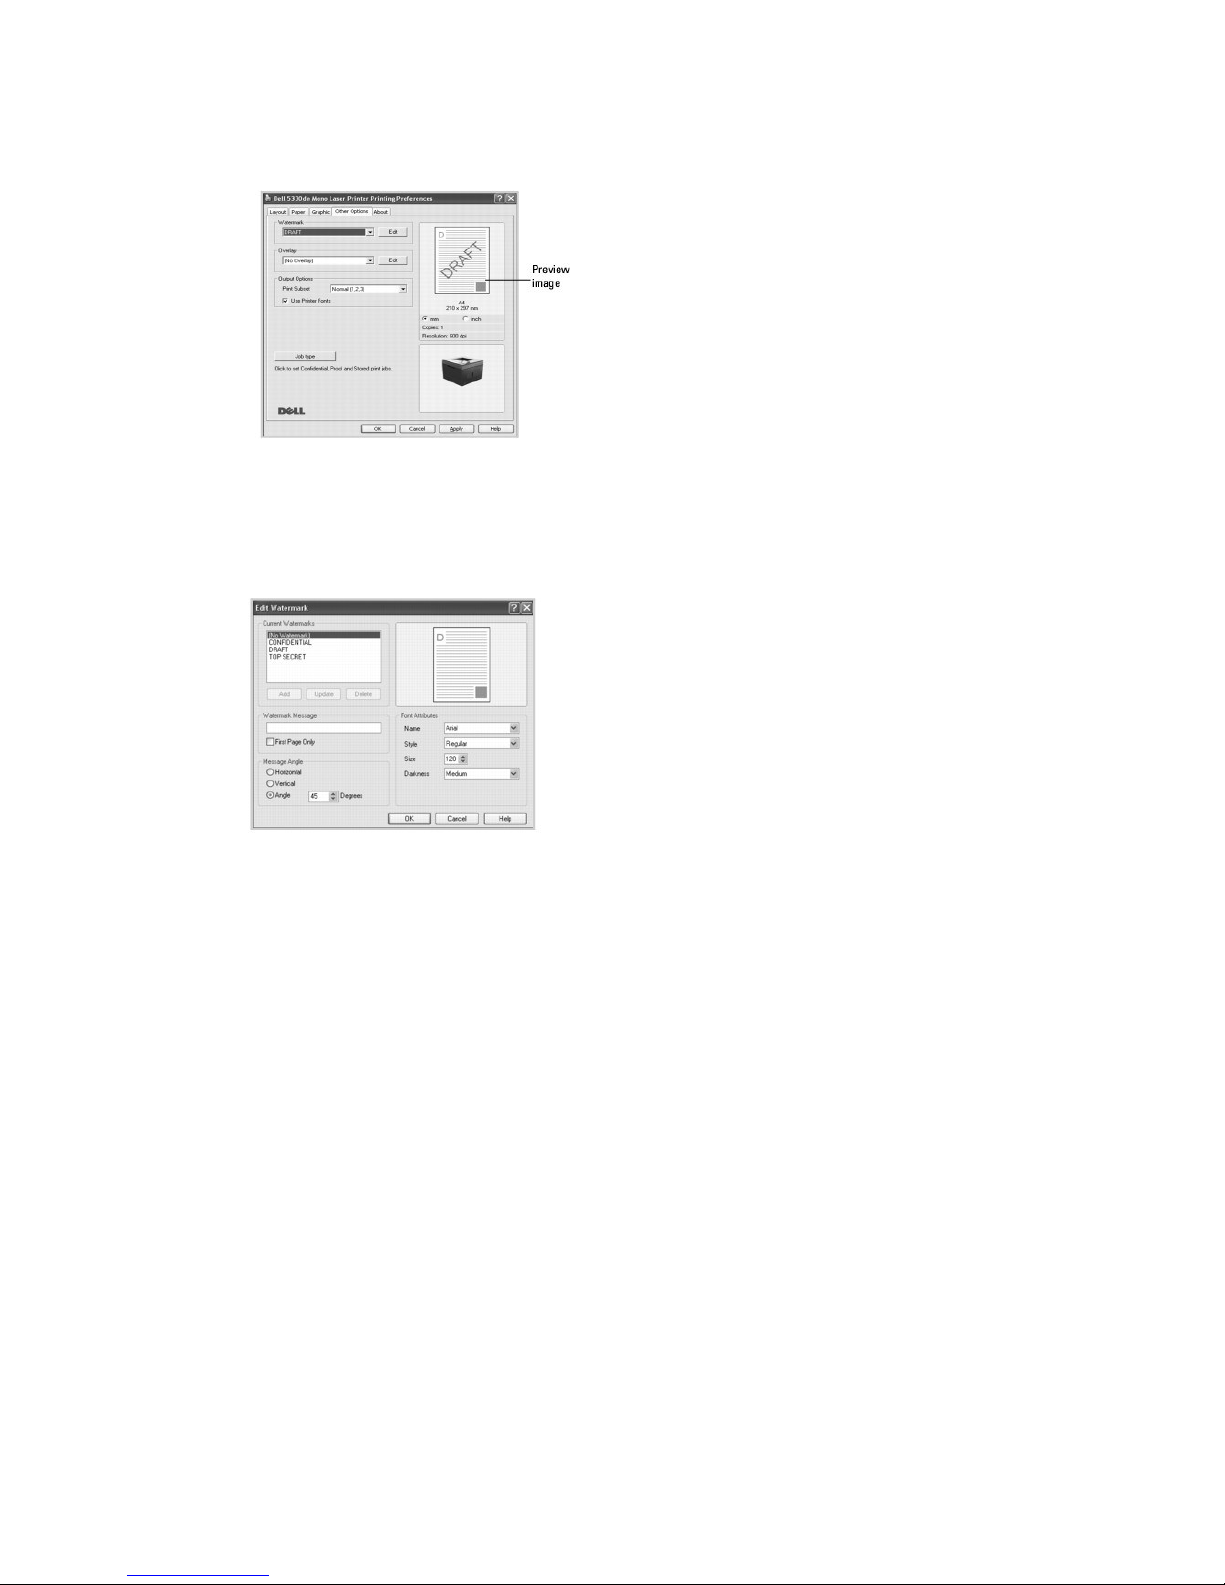
1. To change the print settings from your software application, go to printer properties.
2. Click the Other Options tab and select a watermark on the Watermark drop-down list. It appears in the preview image window.
3. Click OK and start printing.
Creating a Watermark
1. To change the print settings from your software application, go to printer properties.
2. Click the Other Options tab and click Edit in the Watermark section. The Edit Watermarks window appears.
3. Enter the text message you want to print in the Watermark Message box.
The message displays in the preview image window. The preview image is provided so that you can see how the watermark will appear on the printed
page.
To print the watermark on the first page only, ensure the First Page Only box is checked. .
4. Select the watermark options.
You can select the font name, style and size and gray scale level from the Font Attributes section and set the angle of the watermark from the Message
Angle section.
5. To add a new watermark to the list, click Add.
6. When you have finished creating, click OK and start printing.
To stop printing the watermark, select No Watermark on the Watermark drop-down list.
Editing a Watermark
1. To change the print settings from your software application, go to printer properties.
2. Click the Other Options tab and click Edit in the Watermark section. The Edit Watermarks window appears.
3. Select the watermark you want to edit on the Current Watermarks list, and change watermark message and the options.
4. To save the changes, Click Update.
5. Click OK.
Deleting a Watermark
1. To change the print settings from your software application, go to printer properties.
2. From the Other Options tab, click Edit in the Watermark section. The Edit Watermarks window appears.
3. Select the watermark you want to delete on the Current Watermarks list and click Delete.
Page 96
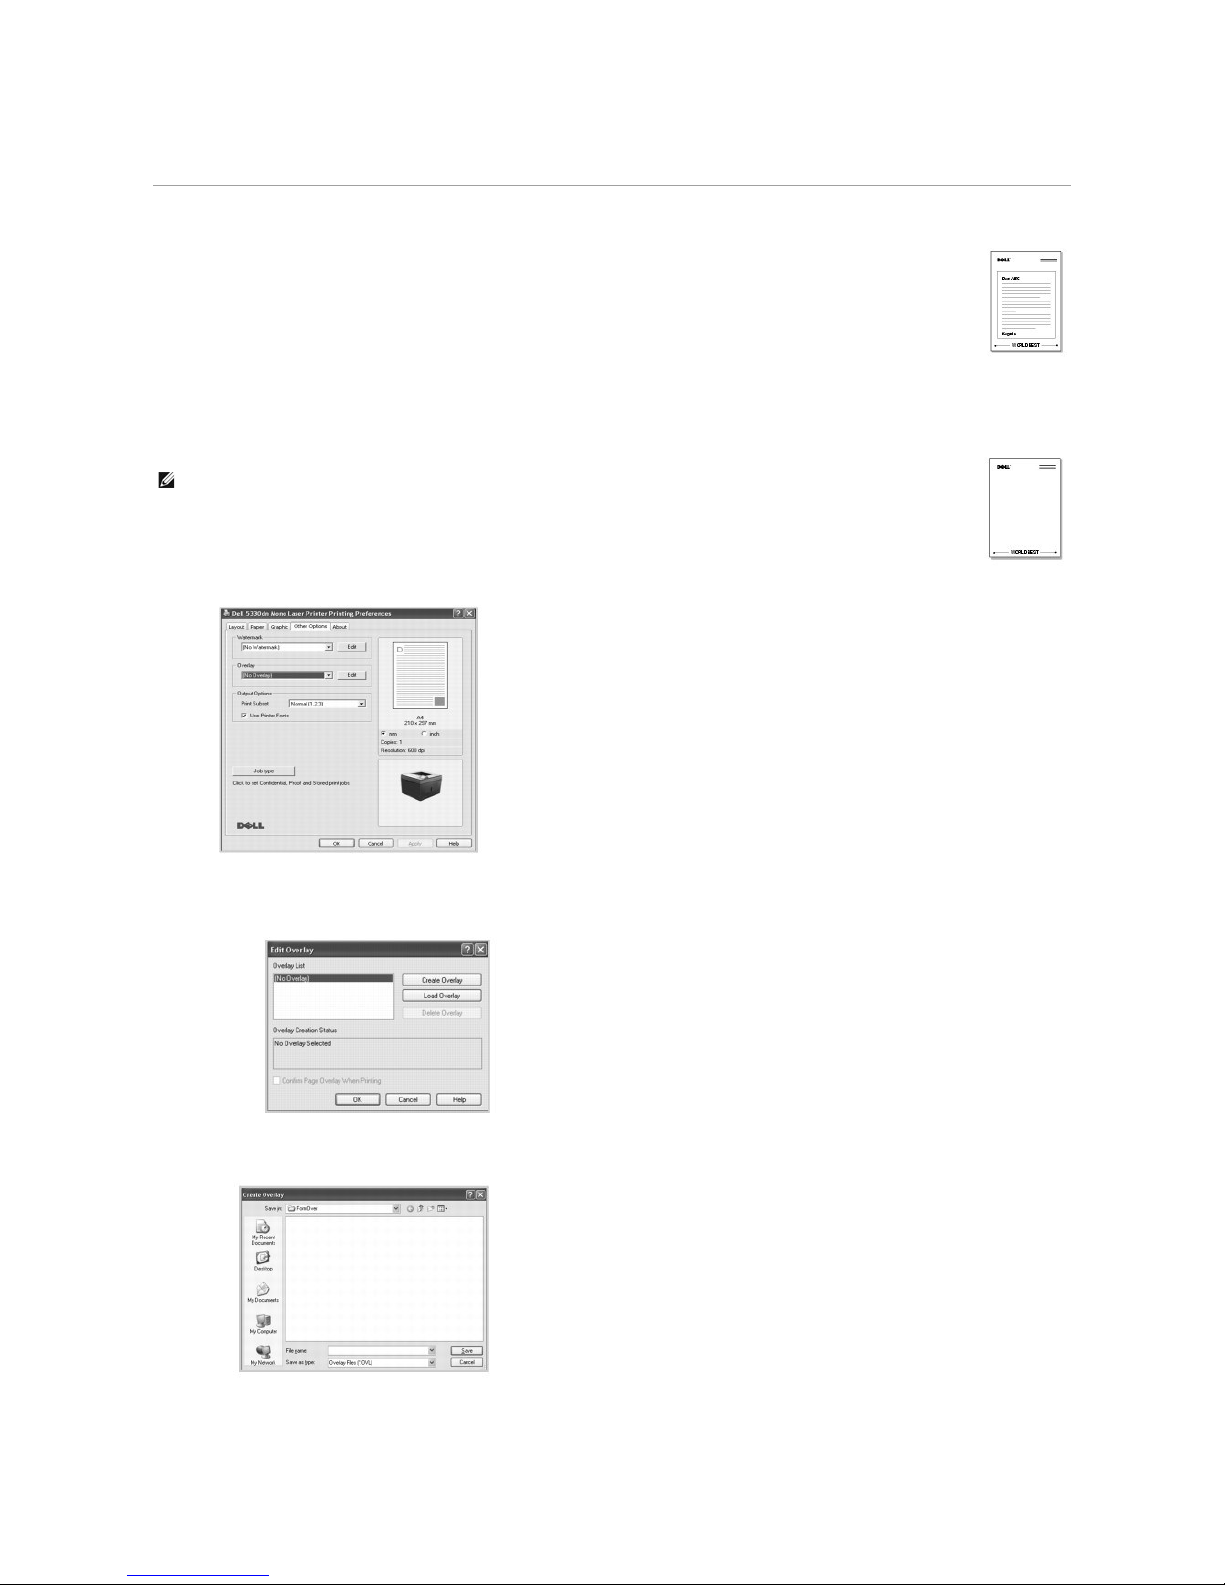
4. Click OK.
Using Overlays
What is an Overlay?
An overlay is text and/or images stored in the computer hard disk drive (HDD) as a special file format that can be printed on any document.
Overlays are often used to take the place of preprinted forms and letterhead paper. Rather than using preprinted letterhead, you can create
an overlay containing the exact same information that is currently on your letterhead. To print a letter with your company's letterhead, you do
not need to load preprinted letterhead paper in the printer. You need only tell the printer to print the letterhead overlay on your document.
Creating a New Page Overlay
To use a page overlay, you must create a new page overlay containing your logo or image.
1. Create or open a document containing text or an image for use in a new page overlay. Position the items exactly as you wish them to
appear when printed as an overlay. If needed, save the file for later use.
2. To change the print settings from your software application, go to printer properties.
3. Click the Other Options tab and click Edit in the Overlay section.
4. In the Edit Overlays window, click Create Overlay.
5. In the Create Overlay window, type a name of up to eight characters in the File name box. Select the destination path, if necessary. (The default is
C:\FormOver).
6. Click Save. You can see the name in the Overlay List.
NOTE: The overlay document size must be the same as documents you will print with the overlay. Do not create an overlay with a
watermark.
Page 97
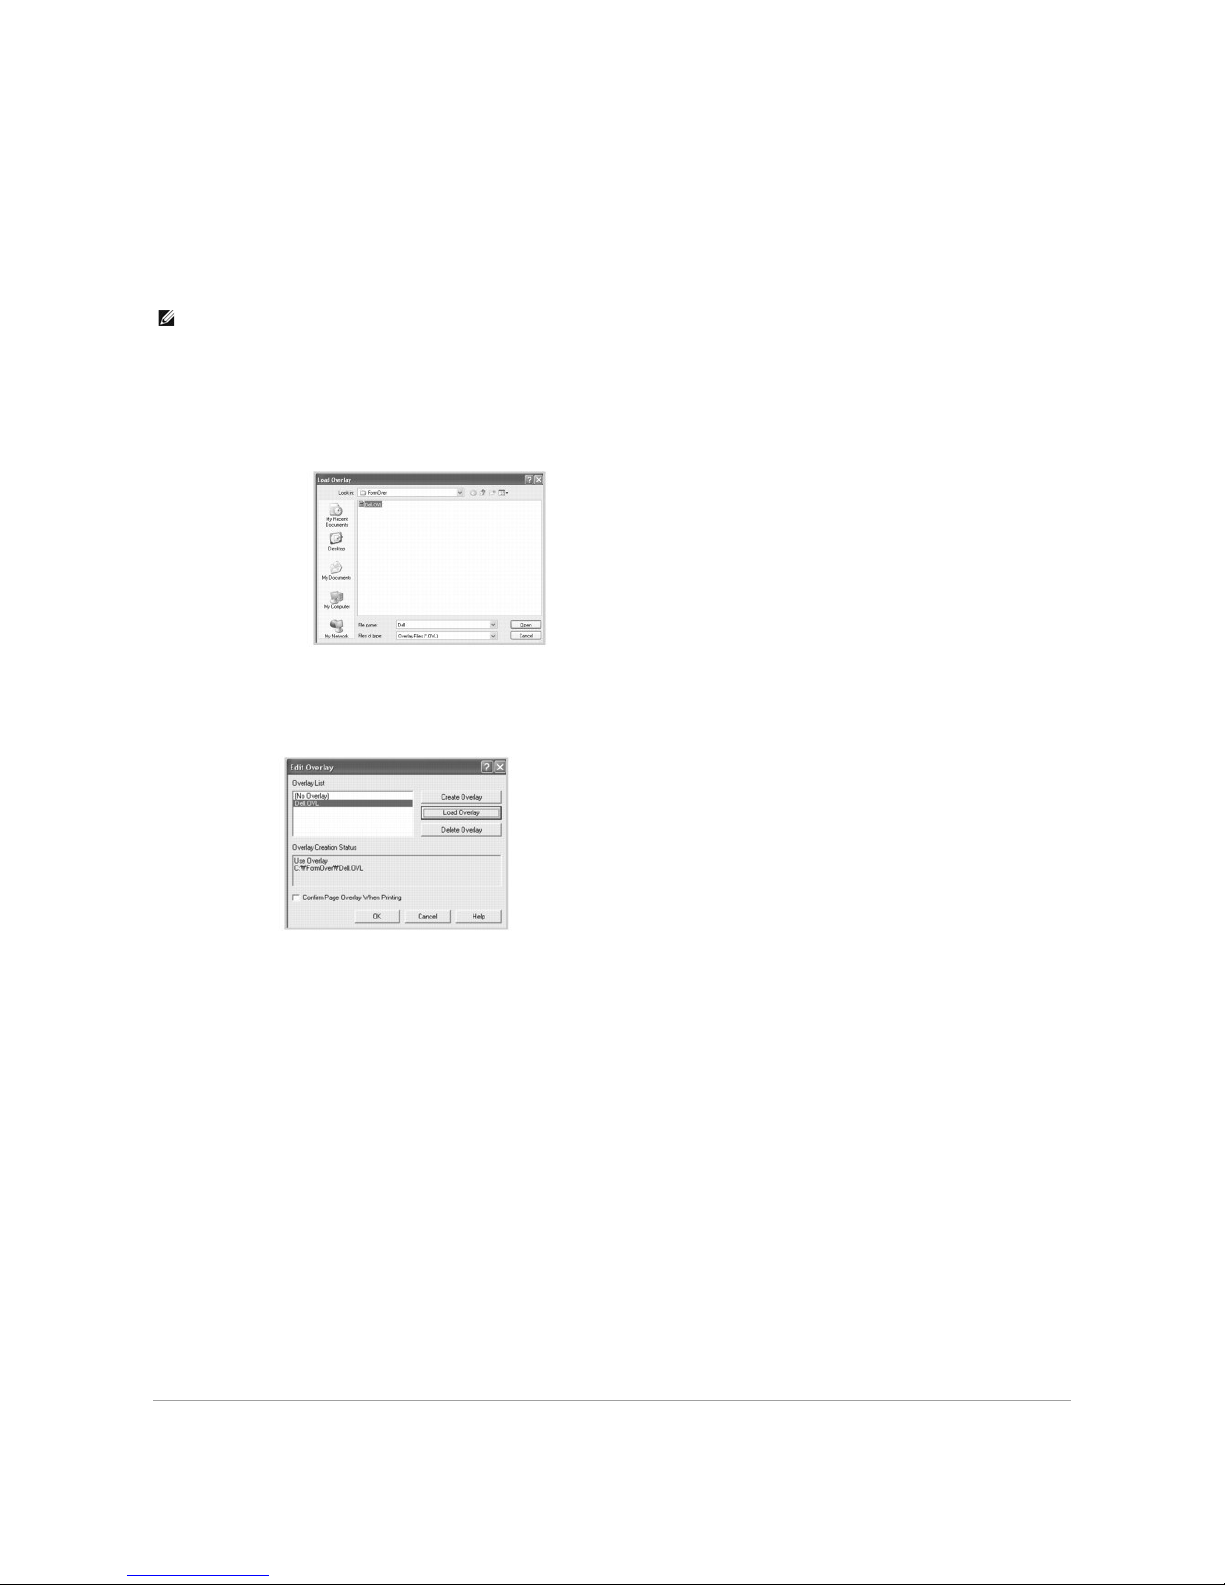
7. Click OK or Yes until you complete creating.
The file is not printed out; it is stored in your computer.
Using a Page Overlay
After an overlay has been created, it is ready to be printed with your document. To print an overlay with a document:
1. Create or open the document you want to print.
2. To change the print settings from your software application, go to printer properties.
3. Click the Other Options tab.
4. Select the overlay you want to print from the Overlay drop-down list box.
5. If the overlay file does not appear on the Overlay List, click Edit, Load Overlay, and select the overlay file.
If you have stored the overlay file you want to use on an external source, such as a CD or floppy disk, you can also load the file when you access this Load
Overlay window.
After you select the file, click Open. The file is now shown in the Overlay List box and is available for printing. Select the overlay from the Overlay List
box.
6. If necessary, click Confirm Page Overlay When Printing. When this box is checked, a message window appears each time you submit a document for
printing asking you to confirm that you want to print an overlay on your document.
Answering Yes to the window means that the selected overlay will be printed with your document. Answering No to the window cancels the use of the
overlay page.
If this box is empty and an overlay has been selected, the overlay will automatically be printed with your document.
7. Click OK or Yes until the printing starts.
The overlay is downloaded with your print job and printed on your document.
Deleting a Page Overlay
You can delete page overlays that are no longer used.
1. In the printer properties window, click the Extras tab.
2. Click Edit in the Overlay section.
3. Select the overlay you want to delete from the Overlay List box.
4. Click Delete Overlay.
5. When a confirming message window appears, click Yes.
6. Click OK until you exit the Print window.
NOTE: The resolution of the overlay must be the same as the resolution of the document that will print with the overlay.
Page 98

Printing Confidential and Stored Jobs
When you send a job to the printer, you can specify in the driver if you want the printer to hold the job in memory or hard disk. When you are ready to print
the job, you must go to the printer and use the operator panel menus to identify which job in the memory or hard disk you want to print. You can use this
function to print a confidential job (Secure Print), store a printing job (Store Print), or verify one copy before printing additional copies (Proof Print).
All confidential and stored jobs have a user name associated with them. To access confidential or stored jobs, select the type of job (confidential or stored)
and then select your user name from the user name list. Once you select your user name, you can either print all your confidential jobs or select an individual
print job. You can choose the number of copies for the print job or delete the print job.
Printing a Confidential Job
When you send a confidential job to the printer, you must enter a personal identification number (PIN) from the driver. The PIN must be four digits using the
numbers 0-9. The job is held in printer memory until you enter the same four-digit PIN from the operator panel and choose to either print or delete the job.
This ensures the job prints only when you are there to retrieve it. No one else using the printer can print the job without the PIN.
1. From a word processor, spreadsheet, browser, or other application, select File Print.
2. Click Properties. (If there is no Properties button, click Setup and then click Properties.)
3. Depending on the operating system, you might have to click the Other Options tab, and then click JOB TYPE.
4. Job Type pop-up box will prompt you, choose secure Print.
5. Enter a User Name and PIN.
6. Send your job to the printer.
Go to the printer when you are ready to retrieve your confidential print job, and follow the At the printer steps.
At the printer
When a printer receives a confidential or stored Jobs, it displays "Stored Job Press Select ( )" on the operator panel.
1. Press Select ( ) to access the confidential and stored Job at the printer.
2. Press Scroll ( to ) to highlight your user name, and then press Select ( ).
3. Press Scroll ( to ) to highlight Confidential jobs, and then press Select ( ).
4. Enter your PIN by pressing Scroll ( to ) until you see the number you want and press Select ( ). Repeat for each number.
5. Press Scroll ( to ) to highlight the job you want to print, and then Select ( ).
6. Press Scroll ( to ) to highlight the option you want (Print 1 copy, Print copies, or Delete), and then press Select ( ).
Printing and Deleting Held jobs
Stored jobs (Proof Print, Delayed Print, or Public Mailbox) are printed or deleted from the printer operator panel and do not require a PIN number.
Proof Print
If you send a Proof Print job, the printer prints one copy and holds the remaining copies you requested in printer memory. Use Proof Print to examine the
NOTE: Only Confidential and Proof printing are available with the base memory; for all other stored jobs options, you need to install the hard disk.
Please refer to the section "Using Hard disk" for details.
NOTE: The confidential Jobs held in the memory (RAM) of the printer are deleted when the printer is turned off. The confidential Jobs held in Hard Disk
are deleted only after they are printed or deleted by administrator.
NOTE: After your job prints, it is deleted from printer memory.
Page 99

first copy to ensure it is satisfactory before printing the remaining copies. Once all copies are printed, the Proof Print job is automatically deleted from printer
memory.
Print Schedule
If you send a Delayed Print job, the printer does not print the job immediately, but prints it at the specified time and date chosen. The job is held in the hard
disk until you delete it from the stored Jobs menu
Stored Print
If you send a Stored Print
job, the printer does not print the job immediately. It stores the job in hard disk so you can print the job later. The job is held in the
hard disk until you delete it from the stored Jobs menu. The Stored Print jobs can be with a PIN (Private Job) or without a PIN (Public) which you can choose
from the driver.
NOTE: Delayed and Stored Print are supported only with Hard disk options.
Page 100

Software Overview
After setting up your printer and connecting it to your computer, install the drivers and utilities from Drivers and Utilities CD the included with the printer. The
Drivers and Utilities CD contains the following:
l Dell Printer Drivers - allows your computer to communicate with your printer. To use your printer in Microsoft® Windows® operating system, you must
install the printer driver(s). For information about installing the printer drivers in Windows, see "Installing Software in Windows".
l Printer Settings Utility - configures and checks print settings.
l Dell TonerManagementSystem™- displays the status of the printer and the name of the job when you send a job to print. The Dell Toner Management
System™windowalsodisplaystheleveloftonerremainingandallowsyoutoorderreplacementtonercartridges.
l User's Guide - HTML documentation provides detailed information about using the printer.
l Firmware Update Utility - updates your printer's firmware.
l Set IP Address Utility - sets your printer's TCP/IP addresses.
l PS driver - Postscript Printer Description (PPD) file - use the PostScript driver to print documents.
l Linux driver - allows you to print in Linux using your printer.
l Macintosh printer driver - allows you to use your printer with a Macintosh computer.
Installing Software in Windows
Before you begin, ensure that your system meets the minimum requirements.
Supported Operating Systems
l Windows NT 4.0
*a
(Service pack 6 or higher)
l Windows 2000 Professional or Windows 2000 Advanced Server
l Windows XP Home Edition or Windows XP Professional
l Windows 2003 or Windows 2003 Server
l Windows Vista®
l Windows Server 2008
a.Windows NT is supported only by Parallel port for Local Installation.
Minimum Requirements
l Disk space: Windows NT4.0/Windows 2000: 600 MB
Windows XP: 1.5 GB
Windows 2003 Server: 1.25 GB to 2GB
Software Overview
Installing Software in Windows
Uninstalling Software
UsingtheDell™TonerManagementSystem
Printer Settings Utility
Firmware Update Utility
Dell Toner Re-order application
Set IP Address Utility
NOTE: Window NT 4.0 is supported only PCL 6 Driver.
NOTE: For Windows 2000/2003/XP, the system administrator should install Dell software.
 Loading...