

Page 1
Dell™ Multifunction Color Laser Printer 3115cn
Page
1
of 3Dell Multifunction Color Laser Printer 3115cn User's Guide
2/
29/
2012
mk:@MSITStore:C:\Users\14JMIS~1\AppData\Local\Temp\Rar$DIa0.409\UsersGuide.ch
...
User's Guide
Notes, Notices, and Cautions
Click the links to the left for information on the features, options, and operation of your multifunction printer.
For information on other documentation included with your multifunction printer, see "Finding Information."
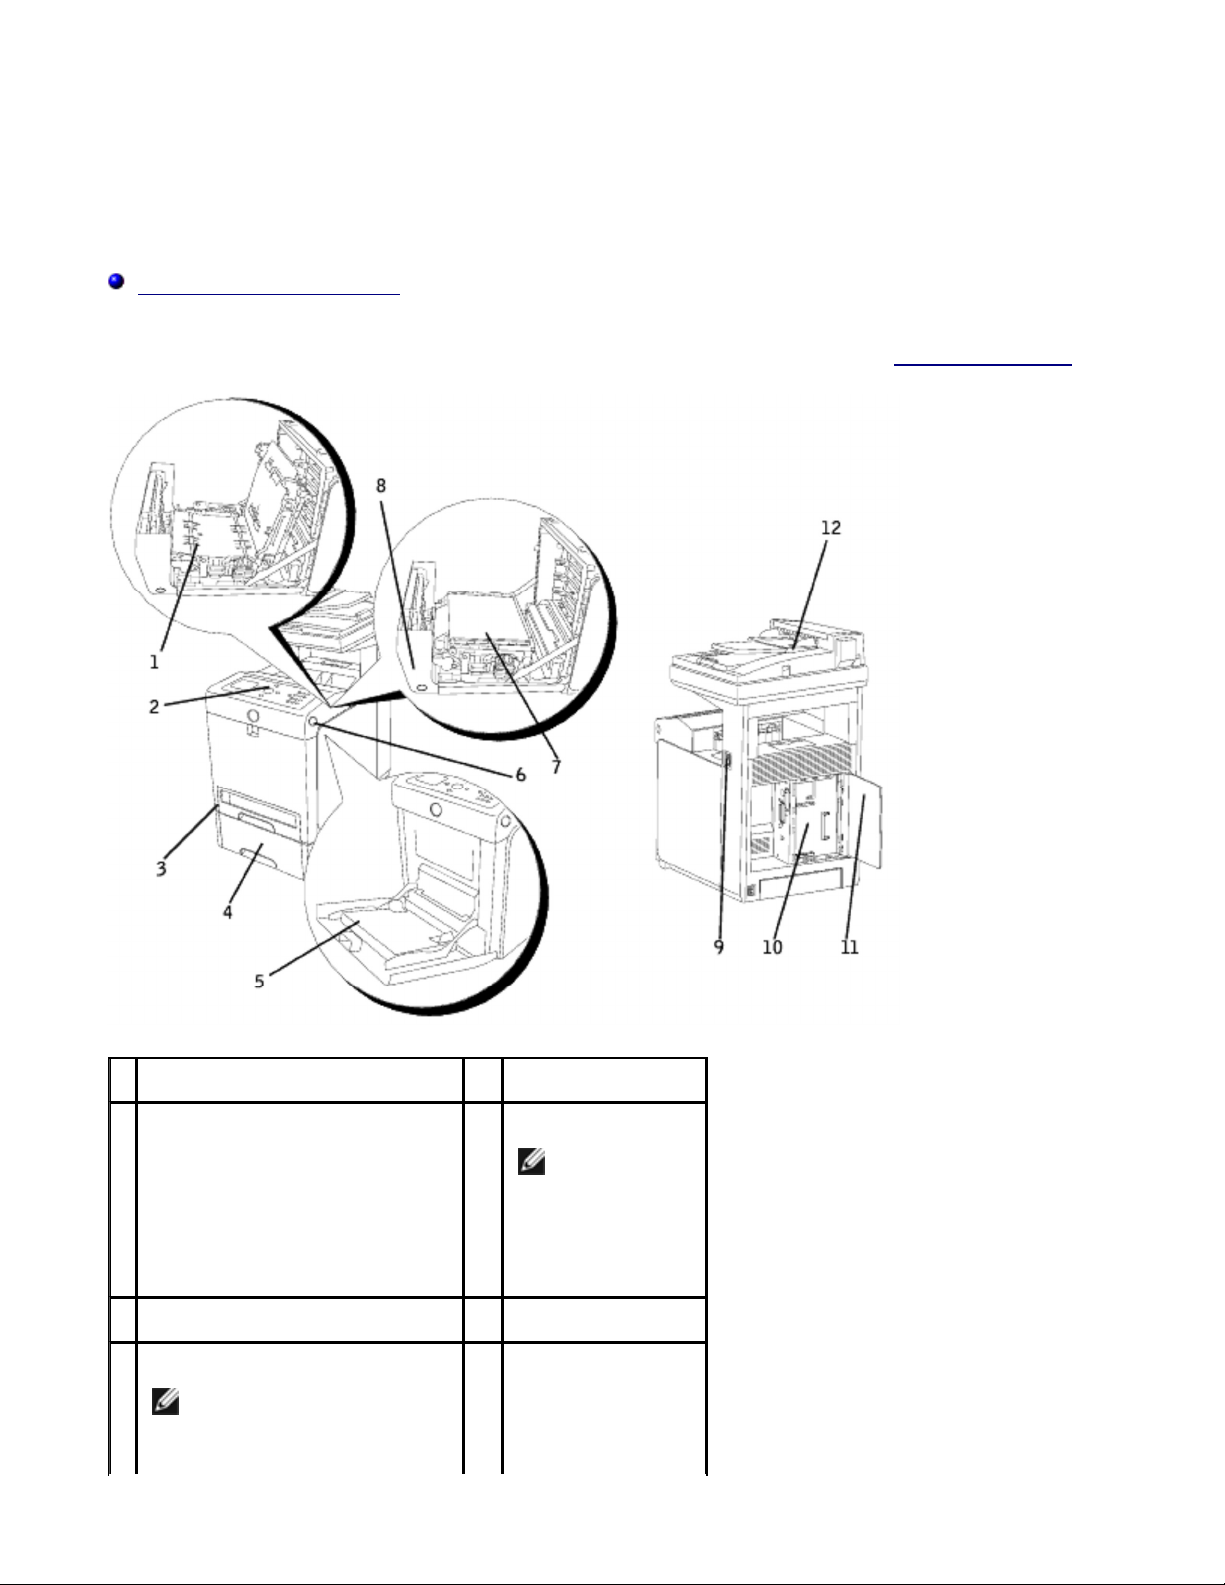
1
Optional duplexer
2
Operator panel
3
Standard 250-sheet tray
4
Optional 550-sheet paper feeder
NOTE: Your multifunction
printer allows for a
maximum of three trays
7
Transfer belt unit
8
Front cover
NOTE: You
can open the
front cover by
pushing the
button (right
side).
9
Power switch
10
Control board
Page 2
(standard 250-sheet tray,
Page
2
of 3Dell Multifunction Color Laser Printer 3115cn User's Guide
2/
29/
2012
mk:@MSITStore:C:\Users\14JMIS~1\AppData\Local\Temp\Rar$DIa0.409\UsersGuide.ch
...
optional 550-sheet paper
feeder, and multipurpose
feeder).
5
Multipurpose feeder
6
Button (right side)
To order replacement print cartridges or supplies from Dell:
1. Double-click the icon on your desktop.
2. Visit Dell's website, or order Dell printer supplies by phone.
www.dell.com/supplies
For best service, have your Dell printer Service Tag available.
For help locating your Service Tag number, see "Express Service Code and Service Tag number."
11
Control board cover
12
Automatic
Document Feeder
(ADF)
Notes, Notices, and Cautions
NOTE: A NOTE indicates important information that helps you make better use of your multifunction
printer.
NOTICE: A NOTICE indicates either potential damage to hardware or loss of data and tells you how to
avoid the problem.
CAUTION: A CAUTION indicates a potential for property damage, personal injury, or death.
Information in this document is subject to change without notice.
© 2008 Dell Inc. All rights reserved.
Reproduction in any manner whatsoever without the written permission of Dell Inc. is strictly forbidden.
Trademarks used in this text: Dell, the DELL logo and Dell ScanCenter are trademarks of Dell Inc.; Microsoft,
Windows, Windows Server, and Windows Vista are either trademarks or registered trademarks of Microsoft
Corporation in the United States and/or other countries; Macintosh, MacOS, EtherTalk and TrueType are
trademarks of Apple Inc., registered in the U.S. and other countries; AppleTalk is a registered trademark of
Apple Inc., registered in the U.S. and other countries; UNIX is a registered trademark of The Open Group in
the United States and other countries; Red Hat and RPM are trademarks or registered trademarks of Red Hat
Inc. in the United States and other countries; Linux is a trademark or registered trademark of Linus Torvalds
in the United States and other countries; The Common UNIX Printing System, CUPS, and the CUPS logo are
the trademarks of Easy Software Products; PCL is a registered trademark of Hewlett-Packard in the United
Page 3

States;
ENERGY STAR
is a registered trademark of the U.S. Environmental Protection Agency. As an
ENERGY
STAR Partner, Dell Inc. has determined that this product meets the ENERGY STAR guidelines for energy
Page
3
of 3Dell Multifunction Color Laser Printer 3115cn User's Guide
2/
29/
2012
mk:@MSITStore:C:\Users\14JMIS~1\AppData\Local\Temp\Rar$DIa0.409\UsersGuide.ch
...
efficiency.
As for libtiff
Copyright © 1988-1997 Sam Leffler
Copyright © 1991-1997 Silicon Graphics, Inc.
THE SOFTWARE IS PROVIDED "AS-IS" AND WITHOUT WARRANTY OF ANY KIND, EXPRESS, IMPLIED OR
OTHERWISE, INCLUDING WITHOUT LIMITATION, ANY WARRANTY OF MERCHANTABILITY OR FITNESS FOR A
PARTICULAR PURPOSE.
IN NO EVENT SHALL SAM LEFFLER OR SILICON GRAGHICS BE LIABLE FOR ANY SPECIAL, INCIDENTAL,
INDIRECT OR CONSEQUENTIAL DAMAGES OF ANY KIND, OR ANY DAMAGES WHATSOEVER RESULTING FROM
LOSS OF USE, DATA OR PROFITS, WHETHER OR NOT ADVISED OF THE POSSIBILITY OF DAMAGE, AND ON
ANY THEORY OF LIABILITY, ARISING OUT OF OR IN CONNECTION WITH THE USE OR PERFORMANCE OF THIS
SOFTWARE.
This software uses the Independent JPEG Group's JPEG software library. Other trademarks and trade names
may be used in this document to refer to either the entities claiming the marks and names or their products.
Dell Inc. disclaims any proprietary interest in trademarks and trade names other than its own.
UNITED STATES GOVERNMENT RESTRICTED RIGHTS
This software and documentation are provided with RESTRICTED RIGHTS. Use, duplication or disclosure by
the Government is subject to restrictions as set forth in subparagraph (c)(1)(ii) of the Rights in Technical Data
and Computer Software clause at DFARS 252.227-7013 and in applicable FAR provisions: Dell Inc., One Dell
Way, Round Rock, Texas, 78682, USA.
This equipment has been tested and found to comply with the limits for a Class B digital device, pursuant to
Part 15 of the FCC rules.
November 2008 Rev. A02
Page 4
Finding Information
Page
1
of 3Finding Information
2/
29/
2012
mk:@MSITStore:C:\Users\14JMIS~1\AppData\Local\Temp\Rar$DIa0.409\UsersGuide.ch
...
What are you
looking for?
· Drivers for my
multifunction printer
· My User's Guide
· Safety information
· How to use my
multifunction printer
· Warranty information
Find it here
Drivers and Utilities CD
The Drivers and Utilities CD contains documentation and drivers for your
multifunction printer. You can use the CD to uninstall/reinstall drivers or access
your documentation.
Readme files may be included on your CD to provide last-minute updates about
technical changes to your multifunction printer or advanced technical reference
material for experienced users or technicians.
Owner's Manual
· Safety information
· Warranty information
How to set up my
multifunction printer
CAUTION: Read and follow all safety instructions in your Owner's
Manual prior to setting up and operating your multifunction printer.
NOTE: The Owner's Manual may not be available in your country or region.
Product Information Guide
CAUTION: Read and follow all safety instructions in the Product
Information Guide prior to setting up and operating your multifunction
printer.
NOTE: The Product Information Guide may not be available in your country or
region.
Setup diagram
Page 5
Troubleshooting Guide Troubleshooting Guide:
Page
2
of 3Finding Information
2/
29/
2012
mk:@MSITStore:C:\Users\14JMIS~1\AppData\Local\Temp\Rar$DIa0.409\UsersGuide.ch
...
- User Settings
- Configuration
- Troubleshooting Instructions
- Others
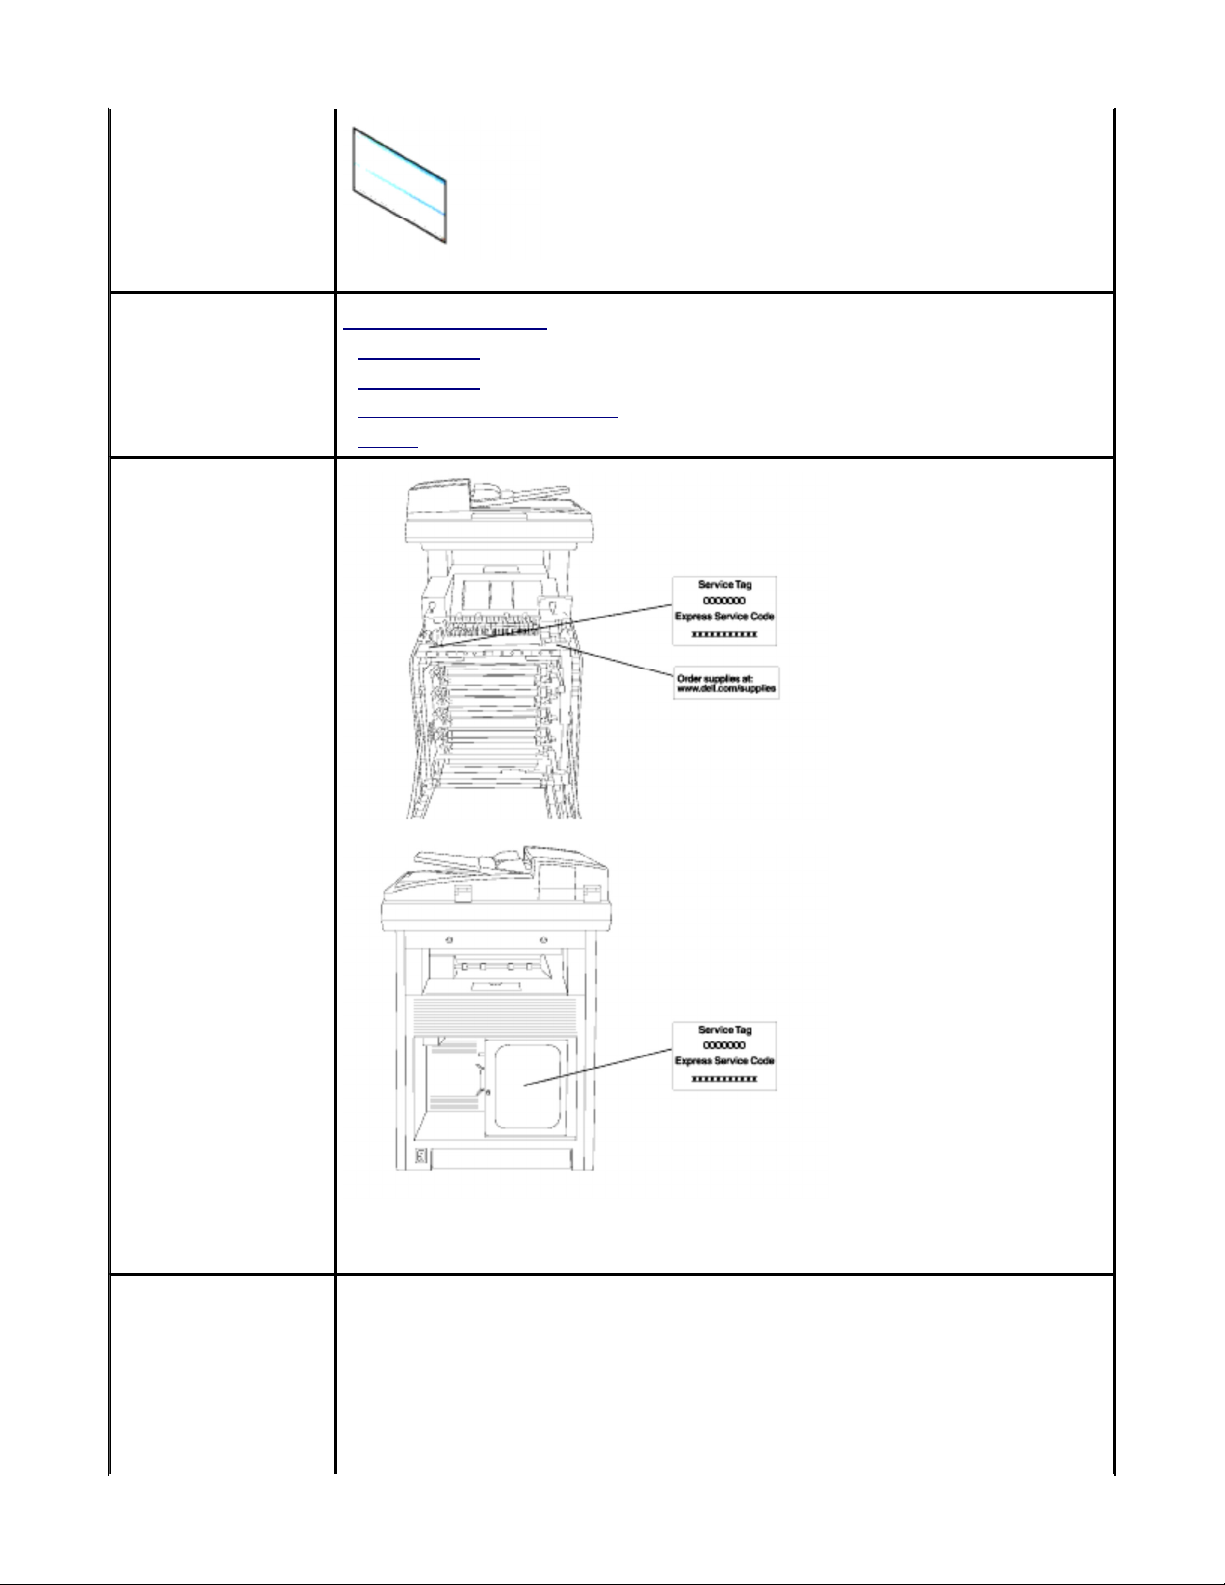
Express Service Code
and Service Tag
number
The Express Service Code and Service Tag numbers are located inside the front
door of your multifunction printer.
· Latest drivers for my
multifunction printer
· Answers to technical
service and support
questions
· Documentation for
my multifunction
Dell Support Website
The Dell Support Website provides several online tools, including:
· Solutions — Troubleshooting hints and tips, articles from technicians, and
online courses
· Upgrades — Upgrade information for components, such as memory
· Customer Care — Contact information, order status, warranty, and repair
Page 6

printer information
Page
3
of 3Finding Information
2/
29/
2012
mk:@MSITStore:C:\Users\14JMIS~1\AppData\Local\Temp\Rar$DIa0.409\UsersGuide.ch
...
· Downloads — Drivers
· Reference — Multifunction printer documentation and product specifications
You can access Dell Support at support.dell.com. Select your region on the
support page, and fill in the requested details to access help tools and information.
Page 7
Dell Printer Configuration Web Tool
order additional print
cartridges.
Page
1
of 40Dell Printer Configuration Web Tool
2/
29/
2012
mk:@MSITStore:C:\Users\14JMIS~1\AppData\Local\Temp\Rar$DIa0.409\UsersGuide.ch
...
Using the Dell Printer Configuration Web Tool
One of the features of the Dell Printer Configuration Web Tool is the E-Mail Alert Setup, which sends you or the key operator an e-mail when the multifunction printer
needs supplies or intervention.
To fill out printer inventory reports requiring the asset tag number of all of the multifunction printer in your area, use the Printer Information feature in the Dell Printer
Configuration Web Tool. Just type the IP address of each printer on the network to display the asset tag number.
The Dell Printer Configuration Web Tool feature also lets you change printer settings and keep track of printing trends. If you are a network administrator, you can
easily copy the printer's settings to one or all printers on the network using your Web browser.
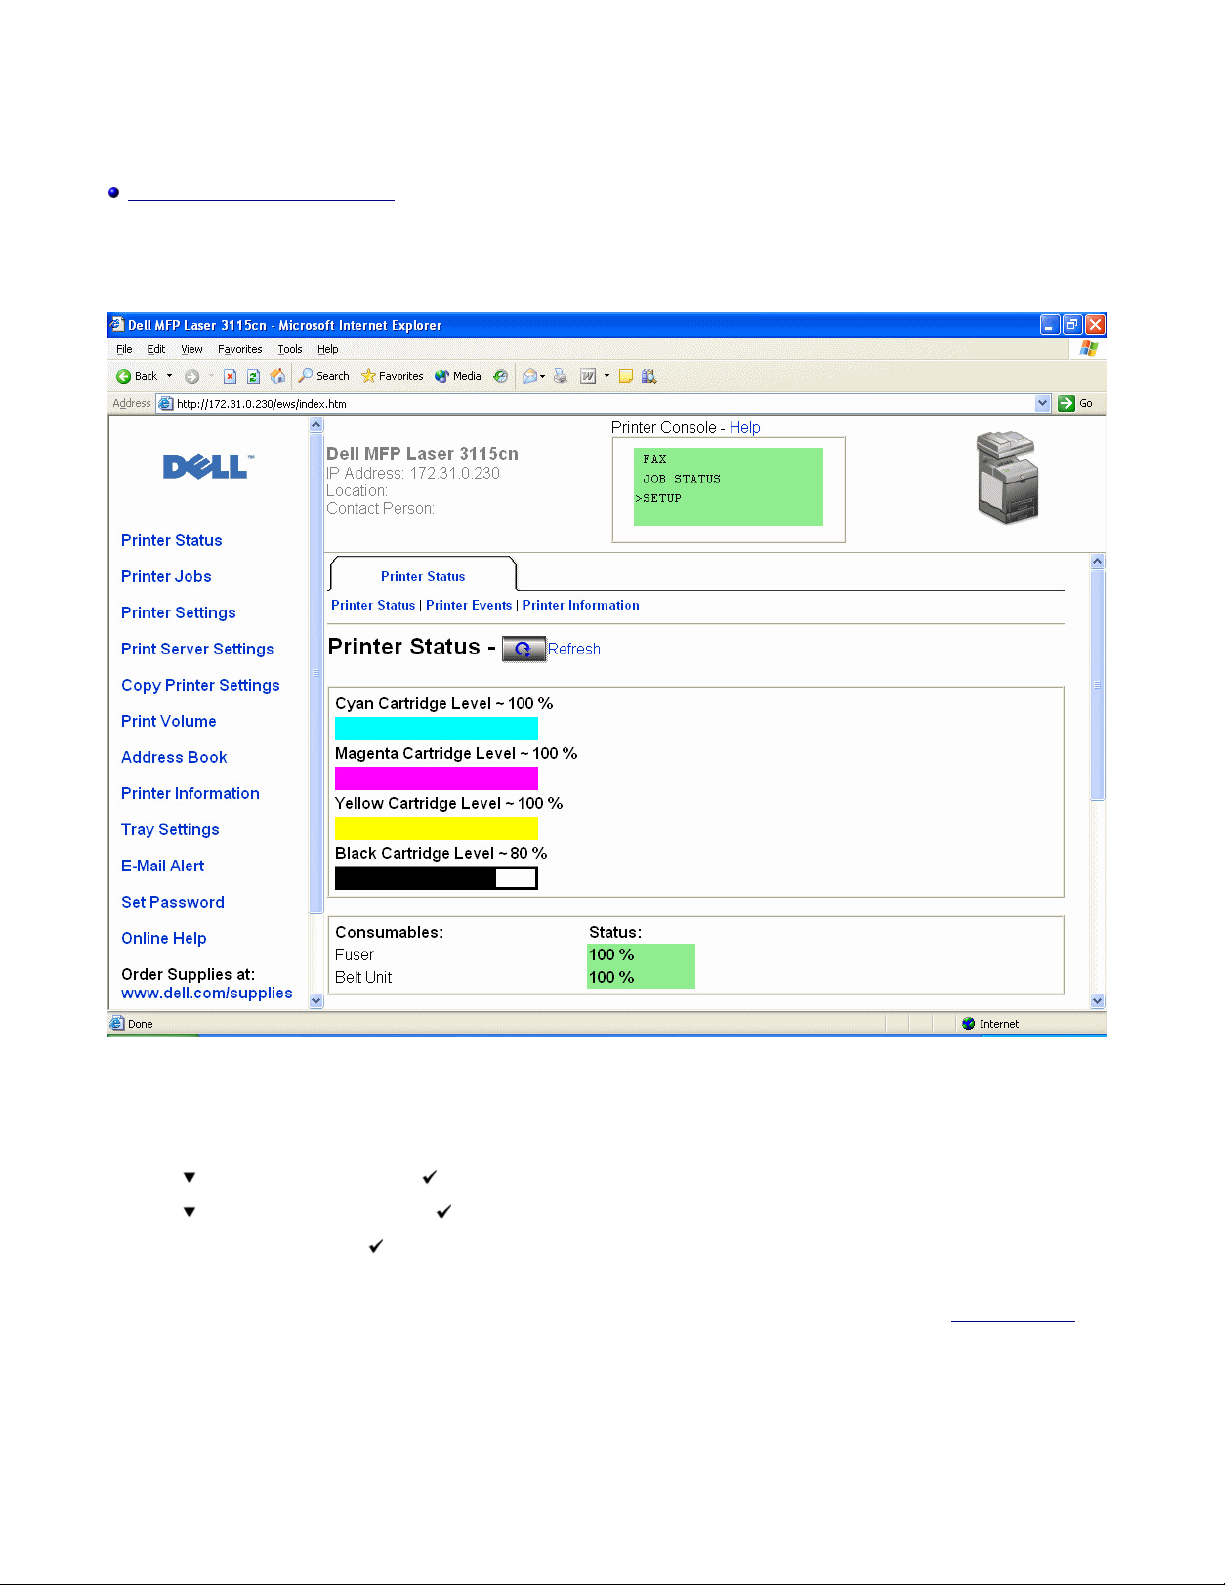
To launch the Dell Printer Configuration Web Tool, type your network printer's IP address in your Web browser.
If you do not know what your printer's IP address is, print a printer settings page, which lists the IP address:
1. Press until >SETUP appears, and then press .
2. Press until >Reports appears, and then press .
3. System Settings is displayed. Press .
The system settings page is printed.
If the IP address shows 0.0.0.0 (the factory default), an IP address has not been assigned. To assign one for your multifunction printer, see "Assign an IP Address."
Use the Dell Printer Configuration Web Tool for:
Printer Status
Use the Printer Status menu to get immediate feedback on printer supply status. When print cartridge is running low, click the Order Supplies link on the first screen to
Page 8

Printer Jobs
Page
2
of 40Dell Printer Configuration Web Tool
2/
29/
2012
mk:@MSITStore:C:\Users\14JMIS~1\AppData\Local\Temp\Rar$DIa0.409\UsersGuide.ch
...
Use the Printer Jobs menu to contain information on Job List page and Completed Jobs page.
These pages show the details of the status regarding each protocol or the print jobs.
Printer Settings
Use the Printer Settings menu to change printer settigns and view the operator panel remotely.
Print Server Settings
Using the Print Server Settings menu, you can change the type of printer interface and necessary conditions for communications.
Copy Printer Settings
Use the Copy Printer Settings menu to copy the printer's settings to another printer or printers on the network just by typing each printer's IP address.
NOTE: You must log in as an administrator to use this feature.
Address Book
Use the Address Book menu to organize E-Mail Address, Server Address and Phone Book.
Print Volume
Use the Print Volume option to keep track of printing trends, such as paper usage and types of jobs being printed, and limit which users use the color mode and the
maximum number of pages they can print.
Printer Information
Use the Printer Information menu to get the information you need for service calls, inventory reports, or the status of current memory and engine code levels.
Tray Settings
Use the Tray Settings menu to get the information about the paper type and size for each tray.
E-Mail Alert
Use the E-Mail Alert menu to receive an e-mail when the multifunction printer needs supplies or intervention. Type your name or the key operator's name in the e-mail
list box to be notified.
Set Password
Use the Set Password menu to lock the operator panel with a password so that other users don't inadvertently change the printer settings you selected.
NOTE: You must log in as an administrator to use this feature.
Online Help
Click Online Help to visit the Dell web page, and see the User's Guide on that page to verify configured settings.
Order Supplies at:
www.dell.com/supplies
Contact Dell Support at:
support.dell.com
Using the Dell Printer Configuration Web Tool
Be sure to activate JavaScript in your browser before using the Dell Printer Configuration Web Tool.
Environment Settings for Web Browsers
Dell recommends configuring the environment settings for your Web browsers, before using the Dell Printer Configuration Web Tool.
NOTE: The Dell Printer Configuration Web Tool pages may be displayed unreadable if you browse the pages that were configured by using the browser of which
language setting is different with your browser's.
Page 9

For Internet Explorer 6.0/7.0
Page
3
of 40Dell Printer Configuration Web Tool
2/
29/
2012
mk:@MSITStore:C:\Users\14JMIS~1\AppData\Local\Temp\Rar$DIa0.409\UsersGuide.ch
...
Setting Up the Display Language
1. Select Preferences from the Edit menu.
2. Select Languages in the General tab.
3. Specify the display language in order of preference in the Language in order of preference list.
For example:
Italian (Italy) [it]
Spanish (Traditional Sort) [es]
German (Germany) [de]
French (France) [fr]
English [en] or English (United States) [en-us]
Setting the Printer's IP Address to Non-proxy
1. Select Internet Options from the Tools menu.
2. Select Proxy server under LAN Settings in the Connections tab.
3. Do either of the following:
z Clear the Use a proxy sever for your LAN check box.
z Click Advanced, and then specify the printer's IP address in the Do not use proxy server for addresses beginning with field under Exceptions.
When you have finished setting the language and proxy, type <http://nnn.nnn.nnn.nnn/> (the printer's IP address) in the URL entry field of the browser to activate the
Dell Printer Configuration Web Tool.
For Netscape Communicator 7.1
Setting Up the Display Language
1. Select Preferences from the Edit menu.
2. Select Languages under the the Navigator group.
3. Specify the display language in order of preference in the Language in order of preference list.
For example:
English [en] or English/United States [en-us]
German [de]
French [fr]
Italian [it]
Spanish [es]
Netherlands [nl]
Norwegian [no]
Swedish [sv]
Setting the Printer's IP Address to Non-proxy
1. Select Preferences from the Edit menu.
2. In the Navigator group, select Proxies in the Advanced tab.
3. Select either Direct connection to the Internet or Manual proxy configuration.
When you select Manual proxy configuration, specify the printer's IP address in the No Proxy for: box.
When you have finished setting the language and proxy, type <http://nnn.nnn.nnn.nnn/> (the printer's IP address) in the URL entry field of the browser to activate the
Dell Printer Configuration Web Tool.
For Firefox 1.5 or Later
Setting Up the Display Language
1. Select Options from the Tools menu.
2. In the Navigator group, select Proxies in the Advanced tab.
3. Click Edit Languages in the General tab.
4. Specify the display language in order of preference in the Language in order of preference list.
For example:
English [en] or English/United States [en-gb]
Italian [it]
Spanish [es]
German [de]
French [fr]
Netherlands [nl]
Norwegian [no]
Swedish [sv]
Page 10
Setting the Printer's IP Address to Non-proxy
Page
4
of 40Dell Printer Configuration Web Tool
2/
29/
2012
mk:@MSITStore:C:\Users\14JMIS~1\AppData\Local\Temp\Rar$DIa0.409\UsersGuide.ch
...
1. Select Options from the Tools menu.
2. Click General on the Options dialog box.
3. Click Connection SettingsoConnection Settings.
4. Do one of the following:
z "Select the Direct connection to the Internet check box.
z "Select the Auto-detect proxy settings for this network check box
z "Select the Manual proxy configuration check box, and then enter the printer's IP address in the No Proxy for edit box.
z "Select the Automatic proxy configuration URL check box
When you have finished setting the language and proxy, type <http://nnn.nnn.nnn.nnn/> (the printer's IP address) in the URL entry field of the browser to activate the
Dell Printer Configuration Web Tool.
Page Display Format
The layout of the page is divided into three sections mentioned below:
Top Frame
Located at the top of all pages is the Top Frame. When Dell Printer Configuration Web Tool is activated, the current status and specifications of the multifunction
printer are displayed in the Top Frame on every page.
The following items are displayed in the Top Frame.
Dell MFP Laser
3115cn
IP Address: Displays the printer's IP address.
Location: Displays the printer's location. The location can be changed in Basic Information on the Print Server Settings page.
Contact Person: Displays the printer's administrator's name. The name can be changed in the Basic Information on the Print Server Settings page.
Printer Console Displays the status of the printer operator panel display and indicators. This is automatically refreshed at the set interval. The interval can be
Help Links to the Dell web page. See the User's Guide on the Dell Support site for help on this product.
Printer Bitmap Shows the printer bitmap. The Printer Status menu appears in the Right Frame by clicking the bitmap.
Displays the printer product name.
changed in the Basic Information on Print Server Settings page.
Left Frame
Located at the left side of all pages is the Left Frame. The titles of menus displayed in the Left Frame are linked to corresponding menus and pages. You can go to the
corresponding page by clicking their characters.
The following menus are displayed in the Left Frame.
Printer Status Links to the Printer Status menu.
Printer Jobs Links to the Printer Jobs menu.
Printer Settings Links to the Printer Settings Report menu.
Print Server Settings Links to the Print Server Reports menu.
Copy Printer Settings Links to the Copy Printer Settings menu.
Print Volume Links to the Print Volume menu
Address Book Links to the Address Book menu.
Printer Information Links to the Printer Status menu.
Tray Settings Links to the Tray Settings menu.
E-Mail Alert Links to the Print Server Settings menu.
Set Password Links to the Other Features menu.
Online Help Links to the Dell web page. See the User's Guide on that page.
Order Supplies at: Links to the Dell web page.
Contact Dell Support at: Links to the Dell support page.
Web address: http://support.dell.com/
Right Frame
Page 11
Located at the right side of all pages is the Right Frame. The contents of the Right Frame correspond to the menu that you select in the Left Frame. For details on the
Page
5
of 40Dell Printer Configuration Web Tool
2/
29/
2012
mk:@MSITStore:C:\Users\14JMIS~1\AppData\Local\Temp\Rar$DIa0.409\UsersGuide.ch
...
items displayed in the Right Frame, see "Details of Menu Items."
Buttons on the Right Frame
Refresh Button
Apply New Settings Button Submits new settings made on the Dell Printer Configuration Web Tool to the multifunction printer. The old printer settings will
Restart printer to apply new
settings Button
Restore Settings Button Restores the old settings from before changes made. New settings will not be submitted to the multifunction printer.
Receives the current printer configuration and updates the latest information in the Right Frame.
be replaced by the new settings.
Submits new settings made on the Dell Printer Configuration Web Tool to the multifunction printer and reboots the
multifunction printer. The old printer settings will be replaced by the new settings.
Changing the Settings of Menu Items
Some menus allow you to change the printer settings through the Dell Printer Configuration Web Tool. When you are accessing these menus, the authentication
dialog appears on the screen. Type a user name and password for the printer's administrator by following the prompts displayed in the dialog box.
The default user name is admin, and the default password is left blank (NULL). You can change only the password in the Set Password page in the Print Server
Settings menu. The user name cannot be changed. See "Set Password" for more information.
Details of Menu Items
"Printer Status" "Printer Status"
"Printer Events"
"Printer Information"
"Printer Jobs" "Job List"
"Completed Jobs"
"Printer Settings" "Printer Settings Report" "Menu Settings"
"Reports"
"Printer Settings" "System Settings"
"Parallel Settings"
"Network Settings"
"USB Settings"
"PCL Settings"
"PS Settings"
"Secure Settings"
"Copy Defaults"
"Copy Color Balance"
"Copy Settings"
"Scan Defaults"
"Fax Defaults"
"Fax Settings"
"Printer Maintenance" "Paper Density"
"Adjust BTR"
"Adjust Fuser"
"Auto Registration Adjustment"
"Color Registration Adjustments"
"Adjust Altitude"
"Reset Defaults"
"Clear Storage"
"Non-Dell Toner"
"Initialize PrintMeter"
"Clock Settings"
*4
*4
*4
*1
Page 12
"Web Link Customization"
Page
6
of 40Dell Printer Configuration Web Tool
2/
29/
2012
mk:@MSITStore:C:\Users\14JMIS~1\AppData\Local\Temp\Rar$DIa0.409\UsersGuide.ch
...
"Print Server Settings" "Print Server Reports" "Print Server Setup Page"
"NetWare Setup Page"
"E-Mail Alert Setup Page"
"Print Server Settings" "Basic Information"
"Port Settings"
"Wireless LAN"
"TCP/IP"
"NetWare"
"SMB"
"AppleTalk"
"E-Mail Alert"
"Bonjour (mDNS)"
"SNMP"
"Scan to PC"
"Other Features" "Set Password"
"Security"
"IPsec"
"Reset Print Server"
"Copy Printer Settings" "Copy Printer Settings"
"Copy Printer Settings Report"
"Print Volume" "Print Volume"
"Dell ColorTrack"
"Address Book" "E-Mail Address"
"Server Address - Top Page"
"Phone Book"
"Tray Settings" "Tray 1 Paper Type"
"Tray 1 Paper Size"
"Tray 1 Custom Size - Y"
"Tray 1 Custom Size - X"
"Tray 2 Paper Type"
"Tray 2 Paper Size"
"Tray 2 Custom Size - Y"
"Tray 2 Custom Size - X"
"MPF Mode"
"Display Popup"
"MPF Paper Type"
"MPF Paper Size"
"MPF Custom Size - Y"
"MPF Custom Size - X"
*1 This item is only available when the RAM disk is set to on.
*2
*2
*3
*3
*2
*2
*3
*2
*5
*5
*5
*5
*2 This item is only available when the optional multi-protocol card is installed.
*3 This item is only available when the optional wireless printer adapter is installed.
*4 This item is only available with the printer using the PostScript driver.
Page 13
*5 This item is only available when the optional 550-sheet paper feeder is installed.
Page
7
of 40Dell Printer Configuration Web Tool
2/
29/
2012
mk:@MSITStore:C:\Users\14JMIS~1\AppData\Local\Temp\Rar$DIa0.409\UsersGuide.ch
...
Printer Status
Use the Printer Status menu to check the status of consumables, hardware, and specifications of the multifunction printer.
The following pages are displayed in the Printer Status menu.
Printer Status
Purpose:
To check the status of remaining consumables and trays.
Values:
Cyan Cartridge Level
Magenta Cartridge Level
Yellow Cartridge Level
Black Cartridge Level
Consumables Status n% Indicates the toner remaining in each print cartridge as %. "n" is a number.
Paper Trays Status OK Indicates that there is some paper in the tray but the quantity is unknown.
Add
Paper
Capacity Displays the maximum capacity of the paper tray.
Size Displays the size of paper in the tray.
Output Tray Status OK Indicates that the tray is available.
Capacity Displays the maximum capacity of the paper tray.
Cover Status Closed Indicates that the cover is closed.
Open Indicates that the cover is open.
Printer Type Displays the type of printing for the multifunction printer. Color Laser is displayed normally.
Printing Speed Displays the printing speed for the multifunction printer.
Printer Events
Purpose:
When printer faults occur such as running out of paper or running out of print cartridge, the details of all alerts or indications of faults are displayed in the Printer Events
page.
Values:
Displays the percent of toner remaining in each print cartridge. When a cartridge is empty, a message appears. The text Print
Cartridge is linked to the Dell Printer Supplies website.
Indicates that there is no paper in the tray.
Location Displays the location where the printer fault occurred.
Details Displays the details of the printer fault.
Printer Information
Purpose:
To verify the printer details such as hardware configuration and software version. This page can also be displayed by clicking Printer Information in the Left Frame.
Values:
Dell Service Tag Number Displays Dell's service tag number.
Asset Tag Number Displays the printer's asset tag number.
Printer Serial Number Displays the printer's serial number.
Memory Capacity Displays the memory capacity.
Processor Speed Displays the processing speed.
Printer Revision Levels Firmware Version Displays the revision date (revision level).
Network Firmware Version Displays the revision date (revision level).
Printer Jobs
The Printer Jobs menu contains information on the Job List and Completed Jobs pages. These pages show the details of the status regarding each protocol or the
Page 14
print jobs.
Page
8
of 40Dell Printer Configuration Web Tool
2/
29/
2012
mk:@MSITStore:C:\Users\14JMIS~1\AppData\Local\Temp\Rar$DIa0.409\UsersGuide.ch
...
Job List
Purpose:
To confirm the print jobs that are being processed. Click the Refresh button to update the screen.
Values:
ID Displays the job id.
Job Name Displays the file name of the job being printed.
Owner Displays the job owner's name.
Host Name Displays the name of the host computer.
Job Status Displays the status of the job being printed.
Job Type Displays the type of the job.
Host I/F Displays the status of the host interface.
Job Submitted Time Displays the date the print job was submitted.
Completed Jobs
Purpose:
To check the completed print jobs. Up to the last 22 print jobs are displayed. Click the Refresh button to update the screen.
Values:
Id Displays the job id.
Job Name Displays the file name of the completed print job.
Owner Displays the job owner's name.
Host Name Displays the name of the host computer.
Output Result Displays the status of completed print jobs.
Job Type Displays the type of the job.
Impression Number Displays the number of pages in the print job.
No. of Sheets Displays the number of sheets in the print job.
Host I/F Displays the status of the host interface.
Job Submitted Time Displays the date the print job was submitted.
Printer Settings
Use the Printer Settings menu to display the printer settings report and to configure printer settings.
The following tabbed pages are displayed at the top of the Right Frame.
Printer Settings Report
The Printer Settings Report tab includes the Menu Settings and Reports pages.
Menu Settings
Purpose:
To display the current settings of the operator panel menus.
Values:
System Settings Power Saver Mode2 Displays the status for the power saver mode 2.
Power Saver Timer
Mode 1
Power Saver Timer
Mode 2
Auto Reset Displays the amount of time before the printer is reset.
Panel Select Tone Displays the selected tone for the panel.
Displays the amount of time before the multifunction printer enters the power saver timer mode 1 after it finishes a
print job.
Displays the amount of time before the multifunction printer enters the power saver timer mode 2 after it finishes a
print job.
Page 15

Panel Alert Tone Displays the alert tone for the panel.
Page
9
of 40Dell Printer Configuration Web Tool
2/
29/
2012
mk:@MSITStore:C:\Users\14JMIS~1\AppData\Local\Temp\Rar$DIa0.409\UsersGuide.ch
...
Machine Ready Tone Displays the tone when the machine becomes ready.
Copy Job Tone Displays the tone when copying starts.
Non-Copy Job Tone Displays the tone when copying is complete.
Fault Tone Displays the tone when an error occurs.
Alert Tone Displays whether the multifunction printer sounds an alarm when an error occurs.
Out of Paper Tone Displays the tone when the paper runs out.
Low Toner Tone Displays the tone when the toner is low.
Auto Clear Alert
Tone
Base Tone Displays the base tone.
All Tones Displays all tones.
Time-Out Displays specify the amount of time the multifunction printer waits to receive additional bytes of data from the
Panel Language Displays the language of the text on the operator panel screen.
Auto Log Print Displays whether the printer outputs logs automatically.
Print ID Displays a location where the user ID is printed.
Print Text Displays whether the multifunction printer outputs PDL (Page Description Language) data, which is not supported by the
Banner Sheet Insert
Position
Banner Sheet
Specify Tray
RAM Disk Displays whether to allocate memory to the RAM disk file system for the Secure Print and Proof Print features.
Substitute Tray Displays whether or not to use another size paper when the paper that is loaded in the specified tray does not match
mm/inch Displays the measurement unit on the operator panel screen.
Fax Activity Displays the status for printing the fax activity.
Fax Transmit Displays the status for printing the fax transmission.
Fax Broadcast Displays the status for printing the fax broadcast.
Protocol Monitor Displays the status for printing the protocol monitor.
Parallel Settings ECP Displays the ECP (Extended Capability Port) communication mode of the parallel interface.
Adobe Protocol Displays PostScript communication protocol for each interface.
Network Settings Adobe Protocol Displays PostScript communication protocol for each interface.
USB Settings Adobe Protocol Displays PostScript communication protocol for each interface.
PCL Settings Paper Tray Displays the input tray.
Paper Size Displays the default paper size.
Custom Size - Y Displays the length of paper.
Custom Size - X Displays the width of paper.
Orientation Displays how text and graphics are oriented on the page.
2 Sided Displays whether to do duplexing as the default for all print jobs. This item is only available when the optional duplexer
Font Displays the default font from the registered fonts in the multifunction printer.
Symbol Set Displays a symbol set for a specified font.
Font Size Displays the font size for scalable typographic fonts.
Font Pitch Displays the font pitch for scalable monospaced fonts.
Form Line Displays the number of characters in a line.
Quantity Displays the number of copies you want for the printer default value.
Image
Enhancement
Displays the tone when the jam is cleared.
computer.
multifunction printer, as text when the multifunction printer receives it
Displays the position of banner sheet.
Displays the tray in which the banner sheet is loaded.
This item is only available when the 256 MB, or higher, optional memory card is installed.
the paper size settings for the current job.
is installed.
Displays whether to perform the image enhancement feature.
Page 16
Hex Dump Displays whether the Hex Dump feature is on or off.
Page
10
of 40Dell Printer Configuration Web Tool
2/
29/
2012
mk:@MSITStore:C:\Users\14JMIS~1\AppData\Local\Temp\Rar$DIa0.409\UsersGuide.ch
...
Draft Mode Displays whether to print in the draft mode.
Line Termination Displays whether to set the line termination.
Default Color Displays the color mode setting.
PS Settings PS Error Report Displays whether the multifunction printer outputs error contents for a PS (PostScript) error.
PS Job Time-Out Displays the execution time for one PostScript job.
Paper Select Mode Displays the tray that is selected in the PostScript printing.
Secure Settings Panel Lock Set Displays whether or not to lock Admin menu with a password.
Copy/Scan/Fax Set Displays whether or not to lock Copy, Scan, or Fax menus with a password.
Secure Receive Set Displays whether or not to require the password for printing received fax documents.
Copy Defaults Color Prints in the Color or Black&White mode.
Input Tray The paper is fed from the selected tray.
Reduce/Enlarge Enlarges or reduces the size of a copied image.
Custom
Reduce/Enlarge
Original Type Uses for documents with both text or photo/gray tones.
Lighter/Darker Works with light print or dark print.
Sharpness Makes the copy sharper or softer than the original.
Color Saturation Adjusts the amount of color to make the colors deeper or lighter than the original.
Auto Exposure Adjusts the overall brightness to make the copy overexposed than the original.
Auto Exposure Level Displays the level of the overall brightness.
Copy Color Balance Yellow Low Dens. Displays the yellow low density.
Yellow Medium
Dens.
Yellow High Dens. Displays the yellow high density.
Magenta Low Dens. Displays the magenta low density.
Magenta Medium
Dens.
Magenta High Dens. Displays the magenta high density.
Cyan Low Dens. Displays the cyan low density.
Cyan Medium Dens. Displays the cyan medium density.
Cyan High Dens. Displays the cyan high density.
Black Low Dens. Displays the black low density.
Black Medium Dens. Displays the black medium density.
Black High Dens. Displays the black high density.
Copy Settings Auto Fit On Fits the image on the paper currently loaded.
2
2Sided*
Multiple-Up Off* Does not perform multiple-up printing.
Collated*
Poster Off* Does not print an image onto several sheets of paper.
3
Reduces or enlarges the image to the custom size (25-400%) if Reduce/Enlarge is set to Custom.
Displays the yellow medium density.
Displays the magenta medium density.
Off* Does not fit the image on the paper currently loaded.
1->1Sided Does not print a 2-sided original document onto one sheet of paper.
LongEdgeBinding Uses for long-edge binding when you perform duplex printing.
ShortEdgeBinding Uses for short-edge binding when you perform duplex printing.
Auto Automatically reduces the original pages to fit onto one sheet of paper.
ID Copy Prints the original pages onto one sheet of paper in the original size.
Manual Prints the original pages onto the one sheet of paper in the size specified in Reduce/Enlarge.
Uncollated Does not sort the copy job.
Collated Sorts the copy job.
2 x 2 Prints an image onto 4 sheets of paper (2 by 2).
Page 17
3 x 3 Prints an image onto 9 sheets of paper (3 by 3).
Page
11
of 40Dell Printer Configuration Web Tool
2/
29/
2012
mk:@MSITStore:C:\Users\14JMIS~1\AppData\Local\Temp\Rar$DIa0.409\UsersGuide.ch
...
4 x 4 Prints an image onto 16 sheets of paper (4 by 4).
Poster Docu. Size A4 Displays the size of the divided sheets.
Letter*
B5
A5
Image Repeat Off* Does not print multiple image copies from the original document on a single page.
On Prints multiple image copies from the original document on a single page.
Margin Off* Does not specify the margin of the copy.
On Specifies the margin of the copy.
Margin Top/Bottom 4-50 mm (0.2-2.0
Margin Left/Right 4-50 mm (0.2-2.0
Margin Middle 0-50 mm (0.0-2.0
Scan Defaults Send to Client Server Stores the scanned image on the server by using the FTP (File Transfer Protocol) protocol.
Network Port*
File Format PDF* Saves the scanned copy in PDF.
Color Color* Prints in the color mode.
Resolution 150* Scans an image in 150 dpi.
Original Type Text&Photo Uses for documents with both text and photo/gray tones.
Document Size A4 Sets the document size in A4.
Lighter/Darker Normal* Works well with standard typed or printed documents.
inch)
inch)
inch)
Computer* Stores the scanned image on the computer by using the SMB (Server Message Block) protocol.
4
Wired* Stores data via the wired connection.
Wireless Stores data via the wireless connection.
MultiPageTIFF Saves the scanned copy in MultiPageTIFF.
TIFF Saves the scanned copy in TIFF.
JPEG Saves the scanned copy in JPEG.
MP TIFF
NonComp*
TIFF NonComp*
Black&White Prints in the black and white mode.
300 Scans an image in 300 dpi.
400 Scans an image in 400 dpi.
600 Scans an image in 600 dpi.
Photo Uses for documents with photo or gray tones.
Text Uses for documents with text.
Letter Sets the document size in Letter.
B5 Sets the document size in B5.
A5 Sets the document size in A5.
Executive Sets the document size in Executive.
8.5x13"*
Legal*
Darker1 Works well with light print or faint pencil markings.
Darker2
Darker3
Lighter3 Works well with dark print.
3
5
5
Displays the size of the top and bottom margins. The default is 5 mm.
Displays the size of the right and left margins. The default is 5 mm.
Displays the size of the middle margin. The default is 10 mm.
Saves the scanned copy in MP TIFF NonComp.
3
Saves the scanned copy in TIFF NonComp.
Sets the document size in 8.5"x13".
Sets the document size in Legal.
Page 18
Lighter2
Page
12
of 40Dell Printer Configuration Web Tool
2/
29/
2012
mk:@MSITStore:C:\Users\14JMIS~1\AppData\Local\Temp\Rar$DIa0.409\UsersGuide.ch
...
Lighter1
Sharpness Softer Adjusts sharpness of color to make the copy softer than the original.
Normal* Does not adjust sharpness of color to make the copy sharper or softer than the original.
Sharper Adjusts sharpness of color to make the copy sharper than the original.
Contrast Normal* Does not adjust the amount of color in a specified hue to make the copy sharper or softer than
Higher Adjusts the amount of color in a specified hue to make the copy sharper than the original.
Lower Adjusts the amount of color in a specified hue to make the copy softer than the original.
Auto Exposure On Adjusts the overall brightness to make the copy overexposed than the original.
Auto Exposure Level Normal* Displays the level of the overall brightness in Normal.
Higher(1) Displays the level of the overall brightness in Higher(1).
Higher(2) Displays the level of the overall brightness in Higher(2).
TIFF File Format TIFF V6* Sets the file in the TIFF V6 format.
TTN2 Sets the file in the TTN2 format.
Image Compression Lower Compresses an image in Lower.
Normal* Compresses an image in Normal.
Higher Compresses an image in Higher.
Max E-Mail Size 50-16384 Sets a maximum volume of e-mail data. The default is 2048 bytes.
3
Fax Defaults*
Fax Settings Interval Timer Specifies the interval time (3-255 minutes) of the resend attempts. The default is 8min.
Resolution Standard* For documents with normal sized characters.
Fine For documents containing small characters or thin lines or documents printed using a dot-matrix
SuperFine For documents containing extremely fine detail. The super fine mode is enabled only if the
Original Type Text&Photo Uses for documents with both text and photo/gray tones.
Photo Uses for documents with photo or gray tones.
Text* Uses for documents with text.
Lighter/Darker Normal* Works well with standard typed or printed documents.
Darker1 Works well with light print or faint pencil markings.
Darker2
Darker3
Lighter3 Works well with dark print.
Lighter2
Lighter1
Delayed Start Saves scanned documents for transmission at a specified time (0-23:59) in order to take advantage of lower long
Number of Redial Specifies the number of redial attempts, 0-9. If you enter 0, the multifunction printer will not redial. The default is 3.
Interval of Redial Automatically redials a remote fax machine if it was busy. Intervals from 1-15 minutes can be entered. The default is
Answer Select Selects the default fax receiving mode.
Auto Answer Fax Answers an incoming call and automatically goes into the receive mode in 0-255 seconds. The default is 1sec.
Auto Answer
TEL/FAX
Auto Answer
Ans/FAX
Line Monitor off Turns off the volume for the line monitor.
distance rates. The default is 21:00.
1min.
· TEL Mode
· FAX Mode (automatic receive mode)
· TEL/FAX Mode*
· Ans/FAX Mode
· DRPD (Distinctive Ring. Pattern Detection) Mode (DRPD is a service provided by some telephone companies.)
Shares one telephone line with an external telephone in 0-255 seconds. The default is 6sec.
Shares one telephone line with an answering machine in 0-255 seconds. The default is 48sec.
the original.
printer.
remote printer also supports the Super Fine resolution.
Page 19

Min Specifies the volume in Min for the incoming faxes.
Page
13
of 40Dell Printer Configuration Web Tool
2/
29/
2012
mk:@MSITStore:C:\Users\14JMIS~1\AppData\Local\Temp\Rar$DIa0.409\UsersGuide.ch
...
Middle* Specifies the volume in Middle for the incoming faxes.
Max Specifies the volume in Max for the incoming faxes.
Ring Tone Volume None Turns off the volume for the incoming faxes.
Min Specifies the volume in Min for the incoming faxes.
Middle Specifies the volume in Middle for the incoming faxes.
Max* Specifies the volume in Max for the incoming faxes.
Line Type PSTN* Sets PSTN (Public Switched Telephone Network) as the line type.
PBX Sets PBX (Private Branch Exchange) as the line type.
Dialing Type PB* Sets PB (Push Button) as the dial type.
DP (10PPS) Sets "DP (10PPS)" (Dial Pulse, 10 Pulse Per Second) as the dial type.
DP (20PPS) Sets "DP (20PPS)" (Dial Pulse, 20 Pulse Per Second) as the dial type.
DM Prevention On Only accepts faxes from numbers registered in the PhoneBook. Incoming faxes from numbers
Off* Accepts faxes from numbers that are not registered in the PhoneBook.
Remote Receive On Receives a fax by pressing the remote receive code on the external telephone.
Off* Does not receive a fax by pressing the remote receive code on the external telephone.
Remote Receive
Tone
Duplex Print On Uses duplex printing when you receive a fax.
Send Header On* Creates cover pages for the faxes.
Send Header Name Includes the header name in the cover pages for the faxes.
G3ID Contains your telephone number in the cover pages for the faxes.
Local Name Contains the local name in the cover pages for the faxes.
DRPD Pattern Patternn Sets the DRPD pattern from Pattern1 to Pattern5. DRPD is a service provided by some telephone
Forwarding Settings Trans. At Error Forwards the incoming faxes when an error occurs.
Forward Settings
Number
Forward Set Print On Prints the ongoing faxes when you can set the multifunction printer to forward the faxes.
Prefix Dial On Adds the prefix number when you send a fax.Prefix Dial is only available when PBX is set as the
Prefix Dial Number Sets a prefix dial number up to five digits.
Discard Size On Discards any excess document at the bottom of the page.
Color Fax On Allows color faxes to be sent and received (select color or black and white when sending a fax).
Extel Hook Thresh Lower Sets Lower in the threshold value.
Fwd. Error Print On* Prints documents that failed to transfer when Forward Set Print is set to Off.
Specifies the tone in 2-digit numbers (00-99) when Remote Receive is set to On.
Off* Does not use duplex printing when you receive a fax.
Off Does not create cover pages for the faxes.
Trans. Always. Always forwards the incoming faxes.
Not Trans.* Does not forward the incoming faxes.
Displays the Forward Settings number.
Off* Does not prints the ongoing faxes when you can set the multifunction printer to forward the
Off Does not add the prefix number when you send a fax.
Off* Does not discard any excess document at the bottom of the page.
Auto Reduction Automatically reduces the size if there is any excess document at the bottom of the page.
Off* Faxes are sent and received in black and white only.
Normal* Sets Normal in the threshold value.
Higher Sets Higher in the threshold value.
whose G3ID is not registered correctly are not accepted even if the number is registered in the
PhoneBook.
companies.
faxes.
line type.
Page 20

Off Does not print documents that failed to transfer when Forward Set Print is set to Off.
Page
14
of 40Dell Printer Configuration Web Tool
2/
29/
2012
mk:@MSITStore:C:\Users\14JMIS~1\AppData\Local\Temp\Rar$DIa0.409\UsersGuide.ch
...
Country*
Paper Density Plain Light Displays the paper density in Light for the plain paper.
Label Light* Displays the paper density in Light for the label.
Adjust BTR Plain Displays the voltage settings of the transfer roller (-3-3) for plain paper. The default is 0.
Plain Thick Displays the voltage settings of the transfer roller (-3-3) for thick plain paper. The default is 0.
Transparency Displays the voltage settings of the transfer roller (-3-3) for transparencies. The default is 0.
Covers Displays the voltage settings of the transfer roller (-3-3) for cover paper. The default is 0.
Covers Thick Displays the voltage settings of the transfer roller (-3-3) for thick cover paper. The default is 0.
Label Displays the voltage settings of the transfer roller (-3-3) for labels. The default is 0.
Coated Displays the voltage settings of the transfer roller (-3-3) for coated paper. The default is 0.
Coated Thick Displays the voltage settings of the transfer roller (-3-3) for thick coated paper. The default is 0.
Envelope Displays the voltage settings of the transfer roller (-3-3) for envelopes. The default is 0.
Adjust Fuser Plain Displays the temperature settings of the fuser unit (-2-2) for plain paper. The default is 0.
Plain Thick Displays the temperature settings of the fuser unit (-2-2) for thick plain paper. The default is 0.
Transparency Displays the temperature settings of the fuser unit (-2-2) for transparencies. The default is 0.
Covers Displays the temperature settings of the fuser unit (-2-2) for cover paper. The default is 0.
Covers Thick Displays the temperature settings of the fuser unit (-2-2) for thick cover paper. The default is 0.
Label Displays the temperature settings of the fuser unit (-2-2) for labels. The default is 0.
Coated Displays the temperature settings of the fuser unit (-2-2) for coated paper. The default is 0.
Coated Thick Displays the temperature settings of the fuser unit (-2-2) for thick coated paper. The default is 0.
Envelope Displays the temperature settings of the fuser unit (-2-2) for envelopes. The default is 0.
Auto Registration
Adjustment
Adjust Altitude Adjust Altitude Displays whether to adjust the height of the installation location of the printer.
Non-Dell Toner Non-Dell Toner Displays whether to use a refilled print cartridge.
Clock Settings Date Format Specifies the date format.
Web Link
Customization
Tray Settings Tray 1 Paper Type Displays the type of paper loaded in the standard 250-sheet tray
Auto Registration
Adjustment
Time Format Specifies the time format in 24H or 12H.
Time Zone Specifies the time zone.
Set Date Sets the date.
Set Time Sets the time.
Select Reorder URL Regular* Displays the URL (http://accessories.us.dell.com/sna) that Order Supplies at links to in the
Tray 1 Paper Size Displays the size of paper loaded in the standard 250-sheet tray
Tray 1 Custom Size
- Y
Tray 1 Custom Size
- X
Tray 2 Paper Type Displays the type of paper loaded in the optional 550-sheet paper feeder.
Tray 2 Paper Size Displays the size of paper loaded in the optional 550-sheet paper feeder.
Tray 2 Custom Size
- Y
Tray 2 Custom Size
- X
MPF Mode Displays the paper size and type when paper is loaded in the multipurpose feeder.
6
United States Sets the country for the fax.
Normal* Displays the paper density in Normal for the plain paper.
Normal Displays the paper density in Normal for the label.
Displays the Displays whether to adjust the registration automatically.
left frame.
Premier Displays the URL (http://premier.dell.com) that Order Supplies at links to in the left frame.
Displays the length of paper loaded in the standard 250-sheet tray.
Displays the width of paper loaded in the standard 250-sheet tray.
Displays the length of paper loaded in the optional feeder.
Displays the width of paper loaded in the optional feeder.
Page 21
Display Popup Displays a popup menu when paper is loaded in the multipurpose feeder.
Page
15
of 40Dell Printer Configuration Web Tool
2/
29/
2012
mk:@MSITStore:C:\Users\14JMIS~1\AppData\Local\Temp\Rar$DIa0.409\UsersGuide.ch
...
MPF Paper Type Displays the type of paper loaded in the multipurpose feeder.
MPF Paper Size Displays the size of paper loaded in the multipurpose feeder.
MPF Custom Size - Y Displays the length of paper loaded in the multipurpose feeder.
MPF Custom Size - X Displays the width of paper loaded in the multipurpose feeder.
*1 All changes made on the Printer Settings, Copy Printer Settings, Dell ColorTrack, and Tray Settings menus on the Dell Printer Configuration Web Tool are
discarded if they are made while the multifunction printer in power saver mode. Exit the mode to change the settings.
*2 This item is only available when the optional duplexer is installed.
*3 This item is only available when the optional memory card is set to on.
*4 This item is only available when the optional wireless printer adapter is installed.
*5 You can only use the Auto Document Feeder (ADF) to read the 8.5"x13" and Legal documents.
*6 click Restart printer to apply new settings for change to take effect.
Reports
Purpose:
To print various types of reports and lists.
Values:
System Settings Click the Start button to print the system settings page.
Panel Settings Click the Start button to print the panel settings page.
PCL Fonts List Click the Start button to print the PCL (Hewlett-Packard Printer Control Language) fonts list.
PCL Macro List Click the Start button to print the PCL Macro list.
Job History Click the Start button to print the job history report.
Error History Click the Start button to print the error history report.
PS Fonts List Click the Start button to print the PS fonts list.
Print Meter Click the Start button to print the print volume report.
Color Test Page Click the Start button to print the color test page.
Stored Documents Click the Start button to print the stored documents list.
Speed Dial Click the Start button to print the Speed Dial report.
Protocol Monitor Click the Start button to print the Protocol Monitor report.
Address Book Click the Start button to print the Address Book report.
Server Address Click the Start button to print the server address report.
Fax Activity Click the Start button to print the fax activity report.
Fax Pending Click the Start button to print the pending faxes report.
This item is only available when the Ram disk is set to on.
Printer Settings
The Printer Settings tab includes System Settings, Parallel Settings, Network Settings, USB Settings, PCL Settings, PS Settings, and Secure Settings pages.
System Settings
Purpose:
To configure the basic printer settings.
Values:
Power Saver Mode2 Displays the status for the power saver mode 2.
Power Saver Timer Mode 1Displays the amount of time before the multifunction printer enters the power saver timer mode 1 after it finishes a print job.
Power Saver Timer Mode 2Displays the amount of time before the multifunction printer enters the power saver timer mode 2 after it finishes a print job.
Auto Reset Displays the amount of time before the setting is reset automatically.
Page 22
Panel Select Tone Displays the selected tone for the panel.
Page
16
of 40Dell Printer Configuration Web Tool
2/
29/
2012
mk:@MSITStore:C:\Users\14JMIS~1\AppData\Local\Temp\Rar$DIa0.409\UsersGuide.ch
...
Panel Alert Tone Displays the alert tone for the panel.
Machine Ready Tone Displays the tone when the machine becomes ready.
Copy Job Tone Displays the tone when copying starts.
Non-Copy Job Tone Displays the tone when copying is complete.
Fault Tone Displays the tone when an error occurs.
Alert Tone Specifies whether the multifunction printer sounds an alarm when an error occurs.
Out of Paper Tone Displays the tone when the paper runs out.
Low Toner Tone Displays the tone when the toner is low.
Auto Clear Alert Tone Displays the tone when the jam is cleared.
Base Tone Displays the base tone.
All Tones Displays all types of tones.
Time-Out Specifies the amount of time the multifunction printer waits to receive additional bytes of data from the computer. When this timeout
Panel Language Determines the language of the text on the operator panel screen.
Auto Log Print Specifies whether the multifunction printer outputs logs automatically.
Print ID Specifies a location where the user ID is printed.
Print Text Specifies whether the multifunction printer outputs PDL data, which is not supported by the multifunction printer, as text when the
Banner Sheet Insert
Position
Banner Sheet Specify
Tray
RAM Disk Specifies whether to allocate memory to the RAM disk file system for the Secure Print and Store Print features.
Substitute Tray Specifies whether or not to use another size paper when the paper that is loaded in the specified tray does not match the paper size
mm/inch Specifies the measurement unit on the operator panel screen as either mm or inches.
Fax Activity Displays the status for printing the fax activity.
Fax Transmit Displays the status for printing the fax transmission.
Fax Broadcast Displays the status for printing the fax broadcast.
Protocol Monitor Displays the status for printing the protocol monitor.
expires, the print job is canceled.
multifunction printer receives it.
Specifies the position of banner sheet.
Specifies the tray in which the banner sheet is loaded.
This item is only available when the 256 MB, or higher, optional memory card is installed.
settings for the current job.
Parallel Settings
Purpose:
To configure the parallel interface.
Values:
ECP Specifies the ECP communication mode of the parallel interface.
Adobe Protocol Specifies PostScript communication protocol for each interface.
Network Settings
Purpose:
To Specify the PostScript communication protocol for this multifunction printer.
Values:
Adobe Protocol Specifies PostScript communication protocol for each interface.
USB Settings
Purpose:
To change printer settings affecting a USB (Universal Serial Bus) port.
Values:
Page 23
Adobe Protocol Specifies PostScript communication protocol for each interface.
Page
17
of 40Dell Printer Configuration Web Tool
2/
29/
2012
mk:@MSITStore:C:\Users\14JMIS~1\AppData\Local\Temp\Rar$DIa0.409\UsersGuide.ch
...
PCL Settings
Purpose:
To change printer settings that only affect jobs using the PCL emulation printer language.
Values:
Paper Tray Specifies the input tray.
Paper Size Specifies the default paper size.
Custom Size - Y Specifies the length of paper. The available range is from 98 mm (3.89 in.) to 355 mm (13.98 in.).
Custom Size - X Specifies the width of paper. The available range is from 77 mm (3.03 in.) to 220 mm (8.66 in.).
Orientation Specifies how text and graphics are oriented on the page.
2 Sided Sets duplexing as the default for all print jobs. This item is only available when the optional duplexer is installed.
Font Specifies the default font from the registered fonts in the multifunction printer.
Symbol Set Specifies a symbol set for a specified font.
Font Size Specifies the font size for scalable typographic fonts.
Font Pitch Specifies the font pitch for scalable monospaced fonts.
Form Line Specifies the number of characters in a line.
Quantity Sets the number of copies you want for the printer default value.
Image
Enhancement
Hex Dump Specifies whether to help isolate the source of a print job problem. With Hex Dump selected, all data sent to the multifunction printer is printed in
Draft Mode Specifies whether to print in the draft mode.
Line Termination Sets the line termination.
Default Color Specifies the color mode to Color or Black. This setting is used when the color printing mode setting is not specified for the print job that is sent
Specifies whether to perform the image enhancement feature.
hexadecimal and character representation. Control codes are not executed.
to the multifunction printer.
PS Settings
Purpose:
To change printer settings that only affect jobs using the PostScript emulation printer language.
Values:
PS Error Report Specifies whether the multifunction printer outputs error contents for a PostScript error.
PS Job Time-Out Specifies the execution time for one PostScript job.
Paper Select Mode Specifies the way to select the tray for the PostScript mode.
Secure Settings
Purpose:
To set or change the password to limit access to the menus from the operator panel.
Set the password of the Dell Printer Configuration Web Tool from Set Password in Print Server Settings.
Values:
Panel Lock Panel Lock Set Specifies whether to limit access to the Admin menu.
New Password Sets a password to limit access to the menus.
Re-enter Password Type the new password again to confirm.
Copy/Scan/Fax Lock Copy/Scan/Fax Set Specifies whether to limit access to the Copy, Scan, and Fax menus.
New Password Sets a password to limit access to the menus.
Re-enter Password Type the new password again to confirm.
Secure Receive Secure Receive Set Specifies whether to limit printing received fax documents.
Page 24
New Password Sets a password for receiving faxes.
Page
18
of 40Dell Printer Configuration Web Tool
2/
29/
2012
mk:@MSITStore:C:\Users\14JMIS~1\AppData\Local\Temp\Rar$DIa0.409\UsersGuide.ch
...
Re-enter Password Type the new password again to confirm.
NOTE: This menu sets a password to lock the operator panel. When changing the password for the Dell Printer Configuration Web Tool, click Set Password on
the left frame and set the password.
Copy Defaults
Purpose:
To create your own default Copy settings.
Values:
Color Prints in the Color or Black&White mode.
Input Tray The paper is fed from the selected tray.
Reduce/Enlarge Enlarges or reduces the size of a copied image.
Custom Reduce/Enlarge Reduces or enlarges the image to the custom size (25-400%) if Reduce/Enlarge is set to Custom.
Original Type Uses for documents with both text or photo/gray tones.
Lighter/Darker Works with light print or dark print.
Sharpness Makes the copy sharper or softer than the original.
Color Saturation Adjusts the amount of color to make the colors deeper or lighter than the original.
Auto Exposure Adjusts the overall brightness to make the copy overexposed than the original.
Auto Exposure Level Displays the level of the overall brightness.
*1 All changes made on the Tray Setting menus on the Dell Printer Configuration Web Tool are discarded if they are made while the multifunction printer in power
saver mode. Exit the mode to change the settings.
Copy Color Balance
Purpose:
To set the Copy color balance.
Values:
Yellow Low Dens. Displays the yellow low density.
Yellow Medium Dens. Displays the yellow medium density.
Yellow High Dens. Displays the yellow high density.
Magenta Low Dens. Displays the magenta low density.
Magenta Medium Dens. Displays the magenta medium density.
Magenta High Dens. Displays the magenta high density.
Cyan Low Dens. Displays the cyan low density.
Cyan Medium Dens. Displays the cyan medium density.
Cyan High Dens. Displays the cyan high density.
Black Low Dens. Displays the black low density.
Black Medium Dens. Displays the black medium density.
Black High Dens. Displays the black high density.
Copy Settings
Purpose:
To confirm the Copy settings.
Values:
Auto Fit On Fits the image on the paper currently loaded.
Off* Does not fit the image on the paper currently loaded.
1
2Sided*
1->1Sided Does not print a 2-sided original document onto one sheet of paper.
Page 25
LongEdgeBinding Uses for long-edge binding when you perform duplex printing.
Page
19
of 40Dell Printer Configuration Web Tool
2/
29/
2012
mk:@MSITStore:C:\Users\14JMIS~1\AppData\Local\Temp\Rar$DIa0.409\UsersGuide.ch
...
ShortEdgeBinding Uses for short-edge binding when you perform duplex printing.
Multiple-Up Off* Does not perform multiple-up printing.
Auto Automatically reduces the original pages to fit onto one sheet of paper.
ID Copy Prints the original pages onto one sheet of paper in the original size.
Manual Prints the original pages onto the one sheet of paper in the size specified in Reduce/Enlarge.
Collated*
Poster Off* Does not print an image onto several sheets of paper.
Poster Docu. Size A4 Displays the size of the divided sheets.
Image Repeat Off* Does not print multiple image copies from the original document on a single page.
Margin Off* Does not specify the margin of the copy.
Margin Top/Bottom 4-50 mm (0.2-2.0 inch) Displays the size of the top and bottom margins.
Margin Left/Right 4-50 mm (0.2-2.0 inch) Displays the size of the right and left margins.
Margin Middle 0-50 mm (0.0-2.0 inch) Displays the size of the middle margin.
*1 This item is only available when the optional duplexer is installed.
*2 This item is only available when the optional memory card is set to on.
Scan Defaults
Purpose:
To create your own default Scan settings.
Values:
2
Uncollated Does not sort the copy job.
Collated Sorts the copy job.
2 x 2 Prints an image onto 4 sheets of paper (2 by 2).
3 x 3 Prints an image onto 9 sheets of paper (3 by 3).
4 x 4 Prints an image onto 16 sheets of paper (4 by 4).
Letter*
B5
A5
On Prints multiple image copies from the original document on a single page.
On Specifies the margin of the copy.
Send to Client Server Stores the scanned image on the server by using the FTP protocol.
Computer* Stores the scanned image on the computer by using the SMB protocol.
Network Port Wired Stores data via the wired connection.
Wireless Stores data via the wireless connection.
File Format PDF* Saves the scanned copy in PDF.
Multi Page TIFF Saves the scanned copy in MultiPageTIFF.
TIFF Saves the scanned copy in TIFF.
JPEG Saves the scanned copy in JPEG.
MP TIFF NonComp Saves the scanned copy in MP TIFF NonComp.
TIFF NonComp Saves the scanned copy in TIFF NonComp.
Color Color* Prints in the color mode.
Black&White Prints in the black and white mode.
Resolution 150* Scans an image in 150 dpi.
300 Scans an image in 300 dpi.
400 Scans an image in 400 dpi.
600 Scans an image in 600 dpi.
Page 26
Original Type Text&Photo* Uses for documents with both text and photo/gray tones.
Page
20
of 40Dell Printer Configuration Web Tool
2/
29/
2012
mk:@MSITStore:C:\Users\14JMIS~1\AppData\Local\Temp\Rar$DIa0.409\UsersGuide.ch
...
Photo Uses for documents with photo or gray tones.
Text Uses for documents with text.
Document Size A4 Sets the document size in A4.
Letter Sets the document size in Letter.
B5 Sets the document size in B5.
A5 Sets the document size in A5.
Executive Sets the document size in Executive.
8.5"x13"*
Legal*
Lighter/Darker Normal* Works well with standard typed or printed documents.
Darker1 Works well with light print or faint pencil markings.
Darker2
Darker3
Lighter3 Works well with dark print.
Lighter2
Lighter1
Sharpness Softer Adjusts sharpness of color to make the copy softer than the original.
Normal* Does not adjust sharpness of color to make the copy sharper or softer than the original.
Sharper Adjusts sharpness of color to make the copy sharper than the original.
Contrast Normal* Does not adjust the amount of color in a specified hue to make the copy sharper or softer than the original.
Higher Adjusts the amount of color in a specified hue to make the copy sharper than the original.
Lower Adjusts the amount of color in a specified hue to make the copy softer than the original.
Auto Exposure On Adjusts the overall brightness to make the copy overexposed than the original.
Auto Exposure Level Normal* Displays the level of the overall brightness in Normal.
Higher(1) Displays the level of the overall brightness in Higher(1).
Higher(2) Displays the level of the overall brightness in Higher(2).
TIFF File Format TIFF V6* Sets the file in the TIFF V6 format.
TTN2 Sets the file in the TTN2 format.
Image Compression Lower Compresses an image in Lower.
Normal* Compresses an image in Normal.
Higher Compresses an image in Higher.
Max E-Mail Size 50-16384 Sets a maximum volume of e-mail data. The default is 2048 K bytes.
*1 You can only use the Auto Document Feeder (ADF) to read the 8.5"x13" and Legal documents.
1
1
Sets the document size in 8.5"x13".
Sets the document size in Legal.
Fax Defaults
Purpose:
To create your own default Fax settings.
Values:
Resolution Standard* For documents with normal sized characters.
Fine For documents containing small characters or thin lines or documents printed using a dot-matrix printer.
SuperFine For documents containing extremely fine detail. The super fine mode is enabled only if the remote printer also supports the Super
Original Type Text&Photo Uses for documents with both text and photo/gray tones.
Photo Uses for documents with photo or gray tones.
Text* Uses for documents with text.
Lighter/Darker Normal* Works well with standard typed or printed documents.
Fine resolution.
Page 27

Darker1 Works well with light print or faint pencil markings.
Page
21
of 40Dell Printer Configuration Web Tool
2/
29/
2012
mk:@MSITStore:C:\Users\14JMIS~1\AppData\Local\Temp\Rar$DIa0.409\UsersGuide.ch
...
Darker2
Darker3
Lighter3 Works well with dark print.
Lighter2
Lighter1
Delayed Start 21:00* Saves scanned documents for transmission at a specified time in order to take advantage of lower long distance rates.
00:0023:59
Fax Settings
Purpose:
To confirm the Fax settings.
Values:
Interval Timer Specifies the interval time (3-255 minutes) of the resend attempts.
Number of Redial Specifies the number of redial attempts, 0-9. If you enter 0, the multifunction printer will not redial. The default is 3.
Interval of Redial Automatically redials a remote fax machine if it was busy. Intervals from 1-15 minutes can be entered.
Answer Select You can select the default fax receiving mode.
Auto Answer Fax Answers an incoming call and automatically goes into the receive mode.
Auto Answer TEL/FAX Shares one telephone line with an external telephone.
Auto Answer Ans/FAX Shares one telephone line with an answering machine.
Line Monitor Specifies the volume of the external telephone (line monitor).
Ring Tone Volume Specifies the volume for the incoming faxes.
Line_Type PSTN Sets PSTN as the line type.
Dialing Type PB Sets PB as the dial type.
DM Prevention On Does not accept faxes including junk fax sent from remote stations.
Remote Receive On Receives a fax by pressing the remote receive code on the external telephone.
Remote Receive Tone Specifies the tone when Remote Receive is set to On.
Duplex Print*
Send Header On Creates cover pages for the faxes.
Send Header Name Includes the header name in the cover pages for the faxes.
G3ID Contains your telephone number in the cover pages for the faxes.
Local Name Contains the local name in the cover pages for the faxes.
DRPD Pattern Patternn Sets the DRPD pattern from Pattern1 to Pattern5. DRPD is a service provided by some telephone companies.
Forward Settings Trans. At Error* Forwards the incoming faxes when an error occurs.
Forward Settings Number Sets the number of the multifunction printer to forward the incoming faxes.
Forward Set Print On Prints the ongoing faxes when you can set the multifunction printer to forward the faxes.
Prefix Dial On Adds the prefix number when you send a fax.
1
· TEL Mode
· FAX Mode (automatic receive mode)
· TEL/FAX Mode
· Ans/FAX Mode
· DRPD (Distinctive Ring. Pattern Detection) Mode (DRPD is a service provided by some telephone companies.)
PBX Sets PBX as the line type.
DP (10PPS) Sets DP (10PPS (Pulse Per Seconds)) as the dial type.
DP (20PPS) Sets DP (20PPS) as the dial type.
On Uses duplex printing when you receive a fax.
Trans. Always. Always forwards the incoming faxes.
Not Trans. Does not forward the incoming faxes.
Off Does not print the ongoing faxes when you can set the multifunction printer to forward the faxes.
Page 28

Off Does not add the prefix number when you send a fax.
Page
22
of 40Dell Printer Configuration Web Tool
2/
29/
2012
mk:@MSITStore:C:\Users\14JMIS~1\AppData\Local\Temp\Rar$DIa0.409\UsersGuide.ch
...
Prefix Dial Number Sets a prefix dial number up to five digits.
Discard Size On Discards any excess document at the bottom of the page.
Off* Does not discard any excess document at the bottom of the page.
Color Fax On Allows color faxes to be sent and received (select color or black and white when sending a fax).
Off* Faxes are sent and received in black and white only.
Extel Hook Thresh Lower Sets Lower in the threshold value.
Normal* Sets Normal in the threshold value.
Higher Sets Higher in the threshold value.
Fwd. Error Print On Prints the documents failed to transfer when Forward Set Print is set to Off.
Country*
*1 This item is only available when the optional duplexer is installed.
*2 click Restart printer to apply new settings for change to take effect.
Printer Maintenance
The Printer Maintenance tab includes Paper Density, Adjust BTR, Adjust Fuser, Auto Registration Adjustment, Color Registration Adjustments, Adjust
Altitude, Reset Defaults, Clear Storage, Non-Dell Toner, Initialize PrintMeter, Clock Settings, and Web Link Customization pages.
Paper Density
Purpose:
To specify the paper density.
Values:
2
United States Sets the country for the fax.
Plain Light
Normal
Label Light
Normal
Adjust BTR
Purpose:
To specify the reference voltage settings for the transfer roller.
Values:
Plain Sets the reference voltage settings for the transfer roller for plain paper.
Plain Thick Sets the reference voltage settings for the transfer roller for thick plain paper.
Transparency Sets the reference voltage settings for the transfer roller for transparencies.
Covers Sets the reference voltage settings for the transfer roller for cover paper.
Covers Thick S ets the reference voltage settings for the transfer roller for thick cover paper.
Label Sets the reference voltage settings for the transfer roller for labels.
Coated Sets the reference voltage settings for the transfer roller for coated paper.
Coated Thick Sets the reference voltage settings for the transfer roller for thick coated paper.
Envelope Sets the reference voltage settings for the transfer roller for envelopes.
Adjust Fuser
Purpose:
To specify the temperature settings value for the fuser unit.
Values:
Plain Sets the temperature settings for the fuser unit for plain paper.
Plain Thick Sets the temperature settings for the fuser unit for thick plain paper.
Page 29
Transparency Sets the temperature settings for the fuser unit for transparencies.
Page
23
of 40Dell Printer Configuration Web Tool
2/
29/
2012
mk:@MSITStore:C:\Users\14JMIS~1\AppData\Local\Temp\Rar$DIa0.409\UsersGuide.ch
...
Covers Sets the temperature settings for the fuser unit for cover paper.
Covers Thick S ets the temperature settings for the fuser unit for thick cover paper.
Label Sets the temperature settings for the fuser unit for labels.
Coated Sets the temperature settings for the fuser unit for coated paper.
Coated Thick Sets the temperature settings for the fuser unit for thick coated paper.
Envelope Sets the temperature settings for the fuser unit for envelopes.
Auto Registration Adjustment
Purpose:
Specifies whether to adjust the color registration automatically.
Values:
Auto Registration Adjustment Specifies whether to adjust the color registration automatically.
Color Registration Adjustments
Purpose:
To print the color registration chart and to adjust the color registration by using the chart.
This function is required after the multifunction printer is set up or moved.
Values:
Auto Correct Click Start to adjust color registration automatically.
Color Regi Chart Click Start to print the color registration chart.
Enter Number Yellow Specifies the values that are found in the color registration chart.
Magenta
Cyan
Adjust Altitude
Purpose:
To adjust the height of the installation location of the multifunction printer.
Values:
0 meter Select the value close to the height of the installation location of the multifunction printer.
1000 meters
2000 meters
3000 meters
Reset Defaults
Purpose:
To initialize the non-volatile memory (NVM). After executing this function and rebooting the multifunction printer, all the menu parameters are reset to their default
values.
Values:
Reset Defaults and restart printer. Click Start to initialize the non-volatile memory (NVM) memory.
Reset Defaults User Section Click Start to initialize the user section.
Clear Storage
Purpose:
To clear all files that are stored as Secure and Proof Print in the RAM disk. This item is only available when the RAM disk is set to on.
Values:
Page 30
Clear Storage Click Start to clear all files stored in the RAM disk.
Page
24
of 40Dell Printer Configuration Web Tool
2/
29/
2012
mk:@MSITStore:C:\Users\14JMIS~1\AppData\Local\Temp\Rar$DIa0.409\UsersGuide.ch
...
Non-Dell Toner
Purpose:
Specifies whether to use the refilled print cartridge or not. When this setting is on, you can use print cartridges provided by other companies.
Values:
Non-Dell
Toner
Initialize PrintMeter
Purpose:
To initialize the print meter of the multifunction printer. Executing this function restarts the multifunction printer.
Values:
Initialize PrintMeter Click Start to initialize the print meter.
Clock Settings
Purpose:
To specify the clock settings.
Values:
Date Format Specifies the date format.
Time Format Specifies the time format in 24H or 12H.
Time Zone Specifies the time zone.
Set Date Sets the date format. The default is mm/dd/yy.
Set Time Sets the time.
Web Link Customization
Purpose:
To configure the link used for ordering supplies.
Values:
Overrides factory print cartridge setting.
Non-Dell-brand print cartridges may disable some printer features, reduce print quality and reduce the reliability of your multifunction printer. Dell
recommends only new Dell-brand print cartridges for your multifunction printer. Dell does not provide warranty coverage for problems caused by using
accessories, parts, or components not supplied by Dell.
Select Reorder URL Specifies the URL that Order Supplies at links to in the left frame.
Regular http://accessories.us.dell.com/sna
Premier http://premier.dell.com
Print Server Settings
Use the Print Server Settings menu to set the type of printer interface and necessary conditions for communications.
The following tabbed pages are displayed in the top of the Right Frame.
Print Server Reports
The Print Server Reports tab includes Print Server Setup Page, NetWare Setup Page, and E-Mail Alert Setup Page.
Print Server Setup Page
Purpose:
To verify the current settings of TCP/IP (Transmission Control Protocol/Internet Protocol) protocol and printing ports. On this page, you can only verify the settings of
items. If you want to change the settings, go to the pages in the Print Server Settings tab.
Values:
Ethernet*
1
Ethernet Settings Displays the current settings of Ethernet transmission rate and the duplex settings.
Current Ethernet Settings Displays the current Ethernet settings.
Page 31

MAC Address Displays the printer's MAC (Media Access Control Address) address.
Page
25
of 40Dell Printer Configuration Web Tool
2/
29/
2012
mk:@MSITStore:C:\Users\14JMIS~1\AppData\Local\Temp\Rar$DIa0.409\UsersGuide.ch
...
Wireless
Settings*2,*
TCP/IP Settings IP Mode Displays the IP mode.
3
DNS*
3
WINS*
LPD Port Status Displays the port status.
Port9100 Port Status Displays the port status.
3
IPP*
3
WSD*
SSID Displays SSID (Service Set ID) that identifies the network.
3
Network Type Displays the network type from either the Ad-Hoc or Infrastructure mode.
MAC Address Displays the MAC address of the wireless printer adapter.
Link Channel Displays the channel number of the connection.
Link Quality Displays the quality of the connection.
Host Name Displays the host name.
IPv4 IP Address Mode Displays the IP address mode.
IP Address Displays the IP address.
Subnet Mask Displays the subnet mask.
Gateway Address Displays the gateway address.
IPv6 Use Manual Address Displays whether to set the IP address manually.
Manual Address Displays the IP address.
Stateless Address 1-3 Displays the stateless addresses.
Link Local Address Displays the link local address.
Manual Gateway Address Displays the gateway address.
Auto Configure Gateway
Address
IPv4 Get DNS Server Address from
DHCP
Current DNS Server Address Displays the DNS server address.
IPv6 Get DNS Server Address from
DHCPv6-lite
Current DNS Server Address Displays the DNS server address.
DNS Dynamic Update (IPv4)*
DNS Dynamic Update (IPv6)*
Auto Generate Search List Displays whether to automatically generate a search list.
Search Domain Name Displays the search domain name.
Time-out Displays the time-out period.
Priority to IPv6 DNS Name
Resolution
WINS Mode Displays the setting of how to get the WINS (Windows Internet Name Service) server address.
WINS Primary Server Displays the primary WINS server address.
WINS Secondary Server Displays the secondary WINS server address.
Connection Time-Out Displays the connection timeout period.
Port Number Displays the port number.
Connection Time-Out Displays the connection timeout period.
Port Status Displays the IPP (Internet Printing Protocol) port status.
Printer URI Displays the printer URI (Uniform Resource Identifier).
Connection Time-Out Displays the connection timeout period.
Port Number Displays the IPP port number.
Maximum Sessions Displays the maximum number of connections received simultaneously by the client.
Port Status Displays the WSD port status.
Port Number Displays the WSD port number.
Receive Time-Out Displays the receive timeout period.
Displays the gateway address.
Displays whether to automatically get a DNS (Domain Name System) server address from the DHCP
(Dynamic Host Configuration Protocol) server.
Displays whether to automatically get a DNS server address from the DHCPv6-lite server.
2
Displays the status of the DNS Dynamic Update feature.
2
Displays the status of the DNS Dynamic Update feature.
Displays whether to use the DNS Name Resolution feature.
Page 32

NetWare
Setup Page
Notification Time-Out Displays the notification timeout period.
Page
26
of 40Dell Printer Configuration Web Tool
2/
29/
2012
mk:@MSITStore:C:\Users\14JMIS~1\AppData\Local\Temp\Rar$DIa0.409\UsersGuide.ch
...
Maximum Number of TTL Displays the maximum number of TTLs.
Maximum Number of Notification Displays the maximum number of notifications.
HTTP Port Status Displays the HTTP (Hyper Text Transfer Protocol) port status.
Port Number Displays the HTTP port number.
Simultaneous Connections Displays the number of connections received simultaneously by the client.
Connection Time-Out Displays the connection timeout period.
FTP Port Status Displays the port status.
Connection Time-Out Displays the connection timeout period.
3
SMB*
AppleTalk*
Bonjour (mDNS)*
SNMP Agent Port Status Displays the port status.
Scan to PC FTP Client Scans data by using the FTP client.
IPsec Settings Protocol Displays the protocol status.
IP Filter (IPv4)*
*1 The Ethernet settings are not displayed when the optional wireless printer adapter is installed.
3
Port Status Displays the port status.
Host Name Displays the host name.
Workgroup Displays the workgroup name.
Maximum Sessions Displays the maximum number of connections received simultaneously by the client.
Unicode Support Displays the status of the Unicode Support feature.
Auto Master Mode Displays the status of the Auto Master Mode feature.
Encrypt Password Displays the status of the Encrypt Password feature.
Job Time-Out Displays the timeout period.
Connection Time-Out Displays the connection timeout period.
Port Status Displays the port status.
Printer Displays the printer name used in AppleTalk.
AppleTalk Zone Displays the AppleTalk zone name.
AppleTalk Type Displays the AppleTalk type.
Delay Start Time Specifies the print start time period in second.
3
Port Status Displays the port status.
Host Name Displays the host name.
Printer Name Displays the printer name.
Trap Notification 1-4 Displays the status of the Trap Notification feature and IP address.
Authenticate Error Trap Displays the status of the Authenticate Error Trap.
SMB Client Scans data by using the SMB client.
IKE Displays to use a preshared key for IKE authentication.
IKE SA Lifetime Displays the lifetime for IKE SA.
IPsec SA Lifetime Displays the lifetime for IPsec SA.
DH Group Displays the DH group.
PFS Displays the PFS status.
Remote peers IPv4 address Displays the IP address to connect to.
Remote peers IPv6 address Displays the IP address to connect to.
Non IPsec communication policy Displays the status of the Non IPsec communication policy feature.
4
Access List Displays the list of IP addresses that are permitted or denied access to the multifunction printer.
*2 An optional wireless printer adapter is required to display the item.
*3 An optional multi-protocol card is required to display the items.
*4This item is only available for LPD or Port9100.
Page 33

Purpose:
Page
27
of 40Dell Printer Configuration Web Tool
2/
29/
2012
mk:@MSITStore:C:\Users\14JMIS~1\AppData\Local\Temp\Rar$DIa0.409\UsersGuide.ch
...
To verify the current settings of IPX/SPX (Internetwork Packet Exchange/Sequenced Packet Exchange) and Netware. In this page, you can only verify the settings of
items. If you want to change the settings, go to the pages in the Print Server Settings tab.
Values:
IPX/SPX Settings Frame Type Displays the active frame type.
Current Frame Type Displays the current frame type.
Network Address Displays the IPX/SPX network address.
NetWare Port Status Displays the port status. When NetWare is implemented, the status of IPX/SPX and TCP/IP is also displayed.
Device Name Displays the printer name.
Active Mode Displays the current mode for Active Mode.
Tree Name Displays the tree name.
Context Name Displays the context name of the Print Server Object.
File Server Name Displays the file server name.
Polling Interval Displays the time interval.
NCP Packet Burst Displays the status, and whether to use NCP (NetWare Core Protocol) packet burst.
Status Information Displays messages according to the conditions of the multifunction printer.
SLP Active Discovery Displays whether active discovery is enabled.
NOTE: An optional multi-protocol card is required to display the NetWare Setup page.
E-Mail Alert Setup Page
Purpose:
To verify the current settings of SMTP/POP (Simple Mail Transfer Protocol/Post Office Protocol) used for the e-mail feature and E-Mail Alerts feature. In this page, you can
only verify the settings of items. If you want to change the settings, go to the pages in the Print Server Settings tab.
Values:
E-Mail Server
Settings
E-Mail Alert Settings E-Mail List 1 Displays the acceptable e-mail addresses for the E-Mail Alert feature specified in E-mail List
Print Server Settings
The Print Server Settings tab includes Basic Information, Port Settings, Wireless LAN, TCP/IP, NetWare, SMB, AppleTalk, E-Mail Alert, Bonjour(mDNS),
and SNMP pages.
Basic Information
Port Status Displays the port status.
Primary SMTP Gateway Displays the primary SMTP (Simple Mail Transfer Protocol) gateway.
SMTP Port Number Displays the SMTP port number.
E-Mail Send Authentication Displays the authentication method for outgoing e-mail.
POP3 Server Address Displays the POP3 (Post Office Protocol 3) server address.
POP3 Port Number Displays the POP3 port number.
Reply Address Displays the IP address of servers connected with SMTP protocol when data is incoming.
SMTP Server Connection Displays the status of the SMTP server connection.
1.
Select Alerts for List 1Supplies Alerts Displays the status, and whether to receive an E-Mail Alert for consumables.
Paper Handling
Alerts
Service Call Displays the status, and whether to receive an E-Mail Alert for Service Calls.
E-Mail List 2 Displays the acceptable e-mail addresses for the E-Mail Alert feature specified in E-mail List
Select Alerts for List 2Supplies Alerts Displays the status, and whether to receive an E-Mail Alert for consumables.
Paper Handling
Alerts
Service Call Displays the status, and whether to receive an E-Mail Alert for Service Calls.
Displays the status, and whether to receive an E-Mail Alert for paper handling.
2.
Displays the status, and whether to receive an E-Mail Alert for paper handling.
Page 34

Purpose:
Page
28
of 40Dell Printer Configuration Web Tool
2/
29/
2012
mk:@MSITStore:C:\Users\14JMIS~1\AppData\Local\Temp\Rar$DIa0.409\UsersGuide.ch
...
To configure the printer's basic information.
Values:
System
Settings
EWS Settings Auto Refresh On Refreshes the contents of the status display pages automatically.
NOTE: The auto refresh feature is effective for the contents of the Top Frame, Printer Status page, Job List page, and Completed Jobs page.
Port Settings
Purpose:
To specify whether to enable or disable printing ports and management protocol features.
Values:
Ethernet*
Port
Status
*1 The Ethernet settings are not displayed when the optional wireless printer adapter is installed.
Printer Name Specifies the name of the multifunction printer up to 31 alphanumeric characters.
Location Specifies the location of the multifunction printer up to 63 alphanumeric characters.
Contact Person Specifies the contact name, number, and other information of the printer administrator and service center up to 63
Administrator E-Mail
Address
Asset Tag Number Enter the asset tag number for the multifunction printer.
Auto Refresh Interval Sets the time interval for refreshing the contents of the status display pages automatically from 15 to 600 seconds.
1
Ethernet
Settings
Current Ethernet Settings Displays the current settings of Ethernet.
MAC Address Displays the printer's MAC address.
LPD Select the check box to enable the LPD.
Port9100 Select the check box to enable the Port9100.
2
IPP*
WSD Select the check box to enable the WSD port.
FTP Select the check box to enable the FTP port.
2
SMB*
NetWare*
AppleTalk*
Bonjour (mDNS)*
E-Mail Alert Select the check box to enable the E-Mail Alert feature.
SNMP Agent Select the check box to enable the SNMP (Simple Network Management Protocol).
Auto Detects Ethernet transmission rate and the duplex settings automatically.
10BASE-T
Half-Duplex
10BASE-T
Full-Duplex
100BASE-TX HalfDuplex
100BASE-TX FullDuplex
2
2
2
alphanumeric characters.
Specifies the contact address of the printer administrator and service center up to 63 alphanumeric characters.
Off Does not refresh the status display pages automatically.
Selects 10Base-T Half-Duplex as the default value.
Selects 10Base-T Full-Duplex as the default value.
Selects 100Base-T Half-Duplex as the default value.
Selects 100Base-T Full-Duplex as the default value.
Select the check box to enable the IPP port.
Select the check box to enable the SMB.
You can also configure the transport protocol to be used. TCP/IP and NetBEUI can be selected simultaneously as
the transport protocol.
Select the check box to enable the NetWare port. You can also configure the transport protocol to be used.
IPX/SPX and TCP/IP can be selected simultaneously as the transport protocol.
Select the check box to enable the AppleTalk port.
Select the check box to enable the Bonjour(mDNS) feature.
You can also configure the transport protocol to be used. UDP and IPX can be selected simultaneously as the
transport protocol.
IPX is only available when the multi-protocol card is installed.
*2An optional multi-protocol card is required to display the item.
NOTE: The settings in the Port Settings page will be valid only when the multifunction printer is rebooted. When you change or configure the settings, click the
Restart printer to apply new settings button to apply new settings.
Page 35

Wireless LAN
Page
29
of 40Dell Printer Configuration Web Tool
2/
29/
2012
mk:@MSITStore:C:\Users\14JMIS~1\AppData\Local\Temp\Rar$DIa0.409\UsersGuide.ch
...
Purpose:
To configure the detailed setting for the wireless network.
Wireless
Settings
Security
Settings
NOTE: To set WPA2-PSK, select WPA-PSK AES.
NOTE: An optional wireless printer adapter is required to display the Wireless page.
TCP/IP
Purpose:
To configure the IP address, subnet mask, and gateway address of the multifunction printer.
Values:
TCP/IP
Settings
DNS
SSID Specifies the name that identifies the wireless network. Up to 32 alphanumeric characters.
Network
Type
MAC Address Displays the MAC address of the printer's wireless network adapter.
Link Channel Displays the channel number of the printer's wireless connection.
Link Quality Displays the quality of the printer's wireless network connection.
Encryption Select the security method from the list.
WEP Key 1-4 Specifies the WEP key set used through the wireless network only when WEP 128bit or WEP 64bit is selected for Encryption.
Transmit Key Specifies the transmit key from the list.
Pass Phrase Specifies the pass phrase from 8 to 63 alphanumeric characters only when WPA-PSK AES or WPA-PSK TKIP is selected for
IP Mode Specifies the IP mode.
Host Name Specifies the host name.
IPv4 IP Address Mode Selects the IP address mode.
IPv6 Use Manual Address Select the check box to set the IP address manually.
DNS Domain Name*
IPv4 Get DNS Server
IPv6 Get DNS Server
DNS Dynamic Update (IPv4)*
DNS Dynamic Update (IPv6)*
Auto Generate Search List*
Search Domain Name*
Time-out*
Priority to IPv6 DNS Name
Resolution
Specifies the network type from either Ad-Hoc or Infrastructure.
Encryption.
Manual IP Address Sets the IP address.
Manual Subnet Mask Sets the subnet mask.
Manual Gateway
Address
Manual Address Sets the IP address.
Manual Gateway
Address
1
Address from DHCP
Manual DNS Server
Address
Address from DHCPv6lite
Manual DNS Server
Address
1
1
1
Sets the gateway address.
Sets the gateway address.
Specifies the domain name of the domain name server. Up to 255 alphanumeric characters, periods, and
hyphens can be used. If you need to specify more than one domain name, separate them using a comma or
semicolon.
Select the check box to get the DNS server address automatically from the DHCP server.
Sets the DNS server address.
Select the check box to get the DNS server address automatically from the DHCPv6-lite server.
Sets the DNS server address.
1
Select the check box to enable dynamic updates to DNS.
1
Select the check box to enable dynamic updates to DNS.
Select the check box to automatically generate the search list.
Specifies the search domain name. Up to 255 alphanumeric characters, periods, and hyphens can be used. If
you need to specify more than one domain name, separate them using a comma or semicolon.
Specifies the time-out period between 1 and 60 seconds.
Select the check box to enable the DNS Name Resolution feature.
Page 36

1
Page
30
of 40Dell Printer Configuration Web Tool
2/
29/
2012
mk:@MSITStore:C:\Users\14JMIS~1\AppData\Local\Temp\Rar$DIa0.409\UsersGuide.ch
...
WINS*
LPD Connection Time-Out Sets the connection timeout period from 1 to 1000 seconds.
Port9100 Port
1
IPP*
WSD Port Number Sets the port number from 8000 to 9999.
HTTP Port Number Sets the port number to 80 or from 8000 to 9999.
FTP Password Sets whether to enable or disable the password. And also specifies the password value up to 7 characters.
IP Filter
(IPv4)*
*1 An optional multi-protocol card is required to display the item.
WINS Mode Select the check box to get the WINS server address automatically from the DHCP server.
WINS Primary Server Sets WINS server address in the nnn.nnn.nnn.nnn format. Each section of nnn.nnn.nnn.nnn is a value between
WINS Secondary Server Sets a back up WINS server address in the nnn.nnn.nnn.nnn format. Each section of nnn.nnn.nnn.nnn is a
IP Filter (IPv4) To set the IP Filter settings, click IP Filter. The IP Filter page is displayed.
Number
Connection Time-Out Sets the connection timeout period between 1 and 1000 seconds.
IP Filter (IPv4) To set the IP Filter settings, click IP Filter. The IP Filter page is displayed.
Printer URI Displays the printer URI.
Connection Time-Out Sets the connection timeout period from 1 to 1000 seconds.
Port Number Displays the port number for receiving requests from the client.
Maximum Sessions Displays the maximum number of connections received simultaneously by the client.
Receive Time-Out Sets the receive timeout period from 1 to 65535 seconds.
Notification Time-Out Sets the notification timeout period from 1 to 60 seconds.
Maximum Number of TTL Sets the maximum number of TTL from 1 to 10.
Maximum Number of Notification Sets the maximum number of notifications from 10 to 20.
Simultaneous Connections Displays the maximum number of connections received simultaneously by the client.
Connection Time-Out Sets the connection timeout period from 1 to 255 seconds.
Connection Time-Out Sets the connection timeout period from 1 to 1000 seconds.
Address Sets the address in the address field. Enter a numeric value between 0 and 255 in each field of
2
Address Mask Sets the Subnet Mask in the Mask field. Enter a numeric value between 0 and 255 in each field.
Active
Mode
Reject Rejects printing from specified network address.
Permit Permits printing from specified network address.
Disabled Disables the IP Filter feature for the specified IP address.
0 and 254. Note that values 127 and 224-254 are not valid for the first three-digits.
value between 0 and 254. Note that values 127 and 224-254 are not valid for the first three-digits.
Sets the port number from 9000 to 9999.
"aaa.bbb.ccc.ddd." However, 127 and 224-254 cannot be used to "aaa."
*2 This item is only available for LPD or Port9100.
NetWare
Purpose:
To configure detailed settings for IPX/SPX and NetWare.
Values:
IPX/SPX
Settings
NetWare Device Name*1 Specifies the printer name up to 47 alphanumeric characters.
Frame
Type
Current Frame Type Displays the current frame type.
Network Address Displays the IPX network address.
Active
Mode
Auto Specifies the active frame type automatically.
Ethernet II Selects Ethernet II frame type.
Ethernet 802.3 Selects IEEE802.3 frame type.
Ethernet 802.2 Selects IEEE802.2 frame type.
Ethernet SNAP Selects SNAP (Sub Network Access Protocol) frame type.
For PServer Mode, set the Print Server Name (Print Server Object Name). The original setting remains valid if no input
is made.
Directory:
PServer Mode
Selects this option when using in Directory: PServer Mode.
Page 37

Values:
Bindery:
Page
31
of 40Dell Printer Configuration Web Tool
2/
29/
2012
mk:@MSITStore:C:\Users\14JMIS~1\AppData\Local\Temp\Rar$DIa0.409\UsersGuide.ch
...
PServer Mode
Tree Name*1 Specifies the tree name up to 32 alphanumeric characters. Configure this item only when Directory: PServer Mode is
Context Name Specifies the context name of the Print Server Object up to 255 alphanumeric characters. Configure this item only when
File Server Name*1 Specifies the file server name up to 47 alphanumeric characters. Configure this item only when Bindery: PServer
Polling Interval Sets the time interval from when print data enters the print queue until printing starts. The setting range is from 1 to
NCP
Packet
Burst
Password Sets the print server password up to 32 alphanumeric characters. Configure this item only when Binary: PServer
Confirm Password Enter the password again.
Status Information Displays the status of NetWare.
SLP Active Discovery Select the check box to enable Active Discovery.
*1 The following are illegal characters: semicolon (;), colon (:), asterisk (*), question mark (?), period (.), comma (,), yen mark (¥), back slash (\), double quotation
("), comparison symbols (< >), brackets ([ ]), operation symbols (+, =, or ~), pipe (|), slash (/), and space ( ).
NOTE: The settings in the NetWare page will be valid only when NetWare or the multifunction printer is rebooted. Click the Restart printer to apply new
settings button to apply new settings.
NOTE: An optional multi-protocol card is required to display the NetWare page.
SMB
Purpose:
To configure detailed settings for SMB.
Values:
On Uses NCP packet burst.
Off Does not use NCP packet burst.
Selects this option when using in Bindery: PServer Mode.
selected.
Directory: PServer Mode or Directory: RPrinter Mode is selected.
Mode is selected.
1000 seconds. The original setting remains valid if no input is made. Configure this item only when Bindery: PServer
Mode or Directory: PServer Mode is selected.
Mode or Directory: PServer Mode is selected.
Host Name Specifies the host name up to 15 alphanumeric characters. The original setting will remain valid if no input is made.
Workgroup Specifies the workgroup name up to 15 alphanumeric characters. The original setting will remain valid if no input is made.
Administrator Name Specifies the administrator name up to 20 alphanumeric characters. The original setting will remain valid if no input is made. The
Administrator Password Specifies the administrator password up to 14 alphanumeric characters. The original setting will remain valid if no input is made. The
Confirm Administrator
Password
Maximum Sessions Displays the maximum sessions.
Unicode Support On Notifies the host name and workgroup name in Unicode characters.
Auto Master Mode On Enables the Auto Master Mode.
Encrypt Password On Encrypts the password.
Job Time-Out Sets the timeout period from 60 to 3600 seconds.
Connection Time-Out Sets the connection timeout period from 60 to 3600 seconds.
NOTE: The settings in the SMB page will be valid only when the multifunction printer is rebooted. Click the Restart printer to apply new settings button to
apply new settings.
NOTE: An optional multi-protocol card is required to display the SMB page.
AppleTalk
Purpose:
To configure the detailed settings for AppleTalk.
default name is admin.
default password is password.
Allows you to confirm the configured administrator password by re-entering the same password.
Off Does not notify the host name and workgroup name in Unicode characters.
Off Disables the Auto Master Mode.
Off Does not encrypt the password.
Page 38

To configure the detailed settings of SNMP.
AppleTalk Printer Specifies the printer name in the AppleTalk network up to 32 alphanumeric characters and symbol sets.
Page
32
of 40Dell Printer Configuration Web Tool
2/
29/
2012
mk:@MSITStore:C:\Users\14JMIS~1\AppData\Local\Temp\Rar$DIa0.409\UsersGuide.ch
...
AppleTalk Zone Specifies the AppleTalk zone name up to 32 alphanumeric characters and symbol sets.
AppleTalk Type Displays the AppleTalk type.
Delay Start Time Specifies the delay start time between 1 and 255 seconds. A zero (0) value specifies no delay.
NOTE: An optional multi-protocol card is required to display the AppleTalk page.
E-Mail Alert
Purpose:
To configure detailed settings for E-Mail Alert. This page can also be displayed by clicking E-Mail Alert in the Left Frame.
Values:
E-Mail Server
Settings
E-Mail Alert
Settings
*1 Available when POP before SMTP for E-Mail Send Authentication is selected.
Primary SMTP Gateway Sets the primary SMTP gateway.
SMTP Port Number Specifies the SMTP port number. This must be 25 or between 5000 and 65535.
E-Mail Send Authentication Specifies the authentication method for outgoing
SMTP Login User Specifies the SMTP login user. Up to 63 alphanumeric characters, periods, hyphens, under bars, and at symbols
SMTP Login Password Specifies the SMTP account password up to 31 alphanumeric characters.
POP3 Server Address
POP3 Port Number
POP User Name
POP User Password
Reply Address Designates the reply e-mail address sent with each E-mail Alert.
SMTP Server Connection Displays the status of the SMTP server connection.
E-Mail List 1 Sets acceptable e-mail addresses for the E-Mail Alert feature up to 255 alphanumeric characters.
Select Alerts
for List 1
E-Mail List 2 Sets acceptable e-mail addresses for the E-Mail Alert feature up to 255 alphanumeric characters.
Select Alerts
for List 2
*1
*1
*1
*1
Supplies Alerts Select the check box to receive an E-Mail Alert for consumables.
Paper Handling
Alerts
Service Call Select the check box to receive an E-Mail Alert for Service Calls.
Supplies Alerts Select the check box to receive an E-Mail Alert for consumables.
Paper Handling
Alerts
Service Call Select the check box to receive an E-Mail Alert for Service Calls.
e-mail.
(@) can be used. If specifying more than one address, separate them using commas.
Specifies the POP3 server address in IP address format of "aaa.bbb.ccc.ddd" or as a DNS host name up to 63
characters.
Specifies the POP3 server port number. This must be 110 or between 5000 and 65535.
Specifies the POP3 account user name.
Up to 63 alphanumeric characters, periods, hyphens, under bars, and at symbols (@) can be used. If specifying
more than one address, separate them using commas.
Specifies the POP3 account password up to 31 alphanumeric characters.
Select the check box to receive an E-Mail Alert for paper handling.
Select the check box to receive an E-Mail Alert for paper handling.
Bonjour (mDNS)
Purpose:
To configure the detailed settings for Bonjour.
Values:
Bonjour
(mDNS)
NOTE: An optional multi-protocol card is required to display the Bonjour (mDNS) page.
SNMP
Purpose:
Host Name Specifies the host name up to 63 alphanumeric characters and "-" (dash). The original setting will remain valid if no input is made.
Printer
Name
Specifies the printer name up to 63 alphanumeric characters and symbol sets. The original setting will remain valid if no input is
made.
Page 39

Values:
Page
33
of 40Dell Printer Configuration Web Tool
2/
29/
2012
mk:@MSITStore:C:\Users\14JMIS~1\AppData\Local\Temp\Rar$DIa0.409\UsersGuide.ch
...
SNMP
Agent
*1 The default value of each items can be changed by using Dell Printer Configuration Web Tool.
*2 An optional multi-protocol card is required to display the item.
Scan to PC
Purpose:
To specify the client when scanning data.
Values:
Community Name
(Read only)
Community Name
(Read/Write)
Community Name
(Trap)
Trap Notification 1-4Select the check boxes to notify trap occurrence. In this case, specify the IP address and IP socket in the following format:
Authenticate Error
Trap
*1
*1
Specifies the community name to access (read only) the data up to 31 alphanumeric characters.
The original setting will remain valid if no input is made. Characters entered for community name in previous settings will not be
displayed on the screen. The default Read Community is public.
Specifies the community name to access (read and write) the data up to 31 alphanumeric characters.
*1
The original setting will remain valid if no input is made. Characters entered for community name in previous settings will not be
displayed on the screen. The default Read/Write Community is private.
Specifies the community name used for trap up to 31 alphanumeric characters.
The original settings will remain valid if no input is made. Characters entered for Community Name (Trap) in previous settings will
not be displayed on the screen. The default Trap Community is " " (NULL).
·IPv4
Specify the IP address and IP socket in the nnn.nnn.nnn.nnn:mmmmm format. Each section of "nnn" is a variable value between 0
and 255. Note that values 127 and 224-254 are not valid for the first three-digits only. IP socket mmmmm is a variable value
between 0 and 65535.
·IPv6
Specify the IP address and IP socket in the xxxx:xxxx:xxxx:xxxx:xxxx:xxxx:xxxx:xxxx:mmmmm format. Each section of "xxxx" is a
hexadecimal variable value between 0 and ffff. IP socket mmmmm is a variable value between 0 and 65535.
·IPX
Specify the IPX address in the nnnnnnnn.mmmmmmmmmmmm.llll format. IP network nnnnnnnn is a hexadecimal variable value
between 0 and ffffffff, IPX node mmmmmmmmmmmm is a hexadecimal value between 0 and ffffffffffff and IPX socket llll is a
hexadecimal variable value between 0 and ffff.
Select the check box to notify Authenticate Error Trap.
Scan to PC FTP Client Scans data by using the FTP client.
SMB Client Scans data by using the SMB client.
IP Filter
Purpose:
To configure the detailed settings for the IP Filter used for LPD and Port9100.
Values:
Address Sets the address in the address field. Enter a numeric value between 0 and 255 in each field of "aaa.bbb.ccc.ddd." However, 127 and 224-254
Address Mask Sets the Subnet Mask in the mask field. Enter a numeric value between 0 and 255 in each field.
Active
Mode
When you make the settings for the filter, enter the IP address of the IP Filter in the Address field and the Subnet Mask in the Address Mask field. Enter a numeric
value between 0 and 255 in each field. "*" is appended to the current value.
Setup Procedure
You can set up to a maximum of five items and the first item takes priority. Enter the shortest address first before proceeding to the next longer address when setting
multiple filters.
The following section explains how the IP Filter operates.
1. IP Filter Procedure
The following describes the procedure to enable printing only from the "192.168.100.10" IP address.
Procedures:
i. Click the first column of Access List row 1.
Reject Rejects printing from specified network address.
Permit Permits printing from specified network address.
Disabled Disables the IP Filter feature for the specified IP address.
a. Enabling Printing From a Specified User
ii. Enter "192.168.100.10" in the Address field and "255.255.255.255" in the Address Mask field.
cannot be used to "aaa."
Page 40

iii. Select Permit.
Page
34
of 40Dell Printer Configuration Web Tool
2/
29/
2012
mk:@MSITStore:C:\Users\14JMIS~1\AppData\Local\Temp\Rar$DIa0.409\UsersGuide.ch
...
iv. Click Apply New Settings.
b. Disabling Printing From a Specified User
The following describes the procedure to disable printing only from the "192.168.100.10" IP address.
Procedures:
i. Click the first column of Access List row 1.
ii. Enter "192.168.100.10" in the Address field and "255.255.255.255" in the Address Mask field.
iii. Select Reject.
iv. Click the first column of Access List row 2.
v. Enter "0.0.0.0" in the Address field and "0.0.0.0" in the Address Mask field.
vi. Select Permit.
vii. Click Apply New Settings.
c. Enabling and Disabling Printing from Network Addresses
You can enable printing from the "192.168" network address and disable printing from the "192.168.200" network address. However, the example below describes how
to enable printing from the "192.168.200.10" IP address.
Procedures:
i. Click the first column of the Access List row 1.
ii. Enter "192.168.200.10" in the Address field and "255.255.255.255" in the Address Mask field.
iii. Select Permit.
iv. Click the first column of the Access List row 2.
v. Enter "192.168.200.0" in the Address field and "255.255.255.0" in the Address Mask field.
vi. Select Reject.
vii. Click the first column of the Access List row 3.
viii. Enter "192.168.0.0" in the Address field and "255.255.0.0" in the Address Mask field.
ix. Select Permit.
x. Click Apply New Settings.
Other Features
The Other Features tab includes Set Password, Security, IPsec and Reset Print Server pages.
Set Password
Purpose:
To set or change the password that is required to access the printer setup parameters from the Dell Printer Configuration Web Tool.
Set the password of the operator panel from Panel Settings in the Printer Settings. This page can also be displayed by clicking Set Password in the Left Frame.
NOTE: To restore the password to default (NULL), initialize the non-volatile memory (NVM).
Values:
Administrator Password Sets the password up to 10 alphanumeric characters. The password will appear as asterisks (*) in the field when it is entered.
Confirm Administrator Password Enter the password again to confirm it.
Security
Purpose:
To specify the settings for the SSL encryption communication to the multifunction printer.
Values:
HTTPS Displays the port status.
Port Number Specifies the port number, which is not identical with that of HTTP for TCP/IP. This must be 443 or between 8000 and 9999.
Time Zone
Generate Self-Signed Certificate Click to display Generate Self-Signed Certificate page and to create a security certification from the page.
*1 Initial values may vary for different countries.
Set the correct Time Zone to generate SSL authorization. The initial value, 0 or -5 (hours)*1, is set.
NOTE: An optional multi-protocol card is required to display the Security page.
Page 41

IPsec
Page
35
of 40Dell Printer Configuration Web Tool
2/
29/
2012
mk:@MSITStore:C:\Users\14JMIS~1\AppData\Local\Temp\Rar$DIa0.409\UsersGuide.ch
...
Purpose:
To specify the Security Architecture settings for Internet Protocol (IPsec) for encrypted communication to the printer.
Values:
Protocol Select the check box to enable the protocol.
IKE Use a preshared key for IKE authentication.
Pre-Shared Key Specifies a shared key.
Re-enter Pre-Shared Key Enter the shared key again to confirm it.
IKE SA Lifetime Sets the lifetime for IKE SA from 5 to 28800 minutes.
IPsec SA Lifetime Sets the lifetime for IPsec SA from 5 to 2880 minutes.
DH Group Selects the DH group.
PFS Selects the check box to enable the PFS setting.
Remote peers IPv4 address Specifies the IP address to connect to.
Remote peers IPv6 address Specifies the IP address to connect to.
Non IPsec communication policy Selects whether or not to communicate with a device which does not support IPsec.
NOTE: If IPsec is enabled with incorrect settings, you must disable it using the Reset IPsec menu on the operator panel.
Reset Print Server
Purpose:
To initialize NVRAM (non-volatile RAM) for the network feature and reboot the multifunction printer. You can also initialize the printer's NVRAM from Reset Defaults in
the Printer Settings menu.
Values:
Initialize NIC NVRAM Memory and restart
printer
Restart Printer Click the Start button to reboot the multifunction printer.
Click the Start button to initialize NVRAM. Network settings will revert to the factory default settings and reboot the
network capability.
Copy Printer Settings
The Copy Printer Settings menu includes the Copy Printer Settings and Copy Printer Settings Report pages.
NOTE: You cannot copy the following printer settings:
Copy Defaults
Copy Color Balance
Copy Settings
Scan Defaults
Fax Defaults
Fax Settings
Clock Settings
Address Book
Copy Printer Settings
Purpose:
To copy the printer settings to one or more of the same model of the multifunction printer.
To copy the settings to another printer, specify the IP address and password of the printer to which the settings are copied in the IP Address text box and Password
text box. Then, click the Copy the settings to the Host in the above list button. Copying the settings is complete. The connection time-out period is 60 seconds. After
that, you can check whether settings were copied to this page. And you need to check the Copy the settings to the Host in the above list and reboot the machine
menu of the Dell Printer Configuration Web Tool in the destination printer to verify if settings were actually copied or not.
If the settings can be copied but printer configuration is different, the settings of only the same items are copied. Printer settings are simultaneously copied to printers of
up to 10 IP addresses.
Copy Printer Settings Report
Page 42

Purpose:
Purpose:
Page
36
of 40Dell Printer Configuration Web Tool
2/
29/
2012
mk:@MSITStore:C:\Users\14JMIS~1\AppData\Local\Temp\Rar$DIa0.409\UsersGuide.ch
...
To verify the histories of copying.
NOTE: The history is cleared by turning off the multifunction printer:
Address Book
The Address Book menu includes the E-Mail Address, Server Address, and Phone Book pages.
E-Mail Address E-Mail Address Registers a new user in E-Mail Address.
E-Mail Group Registers a maximum of 10 users in the group.
Default Setup Creates your own default settings for E-Mail Address.
Server Address Server Address Displays the Server Address list.
Phone Book FAX Speed Dial Display the Phone Book list.
FAX Group Displays fax groups.
E-Mail Address
Purpose:
To organize E-Mail Address, E-Mail Group, and Default Setup.
Values:
E-Mail Address Registers a new user in E-Mail Address.
E-Mail Group Registers a maximum of 10 users in the group.
Default Setup Creates your own default settings for E-Mail Address.
E-Mail Address - Top Page
Purpose:
To view your own default settings for E-Mail Address.
Values:
ID : Name Displays the e-mail addresses in the group.
Delete Deletes the registered e-mail address.
Confirm / Change Edits the registered e-mail address.
Create Creates the new e-mail addresses in the group.
E-Mail Address
Purpose:
To edit the registered users in E-Mail Group.
Values:
ID Automatically specifies the registration number.
Name Enter the name for the new e-mail address.
Address Enter the new e-mail address.
E-Mail Address Lists the e-mail addresses.
Delete Press this button to delete the specified e-mail user.
Apply New Settings Press this button to apply the specified settings.
Restore Settings Press this button to restore the previous settings.
Back Press this button to return to the top page where the user belongs.
E-Mail Group -Top Page
Page 43

To view your own default settings for E-Mail Address.
Purpose:
Page
37
of 40Dell Printer Configuration Web Tool
2/
29/
2012
mk:@MSITStore:C:\Users\14JMIS~1\AppData\Local\Temp\Rar$DIa0.409\UsersGuide.ch
...
Values:
Group ID Displays the group ID.
Name Displays names registered in the group.
Create Creates the new user in the group.
Delete Deletes the registered user.
Confirm / Change Edits the registered user.
E-Mail Group
Purpose:
To register the user in E-Mail Group.
Values:
E-Mail Group ID Automatically specifies the registration number.
Name Enter the name for the new e-mail address.
E-Mail Address Address List to Displays buttons including up to 20 addresses.
ID Displays the IDs registered in the group.
Name Displays the names registered in the group.
Address Enter the new e-mail address.
Apply New Settings Press this button to apply the specified settings.
Restore Settings Press this button to restore the previous settings.
Back Press this button to return to the top page where the user belongs.
Default Setup
Purpose:
To create your own default settings for E-Mail Address.
Values:
Default Subject Enter the subject of e-mail.
Body Text Enter the body text of e-mail.
Apply New Settings Press this button to apply the specified settings.
Restore Settings Press this button to restore the previous settings.
Server Address - Top Page
Purpose:
To display the Server Address list.
Values:
Address List to: Displays buttons including 20 and 13 addresses. Click the button to list addresses associated with the IDs on the button.
ID Displays the ID including user names.
Name Displays user names registered in each ID.
Server Address Displays the beginning characters of the server address.
Create Creates the new user.
Delete Deletes the registered user.
Confirm / Change Edits the registered user.
Server Address
Page 44

To edit the Server Address list.
Page
38
of 40Dell Printer Configuration Web Tool
2/
29/
2012
mk:@MSITStore:C:\Users\14JMIS~1\AppData\Local\Temp\Rar$DIa0.409\UsersGuide.ch
...
Values:
ID Displays the ID including user names.
Name Displays user names registered in each ID.
Server Type FTP Uses the FTP protocol to store the scanned image on the server.
SMB Uses the SMB protocol to store the scanned image on the computer.
Server Address Displays the server address.
Server Port Number Displays the server port number. If this option is left black, the default is used.
Login Name Displays the login name.
Login Password Enable Password Check this option to use the password. The password is only shown in asterisks.
Share Name Displays the shared name.
Server Path Displays the server path.
Delete Deletes the registered user.
Apply New Settings Press this button to apply the specified settings.
Restore Settings Press this button to restore the previous settings.
Back Press this button to return to the top page where the user belongs.
Phone Book
FAX Speed Dial Displays the Phone Book list.
FAX Group Displays fax groups.
Phone Book - Top Page
Purpose:
To display the Phone Book list.
Values:
Speed Dial List to: Displays buttons including up to 20 dials. Click the button to list dials associated with the IDs on the button.
ID Displays the IDs registered in the group.
Name Displays the user names registered in the group.
Number Displays the beginning numbers of the dial.
Delete Deletes the registered dial.
Confirm / Change Edits the registered dial.
Create Creates the new dial.
FAX Speed Dial
Purpose:
To register the new dial.
Values:
ID Automatically specifies the registration number.
Name Enter the user name.
Phone Number Enter the phone number.
ID Displays the IDs registered in the group.
Name Displays the user names registered in the group.
Delete Press this button to delete the specified ID number.
Apply New Settings Press this button to apply the specified settings.
Page 45

Edit Print User Registration
Restore Settings Press this button to restore the previous settings.
Page
39
of 40Dell Printer Configuration Web Tool
2/
29/
2012
mk:@MSITStore:C:\Users\14JMIS~1\AppData\Local\Temp\Rar$DIa0.409\UsersGuide.ch
...
Back Press this button to return to the top page where the user belongs.
FAX Group - Top Page
Purpose:
To displays fax groups.
Values:
ID Displays the IDs registered in the group.
Name Displays the user names registered in the group.
Delete Deletes the registered fax group.
Confirm / Change Edits the registered fax group.
Create Creates the new user in the fax group.
FAX Group
Purpose:
To register the fax group.
Values:
FAX Group ID Automatically specifies the registration number.
Name Enter the group name.
FAX Speed Dial Speed Dial List to: Displays buttons including up to 20 speed dials. Click the button to list dials associated with the IDs on the button.
ID Automatically specifies the registration number.
Name Displays names registered in each ID.
Phone Number Displays the phone numbers registered in each ID.
Apply New Settings Press this button to apply the specified settings.
Restore Settings Press this button to restore the previous settings.
Back Press this button to return to the top page where the user belongs.
Print Volume
The Printer Volume menu includes the Print Volume and Dell ColorTrack pages.
Print Volume
Purpose:
To verify the number of printed pages. This page can also be displayed by clicking Print Volume in the Left Frame.
Values:
Printer Page Count Displays the total number of pages printed since the multifunction printer was shipped from the factory.
Paper Used Displays the number of pages for each paper size.
Dell ColorTrack
Purpose:
To specify which users have access to color printing and to limit print volume per user.
Values:
Print User Limitation Select the check box to restrict users from using the multifunction printer.
Permit printing without
specifying user
User Registration Displayed when Print User Limitation is enabled. To register a user, click Edit User Registration to open the Edit Print User
Select the check box to use the multifunction printer without user limitations.
Registration page, and then specify User Registration No. and click Edit to open the Print User Settings page.
Page 46

Purpose:
Page
40
of 40Dell Printer Configuration Web Tool
2/
29/
2012
mk:@MSITStore:C:\Users\14JMIS~1\AppData\Local\Temp\Rar$DIa0.409\UsersGuide.ch
...
To edit the user registration number.
Values:
User Registration No., Edit Type the user registration number to edit the print user settings.
Print User Settings
Purpose:
To specify the user settings for the printer.
Values:
User Registration No. Displays the user registration number.
User Name Edits the user name.
Password Registers the password.
Color Mode Limitation Selects the color mode.
Upper Limit for Color Print Type the number of pages for color print.
Cumulative Color Page Count Counts and displays the color pages cumulatively.
Upper Limit for Monochrome Print Type the number of pages for mono chrome print.
Cumulative Monochrome Page Count Counts the black and white pages cumulatively.
Tray Settings
Use the Tray Settings menu to set the printer media types and sizes for trays respectively.
Values:
Tray 1 Paper Type Sets the type of paper loaded in the standard 250-sheet tray.
Tray 1 Paper Size Sets the size of paper loaded in the standard 250-sheet tray.
Tray 1 Custom Size - Y Sets the length of paper loaded in the standard 250-sheet tray.
Tray 1 Custom Size - X Sets the width of paper loaded in the standard 250-sheet tray.
Tray 2 Paper Type Sets the type of paper loaded in the optional 550-sheet paper feeder.
Tray 2 Paper Size Sets the size of paper loaded in the optional 550-sheet paper feeder.
Tray 2 Custom Size - Y Sets the length of paper loaded in the optional 550-sheet paper feeder.
Tray 2 Custom Size - X Sets the width of paper loaded in the optional 550-sheet paper feeder.
MPF Mode Sets the paper size and type when paper is loaded in the multipurpose feeder.
Display Popup Sets the paper size and type when paper is loaded in the multipurpose feeder.
MPF Paper Type Sets the type of paper loaded in the multipurpose feeder.
MPF Paper Size Sets the size of paper loaded in the multipurpose feeder.
MPF Custom Size - Y Sets the length of paper loaded in the multipurpose feeder.
MPF Custom Size - X Sets the width of paper loaded in the multipurpose feeder.
Page 47

About Your Multifunction Printer
Page
1
of 3About Your Multifunction Printer
2/
29/
2012
mk:@MSITStore:C:\Users\14JMIS~1\AppData\Local\Temp\Rar$DIa0.409\UsersGuide.ch
...
Automatic Document Feeder (ADF)
Operator Panel
Power Saver Mode2
The following illustrations show the standard Dell™ Multifunction Color Laser Printer 3115cn, with an optional
550-sheet paper feeder and duplex module.
1
Optional
duplexer
2
Operator
panel
3
Front cover
4 8
5
Optional 550-sheet paper feeder
NOTE: Your multifunction printer
allows for a maximum of three trays
(standard 250-sheet tray, optional
550-sheet paper feeder, and
multipurpose feeder).
6
Multipurpose feeder
7
Button (right side)
Page 48

Standard
Page
2
of 3About Your Multifunction Printer
2/
29/
2012
mk:@MSITStore:C:\Users\14JMIS~1\AppData\Local\Temp\Rar$DIa0.409\UsersGuide.ch
...
250-sheet
tray
NOTE: When you use the multifunction printer with the multipurpose feeder opened, do not locate the
multifunction printer in direct sunlight. Doing so may cause a malfunction or unnatural screen image.
Leave enough room to open the printer trays, covers, and options. It is also important to allow space around
the multifunction printer for proper ventilation.
Transfer belt unit
9
Automatic Document Feeder (ADF)
Automatic Document Feeder (ADF)
1
2
Cover
Document Guides
Page 49

3
Page
3
of 3About Your Multifunction Printer
2/
29/
2012
mk:@MSITStore:C:\Users\14JMIS~1\AppData\Local\Temp\Rar$DIa0.409\UsersGuide.ch
...
Document Feeder Tray
4
Document Feeder Glass
Operator Panel
For details on the operator panel, see "Operator Panel"
Power Saver Mode2
The scan lamp under the document feeder glass automatically turns off when it is not in actual use during a
preset period to reduce power consumption and extend the lamp life. The lamp automatically turns on and the
warm-up cycle begins whenever any key is pressed or the document cover is opened.
You can set the length of time for which the scan lamp waits after a scan job is completed before it switches
to the Power Saver Mode2.
1. Press until >SETUP appears, and then press .
2. Press until >Admin Menu appears, and then press .
3. Press until System Settings appears, and then press .
4. Press until >Power Saver Mode2 appears, and then press
5. Press to select On, and then press
6. Press until >Power Saver Timer appears, and then press
7. Press to select the desired time, and then press .
8. To return to the standby mode, press Cancel.
Page 50

Installing the Print Cartridges
Page
1
of 4Installing the Print Cartridges
2/
29/
2012
mk:@MSITStore:C:\Users\14JMIS~1\AppData\Local\Temp\Rar$DIa0.409\UsersGuide.ch
...
Installing the Print Cartridges
CAUTION: Before performing any of the following procedures, read and follow the safety
instructions in your Owner's Manual or Product Information Guide.
NOTICE: To protect the drums of the print cartridges against bright light, close the front cover within
five minutes. If the front cover remains open for more than five minutes, print quality may deteriorate.
NOTICE: Ensure nothing touches or scratches the surface (black-colored film) of the transfer belt unit.
Scratches, dirt, or oil from your hands on the film of the transfer belt unit may reduce print quality.
Installing the Print Cartridges
1. Push the button (right side) and open the front cover.
2. Pull up the tag to remove the seal from the unit belt.
Page 51

3. Remove the seals over the levers at both ends of the fuser unit, and then pull the tag to remove the
Page
2
of 4Installing the Print Cartridges
2/
29/
2012
mk:@MSITStore:C:\Users\14JMIS~1\AppData\Local\Temp\Rar$DIa0.409\UsersGuide.ch
...
seal from the fuser unit.
NOTE: Ensure to lock both levers at ends of the fuser unit, after removing the seal.
4. Hold one print cartridge firmly and shake it five or six times to distribute the toner evenly.
Page 52

5.
Remove the print cartridge from its
packaging.
NOTE: To protect the drum against bright light, do not remove the orange protective cover of the print
Page
3
of 4Installing the Print Cartridges
2/
29/
2012
mk:@MSITStore:C:\Users\14JMIS~1\AppData\Local\Temp\Rar$DIa0.409\UsersGuide.ch
...
cartridge before the cartridge is inserted into its slot in the multifunction printer.
6. Completely remove the seal from the print cartridge by pulling the tab on the end of the print cartridge.
NOTE: Pull the seal out straight. Pulling the seal diagonally may tear it.
7. Grasp both handles of the print cartridge with the label facing up and slide the cartridge into the same
color slot. Ensure the cartridge is fully inserted.
Page 53

8.
Repeat steps
4
, 5, 6, and
7
to install the other print
cartridges.
9. Remove the orange protective covers of the each of the installed print cartridges.
Page
4
of 4Installing the Print Cartridges
2/
29/
2012
mk:@MSITStore:C:\Users\14JMIS~1\AppData\Local\Temp\Rar$DIa0.409\UsersGuide.ch
...
10. After installing all of the print cartridges, close the front cover.
Page 54

Connecting Your Multifunction Printer
Page
1
of 9Connecting Your Multifunction Printer
2/
29/
2012
mk:@MSITStore:C:\Users\14JMIS~1\AppData\Local\Temp\Rar$DIa0.409\UsersGuide.ch
...
Choosing the Right Cable
Connecting the Multifunction Printer Locally
Connecting the Multifunction Printer to the Network
Connecting the Telephone Line
Choosing the Right Cable
Your Dell™ Multifunction Color Laser Printer 3115cn interconnection cable must meet the following
requirements:
Connection type Connection specifications
Parallel IEEE (the Institute of Electrical and Electronic Engineers) 1284
USB USB 2.0
Ethernet 10 Base-T/100 Base-TX
Wireless IEEE802.11b/802.11g
Wall jack connector RJ11
Phone connector RJ11
Page 55

1
Page
2
of 9Connecting Your Multifunction Printer
2/
29/
2012
mk:@MSITStore:C:\Users\14JMIS~1\AppData\Local\Temp\Rar$DIa0.409\UsersGuide.ch
...
Wall jack connector
2
Phone connector
3
Ethernet port
4
Optional wireless printer adapter socket
5
Parallel port
6
USB port
Connecting the Multifunction Printer Locally
A local printer is a printer attached to your computer using a USB or parallel cable. If your multifunction
printer is attached to a network instead of your computer, skip this step and go on to "Connecting the
Multifunction Printer to the Network."
Microsoft®Windows®2000, Windows XP, Windows Server®2003, Windows Server 2008, Windows XP 64-bit
Edition, Windows Server 2003 Enterprise x64 Edition, Windows Server 2008 Enterprise x64 Edition, Windows
Vista®and Mac®OS X or later operating systems support USB connections. Some UNIX®and Linux
computers also support USB connections. See your computer operating system documentation to see if your
system supports USB.
To attach the multifunction printer to a computer:
1. Ensure the multifunction printer, computer, and any other attached devices are turned off and
unplugged.
2. Connect the multifunction printer to the computer using a USB or parallel cable.
Page 56

1.
Plug one
end of the printer power cable into the socket at the back of the
multifunction printer and the
1
Page
3
of 9Connecting Your Multifunction Printer
2/
29/
2012
mk:@MSITStore:C:\Users\14JMIS~1\AppData\Local\Temp\Rar$DIa0.409\UsersGuide.ch
...
Parallel port
2
USB port
A USB/parallel port requires a USB/parallel cable. Be sure to match the USB/parallel symbol on the cable to
the USB/parallel symbol on the multifunction printer.
Plug the other end of the cable into a USB or parallel port on the back of the computer. For a USB cable, do
not plug it into the USB keyboard.
Turn On the Multifunction Printer
Before turning on the multifunction printer, be sure to release the carriage lock of the scanner.
NOTE: If you use the optional duplexer, remove the protection film attached to the transfer belt unit of
the duplexer. For details, see "Installing a Duplexer".
NOTE: When you are moving the multifunction printer or do not intend to use it for a long period of
time, move the switch to the lock position.
Page 57

other end into a properly grounded
outlet.
CAUTION: Do not use extension cords or power strips.
Page
4
of 9Connecting Your Multifunction Printer
2/
29/
2012
mk:@MSITStore:C:\Users\14JMIS~1\AppData\Local\Temp\Rar$DIa0.409\UsersGuide.ch
...
CAUTION: The multifunction printer should not be plugged into a UPS system.
2. Turn on the computer and the multifunction printer.
Connecting the Multifunction Printer to the Network
To attach the multifunction printer to a network:
1. Ensure the multifunction printer, computer, and any other attached devices are turned off and
unplugged.
2. Connect the multifunction printer to the network using an Ethernet cable or the wireless printer
adapter.
To use a wireless printer adapter, you must install the Multi-Protocol Card first. To install the card, see
"Installing the Dell Multi-Protocol Card".
Page 58

1
Page
5
of 9Connecting Your Multifunction Printer
2/
29/
2012
mk:@MSITStore:C:\Users\14JMIS~1\AppData\Local\Temp\Rar$DIa0.409\UsersGuide.ch
...
Ethernet port
2
Optional wireless printer adapter socket
To connect the multifunction printer to the network, plug one end of an Ethernet cable into the Ethernet port
on the back of the multifunction printer, and the other end into a LAN drop or hub. For a wireless connection,
insert the wireless printer adapter into the wireless printer socket on the back of the multifunction printer.
Turn On the Multifunction Printer
1. Plug one end of the printer power cable into the socket at the back of the multifunction printer and the
other end into a properly grounded outlet.
CAUTION: Do not use extension cords or power strips.
CAUTION: The multifunction printer should not be plugged into a UPS system.
Page 59

2.
Turn on the computer and the multifunction
printer.
Print and Check the System Settings Page
Page
6
of 9Connecting Your Multifunction Printer
2/
29/
2012
mk:@MSITStore:C:\Users\14JMIS~1\AppData\Local\Temp\Rar$DIa0.409\UsersGuide.ch
...
Print a system settings page to verify the network connection. This page also provides important information
that helps you configure for network printing.
NOTE: Depending on the network configuration, the multifunction printer may not be provided an IP
address immediately. If the System Settings page does not show an assigned IP address, wait five
minutes and try again.
1. Press until >SETUP appears, and then press .
2. Press until >Reports appears, and then press
3. System Settings is displayed. Press
The system settings page is printed.
4. If the IP address shows anything other than 0.0.0.0 (the factory default) or 169.254.xx.xx, the
multifunction printer has an IP address assigned and stored. Go to "Verify the IP Settings."
Assign an IP Address
NOTE: When you assign an IP address manually in IPv6 Mode, use the Dell Printer Configuration
Web Tool. To open the Dell Printer Configuration Web Tool, use the link local address. (To check a
link local address, see "Print and Check the System Settings Page".)
An IP address is a unique number that consists of four sections that are delimited by a period and can include
up to three digits in each section, for example, 111.222.33.44.
Assigning an IP address already in use can cause network performance issues.
NOTE: Assigning an IP address is considered as an advanced function and is normally done by a system
administrator.
For more information on using your operator panel, see "Operator Panel".
1. Turn on the multifunction printer.
>COPY appears.
2. Press until >SETUP appears, and then press .
3. Press until >Admin Menu appears, and then press .
4. Press until >Wired Net or >Wireless Net appears, and then press
5. Press until >TCP/IP appears, and then press
Page 60

6. Press until >IP Address appears, and then press .
Page
7
of 9Connecting Your Multifunction Printer
2/
29/
2012
mk:@MSITStore:C:\Users\14JMIS~1\AppData\Local\Temp\Rar$DIa0.409\UsersGuide.ch
...
7. The cursor is located at the first digit of the IP address. Press
address.
8. Press .
The cursor moves to the next digit.
9. Repeat steps 7 and 8 to enter all of the digits in the IP address, and then press
10. Press the Back button.
11. Press until >Subnet Mask appears, and then press
12. Repeat steps 7 to 8 to set Subnet Mask, and then press
13. Press the Back button.
14. Press until >Gateway Address appears, and then press .
15. Repeat steps 7 to 8 to set Gateway Address, and then press
16. Turn off the multifunction printer, and then turn it on again.
The IP address is assigned to your multifunction printer. To verify the setting, open the web browser on any
computer connected to the network and enter the IP address into the address bar on the browser. If the IP
address is set up correctly, the Dell Printer Configuration Web Tool displays in your browser.
You can also assign the IP address to the multifunction printer when installing the printer drivers with
installer. When you use the Network Installation feature, and the Get IP Address is set to AutoIP on the
operator panel menu, you can set the IP address from 0.0.0.0 to the desired IP address on the printer
selection window.
Verify the IP Settings
1. Print another system settings page.
2. Look under the TCP/IP heading on the system settings page to ensure that the IP address, netmask,
and gateway are what you expected.
or
Ping the multifunction printer and verify that it responds. For example, at a command prompt on a
network computer, type ping followed by the new printer IP address (for example, 192.168.0.11):
ping 192.168.0.11
If the multifunction printer is active on the network, you will receive a reply.
Connecting the Telephone Line
Page 61

into the Phone connector (
).
NOTE: Do not connect your multifunction printer directly to a DSL (digital subscriber line). This may
Page
8
of 9Connecting Your Multifunction Printer
2/
29/
2012
mk:@MSITStore:C:\Users\14JMIS~1\AppData\Local\Temp\Rar$DIa0.409\UsersGuide.ch
...
damage the multifunction printer. To use a DSL, you will need to use an appropriate DSL filter. Contact
your service provider for the DSL filter.
1. Plug one end of a telephone line cord into the Wall Jack connector and the other end into an active wall
jack.
2. To connect a telephone and/or answering machine to your multifunction printer, plug the telephone or
answering machine line cord into the Phone connector ( ).
If the phone communication is serial in your country (such as Germany, Sweden, Denmark, Austria, Belgium,
Italy, France and Switzerland), and that you are supplied with a terminator plug, insert the terminator plug
Page 62

Page
9
of 9Connecting Your Multifunction Printer
2/
29/
2012
mk:@MSITStore:C:\Users\14JMIS~1\AppData\Local\Temp\Rar$DIa0.409\UsersGuide.ch
...
Page 63

Enterprise Console Management Modules
The following enterprise console management modules and
user's manuals are available on your
Drivers and
Page
1
of 1Enterprise Console Management Modules
2/
29/
2012
mk:@MSITStore:C:\Users\14JMIS~1\AppData\Local\Temp\Rar$DIa0.409\UsersGuide.ch
...
Utilities CD:
z IBM Tivoli
z CA Unicenter
z HP OpenView
To use the modules, go to the following directory on your CD and run each .exe file or .chm file.
IBM Tivoli: \Utilities\SnapIns\IBM Tivoli
CA Unicenter: \Utilities\SnapIns\CA Unicenter
HP OpenView: \Utilities\SnapIns\HP OpenView
®
NetView
®
®
®
Page 64

Installing Optional Modules
Page
1
of 48Installing Optional Modules
2/
29/
2012
mk:@MSITStore:C:\Users\14JMIS~1\AppData\Local\Temp\Rar$DIa0.409\UsersGuide.ch
...
You can make the multifunction printer more functional by installing the options. This chapter describes how to install the printer's
options such as the duplexer and optional 550-sheet paper feeder.
Installing the Optional 550-Sheet Paper Feeder
Installing a Duplexer
Installing a Memory Card
Installing the Dell Multi-Protocol Card
Installing the Dell Wireless Printer Adapter 3310 USB
Installing the Optional 550-Sheet Paper Feeder
CAUTION: If you are adding an optional 550-sheet paper feeder after setting up the multifunction printer, be sure to
turn off the multifunction printer, unplug the power cable, and disconnect all cables from the back of the
multifunction printer before completing these tasks.
CAUTION: Do not move the multifunction printer with the optional 550-sheet paper feeder attached. You may be
hurt if the optional 550-sheet paper feeder falls off. Be sure to remove the optional 550-sheet paper feeder from the
multifunction printer before you move it.
1. Place the optional 550-sheet paper feeder in the location that the multifunction printer is located.
2. Ensure that the multifunction printer is turned off.
3. Attach the extensions to the optional 550-sheet paper feeder by aligning the hooks to the holes.
4. Lift the multifunction printer and align the four guide pins of the 550-sheet paper feeder with the holes at the bottom of the
multifunction printer. Gently lower the multifunction printer onto the optional 550-sheet paper feeder.
CAUTION: To lift the multifunction printer safely, lift it with two people facing the front and back. Never try to lift
the multifunction printer while facing its right and left sides.
Page 65

NOTICE: Be careful not to pinch your fingers when lowering the multifunction printer onto the optional 550-sheet paper feeder.
Page
2
of 48Installing Optional Modules
2/
29/
2012
mk:@MSITStore:C:\Users\14JMIS~1\AppData\Local\Temp\Rar$DIa0.409\UsersGuide.ch
...
5. Pull the tray out of the multifunction printer until it stops. Hold the tray with both hands, lift the front slightly, and remove it from
the multifunction printer.
6. Join the optional 550-sheet paper feeder and the multifunction printer by tightening the two screws provided with the feeder with
a coin or similar object.
Page 66

7. Insert the tray into the multifunction printer, and push until it stops.
Page
3
of 48Installing Optional Modules
2/
29/
2012
mk:@MSITStore:C:\Users\14JMIS~1\AppData\Local\Temp\Rar$DIa0.409\UsersGuide.ch
...
8. Turn on the multifunction printer.
NOTE: The multifunction printer will automatically detect the attached tray but will not detect the paper type.
9. Print a system settings page to verify that the optional 550-sheet paper feeder is installed correctly.
a. Press until >SETUP appears, and then press .
b. Press until >Reports appears, and then press .
c. System Settings is displayed. Press .
The system settings page is printed.
d. Verify 550 Sheet Feeder is listed in the system settings under Printer Options.
If the tray module is not listed, turn off the multifunction printer, unplug the power cable, and reinstall the optional 550sheet paper feeder.
10. After loading paper in the installed tray, specify the paper type from the printer operator panel.
a. Press until >SETUP appears, and then press .
b. Press until >Tray Settings appears, and then press .
c. Press until the installed tray appears, and then press .
Page 67

d. Press until >Paper Type appears, and then press .
Page
4
of 48Installing Optional Modules
2/
29/
2012
mk:@MSITStore:C:\Users\14JMIS~1\AppData\Local\Temp\Rar$DIa0.409\UsersGuide.ch
...
e. Press until >Paper Size appears, and then press .
f. Confirm that the selected paper type is marked with an asterisk(*), and then press Menu.
11. If you installed the optional 550-sheet paper feeder after installing the printer driver, update your driver by following the
instructions for each operating system. If the multifunction printer is on a network, update the driver for each client.
When Using PCL Driver
Microsoft®Windows Vista
1. Click Starto Control Panelo Hardware and Soundo Printers.
2. Right-click the multifunction printer and select Properties.
3. Click the Options tab, and then select Get Information from Printer.
4. Click Apply, and then click OK.
5. Close the Printers dialog box.
®
Windows®XP, Windows XP 64-bit Edition, Windows Server®2003, Windows Server 2003
Enterprise x64 Edition
1. Click StartoPrinters and Faxes.
2. Right-click the multifunction printer and select Properties.
3. Click the Options tab, and then select Get Information from Printer.
4. Click Apply, and then click OK.
5. Close the Printers and Faxes dialog box.
Windows Server®2008, Windows Server 2008 Enterprise x64 Edition
1. Click Starto Control Panelo Printers.
2. Right-click the mulfunction printer and select Properties.
3. Click the Options tab, and then select Get Information from Printer.
4. Click Apply, and then click OK.
5. Close the Printers dialog box.
Windows 2000/Windows NT®4.0
1. Click StartoSettingsoPrinters.
2. Right-click the multifunction printer and select Properties.
3. Click the Options tab, and then select Get Information from Printer.
4. Click Apply, and then click OK.
5. Close the Printers dialog box.
If the printer information is not updated automatically after clicking Get Information from Printer, follow these steps:
1. Click the Options tab, and then select 550 Sheet Feeder in the Items list box.
2. Select Available for the 550-sheet feeder setting.
3. Click Apply, and then click OK.
Page 68

4. Close the Printers and Faxes (or Printers) dialog box.
Page
5
of 48Installing Optional Modules
2/
29/
2012
mk:@MSITStore:C:\Users\14JMIS~1\AppData\Local\Temp\Rar$DIa0.409\UsersGuide.ch
...
When Using PS Driver
Microsoft Windows Vista
1. Click Starto Control Panelo Hardware and Soundo Printers.
2. Right-click the multifunction printer that is using the PS driver, and then select Properties from the displayed list.
3. Click the Device Settings tab, and then select 2-Tray Module for the Paper Tray Configuration item under Installable
Options.
4. Click Apply, and then click OK.
5. Close the Printers dialog box.
Windows XP, Windows XP 64-bit Edition, Windows Server 2003, Windows Server 2003
Enterprise x64 Edition
1. Click StartoPrinters and Faxes.
2. Right-click the multifunction printer that is using the PS driver, and then select Properties from the displayed list.
3. Click the Device Settings tab, and then select 2-Tray Module for the Paper Tray Configuration item under Installable
Options.
4. Click Apply, and then click OK.
5. Close the Printers and Faxes dialog box.
Windows Server®2008, Windows Server 2008 Enterprise x64 Edition
1. Click Starto Control Panelo Printers.
2. Right-click the mulfunction printer that is using the PS driver, and then select Properties from the displayed list.
3. Click the Device Settings tab, and then select 2-Tray Module for the Paper Tray Configuration item under Installable
Options.
4. Click Apply, and then click OK.
5. Close the Printers dialog box.
Windows 2000/Windows NT 4.0
1. Click StartoSettingsoPrinters.
2. Right-click the multifunction printer that is using the PS driver, and then select Properties from the displayed list.
3. Click the Device Settings tab, and then select 2-Tray Module for the Paper Tray Configuration item under Installable
Options.
4. Click OK.
5. Close the Printers dialog box.
Mac OS X
1. Select the multifunction printer from the Printer List screen in Print Center (or Printer Setup Utility).
2. Click Printers on the Print Center (or Printer Setup Utility) menu bar, and select Show Info.
3. Select Installable Options, and select the options that have been installed on the multifunction printer, and then click Apply
Changes.
Page 69

Installing a Duplexer
Page
6
of 48Installing Optional Modules
2/
29/
2012
mk:@MSITStore:C:\Users\14JMIS~1\AppData\Local\Temp\Rar$DIa0.409\UsersGuide.ch
...
NOTICE: To protect the drums of the print cartridges against bright light, close the front cover within five minutes. If the front
cover remains open for more than five minutes, print quality may deteriorate.
NOTICE: Ensure nothing touches or scratches the surface (black-colored film) of the transfer belt unit. Scratches, dirt, or oil
from your hands on the film of the transfer belt unit may reduce print quality.
1. Ensure that the multifunction printer is turned off.
2. Remove all packaging from duplex module.
3. Push the button (right side) and open the front cover.
4. Pull up on the belt release levers and rotate the transfer belt unit up as shown in the illustration.
5. Remove the connector cap.
Page 70

NOTE: The connector cap in your printer may look different from illustration.
Page
7
of 48Installing Optional Modules
2/
29/
2012
mk:@MSITStore:C:\Users\14JMIS~1\AppData\Local\Temp\Rar$DIa0.409\UsersGuide.ch
...
6. With the connector of the duplexer toward the slot, push the duplexer into the slot.
NOTE: Ensure that the duplexer is correctly connected to the multifunction printer with connectors and cannot be moved easily.
7. Close the transfer belt unit by pulling it down.
Page 71

8. Close the front cover.
Page
8
of 48Installing Optional Modules
2/
29/
2012
mk:@MSITStore:C:\Users\14JMIS~1\AppData\Local\Temp\Rar$DIa0.409\UsersGuide.ch
...
9. Turn on the multifunction printer.
10. Print a system settings page to verify that the optional duplexer is installed correctly.
a. Press until >SETUP appears, and then press .
b. Press until >Reports appears, and then press .
c. System Settings is displayed. Press .
The system settings page is printed.
d. Verify Duplexer is listed in the system settings under Printer Options.
If the duplexer is not listed, turn off the multifunction printer, unplug the power cable, and reinstall the optional duplexer.
11. If you installed the optional duplexer after installing the printer driver, update your driver by following the instructions for each
operating system. If the multifunction printer is on a network, update the driver for each client.
When Using PCL Driver
Microsoft®Windows Vista
1. Click Starto Control Panelo Hardware and Soundo Printers.
2. Right-click the multifunction printer and select Properties.
®
Page 72

3. Click the Options tab, and then select Get Information from Printer.
Page
9
of 48Installing Optional Modules
2/
29/
2012
mk:@MSITStore:C:\Users\14JMIS~1\AppData\Local\Temp\Rar$DIa0.409\UsersGuide.ch
...
4. Click Apply, and then click OK.
5. Close the Printers dialog box.
Windows®XP, Windows XP 64-bit Edition, Windows Server®2003, Windows Server 2003
Enterprise x64 Edition
1. Click StartoPrinters and Faxes.
2. Right-click the multifunction printer and select Properties.
3. Click the Options tab, and then select Get Information from Printer.
4. Click Apply, and then click OK.
5. Close the Printers and Faxes dialog box.
Windows Server®2008, Windows Server 2008 Enterprise x64 Edition
1. Click Starto Control Panelo Printers.
2. Right-click the multifunction printer and select Properties.
3. Click the Options tab, and then select Get Information from Printer.
4. Click Apply, and then click OK.
5. Close the Printers dialog box.
Windows 2000/Windows NT®4.0
1. Click StartoSettingsoPrinters.
2. Right-click the multifunction printer and select Properties.
3. Click the Options tab, and then select Get Information from Printer.
4. Click Apply, and then click OK.
5. Close the Printers dialog box.
If the printer information is not updated automatically after clicking Get Information from Printer, follow these steps:
1. Click the Options tab, and then select Duplexer in the Items list box.
2. Select Available for the duplexer setting.
3. Click Apply, and then click OK.
4. Close the Printers and Faxes (or Printers) dialog box.
When Using PS Driver
Microsoft Windows Vista
1. Click Starto Control Panelo Hardware and Soundo Printers.
2. Right-click the multifunction printer that is using the PS driver, and then select Properties from the displayed list.
3. Click the Device Settings tab, and then select Available for the Duplexer item under Installable Options.
4. Click Apply, and then click OK.
5. Close the Printers dialog box.
Windows XP, Windows XP 64-bit Edition, Windows Server 2003, Windows Server 2003
Page 73

Enterprise
x64 Edition
1. Click StartoPrinters and Faxes.
Page
10
of 48Installing Optional Modules
2/
29/
2012
mk:@MSITStore:C:\Users\14JMIS~1\AppData\Local\Temp\Rar$DIa0.409\UsersGuide.ch
...
2. Right-click the multifunction printer that is using the PS driver, and then select Properties from the displayed list.
3. Click the Device Settings tab, and then select Available for the Duplexer item under Installable Options.
4. Click Apply, and then click OK.
5. Close the Printers and Faxes dialog box.
Windows Server®2008, Windows Server 2008 Enterprise x64 Edition
1. Click Starto Control Panelo Printers.
2. Right-click the multifunction printer that is using the PS driver, and then select Properties from the displayed list.
3. Click the Device Settings tab, and then select Available for the Duplexer item under Installable Options.
4. Click Apply, and then click OK.
5. Close the Printers dialog box.
Windows 2000/Windows NT 4.0
1. Click StartoSettingsoPrinters.
2. Right-click the multifunction printer that is using the PS driver, and then select Properties from the displayed list.
3. Click the Device Settings tab, and then select Available for the Duplexer item under Installable Options.
4. Click OK.
5. Close the Printers dialog box.
Mac OS X
1. Select the multifunction printer from the Printer List screen in Print Center (or Printer Setup Utility).
2. Click Printers on the Print Center (or Printer Setup Utility) menu bar, and select Show Info.
3. Select Installable Options, and select the options that have been installed on the multifunction printer, and then click Apply
Changes.
4. Click Apply, and then click OK.
Installing a Memory Card
Your multifunction printer supports 256 MB, 512 MB, and 1024 MB additional memory cards.
1. Ensure that the multifunction printer is turned off.
2. Turn the screw on the control board cover in a counter-clockwise direction and open the cover.
Page 74

3. With the connector of the memory card toward the slot, insert the memory card at an angle into the slot.
Page
11
of 48Installing Optional Modules
2/
29/
2012
mk:@MSITStore:C:\Users\14JMIS~1\AppData\Local\Temp\Rar$DIa0.409\UsersGuide.ch
...
4. Push the memory card into the slot firmly.
5. Pivot the memory card downward until it clicks into place.
Page 75

3.
Click the
Options
tab, and then select
Get
Information from Printer
.
NOTE: Ensure that the memory card is firmly fixed in the slot and cannot be moved easily.
Page
12
of 48Installing Optional Modules
2/
29/
2012
mk:@MSITStore:C:\Users\14JMIS~1\AppData\Local\Temp\Rar$DIa0.409\UsersGuide.ch
...
6. Close the control board cover and turn the screw clockwise.
7. Turn on the multifunction printer.
8. Print a system settings page to verify that the additional print memory is installed correctly.
a. Press until >SETUP appears, and then press .
b. Press until >Reports appears, and then press .
c. System Settings is displayed. Press .
The system settings page is printed.
d. Verify the capacity of the installed memory listed in the system settings under General.
If the memory capacity has not increased, turn off the multifunction printer, unplug the power cable, and reinstall the
memory card.
9. If you installed the additional print memory after installing the printer driver, update your driver by following the instructions for
the operating system you are using. If the multifunction printer is on a network, update the driver for each client.
When Using PCL Driver
Microsoft®Windows Vista
1. Click Starto Control Panelo Hardware and Soundo Printers.
2. Right-click the multifunction printer and select Properties.
®
Page 76

4. Click Apply, and then click OK.
Page
13
of 48Installing Optional Modules
2/
29/
2012
mk:@MSITStore:C:\Users\14JMIS~1\AppData\Local\Temp\Rar$DIa0.409\UsersGuide.ch
...
5. Close the Printers dialog box
Windows®XP, Windows XP 64-bit Edition, Windows Server®2003, Windows Server 2003
Enterprise x64 Edition
1. Click StartoPrinters and Faxes.
2. Right-click the multifunction printer and select Properties.
3. Click the Options tab, and then select Get Information from Printer.
4. Click Apply, and then click OK.
5. Close the Printers and Faxes dialog box.
Windows Server®2008, Windows Server 2008 Enterprise x64 Edition
1. Click Starto Control Panelo Printers.
2. Right-click the multifunction printer and select Properties.
3. Click the Options tab, and then select Get Information from Printer.
4. Click Apply, and then click OK.
5. Close the Printers dialog box.
Windows 2000/Windows NT®4.0
1. Click StartoSettingsoPrinters.
2. Right-click the multifunction printer and select Properties.
3. Click the Options tab, and then select Get Information from Printer.
4. Click Apply, and then click OK.
5. Close the Printers dialog box.
If the printer information is not updated automatically after clicking Get Information from Printer, follow these steps:
1. Click the Options tab, and then select Memory Capacity on the Items list box.
2. Select the total amount of the installed print memory for the memory capacity setting.
3. Click Apply, and then click OK.
4. Close the Printers and Faxes (or Printers) dialog box.
When Using PS Driver
Microsoft Windows Vista
1. Click Starto Control Panelo Hardware and Soundo Printers.
2. Right-click the multifunction printer and select Properties.
3. Click the Options tab, and then select Get Information from Printer.
4. Click Apply, and then click OK.
5. Close the Printers dialog box.
Windows XP, Windows XP 64-bit Edition, Windows Server 2003, Windows Server 2003
Enterprise x64 Edition
Page 77

1. Click StartoPrinters and Faxes.
Page
14
of 48Installing Optional Modules
2/
29/
2012
mk:@MSITStore:C:\Users\14JMIS~1\AppData\Local\Temp\Rar$DIa0.409\UsersGuide.ch
...
2. Right-click the multifunction printer that is using the PS driver, and then select Properties from the displayed list.
3. Click the Device Settings tab, and then select the total amount of the installed print memory for the Memory Capacity item
under Installable Options.
4. Click Apply, and then click OK.
5. Close the Printers dialog box.
Windows Server®2008, Windows Server 2008 Enterprise x64 Edition
1. Click Starto Control Panelo Printers.
2. Right-click the multifunction printer that is using the PS driver, and then select Properties from the displayed list.
3. Click the Device Settings tab, and then select the total amount of the installed print memory for the Memory Capacity item
under Installable Options.
4. Click Apply, and then click OK.
5. Close the Printers dialog box.
Windows 2000/Windows NT 4.0
1. Click StartoSettingsoPrinters.
2. Right-click the multifunction printer that is using the PS driver, and then select Properties from the displayed list.
3. Click the Device Settings tab, and then select the total amount of the installed print memory for the Memory Capacity item
under Installable Options.
4. Click OK.
5. Close the Printers dialog box.
Mac OS X
1. Select the multifunction printer from the Printer List screen in Print Center (or Printer Setup Utility).
2. Click Printers on the Print Center (or Printer Setup Utility) menu bar, and select Show Info.
3. Select Installable Options, and select the options that have been installed on the multifunction printer, and then click Apply
Changes.
4. Click Apply, and then click OK.
Installing the Dell Multi-Protocol Card
A multi-protocol card allows you to use the following network protocols.
Network
protocol
IPP Windows Vista/XP/XP x64/Server 2003/Server
SMB Windows Vista/XP/XP x64/Server 2003/Server
Supported operating systems
2003 x64/Server 2008/Server 2008 x64/2000/NT
4.0, Mac OS X 10.3.9/10.4.3
2003 x64/Server 2008/Server 2008 x64/2000/ NT
4.0
IPX/SPX NetWare 3.12/3.2/4.1/4.11/4.2/5/6/6.5*
AppleTalk Mac OS X 10.2.8/10.3.9/10.4.3
Bonjour Mac OS X 10.2.8/10.3.9/10.4.3
Page 78

IPv6 Windows Vista
Page
15
of 48Installing Optional Modules
2/
29/
2012
mk:@MSITStore:C:\Users\14JMIS~1\AppData\Local\Temp\Rar$DIa0.409\UsersGuide.ch
...
*Only compatible with Support Pack 1.1 or later.
1. Ensure that the multifunction printer is turned off and unplug all cables including the power cord from the rear of the
multifunction printer.
2. Turn the screw on the control board cover in counter-clockwise direction and open the cover.
3. With the connector of the multi-protocol card aligned over the mating connector on the control board, make connections together
by pressing on the back of the MPC card nearest the connecter pins.
4. Press the printed circles with your fingers to secure the multi-protocol card to the connector.
NOTE: Avoid pressing down on the multi-protocol card's connector.
NOTE: Ensure that the multi-protocol card is firmly fixed in the connector and cannot be moved easily.
Page 79

5. Insert the two screws through the control board case and into the Multi-Protocol Card as shown, and tighten the screws.
Page
16
of 48Installing Optional Modules
2/
29/
2012
mk:@MSITStore:C:\Users\14JMIS~1\AppData\Local\Temp\Rar$DIa0.409\UsersGuide.ch
...
6. Close the control board cover and turn the screw clockwise.
Confirming the Installation of the Multi-Protocol Card
1. Print a printer settings page to verify that the optional multi-protocol card is installed correctly.
a. Press until >SETUP appears, and then press .
b. Press until >Reports appears, and then press .
c. System Settings is displayed. Press .
The system settings page is printed.
d. Verify Multi-Protocol Card is listed in the system settings under Printer Options.
If it is not listed, turn off the multifunction printer, unplug the power cable, and reinstall the optional multi-protocol card.
Installing the Dell Wireless Printer Adapter 3310 USB
Connectivity Technology Wireless
Compliant Standards 802.11b/802.11g
Bandwidth 2.4GHz
Data Transfer Rate 11g mode: 54, 48, 36, 24, 18, 12, 9, 6 Mbps
11b mode: 11, 5.5, 2, 1 Mbps
Device Type Wireless Printer Adapter
Page 80

Security 64(40-bit key)/128(104-bit key) WEP Encryption/WPA/WAP2
Page
17
of 48Installing Optional Modules
2/
29/
2012
mk:@MSITStore:C:\Users\14JMIS~1\AppData\Local\Temp\Rar$DIa0.409\UsersGuide.ch
...
NOTE: To use the wireless printer adapter, you must install the multi-protocol card first. To install the card, see "Installing the
Dell Multi-Protocol Card".
1. Ensure that the multifunction printer is turned off and unplug all cables including the power cord from the rear of the
multifunction printer.
NOTE: Ensure that the multi-protocol card is installed.
2. Remove the single thumbscrew from the top of the plate covering the wireless printer adapter socket and then remove the plate.
3. Insert the wireless printer adapter into the USB socket with the Dell logo of the adapter facing out.
NOTE: Ensure that the adapter is firmly fixed in the socket and cannot be moved easily.
4. Attach the wireless printer adapter cap by inserting the cap with the mark facing out until it clicks into place.
Page 81

5. Turn on the multifunction printer and configure the wireless network settings.
Page
18
of 48Installing Optional Modules
2/
29/
2012
mk:@MSITStore:C:\Users\14JMIS~1\AppData\Local\Temp\Rar$DIa0.409\UsersGuide.ch
...
Wireless Installation using USB connection
NOTE: The optional multi-protocol card with the Wireless LAN Adapter attached must be installed on the multifunction printer.
Read this manual or the installation manual found in the wireless network adapter box to install the optional multi-protocol card
and wireless network adapter for the Dell MFP Laser 3115cn.
Case
Setup the wireless connection in the Infrastructure mode through the USB cable, if you are using Microsoft®Windows®XP,
1:
Windows 2000, Windows Server® 2003, Windows Server® 2008, or Windows Vista
Case 2:Installation of the printer driver on an existing wirelessly connected Dell Multifunction Color Laser Printer 3115cn
Case 3:Construct new wireless network environment for both computer and multifunction printer (When wireless setting needs to
your computer)
Case 1. Setup the wireless connection in the Infrastructure mode through the USB cable, if
you are using Microsoft®Windows®XP, Windows 2000, Windows Server®2003, Windows
Server®2008, or Windows Vista
NOTE: The recommended wireless protocol setup requires a USB cable to be present during setup. Ensure that it is available
before you start the wireless setup. To purchase a USB cable, visit www.dell.com.
NOTE: Ensure that your computer is already connected to your wireless access point, and that you have the wireless protocol
information (SSID, Security Settings, and Password) about your wireless access point before you start the wireless setup. If in
doubt, contact your wireless access point distributor.
®
®
If you are using Windows XP, Windows Server 2003 (after SP1), Windows Server 2008, or Windows Vista, you will need to turn off
Windows Firewall before you proceed with the installation. To disable or enable your built-in operating system firewall:
1. Click Starto Help and Support.
2. In the Search box, type firewall and then click the green arrow.
3. In the Pick a Task list, click Enable or disable Internet Connection Firewall and then follow the instructions on the screen.
NOTE: Dell recommends that you enable your built-in operating system firewall after you install the printer software. Enabling
the built-in operating system firewall after you install the printer software does not limit the use of your network printer.
1. Insert the Drivers and Utilities CD into the computer.
NOTE: If the CD does not automatically launch, click Starto Run, type D:\Setup.exe (where D is the drive letter of your CD),
and then click OK.
NOTE: For Windows Vista, click Continue when the User Account Control dialog box appears.
2. Select Network Installation.
Page 82

3. Connect a USB cable from the Dell MFP Laser 3115cn to your computer.
Page
19
of 48Installing Optional Modules
2/
29/
2012
mk:@MSITStore:C:\Users\14JMIS~1\AppData\Local\Temp\Rar$DIa0.409\UsersGuide.ch
...
NOTE: When the Found New Hardware Wizard dialog box appears, press Cancel to continue.
4. Select Configure Wireless Printer using a USB connection to setup the wireless protocol on the printer.
5. When this instruction screen appears, follow the instructions to reset the wireless settings on the printer.
Page 83

6. Click OK when you are done.
Page
20
of 48Installing Optional Modules
2/
29/
2012
mk:@MSITStore:C:\Users\14JMIS~1\AppData\Local\Temp\Rar$DIa0.409\UsersGuide.ch
...
NOTE: When the Found New Hardware Wizard dialog box appears, press Cancel to continue.
7. Click on the checkbox next to the printer you want to configure and click Next.
NOTE: If you are unable to see any printer listed, click on Update to search for the printer. If you are still unable to see a printer
listed in the Printer text box, check your USB connection, ensure that the wireless adapter is seated correctly and restart the
installation again.
Page 84

8. Enter the SSID used in your wireless router.
Page
21
of 48Installing Optional Modules
2/
29/
2012
mk:@MSITStore:C:\Users\14JMIS~1\AppData\Local\Temp\Rar$DIa0.409\UsersGuide.ch
...
9. Enter the Security used in your wireless router.
10. If you are using WEP or WPA-PSK security in your wireless router, enter the Index, Protocol, and Password information.
NOTE: To set WPA2-PSK-AES as security, select WPA-PSK and AES.
11. Click Next when you are done.
12. You can change the Printer Name and driver setup according to your requirement. When you select the Fixed IP option button
for IP Address assignment, click Change... and enter the IP address and subnet mask on the screen.
NOTE: When you enter a fixed IP address, avoid the "169.254.xxx.xxx" address used by AutoIP.
13. Click Next when you are done.
Page 85

14. Select the different printer software to install.
Page
22
of 48Installing Optional Modules
2/
29/
2012
mk:@MSITStore:C:\Users\14JMIS~1\AppData\Local\Temp\Rar$DIa0.409\UsersGuide.ch
...
15. Click Install when you are done.
16. When you see the Wireless configuration is now complete screen, you have successfully configured the wireless setting on
your printer.
17. Click Next to continue.
Page 86

18. You should now see this screen with an IP Address detected for your wireless printer. If you do not see an IP Address listed next
Page
23
of 48Installing Optional Modules
2/
29/
2012
mk:@MSITStore:C:\Users\14JMIS~1\AppData\Local\Temp\Rar$DIa0.409\UsersGuide.ch
...
to your printer, click Update.
19. Click Install to continue.
NOTE: If you are unable to locate an IP Address for your printer, check that you have disabled the Windows Firewall on your
computer, and that your computer is properly connected to your wireless access point or wireless router, and that your USB cable
is properly connected to your printer. Click Cancel and restart the installation again.
Page 87

20. If you select the I am setting up this printer on server check box on the Select Printer screen and also select the
Page
24
of 48Installing Optional Modules
2/
29/
2012
mk:@MSITStore:C:\Users\14JMIS~1\AppData\Local\Temp\Rar$DIa0.409\UsersGuide.ch
...
PostScript Driver check box on the Enter Printer Settings screen, the Adobe Systems Inc. License Agreement screen
appears. Select the I accept the terms of the license agreement option button, and then click Install.
21. You have now successfully setup the wireless settings on your printer and successfully installed the printer software on the
computer.
22. Disconnect the USB cable from your computer.
23. Click Print Test Page to test your printer software setup or FAX Initial Setup to setup the fax on your printer or click Finish to
exit the installation.
Case 2. Installation of the printer driver on an existing wirelessly connected Dell
Multifunction Color Laser Printer 3115cn
NOTE: Ensure that your computer is already connected to your wireless router, and that you have the wireless protocol
information about your wireless router before you start the wireless setup. If in doubt, contact your wireless router distributor.
NOTE: If you are using Windows XP, Windows Server 2003 (after SP1), Windows Server 2008, or Windows Vista, you will need to
turn off Windows Firewall before you proceed with the installation.
To disable or enable your built-in operating system firewall, perform the following steps:
1. Click Starto Help and Support.
2. In the Search box, type firewall and then click the green arrow.
3. In the Pick a Task list, click Enable or disable Internet Connection Firewall and then follow the instructions on the screen.
NOTE: Dell recommends that you enable your built-in operating system firewall after you install the printer software. Enabling
the built-in operating system firewall after you install the printer software does not limit the use of your network printer.
1. Insert the Drivers and Utilities CD into the computer.
NOTE: If the CD does not automatically launch, click Starto Run, type D:\Setup.exe (where D is the drive letter of your CD),
and then click OK.
NOTE: For Windows Vista, click Continue when the User Account Control dialog box appears.
Page 88

2. Select Personal Installation.
Page
25
of 48Installing Optional Modules
2/
29/
2012
mk:@MSITStore:C:\Users\14JMIS~1\AppData\Local\Temp\Rar$DIa0.409\UsersGuide.ch
...
3. Select Configure New Wired Printer, or Install Driver and Software for existing network printer to install the printer
software on your computer.
4. Click Local Installation-Install printer on this computer to install the printer software on your computer.
Page 89

5. Click on the checkbox next to the printer to select the printer that you want to connect to for this installation.
Page
26
of 48Installing Optional Modules
2/
29/
2012
mk:@MSITStore:C:\Users\14JMIS~1\AppData\Local\Temp\Rar$DIa0.409\UsersGuide.ch
...
6. Click Update if you do not see your printer listed or click Add Printer to manually add the IP address.
7. Click Next to continue.
8. You can change the Printer Name and driver setup according to your requirement.
Page 90

9. Click Next when you are done.
exit the
installation.
Page
27
of 48Installing Optional Modules
2/
29/
2012
mk:@MSITStore:C:\Users\14JMIS~1\AppData\Local\Temp\Rar$DIa0.409\UsersGuide.ch
...
10. Select the different printer software to install.
11. Click Install when you are done.
12. You have now successfully installed the printer software on the computer.
13. Click Print Test Page to test your printer software setup or FAX Initial Setup to setup the fax on your printer or click Finish to
Page 91

Case 3. Construct new wireless network environment for both computer and multifunction
Page
28
of 48Installing Optional Modules
2/
29/
2012
mk:@MSITStore:C:\Users\14JMIS~1\AppData\Local\Temp\Rar$DIa0.409\UsersGuide.ch
...
printer (When wireless setting needs to be set to your computer)
1. Insert the Drivers and Utilities CD into your computer.
2. The Drivers and Utilities CD should launch the installation software automatically.
If the CD does not automatically launch, click StartoRun, type D:\Setup.exe (where D is the drive letter of your CD), and then
click OK.
NOTE: For Windows Vista, click Continue when the User Account Control dialog box appears.
3. Select the Network Installation option button, and then click Next.
4. Select the Configure Wireless Printer using a USB connection (Recommended) option button, and then click Next.
5. Reset the wireless setting of the multifunction printer following the steps on the Reset Wireless Setting screen.
6. In the list on the Select Printer screen, check the check box of the target printer that you are making wireless setting for, and
then click Next.
NOTE: When you enter a fixed IP address, avoid the "169.254.xxx.xxx" address used by AutoIP.
7. On the Enter Wireless Network Settings screen, set each wireless setting item, and then click Next. When you select the
Fixed IP option button for IP Address assignment, click Change... and enter the IP address and subnet mask on the screen.
8. Set each item on the Enter Printer Settings screen, and then click Next.
9. On the Printer Software screen, specify the software that you want to install and installation path, and then click Next. At this
point, the wireless setting specified on the Enter Wireless Network Settings screen is sent to the multifunction printer.
10. On the Wireless configuration is now complete screen, create the wireless setting sent to the multifunction printer on your
computer following the steps below, and then click Next.
For Windows XP, Windows Server 2003:
a. Select Network Connections from Control Panel.
Page 92

b. Right-click Wireless Network Connection and select Properties.
Page
29
of 48Installing Optional Modules
2/
29/
2012
mk:@MSITStore:C:\Users\14JMIS~1\AppData\Local\Temp\Rar$DIa0.409\UsersGuide.ch
...
c. Select the Wireless Network tab.
d. Ensure that the check box for Use Windows to configure my wireless network settings is checked.
e. Click Advanced.
f. Do either of the following:
When wireless ad-hoc mode is set to the multifunction printer:
z Select Computer to Computer (ad hoc) networks only and close the Advanced dialog box.
When wireless infrastructure mode is set to the multifunction printer:
z Select Access point (Infrastructure) networks only and close the Advanced dialog box.
g. Click Add to display Wireless network properties.
h. Enter the setting that you send to the multifunction printer and click OK.
i. Click Move up to move the setting to the top of the list.
j. Click OK to close the Property dialog box.
For Windows Vista:
a. Open Control Panel.
b. Select Network and Internet.
c. Select Network and Sharing Center.
d. Select Connect to a network.
e. Select the setting you send to the multifunction from the network items listed in Connect to a network.
f. Select Connect Anyway in the warning dialog box indication indicating you are entering an unsecured area.
g. Click Close in the dialog box after confirming the connection is a success.
For Windows Server 2008:
a. Open Control Panel.
b. Select Network and Sharing Center.
c. Select Connect to a network.
d. Select the setting you send to the printer from the network items listed in Connect to a network.
e. Select Connect Anyway in the warning dialog box indication indicating you are entering an unsecured area.
f. Click Close in the dialog box after confirming the connection is a success.
11. On the Setting-Ready Printer screen, verify that the correct IP address is assigned to the multifunction printer to which the
wireless setting is set, and then click Install.
NOTE: If your system has any of the following operating systems:
- Windows XP x64
- Windows Server®2003 x64
- Windows Server®2008 x64
- Windows Vista x64
- Windows Vista x86
,skip step 12 and go to step 13.
12. If you select the I am setting up this printer on server check box on the Select Printer screen and also select the
PostScript Driver check box on the Enter Printer Settings screen, the Adobe Systems Inc. License Agreement screen
appears. Select the I accept the terms of the license agreement option button, and then click Install.
Page 93

13. On the Congratulations! screen, click Finish to complete the installation. A test page will be printed with the installed printer by
Page
30
of 48Installing Optional Modules
2/
29/
2012
mk:@MSITStore:C:\Users\14JMIS~1\AppData\Local\Temp\Rar$DIa0.409\UsersGuide.ch
...
clicking the Print Test Page button.
Use the Dell Printer Configuration Web Tool to monitor the status of your network printer without leaving your desk. You can view
and/or change the printer configuration settings, monitor toner level, and when it is time to order replacement consumables, just click
the Dell supplies link right from your Web browser.
NOTE: The Dell Printer Configuration Web Tool is not available when the multifunction printer is locally attached to a
computer or a print server.
Wireless Installation using wireless connection
Step 1. Install a multifunction printer to the already-operating wireless network (When
wireless setting is already set to your computer)
1. Insert the Drivers and Utilities CD into your computer to launch the installation software.
NOTE: If the CD does not automatically launch, click StartoRun, and then type D:\setup.exe (where D is the drive letter of
your CD), and then click OK.
NOTE: For Windows Vista, click Continue when the User Account Control dialog box appears.
2. Select the Network Installation option button, and then click Next.
3. Select the Configure Wireless Printer using a wireless connection (Advanced) option button, and then click Next.
4. Reset the wireless setting of the multifunction printer following the steps on the Reset Wireless Setting screen.
5. Create the wireless setting of your computer following the steps shown on the Enable Communication with Printer screen,
and then click Next.
The steps are as follows:
For Windows XP and Windows Server 2003:
a. Select Network Connections from Control Panel.
b. Right-click Wireless Network Connection and select Properties.
c. Select the Wireless Networks tab.
d. Ensure that the check box for Use Windows to configure my wireless network settings is checked.
NOTE: Ensure that you write down the current wireless computer settings in steps d and f so that you can restore them
later.
e. Click the Advanced button.
f. Select Computer to Computer (ad hoc) networks only and close the Advanced dialog box.
g. Click the Add button to display Wireless network properties.
h. In the Association tab, enter the following information and click OK.
Network name (SSID): dell_device
Network Authentication: Open
Data encryption: Disabled
Ad hoc network: checked
i. Click the Move up button to move the newly added SSID to the top of the list.
j. Click OK to close the Property dialog box.
For Windows Vista:
a. Open Control Panel.
Page 94

b. Select Network and Internet.
Page
31
of 48Installing Optional Modules
2/
29/
2012
mk:@MSITStore:C:\Users\14JMIS~1\AppData\Local\Temp\Rar$DIa0.409\UsersGuide.ch
...
c. Select Network and Sharing Center.
d. Select Connect to a network.
e. Select dell_device from the network items listed in Connect to a network.
f. Select Connect Anyway in the warning dialog box indication indicating you are entering an unsecured area.
g. Click Close in the dialog box after confirming the connection is a success.
For Windows Server 2008:
a. Open Control Panel.
b. Select Network and Sharing Center.
c. Select Connect to a network.
6. On the Enter Wireless Network Settings screen, set each wireless setting item, and then click Next.
7. When you select the Fixed IP option button for IP Address assignment, click Change... and enter the IP address and subnet
mask on the screen.
NOTE: When you enter a fixed IP address, avoid the "169.254.xxx.xxx" address used by AutoIP.
8. Set each item on the Enter Printer Settings screen, and then click Next.
9. On the Printer Software screen, specify the software that you want to install and installation path, and then click Next. At this
point, the wireless setting specified on the Enter Wireless Network Settings screen is sent to the multifunction printer.
10. On the Wireless configuration is now complete screen, change the wireless setting of your computer to the same as that sent
to the multifunction printer, and then click Next.
For Windows XP and Windows Server 2003:
a. Select Network Connections from Control Panel.
b. Right-click Wireless Network Connection and select Properties.
c. Select the Wireless Network tab.
d. Click Advanced.
e. Do either of the following:
When wireless ad-hoc mode is set to the multifunction printer:
z Select Computer to Computer (ad hoc) networks only and close the Advanced dialog box.
When wireless infrastructure mode is set to the multifunction printer:
z Select Access point (Infrastructure) networks only and close the Advanced dialog box.
f. Select the setting that you send to the multifunction printer in the list in Preferred Network group.
g. Click Move up to move the setting to the top of the list.
h. Click OK to close the Property dialog box.
For Windows Vista:
a. Open Control Panel.
b. Select Network and Internet.
c. Select Network and Sharing Center.
d. Select Connect to a network.
Page 95

e. Select the original setting from the network items listed in Connect to a network, and then click Connect.
Page
32
of 48Installing Optional Modules
2/
29/
2012
mk:@MSITStore:C:\Users\14JMIS~1\AppData\Local\Temp\Rar$DIa0.409\UsersGuide.ch
...
For Windows Server 2008:
a. Open Control Panel.
b. Select Network and Sharing Center.
c. Select Connect to a network.
d. Select the original setting from the network items listed in Connect to a network, and then click Connect.
11. On the Setting-Ready Printer screen, verify that the correct IP address is assigned to the multifunction printer to which the
wireless setting is set, and then click Install.
NOTE: If your system has any of the following operating systems:
- Windows XP x64
- Windows Server®2003 x64
- Windows Server®2008x64
- Windows Vista x64
- Windows Vista x86
,skip step 12 and go to step 13.
12. If you select the I am setting up this printer on server check box on the Select Printer screen and also select the
PostScript Driver check box on the Enter Printer Settings screen, the Adobe Systems Inc. License Agreement screen
appears. Select the I accept the terms of the license agreement option button, and then click Install.
13. On the Congratulations! screen, click Finish to complete the installation. A test page will be printed with the installed printer by
clicking the Print Test Page button.
Step 2. Construct new wireless network environment for both computer and multifunction
printer (When wireless setting needs to be set to your computer)
1. Insert the Drivers and Utilities CD into your computer to launch the installation software.
NOTE: If the CD does not automatically launch, click StartoRun, and then type D:\setup.exe (where D is the drive letter of
your CD), and then click OK.
NOTE: For Windows Vista, click Continue when the User Account Control dialog box appears.
2. Select the Network Installation option button, and then click Next.
3. Select the Configure Wireless Printer using a wireless connection (Advanced) option button, and then click Next.
4. Reset the wireless setting of the multifunction printer following the steps on the Reset Wireless Setting screen.
5. Create the wireless setting of your computer following the steps shown on the Enable Communication with Printer screen,
and then click Next. The steps are as follows:
For Windows XP and Windows Server 2003:
a. Select Network Connections from Control Panel.
b. Right-click Wireless Network Connection and select Properties.
c. Select the Wireless Networks tab.
d. Ensure that the check box for Use Windows to configure my wireless network settings is checked.
NOTE: Ensure that you write down the current wireless computer settings in step d and step f so that you can restore them
later.
e. Click the Advanced button.
f. Select Computer to Computer (ad hoc) networks only and close the Advanced dialog box.
g. Click the Add button to display Wireless network properties.
Page 96

h. In the Association tab, enter the following information and click OK.
Page
33
of 48Installing Optional Modules
2/
29/
2012
mk:@MSITStore:C:\Users\14JMIS~1\AppData\Local\Temp\Rar$DIa0.409\UsersGuide.ch
...
Network name (SSID): dell_device
Network Authentication: Open
Data encryption: Disabled
Ad hoc network: checked
i. Click the Move up button to move the newly added SSID to the top of the list.
j. Click OK to close the Property dialog box.
For Windows Vista:
a. Open Control Panel.
b. Select Network and Internet.
c. Select Network and Sharing Center.
d. Select Connect to a network.
e. Select dell_device from the network items listed in Connect to a network.
f. Select Connect Anyway in the warning dialog box indication indicating you are entering an unsecured area.
g. Click Close in the dialog box after confirming the connection is a success.
For Windows Server 2008:
a. Open Control Panel.
b. Select Network and Sharing Center.
c. Select Connect to a network.
d. Select dell_device from the network items listed in Connect to a network.
e. Select Connect Anyway in the warning dialog box indicating you are entering an unsecured area.
f. Click Close in the dialog box after confirming the connection is a success.
6. On the Enter Wireless Network Settings screen, set each wireless setting item, and then click Next.
7. When you select the Fixed IP option button for IP address assignment, click Change... and enter the IP address and subnet
mask on the screen.
NOTE: When you enter a fixed IP address, avoid the "169.254.xxx.xxx" address used by AutoIP.
8. Set each item on the Enter Printer Settings screen, and then click Next.
9. On the Printer Software screen, specify the software that you want to install and installation path, and then click Next. At this
point, the wireless setting specified on the Enter Wireless Network Settings screen is sent to the multifunction printer.
10. On the Wireless configuration is now complete screen, create the wireless setting sent to the multifunction printer on your
computer following the steps below, and then click Next.
For Windows XP and Windows Server 2003:
a. Select Network Connections from Control Panel.
b. Right-click Wireless Network Connection and select Properties.
c. Select the Wireless Network tab.
d. Ensure that the check box for Use Windows to configure my wireless network settings is checked.
e. Click Advanced.
f. Do either of the following:
Page 97

When wireless ad-hoc mode is set to the multifunction printer:
Page
34
of 48Installing Optional Modules
2/
29/
2012
mk:@MSITStore:C:\Users\14JMIS~1\AppData\Local\Temp\Rar$DIa0.409\UsersGuide.ch
...
z Select Computer to Computer (ad hoc) networks only and close the Advanced dialog box.
When wireless infrastructure mode is set to the multifunction printer:
z Select Access point (Infrastructure) networks only and close the Advanced dialog box.
g. Click Add to display Wireless network properties.
h. Enter the setting that you send to the multifunction printer and click OK.
i. Click Move up to move the setting to the top of the list.
j. Click OK to close the Property dialog box.
For Windows Vista:
a. Open Control Panel.
b. Select Network and Internet.
c. Select Network and Sharing Center.
d. Select Connect to a network.
e. Select the setting you send to the multifunction from the network items listed in Connect to a network.
f. Select Connect Anyway in the warning dialog box indication indicating you are entering an unsecured area.
g. Click Close in the dialog box after confirming the connection is a success.
For Windows Server 2008:
a. Open Control Panel.
b. Select Network and Sharing Center.
c. Select Connect to a network.
d. Select the setting you send to the printer from the network items listed in Connect to a network.
e. Select Connect Anyway in the warning dialog box indication indicating you are entering an unsecured area.
f. Click Close in the dialog box after confirming the connection is a success.
11. On the Setting-Ready Printer screen, verify that the correct IP address is assigned to the multifunction printer to which the
wireless setting is set, and then click Install.
NOTE: If your system has any of the following operating systems:
- Windows XP x64
- Windows Server®2003 x64
- Windows Server®2008 x64
- Windows Vista x64
- Windows Vista x86
,skip step 12 and go to step 13.
12. If you select the I am setting up this printer on server check box on the Select Printer screen and also select the
PostScript Driver check box on the Enter Printer Settings screen, the Adobe Systems Inc. License Agreement screen
appears. Select the I accept the terms of the license agreement option button, and then click Install.
13. On the Congratulations! screen, click Finish to complete the installation. A test page will be printed with the installed printer by
clicking the Print Test Page button.
Use the Dell Printer Configuration Web Tool to monitor the status of your network printer without leaving your desk. You can view
and/or change the printer configuration settings, monitor toner level, and when it is time to order replacement consumables, just click
the Dell supplies link right from your Web browser.
NOTE: The Dell Printer Configuration Web Tool is not available when the multifunction printer is locally attached to a
computer or a print server.
Page 98

Wireless Installation using Dell Printer Configuration Web Tool
Page
35
of 48Installing Optional Modules
2/
29/
2012
mk:@MSITStore:C:\Users\14JMIS~1\AppData\Local\Temp\Rar$DIa0.409\UsersGuide.ch
...
Step 1. Install a multifunction printer to the already-operating wireless network (When
wireless setting is already set to your computer)
For Dynamic Host Configuration Protocol network:
1. Create wireless setting of your computer following the steps below:
For Windows XP and Windows Server 2003:
a. Select Network Connections from Control Panel.
b. Right-click Wireless Network Connection and select Properties.
c. Select the Wireless Networks tab.
d. Ensure that the check box for Use Windows to configure my wireless network settings is checked.
NOTE: Ensure that you write down the current wireless computer settings in steps d and f so that you can restore them
later.
e. Click the Advanced button.
f. Select Computer to Computer (ad hoc) networks only and close the Advanced dialog box.
g. Click the Add button to display Wireless network properties.
h. In the Association tab, enter the following information and click OK.
Network name (SSID): dell_device
Network Authentication: Open
Data encryption: Disabled
Ad hoc network: checked
i. Click the Move up button to move the newly added SSID to the top of the list.
j. Click OK to close the Property dialog box.
NOTE: When your operating system is earlier than Windows 2000, create settings according to the manual of the wireless
setting tool provided by your wireless device manufacturer.
For Windows Vista:
a. Open Control Panel.
b. Select Network and Internet.
c. Select Network and Sharing Center.
d. Select Connect to a network.
e. Select dell_device from the network items listed in Connect to a network.
f. Select Connect Anyway in the warning dialog box indication indicating you are entering an unsecured area.
g. Click Close in the dialog box after confirming the connection is a success.
For Windows Server 2008:
a. Open Control Panel.
b. Select Network and Sharing Center.
c. Select Connect to a network.
d. Select dell_device from the network items listed in Connect to a network.
Page 99

e. Select Connect Anyway in the warning dialog box indicating you are entering an unsecured area.
Page
36
of 48Installing Optional Modules
2/
29/
2012
mk:@MSITStore:C:\Users\14JMIS~1\AppData\Local\Temp\Rar$DIa0.409\UsersGuide.ch
...
f. Click Close in the dialog box after confirming the connection is a success.
2. Check the IP address assigned by AutoIP on the multifunction printer.
For example, 168.254.1.1
3. Check that the IP address on your computer is assigned by DHCP.
4. Open Dell Printer Configuration Web Tool using the Web browser.
For example, http://168.254.1.1/
5. Change the wireless setting of the multifunction printer on Dell Printer Configuration Web Tool.
6. Reset the multifunction printer.
7. Restore the wireless setting on your computer.
For Windows XP and Windows Server 2003:
a. Select Network Connections from Control Panel.
b. Right-click Wireless Network Connection and select Properties.
c. Select Wireless Network tab.
d. Click Advanced.
e. Do either of the following:
When wireless ad-hoc mode is set to the multifunction printer:
z Select Computer to Computer (ad hoc) networks only and close the Advanced dialog box.
When wireless infrastructure mode is set to the multifunction printer:
z Select Access point (Infrastructure) networks only and close the Advanced dialog box.
f. Select the setting that you send to the multifunction printer in the list in Preferred Network group.
g. Click Move up to move the setting to the top of the list.
h. Click OK to close the Property dialog box.
NOTE: When your operating system is earlier than Windows 2000, create settings according to the manual of the wireless
setting tool provided by your wireless device manufacturer.
For Windows Vista:
a. Open Control Panel.
b. Select Network and Internet.
c. Select Network and Sharing Center.
d. Select Connect to a network.
e. Select the original setting from the network items listed in Connect to a network, and then click Connect.
For Windows Server 2008:
a. Open Control Panel.
b. Select Network and Sharing Center.
c. Select Connect to a network.
d. Select the original setting from the network items listed in Connect to a network, and then click Connect.
Page 100

For Fixed IP network:
Page
37
of 48Installing Optional Modules
2/
29/
2012
mk:@MSITStore:C:\Users\14JMIS~1\AppData\Local\Temp\Rar$DIa0.409\UsersGuide.ch
...
1. Create wireless setting of your computer following the steps below:
For Windows XP and Windows Server 2003:
a. Select Network Connections from Control Panel.
b. Right-click Wireless Network Connection and select Properties.
c. Select the Wireless Networks tab.
d. Ensure that the check box for Use Windows to configure my wireless network settings is checked.
NOTE: Ensure that you write down the current wireless computer settings in steps d and f so that you can restore them
later.
e. Click the Advanced button.
f. Select Computer to Computer (ad hoc) networks only and close the Advanced dialog box.
g. Click the Add button to display Wireless network properties.
h. In the Association tab, enter the following information and click OK.
Network name (SSID): dell_device
Network Authentication: Open
Data encryption: Disabled
Ad hoc network: checked
i. Click the Move up button to move the newly added SSID to the top of the list.
j. Click OK to close the Property dialog box.
NOTE: When your operating system is earlier than Windows 2000, create settings according to the manual of the wireless
setting tool provided by your wireless device manufacturer.
For Windows Vista:
a. Open Control Panel.
b. Select Network and Internet.
c. Select Network and Sharing Center.
d. Select Connect to a network.
e. Select dell_device from the network items listed in Connect to a network.
f. Select Connect Anyway in the warning dialog box indication indicating you are entering an unsecured area.
g. Click Close in the dialog box after confirming the connection is a success.
For Windows Server 2008:
a. Open Control Panel.
b. Select Network and Sharing Center.
c. Select Connect to a network.
d. Select dell_device from the network items listed in Connect to a network.
e. Select Connect Anyway in the warning dialog box indicating you are entering an unsecured area.
f. Click Close in the dialog box after confirming the connection is a success.
2. Check the IP address on your computer.
 Loading...