

Page 1
Dell™ 3100MP Projector User's Guide
The information below is provided by the supplier of the referenced device without independent verification by Dell
and is subject to the restrictions and disclaimers
Safety Instructions
About Your Projector
Installation
Using Your Projector
Troubleshooting
Specifications
Regulatory Notices
Contacting Dell
.
Notes, Notices, and Cautions
NOTE: A NOTE indicates important information that helps you make better use of your computer.
NOTICE: A NOTICE indicates either potential damage to hardware or loss of data and tells you how to avoid
the problem.
CAUTION: A CAUTION indicates a potential for property damage, personal injury, or
death.
Information in this document is subject to change without notice.
© 2001 Coretronic Corporation.
© 2002 Dell Computer Corporation. All rights reserved.
Reproduction in any manner whatsoever without the written permission of Dell Computer Corporation is strictly
forbidden.
Trademarks used in this text: Dell and the DELL logo are trademarks of Dell Computer Corporation; DLP and Texas
Instruments are trademarks of Texas Instruments Corporation; Microsoft and Windows are registered trademarks of
Microsoft Corporation; Macintosh is a registered trademark of Apple Computer, Inc.
Other trademarks and trade names may be used in this document to refer to either the entities claiming the marks
and names or their products. Dell Computer Corporation disclaims any proprietary interest in trademarks and trade
names other than its own.
Restrictions and Disclaimers
The information contained in this document, including all instructions, cautions, and regulatory approvals and
certifications, is based upon statements provided to Dell by the manufacturer and has not been independently verified
or tested by Dell. Dell disclaims all liability in connection with any deficiencies in such information.
All statements or claims regarding the properties, capabilities, speeds, or qualifications of the part referenced in this
document are made by the manufacturer and not by Dell. Dell specifically disclaims any knowledge of the accuracy,
completeness, or substantiation for any such statements.
March 2002 Rev. A00
Page 2

Back to Contents Page
Safety Instructions: Dell™ 3100MP Projector
CAUTION
Use the following safety guidelines to help protect your projector from potential damage and to ensure your own
personal safety:
The lamp becomes very hot with use. Do not attempt to replace the lamp after use until the projector
has been allowed to cool down for at least 30 minutes, and follow all instructions in "Changing the
Lamp."
Do not touch the bulb or the lamp glass at any time. The bulb may explode due to improper handling,
including the touching of the bulb or the lamp glass.
To avoid damaging the projector, allow the cooling fan to run for 3 minutes before turning off the
projector.
The remote control is equipped with a Class II laser that emits laser radiation. To reduce the risk of
injury, do not look directly into the laser light, and do not point the laser light into anyone's eyes.
Do not block the ventilation slots and openings on the projector.
Disconnect the power cord from the electrical outlet if the projector is not used for a long period of time.
Do not use the projector in an extremely hot, cold, or humid environment.
Do not use the projector in areas susceptible to excessive dust and dirt.
Do not use the projector near any appliance that generates a strong magnetic field.
Do not place the projector in direct sunlight.
Do not look into the lens while the projector is on; the bright light may hurt your eyes.
To reduce the risk of fire or electric shock, do not expose the projector to rain or moisture.
To prevent electric shock, do not open or disassemble the projector further than what is needed for lamp
replacement.
To avoid damaging the projector, ensure that the zoom lens is fully retracted before moving the projector
or placing the projector in its carrying case.
Turn off the projector and disconnect it from the electrical outlet before cleaning it. Use a soft cloth
moistened with mild detergent to clean the display housing. Do not use abrasive cleaners, waxes, or
solvents.
Back to Contents Page
Page 3
Back to Contents Page
About Your Projector: Dell™ 3100MP Projector
Features
Equipment
Panel Control
Main Unit
Connection Ports
Remote Control With Mouse Function and Laser Pointer
Features
Single chip 0.7" Texas Instruments DLP™ technology
True XGA, 1024 x 768 addressable pixels
3.5 lb (1.6 kg) lightweight compact design
1000 ANSI lumens brightness
Auto image re-sizing to 1024 x 768 full screen with scaling compression compatibility for UXGA, SXGA+,
XGA, SVGA, VGA, MAC, and SXGA
130- watt, user-replaceable P-VIP lamp
Compatibility with Macintosh® computers
Compatibility with NTSC, NTSC4.43, PAL, PAL-M, PAL-N, SECAM, and HDTV (1080i, 720P, 576P, 480i/P)
Remote control with mouse function and laser pointer
DVI- I connection for digital and analog video connectivity
High- definition TV compatibility
User- friendly, multilanguage on- screen display (OSD)
Advanced electronic keystone correction
User- friendly control panel with backlight
Carrying case included
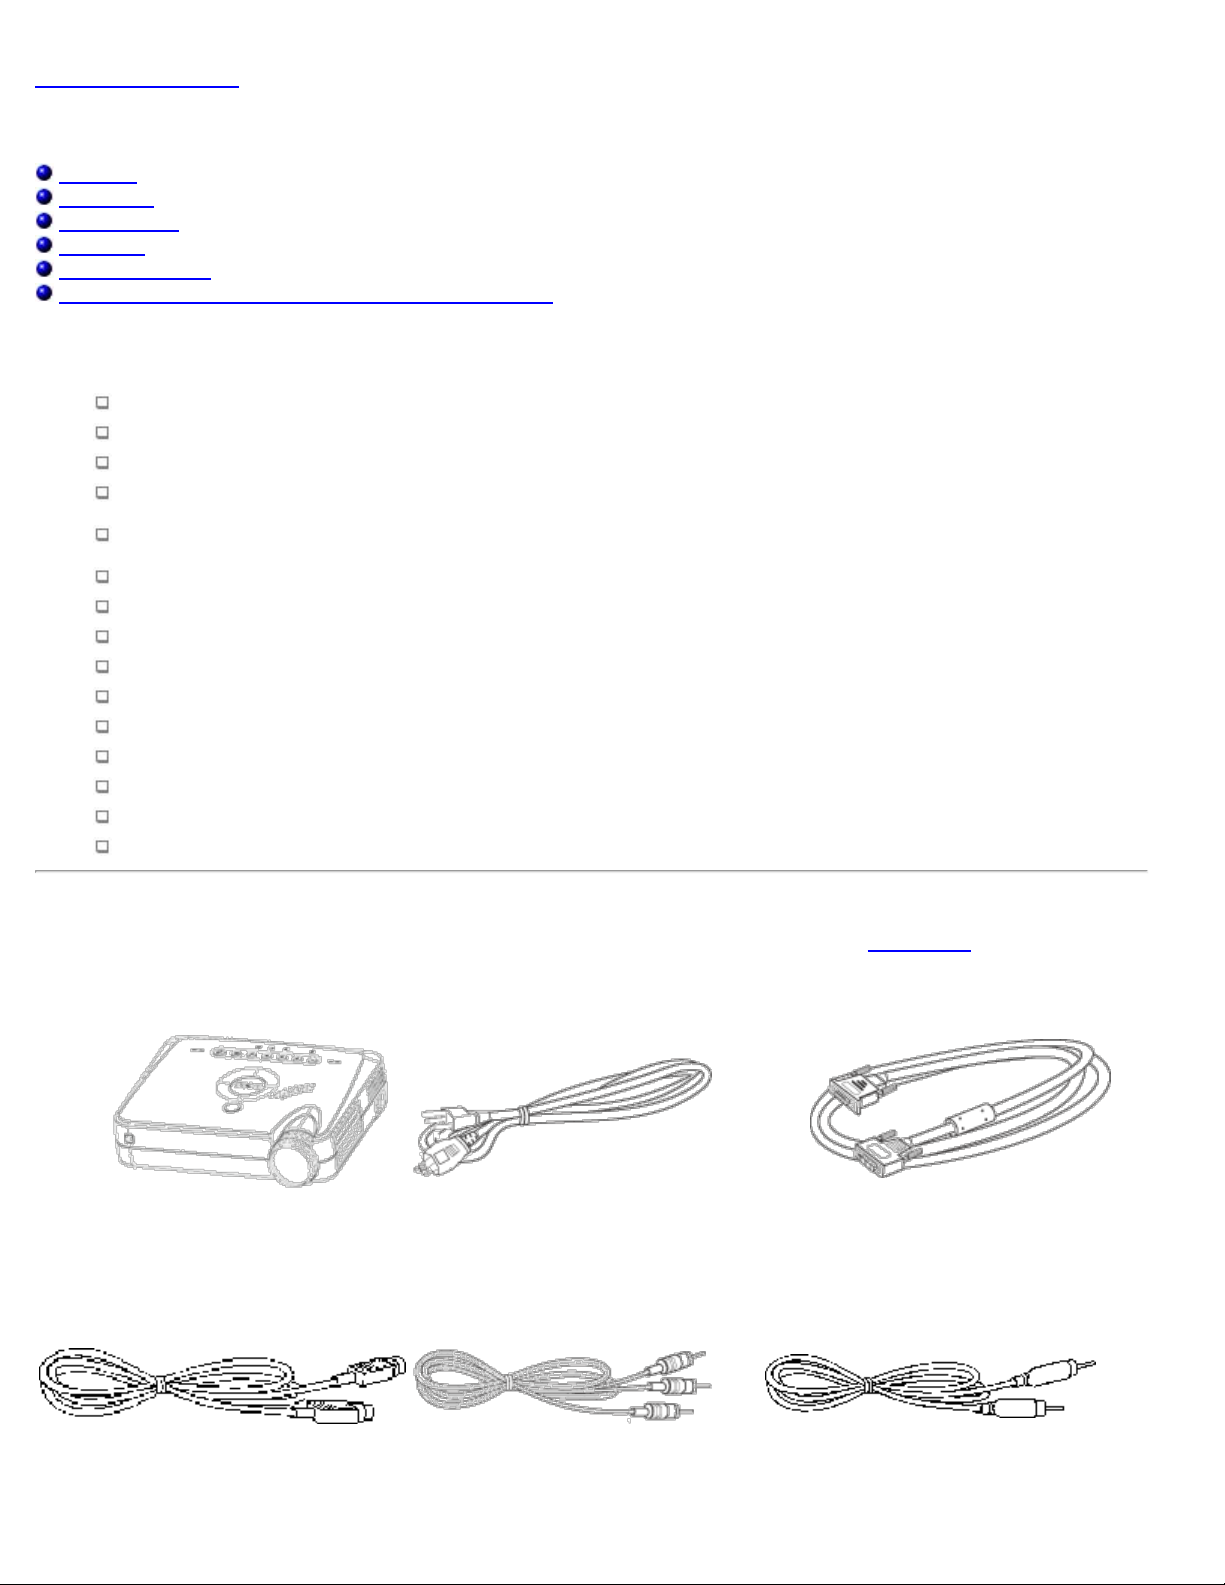
Equipment
Your projector comes with all the items shown below. Ensure that you have all the items, and contact Dell if anything is
missing.
main unit power cord D-sub to DVI-I signal cable
S-video cable RCA audio cable composite video cable
Page 4
DVI-I signal cable for
HDTV/component
remote mouse Y-cable remote control with mouse
function and laser pointer
batteries (2) Dell 3100MP Projector
Dell 3100MP Projector Safety and
Warranty Guide
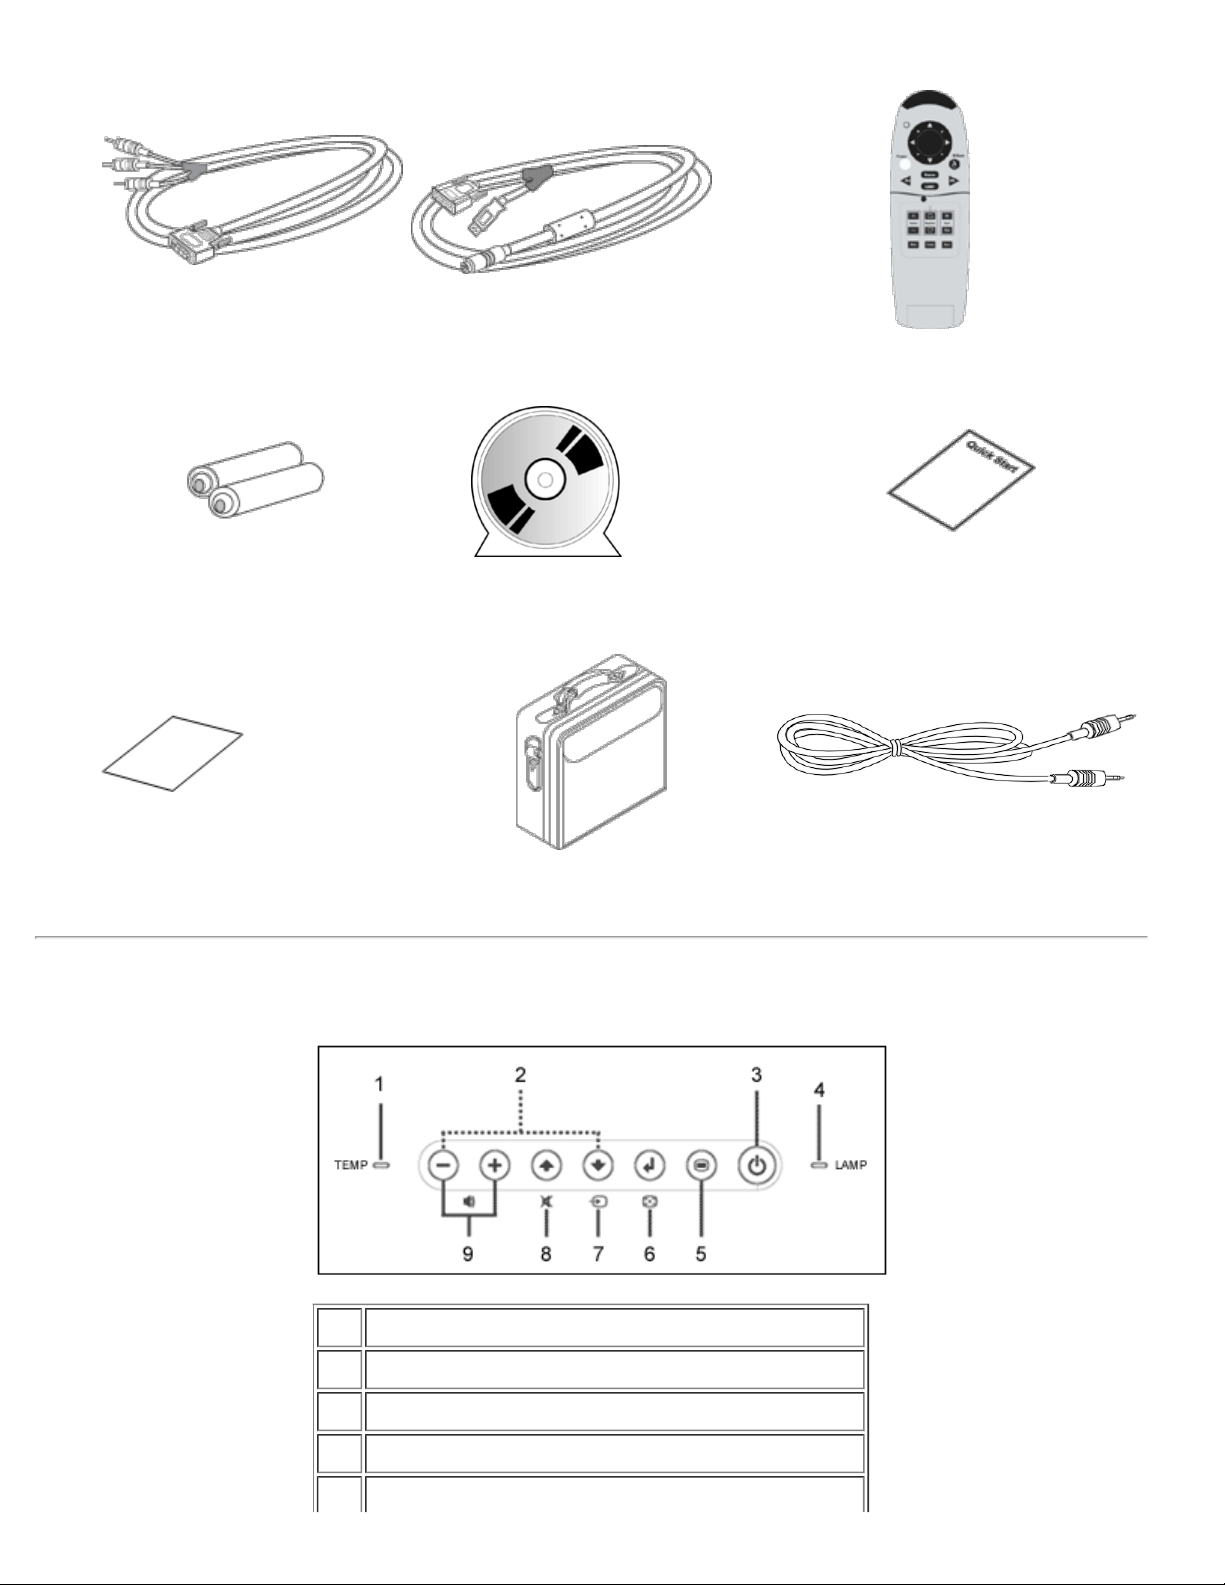
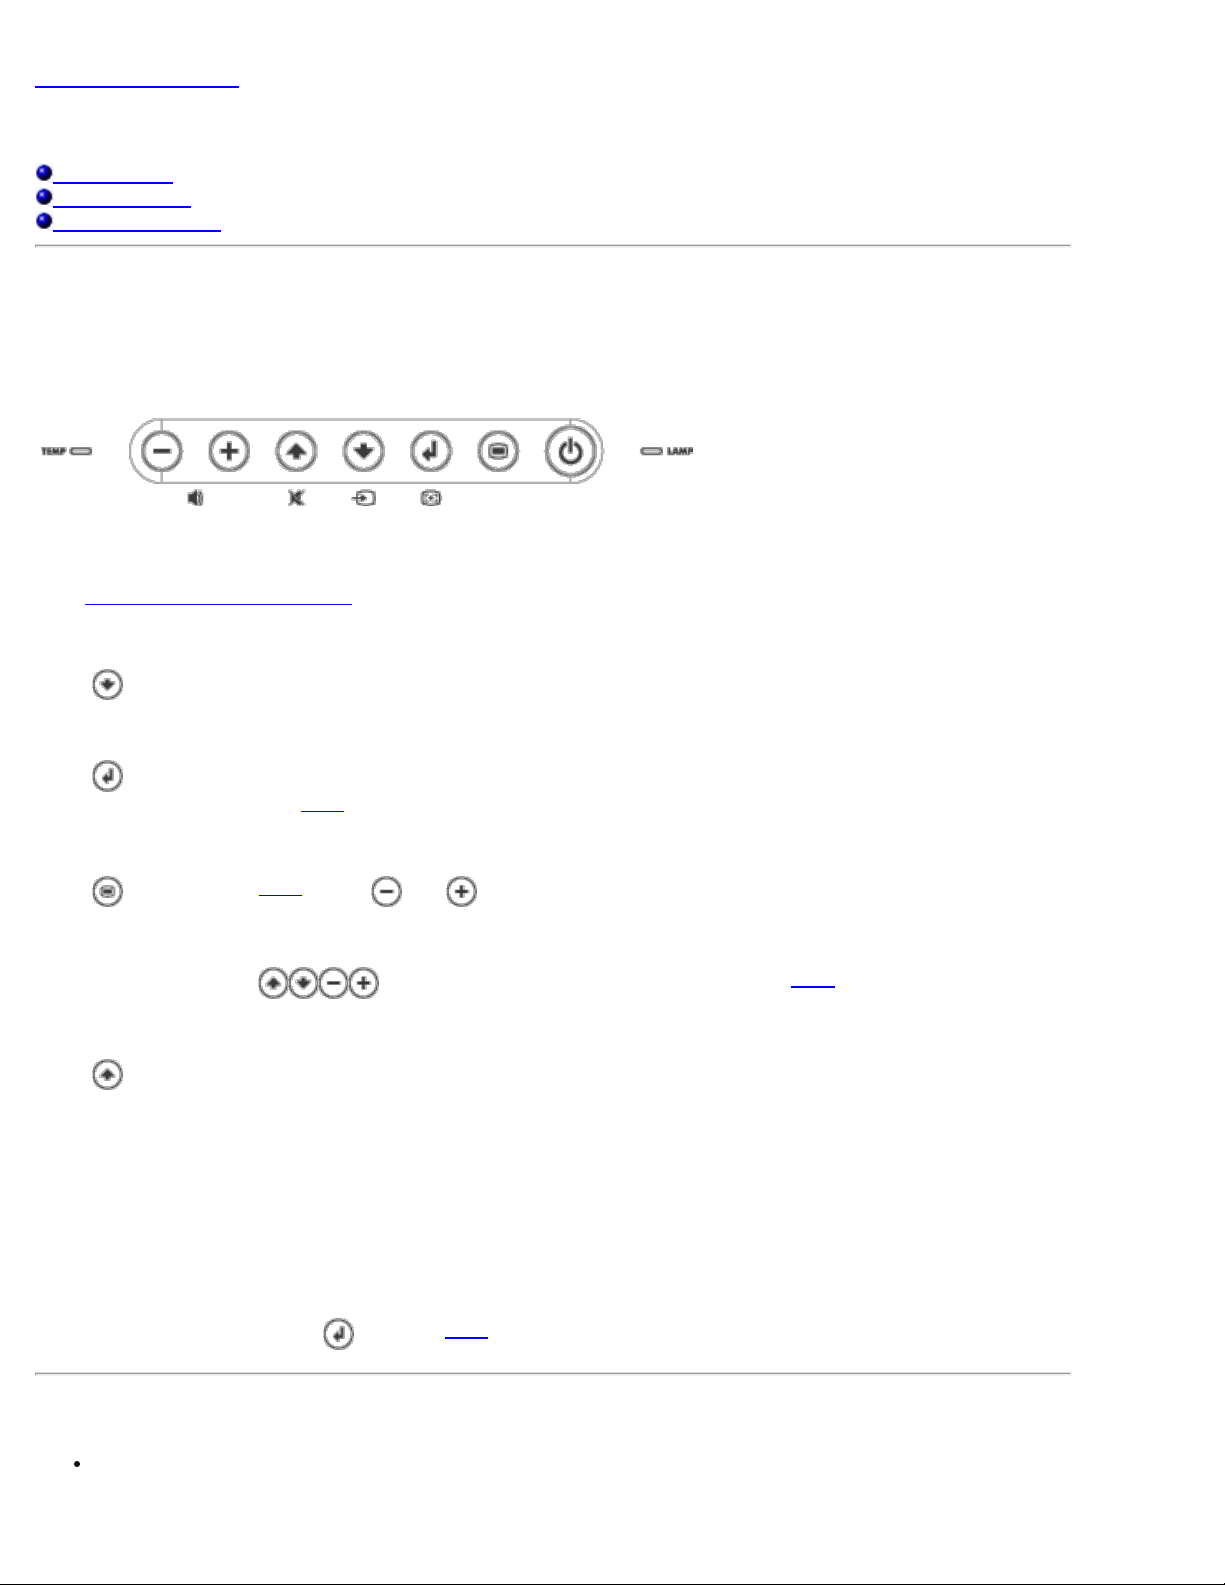
Panel Control
Dell 3100MP Projector Quick Start Card
User's Guide
carrying case mini pin to mini pin cable
1 temperature warning light
2 four directional keys
3 power button
4 lamp warning light
5 Menu
Page 5

Main Unit
6 Enter
7 Source
8 Mute
9 Volume
Connection Ports
1 panel control
2 speaker
3 power connector
4 zoom ring
5 focus ring
6 zoom lens
7 remote control receiver
8 elevator button
1 remote- mouse input connector
Page 6
2 HDTV/component video and computer input connector
3 audio input connector
4 composite video connector
5 S- video connector
6 monitor loop -through connector
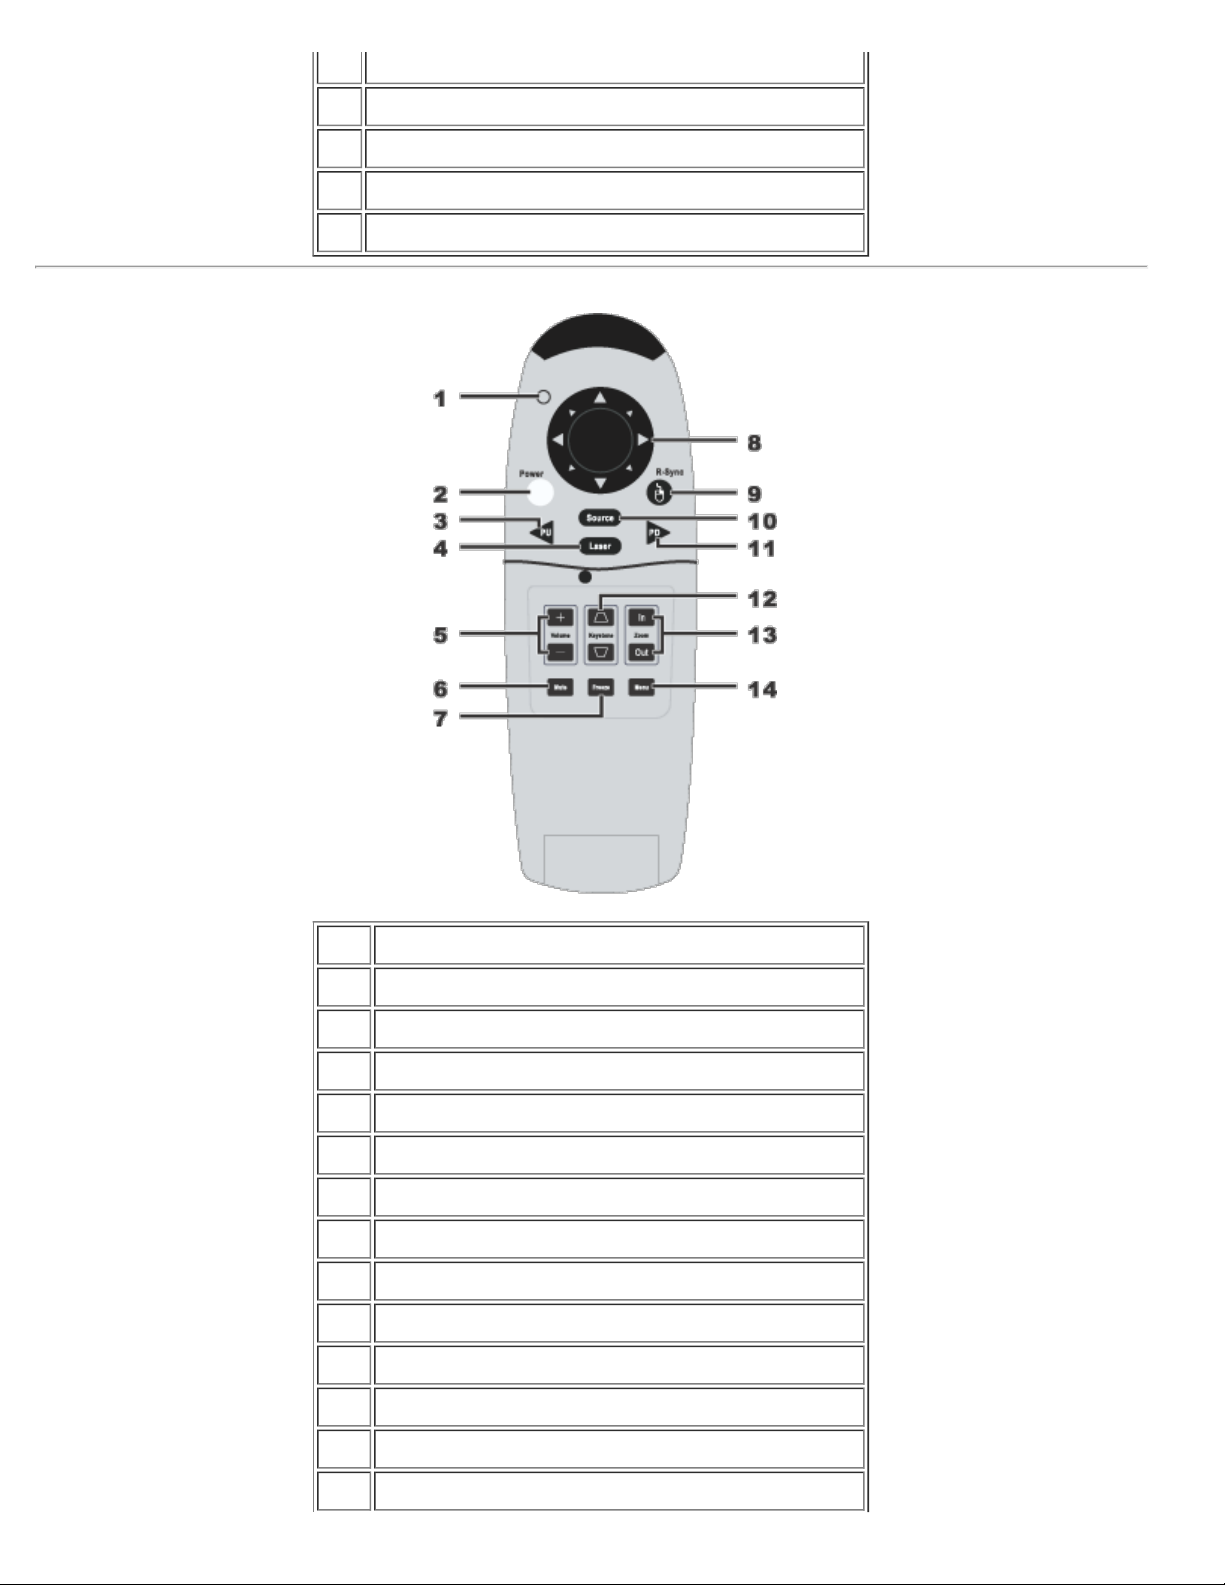
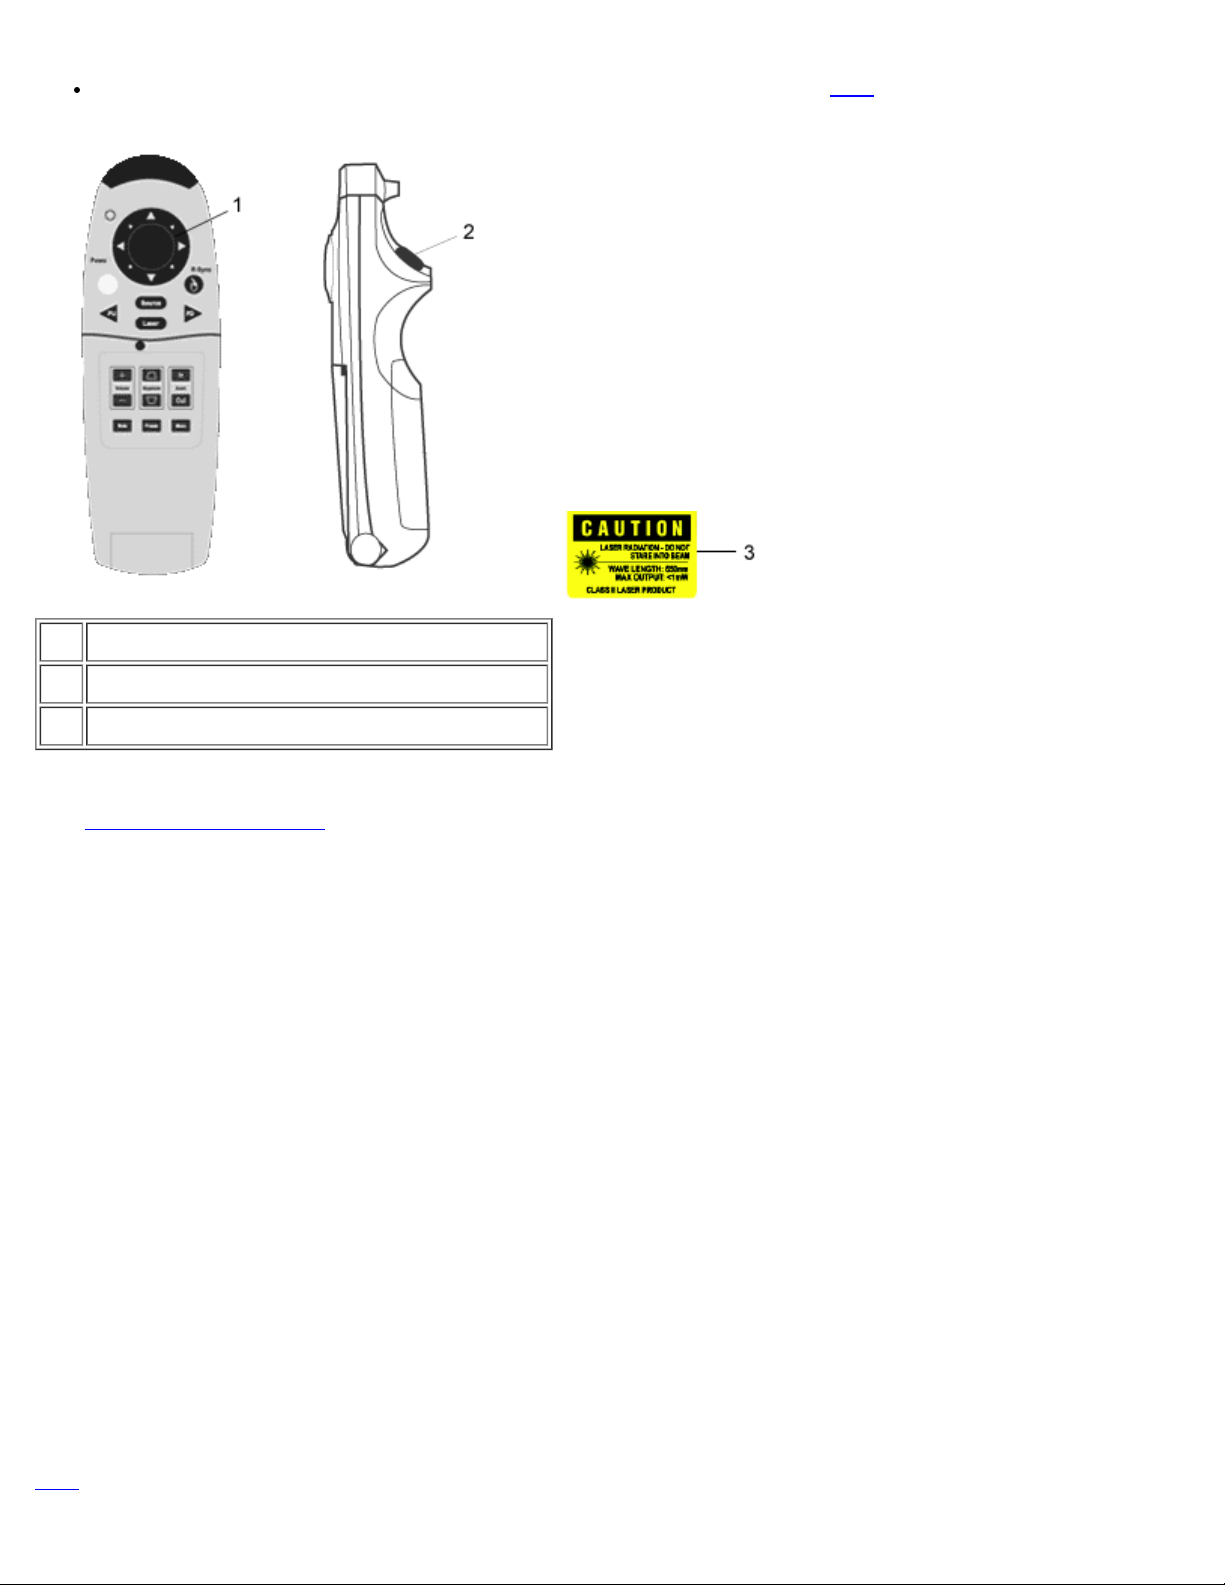
Remote Control With Mouse Function and Laser Pointer
1 light
2 Power button
3 PU button (page up)
4 laser pointer
5 volume controls
6 Mute button
7 Freeze button
8 directional pad
9 R-Sync button
10 Source button
11 PD button (page down)
12 keystone correction
13 zoom in/zoom out
14 Menu button
Page 7

CAUTION: The remote control has a Class II laser that emits radiation. To reduce the risk of injury to the
eyes, do not look directly into the laser light on the remote control and do not point the laser light into anyone's
eyes.
Battery Disposal: Your projector remote control uses zinc- manganese batteries. If you need to
replace the batteries, see your Dell 3100MP Projector Quick Start Card .
Do not dispose of used batteries along with household waste. Contact your local waste disposal
agency for the address of the nearest battery deposit site.
Back to Contents Page
Page 8
Back to Contents Page
Installation: Dell™ 3100MP Projector
Connecting the Projector
Powering On/Off the Projector
Adjusting the Projected Image
Changing the Lamp
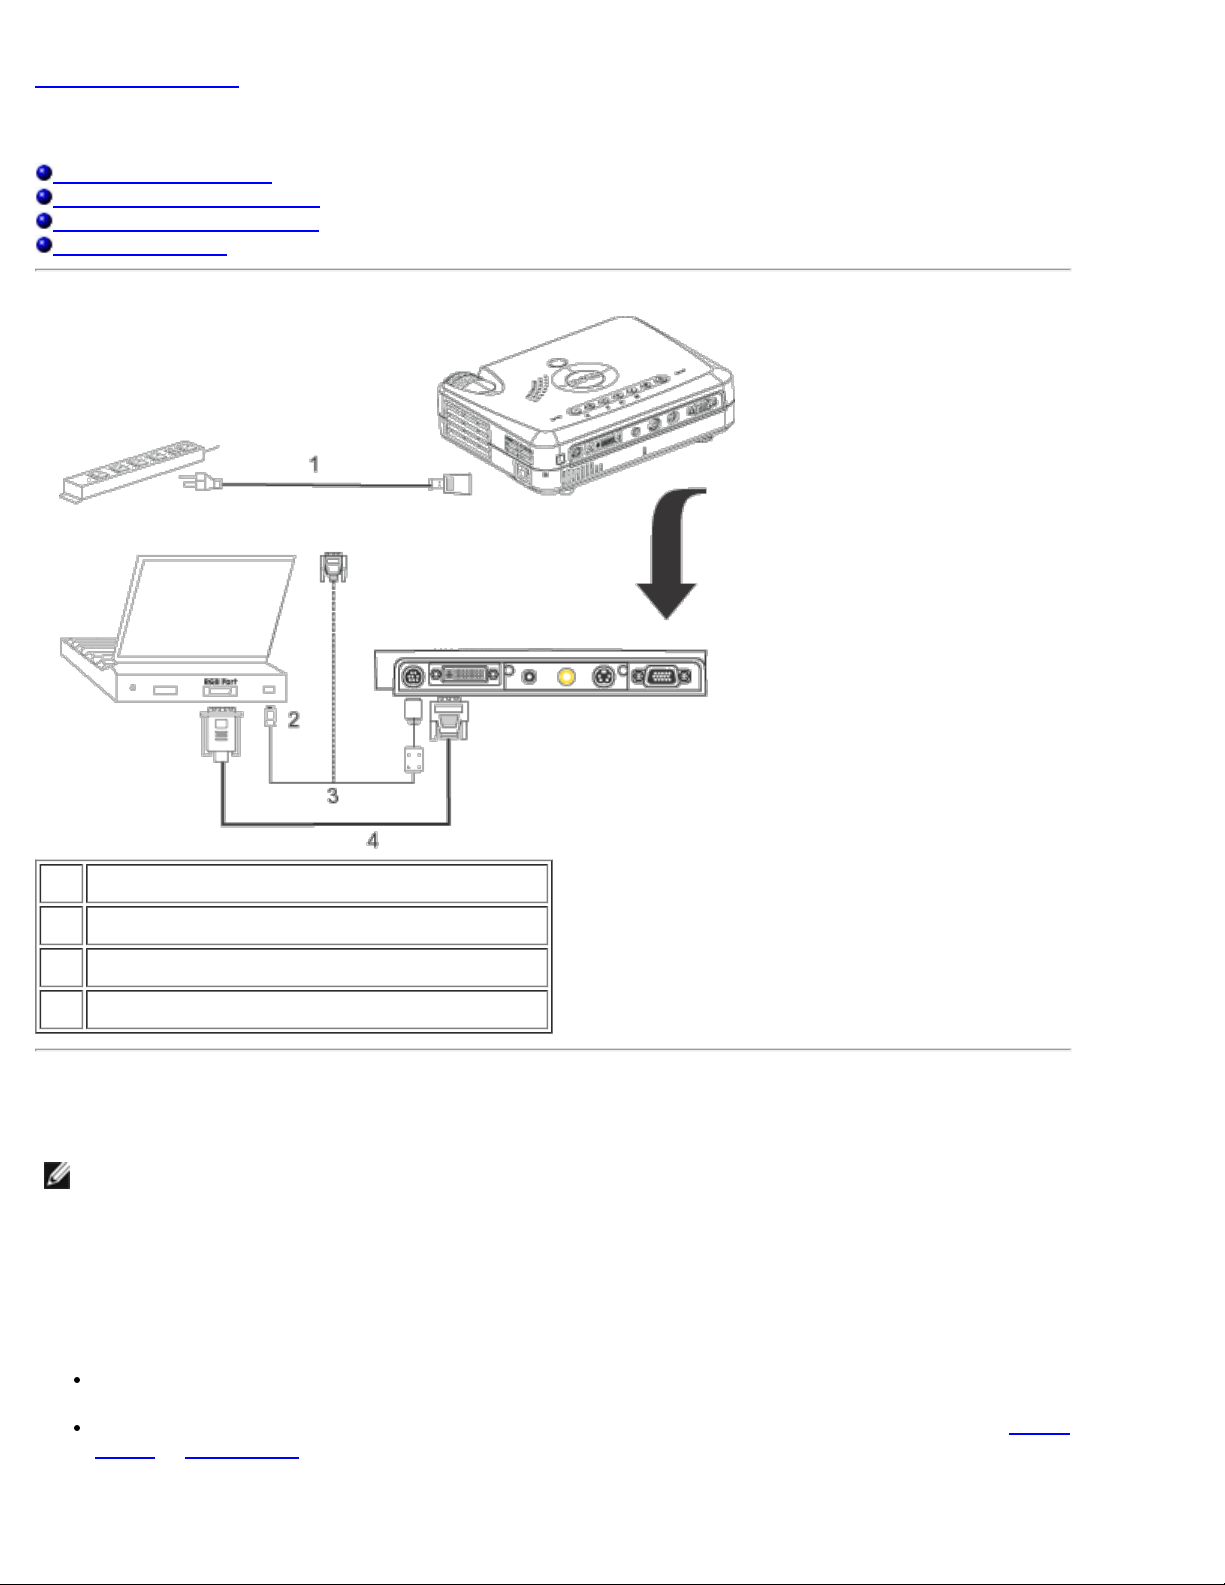
Connecting the Projector
1 power cord
2 USB
3 remote mouse Y- cable
4 D-sub to DVI- I cable
Powering On/Off the Projector
Powering On the Projector
NOTE: Turn on the projector before you turn on the source.
1. Remove the lens cap.
2. Ensure that the power cord and D- sub to DVI -I cable are securely connected. The power button light blinks
green.
3. Press the power button to turn on the projector. After approximately 5 seconds, the startup screen appears,
and the LAMP light blinks orange. After 20 seconds, the LAMP light stops blinking orange.
4. Turn on your source (computer, notebook, VCR, and so on). The projector automatically detects your source.
If the No Signal - check video cable message appears on the screen, ensure that the D-sub to DVI- I
cable is securely connected.
If you are connecting multiple sources to the projector simultaneously, press the Source button on the remote
control or panel control to select the desired source.
Page 9
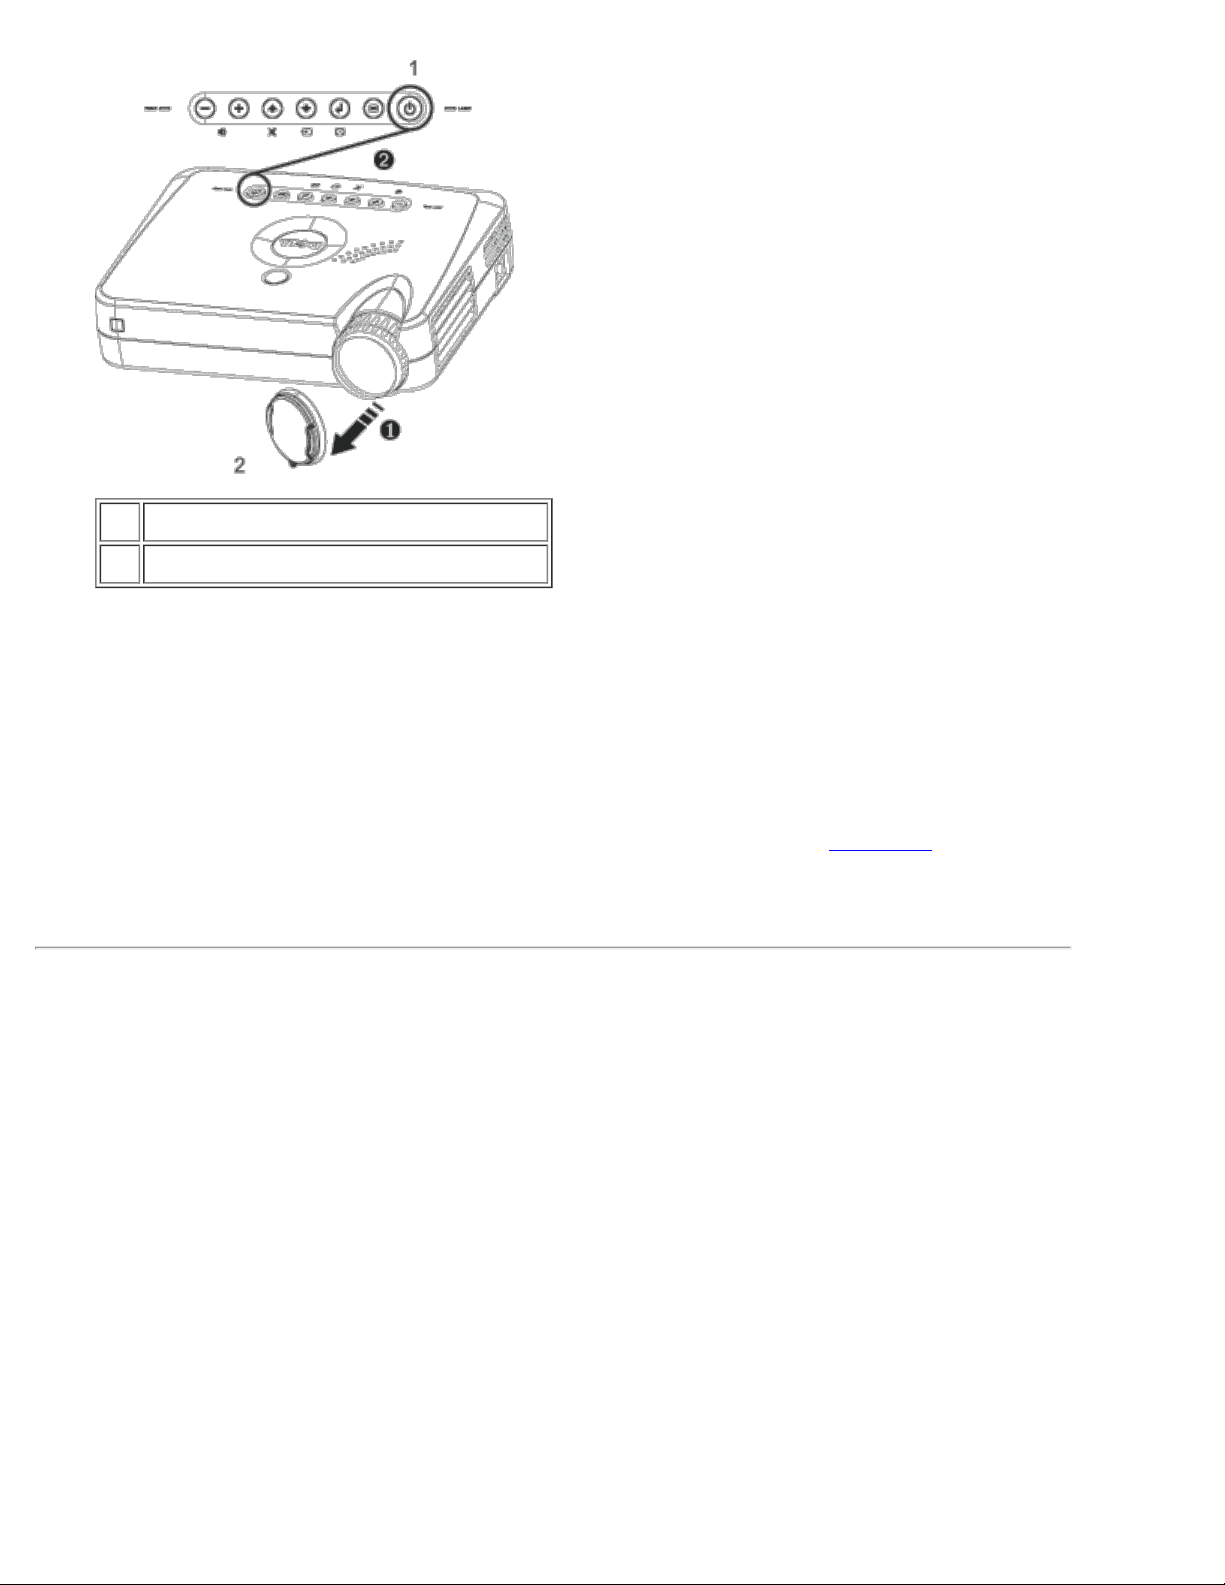
1 power button
2 lens cap
Powering Off the Projector
1. Press the power button to turn off the projector. The Power off the lamp? message appears on the
OSD.
2. Press the power button again. The cooling fans continue to operate for about 30 seconds.
3. Disconnect the power cord from the electrical outlet and the projector.
4. If the LAMP light is solid orange, replace the lamp.
5. If the TEMP light is solid orange, the projector has overheated. The display automatically shuts down. Try
turning the display on again after the projector cools down. If the problem persists, contact Dell
6. If you press the power button while the projector is running, the Power off the lamp? message appears
on the screen. To clear the message, press any button on the panel control or ignore the message; the
message disappears after 5 seconds.
Adjusting the Projected Image
Adjusting the Projector Height
To raise the projector:
1. Press the elevator button.
2. Raise the projector to the desired display angle, and then release the button to lock the elevator foot into
position.
3. Use the tilt adjustment wheel to fine-tune the display angle.
.
To lower the projector:
1. Press the elevator button.
2. Lower the projector, and then release the button to lock the elevator foot into position.
Page 10
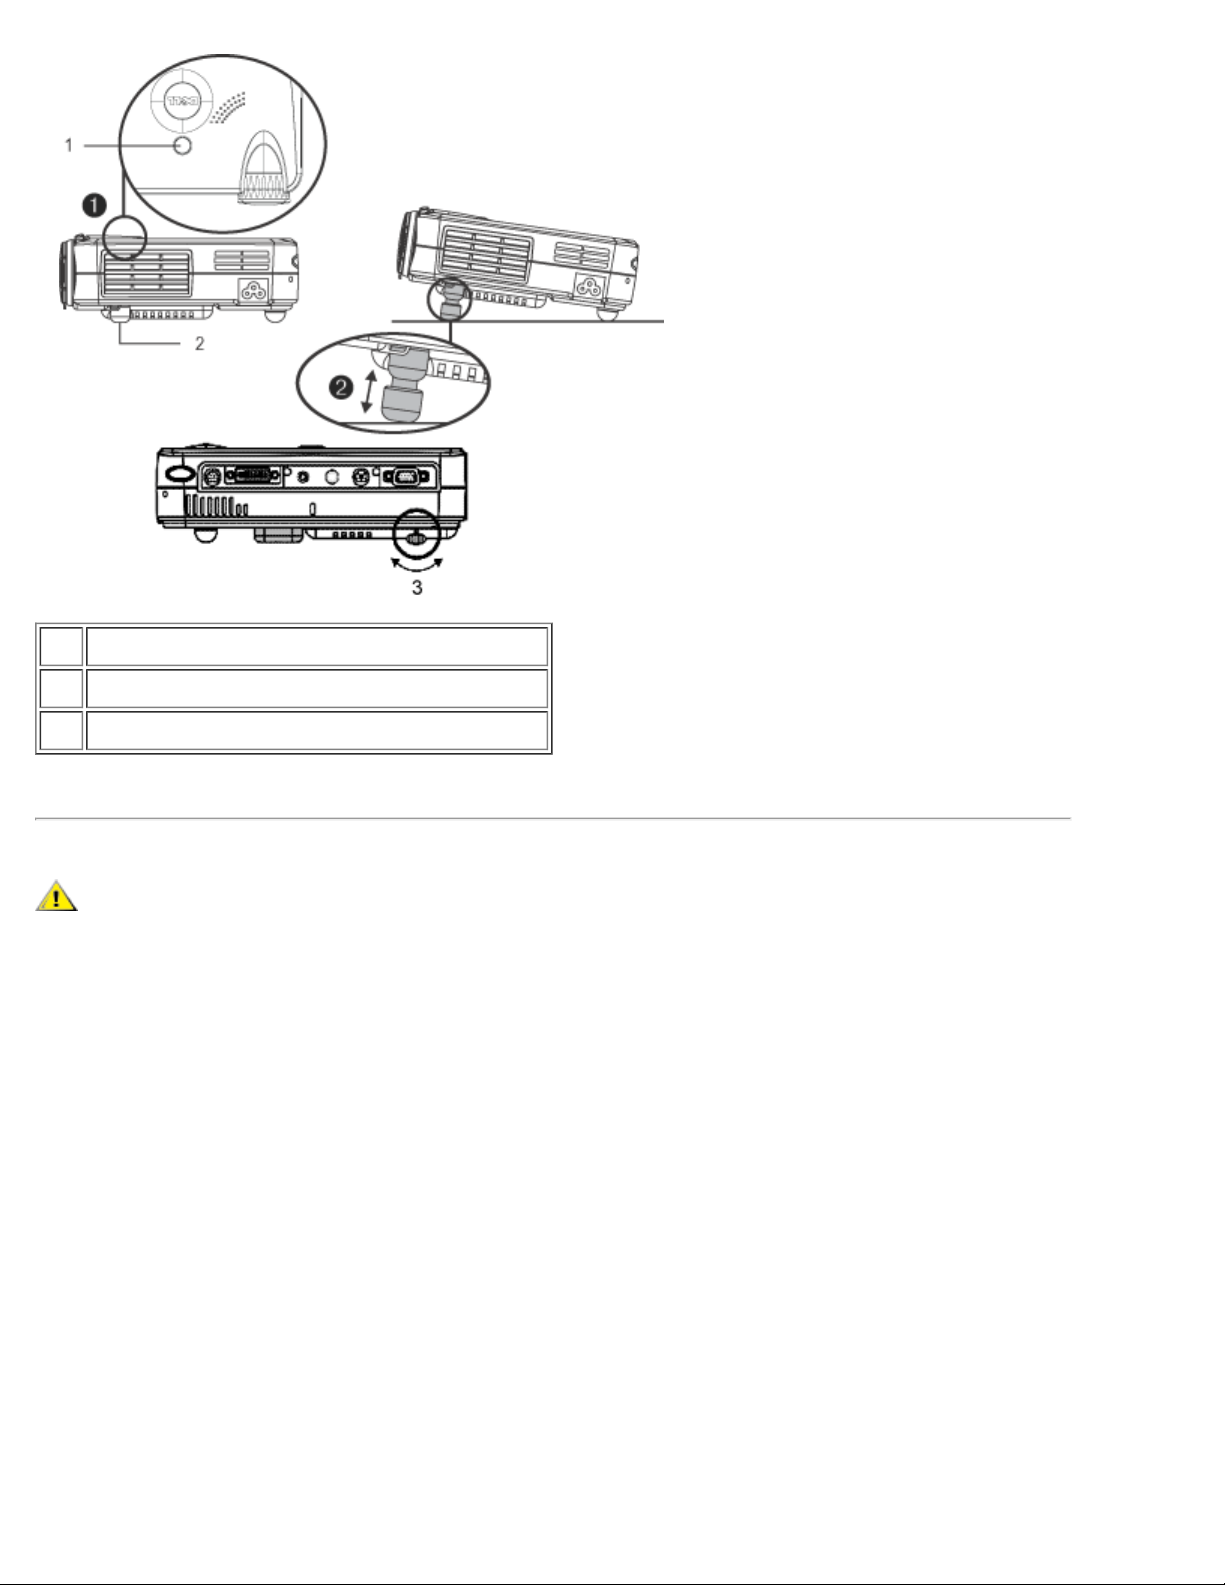
1 elevator button
2 elevator foot
3 tilt adjustment wheel
Adjusting the Projector Zoom and Focus
CAUTION: To avoid damaging the projector, ensure that the zoom lens is fully retracted before moving the
projector or placing the projector in its carrying case.
1. Rotate the zoom ring to zoom in and out.
2. Rotate the focus ring until the image is clear. The projector focuses at distances from 3.3 ft to 39.4 ft (1 m to
12 m).
Page 11
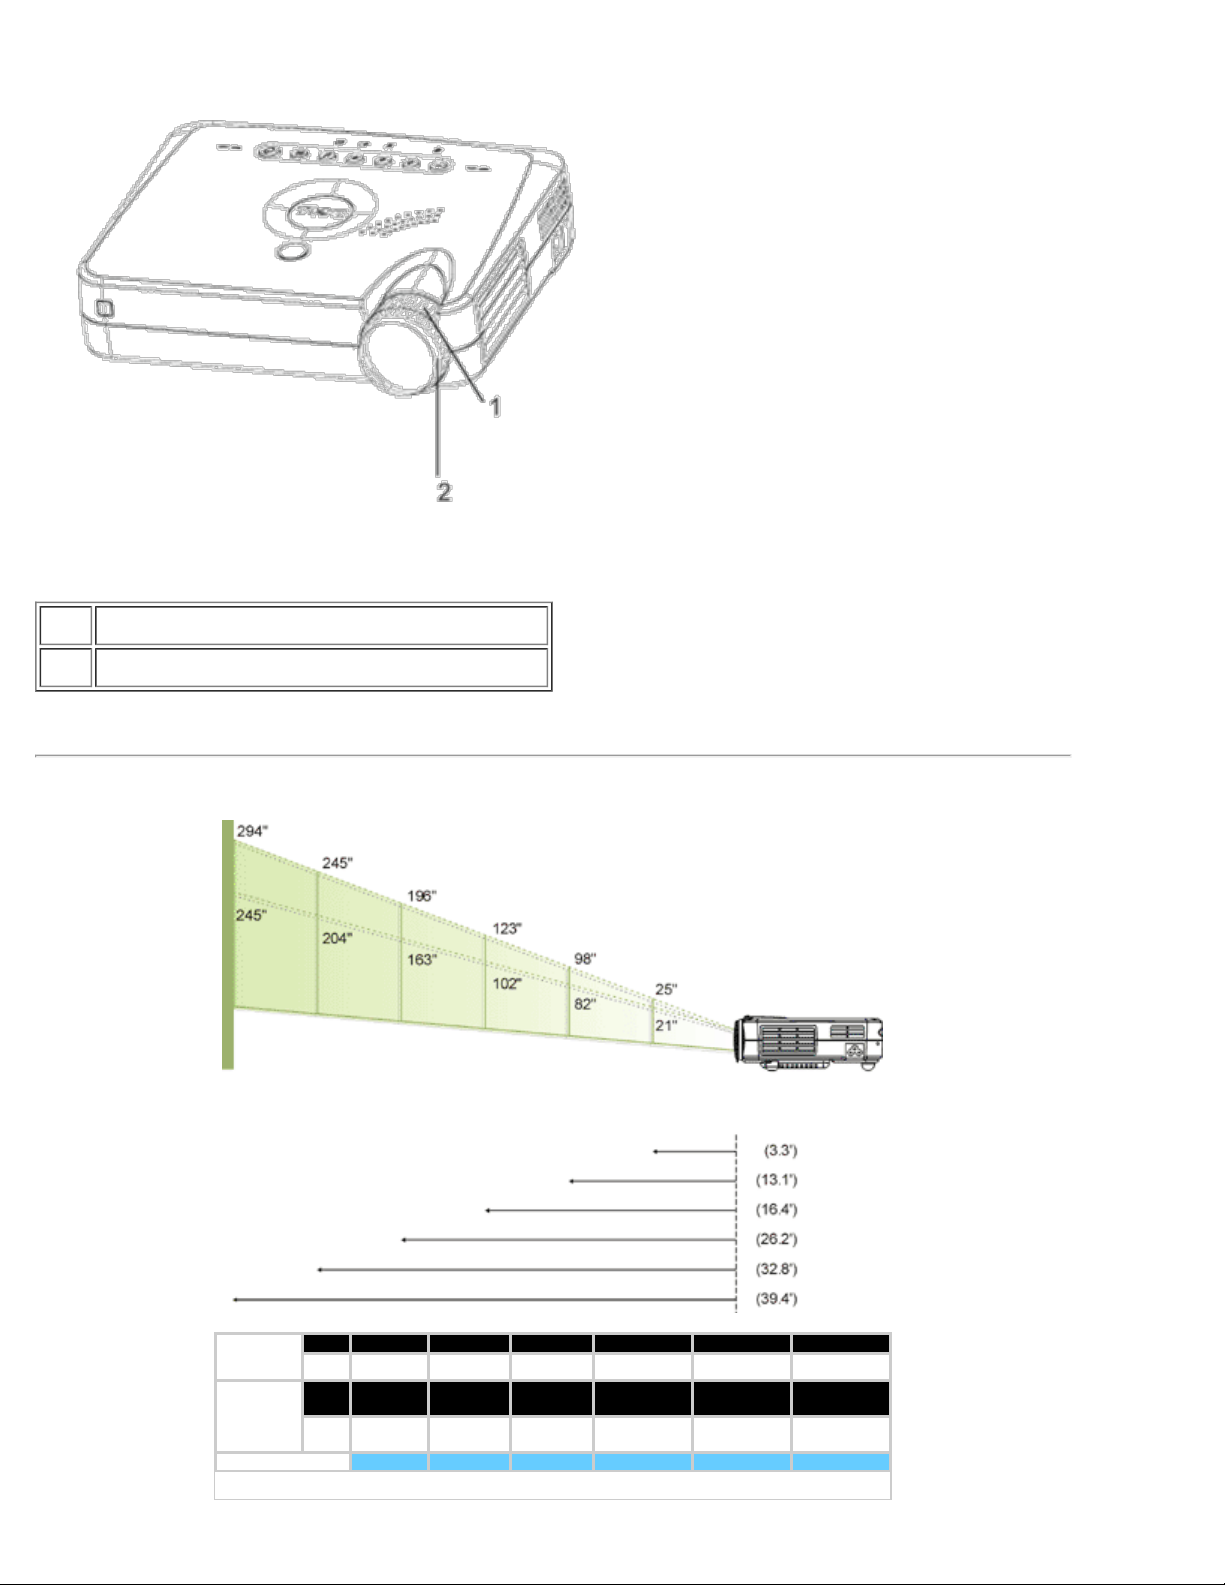
1 zoom ring
2 focus ring
Adjusting Projection Image Size
Screen
(Diagonal)
Screen
Size
Max. 25" 98" 123" 196" 245" 294"
Min. 21" 82" 102" 163" 204"
Max.
20.0"X15.0 78.4"X58.8" 98.4"X73.8" 156.8"X117.6" 196"X147" 235.2"X176.4"
(WXH)
Min.
16.8X12.6" 65.6"X49.2" 81.6"X61.2" 130.4"X97.8" 163.2"X122.4" 196.0"X147.0"
(WXH)
Distance 3.3' 13.1' 16.4' 26.2' 32.8' 39.4'
* This graph is for user reference only.
245"
Page 12

Changing the Lamp
Replace the lamp when you see the Lamp may fail soon! Replacement suggested! message
on the screen by carefully following these instructions.
CAUTION: The lamp becomes very hot with use. Do not attempt to replace the lamp after use until the
projector has been allowed to cool down for at least 30 minutes.
Lamp Changing Procedure:
1. Turn off the projector and disconnect the
power cord.
2. Let the projector cool for at least 30
minutes.
3. Remove the two screws that secure the
lamp cover, and remove the cover.
4. Remove the three screws that secure the
lamp.
5. Pull up the lamp by its metal handle.
6. Reverse steps 1 through 5 to install the
new lamp.
7. Reset the lamp by selecting the left Lamp
Reset icon in the OSD Management
tab.
8. Dell may require that lamps replaced under
warranty are returned to Dell. Otherwise,
contact your local waste disposal agency for
the address of the nearest deposit site
CAUTION: Do not touch the bulb or the lamp glass at any time. The bulb may explode due to improper
handling, including the touching of the bulb or the lamp glass.
Back to Contents Page
Page 13
Back to Contents Page
Using Your Projector: Dell™ 3100MP Projector
Panel Control
Remote Control
On-Screen Display
Panel Control
Power
See " Powering On/Off the Projector
Source
Press
to choose RGB, Digital RGB, S-video, and composite sources.
."
R-Sync (Resync)
Press
R-Sync will not operate if the OSD
Menu
Press
Four Directional Keys
The four directional keys
Mute
Press
Volume + / Increases/decreases projector speaker volume.
Keystone
Adjusts image distortion caused by tilting the projector. (± 16 degrees)
Enter
To confirm your selection, press
to synchronize the projector to the input source.
is displayed.
to activate the OSD. Press and to navigate through the menu tabs.
can be used to toggle through the tabs in the OSD.
to mute and unmute the projector speaker.
while the OSD is on the screen.
Remote Control
If the remote control cover is closed:
The R-Sync button functions as the right mouse button.
Page 14
The Enter button functions as the left mouse button.
If the remote control cover is open, use the directional pad to navigate through the OSD tabs.
1 directional pad
2 Enter button
3 laser radiation caution
Power
See " Power On/Off the Projector
Source
Press the Source button to choose RGB, Digital RGB, S- video, and composite sources.
R-Sync
If the remote control cover is open, the R-Sync button synchronizes the projector to the input source.
If the remote control cover is closed, the R-Sync button functions as the right mouse button.
Directional Pad
The directional pad can be used to control mouse movement when the remote control cover is closed. The mouse
function is enabled using the remote mouse Y-cable connection between your computer and the projector.
Laser
Aim the remote control at the screen, and press and hold the Laser button to activate the laser light.
Page Up
Press the PU button to page up.
."
Page Down
Press the PD button to page down.
Menu
Press the Menu button to activate the OSD. Use the directional pad and Enter button to navigate through the
OSD
.
Page 15
Zoom In/Out (Computer Mode Only)
Press the In button to digitally magnify an image up to 32 times on the screen. Press the Out button to reduce the
zoomed image.
This function cannot be used with SXGA+ and UXGA.
Freeze
Press the Freeze button to temporarily stop video motion. Press the button again to resume video motion.
Mute
Press the Mute button to mute or unmute the projector speaker.
Volume
Increases/decrease the speaker volume.
Keystone
Adjusts image distortion caused by tilting the projector. (± 16 degrees)
Enter
Activates the left mouse button when the remote control cover is closed.
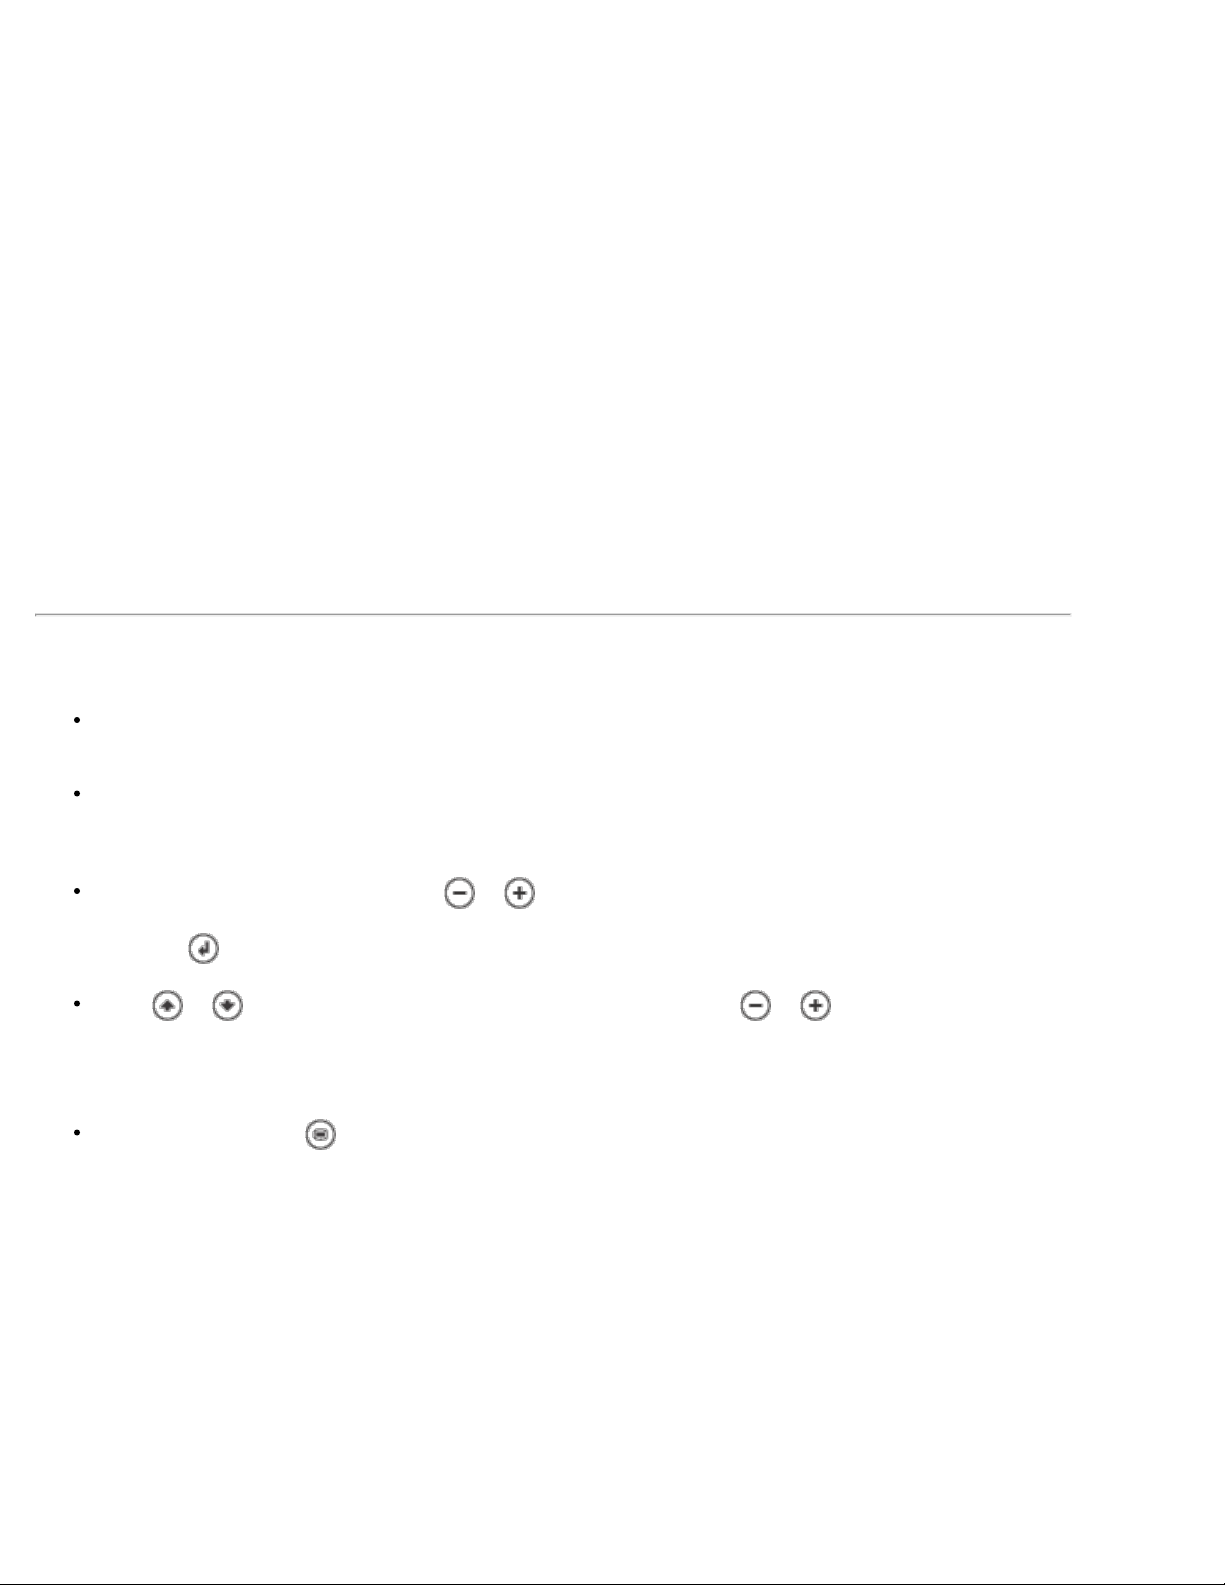
On-Screen Display
The projector has a multilanguage OSD that can only be displayed when the projector is accepting an input
source.
The OSD allows you to make image adjustments and change a variety of settings. If the source is a computer,
the OSD shows the computer OSD. When using a video source, the OSD shows the video OSD. The
projector automatically detects the source.
When the OSD is on the screen, press or to navigate through the OSD tabs.
Example: Image-I --> Image-II-- > Audio-- > Language --> Management--> Image-I. To make a selection in a
tab, press
Press or to make a selection and adjust the settings by pressing or . When an item is selected,
the color of the item changes from yellowish brown to blue.
Example: Brightness-- > Color Temp.--> Zoom --> Contrast--> Keystone--> Brightness
To exit the OSD, press .
.
Page 16

Image-I (Computer Mode)
Brightness
Adjusts the brightness of the image.
Press to darken the image.
Press to lighten the image.
Contrast
Controls the degree of difference between the lightest and darkest parts of the picture.
Adjusting the contrast changes the amount of black and white in the image.
Press to decrease the contrast.
Press to increase the contrast.
Color Temp.
Adjusts the color temperature. The range is from 6500K to 9000K, and the default is
7050K. With the higher temperature, the screen looks colder; with the lower temperature,
the screen looks warmer.
Zoom
Press to digitally magnify an image up to 32 times on the projection screen.
Press to reduce the zoomed image.
Keystone (Keystone Correction)
Adjusts image distortion caused by tilting the projector. (± 16 degrees)
Page 17

Image-I (Video Mode)
Brightness
Adjusts the brightness of the image.
Press to darken the image.
Press to lighten the image.
Contrast
Controls the degree of difference between the lightest and darkest parts of the picture.
Adjusting the contrast changes the amount of black and white in the image.
Press to decrease the contrast.
Press to increase the contrast.
Color
Adjusts a video image from black and white to fully saturated color.
Press to decrease the amount of color in the image.
Press to increase the amount of color in the image.
Sharpness
Adjusts the sharpness of the image.
Press to decrease the sharpness.
Press to increase the sharpness.
Tint
Adjusts the color balance of red and green.
Press to increase the amount of green in the image.
Press to increase the amount of red in the image.
Page 18

Image-II (Computer Mode)
Frequency
Changes the display data frequency to match the frequency of your computer graphic
card. If you experience a vertical flickering bar, use the frequency function to make an
adjustment.
Tracking
Synchronizes the signal timing of the display with that of the graphic card. If you
experience an unstable or flickering image, use the tracking function to correct it.
16 : 9 / 4 : 3
Select this function to fit your desired aspect ratio type.
Horizontal Position
Press to move the image left.
Press to move the image right.
Vertical Position
Press to move the image down.
Press to move the image up.
Reset
Select Yes to reset the display to its factory default settings. Reset items include both
Image-I and Image-II settings.
Page 19

Image-II (Video Mode)
Keystone Correction
Adjusts image distortion caused by tilting the projector. (± 16 degrees)
16 : 9 / 4 : 3
Select this function to fit your desired aspect ratio type.
Color Temp.
Adjusts the color temperature setting. The range is from 6500K to 9000K, and the default
is 7050K. With the higher temperature settings, the screen looks colder; with the lower
temperature, the screen looks warmer.
Reset
Select Yes to reset the display to its factory default settings. Reset items include both
Image-I and Image-II settings.
Audio
Volume
Press to decrease the volume.
Treble
Controls the higher frequencies of your audio source.
Press to increase the volume.
Page 20

Press to decrease the treble.
Press to increase the treble.
Bass
Controls the lower frequencies of your audio source.
Language
Press to decrease the bass.
Press to increase the bass.
Stereo / Mono
Mono : Mono sound effect.
Stereo : Stereo sound effect.
Mute
Select the left icon to mute the volume.
Select the right icon to unmute the volume.
Language
Press
or to select the language you prefer.
Management
Menu Location
Selects the location of the OSD on the screen.
Projection
Front-Desktop
The default setting.
Rear-Desktop
The projector reverses the image so you can project from behind a translucent
screen.
Front-Ceiling
Page 21

Signal Type
Select signal type from RGB, HDTV, and component video sources.
Lamp Reminder
The Lamp may fail soon! Replacement suggested! message appears on the
screen 30 hours before the end of lamp life. Use this function to show or hide the
message.
Lamp Reset
Use this function only after a new lamp is installed in the projector. Select the left Lamp
Reset icon (light bulb and arrow under the icon), and press the Enter button to accept
the new lamp.
Back to Contents Page
The projector turns the image upside down for ceiling-mounted projection.
Rear-Ceiling
The projector simultaneously reverses and turns the image upside down. You can
project from behind a translucent screen with a ceiling-mounted projection.
Page 22

Back to Contents Page
Troubleshooting: Dell™ 3100MP Projector
No image appears on the screen
Partial, scrolling, or incorrectly displayed image
The screen does not display your presentation
Image is unstable or flickering
Image has vertical flickering bar
Image is out of focus
The screen is outstretched when displaying 16:9 DVD
Image is reversed
Lamp burns out or makes a popping sound
If you experience problems with your projector, see the following troubleshooting tips. If the problem persists, contact
Dell.
No image appears on the screen
If you are using a portable computer, press .
Ensure that all the cables are correctly and securely connected as described in "Connecting
the Projector."
Ensure that the pins of the connectors are not bent or broken.
Ensure that the lamp is securely installed (see "Changing the Lamp").
Ensure that the lens cap is removed and the projector is turned on.
Partial, scrolling, or incorrectly displayed image
Press the R-Sync button on the remote control or the panel control .
If you are using a desktop computer and the resolution of your computer is set higher than
1024 x 768, follow the steps below to reset the resolution.
For Microsoft® Windows® 95, Windows 98, Windows 2000, and Windows XP:
1. Open the Control Panel, and then double click Display.
2. Click the Settings tab.
3. Verify that the resolution setting in Desktop Area is less than or equal to 1024 x 768
resolution.
If the projector still does not display the image correctly, change the monitor display:
Follow steps 1 and 2. Click Advanced Properties.
4. Click the Change button in the Monitor tab.
5. Click Show all devices. Then click Standard monitor types in the
Manufacturer box; click to select the resolution mode you need in the Models box.
6. Verify that the resolution setting of the monitor display is less than or equal to 1024 x
768.
If you are using a portable computer:
1. Set the resolution of the computer.
2. Press
If you experience difficulty in changing resolutions or your monitor freezes, restart all the
equipment and the projector.
.
Page 23

The screen does not display your presentation
If you are using a portable computer, press .
Image is unstable or flickering
Adjust the tracking in the OSD Image-II tab.
Change the monitor color setting on your computer.
Image has vertical flickering bar
Adjust the frequency in the OSD Image-II tab.
Check and reconfigure the display mode of your graphic card to make it compatible with the
projector.
Image is out of focus
Adjust the focus ring on the projector lens.
Ensure that the projection screen is within the required distance from the projector (3.3ft
[1m] to 39.4ft [12m]).
The screen is outstretched when displaying 16:9 DVD
The projector automatically detects 16:9 DVD and adjusts the aspect ratio by digitization to full screen with a 4:3
default setting.
If the projector is still outstretched, adjust the aspect ratio as follows:
If you are playing a 16:9 DVD, select 4:3 aspect ratio type on your DVD player.
If you cannot select 4:3 aspect ratio type on your DVD player, select 4:3 OSD function.
Image is reversed
Select Management from the OSD.
Lamp burns out or makes a popping sound
When the lamp reaches its end of life, it will burn out and may make a loud popping sound.
If this occurs, the projector will not turn back on until the lamp is replaced. To replace the
lamp, see "Changing the Lamp
Back to Contents Page
".
Page 24

Back to Contents Page
Specifications: Dell™ 3100MP Projector
Light Valve single-chip DLP™ technology
Contrast Ratio 280:1 (Full On/Full Off)
Lamp 130- watt, user-replaceable P-VIP lamp
Number of Pixels 1024 x 768
Displayable Color 16.7M colors
Projection Lens F/2.21–2.47, f=28.55–34.28 mm with 1.2x manual zoom lens
Projection Screen Size 21–294 inches (diagonal)
Projection Distance 3.3–39.4 ft (1m–12m)
Video Compatibility NTSC, NTSC 4.43, PAL, PAL -M, PAL-N, SECAM, and HDTV
(1080i, 720P, 576P, 480i/P) -compatibility
Composite video and S-video capability
H. Frequency 15kHz–100kHz horizontal scan
V. Frequency 43Hz–120Hz vertical refresh
Multimedia Audio one internal speaker with 2-watt output
Power Supply universal 100–240V AC 50–60 Hz
Power Consumption 180 watts at normal operation
I/O Connectors power: AC power input socket
computer input: one 30 -pin DVI-I for analog/digital/component
and HDTV signal
computer output: one 15 -pin D -sub
video input: one composite video RCA and one S -Video
audio input: one phone jack
mouse input: one 8-pin connector for remote mouse (USB and
RS232)
Weight 3.5 lb (1.6 kg)
Dimensions (W x H x D) 2.0 x 6.9 x 8.9 inches (52 x 176 x 225 mm)
Environmental
operating temperature: 10
o
C–40oC (50oF–104oF)
humidity: 80% maximum
storage temperature: –20oC to 60oC (–4oF to 140oF)
humidity: 80% maximum
FCC, CE, VCCI, UL, cUL, TUV GS, ICES -003, MIC, BSMI, CSafety Regulation
Tick, NEMKO, GOST, PCBC, CCIB, PSB, EK, EZU, IRAM,
NOM
Compatibility Modes
Mode Resolution
VGA 640X350
VGA 640X350
(ANALOG) (DIGITAL)
V. Frequency
(Hz)
H. Frequency
(KHz)
V. Frequency
(Hz)
70 31.5 70 31.5
85 37.9 85 37.9
H. Frequency
(KHz)
Page 25

VGA 640X400
85 37.9 85 37.9
VGA 640X480
VGA 640X480
VGA 640X480
VGA 640X480
VGA 720X400
VGA 720X400
SVGA
SVGA
SVGA
SVGA
SVGA
XGA 1024X768
XGA
XGA
XGA
XGA
*SXGA
*SXGA
*SXGA
*SXGA+ 1400X1050 60 63.98 - -
*UXGA
MAC LC13*
MAC II 13*
800X600 56 35.2 56 35.2
800X600 60 37.9 60 37.9
800X600 72 48.1 72 48.1
800X600 75 46.9 75 46.9
800X600 85 53.7 85 53.7
1024X768 60 48.4 60 48.4
1024X768 70 56.5 70 56.5
1024X768 75 60.0 75 60.0
1024X768 85 68.7 - 1280X1024 60 63.98 - 1280X1024 75 79.98 - 1280X1024 85 91.1 - -
1600X1200 60 75.0 - -
640X480 66.66 34.98 - 640X480 66.68 35 - -
60 31.5 60 31.5
72 37.9 72 37.9
75 37.5 75 37.5
85 43.3 85 43.3
70 31.5 70 31.5
85 37.9 85 37.9
43.4 35.5
MAC 16* 832X624 74.55 49.725 - MAC 19* 1024X768 75 60.24 - -
*MAC 1152X870 75.06 68.68 - MAC G4 640X480 60 31.35 - MAC G4 640X480 120 68.03 - MAC G4 1024X768 120 97.09 - -
IMAC DV 640X480 117 60 - IMAC DV 800X600 95 60 - IMAC DV 1024X768 75 60 - IMAC DV 1152X870 75 68.49 - IMAC DV 1280X960 75 75 - IMAC DV 1280X1024 85 91.1 - -
* Compression computer image.
Back to Contents Page
Page 26

Back to Contents Page
Regulatory Notices: Dell™ 3100MP Projector
Federal Communications Commission (FCC) Notice (U.S. Only)
FCC Declaration of Conformity
CE Declaration of Conformity for a Class B Digital Device
Canadian Regulatory Information (Canada Only)
EN 55022 Compliance (Czech Republic Only)
VCCI Class 2 Notice (Japan Only)
MIC Notice (South Korea Only)
Polish Center for Testing and Certification Notice
NOM Information (Mexico Only)
BSMI Notice (Taiwan Only)
Regulatory Listing
Federal Communications Commission (FCC) Notice (U.S. Only)
NOTICE: This equipment has been tested and found to comply with the limits for a Class B
digital device, pursuant to Part 15 of the FCC Rules. These limits are designed to provide
reasonable protection against harmful interference in a residential installation. This equipment
generates, uses, and can radiate radio frequency energy and, if not installed and used in
accordance with the instructions, may cause harmful interference to radio communications.
However, there is no guarantee that interference will not occur in a particular installation. If
this equipment does cause harmful interference to radio or television reception, which can be
determined by turning the equipment off and on, the user is encouraged to try to correct the
interference by one or more of the following measures:
Reorient or relocate receiving antenna.
Increase the separation between the equipment and receiver.
Connect the equipment into an outlet on a circuit different from that to which the receiver is connected.
Consult the dealer or an experienced radio/TV technician for help.
This device complies with Part 15 of the FCC rules. Operation is subject to the following two conditions:
This device may not cause harmful interference.
This device must accept any interference received including interference that may cause undesired operation.
Instructions to Users: This equipment complies with the requirements of FCC (Federal Communication
Commission) equipment provided that following conditions are met.
1. Power cable: Shielded power cable must be used.
2. Video inputs: The input signal amplitude must not exceed the specified level.
NOTICE: Changes or modifications not expressly approved by the party responsible for
compliance could void the user's authority to operate the equipment.
FCC Declaration of Conformity
According to 47 CFR, Part 15 of the FCC Rules
Page 27

* For the following named product:
DLP Projector
3100MP/DELL CHC7229
* Manufactured at:
Coretronic Corporation
We hereby declare that this device complies with Part 15 of the FCC Rules.
Operation is subject to the following two conditions:
1. This device may not cause harmful interference, and
* FCC Rules: Tested to comply with FCC part 15, class B
* Test site at: Advance Data Technology Corporation
* Responsible Party for
Product Compliance:
* Manufacturer Information: Coretronic Corporation RD Center
2. This device must accept any interference received,
including interference that may cause undesired operation.
No.81- 1, Lu Liao Keng, 9 Ling, Wu Lung Tsung, Chiung Lin Hsiang, Hsin Chu
Hsien, Taiwan
Coretronic Corporation
No 11, Li Hsing Rd, Scienced - Based Industrial Park, Hsinchu, Taiwan
Tel: 886-3- 5772000 Fax: 886-3-5790066
No 11, Li Hsing Rd, Scienced
based Industrial Park, Hsinchu,
300, Taiwan
Technology Engineering
Associate Vice President
March 29, 2002
Hsinchu, March 29, 2002 Mr. Vincent Lin
CE Declaration of Conformity for a Class B Digital Device
Directives to which conformity is declared:
EMC Directives 89/336/EEC and Amending Directive 92/31/EEC
And
Low Voltage Directive 73/23/EEC
Standards to which conformity is declared
EN55022: 1998; EN55024: 1998; EN60950 +A1+A2+A3+A4: 1992;
EN61000-3- 2: 1995; EN61000-3-3: 1995
Manufacturer's Name: Coretronic Corporation
Manufacturer's Address: No 11, Li Hsing Rd, Scienced- Based Industrial Park, Hsinchu, Taiwan
Importer's Address: Dell Computer de Mexico,
Paseo de la Reforma 2620, 11th Floor
Col. Lomas Altas Dell Product
Mexico DF
CP 11950
Type of Equipment: DLP Projector
Model Number(s): 3100MP
Reference Report Number:
Previously Declared Models:
Page 28

I, the undersigned, hereby declare that the equipment specified above conforms to the above Directive(s) and
standards.
Hsinchu, Taiwan
March 29, 2002 Mr. Vincent Lin Head of RD Center
Canadian Regulatory Information (Canada Only)
This digital apparatus does not exceed the Class B limits for radio noise emissions from digital apparatus set out in
the Radio Interference Regulations of the Canadian Department of Communications.
Note that Canadian Department of Communications (DOC) regulations provide, that changes or modifications not
expressly approved by Dell Computer Corporation could void your authority to operate this equipment.
This Class B digital apparatus meets all requirements of the Canadian Interference-Causing Equipment Regulations.
Cet appareil numerique de la classe B respecte toutes les exigences du Reglement sur le materiel brouilleur du
Canada.
EN 55022 Compliance (Czech Republic Only)
This device belongs to Class B devices as described in EN 55022, unless it is specifically stated that it is a Class A
device on the specification label. The following applies to devices in Class A of EN 55022 (radius of protection up to
30 meters). The user of the device is obliged to take all steps necessary to remove sources of interference to
telecommunication or other devices.
VCCI Class 2 Notice (Japan Only)
This equipment complies with the limits for a Class 2 digital device (devices used in or adjacent to a residential
environment) and conforms to the standards for information technology equipment that are set by the Voluntary
Control Council for Interference for preventing radio frequency interference in residential areas.
Class B ITE
Page 29

MIC Notice (South Korea Only)
B Class Device
Please note that this device has been approved for nonbusiness purposes and may be used in any environment,
including residential areas.
Polish Center for Testing and Certification Notice
The equipment should draw power from a socket with an attached protection circuit (a three-prong socket). All
equipment that works together (computer, monitor, printer, and so on) should have the same power supply source.
The phasing conductor of the room's electrical installation should have a reserve short - circuit protection device in
the form of a fuse with a nominal value no larger than 16 amperes (A).
To completely switch off the equipment, the power supply cable must be removed from the power supply socket,
which should be located near the equipment and easily accessible.
A protection mark "B" confirms that the equipment is in compliance with the protection usage requirements of
standards PN-93/T-42107 and PN - 89/E -06251.
Page 30

NOM Information (Mexico Only)
The following information is provided on the device(s) described in this document in compliance with the
requirements of the official Mexican standards (NOM)
Exporter: Dell Computer Corporation
One Dell Way
Round Rock, TX 78682
Importer: Dell Computer de México,
Paseo de la Reforma 2620, 11th Floor
Col. Lomas Altas
México DF
CP 11950
Ship to: Dell Computer de Mexico,
S.A. de C.V. al Cuidado de Kuehne & Nagel
de México S. de R.I., Avenida Soles No. 55
Col. Peñon de los Baños, 15520 Mexico, D.F.
Page 31

Supply voltage: > 100–240 VAC
Frequency: 50–60 Hz
Current consumption: 1.2 A
BSMI Notice (Taiwan Only)
Regulatory Listing
Safety Certifications:
UL 1950
cUL
NOM
CE Mark--EN60950: 1992 + A1 + A2 + A3
NEMKO
SEMKO
DEMKO
FIMKO
EZU
IEC 950
TUV GS
PCBC
GOST
CCIB
EK
PSB
IRAM
EMC Certifications:
FCC Part 15 Class B
CE Mark--EN55022:1998 Class B, EN61003- 3:1995, EN55024:1998
ICES-003
EZU
NEMKO
SEMKO
DEMKO
FIMKO
PCBC
C-Tick
VCCI Class B ITE
MIC
BSMI
Page 32

Back to Contents Page
Page 33

Back to Contents Page
Contacting Dell: Dell™ 3100MP Projector
Overview Europe Contact Numbers
International Dialing Codes Asia and Other Regions Contact
Numbers
Americas Contact Numbers
Overview
When you need to contact Dell, use the telephone numbers, codes, and electronic addresses provided in the
following sections. "International Dialing Codes
and international calls. "Americas Contact Numbers
Regions Contact Numbers" provide local telephone numbers, area codes, toll-free numbers, and e-mail
addresses, if applicable, for each department or service available in various countries around the world.
If you are making a direct-dialed call to a location outside of your local telephone service area, determine
which codes to use (if any) in "International Dialing Codes
other sections.
" provides the various codes required to make long-distance
," "Europe Contact Numbers," and "Asia and Other
," in addition to the local numbers provided in the
For example, to place an international call from Paris, France, to Bracknell, England, dial the international
access code for France followed by the country code for the U.K., the city code for Bracknell, and then the
local number as shown in the following illustration:
To place a long-distance call within your own country, use area codes instead of international access codes,
country codes, and city codes. For example, to call Paris, France, from Montpellier, France, dial the area
code plus the local number as shown in the following illustration:
The codes required depend on where you are calling from as well as the destination of your call; in addition,
each country has a different dialing protocol. If you need assistance in determining which codes to use,
contact a local or an international operator.
NOTES: Toll-free numbers are for use only within the country for which they are listed. Area codes are
most often used to call long distance within your own country (not internationally)—in other words,
when your call originates in the same country you are calling.
Have your Express Service Code ready when you call. The code helps Dell's automated-support
telephone system direct your call more efficiently.
Page 34

International Dialing Codes
Click a listed country to obtain the appropriate contact numbers.
International
Country (City)
Access Code Country Code City Code
Argentina
Australia
Austria
Belgium
Brazil
Brunei
Canada
Chile
China
Czech Republic
Denmark
Finland
France
(Buenos Aires) 00 54 11
(Sydney) 0011 61 2
(Vienna) 900 43 1
(Brussels) 00 32 2
0021 55 51
— 673 —
(North York, Ontario) 011 — Not required
(Santiago) — 56 2
(Xiamen) — 86 592
(Prague) 00 420 2
(Horsholm) 00 45 Not required
(Helsinki) 990 358 9
(Paris) (Montpellier) 00 33 (1) (4)
Germany
Hong Kong
Ireland
Italy
Japan
Korea
Luxembourg
Macau
Malaysia
Mexico
Netherlands
New Zealand
Norway
(Langen) 00 49 6103
001 852 Not required
(Cherrywood) 16 353 1
(Milan) 00 39 02
(Kawasaki) 001 81 44
(Seoul) 001 82 2
00 352 —
— 853 Not required
(Penang) 00 60 4
(Colonia Granada) 00 52 Not required
(Amsterdam) 00 31 20
00 64 —
(Lysaker) 00 47 Not required
Poland
(Warsaw) 011 48 22
Page 35

Portugal 00 35 —
Singapore
South Africa
Spain
Sweden
Switzerland
Taiwan
Thailand
U.K.
(Bracknell) 010 44 1344
U.S.A.
(Singapore) 005 65 Not required
(Johannesburg) 09/091 27 11
(Madrid) 00 34 91
(Upplands Vasby) 00 46 8
(Geneva) 00 41 22
002 886 —
001 66 —
(Austin, Texas) 011 1 Not required
Americas Contact Numbers
Country (City) Department Name or Service
Area
Code
Local Number or
Toll-Free Number
Antigua and
Barbuda
Argentina
(Buenos Aires)
Barbados
Bermuda
General Support 1-800-805-5924
Technical Support, Customer Care toll free: 0800 444 0733
Sales toll free: 0810 444 3355
Tech Support Fax 11 4515-7139
Customer Care Fax 11 4515-7139
Website: www.dell.com.ar
General Support 1-800-534-3066
General Support 1-800-342-0671
Brazil
Customer Support, Technical Support toll free: 0800 90 3355
Technical Support Fax 51 481-5470
Customer Care Fax 51 481-5480
Page 36

Sales toll free: 0800 90 3390
Website: www.dell.com/br
Canada
(North York,
Ontario)
Cayman Islands
Automated Order-Status System toll free: 1-800-433-9014
AutoTech (Automated technical support) toll free: 1-800-247-9362
Customer Care (From outside Toronto) toll free: 1-800-387-5759
Customer Care (From within Toronto) 416 758-2400
Customer Technical Support toll free: 1-800-847-4096
Sales (Direct sales—from outside
Toronto)
Sales (Direct sales—from within Toronto) 416 758-2200
Sales (Federal government, education,
and medical)
Sales (Major accounts) toll free: 1-800-387-5755
TechFax toll free: 1-800-950-1329
General Support 1-800-805-7541
toll free: 1-800-387-5752
toll free: 1-800-567-7542
Chile
(Santiago)
NOTE: Customers
in Chile call the
U.S.A. for sales,
customer, and
technical
assistance
Colombia
Costa Rica
Dominican
Republic
Sales, Customer Support, and Technical
Support
General Support 980-9-15-3978
General Support 800-012-0435
General Support 1-800-148-0530
toll free: 1230-020-4823
Page 37

El Salvador
General Support 01-889-753-0777
Guatemala
Jamaica
Latin America
NOTE: Customers
in Latin America
call the U.S.A. for
sales, customer,
and technical
assistance.
General Support 1-800-999-0136
General Support 1-800-682-3639
Customer Technical Support (Austin,
Texas, U.S.A.)
Customer Service (Austin, Texas,
U.S.A.)
Fax (Technical Support and Customer
Service)
(Austin, Texas, U.S.A.)
Sales (Austin, Texas, U.S.A.) 512 728-4397
512 728-4093
512 728-3619
512 728-3883
Mexico
Netherlands
Antilles
Nicaragua
SalesFax (Austin, Texas, U.S.A.) 512 728-4600
728-3772
Customer Technical Support 001-877-384-8979 or 001-
877-269-3383
Sales 50-81-8800 or
01-800-888-3355
Customer Service 001-877-384-8979 or 001-
877-269-3383
Main 50-81-8800 or
01-800-888-3355
General Support 001-800-882-15194
General Support 001-800-220-1006
Page 38

Panama
General Support 001-800-507-0962
Peru
Puerto Rico
St. Lucia
Trinidad and
Tobago
U.S.A.
(Austin, Texas)
General Support 0800-50-669
General Support 800-805-7545
General Support 1-800-882-1521
General Support 1-800-805-8035
Automated Order-Status System toll free: 1-800-433-9014
AutoTech (For portable and desktop
computers)
toll free: 1-800-247-9362
Dell Home and Small Business Group (For portable and desktop computers):
Customer Technical Support (Return
Material Authorization Numbers)
Customer Technical Support
(Home sales purchased via
www.dell.com)
Customer Service
(Credit Return Authorization Numbers)
National Accounts (Systems purchased by established Dell national accounts
[have your account number handy] or value-added resellers [VARs]):
Customer Service and Technical Support
(Return Material Authorization Numbers)
Public Americas (Systems purchased by governmental agencies [local, state, or
federal], medical institutions, or educational institutions):
Customer Service and Technical Support toll free: 1-800-234-1490
toll free: 1-800-624-9896
toll free: 1-877-576-3355
toll free: 1-800-624-9897
toll free: 1-800-822-8965
Page 39

(Return Material Authorization Numbers)
Dell Sales toll free: 1-800-289-3355
Spare Parts Sales toll free: 1-800-357-3355
toll free: 1-800-879-3355
U.S. Virgin
Islands
Desktop and Portable Fee-Based
Technical Support
Sales (Catalogs) toll free: 1-800-426-5150
Fax toll free: 1-800-727-8320
TechFax toll free: 1-800-950-1329
Dell Services for the Deaf, Hard-of-
Hearing, or Speech-Impaired
Switchboard 512 338-4400
General Support
toll free: 1-800-433-9005
toll free: 1-877-DELLTTY
(1-877-335-5889)
1-877-673-3355
Venezuela
General Support 8001-3605
Europe Contact Numbers
Country (City) Department Name or Service
Austria
(Vienna)
NOTE: Customers in Austria
call Langen, Germany for
Technical Support and
Customer Care.
Switchboard 01 491 040
Home/Small Business Sales 01 795676-02
Home/Small Business Sales Fax 01 795676-05
Home/Small Business Customer Care 01 795676-03
Preferred Accounts/Corporate Customer
Local
Area
Code
0660-8056
Number or
Toll-Free
Number
Page 40

Care
Home/Small Business Technical Support 01 795676-04
Preferred Accounts/Corporate Technical
Support
Website: support.euro.dell.com
0660-8779
Belgium (Brussels)
Czech Republic
(Prague)
E-mail:
tech_support_central_europe@dell.com
Technical Support 02 481 92 88
Customer Care 02 481 91 19
Home/Small Business Sales
Corporate Sales 02 481 91 00
Fax 02 481 92 99
Switchboard 02 481 91 00
Website: support.euro.dell.com
E-mail: tech_be@dell.com
E-mail for French Speaking Customers:
support.euro.dell.com/be/fr/emaildell/
Technical Support 02 22 83 27 27
Customer Care 02 22 83 27 11
toll free: 0800
16884
Denmark
(Horsholm)
NOTE: Customers in
Denmark call Sweden for fax
technical support.
Fax 02 22 83 27 14
TechFax 02 22 83 27 28
Switchboard 02 22 83 27 11
Website: support.euro.dell.com
E-mail: czech_dell@dell.com
Technical Support 45170182
Relational Customer Care 45170184
Home/Small Business Customer Care 32875505
Switchboard 45170100
Fax Technical Support (Upplands Vasby,
Sweden)
Fax Switchboard 45170117
Website: support.euro.dell.com
46 859005594
Page 41

E-mail: den_support@dell.com
E-mail Support for Servers:
Nordic_server_support@dell.com
Finland
(Helsinki)
France
(Paris) (Montpellier)
Technical Support 09 253 313 60
Technical Support Fax 09 253 313 81
Relational Customer Care 09 253 313 38
Home/Small Business Customer Care 09 693 791 94
Fax 09 253 313 99
Switchboard 09 253 313 00
Website: support.euro.dell.com
E-mail: fin_support@dell.com
Home and Small Business
Technical Support 0825 387 270
Customer Care 0825 823 833
Fax 0825 004 701
Fax (Alternative) 04 99 75 40 01
Switchboard 0825 004 700
Switchboard (Alternative) 04 99 75 40 00
Sales 0825 004 700
Website: support.euro.dell.com
E-mail:
support.euro.dell.com/fr/fr/emaildell/
Corporate
Technical Support 0825 004 719
Customer Care 0825 338 339
Fax 01 55 94 71 01
Switchboard 01 55 94 71 00
Sales 01 55 94 71 00
Website: support.euro.dell.com
Germany
(Langen)
E-mail:
support.euro.dell.com/fr/fr/emaildell/
Technical Support 06103 766-7200
Page 42

Home/Small Business Customer Care 0180-5-224400
Global Segment Customer Care 06103 766-9570
Preferred Accounts Customer Care 06103 766-9420
Large Accounts Customer Care 06103 766-9560
Public Accounts Customer Care 06103 766-9555
Switchboard 06103 766-7000
Website: support.euro.dell.com
Ireland
(Cherrywood)
E-mail:
tech_support_central_europe@dell.com
Ireland Technical Support 1850 543 543
UK Technical Support (dial number
within UK only)
Ireland Home User Customer Care 01 204 4095
Ireland Small Business Customer Care 01 204 4444
Ireland Corporate Customer Care 01 204 4003
UK Customer Care (dial number within
UK only)
Ireland Sales 01 204 4444
UK Sales (dial number within UK only) 0870 907 4000
SalesFax 01 204 0144
Ireland Fax 01 204 5960
0870 908 0800
0870 906 0010
Italy
(Milan)
Switchboard 01 204 4444
Website: support.euro.dell.com
E-mail: dell_direct_support@dell.com
Home and Small Business
Technical Support 02 577 826 90
Customer Care 02 696 821 14
Fax 02 696 821 13
Switchboard 02 696 821 11
Website: support.euro.dell.com
E-mail:
Page 43

support.euro.dell.com/it/it/emaildell/
Corporate
Technical Support 02 577 826 90
Customer Care 02 577 825 55
Fax 02 035 30
Switchboard 02 577 821
Website: support.euro.dell.com
Luxembourg
NOTE: Customers in
Luxembourg call Belgium for
sales, customer, and
technical assistance.
Netherlands
(Amsterdam)
E-mail:
support.euro.dell.com/it/it/emaildell/
Technical Support (Brussels, Belgium) 02 481 92 88
Home/Small Business Sales (Brussels,
Belgium)
Corporate Sales (Brussels, Belgium) 02 481 91 00
Customer Care (Brussels, Belgium) 02 481 91 19
Switchboard (Brussels, Belgium) 02 481 91 00
Fax (Brussels, Belgium) 02 481 92 99
Website: support.euro.dell.com
E-mail: tech_be@dell.com
Technical Support 020 581 8838
Customer Care 020 581 8740
Home/Small Business Sales
toll free: 0800-
toll free:
080016884
0663
Norway
(Lysaker)
NOTE: Customers in Norway
call Sweden for fax technical
Home/Small Business Sales Fax 020 682 7171
Corporate Sales 020 581 8818
Corporate Sales Fax 020 686 8003
Fax 020 686 8003
Switchboard 020 581 8818
Website: support.euro.dell.com
E-mail: tech_nl@dell.com
Technical Support 671 16882
Relational Customer Care 671 17514
Home/Small Business Customer Care 231 62298
Page 44

support.
Switchboard 671 16800
Poland
(Warsaw)
Fax Technical Support (Upplands Vasby,
Sweden)
Fax Switchboard 671 16865
Website: support.euro.dell.com
E-mail: nor_support@dell.com
E-mail Support for Servers:
Nordic_server_support@dell.com
Customer Service Phone 22 57 95 700
Customer Care 22 57 95 999
Sales 22 57 95 999
Switchboard 22 57 95 999
Customer Service Fax 22 57 95 806
Fax 22 57 95 998
Website: support.euro.dell.com
00
46 08 590 05
594
Portugal
Spain
(Madrid)
E-mail: pl_support@dell.com
Technical Support 35 800 834 077
Customer Care 800 300 415
or 800 834 075
Sales
Switchboard 34 917 229 200
Fax 35 121 424 01 12
E-mail:
support.euro.dell.com/es/es/emaildell/
Home and Small Business
Technical Support 902 100 130
Customer Care 902 118 540
800 300 410
or 800 300 411
or 800 300 412
or 351 214 220
710
Sales 902 118 541
Fax 902 118 539
Website: support.euro.dell.com
Page 45

E-mail:
support.euro.dell.com/es/es/emaildell/
Corporate
Technical Support 902 100 130
Customer Care 902 118 546
Switchboard 91 722 92 00
Fax 91 722 95 83
Website: support.euro.dell.com
Sweden
(Upplands Vasby)
E-mail:
support.euro.dell.com/es/es/emaildell/
Technical Support 08 590 05 199
Relational Customer Care 08 590 05 642
Home/Small Business Customer Care 08 587 70 527
Fax Technical Support 08 590 05 594
Sales 08 590 05 185
Website: support.euro.dell.com
E-mail: swe_support@dell.com
Switzerland
(Geneva)
Technical Support (Home and Small
Business)
Technical Support (Corporate) 0844 822 844
Customer Care (Home and Small
Business)
Customer Service (Corporate) 0848 821 721
Switchboard 022 799 01 01
Fax 022 799 01 90
Website: support.euro.dell.com
E-mail for French Speaking HSB and
Corporate Customers:
support.euro.dell.com/ch/fr/emaildell/
0844 811 411
0848 802 202
Page 46

U.K.
(Bracknell)
Technical Support (Corporate/Preferred
Accounts/PAD [1000+ employees])
0870
908 0500
Technical Support (Direct/PAD and
general)
Global Accounts Customer Care 01344 373 186
Corporate Customer Care 0870 908 0500
Preferred Accounts (500–5000
employees) Customer Care
Central Government Customer Care 01344 373 193
Local Government Customer Care 01344 373 199
Home/Small Business Sales 0870 907 4000
Home/Small Business Customer Care 0870 906 0010
Corporate/Public Sector Sales 01344 860 456
Website: support.euro.dell.com
E-mail: dell_direct_support@dell.com
0870 908 0800
01344 373 196
Asia and Other Regions Contact Numbers
Country (City) Department Name or Service
Australia
(Sydney)
Brunei
NOTE: Customers
in Brunei call
Malaysia for
customer
assistance.
Home and Small Business 1-300-65-55-33
Government and Business toll free: 1-800-633-559
Preferred Accounts Division (PAD) toll free: 1-800-060-889
Customer Care toll free: 1-800-819-339
Corporate Sales toll free: 1-800-808-385
Transaction Sales toll free: 1-800-808-312
Fax toll free: 1-800-818-341
Customer Technical Support
(Penang, Malaysia)
Customer Service
(Penang, Malaysia)
Transaction Sales
(Penang, Malaysia)
Area
Code
633 4966
633 4949
633 4955
Local Number or
Toll-Free Number
China
(Xiamen)
Home and Small Business Technical
Support
toll free: 800 858 2437
Page 47

Corporate Accounts Technical
toll free: 800 858 2333
Support
Customer Experience toll free: 800 858 2060
Hong Kong
NOTE: Customers
in Hong Kong call
Malaysia for
customer
assistance.
Home and Small Business toll free: 800 858 2222
Preferred Accounts Division toll free: 800 858 2062
Large Corporate Accounts North toll free: 800 858 2999
Large Corporate Accounts East toll free: 800 858 2020
Large Corporate Accounts South toll free: 800 858 2355
Large Corporate Accounts GCP toll free: 800 858 2055
Large Corporate Accounts HK toll free: 800 964108
Large Corporate Accounts GCP HK toll free: 800 907308
Technical Support toll free: 800 96 4107
Customer Service (Penang, Malaysia) 633 4949
Transaction Sales toll free: 800 96 4109
Corporate Sales toll free: 800 96 4108
India
Japan
(Kawasaki)
Technical Support 1600-33-8045
Sales 1600-33-8044
Technical Support
Technical Support Outside of Japan
Customer Care 044 556-4240
24-Hour Automated Order Status
Service
Individual User 044 556-1657
Business Sales Division (Up to 400
employees)
Public Sales (Government agencies,
education institutions, and medical
institutions)
044
044
044 556-3801
044 556-3494
044 556-3440
toll free: 0120-1982-26
toll free: 0120-1984-33
520-1435
556-3894
or
or
Preferred Accounts Division Sales
(Over 400 employees)
044 556-3433
Page 48

Global Segment Japan 044 556-3469
Large Corporate Accounts Sales
(Over 3500 employees)
Faxbox Service 044 556-3490
Switchboard 044 556-4300
Web site: support.jp.dell.com
044 556-3440
Korea
(Seoul)
Macau
NOTE: Customers
in Macau call
Malaysia for
customer
assistance.
Malaysia
(Penang)
Technical Support toll free: 080-200-3800
Sales toll free: 080-200-3600
Customer Service (Penang, Malaysia) toll free: 604-633-4949
Customer Service (Seoul, Korea) 080-200-3800
Fax 2194-6202
Switchboard 2194-6000
Technical Support toll free: 0800 582
Customer Service (Penang, Malaysia) 633 4949
Transaction Sales toll free: 0800 581
Technical Support toll free: 1 800 888 298
Customer Service 04 633 4949
New Zealand
Singapore
(Singapore)
NOTE: Customers
in Singapore call
Malaysia for
customer
assistance.
South Africa
(Johannesburg)
Transaction Sales toll free: 1 800 888 202
Corporate Sales toll free: 1 800 888 213
Home and Small Business 0800 446 255
Government and Business 0800 444 617
Sales 0800 441 567
Fax 0800 441 566
Technical Support toll free: 800 6011 051
Customer Service (Penang, Malaysia) 04 633 4949
Transaction Sales toll free: 800 6011 054
Corporate Sales toll free: 800 6011 053
Technical Support 011 709 7710
Customer Care 011 709 7707
Page 49

Sales 011 709 7700
Fax 011 706 0495
Switchboard 011 709 7700
Website: support.euro.dell.com
E-mail: dell_za_support@dell.com
Southeast
Asian/Pacific
Countries
(excluding
Australia, Brunei,
China, Hong Kong,
Japan, Korea,
Macau, Malaysia,
New Zealand,
Singapore, Taiwan,
and Thailand—refer
to individual listings
for these countries)
Taiwan
Customer Technical Support,
Customer Service, and Sales
(Penang, Malaysia)
Technical Support toll free: 0080 60 1225
Technical Support (Servers) toll free: 0080 60 1256
Customer Service (Penang, Malaysia) 633 4949
Transaction Sales toll free:
60 4 633-4810
0080 651 228/0800 33 556
Thailand
NOTE: Customers
in Thailand call
Malaysia for
customer
assistance.
Back to Contents Page
Corporate Sales toll free:
0080 651 227/0800 33 555
Technical Support toll free: 088 006 007
Customer Service (Penang, Malaysia) 633 4949
Sales toll free: 088 006 009
 Loading...