

Page 1

QUICK START GUIDE
Page 2

Page 3

QUICK START GUIDE
Page 4

Notes and Cautions
NOTE: A NOTE indicates important information that helps you make better use of your
computer.
CAUTION: A CAUTION indicates either potential damage to hardware or loss of data and tells
you how to avoid the problem.
__________________
Information in this document is subject to change without notice.
© 2009 Dell Inc. All rights reserved.
Reproduction of these materials in any manner whatsoever without the written permission of Dell Inc. is strictly forbidden.
Dell
, the
DELL
Trademarks used in this text:
logo are registered trademarks of Canonical Ltd.
Other trademarks and trade names may be used in this document to refer to either the entities claiming the marks and
names or their products. Dell Inc. disclaims any proprietary interest in trademarks and trade names other than its own.
logo, and YOURS IS HERE are trademarks of Dell Inc.;
January 2009 P/N F670R Rev. A00
Ubuntu
and the
Ubuntu
Page 5

Contents
Overview. . . . . . . . . . . . . . . . . . . . . . . . . . . . .5
Getting Started With Your
Dell Desktop . . . . . . . . . . . . . . . . . . . . . . . . . .6
Getting Started With Your
Classic Desktop . . . . . . . . . . . . . . . . . . . . . . .8
Starting an Application . . . . . . . . . . . . . . . . . .8
Customizing Your Desktop. . . . . . . . . . . . . . . .8
Adding and Removing an Application
Icon on Your Desktop . . . . . . . . . . . . . . . . . . . 8
Getting Started With Ubuntu. . . . . . . . . . . . .9
Connecting to the Internet Using
a Wireless or Wired Connection . . . . . . . . . . 9
Quickly Viewing a Window in
Full Screen . . . . . . . . . . . . . . . . . . . . . . . . . . . 10
System Preferences and
Administration . . . . . . . . . . . . . . . . . . . . . . . . 11
Browsing Files and Folders. . . . . . . . . . . . . . 14
Using the Web Browser . . . . . . . . . . . . . . . . 16
Instant Messaging With Pidgin . . . . . . . . . . 18
Using Totem TV . . . . . . . . . . . . . . . . . . . . . . . 18
Dell Media Experience . . . . . . . . . . . . . . . . . 18
Applications in Ubuntu . . . . . . . . . . . . . . . . . 19
Connecting Devices. . . . . . . . . . . . . . . . . . . . 20
Restoring Your Ubuntu System. . . . . . . . . .22
Starting System Restore . . . . . . . . . . . . . . . .22
3
Page 6

4
Page 7

Overview
Overview
Welcome to your Dell™ Inspiron™ Mini.
®
This guide helps you to get acquainted with the Ubuntu
and set up your computer just the way you want it.
If you need more information, complete documentation on Ubuntu is available from the Help Center
on your computer. To access the Help Center, click the Help icon on the Panel, found at the top of
your screen.
operating system, perform basic functions,
5
Page 8
Getting Started With Your Dell Desktop
1
7
2
3
4
8 9 1110 12 13
14
5
6
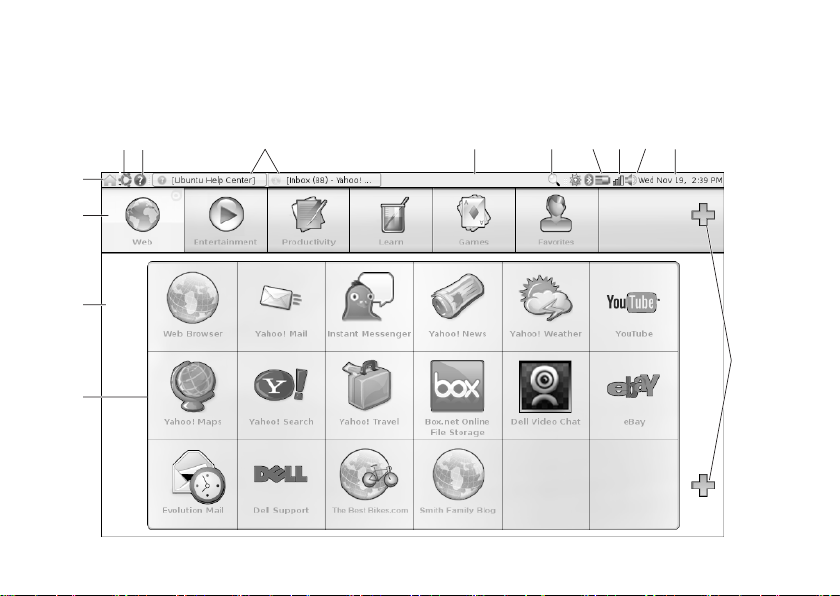
Getting Started With Your Dell Desktop
The Dell Desktop launches when you turn on your computer.
6
Page 9

Getting Started With Your Dell Desktop
1
Launcher — The Launcher organizes applications,
bookmarks, folders, and documents into categories.
Click a Category, and then click an item to open it.
Customize the Launcher by adding your favorite items
to a Category, or even add a new Category — using
the Plus icons.
2
Desktop — Right-click the background to change the
background image.
3
Categories — Click a category to view a list of
applications, bookmarks, folders, or documents.
4
Home icon — Click this icon to minimize all windows
and to display the Launcher.
5
Ubuntu icon — The Ubuntu icon opens the Ubuntu
Menu. From the Ubuntu Menu, access applications,
preferences, system commands, system settings,
and tools.
6
Help icon — Click this icon to access the Help
Center.
7
Running tasks — To bring a running task to the
foreground, click the corresponding item
on the Panel.
8
Panel — The Panel provides quick access to open
running tasks on the desktop, or to frequently-used
programs, files, or utilities on your computer.
9
Search icon — Click this icon to search for files and
folders.
10
Battery/Charging status indicator — Move the
mouse over this icon to view the battery status.
Right-click to change your Power Manager settings.
11
Network status indicator — Click the icon to view
the list of available networks. When connected to
a wireless network, the icon changes to a series of
bars indicating signal strength. The more bars, the
stronger the signal.
12
Volume control icon — Click this icon to adjust the
volume of the computer.
13
Notification area — Includes a clock and icons
associated with programs.
14
Plus icons — Click the upper Plus icon to add a
category to the Launcher. Click the lower Plus icon to
add applications or website bookmarks.
7
Page 10

Getting Started With Your Classic Desktop
Getting Started With Your Classic Desktop
To switch from the Dell Desktop Launcher to the
Classic Desktop, click
Mode→ Classic Desktop.
→ Switch Desktop
Starting an Application
Click the 1. Applications menu.
Select the appropriate category and 2.
application.
Customizing Your Desktop
Personalizing the Panel
You can add frequently used utilities and
applications to the Panel by performing the
following procedures:
Right-click the Panel and select1. Add to
Panel.
Select an application in the 2. Add to Panel
dialog box and click Add.
8
Adding and Removing an Application Icon on Your Desktop
You can add an icon on your Desktop to launch
a frequently used application.
Select an application in the 1. Applications
menu.
Drag and drop the application on to the 2.
Desktop.
To remove an application icon from your
Desktop, drag it into the trash bin.
Page 11

Getting Started With Ubuntu
Getting Started With Ubuntu
Connecting to the Internet Using a Wireless or Wired Connection
Connecting to a Wireless Network
To initiate a connection to a wireless 1.
network, click the Network Manager icon on
the right side of the Panel.
Select the network to which you would 2.
like to connect. If the network requires
a password, the Wireless Network Key
Required screen appears. Enter the network
password. Select the Show password
checkbox to review your password, if
needed.
Connecting to a Wired Network
To use a wired network connection, connect 1.
the network cable into the network port on
the right side of your computer.
If your network automatically assigns 2.
IP addresses and network settings, your
set-up is complete.
If your network does not automatically 3.
assign a network address to your computer,
you may configure an IP address on your
computer from the Network Administration
screen. Go to
Administration→ Network Settings. Use the
IP address and network information provided
by your ISP or network administrator.
→ System→
9
Page 12

Getting Started With Ubuntu
Quickly Viewing a Window in Full Screen
Press <Ctrl><Alt><F> to toggle between standard view and full screen view.
10
Page 13

System Preferences and Administration
From the Dell Desktop, use the tools available
from
and operation of your computer.
→ System to control the appearance
Select • Preferences for settings of themes,
keyboard shortcuts, and power management.
Select • Administration to manage computer
monitors and configuration tools functions
such as network, printing, and users and
groups.
Getting Started With Ubuntu
11
Page 14

Getting Started With Ubuntu
Setting Screensaver Preferences
Click1. → System→ Preferences→
Screensaver.
The Screensaver Preferences window
appears.
In the 2. Screensaver theme list, select Blank
for a blank screen, select Random for a
random screensaver, or select a screensaver
of your choice.
Adjust the slider for the length of time that 3.
you want your computer to idle before the
screensaver appears.
12
Ensure that the 4. Activate screensaver when
computer is idle checkbox is selected.
If you want the screensaver to lock the 5.
screen, select the Lock screen when
screensaver is active checkbox.
Click 6. Close.
Page 15

Getting Started With Ubuntu
13
Page 16

Getting Started With Ubuntu
Browsing Files and Folders
The File Manager allows you to view, create,
organize, and search for your files and folders
using an interface similar to a web browser. To
open the file browser from the Dell Launcher,
select Productivity→ Places.
Using Bookmarks
Bookmarks in the File Manager are similar
to bookmarks in a web browser. Use the
bookmarks feature to help you quickly open
frequently used folders.
To add a bookmark
Browse to the folder that you want to 1.
bookmark, and open it.
Click 2. Bookmarks→ Add Bookmark or press
<Ctrl><D>.
The bookmark appears in the Bookmarks menu
and in the lower portion of the side pane.
14
Creating a New Folder
Browse to the location where you want to 1.
create the new folder.
Click 2. File→ Create Folder, or right-
click and select Create Folder, or press
<Shift><Ctrl><N>.
Name the folder and press 3. Enter.
Page 17

Getting Started With Ubuntu
15
Page 18

Getting Started With Ubuntu
Using the Web Browser
You can browse the web using the web browser.
The search box allows you to search the web
directly from the toolbar. Tabbed browsing
means you can have multiple pages open, but
contained within the same browser window.
Using Tabbed Browsing
To open a new tab, go to File→ New Tab or
press <Crtl><T>.
To close a tab, click the close button on the tab
or press <Ctrl><W>.
Using Bookmarks
To bookmark a page, click 1. Bookmarks→
Bookmark This Page or press <Ctrl><D>
or to bookmark a group of tabs, select
Bookmarks→ Bookmark All Tabs.
16
Select a folder for the bookmark and 2.
click Add.
Bookmarks saved to the Bookmarks Toolbar
Folder appear on the Bookmarks Toolbar.
To organize and edit your bookmarks, click 3.
Bookmarks→ Organize Bookmarks.
Adding Bookmarks to the Launcher
If you have the Dell Desktop enabled, you can
add web site bookmarks to the Launcher from
within the web browser.
To add a bookmark to the Launcher, choose 1.
one of the following methods:
Select – Bookmarks→ Bookmark in
Launcher
Press <Ctrl><Shift><D> –
Click the heart icon –
navigation bar
Select a category and click 2. Apply.
from the
Page 19

Getting Started With Ubuntu
17
Page 20

Getting Started With Ubuntu
Instant Messaging With Pidgin
The Pidgin messaging client allows you to use
multiple types of instant messaging accounts
and protocols all at once.
From the Dell Launcher, select 1.
Web→ Instant Messenger.
If you are opening Pidgin for the first time, 2.
in addition to your Buddy List, an Accounts
dialog box prompts you to add accounts.
Click Add.
Select the 3. Protocol of the account that you
want to add, enter the required information,
and click Save.
Close the 4. Accounts dialog box and,
optionally, the Buddy List.
To access the Pidgin menu options, right-click
the Pidgin icon on the top Panel.
18
Using Totem TV
If your computer includes the optional TV tuner/
antenna, you can use the Totem TV player to
watch digital TV:
From the Dell Launcher, select 1.
Entertainment→ TV Player.
Totem TV automatically presents a scan 2.
dialog. Choose DVB-T.
After scanning completes, double-click the 3.
desired channel name from the list to begin
viewing.
Dell Media Experience
For the best multimedia experience, Dell
provides PowerCinema — a media player for
Music, Video, Photos, and Movies. To view DVD
movies, the portable Dell CD/DVD Player and
PowerDVD software are required.
To use Dell Media Experience, select
Entertainment→ Dell Media Experience from
the Dell Launcher.
Page 21

Getting Started With Ubuntu
Applications in Ubuntu
Ubuntu comes with a wide variety of
pre-installed applications.
Some of the most frequently used applications
include the following:
Adding and Removing Applications
Click 1. → Applications→
Add/Remove.
To add an application, select the required 2.
application checkbox. To remove an
application, deselect the required
application checkbox.
Some applications may require additional 3.
supporting applications or will be a part of a
bundle. If you still want to install/remove the
application, click Install All/Remove All in
the confirmation window.
When you have finished making changes, 4.
click OK.
Check the list of changes you have made in 5.
the confirmation window and click Apply.
Progress windows appear while 6.
downloading, installing, and removing
applications. Once the processes finish, the
Changes Applied window appears.
Click 7. Close.
19
Page 22

Getting Started With Ubuntu
Connecting Devices
Ubuntu supports a wide range of peripheral
devices and lets you connect to them easily.
USB Drives
Connect storage devices like USB hard 1.
drives or pen drives to an available USB port
on the computer
The drivers are automatically installed and 2.
the File Browser window appears.
You can now transfer files between your 3.
computer and the storage device.
20
Digital Cameras
Connect your digital camera to an available 1.
USB port on the computer.
Turn on the camera and place it in review or 2.
file transfer mode.
On the screen that appears, choose F-Spot 3.
Photo Manager as the program to open.
Select the photo(s) and the location to 4.
transfer the photos.
Click 5. Copy and the photos are transferred to
the selected location.
Page 23

Getting Started With Ubuntu
Bluetooth Devices
From the Panel, right-click the Bluetooth 1.
icon
and select Connect new device...
The 2. Bluetooth Device Wizard screen
appears. Click Forward.
The detected Bluetooth devices are listed. 3.
Select the device you wish to use and click
Forward.
A PIN code may be necessary to establish 4.
connection. On the Bluetooth device, enter
the PIN code displayed on your computer
screen, and you are connected (paired).
The 5. Successfully configured new device
message appears. Click Close.
To transfer or browse files, right-click the 6.
Bluetooth icon
device... or Browse files on device...
and select Send files to
21
Page 24

Restoring Your Ubuntu System
Restoring Your Ubuntu System
Use the
Ubuntu LTS
computer to restore your operating system.
CAUTION: Using the Ubuntu LTS DVD
deletes all data on the hard drive.
NOTE: Your computer may or may not have
an optical drive. Use an external optical
drive or any external storage device for the
procedures that involve media.
DVD that shipped with your
Starting System Restore
Turn off the computer.1.
Connect an external USB optical drive 2.
into an available USB connector on your
computer.
Insert the 3.
USB optical disc drive.
CAUTION: Using the Ubuntu LTS DVD
deletes all data on the hard drive.
22
Ubuntu LTS
DVD in the external
Turn on the computer.4.
When the DELL logo appears, press <F12> 5.
immediately.
NOTE: The next steps change the boot
sequence for one time only. On the next
start-up, the computer boots according to
the devices specified in the system setup
program.
When the boot device list appears, highlight 6.
CD/DVD/CD-RW and press <Enter>.
Press any key to 7. Boot from CD-ROM. Follow
the instructions on the screen to complete
the installation.
Page 25

Page 26

Printed in China.
0F670RA00
Printed on recycled paper.
www.dell.com | support.dell.com
 Loading...