

De Lisle 15P STUDIO Instruction Manual

2
MADE IN USA
15P Studio Tube Amplifier
Instruction Manual
32
11. INPUT JACKS
The upper jack is the hi-gain input. The lower
jack is the lo-gain input. Use only high-qaulity,
shielded instrument cables.
10. BASS
This controls the amount of low end frequency
content.
9. CONTOUR
This controls the mid-frequency slope. Rotating
the knob clockwise will shift the slope toward low
frequencies. Rotating the knob anti-clockwise will
shift the slope toward high frequencies.
8. TREBLE
This controls the amount of high-end frequency
content.
7. VOLUME
6. TRI-PENT
stage. In the fully anti-clockwise position, the screen
is strapped to the plate (triode mode). In the fully
clockwise position, the screen is fully bypassed and
the EF86 operates as a pentode. In between these
extremes, screen compression is variable as is gain.
5. NFB
In the up position, negative feedback is applied
to the output section. This lowers gain by 6 dB
frequency response.
4. MASTER
The Master volume controls the overall output
level of the amp. It is after the phase inverter.
3. STANDBY
The Standby switch allows the tubes to warm up
before they are hit with high voltage. Make sure
this switch is in the down position before turning
on the Power switch. After 30 seconds, switch from
Standby to Play.
2. PILOT LIGHT
The pilot indicates that the amp is powered on.
Use #47 replacement bulbs.
1. POWER
This turns on the amplifer. Place the Standby
switch in the lower position before turning on
1 2 3 4 5 6 7 8 9 10 11
MADE IN USA
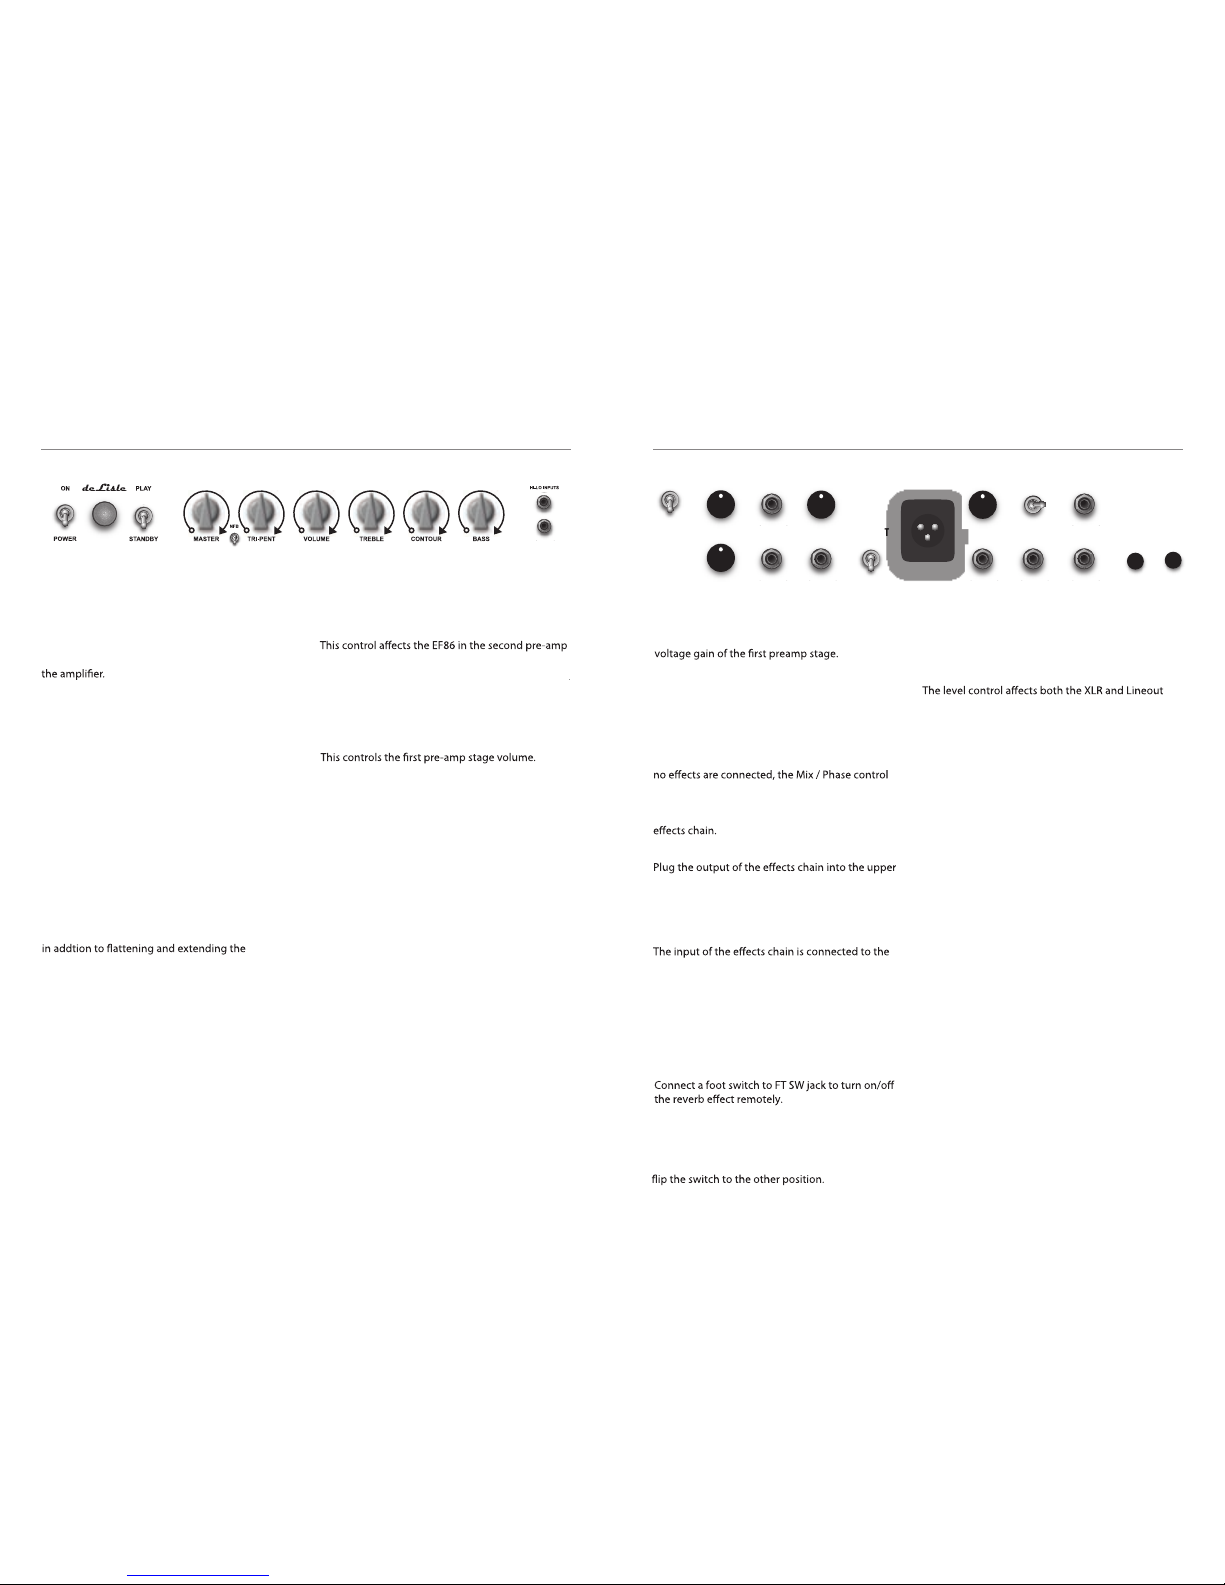
1. BOOST
In the up position, the Boost switch doubles the
1 2 3 4 5 6 7 8 9 10
2. MIX-PHASE / SEND
The Mix / Phase control is a multi-function pot. In
the 12 o'clock position, the dry signal is muted
allowing serial loop operation. Adjust the knob
to either side parallels the dry/wet signals. Any
phase issue can be corrected by rotating the
knob past 12 o'clock in the other direction. When
acts as a gain pot.
The Send control sets the signal level sent to the
3. RETURN / SEND JACK
jack. The return jack can also be used as an input
for another low voltage souce, such as the preamp
out of another amplifer. Set the Mix / Phase pot
to serial operation to mute the internal preamp.
the Send jack. It can also be used as preamp out to
connect to another power amp. Use serial mode
to mute the 15P Studio’s power amp.
4. REVERB / FT SW
The Reverb control mixes the return signal from
the reverb pan and the amp’s dry signal. To add
the eect, rotate the knob anti-clockwise.
6. XLR OUT
Use the XLR out to connect another piece of gear
the requires a balanced input. See 1/4” / XLR note.
7. LEVEL / LINEOUT
levels. Output for the Lineout is -10 dBV (1Vrms).
Output for the XLR out is +4 dBu (1.23Vrms). Levels
may vary depending on operating environment
and control settings. See 1/4” / XLR note.
The Lineout jack provides an unbalanced output.
Either output can be used without a speaker load.
DE LISLE 15P STUDIO REAR PANEL
DE LISLE 15P STUDIO FRONT PANEL
BOOST
MIX / PHASE
SEND
REVERB
FT SW
GND LIFT
XLR
LEVEL
LINEOUT
8 OHM
16 OHM
HP OUT
1/4” / XLR
250mA 2A
5. GND LIFT
This switch is connected to the XLR output. Should
any noise issues arise when the 15P Studio is
connected to another piece gear via the XLR out,
8. 1/4” - XLR / HP OUT
The XLR output requires a larger signal to give us the
required output level, so we have incorporated the
1/4" / XLR toggle switch to bump up the source
voltage. Select the voltage level that corresponds to
the output connection that is in use.
The HP Out jack allows for silent practicing through
headphones when the speaker is unplugged. This
jack also doubles as an attenuated output when a
speaker is connected to it.
9. 8 Ohm / 16 Ohm
Connect an 8 ohm speaker cabinet to the 8 ohm jack,
or connect a 16 ohm speaker cabinet to the 16 ohm
jack. Do not use both connections at the same time.
10. FUSES
The 15P Studio has two fuses, one for the HT supply
(250mA) and one for the Mains (2A). Both are 3AG.
 Loading...