

Page 1
STEAM IRON
Unit USI-280
Instruction manual
Precautionary measures
When using the appliance observe the following precautions:
1. Read all instructions carefully and save it fo r future use.
2. Use iron only for its intended purpose.
3. Before using, make sure that your mains voltage cor responds to t he vo ltage specified on the name plate
of the iron.
4. Do not keep working iron the up sole, this may cause burns a soleplate or steam.
5. If you find damage to the appliance, contact an authorized service center.
6. In the event of damage to the power cord contact an authorized service center. Do not attempt to replace
the cord yourself.
7. Do not let cord touch hot soleplate. Let iron cool completely before you remove it in place.
8. Always turn off the iron from the mains while filling his water or when the water pour out of it, and also
before cleaning the iron.
9. Do not immerse the iron in water or other liquids. This can result in e lect ric shock .
10. Do not let children use an iron alone. Do not leave children unsupervised near the included iron.
11. Do not leave the iron unattended connected to the mains.
12. Do not use iron outdoors. The device is intended for household use only.
Page 2
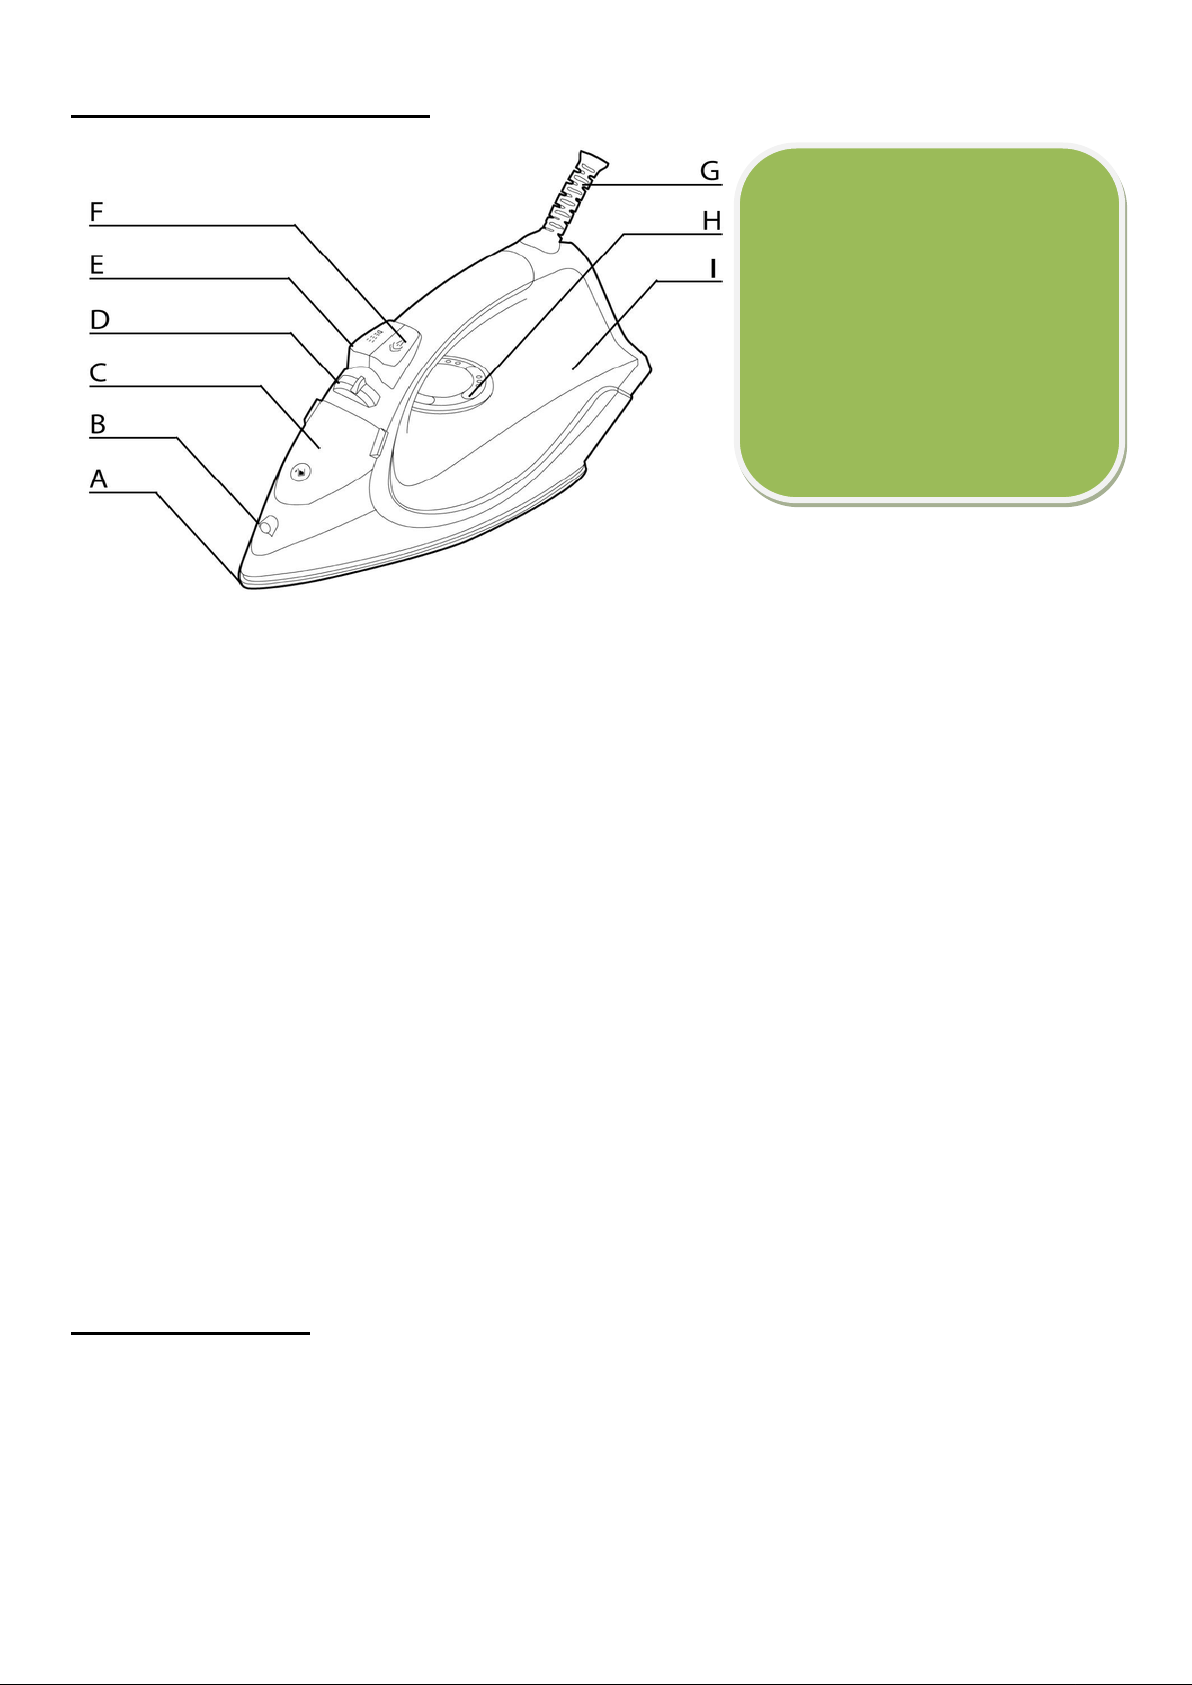
Description of the in st rument.
A. Soleplate
B. Spraying nozzle
C. Cover of water tank
D. Steam regulator
E. Spraying button
F. Steam shot button
G. Power cord
H. Thermoregulator
I. Water tank
Soleplate
Which is made of stainless steel material, it can be heated up and be used to iron the garment.
Spraying nozzle
When pressing spraying water button instantly, water is sprayed from this outlet.
Water tank inlet
Filling water into water tank from it, Make sure water should not exceed the Max level (250ml) as indicated on water
tank.
Regulator supply of steam
Move the button to select the desired steam output for each garment, if selecting the “off” position, it indicates
ironing without ste am.
Spraying button
Pressing the button instantly provides a fine mist spray to dampen hard-to-iron fabrics.
Steam shot button
Pressing the button instantly provides a powerful shot of steam to eliminate stubborn wrinkles.
0
360
Cord bushing
Cord bushing allows free movement of power cord in any direction with great maneuverability when ironing.
Indicator light
When indicator light is illuminated, it indicates that the iron is heating; it will goe s out when it has reached selected
temperature.
Temperature dial
Turning the dial to set ironing temperature that is different with the garment changed.
Using of steam iron.
Before first use
1. Remove all the protective stickers from the soleplate.
2. Heat up the iron to maximum temperature and iron a piece of damp cloth, to remove any residual adhesive
from the sole.
Note: When you first use the iron may emit an unpleasant odor, it will disappear with time.
1
Page 3
Operation of device.
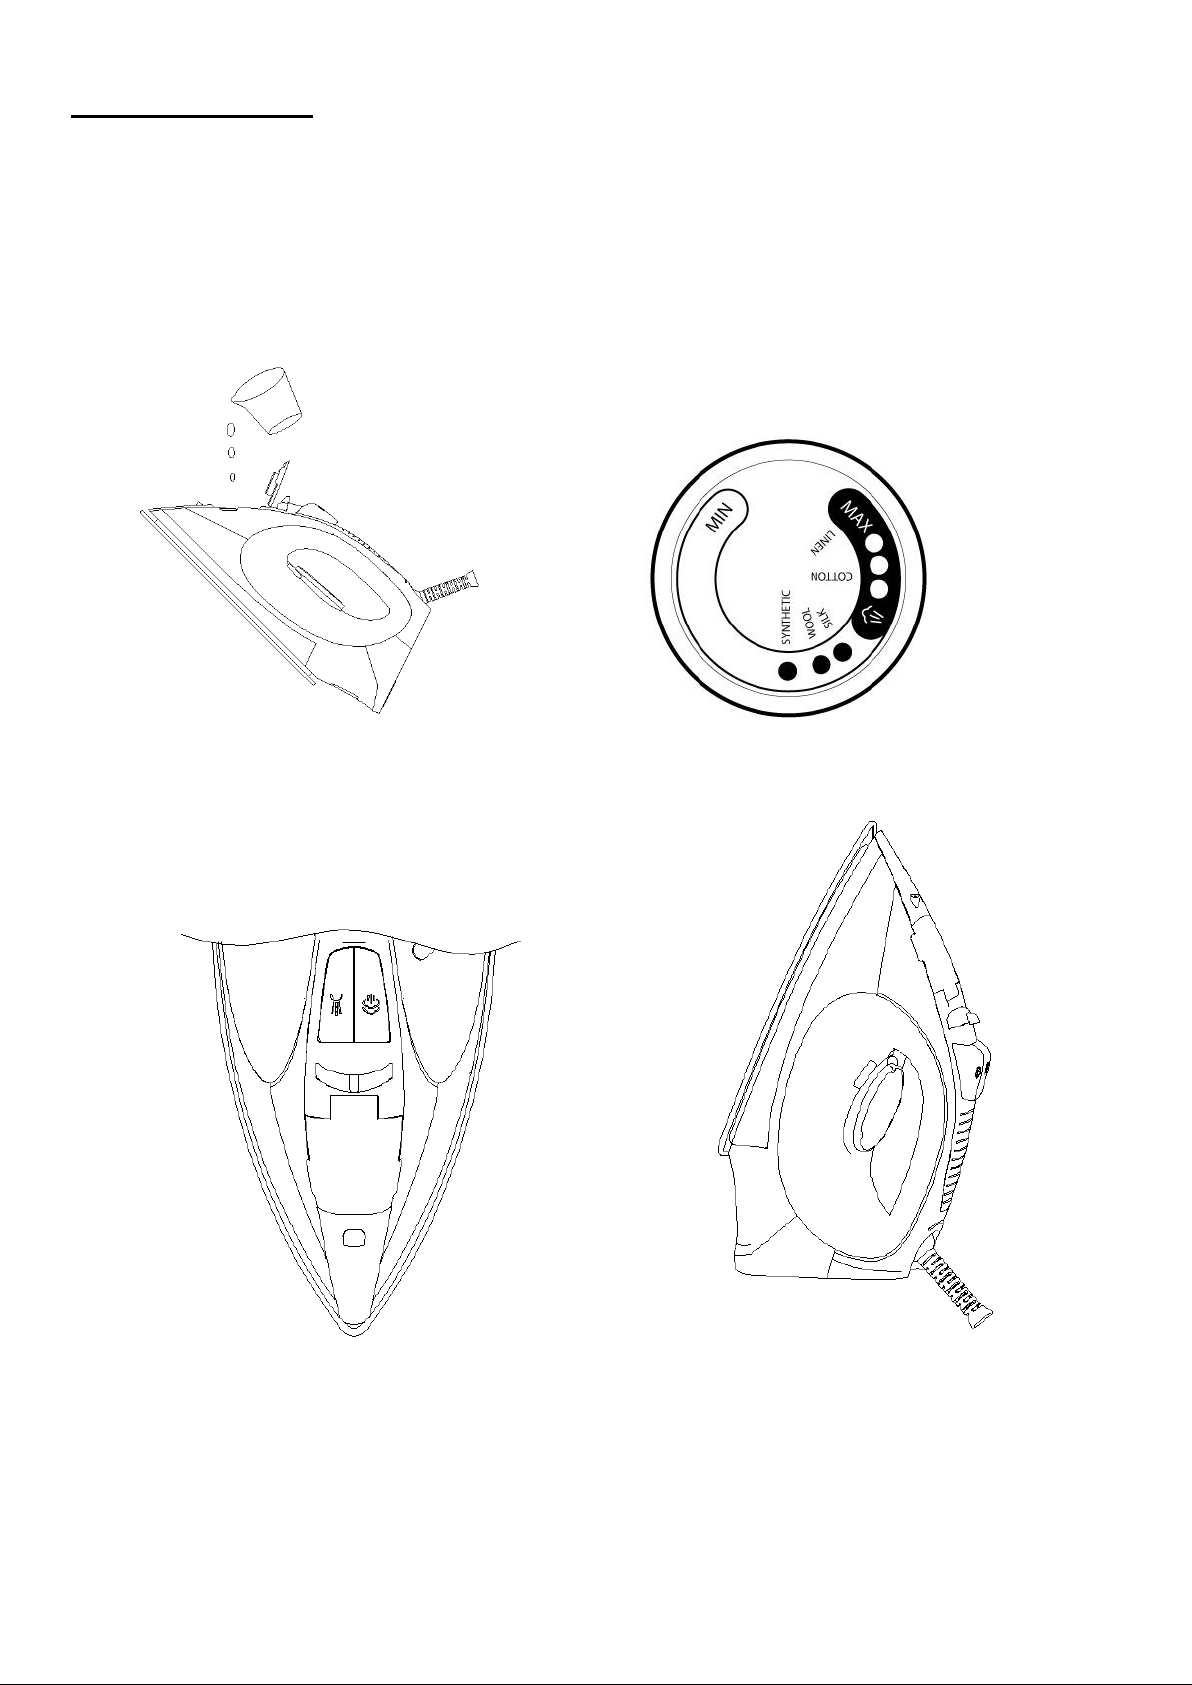
1. Hold the iron vertically, with a slight slope, fill the tank with water, using a measuring cup. You had
better use purified water with less calcium particles. Water is not to exceed “Max” level on the tank (See
pic 1).
2. Close the lid of the water tank until it click s .
3. Connect the iron to the mains and set the thermostat the desired temperature of heating, depending on the
type of fabric (See pic 2). The indicator light will illumina te.
Pic. 1 Pic. 2
4. Make sure steam button is on dry position. (See pic 3), then place the iron vertically (See pic 4).
Pic. 3 Pic. 4
5. Once the sole is heated to a predetermined temperature indicator light goes out. Then set the steam
regulator to the desired position for steam ironing or dry ironing.
WARNING: Not touch hot soleplate at any time before cooling down!
2
Page 4

6. Press spraying water button a couple of times to moisten the laundry if necessary, before spraying make
sure that there is enough water in water tank.
7. Steam shot function had better be used at max temperature, as it helps remove stubborn creases.
8. The iron has an anti-drip function. If iron long during is not used, the sole cools steam generation is
automatically switched off to prevent drip through the holes of the sole.
9. “Steam shot” can also be applied when holding the iron in a vertical position. This is useful for removing
creases from hanging clothes, curtains, etc.
Cleaning and maintenance.
After use.
1. Disconnect power supply and empty the water left in water tank.
2. Wait for the sole completely cool before you remove the iron.
3. Wipe the iron soft, damp cloth. Do not use solvents to clean the soleplate and abrasive cleaners.
4. Store the iron in an upright position. Avoid scratching the sole.
Self-clean function.
It is necessary to regularly clean the iron, depending on the water hardness and intensity of use.
1. Fill water into the water tank and set the temperature selector to Max position
2. Connect the iron to the network. Make sure the steam regulator is set to “Off”.
Warning: Never pour vinegar or other liquid cleaners for eliminating calcium into water tank!
3. Once the iron is hot and the indicator light will turn off. Set the steam regulator “D” to the position of
self-cleaning, until it stops
washing away scale and impurities.
4. Release the button self-cleaning as soon as the water in the tank is over.
. The steam and boiling water will come out through the holes in the sole of
Auto-decalcification function
Iron equipped system Auto-decalcification (Anti-Calc). Thanks to it, reduces the rate of scale formation.
Operating tips
- As the iron heats up faster than it cools down, it is recommended to begin ironing with the fabrics requiring the
lowest ironing temperature, such as synthetic fabrics.
- If the fabric contains sever al kinds of fibres, select the temperature for the tissue in which the canvas of the greatest
content. For example: if the fabric contains 60% polyester and 40% cotton, you should select the temperature
corresponding to polyester and to iron without steam.
- Silk and other fabrics that are likely to become shiny should be ironed on the inner side. To prevent staining do not
spray water straight on silk or other delicate fabrics.
Selecting the ir oning temperature.
3
Page 5

Symbol Fabric Temp.
Variable
Steam shot
Spraying
0
MAX
Synthetic
Silk
steam
water
X X V
Wool
Cotton
Linen
Note: This symbol indicates th a t th e fabric can’t be ironed
Note:“V” symbol indicates the possibility of using;
“X” symbol indicates that the function can’t use.
Specification.
Model: USI-280
Power supple: 230 V ~ 50 Hz
Power: 2200 W
Water tank volume: 350ml
X X V
V V V
The head office of the manufacturer : «UNIT Handelsgesellschaft G.m.b.H.»
131, Gersthofer Str., A-1180, Vienna, Austria
xported by: «UNIT Electronics (H. K.) Limited»
E
3905 Two Exchange Square, 8 Connaught Place,
Central, Hong Kong
Made in People’s Republic of China (P.R.C.)
his appliance is to be stored and used under the following conditions: temperature – not less than
T
+5°C; relative humidity - not higher than 80%; aggressive impurities in the air: not allowable.
As the Manufacturer is constantly working on the improvement of its products, the design and
technical specifications are sub ject to chang e wi thou t prio r notice.
4
Page 6

Утюг Unit
Модель USI-280
Инструкция по эксплуатации
Меры предосторожности
При использовании электроприбора необходимо соблюдать следующие меры предосторожности:
1. Причитайте всю инструкцию и сохраните её для использования в будущем.
2. Используйте утюг только по прямому назначению
3. Перед использованием убедитесь, что напряжение вашей электросети соответствует указанному
напряжению на заводской табличке утюга.
4. Не переворачивайте включённый утюг, это может привести к ожогу металлической подошвой или паром.
5. При обнаружении повреждений прибора обратитесь в авторизованный сервисный центр.
6. В случае обнаружения повреждения сетевого шнура обратитесь в авторизованный сервисный центр. Не
пытайтесь заменить шнур самостоятельно.
7. Не допускайте, чтобы шнур касался горячей подошвы утюга. Дайте утюгу полностью остыть, перед тем
как убрать его на место.
8. Всегда отключайте утюг от сети при наполнении его резервуара водой или когда выливаете воду из него, а
так же перед чисткой утюга.
9. Не погружайте утюг в воду и другие жидкости. Это может привести к поражению электрическим током.
Page 7

10. Не позволяйте детям одним пользоваться утюгом. Не оставляйте детей одних без присмотра рядом с
включённым утюгом.
11. Не оставляйте без присмотра утюг подключенный к электросети.
12. Не используйте утюг на открытом воздухе. Прибор предназначен только для домашнего использования.
Описание прибора.
A. Подошва
B. О
тверстие распылителя воды
C. К
рышка резервуара для воды
егулятор подачи пара
D. Р
нопка распылителя
E. К
F. Кнопка подачи пара
G. С
етевой шнур
H. Т
ерморегулятор
I. Резервуар для воды
одошва
П
Подошва утюга имеет керамическое напыление.
Сопло распылителя
При нажатии кнопки распылителя вода распыляется из этого отверстия.
Резервуар для воды
Наполните резервуар для воды. Максимальный уровень не должен превышать указанный на корпусе (250 мл).
Кнопка интенсивного отпаривая
При нажатии на эту кнопку происходит интенсивная подача пара, что способствует удалению стойких складок.
Регулятор подачи пара.
Регулятор позволяет выбрать мощность подачи пара для разного типа тканей. При установке регулятора в
положение «Off» глажение будет производиться без пара.
Втулка сетевого шнура
Втулка сетевого шнура позволяет шнуру во время глажения двигаться практически в любом направлении.
Световой индикатор
Когда световой индикатор горит, это означает, что утюг нагревается. При достижении утюгом установленной
температуры световой индикатор гаснет.
Терморегулятор
С его помощью выставляется температура нагрева подошвы необходимая для глажения разных типов ткани.
Подготовка к работе.
Перед первым использованием
1. У
далите все защитные наклейки с подошвы утюга.
1
Page 8

2. Нагрейте утюг до максимально температуры и прогладьте им кусок влажной ткани, для удаления остатки
клея с подошвы.
Примечание: При первом использовании может появиться неприятный запах, со временем он исчезнет.
Эксплуатация устройства
1. Удерживая утюг вертикально, с небольшим наклоном, заполните резервуар водой с помощью мерного
стаканчика. Следите, чтобы уровень воды не превышал максимального значения. (См. рис. 1) Если у вас
жёсткая вода, то рекомендуем использовать дистиллированную или деминерализованную воду.
2. Плотно закройте крышку резервуара для воды, до щелчка
одключите утюг к сети электропитания и терморегулятором установите необходимою температуру
3. П
нагрева, в зависимости от типа ткани (См. рис. 2). Световой индикатор будет гореть.
.
Р
ис. 1 Рис. 2
4. Убедитесь, что регулятор подачи пара находится в положении «Off» (См. рис. 3), затем установите утюг
вертикально (См. рис. 4).
Р
ис. 3 Рис. 4
5. Как только подошва нагреется до заданной, температуры индикаторная лампочка погаснет. Затем
установите регулятор подачи пара в требуемое положение для глажения с паром или для сухого глажения.
2
Page 9

Предупреждение: Не касайтесь горячей подошвы утюга, это может привести к ожогу!
6. Нажмите кнопку распыления воды несколько раз, чтобы смочить ткань в случае необходимости. Перед
распылением убедитесь, что в резервуаре есть достаточное количество воды.
7. Использование интенсивного отпаривания возможно только в режиме максимального нагрева подошвы.
Использование данной функции позволяет разглаживать стойкие складки.
8. Утюг оснащён противокапельной функцией. Если в процессе глажения утюг долго не используется, то
подошва остывает, парообразование автоматически отключается, что предотвращает появления капель
ч
ерез отверстия подошвы.
9. Режим интенсивного отпаривания можно использовать при вертикальном положении утюга. Это удобно
при разглаживании складок на весящей одежде, шторах и т. д.
Чистка и уход
После использования
1. О
тключите вилку от розетки и слейте оставшуюся в резервуаре воду.
2. Дождитесь, пока подошва полностью остынет, прежде чем убрать утюг. Не используйте для чистки
подошвы растворители и абразивные чистящие средства.
3. Очищайте корпус утюга мягкой влажной тканью.
4. Храните утюг в вертикальном положении. Избегайте появления царапин на подошве.
Функция самоотчистки.
Необходимо регулярно проводить чистку утюга, в зависимости от жёсткости воды и интенсивности
использования.
1. Налейте воду в резервуар для воды и установите терморегулятор в максимальное положение.
2. Подключите утюг к сети. Убедитесь, что регулятор подачи пара находится в положении «Off». Затем
ставьте утюг как показано на рис
по
Предупреждение: Никогда не наливайте уксус или другие жидкие чистящие средства в резервуар для воды!
3. Как только утюг нагреется, и световой индикатор погаснет, удерживая утюг над раковиной, переведит
р
егулятор подачи пара в положение самоотчистки, до упора (Рис. 3). Пар и кипящая вода будут выходить
через отверстия, в подошве вымывая остатки накипи и примеси.
4. Отпустите кнопку самоотчистки, как только вода в резервуаре закончится.
. 4.
Противоизвестковая система (Anti-Calc)
Утюг оборудован противоизвестковой системой (Anti-Calc). Благодаря её наличию снижается скорость
образования накипи.
Советы по эксплуатации
- Так как нагрев утюга происходит быстрее, чем его остывание, то рекомендуется начинать гладить с тканей
требующих низкую температуру глажения, например синтетические ткани.
-
Если ткань содержит несколько видов волокон, выбирайте температуру, для ткани которой в полотне наибольш
со
держание. Например: если в ткани содержится 60% полиэстера и 40% хлопка, вы должны выбрать температуру
соответствующую полиэстеру и гладить без пара.
-Так как на шёлке и некоторых других тканях в процессе глажения может появляться блеск, то гладить и
екомендуется с внутренней стороны. Для предотвращения окрашивания не распыляйте воду на шёлк и другие
р
ее
е
х
3
Page 10

деликатные ткани.
подачи пара
отпаривание
Синтетика
Шесть
Хлопок
0
MAX
Выбор температуры нагрева
Символ Тип ткани Температура
Регулятор
Интенсивное
Распылитель
Шёлк
X X V
X X V
Лён
V V V
Примечание: Данный символ означает, что ткань нельзя гладить
Примечание:“V” символ означает возможность использования;
“Х” символ указывает, что использование функции невозможно.
Спецификация.
Модель: USI-28
Напряжение: 230 В ~ 50 Гц
Мощность: 2200 Вт
Резервуар для воды: 350мл
0
лавный офис изготовителя: «ЮНИТ Хандельс ГмбХ» Австрия, Вена, А-1180, Герстхофер штрассе, 131
Г
Э
кспортер: «ЮНИТ Электроникс (ГК) Лимитед» 3905 Площадь Ту Эксчейньдж, Коннут
Плейс 8, Центральный, Гонконг Произведено в КНР
Х
ранение и эксплуатацию прибора производить в сухих отапливаемых помещениях при температуре не ниже
+5°С, относительной влажности не более 80%, при отсутствии в воздухе агрессивных примесей.
ри перевозке и хранении беречь от механических повреждений и иных вредоносных воздействий.
П
Р
емонт и восстановление прибора следует производить в специализированных мастерских, согласно
гарантийному талону.
оскольку производитель постоянно работает над совершенствованием своей продукции, дизайн и технические
П
характеристики могут быть изменены без предварительного уведомления. Товар сертифицирован.
4
 Loading...