

Page 1
Page 2

Page 3

Содержание / Contents
Description .................................................................................................5
Important safeguards ...............................................................................6
For the first time ........................................................................................7
Operation of the device ............................................................................8
Cleaning and maintenance .....................................................................12
Specifications ........................................................................................... 13
Устройство мясорубки ...........................................................................15
Меры предосторожности ..............................................................................16
Подготовка к эксплуатации .......................................................................... 17
Эксплуатация устройства ..............................................................................18
Чистка и уход .....................................................................................................22
Спецификация ..................................................................................................23
Page 4
Page 5
Meat Grinder | UGR-468
ENGLISH
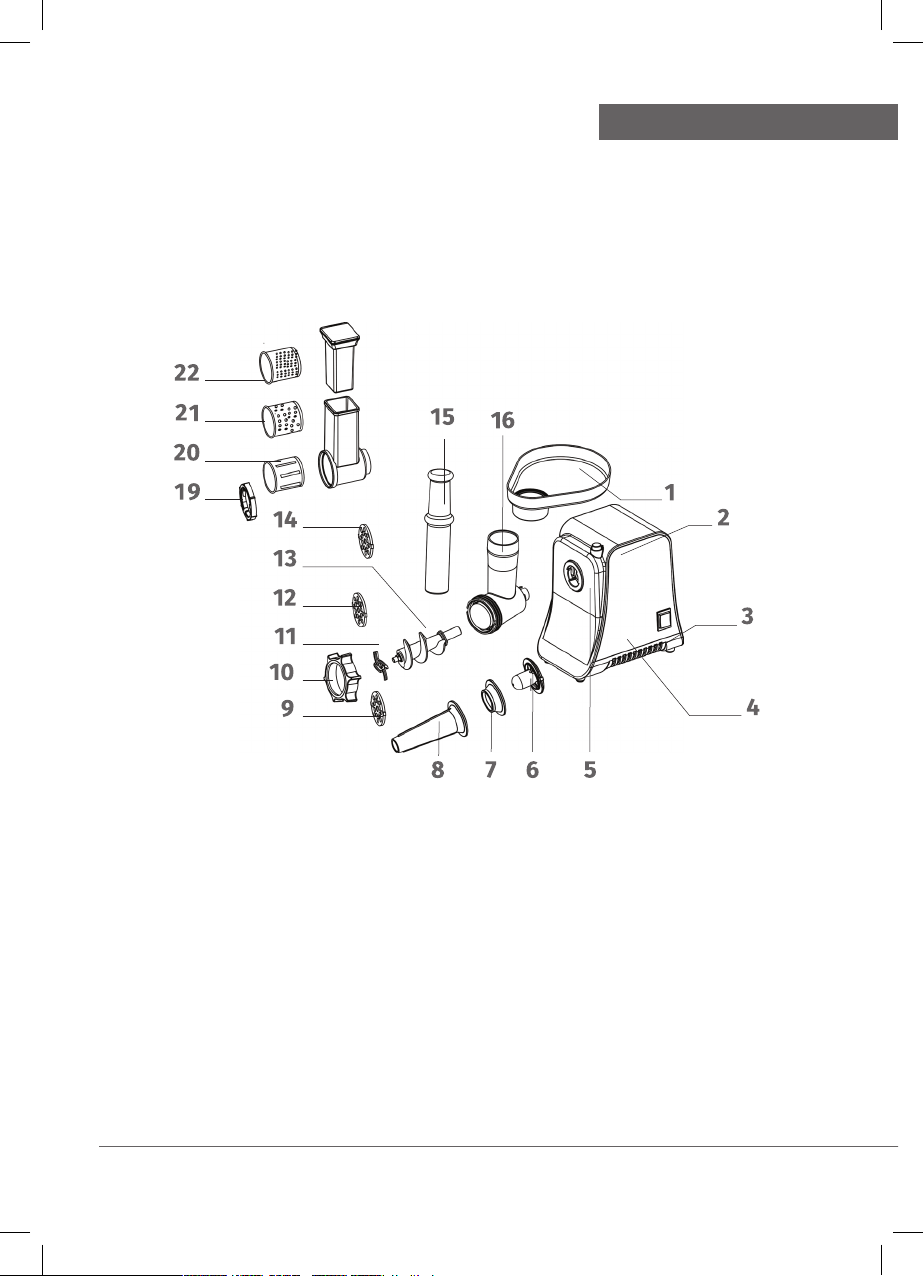
DESCRIPTION
1. Hopper plate
2. Lock button
3. Switch mode (ON/OFF/reverse rotation)
4. Body
5. Head inlet
6. Kubbe A
7. Kubbe B
8. Sausage
9. Cutting plate (coarse)
10. Fixing ring
11. Blade
12. Cutting plate (medium)
13. Snake
14. Cutting plate (fine)
15. Food pusher
16. Head
17. Shredding pusher
18. Shredding head
19. Fixing ring
20. Fine hole cone
21. Coarse hole cone
22. Sliced cone
5
Page 6

Meat Grinder | UGR-468
ENGLISH
IMPORTANT SAFEGUARDS
Dear customer!
Thank you for purchasing the meat grinder UNIT. Before operation, please care-
fully study this manual. This manual contains important safety instructions and
operation of the meat grinder and care for it.
1. The device intended for household use only. Do not use the device for industrial purposes.
2. Before connecting the instrument to the mains supply make sure that the
parameters of the power source meets the specified on the label of the
device.
3. Always disconnect meat grinder from the power outlet before installing or
removing accessories, and before cleaning the device.
4. When the device disconnected from the mains supply never pull the cord
the meat grinder, grasp only the plug.
5. Never use faulty device, including a damaged power cord or plug. If damaged
the power cord for replacement, contact an authorized service center of the
manufacturer.
6. Do not leave the appliance unattended.
7. Do not allow children to use the meat grinder without your supervision. Do
not allow children to play with the meat grinder.
8. During operation, do not allow that long hair, scarves or other items hanging
over the tray, grate, attachments and body an electric motor.
9. If the rotation of the auger of the meat grinder has stopped or is difficult,
first disconnect the appliance from the mains supply and then clean the
auger and blade from the products that block his movement.
10. Before you start to disassemble the meat grinder, wait when stop all of its
moving parts.
11. Do not immerse the body of the meat grinder with the motor or power cord
in water and do not wash them under the tap. Watch that moisture did not
get inside the body of the meat grinder.
12. It is prohibited to grind bones, nuts and other hard foods.
13. Do not overload the meat grinder. During the formation of the blockage
6
Page 7

Meat Grinder | UGR-468
ENGLISH
immediately stop the meat grinder and clean the auger and blade from food
residue.
14. This appliance is not intended for use by persons with reduced physical or
mental capabilities (including children), as well as those that do not have
sufficient knowledge and experience to operate the appliance, unless they
are not watching people responsible for their safety.
15. In the event of a fault, you should contact a authorized service centers.
16. Failure to comply with the precautions and safety could result in damage to
the instrument, injury, electric shock, short circuit or fire.
17. The manufacturer is not responsible for any damage resulting from improper use of its products or failure to comply with precautions and safety.
FOR THE FIRST TIME
Before using the meat grinder thoroughly wash all parts of the meat grinder that
come into contact with food, and then wipe them dry.
Before connecting the device to your network, make sure the button ON/0/R is
set to “OFF”(0).
7
Page 8
Meat Grinder | UGR-468
ENGLISH
OPERATION OF THE DEVICE
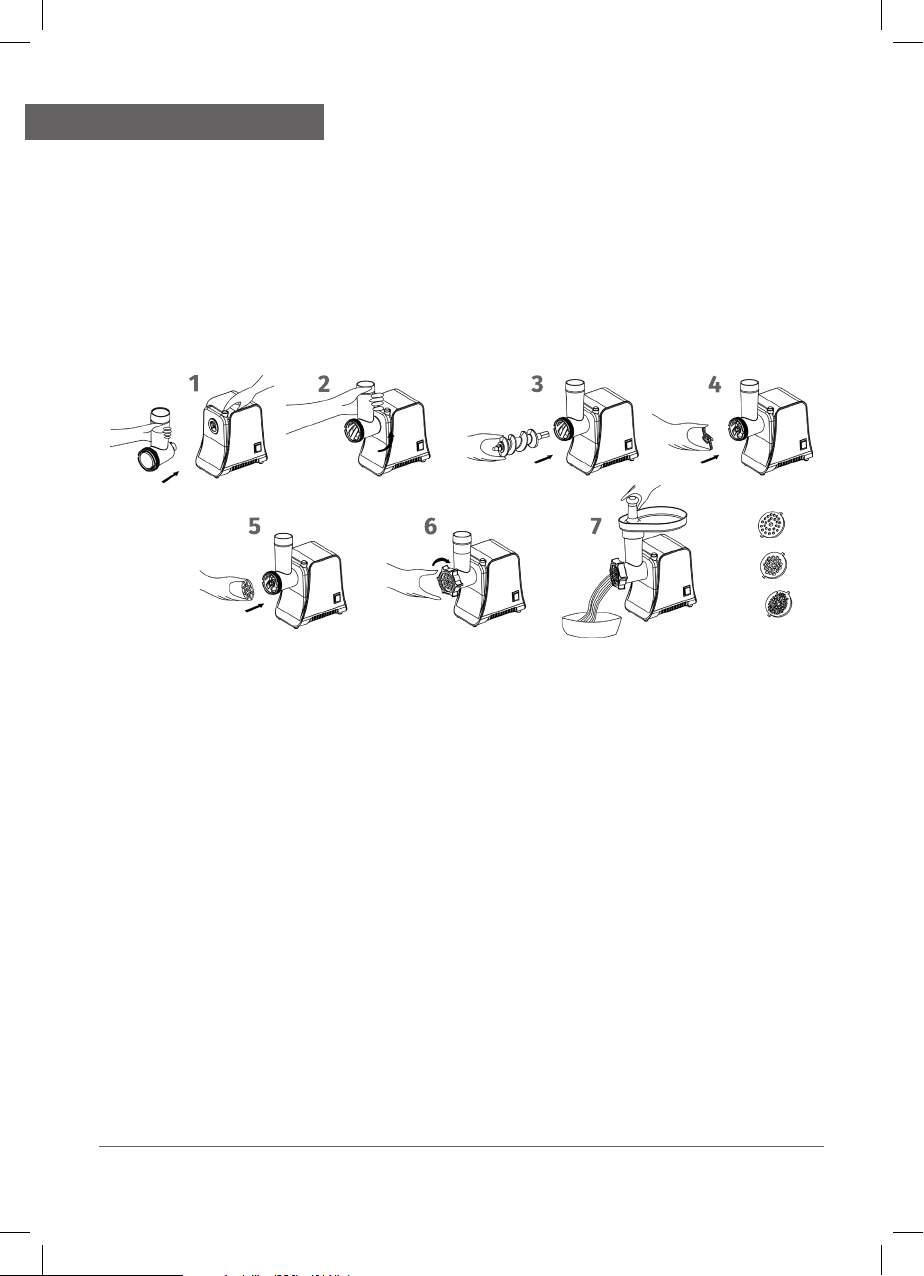
Assembly
1. Press the fasten button hold the head and insert it into the inlet (when
inserting plus pay attention the head must be slanted as per arrow indicated on the top, see fig.1), then move the head anticlockwise so that the head
being fastened tightly. There will be lock when you screwed to the handle.
(fig.2)
2. Place the snake into the head, long end first, and turn to feed the screw
slightly until it is set into the motor housing (fig.3).
3. Place the cutting blade onto the snake shaft with the blade facing the front
as illustrated (fig.4). If it is not fitted properly, meat will not be grinded.
4. Place the desired cutting plate next to the cutting blade, fitting protrusions
in the slot (fig.5).
5. Support or press the centre of the cutting plate with one finger then screw
the fixing ring tight with another hand (fig.6). Do not over tighten.
6. Place the hopper plate on the head and fix it into position (Fig. 7)
7. Install the assembled meat grinder on a firm and level surface. When, make
sure that air can freely approach the bottom and the sides of the housing to
ensure sufficient ventilation.
8
Page 9

Meat Grinder | UGR-468
ENGLISH
Meat processing
1. Plug the unit on and press the button ON/0/R to “ON” position.
2. Feed foods into the hopper plate. Use for it only the food pusher (fig.7).
3. After use switch the unit off and unplug it from the power supply.
Reverse function
In case of jamming switch off the appliance and then press button ON/0/R to
“R” position.
Snake will be rotating in the opposite direction, and the head will get empty.
If it does not work, switch off the unit and clean it.
Making kubbe
1. Place the snake into the head, long end first, and turn to feed the screw
slightly until it is set into the motor housing. Then install the nozzle for
kubbe (Fig. 8).
2. Install the fixing ring (Fig. 9).
3. Place the hopper plate on the head and fix it into position. Now the meat
grinder is ready for making kubbe. (Fig. 10). Note: for making kubbe you
should put into the meat grinder already made stuffing.
4. Cut the resulting hollow sausages to the length you need.
9
Page 10

Meat Grinder | UGR-468
ENGLISH
Making sausages
1. Place the snake into the head, long end first, and turn to feed the screw
slightly until it is set into the motor housing. Then place the cutting blade
onto the snake shaft with the blade facing the front. Place the desired cutting plate next to the cutting blade, fitting protrusions in the slot. Then put
on the sausage nozzle and tighten the fixing ring (Fig. 11).
2. Place the hopper plate on the head and fix it into position. Now the meat
grinder is ready for making sausages (Fig. 11).
3. Put the ingredients to prepare sausages into the hopper.
4. Use the pusher to put the meat into the head.
5. To make the filling of natural casing with minced meat easier, soak it in cold
water for 10 minutes, then rinse thoroughly inside and out.
10
Page 11

Meat Grinder | UGR-468
ENGLISH
Shredder attachment
Press the release button while holding the head, insert it into the hole of the
holder (when mounting pay attention that the head should be tilted according
to the arrow), then move the head anticlockwise so that it is firmly in place.
Install one of the drums of graters or shredding.
Note: To hold the drum and tighten the retaining ring.
Install switch ON/0/R to the “ON” position. To push ingredients through the
chute, use the pusher.
After use, switch off meat grinder and disconnect it from the mains.
11
Page 12

Meat Grinder | UGR-468
ENGLISH
CLEANING AND MAINTENANCE
Disassembly
1. Make sure that the motor has stopped completely. Disconnect the plug from
the power outlet.
2. Disassemble by reversing the steps from 1-6 pictures.
3. To remove the cutting plate easily, place a screwdriver between the cutting
plate and the head and lift it up.
4. Press the fasten knob move the head as per direction. Then you can take
out the head.
Cleaning
5. Remove the remains of meat from the meat grinder.
6. Rinse each piece in warm water with detergent. Wait when they dry completely. Do not use detergents content of chlorine.
7. Do not immerse the body of the meat grinder in water and do not allow
liquid inside of it.
8. For cleaning, do not use strong chemical solvents.
9. Gently wipe the housing of the meat grinder well wrung out damp cloth
12
Page 13

SPECIFICATIONS
Power supply ....................................... 220-240 V ~ 50 Hz
Power ............................................................................. 600 W
Max. Power ................................................................. 1800 W
The head office of the manufacturer : «UNIT Handelsgesellschaft G.m.b.H.»
131, Gersthofer Str., A-1180, Vienna, Austria
Exported by: «UNIT Electronics (H. K.) Limited»
3905 Two Exchange Square, 8 Connaught Place, Central, Hong Kong
Made in People’s Republic of China (P.R.C.)
This appliance is to be stored and used under the following conditions: temperature – not less than
+5°C; relative humidity - not higher than 80%; aggressive impurities in the air: not allowable.
As the Manufacturer is constantly working on the improvement of its products, the design and
technical specifications are subject to change without prior notice.
Page 14

Page 15

Мясорубка | UGR-468
RUSSIAN
УСТРОЙСТВО МЯСОРУБКИ
1. Лоток
2. Кнопка фиксации камеры мясорубки
3. Переключение режимов (ON/0/R)
4. Корпус
5. Отверстие для установки камеры
6. Куббе A
7. Куббе B
8. Насадка для колбас
9. Сетка (крупная)
10. Крепёжное кольцо
11. Нож
12. Сетка (средняя)
13. Шнек
14. Сетка (мелкая)
15. Толкатель мясорубки
16. Камера мясорубки
17. Толкатель тёрки
18. Насадка для тёрки
19. Крепежное кольцо
20. Барабан для мелкой тёрки
21. Барабан для крупной тёрки
22. Барабан для шинковки
15
Page 16

Мясорубка | UGR-468
RUSSIAN
МЕРЫ ПРЕДОСТОРОЖНОСТИ
Уважаемый покупатель!
Благодарим вас за приобретение мясорубки UNIT. Перед началом эксплуатации, пожалуйста, внимательно, изучите настоящую инструкцию. Данное
руководство содержит важные указания по безопасности, эксплуатации
мясорубки и по уходу за ней.
1. Устройство предназначено только для домашнего использования. Не
допускается использование устройства в промышленных целях.
2. Перед включением прибора в сеть электропитания убедитесь, что параметры вашей электросети соответствует указанным на наклейке устройства.
3. Всегда отключайте мясорубку от электросети перед установкой или снятием аксессуаров, а также перед чисткой устройства.
4. При отключении устройства от электросети не тяните за шнур мясорубки, беритесь только за сетевую вилку.
5. Запрещается использовать неисправный прибор, в том числе с поврежденным сетевым шнуром или вилкой. Если поврежден сетевой шнур,
для его замены обратитесь в авторизованный сервисный центр производителя.
6. Не оставляйте работающий прибор без присмотра.
7. Не позволяйте детям использовать мясорубку без вашего присмотра. Не
позволяйте детям играть с мясорубкой.
8. Во время работы с прибором не допускайте, чтобы длинные волосы,
шарф или другие предметы свисали над лотком, решеткой, насадками и
корпусом с электродвигателем.
9. Если вращение шнека мясорубки прекратилось или затруднено, сначала
отключите прибор от электросети и только потом очистите шнек и нож
от продуктов, которые блокируют его движение.
10. Перед тем как начать разбирать мясорубку, дождитесь остановки всех ее
движущихся деталей.
11. Запрещается погружать корпус мясорубки с двигателем или сетевой
16
Page 17

Мясорубка | UGR-468
RUSSIAN
шнур в воду и мыть их под краном. Следите, чтобы влага не попадала
внутрь отсека двигателя.
12. Запрещается измельчать кости, орехи и другие твердые продукты.
13. Не перегружайте мясорубку. При образовании засора немедленно остановите мясорубку и очистите шнек или нож от остатков продуктов.
14. Данный прибор не предназначен для использования лицами с ограниченными физическими или умственными возможностями (в т.ч. детьми),
а также лицами, не имеющими достаточных знаний и опыта работы с
электроприборами, если за ними не присматривают люди, ответственные за их безопасность.
15. В случае возникновения неисправностей следует обращаться в авторизованные сервисные центры. Неквалифицированный ремонт снимает
прибор с гарантийного обслуживания.
16. Несоблюдение мер предосторожности и безопасности может привести
к порче прибора, травмам, поражению электрическим током, короткому
замыканию или пожару.
17. Производитель не несет ответственности за какие-либо повреждения,
возникшие вследствие неправильного использования прибора или
несоблюдения мер предосторожности и безопасности.
18. Храните прибор в чистом и сухом состоянии в недоступном для детей
сухом и прохладном месте.
ПОДГОТОВКА К ЭКСПЛУАТАЦИИ
Перед первым использованием мясорубки тщательно вымойте все детали
мясорубки, которые контактируют с продуктами, а затем вытрите их насухо.
Перед подключением устройства к сети убедитесь, что кнопка ON/0/R находится в положении “0” «Отключено».
17
Page 18

Мясорубка | UGR-468
RUSSIAN
ЭКСПЛУАТАЦИЯ УСТРОЙСТВА
Сборка
1. Нажмите кнопку фиксации камеры мясорубки, возьмите камеру мясорубки и под
уклоном вставьте ее в отверстие для установки на корпусе (Рис. 1). Поворачивайте камеру мясорубки против часовой стрелки, как показано на рисуке 1, пока
не услышите щелчок (Рис. 2). Теперь камера мясорубки надежно прикреплена
к её корпусу. Слегка покачайте камеру мясорубки, чтобы убедиться, что она
надежно держится.
2. Вставьте шнек в камеру мясорубки длинным концом внутрь. Слегка поворачивайте шнек, чтобы зафиксировать его в корпусе мясорубки (Рис. 3).
3. Наденьте нож на посадочное место шнека режущей стороной наружу (Рис. 4).
Если нож установлен неправильно, мясо не будет измельчаться.
4. Установите решетку нужного типа следом за ножом, убедитесь, что выступы на
камере совпадают с пазами решетки (Рис. 5).
5. Удерживая решетку (нажимая по центру) одним пальцем, плотно закрутите крепежное кольцо другой рукой (Рис. 6). Не закручивайте кольцо слишком сильно.
6. 6. Сверху на загрузочную горловину камеры мясорубки установите лоток и
закрепите его (Рис. 7).
7. 7. Установите собранную мясорубку на твердую и ровную поверхность. При
этом убедитесь, что воздух может свободно подходить к нижней и боковым сторонам корпуса с электродвигателем для обеспечения достаточной вентиляции
18
Page 19

Мясорубка | UGR-468
RUSSIAN
Работа с мясом
1. Подключите устройство к электросети и переведите кнопку ON/0/R в
положение “ON” («Включено»).
2. Расположите подготовленные кусочки мяса на лотке. Для проталкивания их в желоб мясорубки используйте толкатель (Рис.7).
3. После использования выключите мясорубку и отключите её от электросети.
Использование реверса
При необходимости вы можете воспользоваться функцией реверса, если
возникнут проблемы с прохождением продуктов через мясорубку.
Выключите мясорубку. Затем переведите кнопку ON/0/R в положение
“R” («Реверс»). Шнек станет вращаться в противоположную сторону,
что позволит избавиться от возникшего затора. Если это не поможет, то
отключите устройство и прочистите его вручную.
Приготовление кеббе
1. Вставьте шнек в камеру мясорубки длинным концом внутрь. Слегка
поворачивайте шнек, чтобы зафиксировать его в корпусе мясорубки.
Далее установите насадку для кеббе (Рис. 8).
2. Установите крепежное кольцо (Рис. 9).
3. Сверху на загрузочную горловину камеры мясорубки установите лоток и
закрепите его. Теперь прибор готов для приготовления кеббе (Рис. 10).
Примечание: для приготовления кеббе в мясорубку закладывается уже
готовый фарш.
4. Нарежьте получившиеся полые колбаски необходимой Вам длины.
19
Page 20

Мясорубка | UGR-468
RUSSIAN
Приготовление колбас
1. Вставьте шнек в камеру мясорубки длинным концом внутрь. Слегка
поворачивайте шнек, чтобы зафиксировать его в корпусе мясорубки.
Далее наденьте нож на посадочное место шнека режущей стороной наружу. Установите решетку нужного типа следом за ножом, убедитесь, что
выступы на камере совпадают с пазами решетки. Затем наденьте насадку для колбас и плотно закрутите крепежное кольцо (Рис. 11).
2. Сверху на загрузочную горловину камеры мясорубки установите лоток и
закрепите его. Теперь прибор готов для приготовления колбас (Рис. 11).
3. Поместите ингредиенты для приготовления колбас в лоток.
4. Используйте толкатель, чтобы аккуратно протолкнуть мясо в загрузочную горловину.
5. Чтобы было проще наполнять натуральную оболочку фаршем, замочите
ее в холодной воде на 10 минут, а затем тщательно промойте внутри и
снаружи.
20
Page 21

Мясорубка | UGR-468
RUSSIAN
Использование насадки для тёрки
Нажмите кнопку фиксации, удерживая насадку, установите её в отверстие
держателя (при установке обратить внимание, что насадка должна быть
наклоненной), затем переместите насадку против часовой стрелки таким
образом, чтобы она плотно встала на место.
1. Установите один из барабанов для тёрки или шинковки.
2. Примечание: Для удержания барабана закрутите крепёжное кольцo.
3. Установите переключатель ON/0/R в положение “ON” («Включено»). Для
проталкивания ингредиентов по желобу используйте толкатель.
4. После использования выключите мясорубку и отключите её от электросети.
21
Page 22

Мясорубка | UGR-468
RUSSIAN
ЧИСТКА И УХОД
Разборка
1. Убедитесь в том, что мясорубка выключена, и её двигатель не работает.
Отключите мясорубку от электросети.
2. Разберите мясорубку в прядке, обратном указанному на рисунках 1 – 6
3. Чтобы легко снять сетку, можно воспользоваться отвёрткой.
4. Нажмите кнопку фиксации и поверните насадку, после чего сможете
легко снять ee.
Чистка
1. Удалите остатки мяса из мясорубки.
2. Промойте каждую часть в тёплой воде с моющим средством. После чего
дайте им полностью высохнуть. Не используйте моющие средства содержащие хлор.
3. Не опускайте корпус мясорубки в воду и не допускайте попадания внутрь
него жидкости.
4. Для чистки не используйте сильнодействующие химические растворители.
5. Аккуратно протрите корпус мясорубки хорошо выжатой влажной тряпкой.
22
Page 23

СПЕЦИФИКАЦИЯ
Напряжение питания ......................................................................... 220-240 ~ 50 Гц
Номинальная мощность ..................................................................................... 600 Вт
Максимальная мощность ................................................................................. 1800 Вт
Главный офис изготовителя: «ЮНИТ Хандельс ГмбХ»
Австрия, Вена, А-1180, Герстхофер штрассе, 131
Экспортер: «ЮНИТ Электроникс (ГК) Лимитед» 3905 Площадь Ту Эксчейньдж,
Коннут Плейс 8, Центральный, Гонконг. Произведено в КНР
Хранение и эксплуатацию прибора производить в сухих отапливаемых помещениях при
температуре не ниже +5°С, относительной влажности не более 80%, при отсутствии в воздухе
При перевозке и хранении беречь от механических повреждений и иных вредоносных
Ремонт и восстановление прибора следует производить в специализированных мастерских,
Поскольку производитель постоянно работает над совершенствованием своей продукции,
дизайн и технические характеристики могут быть изменены без предварительного
агрессивных примесей.
воздействий.
согласно гарантийному талону.
уведомления. Товар сертифицирован.
Page 24

 Loading...