

Page 1

CoEx®
Coffee machine
Users manual
Brewing system: CoEx brewer
Control system: MoVeC 2000
Machine type: 9CND…
Revision H, English
Reference: 5DUCH20m
Your supplier is:
The manufacturer of the machine is:
De Jong Duke
Postbus 190
3360 AD SLIEDRECHT
The Netherlands
Telephone +31 (0) 184 496767 www.dejongduke.nl
Fax: +31 (0) 184 416059 [email protected]
Page 2

2
Copyright © 2004, J.M. de Jong Duke automatenfabriek b.v.
All rights reserved.
Although this user manual has been put together with the utmost care, J.M. de
Jong Duke automatenfabriek b.v. accepts no liability for inaccuracies or
omissions. No liability is accepted for the consequences arising from operation of
the equipment in accordance with the information contained in these instructions.
J.M. de Jong Duke automatenfabriek b.v. Reserves the right to alter specifications
at any time and without prior notification to the purchaser.
Preface
This user’s manual is valid for the machine supplied by the manufacturer,
including the options installed by the manufacturer. The manufacturer accepts no
liability for any damage resulting from incorrect or improper use of the machine,
or resulting from modifications that have not been authorised by the
manufacturer.
This manual gives instructions on the operation and maintenance of the machine.
Moreover, it gives solutions to simple malfunctions that may occur. The
instructions in some paragraphs are meant only for persons who are trained in
the operation and maintenance of the machine.
Besides this manual, a technical manual is also available. This technical manual
gives directions to solving machine malfunctions and the repairing of the
machine. For instructions on the installation of the machine, a separate
installation manual is available.
Always apply the original parts of the manufacturer when the machine needs to
be repaired.
Carefully read this instruction manual before you operate the machine.
Keep this manual on a safe place for possible later reference.
Only properly trained personnel may carry out repairs, install the machines or
transport the machines.
The manual cannot be regarded as a replacement of the training and instruction,
but must be seen as an addition to the training, and as a reference work.
Page 3

3
CONTENTS
1
SAFETY ..............................................................................................4
1.1 SAFETY AND WARNINGS ......................................................................4
1.2 STANDARDS AND NORMS .....................................................................4
1.3 SAFETY RISKS ................................................................................. 4
2 DESCRIPTION OF THE MACHINE........................................................ 5
2.1 GENERAL .......................................................................................5
2.2 THE FRONT OF THE MACHINE................................................................. 5
2.3 OVERVIEW OF THE MACHINE INTERIOR......................................................5
2.4 SERVICE PANEL AND DISPLAY ................................................................6
2.5 TYPE PLATE..................................................................................... 6
2.6 TECHNICAL SPECIFICATIONS .................................................................7
3 BEFORE USAGE ..................................................................................8
3.1 INSTALLATION .................................................................................8
3.2 OPERATION PLACE............................................................................. 8
3.3 PUTTING THE MACHINE OUT OF ORDER......................................................8
4 OPERATION .......................................................................................9
4.1 OPERATION THE MACHINE IN FREE VEND MODE ............................................9
4.2 OPERATING THE MACHINE IN PAY MODE ....................................................9
4.3 JUG DISPENSING .............................................................................. 9
4.4 READING OUT THE COUNTERS.............................................................. 10
5 MAINTENANCE AND FILLING ...........................................................11
5.1 DAILY MAINTENANCE........................................................................ 11
5.2 WEEKLY MAINTENANCE ..................................................................... 13
5.3 MONTHLY MAINTENANCE.................................................................... 14
5.4 FILL UP CANISTERS.......................................................................... 16
5.5 REMOVAL OF THE BREWER.................................................................. 17
5.6 REPLACE THE BREWER ...................................................................... 17
5.7 REMOVAL OF THE TEA BREWER (IF APPLICABLE) ......................................... 18
5.8 REPLACE THE BREWER ...................................................................... 18
5.9 DISASSEMBLING THE MIXING SYSTEM..................................................... 19
5.10 REPLACE THE MIXING BOWLS .............................................................. 19
6 FAILURE / ERROR MESSAGES ..........................................................20
Page 4

4
1 Safety
1.1 Safety and warnings
• Keep this manual near the machine, so the manual is directly available.
• Do not use aggressive cleaning products or abrasives to clean (parts of)
the machine.
• The water connection must be conform national regulations.
• Clean the machine with fresh hygienic water.
• The water system (boiler, pipes, etc.) may contain hot water, be careful!
• Do not shake the machine while in use.
• Do not use water in or near the machine unless the instructions contain
explicit directions to the contrary.
• Do not use a damaged machine. If in doubt, contact your supplier first.
• Damaged water connection tubes may only be repaired by trained
personnel.
• If a fault occurs, disconnect the machine from the electricity supply and
from the water supply.
• Do not lean on the door when open.
• Do not use an extension cable.
• Use the machine only on areas where trained personnel can have attention
to the usage.
1.2 Standards and norms
The machine is build according the CE norms
The machine complies with the following standards:
• Machine standard: 89/392/EEG
• EMC standard: 89/336/EEG,
The machine complies with the following norms:
• EN 292: safety of machines.
• UL and Cul 751: norm vending machines (only if sign is on type plate)
1.3 Safety risks
The important safety risks by using this machine:
- Hot drinks coming out of the machine, look out for scald your self.
- By not correct placed cups or jugs the machine will throw the drinks out to
the front.
- The outlet of the machine can give some drops hot liquid without taking
consumptions.
Page 5
5
2 Description of the machine
2.1 General
The machine is a compact semi-automatic machine for the preparation and
vending of hot drinks. Your supplier can adjust the taste and sizes of the drinks.
2.2 The front of the machine
With the operating panel of the door, the machine can be operated. By pushing
one of the keys, a product choice can be made. Only the lighted keys are
available to make a choice. Before you make a choice, a cup must be placed
under the tap first.
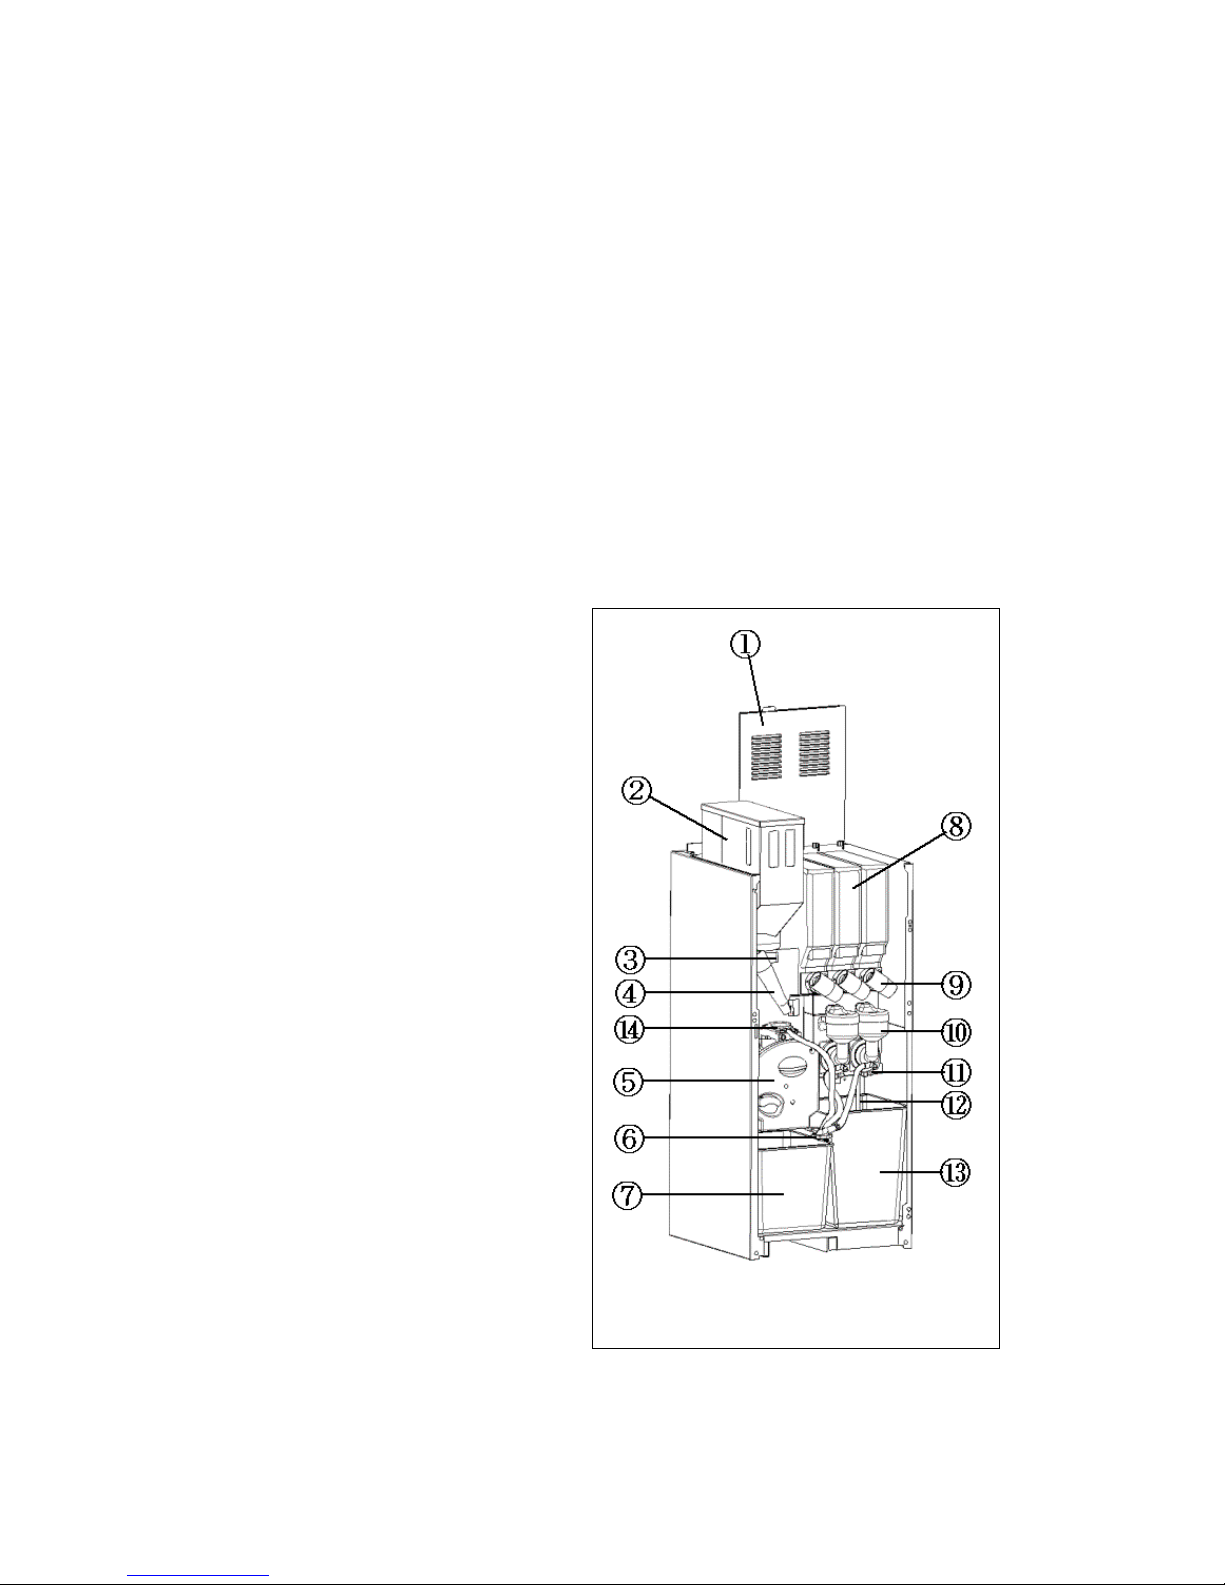
2.3 Overview of the machine interior
1. Lid
2. Coffee beans canister
3. Grinder (if applicable)
4. Grinder outlet
5. Brewer system (CoEx-brewer)
6. Outlet arm
7. Drip tray
8. Canisters
9. Product outlet nozzle
10. Mixing bowl
11. Bayonet-catch mixer
12. Waste bucket sensor
13. Waste bucket
14. Upper piston (filter)
Page 6
6
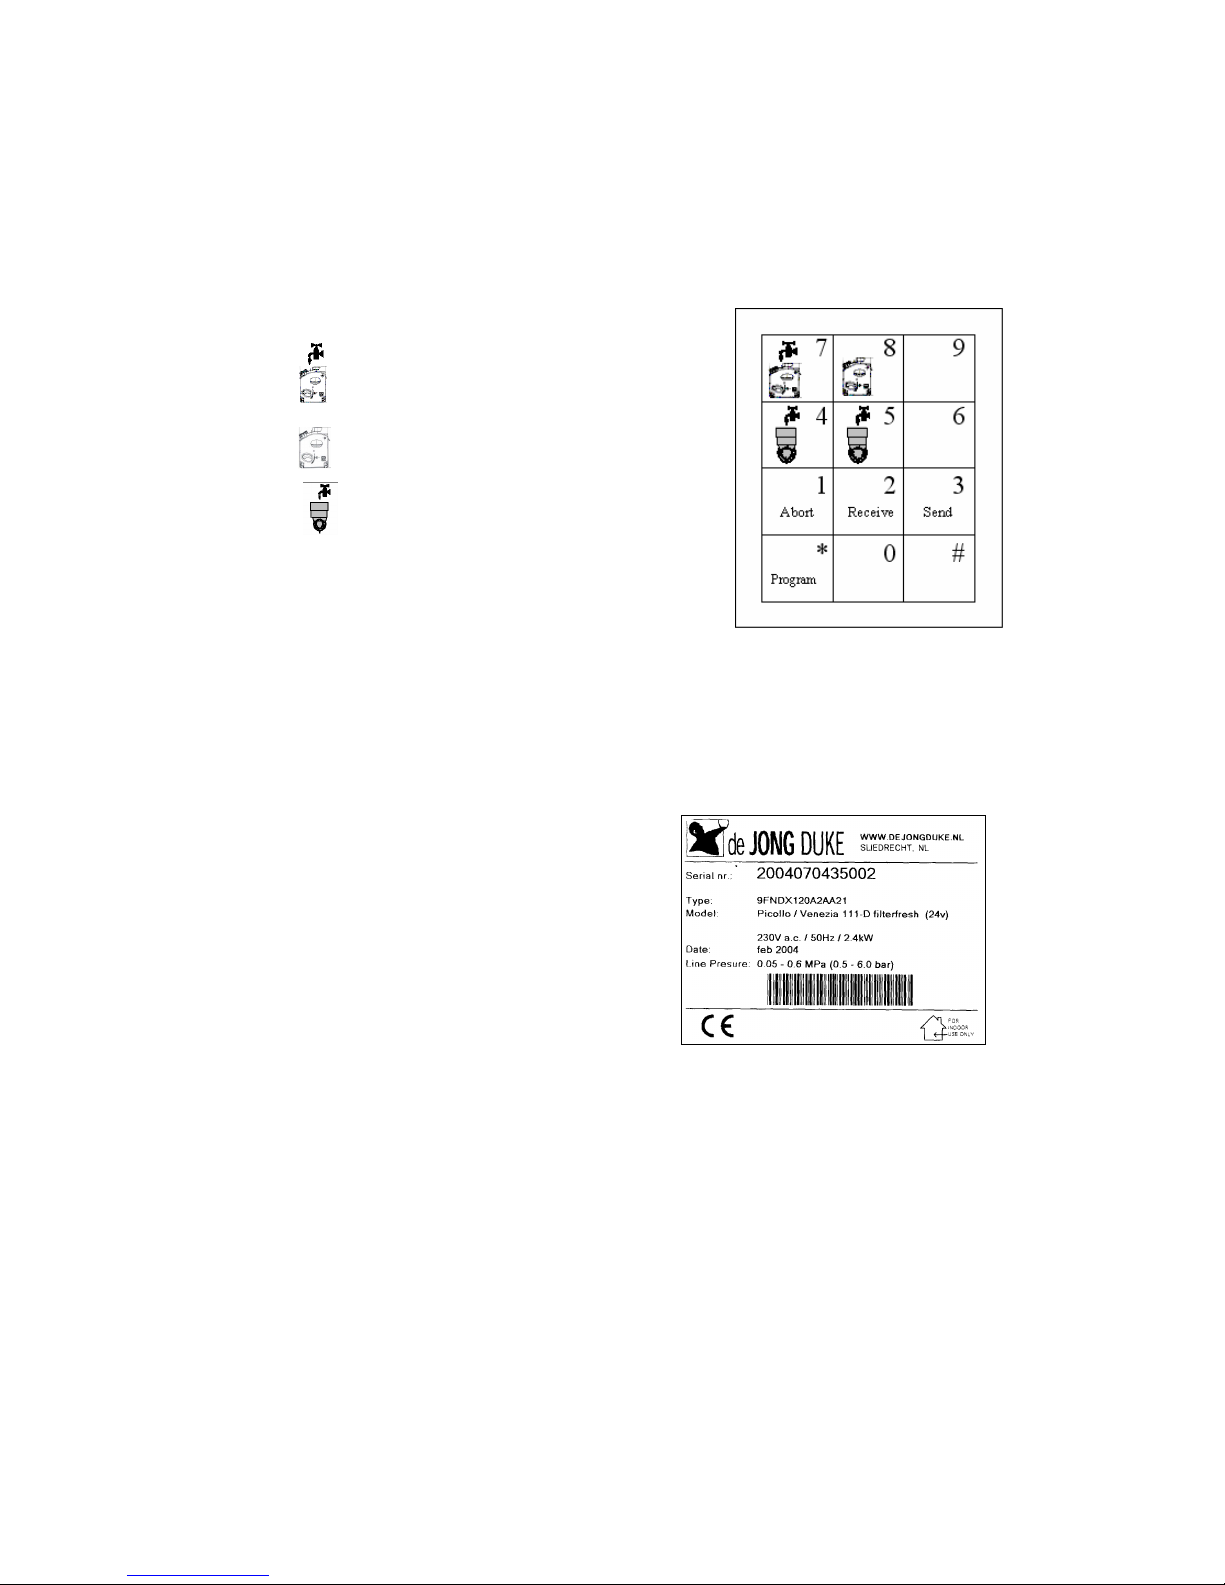
2.4 Service panel and display
The service panel is placed at the interior of the door. This panel is used to
change the settings of the machine. Moreover, the service panel is used to let the
machine perform certain operations necessary for maintenance.
Key * = program key
Key = rinse brewer
Key = run brewer
Key = rinse mixer
On the display of the machine, the settings can be
shown, as well as the error messages and counter
read-outs.
2.5 Type plate
The type plate is mounted on the inside of the machine, left at the top.
The following data are on the type plate:
• Name of manufacturer
• Serial number
• Type/model specification
• Date of construction
• Water connection
Page 7

7
2.6 Technical specifications
Dimensions of the Type 0 machine:
height 795 mm
width 370 mm
depth 530 mm
Weight (empty): +/- 55 kg
Electricity:
Mains supply: 230 Volt AC +/- 10%
frequency: 50 Hz +/- 2%
max. capacity: 2,9 kW
Water pressure:
Minimum: 90 kPa (0,9 bar)
Maximum: 600 kPa (6,0 bar)
Water connection: ¾ BSP connection
Sound pressure: < 70 dB(A)
Ambient temperature in use: 5°C tot +40°C
Ambient temperature in storage: +10°C tot +50°C
Page 8

8
3 Before usage
3.1 Installation
Installation, transportation and adjustment of the machine is specialised work.
Properly trained service personnel should only carry this out.
For instructions about transportation, unpacking and installation of the machine,
see the technical manual.
3.2 Operation place
These machines may only be used inside, in a hygienic dry room, with a
temperature between 5 and 40 degrees Celsius.
Place the machine on a flat, stable surface.
3.3 Putting the machine out of order
If the machine will not be used for some period of time (for example during the
weekend) it is recommended to switch off the water supply and the electricity
(pulling the plug from the socket is sufficient). This will prevent unnecessary use
of energy.
Page 9

9
4 Operation
4.1 Operation the machine in free vend mode
1. Place a cup under the outlet on the cup stand.
All consumptions are dosed on the left cup stand except the selections
hot water and chilled water.
2. Set the desired coffee strength with the strength control buttons.
3. Select your desired drink.
4. Continue with step 5 if the machine is provided with a start-button. If no
start-button is present, the machine will start preparing the drink directly.
Your consumption is ready after the beep.
5. The start-button and the selection buttons of possible additional products
start to blink.
6. Select an additional product (milk or sugar).
7. Press start.
8. After operating the start button, the machine prepares your drink and
dispenses it in the cup.
9. Your drink is ready after the beep.
4.2 Operating the machine in pay mode
In pay mode first insert the required money and continue with step 1 of the free
vend operation.
4.3 Jug dispensing
1. Move the cup stand upwards and place a jug under the outlet.
2. Place the key in the key switch and turn it clockwise.
3. Press the jug button.
4. Set the jug size with the jug button.
5. Select the drink and press the start button.
6. The machine dispenses the selected drink into the jug. (Cancel the jug
function by pressing the selection button again or the cancel button if
available)
7. Your drink is ready after the beep.
8. Remove the key from the key switch and the jug facility is blocked.
Page 10
4
5 6
7 8 9
Send
0
1
2 3
#
*
Receive
Program
Abort
4.4 Reading out the counters
For reading out the counter scores via the service panel, the machine has to be
switched on.
The machine has 3 counter types:
- Total counter (counts all consumptions)
- Free counters (counts consumptions in free mode)
- Pay counters (counts consumptions in pay mode)
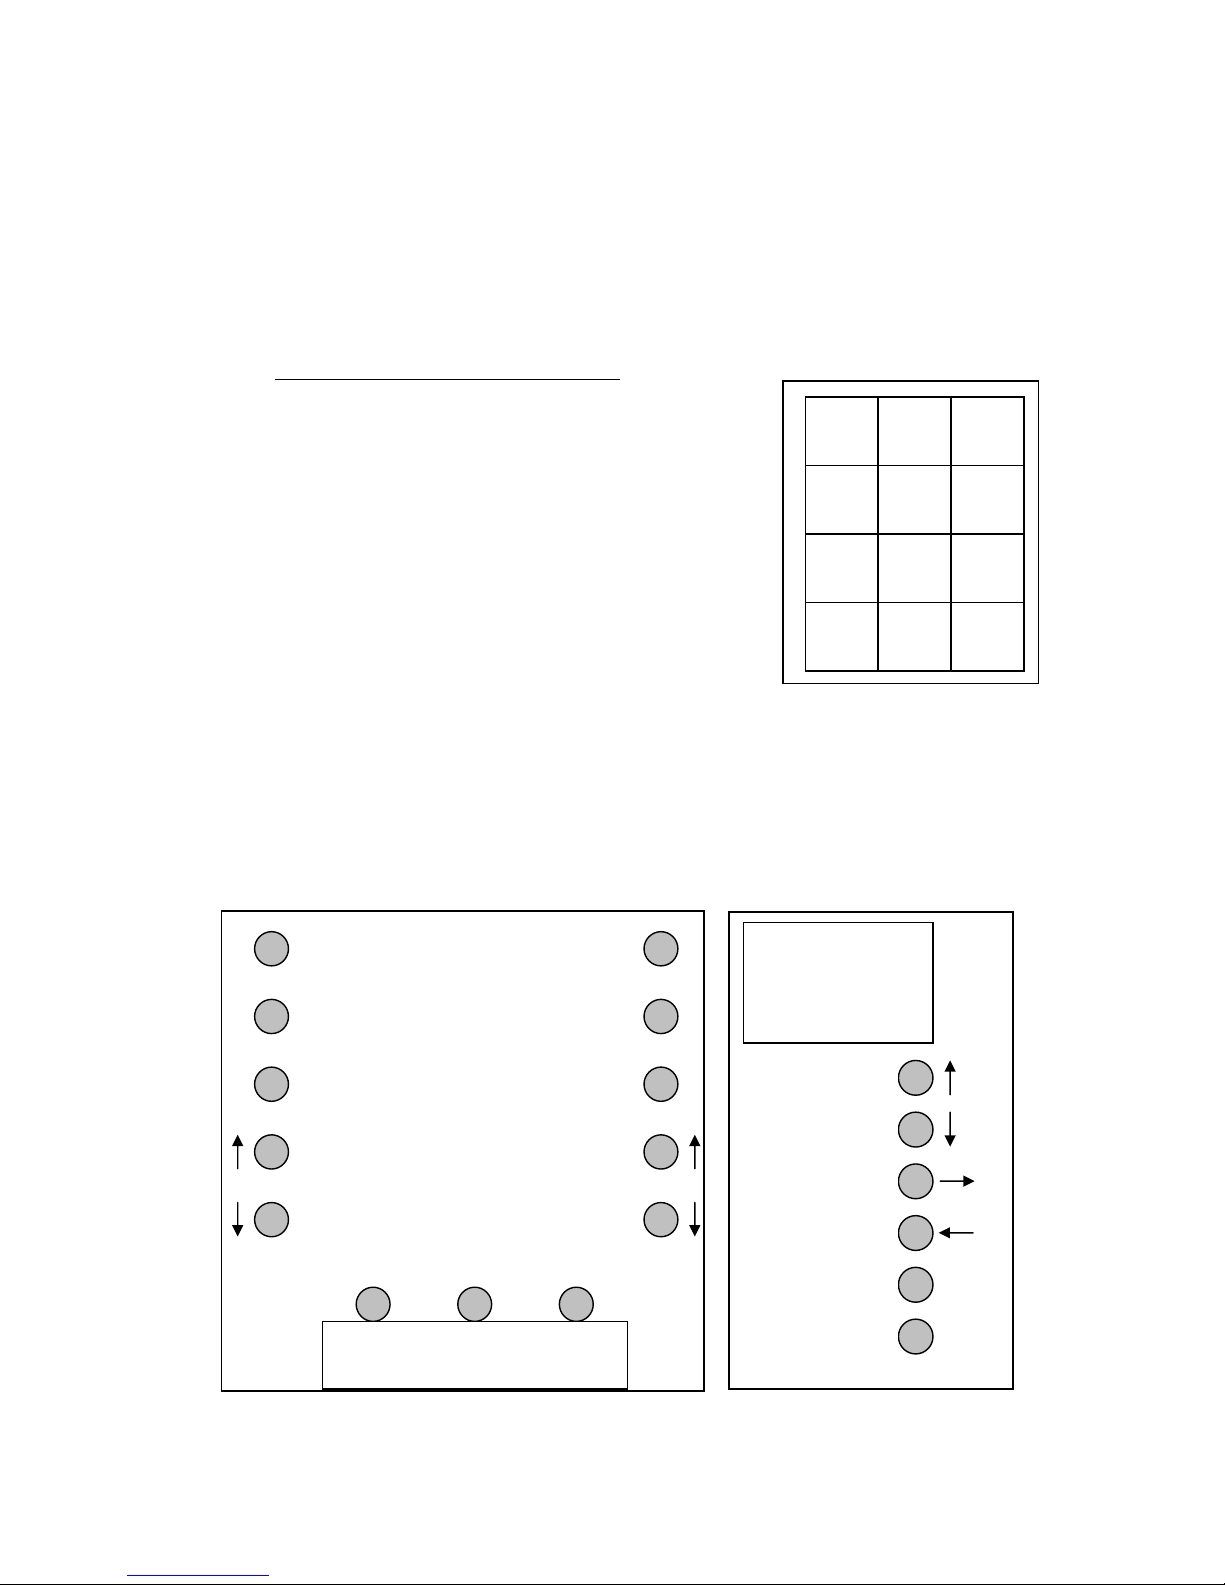
4.4.1 Example of reading out the counters
1. Press the program (*) key on the service key
board twice.
2. The selection keys on the front panel have now
the functions: µ(scroll-up), ¶(scroll-down),
´(enter) and ³(Escape).
3. Select with the µ(scroll-up) and ¶(scroll-down)
keys the item “counters” and press ´(enter).
4. Select “recipe counters” and press enter again.
5. In the display are shown the paid, free and total
consumptions.
6. Select the free or paid counters to show detailed
information. Example: Select “free counters” and
press enter.
7. Scroll with µ(scroll-up) and ¶(down) keys through the consumption
counters.
8. Press ³(Escape) to leave the menu ³(Escape).
The machine can be equipped with EVA-DTS communication, herewith you can
download the counter information with a terminal or counter card. Ask your
supplier for more information.
The front panels:
Password:
Escape enter escape
Escape
enter
Password:
1
2 3 4
5
6
Page 11
11
5 Maintenance and filling
5.1 Daily maintenance
Not performing the daily maintenance work has a harmful influence on the quality
of the products and can lead to malfunctioning of the machine.
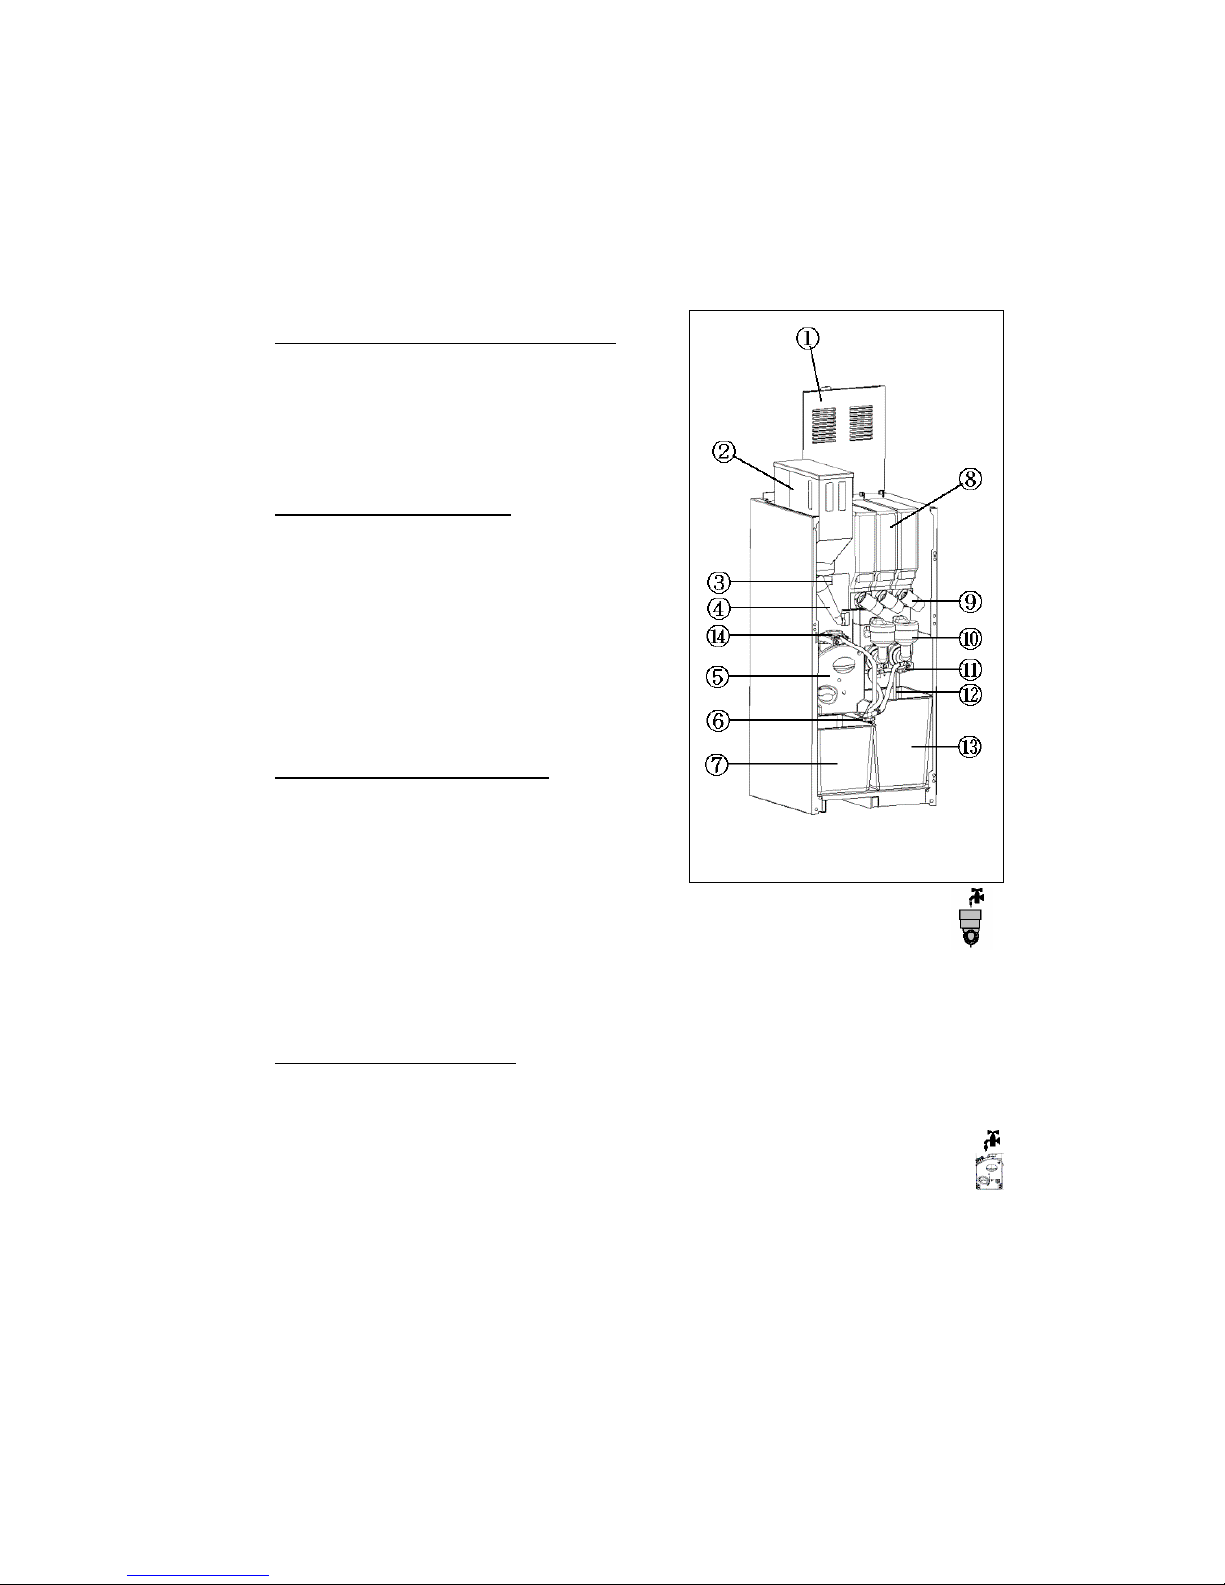
5.1.1 Cleaning the outside of the machine
Clean the outside of the machine with a soft
damp cloth.
5.1.2 Cleaning the outlet pipes
1. Open the door of the machine.
2. Remove the outlet pipes from the
canisters.
3. Clean the outlet pipes of the canister
with a dry brush. Be sure that they are
dry when placed back.
4. Mount the parts back on the canister.
5.1.3 Flushing of the mixer system
1. Open the door of the machine.
2. Switch the machine on.
3. Place a jug underneath the nozzle for
coffee to collect the hot water.
4. Push the key rinse mixer of the service panel. Hot water from the
boiler is dosed in the mixing bowl of the (left) mixing system, as
long as key 4 is held.
5. Hold the key until clean water is coming out of the machine.
6. Close the door of the machine.
5.1.4 Flushing the CoEx brewer
1. Open the door of the machine.
2. Switch the machine on.
3. Place a jug underneath the brewer outlet to collect the warm water.
4. Push the rinse brewer key on the service panel. Hot water from the
boiler is flowing through the CoEx-brewer.
5. Repeat the flushing until clean water is coming out of the brewer. The
brewer has then been flushed sufficiently.
6. Close the door of the machine.
Page 12
12
5.1.5 Flush tea brewer
(if applicable)
1. Open the door of the machine.
2. Switch the machine on.
3. Place a jug underneath the outlet to collect the warm water.
4. Push the key rinse tea brewer of the service panel. Hot water from
the boiler is flowing through the tea brewer.
5. Repeat the flushing until clean water is coming out of the brewer. The
brewer has then been flushed sufficiently.
6. Close the door of the machine.
5.1.6 Empty waste bucket and internal drip tray
1. Open the door of the machine and switch the machine off. (Also if the
waste container is in the base cabinet.)
2. Take out the waste container and empty it.
3. Clean the bottom of the machine with a dry brush or, if necessary, with a
wet brush.
4. Place back the waste container. Pay attention that the waste container
sensor is above or in the waste container.
5.1.7 Empty the drip tray
1. Open the door of the machine.
2. Remove the drip tray and the grid.
3. Rinse the grid and drip tray in warm water.
4. Replace the drip tray and grid.
5.1.8 Clean the cup stand
1. Open the door of the machine.
2. Clean the cup stand with warm water.
5.1.9 Check
Check if there are still enough ingredients in the canisters. If necessary fill up
the canisters.
Page 13
13
5.2 Weekly maintenance
Not performing the weekly maintenance work has a harmful influence on the
quality of the products and can lead to malfunctioning of the machine.
Apart from the daily maintenance, the following tasks have to be performed
weekly to ensure a correctly operating machine and an optimal quality of the
consumptions.
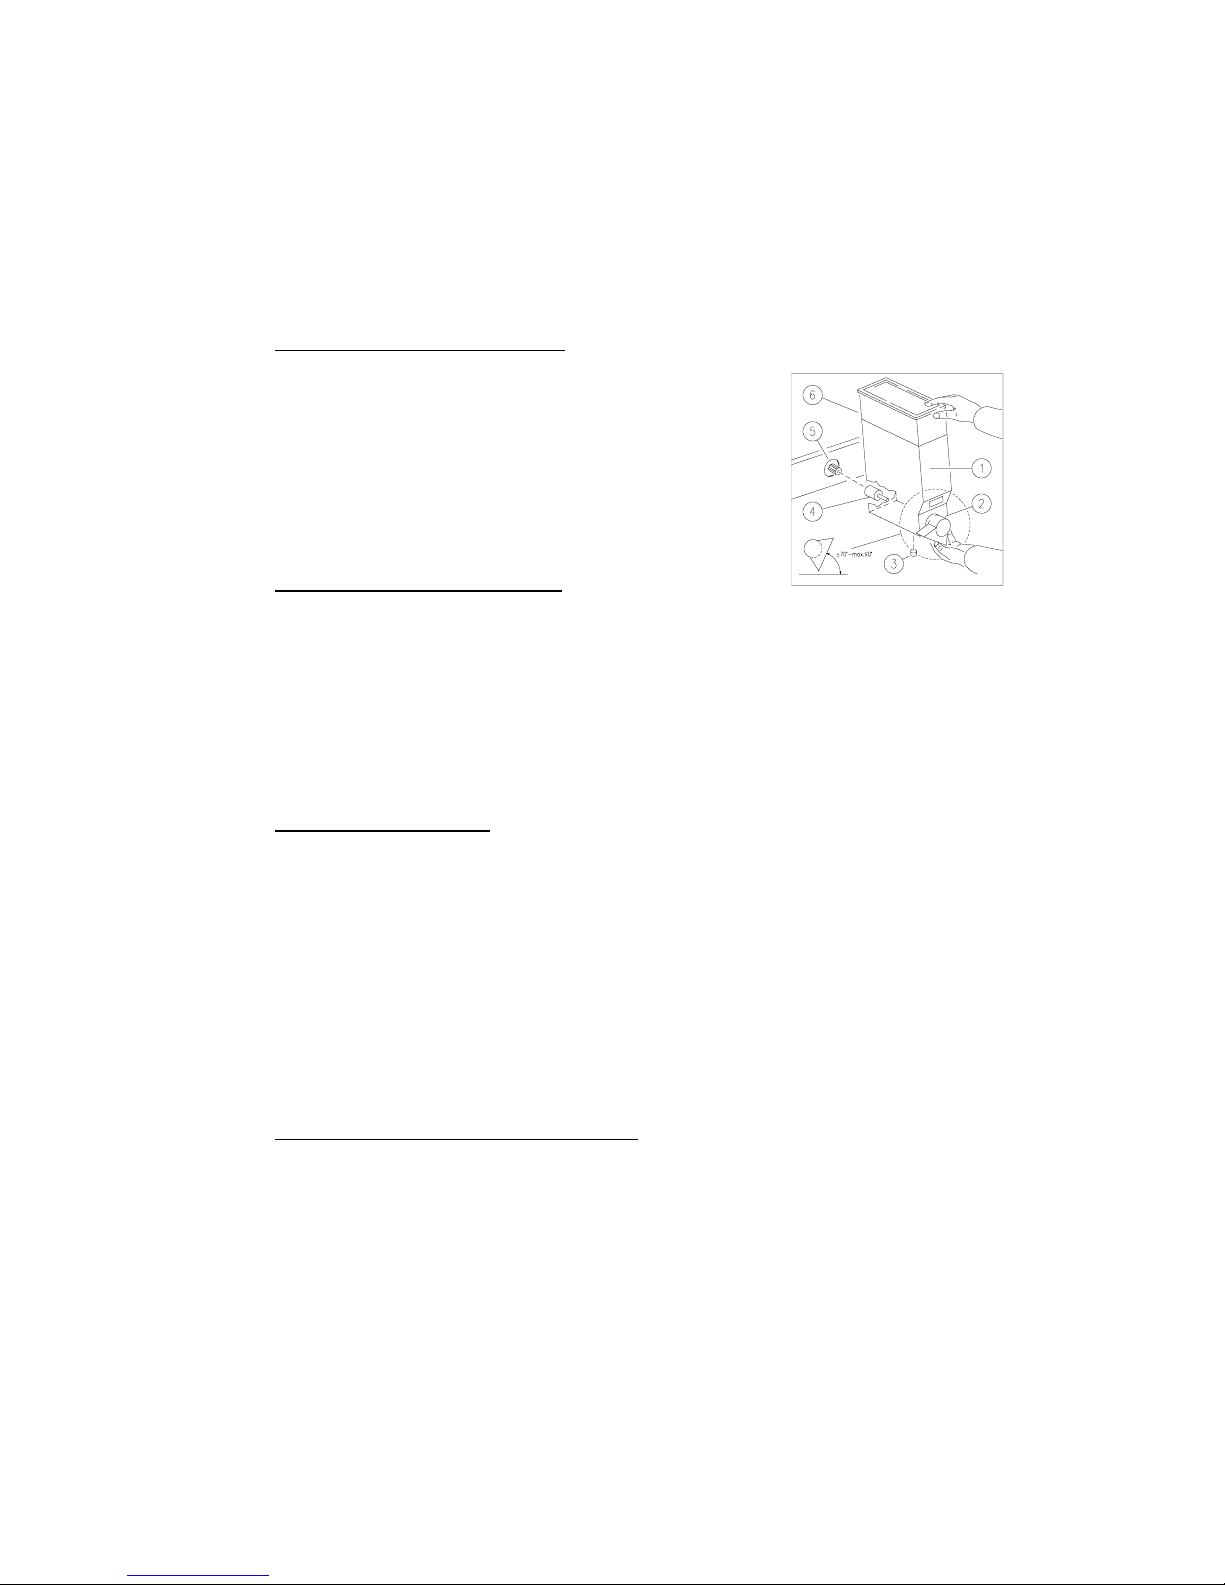
5.2.1 Cleaning canister and platform
1. Open the door of the machine.
2. Take out the canisters of the machine.
3. Empty the canisters.
4. Clean the canisters at the inside with a dry brush.
5. Clear the platform, on which the canisters stand,
with a wet brush.
6. Fill the canisters and place them back according to
paragraph “Fill up canisters”.
5.2.2 Cleaning of the mixing system
1. Open the door of the machine.
2. Remove the mixing system according to paragraph “Disassembling the
mixing bowl”.
3. Rinse out all loose parts of the mixing system in warm water.
4. Clean the parts of the mixing system that remain in the machine with a
wet brush.
5. Mount the mixing system according to paragraph “Assembling the mixing
bowl”. Make sure that the parts are dry before you mount them.
5.2.3 Cleaning of the brewer
1. Open the door of the machine.
2. Remove the outlet pipe of the brewer.
3. Remove the brewer from the machine according to the procedure in
paragraph remove the brewer.
4. Rinse out the brewer and the outlet pipe with warm water.
5. Dry the brewer and the nozzle.
6. Mount the brewer in the machine according to the procedure in paragraph
replace the brewer.
7. Place the nozzle back on the brewer.
8. Take a test drink to test the machine.
5.2.4 Cleaning the tea brewer (if applicable)
1. Open the door of the machine.
2. Remove the tea brewer from the machine according to the procedure in
paragraph disassemble tea brewer.
3. Rinse the outlet pipes in warm water.
4. Dry the brewer and the nozzle.
5. Mount the tea brewer in the machine according paragraph assemble tea
brewer.
6. Take a test drink to test the machine.
Page 14
14
5.3 Monthly maintenance
Not performing the monthly maintenance work has a harmful influence on the
quality of the products and can lead to malfunctioning of the machine.
Apart from the weekly maintenance, the following tasks have to be performed
weekly to ensure a correctly operating machine and an optimal quality of the
consumptions.
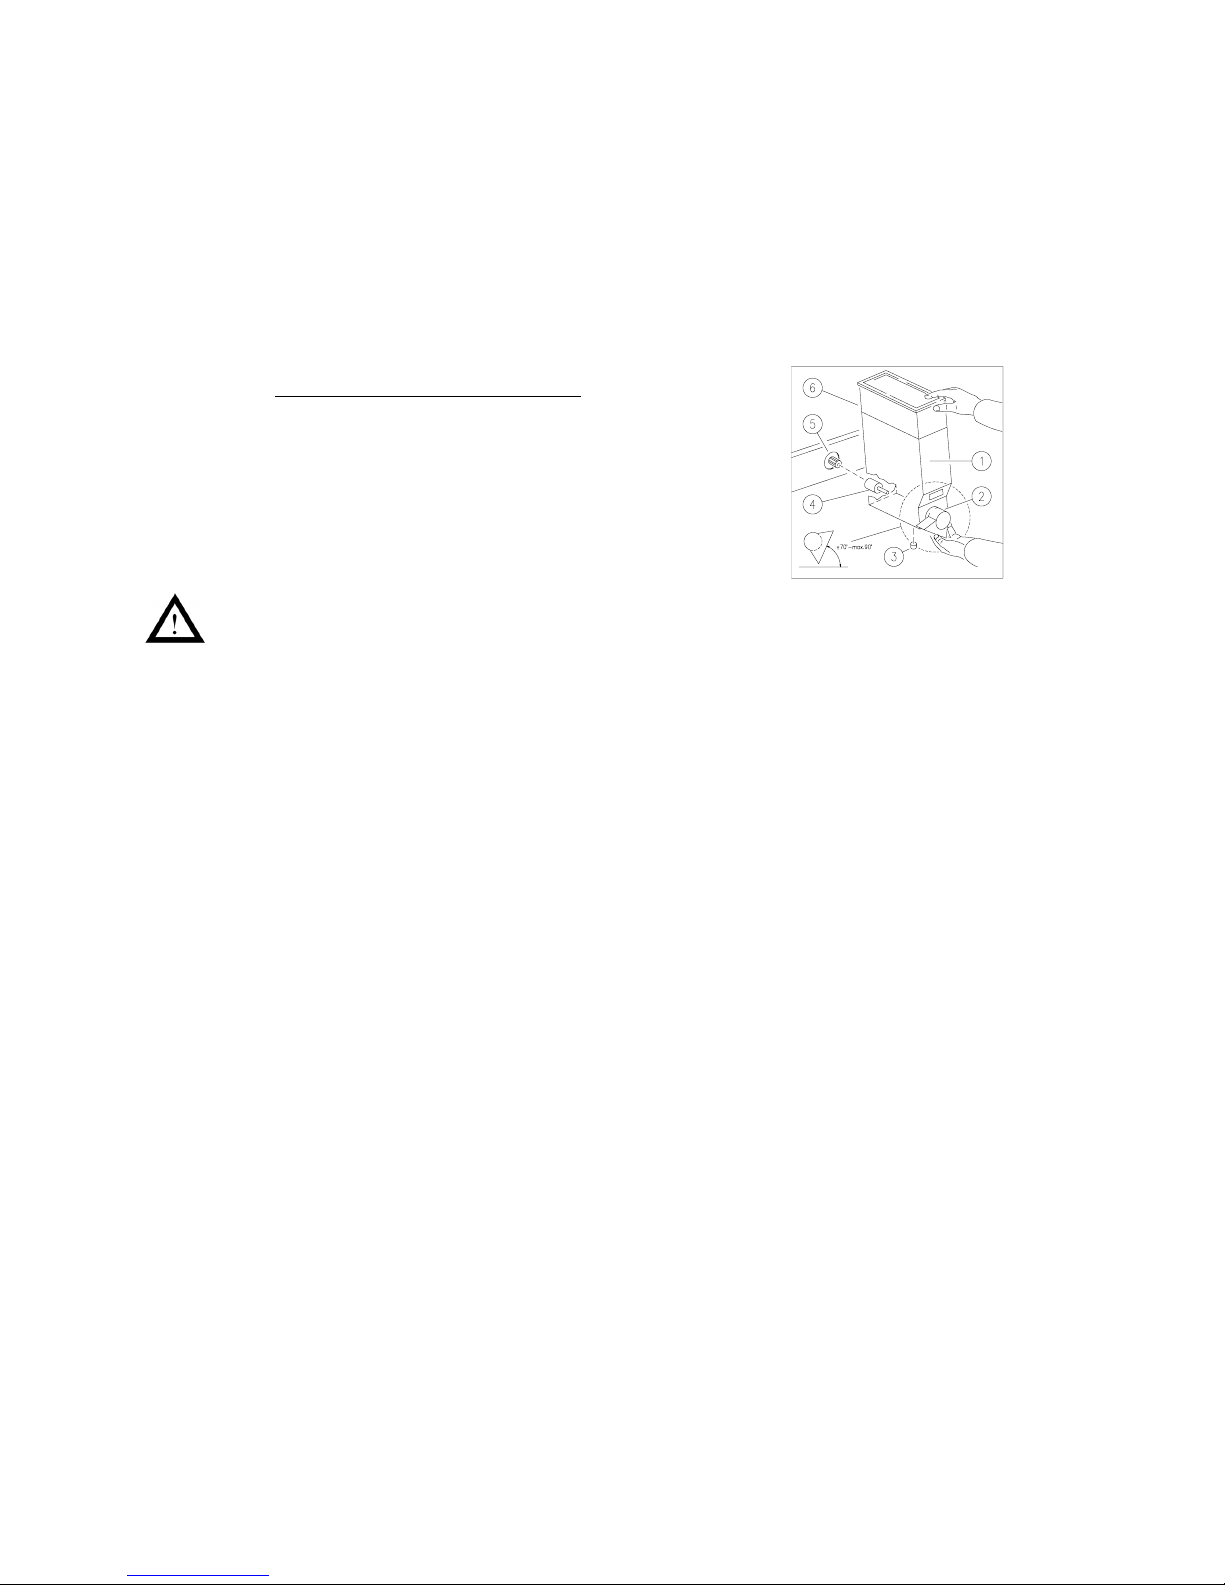
5.3.1 Cleaning the canister with water
1. Remove the canister (1) from the machine.
2. Remove the lid (6) from the canister.
3. Empty the canister.
4. Rinse out the canister with warm water until all
product residues are removed.
5. Dry the canister very thoroughly on the inside and
outside.
If you fill the canister while it is not completely dry, the product may form
lumps, which makes the system not usable anymore.
6. Fill the canister and place it back in the machine according to the
procedure in paragraph “Fill up canisters”.
Page 15
15
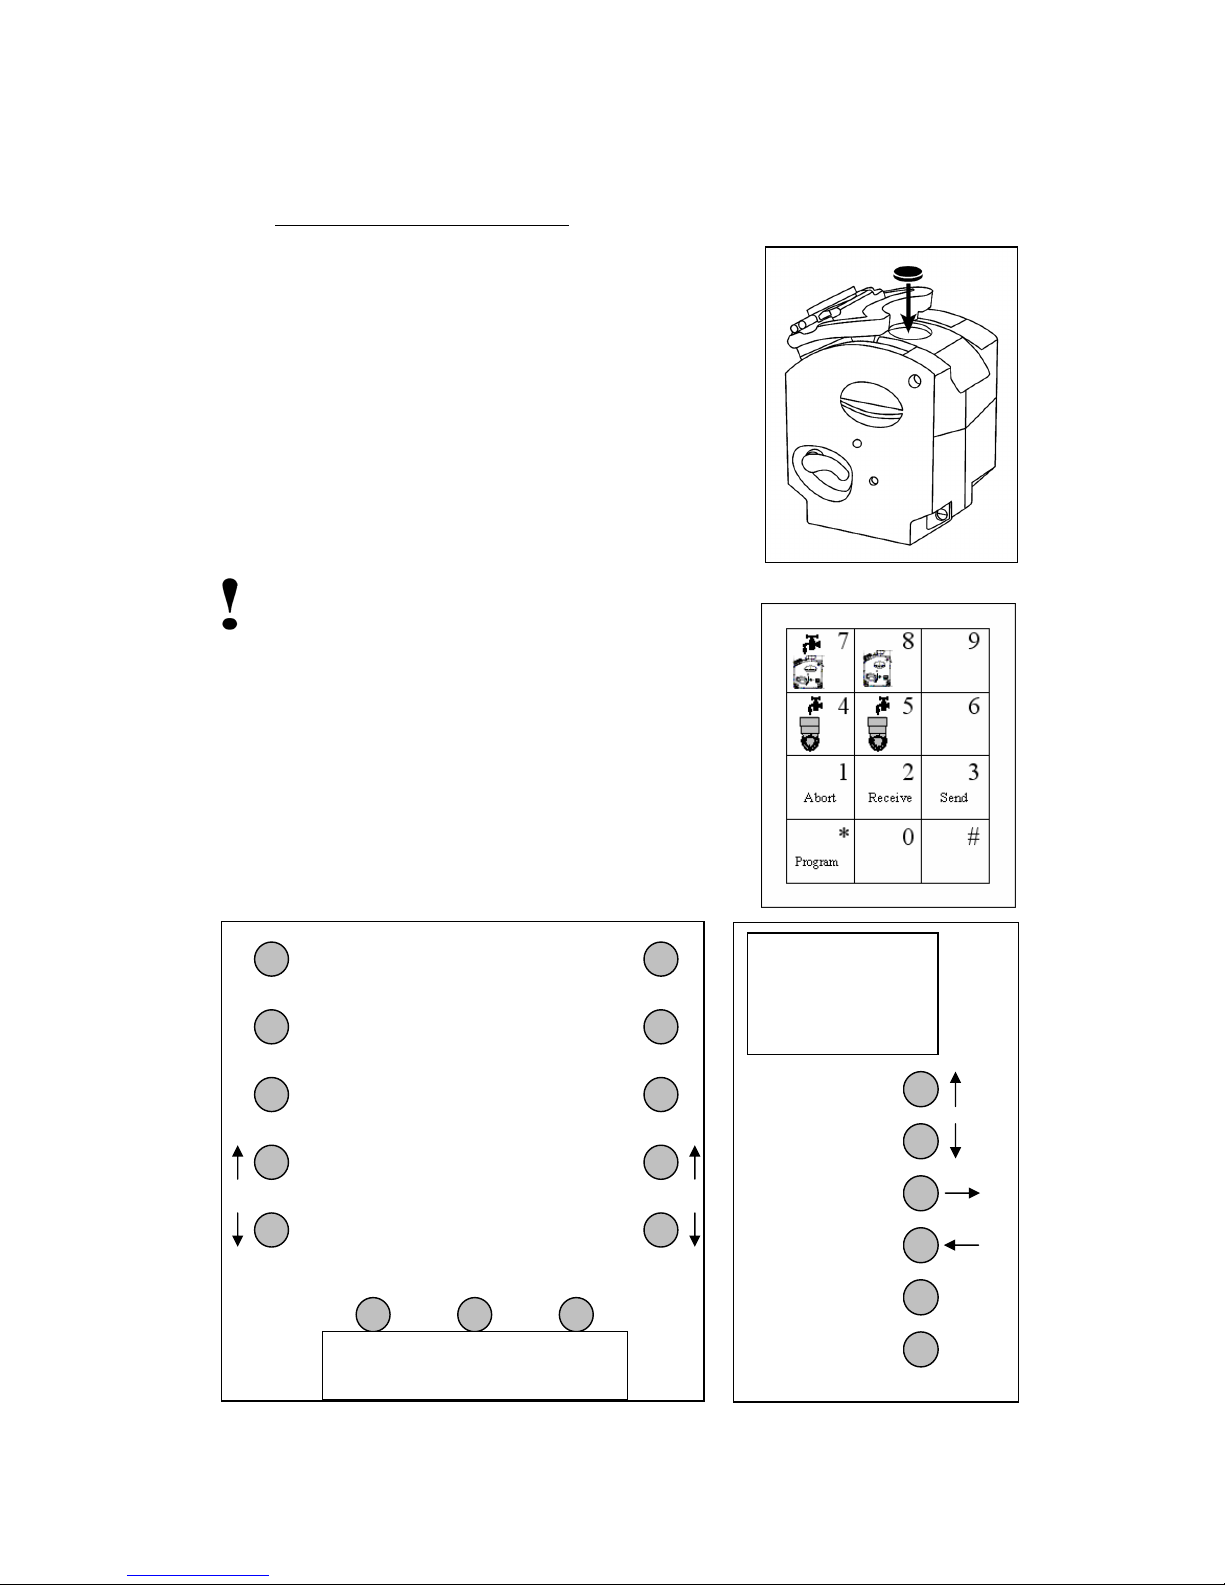
5.3.2 Cleaning cycle for CoEx brewer
Run the cleaning cycle for the CoEx brewer monthly
with the tablet 4INF009.
1. Open the door of the machine.
2. Press the program key on the service keyboard
twice.
3. Select the cleaning cycle with the scroll buttons.
4. Place a cleaning tablet in the CoEx brewer.
5. Place a jug under the brewer outlet.
6. Press enter.
7. The cleaning cycle is started and takes ± 5
minutes.
8. Close the door and run a test consumption to test
the machine.
Not cleaning the brewer can lead malfunction
of the machine!
Note:
Brewers not cleaned monthly with the cleaning tablet
delivered by the manufacturer have no warranty
anymore.
The selection panels:
Password:
Escape enter escape
Escape
enter
Password:
1
2 3 4 5 6
Page 16
16
5.4 Fill up canisters
Do not fill up the canisters further than necessary for one or two days. In this
way, the products stay fresh. Make sure that the canisters remain filled with a
layer of at least 4-cm of product. Only use products that are recommended by the
supplier of the machine.
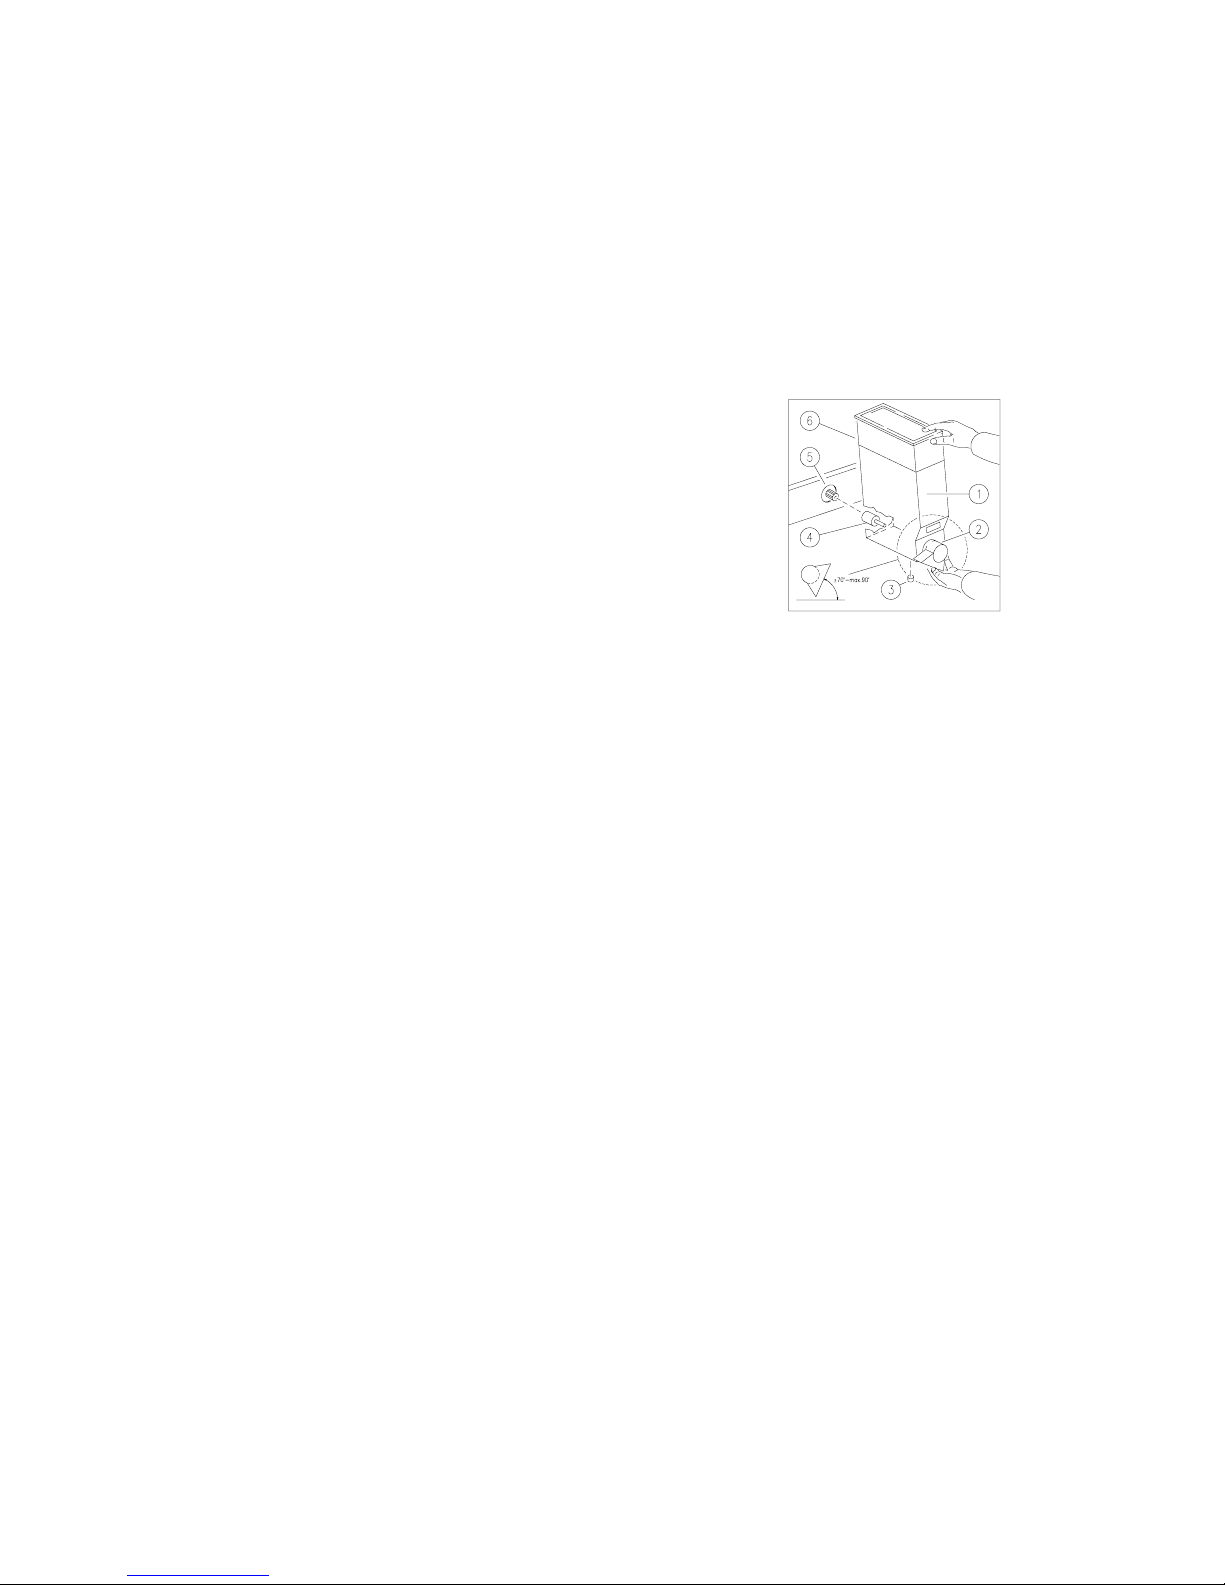
The filling of the canisters has to take place outside the machine. To facilitate
taking out the canisters, the topside of the machine can be tipped up (after
opening the door).
1 Canister
2 Nozzle
3 Positioning ridge
4 Drive of canister
5 Motor drive
6 Lid
Perform the following procedure to fill a canister:
1. Turn the nozzle (2) of the canisters upwards.
2. Slightly lift up the canister at the front, until the positioning ridge (3)
comes out of the hole.
3. Pull the canister towards the front and take it out of the machine.
4. Remove the lid (6) of the canister.
5. Fill the canister with the product that is indicated on the canister.
6. Place the lid (6) back on the canister.
7. Place the holder back in the machine. Check whether the drive (4) at the
back of the holder is fitting well in that of the motor.
8. Push the holder at the front over the positioning ridge (3).
9. Turn the nozzle (2) of the canisters downwards.
10. Rinse out the mixer twice according to flush away product that has
accidentally got into the mixing bowl.
11. Check the position of the nozzle (2) of the canister. It must be positioned
correctly above the brewer or mixing bowl.
12. Check the functioning by taking a test drink.
Page 17
17
5.5 Removal of the brewer
Removal of the brewer is necessary for
performing the maintenance. Properly trained
personnel may only do working on the brewer
itself. Instructions for performing work on the
brewer are described in the technical manual.
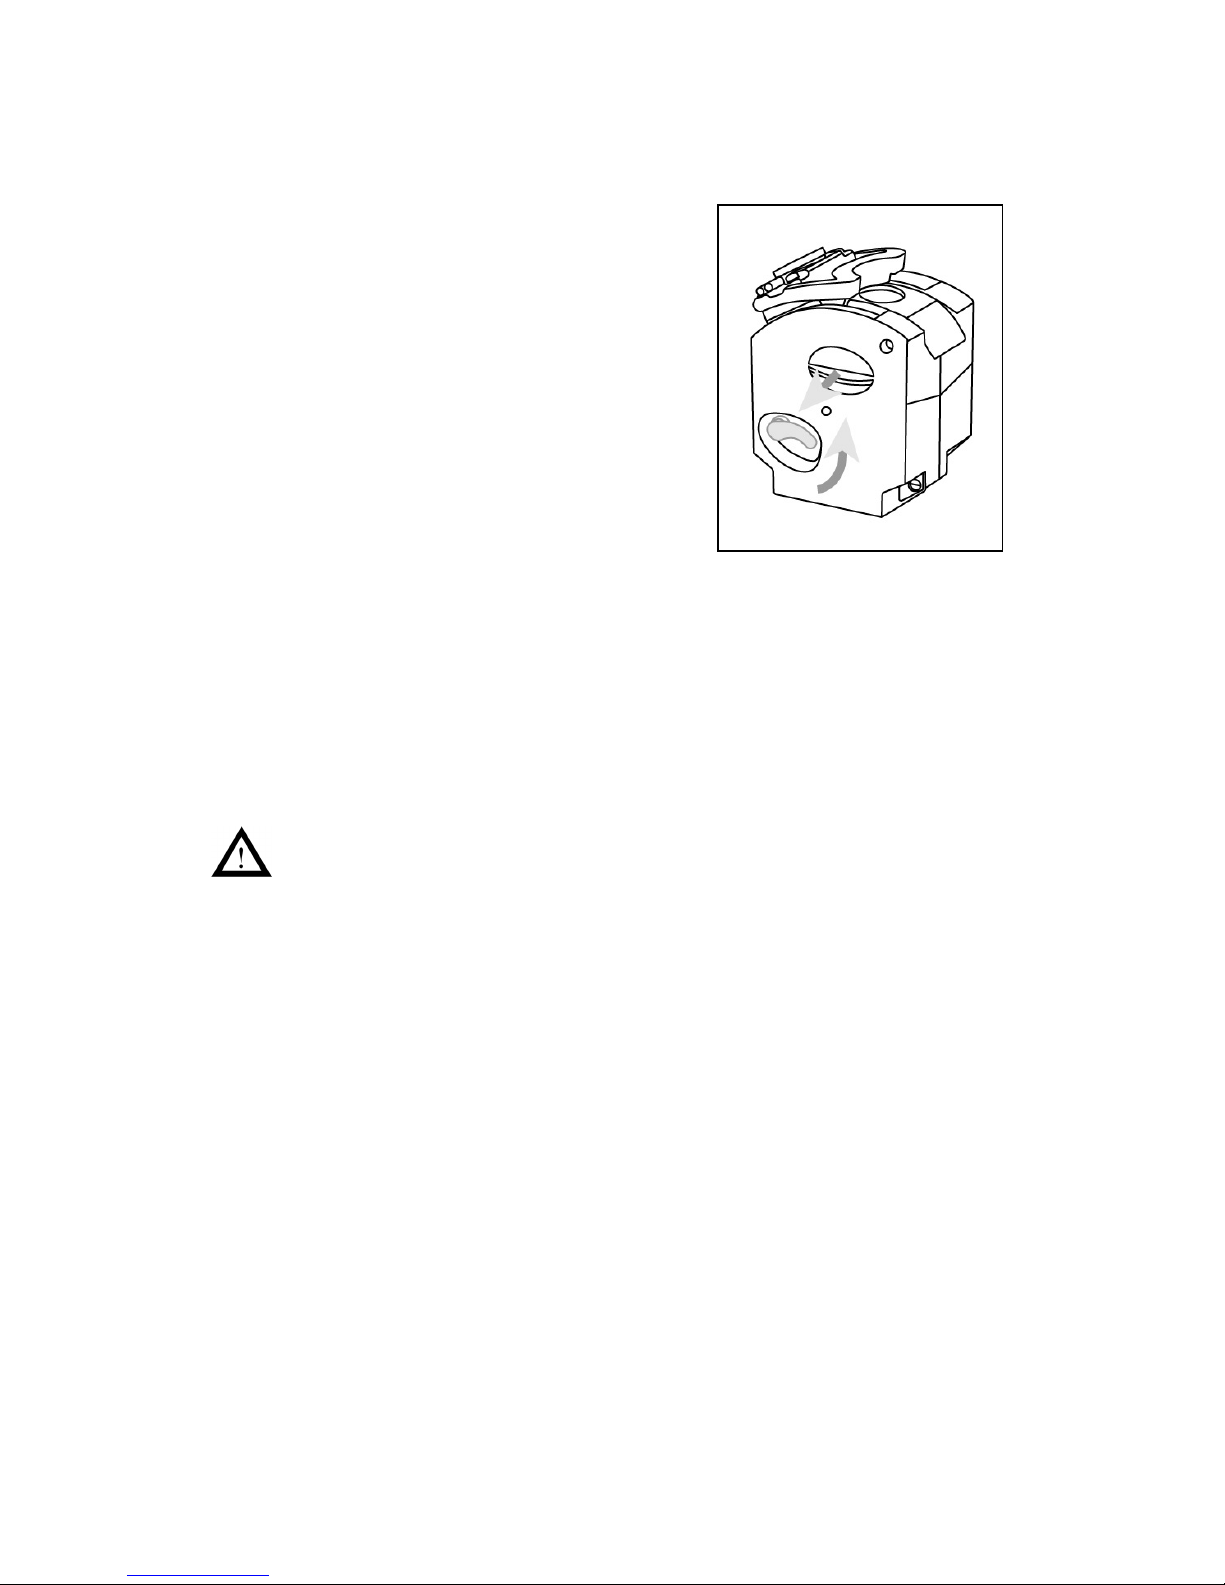
Carry out the following procedure for removal of
the brewer:
1. Open the door of the machine.
2. Switch the machine off.
3. Remove the outlet pipe from the brewer.
4. Push the green handle upwards and pull
the brewer out off the machine at the
same time.
5.6 Replace the brewer
Carry out the following procedure for replace of the brewer:
1. Place the brewer in the bracket.
2. Push the brewer powerfully in the machine till you hear “click” and the
green handle is turned downwards in its home position.
3. Switch the machine on.
4. Check the function of the brewer by a test drink. Place a cup under the
outlet.
Make sure that the green handle is in the down position. When the
brewer isn’t installed correctly the brewer can jump out of the
fitting during a cycle.
Page 18
18
5.7 Removal of the Tea brewer (if applicable)
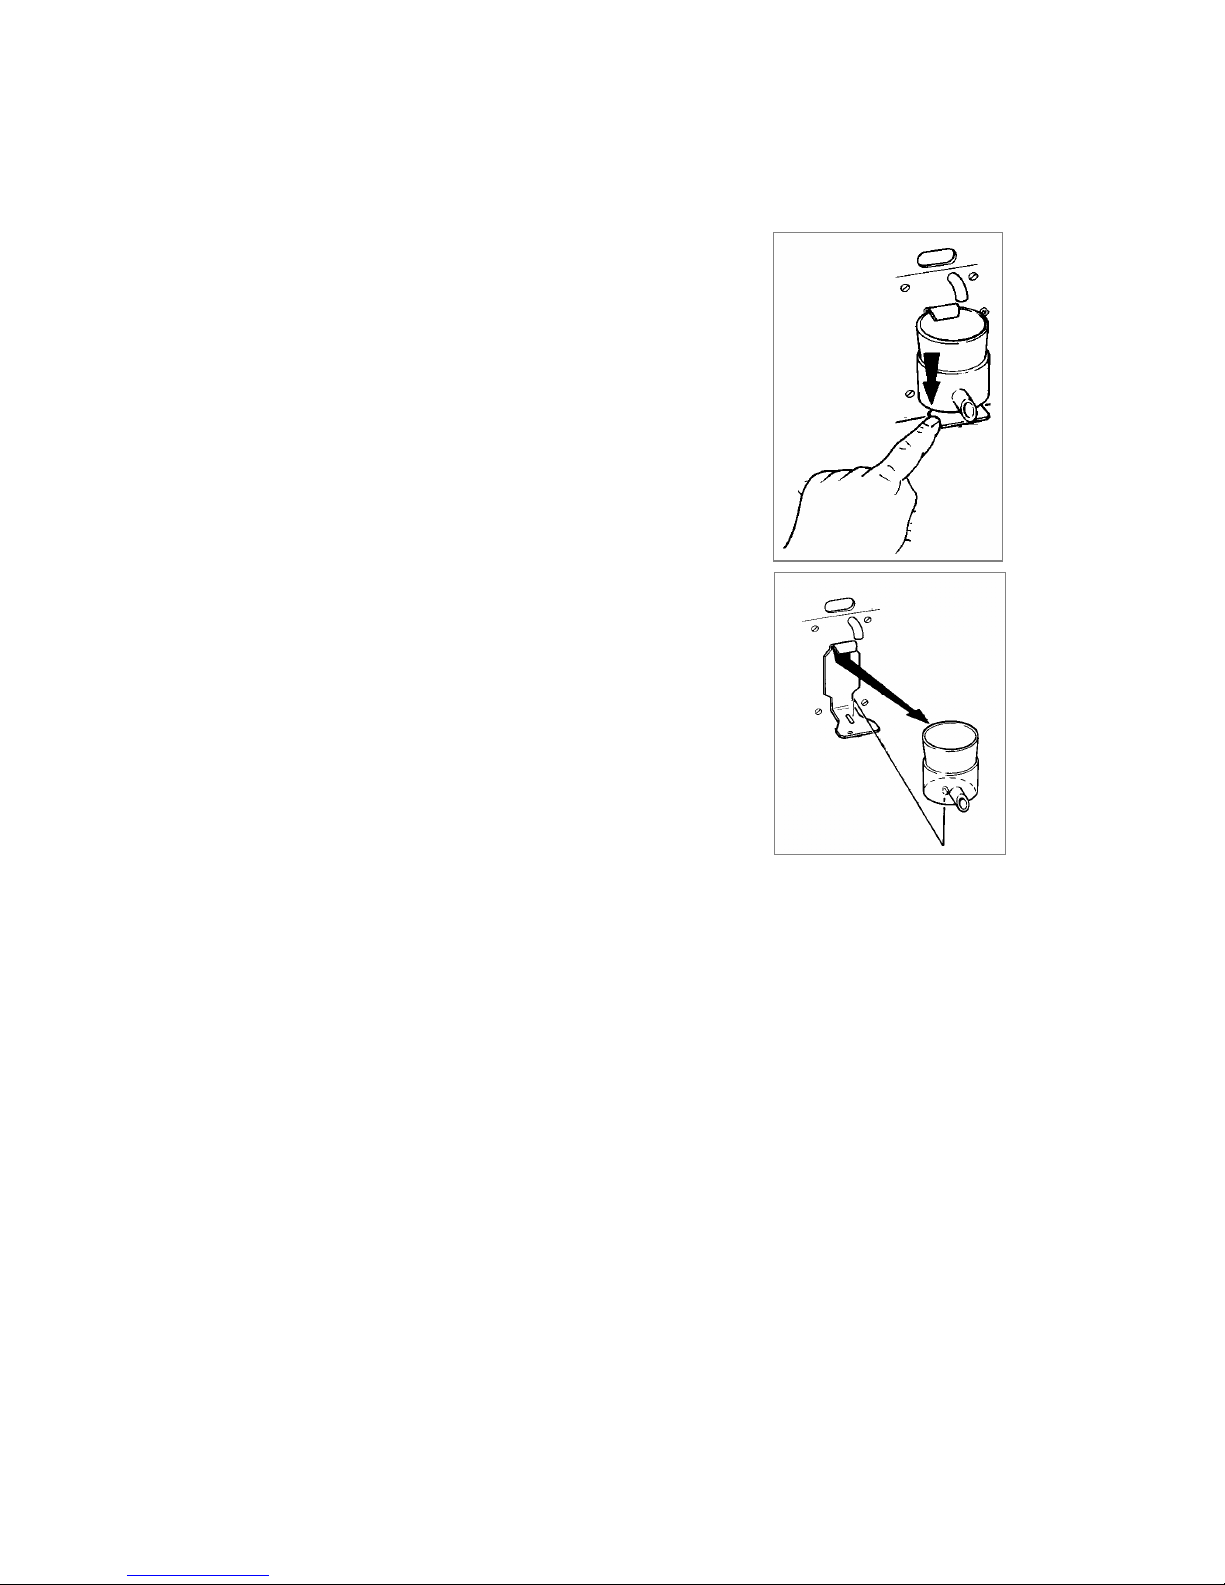
Carry out the following procedure for removal of the tea
brewer:
1. Open the door of the machine.
2. Remove the tea canister from the machine.
3. Push the metal holder under the tea brewer
down wards.
4. Pull the tea brewer forward from the machine.
5.8 Replace the brewer
Replace the mixing system is carried out in reversed
order of the removal.
Clean and dry all the parts before replacing.
Check the function of the tea brewer by a test drink.
Page 19
19
5.9 Disassembling the mixing system
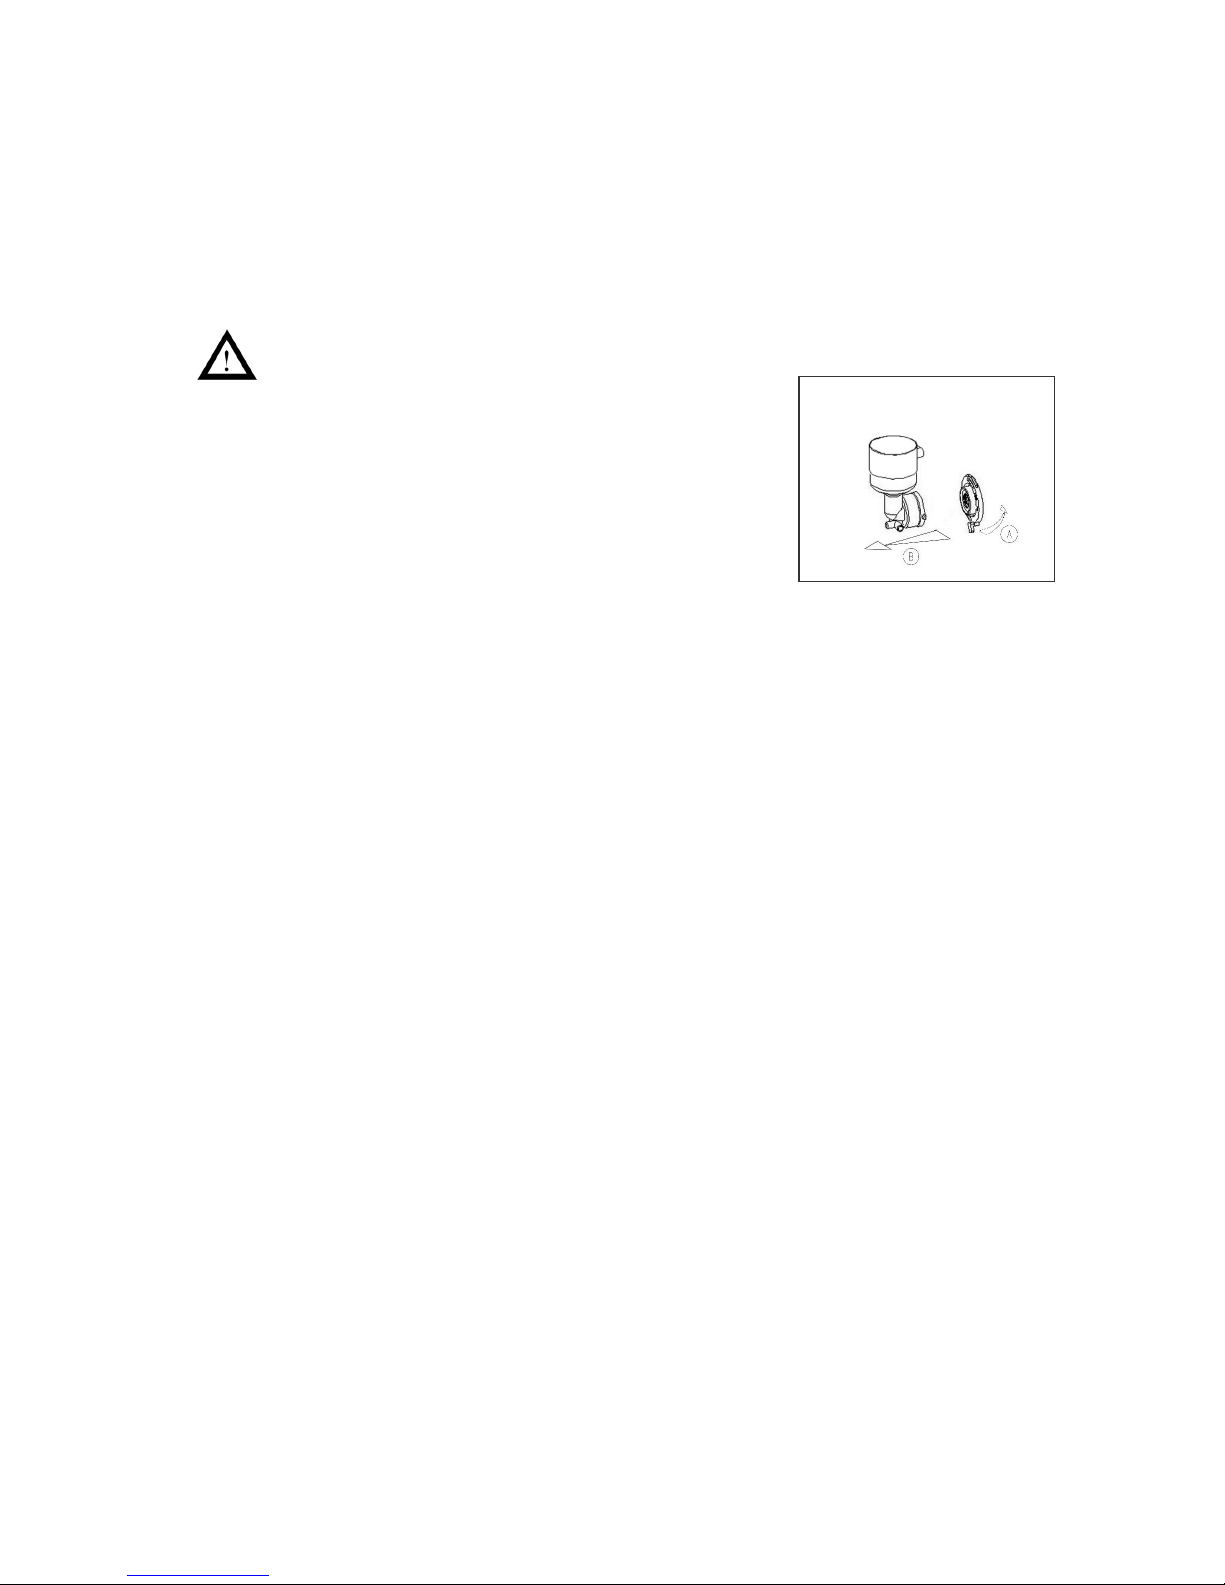
Carry out the following procedure for disassembling the mixing system:
1. Open the machine door.
Be sure that the machine is switched off and can’t switch on unintentional.
2. Open the lid of the machine.
3. Remove the canisters from the machine.
4. Turn the bayonet catch 10º anti clockwise (A) and
pull the mixing bowl out of the machine.
5. Take out the metal suction tray towards the front.
5.10 Replace the mixing bowls
Assembling the mixing system is carried out in reversed order of the
disassembling.
Page 20
20
6 Failure / Error messages
Always check whether an error message is shown in the display. If no error
message is shown and the machine does not work correctly, you may find the
possible cause and solution in the following table. For failures not mentioned in
this manual, contact the service engineer.
Error
message
Possible cause Solution
Brewer not in
position
Brewer has not completed
the cycle correctly.
Brewer defect.
Remove the brewer from the
machine and replace it again
conform the paragraph replace CoEx
brewer.
Make sure that the green handle is
moved down.
Consult the service engineer.
Temperature
to high
Temperature sensor or
heater are broken
Consult the service engineer.
No water
connected
1 No water flows out of the
water connection.
2 Inlet valve is broken.
3. expansion is valve broken
4. flow meter is broken
1. Switch the machine off, open the
water supply and switch the machine
on.
2. Consult the service engineer.
3. Consult the service engineer
4. Consult the service engineer
Not enough
water
Not enough water dosed in
the cup
Retry the selection.
If the message show up again it is
necessary to run a cleaning cycle.
Communication
error
A communication error
registrated.
Communication between IO board
and control board is not working.
Consult the service engineer.
Shortcut
temp.sensor
The temperature Sensor is
broken
Consult the service engineer
Temp.sensor
not connected
The temperature sensor is
disconnected or broken
Consult the service engineer
Sensor not
connected
The sensor connector is not
connected to the PCB
Consult the service engineer
Place cup left 1 There is no cup detected
on the left cup stand
2 Left cup sensor is broken
1 Place a cup on the left cup stand
2 Consult the service engineer
Place cup right 1 There is no cup detected
on the right cup stand
2 Right cup sensor is broken
1 Place a cup on the right cup stand
2 Consult the service engineer
Waste
bucket/drip
tray full
The Waste bucket/drip tray
full
Empty the waste bucket or drip tray
Filling boiler Boiler is filling Press the rinse button to fill the
boiler
Heating The boiler is heating
Clixon is switched off
Wait 2 minutes till the water is on
temperature
Consult the service engineer
Door open De machine door is not
closed
Close the machine door.
Page 21

21
Notes:
-------------------------------------------------------------------------------------------
-------------------------------------------------------------------------------------------
-------------------------------------------------------------------------------------------
-------------------------------------------------------------------------------------------
-------------------------------------------------------------------------------------------
-------------------------------------------------------------------------------------------
-------------------------------------------------------------------------------------------
-------------------------------------------------------------------------------------------
-------------------------------------------------------------------------------------------
-------------------------------------------------------------------------------------------
-------------------------------------------------------------------------------------------
-------------------------------------------------------------------------------------------
-------------------------------------------------------------------------------------------
-------------------------------------------------------------------------------------------
-------------------------------------------------------------------------------------------
-------------------------------------------------------------------------------------------
-------------------------------------------------------------------------------------------
 Loading...