

Page 1

Preface
Please read this user manual before
using the Essence coffee machine and
keep it for reference. This user manual is
valid for the machine supplied by the
manufacturer, including the options
installed by the manufacturer.
The manufacturer accepts no liability
for any damage resulting from incorrect
or improper use of the machine, or
resulting from modifications that have
not been authorised by the manufacturer. This user manual gives
instructions on the operation and
maintenance of the machine. Moreover,
it gives solutions to irregular behaviour
that may occur.
This user manual cannot be regarded
as a substitute to the training and
instruction, but must be seen as an
addition to the training, and as such
only used for reference purposes.
Activities for which proper training is
required are marked and should only be
carried out by trained staff. Instructions
for installation and reparation are
available in a technical manual. When
the machine needs maintenance only
original parts of the manufacturer
should be used. Only properly trained
personnel may carry out repairs, install
the machines or transport the
machines.
Page 2

www.filterfresh.nl
published: www.dejongduke.nl © 2004 / design and photography: www.npk.nl
Page 3

user manual
Essence
Page 4
Contents
1 Safety
1.1 Safety risks 2
1.2 Safety and warnings 2
1.3 Norms and standards 2
2 Description of the machine
2.1 General 3
2.2 The machine exterior and interior (see fold out) 3
2.3 Display and keys 3
2.4 Type plate 3
2.5 Technical specifications 3
3 Installation
3.1 Installing the machine 5
3.2 Placing the machine 5
3.3 Switch off the machine 5
4 Using the Essence
4.1 Preparing a drink 5
4.2 Reading out the counters 5
5 Maintenance and cleaning
5.1 Daily maintenance 6
5.2 Weekly maintenance 8
5.3 Monthly maintenance 10
6 Filling
6.1 Filling the water tank 11
6.2 Filling the coffee canister 12
6.3 Filling the topping canister 13
7 Messages on the display
7.1 Error messages requiring a service engineer 14
7.2 Messages you can solve yourself 15
Page 5
1. Safety
1.1 Safety risks
• Be careful! This machine serves
hot drinks.
• The outlet of the machine may tap
drops of hot liquid in between
ordering drinks.
1.2 Safety and warnings
• Put the brewer outlet down during
daily maintenance (see 5.1, step 4)
• Do not use aggressive cleaning
products or abrasives to clean (parts
of) the machine.
• Be careful! The water system (boiler,
pipes, etc.) may contain hot water.
• Do not shake the machine while in
use.
• Do not use water in or near the
machine unless the instructions
explicitly give direction to do so.
• Do not use a damaged machine. If in
doubt, contact your supplier first.
• Do not leave the key in the door when
leaving the machine unattended.
• If a fault occurs, disconnect the
machine from the electricity supply
and from the water supply.
• Do not lean on the door when open.
• Do not use an extension cable.
• Connection on the water supply must
be according to national regulations.
• The machine may only be in locations
where it can be overseen by trained
personnel.
1.3 Norms and standards
The machine is built according to CE
norms and complies with the following
standards:
• Machine standard: 89/392/EEG.
• EMC standard: 89/336/EEG.
The machine complies with the
following norms:
• EN 292: Safety of machines.
• UL and Cul 751: norm vending
machines.
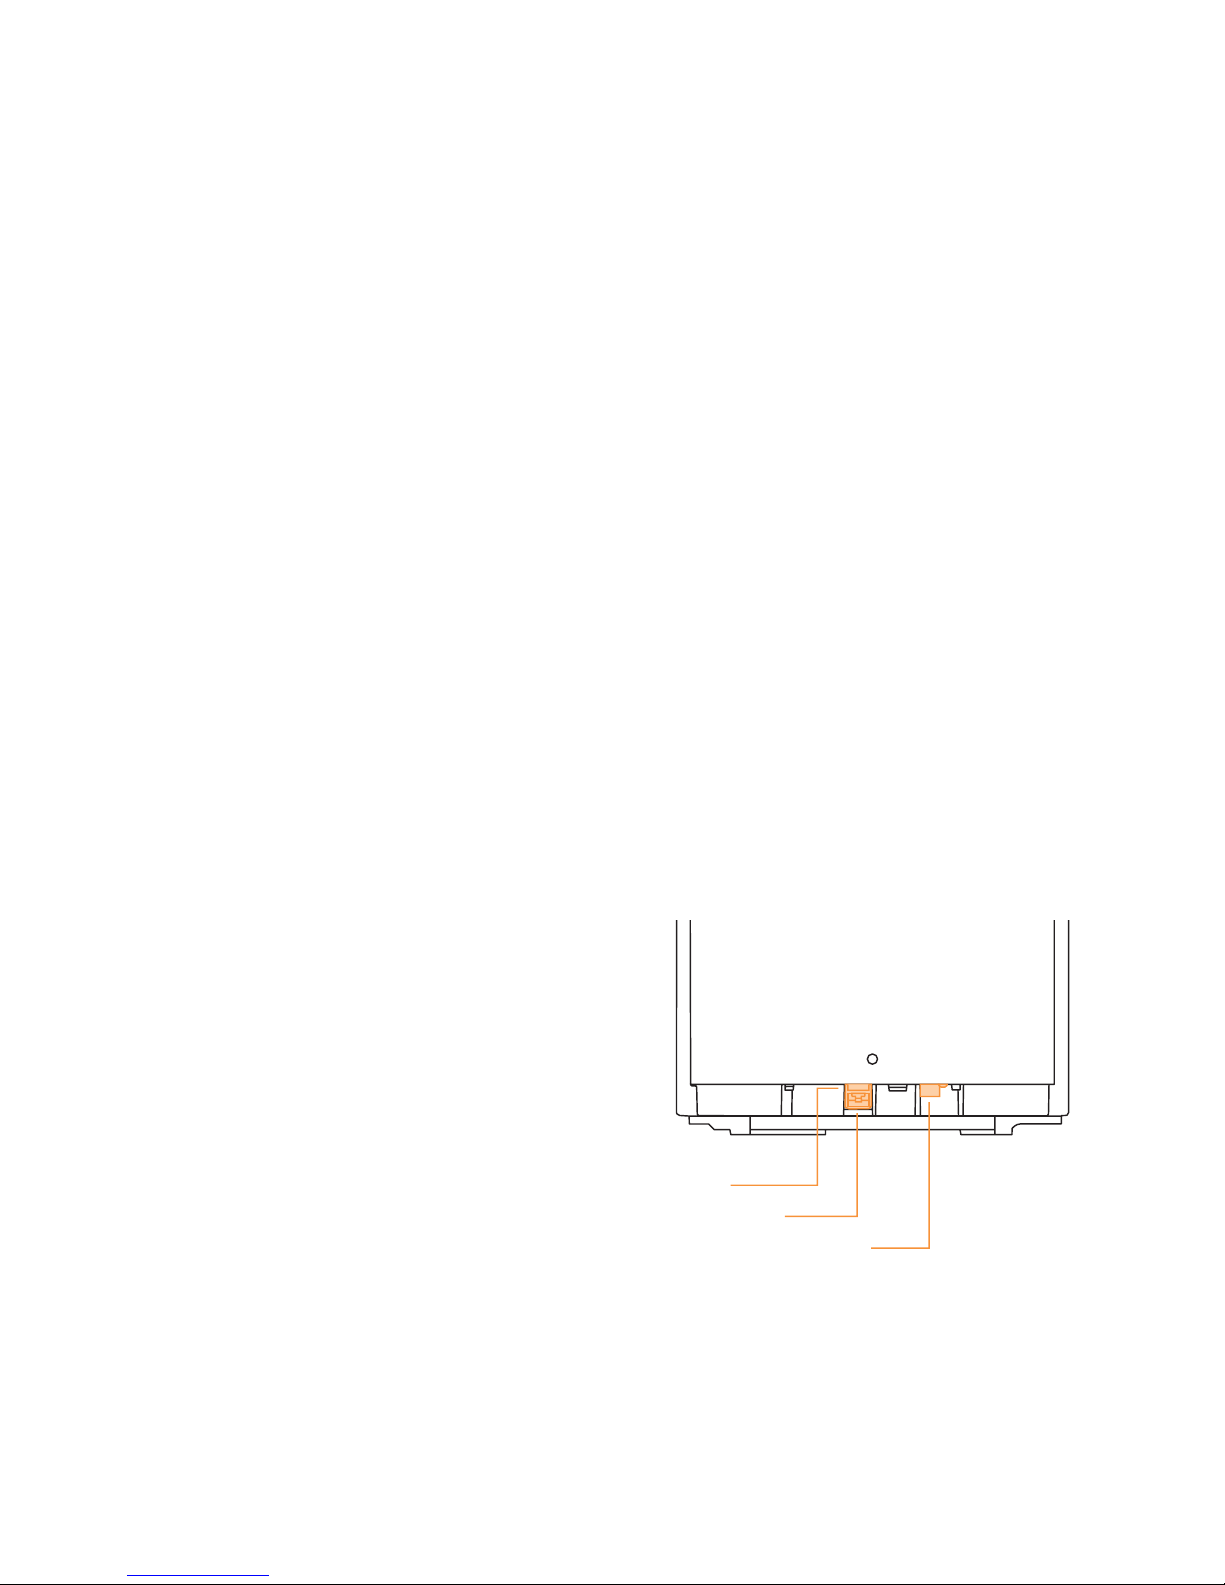
(10)
On/off
Power cord
Water connection
2
Page 6
2 Description of the machine
2.1 General
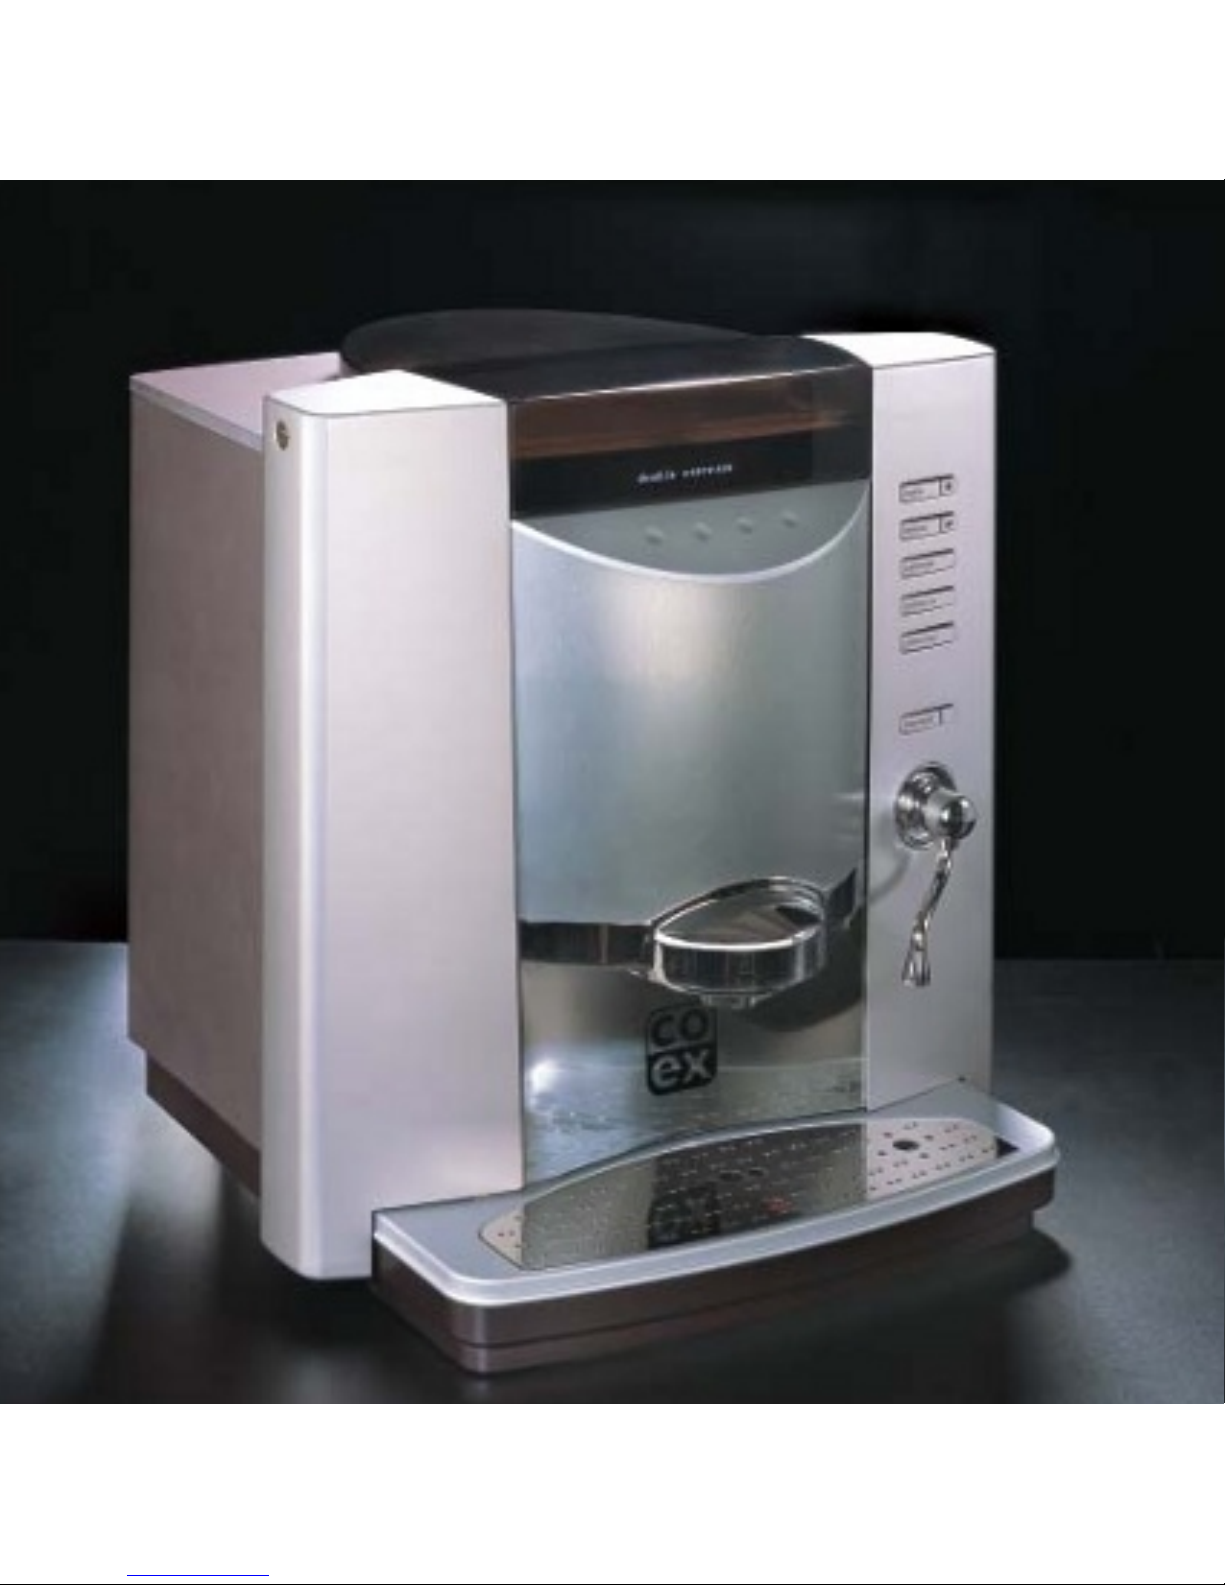
This is a semi-automatic hot drink
machine, with (optional) vending
accessories. Always place a cup before
pressing a drink selection key. You can
adjust for weaker or stronger taste with
the up/down scroll keys (3). Your
supplier can make further adjustments
to the strength and sizes of the drinks.
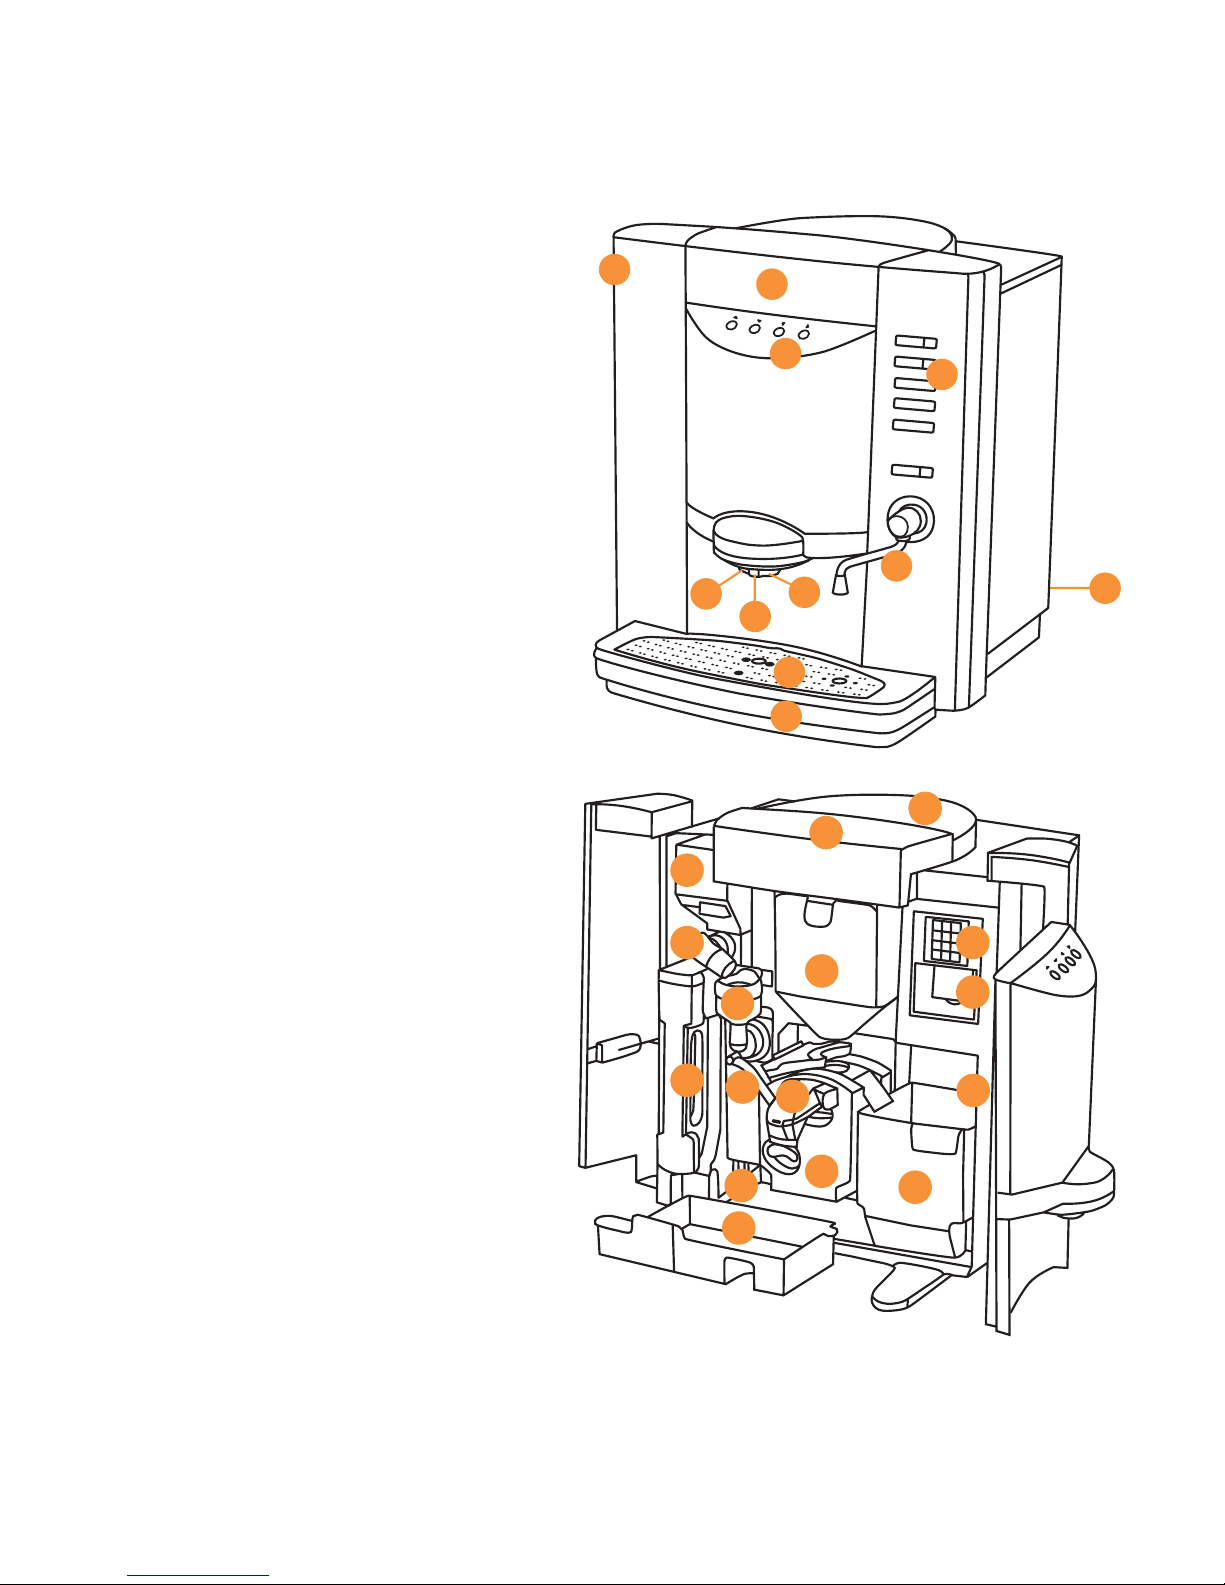
2.2 The machine exterior and interior
See fold out.
2.3 Display and keys
2.3.1 Drink selection keys
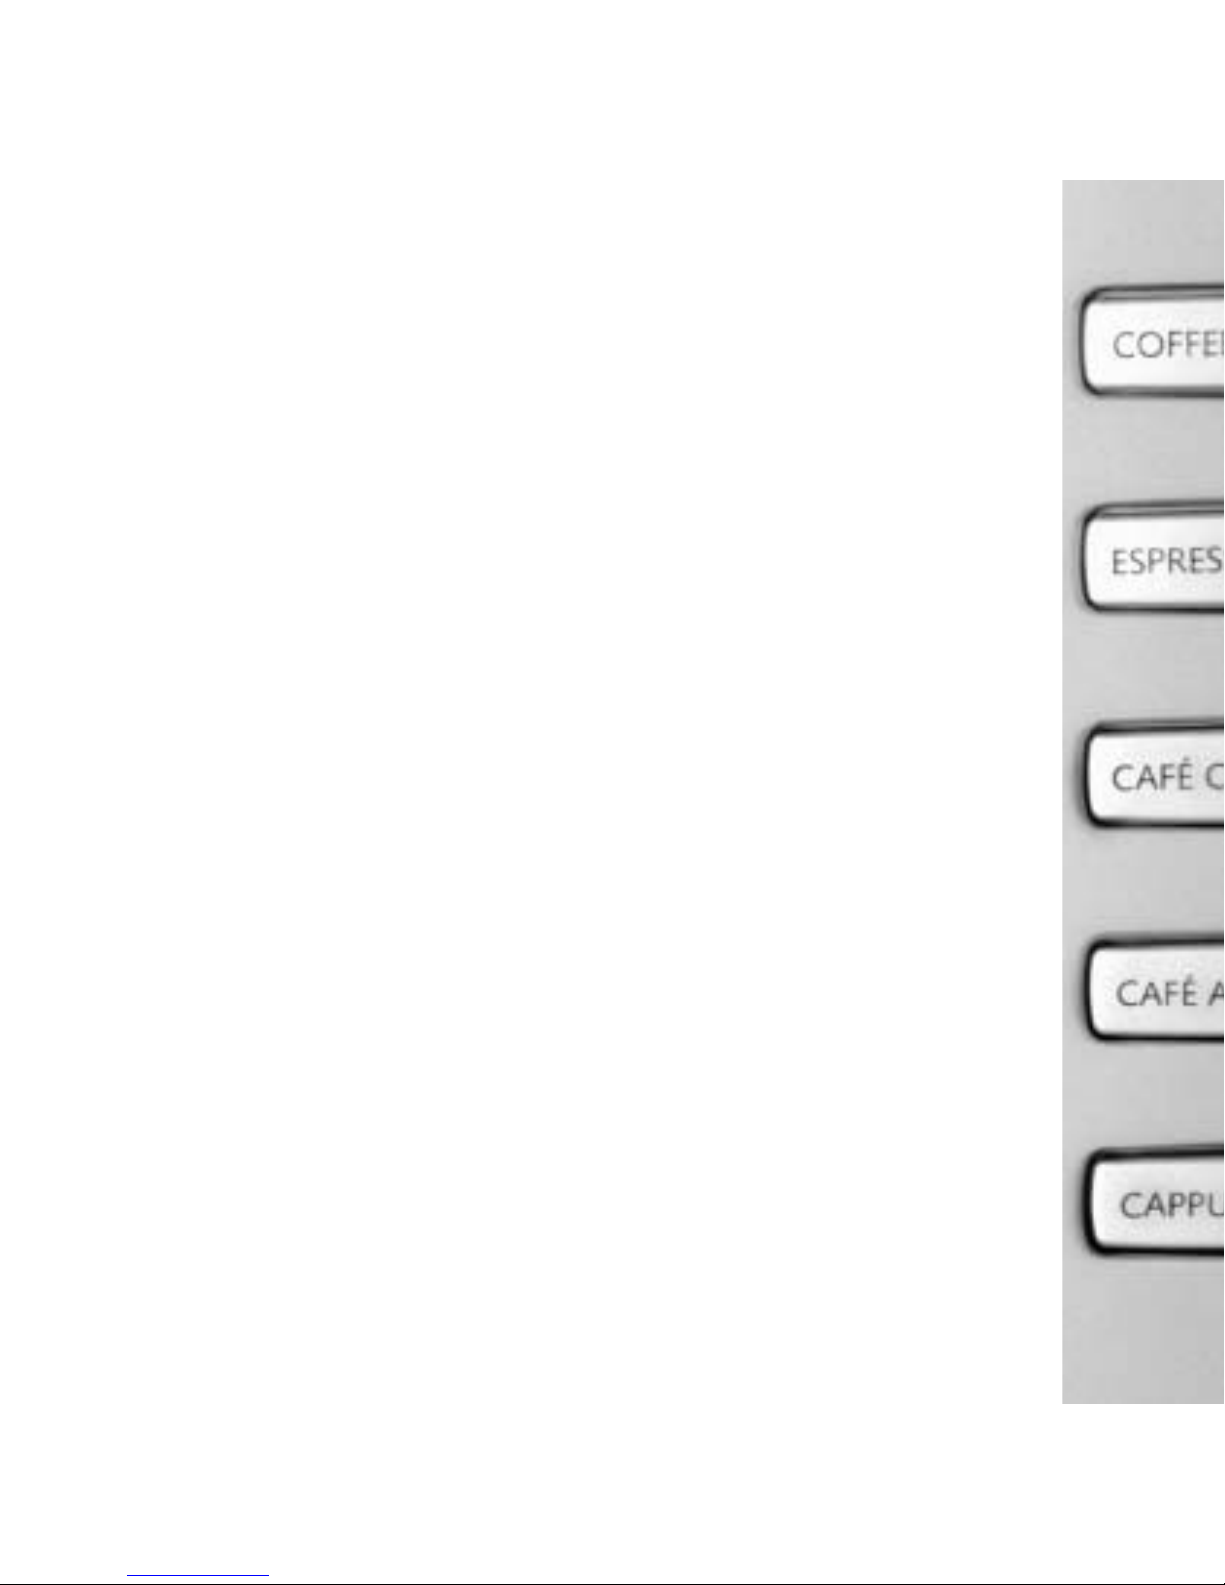
There are five drink selection keys (4).
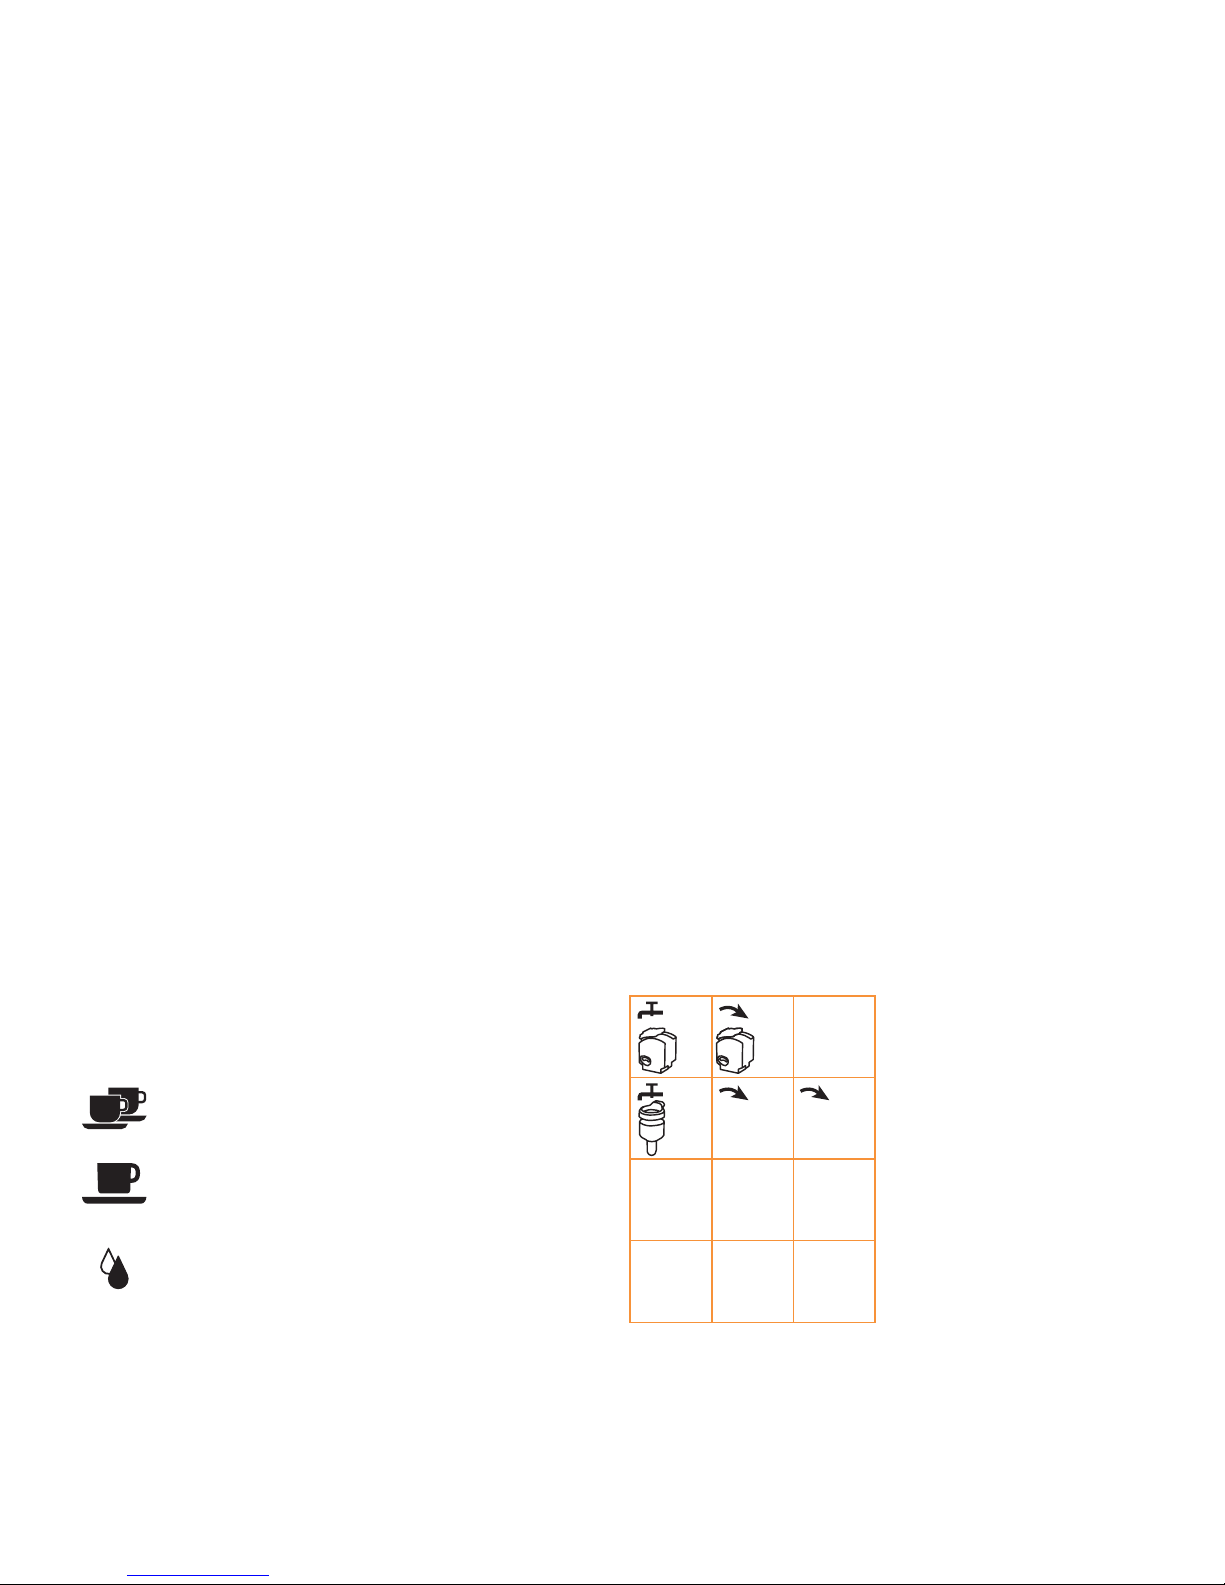
The left part of the water key gives one
cup of hot water, the smaller right part
on the water key gives hot water
continuously. Optionally this key will
give steam.
Two cups of espresso or
double espresso
Large coffee
Hot water or steam
while key pressed
2.3.2 Display and service keys
The display (2) shows the selected drink,
strength settings, messages and counter
read outs. The up/down scroll keys (3)
allow to adjust the strength. The ‘<’
escape and ‘>’ enter keys allow to cancel
or confirm messages on the display.
2.3.3 Service keyboard
This service keyboard (A) is used for
cleaning (see 5) and for reading the
counters (see 4.2). The service engineer
uses it to change the settings of the
machine.
Key * = Program key
Key 4 = Rinse mixer
Key 5 = Run grinder/coffee I
Key 6 = Run grinder/coffee II
Key 7 = Rinse brewer
Key 8 = Run brewer
Other keys are used by the service
engineer.
(A)
3
1
4
7
2
5
8
3
Program
Abo rt Recei ve Send
*
0 #
6
9
Coffe e I Coffe e II
Page 7

2.4 Type plate
The type plate (C) shows:
• Manufacturer
• Serial number
• Type/model specification
• Date of construction
• Water connection
2.5 Technical specifications
Dimensions of the machine:
Width 550 mm/21.7 inch
Height 605 mm/23.8 inch
Depth 500 mm/19.7 inch
Weight (empty) 30 kg/66.2 lbs
Electrical connection
240 Volt AC +/- 10%, 50 Hz +/- 2%
max. capacity 3,0 kW
110 Volt AC +/- 10%, 50 Hz +/- 2%
max. capacity 1.4 kW
Water pressure 0,5 - 6 bar (50 kpa 600 kpa).
Without water connection: use the
hand filled water tank.
Hourly performance: approx. 120 cups
depending on product and volume.
Noise level:
• Standby 0 dB
• Regular coffee 58 dB
• Espresso using whole beans 68 dB
3 Installation
3.1 Installing the machine
Installation, transportation and
adjustment of the machine should only
be carried out by properly trained
service personnel. Their instructions
about transportation, unpacking and
installation of the machine, are
available in the technical manual.
3.2 Placing the machine
Place the machine on a level surface in
a hygienic dry room, with a temperature
between 5°C and 40°C (40F - 100F).
3.3 Switch off the machine
If the machine will not be used for
some time, for example over the
weekend, it is recommended to switch
off the water supply and the electricity.
The main (on/off) switch (10) is located
on the back of the machine.
4
Page 8
4 Using the Essence
4.1 Preparing a drink
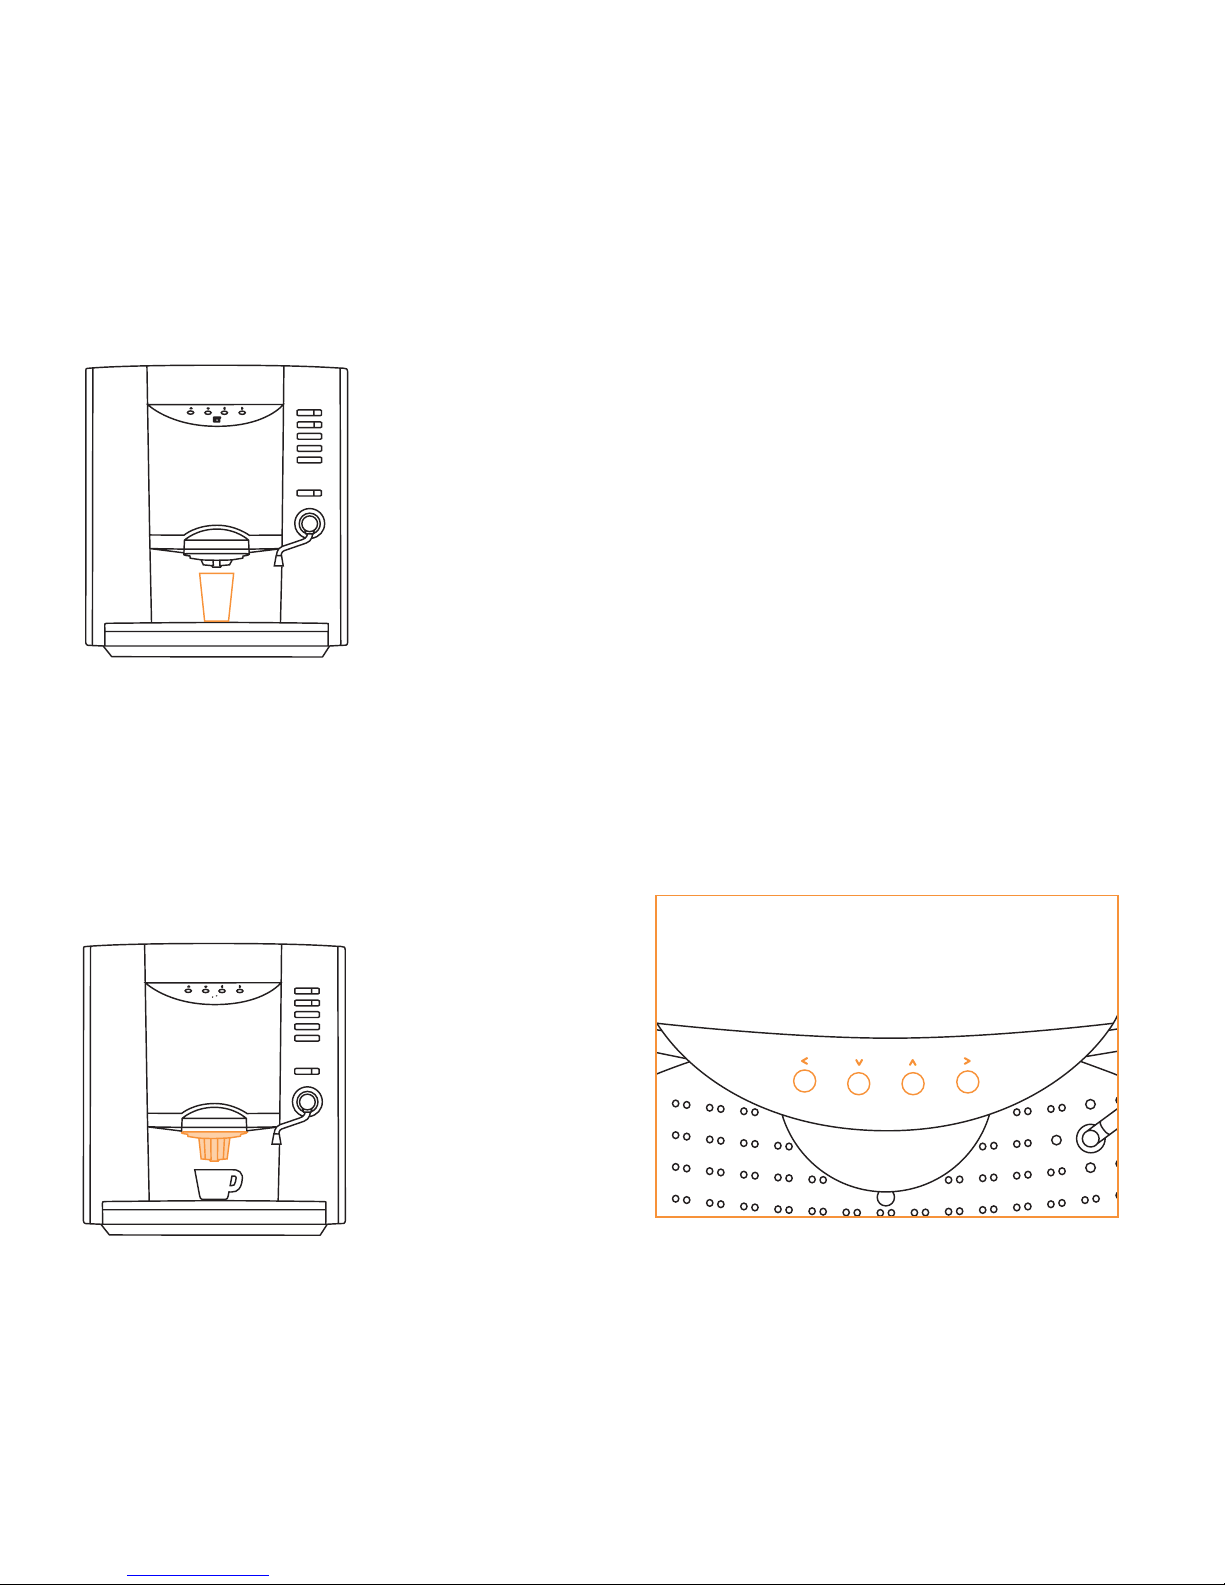
1 Place cup under outlet.
2 Set the strength of your beverage
using the up/down scroll keys (3).
3 Press a drink selection key (4). After
cup is filled, the display will signal
‘beep’ and indicate ‘coffee ready’.
Place the outlet extension (magnetic)
if small cups are used.
4.2 Reading out the counters
Use the service keyboard (A) and the
scroll keys (3). With the ‘<’ escape key
you can leave any menu item to return
to the previous menu item.
1 Press the ‘program*’ key twice on the
service keyboard. A menu appears on
the display.
2 Go to ‘counters’ by using the up/down
scroll keys.
3 Press ‘>’ enter to go into the counters
menu.
4 Scroll down to ‘free’ or ‘paid’ counters
and press ‘>’ enter. The display shows
the counter scores.
5 Press ‘<’ escape key to end the
counters read out.
(3)
5
>
<
<
>
escape scroll down scroll up enter
Page 9
5 Maintenance and cleaning
5.1 Daily maintenance
Not performing the daily maintenance
work has a harmful influence on the
quality of the products and can lead to
malfunctioning of the machine.
Step 1. Refill
1 Unlock (1) and open the doors.
2 Refill topping (see 6.3) and coffee
(see 6.2) if required.
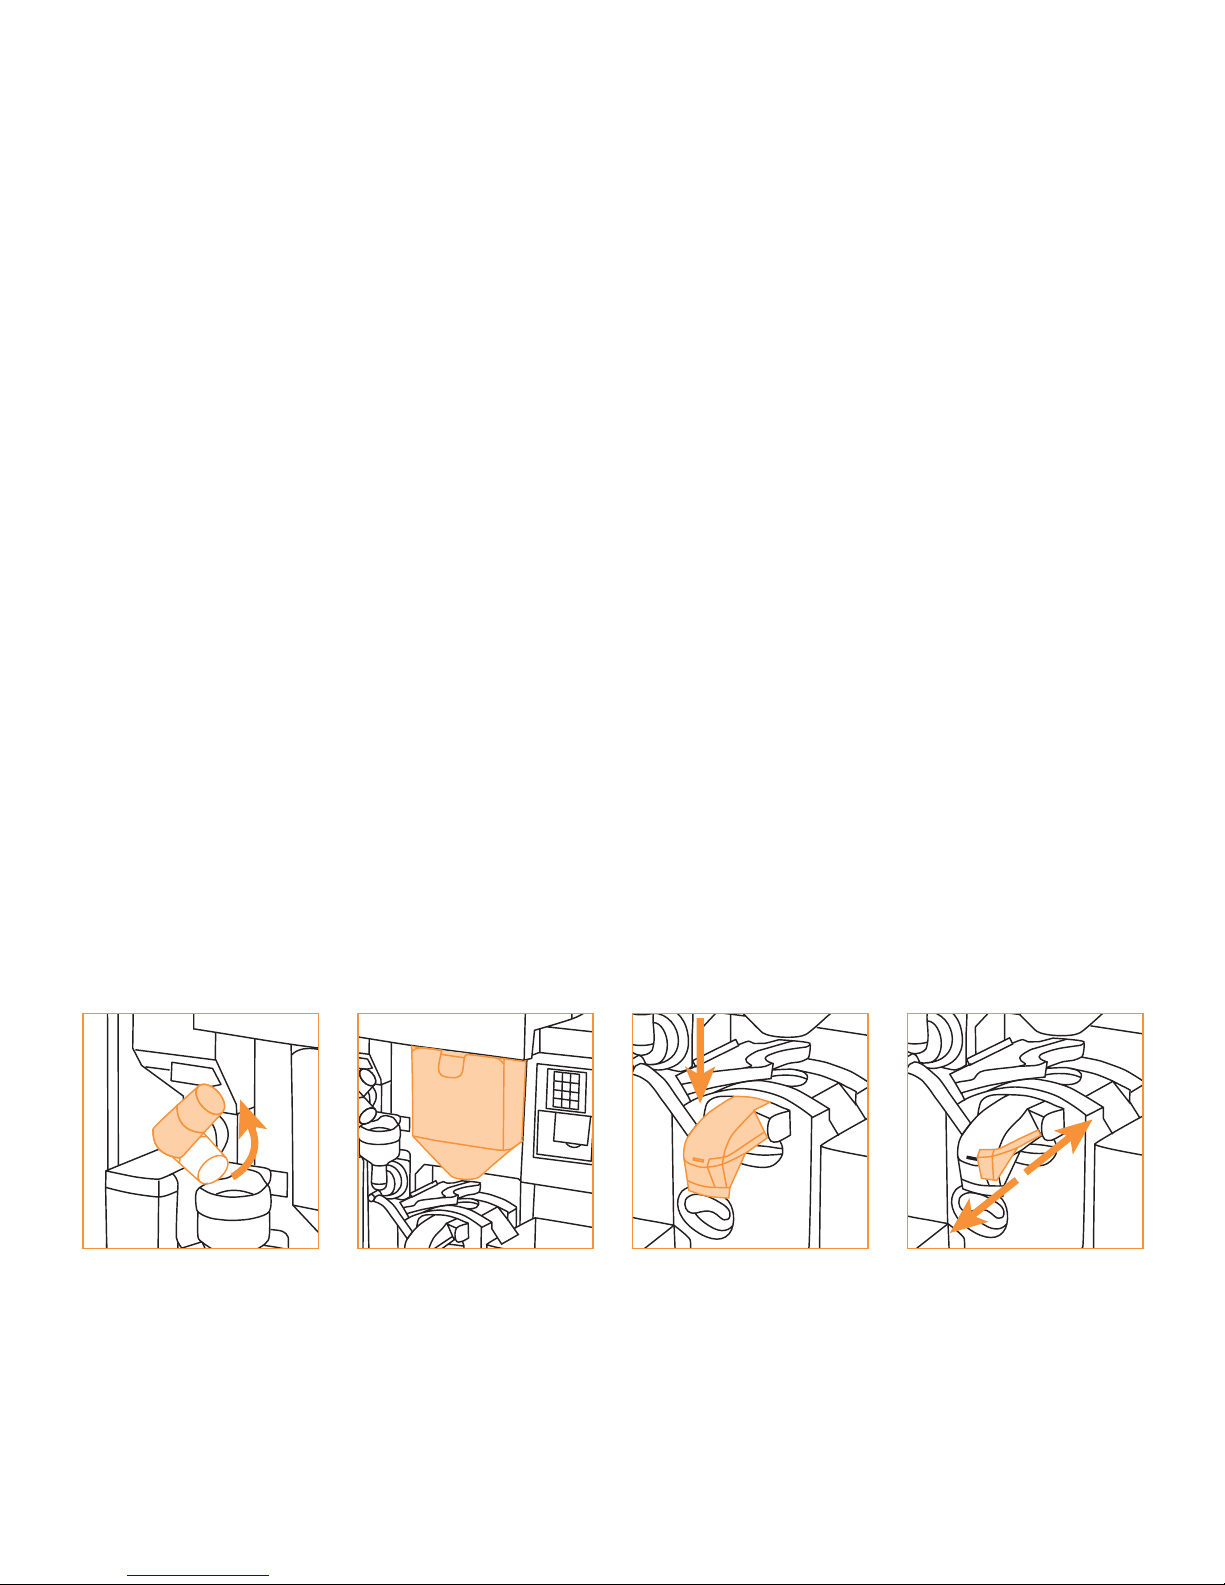
Step 2. Cleaning the topping outlet
1 Rotate the topping outlet (G) upwards
and take it off.
2 Clean it with a dry brush.
3 Be sure it is dry when replacing it.
4 Turn it downwards.
(G) (H)
Step 3. Cleaning the coffee funnel
1 Remove the coffee funnel (H)
2 Clean it with a dry brush.
3 Be sure it is dry when replacing it.
Step 4. Flushing mixer and CoEx®
brewer
1 Remove the drip tray (9) by pulling it
towards you.
2 Place a jug under the brewer outlet.
3 Click the brewer outlet (K) down and
pull the lock forward.
4 Press key 4 on the service keyboard.
Hot water will flow through the mixer.
Hold key until clean water comes out.
5 Press key 7 on the service keyboard
to flush hot water through the CoEx®
brewer. Repeat flushing until clean
water comes out.
6 Unlock the brewer outlet by pushing
the lock inwards.
(K) (K)
6
Page 10
Step 5. Cleaning the outlet extension
1 Remove the outlet extension by
pulling it down (magnetic, see 4.1)
2 Clean it with a brush and hot water.
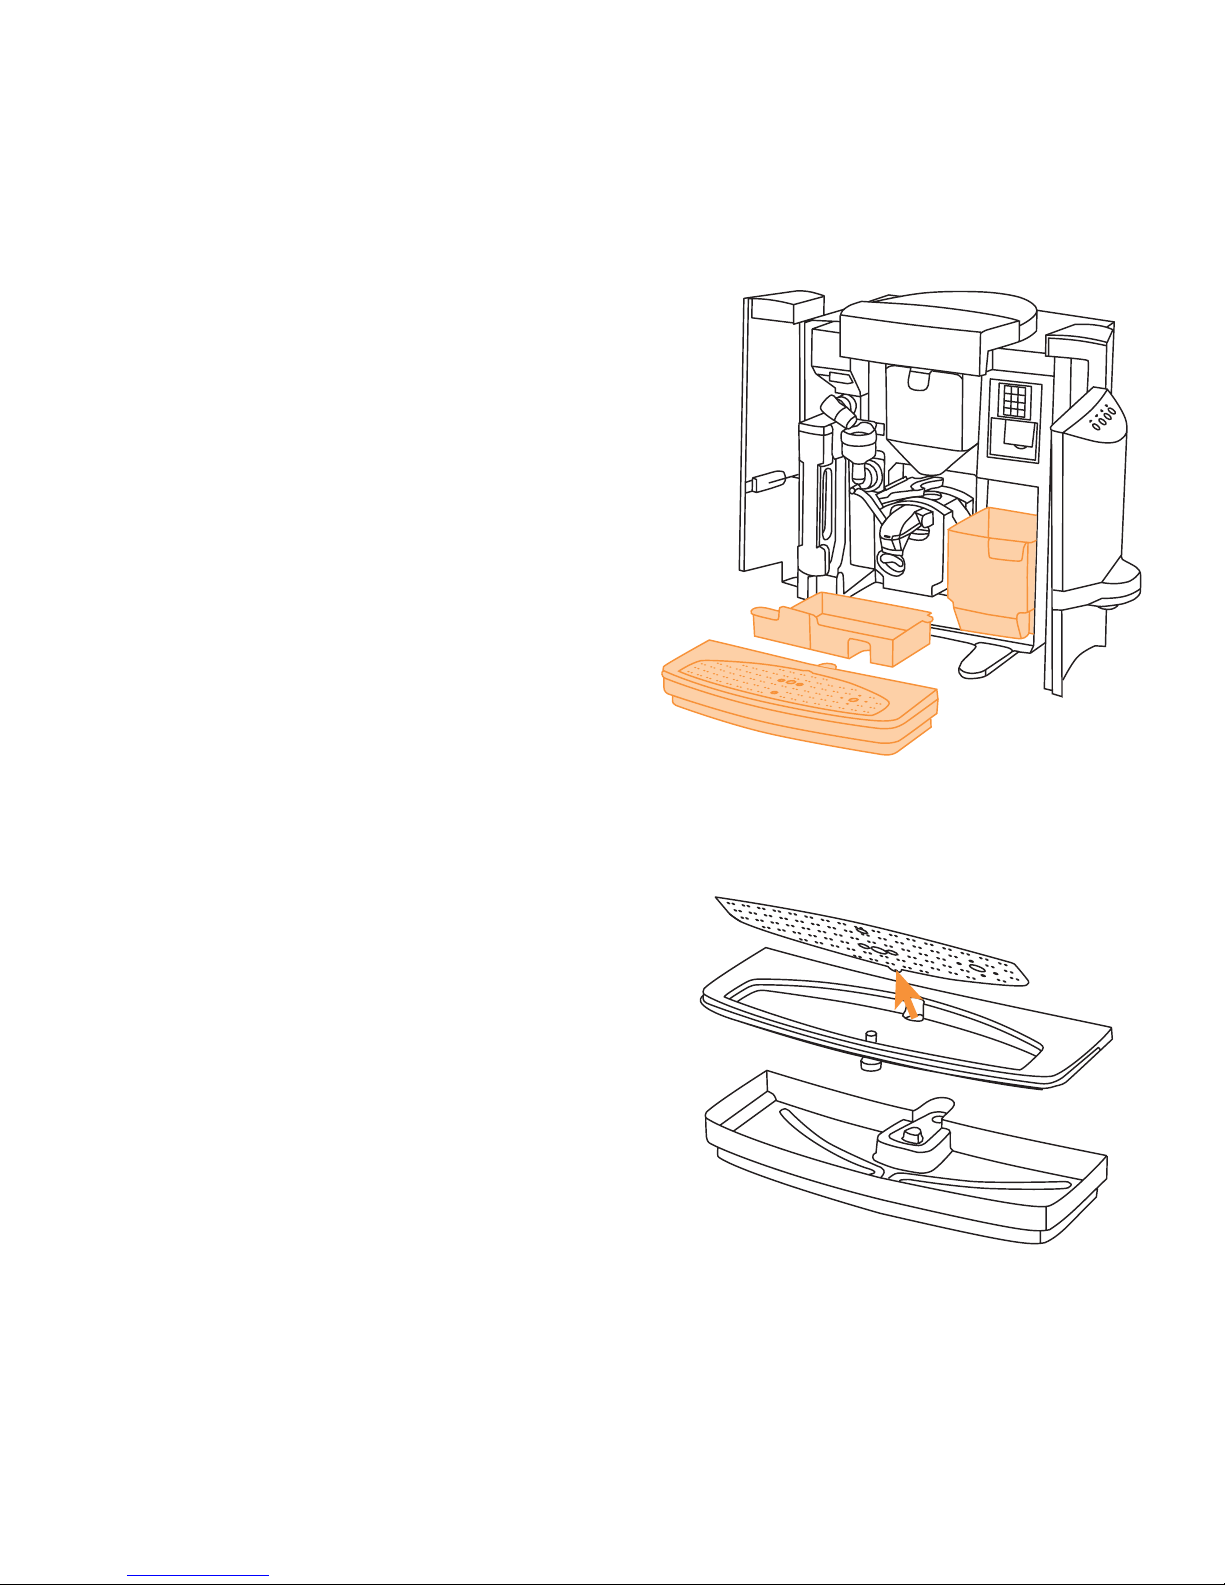
Step 6. Cleaning the waste container
and the internal drip tray
1 Remove the waste container (M).
Empty it and clean it.
2 Remove the internal drip tray (N).
Empty it and clean it.
3 Clean bottom of the machine with a
dry brush or a soft damp cloth.
4 Replace the waste container and the
internal drip tray.
Step 7. Cleaning the drip tray
1 Take the grid (8) out of the tray and
remove the top part.
2 Empty the drip tray and flush all parts
with warm water. Dry the parts.
3 Replace the drip tray.
Step 8. Cleaning the exterior
1 Clean the outside of the machine
with a soft damp cloth.
(9) (N) (M)
7
Page 11
5.2 Weekly maintenance
Not performing the weekly maintenance
work has a harmful influence on the
quality of the ingredients and can lead
to malfunctioning of the machine.
Step 1. Open de doors
1 Unlock (1) and open the doors.
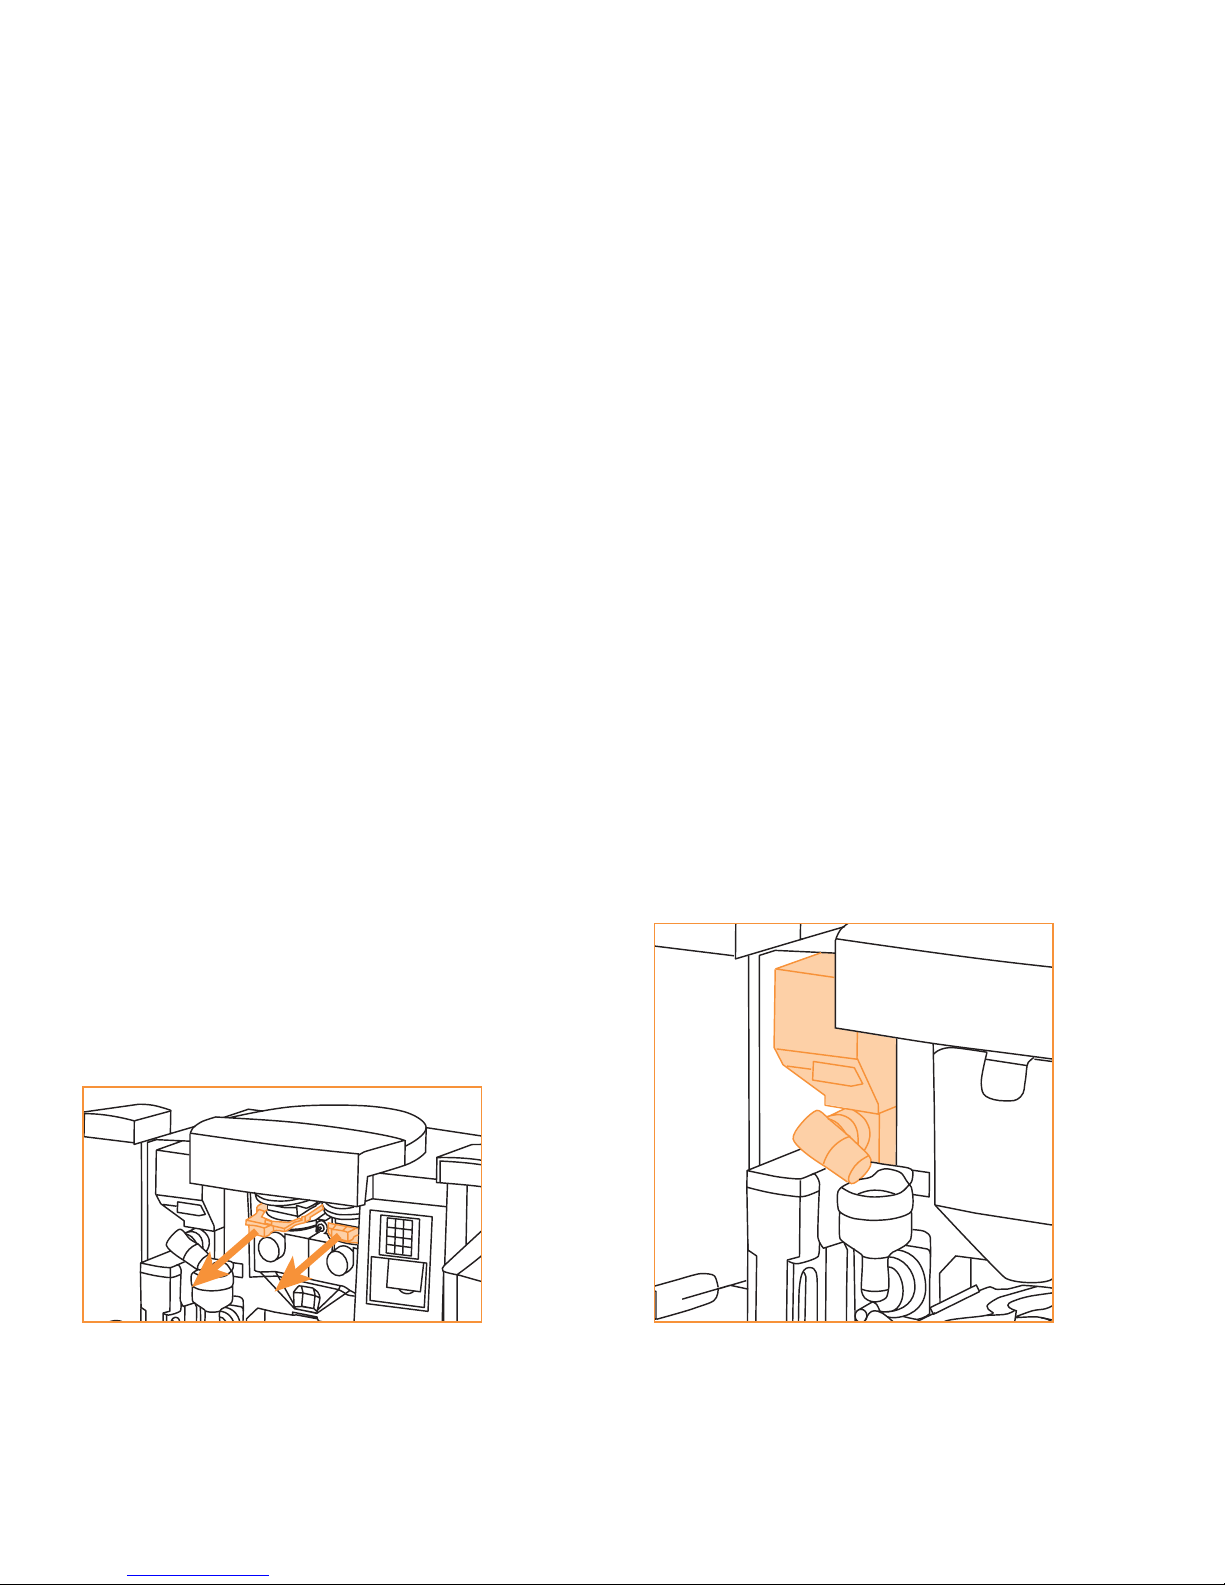
Step 2. Cleaning the coffee canisters
1 Remove the coffee funnel (H)
2 Pull both canister locks forward.
3 Remove the coffee canister lid.
4 Remove coffee canister (E) and
empty it.
5 Clean the coffee canister (F) with
a dry brush.
6 Clean the coffee canister platform
with a soft damp cloth.
7 Make sure the coffee canister is
dry when replacing it.
8 Refill the coffee canister (see 6.2).
9 Open both cannister locks by
pushing them back.
Step 3. Cleaning the topping canister
1 Turn the topping outlet (G) upwards,
remove the topping canister (D) and
empty it (see 6.3).
2 Remove the topping outlet (G) and
clean all topping canister parts with
a dry brush.
3 Replace the topping outlet, in the
upward position.
4 Clean the topping canister platform
with a soft damp cloth.
5 Fill and replace the topping canister.
(D/G)
8
Page 12
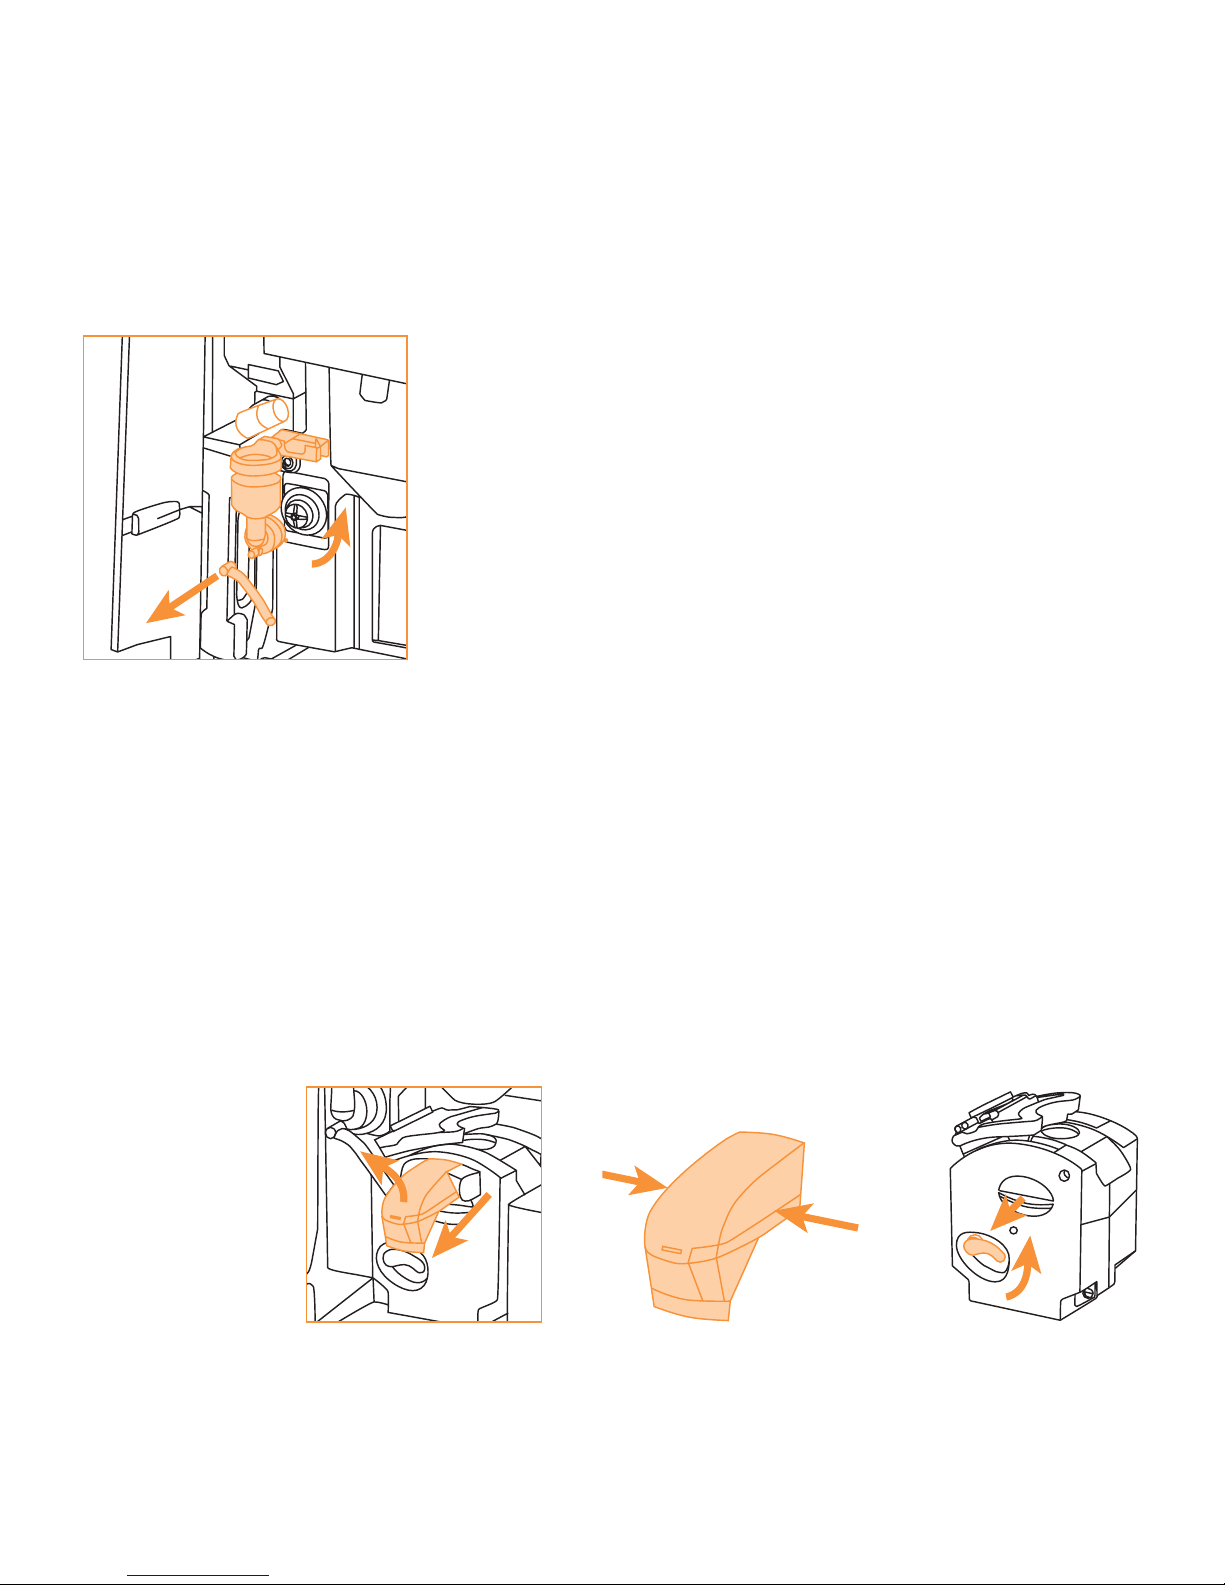
Step 4. Cleaning the mixer
(I/J)
1 Remove the mixer tube (J).
2 Turn the bayonet catch counter clock
wise (approx. 10º) and pull the mixer
(I) parts towards you.
3 Rinse out all loose parts with hot
water.
4 Replace the mixer into the machine.
Assembling of the mixing system is
carried out in reversed order of the
disassembling.
5 Turn the topping outlet downwards.
Step 5. Cleaning the CoEx® brewer
1 Remove the brewer outlet: Press it
down and pull out the knob at the
right (see 5.1, step 4). Then remove
the left part by lifting it upwards.
2 Press the sides to split the two parts
of the brewer outlet (K).
3 Rinse the brewer outlet with hot
water while cleaning both parts,
inside and outside, with a brush.
4 Remove the CoEx® brewer (L): pull the
fixation handle upwards and pull the
brewer towards you at the same time.
5 Rinse out the CoEx® brewer with
warm water while cleaning it with
a brush.
6 Dry the CoEx® brewer and the
brewer outlet.
7 Replace the CoEx® brewer.
8 Assembling of the brewer outlet on
the CoEx® brewer is carried out in
reversed order.
Step 6. Take a test drink
9
(L)(K)
Page 13
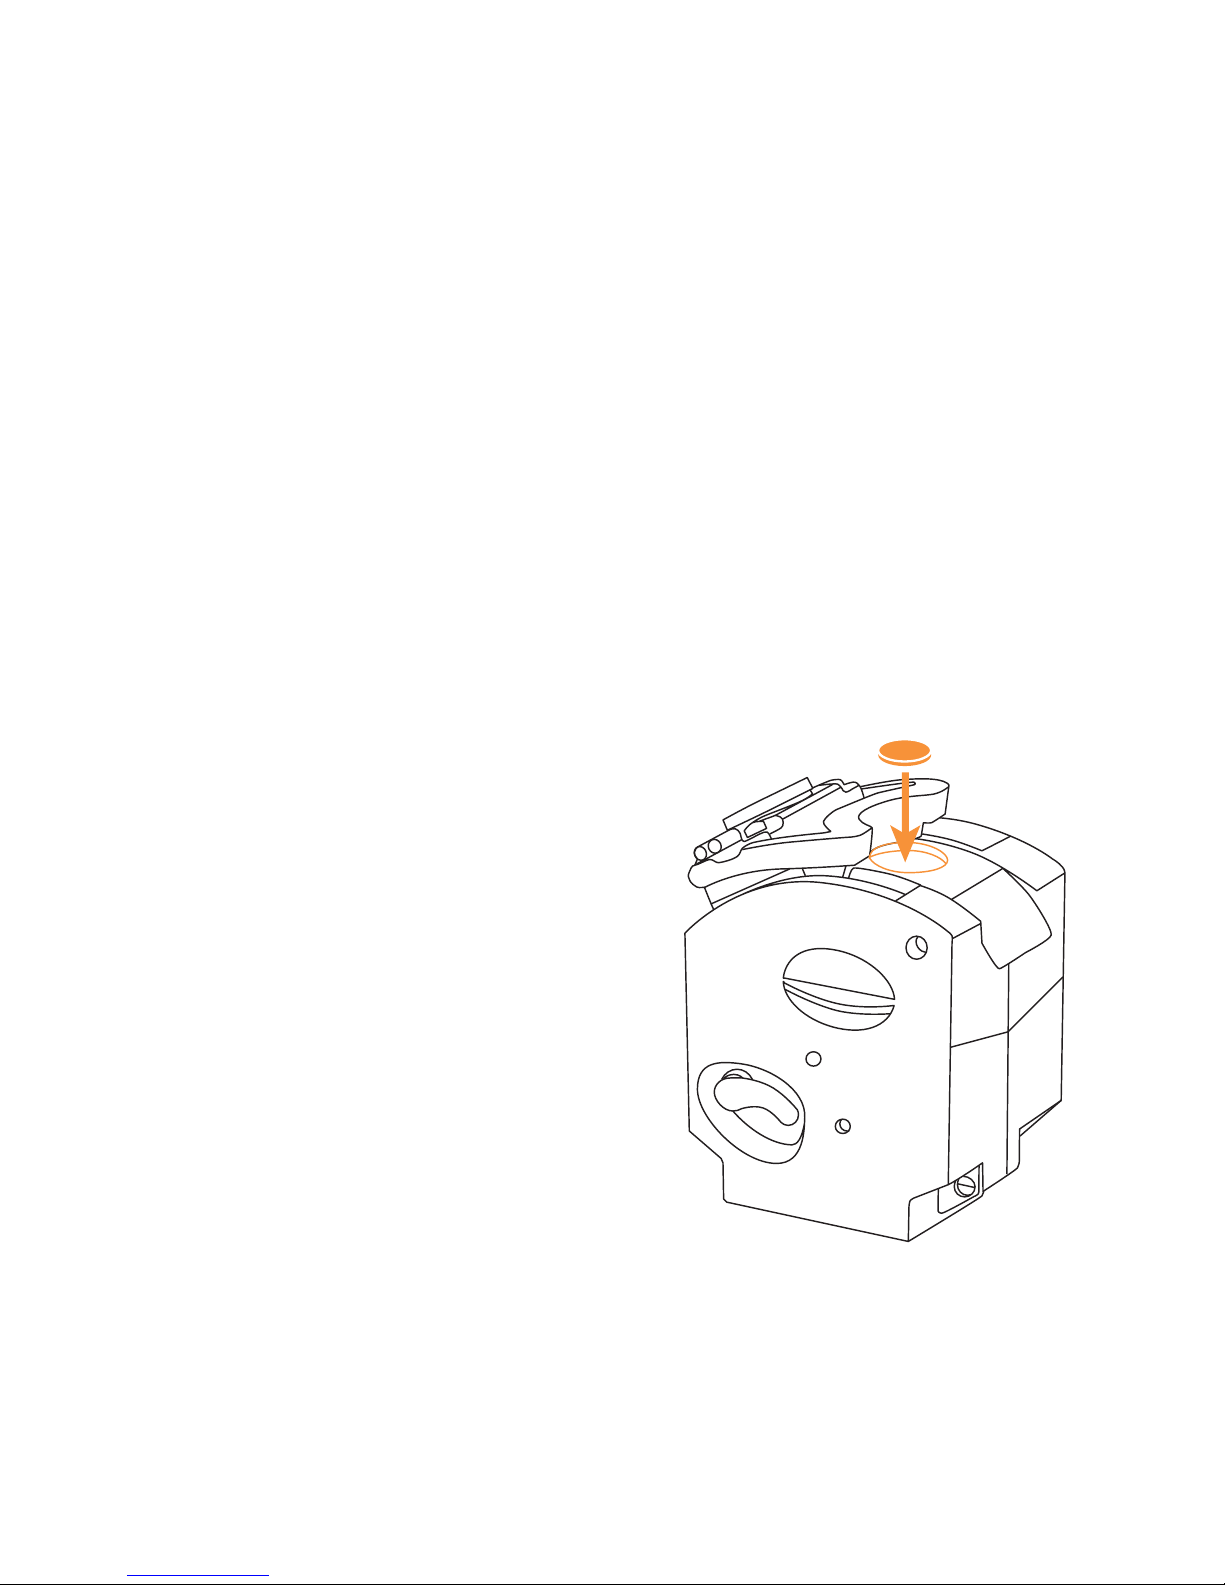
5.3 Monthly maintenance
Not performing the monthly maintenance work has a harmful influence on
the quality of the ingredients and can
lead to malfunctioning of the machine.
Apart from the weekly maintenance,
the following tasks have to be
performed monthly to ensure a correctly
operating machine and an optimal
quality of the coffee.
Step 1. Cleaning the coffee- and topping
canisters with water
1 Remove the coffee canister and
empty it (6.2).
2 Remove the topping canister and
empty it (see 6.3).
3 Rinse out the canisters with warm
water until all coffee and topping
residues are removed.
5 Make sure that each canister is dry
inside and outside. If it is not
completely dry, the coffee may form
lumps, which may block the system.
6 Fill the topping canister and replace
it into the machine (see 6.3).
7 Replace the coffee canister into the
machine and fill it (see 6.2).
8 Open the canister locks (5.2 step 2).
Step 2. Running a cleaning cycle
1 Press the program key on the service
keyboard twice.
3 Select the cleaning cycle.
4 Place a cleaning pill in the CoEx®
brewer.
5 Place a jug under the brewer outlet.
6 Click the brewer outlet down and pull
the lock forward (5.1 step 4).
7 Press ‘>’ enter to start the cleaning
cycle, which takes about six minutes.
8 Unlock brewer outlet.
(L)
10
Page 14
6 Filling
6.1 Filling the water tank
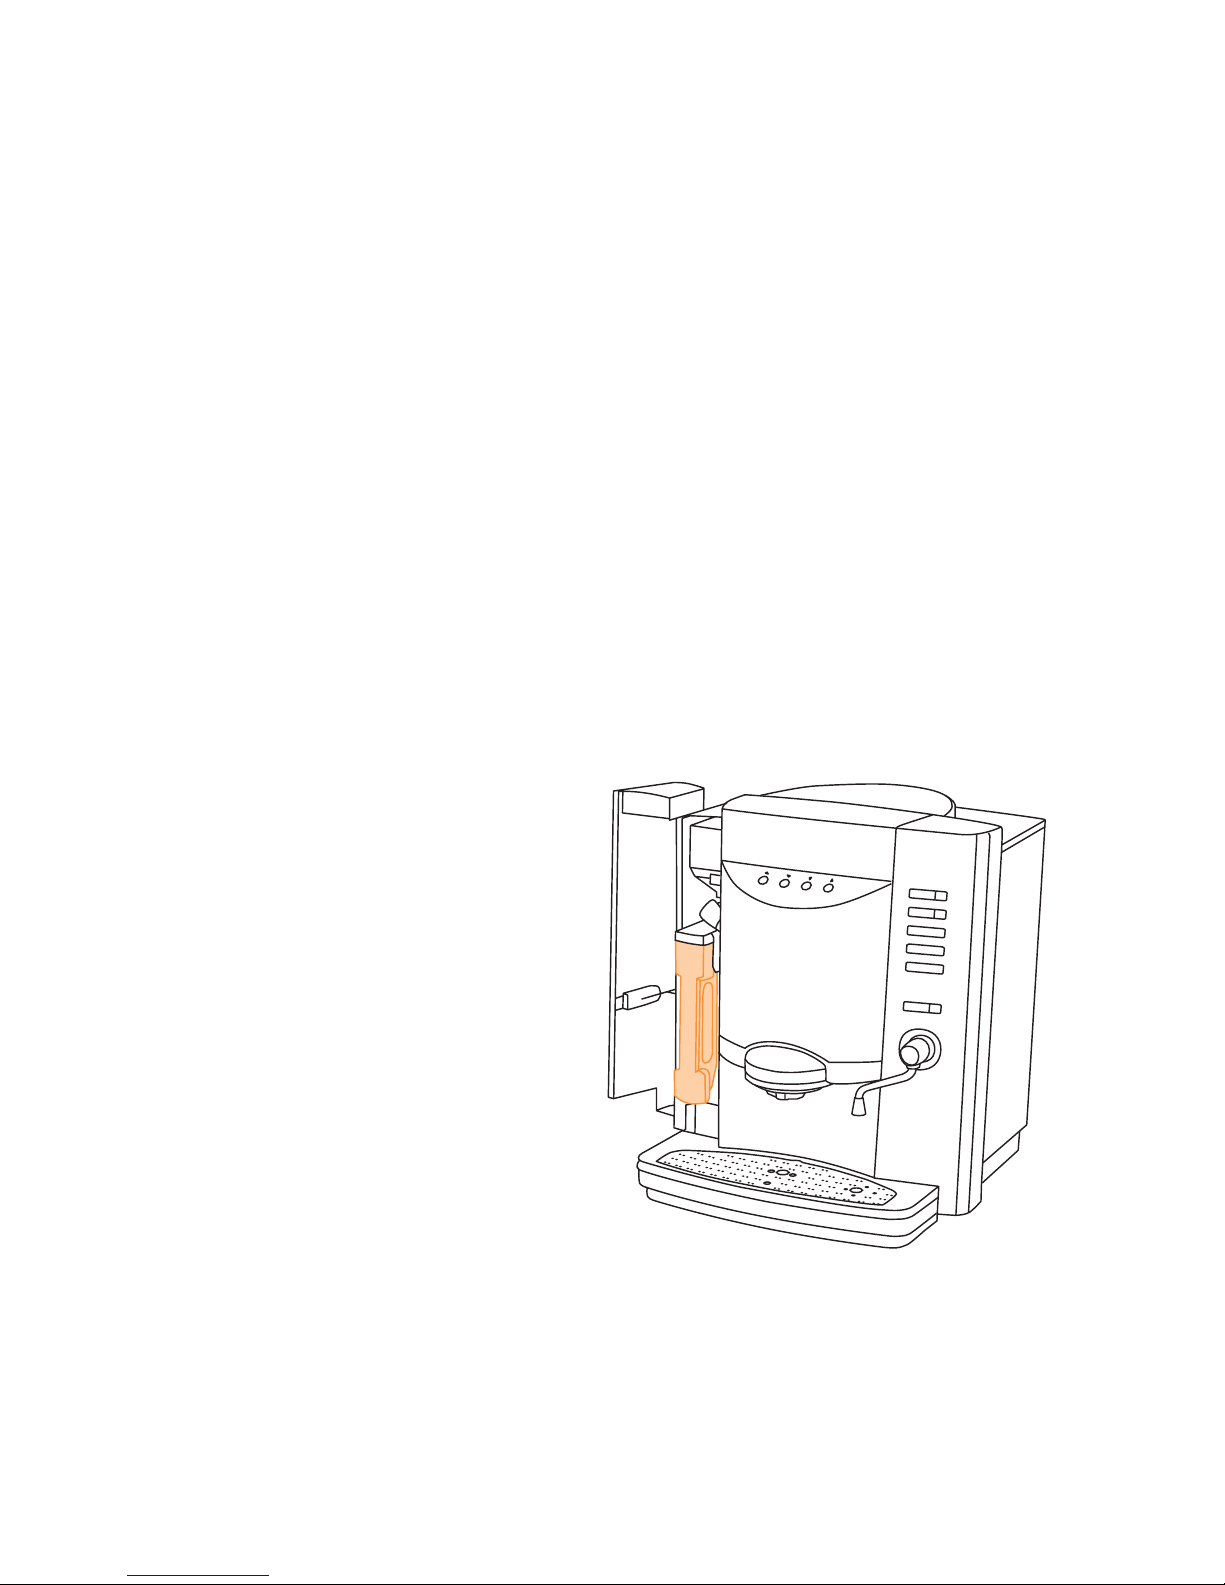
Only for hand fill application.
1 Unlock and open left door.
2 Remove the water tank (P) by pulling
it towards you.
3 Fill the water tank with fresh and
clean water.
4 Replace the water tank.
5 Close the door and lock it.
(P)
11
Page 15
6.2 Filling the coffee canister
Fill up the coffee canister for one or
two days to keep the coffee fresh.
Make sure that the coffee canister
remains filled with a layer of at least
4 cm of ingredients. Use ingredients
which are recommended by the supplier
of the machine.
Use beans and/or ground coffee in
accordance with the type of your
Essence machine.
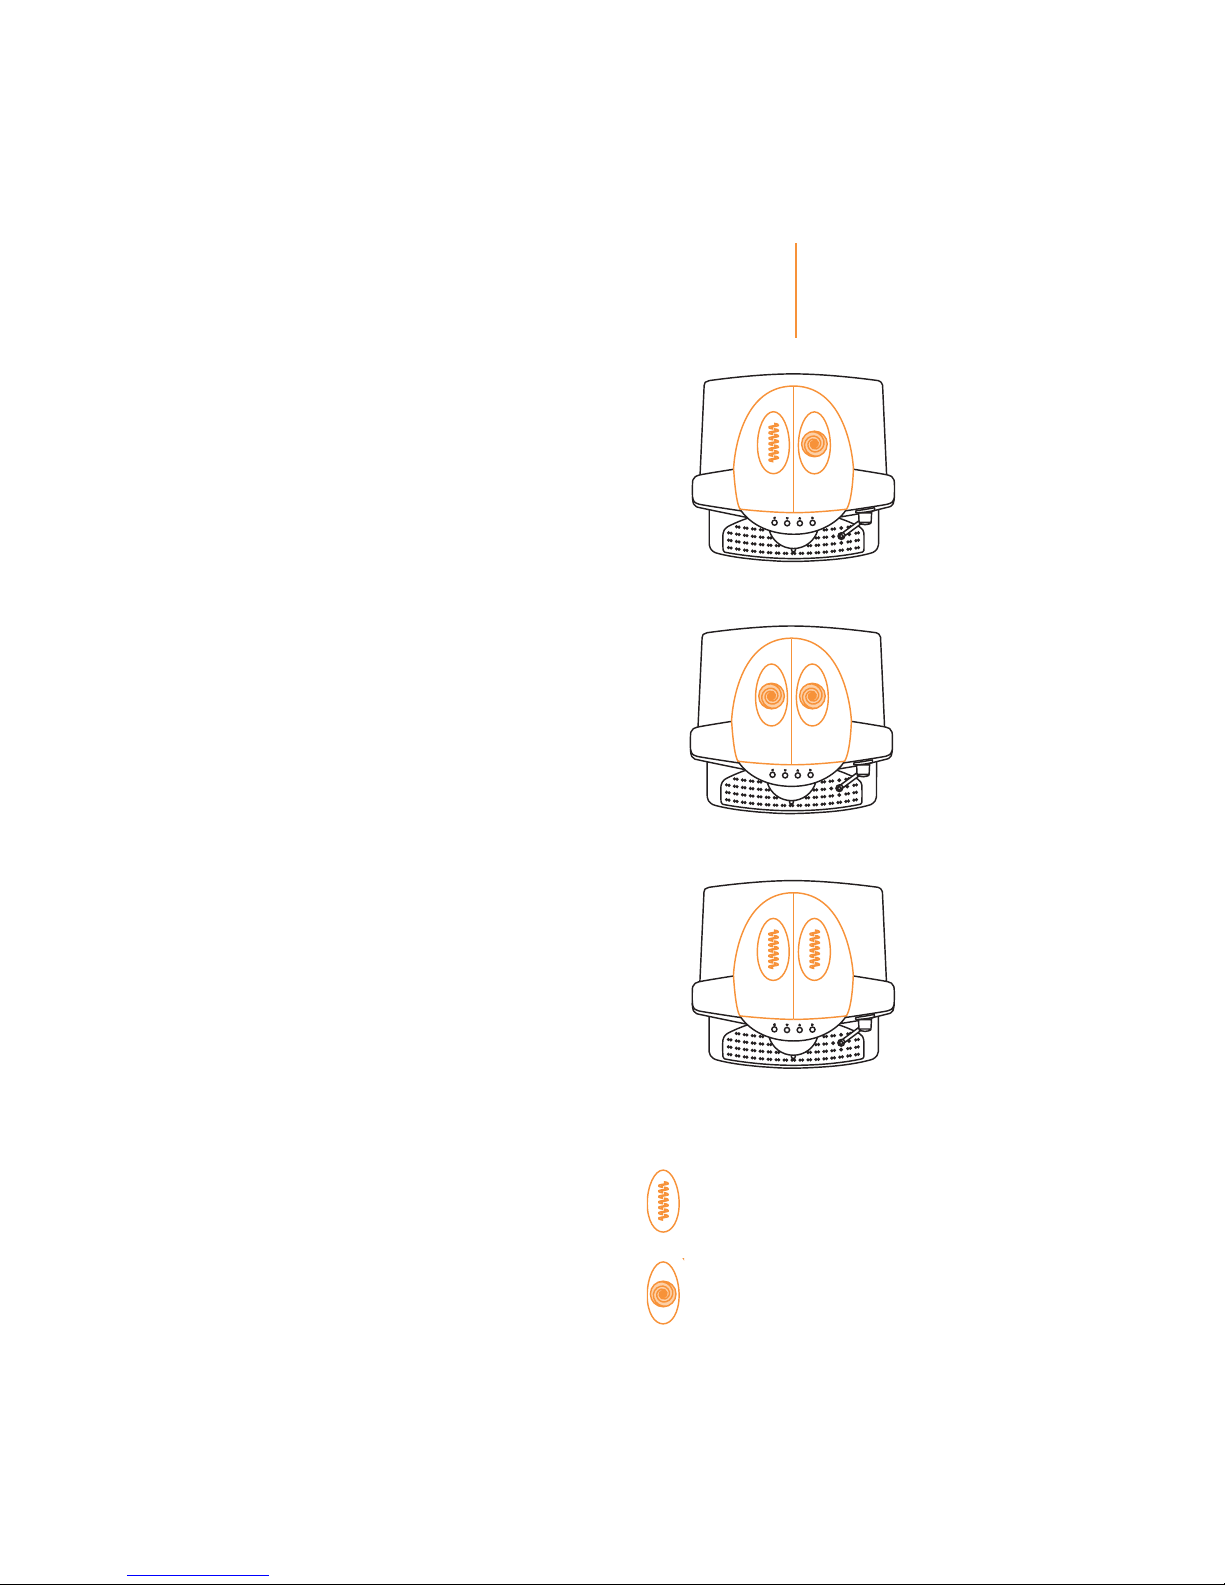
Coffee canisters (I or II):
• Ground coffee/Beans
• Beans/Beans
• Ground coffee/Ground coffee
Fill up the coffee canisters:
1 Unlock the left door.
2 Open the canister lid (E).
3 Fill with beans and/or ground coffee
according to I or II.
4 Replace the canister lid and lock
the door.
5 Take a test drink.
12
Canister I Canister II
Essence BG
Essence Twin B
Essence Twin G
G Ground coffee
B Beans
Page 16
6.3 Filling the topping canister
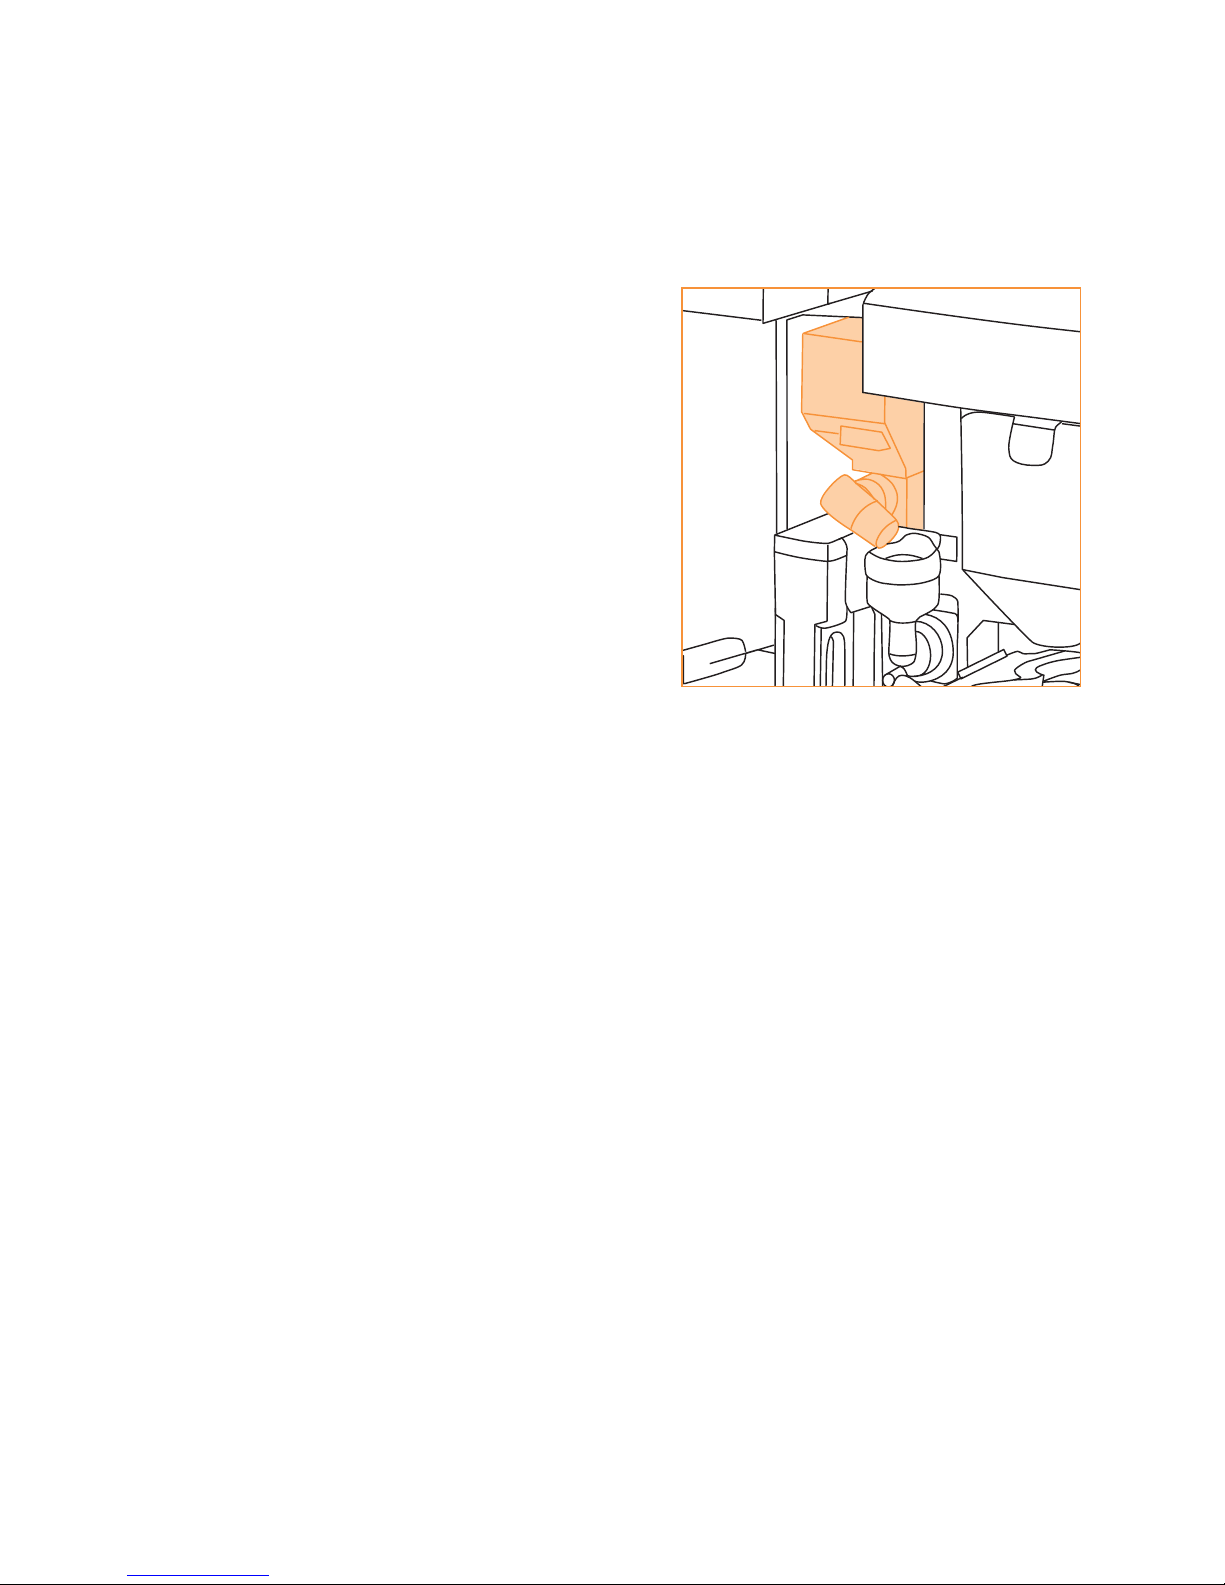
1 Unlock and open the left door.
2 Turn the topping outlet (G) upwards.
3 Lift up the the topping canister (D) at
the front, until the positioning ridge
comes out of the hole.
4 Pull the topping canister towards you
to take it out of the machine.
5 Remove the topping canister lid.
6 Fill the canister with topping and
replace the topping canister lid.
7 Replace the topping canister into the
machine: Slide the topping canister
backwards until you can fit the
positioning ridge back into the hole.
8 Turn the topping outlet downwards.
9 Take a test drink.
10 Close the door and lock it.
(D/G)
13
Page 17

7 Messages on the display
Switch off the machine and water
supply and call the service engineer.
There is no water in the pressure boilers.
The water system is leaking water.
A too high temperature is detected,
The temperature sensor is not
functioning correctly.
This sensor is disconnected.
The internal sensors are disconnected.
The electronic controll system is not
working correctly.
7.1 Error messages requiring a service
engineer
No water in boiler
Inlet valve/water leaking
Water temperature too high
Shortcut temperature sensor
Disconnected temperature sensor
Sensors disconnected
Communication error
14
When the given solutions don't
work please always contact the
service engineer.
Page 18

7.2 Messages you can solve yourself
Water tank needs filling
Close left door
Place cannister lid
Place waste container
Empty internal drip tray
No coffee in brewer
Not enough water in your cup
CoEx brewer not in position
No water connected
Install water tank
Filling pressure boiler
ERROR 1
Wait until the water tank is filled. In
hand fill mode: fill the water tank (P).
Close both doors.
The coffee cannister lid (E) is not placed
correctly, replace it.
Replace the waste container (M).
Empty and clean internal drip tray (N).
Fill the coffee canister(s), replace the
coffee funnel (H) and/or open the
canister lock.
Empty this cup, try again.
Empty it and retry the same selection.
Replace the CoEx brewer (L).
Open/connect the water connection
(see 1.3) and restart the machine.
Install the hand fill water tank (P).
The hot water system is filling, wait.
The cleaning cycle in not finished.
Restart the cleaning cycle.
15
Page 19

Copyright © 2004, J.M. de Jong DUKE
Automatenfabriek B.V. All rights reserved.
Although this user manual has been written
with the utmost care, De Jong DUKE automatenfabriek b.v. accepts no liability for
inaccuracies or omissions. No liability is
accepted for the consequences due to
operation of the equipment in accordance
with the information contained in these
instructions.
J.M. de Jong DUKE Automatenfabriek B.V.
reserves the right to alter the specifications
and the information in this manual at any
time and without prior notification to the
purchaser. No part of this publication may be
stored in a retrieval system, or transmitted,
in any form or by any means without prior
permission of the publisher.
16
Page 20
Page 21
Page 22
1
2
3
4
5
6
7
8
9
10
A
B
C
D
E
F
G
H
I
J
K
L
M
N
O
P
Exterior of the Essence
Machine lock
Display
Scroll keys (strength selection):
escape/scroll down/scroll up/enter
Drink selection keys
Espresso or coffee outlet
Milk outlet
Hot water or steam outlet
Grid
Drip tray
On/off switch (see 1.3)
Interior of the Essence
Service keyboard
ConfigCard and dataconnection
Type plate
Topping canister
Canister lid
Coffee canisters
Topping outlet
Coffee funnel
Mixer
Mixer tube
Brewer outlet
CoEx® brewer
Waste container
Internal drip tray
Internal drip tray sensor
Water tank
E
1
7
4
3
7
8
9
6
10
2
H
D
G
P
K
F
A
B
L
M
N
O
C
I
J
5
5
 Loading...