

DEI Sales Polk Audio XBAR User Manual
Titleblock do NOT print this page
Date
D
#
F
e
S
D
By
C
r
.
D
h
F
h
Process
NotesArtwo
835
e
y
t
e
r
s
e
ts
ate
n
3
o
3
W
g
ge
Titleblock do NOT print this pa
Date
rawing
Drawing #
ile Nam
File Name
cale
Scale
rawn
Drawn By
olo
Color
Emboss Ht
Emboss Ht.
eboss Dept
Deboss Depth
inis
Finish
Process
Notes
Artwork
Revision Date Description
RevisionD
A
B
C
10 May 2013
BP2
HBP2835
1SurroundBar_MN2835C.pdf
N1SurroundBar_MN2835C.pdf
ll Siz
Full Size
KLB
rints 100% Black
Prints 100% Black
a
n/a
a
n/a
a
n/a
Offset lithograph
Offset lithography
Titleblock does not Prin
Titleblock does not Print
Digital fil
Digital file
rk
Descriptio
Added new warnings & energy star logo
Added new warnings & energy star log
20/1
8/20/13
Change Power Supply to 20V 3A 60W
Change Power Supply to 20V 3A 60
27/1
8/27/13
Remote Guide Step 6: removed steady
Remote Guide Step 6: removed steady
/5/13
9/5/13
blue LED light
Approvals
Approvals
roject Manager
Project Manager
roduct Line Manager
Product Line Manager
echanical Designe
Mechanical Designer
ystem Engineer
System Engineer
ectrical Engineer
Electrical Engineer
afety & Regulation
Safety & Regulations
uality Assuranc
Quality Assurance
reative Director
Creative Director
mmen
Comments
ignature
Signature Date

English
C
m
s
Thi
-
ld
d.
.
All
th
.
All
followed.
d
.
ppli
r
w
like.
-
hild
d
-
ti
d
f
-
Thi
adhered to
th
ppli
y.
w
th
This i
ill fail
.
likely
d
ll
Thi
.
-
r
lli
l.
his ca
esult in a risk of fi re or electric shock.
-
ill liquid of
this audio/video product.
-
lifi ed
l.
lifi ed
l
:
.
liquid h
pilled
.
.
th
Adj
r
d
ill of
lifi ed
t
.
hibi
.
h
Englis
Important Safety Instructions
Important Safety Instruction
This product was designed and manufactured to meet strict
s product was designed and manufactured to meet strict
quality and safety standards. There are, however, some installa
quality and safety standards. There are, however, some installa-
tion and operation precautions which you shou
tion and operation precautions which you should
e particularly aware of.
be particularly aware of.
1. Read Instructions. All the safety and operating instructions
1. Read Instructions. All the safety and operating instructions
ould be read before the system is operate
should be read before the system is operated.
2. Retain Instructions. The safety and operating instructions
2. Retain Instructions. The safety and operating instructions
ould be retained for future reference
should be retained for future reference.
3. Heed Warnings.
3. Heed Warnings. All warnings on the appliances and in
e operating instructions should be adhered to
the operating instructions should be adhered to.
4. Follow Instructions.
4. Follow Instructions. All operating and use instructions
be
should be followed.
5. Cleaning. Unplug the appliance from wall outlet before
5. Cleaning. Unplug the appliance from wall outlet before
leaning. Do not use liquid cleaners or aerosol cleaners.
cleaning. Do not use liquid cleaners or aerosol cleaners.
se a damp cloth for cleaning.
Use a damp cloth for cleaning.
6. Attachments. Do not use attachments not recommende
6. Attachments. Do not use attachments not recommended
the product manufacturer as they may cause hazards
by the product manufacturer as they may cause hazards.
7. Water and Moisture. Do not use these a
7. Water and Moisture. Do not use these appliances near
ater: for example, near a bath tub, washbowl, kitchen sink,
water: for example, near a bath tub, washbowl, kitchen sink,
r laundry tub, in a wet basement, or near a swimming pool,
or laundry tub, in a wet basement, or near a swimming pool,
nd the
and the like.
8. Accessories. Do not place these appliances on an unstable
8. Accessories. Do not place these appliances on an unstable
art, stand, tripod, bracket, or table. The audio/video prod
cart, stand, tripod, bracket, or table. The audio/video prod-
ucts may fall, causing serious injury to a c
ucts may fall, causing serious injury to a child or adult, and
erious damage to the products. Use only with a cart,
serious damage to the products. Use only with a cart,
tand, tripod, bracket, or table recommended by the
stand, tripod, bracket, or table recommended by the
anufacturer, or sold with the appliances. Any mounting
manufacturer, or sold with the appliances. Any mounting
the appliances should follow the manufacturer’s instruc
of the appliances should follow the manufacturer’s instruc-
ons, and should use mounting accessories recommende
tions, and should use mounting accessories recommended
y the manufacturer.
by the manufacturer.
9. Ventilation. Slots and openings in the cabinet are provided
9. Ventilation. Slots and openings in the cabinet are provided
or ventilation and to ensure reliable operation of the ap
for ventilation and to ensure reliable operation of the ap-
ances and to protect them from overheating, and these
pliances and to protect them from overheating, and these
penings must not be blocked or covered. The openings
openings must not be blocked or covered. The openings
hould never be blocked by placing the products on a
should never be blocked by placing the products on a
bed, sofa, rug, or other similar surface. This product should
bed, sofa, rug, or other similar surface. This product should
never be placed near or over a radiator or heat register.
never be placed near or over a radiator or heat register.
s product should not be placed in a built-in installation
This product should not be placed in a built-in installation
uch as a bookcase or rack unless proper ventilation is
such as a bookcase or rack unless proper ventilation is
rovided or the manufacturer’s instructions have
provided or the manufacturer’s instructions have
n
been adhered to.
10 . Power Sources. This product should be operated only from
10 . Power Sources. This product should be operated only from
e type of power source indicated on the marking labels.
the type of power source indicated on the marking labels.
If you are not sure of the type of power supply to your home,
If you are not sure of the type of power supply to your home,
onsult your a
consult your appliance dealer or local power company.
11. Grounding or Polarization. This product is equipped
11. Grounding or Polarization. This product is equipped
ith polarized alternating-current line plugs (plugs having
with polarized alternating-current line plugs (plugs having
ne blade wider than the other). This plug will fi t into
one blade wider than the other). This plug will fi t into
e power outlet only one way.
the power outlet only one way. This is a safety feature.
warnings on the appliances and in
operating and use instructions
ances nea
or adult, an
.
ance dealer or local power compan
s a safety feature.
If you are unable to insert the plug fully into the outlet, try
If you are unable to insert the plug fully into the outlet, try
reversing the plug. If the plug should st
reversing the plug. If the plug should still fail to fi t, contact
your electrician to replace your obsolete outlet. Do not defeat
your electrician to replace your obsolete outlet. Do not defeat
the safety purpose of the polarized plug
the safety purpose of the polarized plug.
12. Power Cord Protection. Power-supply cord should be routed
12. Power Cord Protection. Power-supply cord should be routed
so that it is not
so that it is not likely to be walked on or pinched by items
placed upon or against it, paying particular attention to cords
placed upon or against it, paying particular attention to cords
at plugs, convenience receptacles,
at plugs, convenience receptacles,
and the point where they exit from the appliances.
13. Lightning. For added protection for this audio/video product
13. Lightning. For added protection for this audio/video product
uring a lightning storm, or when it is left un-attended an
during a lightning storm, or when it is left un-attended and
unused for long periods of time, unplug it from the wa
unused for long periods of time, unplug it from the wall
outlet and disconnect the antenna or cable system.
outlet and disconnect the antenna or cable system. This
will prevent damage to the product due to lightning and
will prevent damage to the product due to lightning and
power-line surges
power-line surges.
14. Power Lines. An outside antenna system should not be lo
14. Power Lines. An outside antenna system should not be lo-
cated in the vicinity of overhead power lines or other electric
cated in the vicinity of overhead power lines or other electric
ght or power circuits, or where it can fall into such powe
light or power circuits, or where it can fall into such power
nes or circuits. When insta
lines or circuits. When installing an outside antenna system,
extreme care should be taken to keep from touching such
extreme care should be taken to keep from touching such
power lines or circuits as contact with them might be fata
power lines or circuits as contact with them might be fatal.
15. Overloading. Do not overload wall outlets and extension
15. Overloading. Do not overload wall outlets and extension
rds as t
cords as this can result in a risk of fi re or electric shock.
16. Object and Liquid Entry. Never push objects of any kind into
16. Object and Liquid Entry. Never push objects of any kind into
this product through openings, as they may touch danger
this product through openings, as they may touch danger-
ous voltage points or short out parts that could result in
ous voltage points or short out parts that could result in
a fi re or electric shock. Never sp
a fi re or electric shock. Never spill liquid of any kind on
this audio/video product.
17. Servicing. Do not attempt to service this product yourself,
17. Servicing. Do not attempt to service this product yourself,
as opening or removing covers may expose you to danger
as opening or removing covers may expose you to danger-
ous voltage or other hazards. Refer all servicing to qua
ous voltage or other hazards. Refer all servicing to qualifi ed
service personne
service personnel.
18. Damage Requiring Service. Unplug this product from wall
18. Damage Requiring Service. Unplug this product from wall
outlets and refer servicing to qua
outlets and refer servicing to qualifi ed service personnel
under the following conditions
under the following conditions:
a. When the power supply cord or plug is damaged
a. When the power supply cord or plug is damaged.
b. If
b. If liquid has been spilled, or objects have fallen
into the product
into the product.
c. If the product has been exposed to rain or water
c. If the product has been exposed to rain or water.
d. If the product does not operate normally by following
d. If the product does not operate normally by following
e operating instructions.
the operating instructions. Adjust only those controls that
are covered by the operating instructions, as an imprope
are covered by the operating instructions, as an improper
adjustment of other controls may result in damage an
adjustment of other controls may result in damage and
w
will often require extensive work by a qualifi ed technician
o restore the product to its normal operation
to restore the product to its normal operation.
e. If the product has been dropped or the cabinet
e. If the product has been dropped or the cabinet
has been damaged.
f. When the product ex
f. When the product exhibits a distinct change in
performance this indicates a need for service
performance this indicates a need for service.
to be walked on or pinched by items
ng an outside antenna system,
n r
as been s
ten require extensive work by a qua
, or objects have fallen
ts a distinct change in
to fi t, contact
s
any kind on
service personne
ust only those controls that
technician
Customer Service Hours of Operation: Monday-Friday, 9am-5:30pm est polkcs@polkaudio.com
ustomer Service Hours of Operation: Monday-Friday, 9am-5:30pm est polkcs@polkaudio.co
3

19. Replacement Parts. When replacement parts are required,
)
b-
.
)
t
like.
t
.
-
t
This prod
The
sho
located o
back
Speaker System
CAUTION:
.
.
-
d
.
liquid
.
dil
.
T
f
w
Thi
distance of 20 centimeters betwee
adiator
dy.
n
:
d
g
.
The devi
l
/
-
t
r
t
:
Thi
Thi
i-
ill
r
televisi
the i
i-
diff
r
technici
lp.
t
ll
-
j
ible f
pli
.
19. Replacement Parts. When replacement parts are required,
e sure the service technician has used replacement parts
be sure the service technician has used replacement parts
specifi ed by the manufacturer or that the parts have the
specifi ed by the manufacturer or that the parts have the
same characteristics as the original part. Unauthorized su
same characteristics as the original part. Unauthorized sub-
stitutions may result in fi re, electric shock or other hazards
stitutions may result in fi re, electric shock or other hazards.
AUTION:
CAUTION: Danger of EXPLOSION if battery
s incorrectly replaced. Replace only with the
is incorrectly replaced. Replace only with the
same or equivalent type. (CR2025)
WARNING: Do not expose batteries or battery pack
WARNING: Do not expose batteries or battery pack
o excessive heat such as sunshine, fi re or the
to excessive heat such as sunshine, fi re or the like.
20. Safety Check. Upon completion of any service or repairs
20. Safety Check. Upon completion of any service or repairs
o this product, ask the service technician to perform
to this product, ask the service technician to perform
safety checks to determine that the products are in
safety checks to determine that the products are in
roper operating condition
proper operating condition.
21. Carts and Stands. The appliances should be
21. Carts and Stands. The appliances should be
used only with a cart or stand that is recom
used only with a cart or stand that is recom-
mended by the manufacturer. An appliance
nd cart combination should be moved with
and cart combination should be moved with
are. Quick stops, excessive force, and uneven
care. Quick stops, excessive force, and uneven
surfaces may cause the appliance and cart combination
surfaces may cause the appliance and cart combination
o overturn. Use caution when moving the cart/apparatus
to overturn. Use caution when moving the cart/apparatus
ombination to avoid injury from tip-over.
combination to avoid injury from tip-over.
22.
22. This product is not intended for use outdoors.
The CAUTION marks shown here are located on the back
f your SurroundBar
of your SurroundBar
CAUTION: To prevent electric shock, match wide blade
of plug to wide slot, insert fully
of plug to wide slot, insert fully.
CAUTION: No naked fl ame sources, such as candles,
should be placed on the apparatus.
23.
o not install this apparatus in a confi ned space such as a
23. Do not install this apparatus in a confi ned space such as a
ook case. Ensure the apparatus has adequate ventila
book case. Ensure the apparatus has adequate ventila-
tion and that items such as newspaper, table-cloths, an
tion and that items such as newspaper, table-cloths, and
urtains, etc. do not block the ventilation
curtains, etc. do not block the ventilation.
24.WARNING: To reduce the risk of fi re or electric shock, do
24. WARNING: To reduce the risk of fi re or electric shock, do
ot expose this apparatus to rain or moisture. The apparatus
not expose this apparatus to rain or moisture. The apparatus
shall not be exposed to dripping or splashing. Do not place
shall not be exposed to dripping or splashing. Do not place
objects fi lled with
objects fi lled with liquids, such as vases, on the apparatus.
25.WARNING: The mains plug (power adapter) is used as a
25. WARNING: The mains plug (power adapter) is used as a
disconnect device and shall remain readily operable.
adiation Exposure Statement
Radiation Exposure Statement
his device complies with FCC radiation exposure limits set
This device complies with FCC radiation exposure limits set
orth for an uncontrolled environment and it also complies
forth for an uncontrolled environment and it also complies
ith Part 15 of the FCC RF Rules.
with Part 15 of the FCC RF Rules.
s equipment should be installed and operated with a
This equipment should be installed and operated with a
minimum
minimum distance of 20 centimeters between the radiator
and your bo
and your body.
Operatio
Operation
This equipment complies with Part 15 of the FCC Rules
This equipment complies with Part 15 of the FCC Rules
and Industry Canada licence-exempt RSS standard(s). Operation
and Industry Canada licence-exempt RSS standard(s). Operation
s subject to the following two conditions
is subject to the following two conditions:
1) This device may not cause interference, an
1) This device may not cause interference, and
2) This device must accept any interference, includin
2) This device must accept any interference, including
interference that may cause undesired operation
interference that may cause undesired operation
of the device.
of the device.
anger of EXPLOSION if battery
ame or equivalent type. (CR2025
ended by the manufacturer. An appliance
uct is not intended for use outdoors.
AUTIONmarks
AUTION: No naked fl ame sources, such as candles,
ould be placed on the apparatus
wn here are
®
Speaker System
To prevent electric shock, match wide blade
n the
s, such as vases, on the apparatus
sconnect device and shall remain rea
y operable
n the r
lass B Emissions Limits
Class B Emissions Limits
This Class B digital apparatus meets all requirements of the
This Class B digital apparatus meets all requirements of the
anadian Interference—Causing Equipment Regulations
Canadian Interference—Causing Equipment Regulations.
ce meets the exemption from the routine evaluation
The device meets the exemption from the routine evaluation
imits in section 2.5 of RSS 102 and compliance with RSS-102
limits in section 2.5 of RSS 102 and compliance with RSS-102
F exposure, users can obtain Canadian information on RF
RF exposure, users can obtain Canadian information on RF
exposure and compliance.
exposure and compliance.
roduct Disposa
Product Disposal
ertain international, national and/or local laws and
Certain international, national and/or local laws and/
or regulations may apply regarding the disposal of this
or regulations may apply regarding the disposal of this
product. For further detailed information, please con
product. For further detailed information, please con-
act the retailer where you purchased this product o
tact the retailer where you purchased this product or
he Polk Importer/Distributor in your country. A listing
the Polk Importer/Distributor in your country. A listing
of Polk Importer/ Distributors can be found on the Polk
of Polk Importer/ Distributors can be found on the Polk
website: www.polkaudio.com or by contacting Polk at:
website: www.polkaudio.com or by contacting Polk at:
601 Metro Drive, Baltimore, Maryland 21215, USA.
5601 Metro Drive, Baltimore, Maryland 21215, USA.
hone: 1-410-358-3600; in California: 1-800-377-7655.
Phone: 1-410-358-3600; in California: 1-800-377-7655.
NOTE
NOTE:
s equipment has been tested and found to comply with the
This equipment has been tested and found to comply with the
imits for a Class B digital device, pursuant to part 15 of the
limits for a Class B digital device, pursuant to part 15 of the
Rules. These limits are designed to provide reasonable
FCC Rules. These limits are designed to provide reasonable
protection against harmful interference in a residential installation.
protection against harmful interference in a residential installation.
s equipment generates, uses and can radiate radio frequency
This equipment generates, uses and can radiate radio frequency
energy, and, if not installed and used in accordance with the
energy, and, if not installed and used in accordance with the
nstructions, may cause harmful interference to radio commun
instructions, may cause harmful interference to radio communi-
cations. However, there is no guarantee that interference w
cations. However, there is no guarantee that interference will
ot occur in a particular installation.
not occur in a particular installation.
this equipment does cause harmful interference to radio o
If this equipment does cause harmful interference to radio or
on reception, which can be determined by turning the
television reception, which can be determined by turning the
equipment off and on, the user is encouraged to try to correct
equipment off and on, the user is encouraged to try to correct
nterference by one or more of the following measures: reor
the interference by one or more of the following measures: reori-
ent or relocate the receiving antenna. Increase the separation
ent or relocate the receiving antenna. Increase the separation
between the equipment and receiver. Connect the equipment
between the equipment and receiver. Connect the equipment
nto an outlet on a circuit
into an outlet on a circuit different from that to which the receiver
s connected. Consult the dealer or an experienced radio/TV
is connected. Consult the dealer or an experienced radio/TV
an for he
technician for help.
t 5IFBOUFOOBTVTFEGPSUIJTUSBOTNJUUFSNVTUCFJOTUBMMFE
t 5IFBOUFOOBTVTFEGPSUIJTUSBOTNJUUFSNVTUCFJOTUBMMFE
o provide a separation distance of at least 20 cm from a
to provide a separation distance of at least 20 cm from all
persons and must not be co-located or operating in con
persons and must not be co-located or operating in con-
unction with any other antenna or transmitter.
junction with any other antenna or transmitter.
t $IBOHFTPSNPEJmDBUJPOTOPUFYQSFTTMZBQQSPWFECZUIF
t $IBOHFTPSNPEJmDBUJPOTOPUFYQSFTTMZBQQSPWFECZUIF
arty respons
party responsible for compliance could void the user’s
authority to operate the equipment
authority to operate the equipment.
erent from that to which the receive
or com
ance could void the user’s
4
Polk Customer Service 800-377-7655 (Outside USA & Canada: 410-358-3600)
Polk Customer Service 800-377-7655 (Outside USA & Canada: 410-358-3600
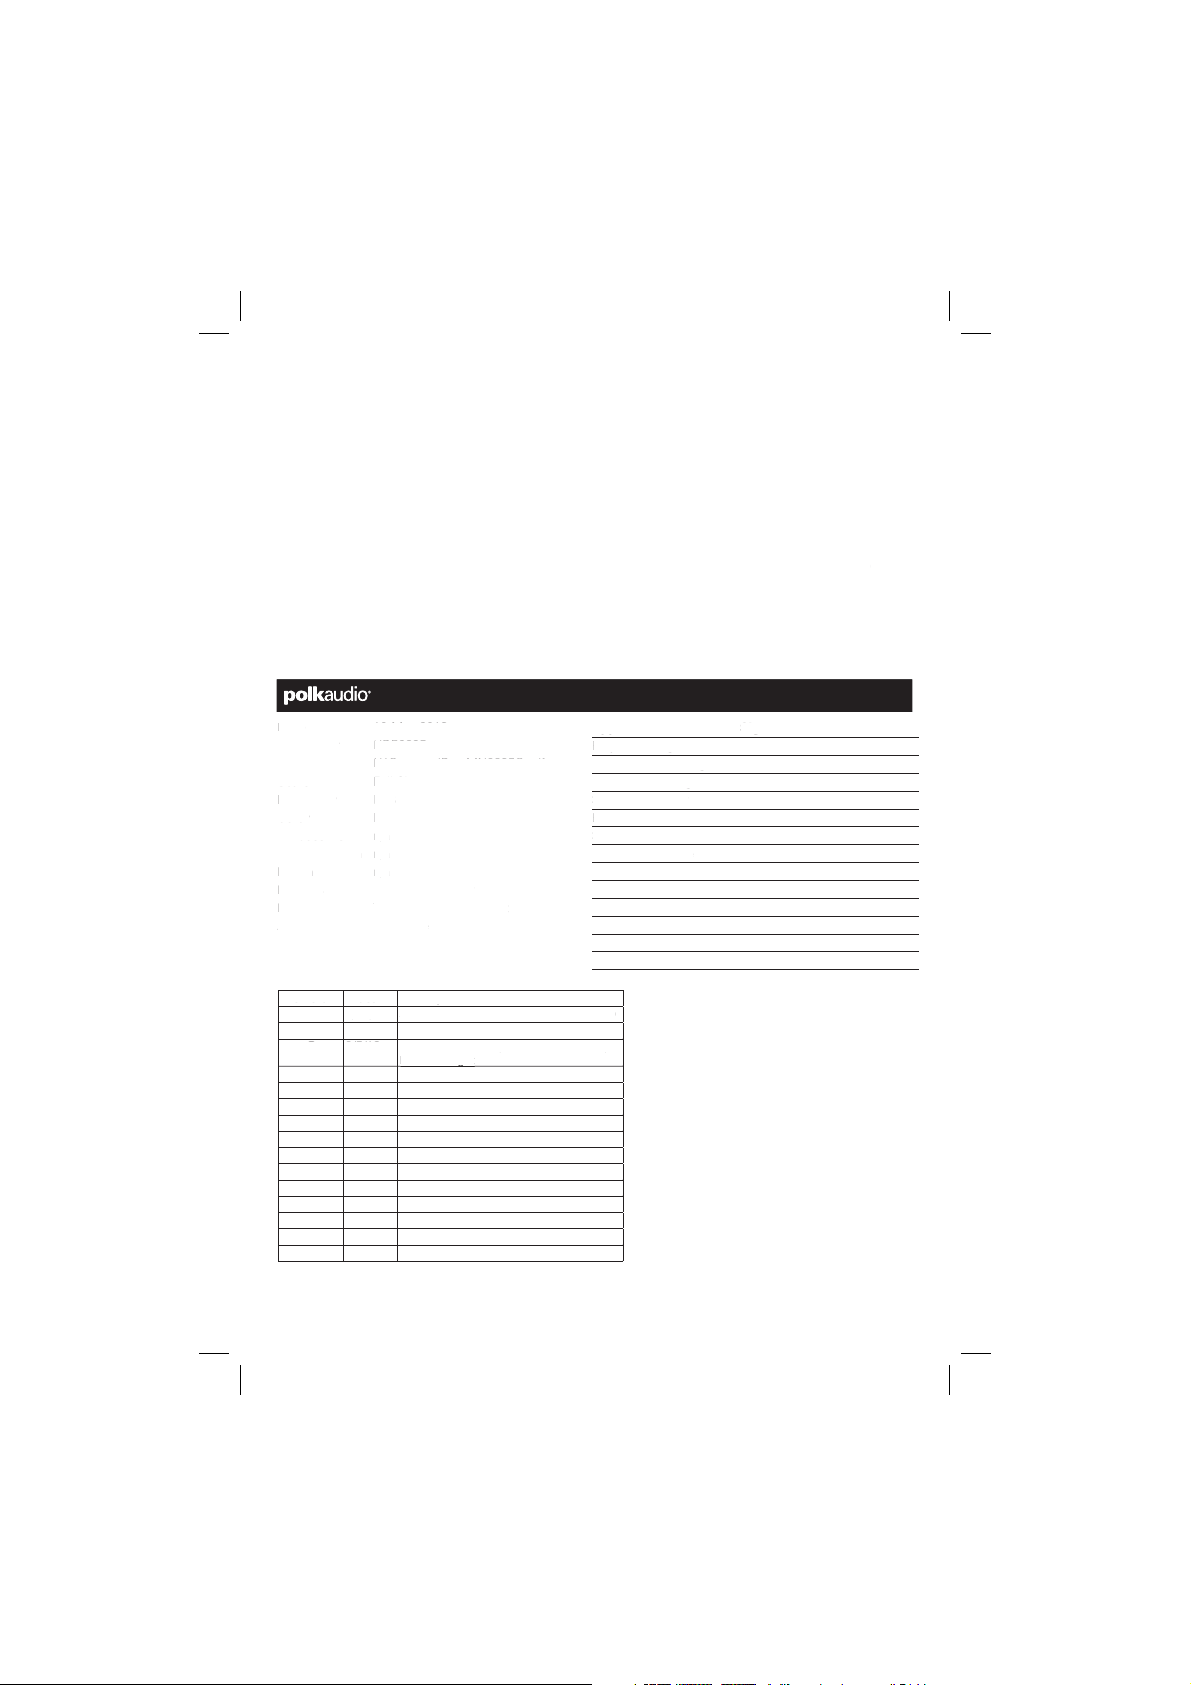
Inside Your N1 SurroundBar™ Carton:
Card
C
m
:
r
t
W
s
s
Weight
)
P
odel
ar
y
5
f
illi
.
Digital
)
r
’
l
t
e
e
n
s
r
erte
r
h
V
odes
e
odes
c
Inside Your N1 SurroundBar Carton
Important Note: If anything is missing or
mportant Note: If anything is missing o
amaged, or if your Polk N1 SurroundBar fails
damaged, or if your Polk N1 SurroundBar fails
o operate, please notify your dealer immediately.
to operate, please notify your dealer immediately.
e recommend keeping your original carton
We recommend keeping your original carton
nd packing materials in case you need to
and packing materials in case you need to
hip the unit in the future.
ship the unit in the future.
SurroundBar
urr
undBa
Remote Control
(Battery Included)
(Battery Included
6' Digital
(Optical) Cable
Quick Start
uick Star
uid
Guide
Specifi cations
pecifi cation
Dimensions 4" H x 39 1/4" W x 4 1/2" D
Dimension
Weight 9 lbs 10 oz (4.35 kg)
ower Requirements0 V, 3 A
Power Requirements 20 V, 3 A
M
Model N1 SurroundBar
emote Batter
Remote Battery CR2025
Remote Control
emote Control
Power Mute
w
Source
Sou
1, 2 &
1, 2 & 3
Volume
Immersion Modes
Immersion M
aming: Warrior & Rac
Gaming: Warrior & Racer
Immersion Modes
mmersion Mode
our Audio Immersion Modes (Warrior, Racer,
Four Audio Immersion Modes (Warrior, Racer,
inema and Music) enable you to tailor the N1
Cinema and Music) enable you to tailor the N1
or maximum high performance audio for a more
for maximum high performance audio for a more
mmersive, more thr
immersive, more thrilling listening experience.
ng listening experience
wner
anua
Manual
4" H x 39 1/4" W x 4 1/2" D
(10.2 cm x 99.7 cm x 11.4 cm)
(10.2 cm x 99.7 cm x 11.4 cm)
9 lbs 10 oz (4.35 kg
N1 SurroundB
R202
Online
nlin
egistratio
Registration
Sou
Source
uetoot
Bluetooth
Bass Volume
Immersion Modes
Immersion M
inema & Musi
Cinema & Music
Power SupplyOwner’s
Customer Service Hours of Operation: Monday-Friday, 9am-5:30pm est polkcs@polkaudio.com
ustomer Service Hours of Operation: Monday-Friday, 9am-5:30pm est polkcs@polkaudio.co
5
1
)
s
er
( )—Turns on the bar or puts
y
f
)
)
g
4. Bluetooth ( ):
h
t
.
t
.
.
y
.
ode:
Source 1.
y
:
.
lly
d.
D
:
.
d
been selected.
Bar Button LED
h.
8
5
0
V
OUT
W
2345 6
4
78 9
7
3A
2
20V
SUB OUT60W
B
SOURCE
13 2
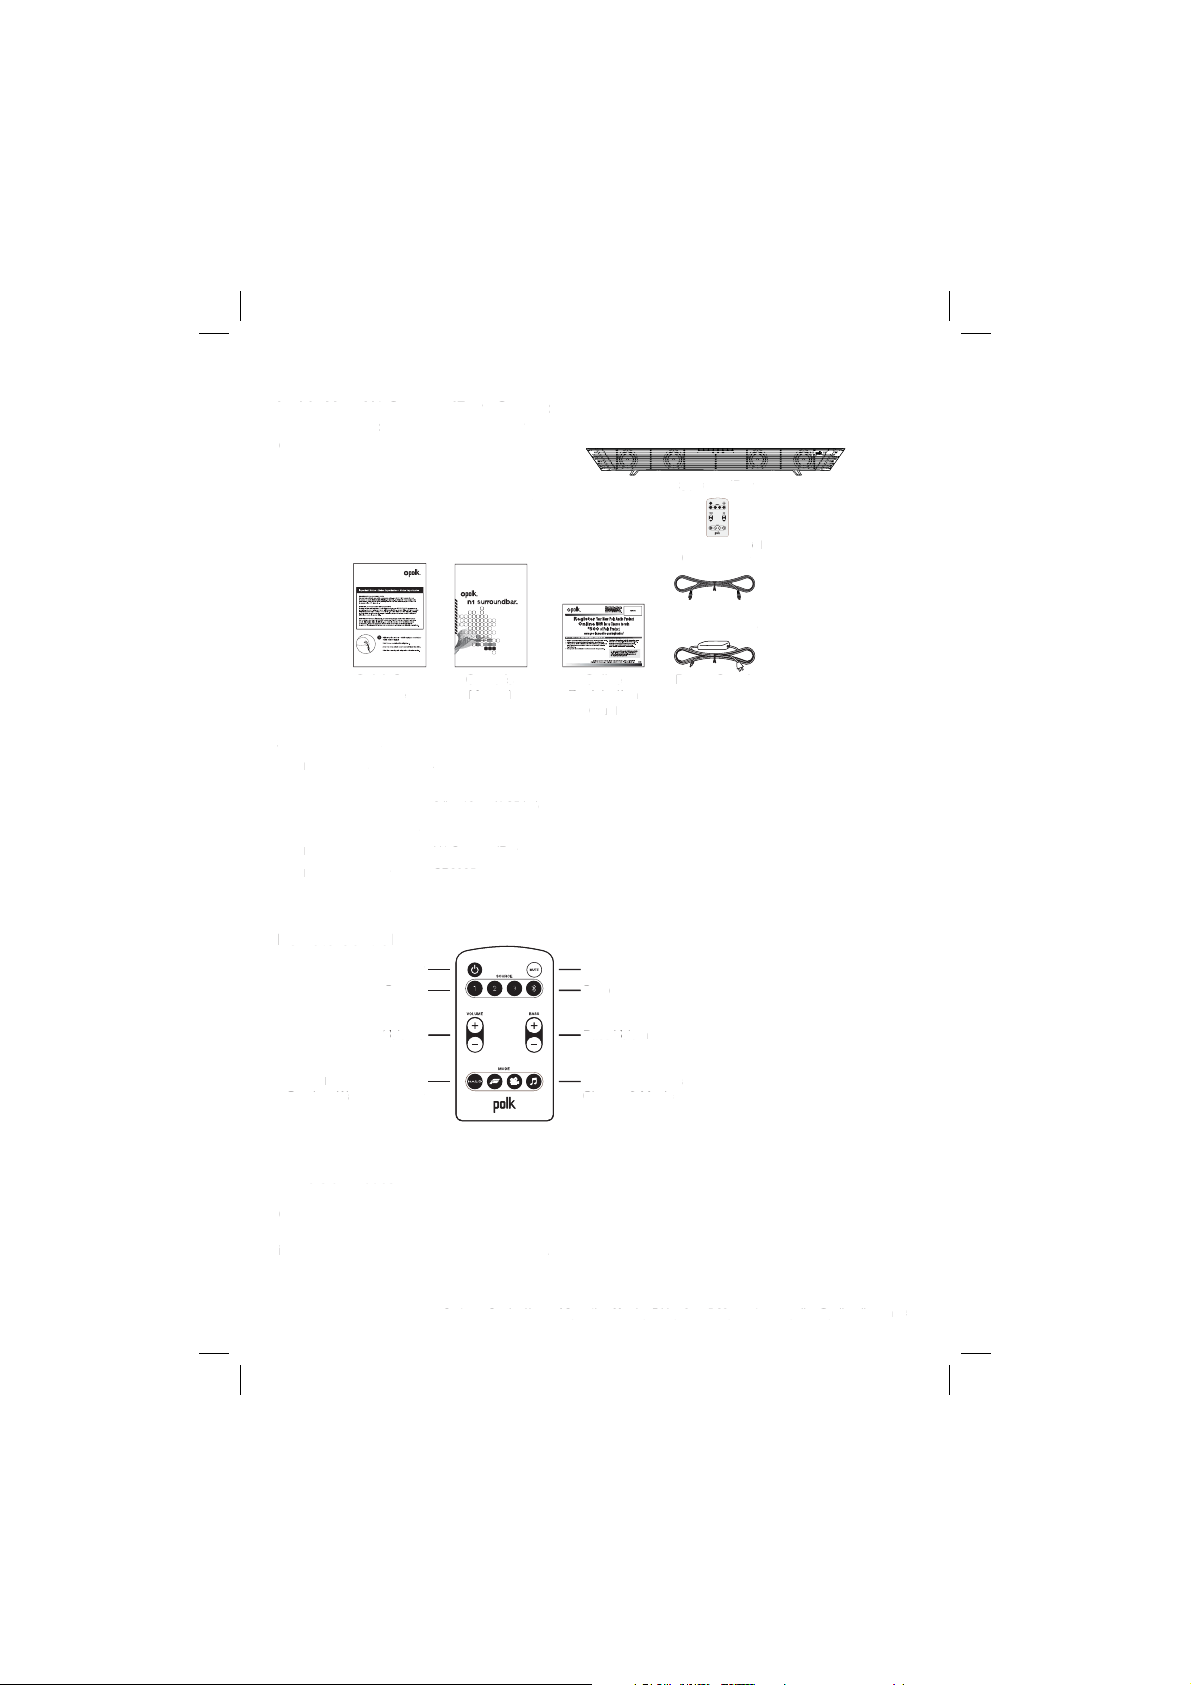
Controls
ontrol
1. Power ( )—Turns on the bar or puts
1.w
t in standby mode.
it in standby mode.
Blue, green or red light to indicate
LED—Blue, green or red light to indicate
perating status.
operating status.
2. Learn—Puts the bar into “learning mode” so
2. Learn—Puts the bar into “learning mode” so
ou can program it to respond to commands
you can program it to respond to commands
rom your TV’s IR remote control.
from your TV’s IR remote control.
3. Source—
3. Source—Changes which input source
you are listening to.
you are listening to.
ource 1:
Source 1: optical (Blue LED for PCM
r Green for Dolby Digital
or Green for Dolby Digital)
ource 2:
Source 2: coaxial (Blue LED for PCM
r Green for Dolby Digital
or Green for Dolby Digital)
ource 3: analo
Source 3: analog
4. Bluetooth ( ): Blue light indicates Bluetooth
ource has been selected.
Source has been selected.
5. Mute—Mutes the sound coming from
5. Mute—Mutes the sound coming from
he N1 SurroundBar
the N1 SurroundBar.
6. Volume Up and Down ( – / + )—Adjusts
6. Volume Up and Down ( – / + )—Adjusts
he volume of the N1 SurroundBar
the volume of the N1 SurroundBar.
7. Power ConnectionThe bar power supply
7. Power Connection—The bar power supply
onnects here
connects here.
8. SUB Out
8. SUB Out—Connect optional subwoofer.
9.Audio Inputs (Source 1, 2, or 3)—Where
9. Audio Inputs (Source 1, 2, or 3)—Where
ou connect your TV (or other source) to the
you connect your TV (or other source) to the
N1 SurroundBar. Use the provided 6' optical
N1 SurroundBar. Use the provided 6' optical
able (Source 1), digital coaxial audio cable
cable (Source 1), digital coaxial audio cable
(Source 2) not included, or 1/8" analog cable
(Source 3) not included.
hanges which input source
tical (Blue LED for PCM
oaxial (Blue LED for PCM
Blue light indicates Bluetoot
onnect optional subwoofer.
ource 2) not included, or 1/8" analog cable
ource 3) not included
Power LED
ower LED
Normal Mode:
rmal M
Green or Blue Steady—Power is on;
reen or Blue Steady—Power is on;
ll is well in
all is well in Source 1.
Red Stead
Red Steady—The bar is in standby mode.
earning Mode
Learning Mode:
Red BlinkingThe bar has failed to learn
Red Blinking—The bar has failed to learn
a remote control command
a remote control command.
Three Quick Blue FlashesLearned IR
Three Quick Blue Flashes—Learned IR
odes have been successfu
codes have been successfully erased.
Learn LED
earn LE
Learning Mode:
earning Mode
Blue Flashing—The bar is in learning mode.
Blue Flashing—The bar is in learning mode
Blue Solid—The bar is in learning mode
Blue Soli
and a bar button has
and a bar button has been selected.
erase
Bar Button LED—Flashes blue. When
learning is successful, both the LEARN
learning is successful, both the LEARN
and the bar command button
LED and the bar command button
fl as
LED fl ash.
6
Polk Customer Service 800-377-7655 (Outside USA & Canada: 410-358-3600)
Polk Customer Service 800-377-7655 (Outside USA & Canada: 410-358-3600
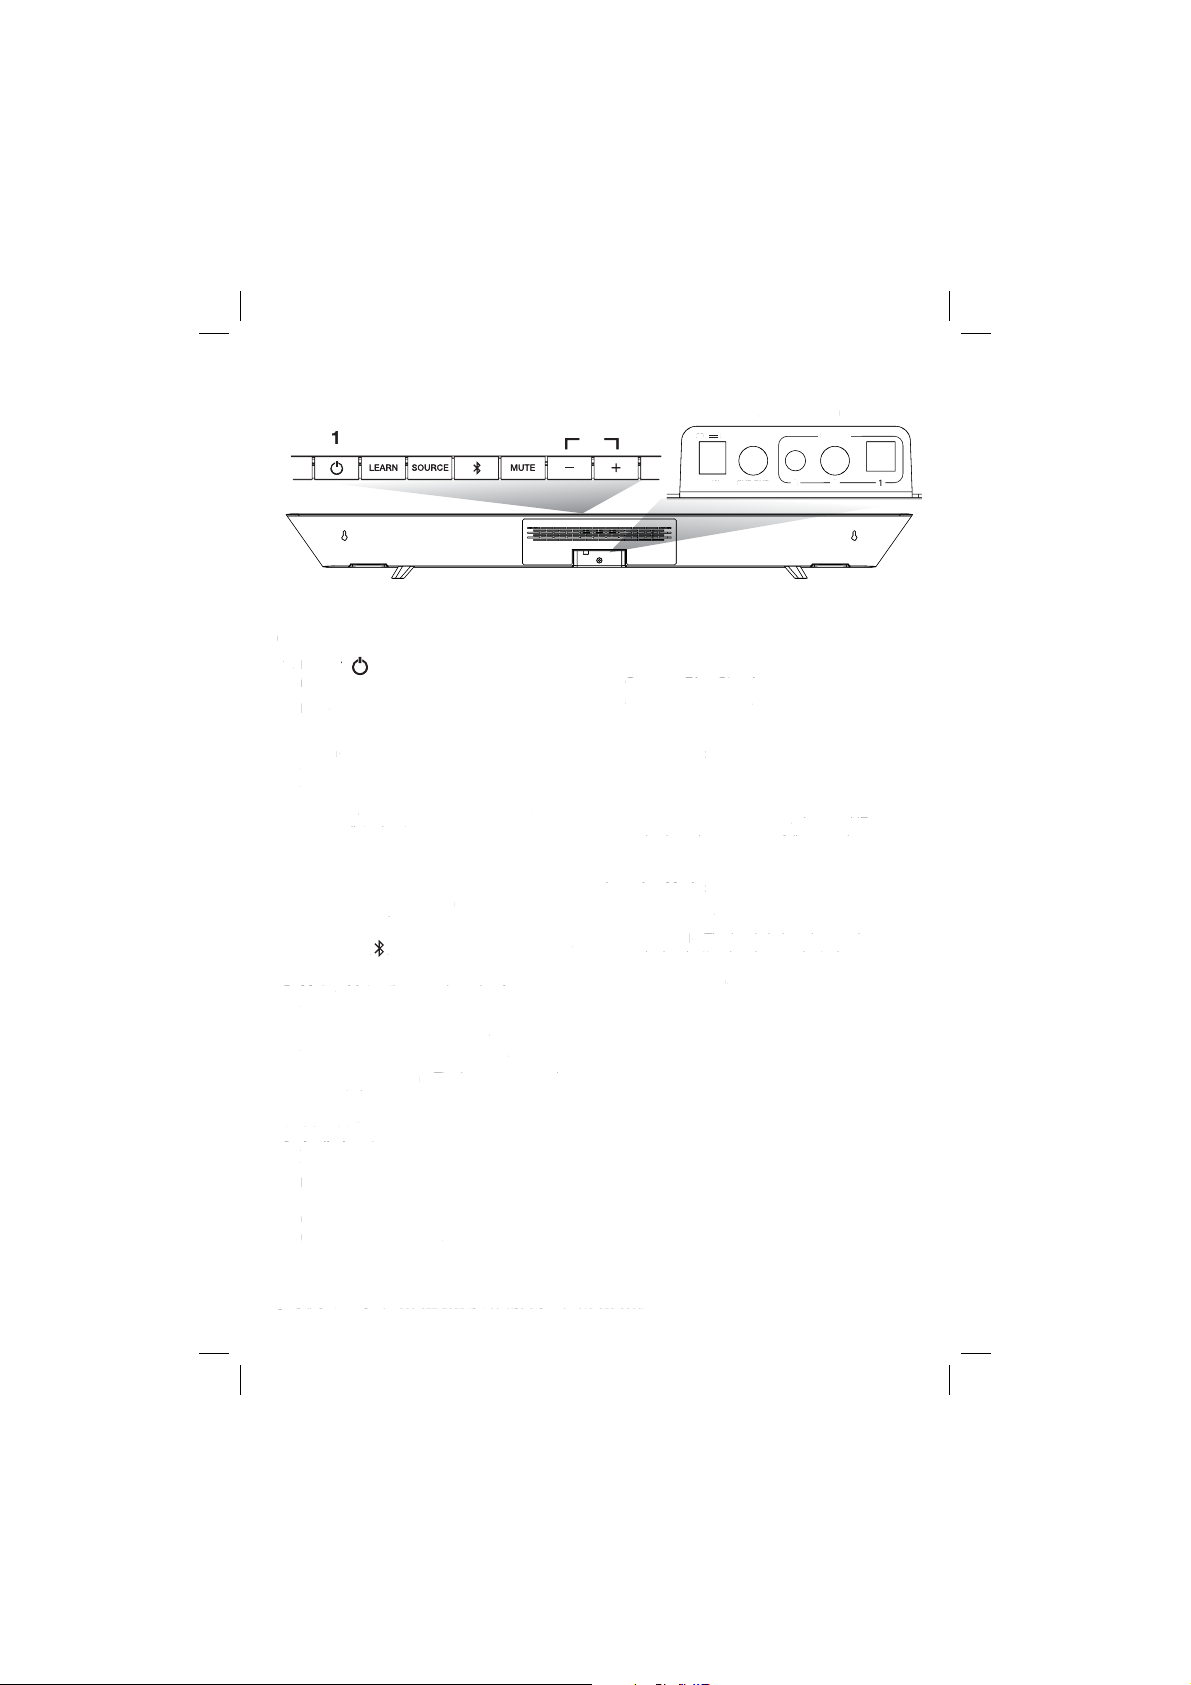
Where To Locate Your Bar
C
m
Wh
d
y
s
)
)
s
)
.
T
W
t
ere To Locate Your Bar
For The Best Sound
For The Best Soun
Note: The rubber feet are detachable and may
Note:The rubber feet are detachable and ma
be removed entirely (for wall-mounting the bar)
be removed entirely (for wall-mounting the bar)
or moved along the bottom surface of the bar,
or moved along the bottom surface of the bar,
epending upon your installation.
depending upon your installation.
Table Mount Wall Mount
able Mount
1
verall Dimension
Overall Dimensions
. 4" H (10.2 cm)
1. 4" H (10.2 cm)
39 1/4" W (99.7 cm
2. 39 1/4" W (99.7 cm)
Keyhole Slots
Keyhole Slots
3. 32" W (81.28 cm
3. 32" W (81.28 cm)
Top of Bar to Keyhole Slot
Top of Bar to Keyhole Slots
4. 1 1/16" (2.67 cm
4. 1 1/16" (2.67 cm)
Note:If you wall mount your SurroundBar,
Note: If you wall mount your SurroundBar,
ensure that your wall anchors secure properly
ensure that your wall anchors secure properly
into the wall and that they can bear the
into the wall and that they can bear the
weight of the SurroundBar
weight of the SurroundBar.
4
all Moun
2
3
Customer Service Hours of Operation: Monday-Friday, 9am-5:30pm est polkcs@polkaudio.com
ustomer Service Hours of Operation: Monday-Friday, 9am-5:30pm est polkcs@polkaudio.co
7
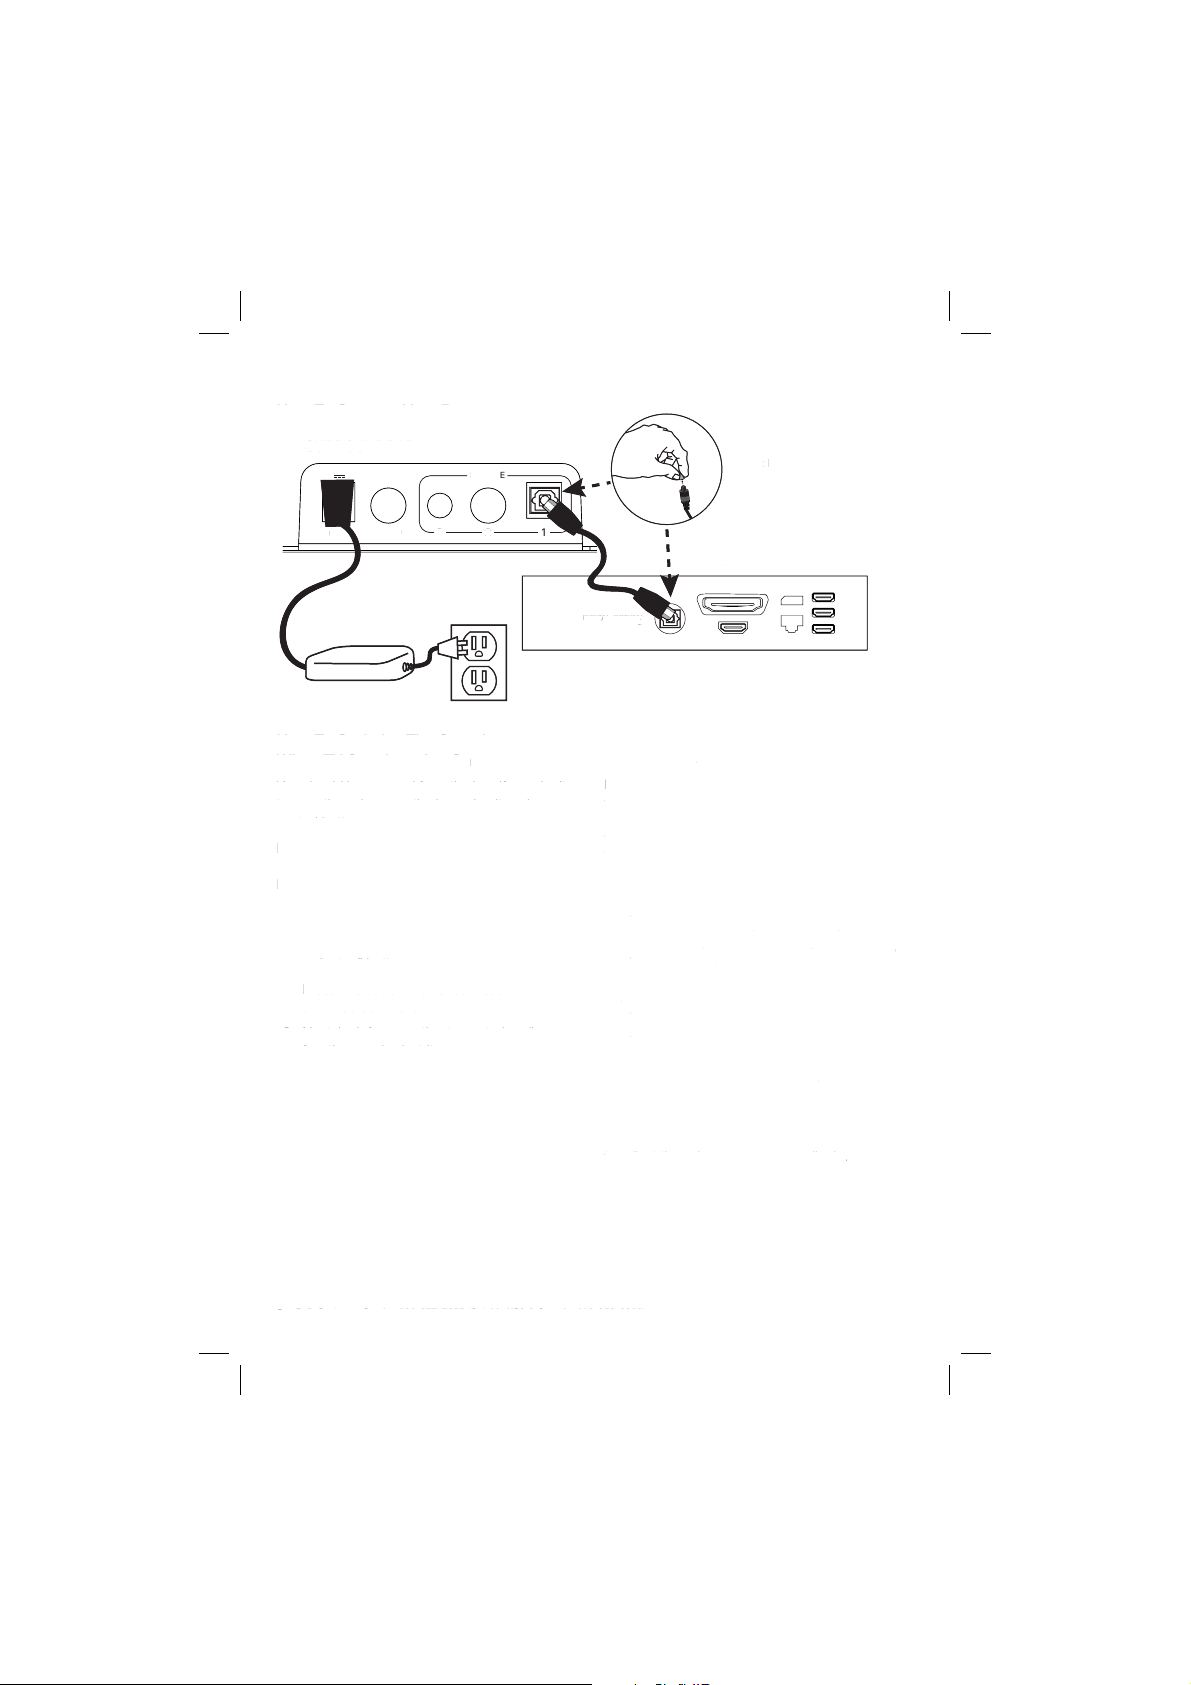
How To Connect Your Bar
)
r
On
Y
.
ibl
Th
TV’s i
e.
f
’ll
r
:
p
A
”
)
g
.
A
r
to adjust the volume as you normally do.
C
T
R
E
AL OPTICA
A
U
T
How To Connect Your Ba
SURROUNDBAR
RROUNDBA
3A
V
20V
SOURCE
SOUR
Note: Remove the protective
Note:
emove the protective
cap prior to inserting cable.
SUB OUT60W
How To Optimize The Sound
How To Optimize The Sound
When TV Speakers Are On
When TV Speakers Are
You should hear sound from the bar. If you don’t,
ou should hear sound from the bar. If you don’t,
turn up the volume on the bar using its volume
turn up the volume on the bar using its volume
control buttons
control buttons.
your bar is connected to your TV, there’s a very
If your bar is connected to your TV, there’s a very
good chance your TV speakers are also playing.
good chance your TV speakers are also playing.
t’s imposs
It’s impossible to give specifi c instructions on how
to turn off the speakers for every TV, but here’s a
to turn off the speakers for every TV, but here’s a
way to do it that covers many of the TVs out there.
way to do it that covers many of the TVs out there.
1.
1. On your TV remote control, fi nd a “menu”
2. Press this button. You should see
3. Next, look for an option to control audio
3. Next, look for an option to control audio
e to give specifi c instructions on how
n your TV remote control, fi nd a “menu”
or “setup” button.
or “setup” button.
Press this button. You should see
an on-screen menu.
an on-screen menu.
functions and select it.
functions and select it.
13 2
XBOX CONSOL
XBOX CONSOLE
DIGITAL OPTICAL
AUDIO OUTPUT
UDIO OUTP
e setting to turn off your
The setting to turn off your TV’s internal speakers
hould be her
should be here.
you can’t turn off your TV internal speakers, don’t
If you can’t turn off your TV internal speakers, don’t
worry. Your N1 SurroundBar will make your TV
worry. Your N1 SurroundBar will make your TV
sound much better. To enjoy the best performance
sound much better. To enjoy the best performance
rom your bar, you
from your bar, you’ll want it to play louder than your
TV. Use the following steps to adjust the volume
TV. Use the following steps to adjust the volume
alance between your TV and the bar
balance between your TV and the bar:
1. If necessary, program your bar to respond to
1. If necessary, program your bar to respond to
the volume up and down control commands
the volume up and down control commands
of your TV remote. (See “How To Setu
of your TV remote. (See “How To Setup
Remote Control For Your SurroundBar
A Remote Control For Your SurroundBar”
on pages 8-9.
on pages 8-9.)
2. Turn your TV volume all the way down usin
2. Turn your TV volume all the way down using
the control buttons on your TV
the control buttons on your TV.
3.Then, using the volume keys on your bar,
3. Then, using the volume keys on your bar,
want it to play louder than you
nternal speakers
set the volume to a normal listening level
do not use the remote control).
(do not use the remote control).
fter you make these adjustments, your N1
After you make these adjustments, your N1
SurroundBar should always be louder than you
SurroundBar should always be louder than your
TV speakers. Then use the TV remote control
TV speakers. Then use the TV remote control
to adjust the volume as you normally do.
8
Polk Customer Service 800-377-7655 (Outside USA & Canada: 410-358-3600)
Polk Customer Service 800-377-7655 (Outside USA & Canada: 410-358-3600

Bluetooth® Wireless Technology
C
m
gy
r
B
r
-
r
r
y
.
ces
r
:
e
Bluetoo
r
s.
.
TheBl
h
LED will illumi
/
y
.
-
ill
.
!
:
If
ir
ess and release the remote co
ess and release the
Bluetooth
source
r
off or disconnec
he
Bluetooth
feature
.
The SurroundBa
e
Bluetooth
source symbol will begin slowly pulsing
when disconnected.
A
:
Any
:
Turn your device’s
Bluetooth
.
er
Bluetooth
Blue-
he
Bluetooth
button on the SurroundBar.
ill
-
lly
ill h
e
Bluetooth
source LED will now
Bluetooth
Bluetooth
d:
h
function on your
.
r
d
A
t
.
r
will
lly
d
Bluetooth
Bluetooth
feature is on.
Bluetooth
To use your Bluetooth wireless technology device
To use you
with the SurroundBar, you must fi rst pair you
with the SurroundBar, you must fi rst pair your
device with your SurroundBar. Pairing creates the
device with your SurroundBar. Pairing creates the
ability of yourBluetooth device to connect with
ability of your Bluetooth device to connect with
your SurroundBar wirelessly. Pairing is like a hand
your SurroundBar wirelessly. Pairing is like a hand-
shake between your Bluetooth device and you
shake between your Bluetooth device and your
SurroundBar in which they meet and exchange
SurroundBar in which they meet and exchange
information.
information.
You only have to pair your SurroundBar with you
You only have to pair your SurroundBar with your
Bluetoothdevice one time for this exchange of
Bluetooth device one time for this exchange of
information to take place. After that you simpl
information to take place. After that you simply
select the “polk soundbar” from your device list
select the “polk soundbar” from your device list
to make the connection to your SurroundBar
to make the connection to your SurroundBar.
The SurroundBar can hold 8 Bluetooth devi
The SurroundBar can hold 8 Bluetooth devices in
its memory. If enough devices pair after yours, you
its memory. If enough devices pair after yours, your
device could be dropped from the memory list.
device could be dropped from the memory list.
air and connect your Bluetooth device
Pair and connect your Bluetooth device
with the SurroundBar
with the SurroundBar:
1.
1. Make sure your Bluetooth device and
2. Activate th
2. Activate the Bluetooth function on your
3.
3. Press the Bluetooth source button from the
The Bluetooth LED will illuminate, then begin
slowly pulsing as it looks for the paired device.
slowly pulsing as it looks for the paired device.
4. Your SurroundBar will now be displayed on
4. Your SurroundBar will now be displayed on
5. After a short delay (5 seconds), the two de
5. After a short delay (5 seconds), the two de-
6.
6. Play your music from your device!
ote
Note: If your device asks for a passcode to pair
to the SurroundBar, enter “0000.”
to the SurroundBar, enter “0000.”
Wireless Technolo
luetooth wireless technology device
in
ake sure yourBluetooth device and
SurroundBar are both powered on.
SurroundBar are both powered on.
Bluetooth source device. See your device’s
Bluetooth source device. See your device’s
manual for instruction
manual for instructions.
ress theBluetooth source button from the
urroundBar remote
SurroundBar remote.
uetoot
your source device and available to pair and
your source device and available to pair and/
or connect. Select the “polk soundbar” on
or connect. Select the “polk soundbar” on
our device to initiate the connection process
your device to initiate the connection process.
vices should now be connected. You should
vices should now be connected. You should
hear a short tone and the Bluetooth source
hear a short tone and the Bluetooth source
w
now be steady blue
LED will now be steady blue.
ay your music from your device
your device asks for a passcode to pa
th function on you
nate, then begin
How to disconnect with a Bluetooth device:
How to disconnect with a Bluetooth device:
1.
r
1. Press and release the remote control
ntrol
Bluetooth button, or
2.
r
2. Press and release the Bluetooth source
utton, o
button, or
3. Turn
3. Turn off or disconnect the Bluetooth feature
on your Bluetooth device
on your Bluetooth device.
The SurroundBar will emit a short tone and the
t t
r will emit a short tone and th
Bluetooth source symbol will begin slowly pulsing
when disconnected.
utomatic connection
Automatic connection:
time you want to connect the last connected
Any time you want to connect the last connected
evice and play it through the SurroundBar,
device and play it through the SurroundBar,
o the following
do the following:
1.
1. Turn your device’s Bluetooth function on.
2.
nt
2. Enter Bluetooth source by pressing the Blue-
source button from the remote or press
tooth source button from the remote or press
t
the Bluetooth button on the SurroundBar.
3. After a short delay, the two devices w
3. After a short delay, the two devices will auto-
atica
matically connect, you will hear a short tone,
nd th
and the Bluetooth source LED will now
source by pressing the
connect, you w
function on
auto
ear a short tone,
be steady blue.
te: By default, the last connected
Note: By default, the last connected Bluetooth
evice will automatically connect if available.
device will automatically connect if available.
Pair and/or connect to a device when in Bluetooth
ource, but disconnecte
source, but disconnected:
.Engage the Bluetoot
1. Engage the Bluetooth function on your
luetooth source device. See your device’s
Bluetooth source device. See your device’s
anual for instructions
manual for instructions.
. The SurroundBar will be displayed on
a. The SurroundBar will be displayed on
your source device as available to pai
your source device as available to pair
and connect. Select the “polk soundbar”
and connect. Select the “polk soundbar”
on your device to initiate the pairing an
on your device to initiate the pairing and
connection process.
connection process.
fter a short delay, the two devices should now
After a short delay, the two devices should now
e paired and connected. You should hear a short
be paired and connected. You should hear a short
one and the Bluetooth source symbol will now
tone and the Bluetooth source symbol will now
e steady blue
be steady blue.
How to disconnect:
How to disconnect:
ote:Anytime The SurroundBar exits SLEEP
Note: Anytime The SurroundBar exits SLEEP
ode and is in Bluetooth source, the SurroundBa
mode and is in Bluetooth source, the SurroundBar
automatica
will automatically connect to the last connected
Bluetooth device if the paired device’s Bluetooth
connect to the last connecte
device if the paired device’s
feature is on.
Customer Service Hours of Operation: Monday-Friday, 9am-5:30pm est polkcs@polkaudio.com
ustomer Service Hours of Operation: Monday-Friday, 9am-5:30pm est polkcs@polkaudio.co
9
 Loading...