


DEI Sales Polk Audio SB5500TX, SB5500RX Users Manual

Date
Drawing #
File Name
Scale
Drawn By
Color
Emboss Ht.
Deboss Depth
Finish
Process
Notes
Artwork
10 June 2014
HBP3133
SB5500_3LangMN3133.qxd
Full Size
KLB
Prints 100% Black
n/a
n/a
n/a
Offset Lithography
Flat size: 11" x 17" horizontal
Fold size: 8.5" x 11"
TITLEBLOCK DOES NOT PRINT
Digital file
Approvals Signature Date
Project Manager
Product Line Manager
Mechanical Designer
System Engineer
Electrical Engineer
Safety & Regulations
Quality Assurance
Creative Director
Comments
Revision Date Description
A
B
C
A

FCC Statement
1. This device complies with Part 15 of the FCC Rules. Operation is subject to the
following two conditions:
(1) This device may not cause harmful interference.
(2) This device must accept any interference received, including interference
that may cause undesired operation.
CAUTION: Any changes or modifications not expressly approved by the grantee of this device could void
the user’s authority to operate the equipment.
Federal Communitcations Commission Interference Statement
This equipment has been tested and found to comply with the limits for a Class B digital device, pursuant
to part 15 of the FCC Rules. These limits are designed to provide reasonable protection against harmful
interference in a residential installation. This equipment generates, uses and can radiate radio frequency
energy and, if not installed and used in accordance with the instructions, may cause harmful interference
to radio communications. However, there is no guarantee that interference will not occur in a particular
installation. If this equipment does cause harmful interference to radio or television reception, which can
be determined by turning the equipment off and on, the user is encouraged to try to correct the interference by one or more of the following measures:
(1) Reorient or relocate the receiving antenna.
(2) Increase the separation between the equipment and receiver.
(3) Connect the equipment into an outlet on a circuit different from that to which
the receiver is connected.
(4) Consult the dealer or an experienced radio/TV technician for help.
RF Exposure Warning
This equipment must be installed and operated in accordance with provided instructions and the
antenna(s) used for this transmitter must be installed to provide a separation distance of at least 20 cm
from all persons and must not be co-located or operating in conjunction with any other antenna or transmitter. End-users and installers must be provide with antenna installation instructions and transmitter
operating conditions
IC Warning
This device complies with Industry Canada License-exempt RSS standard(s).
Operation is subject to the following two conditions:
(1) This device may not cause harmful interference, and
(2) This device must accept any interference, including interference that may cause undesired
operation of the device. Changes or modifications not expressly approved by the party responsible
for compliance could void the user’s authority to operate the equipment. The battery or batteries
shall not be exposed to excessive heat such as sunshine, fire or the like.
Radio Frequency (RF) Exposure Information
The radiated output power of the Wireless Device is below the Industry Canada (IC) radio frequency
exposure limits. The Wireless Device should be used in such a manner such that the potential for human
contact during normal operation is minimized.
This device has also been evaluated and shown compliant with the IC RF Exposure limits under mobile
exposure conditions. (antennas are greater than 20cm from a person’s body).
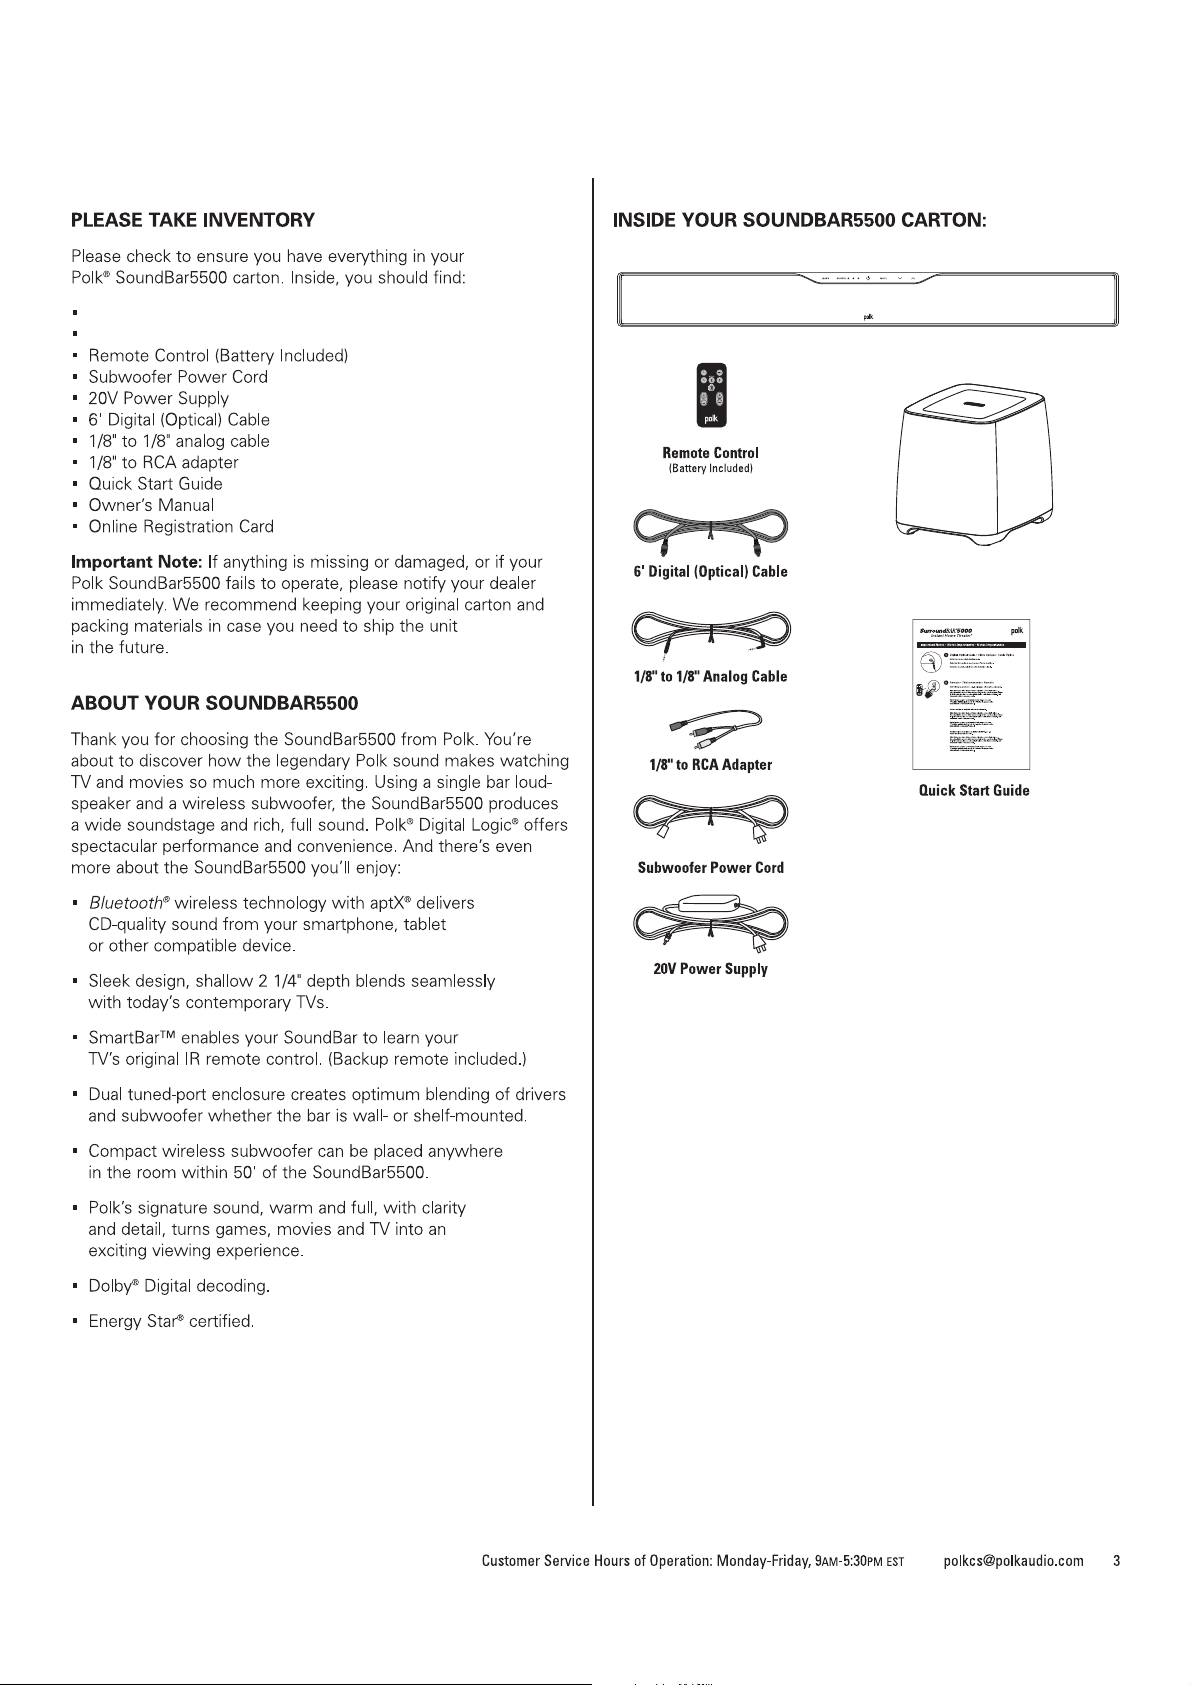
SPEAKER ASSY SB5500
SUBWOOFER ASSY SB5500

SOURCE LED GUIDE
SOURCE 1
SOURCE 2
SOURCE 3
Bluetooth
1
23
SOURCE MUTELEARN
FRONT
4
5
BAR CONTROLS
Front Panel:
1. Learn—Puts the bar into “learning mode” so
you can program it to respond to commands
from your existing remote control.
2. Source—Changes which input source
you are listening to.
Source 1: digital/optical
Source 2: analog
Source 3: analog
Source 4 Bluetooth ( ): Bluetooth
technology (See “PAIR AND CONNECT YOUR
BLUETOOTH DEVICE WITH THE SOUNDBAR”
on page 8.)
LED—Blue light indicates which Source has
been selected (see Source LED Guide above).
Source 1 LED will light green if Dolby Digital
signal is being decoded.
3. Power ( )—Turns on the bar or puts
it in standby mode.
LED—A light that shines green, orange
or red to indicate operating status.
4. Mute—Mutes and unmutes the sound
coming from the SoundBar5500,
indicated by green slow flash.
5. Volume Up and Down ( / )—Adjusts
the volume of the SoundBar5500.
Back Panel:
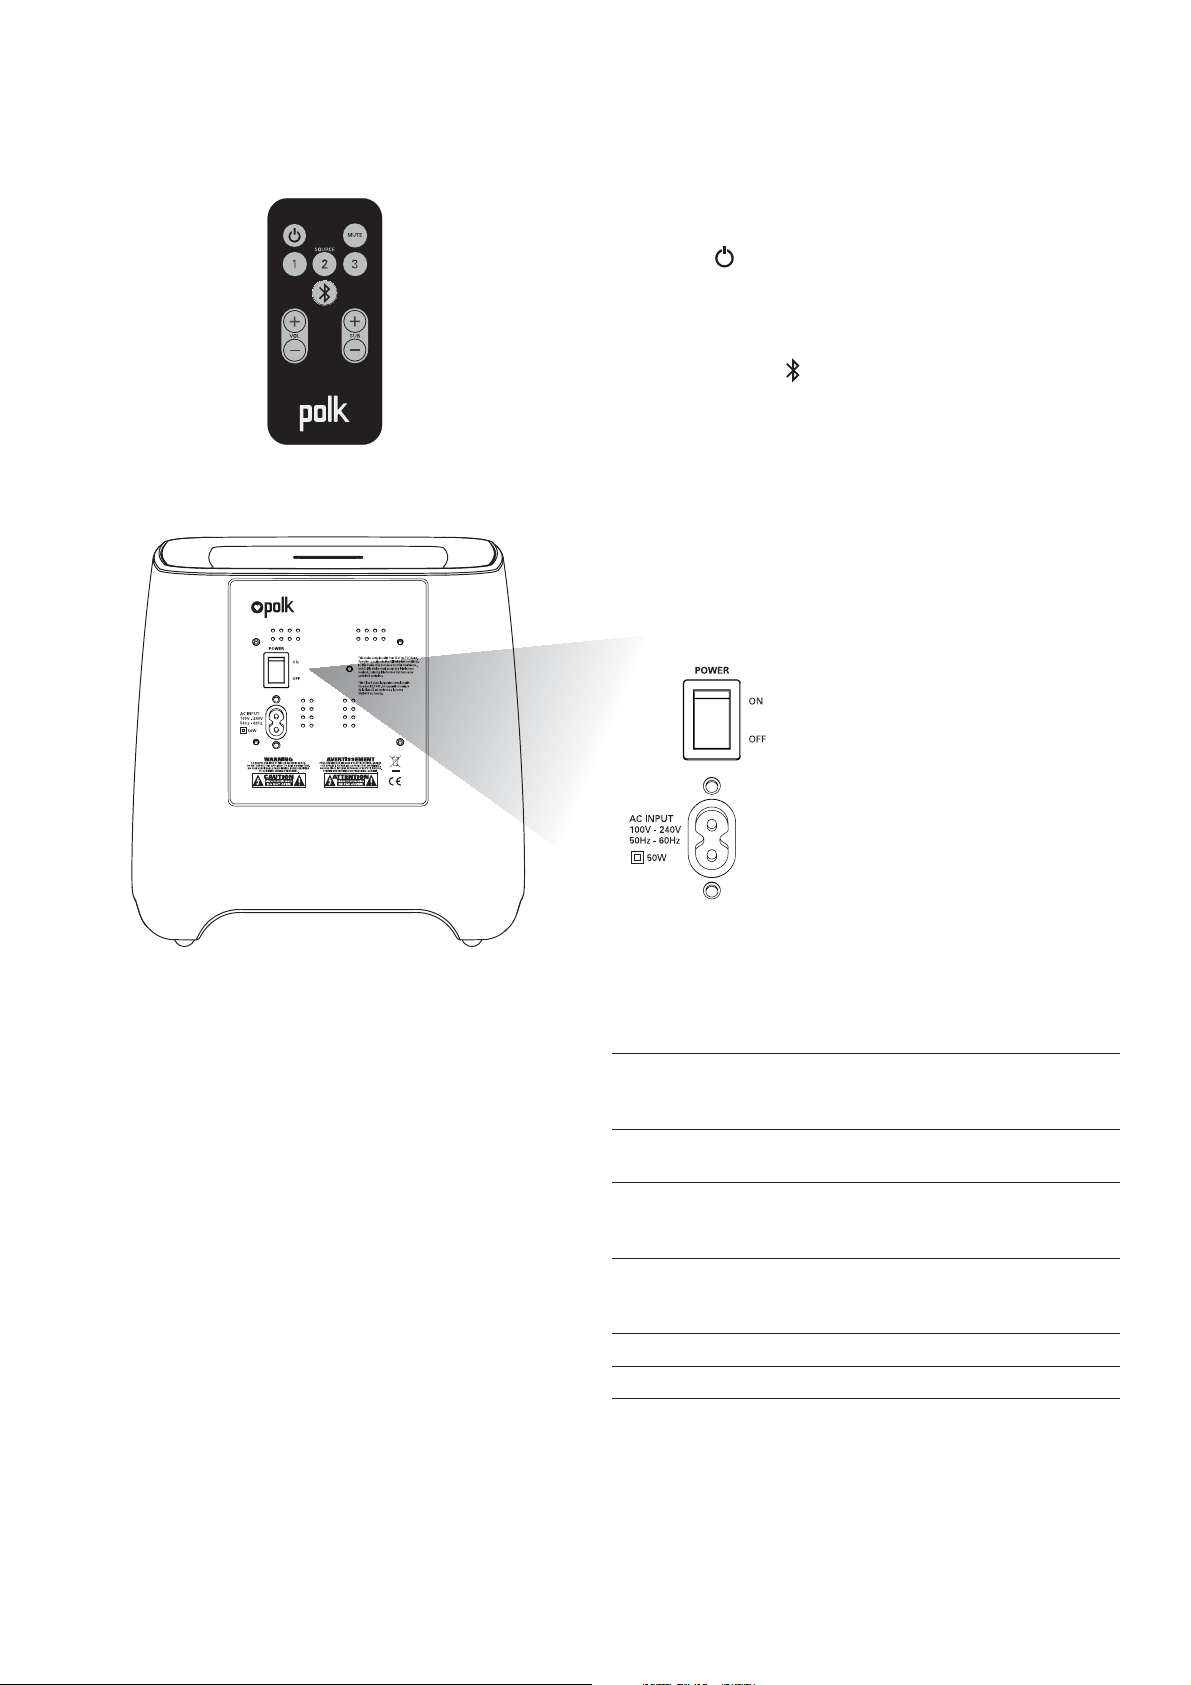
6. Power Switch—Turns the bar on or off,
but you can leave it on all the time.
7. Power Connection—The bar power supply connects here.
®
wireless
POWER
6
20V
2.2A
OFF
ON
44W
BACK
789
SOURCE
132
SYNC
BAR POWER ( ) LED
Normal Operating Mode:
Green Steady—Power is on; all is well.
Red Steady—The bar is in standby mode.
Green Two Blinks—A remote control or keypad
operation signal is received successfully.
Green Slow Blinking—System is muted.
Green Fast Blinking (After pressing volume up
button)—You have reached the maximum volume.
Green Fast Blinking (At power up)—The bar and
subwoofer have established a wireless connection.
BAR POWER ( ) LED
Learning Mode: (See page 10 for instructions.)
Orange Blinking—The bar is in learning mode.
Orange Steady—The bar is in learning mode
and a function has been selected.
Green Blinking—The bar has successfully
learned a remote control command.
Red Blinking—The bar has failed to learn
a remote control command.
Red and Orange Blinking—Learned IR codes
have been successfully erased.
8. Audio Inputs (Source 1, 2, or 3)—Where you connect
your TV (or other sources) to the SoundBar5500.
Use the 6' optical cable (Source 1) provided or 1/8"
analog cable (Source 2 or 3) provided.
9. SYNC—The SYNC button ensures the subwoofer
and bar are communicating. (See “SYNCING THE
BAR AND WIRELESS SUBWOOFER” on page 7.)
4 Polk Audio Customer Service 800-377-7655 (Outside USA & Canada: 410-358-3600)
SOURCE LED
Green Blinking—Dolby Digital source
recognized (Source 1 only).
Green Steady—Dolby Digital source received
and is being decoded (Source 1 only).
Blue Steady—PCM or analog source received.
12
REMOTE CONTROL
3
45
1. Power ( )—Turns on the bar or puts
it in standby mode.
2. Mute—Mutes and unmutes the sound
coming from the SoundBar5500.
3. Source 1, 2, 3 or —Changes which
input source you are listening to.
4. Volume Up and Down ( + / – )—Adjusts
the master volume of the SoundBar
5500 system.
5. SUB Volume Up and Down ( + / – )
Adjusts the volume of the subwoofer.
1
SUBWOOFER CONTROLS
1. Power Switch—Turns the wireless subwoofer on
or off, but you can leave it on all the time if you wish.
2. Power Connection—The subwoofer power
cord connects here.
THE STATUS LIGHT ON THE WIRELESS
SUBWOOFER INDICA TES THE FOLLOWING:
When light shines green:
a. Green Steady—The bar and subwoofer are connected.
b. Green Slow Blinking—The subwoofer is searching
for the bar.
c. Green Fast Blinking—The subwoofer is in the
process of connecting with the bar.
When light shines red:
2
Specifications
Dimensions
SoundBar 3 3/4" H x 31" W x 2 1/4" D
(9.53 cm x 78.74 cm x 5.72 cm)
Subwoofer 10" H x 10 1/4" W x 10 3/4" D
(25.4 cm x 26.04 cm x 27.31 cm)
Weight
SoundBar 5 lbs (2.3 kg)
Subwoofer 7 lbs (3.2 kg)
Power Requirements
SoundBar 20V, 2.2 A
Subwoofer 100V - 240V~50Hz - 60Hz, 50W
Model Soun dBar5500
Remote Battery CR2025
a. Red Steady—The subwoofer is in standby mode.
b. Red Blinking—The subwoofer is in protection mode.
Customer Service Hours of Operation: Monday-Friday, 9AM-5:30PM EST polkcs@polkaudio.com 5

L
EAR
N
S
O
U
R
CE
M
UT
E
L
EA
R
N
SO
U
RC
E
M
U
T
E
Shelf mounted bar sits in front of TV
WHERE TO LOCA TE YOUR BAR
FOR THE BEST SOUND
It’s easy. The bar comes with rubber feet already attached,
so it will sit securely on any flat surface. Just center the bar
under your TV screen. If your TV is housed in a media center ,
you can place the bar above the TV.
If your TV is wall mounted, the bar can mount right beneath
it. The bar has built-in keyhole slots that make it easy.
Note: The rubber feet are detachable and may be removed
entirely (for wall-mounting the bar) or moved along the bottom
surface of the bar, depending upon your installation.
WHERE TO LOCA TE YOUR SUBWOOFER
FOR THE BEST SOUND
Your wireless subwoofer is really easy to place and can
go just about anywhere in the room. Plus you don’t have
to worry about connecting wires, because the only wire
you have to plug in is the power cord. And that’s it.
Here’s a little trick: If you place
your subwoofer in a corner of
your room, it will reinforce the
subwoofer’s output, making it
sound louder.
Wall mounted bar
2
2
4
1
3
Overall Dimensions
1. 3 3/4" H (9.53 cm)
2. 31" (78.74 cm)
Keyhole Slots
3. 19 13/16" W (50.32 cm)
Top of Bar to Keyhole Slots
4. 1 5/8" (4.13 cm)
Note: If you wall mount your SoundBar , ensure that your wall
anchors secure properly into the wall and that they can bear the
weight of the SoundBar, which is 5 lbs (2.3 kg).
6 Polk Audio Customer Service 800-377-7655 (Outside USA & Canada: 410-358-3600)

HOW TO CONNECT YOUR BAR
2.2A
20V
132
SOURCE
SYNC
POWER
OFF
ON
44W
L
R
ANALOG
AUDIO OUTPUT
DIGITAL OPTICAL
AUDIO OUTPUT
TV or Cable/Sat Box
HOW TO CONNECT YOUR SUBWOOFER
This is really easy too. Y ou likely have many sources for your
audio signal: your TV, your DVD player, or a cable/satellite box.
The bar is able to accept audio from up to three different sources.
The simplest approach is to connect the optical audio output of
your TV to the optical input on the back of the bar. This method
will provide the highest quality audio regardless of whether you
are watching TV or watching your favorite DVD.
If your TV does not have an optical output, you can use the optical
output from your DVD player or your cable/satellite box to connect
to the optical input on the bar. Then simply use the other bar
inputs for your other audio sources.
Your subwoofer receives a wireless audio signal from the bar,
so all you need to do is plug in the power cord and make
sure the main power switch is ON.
SYNCING THE BAR AND WIRELESS SUBWOOFER
The SoundBar5500 bar and wireless subwoofer come
from the factory preset to work together . If the wireless
subwoofer stops receiving an audio signal, follow these
instructions to re-establish the connection.
1. Turn off the subwoofer’s AC Mains switch.
2. Press and hold the SYNC button on the back
of the bar for three (3) seconds.
3. The LED on the back of the bar will blink,
indicating that the bar and the subwoofer
are ready to be connected.
4. Turn on the subwoofer’s AC Mains switch. When
the subwoofer LED turns solid green the bar
and subwoofer are connected and ready to use.
Note: Remove the
protective cap prior
to inserting cable.
Customer Service Hours of Operation: Monday-Friday, 9AM-5:30PM EST polkcs@polkaudio.com 7
BLUETOOTH®WIRELESS TECHNOLOGY
To use your Bluetooth wireless technology device
with the SoundBar5500, you must first pair your
device with your SoundBar.
Pairing creates the ability of your Bluetooth device to connect
with your SoundBar wirelessly. Pairing is like a handshake
between your Bluetooth device and your SoundBar5500
in which they meet and exchange information.
You only have to pair your SoundBar with your Bluetooth device
one time for this exchange of information to take place. After that
you simply select the “polk soundbar” from your
device list to make the connection to your SoundBar.
The SoundBar can hold 8 Bluetooth devices in its memory.
If enough devices pair after yours, your device could
be dropped from the memory list.
Pair and connect your Bluetooth device
with the SoundBar:
1. Make sure your Bluetooth device and SoundBar5500
are both powered on.
2. Activate the Bluetooth function on your Bluetooth source
device. See your device’s manual for instructions.
3. Press the Bluetooth source button from the SoundBar
remote or press the SOURCE button on the SoundBar
until the Bluetooth source is selected.
How to disconnect with a Bluetooth device:
1. Press and release the Remote Control Bluetooth button, or
2. Press and release the Bluetooth Source button, or
3. Turn off or disconnect the Bluetooth feature
on your Bluetooth device.
The SoundBar will emit a short tone and the
Bluetooth source symbol will begin slowly pulsing
when disconnected.
Automatic connection:
Any time you want to connect the last paired device
and play it through the SoundBar, do the following:
1. Turn your device’ s Bluetooth function on.
2. Enter Bluetooth source by pressing the Bluetooth source
button from the remote or press the SOURCE button
on the SoundBar until the Bluetooth source is selected.
3. After a short delay, the two devices will automatically
connect, you will hear a short tone, and the Bluetooth
source symbol will now be steady blue.
Note: By default, the last connected Bluetooth device
will automatically connect if available.
Pair and/or connect to a device when in Bluetooth
source, but disconnected:
SOURCELEARN
OR
The Bluetooth symbol will illuminate, then begin slowly
pulsing as it looks for the paired device.
4. Your SoundBar will now be displayed on your source
device and available to pair and/or connect. Select the
“polk soundbar” on your device to initiate
the connection process.
5. After a short delay (5 seconds), the two devices should
now be connected. You should hear a short tone and
the Bluetooth source symbol will now be steady blue.
6. Play your music from your device!
Note: If your device asks for a passcode to pair to the SoundBar ,
enter “0000.”
1. Engage the Bluetooth function on your Bluetooth source
device. See your device’s manual for instructions.
a. The SoundBar will be displayed on your source
device as available to pair and connect. Select
the “polk soundbar” on your device to initiate
the pairing and connection process.
After a short delay, the two devices should now be paired
and connected. Y ou should hear a short tone and the
Bluetooth source symbol will now be steady blue.
How to disconnect:
Note: Anytime The SoundBar exits SLEEP mode and is in
Bluetooth source, the SoundBar will automatically connect
to the last paired Bluetooth device if the paired device’ s
Bluetooth feature is on.
8 Polk Audio Customer Service 800-377-7655 (Outside USA & Canada: 410-358-3600)

HOW TO OPTIMIZE THE SOUND
WHEN TV SPEAKERS ARE ON
You should hear sound from the bar. If you don’t, turn up
the volume on the bar using its volume control buttons.
FINE TUNING YOUR SUBWOOFER VOLUME LEVEL
The next thing you’ll want to do is adjust the subwoofer
to blend with your bar. This will ensure the system produces
the best sound.
If your bar is connected to your TV, there’s a very good chance
your TV speakers are also playing. It’ s impossible to give specific
instructions on how to turn off the speakers for every TV, but
here’s a way to do it that covers many of the TVs out there.
1. On your TV remote control, find a “menu” or “setup” button.
2. Press this button. You should see an on-screen menu.
3. Next, look for an option to control audio functions
and select it.
The setting to turn off your TV’ s internal speakers should be here.
If you can’t turn off your TV internal speakers, don’t worry.
Your SoundBar5500 will make your TV sound much better.
To enjoy the best performance from your bar, you’ll want
it to play louder than your TV. Use the following steps
to adjust the volume balance between your TV and the bar:
1. If necessary, program your bar to respond to the volume
up and down control commands of your TV remote.
(See “HOW TO SETUP A REMOTE CONTROL FOR
YOUR SOUNDBAR5500” on page 10.)
2. Turn your TV volume all the way down using the control
buttons on your TV.
3. Then, using the volume keys on your bar, set the volume
to a normal listening level (do not use the remote control).
To set the subwoofer’s volume, play a variety of source material—
some music, a movie sound track with great special effects,
a movie chapter or a part of a concert in which people are
speaking. Adjust the volume until what you hear sounds
natural to you in your normal viewing location.
After you make these adjustments, your SoundBar5500 should
always be louder than your TV speakers. Then use the
TV remote control to adjust the volume as you normally do.
Customer Service Hours of Operation: Monday-Friday, 9AM-5:30PM EST polkcs@polkaudio.com 9
S
O
U
R
C
E
M
U
T
E
L
E
A
R
N
HOW TO SET UP A REMOTE CONTROL
FOR YOUR SOUNDBAR
SMARTBAR™PROGRAMMING NOTE:
For your SoundBar to respond to your remote control, you
MUST FIRST program the bar to respond to your television’ s
original IR (Infra-Red) remote. An RF (Radio Frequency)
remote will not work. Other remotes (cable, satellite) will
work only after you have programmed the bar to respond
to the TV’s IR remote.
Programming Instructions: Y our SoundBar is currently
programmed to respond to the remote control that is included
with the product. However, we strongly recommend programming the SoundBar to also respond to your existing remote control using the steps illustrated below. This will enable
you to operate all of your components using a single remote
control. While programming the SoundBar, ignore
anything that may be displayed on the TV screen.
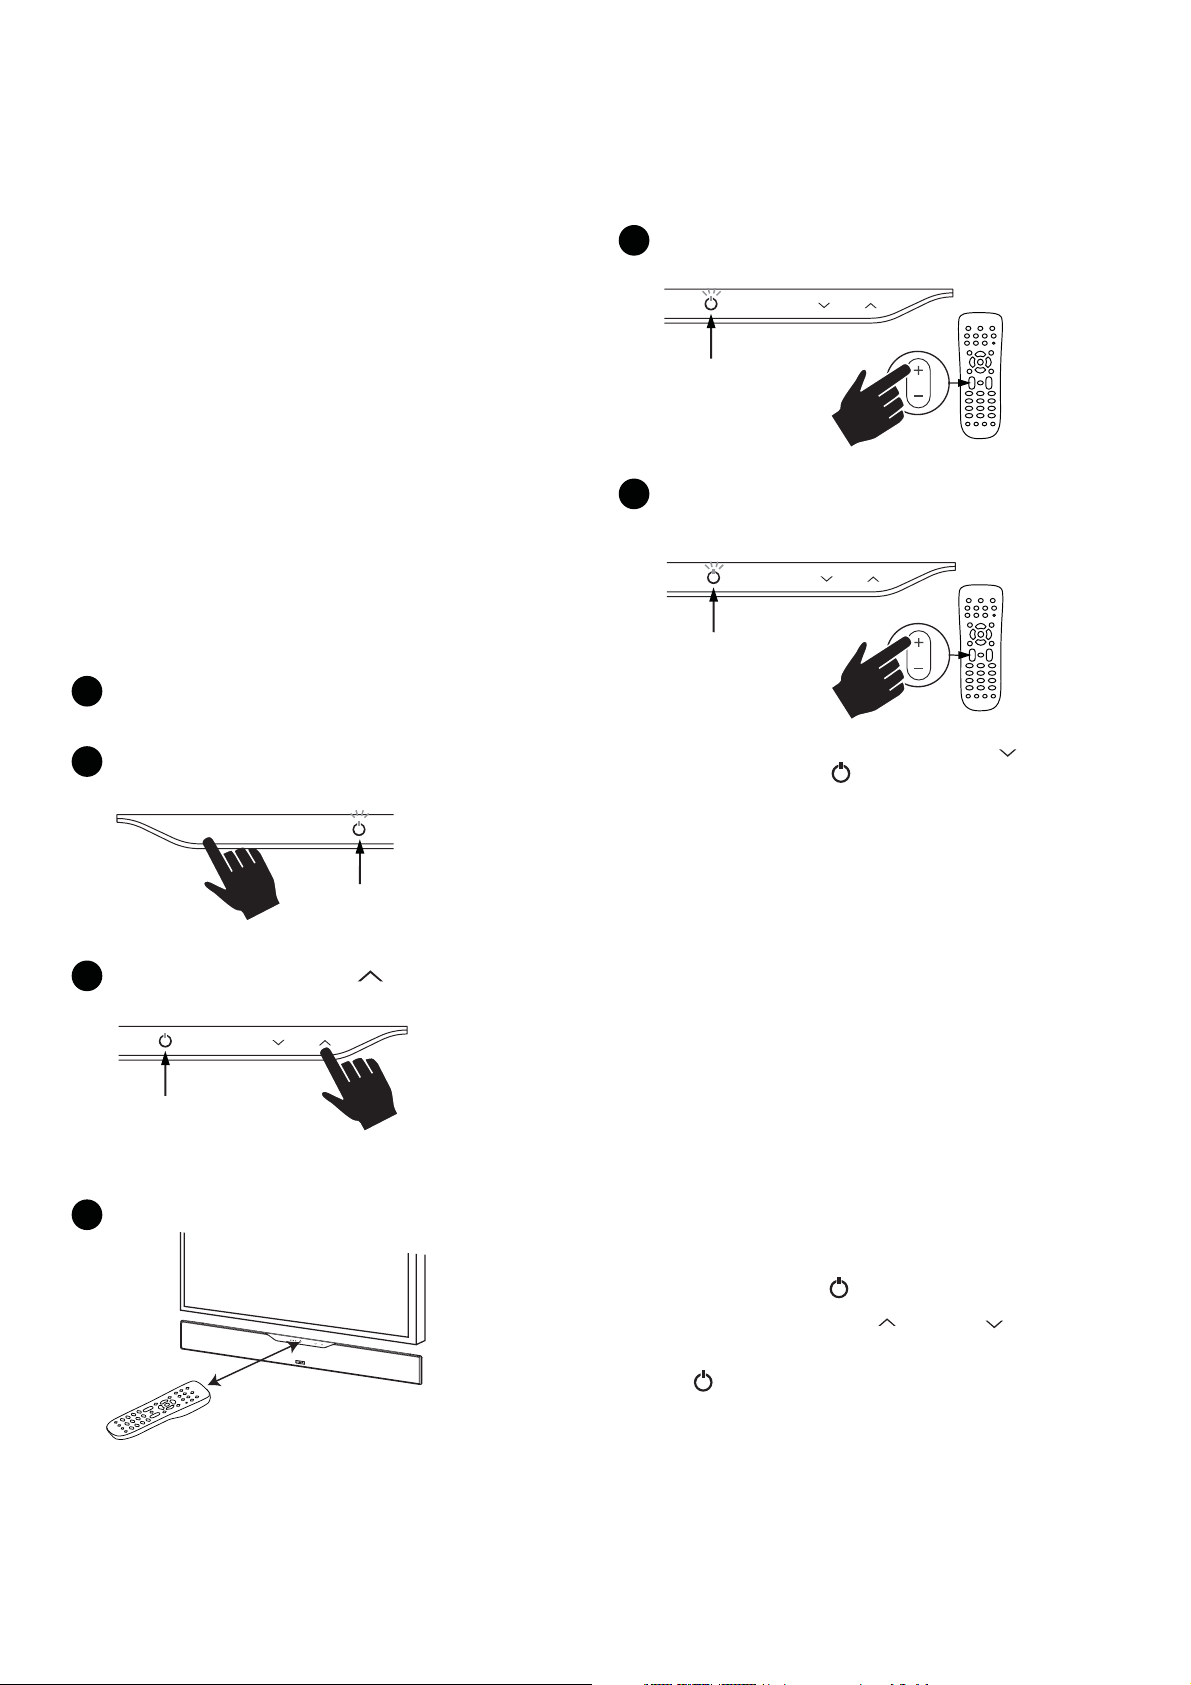
5
Tap “Volume Up” button on your TV’s remote control
4 - 8 times, once per second. T ap, do not hold.
LED
LED blinks with
each button press
6
When the LED blinks green quickly for 3 seconds,
VOL
the command has been learned. The LED will
become solid green.
Example: To teach your bar the “Volume Up”
command of your remote control:
1
The SoundBar is turned on and the LED is solid green.
And you have sound coming from the bar.
Press and hold “LEARN” for 2 seconds, or until LED
2
blinks orange, then release the “LEARN” button.
SOURCELEARN
LED
Blinks orange
3
Press and release Volume Up “ .”
LED turns solid orange.
MUTE
LED
Solid orange
LED
LED blinks green,
then turns solid green
VOL
Verify command works.
Repeat steps 1-6 to program “Volume Down” ( ), Source,
Mute and Power buttons ( ).
Note: If your bar fails to learn certain IR remote codes, the power
LED will blink red. Try erasing any previously programmed codes
(see below) and carefully repeat steps 1-6 above.
Code Erasing Procedure: If you have programmed your
SoundBar to respond to a remote control and you no longer want
it to do so, erase the codes by pressing the LEARN key for about
two seconds while the unit is in standby mode (power LED
is red). Y ou’ll know that previously learned codes have been
successfully erased when the power LED blinks orange twice.
Note: This procedure removes ALL of your bar’s remote control
programming. If you only need to change the programming for
some of the bar buttons, follow the six steps in the sequence
previously described to redo any previous programming.
The SoundBar will continue to respond to the provided
credit card remote control.
4
Hold TV remote 1' - 2' from SoundBar.
1' - 2'
10 Polk Audio Customer Service 800-377-7655 (Outside USA & Canada: 410-358-3600)
SUB VOLUME CONTROL ON THE BAR
While unit is on and LED is solid green.
1. Ta p LEARN once, LED ()turns orange.
2. To adjust sub volume, tap up ()or down ().
3. To return to master volume, tap LEARN again,
LED ( ) turns green.
NOTE: Bass can also be adjusted with included remote control.
TROUBLESHOOTING

The bar does not power on.
Bass output is not loud enough.
Ensure you have plugged the power supply
into a live wall outlet.
Ensure that all components of the power
supply are connected properly.
Ensure the power supply is properly connected
to the bar power input.
Ensure the rear panel power switch is in the “ON” position.
The subwoofer does not power on.
Ensure the subwoofer is plugged into a live wall outlet.
Ensure the rear panel power switch is in the “ON” position.
No sound from the bar.
Check that the TV or cable box is providing a signal.
If necessary, check using an alternate source.
Check that the bar is receiving power and is turned on.
Turn up the volume of the bar.
Check the input cables to make sure they
are connected securely.
Turn up the volume of your television or cable box.
Check mute status: Is the bar status light slowly blinking
green? If so, press the MUTE button on the bar .
No sound from the subwoofer.
See section “Subwoofer does not power on.”
Turn up the subwoofer volume using the remote control.
Is the subwoofer status indicator blinking green? If so,
the bar and subwoofer’ s wireless connection has been
lost. Turn off both the bar and subwoofer. Then turn them
back on to re-establish communication. If this does not
fix the issue, refer to the section “SYNCING THE
BAR AND WIRELESS SUBWOOFER,” on page 7.
The sound coming from the bar is distorted.
Try turning down the volume of your audio
source, if possible.
Audio processing (see FAQ’s on page 12)—
there may be audio processing occurring prior
to reaching the bar. Disable this processing.
Turn up the subwoofer’s volume using the remote control.
Place the subwoofer closer to a corner of the room.
Move subwoofer closer to viewing location within the room.
The bar won’t learn my remote control commands.
Carefully follow the programming instructions
on the previous page of this manual.
Hold the remote steady and 1-2 feet
from the front of the bar.
Quickly “tap” the button on your existing
emote until the status LED blinks green.
r
Note: The bar learns almost all IR commands,
but some IR protocols cannot be programmed.
The volume of my television speakers gets louder
than my SoundBar5500 system over time.
Turn off your TV speakers per the instructions
on page 9 of this manual.
When the remote control volume button is held down,
your television may change volume levels faster than
the bar. Use the buttons on the bar to adjust the volume
of the bar to the correct balance with the TV speakers.
The subwoofer’s output is intermittent,
or sounds weak or is distorted.
The wireless subwoofer could be too far away
from the bar to receive a sufficiently strong signal.
Try moving the subwoofer closer.
My Bluetooth device and bar will not disconnect.
Some Bluetooth devices will constantly attempt
to connect to a paired device, so you must turn off
the Bluetooth function on your device to allow other
devices to connect to the bar.
The included remote control won’t work.
Ensure the battery’s protective plastic tab
has been removed.
Replace the battery (CR2025).
Customer Service Hours of Operation: Monday-Friday, 9AM-5:30PM EST polkcs@polkaudio.com 11

FAQ’S (FREQUENTLY ASKED QUESTIONS)
My TV does not have an optical output.
How do I connect my audio?
You have several options for connecting your audio:
Use the optical output of your source unit (cable/satellite box,
DVD player, etc.) and connect directly to the SoundBar5500
using the supplied optical cable.
Use the 1/8" (3.5mm) analog / headphone output of your TV
(if available) and connect directly to the SoundBar5500
using the supplied 1/8" (3.5mm) to 1/8" (3.5mm) analog cable.
Use the RCA audio outputs (white/red pair) on your TV
(if available) and connect directly to the SoundBar5500
using the supplied 1/8" (3.5mm) to 1/8" (3.5mm) analog
cable and 1/8" (3.5mm) to RCA adapter .
What if my provided optical cable is too short?
We did our best to provide a cable of adequate length;
however, there might be a few setup instances in which
the cable may be too short. If that is your situation,
your local electronics store will have cables that
meet your required length.
My audio sounds strange and distorted.
Your SoundBar5500 requires a clean, unaltered stereo
or Dolby Digital signal for proper audio performance. If the
sound from your SoundBar5500 is strange or distorted,
then check the audio menus of whatever source(s) are
connected to your SoundBar5500 and make sure
any audio processing is turned off.
Why can’t I successfully program the SoundBar5500
to respond to my remote control?
My SoundBar5500 was responding to commands,
but now it isn’t. What should I do?
In this rare event, simply turn off the power (switch located
on the back of the bar), wait a few seconds, and then turn
the power back on. This should restore control.
How do I erase previously learned remote
control commands?
If you have programmed your SoundBar5500 to respond
to a remote control and you no longer want it to do so, then
you can erase the codes by pressing the LEARN key for about
two seconds while the unit is in standby mode (power LED
is red). The SoundBar5500 will continue to respond
to the provided credit card remote control.
Can I adjust the subwoofer level control from the bar
keypad if I cannot locate the provided remote control?
Yes. You can control the subwoofer volume from the
bar keypad by tapping the LEARN key prior to using the
volume buttons. When the power LED shines orange,
the volume keys ( / ) control the subwoofer volume.
Tap the LEARN key again when you are done with
the adjustment.
To contact Customer Service/Technical Support:
If you have a question or comment, please feel free to call
us or email us. In North America and Canada, call Polk Audio
Customer Service: 800-377-7655 (M-F 9-5:30 EST) or via email
polkcs@polkaudio.com. Outside the US, call 410-358-3600.
There are many remote control formats, and we have done
our best to make the SoundBar5500 compatible with the
most popular brands. However, there are likely some cases
in which the bar will not be able to learn your remote codes.
In this case, please use the remote control provided with
the SoundBar5500 product or try a different universal
remote control.
Note: RF only remotes will not work with this system.
How do I control the SoundBar5500?
There are three ways to control your SoundBar5500:
Use the touch-sensitive buttons on the front of the bar .
Use the provided remote control.
Program the SoundBar5500 to respond to your existing
remote (see included instructions).
12 Polk Audio Customer Service 800-377-7655 (Outside USA & Canada: 410-358-3600)

A Note Regarding Wireless Performance:
Like all wireless devices, your SoundBar5500 may be susceptible
to RF interference from such sources as microwave ovens, Wi-Fi computer
systems, video game systems, cordless telephones, blue tooth systems,
baby monitors and other devices. In particular, any devices operating in the
2.4GHz band may cause intermittent wireless connections between the
SoundBar5500 speaker and the subwoofer. It is also possible that your
SoundBar5500 System may affect other wireless systems. For the
most part, you can avoid wireless performance problems by physically
separating these devices from your SoundBar5500 System. Maintaining a distance of several feet or more between your SoundBar5500 speaker and any
wireless device should prevent any mutual interference effects. If you do notice
any subwoofer signal dropouts take care to identify the root cause (most commonly having other wireless devices too close) and resolve accordingly. Any
interference effects from a microwave oven will cease once the oven stops
operating and may be resolved on a long-term basis by increasing the physical
distance between your SoundBar5500 System and the microwave oven.
WARNING: LISTEN CAREFULLY
Polk Audio loudspeakers and subwoofers are capable of playing at extremely high volume levels,
which could cause serious or permanent hearing damage. Polk Audio, Inc. accepts no liability
for hearing loss, bodily injury or property damage resulting from the misuse of its products.
Keep these guidelines in mind and always use your own good judgment when controlling volume:
• You should limit prolonged exposure to volumes that exceed 85 decibels(dB).
Refer to the Occupational Health and Safety Administration (OSHA) guidelines at:
www.osha.gov/dts/osta/otm/noise/standards_more.html.
Polk Audio is a DEI Holdings, Inc. Company. Polk Audio, Polk,
The Speaker Specialists, Polk Digital Logic and SmartBar
are registered trademarks of Polk Audio, Inc.
Products that have earned the Energy Star
®
are designed to protect
the environment through superior energy efficiency.
Manufactured under licence from Dolby Laboratories. Dolby and the
double-D symbol are registered trademarks of Dolby Laboratories.
The Bluetooth
®
word mark and logos are registered trademarks owned by
Bluetooth SIG, Inc. and any use of such marks by Polk Audio is under license.
Other trademarks and trade names are those of their respective owners.
The “aptX
reserved. The aptX
®
software is copyright CSR plc or its group companies. All rights
®
mark and the aptX logo are trade marks of CSR plc or one
of its group companies and may be registered in one or more jurisdictions.”
Customer Service Hours of Operation: Monday-Friday, 9AM-5:30PM EST polkcs@polkaudio.com 13