

Page 1
Page 1
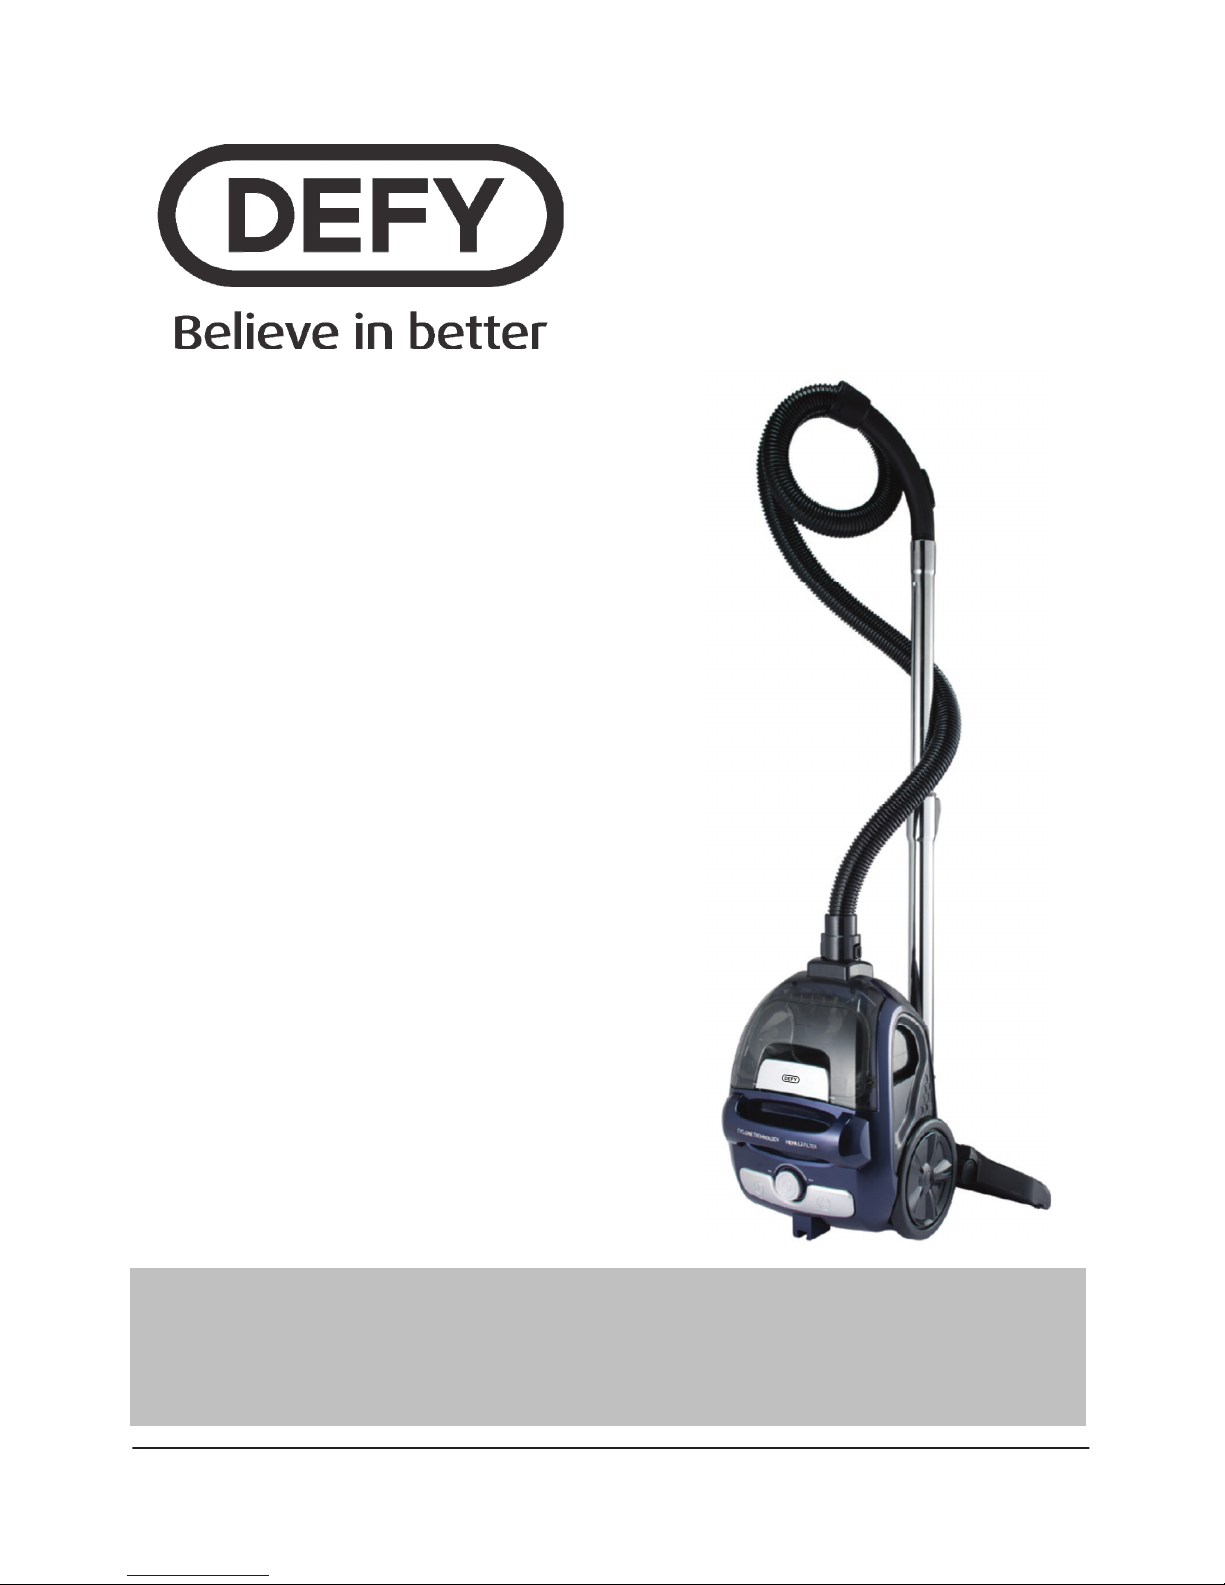
VC 4320 BN
INSTRUCTION MANUAL
BAGLESS CYLINDER VACUUM CLEANER
Page 2
Page 2
Read this manual before operation of the appliance!
Dear Customer,
Congratulations on the purchase of your new Defy appliance!
Please read this manual carefully before using your appliance for the first time and then store
it within easy reach for future reference. We trust you will enjoy years of trouble free use.
The user manual:
x This manual will provide you with information on how to safely operate and care for your
appliance in order that you gain the maximum benefit from it.
x Pay particular attention to any safety instructions.
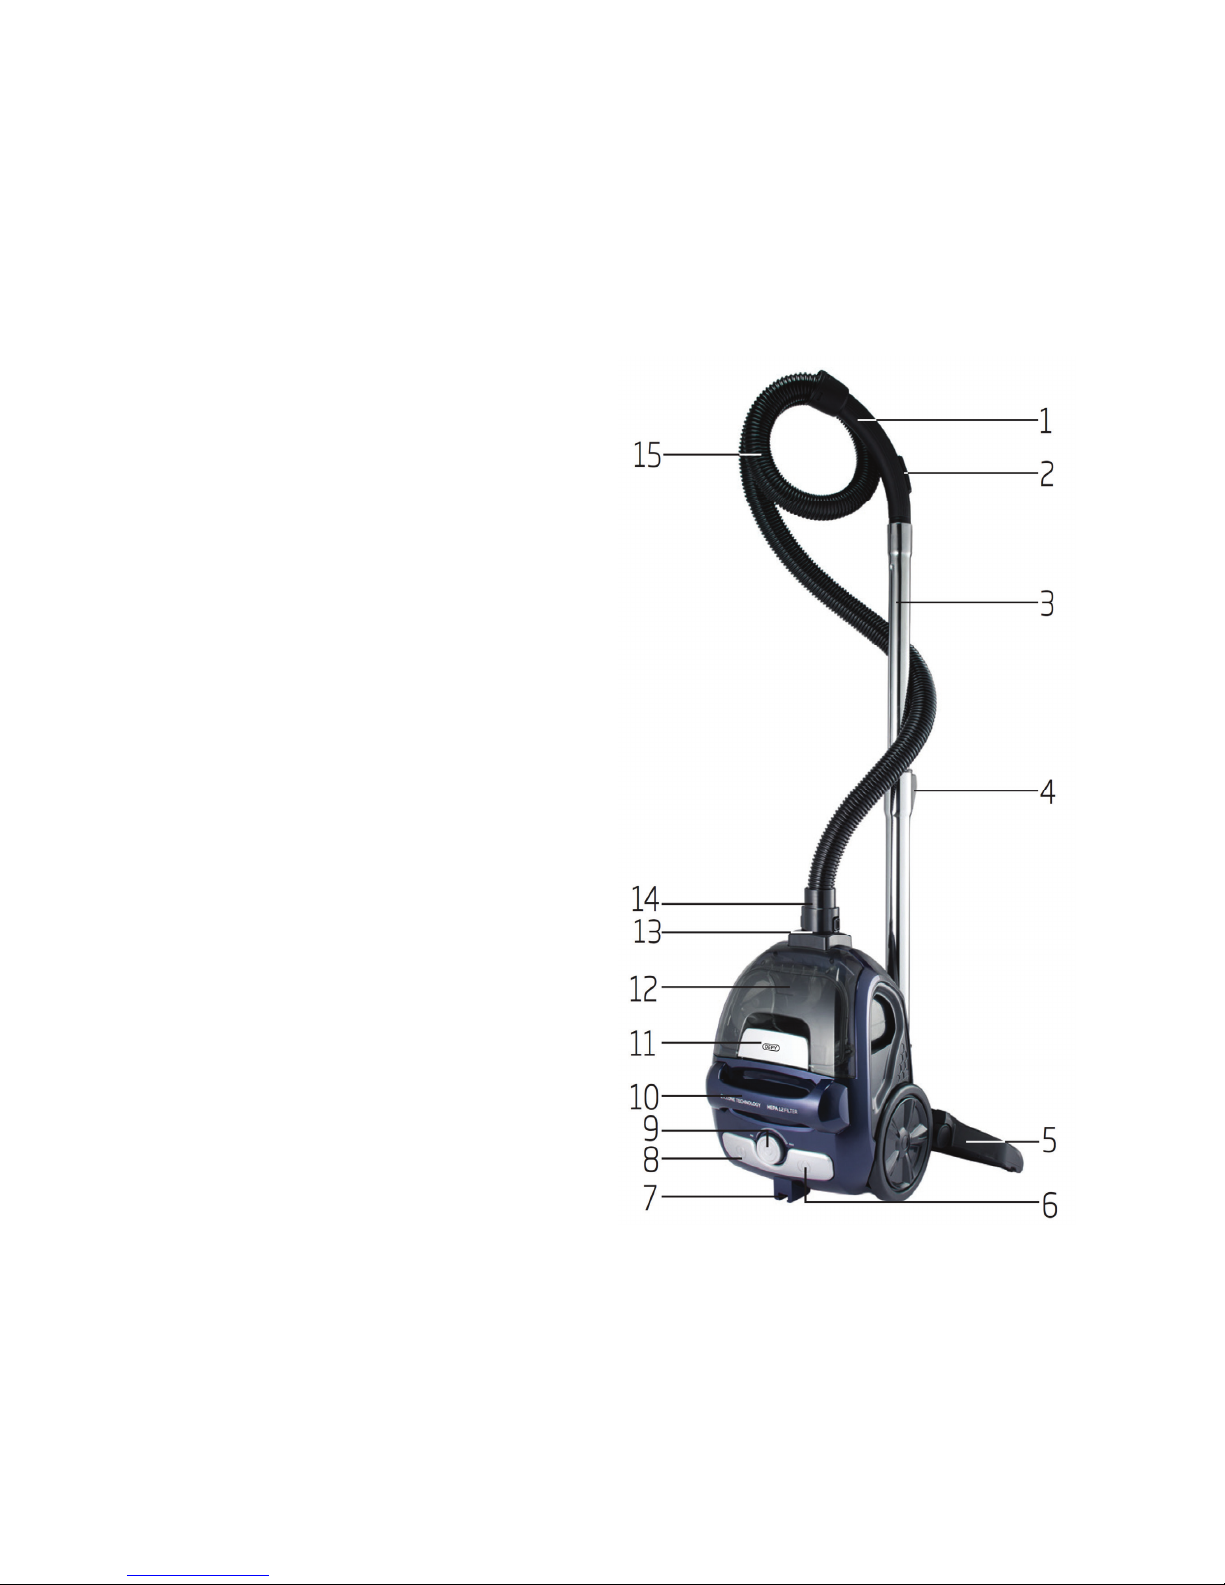
1. Handle
2. Vacuum control
3. Telescopic tube
4. Telescopic tube adjustment latch
5. Parquet/carpet brush
6. Cord winding button
7. Parquet/carpet brush parking groove
8. On/Off button
9. Suction power adjustment knob
10. Carriage handle
11. Dust container removal latch
12. Dust container
13. Suction nozzle
14. Hose cap
15. Hose
Controls and parts
Technical data
Supply voltage: 220-240V~ 50/60 Hz
Power: 1600 W Nom
:1800 W Max
Operating radius: 8 m
Suction power: 300 W
Filter: HEPA 12
Page 3

Page 3
Safety and set-up
Please read this instruction
manual thoroughly prior to
using this appliance! Follow all
safety instructions in order to
avoid damages due to improper
use!
Keep the instruction manual for
future reference. Should this
appliance be given to a third
party, then this instruction
manual must also be handed
over.
While using the vacuum
cleaner for only household
purpose, please observe basic
safety instructions including the
following:
x Use the vacuum cleaner only
for cleaning dry surfaces
indoors.
x Switch off the buttons when
you are plugging the vacuum
cleaner in or out.
x Always unplug the vacuum
cleaner before attaching or
removing the suction hose
and other accessories.
x This appliance is not intended
for use by persons (including
children) with reduced
physical, sensory or mental
capabilities or lack of
experience and knowledge,
unless they have been given
supervision or instruction
concerning the use of the
appliance by a person
responsible for their safety.
x Children should be
supervised to ensure that they
do not play with the
appliance.
1
x Always observe the
instructions in this user
manual when using the
appliance. Use only the
accessories recommended by
the manufacturer.
x Never use the vacuum
cleaner if it is dropped,
damaged, left outdoors or
dropped in water. Never use
the vacuum cleaner with a
damaged cable or plug. If the
power cable or plug is
damaged, please have it
checked, repaired or replaced
by an Authorized Service
agent or a qualified
technician.
x Do not pull or move the
appliance by pulling on the
cable. Do not use the cable
as a handle, do not close the
door on the cable, do not pull
the cable around sharp edges
and corners. Do not run the
vacuum cleaner over the
power cable. Keep the cable
away from hot surfaces.
x Do not touch the vacuum
cleaner or the plug with wet
hands. Do not use on wet
surfaces or outdoors.
x Do not block ventilation holes
with any objects. Do not use
with any openings blocked
and do not restrict the air flow.
Protect all ventilation holes
against dust, hair, lint or
anything that will restrict air
flow.
x Keep hair, loose clothes,
fingers and all parts of your
body away from ventilation
holes and moving parts of the
appliance.
Page 4

Page 4
IMPORTANT: Always
unplug the vacuum
cleaner before attaching
or removing the
accessories.
WARNING: Unplug the
vacuum cleaner before
assembling the vacuum
cleaner, opening and
emptying the dust
chamber or attaching or
removing accessories.
ATTENTION: The
vacuum cleaner is a
powerful appliance.
Ensure that the button is
switched to the "off"
position before plugging
in the appliance. When
operating the vacuum
cleaner ensure it is held
firmly.
IMPORTANT: If the air
inlet, hose or telescopic
tube is clogged, switch
off the vacuum cleaner
and remove the
obstruction before
restarting.
IMPORTANT: Washing
the filters will increase
the vacuum cleaners
performance. Before
placing the filters back
into the vacuum cleaner,
make sure that the filters
are completely dry.
x Do not use the appliance to
clean flammable or
combustible materials (lighter
gasoline, petroleum, kerosene
and etc.). Do not use the
appliance near combustible
liquids or gaseous materials.
x Do not vacuum harmful or
toxic substances (bleach,
ammonia, drain cleaner etc.).
x Do not vacuum hard and
sharp objects such as glass,
nails, coins etc.
x Do not use the vacuum
cleaner when filters are not
attached.
x Be careful when vacuuming
stairs.
x Ensure sufficient illumination
is provided for the area you
are cleaning.
x Store the vacuum cleaner in a
cool and dry place indoors.
x Switch off the appliance by
means of the on/off button
before unplugging the
vacuum cleaner.
x This vacuum cleaner is
intended for household use,
not for commercial or
industrial usage.
Safety and set-up
Page 5

Page 5
The manufacturer strives for
continuous improvement. For
this reason, the text and
illustrations in this manual are
subject to change without notice.
If the appliance is damaged in
any way do not use it. Report the
damage to your dealer who will
take the necessary corrective
action.
Using the vacuum cleaner
2
Attaching/removing the hose
To attach the hose (15), push the hose cap
(14) to match it with the slot (a click sound
will be heard).
Projecting parts on the hose cap should be
aligned correspondingly.
To remove the hose (15), press the
unlocking buttons on the sides of the hose
cap (14) and pull the hose.
Attaching/removing the telescopic tube
1. Attach the telescopic tube (3) to the
handle (1).
2. Pull the telescopic tube (3) from the
handle (1) to remove it.
3. To adjust the length of the telescopic
tube, push the telescopic tube adjustment
latch (4) in the arrow direction and pull it
from the end of it.
Attaching/removing the parquet/carpet
brush
1. Attach the telescopic tube (3) to the
parquet/ carpet brush (5).
2. Pull the telescopic tube (3) from the
parquet/ carpet brush (5) to remove it.
Adjusting the parquet/carpet brush
1. By pressing the adjustment latch located
on the parquet carpet brush (5);
2. Use position for hard floors and
parquet.
x Use position for rugs and
carpets.
x parquet.
Page 6

Page 6
Operation
Adjusting the suction power
You can increase the suction power of the
appliance by turning the suction power
adjustment knob (9) located on the body of
the appliance clockwise according to the
type of the surface to be cleaned. To
decrease the suction power, turn the suction
power adjustment knob anti-clockwise.
Vacuum control
You can lower the suction power of the
parquet carpet brush (5) by pulling the
vacuum adjustment control located on the
handle backwards (2) (1) When using this
method there is no need to use the suction
adjustment knob (9) found on the appliance.
Accessories
2 in 1 nozzle
Things to do for energy saving
x If your vacuum cleaner allows for
adjustment of the suction power, you can
set your vacuum cleaner by adjusting this
button to the required suction power.
Lower suction settings enable less
electricity consumption.
x Frequently cleaning or replacing the filters
will increase the vacuum cleaners
performance and reduce the cleaning time
and in turn will conserve energy.
3
1. Pull out the power plug located at the
back of the appliance and plug it in to the
wall socket.
2. Press the on/off button (8) to switch on
your appliance.
4
WARNING: Do not perform
cleaning tasks using the end part
of the handle (1).
Switching off the vacuum cleaner and
parking feature
Switch off the appliance using the on/off
button (8) and unplug the appliance.
Press the cord rewind button (6) to rewind
the power cord.
Vertical parking feature
Insert the hook of the parquet/carpet brush
(5) into the parking groove located at the
bottom section of the appliance.
Horizontal parking feature
Insert the hook of the parquet/carpet brush
(5) into the parking groove (7) located at the
rear section of the appliance.
Page 7

Page 7
Cleaning and care
Emptying the dust container
1. Pull the dust container removal latch (11)
towards yourself to remove the dust
container (12).
2. Press the dust container release button
located beneath the dust container to
open the cover and empty the container.
3. When you have emptied dust, close the
dust container cover (12); a click sound
will be heard.
4. Insert the dust container (12) back into its
location.
WARNING: To ensure the
consistent performance of your
vacuum cleaner, it is
recommended to clean the filters
and dust chamber after each time
the vacuum cleaner is emptied.
IMPORTANT: Always unplug the
vacuum cleaner before removing
the dust chamber.
IMPORTANT: NEVER USE the
vacuum cleaner without ALL
the filters correctly in place.
5
Motor protection filter
These filters are located on the rear side of
the dust container (12).
5. Pull the dust container removal latch (11)
towards yourself to remove the dust
container (12).
6. Remove the HEPA filter and motor
protection filter found at the back of the
dust container (12).
7. After washing the sponge protection filter
under running water, wring it out slightly
and leave it to dry (for 24 hours
minimum).
8. Shake off the HEPA inlet filter to eliminate
the dust on it. After that, wash it by
holding its clean side under running cool
water.
9. If you wash the HEPA filter, dry it at room
temperature (for 24 hours minimum). Do
not use it within 24 hours and only use
when it is completely dry.
WARNING: Do not use
appliances producing hot air such
as hair dryers or heaters to dry
the filters.
WARNING: Do not install the
filters without completely drying
them; this may result in an
unpleasant damp smell during
use, water may also leak from the
back of the appliance or the filters
may get damaged.
WARNING: Always refit the filters
after they have dried.
Cleaning the filters
HEPA filter
The HEPA outlet filter is located on the rear
side of the appliance.
1. Remove the HEPA filter by pulling it from
its handle.
2. Shake off the HEPA outlet filter to
eliminate the dusts on it. After that, you
can wash it by holding its clean side under
running cool water.
3. If you wash the HEPA filter, dry it at room
temperature (for 24 hours minimum). Do
not use it before ensuring that it is
completely dry.
Handling and transportation
x During handling and transportation, carry
the appliance in its original packaging.
The packaging of the appliance protects it
against physical damage.
x Do not place heavy loads on the
appliance or on the packaging. The
appliance may get damaged.
x Dropping the appliance may render it non-
operational or cause permanent damage.
Page 8

Page 8
Environmental note
This appliance has been made from high
quality materials and parts which can be
reused and are suitable for recycling. Do not
dispose of the appliance with normal
household waste at the end of its service life.
Consult your local authorities
for disposal
information and facilities available.
Help
protect the environment by recycling
used appliances.
Troubleshooting
6
Record in the space below the listed information
for future reference.
SERIAL NUMBER……………………………..
DATE OF PURCHASE………………………..
PURCHASED FROM…………………………..
…………………………………………………...
Please register your product at
www.defy.co.za
DEFY APPLIANCES (PTY) LTD
P.O.BOX 12004
JACOBS
DURBAN
4026
SOUTH AFRICA
WARNING: Always unplug the vacuum cleaner before applying maintenance/
troubleshooting checks to reduce the risk of personal injuries.
Storage
x If you do not plan to use the appliance for
a long period of time, please store it
carefully.
x Switch the appliance off
x Make sure the appliance is unplugged
and completely dry.
x Rewind the mains cord by pressing the
cord rewind button
x Attach the lower tube to the vacuum
cleaner.
x Store the appliance in a cool, dry place.
x Make sure the appliance is kept out of the
reach of children.
Problem Reason Solution
Vacuum cleaner
does not work.
It is not plugged in properly. Plug it in firmly to the wall socket.
No electricity. Check the fuse or power switch.
On/Off button is not pressed. Press the On/Off button.
Blown fuse or tripped switch. Replace the fuse or lift the switch.
Vacuum cleaner
does not lift dirt/
loss of suction.
Dust chamber is full or clogged. Empty the dust container.
Clogged filters. Remove, clean and replace filters.
Low suction when
accessories are
attached.
Hose/flexible hose is not properly
attached.
Attach properly.
Accessory is not attached properly. Attach properly.
Vacuum cleaner
leaks dust.
Dust chamber is full. Empty the dust container
One of the filters is not properly installed. Remove, clean and replace filters.
Page 9

Page 9
Service Centres
If you have followed the instructions and still have a problem, contact the nearest
Defy Service Centre. They will be able to advise you on any aspect of the
appliance.
7
OTHER AREAS ARE SERVICED BY OVER 200 AUTHORISED SERVICE AGENTS.
PLEASE CONSULT THE NEAREST REGIONAL DEFY SERVICE CENTRE FOR DETAILS.
Sub-Saharan Africa Service Agents:
ZAMBIA: SOUTHGATE INVESTMENTS LTD
Plot 1606, Sheki Sheki Road
P.O. Box 33681
Lusaka, 10101, Zambia
Tel: +260 0211 242332/3
Fax: +260 0211 242933
sgiservicecentre@microlink.zm
NAMIBIA: ATLANTIC DISTRIBUTORS (PTY)
LTD
10 Tienie Louw Street, Northern Industrial Area
P.O. Box 21158, Windhoek, Namibia
Tel: (061) 216162
Fax: (061) 216134
atlantic@mweb.com.na
ZIMBABWE: TRADECOMAFRICA
Trade Com Africa, 183 Loreley Crescent
Msasa, Harare, Zimbabwe
Tel: +263 4 486165/6
Cell: +263 772 469010
Cell: +263 772 469011
BOTSWANA: RAY MORGAN AGENCIES
RMA Service Centre, Plot 48, East Gate
Gaborone International Commerce Park
Kgale View, Gaborone
Botswana
Tel: +267 390 3996 / 390 3912
Fax: +267 318 7376
Cell: +267 7134 6539
service@rma.co.bw; raja@rma.co.bw
SWAZILAND: LYNDS DISTRIBUTORS
P.O Box 716, Mbabane, Swaziland, H100
Tel: (00268) 2515 4310/8
Fax: (00268) 2518 4318
MOZAMBIQUE: COOL WORLD. LDA
Rua da Resistencia No. 97B R/C
Cell: +258 84 44 61 234
coolworldlda@hotmail.com
Nosso Show Room
Av: da Industrias, Parcela No.735 * 735A
Machava, Maputo
South African Service Agents:
BLOEMFONTEIN
160 Long Street, Hilton, Bloemfontein 9301
Tel: 051 400 3900
Bloemfontein.Service@defy.co.za
CAPE TOWN
5A Marconi Rd. Montague Gardens, 7441
Tel: 021 526 3000
CapeTown.Service@defy.co.za
DURBAN
135 Teakwood Road, Jacobs,
Durban, 4052
Tel: 086 100 3339
Durban.Service@defy.co.za
EAST LONDON
Robbie de Lange Road, Wilsonia,
East London, 5201
Tel 043 745 1129
EastLondon.Service@defy.co.za
JOHANNESBURG
Cnr. Mimetes & Kruger Sts. Denver ext.12
Johannesburg, 2094
Tel: 011 621 0200 or 011 621 0300
Gauteng.Service@defy.co.za
POLOKWANE
87 Nelson Mandela Drive, Superbia 0699
Tel: 0152 92 1166 / 7 / 8 / 9
Polokwane.Service@defy.co.za
PORT ELIZABETH
112 Patterson Road, North End, Port Elizabeth
6001
Tel: 041 401 6400
PortElizabeth.Service@defy.co.za
PRETORIA
Block A1 Old Mutual Industrial Park,
Cnr. D.F.Malan Drive & Moot Str. Hermanstad,
0082
Tel: 012 377 8300
Pretoria.Service@defy.co.za
Page 10

Page 10
Warranty
8
This certificate is issued by DEFY APPLIANCES (PTY) LIMITED manufacturers of Defy
and Ocean products, hereinafter the Company, to the original purchaser only, of the
appliance described on the certificate and shall constitute the only warranty given in
respect of this appliance.
The Company warrants to the original purchaser that for a period of ONE YEAR from date
of purchase the appliance is free from defect under normal domestic use, both in
workmanship and material, subject to the following conditions.
1. Carry-in service. Small appliances are repaired in our service centres and are not
collected from the customers home. Faulty units must be delivered to the purchasing
dealer or to the nearest Company Service Centre for warranty repairs.
2. Vitreous enamelware, fuses and lamps are specifically excluded from these warranties. It
is an express condition of these warranties that the purchaser takes due care and
attention in the use and maintenance of the appliance. Abuse, misuse in conflict with
operating instructions, connection to incorrect voltages and subjection to commercial use
shall release the Company from its obligations.
3. This warranty shall become void and cease to operate if the appliance is dismantled by,
or any repairs to the appliance are effected by any persons not duly authorised by the
Company, or if substitute parts not approved by the Company are used in the appliance,
or if the serial number of the appliance is removed.
4. The Company shall not be responsible for damages resulting from fire, flood, civil
disturbances or any Act of God. The Company shall not, in terms of these warranties be
responsible nor held liable for any consequential loss or damage of any kind caused by or
due to the failure or malfunction of the appliance. The Company shall not be responsible
for damages caused by insect and/or animal infestation.
5. The Company shall not be responsible for transportation or other costs other than those
incurred within the provisions of Point 1 of this Certificate.
6. For warranties in the Republic of South Africa and Sub-Saharan Africa, please
contact your nearest Defy office. Please refer to the previous page for respective
South African service agents and Sub-Saharan Africa service agents.
7. Where service is requested under warranty and no fault or defect can be found by the
Company, all costs incurred will be for the purchaser's account.
8. This Certificate as well as your invoice will serve as proof of purchase. For the purpose
of warranty, it will be essential to produce this Certificate and invoice. Failure to do so, will
render the purchaser liable for service costs.
KEEP THIS CERTIFICATE AND SALES INVOICE AS PROOF OF
PURCHASE FOR WARRANTY PURPOSES.
 Loading...