

Page 1

Owner’s
Manual
THERMOFAN STOVES
MODELS
631T
731T
735TC
CONTENTS
2 Introduction
2 Unpacking
2 Installation
2 Electrical Installation
3 Safety Advice
3 Control Panels
4 Automatic Oven Timer/Clock
6 Introduction to Thermofan Cooking
6 Thermofan Oven
7 Grilling
7 Warming Drawer
8 Solid plates (model 631T and 731T)
9 Ceran smooth top (model 735TC)
10 Maintenance
11 Problem Check
11 Owner’s Responsibility
11 Service
www.defy.co.za
Page 2

INTRODUCTION
Congratulations on the purchase of this quality product.
We trust that you will enjoy many years of trouble free use. Please read these instructions
carefully before using the stove. This manual will provide you with information on how
to operate and care for your product in order that you gain the maximum benefit from it.
UNPACKING
• Please ensure that packaging material is disposed of in a responsible manner.
• Plastic bags should be cut up to prevent children playing with them and accidentally
suffocating.
• Remove all packing from the oven cavity and position the accessories.
• If the appliance is damaged in any way, do not use it. Report the damage to your
dealer, who will take the necessary corrective action.
INSTALLATION
• Levelling feet are provided to assist you in positioning your stove, so that it will stand
firm and level. To adjust the level, turn the relevant foot to either raise or lower the
stove.
• Surfaces immediately adjacent to the oven should be able to withstand temperatures
of up to 100°C without delaminating or discolouring.
ELECTRICAL INSTALLATION
“This appliance must be earthed and the manufacturer and the seller do
not accept responsibility for any damage due to incorrect installation or
electrical connection.”
• This appliance should not be connected through an earth leakage system. Refer to
S.A.B.S. 0147.
Connection to the power supply This appliance has a ‘Y’ type supply cord connection
and must be installed by a licensed electrician, who will ensure that the oven is correctly
connected and safely earthed. The rated current is printed on the serial number label
attached to the stove upper back panel.
The appliance must be connected to the mains through an All pole isolating switch which
has a minimum clearance between the contacts of 3 mm in All poles.
A means for disconnection must be provided in the fixed wiring.
Page 3
SAFETY ADVICE
• Only use the oven and hob for preparing food.
• Always keep children away from the product when it is in use.
• Do not leave hot fat or oil unattended. If overheating occurs, these could catch fire.
• Switch off the power at the wall switch in the event of a fault or when cleaning the
appliance.
• Do not store flammable items in the oven. If the oven is inadvertently switched on,
these could catch fire.
• Never cover the bottom oven element with aluminium foil. Cooking times will be
affected and the oven enamel could be damaged.
• Avoid spilling fruit juice, particularly citrus, on the oven as it could damage the
enamel.
• Always keep the oven door gasket clean as this will enable the door to seal properly.
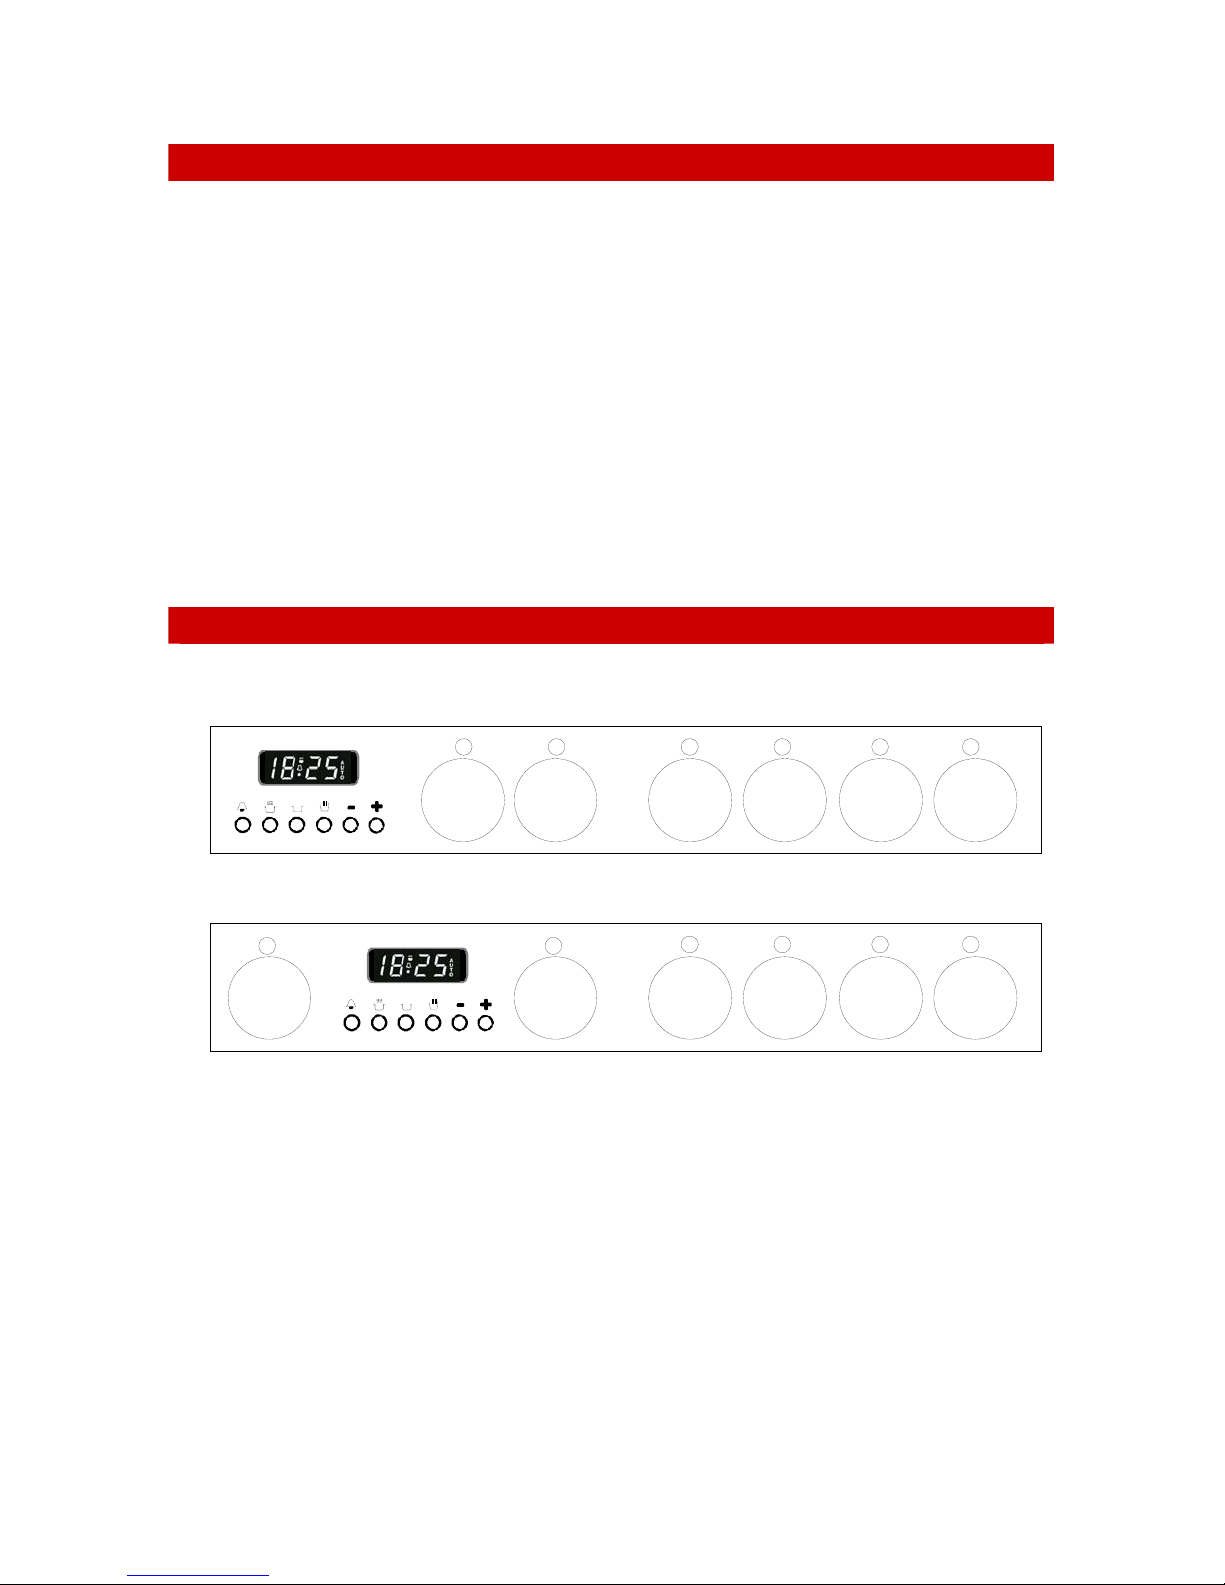
CONTROL PANELS
631T
OVEN TIMER
CLOCK
WARMER
DRAWER
OVEN
THERMOSTAT
L FRONT
PLATE
L REAR
PLATE
R REAR
PLATE
R FRONT
PLATE
12:45
STOP
731T and 735TC
WARMER
DRAWER
12:45
STOP
OVEN TIMER
CLOCK
OVEN
THERMOSTAT
L FRONT
PLATE
L REAR
PLATE
R REAR
PLATE
R FRONT
PLATE
Page 4

AUTOMATIC OVEN TIMER/CLOCK
BUTTON FUNCTIONS
1 = MINUTE MINDER
2 = COOKING PERIOD
3 = STOP TIME
-
4 = MANUAL CONTROL
5 = SUBTRACT
6 = ADD
Setting the time of day
• When the power is first connected (or after a power failure), the clock display will
flash 00.00.
• To set the clock, press buttons 1 and 2 and hold them down.
• Press button 5 or 6 until the correct time of day is displayed.
• Release the buttons. The clock is now set.
• Please note that the clock has a 24 hour display.
• For example 3.00 PM will be displayed as 15.00.
Minute minder
• Suppose that you wish to time the boiling of a 5 minute egg.
• First boil the water
• Press and hold button 1. The display will show 00.00
• Press button 6 until the display shows 00.05
• Release the buttons and place the egg in the boiling water. The display will again
show the time of day.
• After 5 minutes the timer will emit an electronic tone which lasts for about one
minute (2 beeps every 2 seconds). To cancel the tone, press any of the buttons.
Note:
• During the operation of the minute minder, the remaining time may be displayed by
pushing button 1
• The minute minder can be used simultaneously and independent of any automatic
control program
• The display will always revert to the time of day after any program has been set.
Switching the oven off automatically
Suppose you have to go out and you will not be back in time to switch off a meal already
cooking in the oven and requiring another 40 minutes before it is done. Proceed as
follows:
• Press and hold button 2. The clock will display 00.00.
• Press button 6 until the clock displays 00.40.
• Release the buttons and the clock will again display the time of day.
+
65 4 321
• The word AUTO and will light up in the display.
Page 5

• After 40 minutes the oven will switch off automatically and emit an electronic tone
for about one minute. (4 beeps every 3 seconds)
• To cancel the tone, press any of the buttons.
• The word AUTO will flash until button 4 is pressed and manual control is restored.
• The oven thermostat must be turned to the OFF position in an anticlockwise
direction.
Switching the oven on and off automatically ( Autobake )
Autobake is intended for dishes such as roasts and casseroles. These are not affected by a
waiting period in a cold oven.
• Prepare your meal and place it in the oven.
• Set the cooking period required by pressing buttons 2 and 6 until the desired period is
displayed.
• Set the stop time by pushing buttons 3 and 6 until the desired stop time is displayed.
• Release the buttons and the clock will again display the time of day.
• The word AUTO will light up on the clock display.
• Now set the relevant oven thermostat to the desired temperature setting
The automatic control will automatically switch the oven on and the symbol will
light up in the clock display.
Cooking will commence at the selected temperature and for the selected cooking period.
The oven will automatically switch off at the selected stop time and emit an electronic
tone for about one minute (4 beeps every 2 seconds). To cancel the tone, press any of the
buttons.
• The word AUTO will flash until button 4 is pressed and manual control is restored.
• The oven thermostat must be turned to the OFF position in an anticlockwise
direction.
Example:
Suppose the time of day is now 13h00. The food needs to be cooked for 2 hours at 180 C
and it should be ready to serve at 18h00. Here’s what to do.
• Ensure the clock is set to the correct time of day, 13.00.
• Press buttons 2 and 6 until 02.00 is displayed
• Press buttons 3 and 6 until 18.00 is displayed.
• Set the oven thermostat to 180°C.
Hint:
It is not advisable to use the Autobake function for cooking periods that are less
than 60 minutes.
Important:
If the Automatic start and or stop functions are not required, the clock must
be set to manual mode.
Press button 4
Unless this is done, the oven will not work.
Page 6

INTRODUCTION TO THERMOFAN COOKING
Registered by Defy in 1978, Thermofan cooking differs from conventional cooking in
that it uses the principle of forced convection within the oven. The advantages are:
1. Both trays can be used at the same time.
2. Different dishes can be cooked simultaneously without flavour or aroma transfer.
Hence fish, meat and cakes can be baked at the same time.
3. The oven door may be opened any time for inspection purposes without risking a
flop.
4. By circulating hot air around the food, spit-roast chickens may be done without using
a rotisserie.
5. Cooking is done at slightly lower temperatures (10°C TO 20°C lower), saving
electricity and reducing splatter.
THERMOFAN OVEN
• Ensure that the timer is set to manual. Press button 4.
• Set the oven thermostat to the required temperature. The indicator light will glow and
remain on until the oven has reached the selected temperature.
• When the indicator light switches off, the food should be placed in the oven.
• During cooking the indicator light will cycle on and off as the oven thermostat
maintains the selected temperature
• After completion, the thermostat must be returned to the OFF position in an anti
clockwise direction.
Baking guide
• Thermofan baking is done with the oven trays in
RECOMMENDED
position on top of the wire shelves. Unused trays
must be kept in position to facilitate proper airflow.
TRAY POSITIONS
• For small items the entire area of each tray may be
utilised. Larger items should be placed towards the
front of each tray.
• All ovens extract a certain amount of moisture from the food being cooked. The much
greater capacity of the Thermofan oven allows more food to be cooked and thus more
moisture may be released. This is normal and not detrimental to the food or the oven.
• For professional results and perfect browning, open the oven door when half the
baking time has lapsed. Then turn the baking tins around so that the sides previously
facing the back of the oven now face the front.
• Caution: Thermofan baking relies on good contact between the bottom
of the cake tin and the oven tray. Do not use spring form baking tins with
a raised bottom. The lack of contact will cause the bottom of the cake to
be underdone. These tins may be used on a wire shelf where no
insulating air space is created.
5
4
3
2
1
Page 7

GRILLING
• The oven door must remain partially open (about 50 mm)
• Ensure that the timer is set to manual. Press button 4.
• Set the oven thermostat to the GRILL position.
• Pre-heat the roast pan and broiler for 5 minutes
under the grill element to help seal the meat.
• Place the food on the roast pan and place this on a
wire shelf near to the grill element.
• Monitor the grilling process to avoid burning the
food.
• Care must be taken not to touch the grill element
while handling food in the oven.
• After completion, the thermostat must be returned to the OFF position in an anti
clockwise direction.
WARNING:
ACCESSIBLE PARTS MAY BECOME HOT WHEN GRILLING. ALWAYS USE
OVEN GLOVES WHEN HANDLING FOOD IN THE OVEN
AND KEEP CHILDREN WELL AWAY FROM THE PRODUCT WHEN IT IS IN
USE.
RECOMMENDED
GRILL POSITION
5
4
3
2
1
WARMING DRAWER
• The warming drawer has a variable temperature control. This allows the correct
setting for the application. An indicator light will glow when the drawer has been
switched on.
• If food is to be kept warm for a lengthy period it is best to select a lower temperature.
• Food left for too long in the warmer drawer could dry out and spoil. As a precaution
food should always be covered, to minimise the drying effect.
• The drawer can be removed for cleaning purposes. Pull the drawer out to the bump-
stop, then lift the front slightly and continue pulling till the drawer slides free.
• Refit by lifting the rear of the drawer over the bump-stop and then sliding it back.
Page 8

SOLID PLATES
Red dot plates
• Plates featuring a red dot in the centre are high speed, high wattage
plates for increased performance
• For your safety these plates are fitted with thermal limiters. Should
a plate be accidentally switched on and left unattended, the limiter
will reduce the power output of the plate and minimise the risk of
overheating and the possibility of fire.
Caring for Solid Plates
• Before using the plates for the first time, switch them on for about 4 minutes at the
highest setting. This allows the factory applied protective coating to burn in.
• To prevent blotchy discolouration and corrosion, moisture from spatters and spills
should be cleaned off immediately.
• To clean the plates, wipe them with a damp cloth or nylon pad. A little liquid
detergent may be used. Do not use metal scourers or sharp metal objects to clean the
plates.
• After cleaning, dry the plates by switching them on for a short while.
• To prevent rust, periodically apply some, sewing machine oil or electrical hotplate
polish - available from Defy Service Centres. Extra attention is required in areas of
high humidity or in close proximity to the sea.
NOTE: THE WARRANTY DOES NOT COVER THE REPLACEMENT OR
REPAIR OF RUSTED OR CORRODED PLATES.
Recommendations
• Use only pots with a solid level base. An uneven base can prolong cooking times and
waste energy.
• Use pots with a base diameter slightly larger than the plate. This will ensure even heat
distribution and prevent spillage from dripping onto and staining the hot plate.
• Always cover the pot with a lid. This will conserve energy and minimise spillage.
• Thermal shock could damage the plates. Do not put cold pots on very hot plates.
Plate controls—variable
• Select the heat level by turning the knob to the required
setting.
• You may select any setting.
• 1= low, 3 = medium and 6 = high.
• The relevant plate indicator light will glow, when the plate
is switched on.
Page 9

CERAN SMOOTH TOP
WARNING In the unlikely event of sustaining accidental damage and cracking, switch
off the appliance at the mains to avoid electric shock and have the panel replaced before
further use.
Caring for the Ceran hob
• Ceran is a tough, durable material, which provides a beautiful, functional and long
lasting cooking surface. To keep it looking good, it needs to be treated with care and
cleaned regularly.
• Spillage should be wiped off as soon as possible with a damp cloth, preferably while
the hob is still warm.
• Clean the hob with a nylon pad and ‘Smooth top cleaner’. A sample of this cleaner is
supplied with the unit. Replenishment cleaner is available from all Defy Service
Centres.
• If necessary stubborn spills may be removed using the blade scraper provided.
• Do not use metal scourers or coarse abrasive powders as these could scratch the
Ceran.
• Regular cleaning after use will prevent dirt build up and ensure that the hob remains
bright and attractive.
• Wipe the hob surround with a damp hot soapy cloth and dry.
Plate controls—variable
• Select the heat level by turning the plate control knob to the required setting. You
may select any setting, even between numbers. 1= low, 4 = medium and 8 = high.
• The relevant pilot light will glow and shortly thereafter the hot surface indicator light
on the hob will glow. It will remain on for 20 to 30 minutes after switch off. This is a
reminder that the hob surface is still too hot to touch.
Recommendations (see also the enclosed ‘CERAN’ leaflet)
• Use only pots with a solid level base. An uneven base will prolong cooking time and
waste energy.
• Use pots with a base diameter slightly larger than that of the thermal area. This will
ensure even heat distribution and prevent spillage from dripping onto and staining the
hot zone.
• Always cover the pot with a lid. This will conserve energy and minimize spillage.
• Save energy by switching the plate off 5 to 10 minutes before the end of a lengthy
cooking period. The Ceran hob will retain sufficient residual heat to complete the
cooking process.
• A pot with rough edges could scratch the Ceran if it were dragged across the surface
of the hob.
• Any spillage of sugar solution such as jam, must be removed immediately. If allowed
to cool on the Ceran it could pit and damage the surface.
Do not cover the Ceran with aluminium foil and do not use poor quality aluminium pots.
These will leave unsightly deposits which in time, could adhere to the Ceran.
Page 10

MAINTENANCE
Cleaning the oven
• Switch off the electrical power supply before cleaning any part of the appliance.
• Open the oven door and allow the oven to cool down.
• For improved access, the shelves, trays and oven door may be removed. (see details
below)
• Clean the oven with a damp, hot soapy cloth.
• It may be necessary to soak burnt soils with a liquid cleaner to soften them before
scrubbing them with a nylon brush or scouring sponge.
• Heavy soils on the bottom of the oven may require overnight soaking under a sponge
liberally sprinkled with household ammonia. The soil can then be removed the
following morning by washing normally.
• Do not use metal objects or steel wool to clean the oven
• For your convenience, the shelves may be removed.
• After cleaning, fit the bottom element into the hooks of
the element guard. Failure to observe this precaution
would allow the element to rest on and possibly damage
the oven enamel
General cleaning
• Switch off the electrical power supply before cleaning any part of the appliance.
• Wipe down glass panels, cabinet, door, control knobs, trims and handles with a hot
soapy cloth.
• Use only liquid household cleaners and avoid abrasive powders, scouring pads and
caustic cleaners.
• Rinse and wipe down with a clean cloth.
Oven light
The oven light is switched on by the oven thermostat and switches off when the
thermostat knob is returned to 0.
To replace a faulty light bulb, proceed as follows.
• Switch off the power at the wall isolator to avoid the possibility of electric shock.
• Remove the light cover by unscrewing it in an anti-clockwise direction
• Unscrew the faulty bulb and fit a new 40 watt bulb rated for 300°C
• Refit the light cover.
Removing the Oven Door
• Open the oven door to the grill position.
• Firmly grasp the door at both sides and pull the door upwards until it is free of the
hinge arms.
• To replace the door, lower the door onto the exposed hinge arms and push firmly
home.
• Check to see if the door once more closes properly.
Page 11

PROBLEM CHECK
Before calling a service technician to assist with a problem, PLEASE CHECK
THE MAINS DISTRIBUTION BOARD
THE WALL ISOLATOR
DO NOT ATTEMPT REPAIRS YOURSELF
Remember that you may be charged for a service call even during the warranty period if
the fault is due to or caused by any of the above.
OWNER’S RESPONSIBILITY
Since the following are not factory faults, they are the owner’s responsibility.
• Damage to exterior finish.
• Breakage of glass and other components.
• Replacement of the light bulb.
• Damage through improper installation or use of the appliance.
• Damage caused by moving the appliance.
• Rusted or corroded solid plates.
SERVICE
If you have followed the instructions and still have a problem, contact the nearest Defy
Service Centre. They will be able to advise you on any aspect of the product or send a
qualified technician to repair it.
The Manufacturer strives for continuous improvements. For this reason, the text and
illustrations in this book are subject to change without notice.
Part Number 060 535
 Loading...