

Defy Slimline DBO 453, Slimline 600 U, Slimline DBO 451, Slimline 600 SE, Slimline DBO 452 Owner's Manual
...
PAGE 1 OF 19
INDEX
2 Introduction
2 Unpacking
2 Cupboard design
2 Electrical installation
3 Safety advice
4 Under-counter installation
5 Eye level installation
5 The control panel
6 Ringer timer
6 Selector switch
7 Using the oven -Baking and Grilling
8 Solid plate care guide
9 Solid plates
10 Ceran smooth top
11 Maintenance
12 Cleaning
13 Care guide for Stainless steel
15 Do’s and Don’ts
16 Owner’s responsibility
16 Problem check
17 Defy Service Centres
18 Warranty
19 Notes
20 Features
OWNER’S
MANUAL
SLIMLINE
Under Counter Ovens
600 SU - DBO 453
600 U - DBO 451
SLIMLINE
Eye Level Oven
600 SE - DBO 452
600 E - DBO 450
www.defy.co.za
Part Number 068 451
You can rely on Defy. To simplify

PAGE 2 OF19
Introduction
Congratulations on the purchase of this
quality appliance. We trust that you will
enjoy many years of trouble free use.
Please read these instructions carefully
before using the appliance.
This manual will provide you with
information on how to operate and care
for your appliance in order that you gain
the maximum benefit from it.
Unpacking
• Remove all packing from the oven
cavity and position the accessories.
• Ensure that packaging material is
disposed of in a responsible manner and
that plastic bags are cut up to prevent
children playing with them and
accidentally suffocating.
• If the appliance is damaged in any way,
do not use it. Report the damage to your
dealer, who will take the necessary
corrective action.
Electrical installation
This appliance must be earthed and the
manufacturer and the seller do not accept
responsibility for any damage due to
incorrect installation or electrical
connection. This appliance should not be
connected through an earth leakage
system. Refer to S.A.N.S.10142
Support the oven in front of the aperture
and make the electrical connection before
installing. This will ensure enough cable
length for subsequent servicing.
Connection to the power supply
The connection must be carried out by a
licensed electrician, who will ensure that
the oven is correctly connected and safely
earthed.
The rated current is printed on the serial
number label attached to the oven side
trim.
The appliance must be connected to the
mains through a double pole isolating
switch which has a minimum clearance
between the contacts of 3 mm. in both
poles.
A means for disconnection must be
provided in the fixed wiring.
Cupboard design
• Your Defy oven is designed to give you
years of trouble free service, however it
is important that it be correctly
installed.
• Cooking appliances generate
considerable heat. The layout and
materials of the mounting cabinet
should take account of the
characteristics of the oven.
• Surfaces immediately adjacent to the
oven should be able to withstand
temperatures of up to 100°C without
delaminating or discolouring.
• Overhanging doors above the oven may
be subjected to heat as well as
condensation if very moist foods are
being cooked.

PAGE 3 OF 19
Safety advice
This section contains safety instructions that
will help you avoid risk of injury and damage.
All warranties will become void if you do not
follow these instructions.
General safety
• This appliance is not intended for use by
persons (including children) with reduced
physical, sensory or mental capabilities, or
lack of experience and knowledge, unless
they have been given supervision or
instruction concerning the use of the
appliance by a person responsible for their
safety.
• Children should be supervised to ensure
that they do not play with the appliance.
• Connect the appliance to an earthed outlet/
line protected by a fuse of suitable capacity.
Have the earth installation made by a
qualified electrician. Our company shall not
be liable for any problems arising due to the
appliance not being earthed in accordance
with the local regulations.
• If the supply cord is damaged, it must be
replaced by the manufacturer, its service
agent or similar qualified persons in order to
avoid a hazard.
• Do not operate the appliance if it is defective
or has any visible damage.
• Do not carry out any repairs or modifications
on the appliance.
• Never wash down the appliance with water!
There is the risk of electric shock!
• Never use the appliance when your judgment
or coordination is impaired by the use of
alcohol and/or drugs.
• The appliance must be disconnected from the
mains during installation, maintenance,
cleaning and repair procedures.
• Be careful when using alcoholic drinks in
your dishes. Alcohol evaporates at high
temperatures and may cause a fire since it
can ignite when it comes into contact with
hot surfaces.
• Do not heat closed tins and glass jars in the
oven. The pressure that would build up in the
tin/jar may cause it to burst.
• Do not place baking trays, dishes or
aluminium foil directly onto the bottom of
the oven. The heat accumulation might
damage the bottom of the oven.
• Keep all ventilation slots clear of
obstructions.
• The appliance may be hot when it is in use.
Never touch the hot burners, inner sections
of the oven or heaters etc.
• Always use heat resistant oven gloves when
putting in or removing dishes from the hot
oven.
• Do not use the appliance with the front door
glass removed or cracked.
• The rear surface of the oven gets hot when it
is in use. Make sure that the electrical
connection does not come into contact with
the rear surface as connections may get
damaged.
• Do not trap the mains cable between the
oven door and frame and do not route it over
hot surfaces as the cable insulation may melt
and cause a fire as a result of a short circuit.
• Make sure that the function knobs are
switched off after every use.
• When using gas, ensure that the room is well
ventilated.
• Always keep children and infirm persons
away from the appliance when it is in use.
• Only use the appliance for preparing food.
• Use a deep pan, large enough to cover the
appropriate burner.
• Always dry food thoroughly before placing
it in hot oil or fat. Frozen food in particular
will spit and splatter if added too quickly.
• Never fill the pan more than one third full of
fat or oil.
• Never heat fat or fry with a lid on the pan.
• Do not fry too much food at once. This
lowers the temperature of the oil or fat and
results in fatty foods.
• Do not leave hot fat or oil unattended. If
overheating occurs, these could catch fire.
• Do not store flammable items in the oven.
• Always keep the oven door gasket clean.
PAGE 4 OF19
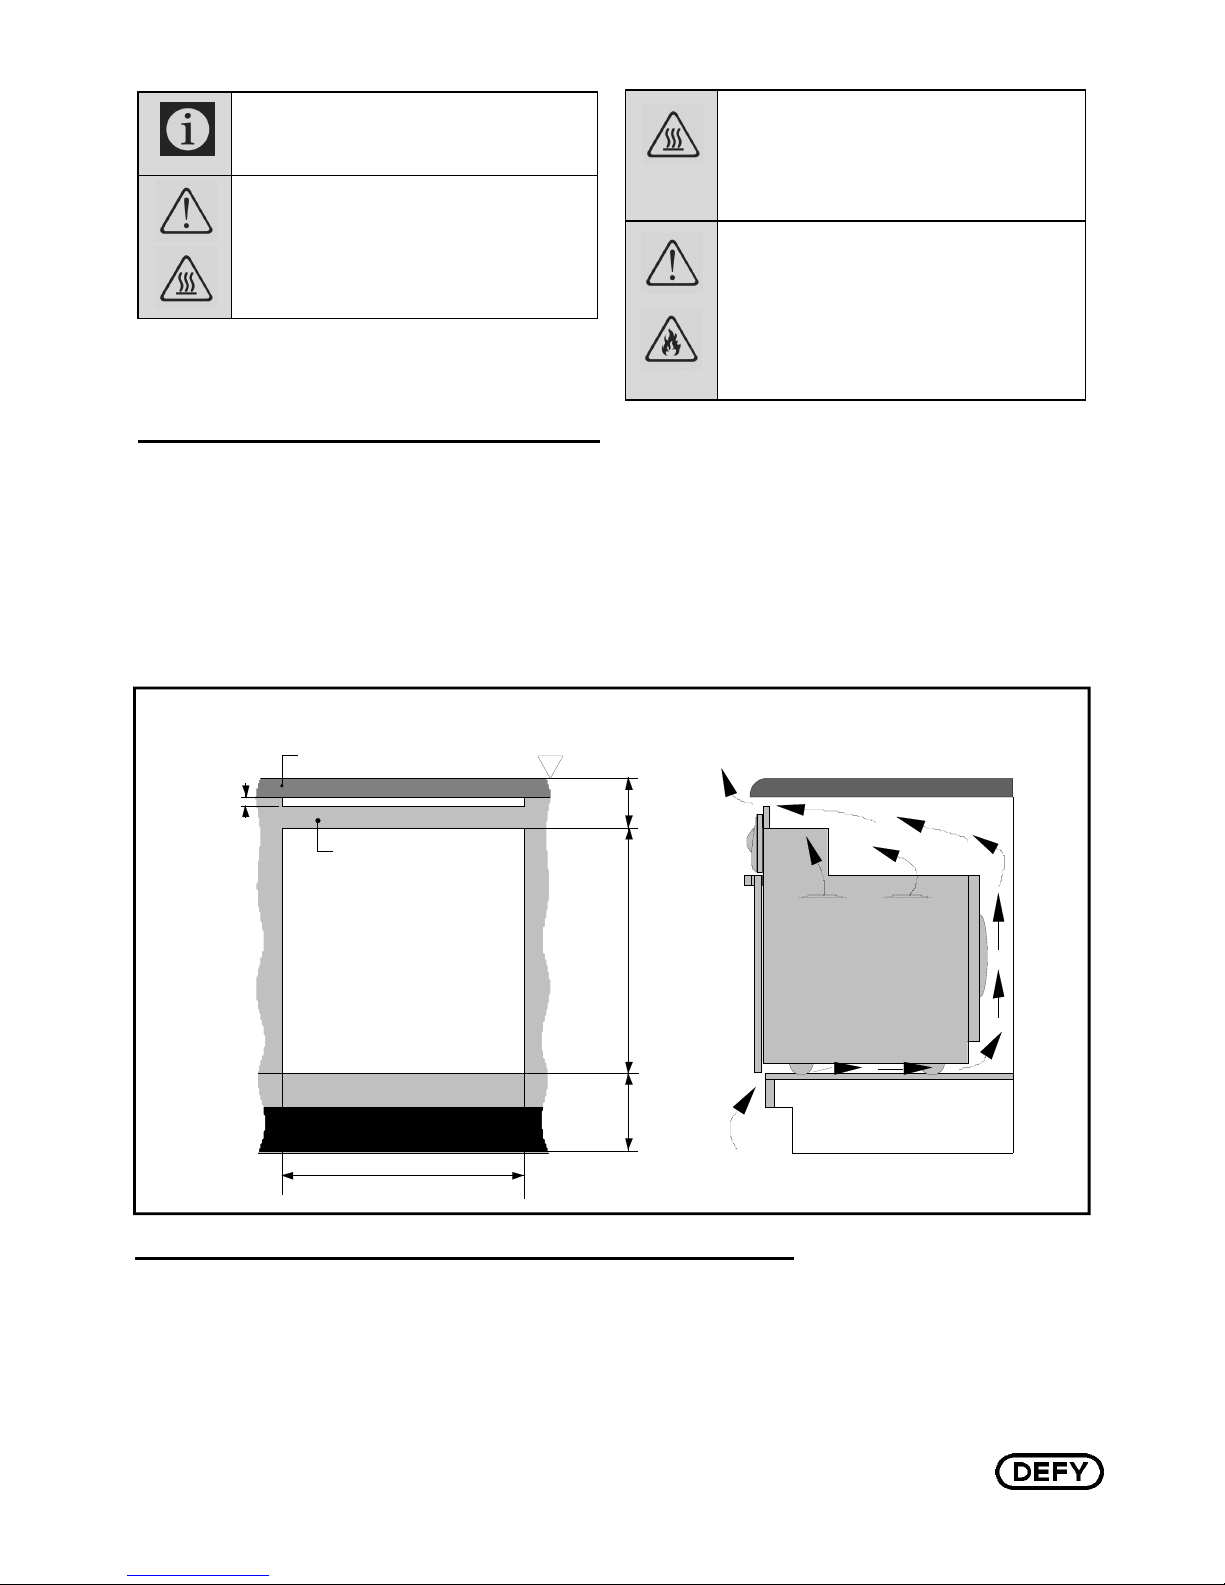
Under-counter oven installation.
CUPBOARD APERTURE FOR MODELS 600SU AND 600U
Worktop
32mm - 48mm thick
Vent
gap
at
front
only
100
590
Aperture
(210)
Floor
Datum
900
565 Aperture
Top filler piece
Typical section showing
ventilation requirements.
Aperture
590 H x 565 W x 570 D
6
+_3
0
+_3
0
+_3
0
• Note: The oven cavity must vent through the front only. Avoid gaps between the
cavity sides and the underside of the worktop.
• Insert the oven into the cupboard.
• Open the door to expose the fixing holes in the side trims.
• Secure the oven by 4 countersunk screws (fasteners are not supplied ).
• The hob should be installed in a ventilated cupboard fitted with a sturdy worktop .
• Secure the hob using the fixing brackets provided.
Note: Hob installation for under-counter oven.
• Hobs have their own dedicated owner’s manual, detailing installation and
operating instructions.
• Do not discard the hob packaging before first retrieving this manual.
• Defy Slimline under-counter ovens may be installed at eye level if so
desired.
• A wiring extension kit is available from the nearest Defy Service Centre.
Figures in this manual are schematic
and may not match your appliance
exactly.
DANGER
Risk of scalding by hot steam!
Take care when opening the oven
door as steam may escape.
WARNING Hot surfaces may cause
burns! Do not touch the hot surfaces
of the appliance. Use oven gloves.
Keep children away from the
appliance.
DANGER Risk of fire by overheated
oil! When heating oil, do not leave it
unattended. Never try to extinguish a
fire with water! When oil has caught
fire, immediately cover the pot or pan
with a lid. Switch off the hob if safe to
do so and phone the fire service.
PAGE 5 OF 19
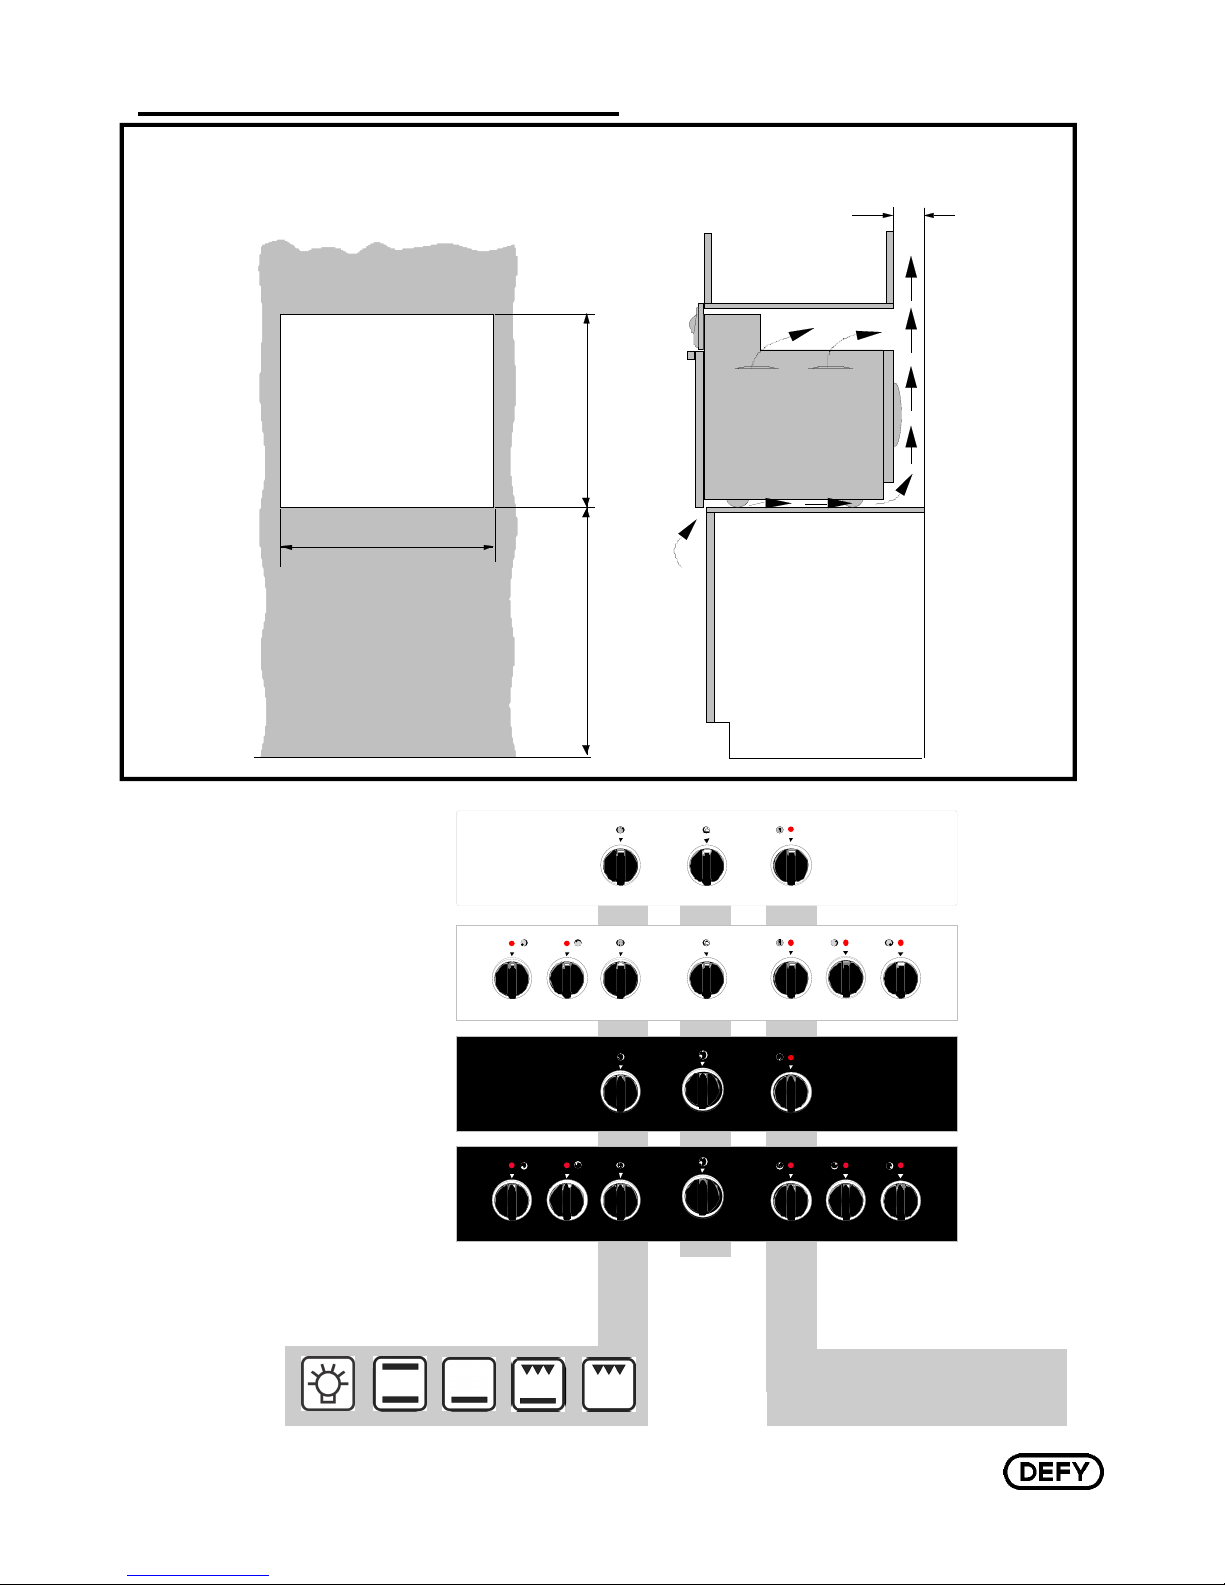
Eye-level oven installation.
590
Ape rtur e
Ty pica l se ction sh owing
ve nt ila tion req uire men ts .
Ap ertu re
590 H x 5 65 W x 5 70 D
565
Ape rtur e
90 0
Ab ove floor
leve l
Flo o r
60
+_3
0
+_3
0
+_3
0
+_3
0
CUPBOARD APERTURE FOR MODEL 600SE AND 600E
(MODELS 600SU AND 600U ARE OPTIONAL)
LEFT PLATES
RIGHT PLATES
OVEN
THERMOSTAT
SELECTOR
RINGER
TIMER
600 SE
EYE LEVEL OVEN
The Control Panel.
600 SE
600 SU
7
6
4
5
3
2
1
7
6
4
5
3
2
1
TIMER
TIMER
7
6
4
5
3
2
1
SELECTOR
7
6
4
5
3
2
1
THERMOSTAT
600 U
7
6
4
5
3
2
1
7
6
4
5
3
2
1
7
6
4
5
3
2
1
SELECTOR
7
6
4
5
3
2
1
7
6
4
5
3
2
1
7
6
4
5
3
2
1
THERMOSTAT
7
6
4
5
3
2
1
SELECTOR
7
6
4
5
3
2
1
THERMOSTAT
7
6
4
5
3
2
1
7
6
4
5
3
2
1
7
6
4
5
3
2
1
SELECTOR
7
6
4
5
3
2
1
7
6
4
5
3
2
1
7
6
4
5
3
2
1
THERMOSTAT
600 E
600 SU
UNDER-COUNTER OVEN
600 E
EYE LEVEL OVEN
600 U
UNDER-COUNTER OVEN
The oven thermostat is marked at 70°C.
When set to this position the oven may
be used to keep food warm.
7
6
4
5
3
2
1
TIMER
7
6
4
5
3
2
1
TIMER
PAGE 6 OF19
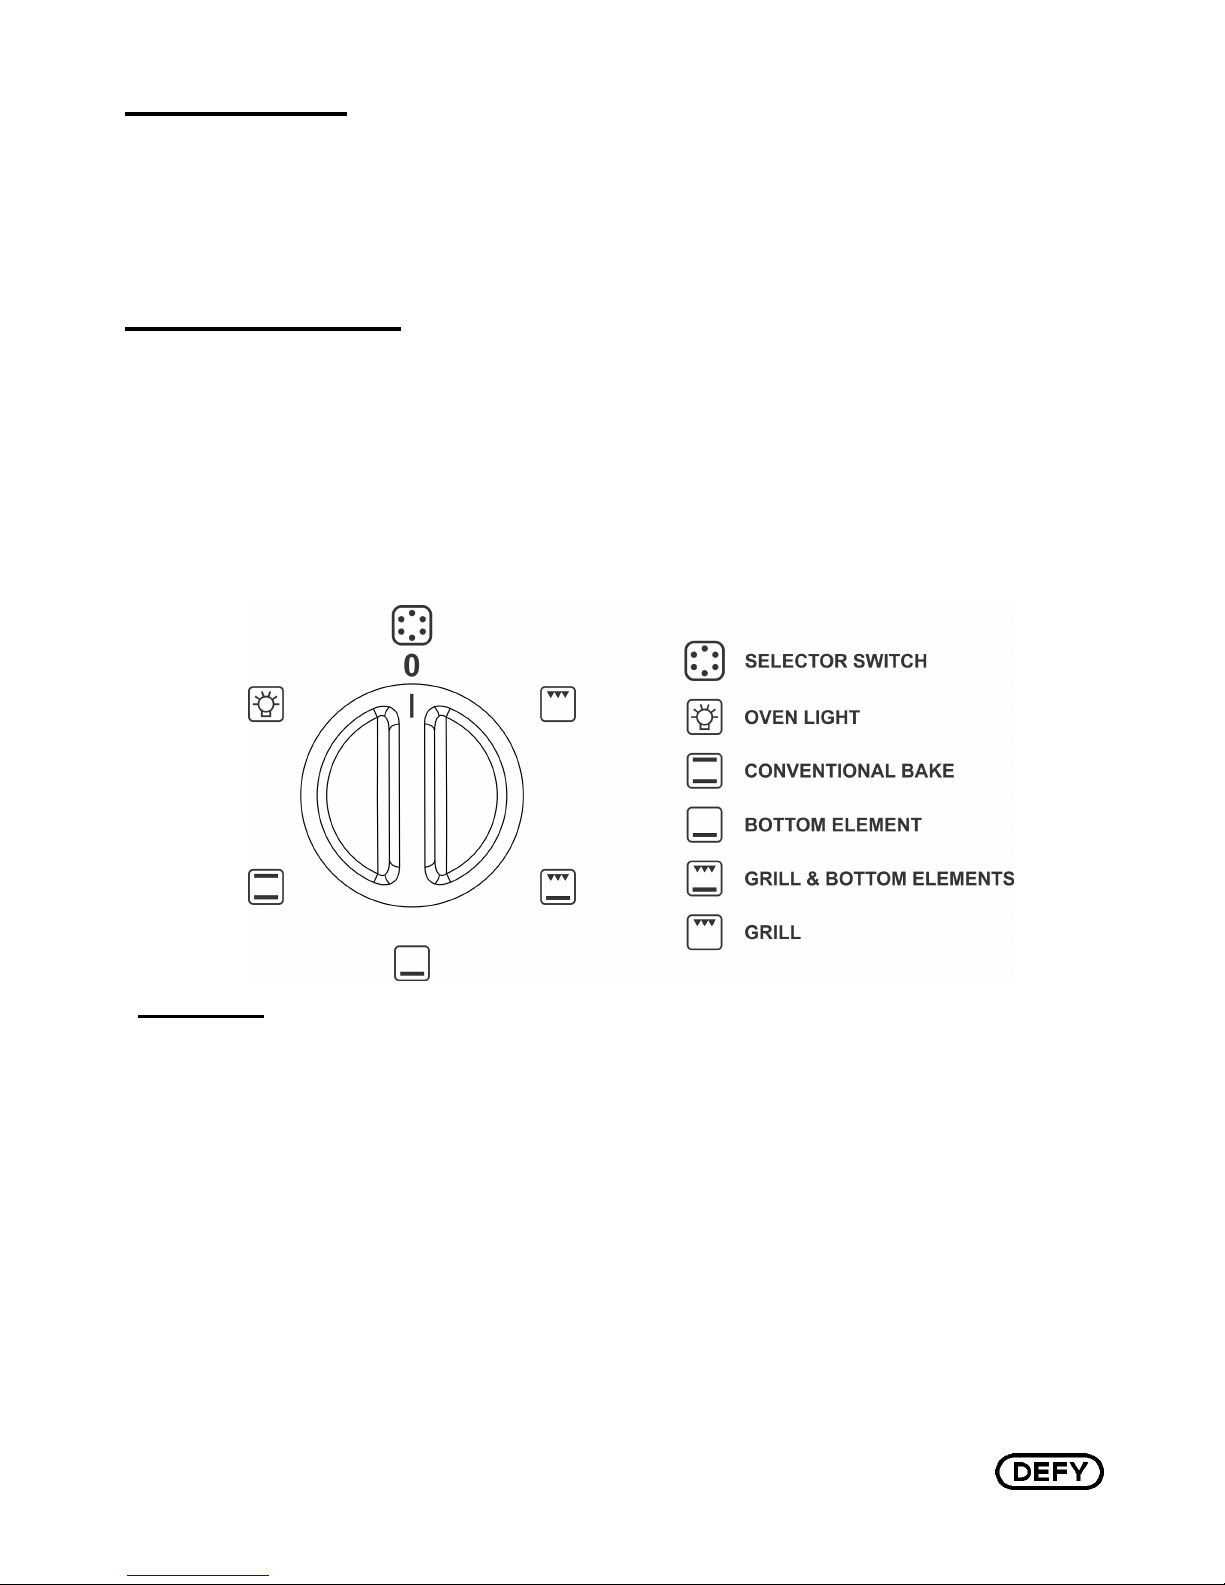
Selector switch
This switch allows the selection of the following oven functions.
1. Off
2. Oven light
3. Conventional Bake
4. Bottom Element
5. Grill & Bottom elements
6. Grill
Ringer timer
• The ringer timer may be used for timing a cooking period of up to 60 minutes.
• First wind the timer by turning the knob fully clockwise.
• Return the knob to the desired time period.
• At the end of the this period the bell will ring.
• Note: If the timer is not first fully wound the bell may not ring.
Note: All ovens extract moisture from the food being cooked, especially so during the winter months.
This is normal and not detrimental to the food or the oven.
Functions
Oven Light: To switch on the light, turn the selector knob until the light icon, depicted on the
knob, is at the top. The light remains on when any other functions are selected.
Top and Bottom elements (Conventional Bake): Both the bottom bake element and the top
heat element are utilised. This position is ideal for baking, roasting and cooking.
Grill: Select the grill function for conventional grilling.
Grill and bottom elements: (Pre-Heat) Reduces oven heat up time. Select conventional bake
when desired temperature has been reached.
Bottom element only: Selecting only the bottom element and setting the thermostat at the
lowest temperature, allows the oven to be used as a warming space.
 Loading...