

Page 1
Page 1
PC 600 S
INSTRUCTION MANUAL
ELECTRIC PRESSURE COOKER
Page 2

Page 2
3
4
10
11
13
14
18
20
21
22
23
Controls and parts
Safety and set-up
Before use
Quick start guide
Cooking preparation
Function selection
Cooking examples
Care and maintenance
Troubleshooting
Service centres
Warranty
Contents
Page 3
Page 3
Read this manual before operation of the appliance!
Dear Customer,
Congratulations on the purchase of your new Defy appliance!
Please read this manual carefully before using your appliance for the first time and then store it
within easy reach for future reference. We trust you will enjoy years of trouble free use.
The user manual:
x This manual will provide you with information on how to safely operate and care for your
appliance in order that you gain the maximum benefit from it.
x Pay particular attention to any safety instructions.
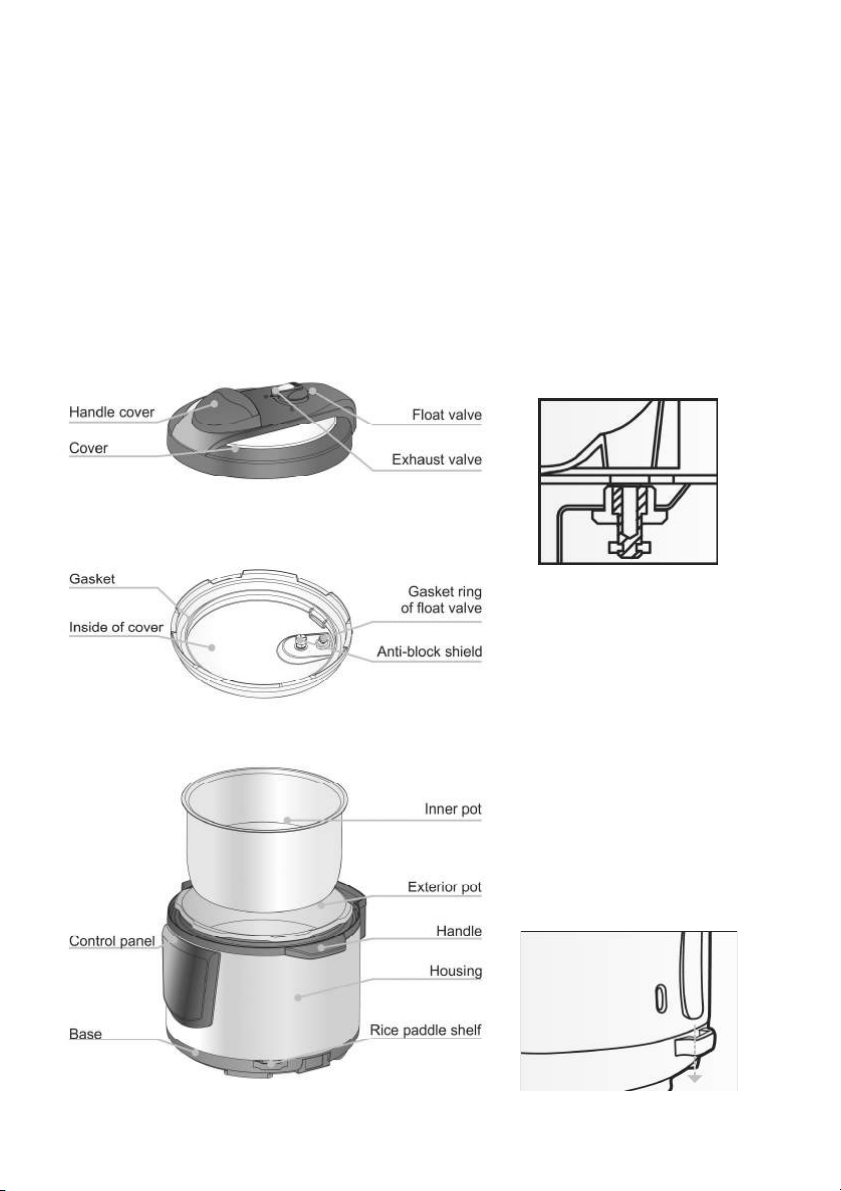
Controls and parts
Structural diagram of float valve
Warming:
1. Before each use, be sure to
inspect the float valve anti-block
shield and mounting gasket.
2. Before placing the inner pot
into the outer pot, be sure to
remove any debris and water
from the outside of the inner pot
and inside of the outer pot.
3. When moving the product,
please lift by the cooker handle.
4. If the outer casing has
collected water then wipe with a
soft dry cloth.
Method of using the scoop
holder
Page 4

Page 4
x
Joint use of the same
socket with another
appliance may cause
unusual heat and fire.
x Do not immerse the
appliance, power cord or
power plug in water or in
other liquids.
x Disconnect the power plug
after using the appliance,
before cleaning the
appliance, before leaving
the room or if a fault
occurs.
x Do not disconnect the plug
by pulling on the cord.
x Prevent damage to the
power cord by not
squeezing, bending or
rubbing it on sharp edges.
Keep the cord away from
hot surfaces and open
flames.
x Do not use an extension
cord with the appliance.
x NEVER use the appliance
if the power cord or the
appliance is damaged.
x Do not place the unit on an
unstable location. Never
use it on newspaper, foam
or any object that may
easily block the vent hole
at the bottom.
Safety and set-up
Please read this instruction
manual thoroughly prior to
using this appliance! Follow
all safety instructions in
order to avoid damages due
to improper use!
Keep the instruction manual
for future reference. Should
this appliance be given to a
third party, then this
instruction manual must
also be handed over.
x NEVER use this product
for purposes other than
those specified.
x This appliance is intended
for household use only.
x Never use the appliance in
or near to combustible,
inflammable places and
materials.
x Check if the mains voltage
on the rating label
corresponds to your local
mains supply. The only
way to disconnect the
appliance from the mains
is to pull out the plug.
x Use a 220V-50Hz socket.
Fire or electric shock may
occur if 220V AC- 50Hz is
not used.
x Please use an individual
socket with earthed wire of
more than 10A rated
current;
1
Page 5

Page 5
x
The maximum cooking
amount shall not exceed
the MAX level inside the
inner pot.
x In operation, never move
this product and never
prohibit compulsory
opening.
x NEVER have your hands
or face near to the exhaust
valve or float valve during
operation to avoid
scalding.
x NEVER touch the cover
with hands during
operation to avoid
scalding.
x After cooking, do not
uncover the cooker until
you confirm that there is
no pressure inside.
x When opening the cover
after cooking, do not touch
the inner pot and cover
inside with hands directly
to avoid scalding.
x CAUTION: In order to
avoid a hazard due to
inadvertent resetting of the
thermal cut out, this
appliance must not be
supplied through an
external switching device,
such as a timer, or
connected to a circuit that
is regularly switched on
and off by the utility.
x NEVER use it in a place
which is near water or fire.
Do not use it in a place
exposed to direct sunshine
or oil splash. Keep it in a
place out of the reach by
children.
x If a spare part such as wire
or plug is damaged or the
product fails, stop the
operation instantly and
send it to the service
centre for inspection and
repair. Repair by the user
is not allowed.
x Never make unauthorized
replacement of any spare
part inside the pressure
cooker, as this may cause
electric shock, fire or
injury.
x Before use each time, be
sure to check the antiblock shield, float valve
and exhaust valve for
obstruction, wipe the
surface of the inner pot
and the heating plate to
confirm they are free of
any foreign object; Check
the exhaust valve for
sealing location.
x Avoid cooking such foods
as oat meal in the pot, as
they may easily clog the
anti-block shield.
x When cooking dry foods,
first soak the dry food for a
period of time.
Page 6

Page 6
x
The ducts in the pressure
regulator allowing the
escape of steam should be
checked regularly to
ensure that they are not
blocked. The container
must not be opened until
the pressure has
decreased sufficiently.
Refer to page 13 for
correct opening procedure.
x This appliance is not
intended for use by
persons (including
children) with reduced
physical, sensory or
mental capabilities or lack
of experience and
knowledge, unless they
have been given
supervision or instruction
concerning the use of the
appliance by a person
responsible for their safety.
x Children must be
supervised to ensure that
they do not play with the
appliance.
x Always keep the appliance
out of the reach of
children.
x Do not leave the appliance
unattended as long as it is
in use. Extreme caution is
advised when the
appliance is being used
near children and people
with limited physical,
sensory or mental
capabilities.
x Before using the appliance
for the first time, clean all
parts which come into
contact with water
carefully. Please see full
details in the “Care and
maintenance” section.
x Dry the appliance before
connecting it to mains
supply.
x Never operate or place
any part of this appliance
on or near hot surfaces
such as gas burner,
electric burner or heated
oven.
x Operate the appliance with
delivered parts only.
x Do not use the appliance
with damp or wet hands.
x Do not touch plug with wet
hands. This may cause
burn or electric shock.
x Always use the appliance
on a stable, flat, clean and
dry surface.
x Make sure that there is no
danger that the power cord
could be accidentally
pulled or that someone
could trip over it when the
appliance is in use.
x Position the appliance in
such a way that the plug is
always accessible.
x Do not stick any foreign
objects on the appliance.
x Do not use the appliance
outdoors or in the
bathroom.
Page 7

Page 7
x
Do not touch hot surfaces.
Use handles or knobs. Use
pot holders when removing
lid or handling hot
containers.
x To protect against
electrical hazards, do not
immerse cord, plugs, or
the Base in water or other
liquid.
x Unplug from outlet when
not in use or before putting
on or taking off parts. Allow
unit to cool before
cleaning.
x Do not operate any
appliance with a damaged
cord or plug or after the
appliance malfunctions, or
is dropped or damaged in
any manner. Return the
appliance to the
manufacturer, for
examination repair or
adjustment. See Warranty
section.
x The use of accessories or
attachments, not
recommended or sold by
the manufacture, may
cause fire, electric shock
or injury.
x Do not let cord hang over
edge of table or counter, or
touch hot surfaces.
x Do not place appliance
base on or near a hot gas
or electric burner, or in a
heated oven.
x Extreme caution must be
used when moving an
appliance containing hot
liquids.
x Any servicing should be
performed by an
authorized service agent.
x Do not wrap the power
cord around the appliance.
x Do not dismantle the
appliance under any
circumstances. No
warranty claims are
accepted for damage
caused by improper
handling.
x It is strictly prohibited to
use a non-brand cover
during heating. May cause
electric shock or other
serious injury.
x Our Household Appliances
meet applicable safety
standards, thus if the
appliance or power cord is
damaged, it must be
repaired or replaced by a
service centre to avoid any
dangers. Faulty or
unqualified repair work
may cause danger and
risks to the user.
x Do not insert foreign
objects such as metal
scraps and needles into a
gap. May cause electric
shock or unusual action.
Page 8

Page 8
The manufacturer strives for continuous improvement. For this reason, the
text and illustrations in this manual are subject to change without notice.
If the appliance is damaged in any way do not use it. Report the damage to
your dealer who will take the necessary corrective action.
x It is prohibited to modify or
repair the unit by an
unqualified technician as
this may cause fire or
electric shock. Please
send it to a designated
service agent for repair or
replacement of spare
parts.
x If the electric pressure
cooker does not work, or
there is no pressure inside
the pot and the float valve
falls down; When the unit
works, pressure inside is
on the rise, and so is the
float valve. Do not open
the cover forcibly until the
pressure is completely
discharged; Otherwise
scalding or other injury
may result.
x Do not wash or immerse it
in water as this may cause
electric shock and short
circuit.
x Carry out regular
inspection of the exhaust
valve and anti-block shield
to make sure that they are
unobstructed.
x Do not add any heavy
object to the exhaust valve
or replace it with other
object.
x When the unit is operating,
the cover has a higher
temperature, so never
touch it with your hand;
This may cause scalding.
Page 9

Page 9
x
When there is foreign
object between the inner
pot bottom and heating
plate, first remove the
foreign object before
using. May cause
overheating or abnormal
operation.
x When moving the product,
please hold the cooker
handle.
x To move the unit, never lift
the cover handle directly to
prevent the cover from
falling down.
x In cooking, never move
your hand or face to the
exhaust valve vent to
avoid scald. In cooking, do
not cover the exhaust
valve vent with a rag.
x Food to be cooked should
not exceed the MAX level,
and otherwise the food
may be half-cooked or
failure may happen.
x Do not place the inner pot
on other appliance for
heating.
x To avoid deformation or
failure of the inner pot.
Please use the supplied
special inner pot.
x Never use the product in
the following places:
x Unstable surfaces;
x Places near water or fire;
x Adjacent to walls and
furniture;
x Places exposed to direct
sunshine or oil splash.
Page 10

Page 10
Steam function
This function is to braise foods and stew
foods and to regulate the pressure holding
times. According to personal cooking
preference, adjust the pressure-holding time
by pressing “+””-“ key.
Timer function/Delayed start function
Set the end of cooking time by pressing “+””“ key.
Before use
Preparation
Before first use, please take out all
accessories from the cooker body and read
the User`s manual carefully, special care
must be given to follow directions and
cautions to avoid any damage to property or
human injury.
2
1. Prior to each use,
inspect whether the gasket
and anti block shield are
mounted to the upper
cover.
2. After use, remove any
foreign object from the
gasket and anti-block
shield. Keep clean to avoid
odor.
3. Never pull the gasket,
as pull deformation may
affect sealing and
pressure effect.
4. A damaged gasket
should not be used ,and
shall be sent to the service
centre for replacement.
Disassembly and installation of anti block shield and gasket
Selecting own cooking time
The function to select length of maintenance
pressure time according to personal
preference. Press pressure level function to
adjust the time By pressing “+” “-“ key.
Auto cook function
Auto cook function
Auto cook function
Auto cook function
Auto cook function
Auto cook function
Page 11

Page 11
A: SELECTING AUTO-COOK FUNCTION:
Quick start guide
1. Connect power cable to wall socket.
2. Once power cable is connected to
Pressure cooker POWER IS ON.
3. Insert inner pot.
4. Add ingredients as per requirements.
5. Close LID.
6. Ensure EXHAUST VALVE is in correct
setting.
7. Select AUTO COOK FUNCTION
according to desired option.
8. Time & pressure level will
AUTOMATICALLY illuminate ON
STANDARD.
9. Unit will display - - -
10. Pressure will start building up for
approximately 10 – 15 minutes.
11. Once pressure has built up the
COOKING TIME (AUTOMATICALLY PREPROGRAMMED) will display on screen.
12. Once cooking time has lapsed, an alarm
will sound and unit will go into KEEP WARM
state, indicated as 0.0 on screen.
13. EXHAUSTING PRESSURE: Slide
EXHAUST VALVE to the left/right and allow
pressure to escape.
14. Opening lid: Hold lid handle firmly and
turn it ANTI-CLOCKWISE. If alarm sounds &
lid is LOCKED, wait a few seconds until
FLOAT VALVE is released.
B: INCREASING/DECREASING
PRESSURE LEVEL + TIME:
1-7. Follow steps 1- 7 as in A above.
8. If longer, more intense cooking is required
press texture ONCE for LONGER OR
TWICE for QUICK (shorter, less intense
cooking).
9-14. Steps 9 – 14 as in A above will follow.
Page 12

Page 12
C: BROWNING INGREDIENTS BEFORE
COOKING:
1-4. Follow steps 1– 4 as in A above.
5. Once FUNCTION is selected, pot will start
heating up IMMEDIATELY & meat can be
browned BEFORE adding liquid and closing/
sealing lid.
5-14. Once meat has been browned to
required colour add desired amount of liquid,
Follow steps 5-14 as in A above.
D: SELECTING OWN COOKING TIME:
1-6. Follow steps 1 – 6 as in A above.
7. Press pressure level AND the +/- keys to
increase/decrease required time up to 60
minutes.
12-14: Steps 12 – 14 will follow as in A
above.
(Programming unit to finish cooking food at a
pre-determined time)
1-8. Follow steps 1-8 as in A above.
9. Calculate the amount of hours from setting
the pot to the END time of cooking (i.e. time
food must be ready). This is the time that
will be entered as indicated below.
10. Press timer button
TIMER FUNCTION/DELAYED START:
11. Immediately press - /+ for amount of
hours.
12. Repeat steps 10 &11 for minutes.
13. Time will start to count down & steps 12
– 14 as in A above will follow.
The start of cooking will AUTOMATICALLY
be calculated according to the auto-cook
function selected.
Page 13

Page 13
1. Open the cover correctly
Hold the cover handle with one hand, rotate
counter clock wise by approximately 30
degrees until the cover marking “ź” aligns
with the outer casing marking “ ”
and lift the cover.
Cooking preparation
2. Check whether parts on the cover are
mounted properly
Check the float valve and exhaust valve for
obstructions, and ensure parts such as the
gasket and anti-block shield are correctly
installed.
3. Remove the non stick inner pot, then
place food and water into the inner pot
x The total amount of food and water must
not exceed the MAX level of the inner pot
height.
4. Place the inner pot in the electric
pressure cooker
x Before placing the pot, be sure to remove
any foreign objects and water droplets
from the exterior of the inner pot and
inside of the housing;
x After placement, rotate the inner pot
slightly left to right to ensure good contact
between the inner pot and heating plate.
5. Close the cover completely
x Before closing, check whether the gasket
has been placed in the steel rim inside the
cover.
x Hold the cover handle with one hand,
rotate clockwise by approximately 30
degrees until the cover marking “ź” aligns
with the outer casing marking “ ”
6. Position the exhaust valve properly
x Align the small handle of the exhaust
valve with the small sealing icon,
indicating that the pressure cooker is in
the airtight mode;
x When manual exhausting is needed, align
the small handle of the exhaust valve with
the small exhaust icon, indicating that the
pressure cooker is in the exhaust mode;
x Move to the sealing zone and inspect
whether the float valve has fallen (the float
valve falls before heating).
Page 14

Page 14
Function selection
General functions
1. After cooking preparations have been
followed according to Page 10
2.Switch on
x The display screen flashes and displays a
red horizontal line “---“, indicating that the
electric pressure cooker has entered the
preparation mode;
3.Select a required Auto cook function
x Once a function key is pressed, the
indicator of a corresponding function level
will illuminate (red);
x The rice porridge function and cake
function are only applicable to certain
models equipped with this function level;
x Cooking time varies with different function
levels. The larger the food amount, the
longer the cooking time. The cooking
times listed in the table below are for
reference only while the machine is
building up pressure, this time is not
included in the displayed cooking time.
(e.g. food amount + water = 8 scales):
Cooking time = heating time + holdup time.
Refer to page 12 to lengthen/shorten
cooking time & pressure level if required.
Function
key
Fish
Rice
porridge
Rice Porridge
Cooking
time (min)
+/- 15 +/- 30 +/- 35 +/- 45
Warming Tips
x In any mode, you can cancel the current
working mode and return to standby mode
by pressing the “Keep Warm/Cancel” key.
x During operation, the machine may
sometimes generate a “cluck” sound, this
is normal and not a malfunction.
x For cooking of small amounts, the inner
pot may be sucked up when the cover is
opened. In this case, shake the inner pot
manually, and remove the inner pot cover
after the inner pot falls into the cooker
body.
4. Press a function key, and 10s later, the
electric pressure cooker will perform the
corresponding function program selected
x Within 10s, you can re-select the preset
time and the function level by pressing
cancel. The electric pressure cooker will
start operating 10s after selection.
x The red horizontal line “---” on the display
screen is bright, indicating that the electric
pressure cooker has entered the working
mode.
x During operation, you can cancel current
working mode and return to standby mode
by pressing the “Keep Warm/Cancel” key.
5. After cooking, enter the keep warm
state automatically
x After cooking, the corresponding function
indicator goes out, the warm indictor
illuminates (yellow), the display screen
shows “0.H”, and gives out the prompt
sound (10 beeps), with the electric
pressure cooker going into warm mode.
x In standby mode, press the “Keep Warm/
Cancel” key, the warm indictor illuminates
(yellow), and gives out a sound prompt (1
beep), indicating that the electric pressure
cooker is going into the warm mode.
Safe Cover Opening
1. Disconnect the power or remove power
plug.
2. Exhaust method
A. Quick opening method
x Slide the exhaust valve to the exhaust
position until the float valves falls. (for non
-fluid food).
x Place a wet towel on the cover to quicken
cooling until the float valve falls. (for nonfluid food).
B. General opening method
x Allow the pressure cooker to cool
naturally, until the float valve falls.
3. Open the cover
x Hold the cover handle firmly, turn the
cover clockwise to the spacing edge, and
carefully pull up the cover.
Function
key
Soup Cake
Bean/
tendons
Meat/
Chicken
Cooking
time (min)
+/- 50 +/- 60 +/- 50 +/- 40
Page 15

Page 15
Safe Cover Opening
x Do not open the cover until the pressure
inside the pot has been adequately
released.
x Never pull out the exhaust valve when it is
exhausting.
x For fluid foods (porridge and sticky liquid),
do not slide the exhaust valve to exhaust
when cooking has just finished, otherwise
the food will eject from the exhaust valve
core. Be sure to disconnect the power
supply, have the unit cool naturally or put
a wet towel around the cover to speed up
cooling until the float falls, and then only
open the cover.
x When a large quantity of food is cooked,
do not exhaust immediately after cooking.
It is recommended to open the cover and
serve the food after a period of warm-
keeping.
4. After cooking, the unit will go into the
warming mode automatically.
x After cooking, the warm indicator
illuminates and the unit will go into the
keep warm mode. Long time warming is
not recommended
Texture Selection. To lengthen/shorten
cooking time and pressure level.
1. Finish cooking preparation according
to Page 10
2. Select a corresponding function level
x When any function key is pressed after
preparation, a corresponding function
indicator illuminates, and the pressure
cooker will perform the cooking procedure
of the corresponding function level.
Texture default is “standard” level.
x Once a function level is selected, you can
also select another function level within
10s, and the pressure cooker will perform
the cooking procedure of the finally
selected function level.
x If selection of another function is not
possible after the pressure cookers enters
the working state, you can cancel the
operation by pressing the “Keep Warm/
Cancel” key.
3. Select texture by pressing “Texture”
key
x after the “Texture” key is pressed
continuously, the screen displays QUICK,
STANDARD and LONGER cyclically.
When one texture is selected, the
corresponding text appears on the screen.
Soup” “porridge” “meat/chicken” bean/
tendons” which have texture function.
Timer Function/Delayed start function
1. Finish cooking preparation according
to Page 10
2. Select a corresponding function level
When any function key is pressed after
preparation, a corresponding function
indicator illuminates; you can also select
another function level within 10s. (To cancel
the operation, press the “Keep Warm/
Cancel” key).
No preset function is made available for the
“Cake /pudding” function.
3. Press “Timer” key to Set end time of
cooking.
If your model is equipped with the 24-hour
preset function, this can be operated as
follows: (Depends on model)
x Within 10s after function selection, press
the “Timer” key to set a cooking end time.
x After the key is pressed, the screen
displays “Timer End Time 2.0 ”, the Hour
portion flashes, and “+” or “-” is used to
adjust the Hour portion.
x After setting of Hour portion, the key is
pressed again, and the Minute portion
flashes. Press “+” or “-” to adjust the
Minute portion.
x The Timer time will be less than 24h, if so,
it will return to “2”.
x After completing the setting, the time
displayed on the screen means the
working end time of the pressure cooker.
(to cancel the operation, press the “Keep
Warm/Cancel” key).
x (The associated drawing represents that
the cooking will end in10h).
4. After cooking, the unit enters the warm
state automatically.
x After the preset time elapses after
cooking, the warm indicator illuminates
and the unit will go into the warming
mode. Warming for a very long period of
time is not recommended.
Page 16

Page 16
(This function depends on the model and must be read selectively on the basis of configuration
and model). The pressure level may vary with cooking food, you can choose the length of the
pressure holding time at your discretion.
x When cooking a food that is not on the current level, or if the current function level fails to
meet your texture requirements, you can utilise the pressure level function to achieve the
optimal cooking effect.
x Less time is consumed for a food easily to be cooked, more time is consumed for a food
more difficult to be cooked.
1.Finish cooking preparation according to page 10.
2. By pressing the “Pressure level” key, select a cooking time.
x After pressing “Pressure level”, the “Pressure level” indicator illuminates. For first time, use
default 30min by pressing “+”and “- key, adjust the times between “00” and “60”min.
Pressure Level function. Selecting own cooking time
By pressing the “pressure level”
key, select Pressure Level
function.
By pressing “+”or “-”
key, select pressure
holding time.
After 10s ,the unit enters working
modes, with the Pressure Level
indicator illuminating.
x For delayed start cooking, press the “Timer” key to select preset time. (Select within 10s
after selecting pressure holding time).
x After pressing the “Timer” key, the screen displays “2.0”, The hour portion flashes, and “+”or
“-” key is used to adjust the hour portion. After setting the hour portion, the “Timer” key is
pressed again, the minute portion flashes, and “+” or “-” key is used to adjust the minute
portion until the desired preset time is reached. The time displayed on the screen means the
working end time of the pressure cooker.
x After selecting the preset time, the “Timer” indicator flashs,10s after flashing, the “Timer”
indicator illuminates until the unit begins to work and the screen displays the preset time.
x When the preset indicator goes out, the pressure cooker has begun work.
Pressing the “Timer” key
selects the preset function.
By pressing “+”or “-” key
sets the preset time.
This diagram illustrates
the cooking end time.
3. After cooking, you can open the cover to enjoy the food.
x After a prompt emits a sound, the “Pressure level” indicator goes out, the warm indicator
illuminates, with the unit going to warm mode; if warming is not required press the “Keep
Warm/Cancel” key to cancel the function, open the cover as per the method on page 11;
The food is now ready to be served.
Page 17

Page 17
(This function depends on the model and must be read selectively on the basis of configuration
and model). The steam function time may vary with the type of foods being cooked. You can
choose the length of pressure-holding time at your discretion.
x If using the steam function fails to meet your food texture requirement, you can utilize the
cooking/braised time function in order to achieve the optimal cooking effect.
x Less time is consumed for a food easily to be cooked and more time is consumed for a food
more difficult to be cooked. Example: you need about 3 min to cook fish, but about 20min to
cook beans and tendons.
1. Finish cooking preparation according to page 10
2. By pressing the “Steam” key, select the cooking time.
x After the “Steam” key is pressed, the “Steam” indicator illuminates. The cooking time will be
according to the previously set time (for first time, use default 30 min) by pressing “+” and “-”
adjust the cooking time between 0 and 60 min.
x The pressure holding time can be selected according to personal taste, food and cooking
experience.
x When cooking or braising food, water added must not be less than 2 cups, the table below
shows approximate time required for food cooking after adding 2 cups of water. (times in
this table are for reference only). You can select the pressure holding time according to
personal tastes, and cooking experience. The set time means pressure holding time, i.e. the
time shown on the screen during time setting: Total time means the time from work start to
uncovering.
Steam Function
x 10s after selection, a sound prompt emits and the screen displays the pressure holding time.
The pressure cooker performs the cooking and braised function. (to cancel the operation,
press the “keep warm/cancel” key).
x If you require delayed start cooking see “pressure level” on page 13.
Function
Dim sum/
Steamed bun
Egg/Fish Corn Meat
Small
tendons
Large
tendons
Water added (cup) 2 2 2 2 2 2
Set time (min) 0 3 5 15 10 20
Total time (min) 20 30 30 40 40 45
By pressing “Pressure level”
key, select the Pressure
Level function.
By pressing “+”or “-”key
select the pressure holding
time.
After 10s the unit enters the
working mode, and the Pressure
level indicator illuminates.
3. After cooking, you can open the cover to enjoy the food.
After a sound prompt emits, the “steam” indicator shows and the warm indicator illuminates.
The unit enters warming mode; The cover can now be opened and the food dished.
Page 18

Page 18
Making Porridge
Making Porridge using the delayed start function.
Cooking examples
3. Press the “Timer” key
x Press and hold the “Timer” key successively until the figure “10.5” appears on the display
screen, indicating that the pressure cooker ends its cooking at 7:30 AM tomorrow after the
end time of cooking is adjusted to be 10.5 hours.
x Within 10s after selection, the pressure cooker will confirm the selection. (Please press
“Keep Warm Cancel” to cancel the operation).
4. Cooking ends at 7:30 AM tomorrow
x The time required for making porridge is about 45min. The cooking time may vary a bit with
voltage, amount of porridge and water.
x After cooking, the corresponding function indicator goes out, the warm indictor illuminates
(yellow), and emits a sound prompt (10 beeps). The electric pressure cooker enters into the
warming mode.
5. Open the cover according to “Safe Cover Opening” on Page 11
x If the float valve has fallen, the cover can be opened and the food served.
x If the float valve has not fallen, put a wet towel around the cover to quicken the cooling down
time, then open the cover after the float valve drops.
x Long periods of keeping warm is not recommended to avoid adverse effects on the texture
and quality of the porridge.
If it is 9:00 PM, and you want to have porridge served at 7:30 AM tomorrow through timing:
1. Complete cooking preparation according to Page 10.
x The proportion of porridge to water can be adjusted according to personal taste.
2. After power-on, press the “Porridge”
function key.
x The “Porridge” indicator illuminates; other
function indictors are not bright.
x Press the “Timer” key within 10s after
pressing of the “Porridge” function key,
and adjust the preset cooking time.
Note:
1. Long time periods of preset timing cooking is not recommended.
2. Minimum timing period of the “Porridge” function key is 1.5 hours.
3. Step 2 and Step 3 can be operated in either order.
x To make porridge by using this cooker, the optimal proportion of porridge to water is about
1:7.
x When cooking sticky food, disable the compulsory exhaust to avoid damage to property.
Page 19

Page 19
Cooking rice
Cooking examples
3. Refit the wiped inner pot into the cooker body
x After placing the inner pot, rotate the inner pot slightly from left to right to ensure full contact
between the inner pot and the heating plate.
4. According to instructions on page 10, fit the cover correctly and switch on
5. Press the “Rice” key
x At the moment, the “Rice” function indicator illuminates, with other function indicators going
out.
x The electric pressure cooker begins cooking within 10s after selection
6. After cooking, the unit enters warm state automatically
x Cooking time is around 35min, but the time may slightly vary with rice amount or rice quality;
7. Open the cover on according to “Safe Cover Opening” on Page 11
x After cooking, it is recommended to serve the rice after 1-3 min of keeping warm, Long
periods of keeping warm is not recommended to avoid adverse effects on the texture and
quality of the rice.
1. Measure the rice portion with a measuring cup and clean it
x One measuring cup of rice is about 150g, a portion suitable for serving one person;
x It is recommended not to wash rice in the inner pot;
x Correct methods of using the measuring cup:
Rice and water amount Rice amount (measuring cup) Water amount (Scale)
Little 0.5 2-3
Large 1.5 7-8
Moderate 1 4-5
2. Add water to the corresponding water level
x Put the cleaned rice into the interior pot and fill it with water to a corresponding water level;
x The scale line inside the inner pot indicates the cooking reference water level; For example:
to cook 2 cups of rice, add water to the scale line “2”;
x The amount of water may vary with the type of rice and hardness of the rice. Never allow
the water to exceed the MAX level inside the inner pot.
Note:
1. Long periods of time using preset timing cooking is not recommended.
2. Minimum timing period of the “Rice” function key is 1.5 hours.
3. Step 2 and Step 3 can be operated in either order.
Rice-water contrast table for making porridge with the cooker:
Warming function
x After cooking, the electric pressure cooker goes
into the warm mode automatically; in the warm
mode, the warm indicator is bright, and “0.0” is
shown on the display screen;
x In the standby mode the warm function may also
be performed by pressing the “Keep Warm/Cancel”
key;
x The keep warm temperature is 60-800C;
x Optimal keep warm time is less than 8 hours.
Page 20

Page 20
Care and maintenance
Cleaning and care
Caution
Never use petrol, solvents or abrasive
cleaners, metal objects or hard brushes to
clean the appliance.
Never put the appliance, base or power cord
in water or any other liquid.
1. Turn the appliance off and disconnect it
from the wall socket.
2. Let the appliance cool down completely.
3. Remove the cover and inner pot, wash
them with a suitable detergent, rinse with
fresh water and then wipe them dry with a
soft cloth.
4. Using clean water, clean the cover,
including the gasket, exhaust valve,
anti-block shield, exhaust valve core and
float valve, and wipe clean with a rag. After
cleaning refit back onto the cover correctly .
5. Clean the cooker body with a rag. Do not
immerse the cooker in water or wash with
splashing water.
6. Clean the appliance after each use.
Note
Before using the appliance after cleaning,
dry all parts carefully using a soft towel.
3
Storage
x If you do not plan to use the appliance for
a long period of time, please store it
carefully.
x Make sure the appliance is unplugged
and completely dry.
x Store the appliance in a cool, dry place.
x Make sure the appliance is kept out of the
reach of children.
Environmental note
Do not dispose of the appliance with normal
household waste at the end of its service life.
Consult your local authorities
for disposal
information and facilities available.
Help protect the environment by
recycling used appliances.
Technical data
Model: PC 600 S
Power supply: 220-240V, 50/60Hz
Power: 1000W
Pressure: 70kPa
Technical and design modifications
reserved.
Page 21

Page 21
Troubleshooting
4
S/N Problem Possible reason Solution
1
Difficult to close the cover Gasket not positioned properly Locate the gasket properly
Push rod jammed by float valve Push the push rod lightly with hand
2
Difficult to open the cover Float valve fails to fall after steam
release
Press the float valve lightly with a
chopstick
Pressure exists inside the cooker Open the cover after the pressure
lowers
3
Leakage from cover No gasket Fit the gasket according to the
requirement
Food particles attached to gasket Clean the gasket ring
Gasket worn Replace the gasket ring
Cover not closed firmly Close the cover properly
4
Leakage from float valve Food particles attached to float valve
gasket ring
Clean the float valve gasket
Float valve gasket ring worn Replace the float valve gasket
5
Float valve unable to rise Too little food and water inside the
pot
Place food and water according to
allowed minimum requirements
Little leakage from cover or exhaust
valve
Contact your nearest service agent
6
Continuous exhausting
from the exhaust
valve does that does not
stop
Exhaust valve not in sealing position Slide the exhaust valve to the
sealing position
Pressure control fails Contact your nearest service agent
for maintenance
7
Lamp not bright after
power on
Bad contact with socket Please inspect the socket
8
All lamps
flash
C1 appears
on display
screen
Sensor fails Contact your nearest service agent
C2 appears
on display
screen
C5 appears
on display
screen
Temperature is too high because
there is no water inside the inner pot
Add water as required
Temperature is too high because
inner pot is not properly placed
Place the inner pot properly
C6 appears
on display
screen
Pressure switch fails
9
Rice half cooked/too hard Too little water added Add more water
Cover closed prematurely After the time is up, release steam
and open the cover in 5 minutes
10
Rice too soft Too much water added Reduce water level
Contact your nearest service agent
Page 22

Page 22
Service Centres
If you have followed the instructions and still have a problem, contact the nearest
Defy Service Centre. They will be able to advise you on any aspect of the
appliance.
5
OTHER AREAS ARE SERVICED BY OVER 200 AUTHORISED SERVICE AGENTS.
PLEASE CONSULT THE NEAREST REGIONAL DEFY SERVICE CENTRE FOR DETAILS.
South African Service Agents:
BLOEMFONTEIN
160 Long Street, Hilton, Bloemfontein 9301
Tel: 051 400 3900
Bloemfontein.Service@defy.co.za
CAPE TOWN
5A Marconi Rd. Montague Gardens, 7441
Tel: 021 526 3000
CapeTown.Service@defy.co.za
DURBAN
35 Intersite Avenue, Umgeni Business Park,
Durban, 4051
Tel: 031 268 3300
Durban.Service@defy.co.za
EAST LONDON
Robbie de Lange Road, Wilsonia,
East London, 5201
Tel 043 745 1129
EastLondon.Service@defy.co.za
JOHANNESBURG
Cnr. Mimetes & Kruger Sts. Denver ext.12
Johannesburg, 2094
Tel: 011 621 0200 or 011 621 0300
Gauteng.Service@defy.co.za
POLOKWANE
87 Nelson Mandela Drive, Superbia 0699
Tel: 0152 92 1166 / 7 / 8 / 9
Polokwane.Service@defy.co.za
PORT ELIZABETH
112 Patterson Road, North End, Port Elizabeth
6001
Tel: 041 401 6400
PortElizabeth.Service@defy.co.za
PRETORIA
Block A1 Old Mutual Industrial Park,
Cnr. D.F.Malan Drive & Moot Str. Hermanstad,
0082
Tel: 012 377 8300
Pretoria.Service@defy.co.za
Sub-Saharan Africa Service Agents:
ZAMBIA: SOUTHGATE INVESTMENTS LTD
Plot 1606, Sheki Sheki Road
P.O. Box 33681
Lusaka, 10101, Zambia
Tel: +260 0211 242332/3
Fax: +260 0211 242933
sgiservicecentre@microlink.zm
NAMIBIA: ATLANTIC DISTRIBUTORS (PTY)
LTD
10 Tienie Louw Street, Northern Industrial Area
P.O. Box 21158, Windhoek, Namibia
Tel: (061) 216162
Fax: (061) 216134
atlantic@mweb.com.na
ZIMBABWE: TRADECOMAFRICA
Trade Com Africa, 183 Loreley Crescent
Msasa, Harare, Zimbabwe
Tel: +263 4 486165/6
Cell: +263 772 469010
Cell: +263 772 469011
BOTSWANA: RAY MORGAN AGENCIES
RMA Service Centre, Plot 48, East Gate
Gaborone International Commerce Park
Kgale View, Gaborone
Botswana
Tel: +267 390 3996 / 390 3912
Fax: +267 318 7376
Cell: +267 7134 6539
service@rma.co.bw; raja@rma.co.bw
SWAZILAND: LYNDS DISTRIBUTORS
P.O Box 716, Mbabane, Swaziland, H100
Tel: (00268) 2515 4310/8
Fax: (00268) 2518 4318
MOZAMBIQUE: COOL WORLD. LDA
Rua da Resistencia No. 97B R/C
Cell: +258 84 44 61 234
coolworldlda@hotmail.com
Nosso Show Room
Av: da Industrias, Parcela No.735 * 735A
Machava, Maputo
Page 23

Page 23
Warranty
6
This certificate is issued by DEFY APPLIANCES (PTY) LIMITED manufacturers of Defy
and Ocean products, hereinafter the Company, to the original purchaser only, of the
appliance described on the certificate and shall constitute the only warranty given in
respect of this appliance.
The Company warrants to the original purchaser that for a period of ONE YEAR from date
of purchase the appliance is free from defect under normal domestic use, both in
workmanship and material, subject to the following conditions.
1. Carry-in service. Small appliances are repaired in our service centres and are not
collected from the customers home. Faulty units must be delivered to the purchasing
dealer or to the nearest Company Service Centre for warranty repairs.
2. Vitreous enamelware, fuses and lamps are specifically excluded from these warranties. It
is an express condition of these warranties that the purchaser takes due care and
attention in the use and maintenance of the appliance. Abuse, misuse in conflict with
operating instructions, connection to incorrect voltages and subjection to commercial use
shall release the Company from its obligations.
3. This warranty shall become void and cease to operate if the appliance is dismantled by,
or any repairs to the appliance are effected by any persons not duly authorised by the
Company, or if substitute parts not approved by the Company are used in the appliance,
or if the serial number of the appliance is removed.
4. The Company shall not be responsible for damages resulting from fire, flood, civil
disturbances or any Act of God. The Company shall not, in terms of these warranties be
responsible nor held liable for any consequential loss or damage of any kind caused by or
due to the failure or malfunction of the appliance.
5. The Company shall not be responsible for transportation or other costs other than those
incurred within the provisions of Point 1 of this Certificate.
6. For warranties in the Republic of South Africa and Sub-Saharan Africa, please
contact your nearest Defy office. Please refer to the previous page for respective
South African service agents and Sub-Saharan Africa service agents.
7. Where service is requested under warranty and no fault or defect can be found by the
Company, all costs incurred will be for the purchaser's account.
8. This Certificate as well as your invoice will serve as proof of purchase. For the purpose
of warranty, it will be essential to produce this Certificate and invoice. Failure to do so, will
render the purchaser liable for service costs.
KEEP THIS CERTIFICATE AND SALES INVOICE AS PROOF OF
PURCHASE FOR WARRANTY PURPOSES.
 Loading...