

Defy MAXIMAID 1100, KOMBOMAID 1100 Owner's Manual
Page 1
You ca n re ly on Defy
www.defy.co.za
OWNER’S MANUAL
MAXIMAID
1100
Automatic Washing Machine
KOMBOMAID
1100
Combination Washer / Dryer
2 INSTALLATION
2 Unpacking
2 Transport fittings
3 Positioning the machine
3 Connection to the cold water supply
3 Connecting the drain hose
4 Electrical connection
4 KNOW YOUR MACHINE
4 Exterior
4 Accessories
4 Detergent drawer
5 CONTROL PANEL
5 Power On /Off
5 Start / Pause
5 Programme selector knob
5 Wash selection
5 Rinse selection
5 Spin speed selection
5 Time delay selection
6 Temperature selection
6 Rinse and Spin
6 Child Safety Lock
6 Door open button
7 HELPFUL HINTS
7 OPERATING THE MACHINE
7 Sorting the laundry
7 Getting ready
7 Loading the machine
8 Programme selection
8 Changing programmes
8 Starting the machine
8 Unloading the machine
8 PROGRAMME GUIDE
8 Normal
8 White
8 Eco White
9 Synthetic
9 Heavy Stain
9 Wool
9 Delicate
9 Blanket
9 Rapid
9 Memory
9 Drum cleaning
10 Programme chart
11 DRYING—Kombomaid 1100 only
12 OTHER HELPFUL PROGRAMMES
12 Delayed start
12 Rinse and Spin –Maximaid 1100 only
12 MAINTENANCE
12 Cleaning the detergent drawer
13 Cleaning the inlet filters
13 Cleaning the pump filter
13 General cleaning
13 Hoses
13 OWNER’S RESPONSIBILITY.
14 STAIN REMOVAL
15 INTERNATIONAL CARE LABELS
16 PROBLEM WASHING CHECK LIST
16 TROUBLE SHOOTING
17 SERVICE CENTRES
18 WARRANTY
19 TECHNICAL SPECIFICATIONS
PAGE
Page 2
Thank you for choosing Defy
Congratulations, you have purchased one of the finest and most modern washing machines that today’s technology can produce. You and your machine are going to make a great team together. But
first it will pay if you really get to know each other. This manual will tell you all you need to know
about your machine, what it will do and how to do it.
Please read all the instructions carefully before operating the machine.
Some of its features are:
• Advanced electronics: Sensors determine the optimum water level and wash duration.
• Direct drive motor: Ensures an exceptionally smooth and quiet operation.
• Nano silver sterilization technology: Applying the attributes of silver (anti-bacteria) and carbon
(deodorization) nano particles, the wash compartment is selectively coated, ensuring a bacteria
free wash.
• Air bubble washing: Millions of generated air bubbles completely dissolve detergents thereby
improving both the wash and rinsing performance.
• Safety lock: Prevents accidental changing of pre-set programmes.
• Inclined drum: Ensures a better wash action and diminishes vibrations.
• Infrared drying technology: Kombomaid -washer dryer only
Installation
UNPACKING
• Carefully remove all packaging from the machine and accessories.
• Please ensure that packaging material is disposed of in a responsible manner.
• Plastic bags should be cut up to prevent children playing with them and accidentally suffocating.
• If the appliance is damaged in any way, do not use it. Report the damage to your dealer, who will
take the necessary corrective action.
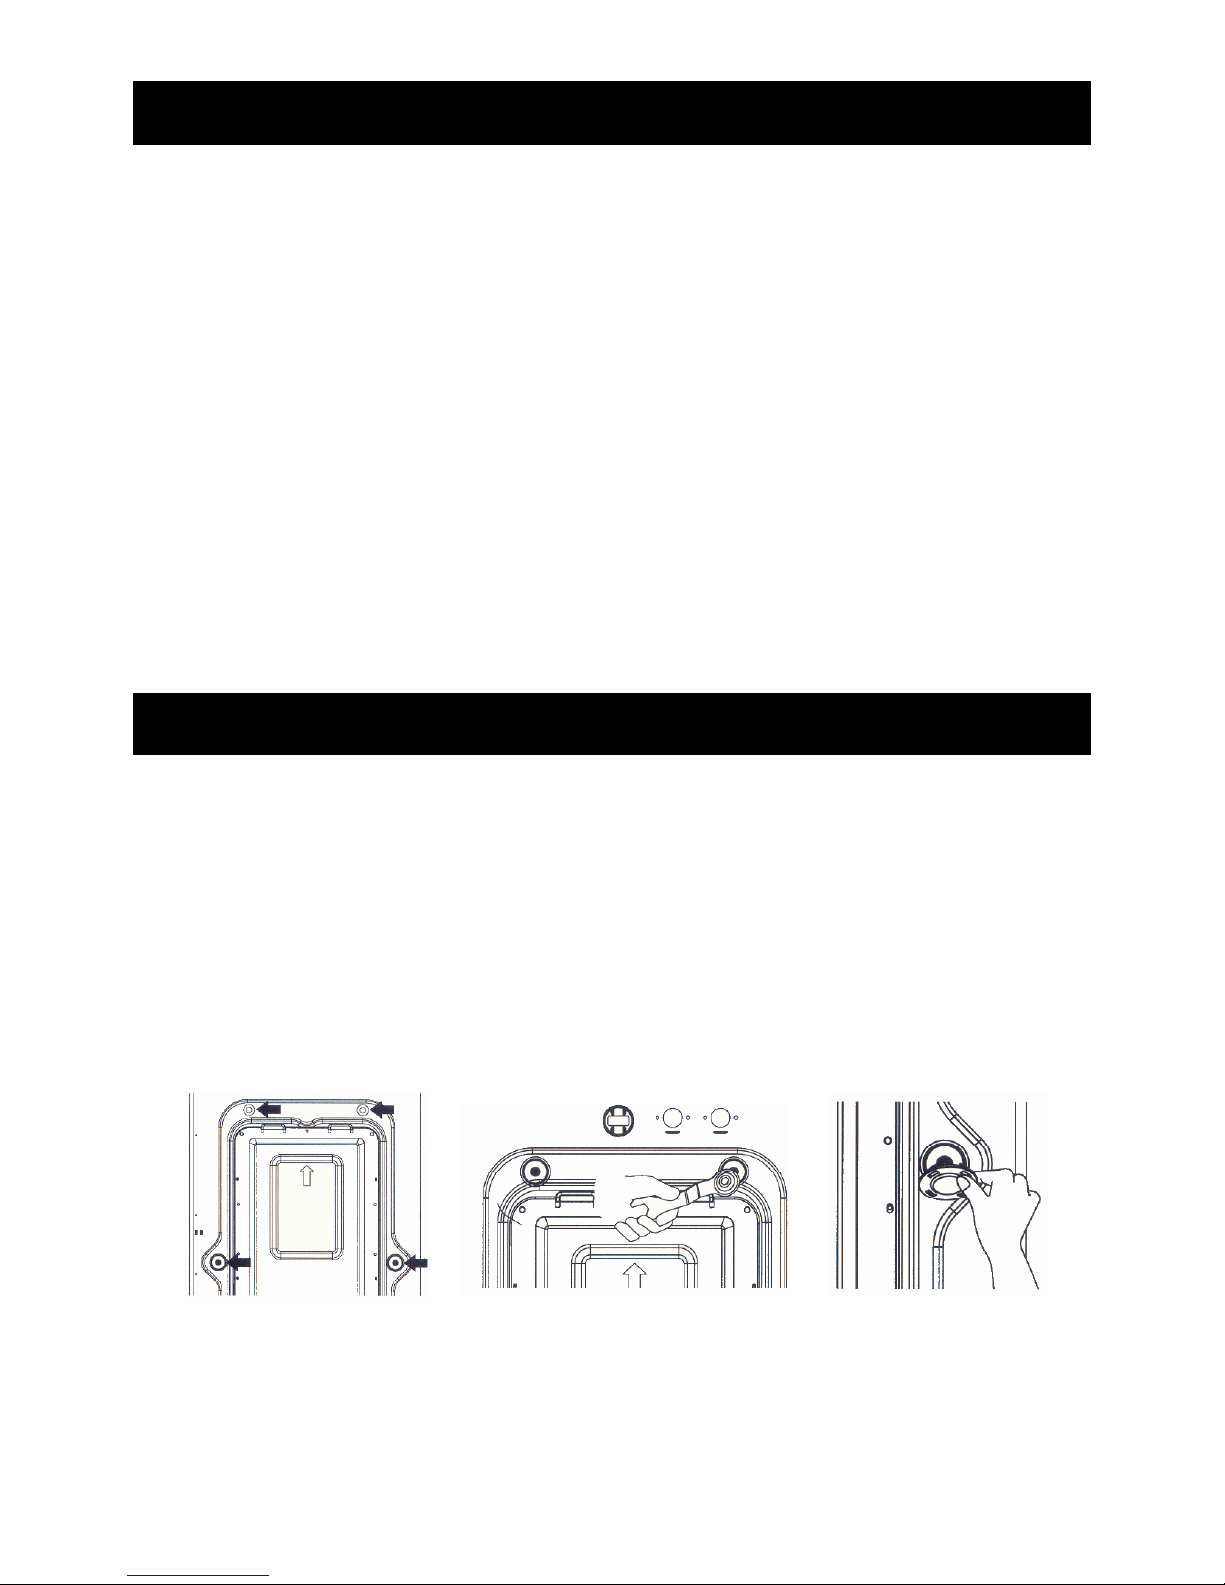
TRANSPORT FITTINGS
• The wash drum is secured by four bolts to prevent damage during transport .
• If these bolts and associated rubber sleeves are not removed before use, it will result in excessive
vibration, noise and possible malfunction.
• To remove the transport fittings proceed as follows:
• Unscrew the 4 bolts at the back of the machine, with the spanner
supplied.
• Remove the bolts and rubber grommets.
• Keep the transport fittings and spanner for future use.
• To prevent damage, the machine should be transported with the
transport fittings securely in place.
• Insert the four plastic
plugs, supplied with
the machine, into the
holes vacated by the
transport fittings.
Page 3
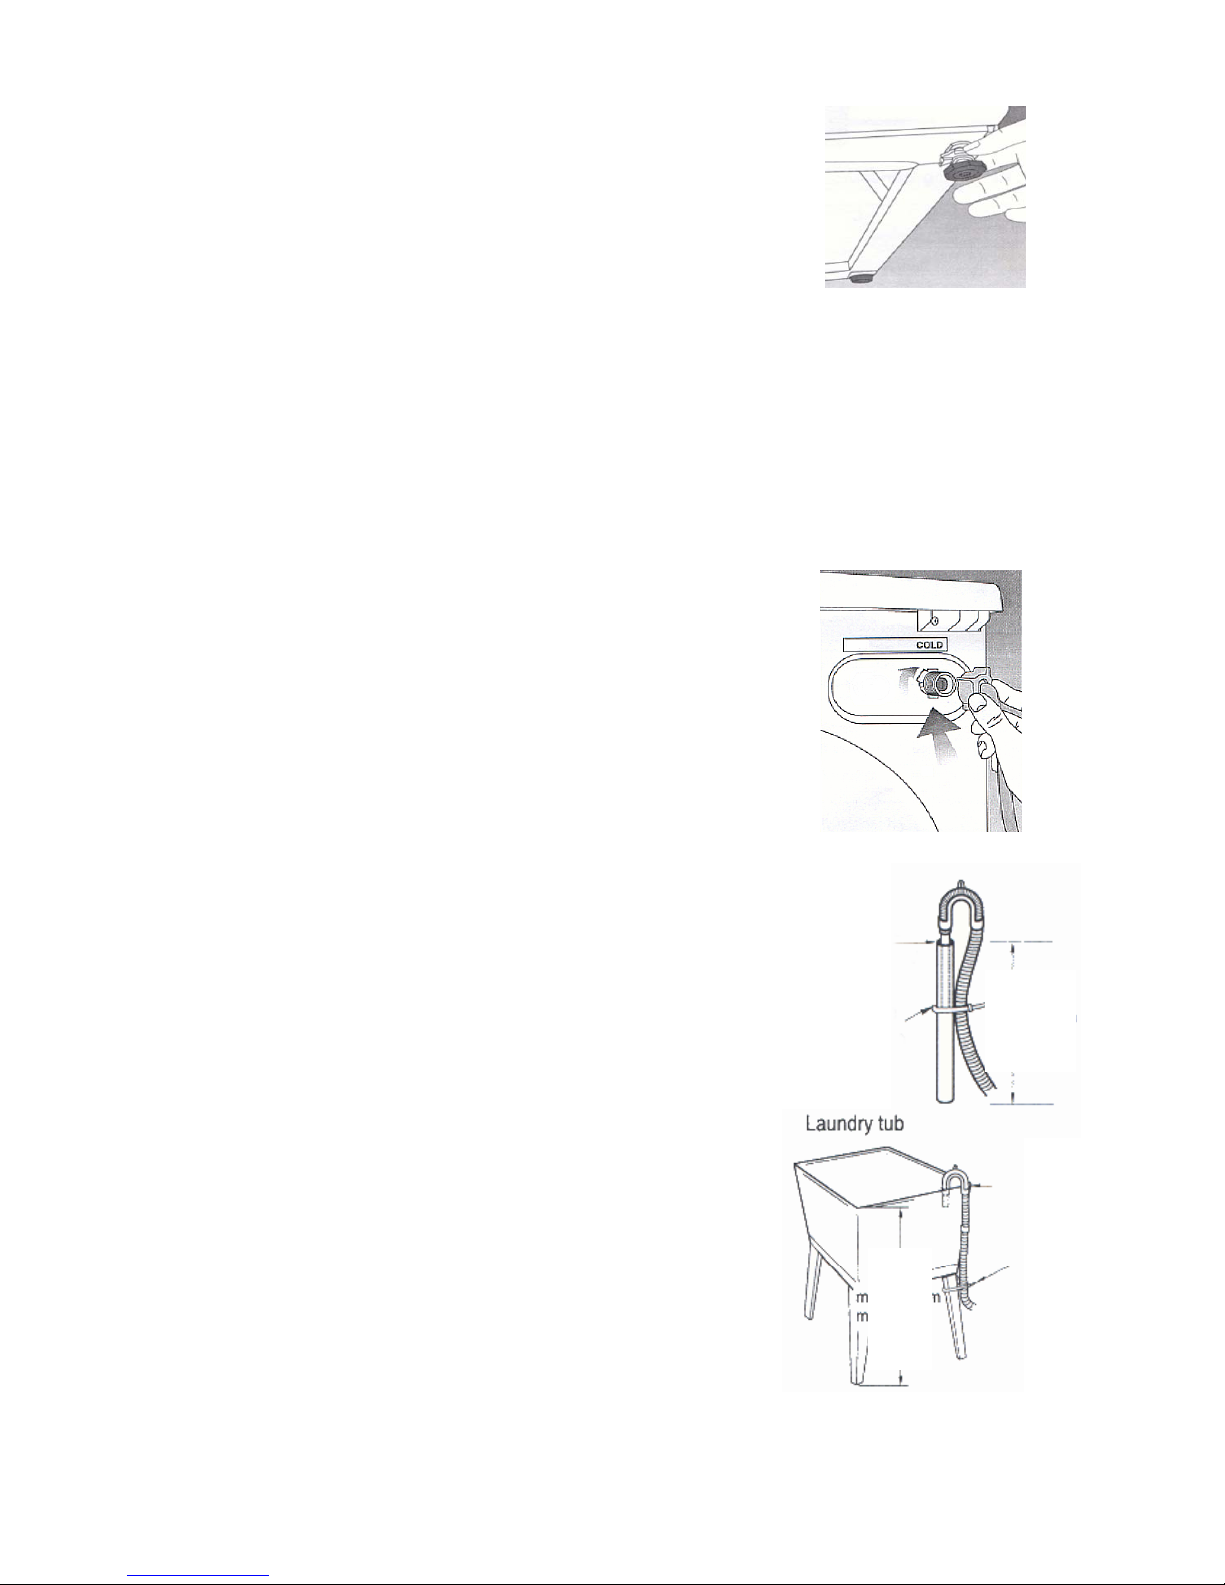
POSITIONING THE MACHINE
• The machine must stand firmly on the floor. Any instability
will negatively effect its performance.
• To level the machine, loosen the plastic lock nuts on the ad-
justable feet using the spanner supplied. Rotate the feet until
the machine stands firm and level. Tighten the lock nuts
firmly. Never remove the lock nuts and feet from the machine.
• Do not place the washing machine in an area where the
temperature could drop to 0°C. Residual water in the pipes
could freeze and damage the machine.
• Ventilation openings should not be obstructed. Leave a space
of 20mm to the left and right of the machine and 100mm at the
back. Never place the machine on a carpet. This could prevent
air circulation and cause electrical components in the machine
to overheat.
• Do not place or store anything on top of the machine.
CONNECTING TO THE COLD WATER SUPPLY
• The water supply should deliver 8 to 80 litres per minute.
• Sealing washers are supplied and these should be fitted at
either end of the inlet hose.
• Secure the angled end of the inlet hose to the water inlet at the
rear of the machine and the straight end to a 3/4 inch BSP
cold water tap.
• Tighten both connections. Open the tap and check for leaks.
• We recommend that the tap be closed when the machine is not
in use.
CONNECTING TO THE DRAIN HOSE
Draining into a dedicated outlet pipe
• The outlet pipe must have an inside diameter of at least
40 mm.
• The end of the pipe must be positioned between 600 mm. and
1000 mm. above floor level.
• Secure the hooked end of the drain hose into the outlet pipe.
Draining into a sink or bath
• The drain hose may be hooked over the edge of a sink or bath
in such a way that the end can not be immersed in the
collected waste water.
• The outlet end of the hose must be between 600 mm. and
1000 mm. above floor level.
• Please note: The outlet hose must be kept free of kinks or
restrictions as these will hinder the operation of the machine.
Hose
retainer
Tie
strap
Hose
retainer
Tie
strap
Max
1000mm
Min
600mm
Max
1000
mm
Min
600m
Page 4
ELECTRICAL CONNECTION
• The appliance must b e earthed and the manufacturer and seller do not accept responsibility
for any damage due to incorrect electrical connection.
• The three pin plug, attached to the power cord, must be inserted into a 15 Am p earthed wall s ocket.
• Do not connect the machine through a double adaptor. It requires a dedica ted power po int
• If the power cord should ever need replacing, use only a genuine cord ( T ype ‘X’) available from
the nearest Defy Service Centre.
Know your machine
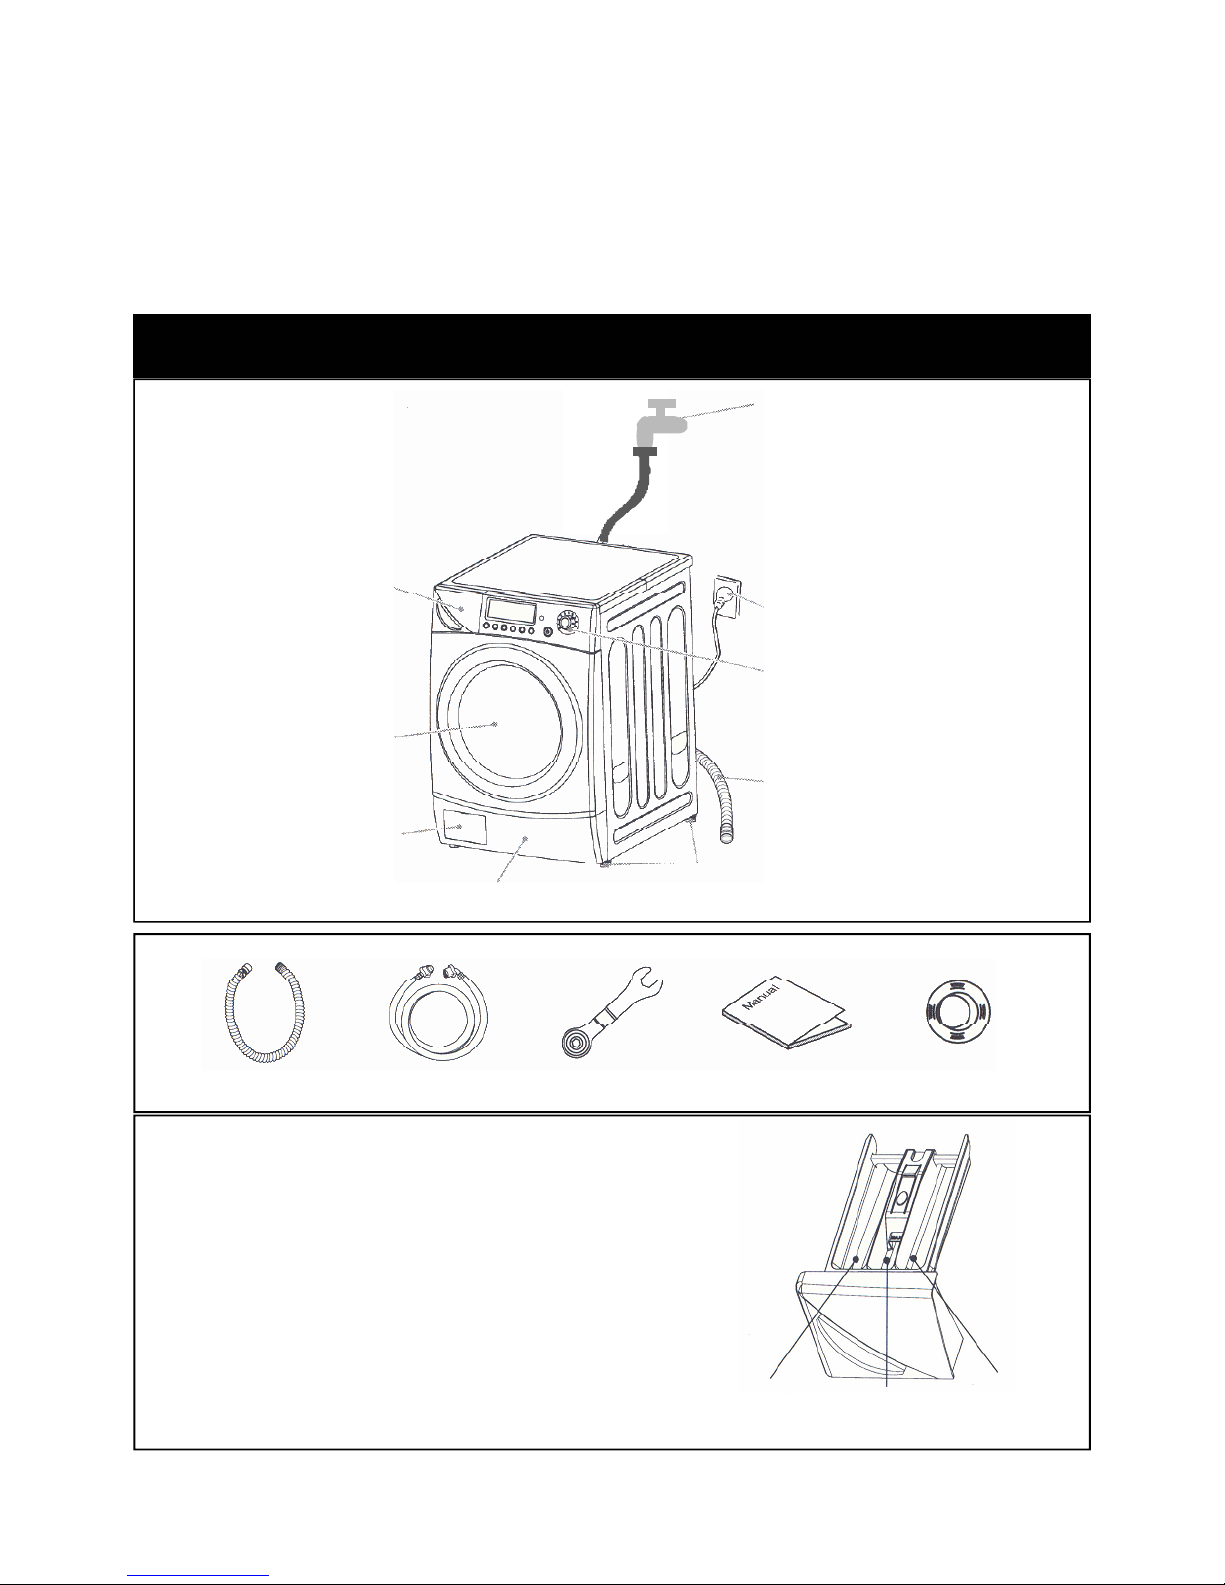
ACCESSORIES
Main wash Fabric softener Pre-wash
DETERGENT DRAWER
• Open the drawer.
• Place detergent and softener in the appropriate
compartment, in accordance with the instructions
on the manufacturer’s pack
• Detergent and softener will automatically be
released at the appropriate time during the wash.
• Use only low foam detergents specifically
designed for front loading washing machines.
•
Over dosing may result in excessive foam, overload the motor and effect performance.
Inlet hose connected
to a cold water tap.
Power cord and plug
connected to a 15A earthed
wall socket.
Control panel.
Drain hose feeding into a
dedicated drain pipe or sink.
Adjustab le levelling feet
Plinth
Pump cover
Door
Detergent drawer
EXTERIOR
Drain hose Inlet hose Spanner Manual Plugs

Page 5
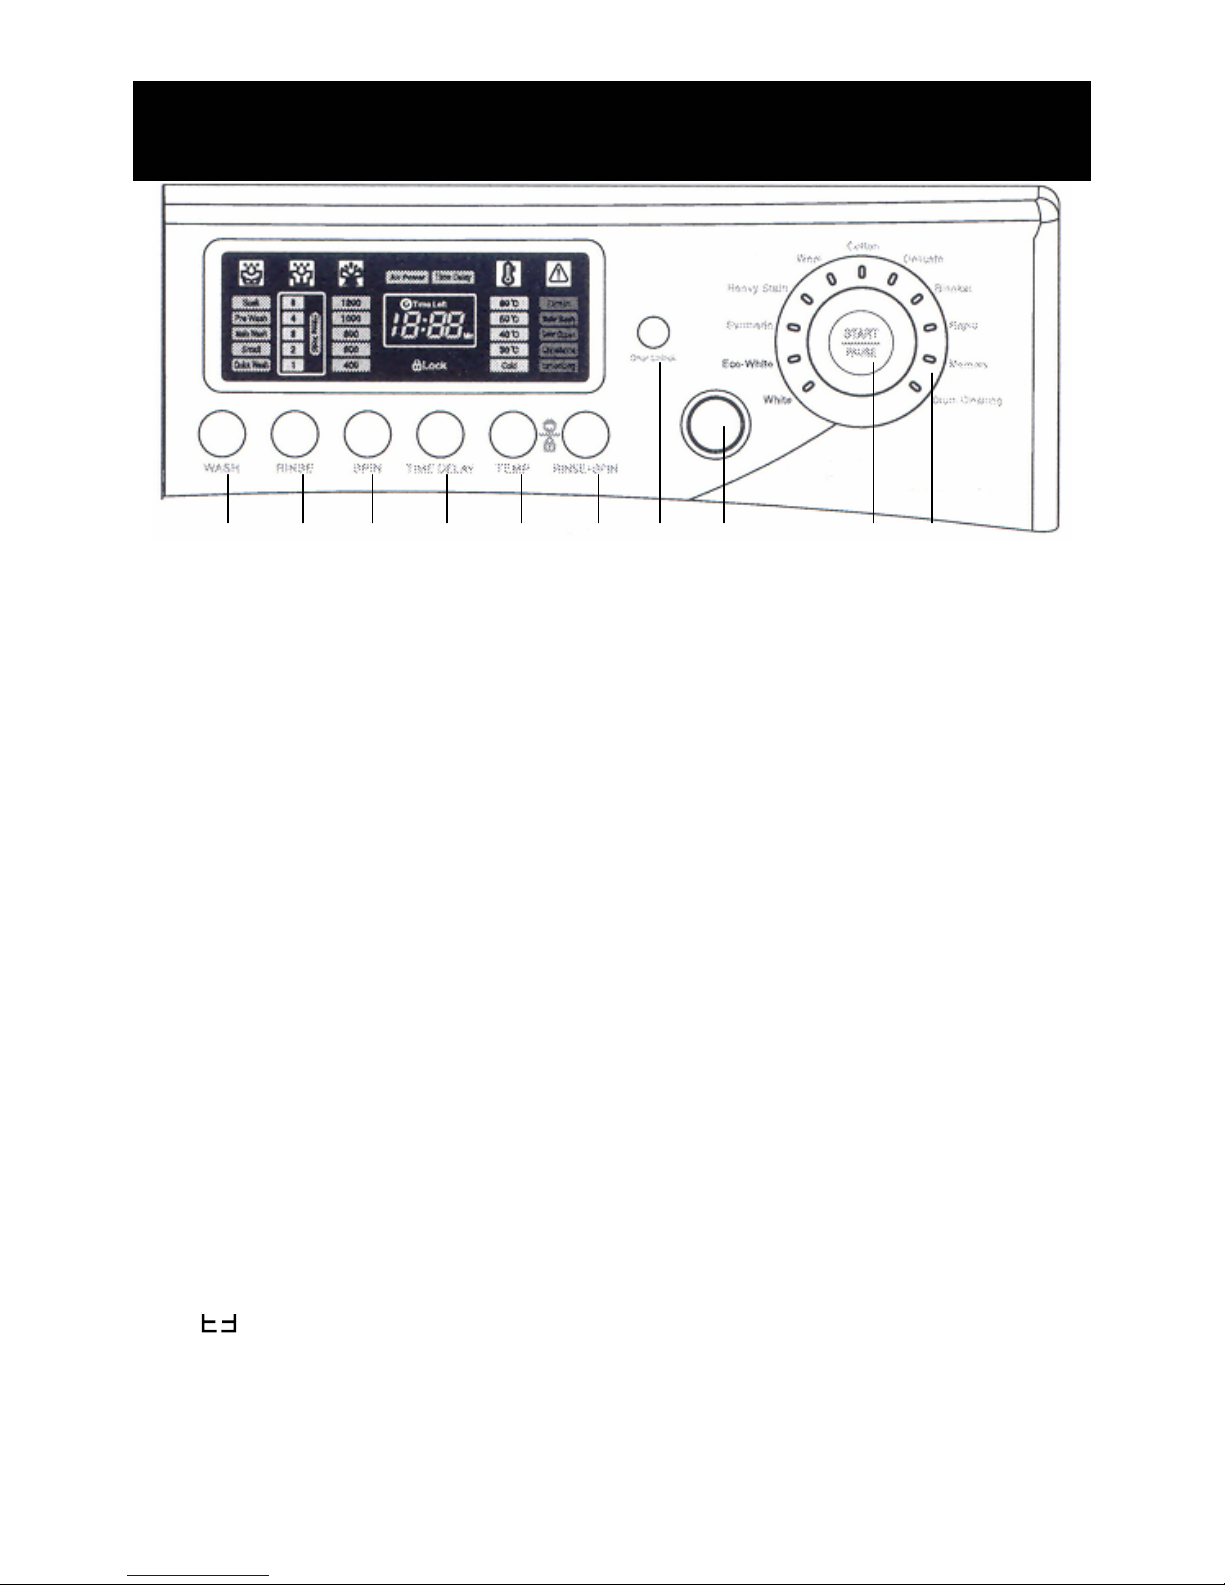
4 5 6 7 8 9 10 1 2 3
1 POWER ON / OFF
• Press this button to switch the power ON or OFF
2 START / PAUSE
• Press this button to start the selected operation. Pressing it once more stops the machine
temporarily, allowing changes to a programme to be made. Select the programme, make the
changes and press the start / pause button once more to resume operation.
3 PROGRAMME SELECTOR KNOB
• Turn the knob to the required programme. Pilot lights around the dial will confirm your
selection.
4 WASH SELECTION
• Press this button repeatedly to select the type of wash you require. Illuminated windows on the
display panel will confirm your selection.
• Quick wash - (recommended load is 1-2 kg) > Small wash - (recommended load is 2-3kg)
>Main wash > Pre-wash > Soak > back to Quick wash.
5 RINSE SELECTION
• Press this button repeatedly to select the number of rinses you require. Illuminated windows on
the display panel will confirm your selection.
• 1 > ‘Rinse and hold’ > 2 > ‘Rinse and hold’ > 3 > 4 > 5 > ‘ Rinse and hold’ > back to 1.
6 SPIN SPEED SELECTION
• Press this button repeatedly to select the spin speed ( r/min) you require. Illuminated windows
on the display panel will confirm your selection.
• 400 > 600 > 800 > 1000 > 1200 > and back to 400.
7 TIME DELAY SELECTION
• By pressing this button repeatedly, you may delay the start time of your wash by 1 to 12 hours .
The clock in the display window will confirm your selection.
THE CONTROL PANEL
The information on pages 5-10 concerns the Maximaid 1100 and the Kombomaid 1100.
Directions for the Kombomaid 1100 drying cycle is found on page 11
Page 6
4 5 6 7 8 9 10 1 2 3
8 TEMPERATURE SELECTION
• Press this button repeatedly to select the wash temperature you may require. Illuminated
windows on the display panel will confirm your selection.
• Cold > 30°C > 40°C > 60°C > 95°C > Cold
9 RINSE AND SPIN (Maximaid 1100 only)
• Press this button if you only wish to rinse and spin a load without washing it first.
8+9 SAFETY LOCK
• When activated, the Safety lock prevents accidental operation of the machine.
• Activating the lock:
• Press the TEMP and RINSE SPIN buttons simultaneously and hold for three seconds.
• ‘CHL’ and the remaining wash time will flash alternately in the display
• In Safety Lock mode, no other button will function except the Power ON / OFF button.
• The Safety lock is cancelled when the power is switched off.
• De-activating the Safety lock while there is power to the machine.
• Press the TEMP and RINSE SPIN buttons simultaneously and hold for three seconds.
10 DOOR OPEN BUTTON
• Should you intentionally wish to open the door during a wash cycle, press the START PAUSE
button and thereafter the DOOR OPEN button.
• After the machine has drained any water from the drum and has cooled the drum down, you ma y
open the door.
• Will be displayed and no other button other than the POWER ON /OFF button will
function.
THE CONTROL PANEL
The information on pages 5-10 concerns the Maximaid 1100 and the Kombomaid 1100.
Directions for the Kombomaid 1100 drying cycle is found on page 11
 Loading...