

Page 1

Owner’s
Manual
LAUNDROMAID
TOP
LOADING
6.5kg
AUTOMATIC
WASHING
MACHINE
CONTENTS
2 Installation
4 Precautions
5 Loading,Detergents & Additives
6 Water Levels
6 Wash Options
7 Fuzzy Logic
7 Standard Wash
8 Automatic Programmes
9 Customised Programmes
10 Pre-setting the end of Wash
Time
11 Selecting a Fast Wash
12 Maintenance
12 Technical Specification
13 Self Diagnostics
www.defy.co.za
14 Problem Solving
Page 2
CONGRATULATIONS
You are now the proud owner of one of the finest and most modern washing machines
that today’s technology can produce. You and your machine are going to make a great
team together. But first it will pay if you really get to know each other. This book will tell
you all you need to know about your machine, what it will do and how to do it. Please
read all the instructions carefully before operating the machine.
INSTALLATION
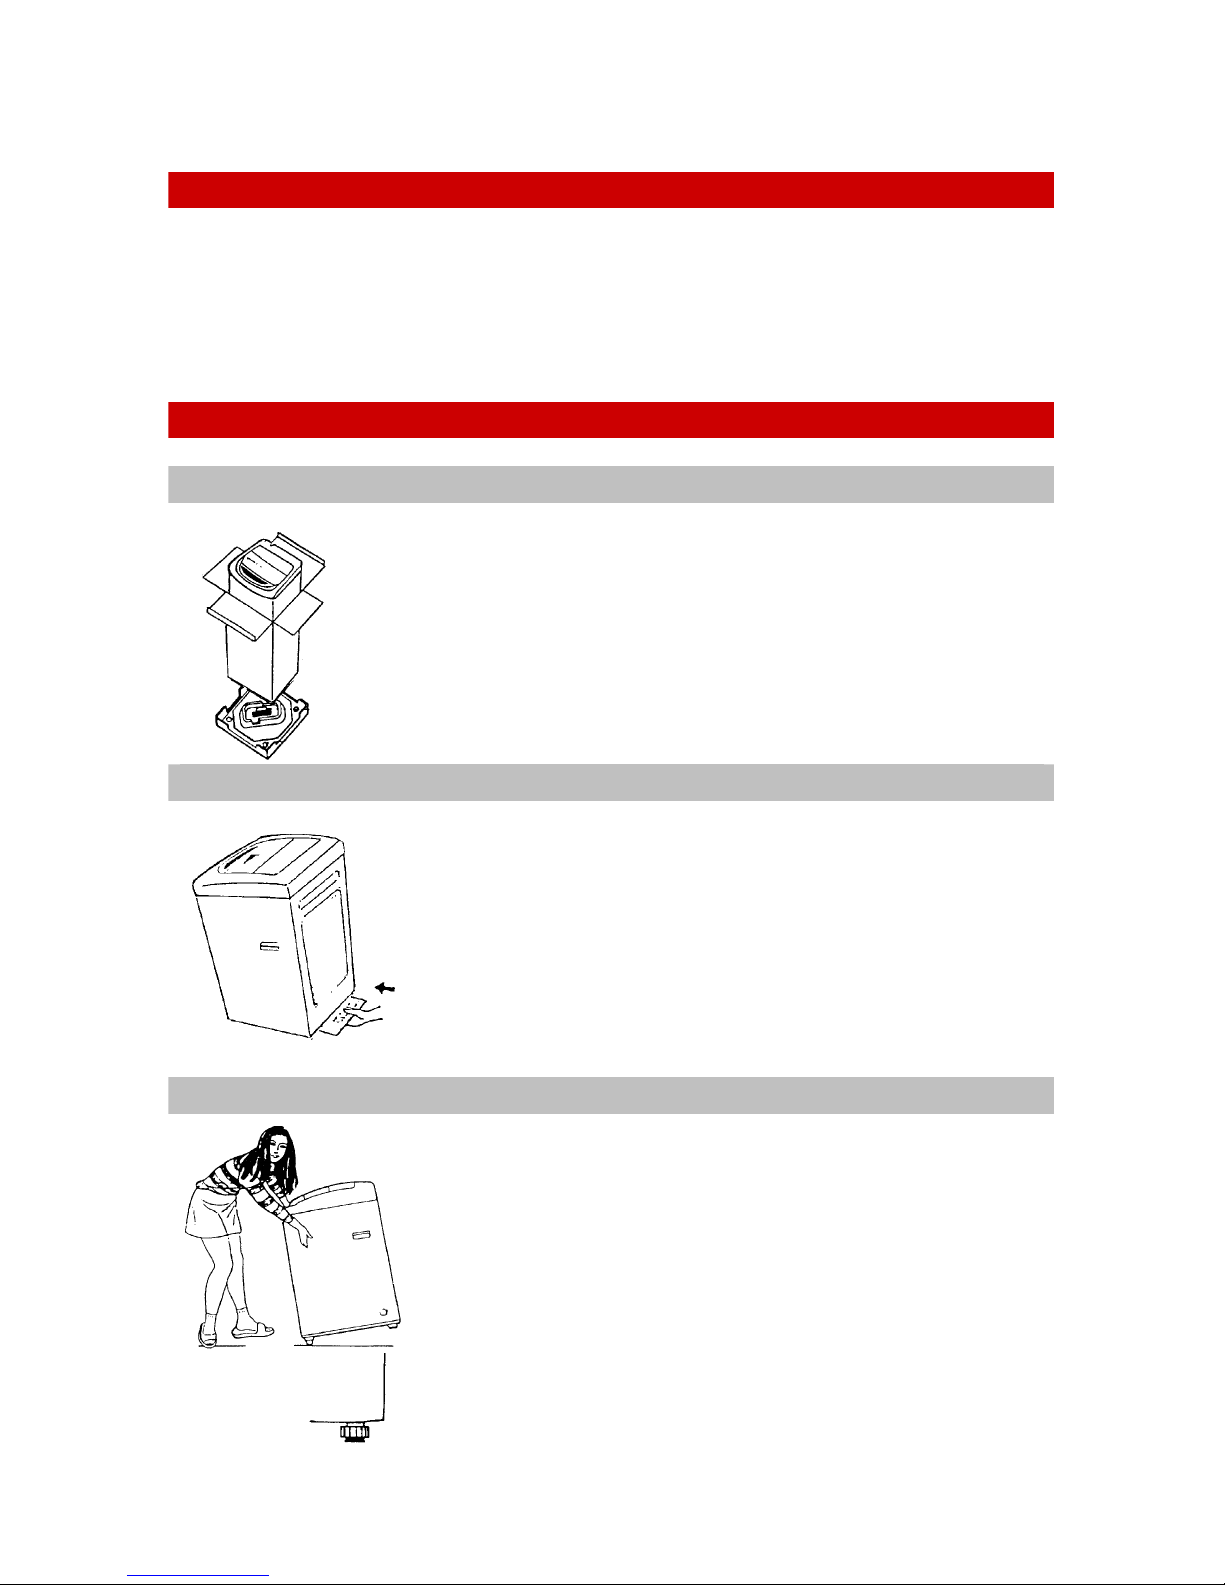
UNPACKING
• Remove all packaging, the foam base plate cover and the convex
plastic block.
• Open the wash-tub lid and remove all the accessories stored in the
drum.
• Do not attempt to operate the machine while any of the packaging is
still in place.
THE BASE COVER
• To prevent access to the mechanics of the machine by either
• Tilt the back of the machine slightly forward and slide the base
• Attach the base cover to the rear of the machine using the
POSITIONING
• The machine has wheels for easy manoeuvrability.
• Positioned the machine on a flat and stable surface
• Adjustable levelling feet are located at the front of the
• The machine should be installed in a well ventilated
children, pets or rodents a base cover is provided.
cover along the retaining rails at the bottom of the machine
until it is fully in place.
screw provided.
machine and these may be turned in or out to achieve
stability.
place, away from direct sunlight
Page 3
INSTALLATION Continued
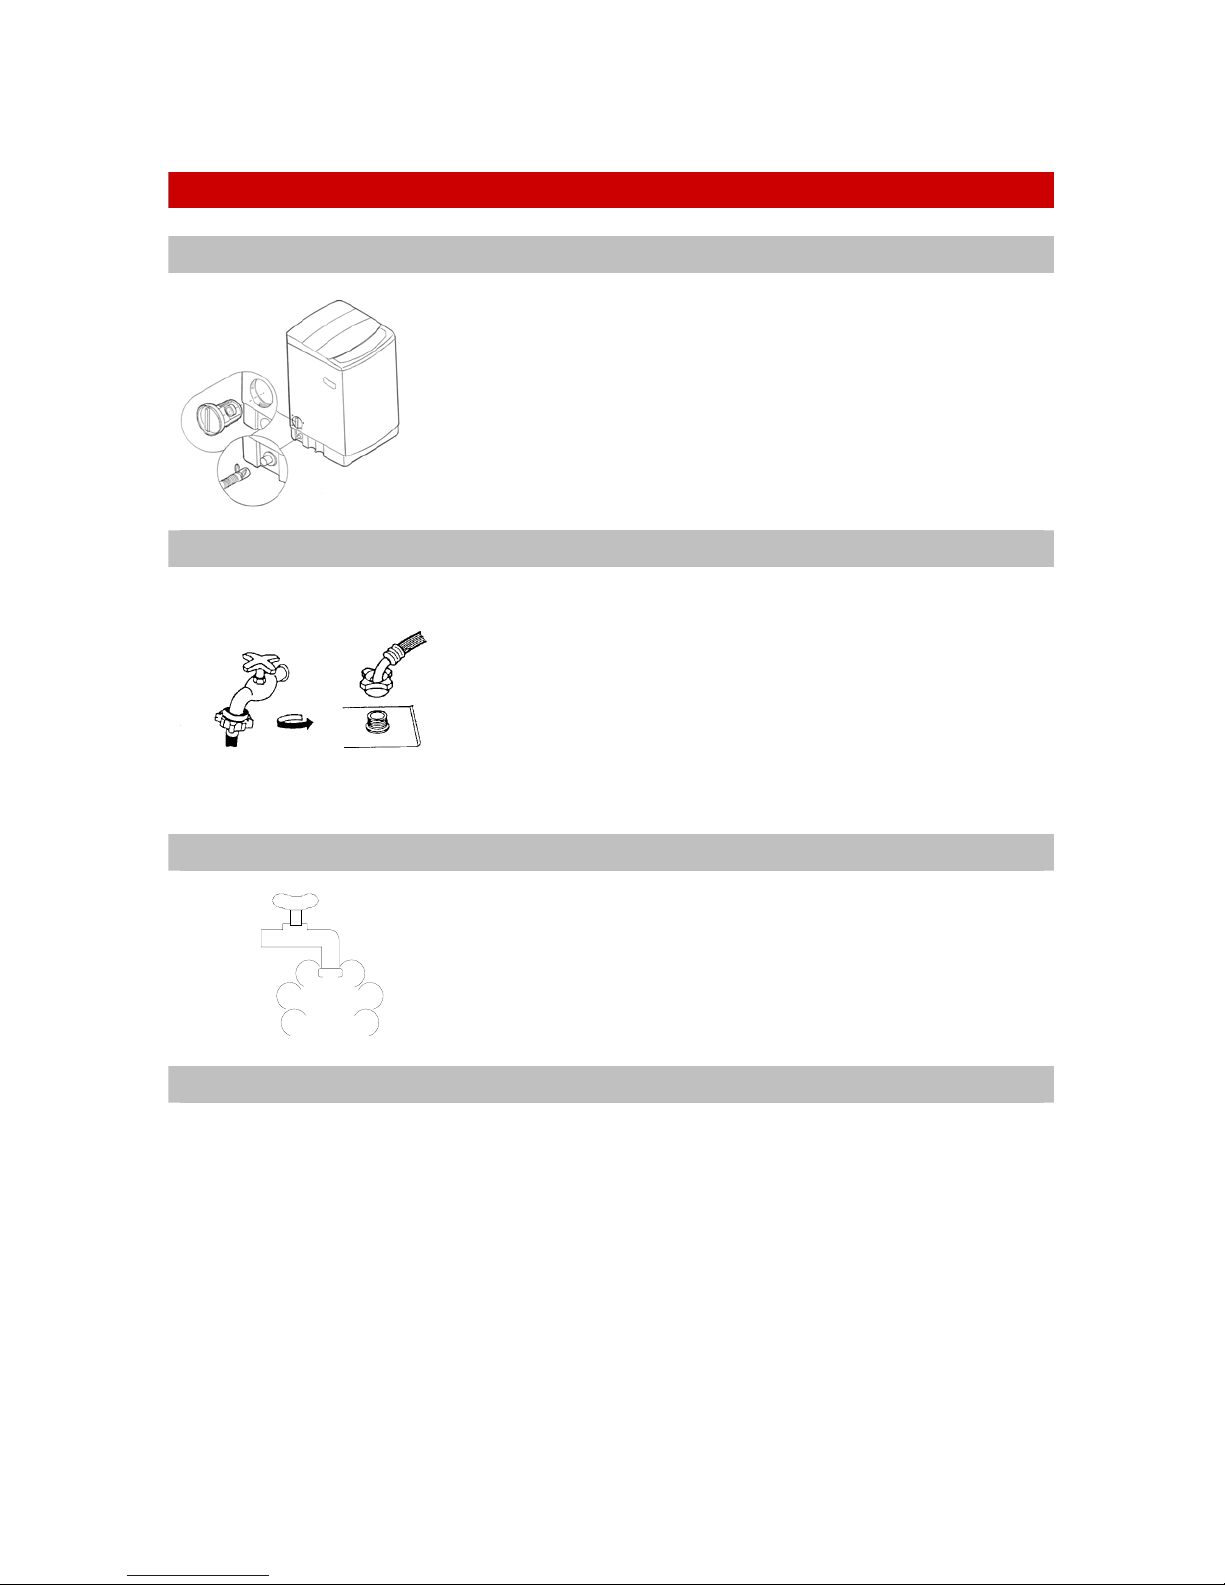
THE DRAIN HOSE
• Attach the drain hose to the drain outlet at the side of
the machine.
• Attach the looped end of the drain hose to an outlet
pipe, sink or suitable drain, the inlet of which should
be 1 metre or higher above floor level.
THE INLET HOSES
• Connect the inlet hoses to the machine inlet fittings. Left
for cold water and right for hot.
• Connect the respective inlet hoses to the hot and cold
water taps.
• Turn on the water taps and check for any leaks.
• Tighten fittings if necessary.
• Switch off the taps when the check is complete.
HOT WATER
• Do not use water hotter than 65 degrees Celsius.
• Very hot water could deform plastic parts of the
machine
ELECTRICAL CONNECTION
• The washing machine is designed to operate on a 230 Volt, 50 Hz, 15 Amp, AC power
supply.
• The machine should be connected to an earthed 3 pin wall socket.
• If the power-cord should ever need replacing, use only a genuine cord available from
the nearest Defy Service Centre.
The appliance must be earthed and the manufacturer and seller do not
accept responsibility for any damage due to incorrect electrical connection.
Page 4
PRECAUTIONS
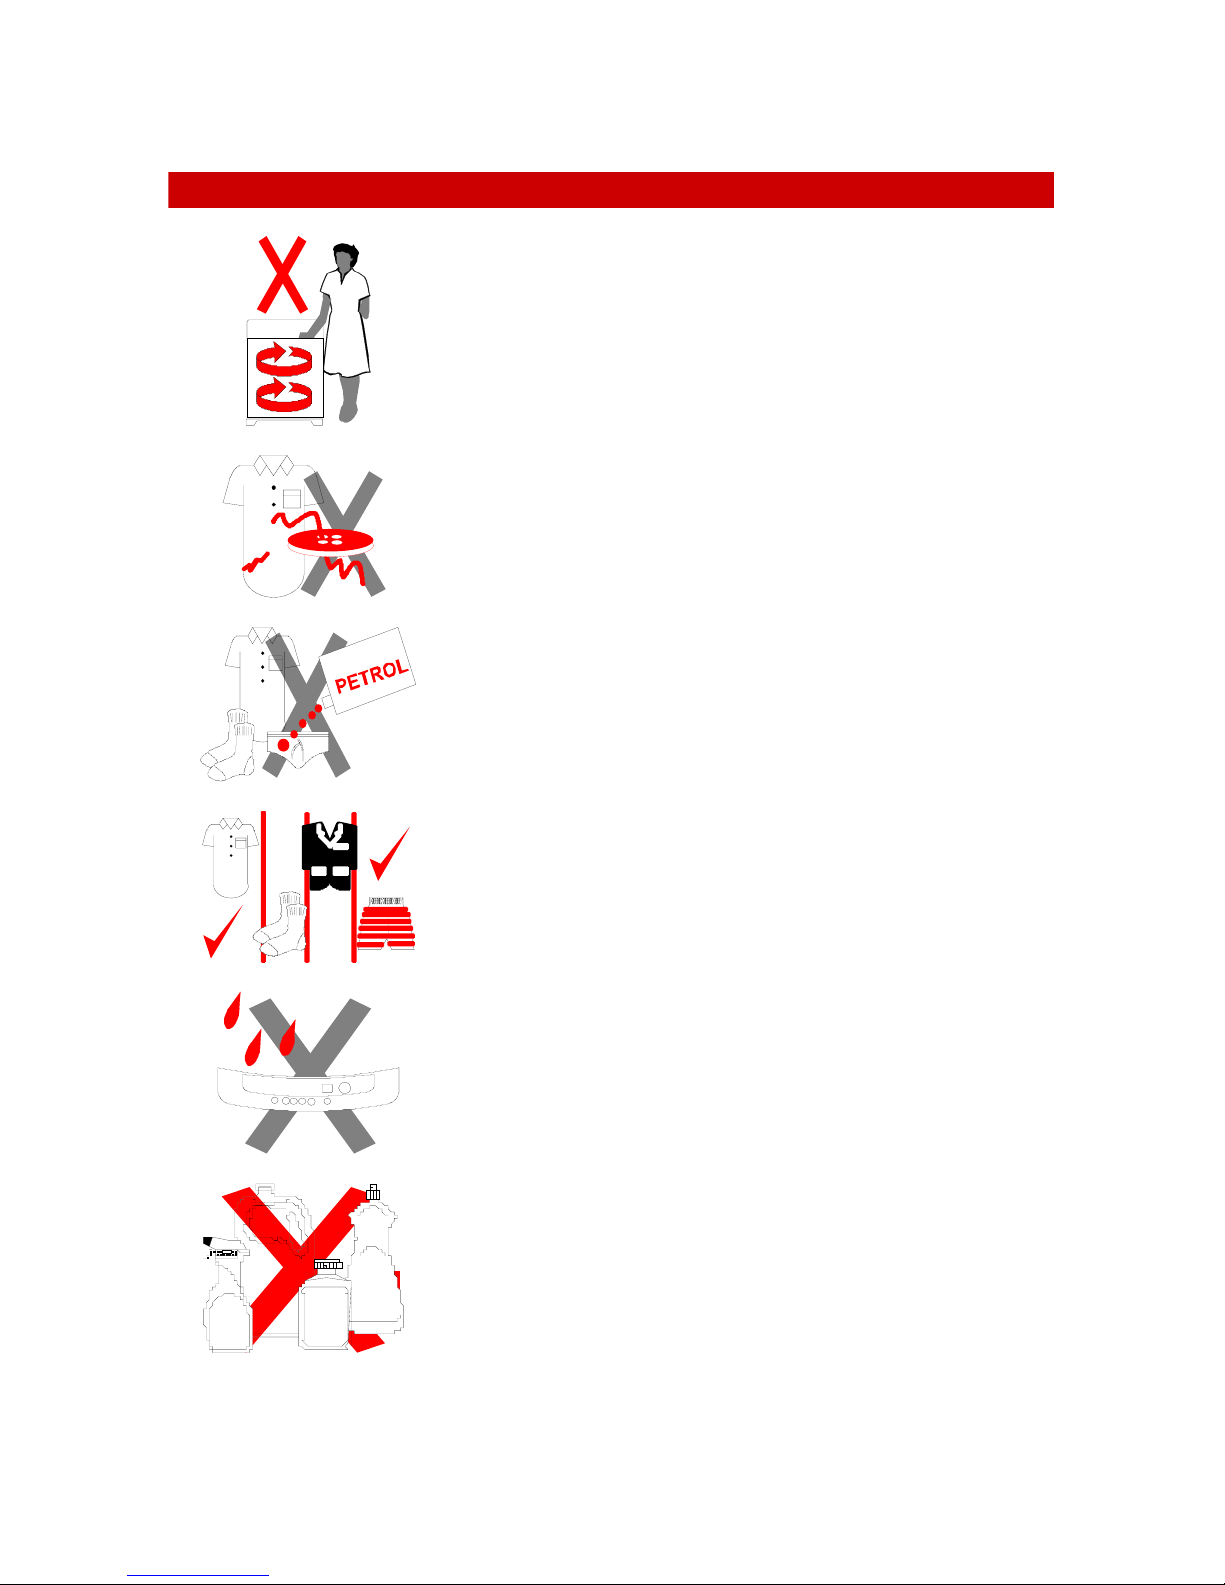
Do not touch the drum when it is rotating
Check all clothes for loose buttons and tears
Check pockets for coins, pins or other small
articles.
Do not wash clothes soaked in petrol, thinners, or
any other flammable liquids
Sort and separate clothes by fabric, colour and
degree of dirt
Avoid spilling water on to the control panel of the
machine
Do not use detergents which are not specifically
designed for top loading automatic washing
machines.
Page 5
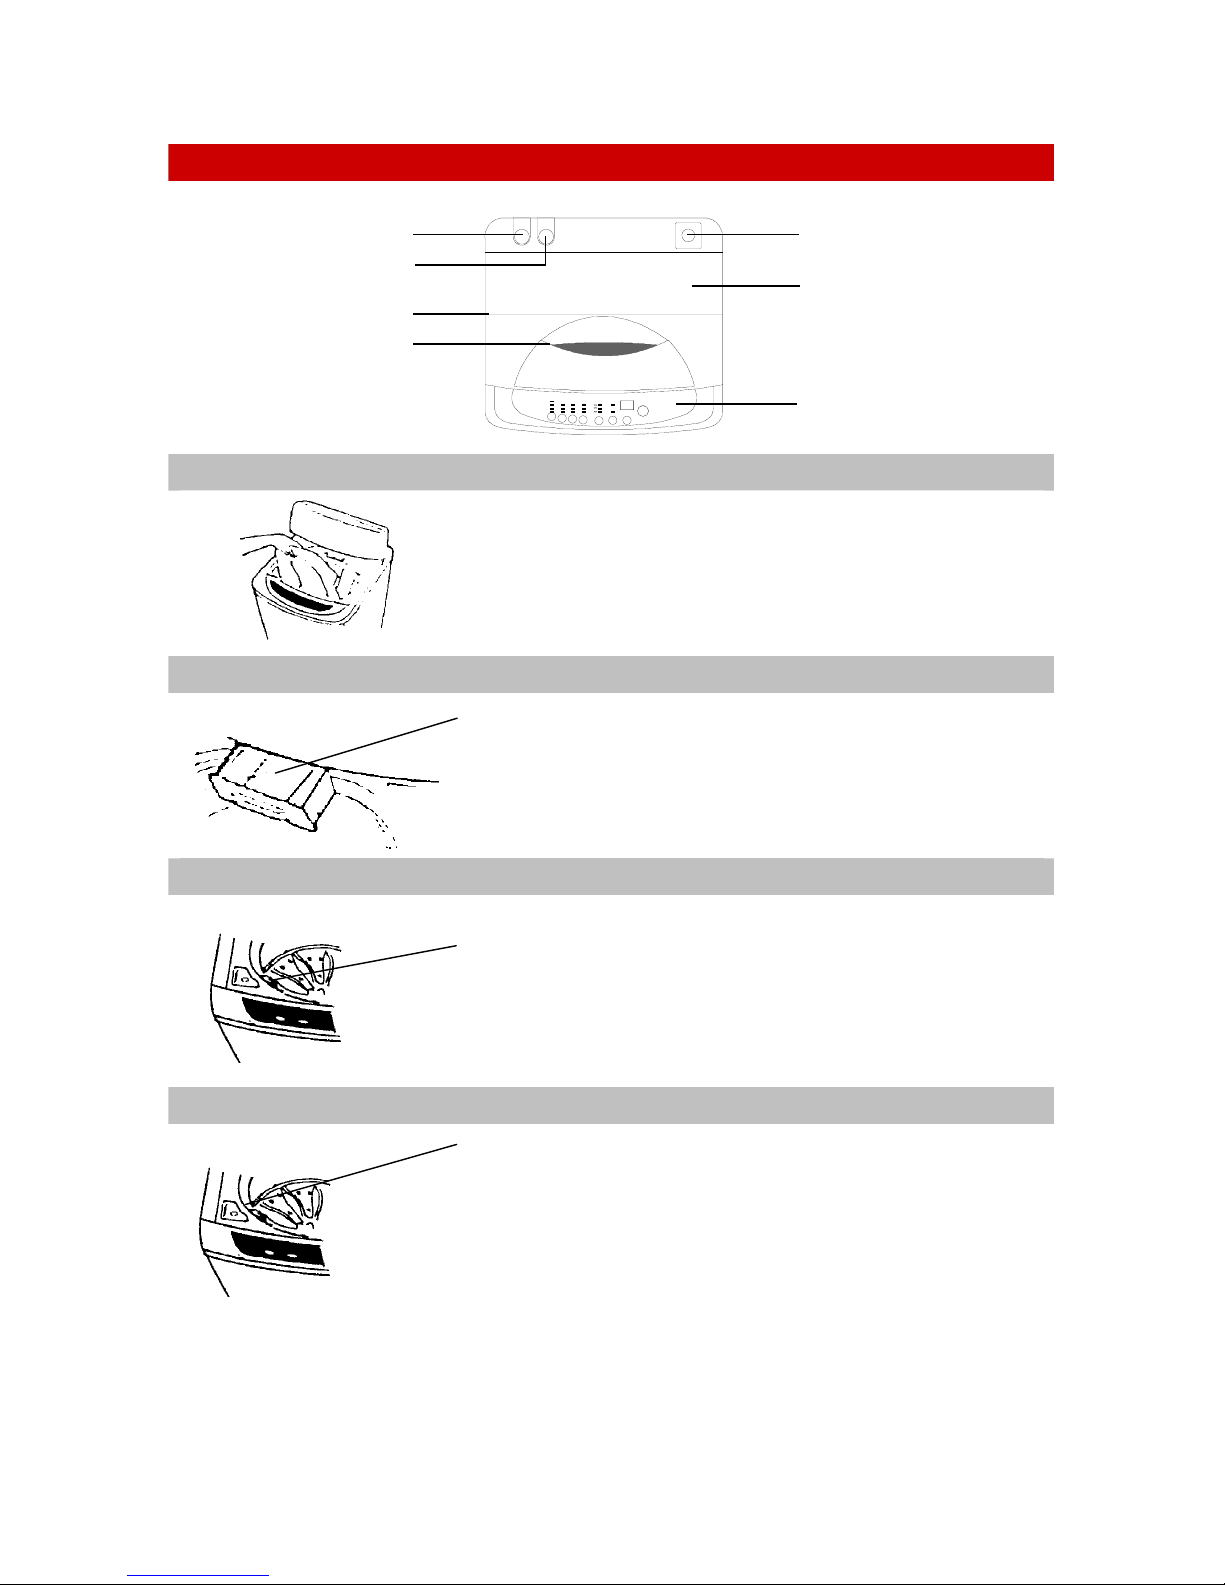
LOADING, DETERGENTS AND ADDITIVES
HOT WATER INLE T
COLD WATER INLET
FOLDING HINGE
LID HANDLE
POWER ON/OFF BUTTON
LID
CONTROL PANEL
LOADING
• Lift and fold the lid.
• Arrange the articles to be washed loosely round the
perimeter of the tub.
• Do not overload the machine
DETERGENT
• The detergent box is located at the rear of the top
surround.
• Pull the detergent drawer outwards and load the centre
compartment with detergent.
• Dose as per the detergent manufacturer’s directions.
SOFTENER
• Pour softener slowly into the depression on the tub rim
• Softener will automatically be dispensed during the last
rinse
• Do not open the lid during a spin cycle as this will
affect the timing of the softener introduction.
BLEACH
• Dilute bleach with water and slowly pour into the
bleach dispenser located on the top surround below the
Always refer to garment care labels for manufacturer's recommendations
lid.
• Be especially careful when using bleach with coloured
clothing.
Do not pour bleach directly into the tub.
NOTE:
Page 6

WATER LEVEL
• Select the water level required by pressing the WATER LEVEL button on the control
panel (LOW to HIGH)
• With a little experience you will soon know which levels best suit your requirements.
BEFORE ANY OF THE WASH OPTIONS ARE SELECTED YOU MUST FIRST:
• Insert the power plug into an earthed wall socket and switch on.
• Turn on the cold water tap, and depending on the water temperature required, the hot
water tap also.
• Load the washing into the machine.
• Add detergent and if necessary softener and bleach.
• Close the lid.
• NOTE: IT IS ESSENTIAL TO TURN ON THE COLD WATER TAP FOR ALL
PROGRAMMES. THE MACHINE RINSES IN COLD WATER EVEN WHEN
USING A HOT WASH.
COLD
HOT
OPTIONAL
WASH OPTIONS
The Defy Washmaid features a number of wash options.
The following section will explain the necessary steps to take for:
1. SELECTING A STANDARD WASH PROGRAMME
2. SELECTING AN AUTOMATIC PROGRAMME
3. CUSTOMISING A PROGRAMME
4. PRE-SET WASH TIME
5. SELECTING A FAST WASH PROGRAMME
Please follow the simple instructions and soon you will be able to operate the machine
from memory or use only your favourite programmes
Page 7

FUZZY LOGIC
This machine has Fuzzy Logic sensors. These enable it to evaluate each load placed in
the drum and to select and modify a wash programme to suit the load. Simply:
1 Load the machine.
2 Press the POWER switch
3 Press the START / HOLD button
The machine will start and complete a suitable programme.
At the end of the wash cycle a buzzer will sound 6 times
FUZZY
DO NOT USE FUZZY LOGIC PROGRAMMES FOR WOOLLEN OR
DELICATE GARMENTS.
STANDARD WASH PROGRAMME
PRESET
START
HOLD
3
1
POWER
WATER
LEVEL
WASH
TIME
SPIN
RINSE
TIME
WATER
AUTO
TEMP
2
The standard wash is the simplest and most convenient manual programme
1 Press the POWER switch
The water level is automatically set at HIGH or it can be manually selected as
required.
2 Select the water temperature
Press the water temperature button to select a COLD, WARM or HOT wash.
Both indicator lights will glow when WARM is selected.
3 Press the START / HOLD button
The machine will start and complete the selected programme..
At the end of the wash cycle a buzzer will sound 6 times
NOTE
Opening the lid will terminate the spin cycle and an alarm will sound.
The machine will not operate if the water does not reach the selected level.
If the START / HOLD button is not pressed after the POWER button has been pressed,
the machine will automatically switch off after about ten minutes
The water level can be changed at any time during the cycle.
Page 8

AUTOMATIC PROGRAMMES
START
WATER
WASH
LEVEL
TIME
POWER
SPIN
RINSE
TIME
WATER
AUTO
TEMP
Soak, Standard, Heavy, Fast and Wool programmes are stored in the machine’s
memory.
1 Press the POWER switch
The machine is ready to accept a programme selection.
2 Select the water temperature
Press the water temperature button to select a COLD, WARM or HOT wash.
Both indicator lights will glow when WARM is selected.
3 Press the AUTOMATIC button
Any of 5 automatic programmes may be selected according to material, and degree of
soiling.
SOAK, STANDARD, FAST, HEAVY or WOOL.
Press the button repeatedly until your choice is illuminated on the control panel.
4 Press the START / HOLD button.
The machine will start and complete the wash programme you have selected.
At the end of the wash cycle a buzzer will sound 6 times
NOTE
The automatic programmes may only be selected before the START / HOLD button is
pressed. If you wish to change the programme after the START / HOLD button has been
pressed, the power must be switched off and the sequence must be repeated afresh.
The SOAK programme takes about 32 to 44 minutes. Thereafter the
standard wash programme will commence.
HOLD
PRESET
Page 9

CUSTOMISING A PROGRAMME
PRESET
START
HOLD
5
1
POWER
WATER
LEVEL
4
WASH
TIME
RINSE
3
SPIN
TIME
WATER
AUTO
TEMP
2
You may customise programmes by using the wash, rinse and spin options.
1 Press the POWER switch
The machine is ready to accept a programme selection.
2 Select the water temperature
Press the water temperature button to select a COLD, WARM or HOT wash.
Both indicator lights will glow when WARM is selected.
3 Press the WASH, RINSE and SPIN buttons
A variety of programmes may be selected such as wash only, rinse only, spin only,
wash and rinse or rinse and spin.
4 Press the WATER LEVEL button
Select a suitable water level for the type and quantity of washing.
5 Press the START / HOLD button.
The machine will start and complete the selected programme.
At the end of the wash cycle a buzzer will sound 6 times
Page 10

PRE-SETTING THE END OF THE WASH TIME
PRESET
5
START
HOLD
6
1
POWER
WATER
LEVEL
WASH
TIME
SPIN
RINSE
TIME
WATER
AUTO
TEMP
3 4 2
Pre-setting the end time of the wash cycle allows washing to commence while you
are away and finish at a time convenient to yourself.
1 Press the POWER switch
The machine is ready to accept a programme selection.
2 Select the water temperature
Press the water temperature button to select a COLD, WARM or HOT wash.
Both indicator lights will glow when WARM is selected.
3 Select AUTOMATIC or CUSTOMISE a suitable programme
A variety of programmes may be selected
4 Press the WATER LEVEL button
If necessary, select a suitable water level for the type and quantity of washing.
5 Press the PRE-SET button
The Stop Time will increase by 1 hour increments every time the button is pressed.
For example: Pre-set 8 hours and the selected wash cycle will be completed in 8
hours time.
At the end of the wash cycle a buzzer will sound 6 times
6 Press the START / HOLD button.
The machine will complete the programme at the selected time.
The indicator lights will go out after 2 minutes only the pre-set light will remain on.
NOTE
After the START / HOLD button has been pressed, pre-set time can only be altered by
switching the power off and on and then repeating the selection procedure
Page 11

SELECTING A FAST WASH PROGRAMME
PRESET
START
HOLD
4
1
POWER
WATER
LEVEL
WASH
TIME
SPIN
RINSE
TIME
WATER
AUTO
TEMP
3 2
A Fast wash is suitable for when you’re in a hurry or for articles which are only
slightly soiled
1 Press the POWER switch
The machine is ready to accept a programme selection.
2 Select the water temperature
Press the water temperature button to select a COLD, WARM or HOT wash.
Both indicator lights will glow when WARM is selected.
3 Press the AUTOMATIC button repeatedly
and select FAST wash
4 Press the START / HOLD button.
The machine will start and complete the selected programme.
At the end of the wash cycle a buzzer will sound 6 times
NOTE
A fast wash programme automatically sets the water level in the machine at LOW.
The wash time is set at 3 minutes with 1 rinse—overflow and 2 minutes of spin.
However, wash time and spin time may be altered prior to pressing the START / HOLD
button.
AT THE END OF A WASH CYCLE A BUZZER WILL SOUND 6 TIMES
• The machine will stop and power will be switched off automatically.
• Turn off the water taps and remove the washing from the machine.
• As a safety precaution, unplug the power plug from the wall socket.
Page 12

MAINTENANCE
CLEANING THE LINT FILTER
• The machine has been designed with a re-circulating water flow. Lint will be trapped
and collected in the lint filter during the wash cycle.
• The filter should be cleaned after every wash cycle to ensure optimum working
conditions.
To remove the lint filter,
hold the frame and pull it
upwards
Turn the filter inside-out
and wash it to remove the
lint deposit
To replace the lint filter,
insert the frame into the
locating grooves and push it
firmly downwards
CLEANING THE DRAIN FILTER
Clean the drain filter weekly or if the ‘E2’ fault code appears
in the display window.
To access the filter, unscrew and withdraw it.
Re– fit the filter after cleaning.
CLEANING THE MACHINE
• The surfaces of the machine need very little attention.
• Periodically wipe the inside of the drum and then the outer cabinet with a damp cloth.
• An occasional polish of the outside panels with a good furniture wax will maintain
the glossy finish.
• Do not use wax or any household cleaner on the control panel.
TECHNICAL SPECIFICATIONS
POWER SUPPLY 230V / 50Hz
POWER INPUT 445W
WASHING CAPACITY 6.5kg
SPIN CAPACITY 6.5kg
WATER PRESSURE 0.03Mpa-1Mpa
NET WEIGHT 39kg
Page 13

SELF DIAGNOSTIC PROBLEM DISPLAY
• The machine has a self diagnostic capability and can therefore identify problem areas.
• In the event of a failure, a code will appear in the time indicator window.
• Please check the code against the following list and take the required action.
DISPLAY CAUSE ACTION REQUIRED
E1
E2
E3
E4
LU
E6
F0
F2
F8
BLOCKED WATER INLETOR
WATER FLOW IS IMPEDED
WATER HAS NOT DRAINED
COMPLETELY
LID HAS NOT BEEN CLOSED
WHILE MACHINE IS ON SPIN
CYCLE
OUT OF BALANCE LOAD RE-DISTRIBUTE CLOTHING EVENLY
THE SUPPLY VOLTAGE IS
TOO LOW
INSUFFICIENT PRE-SET
TIME
POWER SWITCH IS OUT OF
ORDER
TROUBLE WITH E PROM ASK FOR REPAIR
CLOTHING WEIGHT SENSOR
IS BROKEN
CHECK INLET HOSE FOR KINKS.
OPEN TAP MOREASK FOR REPAIR
CHECK DRAIN HOSE ASK FOR
REPAIR
CLOSE LID
AROUND THE TUB
MACHINE WILL OPERATE ONCE
VOLTAGE HAS STABILISED
INCREASE PRE-SET TIME
REPAIR OR REPLACE SWITCH
ASK FOR REPAIR
F9
WATER LEVEL SENSOR IS
BROKEN OR IT’S PLUG IS
LOOSE
ASK FOR REPAIR
Page 14

PROBLEM SOLVING
PROBLEM CHECK...
NO WATER ENTERS
THE MACHINE
THE MACHINE WILL
NOT WASH
ABNORMAL DRAINING
THE MACHINE WILL
NOT SPIN
Also please check the following points:
1. Check that the cord is plugged in and that the wall socket is switched on.
2. Check that there is power to the wall socket by testing the socket with a small electric
appliance such as a kettle or hairdryer.
3. Check that the lint filter has been cleaned.
If you have followed the instructions and still have a problem, contact the nearest
Defy Service Centre. They will be able to advise you on any aspect of the machine or
send a qualified technician to repair it.
The Manufacturer strives for continuous improvements. For this reason, the text and
illustrations in this book are subject to change without notice.
• That the power is on and a fuse has not blown.
• That there is a water supply to the home.
• That the water supply is at normal pressure.
• That the intake is not blocked by deposits or dirt.
• That the intake valve is not malfunctioning (a slight
electro-mechanical click should be heard immediately
after the power is switched on.
• That the START / HOLD button has been pressed.
• That the power is on and a fuse has not blown.
• That the supply voltage is not too low
• The water in the tub has reached the set level
• That a pre-set programme has not been selected, in
which case the machine will only operate at a set time.
• That the drain hose is not blocked or kinked.
• That the end of the drain hose is not under water.
• That the outlet end of the drain hose is 1 metre. above
floor level
• That the drain pump is operating.
• That the lid has been closed.
• That the load is balanced.
• That the machine is standing firm and level
Part No. 062 020
 Loading...