

Page 1
OWNER’S
MANUAL
29 LITRE
DMO 336
Stainless Steel
www.defy.co.za
YOU CAN RELY ON DEFY
CONVECTION
MICROWAVE OVEN
WITH GRILL
INDEX
2 Introduction.
2 How microwaves work.
2 Precautions.
2 Electrical installation.
3 Installation.
3 Safety tips and instructions.
4 The control panel.
5 Features.
6 Accessories and their use.
7 Setting the clock.
7 Child lock.
8 Power save mode.
8 Operation.
8 Operational notes to remember.
9 Microwave cooking.
9 Power level table.
10 Grilling.
11 Convection cooking with pre-heat.
12 Convection cooking –Traditional.
13 Combi cooking.
14 Weight defrost.
14 Time defrost.
15 Auto cook.
16 Auto cook menu.
17 Approved utensils.
18 Speedy cook.
18 How to stop the oven.
18 Warning messages.
18 Arcing.
19 General guide lines.
20 Cleaning and maintenance.
21 Problem solving.
21 Technical specifications.
22 Questions and answers.
23 Service centres.
24 Warranty.
Page 1
Page 2

Introduction.
You are now the owner of one of the finest and
most modern microwave ovens that today’s technology can produce. You are going to make a
great team together, but first you must familiarise
yourself with the product.
How Microwaves work.
Microwaves are high-frequency electromagnetic
waves closely resembling ordinary daylight or
radio waves. But whereas radio waves vary in
length from 1 metre to many kilometres, microwaves are only about 12.5 cm long.
A magnetron converts electrical energy into microwaves. The microwaves are not hot, so there is
no heat in the microwave oven. The microwaves
penetrate the food and provide energy which vibrates the water molecules present in the food.
This incredibly rapid vibration produces extreme
heat which cooks the food.
Please take some time and read through this manual carefully. It will tell you all you need to know
about your new microwave oven, what it will do
and how to do it. We wish you many happy years
of cooking.
This explains the mystery of how hot food can
emerge from a cold oven.
Microwaves are not retained in the air or in the
food after the door is opened. Microwaves can
not penetrate metals, so the oven cavity is made
of metal. The oven door window is transparent
and is lined with a fine metal mesh which prevents the waves from passing through. The door
mechanism is designed in such a manner that the
oven will not operate if the door is open. During
manufacture, the microwave ovens are subjected
to stringent processes and testing to ensure that
microwave leakage does not occur.
Precautions.
1. Do not attempt to operate the oven if the
door is misaligned or bent, the hinges are
loose or broken or if the door no longer
closes properly. Report any damage to your
dealer or nearest Defy Service Centre.
They will be able to take the necessary corrective action.
2. Do not tamper with or attempt to bypass
the door safety interlocks.
3. Do not place or trap any object between the
front edge of the oven and the door.
Electrical installation.
15 Amp Earthed Wall Socket
4. Clean up any residue which may accumulate on the door’s inner sealing surface.
5. Liquids or foods should not be heated in
sealed containers as they might explode.
6. Do not allow children or the infirm to use
the oven without responsible supervision.
7. Any adjustment or repairs should only be
undertaken by a qualified service technician
• Microwave ovens operate off a 15A earthed
electrical socket and do not require specialised electrical installation. However improper earthing could result in electrical
shocks.
• If the supply cord is damaged it must be
replaced by a qualified service technician.
• The use of an extension cord is not recom-
mended but if one must be used, ensure that
the rating is equal or greater than that of the
appliance.
Page 2
Page 3

Installation.
1. Remove all packaging, including the protective film on the cabinet exterior.
2. Examine the oven for any damage. ( A misaligned door, broken door glass or a dent in
the cabinet)
3. If damaged, do not operate the oven and
notify your dealer or the nearest Defy Service Centre immediately.
4. The oven must be placed on a suitable flat,
level and stable surface capable of supporting the weight of the product.
Safety tips and instructions.
Do not use the oven for any purpose other
•
than for cooking food.
• Do not operate the oven when it is empty.
• Do not use the oven as a storage space.
• Do not operate the oven without the roller
guide and metal tray in position.
• Place the food in a microwave approved
cooking utensil and place it centrally on the
tray. Placing a heavy load near the perimeter of the tray could cause the tray to dislodge.
• Do not place food directly on the tray
unless the food is self contained and will
not spill. When cooking more than one
item, arrange the food so that the items are
evenly spaced.
• Monitor the oven when cooking food in
plastic or paper containers to avoid accidental ignition.
• Avoid using recycled paper products for
cooking as these could contain impurities
which could cause sparking.
5. Install the oven well away from Hi-Fi and
TV sets, as broadcast reception could be
affected.
6. Install the oven well away from heaters, or
water taps.
7. Allow an air space of at least 30mm around
the sides and rear of the oven and 100mm
above the oven for ventilation purposes.
8. Do not block any of the air vents on the
cabinet side and rear.
9. If the oven is not adequately vented , it may
overheat and this could lead to failure
eventually.
• Do not pop popcorn in the oven unless you
use microwave popcorn in an approved bag.
• Pierce or puncture the skins of non porous
foods such as egg yolk, sausages, pumpkins
and tomatoes before cooking.
• Do not place eggs or nuts in their shells in
the oven as they might explode.
• Remove all caps or lids when cooking food
in sealed containers.
• Always test the temperature of food and
drinks, especially feeding bottles and baby
food jars, before consumption, to avoid getting burnt.
• Microwave heating of beverages could re-
sult in delayed eruptive boiling, so care
should be taken when handling such containers.
• Never heat fat or oil in the microwave as
the temperature cannot be controlled and
combustion could result.
• Keep the oven and wave-guide cover clean
at all times. Remove all traces of fat or
grease as these could ignite the next time
the oven is used.
Page 3
Page 4
The Control panel.
Display: Cooking time, power lev el, indicators and pre-
1
sent time are displayed.
Blink Display
Auto Cook
2
Combi
3
Weight Defrost
4
Grill
5
MW
6
Time defrost
7
Convection
8
MW
Grill
Combi
Weight
Time
Auto Cook
Lock
Convection
g
Oven Operation
Microwave mode selected
Grill mode selected
Combination mode selected
Weight defrost mode selected
Time defrost selected.
Auto cook mode selected.
Safety lock on.
Convection mode selected.
Weight input mode selected.
Press to select cooking and re-heating
Press to select combination cooking.
Press to select defrosting by weight.
Press to select grilling
Press to Select the power level
Press to select defrosting by time
Select convection cooking and time
Clock
8
Jog dial knob
10
START /
11
COOK
STOP / CLEAR
12
SPEEDY
Press to set the clock
Rotate to set time, weight and
quantity.
Press to start a programme
Also used for speedy cook at full
power. Each press adds 30 seconds of
microwave cooking time.
Press to stop operat io n or to de let e
cooking data.
Page 4
Page 5
Features.
12
8
1 Door seal.
Prevents microwave leakage during
operation.
2 Oven vent.
Allows steam to escape from the oven.
3 Concealed Quartz Grill element.
Used for grilling and browning.
4 Oven cavity.
Features our concave reflex micro-
wave distribution system.
5. Oven light.
The light switches on automatically
whenever the oven is operating and
remains on when the door is open.
6 Door Safety Interlock system:
When the door is opened, the oven
magnetron will automatically shut off
and the oven will not function until the
door is closed again.
7 Electronic display panel:
Displays relevant information.
8 Door Handle
Pulling the handle opens the door and
stops the oven from operating.
3
1011121314
46
5
7
9
15
9 Wave guide and cover.
Distributes microwave energy
throughout the oven cavity.
10 Coupler.
Links the turntable motor shaft to the
roller guide and must remain in place
when cooking.
11 Roller guide.
Allows the metal tray to rotate freely
and must remain in place when cooking.
12 Turntable tray.
The tray must remain in place when
cooking.
13 Door viewing screen.
Allows light but not microwave energy
to pass through.
14 Door hooks.
These are part of the door lock safety
system.
15 Wire stand.
Acts as a pot stand for shallow dishes
when grilling.
Page 5
Page 6
Accessories and their use.
The roller guide.
The roller guide base should be securely fitted over
the coupler at the centre of the oven floor.
The roller guide must remain in the oven at all
times during cooking and should only be removed
for cleaning purposes.
The turntable tray.
Position the tray on top of the roller guide so the
groove in the tray locates snugly over the rollers.
During operation, the tray must always be in place
and will rotate clockwise or anti-clockwise.
The metal stand.
The microwave compatible stand is placed centrally on the tray and allows the food to be positioned closer to the grill.
Use the tray for Microwave cooking, Convection
cooking, Combi cooking, Auto cooking and Defrosting.
Use the wire stand for grilling.
Page 6
Page 7
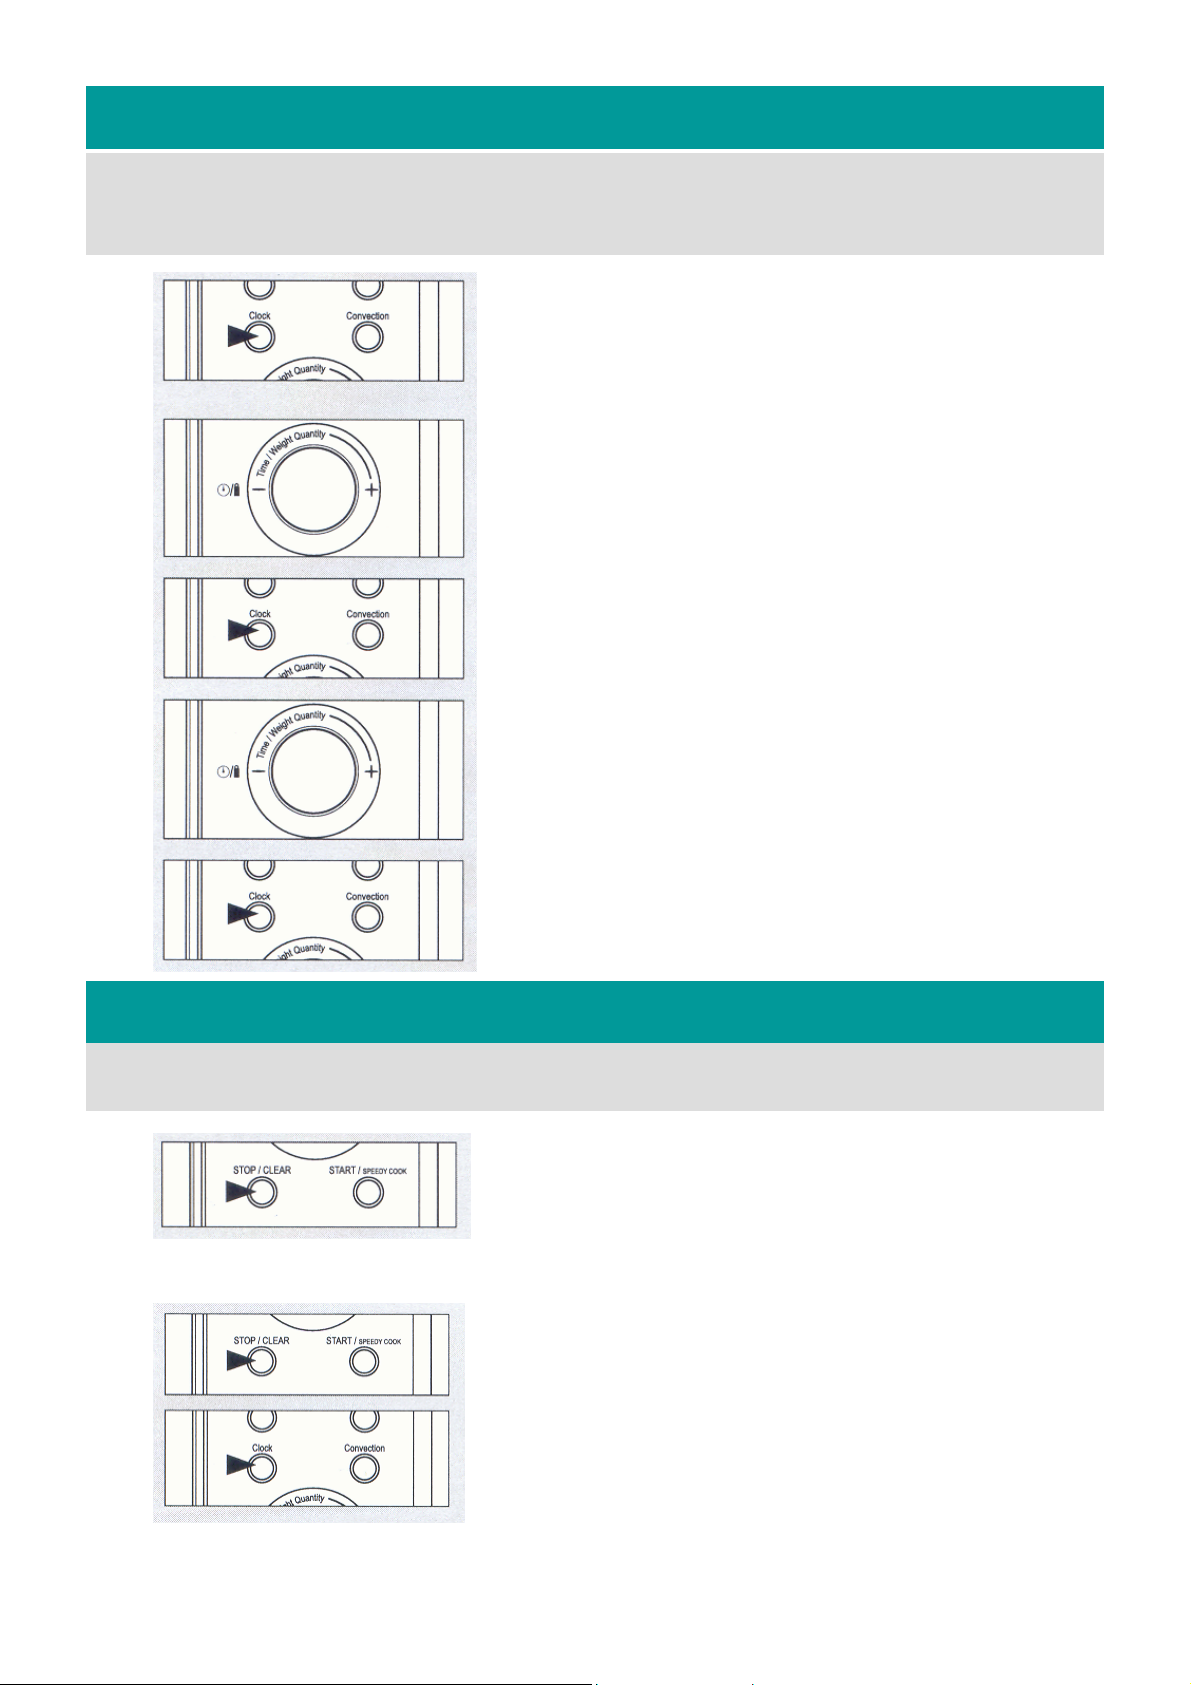
Setting the clock.
When the oven is first plugged in, the display will flash ”:0” and a tone will sound. If the power
should ever be interrupted, the display will show ”:0”when the power supply is restored.
The clock has a 12hour and a 24hour display. To set the clock, proceed as follows:
1
2
3
4
5
1. To select a 12 hour display, press the Clock button once.
12H is displayed.
2. To select a 24 hour display, press the Clock button once
more. 24H is displayed.
3. Turn the jog dial knob until the desired hour is displayed.
4. Press the Clock button.
5. Turn the jog dial knob until the desired minutes are dis-
played.
6. Press the Clock button.
7. The clock is now operational.
6
Child lock.
Activating the Child lock, will prevent the oven from being used.
To lock the controls, proceed as follows:
1. Press and hold the STOP/CLEAR button for 3 sec-
onds. The oven will beep and the lock indicator light
will glow.
2. To cancel the lock, press and hold the STOP/CLEAR
button for 3 seconds. The oven will beep, the lock in-
dicator light will switch off and normal use may resume.
Page 7
Page 8

Power save mode.
Power save mode switches the display off until required. Then the display will function normally
whenever the button is pressed or the dial is turned but if no further action is taken within a 10
second period, the display will clear.
1. Press the STOP/CLEAR button. “0” or the
clock will be displayed.
2. Press and hold the Clock button for 3 seconds.
The oven beeps and the display will clear.
3. To cancel power save, press and hold the
Clock button for 3 seconds. The display will
re-appears and the oven beeps.
OPERATION.
Operational notes to remember.
Safety tip.
At the end of the cooking cycle.
Opening the door.
Cancelling any operation.
Time setting.
Oven light.
1. While learning to operate the oven, place a cup
of water on the tray inside the oven. This will
absorb any microwave energy generated while
you experiment. Never switch the oven on when
it is empty.
2. At the end of a cooking cycle, the oven beeps 3
times, “0” or the clock is displayed, the oven light
switches off and the tray stops rotating.
3. The oven will beep every minute thereafter unless
the STOP/CLEAR button is pressed or until the
door is opened.
4. If the cooking period exceeded 5 minutes, the cool-
ing fan will continue to function for a few minutes
after the cooking has stopped and cool and “0” or
time of day will blink alternately in the display
until the cooling fan switches off.
5. Opening the door will interrupt any operation ex-
cept the cooling fan.
6. To cancel any operation, press the STOP/CLEAR
button. To resume the operation, press the START/
SPEEDY COOK button.
7. For cooking periods of up to 5 minutes, the time
set will be in 10 second increments.
8. For cooking periods of up to 10 minutes the time
set will be in 30 second increments.
9. For cooking periods of up to 60 minutes the time
set will be in 1 minute increments.
10. The oven light will only switch on when the oven
is operating or when the door is open.
Page 8
Page 9

Microwave cooking.
Microwave cooking allows you to set the desired power level and the duration of the cooking period.
The oven will automatically cook at 100% power unless a lower power level is selected.
To activate microwave cooking , proceed as follows:
1. Press the MW button. The MW indicator lights up.
“P-HI” is displayed.
2. Select the power level by pressing the MW button
repeatedly until the appropriate level is displayed
( from 100% to 10%).
3. Turn the dial knob to set the desired cooking time.
The selected time is displayed.
4. Press the START/SPEEDY COOK button. The
oven light switches on and the tray starts rotating.
5. Cooking commences and the remaining time is
counted down in the display.
6. The power level may be checked during the cook-
ing cycle by pressing the MW button The power
level will then be displayed for about 3 seconds.
7. At the end of the cooking period the oven will beep
3 times.
8. Open the door, remove the cooked food and press
the STOP/CLEAR button.
Power level table.
Power level
P-HI 100% 900W
90% 810W
P-90
P-80 80% 720W
P-70 70% 630W
P-60 60% 540W
P-50 50% 450W
P-40
40% 360W
P-30 30% 270W
P-20 20% 180W
P-10 10% 90W
Percentage
Output
P-00 0% 0W
Page 9
Page 10

Grilling.
Grilling enables you to heat and brown food quickly without using microwaves.
When used for the first time, the grill element will generate smoke and release an odour. We
therefore recommend that you heat the grill element for 10 minutes before placing food in the
oven. To activate grilling, proceed as follows:
1. Press the Grill button. The GRILL indicator lights
up.
2. Turn the dial knob to set the desired grilling time.
The selected time is displayed.
3. Press the START/SPEEDY COOK button. The
oven light switches on and the tray starts rotating.
4. Grilling commences and the remaining time is
counted down in the display.
5. At the end of the cooking period the oven will beep
3 times.
6. Open the door, remove the grilled food and press
the STOP/CLEAR button.
Warning:
During and for some time after grilling, the temperature inside the oven will be very hot. Do not touch the
oven w indow or the met allic interior when removing
food from the oven. Use oven gloves while handling
food or accessories.
Tips.
Suggestions Recommended cookware
• Grilling is ideal for toasting bread or muffins.
• Remember to use oven gloves when handling
food as the oven will be hot.
• Place the food on the wire stand.
• The closer the food is placed to the grill ele-
ment , the better the browning effect.
Use oven-proof cookware.
As there is no microwave energy generated, metal
dishes or plates may be placed on the wire stand
without the danger of arcing.
Page 10
Page 11

Convection cooking with pre-heat.
Pre-heating of the oven is recommended ( except for 40°C convection mode). The maximum preheating time allowed is 30 minutes. The convection indicator will blink and the pre-heated temperature will be displayed. If the cooking is not started immediately thereafter, the oven will
maintain the selected temperature for another 15 minutes and then switch off automatically.
To activate convection cooking with pre-heat, proceed as follows:
1. Press the Convection button. The Convection in-
dicator lights up. “110°C” is displayed.
2. Select the convection cooking temperature by
pressing the Convection button again until the appropriate temperature is displayed.
3. The temperature sequence reads from 110°C to
250°C in 10°C increments.
4. Press the START/SPEEDY COOK button. The
Convection indicator blinks. The pre-heating temperature and “PrE” blink alternately in the display.
When the selected pre-heat temperature is attained,
the oven will beep and the pre-heated temperature
will be displayed.
5. Open the oven door and place the food in the oven.
The oven temperature will be displayed.
6. Turn the dial knob to set the cooking time. The
selected time is displayed.
7. Press the START/SPEEDY COOK button. The
oven light switches on and the tray starts rotating.
8. Convection cooking commences and the remaining
time is counted down in the display. You can check
the oven temperature during the cooking process
by pushing the Convection button.
9. At the end of the cooking period the oven will beep
3 times.
10. Open the door, remove the cooked food and press
the STOP/CLEAR button.
Tips.
Suggestions Recommended cookware
• Use this mode of cooking for foods requiring
a pre-heated oven.
• Remember to use oven gloves when handling
food in the oven as the oven will be hot.
Page 11
Use oven-proof cookware.
As there is no microwave energy generated, metal
dishes or plates may be placed on the metal turntable tray without the danger of arcing.
Page 12

Convection cooking - Traditional cooking.
The convection oven may be used in the same way as a traditional oven. Microwaves are not used.
Always use oven gloves when handling food in the oven as dishes will be hot.
1. Press the Convection button. The Convection in-
dicator lights up. “110°C” is displayed.
2. Select the convection cooking temperature by
pressing the Convection button again until the appropriate temperature is displayed.
3. The temperature sequence reads from 110°C to
250°C in 10°C increments.
4. Turn the dial knob to set the cooking time. The
selected time is displayed.
5. Open the oven door and place the food in the oven.
6. Press the START/SPEEDY COOK button. The
oven light switches on and the tray starts rotating.
7. Convection cooking commences and the remaining
time is counted down in the display. You can check
the oven temperature during the cooking process
by pushing the Convection button.
8. At the end of the cooking period the oven will beep
3 times.
9. Open the door, remove the cooked food and press
the STOP/CLEARbutton.
Tips.
Suggestions Recommended cookware
• The convection mode is ideal for baking me-
ringues, biscuits, scones, bread, puddings,
large fruit cakes and all preserves.
• Remember to use oven gloves when handling
food in the oven as the oven will be hot.
Use oven-proof cookware.
As there is no microwave energy generated, metal
dishes or plates may be placed on the metal turntable tray without the danger of arcing.
Page 12
Page 13

Combi ( microwave + convection + grill cooking).
This function combines convection cooking with microwave cooking to give traditional baked or
roasted results in less time.
Always use microwave compatible and oven-proof cookware. Glass or ceramic dishes are ideal as
they allow even microwave penetration to the food.
Always use oven gloves when handling food in the oven as the oven and dishes get hot.
1. Press the Combi button once. The Combi indica-
tor lights up and “C-0” is displayed.
2. Press the Combi button repeatedly to select the de-
sired power level.
• C-0 = 40% power
• C-HI = 50% power
• C-LO = 30% power
• NOTE: in sequential mode only C-0 can be se-
lected
3. Press the Convection button once. 110°C is dis-
played.
4. Press the Convection button repeatedly to select
the appropriate temperature. The temperature sequence reads from 110°C to 250°C in 10°C increments.
5. Turn the dial knob to set the cooking time. The
selected time will be displayed.
6. Press the START/SPEEDY COOK button. The
oven light switches on and the tray starts rotating.
7. At the end of the cooking period the oven will beep
3 times.
8. Open the door, remove the cooked food and press
the STOP/CLEAR button.
NOTE:
You can check the cooking temperature while cooking is in progress by pressing the Convection button.
The display will show the cooking temperature for 3 seconds.
Page 13
Page 14

Weight defrost.
This function allows accurate defrosting of meat, poultry, fish and bread.
Simply enter the weight of the food and the oven will select the correct defrosting time.
During defrosting, the oven will beep as a reminder to open the door, turn the food over, close the door
and press the START/SPEEDY COOK button.
Always use microwave compatible cookware.
1. Press the Weight Defrost button. The Weight De-
frost indicator lights up, “0” is displayed and the
“g” indicator blinks.
2. Turn the dial knob to set the weight. Weight can
be set from 200g to 3000g in 50g increments The
selected weight is displayed.
3. Press the START/SPEEDY COOK button. The
oven light switches on and the tray starts rotating.
4. Defrosting commences and the remaining time is
counted down in the display.
5. Attend to the food (turn over) at the sound of the
beep.
6. At the end of the defrosting period the oven will
beep 3 times.
7. Open the door, remove the defrosted food and
press the STOP/CLEAR button.
Time defrost.
During defrosting, the oven will beep as a reminder to open the door, turn the food over, close the door
and press the START/SPEEDY COOK button.
Always use microwave compatible cookware.
1. Press the Time Defrost button. The Time Defrost
indicator lights up and “0” is displayed.
2. Turn the dial knob to set the defrosting time. The
selected time is displayed.
3. Press the START/SPEEDY COOK button. The
oven light switches on and the tray starts rotating.
4. Defrosting commences and the remaining time is
counted down in the display.
5. Attend to the food (turn over) at the sound of the
beep.
6. At the end of the defrosting period the oven will
beep 3 times.
7. Open the door, remove the defrosted food and
press the STOP/CLEAR button.
Page 14
Page 15

Auto cook.
Selecting the auto cook function allows you automatically cook a range of popular foods.
Remember to use oven gloves when handling food in the oven as the dishes and the oven get hot.
1. Press the Auto cook button once. Th Auto cook
indicator lights up and “AC-1” will be displayed
2. Select a menu by pressing the auto cook button
until the appropriate menu is displayed. Refer to
the auto cook menu chart below.
3. Turn the dial knob to set the weight. The selected
weight is displayed.
4. Press the START/SPEEDY COOK button. The
oven light switches on and the tray starts rotating.
5. Auto cooking commences and the remaining time
is counted down in the display.
6. At the end of the cooking period the oven will beep
3 times.
7. Open the door, remove the food and press the
STOP/CLEAR button.
Auto cook menu chart
AC menu
No.
AC1 Press once
AC2 Press twice
AC3 Press 3 times
AC4 Press 4 times
AC5 Press 5 times
Auto cook
button
Auto cook menu Minimum
ROAST PORK
ROAST BEEF
ROAST CHICKEN
BAKED FISH
FRESH
VEGETABLES
Maximum
weight
500g 2000g 100g
500g 2000g 100g
800g 3000g 100g
300g 900g 100g
100g 900g 50g
weight
Weight
Increments
Page 15
Auto Cook Menu on next page
Page 16

Auto cook menu .
Menu Start
Temperature
Roast pork
Roast beef
Roast
chicken
Chilled 1. Tie the joint into a neat shape.
Chilled 1. Wash and dry the chicken. Tie the legs loosely
Method Cookware
Place the pork or beef
2. Place the meat directly onto the metal tray.
3. Brush with a little oil.
4. Cook on auto cook ROAST PORK or ROAST
BEEF.
5. Turn over when prompted by the oven beep.
6. Remove from the oven and drain off any excess juices.
7. Let stand for 10 minutes before carving.
together with string.
2. Pierce the skin a few times just under the legs.
3. Brush the butter mixture all over the chicken.
4. Place the chicken directly onto the metal tray.
5. Cook on auto cook ROAST CHICKEN.
6. Turn over when prompted by the oven beep.
7. Remove from the oven. Drain off any excess
juices. Season with salt if required. Allow to
stand for 10 minutes before carving.
directly onto the metal
turntable tray.
Place the chicken
directly onto the metal
turntable tray.
Baked fish
Fresh
vegetables
Chilled 1. All fish whether whole, filleted or steaks.
(except battered or crumbed)
2. Place the prepared fish in a buttered dish.
3. Season with salt and pepper, sprinkle lemon
juice and dot with butter. Do not cover the
dish.
4. Cook on auto cook BAKED FISH.
1. Wash and trim.
2. Place the prepared vegetables in a suitable
container.
3. Sprinkle with 4-5 tablespoons of water
4. Cover with pierced cling film or a lid.
5. Place the dish on the metal tray.
6. Cook on auto cook FRESH VEGETABLES.
7. For best results, cut the vegetables into similar
sized pieces.
Use a microwave heatproof shallow dish
eg. Pyrex and place it
directly on the metal
turntable tray
Use a microwave heatproof dish
eg. Pyrex and place it
directly on the metal
turntable tray
Page 16
Page 17

Utensils should be approved for use in a microwave oven.
MATERIAL GRILLING MICROWAVE
COOKING
Glass (general). NO YES (1) NO
Glass (heat resistant). YES YES YES
Ceramic (heat resistant). YES YES (1) YES (1)
Earthenware. YES YES YES
China (heat resistant). YES YES (1) YES (1)
Plastic (general). NO YES (2) NO
Plastic (heat resistant). YES (2) YES (2) YES (2)
Aluminium foil
(containers).
Aluminium foil. YES YES (3) YES (3)
Metal baking tins. YES (4) NO YES (4)
Metal (pots and pans). YES NO NO
Cleaning ALWAYS UNPLUG THE OVEN AT THE WALL SOCKET BEFORE CLEANING
Paper. NO YES NO
YES NO NO
COMBI
COOKING
1. Without metal parts, trims or gold leaf.
2. Some plastics are heatproof only to a certain temperature. Check carefully.
3. It is permissible to use aluminium to shield certain areas of delicate food to prevent
overcooking but use small pieces only.
4. Metal tins may be use in combination cooking however if these are very deep, they
will greatly reduce efficiency as the metal will shield the contained food from microwave energy.
Page 17
Page 18

Speedy cook.
Selecting speedy cook, enables the oven to operate immediately at full power. Pressing the
START/SPEEDY COOK button repeatedly increases the time by 30 second increments
To set the memory, proceed as follows:
1. Press the START/SPEEDY COOK button. 30
seconds are displayed
2. To increase the time by 30 second increments,
press the START/SPEEDY COOK button repeatedly until the desired time is displayed.
3. Cooking commences and the remaining time is
counted down in the display.
4. At the end of the cooking period the oven will beep
3 times.
5. Open the door, remove the food and press the
STOP/CLEAR button.
To stop the oven when it is operating.
1 Open the door.
• The oven stops operating
• The oven may be re-started by closing the
door and pressing the START/SPEEDY
COOK button.
Warning messages.
2 Press the STOP / CLEAR button.
• The oven stops operating.
• If you wish to cancel the setting, press the
STOP /CLEAR button once more.
• If not, pressing the START/SPEEDY
COOK button will resume operation.
• This message is displayed if the temperature
inside the oven is too hot or if the sensor inside the oven is faulty.
• Unplug the unit and call the nearest Defy
Service Centre.
Arcing.
• Arcing is the term used for sparking inside
the oven. Arcing may be caused by:
• Metal or foil touching the oven walls.
• Foil not moulded to the food can act like an
antenna.
• Metal ties, poultry pins or gold rimmed
dishes
Page 18
• Recycled paper towels sometimes contain
small metal particles.
• An incorrectly fitted turntable tray touching
the door or oven walls
• If you see arcing, press the STOP/
CLEAR button and correct the problem.
Page 19

General guide lines.
Since microwave cooking differs from traditional cooking, the following guidelines should
considered when using the oven.
If the food is undercooked.
Check if the correct power level was selected.
Check that the time selected was sufficient.
Remember, recipes are only approximate and
times may differ depending on weight, density,
initial temperatures and so forth.
Check to see if the container was appropriate for
the type of meal being cooked.
If the food is dried out, overcooked or burnt.
Check if the correct power level was selected.
Check if the time selected was too long
Remember, recipes are only approximate .
Points to remember when defrosting.
The shape of the food alters defrosting time.
Shallow rectangular shapes defrost faster than
deep spherical shapes.
Separate pieces or slices as they defrost to speed
up the process.
Shield sensitive food areas with thin strips of aluminium foil to prevent premature cooking.
Defrosting works best when the food is thawed in
the oven and allowed to defrost completely during a standing time.
Quantity of food.
The more food you wish to cook, the longer it
takes. Double the quantity takes nearly double the
time. For example, a single potato might take four
minutes to cook while two potatoes require seven
minutes.
Starting temperatures.
The lower the temperature of the food placed in
the oven, the longer the time required to cook it.
Food at room temperature will cook quicker than
refrigerated food.
Composition of the food.
Food with a high fat or sugar content will heat up
faster than food containing a lot of water. Fat and
sugar will also achieve a higher temperature during the cooking process than water.
The more dense the food, the longer it takes to
cook. Meat for example takes longer to heat than
sponge cake.
Size and shape
Smaller pieces will cook faster than larger pieces
and uniform pieces will cook more evenly than
irregular pieces.
Thin parts will cook faster than thicker parts.
Place the thinner chicken wings and legs nearer
the centre of the tray.
Stirring and turning the food
Stirring and turning are techniques used in conventional as well as microwave cooking. It allows
heat to distribute more quickly and avoids overcooking at more exposed areas.
Covering the food
Covering the food with perforated cling wrap or
pot lids, reduces splatter, shortens cooking times,
and retains moisture. All materials which allow
the passage of microwaves are suitable.
(see utensil guide)
Releasing pressure in foods
Several foods are covered with a membrane.
Steam builds up under the membrane and these
foods should be pricked with a fork or cocktail
stick to release pressure and prevent them from
bursting. Typical examples of these foods are potatoes, chicken livers, sausages, egg yolks, and
certain fruits.
Standing time.
Experience has shown that standing time , after
using the oven, always improves results as it allows heat to be evenly distributed prior to consumption.
In a microwave, food continues to cook even
when the microwave energy is turned off.
The reason for this is the transfer of heat from the
food centre through a conduction process.
The length of standing time is dependent on the
volume and density of the food and may range
from 1 to 10 minutes. Generally the larger dense
foods need more standing time.
Page 19
Page 20

Cleaning and maintenance.
Door.
Wipe off any splatter while the door is still
warm, using a soft damp soapy cloth or sponge.
Rinse with a clean damp cloth and dry.
Steam or condensation is generated during the
cooking process . This is normal and not detrimental to the oven. If it proves hindersome however it may be wiped up with a clean cloth.
Interior.
The oven interior is made of stainless steel. In
order for it to retain it’s natural shine and lustre,
spills and splatter should be cleaned as they occur, or soon after cooking.
Wipe with a mild liquid detergent and a damp
cloth or sponge. Rinse with a clean damp cloth
and dry.
More aggressive spills may be cleaned with a
non abrasive detergent and a nylon scouring pad
but be careful not to scratch the surface.
Two quartz grill elements are located above the
ceiling of the oven and are visible through the
pattern of holes. Do not attempt to touch or clean
the elements.
Roller guide and steel tray.
These may be removed for cleaning. The tray is
dishwasher proof. If food spills accumulate under
the rotating tray, it could compromise the oven
efficiency. Be sure to wipe up any spills in this
area. Ensure proper installation after cleaning.
Note:
Do not use any other turntable tray in the oven.
Do not operate the oven without the roller guide
or turntable tray in position.
Note:
Although the oven is equipped with all the necessary safety features, it is still important to observe
the following:
1. Do not tamper with the door safety interlocks.
2. Do not place any object between the door and
the front face of the oven.
3. Do not allow dirt to accumulate between the
front face of the oven and the door.
4. Wipe the sealing area frequently with a damp
cloth. Never use abrasive powders or pads.
5. Do not subject the opened door to any strain. A
child swinging on the door could distort it or
cause the oven to topple over.
6. Do not operate the oven if it is damaged, if the
door is bent, if the hinges are loose or broken
or if the door does not seal properly.
7. The door should never be adjusted by any
other than a qualified service technician.
Control panel.
Exercise care when cleaning the control panel.
Avoid scrubbing or using any household cleaner.
Wipe with a slightly damp cloth and dry.
Exterior.
Clean with a damp soapy cloth or sponge.
Rinse with a damp cloth and dry.
Do not use any abrasive cleaners.
Page 20
IMPORTANT
Do not use a steam cleaner, scourers, abrasives, caustic cleaners, alcohol, thinners, volatile liquids or oven cleaners on any part of the
appliance.
Page 21

Problem solving.
If you experience a problem, , please check the chart below. If the problem cannot be rectified in
this manner, please consult your nearest Defy Service Centre for assistance.
PROBLEM
SOLUTION
HAS THE
START/SPEEDY COOK
OVEN WILL NOT START
ARCING OR SPARKING
UNEVENLY COOKED FOOD
OVERCOOKED FOOD
UNDERCOOKED FOOD
INCOMPLETE DEFROSTING
BUTTON BEEN PRESSED?
IS THE POWER CORD PLUGGED IN?
IS THE DOOR CLOSED?
SET THE COOKING TIME ( CLOCK SET)
USE APPROVED COOKWARE ONLY
DO NOT OPERATE THE OVEN WHEN EMPTY
TURN THE DIAL KNOB OR PRESS CORRECT FUNCTION BUTTONS
CHECK TO SEE THAT THE OVEN VENTILATION SLOTS ARE NOT OBSTRUCTED
Note: It is normal for steam to escape and be
visible around the door during the cooking cycle. The door is designed to prevent microwave
leakage and is not intended to seal the oven
cavity completely.
X X X X
X X
X X X X X
X
X X X X
X X X X X
ONLY USE THE SUPPLIED TRAY
TURN OR STIR THE FOOD
COMPLETELY DEFROST FOOD
INITIATE MANUAL COOLING FOR 10 MINUTES
Caution: Do not attempt to operate an empty
oven as this will damage the oven.
Do not block the exhaust vent at the rear and
side of the cabinet.
TECHNICAL SPECIFICATIONS
Power supply
Microwave power consumption
Microwave output power
Microwave frequency
Grill power consumption
Convection power consumption
Combination heating power consumption
Outside dimensions in mm. (W x H x D)
Oven cavity dimensions in mm. (W x H x D)
Select function
Microwave power levels
Net weight
Timer
Page 21
230V –50Hz
1450W
900W (IEC 705)
2,450 MHz
850W
2250W
2950W
542 x 330 x 490 ( excluding 30mm handle depth)
350 x 230 x 350
18 kg approx.
60 minutes
Microwave / Grill / Convection / Combination
10 Stages
Page 22

Questions and answers.
I accidentally operated my microwave without
any food in it. Is it damaged?
We do not recommend operating the oven without any food in it. However running it for a
SHORT period should not damage the oven.
Can I open the door while the oven is operating?
The door may be opened at any time during the
cooking process. Microwave energy will instantly
be switched off and the time setting will be remembered until the door is closed again.
Does microwave energy pass through the door
screen?
No. Light is allowed to pass through but not microwave energy.
My microwave oven causes TV interference. Is
this normal?
Some TV and radio interference might occur
when using the microwave oven. This is similar
to the interference caused by mixers , vacuum
cleaners, hair dryers etc. Try positioning the TV
as far as possible from the microwave oven.
How do I know if the oven is operating or not?
The oven is operating when the door is closed and
the interior light is on. At the end of a cooking
cycle, the oven will beep , the light will go out
and the cooling fan will run for an additional two
minutes
.
Why does my oven light dim?
When cooking at reduced power levels, the oven
cycles to maintain these levels. Clicking noises
may be heard and the light dims during cycling.
This is normal.
When is the oven light on?
The oven light is on during a cooking cycle and
when the door is opened.
Why does steam accumulate round the oven
door?
During cooking steam is released from most
foods. Some steam will condense on cooler surfaces and this is evident around the door. This
occurrence is however completely normal and has
no detrimental effect on the oven.
Sometimes warm air escapes from the oven
vents. Why?
The vents are designed to carry hot air away from
the oven during cooking. They do not allow microwave energy to escape. Ensure that the vents
are not obstructed in any way.
Why does smoke exhaust from the rear of the
oven?
Smoke may be produced when food is overcooked. However it is normal for any smoke to be
exhausted from the oven cavity similar to the hot
air described above.
The Manufacturer strives for continuous improvements.
The content of this book is therefore subject to change without notice.
Page 22
Page 23

Service Centres.
If you have followed the instructions and still have a problem, contact the
nearest Defy Service Centre. They will be able to advise you on any aspect
of the product or send a qualified technician to repair it.
BLOEMFONTEIN
CAPE TOWN
DURBAN
EAST LONDON
JOHANNESBURG
Commercial Head Office,
Administration, Distribution, National Groups,
Tel. Sales, Contracts and Credit.
POLOKWANE
PORT ELIZABETH
PRETORIA.
160 Long Street, Hilton,
Bloemfontein 9301.
Tel. 051 400 3900
Bloemfontein.Service@defy.co.za
5A Marconi Rd.
Montague Gardens, 7441.
Tel. 021 551 8314
CapeTown.Service@defy.co.za
35 Intersite Avenue,
Umgeni Business Park, Durban 4051.
Tel. 031 268 3300
Durban.Service@defy.co.za
16 Bowls Rd. Arcadia,
East London 5201.
Tel. 043 743 7100
EastLondon.Service@defy.co.za
Cnr. Mimetes & Kruger Sts. Denver ext.12
Johannesburg. 2094.
Tel. 011 621 0200 or 011 621 0300
Gauteng.Service@defy.co.za
87 Nelson Mandela Drive.
Superbia 0699.
Tel. 0152 92 1166 / 7 / 8 / 9.
Polokwane.Service@defy.co.za
112 Patterson Road,
North End, Port Elizabeth 6001.
Tel. 041 401 6400
PortElizabeth.Service@defy.co.za
Block A1 Old Mutual Industrial Park.
Cnr. D.F.Malan Drive & Moot Str.
Hermanstad. 0082.
Tel. 012 377 0061
Pretoria.Service@defy.co.za
OTHER AREAS ARE SERVICED BY OVER 200 AUTHORISED SERVICE AGENTS.
PLEASE CONSULT THE NEAREST REGIONAL DEFY SERVICE CENTRE FOR DETAILS
Page 23
Page 24

Warranty.
This certificate is issued by DEFY APPLIANC ES LIMITED manufacturers of Defy and Ocean products,
hereinafter the Company, to the original purchaser only, of the appliance described on the certificate and
shall constitute the only warranty given in respect of this appliance.
The Company warrants to the original purchaser that for a period of TWO YEARS from date of purchase
the appliance is free from defect under normal domestic use, both in workmanship and material, subject
to the following conditions.
1. Repair or replacement of any part of this appliance, found by the Company to be defective, shall be at
the election of the Company. The Company reserves the right to effect such service through any of its
Service Divisions or Authorised Service Dealers. The cost of such service shall be borne by the Company in full, provided that the appliance is located no further than 50 km from a Company Service
Centre or an Authorised Service Dealer. Where the appliance is located beyond the 50 km radius, the
purchaser shall be liable for the standard travelling charges, as determined by the Company.
CARRY IN SERVICE Microwave ovens, Compact cookers and small appliances are repaired in our
service centres and are not collected from the customers home. Faulty units should be delivered to the
purchasing dealer or to the nearest Company Service Centre for warranty repairs.
2. Rusted or corroded plates, vitreous enamelware, fuses and lamps are specifically excl uded from these
warranties. It is an express condition of these warranties that the purchaser takes due care and attention
in the use and maintenance of the appliance. Abuse, misuse in conflict with operating instructions, connection to incorrect voltages and subjection to commercial use shall release the Company from its obl igations.
3. This warranty shall become void and cease to operate if the appliance is dismantled by, or any repairs
to the appliance are effected by any persons not duly authorised by the Company, or if substitute parts
not approved by the Company are used in the appliance, or if the serial number of the appliance is removed.
4. The Company shall not be responsible for damages resulting from fire, flood, civil disturbances or any
Act of God. The Company shall not, in terms of these warranties be responsible nor held liable for any
consequential loss or damage of any kind caused by or due to the failure or malfunction of the appliance.
5. The Company shall not be responsible for transportation or other costs other than those incurred within
the provisions of Point 1 of this Certificate.
6. These warranties shall not apply to the appliance if it is purchased or used beyond the borders of the
Republic of South Africa, Namibia, Botswana, Swaziland and Lesotho.
7. Where service is requested under warranty and no fault or defect can be found by the Company, all
costs incurred will be for the purchaser's account.
8. This Certificate as well as your invoice will serve as proof of purchase. For the purpose of warranty, it
will be essential to produce this Certificate and invoice. Failure to do so, will render the purchaser liable for service costs.
KEEP THIS CERTIFICATE AND SALES INVOICE AS PROOF OF
PURCHASE FOR WARRANTY PURPOSES.
Page 24
 Loading...