

Page 1
Owner’s
Manual
You can rely on Defy
COMMERCIAL
FLAT AND
SLANTED
TOP
CHEST FREEZER
MODELS
www.defy.co.za
2 - Unpacking and Installation
2 - Electrical installation
3 - Operating the freezer
3 - Fitting the glass lids
4 - Temperature setting
4 - Freezing guide
4 - Defrosting
5 - Maintenance
5 - Owners responsibility
5 - Service
6 - Service centres
7 - Warranty
Page 1
Page 2

Introduction
Congratulations on the purchase of this quality appliance.
We, the manufacturer, trust that you will enjoy many years of trouble free use. Please read these instructions carefully before using
the product. This book will provide you with information on how
to operate and care for your appliance in order that you gain the
maximum benefit from it.
Unpacking
• Please ensure that packaging material is disposed of in a responsible manner. Plastic
bags should be cut up to prevent children playing with them and accidentally suffo-
• Please ensure that packaging material is disposed of in a responsible manner. Plastic
cating.
bags for example should be cut up to prevent children playing with them and acciden-
• If the appliance is damaged in any way, do not use it. Report the damage to your
tally suffocating.
dealer, who will take the necessary corrective action.
• If the appliance is damaged in any way, do not use it. Report the damage to your
dealer, who will take the necessary corrective action.
Installation
• The appliance should be solidly positioned on the floor in a dry, well
aired place away from heat sources such as stoves, geysers and direct
sunlight and in such a way that air flow through the grill on the right
hand side is not restricted
Electrical installation
This appliance must be earthed
and the manufacturer
and the seller
do not accept responsibility
for any damage due to incorrect
electrical connection.
This appliance is designed for use on 220-250 Volt, 50 Hz, AC
•
current.
•
This makes it suitable for operation in all areas in South Africa
with an Escom or municipal supply.
•
A 3-pin moulded plug is fitted by the manufacturer. The plug is
rated 3A and fits into a 15A wall socket.
•
If the power supply cord is damaged it must be replaced by the
manufacturer, their service agent or a similarly qualified person
in order to avoid a fire hazard
•
No other appliance should be connected to the same terminal
point.
Page 2
Page 3
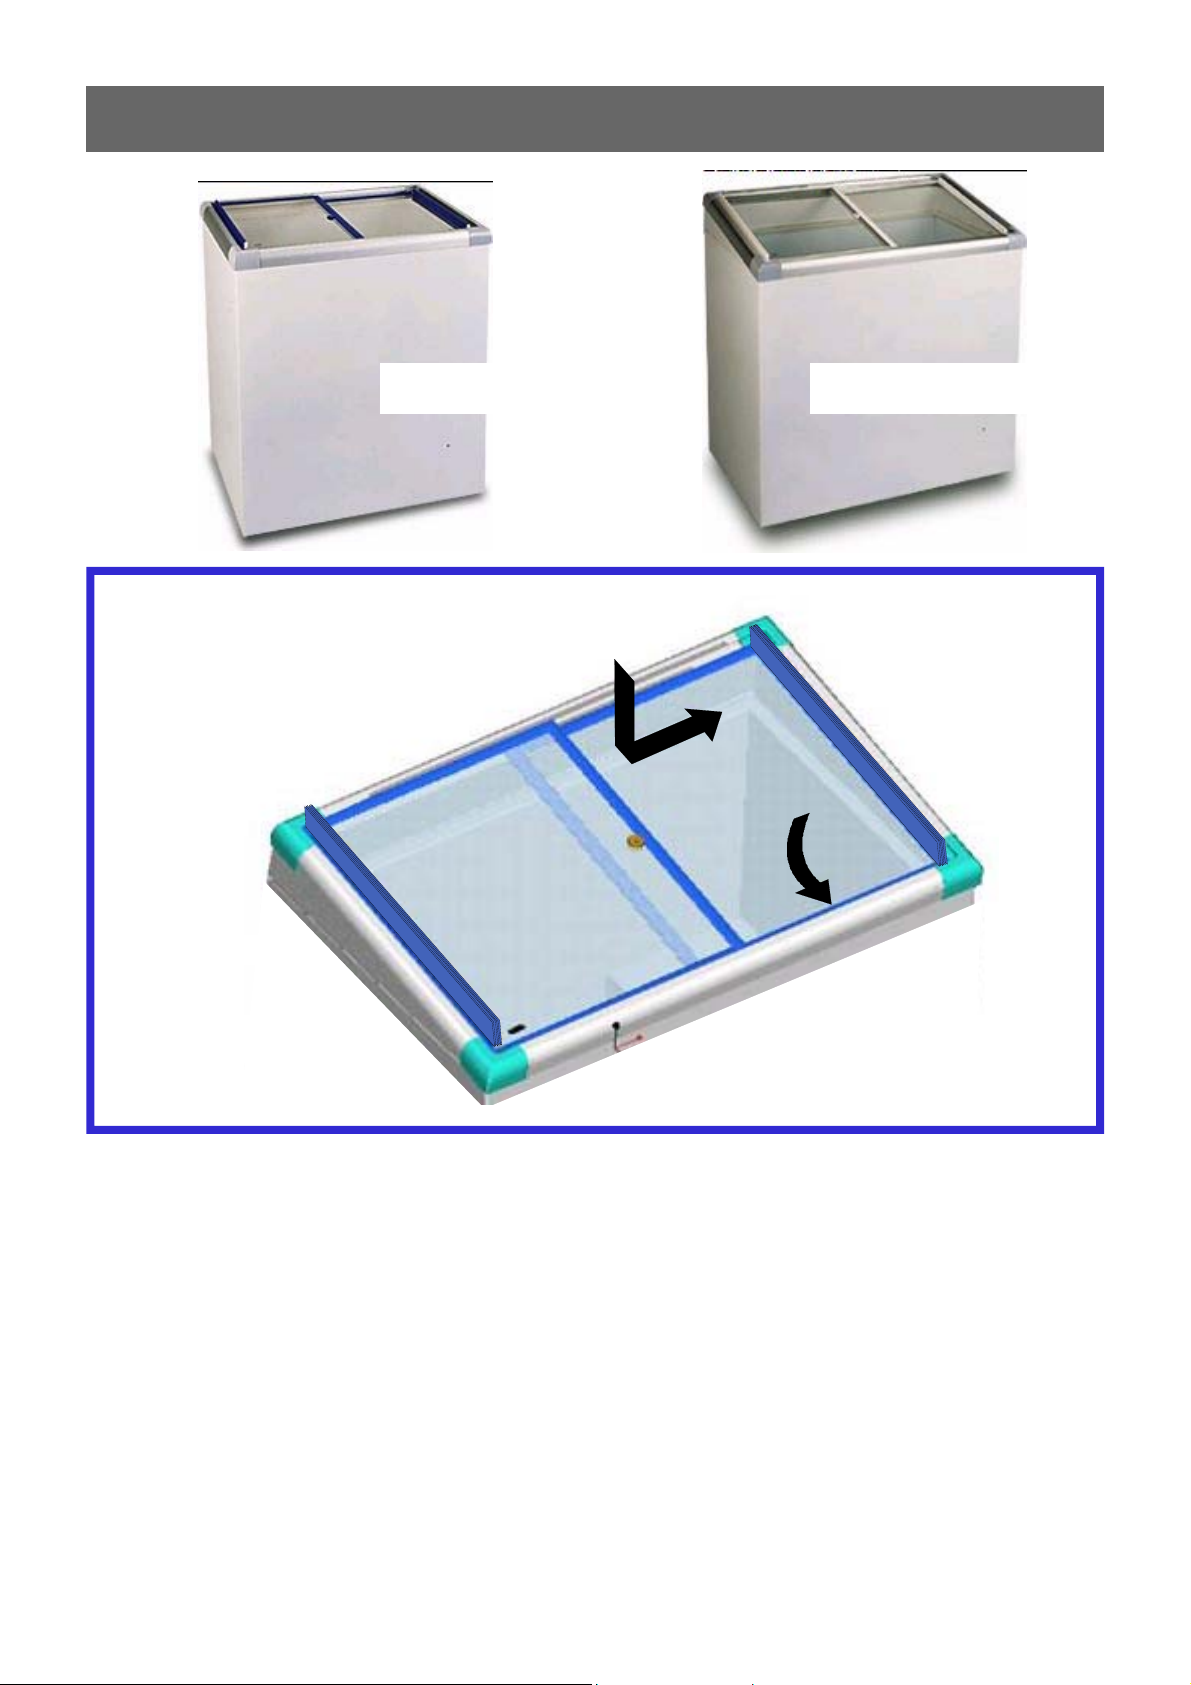
Fitting the glass lids.
FLAT TOP SLANTING TOP
2
BOTTOM
1
TOP
• The two glass lids supplied with the unit should be fitted as follows:
• Around the upper perimeter of the unit there are two aluminium retaining ledges each
of which has a cut out at the rear,
• Slide the bottom right lid into the lower front ledge. Lower it through the slot at the
rear and slide to the right
• Repeat the sequence for the upper left lid using the upper ledge and sliding to the left.
• Ensure that the handles face up and are at the sides of the unit when the lids are closed.
NOTE
During operation, particularly in high humidity conditions, there may be some condensation on the lids. This is normal and does not negatively affect the performance of the unit
.
Page 3
Page 4

Temperature setting
The thermostat is pre-set at the factory to give a temperature in the cabinet of –18
o
°C.
This temperature is ideal for storing frozen food for long periods of time.
Freezing guide
• Wrap all food before storage or place in airtight containers to prevent dehydration.
• The art of good packing is to eliminate all the air pockets from packages and to keep
air out by firm sealing. A heavy deposit of frost on the inner surface of a package taken
from the freezer means that air pockets were not eliminated before sealing.
• When packaging in sheet material such as aluminium foil, parcel tightly and press out
all air pockets. All folds should be sealed with deep-freeze sealing tape.
• Spilt food containing acids /salt could cause permanent staining of the cabinet interior.
• When loading bulk into the freezer, load one quarter at a time and allow to freeze be-
fore loading the next quarter.
• Allow hot food to cool before putting it in the freezer.
• Remember, liquids can increase in volume when frozen. Do not store sealed bottles,
jars or cans in the freezer as the contents will freeze, expand and rupture the container.
• Do not exceed the expiry date shown on food packs.
• Do not pack above the maximum load line shown on the inside of the cabinet.
Defrosting
1. The freezer should be defrosted whenever the ice build up on the inside wall exceeds
5 mm. in thickness,
2. Remove the plug from the wall socket and proceed as follows:
3. Open the lid and leave it open during defrosting.
4. Remove the contents of the freezer, wrap them in newspaper and
store in a cool place.
5. Sponge up the defrost water.
6. After defrosting, dry the cabinet and replace the freezer contents.
Close the lid, insert the power plug in the wall socket and switch the freezer on.
Note:
Never try to speed up the defrosting process by chipping at the ice with a sharp object
Page 4
Page 5

Maintenance
Cleaning
• Always disconnect the plug from the mains socket before cleaning
the appliance.
• Clean the appliance whenever necessary using warm soapy water and a sponge.
• Dry with a soft cloth
• Do not use pot scourers or abrasive powders to clean the appliance.
• Spillages, especially citric and acidic juices, must be wiped up immediately as they
could stain the product.
• Freezer baskets may be removed for cleaning purposes.
• The back of the unit may be vacuumed or dusted using a soft bristle brush.
• A mild furniture polish may be used on the exterior cabinet to add lustre and protect
against finger marks.
Owners responsibility
Since the following are not factory faults they are the owners responsibility:
• Damage to the exterior finish.
• Breakage of components
• Damage caused through improper use of the appliance.
• Damage caused by moving the appliance.
• The Company shall not be held liable for the loss of goods stored in the freezer
should the unit malfunction .
Service
Before calling a service technician to assist with a problem, please check:
• Is the power switched OFF? The power should be ON.
• Has a house fuse blown or a circuit tripped out? Repair or re-set as necessary.
• Is the 3-pin plug pushed firmly into the wall socket? Check another appliance such as a
toaster or kettle in the same socket.
• Has the lid been left open for a long time? Close the lid and monitor performance.
Remember that you may be charged for a service call even during the warranty
period if the fault is caused by any of the above.
If you have followed the instructions and still have a problem, contact the nearest Defy
Service Centre. They will be able to advise you on any aspect of the machine or send a
qualified technician to repair it.
Page 5
Page 6

Service Centres
If you have followed the instructions and still have a problem, contact the
nearest Defy Service Centre. They will be able to advise you on any aspect
of the product or send a qualified technician to repair it.
BLOEMFONTEIN
CAPE TOWN
DURBAN
EAST LONDON
JOHANNESBURG
Commercial Head Office,
Administration, Distribution, National Groups,
Tel. Sales, Contracts and Credit.
POLOKWANE
PORT ELIZABETH
PRETORIA.
160 Long Street, Hilton,
Bloemfontein 9301.
Tel. 051 400 3900
Bloemfontein.Service@defy.co.za
5A Marconi Rd.
Montague Gardens, 7441.
Tel. 021 551 8314
CapeTown.Service@defy.co.za
35 Intersite Avenue,
Umgeni Business Park, Durban 4051.
Tel. 031 268 3300
Durban.Service@defy.co.za
16 Bowls Rd. Arcadia,
East London 5201.
Tel. 043 743 7100
EastLondon.Service@defy.co.za
Cnr. Mimetes & Kruger Sts. Denver ext.12
Johannesburg. 2094.
Tel. 011 621 0200 or 011 621 0300
Gauteng.Service@defy.co.za
87 Nelson Mandela Drive.
Superbia 0699.
Tel. 0152 92 1166 / 7 / 8 / 9.
Polokwane.Service@defy.co.za
112 Patterson Road,
North End, Port Elizabeth 6001.
Tel. 041 401 6400
PortElizabeth.Service@defy.co.za
Block A1 Old Mutual Industrial Park.
Cnr. D.F.Malan Drive & Moot Str.
Hermanstad. 0082.
Tel. 012 377 0061
Pretoria.Service@defy.co.za
OTHER AREAS ARE SERVICED BY OVER 200 AUTHORISED SERVICE AGENTS.
PLEASE CONSULT THE NEAREST REGIONAL DEFY SERVICE CENTRE FOR DETAILS
Page 6
Page 7

Warranty
This certificate is issued by DEFY APPLIANCES LIMITED manufacturers of Defy and Ocean products, hereinafter the Company, to the original purchaser only, of the appliance described on the certificate a nd shall constitut e the only warranty given in respect of this appliance.
The Company warrants to the original purchaser that for a period of ONE YEAR from date of purchase the appliance is free from defect, both in workmanship and material, subject to the following
conditions.
1. Repair or replacement of any part of this appliance, found by the Company to be defective, shall be
at the election of the Company. The Co mpany reserves the righ t to effect such service through any
of its Service Divisions or Authorised Service Dealers. The cost of such service shall be b orne by
the Company in full, provided th at the applian ce is located no further than 50 km from a Company
Service Centre or an Authorised Service Dealer. Where the appliance is located beyond the 50 km
radius, the purchaser s hall be liable fo r the standard trav elling charges, as det ermined by th e Company.
2. Vitreous enamelware, fuses and lamps are specificall y excluded from these warr anties. It is an ex-
press condition of these warranties that the purchaser takes due care and attention in the use and
maintenance of the appliance. Abuse, misuse in conflict with operating instructions, connection to
incorrect voltages and subjection to commercial use shall re lease the Company from its obligations.
3. This warranty shall beco me void and cea se to operate if the appliance is dismantled by, or any re-
pairs to the appliance are effected by any persons n ot duly authorised by the Compan y, or if substitute parts not approved by the Company are used in the appliance, or if the serial number of the appliance is removed.
4. The Company shall not be responsible for damages resulting from fire, flood, civil disturbances or
any Act of God. The Compan y shall not, in terms of these warranties b e responsible nor h eld liable
for any consequential loss or damage of any kind caused by or due to the failure or malfunction of
the appliance.
5. The Company shall not be responsible for transportation or other costs other than those incurred
within the provisions of Point 1 of this Certificate.
6. These warranties shall not apply to the appliance if it is purchased or used beyond the borders of
the Republic of Sout h Africa, Namibia , Botswana, Swaziland and Lesotho.
7. Where service is requ ested und er warran ty and no fault or defect can be found by the Company, all
costs incurred will be for the purchaser's account.
8. This Certificate as well as your invoice will serve as proof of purchase. For the purpose of war-
ranty, it will be essential to produce this Certificate and invoice. Failure to do so, will render the
purchaser liable for service costs.
KEEP THIS CERTIFICATE AND SALES INVOICE AS PROOF OF
PURCHASE FOR WARRANTY PURPOSES.
Page 7
Page 8

Features
• Thick walls for superior insulation (Polyurethane)
• Chromadek outer wrap (Galvanised substrate)
• Anodised aluminium top surround (with ABS plastic corner pieces)
Four rollers for easy moving
• Pilot light lens mounted in front of cabinet
• Two 4mm toughened sliding glass lids.
• Storage baskets
You can rely on Defy
The Manufacturer strives for continuous improvements. For this reason, the text
and illustrations in this book are subject to change without notice.
Part Number :13964
Page 8
 Loading...