

Page 1

Page 1
OWNER’S MANUAL
You can rely on Defy
www.defy.co.za
Automaid
600
INDEX
INSTALLATION
• Packaging
• Transport fittings
• Levelling
• Water connection
• Water drainage
• Electrical connection
DETERGENT dispenser
CONTROL PANEL
FEATURES
• Detergent dispenser
• Temperature control
• Wash programme selector
• On / Off button
• No Heat button
• Rinse and hold button
• Door
HELPFUL HINTS
PROGRAMME SELECTION GUIDE
OPERATING THE MACHINE
• Sorting
• Loading
• Washing
• Unloading
CARE AND MAINTENANCE
• Detergent drawer
• Siphon
• Filters
• General cleaning
• The pump filter
FABRIC CARE LABELS
PROBLEM WASHING CHECK
TROUBLE SHOOTING
SERVICE CENTRES
WARRANTY
TECHNICAL SPECIFICATIONS
PAGE
2
2
2
3
3
3
4
4
4
5
5
5
5
5
5
5
6
6
7
8
8
8
8
8
9
9
9
9
9
10
10
11
11
13
14
15
Page 2
Page 2
Packaging
All packaging must be removed from the machine and disposed of in a responsible
manner. Plastic bags and “Bubble wrap” sheets should be torn open to prevent
children playing with them and accidentally suffocating.
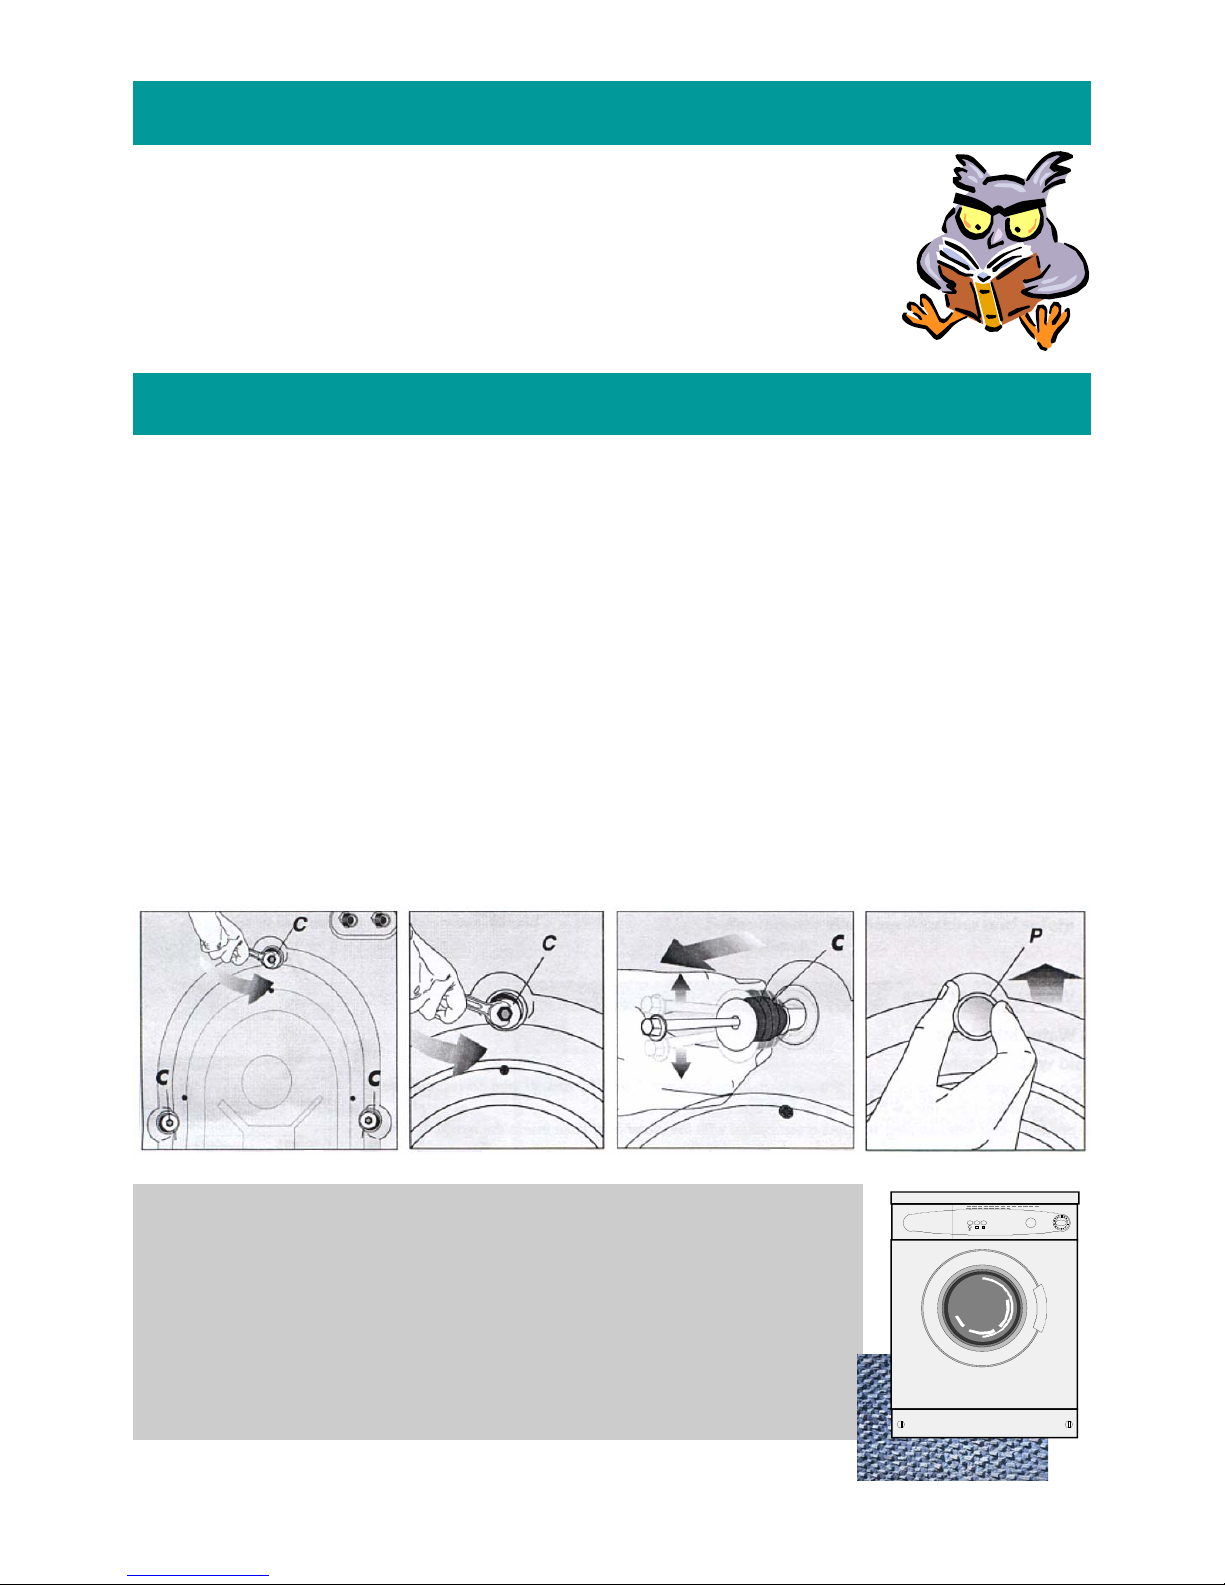
Transport fittings
The wash drum is secured during transport to prevent damage.
Before using the machine, remove the transport fittings as follows:
Note:
To prevent damage, the machine should not be transported without the transport fittings securely in place.
Note:
Never place the machine on a carpet. This could prevent
air circulation and cause electrical components in the
machine to overheat
1. Using a suitable spanner, loosen the three transport bolts ( C ) by turning them in
an anti-clockwise direction until the bolts can be partially withdrawn.
2. Remove the bolts and the rubber bushes by pulling outwards. An up and down action together with a little dishwashing liquid will ease the removal.
3. Insert the three plastic plugs ( P ) supplied with the machine into the holes vacated
by the transport fittings.
Installation
Thank you for choosing Defy
You are now the proud owner of one of the finest and most
modern washing machines that today’s technology can produce. You and your Automaid are going to make a great team
together. But first it will pay if you really get to know each
other. This book will tell you all you need to know about your
machine, what it will do and how to do it. Please read all the
instructions carefully before operating the machine.
Page 3
Page 3
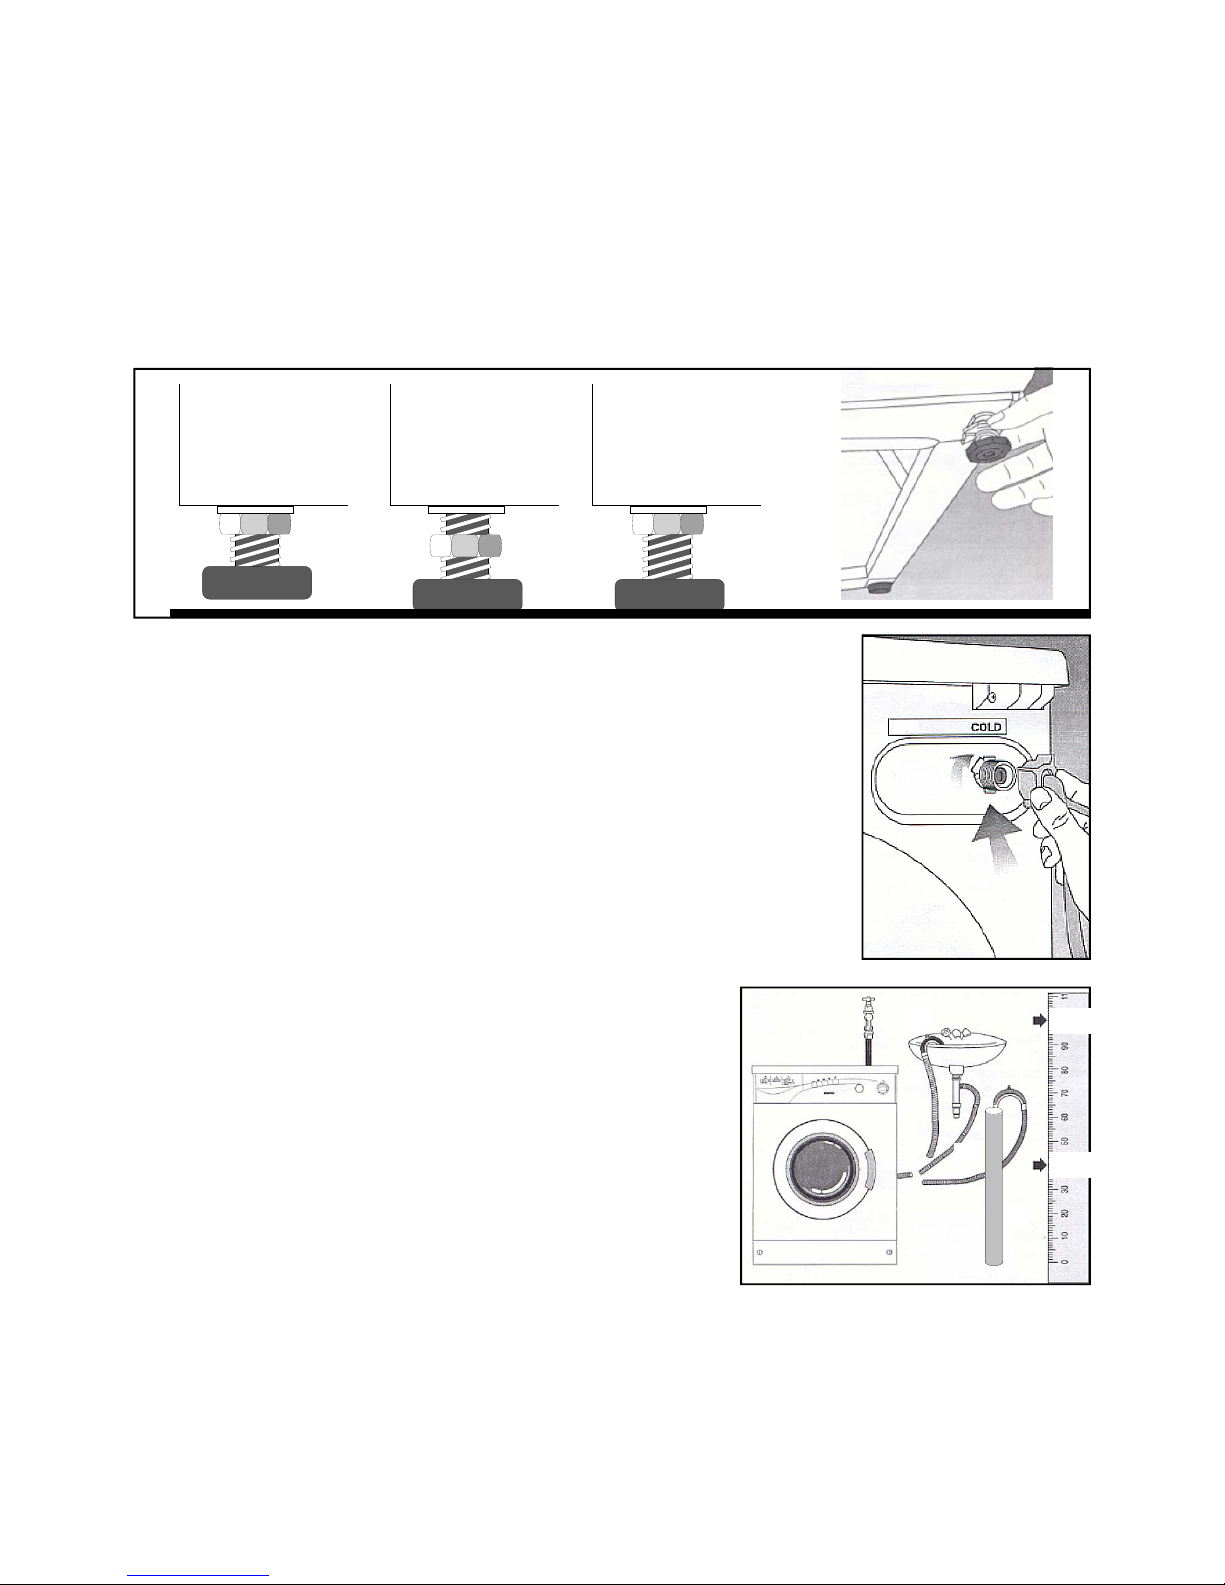
Levelling
1. The machine must stand firmly on the floor. Any instability will negatively affect
its performance.
2. The machine has two adjustable feet at the front.
3. To level the machine, loosen the plastic lock nuts on the adjustable feet.
4. Rotate the fee t until the machine stands firm and level.
5. Tighten the lock nuts firmly.
6. Caution : Never remove the lock nuts and feet from the machine.
NOT LEVELLED NOT LOCKED
LEVELLED
AND LOCKED
Connecting to the cold water supply
1. The water supply should deliver 8 to 80 litres per minute.
2. Sealing washers are supplied and these should be fitted at either end of the inlet hose
3. Secure the angled end of the inlet hose to the water inlet at
the rear of the machine and the straight end to a 3/4 inch
BSP cold water tap.
4. Tighten both connections, open the tap and check for leaks.
5. We recommend that the tap be closed when the machine is
not in use.
Water drainage
Draining into a dedicated outlet pipe (A)
1. The outlet pipe must have an inside diameter of at
least 40 mm.
2. The end of the pipe must be positioned between
400 mm. and 1000 mm. above floor level.
3. Secure the hooked end of the drain hose into the
outlet pipe.
Draining into a sink or bath (B)
1. The drain hose may be hooked over the edge of a
sink or bath in such a way that the end can not be
immersed in the collected waste water.
2. The outlet end of the hose must be between 40 cm. and 100 cm. above floor level.
3. Please note: The outlet hose must be kept free of kinks or restrictions as these will
hinder the operation of the machine
FLOOR
A
A
B
40
100
Page 4
Page 4
Electrical connection
1. The power cord must be connect ed to a 1 5 am p ea rthed wall s ocket
2. Do not connect the machine through a double adaptor. It requires a
dedicated power point
3. If the power cord should ever need replacing, use only a genuine
cord ( Type ‘X’) available from the nearest Defy Service Centre.
The appliance must be earthed and the manufacturer and seller do not accept
responsibility for any damage due to incorrect electrical connection.
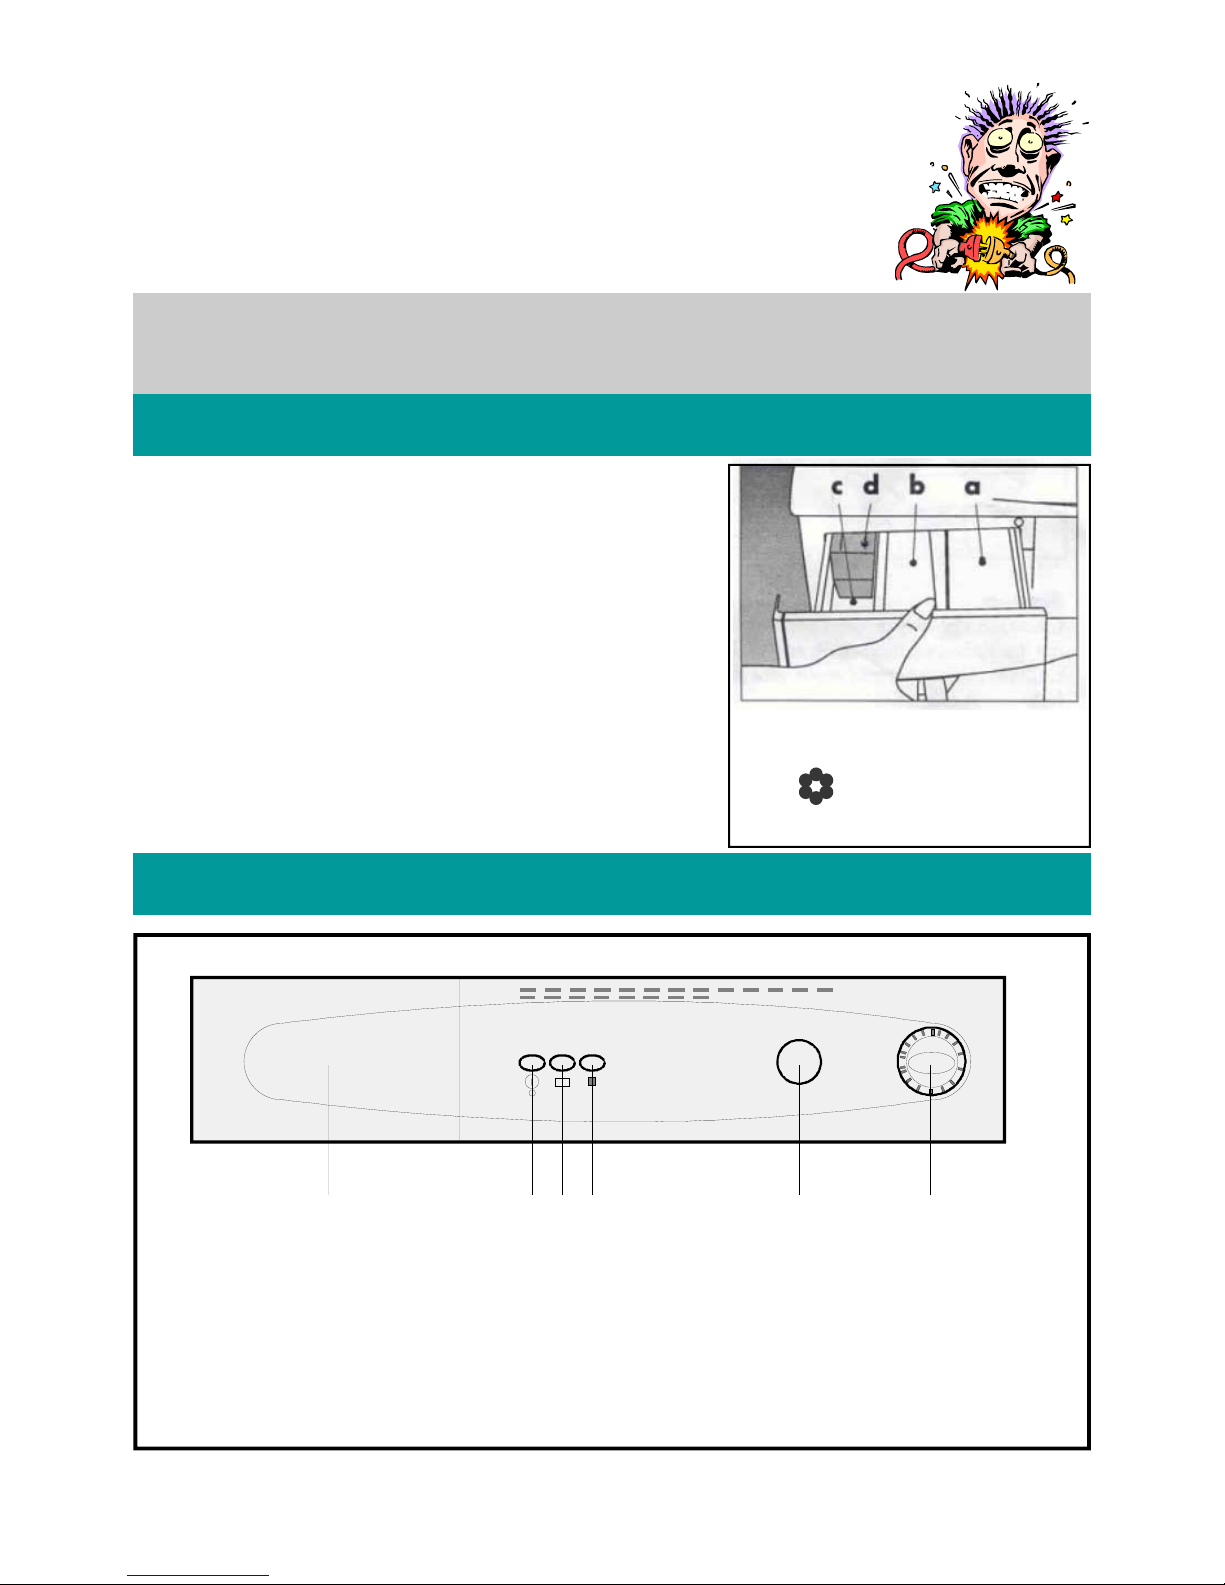
The control panel
1. Detergent dispenser
2. On / Off button
3. Rinse and Hold button
4. No spin button
5. Temperature selection knob
6. Programme selection knob
The detergent dispenser
1. Open the dispenser
2. Place detergent / softener in the appropriate compartment of the dispenser, in accordance with the
manufacturer’s instructions
3. Detergent and additives will automatically be released at the appropriate time during the wash.
4. Concentrated softener may clog the siphon. In this
case add some water to the softener liquid.
NOTE:Use only low foam detergents specifically
designed for front loading washing machines
Pre-wash detergent
Wash detergent.
Fabric softener
Siphon
(a)
(b)
(c)
(d)
123456
Page 5

Page 5
Features
1 Detergent dispenser.
The detergent dispenser has 3 compartments. ( See page 4.)
Use only low foam detergents specifically designed for front loading automatic
washing machines.
Dose as per the manufacturer’s recommendations on the detergent pack.
Dosage may vary according to wash load, dirt and water hardness.
2 On / Off button.
Push the button for power ‘ON’
The door will lock and the indicator light will glow
Push the button once more for power “OFF’
3 Rinse and Hold button
Selecting this feature will stop the machine during the final rinse cycle with water
in the tub. This prevents drip-dry, permanent press and wool articles from creasing
caused by waiting in a ‘dry’ machine before being removed. To complete the programme, press the button once more or select (H) on the programme selector to discharge the water.
4 No spin button
Selecting this feature will eliminate the spin cycle from any selected programme.
5 Temperature selector
To access the temperature selector knob, push it gently to free it from the control panel.
Select the temperature as indicated in the programme guide or a lower temperature if you
desire. The knob is marked from 90°C to 30°C with indicating ambient tap water
temperature.
6 W ash programm e selector
Push to free the knob from the control panel. Turn the knob in a clockwise direction
to select the desired programme.
Warning
Switch the machine off before turning the knob
Page 6

Page 6
Features
Door
Open the door by gently pulling on the handle.
Close the door by pushing firmly until it clicks into place.
Note:
The door locks during the wash cycle
Switch the machine off and allow 1 to 2 minutes for the
safety lock to disengage. ( a click sound will be heard )
Thereafter the door may be opened.
Helpful hints
• Sort washing by material type.
• Adhere to garment label washing instructions.
• Fasten zips to prevent them snagging other articles.
• Mend loose seams and tears before washing.
• Secure all loose buttons.
• Empty all pockets of coins and loose objects.
• Secure or remove brassiere wires.
• Wash small articles such as socks, handkerchiefs and delicate undies in a wash bag
or pillow slip. This will prevent tangling.
• Treat any stains before washing.
• Test fabrics for colourfastness before washing.
• Wash new denim separately as colours may run.
• Wash new bulky articles such as quilts and sleeping bags individually. For best re-
sults use the WOOL programme.
• Do not wash articles which have been soaked in paint, petrol, thinners, or other
flammable liquids.
• Do not wash rubberised articles such as rain coats and training shoes.
• It is important not to overload the machine as this will prevent it from washing
properly.
R
E
M
O
V
E
I
T
E
M
S
F
R
O
M
P
O
C
K
E
T
S
B
E
F
O
R
E
W
A
S
H
I
N
G
I
M
P
O
R
T
A
N
T
Page 7

Page 7
DETERGENT
COMPT
HEAVILY
SOILED
NORMALLY
SOILED
LIGHTLY
SOILED
VERY LIGHTLY
SOILED
VERY LIGHTLY
SOILED
HEAVILY
SOILED
NORMALLY
SOILED
LIGHTLY
SOILED
LIGHTLY
SOILED
WOOLLENS
A –B-C
B-C
B-C
B-C
B-C
A-B-C
B-C
B-C
B-C
B-C
PROGRAMME
COTTON AND LINENS
A WHITE PRE-WASH
B MAIN WASH
X COLOUR FAST
M NON COLOUR FAST
S COLD WASH
C SPIN
SYNTHETICS
D PRE-WASH
F MAIN WASH
G RAPID WASH
N COLD WASH
H SPIN
WOOLLEN /
DELICATE
J MAIN WASH
K DRAIN / SPIN
°C
MAX
90
COLD
To 90
COLD
TO 90
COLD
TO 60
COLD
TO 40
COLD
MAX
60
COLD
TO 60
COLD
TO 60
COLD
TO 40
COLD
MAX
40
COLD
TO 40
LOAD
Kg.
5
5
5
5
5
5
2.5
2.5
2.5
2.5
2.5
1.5
1.5
OPTION BUTTONS
RINSE & HOLD NO SPIN
Programme selection guide
Note: During heating there may be a period (10 to 15 minutes) during which there is
no drum rotation This is normal and should not be regarded as a fault.
Page 8

Page 8
Sorting the laundry
Sort the laundry in one of the following groups:
1. White cotton and linen as well as robust colourfast fabrics.
2. Synthetics and synthetic blends as well as non colourfast fabrics
3. Delicate fabrics such as silks and rayon
4. Wool
Loading the machine
It is important not to overload the machine as this will prevent it from washing prop-
erly. You should be able to fit a hand between the top of the drum and the wash load
in the drum.
The maximum recommended load of dry clothing that may be washed at one time in
your Automaid is 5 kg.
Washing
1. Plug the machine in and switch on at the wall socket.
2. Open the water tap.
3. Check that the drain hose is in position and is free of kinks.
4. Open the door.
5. Load washing into the machine, distributing it evenly and loosely in the drum.
DO NOT EXCEED THE MAXIMUM WASH LOAD AS DETAILED IN THE
WASH GUIDE
6. Close the door.
7. Add detergents and additives to the relevant compartments in the detergent drawer
and close the drawer.
8. Push the Temperature selection knob to free it from the facia. Select a temperature
( see wash guide) by turning the knob to the required setting. Push the knob back
in to prevent accidental activation.
9. Push the Programme selection knob to free it from the facia. Rotate the knob in a
clockwise direction to the desired programme. Do not attempt to turn the knob
back if the programme is inadvertently bypassed, rather continue around the dial
once more. Push the knob back in to prevent accidental activation.
10. Select any of the desired option buttons as detailed in the wash guide.
11. Push the power ‘ON’ button
12. The indicator light will glow and the machine will commence with the selected
wash cycle.
Unloading the machine
1. The machine will stop automatically at the end of the selected cycle.
2. Switch off the machine and allow time for the safety lock to disengage.
3. Open the door and remove the wash load.
4. Gently rotate the drum by hand to check if all the laundry has been removed
5. Close the tap.
6. Leave the door slightly ajar to assist with drying and to prevent unpleasant odours
from forming.
Operating the machine
Page 9

Page 9
Water intake filter
The filters at the water intake point prevent dirt from en-
tering the machine and should be cleaned every 30 to 40
washes. To clean the filters, close the tap, disconnect the
hose and clean the filters with a small nylon brush. If the
filter is very dirty you may need to remove it with a pair
of long nosed pliers.
To clean the filter at the tap side of the hose, pull it out
by hand and rinse under running water.
Hoses
Periodically check the inlet and outlet hoses for leaks,
perishing or cracks. In very cold conditions water in the
hoses may freeze. In this instance, empty the hoses after
the wash is complete.
Replacement hoses may be purchased from your nearest
Defy Service Centre.
Care and maintenance
Detergent Dispenser
To remove residual detergent, pull the dispenser drawer outward, press on the
marked area of the siphon, and pull the drawer free.
Wash the dispenser and the housing in water before re-inserting the dispenser.
Siphon
To prevent clogging, the siphon (d -on page 4) should be cleaned after every 30 to
40 washes.
Grasp the edges and pull the siphon free.
Clean away any residual softener and carefully re-fit the siphon.
ll
l
Page 10

Page 10
Do not wash in
centrifugal
machine
Cleaning the pump filter
A filter prevents foreign objects from entering and dam-
aging the pump. This filter should be cleaned after every
30-40 washes. First disconnect the machine from the
power supply. Use a large screwdriver or coin to turn the
plastic fasteners in the kick panel through 90°. Place a
shallow container below the filter outlet to collect any
spillage. Remove the filter by turning it in a counter
clockwise direction. Rinse the filter under running water.
Re-fit and secure the filter and kick panel.
If the filter cap is not fitted properly, water will leak from
the machine.
General Cleaning
On no account use benzene or other solvents to clean
the cabinet, door or rubber of the machine.
A damp cloth will normally suffice.
If desired, a good wax polish may be used on the
metal parts of the cabinet.
Care and maintenance
International fabric care labels
Recommended
washing
temperature
No dry
cleaning
Bleach can
be used
Do not use
bleach
No spin May be
washed in
centrifugal
machine
Dry on
horizontal
surface
Wash by
hand only
Line dry Dry clean Do not wash
Ironing is permitted
Do not iron Use a warm,
Not hot iron
Page 11

Page 11
Problem washing—Check list
Greasy stains on washing.
• Use more detergent if washing is heavily soiled.
• Use both pre-wash and main wash programmes.
• Check that the machine is not overloaded.
Grey, dirty looking washing.
• Use more detergent if the washing is heavily soiled or if the machine is located in a
hard water area.
• Use pre-wash and main wash programmes.
• Check that the machine is not overloaded.
Poor wash results
• Read the instruction book carefully
• Follow the manufacturer’s instructions on the detergent pack.
• Sort out fabric types and separate natural from synthetic fabrics.
• Select the appropriate wash programme.
• Use fabric softeners for extra softness.
• Check that the machine is not overloaded.
Discolouring
• This could be caused by natural body oils or iron deposits in the water supply.
• Select the correct programme. ( water not too hot )
• Use the correct detergent dosage.
• Wash the garment to the manufacturer’s directions.
• Check that the machine is not overloaded.
Trouble shooting
Foam is expelled from the detergent dispenser.
Check:
• That detergent is suitable for front loading automatic washing machines. If the de-
tergent is suitable, try using less detergent.
The machine drains as it fills.
Check:
• That the outlet hose is fitted as described in this manual.
If you experience a problem with the machine, please check the following
before calling a Service technician. It may seem obvious, but you may be
charged for a service call, even during the warranty period, if no fault is found.
Page 12

Page 12
The machine will not work at all.
Check:
• House fuses or circuit breakers.
• Wall socket ( plug in another appliance to check )
• That the door is closed properly.
• That the water tap is open.
• That a programme has been selected.
• That the ON/ Off button has been pressed in.
• That the indicator light is on.
The machine does not drain or spin.
Check:
• That the drain hose is not kinked or obstructed.
• That the outlet pipe or sink is not blocked.
The machine does not fill with water.
Check:
• That the water tap is open.
• That the drain hose end is at least 400 mm. above floor level.
• That the inlet hose is not kinked.
• That there is a water supply to the tap.
The machine vibrates or is excessively noisy.
Check:
• Whether anything has fallen between the wall and the machine.
•
That the machine stands level and that the feet are locked.
•
That the transport brackets and all packaging has been removed.
•
That there is a clearance of at least 50 mm. at the back of the machine.
•
That the laundry is evenly distributed in the drum.
•
That the wash load is balanced. ( equally distributed round the drum )
The door will not open
Check:
• That the machine is switched off at the ON/OFF switch.
• That the safety lock has disengaged ( wait at least two minutes )
The machine leaks water
Check:
• That the inlet and outlet hoses are secured .
Trouble shooting
Page 13

Page 13
Service Centres
If you have followed the instructions and still have a problem, contact the
nearest Defy Service Centre. They will be able to advise you on any aspect
of the product or send a qualified technician to repair it.
BLOEMFONTEIN
CAPE TOWN
EAST LONDON
JOHANNESBURG
DURBAN
POLOKWANE
PORT ELIZABETH
PRETORIA.
OTHER AREAS ARE SERVICED BY OVER 200 AUTHORISED SERVICE AGENTS.
PLEASE CONSULT THE NEAREST REGIONAL DEFY SERVICE CENTRE FOR DETAILS
P.O.Box 1691 Bloemfontein. 9300.
160 Long Street, Hilton,
Bloemfontein 9301.
Tel. 051 400 3900
P.O.Box 953 Milnerton. 7435
5A Marconi Rd.
Montague Gardens,
7441.
Tel. 021 551 8314
P.O.Box 7006 East London 5200.
16 Bowls Rd. Arcadia,
East London 5201.
Tel. 043 743 7100
P.O.Box 27150 Benrose 2011.
Cnr. Mimetes & Kruger Sts. Denver ext.12
Johannesburg. 2094.
Commercial Head Office, Tel. Sales, Administration,
Distribution, Commercial Head Office, National Groups,
Contracts and Credit.
Tel. 011 621 0200 or 011 621 0300
P.O.Box 12004 Jacobs 4026.
174 Teakwood Rd.
Jacobs 4052.
Tel. 031 460 9712
P.O.Box 1719 Polokwane 0700.
87 Nelson Mandela Drive.
Superbia 0699.
Tel. 0152 92 1166 / 7 / 8 / 9.
P.O.Box 2971 North End 6056.
3 Sidon Str.North End
Port Elizabeth.6001.
Tel. 041 401 6400
P.O.Box 19768 Pretoria West 0117.
Block A1 Old Mutual Industrial Park.
Cnr. D.F.Malan Drive & Moot Str. Hermanstad. 0082.
Page 14

Page 14
This certificate is issued by DEFY APPLIANCES LIMITED manufacturers of Defy and Ocean
products, hereinafter the Compan y, to the original purchaser only, of the applianc e described on
the certificate and shall constitute the only warranty given in respect of this appliance.
The Company warrants to t he original purchaser that for a period of TWO YEARS fro m date of
purchase the appliance is free fro m defect under normal domestic use, both in workmanship and
material, subject to the following conditions.
1. Repair or replace ment of any p art of t hi s appl iance , fou nd by th e Co mpan y to be defect iv e, shall
be at the election of th e Company. The Company reserve s the right to effect such servic e through
any of its Service Divisi ons or Aut horised S ervice D ealer s. The c ost of such ser vice shall b e bo rne
by the Company in full , p r ovided t h at the a ppli a nce is located no further than 50 km. fro m a C ompany Service Centre or an Autho rised Se rvice Dealer. Where t he appli ance is locat ed beyond the
50 km. radius, the purchaser shall be liable for the standard travellin g charges, as determined by
the Company.
CARRY IN SERVICE Microw ave ovens, Compact cookers and small appliances are re paired in
our service centre s and are not collected from the customers ho me. Faulty units should be de livered to the purchasing dealer or to the nearest Company Service Centre for warranty repairs.
2. Vitreous enamelwar e, fuses and lamp s are specificall y excluded from the se warranties. It is an
express condition of these warranties that the purchaser takes due care and attention in the use and
maintenance of the appliance. Abuse, misu se in confli ct with oper ating in structions, connection to
incorrect voltages and subjection to commercial use shall release the Company from its obligations.
3. This warranty shal l become void an d cease to operate i f the appliance i s dismantled by, or any
repairs to the applian ce are ef fect ed by an y pers ons not dul y autho rised by th e Compan y, or if s ubstitute parts not appro ved by the Co mpany are u sed in the applian ce, or if the serial numb er of the
appliance is removed.
4. The Company shall n ot be responsible for damages re sulting fro m fire, flood, civil distur bances
or any Act of God. The Company shall not, in terms of these warranties be responsible nor held
liable for any con sequ entia l loss or damag e of an y kind caused b y or due to t he fai lur e or mal function of the appliance.
5. The Company shall not be responsible for transportation or other costs other than those incurred
within the provisions of Point 1 of this Certificate.
6. These warranties sh al l not apply to the appliance if it i s purchased or used beyo nd the borders of
the Republic of South Africa, Namibia, Botswana, Swaziland and Lesotho.
7. Where service is requested under warrant y and no fault or defe ct can be found b y the Company,
all costs incurred will be for the purchaser's account.
8. This Certificate as well as your invoice will serve as proof of purchase. F or the purpos e of war-
ranty, it will be essential to produce this Certificate and invoice. Failure to do so, will render the
purchaser liable for service costs.
KEEP THIS CERTIFICATE AND SALES INVO ICE AS PROOF OF
PURCHASE FOR WARRANTY PURPOSES.
Warranty
Page 15

Page 15
Technical specification
1 2 3 4
5
6
7 8
1. Lid
2. Option buttons
3. Temperature selector knob
4. Programme selector knob
5. Detergent dispenser
6. Door
7. Kick-panel
8. Kick-panel securing screw
The Manufacturer strives for continuous improvements.
For this reason, the text and illustrations
in this book are subject to change without notice.
Height
Width
Depth
Net Weight
Power requirement
Nominal current
Power
Washing speed
Spin speed
850 mm.
600 mm.
540 mm.
66 kg.
230V, 50 Hz.
10 A
2250 W
70 r/min
600 r/min
Page 16

Page 16
OWNER’S MANUAL
You can rely on Defy
www.defy.co.za
Automaid
600
INDEX
INSTALLATION
• Packaging
• Transport fittings
• Levelling
• Water connection
• Water drainage
• Electrical connection
DETERGENT dispenser
CONTROL PANEL
FEATURES
• Detergent dispenser
• Temperature control
• Wash programme selector
• On / Off button
• No Heat button
• Rinse and hold button
• Door
HELPFUL HINTS
PROGRAMME SELECTION GUIDE
OPERATING THE MACHINE
• Sorting
• Loading
• Washing
• Unloading
CARE AND MAINTENANCE
• Detergent drawer
• Siphon
• Filters
• General cleaning
• The pump filter
FABRIC CARE LABELS
PROBLEM WASHING CHECK
TROUBLE SHOOTING
SERVICE CENTRES
WARRANTY
TECHNICAL SPECIFICATIONS
PAGE
2
2
2
3
3
3
4
4
4
5
5
5
5
5
5
5
6
6
7
8
8
8
8
8
9
9
9
9
9
10
10
11
11
13
14
15
 Loading...