

Page 1

Page 1
INDOOR
UNITS
AH12H3
AH18H3
AH24H3
OUTDOOR
UNITS
AC12H3
AC18H3
AC24H3
Do not attempt to install or maintain the Air Conditioner yourself. Only authorised
agents are to carry out installation and repairs. The manufacturer shall not assume
responsibility for accidents or injury caused by incorrect installation. The installation
instructions are provided in a separate booklet entitled “Installation Instructions”
SPLIT WALL MOUNTED TYPE
AIR CONDITIONERS
Users Manual
Record in the space below the listed information for future reference. The rated current is
printed on the serial number label attached to the oven side trim.
SERIAL NUMBER…………………………………………………………………………………..
DATE OF PURCHASE……………………………………………………………………………...
PURCHASED FROM………………………………………………………………………………..
………………………………………………………………………………………………………….
The manufacturer strives for continuous
improvement. For this reason, the text and
illustrations in this manual are subject to change
without notice.
Page 2
Page 2
Read this manual before initial installation and operation of the appliance!
Dear Customer, please read this manual carefully before using your appliance for the first time
and then store it within easy reach for future reference. We trust you will enjoy years of trouble
free use.
The user manual:
x This manual will provide you with information on how to safely operate and care for your
appliance in order that you gain the maximum benefit from it.
x Pay particular attention to safety instructions.
x Read all additional documents supplied with your appliance.
x This manual may be used for several similar but different models. Please check for
relevance regarding your particular model.
Explanation of symbols used in this manual
Important safety information. Warning for hazardous situations with regard to life and
property.
Caution; Warning for supply voltage.
Caution; Warning for fire hazard.
Useful information. Important information or useful hints about usage.
Unpacking
Remove all packaging. Ensure that packing material is disposed of in a responsible manner
and that any plastic bags are cut up to prevent children playing with them and accidentally
suffocating. If the appliance is damaged in any way do not use it. Report the damage to your
dealer who will take the necessary corrective action.
Since the following are not factory faults they are the owners responsibility
Damage to the exterior finish and breakage of components.
Damage caused through improper use of the appliance.
Damage caused by moving the appliance.
This appliance is not intended for use by persons (including children) with reduced
physical, sensory or mental capabilities or lack of experience and knowledge, unless
they have been given supervision or instruction concerning the use of the appliance
by a person responsible for their safety.
Children should be supervised to ensure that they do not play with the appliance.
The manufacturer strives for continuous improvement. Thus technical specifications,
text and illustrations in this manual are subject to change without notice.
Figures represented in this instruction manual are schematic and may not
correspond exactly with your appliance. If the parts are not included in the unit you
have purchased, they may be model specific and only valid for some models.
Values stated on the labels or in the documentation accompanying it are obtained in
laboratory conditions in accordance with the relevant standards. Depending on
operational and environmental conditions of the appliance, these values may vary.
Page 3
Page 3
Contents
1. Important Safety Information 4
Warnings 4
2. Your Air Conditioner 6
Indoor unit 6
Outdoor unit 6
Specifications 6
3. Using your air conditioner 8
Remote controller 8
Precautions 8
Replacement of batteries 10
4. Maintenance and cleaning 13
5. Trouble Shooting 14
6. Installation 16
Installation of indoor unit 18
Wiring diagram 20
Installation of outdoor unit 21
Wiring diagram 22
Post installation check 24
7. Branches 25
8. Warranty 26
Page 4
Page 4
The appliance must be grounded. Incomplete grounding may result in an electric shock.
Do not pull the power cord during operation. Doing so could cause a fire. To unplug the
appliance, switch it off and remove the plug by pulling on the plug and not the cord!
Do not attempt to extend the power cord by joining it to another cord, or by using an
extension cord. Do not put any other loads on the power supply socket. Extension cables
and multiway plugs must not be used for connection.
Do not damage the power cord. Placing heavy objects on the power cord, having the power
cord near objects that operate at high temperatures may cause electric shock and fire.
Pull out the power plug or turn off the power supply when not using the appliance for a long
period of time. (Accumulated dirt might cause fire).
An earth leakage breaker with rated capacity must be installed to avoid possible electric
shocks.
Do not place burner type appliances where they will be exposed to the airflow of the air
conditioner as this may cause incomplete combustion.
Do not use the following for cleaning: Chemical solvents, insecticide or inflammable
spraying materials. These will damage the appearance of the appliance. Do not spray or
sprinkle water directly onto the indoor unit.
Vapour and vaporized cleaning materials must never be used in cleaning the appliance. The
vapour may come into contact with the electrical parts and cause a short circuit or electric
shock.
Close doors and windows (preferably use a curtain) while operating the appliance for a long
time, if room air is quite turbid, open the door and window for a short period of time to allow
for some fresh air circulation.
If anything abnormal such as a burning smell occurs, stop the operation immediately and
switch the circuit breaker off.
Do not install the appliance at locations where flammable gas may leak. If there is an
electrical leakage from the air conditioner, it may cause a fire or explosion.
Do not use the appliance other than for its intended purpose. Do not use the appliance for
cooling medicine or academic research samples which require strict temperature control.
Important safety information
Please review and observe the following information. Failure to do so may result in injuries or
material damage and will render any warranty and reliability commitments void.
Warnings
x Hand this owners manual over to the new owner should ownership change.
x The appliance must only be used for its intended purpose: Room temperature regulation.
x The appliance is intended to be used in household and similar applications such as in shops,
offices and other working environments; farm houses and by clients in hotels, motels and
other residential type environments; bed and breakfast type environments; catering and
similar non-retail applications.
x Contact the customer care line on 086 100 3339 for all questions and problems relating to
the airconditioner. Only authorised agents are to carry out installation and repairs.
1
Page 5
Page 5
Do not insert a finger, a rod or any other objects into the air outlet/inlet grille. The fan runs at
a high speed and it will cause an injury if touched.
Do not dispose of the appliance along with regular household waste. Contact your local
authority for disposal information and facilities available. Never dispose of the appliance in a
fire.
Do not allow children to hang on the appliance. Never use the parts of the appliance as a
means of support or step.
Keep ventilation openings clear of obstructions.
Unplug the appliance when cleaning, during routine maintenance or if it will not be used for
an extended period.
Should the mains lead of the appliance become damaged or should it need replacing at any
time, it must be replaced by a DEFY Authorised Service Agent.
Never connect your appliance to electricity saving systems as they may damage the
appliance. Do not pull the batteries apart or throw them into a fire, they will explode.
Do not use explosive substances such as aerosol cans with a flammable propellant near the
appliance. Do not use flammable gas, benzene, petrol or volatile substances near the
appliance.
In the event of a malfunction, disconnect the appliance from the power supply. Do not
operate a damaged appliance. Consult with your nearest DEFY service centre should you
have any concerns.
Never place objects on top of the appliance, they may fall down and injure you.
Never plug the appliance into the wall socket during installation. Death or serious injury may
result.
The electrical safety of the appliance is only guaranteed if the earth system of your home is
compliant with national standards.
Do not expose your body directly to the cool (or hot) air of the appliance for prolonged
periods; do not cool (or heat) the room too much. This could effect your physical condition
and cause health problems.
To prevent condensed water from dripping from the appliance: Do not open windows and
doors while operating the appliance in the COOL/DRY mode for too long a period of time
under high humidity conditions. (above 80%).
The appliance is to be installed in accordance with national wiring regulations. The
appliance must NOT be installed in the laundry. The appliance must be installed 2.3m
above the floor. The appliance must be positioned so that the plug is accessible. For models
whose cooling capacity is above 4600W an all-pole disconnection device (which has at least
3mm separation distance in all pole and a residual current device (RCD) and a rating of
above 10mA) is to be incorporated in the fixed wiring according to national regulations.
Young children or infirm persons are not to use the appliance without supervision.
Page 6
Page 6
Your Air Conditioner
2
Unit AH12H4 / AC12H4 AH18H4 / AC18H4 AH24H4 / AC24H4
Refrigerant gas type R410A
Related gas GWP
Quantity R410A
Refrigerant gas (Kg)
0.88 1.34 1.65
tCO2 Eq. 1.837 2.798 3.445
2088
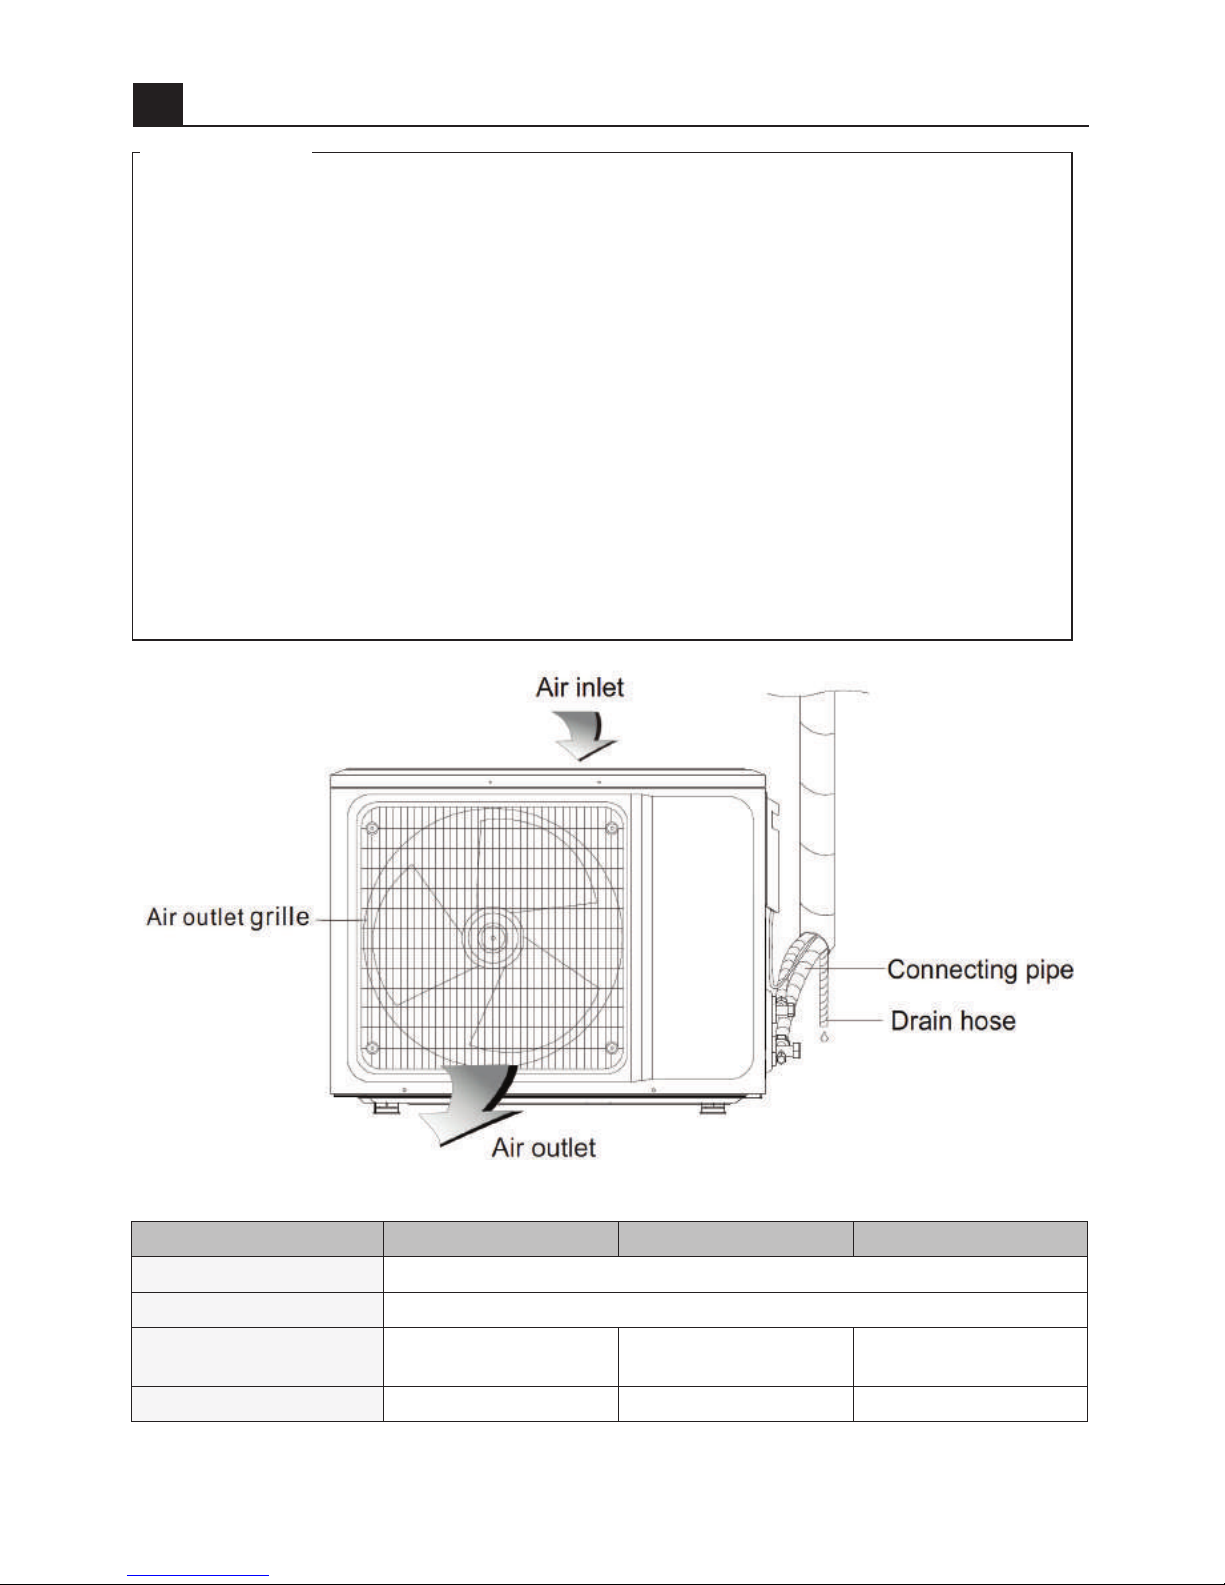
Specifications
Indoor unit
Outdoor unit
Page 7
Page 7
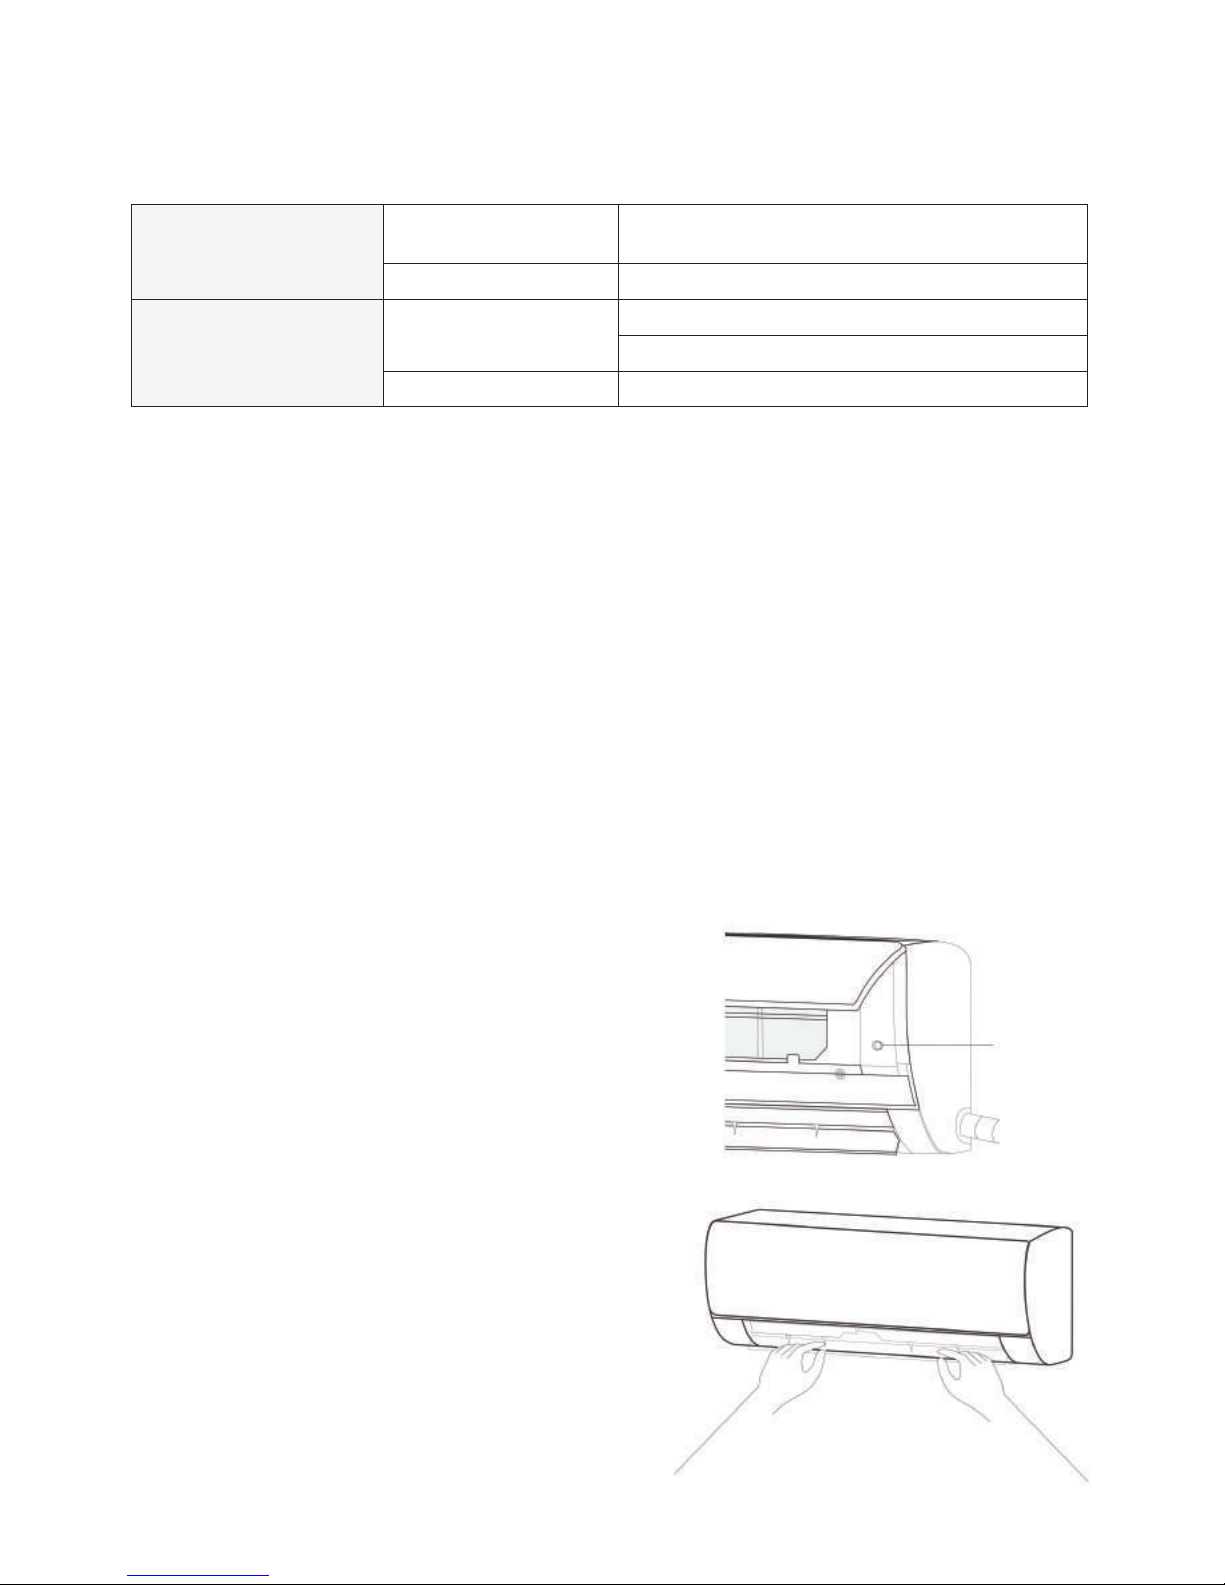
Emergency operation
x If the remote controller is lost or broken, use the
“force” switch button to operate the air
conditioner.
x If this button is pushed with the unit OFF, the air
conditioner will operate in Auto mode.
x If this button is pushed with the unit ON, the air
conditioner will stop running.
Airflow direction adjustment
1. Use the up-down swing and left-right swing
buttons on the remote controller to adjust the
airflow direction. Refer to the users manual of the
remote controller for detail.
2. For models without left-right swing function, the
fins must be moved manually.
Cooling
Outdoor
>48°C
Indoor >16°C
Heating
Outdoor
>30°C
<-7°C
Indoor
>30°C
Within the temperature range provided in the following table, the air conditioner may stop
running and other anomalies may arise.
x If the temperature is too high, the air conditioner may activate the automatic protection
device. If so, the air conditioner may be shut down.
x If the temperature is too low, the heat exchanger of the air conditioner may freeze, leading
to water leakage or other malfunctions.
x With long-term cooling or dehumidification, at a relative humidity of above 80% (doors and
windows are open), there may be water condensation or dripping near the air outlet.
Conditions that will prevent the unit from running normally
x The fan of the indoor unit will not start running immediately after heating is started, this is to
avoid the blowing out of cool air.
x When it is cold and wet outside, the outdoor unit will develop frost over the heat exchanger
which will compromise the heating capacity. The air conditioner will start to defrost on order
to remedy this condition.
x During defrost, the air conditioner will stop heating for about 5-12 minutes.
x Vapour may arise from the outdoor unit during defrosting. This is not a malfunction and is
normal during the defrosting process.
x Heating will resume after defrosting has completed.
Notes for heating
Page 8

Page 8
Remote controller
Using your air conditioner
3
Note: The appearance and functions of the remote controllers may vary slightly from
model to model. Some indicators and functions on your remote control may not be
applicable to the model you have purchased.
Precautions
x Before first time use of the remote
controller, install the batteries and ensure
the “+”and “-” poles are correctly
positioned.
x Ensure the remote controller is pointed to
the signal receiving window, and that
there is no obstruction in between and the
distance is 8m at the maximum.
x Do not let the remote controller drop or
fling it at will. Do not let any liquid in the
remote controller. Do not expose the
remote controller directly to the sunlight or
excessive heat.
x If the remote controller does not function
normally, remove the batteries for 30
second before reinstall them. If that
doesn't work, replace the batteries.
x When replacing the batteries, do not mix
the new batteries with old ones or mix
batteries of different types, which could
cause failure of the remote controller.
x If the remote controller is not to be used
for a long period of time, remove the
batteries first, lest the leakage from them
may damage the remote controller.
x Properly dispose the discarded batteries.
Note:
This is a universal remote controller and may
cover a variety of models. Some of the
buttons may not be applicable to the
particular model you have purchased. If so,
these will not function on your model. (If a
specific function is not available on the air
conditioner, pressing the corresponding
button will have no effect).
Page 9

Page 9
Note: AUTO air speed is not
available in FAN mode
3. Speed
x Press this button in order to be able to
select the fan speed as follows:
Low - Mid - High - Auto
4. Display
x Press this button to turn on/off the display.
This is for the convenience of users who
are unconformable sleeping with the
backlight on.
5. Zone Follow
x Press this button to set the temperature
display on the remote controller to
ambient temperature and press this
button again to set it to pre-set
temperature.
6. Timer
x With the unit ON, press this button to set
OFF timer or with it OFF to set ON timer.
x Press this button once, “ON(OFF)” will
flash. Press “ a ” or “ b ” to set the
number of hours in which the unit will be
switched ON/OFF, with an interval of 0.5 h
if less than 10 hrs., or 1 hour if longer than
10 hrs. , and a range of 0.5-24 hrs.
x Press it again to confirm the setting, the
“ON (OFF)” will stop flashing.
x If the timer button is not pressed longer
than 10 seconds after the “ON (OFF)”
flashes, the timer setting will exit.
x If a timer setting is confirmed, pressing
this button again will cancel it.
Note: The remote controller will
display all symbols during power-on
and only those corresponding to the
current operation will be displayed
relating to the particular function for
the rest of the time.
1. On/Off
x Press this button to turn on/off the unit.
x This will clear the existing timer and
SLEEP settings.
2. Temp
x Press this button to set the temperature
display to Fahrenheit, which is displayed
by default in Celsius. The “°C” will not be
displayed on the LCD.
x Press this button again to restore the
temperature display to Celsius.
Note: Temperature display in
Fahrenheit is not available for some
models. When temperature is
displayed in Fahrenheit on the
remote controller, it might be in
Celsius on the unit, the function
and operation of which will not be
affected.
Page 10

Page 10
Note: When a ON timer is set, all
function buttons (except SLEEP,
DISPLAY and Zone Follow can't be
set ) are valid and when the ON
time set is up, the unit will operate
as pre-set.
7. Self Clean +
x Press this button with the unit OFF, the
remote controller will display “CL” and the
unit will automatically clean dust off the
evaporator and dry it, to increase the
cooling and heating efficiency.
x The iCLEAN function runs for
approximately 30 minutes, during which if
the unit is turned on with the remote
controller or this button is pressed again,
the iCLEAN will be deactivated.
8. a or b
x Each time the “a” is pressed, the
temperature setting will increase by 1°C
and each time the “b” is pressed, it will
decrease by 1°C.
x The temperature setting ranges from 16°C
(60°F)~32°C (90°F).
Note: The temperature cannot be
set in AUTO or FAN mode, thus
these two buttons are not
functional.
10. Mode
x Press this button in order to set the
running mode as follows:
Auto - Cool - Dry - Heat - Fan
Note: Heat mode is not available
for cool only units
11. Sleep
x Press this button to enter SLEEP mode,
which the unit will exit after 10 hours of
continuous operation and restore to the
previous status.
Note: The sleep function cannot be
activated in FAN mode
12. Swing
x Press this button to activate up/down
swing and press it again to fix the swing
position.
13. Swing (Optional)
x Press this button to activate left/right
swing and press it again to fix the swing
position.
14. Self Clean
x The Self Clean functions when the unit is
turned off with the remote controller in
COOL, DRY or AUTO mode. It will
operate in HEAT mode (FAN mode for
cool only units), with the internal fan
running with weak flow for 3 minute before
stop, to remove the moisture within the
evaporator so as to prevent it from giving
off bad smell from mould.
x This function is not set in the factory. You
may set it or cancel it any time you want
as follows: With both the unit and the
remote controller OFF, point the remote
controller at the unit and press “Self
Clean” button once, the buzzer will sound
5 times after 5 times, indicating this
function is set. Once set, this function will
remain valid except when the unit is
power off or until it is cancelled.
9. Turbo
x Press this button only in COOL or HEAT
mode to set TURBO on or off to increase
cooling or heating speed.
x When TURBO is on, the air speed is
HIGH.
x When TURBO is off, the air speed will
default to the previous setting.
Page 11

Page 11
x If the remote controller will not be used for
an extended period of time then remove
the batteries to prevent any leakage of the
electrolyte from damaging the remote
controller.
x If the remote controller enters an abnormal
state, remove and then reinsert the
batteries to clear the display.
To cancel Self Clean:
1. Power off the unit.
2. With both the unit and the remote
controller OFF, point the remote controller at
the unit and press this button once, the
buzzer will sound 3 times after 5 times,
indicating this function is cancelled.
Note: With Self Clean activated, it
is advised not to turn ON the unit
again before it is fully OFF.
Self Clean function will be invalid
when OFF timer is set.
15. ECO (Not available for this model)
x If this button is pressed in COOL mode,
the unit will enter the ECO mode which
has the lowest electricity consumption,
and exit it automatically 8 hours after.
x Changing modes or turning off the remote
controller will automatically cancel the
ECO function.
x Press ECO button in ECO mode to exit
this mode.
Note: The ECO mode only works
for inverter units
x Replace the batteries when any of the
following conditions occur: When the
signal from the remote controller is weak
and the indoor unit does not receive a
proper signal, the indicators on the display
screen become blurred.
x Slide the back cover of the remote
controller off, remove the old batteries and
replace with two new batteries.
x The positive and negative poles must
match with the batteries poles.
x New batteries of a matching type must be
used.
Replacement of batteries
Page 12

Page 12
Automatic operation mode
1. Press the “MODE” button, select the
automatic operation mode.
2. By pressing the “SPEED” button, you can
select the fan speed from LOW, MID, HIGH,
AUTO.
3. Press the “ON/OFF” button, the airconditioner starts to operate.
4. Press the “ON/OFF” button again, the airconditioner stops.
Note: In the fan operation mode,
the temperature settings is noneffective.
Cooling/Heating operation mode
1. Press the “MODE” button, select the
Cooling or Heating operation mode.
2. By pressing the “ a ”or “ b ”button, you
can set the temperature range from 16°C
(60°F)~32°C(90°F), the display changes as
you touch the button.
3. By pressing the “SPEED” button, you can
select the fan speed from LOW, MID, HIGH,
AUTO.
4. Press the “ON/OFF” button, the airconditioner starts to operate.
5. Press the “ON/OFF” button again, the airconditioner stops.
Note: Cold wind types have no
heating function.
Warning: Do not break, pull the
batteries apart or throw them into a
fire. There is a risk of explosion and
fire.
1. Press the “MODE” button, select the fan
operation mode.
2. By pressing the “SPEED” button, you can
select the fan speed from LOW, MID, HIGH.
3. Press the “ON/OFF” button, the airconditioner starts to operate.
4. Press the “ON/OFF” button again, the airconditioner stops.
Fan operation mode
Note: In the fan operation mode,
the temperature settings is noneffective.
1. Press the “MODE” button, select the
drying operation mode.
2. By pressing the “ a ”or “ b ” button, you
can set the temperature range from 16°C
(60°F)~32°C (90°F), the
display changes as you touch the button.
3. By pressing the “SPEED” button, you can
select the fan speed from LOW, MID, HIGH,
AUTO.
4. Press the “ON/OFF” button, the airconditioner starts to operate.
5. Press the “ON/OFF” button again, the airconditioner stops.
Drying operation mode
The remote controller has a backlight which
can be turned on by pressing any button for
the convenience of operation in darkness.
The backlight will be automatically turned off
if there is no operation within 10 seconds.
Backlight function (Some models)
Page 13

Page 13
Maintenance and cleaning
4
Cleaning the air filter
When the panel of the indoor unit is dirty, clean it gently with a slightly damp cloth using tepid
water below 45°C. Do not remove the panel whilst cleaning.
Warning:
x Before cleaning the air conditioner, it must be shut down and the electricity must
be switched off for more than 5 minutes to prevent the risk of an electric shock.
x Do not wet the air conditioner. This can cause an electric shock. Never rinse or
wet the air conditioner with water under any circumstances.
x Volatile liquids such as thinners or gasoline will damage the air conditioner
housing, Only clean the housing of air conditioner with a soft dry cloth and a
damp cloth moistened with a neutral detergent.
x Clean the filter regularly to ensure that the unit operates efficiently. If the service
environment of the air conditioner is dusty, then increase the frequency of
cleaning intervals. After removing the filter, do not touch the fins of the indoor unit
with your fingers.
1. Use both hands to open the panel from both ends as per the above diagram.
2. Release the air filter from the slot and remove it.
Remove the air filter
Use a vacuum cleaner to clean the air filter. The filter may also be rinsed with water to clean
the filter. If the filter is very dirty (for example, greasy), clean it with warm water (below 45°C)
and a use mild detergent. Rinse the filter with water and once complete place the filter in the
shade to air dry.
Clean the air filter
1. Reinstall the dried filter in reverse order of removal, close the cover properly.
Refit the air filter
Page 14

Page 14
1. Check whether all the air inlets and outlets of the units are unblocked.
2. Check whether the water outlet of the drain pipe is free from any obstruction. Clean and
remove if there are any blockages or obstructions
3. Check the ground wire is properly grounded.
4. Check whether the remote control batteries are fitted and have sufficient power in them.
5. Check whether there is any damage in the mounting bracket of the outdoor unit. if any,
contact the customer care line on 086 100 3339.
Check before use
Note: If the air filters and inlets are blocked by dust or dirt, the cooling and heating
performance will be affected and the operation noise and power consumption
increased. Air filters & inlets should be cleaned regularly.
Symptom Check
The air conditioner does not
operate.
x Make sure the air conditioner plug is securely plugged in.
x Are there any obstacles or disturbance supply oscillators in the room
that may be disturbing the signal from the remote controller?
x Is there a power failure?
x Is the power plug plugged in properly?
x Check for a blown fuse or tripped circuit breaker.
x Test the wall socket for power using another appliance.
x Inspect the electrical cord for damage.
x Eliminate the use of an extension cord, if any is being used.
x Does it reach the set time for start up?
The remote controller is not
operational.
x Check whether the batteries of the remote controller are usable.
x Is the remote controller out of effective distance to the indoor unit?
x Are there any obstructions between the controller and the signal
receptor?
x Check whether the batteries are positioned correctly.
Poor cooling or heating
performance.
x Is the temperature setting appropriate?
x Are the air filters clean?
x Are there any obstacles blocking the inlets and outlets of the indoor
and outdoor units? Is sleep mode used during daytime?
x Are there any heat sources in the room?
x Is the indoor fan speed set low?
x Are doors and windows closed?
Trouble shooting
5
Please review this list before calling the customer care line. It could save you time and money.
This list includes frequent complaints that do not arise from defective workmanship or material
usage. Some of the features described here may not apply to your model.
Maintenance after use
1. Switch off the power source of the air conditioner, switch off the circuit breaker and remove
the batteries from the remote control.
2. Clean the filter and the unit body.
3. Remove any dust or debris from the outdoor unit.
4. Check whether there is damage in the mounting bracket of the outdoor unit. If any, contact
the customer care line on 086 100 3339.
Page 15

Page 15
Please register your product at
www.defy.co.za
DEFY APPLIANCES (PTY) LTD
P.O.BOX 12004
JACOBS
DURBAN
4026
SOUTH AFRICA
If one of the following symptoms occurs, please switch the circuit breaker off
immediately and call the Defy customer care line on 086 100 3339 for help.
x The power cord or power plug has overheated or is damaged.
x An abnormal sound is heard during operation.
x The circuit breaker, fuse or the earth leakage breaker often cuts off the operation.
x One of the switches or buttons often fails to work normally.
x The air conditioner emits a burning smell during operation.
x Water leaks from the indoor unit.
x An unpleasant odour is emitted during operation.
x Water has penetrated the machine or the remote control.
x Air switch or protection switch often breaks.
Symptom Check
Poor cooling performance.
x Is there direct sunlight in the room?
x Is there a heat source in the room?
x Are there too many people in the room?
Indoor unit does not operate
immediately when the air
conditioner is restarted.
x If the air conditioner is turned on immediately after it is turned off, the
protective delay switch will delay the operation for 3 to 5 minutes.
There is unusual smell
blowing from the outlet
after operation is started.
x The air conditioner itself does not have undesirable odour.
x If there is an odour, it may be due to the odour in the environment.
x Please clean the air filter or activate the cleaning function.
There is sound of running
water during the running
of the air conditioner.
x Sometimes the "hissing" sound of running water can be heard. This is
the sound of the flow of the refrigerant, not a malfunction.
A slight "click" sound is heard
at the of start-up or shutdown.
x Due to temperature changes, the panel and other parts may expand
and contract which will give off the sound. This is normal, and is not a
fault.
During the cooling operation,
the indoor unit outlet
sometimes blows out mist.
x This is because the indoor air is cooled rapidly. After it runs for some
time, the indoor temperature and humidity will be reduced and the
mist will disappear.
Mist is blown out at COOL
operation.
x This phenomenon sometimes occurs when the temperature and
humidity of the room are very high. This will disappear with the
lowering of the temperature and humidity .
Moisture may form on the air
outlet grilles.
x If the unit is operated for a long period of time with high humidity,
moisture may form on the air outlet grilles and drip down.
Page 16

Page 16
x When carrying out installation at 2m or
higher above the base level, safety belts
must be worn and ropes of sufficient
strength be securely fastened to the
outdoor unit. Follow these safeguards to
prevent falling that could cause personal
injury or death as well as property loss.
Important notice
x Avoid places where there are inflammable
or explosive gas.
x Avoid places subject to strong artificial
electric/magnetic fields.
x Avoid places subject to noise and
resonance.
x Avoid severe natural conditions (strong
wind, direct sunshine or high temperature
heat sources).
x Avoid places within the reach of children.
x Keep the distance between indoor and
outdoor units to a minimum.
x Select where it is easy to perform service
and repairs and where ventilation is good.
x The outdoor unit shall not be installed in
an aisle, stairway, exit, fire escape,
catwalk or any other public area.
x The outdoor unit shall be installed as far
as possible from neighbours doors and
windows and from plants.
Installation position requirements
Raised height requirements
x The mounting rack must meet the relevant
national or industrial standards in terms of
strength. Welding and connection areas
must be rustproofed.
x The mounting rack and its load carry
surface shall be able to withstand 4 times
or more above the weight of the unit, or
200kg, whichever is heavier.
x The mounting rack of the outdoor unit
shall be fastened with expansion bolts.
x Ensure the installation is secure,
regardless of what type of wall it is
installed on, to prevent potential accidents
that could hurt people.
Mounting structure requirements
x Be sure to use the rated voltage and air
conditioners dedicated circuit for the
power supply. The power cord diameter
must meet the national requirements.
x When the maximum current of the air
conditioner is 16A, it must use the air
switch or leakage protection switch
equipped with protection devices.
x The normal operating range is 90%-110%
of the local rated voltage.
x The minimum clearance between the air
conditioner and combustibles is 1.5 m.
Electrical safety requirements
Installation
6
x Installation is the buyer’s responsibility.
The manufacturer accepts no liability for
this service. Any action that the
manufacturer has to take as a result of an
erroneous installation will not be covered
by the warranty.
x The installation, including electrical
connections, must be carried out by
qualified personnel in accordance with
current and local regulations. An
installation by an unqualified person may
constitute a hazard and will void the
warranty.
x The manufacturer shall not be held
responsible for injury to persons or
damages arising from procedures carried
out by unauthorized persons or due to
non compliance with these provisions.
Page 17

Page 17
x The air conditioner is a type I electrical
appliance and must be properly grounded.
x Do not connect the grounding wire to a
gas pipe, water pipe, lightning rod,
telephone line, or a circuit poorly
grounded to the earth.
x The grounding wire is specially designed
and shall not be used for any other
purpose. Do not fasten the grounding wire
with a common tapping screw.
Grounding requirements
Note:
The connection method of the air
conditioner and the power cord and
the interconnection method of each
independent element shall be
subject to the wiring diagram affixed
to the machine.
The model and rating value of the
fuse shall be subject to the
silkscreen on the corresponding
controller or fuse sleeve.
No Name
1 Indoor unit
2 Remote controller
3 Batteries
Quantity
1
1
2
Unit
Set
PC
PC
4 Instructions 1 Set
5 Drain pipe 1 PC
Packing list indoor unit
No Name
1 Outdoor unit
2 Connecting pipe
3 Plastic strap
Quantity
1
2
1
Unit
Set
PC
Roll
4 Pipe protection ring 1 PC
5 Putty 1 Packet
Packing list outdoor unit
Page 18

Page 18
1. The wall for installation of the indoor unit
shall be hard and firm, so as to prevent
vibration.
2. Use the "+" type screw to fasten the peg
board. Horizontally mount the peg board on
the wall and ensure that it is mounted
squarely.
3. Check the peg board by hand after the
installation and check whether it has been
securely mounted.
Installation of indoor unit
Mounting plate
1. Make a hole with an electric hammer or a
water drill at the predetermined position on
the wall for piping. The hole must slant
outwardly by between 5°-10°.
2. To protect the piping and the cables from
being damaged running through the wall,
and from the rodent damage, a pipe
protecting ring shall be installed and sealed
with putty.
Wall - Through hole
Note: The wall hole should be
between Ø60mm ~ Ø80mm. Avoid
making contact with pre-buried
power wire and hard walling when
making the hole.
Page 19

Page 19
1. Depending on the position of the unit, the
piping may be routed to the side either from
the left or to the right ( Fig 1 ), or vertically
from the back( Fig 2 )(depending on the pipe
length of the indoor unit). In the case of side
routing, cut off the outlet cutting stock from
the correct side.
2. The power cord may be routed separately
from the piping. Cut off the outlet cutting
stock and then run the power cord through
the hole, keeping the remaining part as
a protector against rodents.
Routing the pipe
1. Remove the mountings and pull the indoor
unit pipe out of the housing.
2. Connect the connecting pipe to the indoor
unit: Aim at the pipe centre, tighten the
Taper nut with fingers, and then tighten the
Taper nut with a torque wrench, the direction
is shown in the diagram on the top right. The
torque used is shown in the following table.
Wrap the piping
Drain pipe connection
Size of pipe (mm) Torque (N . m)
Ø6 / Ø6.35 15~25
Ø9.52 35~40
Ø12 / Ø12.7 45~60
Ø15.88 73~78
Ø19.05 75~80
1. Use the insulation sleeve to wrap the joint
of the indoor unit and the connection pipe.
Then use insulating material to pack, seal
and insulate the pipe, to prevent generation
of water condensation at the joint.
2. Connect the water outlet with drain pipes,
ensure the connection pipe, cables, and the
drain hose are straight.
3. Use plastic cable ties to wrap the
connecting pipes, cables and drain hose.
Run the pipe sloping downward.
Page 20

Page 20
1. Hang the indoor unit on the peg board,
and move the unit from left to right to ensure
that the hook is properly positioned in the
peg board.
2. Push toward the lower left side and the
upper right side of the unit toward the peg
board until the hook is embedded in the
slot and makes a "click" sound.
Mounting the indoor unit
x If your air conditioner is provided with a
power cable, the wiring of the indoor unit
has been connected in the factory, and
there is no need of connection. If the
power cable is not provided, connection is
needed in accordance with the wiring
diagram shown below.
Wiring diagram
This manual covers a variety of
models. Some speciality type
wiring diagrams may not be
included.
The diagram is for reference only,
there may be a slight difference
between the wiring diagram and
the unit you have purchased,
Page 21

Page 21
Connect the outdoor unit with the connecting
Pipe: Aim the counter-bore of the connecting
pipe at the stop valve, and tighten the Taper
nut with fingers. Then tighten the Taper nut
with a torque wrench.
Install the connection pipe
When extending the piping, an extra amount
of refrigerant must be added so that the
operation and performance of the air
conditioner is not compromised.
Installation of outdoor unit
Page 22

Page 22
1. Loosen the screws and remove E-parts
cover from the unit.
2. Connect the cables respectively to the
corresponding terminals
of the terminal board of the outdoor unit (see
the wiring diagram), and if there are signals
connected to the plug, just conduct butt joint.
3. Ground wire: Remove the grounding
screw out of the electric bracket, cover the
grounding wire end onto the grounding
screw and screw it into the grounding hole.
4. Fix the cable reliably with fasteners
(Pressing board).
5. Put the E-parts cover back in its original
place and fasten
it with screws.
Wiring connection
Wiring diagram
Page 23

Page 23
Vacuum Pumping Method (R410A
refrigerant evacuation must use the vacuum
pumping method).
Expelling the air
Before working on the air conditioner,
remove the cover of the stop valve (gas and
liquid valves) and be sure to retighten it
afterward. (to prevent potential air leakage)
1. To prevent air leakage and spilling tighten
all connecting nuts of all flare tubes.
2. Connect the stop valve, charge hose,
manifold valve, and vacuum pump.
3. Fully open the handle Lo of the manifold
valve and apply vacuum for at least 15
minutes and check that the compound
vacuum gauge reads -0.1MPa(-76cmHg).
4. After applying vacuum, fully open the stop
valve with a hex wrench.
5. Check that both indoor and outdoor
connections are free of air leakage.
When the unit is heating, the condensing
water and defrosting water can be let out
reliably through the drain house.
Installation:
Install the outdoor drain elbow in the Ø25
hole on the base plate, and join the drain
hose to the elbow so that the waste water
formed in the outdoor unit can be drained out
safely to a proper place.
Outdoor condensation drainage (Heat
pump type only)
Page 24

Page 24
Post installation check
Electrical Safety Check
1. If the supply voltage is as required.
2. If there is any faulty or miss connection in
each of the power, signal and grounding
wires.
3. If the grounding wire of the air conditioner
is securely grounded.
Installation Safety Check
1. If the installation is secure.
2. If the water drain is smooth.
3. If the wiring and piping are correctly
installed.
4. Check that no foreign matter or tools are
left inside the unit.
Leak test of the refrigerant
Depending on the installation method, the
following methods may be used to check for
suspected leaks, on areas such as the four
connections of the outdoor unit and the
cores of the cut-off valves and t-valves:
1. Bubble method: Spray a uniform layer of
soap water over the suspected leak spot and
observe carefully for bubbles.
2. Instrument method: Check for leaks by
pointing the probe of the leak detector
to the suspected leak according to the
instructions.
Test operation
Test Operation preparation
Verify that all piping and connection cables
are well connected.
Confirm that the values at the gas side the
liquid side are fully open.
Connect the power cord to an independent
power socket.
Install batteries in remote control.
Test Operation method
1. Turn on the power and push the ON/OFF
switch button of the remote controller to start
the air conditioner.
2. Select COOL, HEAT (not available on cool
-only models), SWING and other
operation modes with the remote controller
and see if the operation is ok.
Page 25

Page 25
Branches
If you have followed the instructions and still have a problem, contact the customer care
line on 086 100 3339. They will be able to advise you on any aspect of the appliance.
OTHER AREAS ARE SERVICED BY OVER 200 AUTHORISED SERVICE AGENTS.
PLEASE CONTACT THE CUSTOMER CARE LINE FOR DETAILS.
South African Branches:
BLOEMFONTEIN
160 Long Street, Hilton, Bloemfontein 9301
Tel: 051 400 3900
Bloemfontein.Service@defy.co.za
CAPE TOWN
5A Marconi Rd. Montague Gardens, 7441
Tel: 021 526 3000
CapeTown.Service@defy.co.za
DURBAN
135 Teakwood Road, Jacobs,
Durban, 4052
Tel: 086 100 3339
Durban.Service@defy.co.za
EAST LONDON
Robbie de Lange Road, Wilsonia,
East London, 5201
Tel 086 100 3339
EastLondon.Service@defy.co.za
JOHANNESBURG
Cnr. Mimetes & Kruger Sts. Denver ext.12
Johannesburg, 2094
Tel: 011 621 0200 or 011 621 0300
Gauteng.Service@defy.co.za
POLOKWANE
87 Nelson Mandela Drive, Superbia 0699
Tel: 0152 92 1166 / 7 / 8 / 9
Polokwane.Service@defy.co.za
PORT ELIZABETH
112 Patterson Road, North End, Port Elizabeth
6001
Tel: 041 401 6400
PortElizabeth.Service@defy.co.za
PRETORIA
Block A1 Old Mutual Industrial Park,
Cnr. D.F.Malan Drive & Moot Str. Hermanstad,
0082
Tel: 012 377 8300
Pretoria.Service@defy.co.za
Sub-Saharan Africa Branches:
ZAMBIA: SOUTHGATE INVESTMENTS LTD
Plot 1606, Sheki Sheki Road
P.O. Box 33681
Lusaka, 10101, Zambia
Tel: +260 0211 242332/3
Fax: +260 0211 242933
sgiservicecentre@microlink.zm
NAMIBIA: ATLANTIC DISTRIBUTORS (PTY)
LTD
10 Tienie Louw Street, Northern Industrial Area
P.O. Box 21158, Windhoek, Namibia
Tel: (061) 216162
Fax: (061) 216134
atlantic@mweb.com.na
ZIMBABWE: TRADECOMAFRICA
Trade Com Africa, 183 Loreley Crescent
Msasa, Harare, Zimbabwe
Tel: +263 4 486165/6
Cell: +263 772 469010
Cell: +263 772 469011
BOTSWANA: RAY MORGAN AGENCIES
RMA Service Centre, Plot 48, East Gate
Gaborone International Commerce Park
Kgale View, Gaborone
Botswana
Tel: +267 390 3996 / 390 3912
Fax: +267 318 7376
Cell: +267 7134 6539
service@rma.co.bw; raja@rma.co.bw
SWAZILAND: LYNDS DISTRIBUTORS
P.O Box 716, Mbabane, Swaziland, H100
Tel: (00268) 2515 4310/8
Fax: (00268) 2518 4318
MOZAMBIQUE: COOL WORLD. LDA
Rua da Resistencia No. 97B R/C
Cell: +258 84 44 61 234
coolworldlda@hotmail.com
Nosso Show Room
Av: da Industrias, Parcela No.735 * 735A
Machava, Maputo
7
Page 26

Page 26
This certificate is issued by DEFY APPLIANCES (PTY) LIMITED manufacturers of Defy and
Ocean products, hereinafter the Company, to the original purchaser only, of the appliance
described on the certificate and shall constitute the only warranty given in respect of this
appliance.
The Company warrants to the original purchaser that for a period of TWO YEARS from date of
purchase the appliance is free from defect under normal domestic use, both in workmanship and
material, subject to the following conditions.
1. Repair or replacement of any part of this appliance, found by the Company to be defective, shall be
at the election of the Company. The Company reserves the right to effect such service through any
of its Service Divisions or Authorised Service Dealers. The cost of such service shall be borne by
the Company in full, provided that the appliance is located no further than 50km from a Company
Service Centre or an Authorised Service Dealer. Where the appliance is located beyond the 50km
radius, the purchaser shall be liable for the standard travelling charges, as determined by the
Company.
2. Vitreous enamelware, fuses and lamps are specifically excluded from these warranties. It is an
express condition of these warranties that the purchaser takes due care and attention in the use and
maintenance of the appliance. Abuse, misuse in conflict with operating instructions, connection to
incorrect voltages and subjection to commercial use shall release the Company from its obligations.
3. This warranty shall become void and cease to operate if the appliance is dismantled by, or any
repairs to the appliance are effected by any persons not duly authorised by the Company, or if
substitute parts not approved by the Company are used in the appliance, or if the serial number of
the appliance is removed.
4. The Company shall not be responsible for damages resulting from fire, flood, civil disturbances or
any Act of God. The Company shall not, in terms of these warranties be responsible nor held liable
for any consequential loss or damage of any kind caused by or due to the failure or malfunction of
the appliance.
5. The Company shall not be responsible for transportation or other costs other than those incurred
within the provisions of Point 1 of this Certificate.
6. For warranties in the Republic of South Africa and Sub-Saharan Africa, please contact your
nearest Defy office. Please refer to the previous page for respective South African branches
and Sub-Saharan Africa branches.
7. Where service is requested under warranty and no fault or defect can be found by the Company,
all costs incurred will be for the purchaser's account.
8. The units are to be serviced every 12 months by an authorised installer/technician, the cost
of which is for the purchasers account. Failure to ensure that a unit is serviced according to
the prescribed service intervals will result in the warranty becoming void.
9. This Certificate as well as your invoice will serve as proof of purchase. For the purpose of warranty,
it will be essential to produce this Certificate and invoice. Failure to do so, will render the purchaser
liable for service costs.
KEEP THIS CERTIFICATE AND SALES INVOICE AS PROOF OF
PURCHASE FOR WARRANTY PURPOSES.
Warranty
8
 Loading...