

Page 1

1
OWNER’S
MANUAL
STAINLESS STEEL
SLIMLINE
BUILT-IN OVEN
AND HOB
600STS
600SSU
www.defy.co.za
You can rely on Defy
Six Hundred S
5
6
2 Unpacking
2 Cupboard design
2 Electrical installation
3 Under-counter installation
3 Hob installation
4 Eye-level installation
4 The control panel
5 Thermofan oven
6 Conventional oven
7 Safety advice
7 Ringer timer
8 Solid plates
9 Maintenance and cleaning
13 Problem check
14 Service centres
15 Warranty
16 Features
2
3
2
3
4
4
1
1
5
6
7
7
8
8
2
3
4
1
5
6
7
8
S L I M L I N E
2
3
4
1
5
6
7
8
2
3
4
5
6
7
8
A
2
3
4
1
1
5
6
7
8
Page 2

2
“This appliance must be
and the manufacturer and the
do not accept
for any
due to incorrect
or electrical
•
•
•
Introduction
Congratulations on the purchase of this quality product.
We trust that you will enjoy many years of trouble free use. Please
read these instructions carefully before using the oven and hob. This
manual will provide you with information on how to operate and
care for your product in order that you gain the maximum benefit
from it.
Unpacking
Please ensure that packaging material is disposed of in a responsible manner.
Plastic bags should be cut up to prevent children playing with them and accidentally
•
Please ensure that packaging material is disposed of in a responsible manner. Plastic
suffocating.
bags for example should be cut up to prevent children playing with them and acciden-
•
Remove all packing from the oven cavity and position the accessories.
tally suffocating.
If the appliance is damaged in any way, do not use it. Report the damage to your
•
If the appliance is damaged in any way, do not use it. Report the damage to your
dealer, who will take the necessary corrective action.
dealer, who will take the necessary corrective action.
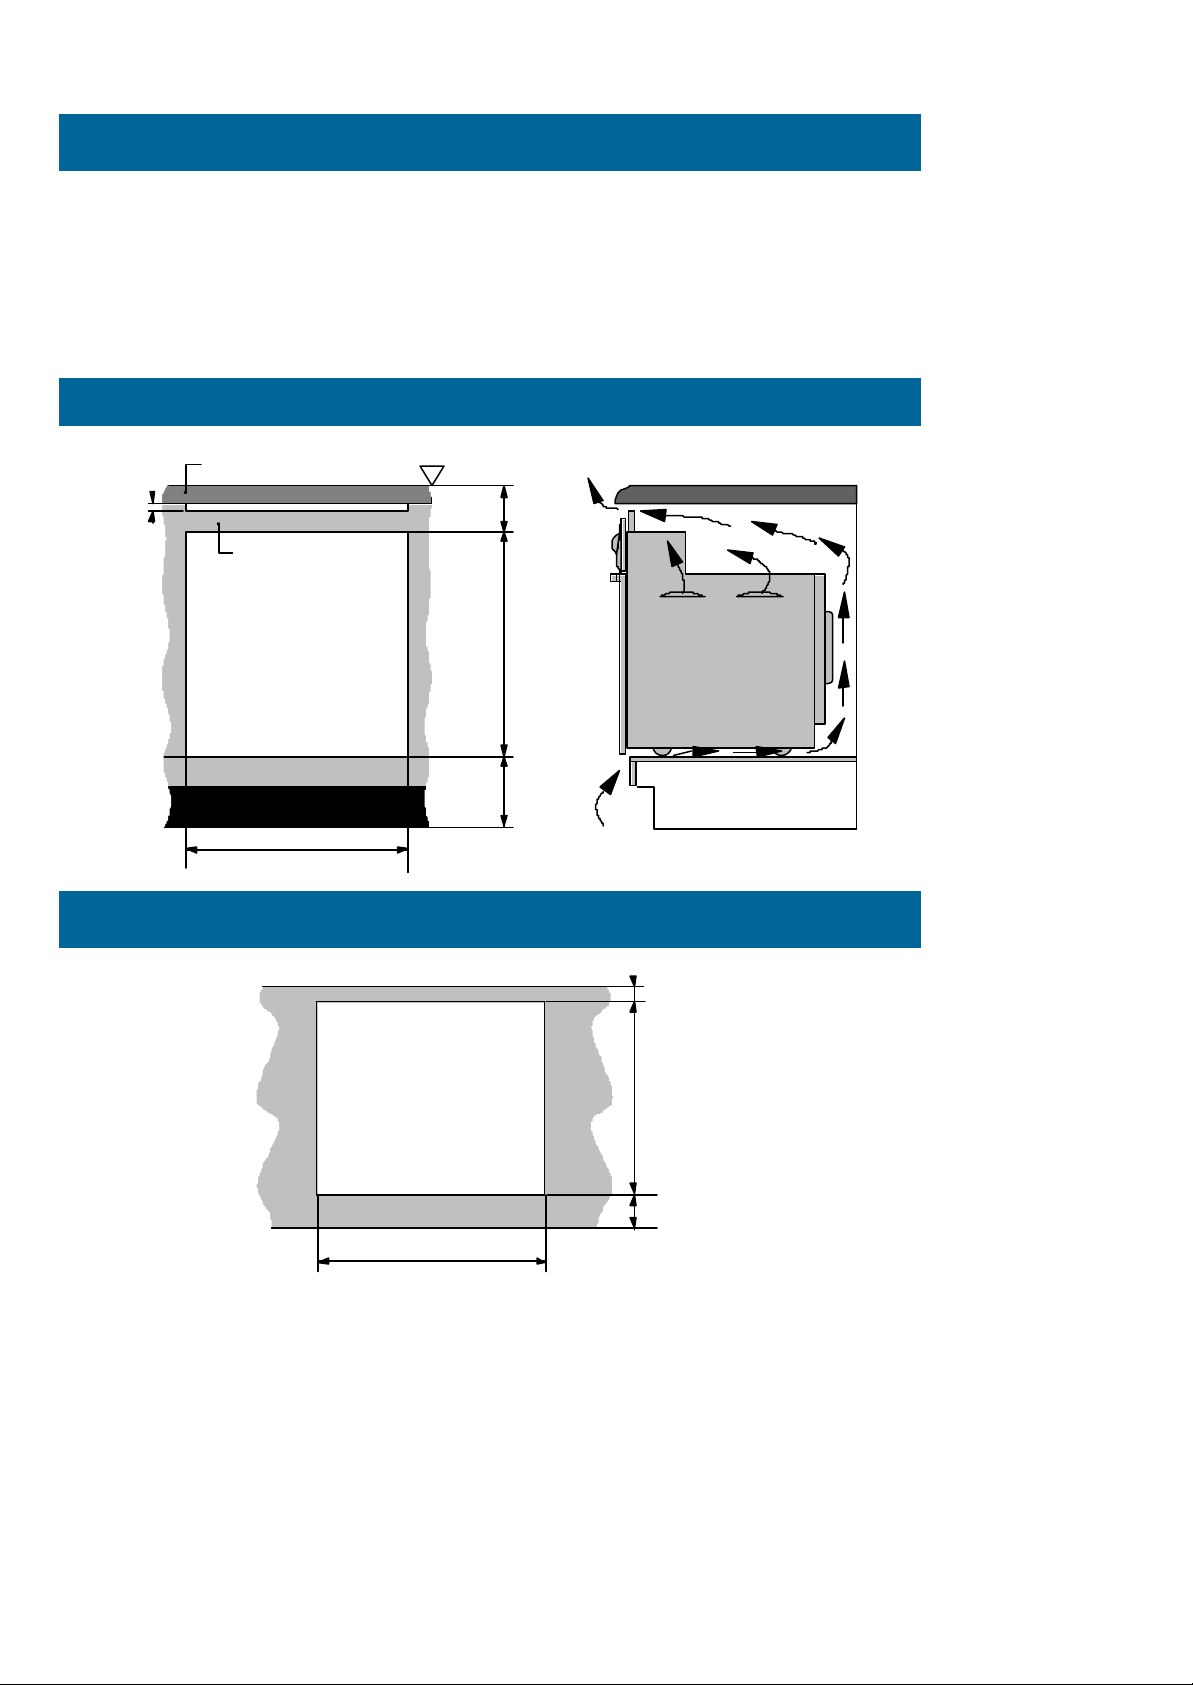
Cupboard design
•
Cooking appliances generate considerable heat. The layout and materials of the
mounting cabinet should take account of the characteristics of the oven.
•
Surfaces immediately adjacent to the oven should be able to withstand temperatures
of up to 100 C without delaminating or discolouring.
•
Because the oven vents through the handle, overhanging doors and worktops above
the oven may be subjected to heat as well as condensation if very moist foods are
being cooked.
Electrical
installation
•
This appliance should not be connected through an earth leakage system.
Refer to S.A.B.S. 0142.
•
Place the oven on the floor in front of the aperture and make the electrical connection
before installing. This will ensure enough cable length for subsequent servicing.
Connection to the power supply
ensure that the oven is correctly connected and safely earthed. The rated current is printed
on the serial number label attached to the oven side trim.
The appliance must be connected to the mains through a double pole isolating switch
which has a minimum clearance between the contacts of 3 mm. in both poles.
A means for disconnection must be provided in the fixed wiring.
Hob to oven connection
must be carried out by a licensed electrician, who will
— Two 6 pin electrical plugs are used. ( Refer to label on oven )
Page 3
3
Installation
• Note: The oven cavity must vent through the front only. Avoid gaps between cupboard
sides and the underside of the worktop.
• Insert the oven into the cupboard.
• Open the door to expose the fixing holes in the side trims.
• Secure the oven by 4 countersunk screws (fasteners are not supplied ).
• The hob should be installed in a ventilated cupboard fitted with a sturdy worktop.
• Secure the hob using the fixing brackets provided.
Under-counter installation
Worktop
32mm - 48mm thick
6
Vent
gap
at
front
only
Top filler piece
Aperture
590 H x 565 W x 570 D
900
Datum
100
590
Aperture
+_3
+_3
0
0
+_3
565 Aperture
0
(210)
Floor
Typical section showing
ventilation requirements
Hob installation
( 35 )
485
+_3
0
Worktop front
80
+_3
0
560
+_3
0
Page 4
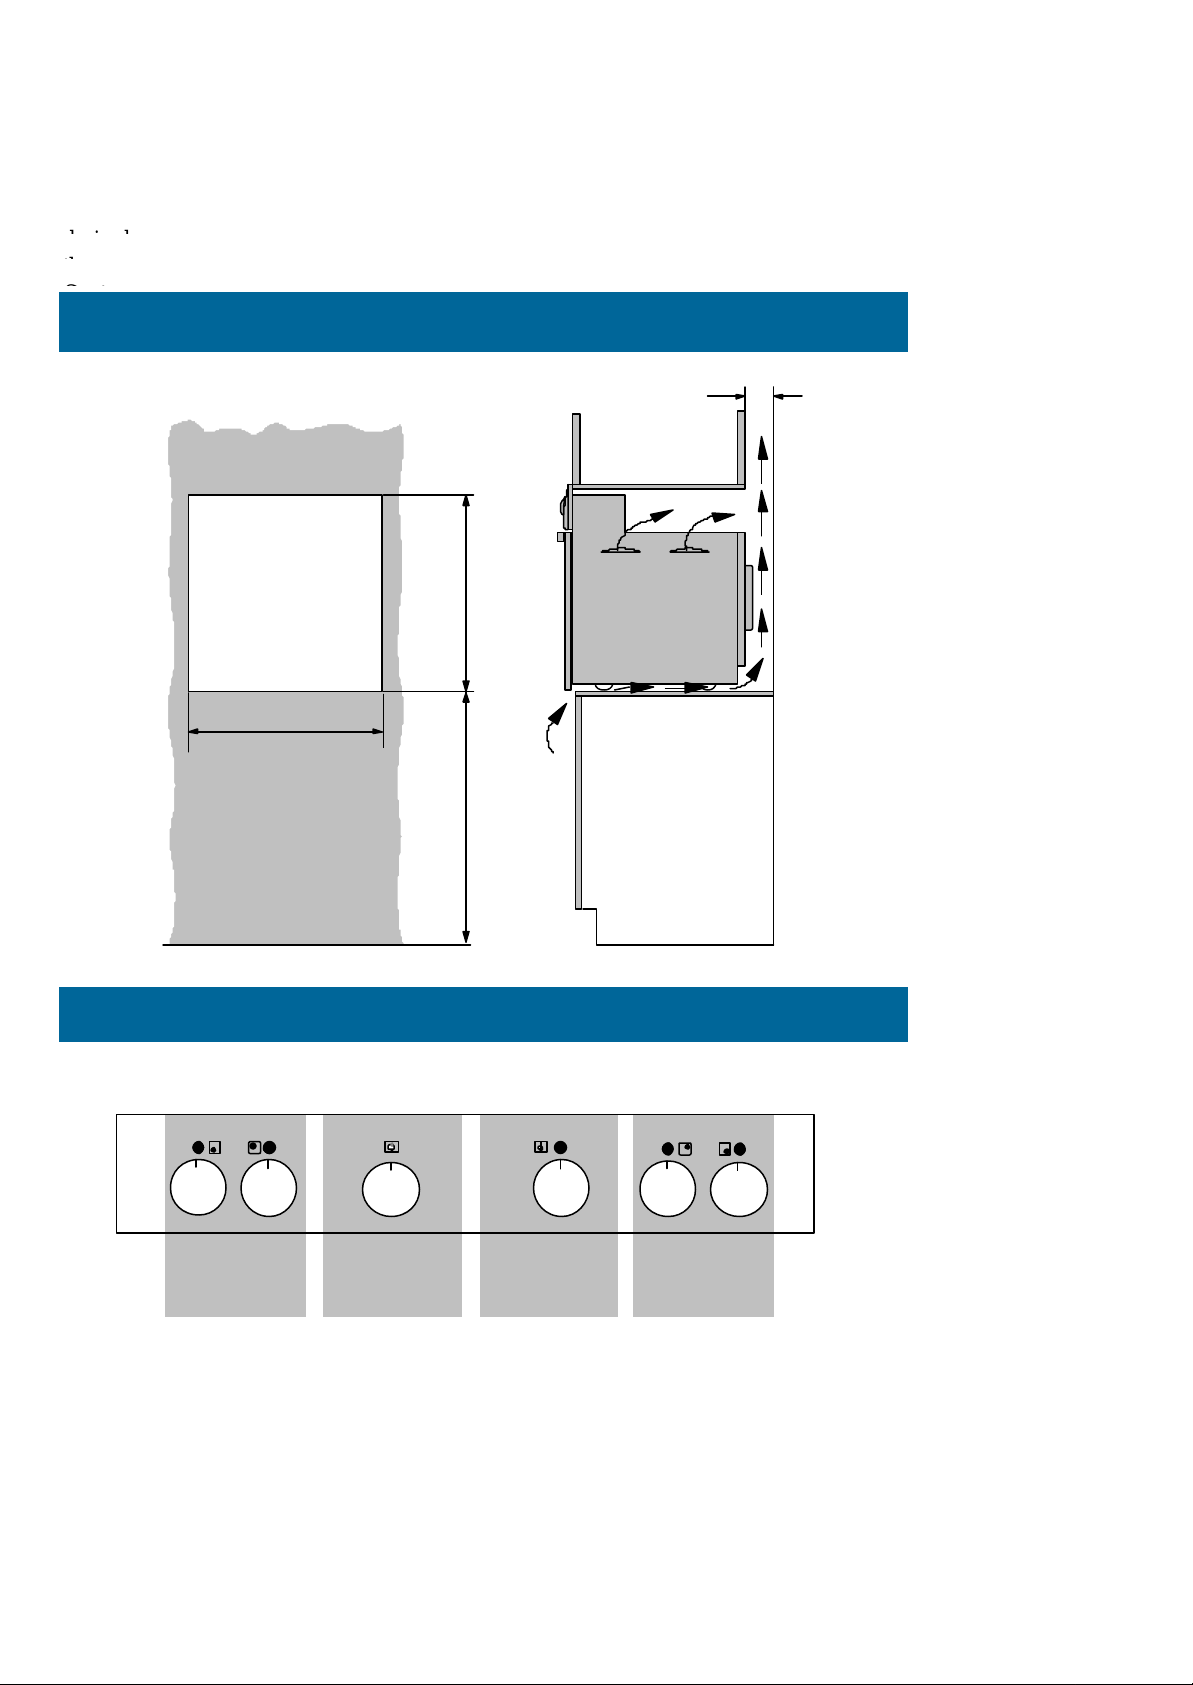
4
Defy Slimline undercounter ovens may be
installed at eye level if so
This will require the purchase of a wiring extension kit ( part No. 061120 ) from
nearest Defy Service
+ _ 3 0 + _ 3 0 + _ 3 0 + _ 3 0
Left
and
Plate
Ring
time
Ove
Thermost
Right
and
Plate
5
NOTE
Eye - level installation ( optional )
Aperture
590 H x 565 W x 570 D
590
Aperture
565
Aperture
900
Above floor
level
Typical section showing
ventilation requirements
Floor
The control panel
60
Page 5

Thermofan oven ( model 600STS )
Registered by Defy in 1978, Thermofan cooking differs from conventional cooking in
that it uses the principle of forced convection within the oven. The advantages are:
1. Both trays may be used at the same time.
2. Different dishes can be cooked simultaneously without flavour or aroma transfer.
Hence fish, meat and cakes can be baked at the same time.
3. The oven door may be opened any time for inspection purposes without risking a
flop.
4. By circulating hot air around the food, spit-roast chickens may be done without using a rotisserie.
5. Cooking is done at slightly lower temperatures, saving electricity and reducing
splatter.
Cooking
• Set the oven thermostat to the required temperature.
• The indicator light will glow and remain on until the oven has reached the selected
temperature. When the indicator light switches off, the food should be placed in the
oven. During cooking the indicator light will cycle on and off as the oven thermostat
maintains the selected temperature
• After completion, the thermostat must be returned to 0.
4
3
2
1
Baking guide
• Thermofan baking may be done on both trays simultaneously (small items) or on a
single tray for larger items ( see shelf positions). When using a single tray, the other
tray should be removed from the oven.
• For small items the entire area of each tray may be utilised. Larger items should be
placed towards the front of the tray.
• All ovens extract a certain amount of moisture from the food being cooked. The much
greater capacity of the Thermofan oven allows more food to be cooked and thus more
moisture may be released. This is normal and not detrimental to the food or the oven.
• For professional results and perfect browning, open the oven door when half the bak-
ing time has lapsed. Then turn the baking tins around so that the sides previously facing the back of the oven now face the front.
Caution: Thermofan baking relies on good contact between the bottom of the cake
tin and the oven tray. Do not use spring form baking tins with a raised bottom. The
lack of contact will cause the bottom of the cake to be underdone. These tins may be
used on a wire shelf where no insulating air space is created.
Position 4 and 2 = T/fan baking (small items)
Position3 = Grill
Position 2 = T/Fan baking (large items —single tray usage).
Position 1 = T/Fan roasting ( large)
Page 6

6
2 3 4
WARNING:
ACCESSIBLE PARTS MAY BE
ALWAYS USE OVEN GLOVES
WHEN HANDLING FOOD IN THE
Conventional oven (Model 600SSU)
Baking
•
•
•
•
•
Note
•
•
•
Set the oven thermostat to the required temperature.
The thermostat indicator light will glow and remain on until the oven has reached the
selected temperature. The light will then switch off.
Thereafter place the food in the oven.
During the baking cycle, the indicator light will switch on and off as the thermostat
maintains the selected temperature.
After baking is completed, the thermostat must be turned to the "0" position in
an anti clockwise direction.
The oven thermostat is marked down to 70
°
C.
When set to this position, the oven may be used as a warmer.
All ovens extract moisture from the food being cooked, especially so during the winter months. This is normal and not detrimental to the food or the oven.
Baking Guide
•
Where possible, bake on the middle shelf position of the oven.
•
Place the food halfway between the back of the oven and the door.
•
Do not open the oven door until at least two thirds of the baking time has lapsed.
•
The roast pan must not be used for baking purposes
Grilling Models 600STS and 600SSU
•
The oven door must remain closed during grilling.
•
Position the wire shelf in the desired position below the grill element
•
Set the oven thermostat to the GRILL position.
•
The thermostat indicator light will glow.
•
Pre - heat the grill element for about 5 minutes.
•
Partially withdraw the shelf and place the broiler / roast pan with the food on it in the
centre of the shelf. Slide the shelf back into position. Close the door.
•
Monitor the grilling to avoid burning the food.
•
Care must be taken not to touch the grill element while handling food in the oven.
•
After grilling is completed , the thermostat must be returned to the "0" position
in an anticlockwise direction.
•
NB The broiler / roast pan may also be pre - heated at the same time as the grill
1
Position 3
is recommended
for grilling
COME HOT WHEN GRILLING.
OVEN.
KEEP CHILDREN WELL AWAY
FROM THE PRODUCT WHEN IT IS
IN USE.
-
Page 7

7
Safety advice
•
Only use the oven and hob for preparing food.
•
Always keep children away from the product when it is in use.
• Do not leave hot fat or oil unattended. If overheating occurs, these could catch fire.
•
Switch off the power at the wall switch in the event of a fault or when cleaning the appliance.
• Do not store flammable items in the oven. If the oven is inadvertently switched on,
these could catch fire.
•
Never cover the bottom oven element with aluminium foil. Cooking times will be affected and the oven enamel could be damaged.
•
Avoid spilling fruit juice, particularly citrus, on the oven as it could damage the enamel.
•
Always keep the oven door gasket clean as this will enable the door to seal properly.
Ringer timer
•
The ringer timer may be used for timing the cooking period. It does
not switch off the oven or the plates but gives an audible ring when the
selected time period has elapsed.
•
Turn the control knob to 60 minutes to wind up the mechanism.
•
Return the knob to the desired period.
•
When the time has elapsed, the timer will ring for a few seconds.
Page 8

8
Solid plates
•
Red dot plates
•
Plates featuring a red dot in the centre are high speed, high
wattage plates for increased performance
•
For your safety these plates are fitted with thermal limiters.
Should a plate be accidentally switched on and left unattended,
the limiter will reduce the power output of the plate and minimise the risk of overheating and the possibility of fire.
Caring for Solid Plates
•
Before using the plates for the first time, switch them on for about 4 minutes at the
highest setting. This allows the factory applied protective coating to burn in.
•
To prevent blotchy discolouration and corrosion, moisture from spatters and spills
should be cleaned off immediately.
•
To clean the plates, wipe them with a damp cloth or nylon pad. A little liquid detergent
may be used. Do not use metal scourers or sharp metal objects to clean the plates.
•
After cleaning, dry the plates by switching them on for a short while.
•
To prevent rust, periodically apply some sewing machine oil or electrical hotplate polish -
available from Defy Service Centres. Extra attention is required in areas of high
humidity or in close proximity to the sea.
NOTE: THE WARRANTY DOES NOT COVER THE REPLACEMENT
OR REPAIR OF RUSTED OR CORRODED PLATES.
Recommendations
•
Use only pots with a solid level base. An uneven base can prolong cooking times and
waste energy.
•
Use pots with a base diameter slightly larger than the plate. This will ensure even heat
distribution and prevent spillage from dripping onto and staining the hot plate.
•
Always cover the pot with a lid. This will conserve energy and minimise spillage.
•
Thermal shock could damage the plates. Do not put cold pots on very hot plates.
•
Plate controls
Select the heat level by turning the relevant plate control knob to the required setting.
•
The higher the number selected, the hotter the temperature of the plate will be.
•
The plate indicator light will glow when a plate is switched on.
Page 9

9
Maintenance
Lift-off oven door
The oven door may be removed to improve oven access during cleaning
Grasp the open door on
Grasp the open door on
both sides near the hinges
both sides near the hinges
Flip the retainer clasps up
and over the hook on the
upper hinge arm .
Maintain upward pressure
on the door to prevent the
clasps from disengaging
Lift the door upwards and
outwards until it is free of
After cleaning ,refit the door
Removing the inner door glass.
• The glass may be removed for cleaning pur-
poses by removing the two screws which hold it
in place.
• It is now possible to clean the inside of the
outer glass if required.
• Wash the glass in hot soapy water, rinse and
dry.
• Re-assemble by carefully locating the rubber
seal in the embossed groove before fitting the
glass. The glass is marked
“THIS SIDE TOWARDS OVEN”.
• Re-fit the two securing screws.
Removing the side racks and shelves
• The side racks and shelves may be removed for
cleaning purposes.
• Remove the bottom bake element guard.
• Slide the shelf out fully against the shelf stop.
• Lift the shelf slightly and slide it out
• The side racks may be removed by pulling the bot-
tom stay slightly downwards thereby dislodging it
from the retainer at the bottom centre. Lift the
racks free of the retaining slots in the oven wall.
• Replace in reverse order of disassembly.
the hinge housing
in reverse order.
Page 10

10
Switch off the electrical power supply before cleaning a
ny part of the
Clean the oven with a damp, hot soapy
•
•
It may be necessary to soak burnt soils with a liquid cleaner to
soften them
scrubbing them with a nylon brush or scouring
Heavy soils on the bottom of the oven may require overnight soaking under a
liberally sprinkled with household ammonia. The soil can then be removed the
ing morning by washing
Do not use metal objects or steel wool to clean the
For your convenience, the shelves and side racks may be removed to improve
Switch off the el
ectrical power supply before cleaning any part of the
Wipe down glass panels, cabinet, door, control knobs, trims and handles with a
•
Use only liquid household cleaners
and avoid
Rinse and wipe down with a clean
The oven light is switched on by the oven thermostat and switches off
To replace a faulty light bulb, proceed as
Switch off the power at the wall switch to avoid the possibility of
Remove the light cover by unscrewing it in an
Uns
crew the faulty bulb and fit a new 25 watt bulb rated for
Maintenance
Oven light
the thermostat knob is returned to 0 .
•
shock.
•
Refit the light cover.
Cleaning
Cleaning the oven
•
•
Open the oven door and allow the oven to cool down.
•
Do not use a steam cleaner.
•
•
•
General cleaning
•
•
soapy cloth.
•
Do not use a steam cleaner.
sive powders, scouring pads and caustic cleaners.
•
- clockwise direction
°
C
Page 11

11
jected to misuse or even abuse. Care should be taken to avoid such ‘abnormal use’.
•
•
Cleaning and maintaining
stainless steel
Stainless steel is not adversely affected by normal household use but because of it’s
reputation for durability, it is sometimes assumed to be indestructible, and therefore sub-
Cleaning materials
DO USE
•
A soft cloth or synthetic sponge.
•
Soap, or mild household detergent ( Handy Andy )
Diluted ammonia in warm water.
•
A nylon bristle brush.
•
Cleaners labelled “Suitable for stainless steel”
DO NOT USE
•
•
•
•
•
Cleaning procedure
•
•
•
•
Acids
Coarse abrasive cleaning powders.
Metallic scourers, steel wool or metal scrapers.
Wire brushes or emery paper.
So called ‘silver cleaners’.
Kitchen scourer/foam pads
Frequent cleaning is recommended rather than an occasional aggressive clean.
Routine cleaning will preserve the corrosion resistance and appearance of the stainless
steel for many years.
Clean the stainless steel as often as necessary ( ie. when noticeably dull or dirty ) and
use the simplest cleaning method that will effectively do the job.
Use clean water, or a mild detergent solution applied with a soft cloth or sponge. Rinse
well and wipe dry.
.
ALWAYS WIPE
IN THE DIRECTION OF THE
BRUSHED TEXTURE
ON THE STAINLESS STEEL
Page 12

12
CONDITION ACTION NOTES AND COMMENTS
Requires routine cleaning Mild detergent solution ap-
plied with soft sponge or
cloth. Rinse and wipe dry.
Finger prints Pre-treat finger marks with
alcohol or an organic solvent. Follow immediately
with routine cleaning
If possible use warm to
hand-hot water. A 5% addition of ammonia is beneficial.
Minimize re-occurrence by
applying a wax or silicone
based household polish to
the clean dry surface
Wipe with a little baby oil
Stubborn stains and
discolouration
Grease and fat splatter. Wipe off excess with a soft
Scratches on the brushed finish.
and a soft lint free cloth.
Buff to shine
Use a little Ceran cleaning
paste. (available from Defy
Service Centres)
Rinse and dry.
cloth or paper towel. Use a
water borne degreasing
agent ( dishwashing liquid ).Follow up by routine
cleaning.
For slight scratches, use a
nylon pad loaded with an
iron free abrasive polishing
compound. Follow the direction of the original texture.
Follow up with routine
cleaning.
For deep scratches use a
coarser abrasive initially and
follow up as for light
scratches.
Apply whenever necessary
Repeat several times rather
than resorting to a single
aggressive cleaning method
Deep scratches will be difficult to remove completely.
Do not use steel wool or
metal scourers unless they
are made from stainless
steel.
It must be appreciated that some of the above suggested procedures will alter the
surface appearance of the treated area.
They should therefore only be applied with due consideration and care.
Page 13

13
CONDITION ACTION NOTES AND COMMENTS
Requires routine cleaning Mild detergent solution ap-
plied with soft sponge or
cloth. Rinse and wipe dry.
Finger prints Pre-treat finger marks with
alcohol or an organic solvent. Follow immediately
with routine cleaning
If possible use warm to
hand-hot water. A 5% addition of ammonia is beneficial.
Minimize re-occurrence by
applying a wax or silicone
based household polish to
the clean dry surface
Wipe with a little baby oil
Stubborn stains and
discolouration
Grease and fat splatter. Wipe off excess with a soft
and a soft lint free cloth.
Buff to shine
Use a little Ceran cleaning
paste. (available from Defy
Service Centres)
Rinse and dry.
cloth or paper towel. Use a
water borne degreasing
agent ( dishwashing liquid ).Follow up by routine
cleaning.
Apply whenever necessary
Repeat several times rather
than resorting to a single
aggressive cleaning method
Scratches on the brushed finish.
For slight scratches, use a
nylon pad loaded with an
iron free abrasive polishing
compound. Follow the direction of the original texture.
Follow up with routine
cleaning.
For deep scratches use a
coarser abrasive initially and
follow up as for light
scratches.
Deep scratches will be difficult to remove completely.
Do not use steel wool or
metal scourers unless they
are made from stainless
steel.
It must be appreciated that some of the above suggested procedures will alter the
surface appearance of the treated area.
They should therefore only be applied with due consideration and care.
Page 14

14
Service centres
15
BLOEMFONTEIN
P.O.Box 1691 Bloemfontein. 9300. 160 Long Street, Hilton. Bloemfontein 9301.
Tel. 051 400 3900
CAPE TOWN
P.O.Box 953 Milnerton. 7435 5A Marconi Rd. Montague
Gardens, Milnerton 7441.
Tel. 021 551 8314
DURBAN
P.O.Box 12004 Jacobs 4026. 135 Teakwood Rd. Jacobs 4052.
Tel. 031 460 9712
EAST LONDON
P.O.Box 7006 East London 5200. 16 Bowls Rd. Arcadia East London 5201.
Tel. 043 743 7100
JOHANNESBURG
P.O.Box 27150 Benrose 2011. Cnr. Mimetes & Kruger Sts. Denver ext.12 JHB. 2094.
Tel. 011 621 0200
Tel. Sales, Administration, Distribution, Commercial Head Office,
National Groups, Contracts and Credit.
PIETERSBURG
P.O.Box 1719 Pietersburg 0700. 87 Hoof Str. Superbia 0699.
Tel. 0152 92 1166 / 7 / 8 / 9.
PORT ELIZABETH
P.O.Box 2971 North End 6056. 204 Kempston Rd. Port Elizabeth.6001.
Tel. 041 401 6400
PRETORIA
P.O.Box 19768 Pretoria West 0117. Block A3 Old Mutual
Park.
Cnr. D.F.Malan Rd. & Moot Str. Hermanstad. 0082.
Tel. 012 377 0061
Page 15

This certificate is issued by DEFY APPLIANCES LIMITED manufacturers of Defy
products, hereinafter the Company, to the original purchaser only, of the appliance
certificate and shall constitute the only warranty given in respect of this
The Company warrants to the original purchaser that for a period of ONE YEAR from
chase the applian
ce is free from defect under normal domestic use, both in workmanship
rial, subject to the following
1.
Repair or replacement of any part of this appliance, found by the Company to be
be at the election of the Company. The Company
reserves the right to effect such
any of its Service Divisions or Authorised Service Dealers. The cost of such service shall
by the Company in full, provided that the appliance is located no further than 50 km
pany Service Centre or an Authorised Service Dealer. Where the appliance i
s located
50 km radius, the purchaser shall be liable for the standard travelling charges, as
Company.
CARRY IN SERVICE Microwave ovens, Compact cookers and small appliances are
our service centres and
are not collected from the customers home. Faulty units should
ered to the purchasing dealer or to the nearest Company Service Centre for
2.
Rusted or corroded plates, vitreous enamelware, fuses and lamps are specifi
cally
these warranties. It is an express condition of these warranties that the purchaser takes due
attention in the use and maintenance of the appliance. Abuse, misuse in conflict with
structions, connection to in
correct voltages and subjection to commercial use shall
Company from its
3.
This warranty shall become void and cease to operate if the appliance is dismantled by,
pairs to the appliance are effected by any p
ersons not duly authorised by the Company,
tute parts not approved by the Company are used in the appliance, or if the serial number
pliance is
4. The Company shall not be responsible for damages resulting from
fire, flood, civil
any Act of God. The Company shall not, in terms of these warranties be responsible nor
for any consequential loss or damage of any kind caused by or due to the failure or
the 5.
The Company shall not be responsible for transportation or other costs other than those
within the provisions of Point 1 of this
6. These warranties shall not apply to the appliance if it is purchased or used beyo
nd the
the Republic of South Africa, Namibia, Botswana, Swaziland and
7
. Where service is requested under warranty and no fault or defect can be found by the
all costs incurred will be for the purchaser's
8.
This Certificate as well as your invoice will serve as proof of purchase.
purpose of warranty, it will be essential to produce this Certificate and
Failure to do so, will render the purchaser liable for service
KEEP THIS CERTIFICATE AND SALES INVOICE AS
PURCHASE FOR WARRANTY
Warranty
Page 16

16
Stainless steel hob with controls on oven
Removable inner door glass
2 Red dot high speed plates and
Defy Slimline Oven and hob
Under counter
Stainless steel cosmetics
Conventional bake oven
Thermofan oven
Grill element
Ringer timer
Air vented “cool door”
Full glass door
Removable door
Roast pan and broiler
Baking trays
Chromed wire shelf
2 standard plates
600STS 600SSU
*
*
*
*
*
*
*
*
*
*
*
*
*
*
*
*
*
*
*
*
*
*
*
*
*
*
*
You can rely on Defy
The Manufacturer strives for continuous improvements. For this reason, the text
and illustrations in this book are subject to change without notice.
Part Number 063 486
 Loading...