

Page 1

5.1 Home Theater Sound Bar and Wireless Subwoofer System
Setup Guide
Page 2
2
AAA
AAA
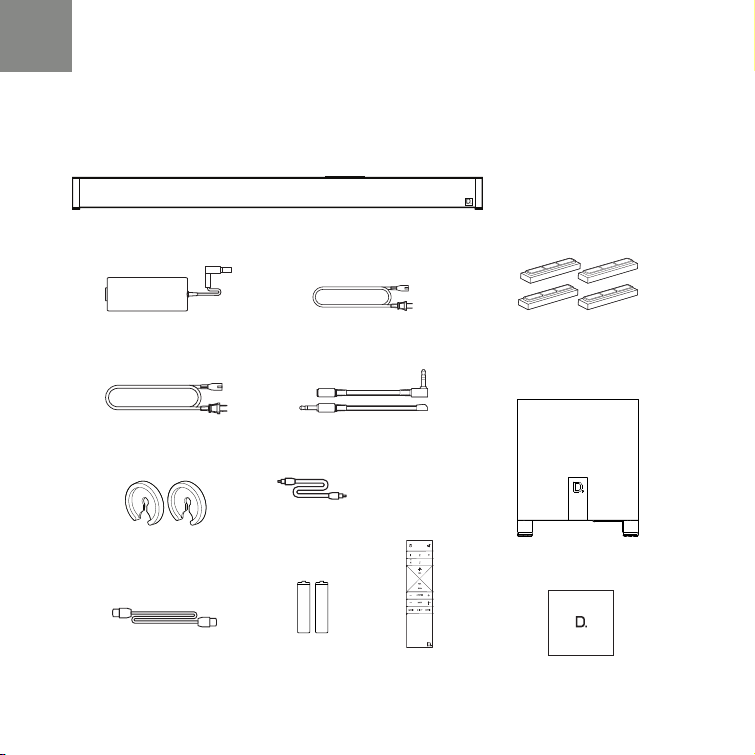
What’s in the Box
Sound bar
Power supply
Power cord
Two spaces for
wall mounting
HDMI cable
Subwoofer power cord Four risers (magnetic)
IR Adapters (input and output)
Optical cable
HDMI
HDMI
HDMI
OPTICAL
AUX
6
AAA
AAA
Two AAA
batteries Literature
Remote
control
Subwoofer
Page 3
Setup
3
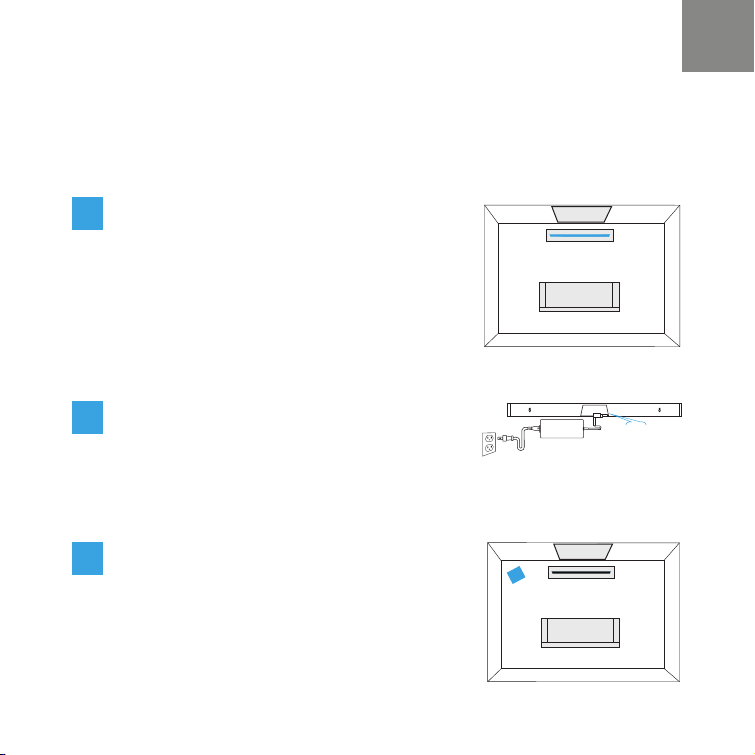
1.
Place the sound bar
For the best listening experience, position the
sound bar centered under your TV. You may
choose to place it either on a stand, or wall-
TV
Sound Bar
mount the sound bar below the TV.
2.
Connect the sound bar to an AC outlet
During startup, you will see multiple light
shows. When all 10 LEDs are blinking slowly,
POWER
INPUT
the sound bar is ready to be set up with the
Google Home app.
3.
Place the subwoofer
For best performance place on the same wall
as the TV, no more than 30ft (10m) from the
sound bar.
Subwoofer
TV
Performance Tip: placing the subwoofer in
a corner can make the bass seem even
more pronounced.
Page 4
4
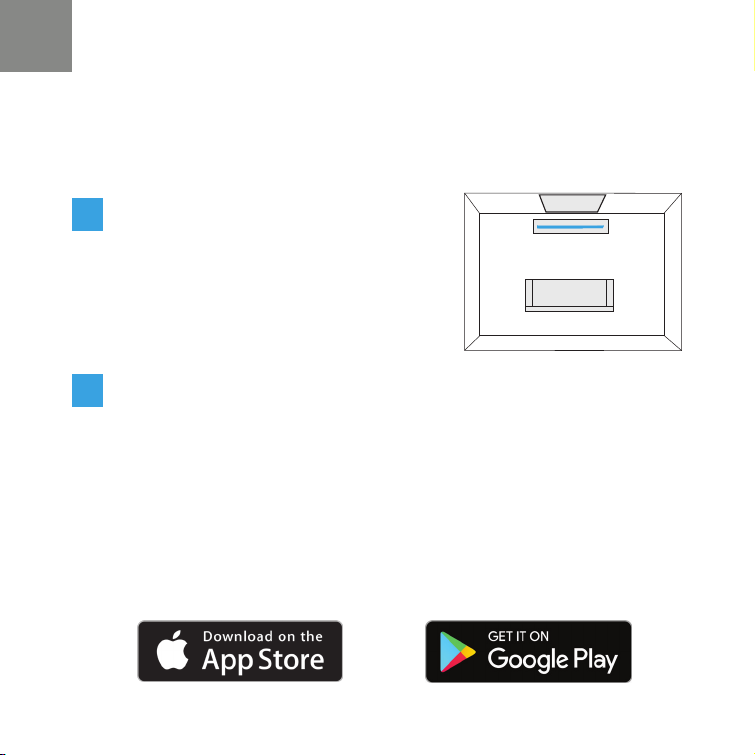
Connect the subwoofer to an
4.
AC outlet
A solid light will be visible on the
back of the subwoofer to indicate that
it is paired to the sound bar.
Download the Google Home App to setup your sound bar on your
5.
Wi-Fi network
Download the free Google Home app and follow the in-app instructions to setup the
sound bar on your Wi-Fi network.
For more detailed setup information about Google Home and Chromecast built-in for
audio, visit: https://support.google.com/googlehome and
https://support.google.com/chromecastbuiltin
Once the sound bar is connected to your Wi-Fi network, it will receive rmware updates
for the latest features, performance and tuning. We require updating your sound bar
to the latest rmware for the best overall experience. Please refer to the “Receiving
Automatic Updates” section under “Functionalities” (p. 8) for details.
Sound Bar
TV
Page 5
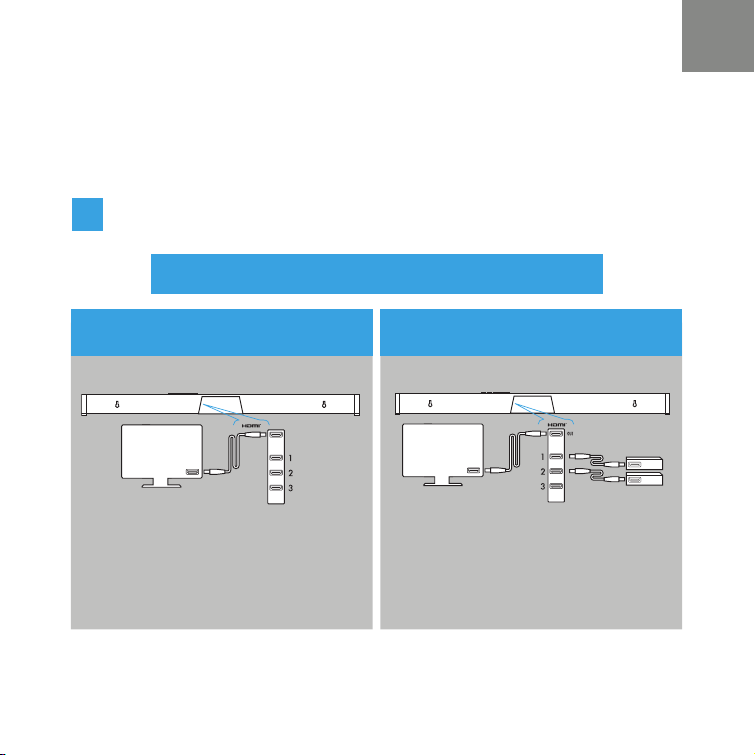
Connect to your TV
6.
5
Is an HDMI input jack on your TV labeled “ARC”?
YES — Use HDMI (ARC)
TV ARC
TV
HDMI IN
ARC
Connect the included HDMI cable to the HDMI
jacks labeled with “ARC” on both the TV and the
sound bar.
OUT
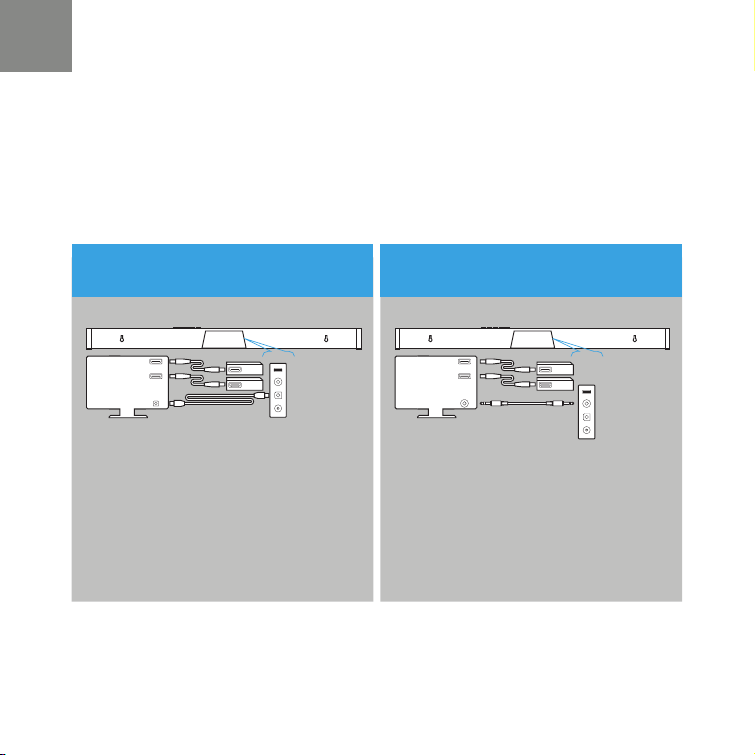
NO — Use all sources into your
Studio Advance via HDMI
TV
HDMI
IN
The HDMI cable runs from the HDMI output of the
Studio Advance to an HDMI input on the TV set.
Blu-ray
Cable
Page 6
6
Connect to your TV (cont.)
If your TV does not have
HDMI, use Optical
HDMI IN
TV
OPT
OUT
Connect the included Optical cable between the
TV and sound bar. With certain TV models you may
need to turn the internal TV speakers off or set the
sound to external speaker.
INPUTS
Blu-ray
FIRMWARE
AUX IN
Cable
OPT IN
POWER
All sources into your TV with 3.5mm
analog mini-jack to the sound bar
HDMI IN
TV
AUX
OUT
Some older TV’s have only an analog output
connection. In this scenario, the TV does all the
switching between sources and the Studio Advance is
always set to INPUT #4. A Dolby Digital or DTS digital
audio signal cannot be passed through a TV’s analog
output connection. The best audio signal quality that
can be reproduced using this method is two-channel
stereo audio. This method is the least-preferred
connection method of the four described here.
INPUTS
Blu-ray
Cable
FIRMWARE
AUX IN
OPT IN
POWER
Page 7
Turn on your TV and enjoy the Studio Advance
7.
Turn on your TV and verify that you are hearing sound from the sound bar.
Note: Access your TV’s menu and turn off its internal speakers.
If you do not hear sound and do not see any lights on the front of your sound bar,
press the power button on the sound bar to turn it on.
7
Page 8
8
Functionalities
1.
Using your TV remote to control the volume
The Studio Advance comes pre-congured to respond to volume and mute commands from
the most popular TV remotes including: Samsung, LG, Sony, Vizio and other major brands.
*
All other trademarks, product names, logos and brands referenced herein are the
property of their respective owners
*
Listening to music via Bluetooth
2.
• Bluetooth will only work after the product has been set up using the Google
Home app.
• To pair your device using Bluetooth, press the Bluetooth button on the sound
bar. A blue light will slowly pulse on the sound bar as it waits to connect to your
Bluetooth device.
• Go to the Bluetooth settings section in your phone, tablet or computer and
select the name chosen in the Google Home app. The name of the device
changes to the name congured in the Home App setup ow. The light will turn
solid blue for 3 seconds and fade to off when your Bluetooth device is connected.
• To re-establish a Bluetooth connection after pairing has already been completed,
go to the Bluetooth settings on your device and connect to the sound bar.
®
Page 9
Chromecast built-in benets
3.
The Studio Advance features Chromecast built-in for easy streaming and more:
• Stream music from your favorite apps over Wi-Fi.
• Create a whole-home audio experience. Multi-room sync lets you play the same song
across Chromecast built-in compatible speakers in your house at the same time.
• Use Google Assistant on a Google Home speaker or other Assistant-enabled
device to control music playback on the Studio Advance with voice commands.
Listening to music via Chromecast built-in
• Tap the cast button from your favorite music apps to start streaming to your speakers. For
more information please visit: https://www.google.com/chromecast/built-in/audio/
• For information on list of Chromecast compatible apps please visit:
https://store.google.com/us/product/chromecast_2015_apps?hl=en-US
Receiving automatic updates (highly recommended)
Denitive Technology securely provides periodic software updates via the Internet which improve
product performance.
Google Home App
for iPhone, iPad
and Android devices
9
Page 10
10
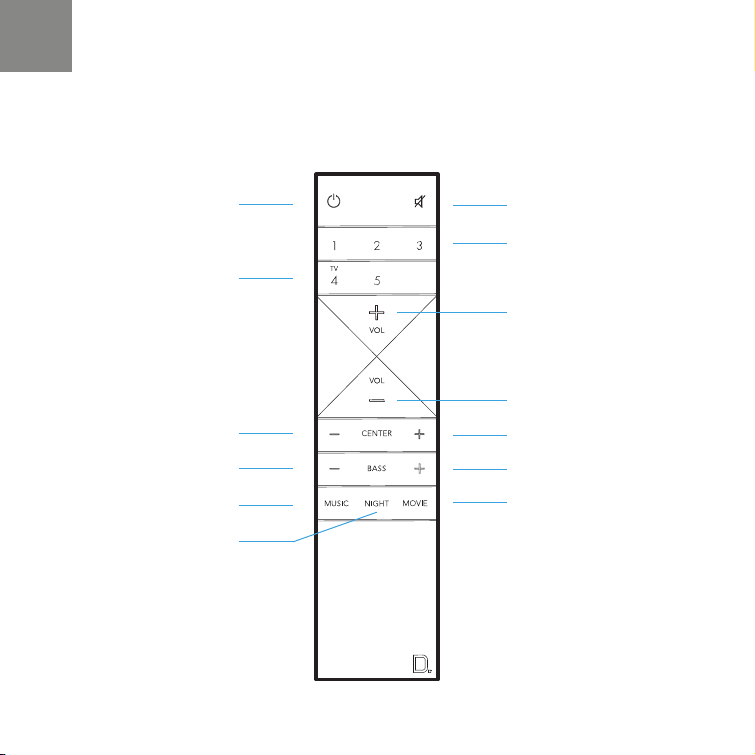
Remote Control
Power On/Off
TV Input
Center Down
Bass Down
Music Mode
Night Mode
HDMI
HDMI
OPTICAL
Night Mode
HDMI
Mute
HDMI Inputs
AUX
6
Master Volume Up
Master Volume Down
Center Up
Bass Up
Movie Mode
Page 11
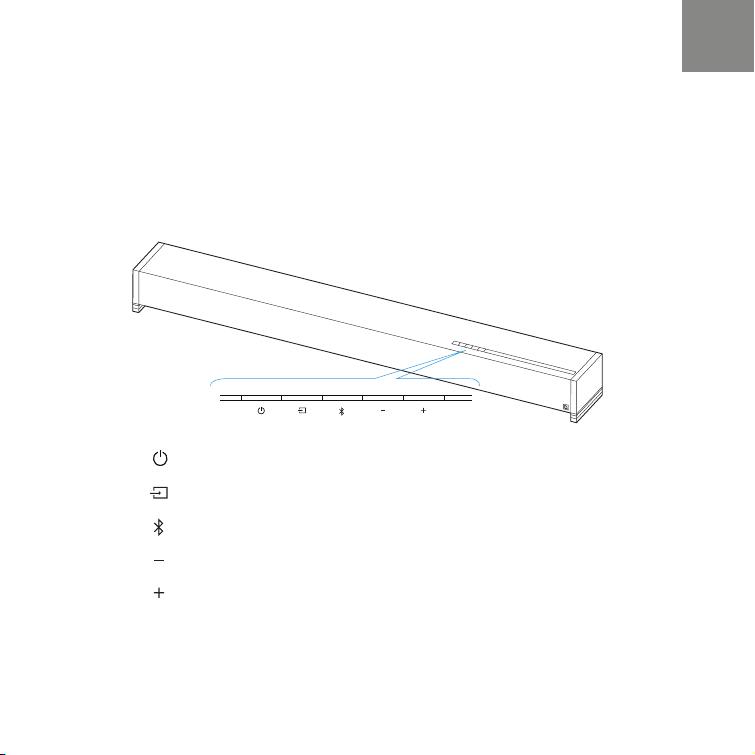
Sound Bar Controls
Front of Studio Advance
• Power - Turns the Studio Advance on/off
• Source - Switches sound bar inputs
• Bluetooth - Initiates Bluetooth pairing
• Volume Down - Decreases the master volume
• Volume Up - Increases the master volume
11
Page 12
12
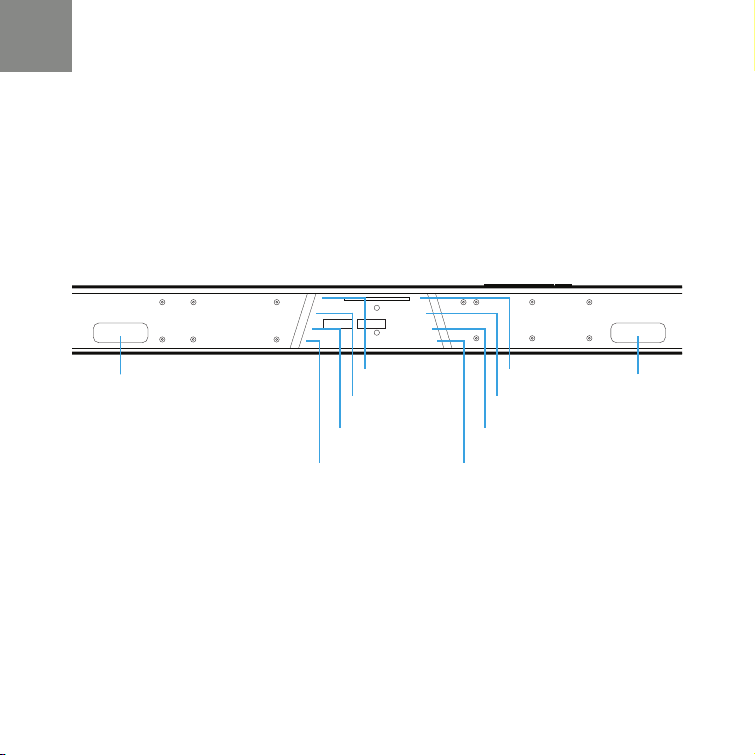
Back of Studio Advance
IR Input IR Output
TV ARC Out Firmware
HDMI 1 Aux In
HDMI 2 Opt In
HDMI 3 Power
Page 13
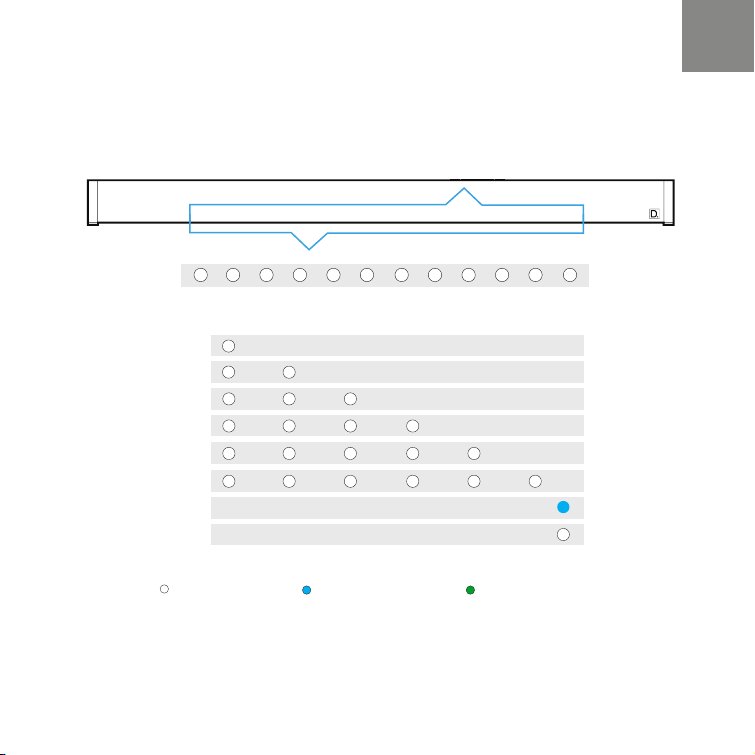
Visual LED Indicators (Sound Bar)
SOURCE INDICATORS
1. 2. 3. 4. 5. 6. 7. 8. 9. 10.
Above is a closeup of the source indicators.
HDMI 1
HDMI 2
HDMI 3
HDMI ARC
OPTICAL
AUX
BLUETOOTH
CHROMECAST
Several source colors indicate the audio bitstream for non-streaming inputs.
PCM CONTENT DOLBY CONTENT DTS CONTENT
13
12.
11.
NOTE: All source indicators appear for three seconds before fading to off.
Page 14
14
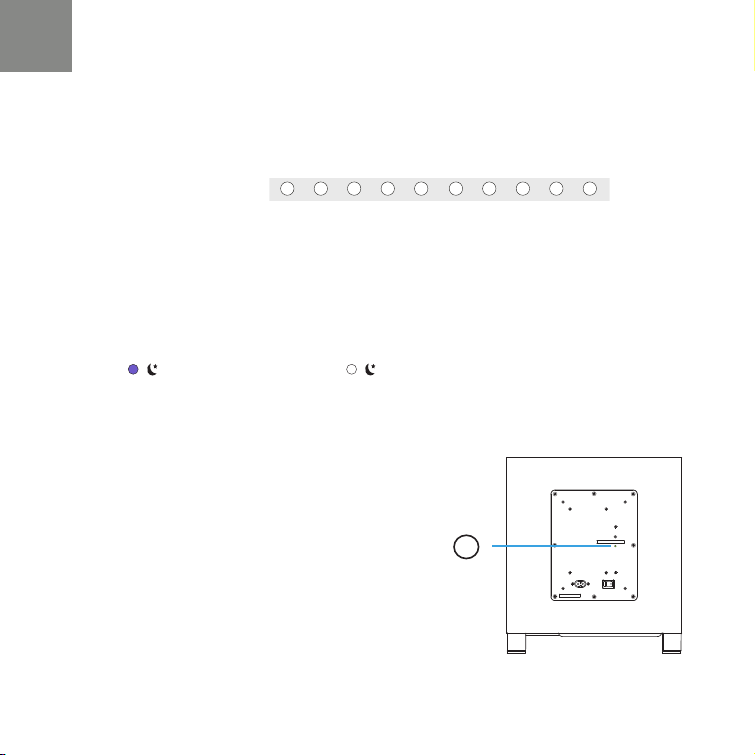
MUTE INDICATOR
While MUTE is active, the source indication will blink.
VOLUME LEVEL
INDICATORS
Master Volume will be indicated with 10 LEDs. Each LED will have 10 levels of brightness to
indicate 1-100% volume. Volume 1% will be indicated with the left most volume dimly lit, volume
100% will be indicated with all 10 volume LEDs fully illuminated.
Volume indicators will illuminate in purple instead of white to indicate the state of Night Mode. In
Standby, all lights are off.
NIGHT MODE - enabled NIGHT MODE - disabled
Visual LED Indicators (Subwoofer)
A solid LED light on the subwoofer indicates the
subwoofer is connected to the sound bar.
If the subwoofer fails to connect, please call
customer service.
Page 15
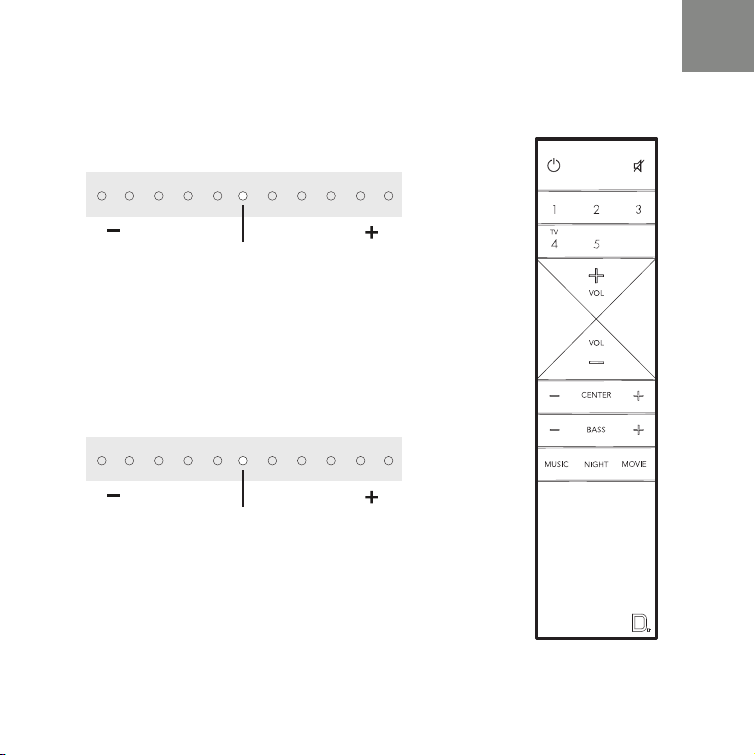
Optimize Your Listening Experience
Less
CENTER
Customize the voice level to reproduce clear, crisp
dialogue on your sound bar using the center (+/-)
button on your sound bar remote.
DEFAULT
LEVEL
More
CENTER
CENTER
BASS
HDMI
HDMI
OPTICAL
HDMI
15
AUX
6
Less
BASS
DEFAULT
LEVEL
Customize the bass level using the bass (+/-)
buttons on your sound bar remote.
More
BASS
Page 16
16
NIGHT MODE
NIGHT MODE
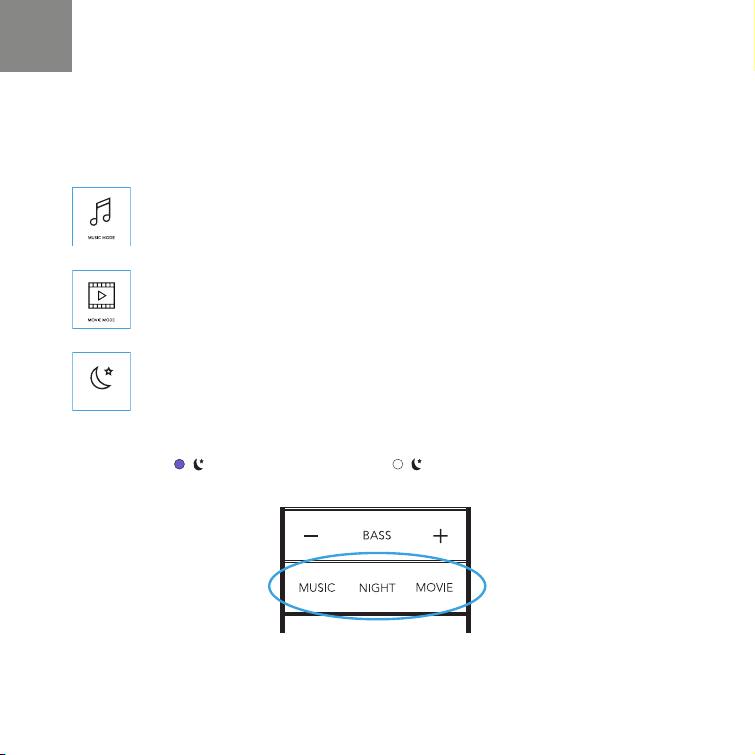
Sound Modes
NIGHT MODE
Music Mode
Music mode provides a natural and balanced sound prole with smoother bass
while minimizing home theater spatialization effects.
Movie Mode
Movie mode is optimized for both movies and TV content. It provides home theater
spatialization effects, as well as enhanced dialogue and more dynamic bass impact.
This is the default sound mode for HDMI and Optical input sources.
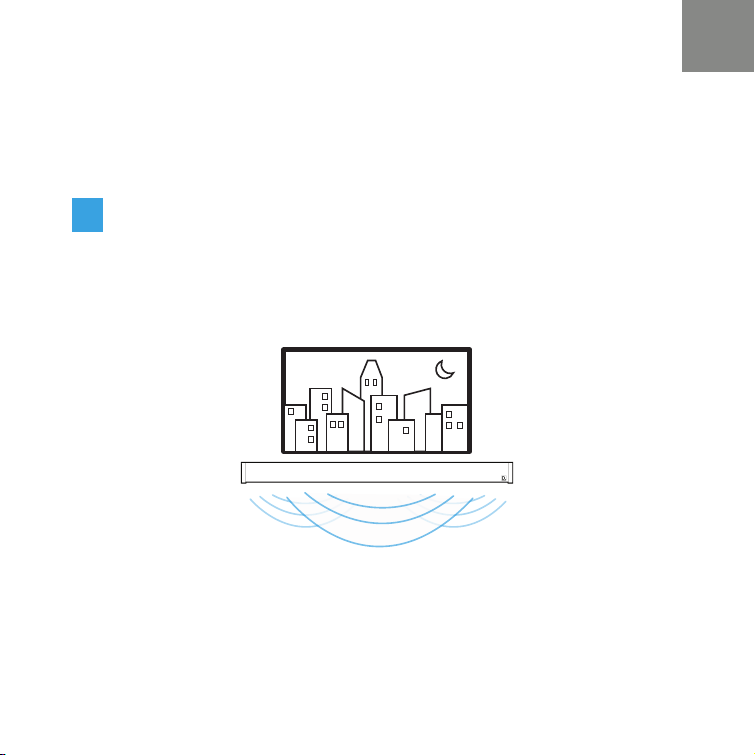
Night Mode
Night mode is optimal for low-volume listening. Bass and dynamic range are
reduced to improve vocal clarity. Volume indicators will illuminate in purple instead
of white to indicate the state of Night Mode. In Standby, all lights are off.
NIGHT MODE - enabled NIGHT MODE - disabled
Page 17

Using Your TV or Cable/Satellite TV Remote
to Control the Studio Advance
Here’s how to use your TV, cable, or satellite remote to control the Studio Advance.
HDMI CEC CONTROL
If your TV is connected via HDMI ARC and your TV supports CEC (and it is enabled in the TV
settings menu), you can control the volume and mute functions on the Studio Advance from your
TV without any further setup.
PRELOADED IR CODES
The Studio Advance comes pre-loaded with remote commands for many of the televisions
manufactured within the last 5 years.
17
Page 18
18
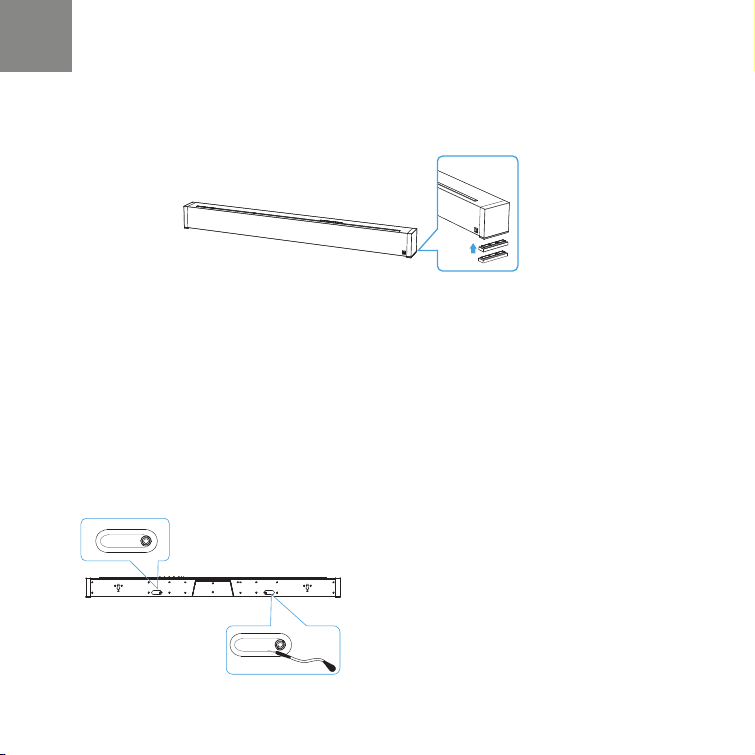
Placement Options
TABLETOP MOUNTING
The Studio Advance comes with extra riser feet (two per side) that magnetically attach to the Studio
Advance to raise it as much as 15.2 mm (5/8”) off the tabletop so the Studio Advance will clear the
TV’s protruding table stand.
Attach magnetic feet: Peel off the protective cover and expose the magnets. Attach the feet to
the bottom edge of the Studio Advance.
NOTE: The Studio Advance could block your TV’s remote “eye”, making it impossible to control
the TV via remote control, so we supply an IR asher. Plug the asher into the Studio Advance IR
output and position it in front of the TV’s eye.
IR INPUT
For custom installations: the IR input is more
likely to be used with a home automation system,
like Crestron or Control 4. This is often just an
electrical connection to a piece of equipment.
IR OUTPUT
Page 19

IR OUTPUT
IR INPUT
MOUNTING THE STUDIO ADVANCE ON THE WALL
The Studio Advance has built-in keyhole slots so you can wall-mount it beneath your wall-mounted
television. Spacers are included to help secure and install your Studio Advance on the wall.
NOTE: DO NOT mount the Studio Advance directly to the wall. You must use the supplied wallmount spacers to ensure proper operation and reliability. DO MAKE SURE you are using a wall
anchor of suitable load-bearing capacity (13.65 lb).
812.8 mm
[32"]
TIPS FOR WALL MOUNTING THE STUDIO ADVANCE
Leveling the Studio Advance: Use a bubble level to make sure the bar is level. Mark holes with
pencil, taking the keyhole slot measurement from the bar.
Drill Screw Holes in Wall: Pre-drill the pilot-hole locations for mounting screws (not included). Use screws
rated to hold securely in the wall material and have screw heads at least 0.33” (8.5 mm) in diameter.
NOTE: Measure Twice. Make sure the sound bar clears the ceiling, adjacent walls, corners, beams,
lighting xtures and door/window frames. Leave at least 1-2” (25-50 mm) above the Studio
Advance location to allow the Studio Advance to slide onto the screws. Make sure the center of
the bar is centered with the TV screen’s center point.
Hang the Studio Advance on Posts: Line up the bar so that the screw heads slide into the keyhole
slots. Slide the bar down so the screw heads hold the bar rmly in place.
19
Page 20

20
For Further Assistance:
Phone Number
(800) 228-7148 (North America)
+1 (410) 363-7148
Email
denitive@custhelp.com
Mail
Denitive Technology
1 Viper Way
Vista, CA 92081
Follow us on
Twitter
Instagram
Facebook
Google, Chromecast, Google Play and other related marks are trademarks of Google LLC
Page 21

AAA
AAA
FR
Contenu de la boîte
21
Barre de son
Alimentation électrique
Cordon d’alimentation
Deux emplacements
pour montage mural
Câble HDMI
Cordon d’alimentation
du subwoofer Quatre rehausseurs (magnétiques)
Adaptateurs IR (entrée et sortie)
Câble optique
HDMI
HDMI
HDMI
OPTICAL
AUX
6
AAA
AAA
Deux piles
AAA Documentation
Télécommande
Subwoofer
Page 22

22
Installation
1.
Placez la barre de son
Pour une expérience d’écoute optimale, placez la
barre de son au centre, sous votre téléviseur. Vous
pouvez choisir de la placer sur un support ou de la
TV
Sound Bar
Barre de son
xer au mur, sous le téléviseur.
2.
Branchez la barre de son sur une prise
secteur (AC)
Au cours de la conguration, vous verrez
POWER
INPUT
plusieurs lumières. Lorsque les 10 LED clignotent
lentement, la barre de son est prête à être
congurée avec l’application Google Home.
3.
Placez le subwoofer
Pour des performances optimales, placez-le
sur le même mur que le téléviseur, à 10 mètres
maximum de la barre de son.
Subwoofer
TV
Conseil de performance : placer le subwoofer
dans un coin peut accentuer encore les graves.
Page 23

FR
23
Branchez le subwoofer sur une prise
4.
secteur (AC)
Une lumière xe, visible à l’arrière du subwoofer,
indique qu’il est jumelé à la barre de son.
Téléchargez Google Home app pour congurer la barre de son sur votre
5.
réseau Wi-Fi
Téléchargez Google Home app et suivez les instructions de l’application pour
congurer la barre de son sur votre réseau Wi-Fi.
Pour plus d’informations sur la conguration de Google Home et de Chromecast built-
in pour l’audio, visitez : https://support.google.com/googlehome et
https://support.google.com/chromecastbuiltin
Une fois la barre de son connectée à votre réseau Wi-Fi, elle reçoit les mises à jour du
micrologiciel pour les dernières fonctionnalités, performances et réglages. Nous devons
mettre à jour votre barre de son avec le dernier micrologiciel pour une performance
globale optimale. Pour plus de détails, reportez-vous à la section “Réception de mises
à jour automatiques”, sous “Fonctionnalités” (p. 8).
Barre de son
Sound Bar
TV
Page 24

24
Connexion à votre téléviseur
6.
Votre téléviseur comporte-t-il une prise d’entrée HDMI avec une étiquette “ARC” ?
Oui – Utilisez HDMI ARC
TV ARC
TV
HDMI IN
ARC
Connectez le câble HDMI fourni sur les prises
HDMI portant la mention “ARC” sur le téléviseur
et la barre de son.
OUT
Non – Utilisez toutes les sources dans
votre Studio Advance via HDMI
TV
HDMI
IN
Le câble HDMI relie la sortie HDMI du Studio
Advance à une entrée HDMI sur le téléviseur.
Blu-ray
Cable
Page 25

FR
25
Connexion à votre téléviseur (suite)
Si votre téléviseur n’est pas équipé en
HDMI, utilisez la connexion optique
HDMI IN
TV
OPT
OUT
Branchez le câble optique inclus entre le téléviseur
et la barre de son. Avec certains modèles de
téléviseur, il peut être nécessaire d’éteindre les
haut-parleurs internes du téléviseur ou de régler le
son sur un haut-parleur externe.
INPUTS
Blu-ray
FIRMWARE
AUX IN
Cable
OPT IN
POWER
Toutes les sources de votre téléviseur avec mini-
prise analogique de 3,5 mm sur la barre de son
HDMI IN
TV
AUX
OUT
Certains téléviseurs plus anciens ne disposent que
d’une connexion de sortie analogique. Dans ce
scénario, le téléviseur bascule entre les sources et
Studio Advance est toujours réglé sur ENTRÉE #4.
Un signal audio numérique Dolby Digital ou DTS ne
peut pas être transmis via la connexion de sortie
analogique du téléviseur. La meilleure qualité de
signal audio pouvant être reproduite à l’aide de cette
méthode est un son stéréo à deux canaux. Cette
méthode est la méthode de connexion la moins
recommandée parmi les quatre décrites ici.
INPUTS
Blu-ray
Cable
FIRMWARE
AUX IN
OPT IN
POWER
Page 26

26
Allumez votre téléviseur et protez de Studio Advance
7.
Allumez votre téléviseur et vériez que vous entendez le son de la barre de son.
Remarque : Accédez au menu de votre téléviseur et éteignez ses haut-parleurs internes.
Si vous n’entendez pas de son et que vous ne voyez aucune lumière à l’avant de votre
barre de son, appuyez sur le bouton d’alimentation de la barre de son pour l’allumer.
Page 27

FR
Fonctionnalités
1.
2.
Utilisation de la télécommande de votre téléviseur pour contrôler le volume
Le Studio Advance est préconguré pour répondre aux commandes de volume et de
mise en sourdine des télécommandes de téléviseur les plus courantes, notamment :
Samsung, LG, Sony, Vizio et d’autres grandes marques.
*
Toutes les autres marques de commerce, noms de produits, logos et marques cités
dans le présent document appartiennent à leurs propriétaires respectifs
Écouter de la musique via Bluetooth
• Bluetooth ne fonctionne qu’une fois le produit conguré avec Google Home app.
• Accédez à la section des paramètres Bluetooth, appuyez sur le bouton Bluetooth
de la barre de son. Une lumière bleue pulse lentement sur la barre de son en
attendant la connexion à votre appareil Bluetooth.
• Accédez à la section des paramètres Bluetooth de votre téléphone, tablette
ou ordinateur et sélectionnez le nom choisi dans Google Home app. Le nom
de l’appareil devient le nom conguré dans le processus de conguration de
l’application Home App. Le voyant devient bleu pendant 3 secondes et s’éteint
lorsque votre appareil Bluetooth est connecté.
• Pour rétablir une connexion Bluetooth connection after pairing has already been
completed, go to the Bluetooth settings on your device and connect to the
sound bar.
®
*
27
Page 28

28
Avantages de Chromecast built-in
3.
Le Studio Advance est doté de la fonctionnalité Chromecast built-in pour une diffusion
facile et plus encore :
• Diffusez de la musique à partir de vos applications préférées via Wi-Fi.
• Créez une expérience audio dans toute la maison. La synchronisation dans
plusieurs pièces vous permet d’écouter simultanément le même morceau sur
toutes les enceintes compatibles Chromecast built-in de votre maison.
• Utilisez Google Assistant sur une enceinte Google Home ou un autre appareil
sur lequel Assistant est activé pour contrôler la lecture de musique sur le Studio
Advance à l’aide de commandes vocales.
Écouter de la musique via Chromecast built-in
• Appuyez sur le bouton de diffusion de vos applications préférées de musique pour lancer la
diffusion sur vos enceintes. Pour plus d’informations, visitez :
https://www.google.com/chromecast/built-in/audio/
• Pour plus d’informations sur la liste des applications compatibles Chromecast, visitez :
https://store.google.com/us/product/chromecast_2015_apps?hl=en-US
Réception des mises à jour automatiques (vivement recommandé)
Denitive Technology fournit en toute sécurité des mises à jour logicielles périodiques via Internet
qui améliorent les performances du produit.
Google Home App
pour iPhone, iPad
appareils Android
Page 29

FR
Télécommande
29
Marche/arrêt
Entrée TV
Centre bas
Graves bas
Mode Musique
Mode Nuit
HDMI
HDMI
OPTICAL
Night Mode
HDMI
Sourdine
Entrées HDMI
AUX
6
Augmenter le
volume principal
Diminuer le
volume principal
Centre haut
Graves haut
Mode Film
Page 30

30
Commandes de la barre de son
Avant de Studio Advance
• Alimentation - Permet d’allumer/éteindre le Studio Advance
• Source - Commute les entrées de la barre de son
• Bluetooth - Lance l’appariement Bluetooth
• Réduction du volume - Diminue le volume principal
• Augmentation du volume - Augmente le volume principal
Page 31

FR
Arrière de Studio Advance
31
Entrée IR Sortie IR
Sortie TV ARC Micrologiciel
HDMI 1 Entrée Aux
HDMI 2 Entrée optique
HDMI 3 Alimentation
Page 32

32
Indicateurs visuels à LED (barre de son)
INDICATEURS DE SOURCE
1. 2. 3. 4. 5. 6. 7. 8. 9. 10.
Ci-dessus se trouve une vue agrandie des indicateurs de source.
HDMI 1
HDMI 2
HDMI 3
HDMI ARC
OPTIQUE
AUX
BLUETOOTH
CHROMECAST
Plusieurs couleurs de source indiquent le train de bits audio pour les entrées de diffusion non-continues.
CONTENU PCM CONTENU DOLBY CONTENU DTS
12.
11.
REMARQUE : Tous les indicateurs de source apparaissent pendant trois secondes avant de
disparaître progressivement.
Page 33

FR
33
INDICATEUR DE
Lorsque la SOURDINE est active, l’indication de la source clignote.
SOURDINE
INDICATEURS DE
NIVEAU DE VOLUME
Le volume principal est indiqué par 10 LED. Chaque LED possède 10 niveaux de luminosité pour
indiquer un volume compris entre 1 et 100 %. Le volume 1 % est indiqué avec le volume le plus à gauche
faiblement éclairé et le volume 100 % est indiqué avec les 10 LED de volume entièrement allumés.
Les indicateurs de volume s’allument en violet plutôt qu’en blanc pour indiquer l’état du mode
Nuit. En veille, toutes les lumières sont éteintes.
Mode Nuit - activé Mode Nuit - désactivé
Indicateurs visuels à LED (Subwoofer)
Une LED à lumière xe sur le subwoofer indique que
celui-ci est connecté à la barre de son.
Si le subwoofer ne parvient pas à se connecter,
contactez le service clientèle.
Page 34

34
Optimisez votre expérience d’écoute
Moins au
CENTRE
Personnalisez le niveau de voix pour reproduire des
dialogues clairs et précis sur votre barre de son à
l’aide du bouton central (+/-) de la télécommande
NIVEAU PAR
DÉFAUT
de la barre de son.
Plus au
CENTRE
CENTRE
GRAVES
HDMI
HDMI
OPTICAL
HDMI
AUX
6
Moins de
GRAVES
NIVEAU PAR
DÉFAUT
Plus de
GRAVES
Personnalisez le niveau des graves à l’aide des
boutons des graves (+/-) de la télécommande de
la barre de son.
Page 35

NIGHT MODE
NIGHT MODE
FR
Modes sonores
NIGHT MODE
35
Mode Musique
Le mode Musique offre un prol sonore naturel et équilibré avec des graves plus
doux, tout en minimisant les effets de spatialisation du cinéma à domicile.
Mode Film
Le mode Film est optimisé pour les lms et le contenu télévisé. Il propose des effets
de spatialisation pour le cinéma à domicile, un dialogue amélioré et un impact plus
dynamique des graves. Il s’agit d’un son par défaut davantage destiné aux sources
d’entrée HDMI et optiques.
Mode Nuit
Le mode Nuit est optimal pour une écoute à faible volume. Les graves et la plage
dynamique sont réduites pour améliorer la clarté vocale. Les indicateurs de volume
s’allument en violet plutôt qu’en blanc pour indiquer l’état du mode Nuit. En veille,
toutes les lumières sont éteintes.
MODE NUIT - activé MODE NUIT - désactivé
Page 36

36
Utilisation de votre téléviseur ou de votre télécommande
câble/satellite pour commander le Studio Advance
Il existe plusieurs façons d’utiliser votre téléviseur, câble ou télécommande satellite pour contrôler
le Studio Advance.
Commande HDMI CEC
Si votre téléviseur est connecté via HDMI ARC, qu’il prend en charge CEC (et qu’il est activé dans
le menu Paramètres du téléviseur), vous pouvez contrôler le volume et les fonctions de mise en
sourdine du Studio Advance à partir de votre téléviseur, sans autre conguration supplémentaire.
Codes IR préchargés
Le Studio Advance est livré avec des commandes à distance pour la plupart des téléviseurs
fabriqués au cours des 5 dernières années.
Page 37

FR
Possibilités de positionnement
MONTAGE SUR TABLE
Le Studio Advance est livré avec des pieds rehausseurs supplémentaires (deux par côté) qui se xent
magnétiquement à la barre pour la relever jusqu’à 15,2 mm de la table an que la barre dégage le
pied saillant du téléviseur.
Fixation des pieds magnétiques : Retirez la protection pour faire apparaître les aimants. Fixez les
pieds sur le bord inférieur de la barre de son.
REMARQUE : Le Studio Advance peut bloquer le capteur de télécommande de votre téléviseur,
empêchant de le contrôler à l’aide d’une télécommande. De sorte que nous fournissons un
clignotant IR. Branchez le clignotant sur la sortie infrarouge de la barre et placez-le devant le
capteur du téléviseur.
37
IR INPUT
Pour les installations personnalisées : l’entrée
IR est plus susceptible d’être utilisée avec
un système domotique, comme les Crestron
ou Control 4. Il s’agit souvent d’une simple
connexion électrique à un équipement.
IR OUTPUT
Page 38

38
IR OUTPUT
IR INPUT
MONTAGE DE LA BARRE DE SON SUR LE MUR
Le Studio Advance possède des fentes en trou de serrure intégrées pour vous permettre de le
monter au mur sous votre téléviseur mural. Des entretoises sont incluses pour aider à sécuriser et
installer votre barre de son sur le mur.
REMARQUE : NE PAS monter le Studio Advance directement sur le mur. Vous devez utiliser les
entretoises de montage mural fournies pour assurer un fonctionnement correct et une abilité
optimale. ASSUREZ-VOUS que vous utilisez un ancrage mural de capacité portante appropriée (6,2 kg).
812.8 mm
[32"]
CONSEILS POUR LE MONTAGE MURAL DU STUDIO ADVANCE
Mise à niveau du Studio Advance : Utilisez un niveau à bulle pour vous assurer que la barre est à niveau.
Marquez les trous avec un crayon, en prenant la mesure de la fente en trou de serrure de la barre.
Percez des trous de vis dans le mur : Pré-percez les emplacements des trous d’implantation pour les vis
de montage (non fournies). Utilisez des vis conçues pour maintenir fermement le matériau du mur et des
têtes de vis d’au moins 8,5 mm de diamètre.
REMARQUE : Mesurez deux fois. Assurez-vous que la barre de son dégage le plafond, les murs
adjacents, les angles, les poutres, les appareils d’éclairage et les encadrements de portes/fenêtres.
Laissez au moins 25 à 50 mm au-dessus de l’emplacement du Studio Advance pour permettre au Studio
Advance de glisser sur les vis. Assurez-vous que le centre de la barre est centré sur le point central de
l’écran du téléviseur.
Accrochez le Studio Advance sur les montants : Alignez la barre de sorte que les têtes de vis glissent
dans les fentes en trou de serrure. Faites glisser la barre vers le bas pour que les têtes de vis la
maintiennent fermement en place.
Page 39

FR
Pour une assistance supplémentaire :
Numéro de téléphone
(800) 228-7148 (Amérique du nord)
+1 (410) 363-7148
Adresse électronique
denitive@custhelp.com
Courrier
Denitive Technology
1 Viper Way
Vista, CA 92081
Suivez-nous sur
Twitter
Instagram
Facebook
39
Google, Chromecast, Google Play et les autres marques connexes sont des marques
commerciales de Google LLC
Page 40

40
AAA
AAA
Contenido de la Caja
Barra de sonido
Fuente de
alimentación
Cable de
alimentación
Dos espacios para el
montaje en pared
Cable HDMI
Cable de alimentación del
subwoofer Cuatro elevadores (magnéticos)
Adaptadores IR (entrada y salida)
Cable óptico
HDMI
HDMI
HDMI
OPTICAL
AUX
6
AAA
AAA
Dos pilas
AAA Documentación
Mando a
distancia
Subwoofer
Page 41

ES
41
Instalación
1.
Instalación de la barra de sonido
Para disfrutar de una mejor experiencia auditiva,
disponga la barra de sonido bien centrada bajo su
TV. Puede elegir colocarla en un soporte o montar
TV
Sound Bar
Barra de sonido
la barra de sonido en la pared, bajo el televisor.
2.
Conecte la barra de sonido a un
conector de AC
Durante la conguración observará múltiples
POWER
INPUT
efectos de luz. Cuando los 10 LED parpadeen
lentamente, la barra de sonido estará lista para
su conguración con ayuda de la aplicación
Google Home.
3.
Monte el subwoofer
para obtener el mejor rendimiento, colóquelo
en la misma pared que el televisor, a no más de
10 metros (30 pies) de la barra de sonido.
Subwoofer
TV
Consejo de rendimiento: colocar el subwoofer
en una esquina ayuda a maximizar el efecto de
los bajos.
Page 42

42
Conecte el subwoofer a un
4.
conector de AC
Observará una luz ja en la parte posterior del
subwoofer, indicativa de que está enlazado con
la barra de sonido.
Descargue Google Home app para congurar su barra de sonido en su
5.
red Wi-Fi
Descargue gratuitamente Google Home app y siga las instrucciones de la aplicación
para congurar la barra de sonido en su red Wi-Fi.
Para obtener información más detallada sobre la conguración de Google Home y
Chromecast built-in para audio, visite: https://support.google.com/googlehome y
https://support.google.com/chromecastbuiltin
Una vez que la barra de sonido esté conectada a su red Wi-Fi, recibirá las
actualizaciones de rmware más recientes de funciones, rendimiento y optimización.
Aconsejamos rmemente actualizar su barra de sonido al rmware más reciente para
disfrutar del mejor rendimiento general. Consulte la sección “Recibir actualizaciones
automáticas” en “Funcionalidades” (pág. 8) para obtener más información.
Barra de sonido
TV
Sound Bar
Page 43

ES
Conéctela a su televisor
6.
¿dispone su TV de un conector de entrada HDMI con la marca “ARC”?
43
Sí — Usar HDMI (ARC)
TV ARC
TV
HDMI IN
ARC
Conecte el cable HDMI incluido a los conectores
HDMI marcados con “ARC” tanto en el televisor
como en la barra de sonido.
OUT
NO — Usar todas las fuentes en su Studio
Advance vía HDMI.
TV
HDMI
IN
El cable HDMI discurre desde la salida HDMI del
Studio Advance a una entrada HDMI en el TV.
Blu-ray
Cable
Page 44

44
Conexión a su TV (cont.)
Si su TV no dispone de conexión
HDMI utilice el cable óptico
HDMI IN
TV
OPT
OUT
Conecte el cable óptico incluido entre el televisor
y la barra de sonido. En algunos modelos de TV
podría tener que desactivar los altavoces internos
o congurar el sonido en el altavoz externo.
INPUTS
Blu-ray
FIRMWARE
AUX IN
Cable
OPT IN
POWER
Todas las fuentes de su TV con tomas mini
analógicas de 3,5 mm a la barra de sonido
HDMI IN
TV
AUX
OUT
Algunos televisores más antiguos solo cuentan con
conexiones de salida analógicas. En tal caso, el TV
realiza todas las conmutaciones entre las fuentes
y Studio Advance siempre está congurado en la
ENTRADA N.º 4. Una señal de audio digital Dolby
Digital o DTS no puede atravesar la conexión de
salida analógica de un televisor. La mejor calidad
de la señal de audio que puede proporcionar este
método es audio estéreo de dos canales. Este
método de conexión es el menos preferido de los
cuatro aquí descritos.
INPUTS
Blu-ray
Cable
FIRMWARE
AUX IN
OPT IN
POWER
Page 45

ES
Encienda su televisor y disfrute de Studio Advance
7.
Encienda su TV y verique que el sonido que escucha procede de la barra de sonido.
Nota: acceda al menú del TV y apague sus altavoces internos.
Si no escucha el sonido y no observa ninguna luz en la parte frontal de la barra de
sonido, presione el botón de encendido de la barra de sonido para activarla.
45
Page 46

46
Funciones
Usando el mando a distancia de su TV para controlar el volumen
1.
Studio Advance viene precongurada de fábrica para responder a los comandos de
volumen y silencio de los mandos a distancia de los TV más populares, que incluyen:
Samsung, LG, Sony, Vizio y otras marcas importantes.
*
Todas las demás marcas comerciales, nombres de productos, logotipos y marcas a las
que se hace referencia en este documento son propiedad de sus respectivos dueños
Escuchar música a través de Bluetooth
2.
• Bluetooth solo funcionará después congurar el producto con la aplicación
Google Home.
• Para enlazar su dispositivo mediante Bluetooth, presione el botón Bluetooth en
la barra de sonido. Una luz azul parpadeará lentamente en la barra de sonido
mientras espera para conectarse a su dispositivo Bluetooth.
• Vaya a la sección de conguración de Bluetooth de su teléfono, tablet u
ordenador y seleccione el nombre elegido en Google Home app. El nombre del
dispositivo cambiará al nombre congurado en el ujo de conguración de la
aplicación Home. La luz cambiará a azul jo durante 3 segundos y se apagará al
conectarse su dispositivo Bluetooth.
• Para restablecer una conexión Bluetooth una vez enlazado, vaya a la
conguración de Bluetooth en su dispositivo y conéctese a la barra de sonido.
*
®
Page 47

ES
Benecios de contar con Chromecast built-in
3.
Studio Advance incluye Chromecast built-in para facilitar la transmisión y mucho más:
• Transmita música desde sus aplicaciones favoritas a través de Wi-Fi.
• Disfrute de una experiencia de audio en todo su hogar. La sincronización multisala
le permite reproducir la misma canción a través de los altavoces compatibles con
Chromecast built-in simultáneamente en todo su hogar.
• Use Google Assistant en un altavoz de Google Home u otro dispositivo habilitado
para Assistant para controlar la reproducción de música en Studio Advance
mediante comandos de voz.
Escuchar música a través de Chromecast built-in
• Toque el botón de selección de sus aplicaciones de música favoritas para iniciar la
transmisión a sus altavoces. Para obtener más información, visite: https://www.google.com/
chromecast/built-in/audio/
• Para obtener información sobre la lista de aplicaciones compatibles con Chromecast, visite:
https://store.google.com/us/product/chromecast_2015_apps?hl=en-US
Recibir actualizaciones automáticas (muy recomendable)
Denitive Technology proporciona de forma segura actualizaciones periódicas de software a
través de Internet que mejoran el rendimiento del producto.
47
Google Home App
para iPhone, iPad y
dispositivos Android
Page 48

48
Mando a Distancia
Encendido/Apagado
Entrada de TV
Bajar central
Bajar bajos
Modo Música
Modo Nocturno
HDMI
HDMI
OPTICAL
Night Mode
HDMI
Silencio
Entradas HDMI
AUX
6
Subir volumen principal
Bajar volumen principal
Subir central
Subir bajos
Modo Película
Page 49

ES
Controles de la Barra de Sonido
Parte frontal de Studio Advance
• Alimentación - Enciende/apaga Studio Advance
• Fuente - Cambia las entradas de la barra de sonido
• Bluetooth - Inicia el enlace por Bluetooth
• Bajar volumen - Reduce el volumen principal
• Subir volumen - Aumenta el volumen principal
49
Page 50

50
Parte trasera de Studio Advance
Entrada IR Salida IR
Salida TV ARC Firmware
HDMI 1 Entrada aux
HDMI 2 Entrada óptica
HDMI 3 Alimentación
Page 51

ES
Indicadores LED visuales (Barra de Sonido)
INDICADORES DE FUENTE
1. 2. 3. 4. 5. 6. 7. 8. 9. 10.
Más arriba se muestra un primer plano de los indicadores de fuente.
HDMI 1
HDMI 2
HDMI 3
HDMI ARC
ÓPTICO
AUX
BLUETOOTH
CHROMECAST
Distintos colores de fuente indican el ujo de bits de audio para entradas sin transmisión.
CONTENIDO PCM CONTENIDO DOLBY CONTENIDO DTS
51
12.
11.
NOTA: Todos los indicadores de fuente se muestran durante tres segundos antes de apagarse.
Page 52

52
INDICADOR DE SILENCIO
Mientras SILENCIO esté activo, la indicación de fuente
permanecerá intermitente.
INDICADORES DE
NIVEL DE VOLUMEN
El volumen principal se indicará con 10 LED. Cada LED tendrá 10 niveles de brillo para indicar
el volumen del 1-100 %. El volumen 1% se indicará iluminando tenuemente el volumen más a la
izquierda; el volumen 100% se indicará con los 10 LED de volumen iluminados al máximo.
Los indicadores de volumen se iluminarán en púrpura, en lugar de blanco, para indicar el estado
del modo Nocturno. En modo de Espera, todas las luces permanecen apagadas.
MODO NOCTURNO - Habilitado Modo Nocturno - Inhabilitado
Indicadores LED visuales (subwoofer)
Una luz LED ja en el subwoofer indica que está
conectado a la barra de sonido.
Si el subwoofer no se conecta, llame al servicio de
atención al cliente.
Page 53

ES
Optimice su Experiencia de Escucha
53
Menos
CENTRAL
NIVEL
PREDETERMINADO
Más
CENTER
Personalice el nivel de voz para reproducir diálogos
claros y nítidos en la barra con el botón central (+/-)
del mando a distancia de la barra de sonido.
Menos
BAJOS
NIVEL
PREDETERMINADO
Más
BAJOS
Personalice el nivel de bajos con los botones de bajos
(+/-) en el mando a distancia de su barra de sonido.
CENTRAL
BAJOS
HDMI
HDMI
OPTICAL
HDMI
AUX
6
Page 54

54
NIGHT MODE
NIGHT MODE
Modos de sonido
NIGHT MODE
Modo Música
El modo de música ofrece un perl de sonido natural y equilibrado con bajos más
suaves y minimiza los efectos de espacialización del sistema de cine en casa.
Modo Película
El modo de película está optimizado para películas y contenido de TV. Proporciona
efectos de espacialización de cine en casa, así como un diálogo mejorado y un
efecto de graves más dinámico. Este es el sonido predeterminado para las fuentes
de entrada HDMI y óptica.
Modo Nocturno
El modo nocturno resulta óptimo para escuchar a bajo volumen. Los bajos y el
rango dinámico se modican para mejorar la claridad vocal. Los indicadores de
volumen se iluminarán en púrpura, en lugar de blanco, para indicar el estado del
modo Nocturno. En modo de Espera, todas las luces permanecen apagadas.
MODO NOCTURNO - Habilitado MODO NOCTURNO - Inhabilitado
Page 55

ES
Use el mando a distancia de su TV o TV por cable/satélite
para controlar Studio Advance
Hay varias formas de usar el mando a distancia de su TV, dispositivo por cable o satélite para
controlar Studio Advance.
CONTROL HDMI CEC
Si su TV está conectado a través de HDMI ARC y su TV es compatible con CEC (y está habilitado
en el menú de conguración del TV), podrá controlar las funciones de volumen y silencio de Studio
Advance desde su TV sin necesidad de realizar más conguraciones.
CÓDIGOS IR PRECARGADOS
Studio Advance se suministra precargada con comandos remotos para muchos de los televisores
fabricados en los últimos 5 años.
55
Page 56

56
Opciones de montaje
MONTAJE SOBREMESA
Studio Advance incluye bases elevadoras adicionales (dos a cada lado) que se jan magnéticamente
a la barra para elevarla 15,2 mm (5/8”) de la mesa, evitando así el soporte de mesa saliente del TV
Fije las bases magnéticas: retire la cubierta protectora dejando los imanes expuestos. Fije los pies
en al borde inferior de la barra de sonido.
NOTA: el Studio Advance podría bloquear el sensor remoto de su TV, imposibilitando su control a
través del mando a distancia, por lo que incluimos un repetidor IR. Conecte el repetidor a la salida
IR de la barra y dispóngalo delante del sensor del televisor.
IR INPUT
En el caso de instalaciones personalizadas: es
más probable que la entrada IR se utilice en un
sistema de domótica, como Crestron o Control
4. A menudo solo es una conexión eléctrica a
una parte del equipo.
IR OUTPUT
Page 57

IR OUTPUT
IR INPUT
ES
MONTAJE DE LA BARRA DE SONIDO EN PARED
El Studio Advance cuenta con ranuras perforadas integradas para permitir su montaje en pared
bajo el televisor, ya montado en la pared. Se incluyen separadores para ayudar a anclar e instalar
su barra de sonido en la pared.
NOTA: NO monte el Studio Advance directamente en la pared. Deben utilizarse los separadores
para montaje en pared incluidos para garantizar el uso y abilidad adecuados. ASEGÚRESE de
utilizar anclajes de pared con la capacidad de carga adecuada (13,65 lb).
812.8 mm
[32"]
CONSEJOS PARA EL MONTAJE EN PARED DEL STUDIO ADVANCE
Nivelación del Studio Advance: Utilice un nivel para garantizar la nivelación de la barra. Marque
los oricios con un lápiz, tomando las medidas de la ranuras perforadas de la barra.
Taladre los oricios para los tornillos en la pared: taladre previamente los oricios guía para el
montaje de los tornillos de montaje (no incluidos). Emplee tornillos con la capacidad nominal
adecuada para anclar de forma segura al material de la pared y con cabezas de al menos 0,33”
(8,5 mm) de diámetro.
NOTA: mida dos veces. Asegúrese de que la barra de sonido quede apartada del techo, paredes
adyacentes, esquinas, vigas, luminarias y marcos de puertas/ventanas. Deje al menos 1-2” (25-50
mm) de separación sobre la ubicación del Studio Advance para permitir que el Studio Advance
deslice sobre los tornillos. Asegúrese de que el centro de la barra quede centrado con el punto
medio de la pantalla del TV.
Suspenda el Studio Advance sobre postes: alinee la barra de modo que las cabezas de los
tornillos se deslicen en las ranuras perforadas. Deslice la barra hacia debajo, de modo que las
cabezas de los tornillos sujeten rmemente la barra en posición.
57
Page 58

58
Para Solicitar Asistencia:
Número de teléfono
(800) 228-7148 (Norteamérica)
+1 (410) 363-7148
Correo electrónico
denitive@custhelp.com
Correo postal
Denitive Technology
1 Viper Way
Vista, CA 92081
Siga con nosotros
Twitter
Instagram
Facebook
Google, Chromecast, Google Play y otras marcas relacionadas son marcas comerciales de Google LLC
Page 59

1 Viper Way
Vista, CA 92081
800-228-7148
www.denitivetechnology.com
Sound United Europe
a division of D&M Europe B.V.
Beemdstraat 11
5653 MA Eindhoven
The Netherlands
HBP4236
 Loading...