

Page 1

Owner's Manual
Page 2
IMPORTANT SAFETY INSTRUCTIONS
1. Read these instructions.
2. Keep these instructions.
3. Heed all warnings.
4. Follow all instructions.
5. Do not use this apparatus near water.
6. Clean only with dry cloth.
7. Do not block any ventilation openings. Install in accordance
with the manufacturer’s instructions.
8. Do not install near any heat sources such as radiators, heat registers,
stoves, or other apparatus (including amplifiers) that produce heat.
9. Do not defeat the safety purpose of the polarized or grounding plug.
A polarized plug has two blades with one wider than the other. A grounding
plug has two blades and a third grounding prong. The wide blade or the third
prong is provided for your safety. If the provided plug does not fit into your outlet, consult
an electrician for replacement of the obsolete outlet.
10. Protect the power cord from being walked on or pinched particularly at the plugs,
convenience receptacles, and at the point where they exit from the apparatus.
11. Only use attachments/accessories specified by the manufacturer.
12. Use only with the cart, stand, tripod, bracket, or table specified
by the manufacturer, or sold with the apparatus. When a cart or rack
is used, use caution when moving the cart/apparatus combination
to avoid injury from tip-over.
13. Unplug the apparatus during lightning storms or when unused
for long periods of time.
14. Refer all servicing to qualified personnel. Servicing is required when the
apparatus has been damaged in any way, such as when power supply cord
or plug is damaged, liquid has been spilled or objects have fallen into the
apparatus, or apparatus has been exposed to rain or moisture, does not
operate normally, or has been dropped.
15. WARNING: To reduce the risk of fire or electric shock, do not expose
this apparatus to rain or moisture. The apparatus shall not be exposed
to dripping or splashing and objects filled with liquids, such as vases,
shall not be placed on apparatus.
16. WARNING: The mains plug/appliance coupler is used as disconnect device;
the disconnect device shall remain readily operable.
17. Protective grounding terminal. The apparatus should be connected to a
18. Correct Disposal of this product. This marking indicates that this
19. No naked flame sources, such as lighted candles, should be placed
20.
Warning: To reduce the risk of electric shock, do not remove cover (or back) as
mains socket outlet with a protective grounding connection.
product should not be disposed with other household wastes
throughout the EU. To prevent possible harm to the environment or
human health from uncontrolled waste disposal, recycle it responsibly
to promote the sustainable reuse of material resources. To return your
used device, please use the return and collection systems or contact retailer
where the product was purchased; they can take this product for environmental
safe recycling.
on the apparatus.
RISK OF ELECTRIC SHOCK
CAUTION
ATTENTION: RISQUE DE CHOC ELECTRIQUE - NE PAS OUVRIR
This lightning flash with arrowhead symbol within an equilateral triangle
is intended to alert the user to the presence of non-insulated “dangerous
voltage” within the product’s enclosure that may be of sufficient magnitude to constitute a risk of electric shock.
DO NOT OPEN
2
1.800.228.7148
www.denitivetech.com
Page 3

there are no user-serviceable parts inside. Refer servicing to
qualified personnel.
The exclamation point within an equilateral triangle is intended to
alert the user to the presence of important operating and maintenance
instructions in the literature accompanying the appliance.
21. The battery (battery or batteries or battery pack) shall not be exposed
to excessive heat such as sunshine, fire or the like.
EN
Denitive Technology
11433 Cronridge Dr.
Owings Mills, MD 21117
3
Page 4

TABLE OF CONTENTS
Performance Benchmarks of the Mythos ST-L ........................................................................................................................................2
Unpacking and Inspecting Your Mythos ST-L ........................................................................................................................................3
What’s In Your Mythos ST-L Carton .....................................................................................................................................................3
Locating your Mythos ST-L Super Towers .............................................................................................................................................4
Aiming the loudspeakers into your listening area .................................................................................................................................4
5.1 Home Theater Conguration .......................................................................................................................................................5
Room Acoustics ...............................................................................................................................................................................5
Adjustable Gliders ...........................................................................................................................................................................6
Carpet Spikes .................................................................................................................................................................................6
Connections ....................................................................................................................................................................................7-11
Subwoofer Tuning ............................................................................................................................................................................11
Subwoofer Adjustment .....................................................................................................................................................................12
Remote control ................................................................................................................................................................................13
Fine Tuning .....................................................................................................................................................................................14
LED Indicators .................................................................................................................................................................................15
Troubleshooting ...............................................................................................................................................................................17
Service ...........................................................................................................................................................................................18
Technical Assistance .........................................................................................................................................................................18
Warranty ........................................................................................................................................................................................19
Specications ..................................................................................................................................................................................20-21
EN
Denitive Technology
11433 Cronridge Dr.
Owings Mills, MD 21117
4
Page 5

EN
PERFORMANCE BENCHMARKS
OF THE MYTHOS ST-L
Mythos ST-L represents a major redesign of this consummate
Denitive Technology oor standing loudspeaker. Like the original
Mythos ST, Mythos ST-L features a built-in powered subwoofer
in an elegant extruded aluminum enclosure. But the ST-L is more
than a renement of the previous model. It is, in fact, a meticulous
rethinking of the original high performance super tower. Drivers,
tweeter, amplier and user interface, all have been signicantly
developed to offer serious audio listeners elegant appearance,
greater convenience and exhilarating performance.
• Improved mid- and high-frequency detail
• Overall higher output
• Lower harmonic and intermodulation distortion
• Flatter frequency response on- and off-axis
• More extended, lower-distortion bass response
• Greater soundstage width and depth
• Easier foot/spike height adjustment
• More convenient bass-level adjustment
• Improved appearance
5
1.800.228.7148
www.denitivetech.com
Page 6
UNPACKING AND INSPECTING YOUR MYTHOS ST-L
AAA
AAA
LEFT BASS
RIGHT BASS
LOW LEVEL
-
+
-
+
-
+
STEREO BASS
ON OFF
MUTE
POWERON OFF
L R
AAA
AAA
LEFT BASS
RIGHT BASS
LOW LEVEL
-
+
-
+
-
+
STEREO BASS
ON OFF
MUTE
POWERON OFF
L R
AAA
AAA
LEFT BASS
RIGHT BASS
LOW LEVEL
-
+
-
+
-
+
STEREO BASS
ON OFF
MUTE
POWERON OFF
L R
Each loudspeaker leaves our plant in perfect condition. Any visible or concealed
damage most likely occurred in handling after it left our plant and should be
reported at once to your Denitive dealer or the delivery company that delivered
your loudspeaker. Please unpack your system carefully. Save all cartons and packing
materials in case you move or need to ship your system. Please record the serial
numbers found on the back of your Mythos ST-Ls in an appropriate place and
register them online at: www.denitivetech.com/registration/
WHAT’S IN YOUR MYTHOS ST-L CARTON
Inside each Mythos ST-L loudspeaker carton you should nd:
1. One Mythos ST-L Super Tower with attached AC power cord
2. Literature Packet (Letter and Owner’s Manual)
3. Accessory Box (Remote Control, batteries,
(4) Carpet spikes)
EN
Denitive Technology
11433 Cronridge Dr.
Owings Mills, MD 21117
6
Page 7

EN
LEFT SPEAKER
TV & CENTER SPEAKER
RIGHT SPEAKER
1'-2'FT
LOCATING YOUR MYTHOS ST-L SUPER TOWERS
The following guidelines are for a 2-Channel setup, a classic conguration that optimizes the Mythos ST-L’s performance for the most
critical listener. Please remember that no two rooms and listening set-ups are the same, so don’t be afraid to experiment with your speakers.
Whatever sounds best to you is what matters.
AIMING THE LOUDSPEAKERS INTO YOUR
LISTENING AREA
To enjoy the most realistic stereo image and lifelike sound, place the speakers
so that an equilateral triangle is created between the speakers and your
favorite listening position
If your room arrangement forces you to place the speakers farther apart than
the distance from which you are listening, angle the speakers toward the
middle. Angling the speakers in (pointed directly at the listener) will result in a
somewhat brighter, clearer sound. This angling creates a sharper focus and a
more solid central image; generally, we recommend that you take some time to
experiment with speaker positioning and toe-in angle to nd the best balance
between image width and focus. Do your positioning experiments before
installing the spike feet.
2-CHANNEL SETUP
7
1.800.228.7148
www.denitivetech.com
Page 8
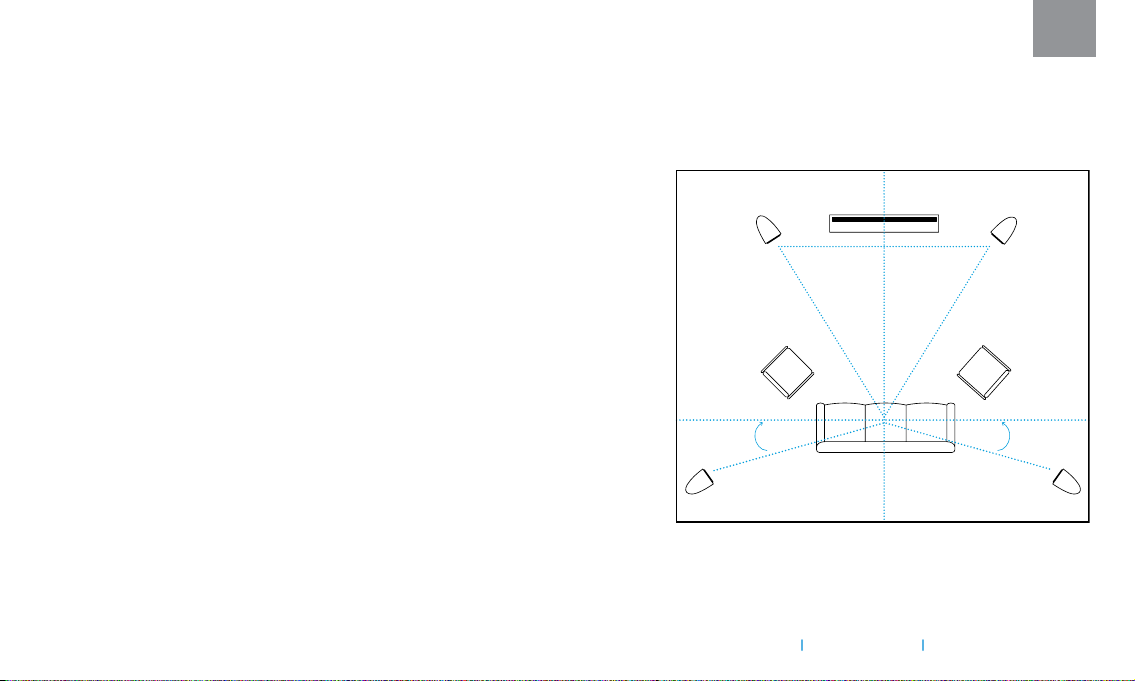
5.1 HOME THEATER CONFIGURATION
Four Mythos ST-L Super Towers will make an astounding 5.1 home theater.
When used as left and right surrounds, do not locate the speakers forward of
your listening position. If you use the towers as left and right rear surrounds,
position them wide apart if possible. (For instance, if there is a couch in the
center of the rear wall, position the speakers wider apart than the couch). If a
full Mythos ST-L Home Theater loudspeaker setup isn’t in the budget right now,
Denitive Technology also offers a complete line of center channel and surround
loudspeakers, any of which will blend with your Mythos ST-L front stage. We
specically recommend the Mythos Ten for the best-match center channel speaker.
Note: Each loudspeakers Identity Switch should be set to “Left” or “Right” depending
on which side of the room the speaker is located.
LEFT SPEAKER
EN
TV & CENTER SPEAKER RIGHT SPEAKER
ROOM ACOUSTICS
Ideally, the speakers should be placed at one to two feet from room boundaries,
such as large pieces of furniture, walls and especially corners. Placing a speaker
closer to room boundaries increases bass, but may result in a “boomy” or
bass-heavy sound and degradation of stereo imaging. Try varying the speakers’
distance from the rear walls, side walls, and corners until the best balance
between low frequency extension and clarity is achieved. If you cannot get the
speakers at least one foot from the room boundary, treat the adjacent room
boundaries with absorbing or diffusing material to improve performance.
º
20
LEFT REAR
SURROUND
Denitive Technology
5.1 HOME THEATER SETUP
11433 Cronridge Dr.
Owings Mills, MD 21117
º
20
RIGHT REAR
SURROUND
8
Page 9

EN
ADJUSTABLE GLIDERS
Mythos ST-L feet can be leveled and stabilized using either the rubber-tipped
glides, which are already installed on the knurled thumb screws or with oor
spikes, which are included in the accessory box.
The knurled knobs that protrude above the base are threaded, so you can
level your speakers while they stand upright. Simply grip the knurled knob
and turn clockwise to raise height at that corner or counter-clockwise to
lower height. A spirit level will help you achieve perfect verticality.
CARPET SPIKES
Use the optional carpet spikes to provide much greater stability and
performance when placing your loudspeakers on carpeting.
Note: take care when using the spikes, as they may cause damage to wooden
or other oors, which are susceptible to being scratched. Denitive Technology is
specically not responsible for damage that may result from the use of spikes.
9
1.800.228.7148
www.denitivetech.com
KNURLED
KNOB
RUBBER-TIPPED
GLIDES
RAISE THE HEIGHT
LOWER THE HEIGHT
CARPET SPIKES
Page 10

CONNECTIONS
HIGH LEVEL CONNECTIONS
THE 5-WAY BINDING POST
Mythos ST-L Super Towers have gold-plated 5-way binding posts, which are
the audiophile standard. They give you tremendous hookup exibility when
it comes to the type of connector you want to use, including spade and pin
connectors, single and dual banana plugs and, of course, bare wire. The
following directions are for bare wire:
BARE WIRE HOOKUP
Follow the hookup directions included with your receiver. Strip 1/2 inch
(12.7mm) of insulation from each of the two conductors of the wire to
expose the bare metal and twist each of the individual conductors into
single un-frayed strands. Note that one of the terminals on the rear of each
speaker is red (+) and the other is black (–). Make certain that you connect
the wire from the red (+) terminal of your amplifier or receiver to the red (+)
terminal on your speaker and the wire from the black (–) terminal of your
amplifier or receiver to the black (–) terminal on your speaker. Most wire
has some indicator (such as color-coding, ribbing or writing) on one of the
two conductors to help you maintain consistency.
To connect wire to the binding post, unscrew the binding nut and insert
the bare wire into the hole near the base of the binding post. Do not insert
the insulated part of the wire into the hole, as this will not give you a good
connection. Tighten the nut back down on the binding post until it rmly
meets the wire. Do not over tighten.
1 2
LOOSEN HEX NUT. INSERT SPEAKER WIRE
THROUGH HOLE.
3 4
TIGHTEN HEX NUT. DO NOT INSERT INSULATED
Denitive Technology
11433 Cronridge Dr.
SECTION OF SPEAKER WIRE.
Owings Mills, MD 21117
EN
10
Page 11

EN
BI-WIRING
BI-WIRING
Bi-wiring in effect provides the midrange drivers and tweeter with separate
signal paths, improving their damping factor and reproducing recorded material with greater clarity, depth and detail. Each Mythos ST-L Super Tower has
a set of Bi-wire (high level) 5-way binding posts, and an LFE input. Simply
run separate speaker wires to the low and high frequency drivers from a
single amplier.
Note: You must remove the jumper strips that connect the terminals before you
bi-wire your loudspeakers.
Connect one set of speaker wires to the upper terminals (tweeter) on
each speaker and one set of wires to the lower terminals (midrange/
subwoofer). Connect the other ends of both wire sets to the corresponding
amplier outputs.
Important Note: Both speakers must be connected in the same way (in correct
polarity) to their own channel of the amplier. If you experience a great lack of
bass, it’s likely that one speaker is out of polarity with the other.
11
1.800.228.7148
www.denitivetech.com
AMPLIFIER
LEFT CHANNEL RIGHT CHANNEL
Page 12

REMOVE
REMOVE
BI-AMPING
Bi-amping improves the way your sound system handles
those more demanding moments when listening to music
or watching cinema. When a piece of music is at its
most demanding, bi-amping can help each section of
your speaker by giving each driver and tweeter their
own source of power, creating a sense that the sound
being reproduced is more effortless, less constrained.
CAUTION: You must remove the jumper strips that con-
nect the terminals before you bi-amp your loudspeakers;
you will damage your loudspeakers if you don’t.
After removing the jumpers, connect the speaker wires
from the high frequency amplier outputs to the upper
set (tweeter) of terminal posts on each speaker. Follow
the same procedure for connecting the low/mid
frequency amplier outputs (midrange/subwoofer)
to the lower set of terminals. Maintain correct wiring
polarity (+ to +, – to –) in all connections.
EN
BI-AMPING
HIGH FREQ. AMPLIFIER
LEFT CHANNEL RIGHT CHANNEL
LEFT CHANNEL RIGHT CHANNEL
MID/LOW FREQ. AMPLIFIER
Denitive Technology
11433 Cronridge Dr.
Owings Mills, MD 21117
12
Page 13

EN
WIRE RECOMMENDATIONS
The Mythos ST-L is an ultra-performance loudspeaker and should be used with high
quality audiophile-grade speaker wire. Consult your retailer for specic brand and
model recommendations. Use at least 14 gauge stranded cable.
LOW LEVEL CONNECTIONS
USING THE LFE INPUT ON YOUR MYTHOS ST-Ls
In most multi-channel systems the best hookup method is simply to connect speaker
wires to the high level inputs. Set “Speaker Set Up” or “Bass Management” of the multichannel receiver/processor to Front L&R = LARGE and Subwoofer = NO. With this
method you will get every iota of performance that your system can deliver.
You also have the option to use the low level LFE input in addition to the speaker wires.
This method gives you more control of the LFE channel level relative to the L&R channel's
bass. Use a “Y” connector (available from your dealer) out of the LFE output on your
receiver or processor to feed two line level cables, connecting one to the LFE input on
your left Mythos ST-L and the other to the LFE input on your right speaker. Set “Speaker
Set Up” or “Bass Management” of the multi-channel receiver/processor to Front L&R =
LARGE and Subwoofer = YES.
LOW LEVEL
13
1.800.228.7148
www.denitivetech.com
Page 14

USING MULTI-CHANNEL, SACD OR DVD-AUDIO WITH YOUR ST-Ls
Because of the nature of their bass management systems, a multi-channel Home Theater System, SACD player or DVD-Audio player
(or any other format that requires using 6- channel or more interconnects) requires the use of an LFE connection between your
receiver or processor and your Mythos ST-L Loudspeakers. This will simply give you more control over your bass. If you are using
one of these players, or have a multi-channel home theater system, use the connection method outlined in the “Using the LFE Input”
section and set your speakers to “Large.”
POWERING UP THE ACTIVE SUBWOOFER
Your Mythos ST-L Super Towers contain a built-in, active powered subwoofer section. This means each Mythos ST-L must be plugged
into an electrical socket of the appropriate voltage using the plug on the end of the electrical cord, which is attached to the speaker
through the hole at the bottom of the base. The Mythos ST-L has a special circuit that automatically turns the powered subwoofer
section on when a signal is fed to the loudspeaker and does not require an on-off switch. Please note that it is normal for you to
hear a small pop from the speaker when the amp powers up.
SUBWOOFER TUNING
Tuning ST-L built-in subs is accomplished in two steps: a coarse setting, which involves the controls on the back of each tower, and
a ne tuning adjustment, which is accomplished from your listening position using the Bass Remote Control. Begin by following the
“Coarse Sub Adjustment” steps.
SETTING LEFT AND RIGHT CHANNEL CONFIGURATION (IDENTITY SWITCH)
The Identity Switch tells which loudspeaker to respond to which commands from the remote control. Each Mythos ST-L Super Tower
can be congured as either a left or right channel loudspeaker. This is done by setting the L/R identity switch, which is on the back
of each loudspeaker, to correspond to the loudspeaker’s left or right orientation.
EN
Denitive Technology
11433 Cronridge Dr.
Owings Mills, MD 21117
14
Page 15

EN
SUBWOOFER ADJUSTMENT
1. Select “Left” on the slide switch on the input panel of the Left unit (as you face the
speaker) and “Right” on the right speaker.
2. Set the “Subwoofer Gain” on each speaker’s input plate to 0dB (the correct setting for
most systems and rooms).
3. Set the balance control on your receiver or preamp to full left channel (or disconnect the
right channel speaker if you don’t have a balance control).
4. On the remote, press the Low Level Off button to make sure that function is disengaged.
5. Now play a mono music recording that has a good balance of bass and midrange. Set
the Left Bass level control until you hear a good balance of bass to midrange.
As you change bass level, the white LEDs on the front of the speaker will indicate the variation + or – from 0dB in 1dB increments (see explanation of LEDs on page 15).
If you have to turn the bass level nearly all the way up to +7dB to get the bass level you
want, go back to the subwoofer gain button (Sub Gain) on the input panel and switch to the
+10 dB position.
If you have to turn the bass level all the way down to get the bass level you want, go back
to the subwoofer gain switch on the input panel and switch to the –10 dB position. Repeat
the process for the other channel (the other tower).
SUB LEVEL
SUB GAIN
15
1.800.228.7148
www.denitivetech.com
Page 16

REMOTE CONTROL
LEFT BASS
RIGHT BASS
LOW LEVEL
-
+
-
+
-
+
STEREO BASS
ON OFF
MUTE
POWERON OFF
L R
Note: For your convenience, the IR receiver is located on each loudspeaker just below the D’Appolito Array (Midrange/
Tweeter/Midrange complement) near the top of the tower. This location lets you aim your remote at a normal listening height
from any where in the room.
The Mythos ST-Ls remote makes it easy to set just the right amount of bass output to compensate for program material,
listening level differences and room acoustics. The remote is the best tool for perfectly adjusting the built-in subwoofers
to achieve seamless blending with the mid-range drivers.
1. Power ON/Off: Press these buttons to turn the subwoofer on or off.
2. Mute L/R: Mutes either the left or right subwoofer. Hitting the speaker’s Mute button again,
or the corresponding Bass Level toggle, will take the loudspeaker out of mute.
3. Left Bass and Right Bass +/–: Increases/decreases the left and right loudspeaker’s subwoofer levels respectively.
Note: the volume range goes from –7 to 0 to +7 and is indicated by the LEDs at the base of the loudspeaker, beneath
the Denitive Technology logo.
4. Low Level On/Off: Engaging Night Mode compresses the dynamic range so that the peak bass volume level is
reduced—ideal for leaving family members, or neighbors, undisturbed late at night.
5. Stereo Bass Control: This increases or decreases both loudspeakers’ subwoofer levels simultaneously.
Note: If the line of sight from your listening position to the IR receiver on the loudspeaker is obstructed, the remote will
not work. Connect an IR remote repeater (optional, available from most audio/video specialty dealers) to the IR remote
jack on the back of the loudspeaker. Labeled "IR IN."
EN
Denitive Technology
11433 Cronridge Dr.
Owings Mills, MD 21117
16
Page 17

EN
FINE TUNING
ADVANTAGES OF TUNING FROM THE LISTENING POSITION
Subwoofer levels can be set for each channel independently to compensate for room acoustics or placement anomalies. For example, if one
speaker is placed closer to a wall or corner than the other, it will probably have greater bass output due to boundary reinforcement. Realizing
consistent bass output between two speakers in a stereo pair makes an enormous difference in timbre and imaging accuracy.
FINE ADJUSTMENT
Now switch back to a stereo recording and use the Stereo Bass control to make your nal adjustment (you will probably want to turn the bass
level down a bit). As you make settings adjustments, the white LEDs on the front of the towers light up to indicate the setting value and then
turn off a few seconds later.
1. Sit in your favorite listening position with remote in hand.
2. Play a piece of music you are very familiar with that has good deep bass content.
3. Using the Stereo Bass control on the remote, adjust the volume up or down to taste.
The bass should have impact without sounding too “heavy.”
17
1.800.228.7148
www.denitivetech.com
Page 18

EN
LED INDICATORS
There is a single Power LED on the back panel of
each loudspeaker. There are 15 LEDs on the front
panel below the Denitive Technology logo that
light to indicate any change you make in volume
levels or power status.
VOLUME LEVELS UPVOLUME LEVELS DOWN
Remote Control LED Indicates
Power On LED on rear panel shines red.
White LED’s turn on sequentially from the middle
to the outside then show the base trim value and
end at blue LED center.
Power Off All LEDs on front of tower shine, then turn off
sequentially.
Volume Levels
(Stereo Bass, Left & Right Bass)
Low Level Mode On: Center Blue LED turns to red and dims
Mute On: Center blue LED turns red and then fades in
On front of tower: Indicated by +/-7 white LEDs
to the left and right of the blue center LED.
Off: Center red LED turns blue and trim value
shown on white LEDs. Hold and then fade to dim
Blue LED
and out until mute condition is terminated
Off: Center red LED turns blue, trim value is
shown on white LED’s, hold and then fade to dim
blue LED
Rear Panel Controls LED Indicates
Sub Level +/-
Subwoofer Gain
Amplier Power On/Off Indicated by red LED
Denitive Technology
Indicated by +/
–10, 0, +10 indicated by 3 blue LEDs
11433 Cronridge Dr.
– 7 white LEDs on front panel.
Owings Mills, MD 21117
18
Page 19

EN
USING THE MYTHOS ST-L LOW-LEVEL CONTROL
Your Mythos ST-Ls have a low level control on the remote control, which initiates dynamic range compression of the subwoofers to bring
down their overall levels. This feature is especially invaluable for late-night movie viewing when others in the home are trying to sleep.
ADDING AN EXTERNAL SUBWOOFER TO YOUR MYTHOS ST-L
Although the built-in subwoofers in your Mythos ST-Ls deliver superb low frequency response and are all that are required for amazing
performance, some listeners go for the ultimate performance and add an additional powered subwoofer to their system. If you choose to do
so, we strongly suggest using the SuperCube8000 (www.denitivetech.com/SuperCube8000) in order to achieve the highest level of sound
quality possible. This should be driven with an additional RCA low-level cable connected to the LFE output of your receiver or processor. Your
receiver or decoder’s bass management system should still be set to “Large” left and right main speakers and “Yes” subwoofer.
SPEAKER BREAK-IN PERIOD
Your Mythos ST-L Super Towers should sound good right out of the box; in fact, there is no specic speaker break-in period. The best
recommendation we can make is to play your speakers. We have found that after around 40-60 hours (or more) of normal playing, the
suspensions work in, and this results in fuller bass, a more open “blossoming” midrange and smoother high frequency reproduction.
19
1.800.228.7148
www.denitivetech.com
Page 20

TROUBLESHOOTING
IMPORTANT NOTE REGARDING DISTORTION
If you hear distortion when the speakers are being driven at high volume levels, it’s because you’re driving (turning up) the amplier too loud
and not from driving the speakers with more power than they can handle. Remember, most ampliers produce their full-rated power well
before the volume control is turned all the way up! If your speakers distort when you play them loud, turn down the amplier.
IMPORTANT NOTE ON INTERNAL OVERLOAD PROTECTION
The subwoofers feature an internal overload protection circuit, which will turn the subwoofers off or down if overdriven or overheated;
after a few minutes, they will resume normal operation.
If you experience any difculties with your Mythos ST-Ls, try the suggestions described below. If you are still having problems, please consult
your Denitive Technology Authorized Dealer for assistance.
1. Make sure all your system interconnects and power cords are solidly in place.
2. Should you experience any level of hum or noise, try plugging the power cords into the same power outlet as your amplier.
3. The system has sophisticated internal protection circuitry. If for some reason the protection circuitry is tripped, please turn down your
system’s volume and wait ve minutes before trying the system again. If the amplier should overheat, the system will turn off until the
amplier cools down and resets.
4. Check to be sure that your power cord has not been damaged.
5. Check that no foreign objects or liquid have entered the cabinet.
6. If you cannot get the subwoofer driver to turn on, or if no sound comes out and you are sure the system is set up properly,
please bring the loudspeaker to your Denitive Technology Authorized Dealer for assistance, but please call rst.
EN
Denitive Technology
11433 Cronridge Dr.
Owings Mills, MD 21117
20
Page 21

EN
SERVICE
Service and warranty work on your Denitive loudspeakers will normally be performed by your local Denitive Technology dealer. If, however,
you wish to return the speaker to us, please contact us rst, describing the problem and requesting authorization as well as the location of the
nearest factory service center.
Please note that the address given in this booklet is the address of our ofces only. Under no circumstances should loudspeakers be shipped
to our ofces or returned without contacting us rst and obtaining return authorization.
Denitive Technology Ofces
11433 Cronridge Drive,
Owings Mills, Maryland 21117
Phone: 410-363-7148
TECHNICAL ASSISTANCE
It is our pleasure to offer assistance if you have any questions regarding your Mythos ST-Ls or their set-up. Please contact your nearest Denitive
Technology dealer or contact us directly at (800) 228-7148 (USA and Canada) or +1 (410) 363-7148 or email info@denitivetech.com.
Visit us at www.denitivetech.com.
This product complies with the essential requirements of the EMC directive 89/336/EEC. DUAT012609
21
1.800.228.7148
www.denitivetech.com
Page 22

Warranty
DEI Sales Co., dba Denitive Technology (herein “Denitive”), warrants to the original retail purchaser only that this Denitive loudspeaker product (the “Product”) will be free from defects in material and workmanship for a period of ve (5) years covering the drivers and cabinets, and three (3) years for the electronic
components from the date of the original purchase from a Denitive Authorized Dealer. If the Product is defective in material or workmanship, Denitive or its
Authorized Dealer will, at its option, repair or replace the warranted product at no additional charge, except as set forth below. All replaced parts and Product(s)
become the property of Denitive. Product that is repaired or replaced under this warranty will be returned to you, within a reasonable time, freight collect. This
warranty is non-transferrable and is automatically void if the original purchaser sells or otherwise transfers the Product to any other party. This Warranty does not
include service or parts to repair damage caused by accident, misuse, abuse, negligence, inadequate packing or shipping procedures, commercial use, voltage
in excess of the rated maximum of the unit, cosmetic appearance of cabinetry not directly attributable to defects in material or workmanship. This warranty does
not cover the elimination of externally generated static or noise, or the correction of antenna problems or weak reception. This warranty does not cover labor costs
or damage to the Product caused by installation or removal of the Product. Denitive Technology makes no warranty with respect to its products purchased from
dealers or outlets other than Denitive Technology Authorized Dealer. This Warranty applies only to Products purchased in Canada, the United States of America,
its possessions, and U.S. and NATO armed forces exchanges and audio clubs. The Warranty terms and conditions applicable to Products purchased in other
countries are available from the Denitive Technology Authorized Distributors in such countries.
Limited Warranty:
5-Years for Drivers and Cabinets,
3-Years for Electronic Components
EN
Denitive Technology
11433 Cronridge Dr.
Owings Mills, MD 21117
22
Page 23

EN
Specications – Mythos ST-L
Tweeter 1" magnesium/aluminum alloy tweeter
Midrange Two 5 1/4" 3rd generation BDSS with LRW in an Asymmetric Driver Array
Woofer One 6" x 10" carbon active woofer pressure coupled to two 6" x 10" planar low- bass radiators.
Built-In Subwoofer Power Amplier 1200 Watt Class HD amplier
Overall Frequency Response 14Hz to 30kHz
Recommended Amplication 20-350 Watts
2.83V Sensitivity 92.3 dB spL
Amplier Power On/Off Indicated by blue LED
Impedance compatible with 8 Ohm
Impedance Minimum 3.6 Ohm @ 278Hz
Tweeter/Midrange Crossover Frequency 2366 Hz
Midrange/Woofer Crossover Frequency 111 Hz
Tweeter High Pass Slope (acoustic) 12 dB/octave
Midrange Low Pass Slope (acoustic) 12 dB/octave
Midrange High Pass Slope (acoustic) 12 dB/octave
23
1.800.228.7148
www.denitivetech.com
Page 24

Woofer Low Pass Slope (acoustic) 12 dB/octave
Midrange Enclosure Type Sealed box
Woofer Enclosure Type Dual Bass Radiators
Dimensions (greatest overall depth, grille) Depth 14.187" (36.035 cm) Height 50.809" (129.05486 cm) width 12.682" (32.21228 cm)
Base Dimensions Depth 14.187" (36.035 cm) width 12.682" (32.21228 cm)
Shipping Weight 75 lbs (34.0194 kg)
EN
Denitive Technology
11433 Cronridge Dr.
Owings Mills, MD 21117
24
Page 25

Denitive Technology
11433 Cronridge Dr.
Owings Mills, MD 21117
1.800.228.7148
www.denitivetech.com
 Loading...