

Page 1

Defibtech DDU-2000 Series
Automated External Defibrillator
• DDU-2300
• DDU-2400
• DDU-2450
AHA/ERC 2010
User Manual
DAC-E2510EN- BB
ELECTRONIC
DISTRIBUTION
Page 2

PRESS “ON”
BUTTON
1
APPLY PADS
FOLLOW AED
INSTRUCTIONS
2
IF INSTRUCTED,
PRESS “SHOCK”
BUTTON
3
B
2
DAC-E2510EN- BB
Page 3

Notices
Defibtech, LLC shall not be liable for errors contained herein or for incidental or consequential damages in
connection with the furnishing, performance, or use of this material.
Information in this document is subject to change without notice. Names and data used in the examples are
fictitious unless otherwise noted.
Limited Warranty
The “Limited Warranty” shipped with Defibtech AED products serves as the sole and exclusive warranty provided
by Defibtech, LLC, with respect to the products contained herein.
Copyright
Copyright © 2014 Defibtech, LLC
All rights reserved. Copyright questions should be directed to Defibtech.
For contact information, refer to Chapter 14 of this manual.
Tracking
U.S.A. federal regulations require Defibtech to maintain records for each AED it distributes (reference 21 CFR 821,
Medical Device Tracking). These requirements also apply anytime there is a change in the AED’s location, including
if you move, sell, donate, give away, export or even throw it away. We depend on AED owners/users/holders to
contact us when these things happen to ensure the tracking information remains accurate in the event we need
to share important product notices. If your location is outside the U.S.A., we ask you share your information for
exactly the same reasons. To keep your information up to date, please inform Defibtech using the information in
the “Contacts” section contained in this document.
3
DAC-E2510EN- BB
Page 4

Contents
!
!
!
!
!
!
!
1 Introduction To The DDU-2000 Series AED ......................................................6
1.1 Overview ........................................................................................................................... 6
1.2 The Defibtech DDU-2000 Series AED ............................................................................... 8
1.3 Indications ....................................................................................................................... 10
1.4 Contraindications ............................................................................................................. 10
1.5 Operator Training Requirements ...................................................................................... 10
2 Dangers, Warnings, And Cautions ................................................................... 11
!
2.1 Dangers ...................................................................................................................... 11
!
2.2 Warnings .................................................................................................................... 11
2.3 Cautions ..................................................................................................................... 12
3 Setting Up The DDU-2000 Series AED ............................................................ 13
3.1 Overview ......................................................................................................................... 13
3.2 Connecting The Defibrillation Pads .................................................................................. 13
3.3 Installing The Defibtech Data Card (DDC Card) (Optional) ............................................... 14
3.4 Installing And Removing The Battery Pack ......................................................................15
3.5 Checking The DDU-2000 Series AED Status ................................................................... 15
3.6 Completing The Installation ............................................................................................. 16
3.7 Storing The DDU-2000 Series AED ................................................................................. 16
4 Using The DDU-2000 Series In AED Mode ...................................................... 17
4.1 Overview ......................................................................................................................... 17
4.2 Preparation ...................................................................................................................... 19
4.3 Heart Rhythm Analysis .................................................................................................... 22
4.4 Delivering The Shock .......................................................................................................22
4.5 CPR Period ......................................................................................................................22
4.6 Post Use Procedures ....................................................................................................... 23
4.7 AED Mode Voice And Text Prompts................................................................................. 23
4.8 Operational Environment .................................................................................................27
5 Manual Mode (DDU-2400 only) ............................................................................28
5.1 Entering Manual Mode .................................................................................................... 28
5.2 Exiting Manual Mode ......................................................................................................28
5.3 Selecting Energy .............................................................................................................29
5.4 Initiating Charge ..............................................................................................................29
5.5 Delivering The Shock .......................................................................................................29
6 ECG Monitor Mode (DDU-2400/2450 only) ...........................................................30
6.1 Entering ECG Monitor Mode ........................................................................................... 30
6.2 Applying The ECG Monitoring Electrodes ....................................................................... 30
6.3 Monitoring The Patient .................................................................................................... 31
Click any of the section headings above to be automatically re-directed to that page.
See page references noted in green throughout this book for other interactive links.
DAC-E2510EN- BB
4
Page 5

7 Maintenance And Troubleshooting .................................................................32
7.1 Routine Unit Maintenance ...............................................................................................32
7.2 Self-Tests ......................................................................................................................... 36
7.3 Cleaning ..........................................................................................................................36
7.4 Storage ............................................................................................................................36
7.5 Operator’s Checklist ........................................................................................................37
7.6 Troubleshooting ............................................................................................................... 38
7.7 Repair .............................................................................................................................. 39
8 Maintenance Mode ..........................................................................................40
8.1 Overview ......................................................................................................................... 40
8.2 Navigation (in Maintenance Mode) ..................................................................................40
8.3 Entering Maintenance Mode ........................................................................................... 41
8.4 AED Main Menu Screen .................................................................................................41
8.5 AED Status Screen .......................................................................................................... 41
8.6 AED Maintenance Screen ............................................................................................... 42
8.7 AED Options Screen .......................................................................................................44
8.8 Rescue Options Screen ...................................................................................................46
8.9 Help Topics Screen ..........................................................................................................48
9 DDU-2000 Series AED Accessories .................................................................49
9.1 Defibrillation Pads ............................................................................................................ 49
9.2 Battery Packs ................................................................................................................... 49
9.3 Data Cards ....................................................................................................................... 49
9.4 USB Cable ....................................................................................................................... 50
9.5 ECG Monitoring Adapter ................................................................................................. 50
10 Event Viewing .................................................................................................. 51
10.1 DefibView ........................................................................................................................ 51
10.2 Defibtech Data Cards (DDC Cards) ................................................................................ 51
10.3 Downloading The Internal Data Log ................................................................................ 51
11 Technical Specifications ..................................................................................52
11.1 Defibtech DDU-2000 Series AED .................................................................................... 52
11.2 Battery Packs ................................................................................................................... 58
11.3 Self-Adhesive Defibrillation Pads ..................................................................................... 58
11.4 ECG Monitoring Adapter / Cable (Optional) .....................................................................58
11.5 Event Documentation .....................................................................................................59
11.6 Defibtech Event Viewer ................................................................................................... 59
11.7 Recycling Information ......................................................................................................59
11.8 Notice To European Union Customers ............................................................................59
12 Electromagnetic Conformity ...........................................................................60
12.1 Guidance And Manufacturer’s Declaration ...................................................................... 60
13 Glossary Of Symbols .......................................................................................63
14 Contacts ..........................................................................................................65
Click any of the section headings above to be automatically re-directed to that page.
See page references noted in green throughout this book for other interactive links.
5
DAC-E2510EN- BB
Page 6

1 Introduction To The DDU-2000 Series AED
This User Manual provides information to guide trained operators in the use and maintenance of the Defibtech
DDU-2000 Series Semi-Automatic External Defibrillator (AED) and its accessories.
This chapter includes intended use, an overview of the AED, a discussion of when it should and should not be used,
and information on operator training.
1.1 Overview
The DDU-2000 Series AED is a Semi-Automatic External Defibrillator that is designed to be easy to use, portable,
and battery powered. It has two primary user controls: the ON/OFF and SHOCK buttons, along with three softkey
buttons for advanced mode features. Voice prompts, text prompts, and a display screen with visual prompts provide
a simple interface for the operator. The DDU-2000 Series AED is capable of recording event information, including
ECG, audio data (optional), and SHOCK/NO-SHOCK recommendations.
The DDU-2000 Series of AEDs includes the following models:
• DDU-2300 — Operates in AED Mode.
• DDU-2450 — Operates in AED Mode; includes patient ECG display and ECG monitor mode using an
optional ECG Monitoring Adapter.
• DDU-2400 — Operates in AED Mode or Manual Mode; includes patient ECG display and ECG monitor mode
using an optional ECG Monitoring Adapter.
In AED Mode, when connected to a patient who is unconscious and not breathing, the DDU-2000 Series AED
performs the following tasks:
• Prompts the operator, through audio, text, and video prompts, to prepare the patient for treatment.
• Automatically analyzes the patient’s ECG.
• Determines whether a shockable rhythm is present.
• Charges the defibrillation capacitor and arms the SHOCK button if the AED detects a shockable rhythm.
• Prompts the operator to press the SHOCK button when the device is ready and a shock is recommended.
• Delivers a shock once the device has determined a shock is required and the SHOCK button has been pressed.
• Provides instructions to perform CPR.
• Repeats the process if additional shocks are required.
• Allows user to select between Video display or ECG display (DDU-2400 and DDU-2450 only).
In ECG Monitor Mode (DDU-2400 and DDU-2450 only), the AED allows display of the patient ECG using an optional
3-wire (LEAD II) ECG adapter cable. ECG Monitor Mode provides a non-diagnostic display of the heart rhythm of a
responsive or breathing patient for attended patient monitoring. While connected to the ECG adapter cable, the AED
disables its shock capability.
Manual Mode (DDU-2400 only) allows the user to override the automatic features of the AED. Manual Mode provides
for operator selected energy levels along with charge, shock, and disarm features.
In AED Mode, the DDU-2000 Series AED will NOT shock a patient automatically; it will only advise the operator.
The SHOCK button is enabled only when a shockable rhythm is detected and the device is charged and ready to
shock. Charging occurs automatically when the device detects a shockable rhythm. The operator must press the
SHOCK button to initiate defibrillation. In Manual Mode, the operator is responsible for making the shock/noshock decision, initiating charging and delivering the shock.
The DDU-2000 Series AED uses two self-adhesive defibrillation pads (also known as electrode pads, electrodes, or
pads) to monitor ECG signals and, if necessary, to deliver defibrillation energy to the patient. These pads are provided
in a single-use, disposable package. The DDU-2000 Series AED determines proper pad-to-patient contact by measuring
the impedance between the two pads (impedance varies with the electrical resistance of the patient’s body).
The DDU-2000 Series AED user interface is clear and concise. It has two primary push-button controls and a display
screen. Easily understandable voice messages and text and video prompts guide the operator through the use of the
unit. The device communicates the status of the AED and of the patient to the operator. In Manual Mode, additional
functions are provided through the three softkeys to the right of the display.
1. Introduction
6
6
DAC-E2510EN- BB
Page 7

Defibrillation energy is delivered as an impedance compensated biphasic truncated exponential waveform. In AED
Mode, the device delivers 150 Joules of defibrillation energy (into a 50-ohm load) when using adult defibrillation
pads and 50 J of defibrillation energy (into a 50-ohm load) when using child/infant pads (also known as pediatric
defibrillation pads). Energy delivered does not change significantly with patient impedance, although the duration of
the generated waveform will vary. In Manual Mode, the DDU-2400 (only) offers user-selected energy levels from
25 to 200 Joules.
Defibrillation and AED operating power is supplied by a replaceable (non-rechargeable) battery pack that provides for
long standby life and low maintenance operation. Each battery pack is marked with an expiration date.
The DDU-2000 Series AED records event documentation internally and, optionally, on Defibtech Data Cards (DDC
cards). The optional DDC card plugs into a slot in the AED and enables the AED to record event documentation and,
optionally, audio data onto the card. Audio recording is selectable through configuration settings. Event documentation
stored internally can be downloaded onto a DDC card for review.
A USB port is provided to perform maintenance and data recovery. The USB interface allows connection to a personal
computer. Defibtech PC maintenance software helps support event downloading and unit maintenance operations.
1. Introduction
7
DAC-E2510EN- BB
Page 8

1.2 The Defibtech DDU-2000 Series AED
1. Introduction
A. Speaker. The speaker projects the voice
prompts when the DDU-2000 Series AED is
on. The speaker also emits a “beep” when
the unit is off and has detected a condition
that requires attention from the user or
needs servicing.
B. SHOCK Button. This button will flash when a
shock is recommended. Pressing this button
will deliver a shock when the button is flashing.
This button is disabled at all other times.
C. Display Screen. Color display panel used to
display text and video prompts, messages,
indicators for rescue, unit status, and
maintenance operations. The display screen
provides visual prompts, including CPR
coaching, to assist rescuers with step-by-step
instruction. DDU-2400/2450 models can also
show an ECG trace.
D. ON/OFF Button. This button is used to turn
the DDU-2000 Series AED on and off.
K. Unit Serial Number. The unit’s serial
number can be found on the back of the
AED, above the battery pack opening.
L. Battery Pack Opening. This opening is where
the battery pack is inserted into the unit.
M. Battery Pack Eject Release Latch.
This release latch releases the battery pack
from the DDU-2000 Series AED.
N. Pad Storage Area. The pad storage area is
found on the back of the AED allowing the
pads to be stored in a pre-connected state
for rapid deployment during an emergency.
O. Pads Connector. This connector attaches the
patient pads to the unit at the pads connector
socket (item E).
P. Defibrillation Pads. The defibrillation
pads are pads that are placed on the patient.
The pads may be stored in the pad storage
area (item N) on the back of the unit.
E. Pads Connector Socket. The pads connector
(item O) is inserted into this socket.
F. Active Status Indicator (ASI). The ASI
indicates the current status of the AED.
This indicator flashes green to indicate
the unit is ready for use and flashes red to
indicate unit needs attention from the user
or needs servicing.
G. Softkey Buttons. Three context sensitive
softkey buttons are used to navigate menus
or select actions.
H. USB Port. The USB port is provided to
perform data recovery and maintenance.
Not to be used during rescue operation.
I. Defibtech Data Card (DDC card).
This optional plug-in card provides enhanced
storage capabilities to the AED.
J. USB and Defibtech Data Card (DDC card)
Access Door. Behind the access door is the
USB connector port and Defibtech Data Card
(DDC card) slot.
Q. Defibrillation Pads Expiration Date
(back side). The defibrillation pads expiration
date is located on the back side of the pads
package. Do not use the pads after the
printed date has passed.
R. Battery Pack Serial Number.
The battery pack’s serial number is located
on the label on the battery pack.
S. Battery Pack. The battery pack provides
a replaceable main power source for the
DDU-2000 Series AED.
T. Battery Pack Expiration Date.
The battery pack expiration date is printed
on the label on the battery pack. Do not
use the battery pack after the printed
date has passed.
U. ECG Monitoring Adapter.
This optional adapter for the DDU-2400 and
the DDU-2450 provides a non-diagnostic
ECG display of the patient’s heart rhythm
for attended patient monitoring.
8
DAC-E2510EN- BB
Page 9

E. Pads Connector Socket
D. ON/OFF Button
C. Display Screen
B. SHOCK Button
A. Speaker
FRONT OF AED
U. ECG Monitoring Adapter
(optional; DDU-2400/2450 only)
F. Active Status Indicator (ASI)
G. Softkey Buttons
(Top, Center, Bottom)
H. USB Port
I. Defibtech Data Card
(DDC Card) (optional)
J. USB and Defibtech Data Card
(DDC Card) Access Door
K. Unit Serial Number
1. Introduction
O. Pads Connector
P.
Defibrillation
Pads
L. Battery Pack Opening
M. Battery Pack
Eject Release Latch
N. Pad Storage Area
Q. Defibrillation Pads
Expiration Date
(on back of package)
BACK OF AED
S. Battery Pack
T. Battery Pack
Expiration Date
DEFIBRILLATION
PADS PACKAGE
R. Battery Pack
Serial Number
BATTERY PACK
9
DAC-E2510EN- BB
Page 10

1.3 Indications
The DDU-2000 Series Semi-Automatic External Defibrillator (AED) is indicated for use on victims of sudden cardiac
arrest (SCA) who are:
• Unconscious and unresponsive
• Not breathing
For patients under 8 years old or less than 55 pounds (25kg), use child/infant electrode pads. Do not delay therapy
to determine exact age or weight.
1.4 Contraindications
The AED should not be used if the patient shows any of the following signs:
• Conscious and/or responsive
• Breathing
• Has a detectable pulse
1.5 Operator Training Requirements
In order to safely and effectively operate the AED, a person shall have met the following requirements:
• AED and/or defibrillation training as required by local, state, provincial, or national regulations.
• Any additional training as required by the authorizing physician.
• Thorough knowledge and understanding of the material presented in this User Manual.
Manual Mode (DDU-2400) is intended for use only by qualified medical personnel trained in advanced life support
skills and ECG recognition who want to deliver a shock independent of AED Mode.
ECG Monitor Mode (DDU-2400 and DDU-2450 only) is intended to be used by personnel trained in basic life and/or
advanced life support, or other physician-authorized emergency medical training. Users should be trained in ECG
recognition to allow for rhythm and heart rate monitoring using standard ECG monitoring electrodes.
1. Introduction
10
DAC-E2510EN- BB
Page 11

2 Dangers, Warnings, And Cautions
!
!
!
!
!
!
This chapter includes a list of danger, warning, and caution messages that relate to the Defibtech DDU-2000 Series
AED and its accessories. Many of these messages are repeated elsewhere in this User Manual and on the DDU-2000
Series AED or accessories. The entire list is presented here for convenience.
2.1
Immediate hazards that will result in serious personal injury or death.
• Hazardous electrical output. This equipment is for use only by qualified personnel.
• Possible fire or explosion. Do not use in the presence of flammable gases or anesthetics. Use care when operating
this device close to oxygen sources (such as bag-valve-mask devices or ventilator tubing). Turn off gas source or
move source away from patient during defibrillation, if necessary.
• The DDU-2000 Series AED has not been evaluated or approved for use in hazardous locations as defined in the
National Electric Code standard. In compliance with IEC classification, the DDU-2000 Series AED is not to be used in
the presence of flammable substance/air mixtures.
2.2
Conditions, hazards, or unsafe practices that may result in serious personal injury or death.
• Improper use can cause injury. Use the DDU-2000 Series AED only as instructed in the User Manual. The DDU-2000
Series AED delivers electrical energy that can potentially cause death or injury if it is used or discharged improperly.
• Improper maintenance can cause the DDU-2000 Series AED not to function. Maintain the DDU-2000 Series AED only
as described in the User Manual. The AED contains no user-serviceable parts — do not take the unit apart.
• No modification of this equipment is allowed.
• Electrical Shock Hazard. Dangerous high voltages and currents are present. Do not open unit, remove cover (or
back), or attempt repair. There are no user serviceable components in the DDU-2000 Series AED. Refer servicing
to qualified service personnel.
• Lithium battery packs are not rechargeable. Any attempt to recharge a lithium battery pack may result in fire or explosion.
• Do not immerse battery pack in water or other liquids. Immersion in fluids may result in fire or explosion.
• Do not let fluids get into the DDU-2000 Series AED. Avoid spilling fluids on the AED or its accessories. Spilling fluids
into the DDU-2000 Series AED may damage it or cause a fire or shock hazard.
• Do not sterilize the DDU-2000 Series AED or its accessories.
• Use only Defibtech disposable self-adhesive defibrillation pads, battery packs, and other accessories supplied by
Defibtech or its authorized distributors. Substitution of non-Defibtech approved accessories may cause the device to
perform improperly.
• Do not open sealed pads package until pads are to be used.
• Do not touch the patient during defibrillation. Defibrillation current can cause operator or bystander injury.
• Do not allow pads to touch metal objects or equipment in contact with the patient. Do not touch equipment connected
to the patient during defibrillation. Disconnect other electrical equipment from the patient before defibrillation.
• Do not shock with defibrillation pads touching each other. Do not shock with gel surface exposed.
• Do not allow defibrillation pads to touch each other, or to touch other ECG electrodes, lead wires, dressings,
transdermal patches, etc. Such contact can cause electrical arcing and patient skin burns during defibrillation and
may divert defibrillating energy away from the heart.
• The defibrillation pads are intended for one-time use only and must be discarded after use. Reuse can lead to potential cross
infection, improper performance of the device, inadequate delivery of therapy, and/or injury to the patient or operator.
• Avoid contact between parts of the patient’s body and conductive fluids such as water, gel, blood or saline, and metal
objects, which may provide unwanted pathways for defibrillating current.
• Disconnect all non-defibrillator proof equipment from the patient before defibrillation to prevent electrical shock
hazard and potential damage to that equipment.
DANGERS:
WARNINGS:
11
11
2. Dangers, Warnings,
And Cautions
DAC-E2510EN- BB
Page 12

!
!
!
WARNINGS (continued)
• Aggressive or prolonged CPR to a patient with defibrillation pads attached can cause damage to the pads.
Replace the defibrillation pads if they become damaged during use.
• Possible Radio Frequency (RF) interference from RF devices such as cellular phones and two-way radios can cause
improper AED operation. Normally using a cell phone near the AED should not cause a problem; however, a distance
of 2 meters (6 feet) between RF devices and the DDU-2000 Series AED is recommended.
• CPR during analysis can cause incorrect or delayed diagnosis by the patient analysis system.
• Handling or transporting the patient during ECG analysis can cause incorrect or delayed diagnosis, especially if
very low amplitude or low frequency rhythms are present. If the patient is being transported, stop vehicle before
beginning ECG analysis.
• In patients with cardiac pacemakers, the DDU-2000 Series AED may have reduced sensitivity and not detect all
shockable rhythms. If you know the patient has an implanted pacemaker, do not place electrodes directly over an
implanted device.
• During defibrillation, air pockets between the skin and defibrillation pads can cause patient skin burns. To help
prevent air pockets, make sure self-adhesive defibrillation pads completely adhere to the skin. Do not use dried
out or expired defibrillation pads.
• User-initiated and automatic self-tests are designed to assess the DDU-2000 Series AED’s readiness for use.
However, no degree of testing can assure performance or detect abuse, damage, or a defect that occurred after the
most recent test is completed.
• Use of damaged equipment or accessories may cause the device to perform improperly and/or result in injury to the
patient or operator.
• The DDU-2400 Manual Mode Charge feature can deliver dangerous energy when used inappropriately; Manual Mode
is intended for use only by authorized operators who have been specifically trained in cardiac rhythm recognition and
in manual defibrillation therapy.
• Possible misinterpretation of ECG data. The frequency response of the LCD display is intended for basic ECG
rhythm identification; it does not provide the resolution required for pacemaker pulse identification or accurate
measurements, such as QRS duration and ST segment interpretation. For such purposes an ECG Monitor with an
appropriate frequency response should be used.
• Follow voice prompts if the LCD screen becomes blank or unreadable.
2. Dangers, Warnings,
And Cautions
2.3
Conditions, hazards, or unsafe practices that may result in minor
personal injury, damage to the DDU-2000 Series AED, or loss of data.
• Follow all battery pack labeling instructions. Do not install battery packs after the expiration date.
• Follow all defibrillation pad label instructions. Use defibrillation pads prior to their expiration date. Do not re-use
defibrillation pads. Discard defibrillation pads after use (in the event of suspected pad malfunction, return pads to
Defibtech for testing).
• Recycle or dispose of lithium battery packs in accordance with local, state, provincial, and/or national regulations. To
avoid fire and explosion hazard, do not burn or incinerate the battery pack. Do not crush.
• Use and store the DDU-2000 Series AED only within the range of environmental conditions specified in the technical
specifications.
• If possible, disconnect the DDU-2000 Series AED from the patient prior to use of other defibrillators.
• Do not connect the DDU-2000 Series AED to a PC or other device (using the USB port) while the unit’s electrodes
are still connected to the patient.
• Using non-Defibtech Data Cards (DDC cards) may damage the unit and will void the warranty.
• Although the DDU-2000 Series AED is designed for a wide variety of field use conditions, rough handling
beyond specifications may result in damage to the unit.
CAUTIONS:
DAC-E2510EN- BB
12
Page 13

3 Setting Up The DDU-2000 Series AED
This chapter describes the steps required to make your Defibtech DDU-2000 Series AED operational. The DDU-2000
Series AED is designed to be stored in a “ready” state. This chapter tells you how to make the device ready, so that if
and when you need it, few steps are required to begin using the device.
3.1 Overview
The following components and accessories are included with your DDU-2000 Series AED. Replacement and other
accessories are detailed in the “DDU-2000 Series AED Accessories” section. Before getting started, identify each
component and ensure that your package is complete.
DDU-2000 Series AED Battery Pack
Defibrillation Pads
Package
Operating Guide
(booklet)
Defibtech DDU-2000 Series
Automated External
Defibrillator
· DDU-2300
· DDU-2400
· DDU-2450
Operating Guide
Defibtech Data Card
(DDC card) (optional)
User Manual
(on Defibtech
User CD)
3.2 Connecting The Defibrillation Pads
The DDU-2000 Series AED defibrillation pads are supplied sealed in a package with the connector and part of the
cable exposed. This allows the pads to be stored in a pre-connected state for rapid deployment during an emergency.
DO NOT open the sealed pads package until the
pads are to be used. The packaging should be opened
only immediately prior to use, otherwise the pads
WARNING
may dry out and become non-functional.
3. Setting Up The
DDU-2000 Series AED
Note: The DDU-2000 Series AED is designed to be stored with the pads connector already installed. This simplifies
the procedure for deploying and operating the device in an emergency.
First, check to ensure that the pads package has not expired. The expiration date is printed on the pad pouch and is
also reported on the AED status screen. Do not use pads past expiration date. Discard expired pads.
DAC-E2510EN- BB
13
13
Page 14

Connecting The Defibrillation Pads (continued)
Insert the connector end of the defibrillation pad cable into the pads connector socket on
the top-left corner of the DDU-2000 Series AED as shown. Insert pads connector firmly
until it is fully seated in the unit. The connector will only fit in one way – if the connector
does not fit, rotate the connector before trying again.
The connected pads package can then be stored in the pad storage slot in the back of the
DDU-2000 Series AED. After connecting the pads connector to the unit, push the pads
package, rounded end first, with the pictures on the package facing out, into the pad
holder compartment on the back of the AED. When the pads package is fully inserted,
press the pad cable into the groove in the back of the unit to hold the cable in place and
tuck any excess cable behind the pads package.
The pads are intended for one time use only and must
be discarded after use or if the package has been opened
WARNING
or damaged.
3.3 Installing The Defibtech Data Card (DDC Card) (Optional)
The Defibtech Data Card (DDC card) is used to store event and audio information collected by the AED. All DDU2000 Series AEDs will operate without DDC cards and will still store critical event information internally. DDC
cards may be reviewed with a separate Defibtech PC-based software package. (Refer to the “DefibView” section
in Chapter 10 of this manual.)
Before installing the DDC card, ensure the AED is turned OFF. Locate the data card/USB port access door on the
right-hand side of the unit. Open the data card/USB port access door by slightly pushing and then sliding the door
down to release the latch. The door will spring open. Insert the DDC card into the thin slot in the side of the AED
centered above the USB port opening, notched end first, label side up, until it clicks into place. The card should be
flush with the surface of the slot. If the card does not push in all the way, it may have been inserted upside down.
In that case, remove the card, flip it over, and try inserting it again.
To remove the DDC card, press the card as far as it will go and then release. Upon release, the DDC card will be
partially ejected and can be removed by pulling the DDC card the rest of the way out.
Close the data card/USB port access door by closing and then pushing the door up until the door latch engages.
Using non-Defibtech Data Cards
(DDC cards) may damage the unit
CAUTION
and will void the warranty.
3. Setting Up The
DDU-2000 Series AED
14
DAC-E2510EN- BB
Page 15

3.4 Installing And Removing The Battery Pack
The battery pack provides power to the DDU-2000 Series AED. Do not install the battery pack after the expiration
date printed on the label. The battery pack is non-rechargeable.
Before inserting the battery pack into the DDU-2000 Series AED, ensure that
the battery pack opening in the back of the AED is clean and clear of any
foreign objects. Insert the battery pack into the opening in the back of the AED.
Push the pack all the way in until the latch clicks. The battery pack will only fit in
one way – if the battery pack does not fit, rotate the battery pack before trying
again. Once fully inserted, the battery pack surface should be flush with the
back of the AED.
Within moments of insertion the DDU-2000 Series AED will turn on and run a
battery pack insertion self-test.* When the test is completed, the unit will report
the status of the battery pack and shut down. Afterwards, the Active Status
Indicator (ASI), adjacent to the ON/OFF button of the DDU-2000 Series AED,
will periodically flash. If the indicator flashes green, the AED and battery pack
are ready for use. If the indicator flashes red, is solid red, or there is no flashing
light, the AED requires service. (Refer to the “Checking The DDU-2000 Series
AED Status” section below for more details on the meaning of the indicator.)
*Note: The battery pack must be removed from the unit for more than 10 seconds for the battery pack self-test to
be performed automatically.
To remove the battery pack, push the battery pack eject release latch. After the battery pack is partially ejected, pull
the battery pack out.
3.5 Checking The DDU-2000 Series AED Status
Active Status Indicator (ASI)
Once a fully functional battery pack is installed in the DDU-2000 Series AED, an LED indicator located to the right
of the ON/OFF button actively indicates unit status. If the unit is ready for use, the Active Status Indicator (ASI) will
flash green. Ready for use means that the DDU-2000 Series has passed the most recent self-test (scheduled or
user initiated). If the unit needs service, the ASI will flash red. Anytime the ASI flashes red, the unit will also “beep”
periodically to call attention to itself. The ASI also uses a distinct flash pattern to assist people with color blindness:
green will flash a single flash and red will flash a double flash.
The ASI is powered by the battery pack. If the battery pack has been completely discharged or is not installed in the
unit, the active status indication will be off. In this case, immediately replace the battery pack or reinsert it into the
unit to restore active status indication.
• Flashing Green: The DDU-2000 Series AED is OFF and ready for use.
• Solid Green: The DDU-2000 Series AED is ON and ready for use.
• Flashing or Solid Red: The DDU-2000 Series AED needs immediate service. Refer to the
“Troubleshooting” section in Chapter 7 of this manual or call Defibtech for service.
Active Status
Indicator
(ASI)
• No Flashing Light: The DDU-2000 Series AED needs immediate service. Refer to the
“Troubleshooting” section in Chapter 7 of this manual or call Defibtech for service.
3. Setting Up The
DDU-2000 Series AED
15
DAC-E2510EN- BB
Page 16

Checking The DDU-2000 Series AED Status (continued)
To check the status of the AED
AED status OK
Battery status
Expires 01/2018
Pads status Adult
Expires 06/2018
AED S/N 099999999
Battery S/N 099999999
Software version V2.2
when the unit is off, press the
center softkey button. The display
screen will show unit status, battery
pack status, and pad status. After
a short period of time, the display
screen, and the unit will turn off.
AED Status screen
3.6 Completing The Installation
Once you have completed the previous steps to set up your DDU-2000 Series AED, follow this procedure:
1. Turn the unit on by pressing the ON/OFF button.
2. Listen for the “Call for Help” voice prompt.
3. Turn the unit off by pressing and holding the ON/OFF button.
4. Listen for the “Powering Off” voice prompt.
5. Check Active Status Indicator (ASI) to verify that it is flashing green.
(Refer to the ”Self-Tests” section in Chapter 7 of this manual for instructions on how to run a manually initiated self-test.)
3.7 Storing The DDU-2000 Series AED
Store the DDU-2000 Series AED, with defibrillation pads attached, in environmental conditions within range of the
specifications. (Refer to the “Environmental” section in Chapter 11 of this manual.) The unit should also be stored
so that the Active Status Indicator (ASI) can be readily seen.
The Active Status Indicator (ASI) should periodically flash with a green light. If it flashes with a red light or does not
flash at all, the DDU-2000 Series AED needs servicing. (Refer to the “Checking The DDU-2000 Series AED Status”
section in this chapter for more information.)
Defibtech recommends storing your AED in an easily accessible location.
.
3. Setting Up The
DDU-2000 Series AED
16
DAC-E2510EN- BB
Page 17

4 Using The DDU-2000 Series In AED Mode
This chapter describes how to use the DDU-2000 Series in AED Mode. In AED Mode, the unit analyzes the patient’s
rhythm and automatically charges if a shockable rhythm is detected. The DDU-2000 Series AED was designed for
simple operation, allowing the operator to focus on the patient. There are two primary control buttons and a display
screen. Concise and easily understandable voice messages and text and video prompts guide the operator through
the use of the unit.
The following sections describe in detail how to use the DDU-2000 Series AED. The basic steps for use are:
• Turn the DDU-2000 Series AED ON by pressing the ON/OFF button.
• Plug in pads connector into Pad Connector Socket on AED if not yet plugged in.
• Place defibrillation pads on patient (follow instructions on pads package).
• Follow voice and display prompts.
• Press SHOCK button if instructed by the AED.
• Perform CPR when instructed.
4.1 Overview
Pads Connector Socket –
Socket for pads connector
Active Status Indicator (ASI) –
Indicates the current
status of the AED
4. Using The DDU-2000
Series in AED Mode
ON/OFF Button –
Turns AED on and off
Display Screen –
Displays video or
ECG, text prompts
and information
Speaker –
Creates audio output
from device
Softkey Buttons
(Top, Center, Bottom) –
Buttons used to navigate
menus or select options
SHOCK Button –
Enabled/disabled by
software to allow the
user to discharge a
shock to the patient
17
17
DAC-E2510EN- BB
Page 18

4. Using The DDU-2000
Overview (continued)
Unit Video Display Screen (During AED Mode)
Battery Indicator
Main Screen
Text Prompts
Battery Indicator – The Battery Indicator indicates the approximate remaining battery capacity.
Main Screen – The Main Screen displays video instructions to guide the user during a rescue.
Text Prompts – The Text Prompt Area displays text prompts to guide the user during a rescue.
Softkey Buttons (not pictured) – The Softkey Buttons are located to the right of the display screen. If a softkey
button is active, it will have a softkey icon displayed next to it. The softkey buttons are used to navigate menus or
select actions.
Rescue Breathing Options Softkey Icon – When this icon is present on the screen (during a rescue), the user
may press the corresponding softkey button to select CPR coaching with compressions only (no breathing) or CPR
coaching with compressions and breathing.
Information Softkey Icon – When this icon is present on the screen, the user may press the corresponding
softkey button for additional information with video instruction. The additional information is context dependent;
topics include preparing the patient and performing CPR. To exit, press the softkey button again.
Mode Select Softkey Icon (DDU-2400/2450 only) – When this icon is present on the screen (during a rescue),
the user may press the corresponding softkey button to bring up the Mode of Operation selection screen.
Give 30 Compressions
(sample display screen)
Rescue Breathing
Options Softkey Icon
Information
Softkey Icon
Mode Select
Softkey Icon
(DDU-2400/2450 only)
Series in AED Mode
Mode of Operation
AED / Video Mode
Manual Mode
AED / ECG Mode
Mode of Operation screen
(with corresponding softkeys;
DDU-2400/2450 only)
The user may then select AED Mode with video, AED Mode with ECG, or Manual Mode (available only for DDU-2400
with Manual Mode enabled) by pressing the corresponding softkey button. If no selection is made within 8 seconds,
the AED will continue in the current mode. The current mode is indicated with a green check mark next to it.
18
DAC-E2510EN- BB
Page 19

4. Using The DDU-2000
Unit ECG Display Screen (During AED Mode, DDU-2400/2450 only)
Battery Indicator
Main Screen
Mode Select
Text Prompts
Battery Indicator – The Battery Indicator indicates the approximate remaining battery capacity.
Heart Rate Indicator – The Heart Rate Indicator displays the patient’s heart rate.
Elapsed Time – The Elapsed Time displays the time since the start of the event in hr:min:sec.
Shock Count – The Shock Count displays the number of shocks delivered for current event.
Main Screen – The Main Screen displays the patient’s ECG if the pads are connected.
Text Prompts – The Text Prompt Area displays text prompts to guide the user during a rescue.
Mode Select Softkey Icon (DDU-2400/2450 only) – When this icon is present on the screen (during a
rescue), the user may press the corresponding softkey button to bring up the Mode of Operation selection screen.
Analyzing
(sample display screen)
Softkey Icon
Series in AED Mode
4.2 Preparation
Checking The DDU-2000 Series AED Status
Visually check the Active Status Indicator (ASI). The ASI should flash green. The ASI flashes green to indicate ready
for use status. The ASI flashes red, solid red, or is not lit at all to indicate that service is required.
The ASI is powered by the battery pack. If the battery pack has been completely discharged or is not installed in the
unit, the active status indication will not be available. In this case, immediately replace the battery pack or reinsert it
into the unit to restore active status indication.
• Flashing Green: The DDU-2000 Series AED is OFF and ready for use.
• Solid Green: The DDU-2000 Series AED is ON and ready for use.
• Flashing or Solid Red: The DDU-2000 Series AED needs immediate service. Refer to the
“Troubleshooting” section in Chapter 7 of this manual or call Defibtech for service.
Active Status
Indicator
(ASI)
Turning On The DDU-2000 Series AED
Press the green ON/OFF button to turn the DDU-2000 Series AED on. The unit will emit a “beep” and the display
screen will turn on. The ASI indicator next to the ON/OFF button will illuminate green anytime the AED is on. (To turn
the unit off, press AND HOLD the ON/OFF button for approximately two seconds; the unit will emit a “beep” and
power off.)
• No Flashing Light: The DDU-2000 Series AED needs immediate service. Refer to the
“Troubleshooting” section in Chapter 7 of this manual or call Defibtech for service.
Call For Help
Call professional emergency services for help. As soon as the AED is turned on the unit will prompt the user to “Call for
help.” This is a reminder that the first step in a rescue should always be to contact professional emergency services.
If another person is available, the user should direct that person to call for help and then continue the rescue
without delay.
19
DAC-E2510EN- BB
Page 20

4. Using The DDU-2000
Selecting an Alternate Spoken Language
Some AED models are factory configured to support an
alternate spoken language. If the AED supports an alternate
language, a Language Softkey Icon (represented in the form
of a flag) will be displayed. When the Language Softkey Icon
is present, the user may press the corresponding softkey to
switch the spoken voice prompts to the alternate language.
(Note: Text prompts continue in the primary language.)
Pressing the Language Softkey Icon again will switch the
spoken language back to the primary language. The Language
Softkey Icon is available only until the defibrillation pads are
Follow Instructions
Preparing The Patient
Prepare the patient by removing any clothing from the patient’s chest. Wipe away moisture from the chest if
necessary (the defibrillation pads will stick better on dry skin). If necessary, shave excessive chest hair, which can
prevent effective patient-electrode contact. To ensure that defibrillation pads fully contact the patient’s skin, check
that no jewelry or other objects are directly underneath where the pads will be placed.
Connecting The Defibrillation Pads To The DDU-2000 Series AED
Connect pads to unit, if not already connected. Follow AED voice and display instructions.
The DDU-2000 Series AED is designed to be stored with the defibrillation pads connector
attached to the unit, while the pads themselves remain sealed in their package. This reduces
the time needed to setup and start treatment in an emergency.
The Defibtech AED should be stored with the pads connector attached to the unit. However,
if pads were damaged or not properly connected, you may need to substitute a new set of
pads during an emergency. The pads connector socket is on the top left corner of the AED.
connected to the patient.
Series in AED Mode
To detach a set of pads from the unit, pull firmly on the pad connector. Do not reuse used pads. Insert the
connector for the new pads as shown above. The connector will only fit in one way – if the connector does not fit,
rotate the connector before trying again. Insert connector firmly until it is completely seated in the unit.
When this Information Softkey Icon is present on the screen, the user may
press the corresponding softkey button for additional information with video
instruction. To exit, press the softkey button again.
Opening The Defibrillation Pads Package
Remove the pads package from the pad storage slot at the back of the AED. Open the pads package by tearing
along the dotted line, starting at the black arrow (follow directions on the package). Check that the pads are:
• Free from obvious signs of damage.
• Clean of excessive debris (for example, dirt if the pad was dropped).
• Not dried out, and that the gel is sticky and will adhere to the patient.
• Not expired. Do not use pads after the expiration date printed on the package.
If any of these conditions are found, use a new set of pads, if possible.
20
DAC-E2510EN- BB
Page 21

4. Using The DDU-2000
Applying The Defibrillation Pads To The Patient
Apply pads correctly to patient. Follow AED voice and text prompts. Correct pad placement is essential for effective
analysis of the patient’s cardiac rhythm and subsequent shock delivery (if required).
Remove the pads from the pads package by tearing the package along the dotted line near the top of the package.
Follow the directions and diagram showing proper defibrillation pad placement located on the defibrillation pads
package and on the pads.
Peel off each pad from the blue liner before placing it as shown on the picture on the pad. Peel the pad off the blue
liner only when the pad is ready to be placed on the patient.
Place the pads with the sticky side of the pad on the patient’s skin. Pad placement on infants and children under
8 years or less than 55 pounds (25 kg) is different than placement for adults and children 8 years or older or
over 55 pounds (25 kg). If you are unsure of a child’s age or weight or do not have child/infant pads, do not delay
treatment.
Place the pads on the patient’s bare chest exactly as shown in the picture on the pad. See diagrams below:
Sample Adult Pads Sample Child/Infant Pads
Series in AED Mode
For adults and children 8 years or older or
over 55 pounds (25 kg), use adult pads:
Place one pad just below the patient’s right collar bone
as shown in the picture. Place the second pad over
the ribs on the patient’s left side below the left breast.
Use picture on pad to determine individual
pad placement.
For infants and children under 8 years or less than
55 pounds (25 kg), use child/infant pads
(Note: Child/infant pads can be identified by
their blue connector and pads package):
Place one pad in the center of the chest and one pad
on the center of the back, as shown. Use picture on
pad to determine individual pad placement.
21
DAC-E2510EN- BB
Page 22
4. Using The DDU-2000
Follow DDU-2000 Series AED Instructions
At this point, the DDU-2000 Series AED will check to make sure that the pads are well connected to the patient and that
an adequate ECG signal is being received. Do not touch the patient. Eliminate any patient movement, and cease CPR
at this time.
If there is a problem with the pad connection, socket connection, patient motion, or other interference, the AED will
guide the operator with both audible and displayed instructions. Text prompts are identical to or are an abbreviated form
of the audio prompts. Video prompts reinforce the audio and text prompts and aid in high ambient noise environments.
4.3 Heart Rhythm Analysis
Once the DDU-2000 Series AED has determined that the pads are making a good connection to the patient, the
AED will start the ECG rhythm analysis. The unit analyzes the ECG signal and determines whether a shockable or
non-shockable rhythm is present. While analyzing, the AED will continue to monitor signal and pad conditions and
will reassess analysis and prompt the user if additional user action is needed.
4.4 Delivering The Shock
If the DDU-2000 Series AED ECG analysis algorithm has determined that a shock is required, the unit will automatically
charge in preparation for shock delivery. While the AED charges, the unit may emit a charging tone and will continue
to analyze the patient’s heart rhythm. If the unit detects that the heart rhythm has changed to one that does not
require a shock, the unit will prompt the user to begin CPR. While analyzing, the AED will continue to monitor signal
and pad conditions.
If the unit has determined that a shock is required and has completed charging, the SHOCK button will flash and the
user will be instructed to press the flashing SHOCK button. The user should follow the AED instructions and press
the SHOCK button.
Important: The DDU-2000 Series AED will not automatically deliver a shock — the user must press the flashing
SHOCK button.
shockable rhythm, the unit will cancel the shock. Also, if the SHOCK button is not pressed within 30 seconds of the
initial “press flashing SHOCK button” prompt, the unit will automatically cancel the shock.
The user can abort charging or shock delivery at any time by pressing and holding the ON/OFF button for approximately
two seconds to turn the unit off.
If while waiting for the SHOCK button to be pressed, the unit detects a rhythm change to a non-
Series in AED Mode
4.5 CPR Period
The operator will be prompted to begin CPR. The unit will not monitor the patient’s ECG rhythm during the CPR period.
During the CPR period, the AED will not advise the user to “stop motion” even if motion is present.
The user should follow the AED instructions during this time. Once the CPR period is complete, the unit will continue in
Heart Rhythm Analysis mode.
CPR coaching is provided through a series of voice and visual prompts and audible tones. The factory default setting
provides prompts for chest compressions only (no breathing).
However, breathing prompts can be enabled/disabled by pressing the softkey button next to the Rescue Breathing
Options icon displayed on the screen during rescue. (Refer to the “Rescue Breathing Options Softkey Icon” section
below.) Breathing prompts can also be enabled/disabled by setting the menu option in Maintenance Mode. (Refer to the
“CPR Breathing” section in Chapter 8 of this manual.)
Rescue Breathing Options Softkey Icon: During a rescue, when this icon is present on the
screen, the user may press the corresponding softkey button to select CPR coaching with
compressions only (no breathing) or CPR coaching with compressions and breathing.
Note: Refer to the “
to change the factory default setting.
When this Information Softkey Icon is present on the screen, the user may
press the corresponding softkey button for additional information with video
instruction. To exit, press the softkey button again.
CPR Breathing
” section in Chapter 8 of this manual for instructions on how
DAC-E2510EN- BB
22
Page 23
4. Using The DDU-2000
4.6 Post Use Procedures
After the DDU-2000 Series AED has been used on a patient, the unit should be cleaned following procedures in
the “Cleaning” section in Chapter 7 of this manual and prepared for the next use. The following steps should be
performed:
1. Connect a new pads package (check to make sure the package is not expired and package is not damaged).
2. Perform a self-test manually. Unit will report status at the end of the self-test. (Refer to the “Self-Tests”
section in Chapter 7 of this manual for instructions on how to run a manually initiated self-test.)
3. Turn off the unit by pressing the ON/OFF button.
4. Check to make sure that the Active Status Indicator (ASI) is flashing green.
4.7 AED Mode Voice And Text Prompts
The following section provides brief descriptions of some of the voice and text prompts that the user will hear and
see in AED Mode.
General Prompts
Voice Tex t
“Call for help” Call For Help
Purpose: As soon as the DDU-2000 Series AED is turned on, the user will be prompted to call for help. This
indicates that the first step in a rescue should always be to contact professional emergency services. If another
person is available, the user should direct that person to call for help and then continue the rescue without delay.
“Pediatric mode” Pediatric Mode
Purpose: This informs the user that child/infant pads are attached to the unit. Child/infant pads should only be
used if the patient is an infant or a child under the age of 8 or less than 55 pounds (25 kg). For children 8 years
or older or over 55 pounds (25 kg) and for adults, adult pads should be used. Do not delay therapy to determine
exact age or weight.
“Training pads” Training Pads
Purpose: This informs the user that training pads are attached to the unit. Training pads are used for training purposes
only and will not deliver a shock. In a rescue, immediately replace the training pads with defibrillation pads.
“Powering off” Powering Off
Purpose: This informs the user that the unit is turning off.
Series in AED Mode
Pad Connection/Pad Application Related Prompts
Voice Tex t
“Follow instructions to apply pads” Follow Instructions
Purpose: This instructs the user to follow the AED prompts in order to apply the pads to the patient.
“Remove clothing from patient’s chest” Remove Clothing
Purpose: This instructs the user to remove all clothing from patient’s chest. Pads must be applied to the patient’s
bare chest.
“Locate pads package in back of AED” Locate Pads
Purpose: This helps the user locate the pads in the pad storage area, which is located on the back of the unit.
“Plug in pads connector” Plug In Pads
Purpose: The DDU-2000 Series AED is unable to detect that the pads are plugged in. Check that the connector
is fully inserted into the unit. If the pads are properly plugged in, continue to follow audio and visual instructions.
“Tear open pads package” Open Pads Package
Purpose: This instructs the user to tear open the pads package on the dotted line on the top of the package. Once
the package is open, the user will be able to remove the pads from inside the package.
23
DAC-E2510EN- BB
Page 24
4. Using The DDU-2000
Pad Connection/Pad Application Related Prompts (continued)
Voice Tex t
“Peel pads from blue liner” Peel Pads
Purpose: This instructs the user to peel each pad from the blue liner before placing the pads on the patient. Peel
the pads from the blue liner only when the pad is ready to be placed. Place the pads with the sticky side of the pad
on the patient’s bare skin.
“Apply pads to patient’s bare chest as shown” Apply Pads to Patient
Purpose: The DDU-2000 Series AED has determined that the pads are not placed on the patient or not properly
applied. Place pads on the patient following instructions on the pads package. If the prompts continue, try
replacing the pads with a new set.
“Poor pad contact to patient”
“Press pads firmly”
Purpose: The pads are not making proper contact with the patient and the impedance is out of range for proper
ECG analysis and shock delivery. Check that the pads are properly placed and fully adhering to the patient and
that there are no air bubbles between the pads and the patient. If the pads are not sticking due to moisture, dry
the patient. If the pads are not sticking due to excessive hair, shave or clip excessive chest hair. If the prompts
continue, try replacing the pads with a new set.
“Check pads” Check Pads
Purpose: The pads are making improper contact with the patient or touching each other and the impedance is out of
range for proper ECG analysis and shock delivery. Check that the pads are not touching each other and that the patient
is dry. If the prompts continue, try replacing the pads with a new set.
“Pausing for CPR” Pausing for CPR
Purpose: If too long a period of time has passed, the user should stop attempting to resolve problems with the
pads and assess the condition of the patient. The user will be prompted to begin CPR.
“Replace pads” Replace Pads
Purpose: The pads are making improper contact with the patient or touching each other and the impedance is
out of range for proper ECG analysis and shock delivery. If another set of pads is available, replace the pads,
otherwise check that the pads are properly placed and fully adhering to the patient. Make sure that the pads are
not touching each other. If the pads are not sticking due to moisture, dry the patient. If the pads are not sticking
due to excessive hair, shave or clip excessive chest hair. If the prompts continue, try replacing the pads with a
new set.
Poor Pad Contact
Press Pads Firmly
Series in AED Mode
Motion/Interference Prompts
Voice Tex t
“Stop motion” Stop Motion
Purpose: The DDU-2000 Series AED has detected possible motion in the patient. Stop all patient motion, including
CPR, in response to this prompt.
“Stop interference” Stop Interference
Purpose: The DDU-2000 Series AED has detected interference on the ECG signal. Eliminate any radio or electrical
sources of interference. Check the pads to make sure they are adhering properly to the patient. If the environment
is very dry, minimize movement around the patient to reduce static discharges.
“Pausing for CPR” Pausing for CPR
Purpose: The user should stop attempting to resolve motion and/or interference problems and assess the condition
of the patient. The user will be prompted to begin CPR.
24
DAC-E2510EN- BB
Page 25

4. Using The DDU-2000
Heart Rhythm Analysis Prompts
Voice Tex t
“Analyzing heart rhythm”
“Analyzing”
Purpose: The DDU-2000 Series AED is actively analyzing the patient’s ECG signal. The AED will continue analyzing
until it has determined whether a rhythm is shockable or non-shockable or if analyzing is interrupted for some reason.
“Do not touch the patient” Do Not Touch Patient
Purpose: The DDU-2000 Series AED is trying to analyze the patient’s heart rhythm. The operator should not touch
the patient. This prompt will be spoken at the beginning of the analysis period and also if motion or interference
has been detected.
“Analyzing interrupted” Analyzing Interrupted
Purpose: The DDU-2000 Series AED has determined that accurate ECG analysis is not possible and has ceased
analyzing. The operator is prompted to resolve the problem. (Refer to the “Motion/Interference Prompts” and the
“Pad Connection/Pad Application Related Prompts” section in this chapter.) Once the problem is resolved, the unit
will enter analysis mode again.
“No shock advised” No Shock Advised
Purpose: The DDU-2000 Series AED has determined that a shock is not required. The unit will NOT charge and
the SHOCK button will NOT be enabled. The user will be prompted to begin CPR.
“Shock advised” Shock Advised
Purpose: The DDU-2000 Series AED has determined that a shock is recommended and the unit will begin
charging in anticipation of delivering a defibrillation shock.
Analyzing Rhythm
Analyzing
Series in AED Mode
Shock Related Prompts
Voice Text
“Charging” Charging
Purpose: The DDU-2000 Series AED has determined that a shock is recommended and is charging the unit
in anticipation of a defibrillation shock. Analysis will continue during this phase. A tone will sound to indicate
charging progress. If the unit detects a rhythm change to a non-shockable one, charging will abort and the user
will be prompted to begin CPR.
“Stand clear” Stand Clear
Purpose: The DDU-2000 Series AED is charging and the operator and others should stand clear of the patient.
Analysis will continue during this phase and analyzing prompts will continue to be displayed. A tone will sound
to indicate charging progress. If the unit detects a rhythm change to a non-shockable one, charging will abort
and the user will be prompted to begin CPR.
“Press flashing SHOCK button” Press SHOCK Button
Purpose: The DDU-2000 Series AED has fully charged, the heart rhythm analysis algorithm still indicates that a
shock is recommended, and the unit is ready to deliver a shock. The operator should press the SHOCK button to
deliver the shock. The SHOCK button will flash during this phase and will cancel after 30 seconds.
Important: The DDU-2000 Series AED will not automatically deliver a shock – the user must press the SHOCK button.
“Shock ‘x’ delivered” Shock “x” Delivered
Purpose: The DDU-2000 Series AED has delivered the shock. The ‘x’ indicates the number of shocks that have
been delivered since the unit was turned on. After each shock, the AED will enter Post-Shock CPR mode.
(AHA/ERC 2010 Protocol)
“Shock cancelled” Shock Cancelled
Purpose: The DDU-2000 Series AED has aborted shock mode. If while waiting for the SHOCK button to be
pressed, the unit detects a rhythm change to a non-shockable rhythm, the unit will cancel the shock. Also, if the
SHOCK button is not pressed within 30 seconds of the initial “press flashing SHOCK button” prompt, the unit
will automatically cancel the shock.
25
DAC-E2510EN- BB
Page 26

4. Using The DDU-2000
Shock Related Prompts (continued)
Voice Text
“SHOCK button not pressed” Button Not Pressed
Purpose: After shock is advised, the DDU-2000 Series AED will prompt user to press the flashing shock button.
If after 30 seconds the shock button is not pressed, the DDU-2000 Series AED will give this prompt and
immediately go to CPR mode.
No Shock Required Prompts
Voice Text
“No shock advised”
“It is safe to touch the patient”
Purpose: The DDU-2000 Series AED has determined that a shock is not required. The unit will not charge and
the SHOCK button will not be enabled. The user will be prompted to begin CPR.
CPR Prompts
Note: CPR breathing coaching prompts can be set through the Rescue options menu option listed on the AED
Main Menu screen. The factory default setting provides prompts for chest compressions only (no breathing).
Breathing prompts can be included either by changing the menu option (refer to the “CPR Breathing” section in
Chapter 8 of this manual) or by pressing a softkey button during rescue. (Refer to ”Rescue Breathing Options
Softkey Icon” section of this chapter.)
Voice Text
“Begin CPR now” Begin CPR Now
Purpose: This indicates that the user should begin performing CPR immediately. The unit will not monitor the
patient’s ECG rhythm during this CPR period.
“Give Compressions” Give “xx” Compressions
Purpose: This indicates that the user should begin CPR compressions immediately. The unit will emit a beep at
the rate that compressions should be given.
“Continue”
“Continue for 1 minute ‘xx’ seconds”
Purpose: This indicates that the user should continue performing CPR. This phrase is spoken to let the user
know that the unit is still operating normally. The unit will not be monitoring the patient’s ECG rhythm during this
mandatory two minute CPR period. (AHA/ERC 2010 Protocol)
“Ending in 5, 4, 3, 2, 1” Ending in “xx” Seconds
Purpose: This indicates that the user should prepare to finish performing CPR. This phrase is spoken during the last
several seconds of the CPR period to let the operator know that the unit is still operating normally and that the CPR
period is ending.
“Stop CPR”
“Stop Now”
Purpose: This indicates that the CPR period has ended and the user should stop CPR. The unit will enter Analyze Mode.
“Do not touch the patient”
“Analyzing heart rhythm”
Purpose: This indicates the unit has entered Analyze Mode and is performing an ECG analysis. The user should
not touch the patient during the ECG analysis.
No Shock Advised
OK to Touch Patient
Continue “xx” Seconds
Stop CPR
Stop Now
Do Not Touch Patient
Analyzing Rhythm
Series in AED Mode
26
DAC-E2510EN- BB
Page 27

4. Using The DDU-2000
CPR Coaching Help Prompts
Voice Te x t
“Place hands” Place Hands
Purpose: This reminds the user of the correct placement of hands for CPR.
“Press”
“Compress Chest”
Purpose: This reminds the user to perform CPR compressions.
“Tilt head back”
“Pinch nose”
“Give rescue breaths”
Purpose: This guides the user to prepare the patient for rescue breaths and to give breaths.
“Breathe” Breathe
Purpose: This instructs the user to give rescue breaths. Each time the instruction is given, the user should give the
patient a rescue breath.
Press
Compress Chest
Tilt Head Back
Pinch Nose
Give “x” Breaths
4.8 Operational Environment
The Defibtech AED is designed to operate in a wide range of environmental conditions. To ensure the reliability and
safety of the AED in a given environment, refer to the “Environmental” section in Chapter 11 of this manual for a
detailed list of approved environmental conditions.
Series in AED Mode
27
DAC-E2510EN- BB
Page 28

5 Manual Mode (DDU-2400 only)
The DDU-2400 AED provides a Manual Mode to override the AED features of the defibrillator. Manual Mode provides
an ECG display of patient’s rhythm as well as operator-initiated charge, shock, and disarm functions. Manual Mode
should only be used by qualified medical personnel trained in advanced life support skills and ECG recognition who
want to deliver a shock independent of AED Mode.
The DDU-2400 Manual Mode Charge feature is intended
for use only by authorized operators who have been
WARNING
5.1 Entering Manual Mode
specifically trained in cardiac rhythm recognition and in
manual defibrillation therapy.
When the Mode Select Icon is present on the screen, the user may press the
corresponding softkey button to bring up the Mode of Operation screen.
Mode of Operation
AED / Video Mode
Manual Mode
Manual Mode Softkey
(when in Mode of Operation; DDU-2400 only)
AED / ECG Mode
Mode of Operation screen
When Manual Mode is entered, the main screen automatically switches to ECG view and text prompts provide
instruction. (NOTE: Voice prompts are disabled while in Manual Mode.) If the pads are not applied, the display
will show a dashed ECG and prompt the user to apply the pads. When the pads are applied, the display shows the
patient’s ECG and heart rate.
Energy Select
Softkey Icon
5. Manual Mode
(DDU-2400 only)
Manual Mode
Apply Pads to Patient
Manual Mode
Manual Override
Manual Mode: unapplied pads Manual Mode: pads applied
5.2 Exiting Manual Mode
To exit Manual Mode, press the softkey associated with the Mode Select Icon
and select a mode of operation.
Initiate Charge
Softkey Icon
Mode Select
Softkey Icon
28
DAC-E2510EN- BB
Page 29

5.3 Selecting Energy
The user may select the desired energy level by pressing the softkey associated with
the Energy Select Icon (upper button). The default energy when entering Manual
Mode is always 150 J (adult pads) or 50 J (pediatric pads). Pressing the Energy Select
Icon will cycle the energy through the following options:
• 25, 50, 70, 100, 150, 200 Joules (Adult pads attached)
• 25, 50, 70, 100 Joules (Pediatric non-attenuating pads attached)
• 50 Joules (not selectable) (Pediatric attenuating pads attached)
5.4 Initiating Charge
To initiate charging, press the softkey associated with the CHARGE Softkey Icon
(middle button). The AED’s main screen will display a progress bar and produce an
audible rising tone while charging. The CHARGE Softkey Icon will change to the
DISARM Softkey Icon.
5. Manual Mode
(DDU-2400 only)
DISARM Softkey Icon
Charging
Charging Screen
While charging, pressing the softkey associated with the DISARM Softkey Icon
(middle button) will cancel the charge.
5.5 Delivering The Shock
When charging is complete, the AED will prompt the user to press the flashing SHOCK button and will produce
a two-toned audible alarm.
Manual Mode
Press SHOCK Button
Shock Delivery Screen
The user should follow the AED
press the flashing SHOCK button. (Note: If the SHOCK button is not
pressed within 30 seconds, the AED will automatically disarm.)
IMPORTANT
deliver a shock — the user must press the flashing SHOCK
button.
The user can abort charging or shock delivery at any time while
in Manual Mode by pressing the DISARM softkey (middle button)
or by pressing and holding down the AED
approximately two seconds to turn the unit off.
: The DDU-2000 Series AED will not automatically
’s onscreen text
’s
ON/OFF button for
instructions and
SHOCK button (flashes when ready to shock)
29
DAC-E2510EN- BB
Page 30

6 ECG Monitor Mode (DDU-2400/2450 only)
At the discretion of emergency care personnel, the DDU-2400 and DDU-2450 AED can also be used with an optional
ECG Monitoring Adapter (DAC-2020/2021) to provide a non-diagnostic ECG display of the patient’s heart rhythm
for attended patient monitoring. The system is intended for use on a conscious or breathing patient, regardless of
age. While connected to the ECG Monitoring Adapter, the DDU-2400/2450 AED’s shock capability is disabled, but it
continues to evaluate the patient’s ECG. There are no known contraindications to use of the ECG Monitoring Adapter.
Note: The AED does not have to be turned off before changing from defibrillation pads to the ECG Monitoring Adapter
or vice versa. To deliver a shock to the patient, disconnect the ECG Monitoring Adapter and attach the defibrillation pads.
6.1 Entering ECG Monitor Mode
Remove the defibrillation pads and plug in the optional ECG Monitoring Adapter. The AED will automatically switch
to ECG Monitor Mode with ECG view and onscreen text prompts will provide instruction. (NOTE: Voice prompts
are disabled while in ECG Monitor Mode.) If the pads are not applied, the display will show a dashed ECG and
prompt the user to apply the pads. When the pads are applied, the display shows the patient’s ECG and heart rate.
Note: The ECG Monitoring Adapter uses the same connector socket in the AED used by the defibrillation pads.
6.2 Applying The ECG Monitoring Electrodes
Apply ECG monitoring electrodes to the patient’s chest as shown below:
RA LA
LL
AHA LABELS: (DAC-2020)
RA – Right Arm
LA – Left Arm
LL – Left Leg
R L
F
IEC LABELS: (DAC-2021)
R – Right
L – Left
F – Foot
6. ECG Monitor Mode
Using the DDU-2300 AED
(DDU-2400/2450 only)
30
30
DAC-E2510EN- BB
Page 31
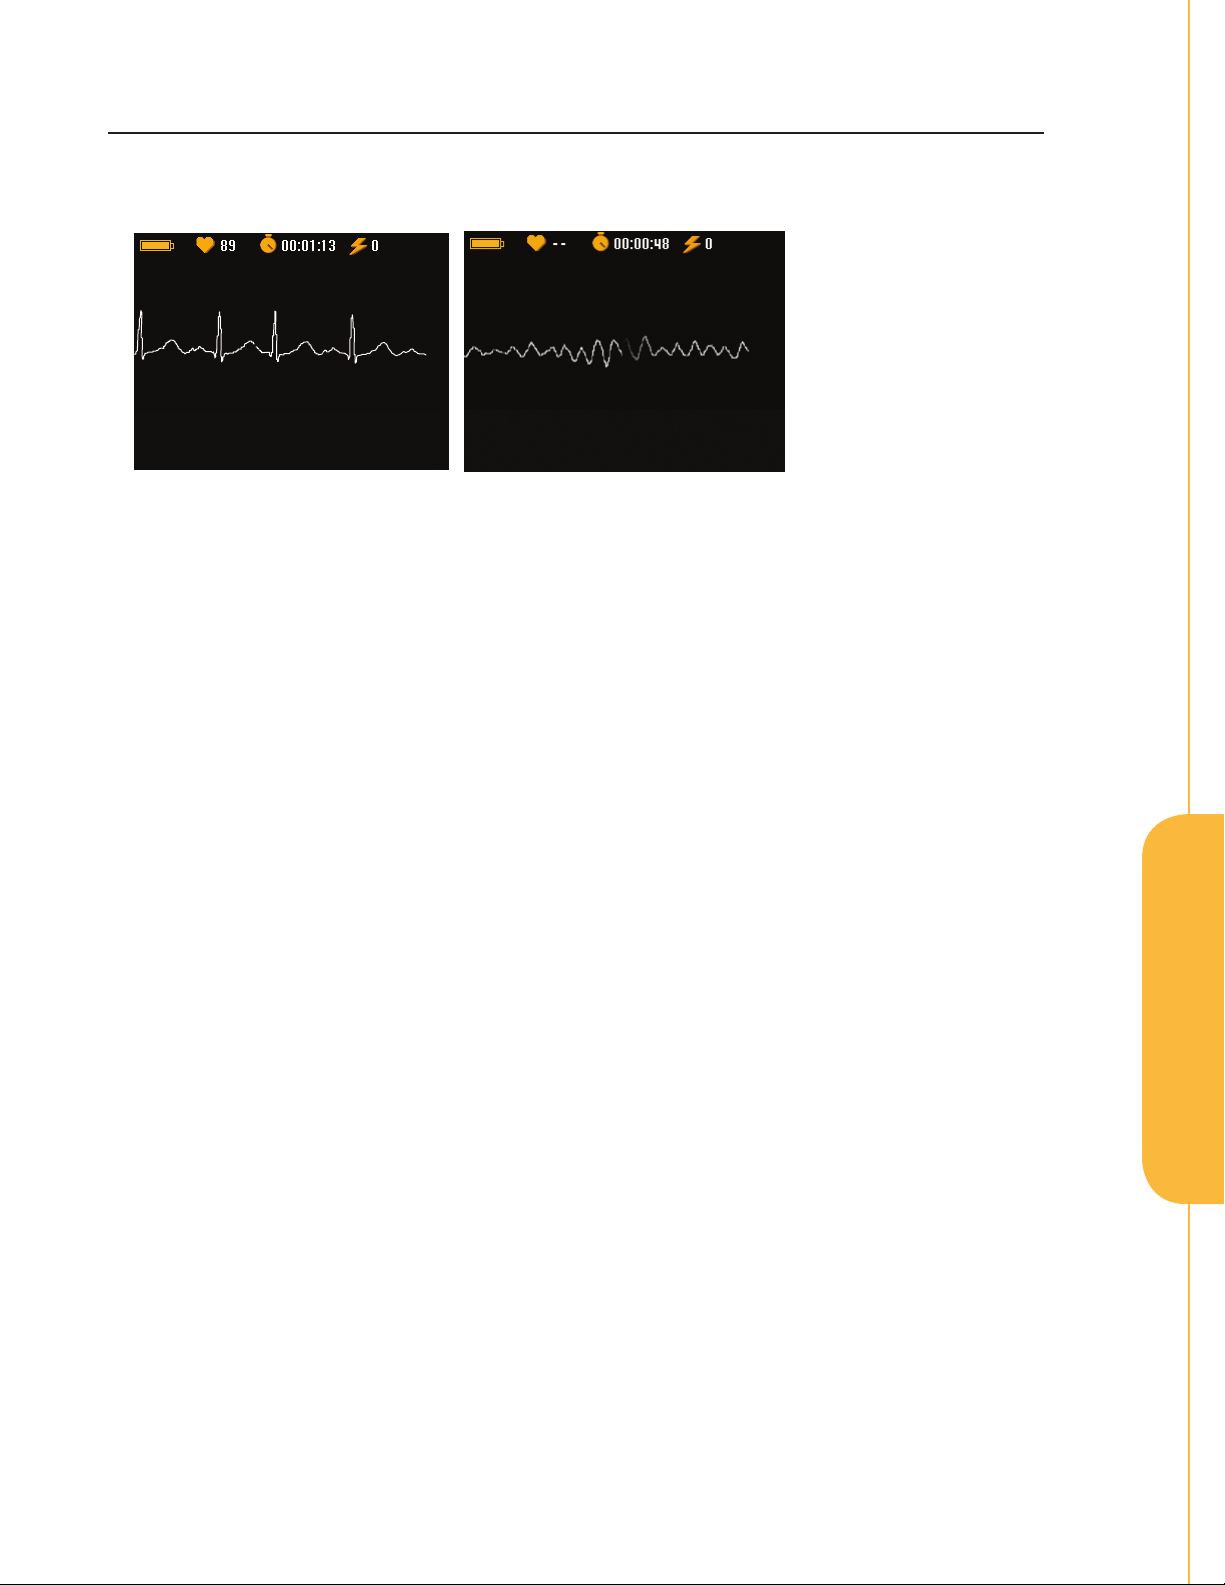
6.3 Monitoring The Patient
After the ECG monitoring electrodes are connected, the defibrillator displays a non-diagnostic ECG of the patient’s
heart rhythm and heart rate in a Lead II configuration. While in ECG Monitor Mode, the defibrillator’s shock capability
is disabled; however, the defibrillator continues to evaluate the patient’s ECG for a potentially shockable rhythm.
Monitoring
Monitoring
ECG Monitor Mode Screen Shockable rhythm detected
If a shockable rhythm is detected, the defibrillator prompts Plug in Rescue Pads.
• Confirm the patient’s condition: Not responsive? Not breathing? No signs of circulation?
• Remove the ECG Monitoring Adapter and connect the defibrillation pads (Rescue Pads) to the AED.
• Apply the defibrillation pads to the patient’s chest, keeping them at least 2.5 cm (one inch) away from the
ECG monitoring electrodes. If necessary, remove the ECG monitoring electrodes.
• Follow the AED’s voice and onscreen text prompts.
Plug in Rescue Pads
Monitoring
6. ECG Monitor Mode
(DDU-2400/2450 only)
31
DAC-E2510EN- BB
Page 32

7. Maintenance And
7 Maintenance And Troubleshooting
This chapter describes the maintenance and troubleshooting procedures for the DDU-2000 Series AED. The self-tests
that are performed by the device are described along with the frequency and nature of routine maintenance for which
the owner/operator is responsible. A troubleshooting guide is provided to help diagnose user serviceable problems.
The DDU-2000 Series AED contains no user serviceable parts.
7.1 Routine Unit Maintenance
Although the DDU-2000 Series AED is designed to be very low maintenance, simple maintenance tasks must be
performed by the owner/operator on a regular basis to ensure the unit’s dependability.
Daily Monthly After Each Use Action
• • • Check that the Active Status Indicator (ASI) is flashing green
• • Check the condition of the unit and accessories
• Run manually initiated self-test
• Replace pads
• Check pad and battery pack expiration dates
• Check the DDC card, if one was installed
Note: If the unit has been dropped, mishandled, or abused, a manually initiated self-test should be performed.
Troubleshooting
Checking The Active Status Indicator
The Active Status Indicator (ASI) is located to the right of the ON/OFF button of the DDU-2000 Series AED and
indicates the operational readiness state of the unit. The ASI will periodically flash green to indicate that the unit is
ready for use. Ready for use means that the DDU-2000 Series has passed the most recent self test (scheduled or
user initiated). If it is flashing red, solid red, or not flashing at all, the AED needs service. Anytime the ASI is flashing
red, the unit will periodically emit two “beeps” to call attention to it.
If the ASI is not flashing at all, the most likely cause is that the battery pack needs to be replaced. (Refer to the
“Installing And Removing The Battery Pack” section in Chapter 3 of this manual.) Once the battery pack has been
replaced with a fresh battery pack, the ASI should once again flash green. If it still does not flash green after inserting
a new battery pack, the DDU-2000 Series AED is non-operational and may need servicing. Call Defibtech for service.
(Refer to the “Contacts” section in Chapter 14 of this manual.)
If the ASI is flashing red, turn the DDU-2000 Series AED on. If the unit does not turn on or does not speak, the AED
is non-operational and requires servicing. If the unit does turn on, then turn the unit off and the voice prompts will
indicate the nature of the problem.
• Flashing Green: The DDU-2000 Series AED is OFF and ready for use.
• Solid Green: The DDU-2000 Series AED is ON and ready for use.
• Flashing or Solid Red: The DDU-2000 Series AED needs immediate service. Refer to the
“Troubleshooting” section in this chapter or call Defibtech for service.
Active Status
Indicator
• No Flashing Light: The DDU-2000 Series AED needs immediate service. Refer to the
“Troubleshooting” section in this chapter or call Defibtech for service.
(ASI)
32
32
DAC-E2510EN- BB
Page 33

7. Maintenance And
Checking The AED Status Using The AED Status Screen
You may also check the status of the unit when it is off by pressing the center softkey button to enter Maintenance
Mode and display the AED Status Screen.
The AED Status Screen is used to provide a quick overview of the DDU2000 Series AED’s status and to display select information without
turning the unit on in AED Mode.
AED status OK
Battery status
Expires 01/2018
Pads status Adult
Expires 06/2018
AED S/N 099999999
Battery S/N 099999999
Software version V2.2
With the AED off, press and release the CENTER softkey button to
display the AED Status Screen. The AED Status Screen will be displayed
for a short period of time.
If the unit does not turn on, check to make sure a good battery pack is
installed. (Refer to the “Troubleshooting” section in this chapter.)
From the AED Status Screen you can enter Maintenance Mode by pressing the
softkey button to the right of the Tool Icon.
Note: If the unit requires service, the AED Status Screen will present information about the problem to the user.
The user should follow the text prompts to address the condition requiring attention.
Card Application Softkey Icon:
If an application is present on an inserted Defibtech
Data Card (DDC card), a card icon will also appear next to the center softkey button.
Pressing this button will load and run the application contained on the card.
Maintenance Related Prompts
Troubleshooting
Voice Tex t
“Power on test failed”
“Service code ‘xxxx’ ”
Power On Test Failed
Service Code “xxxx”
Purpose: This indicates that the DDU-2000 Series AED has failed the power-on self-test and is non-operational
and needs servicing. The code number will indicate to service personnel the type of problem the unit is
experiencing.
“Battery test failed”
“Service code ‘xxxx’ ”
Battery Test Failed
Service Code “xxxx”
Purpose: This indicates that the DDU-2000 Series AED’s battery pack is non-operational and needs servicing.
The code number will indicate to the service personnel the type of problem that the unit is experiencing.
“Service code ‘xxxx’ ” Service Code “xxxx”
Purpose: The DDU-2000 Series AED will report this message when it powers off, indicating a service code that was
previously detected.
“Service required” Service Required
Purpose: This indicates that the DDU-2000 Series AED has detected an internal error, is non-operational, and
needs servicing.
“Battery low” Battery Low
Purpose: This indicates that the battery pack capacity is low and that the battery pack should be replaced soon.
The AED will still be able to deliver at least six defibrillation shocks the first time this message is spoken.
“Replace battery now” Replace Battery Now
Purpose: This indicates that the battery pack is almost discharged and that the AED may not be able to deliver
defibrillation shocks. Replace the battery pack immediately.
“Pads missing” Pads Missing
Purpose:
This indicates that the unit did not detect connected pads during a self-test.
“Pads expired” Pads Expired
Purpose:
This indicates that defibrillation pads have expired. Replace the pads immediately.
33
DAC-E2510EN- BB
Page 34

7. Maintenance And
Checking The Condition Of The Unit And Accessories
Inspect the unit for dirt and contamination, especially in the pads connector socket and around the battery pack
opening. (Refer to the “Cleaning” section in this chapter of this manual for guidance on cleaning your AED.)
Inspect the unit display screen for damage. Look for cracks or other signs of damage on the case, especially near
the connector socket.
If any cracks or other signs of damage are visible, remove the AED from service and contact an authorized
service center.
Replacing Pads
The Defibtech defibrillation pads are intended for one time use only. The pads must be replaced after each use or if
the package has been damaged.
The DDU-2000 Series AED defibrillation pads are supplied in a sealed pouch with the connector and part of the cable
exposed. The DDU-2000 Series AED is designed to be stored with the electrode cable already installed. This allows
the pads to be stored in a pre-connected state for rapid deployment during an emergency.
DO NOT remove the defibrillation pads from the sealed
package until the pads are to be used. The packaging
should be opened only immediately prior to use, otherwise
CAUTION
the pads may dry out and become non-functional.
Troubleshooting
STEP 1: Inspect The Pads – First, check to ensure that the pads package has not expired. Do not use pads past
their expiration date. Discard expired pads. Next, check to ensure that the pads package has not been torn,
opened, or damaged. Dispose of the pads if the package is open or damaged. Inspect the pads cable and replace
pads if any nicks, cuts, or broken cables are found.
STEP 2: Connect The Pads To The Unit – Insert the connector end of the defibrillation pad cable into the pads
connector socket on the top-left corner of the DDU-2000 Series AED as shown. Press the pads connector in firmly
until it is fully seated in the unit.
STEP 3: Store The Pads In Back Of Unit – The pads package can then be stored in the pad storage slot in the back
of the DDU-2000 Series AED. After connecting the pads connector to the unit, push the pads package, rounded
end first, with the pictures on the package facing up and out, into the pad holder compartment on the back of the
AED. When the pads package is fully inserted, press the pad cable into the groove in the back of the unit to hold
it in place and tuck any excess cable behind the pads package.
The defibrillation pads are intended for one-time use only
and must be discarded after use or if the package has
WARNING
been opened.
DAC-E2510EN- BB
34
Page 35

7. Maintenance And
Checking Pad And Battery Pack Expiration Dates
It is important to check the expiration dates of the pads and battery pack. The expiration date of the pads package is
printed on the outside of the sealed package. The expiration date of the battery pack is printed on the label on the
battery pack. Once an accessory is past its expiration date, it should be taken out of service and replaced as soon
as possible. Follow the instructions in the “Installing And Removing The Battery Pack” and “Connecting The Pads”
sections of Chapter 3 in this manual to replace an expired part with an unexpired part. Pads should be discarded.
Battery packs should be appropriately recycled.
You may also check the status of pads and battery pack when the unit is off by pressing the center softkey button
to display the AED Status Screen and enter Maintenance Mode. (Refer to the “AED Status Screen” section in
Chapter 8 of this manual.)
Checking The Defibtech Data Card (DDC card), If One Is Installed
Each time the DDU-2000 Series AED is used, an event file is created on the Defibtech Data Card (DDC card) if
installed. If the unit was used to treat a patient, the DDC card in the unit should be removed and provided to the
patient’s care provider. A new DDC card should be installed before the next use.
Troubleshooting
To remove the DDC card, ensure the AED is OFF. Locate the data card/USB port access door on the right-hand side of
the unit. Open the data card/USB port access door by slightly pushing and then sliding the door down to release the
latch. The door will spring open. To remove the DDC card, press the card in as far as it will go, and then release. Upon
release, the DDC card will be partially ejected and can be removed by pulling the DDC card the rest of the way out.
To install a new DDC card, insert the DDC card into the thin slot in the side of the AED centered above the USB port
opening, notched end first, label side up, until it clicks into place. The card should be flush with the surface of the
slot. If the card does not push in all the way, it may have been inserted upside down. In that case, remove the card,
flip it over, and try inserting it again.
Close the data card/USB port access door by closing and then pushing up the door until the door latch engages.
Note: A DDC card is not required for the DDU-2000 Series AED to operate. Even if a DDC card is not installed, the
unit will still record basic essential information internally. The AED will still operate properly even after a “replace
data card” message.
35
DAC-E2510EN- BB
Page 36

7. Maintenance And
7.2 Self-Tests
The DDU-2000 Series AED provides for both automatic and manually initiated self-tests. These self-tests test
various components of the AED, including the system controls, battery pack condition, charge/discharge functions,
and measurement and signal acquisition functions.
Automatic Unit Self-Tests
Every time the unit is turned on, power-on self-tests are performed to test the basic operation of the unit.
The unit also performs daily, weekly, monthly, and quarterly self-tests automatically (without any intervention from
the operator) to check the integrity of the unit’s hardware and software. The unit will also perform a battery insert
self-test when the battery pack is inserted.
Manual Self-Tests
Manually initiated self-tests may be run at any time by the user to test the DDU-2000 Series AED’s systems, including
the charging and shocking functions (the shock is internally dissipated; i.e., no voltage will be present at the pads).
To run a manually initiated AED test, the unit must be put into Maintenance Mode. (Refer to the “AED Maintenance
Screen” section in Chapter 8 of this manual for detailed information on performing these self-tests.)
Note: Running a manually initiated self-test will consume approximately one shock’s worth of energy from the battery.
7.3 Cleaning
After each use, clean the DDU-2000 Series AED of any dirt or contaminants on the case and connector socket.
The following are important guidelines to be adhered to when cleaning the device: (Also applies to ECG Monitoring
Adapter, DAC-2020/2021)
• The battery pack should be installed when cleaning the DDU-2000 Series AED.
• Do not immerse the DDU-2000 Series AED in fluids or allow fluids to enter the unit.
• Do not spray cleaning solutions directly on the unit or its connectors.
• Do not use abrasive materials or strong solvents such as acetone or acetone based cleaning agents.
• To wipe the DDU-2000 Series AED's case clean, use a soft cloth dampened with one of the following recommended
cleaning agents:
– Soapy water
– Ammonia based cleaners
– Hydrogen peroxide
– Isopropyl alcohol (70 percent solution)
– Chlorine bleach (30 ml/liter water)
• Ensure that the connector socket is completely dry before reinstalling the pads cable. After cleaning, allow
the unit to completely dry. Before returning it to service, always check the AED operational status. (Refer to
“Checking The AED Status Using The AED Status Screen” earlier in this chapter.)
Troubleshooting
7.4 Storage
The DDU-2000 Series AED should be placed in a readily accessible location in an orientation where the Active Status
Indicator (ASI) next to the ON/OFF button can be easily seen. In general, the unit should be stored in clean, dry and
moderate temperature conditions. Make sure that the environmental conditions of the storage location are within
the ranges detailed in the “Environmental” section in Chapter 11 of this manual.
36
DAC-E2510EN- BB
Page 37

7. Maintenance And
7.5 Operator’s Checklist
The following checklist may be used as the basis for an Operator’s Checklist. The table should be copied and filled
out as recommend by the schedule in the “Routine Unit Maintenance” section of this chapter. As each item is
completed it should be checked off.
Defibtech DDU-2000 Series Operator’s Checklist
Defibtech DDU-2000 Series AED Serial Number: ___________________________________________________
Defibtech DDU-2000 Series AED Location: __________________________________________________________
Date:
Check unit and accessories for damage, dirt, and
contamination. Clean or replace as necessary.
Check that spare battery pack and pads are available.
Check that battery pack and pads are not past expiration dates.
Troubleshooting
Check that the Active Status Indicator (ASI) is flashing green.
Comments:
Inspection by: (initials or signature)
37
DAC-E2510EN- BB
Page 38

7. Maintenance And
7.6 Troubleshooting
The following table lists the symptoms, the possible causes, and the possible corrective actions for common problems.
Refer to the other sections of the user manual for detailed explanations on how to implement the corrective actions.
If the unit continues to be non-functional, refer the unit for servicing. (Refer to Chapter 14 of this manual for contact
information.)
Symptom Possible Cause Corrective Action
Battery pack not inserted Insert battery pack
Unit will not turn on
Unit immediately turns off
ASI flashes red and/or unit makes periodic
”beep” sound
ASI does not flash at all
“Power on test failed, service code ‘xxxx’”
prompt
“Battery test failed, service code ‘xxxx’”
prompt
“Service required” prompt Unit needs servicing Call for service
“Replace battery now” prompt
“Battery low” prompt
Display screen does not work
Battery pack depleted or
needs servicing
Unit needs servicing Call for service
Battery pack depleted Replace battery pack
Unit needs servicing Call for service
Unit needs servicing
Battery pack non-functional Replace battery pack
Defibrillation pads are not
pre-connected to unit
Defibrillation pads
or battery pack expired
Battery pack not inserted Insert battery pack
Battery pack is low
or needs servicing
Unit needs servicing Call for service
Unit needs servicing
Battery pack needs servicing
Battery pack capacity is
critically low
Battery pack capacity is
getting low
Battery pack depleted Replace battery pack
Battery pack not inserted
properly
Replace battery pack
or call for service
Go to AED Status
Screen by pressing the
CENTER softkey button
or call for service
Connect defibrillation
pads to unit
Replace expired
component
Replace battery pack or
call for service
Record code number
and call for service
Record code number
and call for service
Unit may not deliver a
shock, replace battery
pack immediately
Replace battery pack as
soon as possible
Make sure battery pack
is oriented correctly and
fully inserted
Troubleshooting
“ Plug in pads connector” prompt
Unit needs servicing Call for service
Pads connector not plugged in Plug in pads connector
Pads connector broken Replace pads
Unit’s connector broken Call for service
38
DAC-E2510EN- BB
Page 39

7. Maintenance And
Troubleshooting (continued)
Symptom Possible Cause Corrective Action
Pads not connected to patient Place pads on patient
“ Apply pads to patient’s bare chest as
shown” prompt
“Poor pad contact to patient” or
“Press pads firmly” prompt
“Check pads” prompt Pads touching
“Stop motion” prompt
“ Stop interference” prompt
“ Analyzing interrupted” prompt Motion or interference detected
“Shock cancelled” prompt
Pads not making good
connection to patient
Pads or pad cable damaged Replace pads
Dry pads Replace pads
Partial pad connection
Patient motion has
been detected
External interference
has been detected
Patient’s ECG rhythm changed No action necessary
Shock button not pressed within
30 seconds
Low battery – insufficient to
charge
Bad pad to patient connection
Troubleshooting
Check pad connection to
patient
Check that pads are
placed securely on
patient
Separate pads and place
correctly on patient
Stop patient motion
Stop external
interference
Stop motion or
interference
Press shock button
within 30 seconds
Replace battery pack
Check that pads are
placed securely on
patient
Dry pads Replace pads
“ Replace data card” prompt
“ Pads missing” prompt Pads not connected to unit
DDC card is full
DDC card has failed Replace DDC card
Replace DDC card with a
card that is not full
Make sure pads
connector is oriented
correctly and fully
inserted into unit
7.7 Repair
The DDU-2000 Series AED contains no user serviceable parts. If the unit needs servicing, call Defibtech.
(Refer to Chapter 14 of this manual for contact information.)
39
DAC-E2510EN- BB
Page 40

8 Maintenance Mode
8.1 Overview
Maintenance Mode for the Defibtech DDU-2000 Series AED permits the user to perform maintenance-related
actions such as viewing unit information, initiating unit self-tests, changing unit parameters, downloading rescue
data, and upgrading software.
Maintenance Mode is navigated through a series of screens, menus, and menu options. In Maintenance Mode, the
softkey buttons located directly to the right of the display screen are used to scroll through and select menu options.
When a softkey icon (for example, an arrow) appears on the display screen directly to the left of a softkey button, the
softkey button is functional for that screen. If a softkey icon is not displayed on the screen, then the corresponding
softkey button has no functionality for that screen.
Note: While the unit is in Maintenance Mode, it cannot perform a rescue. Maintenance Mode allows the user to
go directly to AED Mode by selecting the Rescue now option. The Rescue now option appears at the top of every
screen/menu when the unit is in Maintenance Mode. The user can also exit Maintenance Mode at any time and go
to AED Mode by pressing the ON/OFF button to turn the unit off and then immediately pressing the ON/OFF button
again to turn the unit back on.
The Display Screen (During Maintenance Mode):
8. Maintenance Mode
Title
Rescue now
Menu
Options
Title – The name of the menu appears in a banner across the top of the screen.
Softkey Buttons – Softkey buttons are used to scroll through menus and to select menu options.
Softkey Button Icons – The presence of an on-screen icon located directly to the left of a softkey button
Menu Options – The list of options available from a particular menu. Use the top or bottom
AED status
AED maintenance
AED options
Rescue options
Help topics
Turn AED off
indicates that the softkey is functional.
softkey buttons to scroll through the list of options. Select an option by
pressing the center softkey button once an option is highlighted (with a box).
AED Main Menu
Top
Center
Bottom
Softkey
Buttons
8.2 Navigation (in Maintenance Mode)
The three softkey buttons located to the right of the display screen are used to navigate in Maintenance Mode.
Typical functions of the softkey buttons are the following:
Top softkey button: Scroll up
Center softkey button: Select highlighted option
Bottom softkey button: Scroll down
When a menu option is highlighted and then selected (typically by pressing the CENTER softkey button), either
another screen will be displayed with additional menu options or an action will be performed.
Exiting Maintenance Mode
To exit Maintenance Mode and return to Rescue Mode, scroll to and select Rescue now or simply turn the unit off
and then back on.
To exit Maintenance Mode and turn the unit off, scroll to and select Turn AED off or simply turn the unit off by
pressing the ON/OFF button.
40
40
DAC-E2510EN- BB
Page 41

8.3 Entering Maintenance Mode
Before You Begin: Make certain the DDU-2000 Series AED is turned off and a battery pack is installed.
STEP 1 – Press and release the CENTER softkey button.
AED status OK
Battery status
Expires 01/2018
Pads status Adult
Expires 06/2018
AED S/N 099999999
Battery S/N 099999999
Software version V2.2
Result – The unit will turn on and display the AED Status Screen for a
short period of time.
If the unit does not turn on, check to make sure a good battery pack
is installed. (Refer to the “Troubleshooting” section in Chapter 7 of this
manual.)
STEP 2 – Press the BOTTOM softkey button (to the right of the Tool Icon). Note: If the bottom softkey button
is not pressed within a short period of time, the unit will automatically turn off.
Result – The unit will enter Maintenance Mode and display the AED Main Menu screen.
8.4 AED Main Menu Screen
The AED Main Menu screen allows the user to view the status of the AED, perform maintenance functions, change
AED options, and access help topics. All maintenance functions are accessed through the AED Main Menu screen.
The user may select from the following options using the softkey buttons:
AED Main Menu
Rescue now
AED status
AED maintenance
AED options
Rescue options
Help topics
Turn AED off
When the user selects “Rescue now,” the unit will exit Maintenance Mode and proceed directly to Rescue Mode.
The other menu options will perform different functions and are described in detail below.
Rescue now – Puts device in Rescue Mode
AED status – Displays current AED status information
AED maintenance – Displays AED Maintenance Menu screen
AED options – Displays AED Options Menu screen
Rescue options – Displays Rescue Options Menu screen
Help topics – Displays Help Topics screen
Turn AED off – Turns unit off
8. Maintenance Mode
8.5 AED Status Screen
The AED Status screen displays unit-specific data such as current status, battery pack charge state, battery pack
expiration date, defibrillation pads expiration date, unit serial number, battery pack serial number, and software
version number.
Before you begin: Be sure the unit is in Maintenance Mode.
To enter: Navigate to AED status:
AED Main Menu Ú AED status
Note: When the unit is turned off, the AED Status screen can also be accessed by pressing the center softkey button.
What it does: The unit will display the AED Status screen. This is an informational screen only; no action is taken
by the AED.
To exit: To exit the AED Status screen, press and release the BOTTOM softkey button.
The unit will exit the AED Status screen and return to the AED Main Menu screen.
DAC-E2510EN- BB
41
Page 42

8.6 AED Maintenance Screen
The AED Maintenance screen allows the user to select such options as AED tests, software upgrades, data backups,
and data card functions.
Before you begin: Be sure the unit is in Maintenance Mode.
To enter: Navigate to AED Maintenance:
AED Main Menu Ú AED maintenance
What it does: The unit will display the AED Maintenance menu screen. This screen will allow the user to navigate
further to perform various maintenance tasks:
• Perform AED test
• Upgrade AED
• Transfer data to card
• Format data card
• Run application from card
To exit: Use the TOP or BOTTOM softkey buttons to scroll to and highlight the selection “Go to main menu.”
Press the CENTER softkey button. The unit will exit the AED Maintenance screen and return to the AED Main
Menu screen.
Perform AED Test
Perform AED test will initiate a system hardware and software self-test.
Note: Running manually initiated AED tests will consume approximately one shock’s worth of battery life.
Before you begin: Be sure the unit is in Maintenance Mode.
To enter: Navigate to Perform AED test:
AED Main Menu Ú AED maintenance Ú Perform AED test
What it does: When the user selects “Perform AED test” selection and presses the CENTER softkey
button, the unit will begin performing the self-test procedure:
The unit says: “Performing AED test“
The unit displays: Testing AED
The unit will then prompt the user to “Press flashing shock button.” Continue to follow the directions
until the test is complete. Once the AED test is complete the unit will verbally and visually report the
status of the AED. The information will be displayed in a pop-up window. The user must press any
softkey button to confirm the test status and return to the AED Maintenance screen.
If self-test passes: The unit will speak and display: “AED OK”
If self-test fails: The unit will display an error screen with text prompts providing instructions to
address the condition.
Note: If self-test fails, the user should follow the text prompts to address the condition requiring
attention or refer to the “Troubleshooting” section in Chapter 7 of this manual.
To exit: Press any softkey button. The self-test status pop-up window will clear and the display will
return to the AED Maintenance menu screen.
8. Maintenance Mode
Upgrade AED
The Upgrade AED menu selection is a method of performing a unit upgrade and will activate the
system upgrade procedure from a Defibtech Data Card (DDC card) containing an upgrade application.
Note: Upgrades can also be performed directly from the AED Status Screen if an upgrade card is
present when the AED Status Screen mode is launched.
Before you begin: Be sure the unit is in Maintenance Mode.
DAC-E2510EN- BB
42
Page 43

To enter: Navigate to Upgrade AED:
AED Main Menu Ú AED maintenance Ú Upgrade AED
What it does: If an upgrade data card is present, the unit will start performing the upgrade process.
Follow any prompts and instructions that the upgrade application provides.
Do not turn off the unit or remove the battery
WARNING
Note: If the DDC card is not inserted, the unit will speak and display “Data Card Missing.”
(Refer to the “Installing The Defibtech Data Card (DDC card)” section in Chapter 3 of this manual.)
Press any softkey button to acknowledge the message and then install a Defibtech Data Card (DDC card).
To exit: When the unit finishes performing the AED upgrade, follow the displayed and spoken
instructions.
Transfer Data To Card
Transfer data to card will initiate a data transfer from the DDU-2000 Series AED to a Defibtech Data
Card (DDC card) inserted in the device. Internal event data and device history is written to the DDC card.
Before you begin: Be sure the unit is in Maintenance Mode. Be sure a DDC Card is installed in
the device. (Refer to the “
manual.)
To enter: Navigate to Transfer data to card:
AED Main Menu Ú AED maintenance Ú Transfer data to card
What it does: The unit begins transferring rescue data to the card:
The unit says: “Transferring data to data card”
The unit displays: Transferring Data
The unit will finish transferring data to the data card and will speak and display:
“data transfer complete.”
pack or data card until the operation is complete.
Installing The Defibtech Data Card (DDC card)
” section in Chapter 3 of this
8. Maintenance Mode
Do not turn off the unit or remove the battery
WARNING
Note: If a data card is not inserted, the unit will speak and display “Data Card Missing.”
(Refer to the “
To exit: When the unit finishes transferring the data to the data card, it will automatically return to the
AED Maintenance menu screen.
Format Data Card
Format data card is a maintenance tool used to repair corrupted cards. It is unnecessary to perform
this step on cards purchased with your DDU-2000 Series AED.
WARNING
Before you begin: Be sure the unit is in Maintenance Mode. Be sure a Defibtech Data Card (DDC
card) is currently installed in the device. (Refer to the “
section in Chapter 3 of this manual.)
pack or data card until the operation is complete.
Installing The Defibtech Data Card (DDC card)
This step will erase all data on the data card!
” section in Chapter 3 of this manual.)
Installing The Defibtech Data Card (DDC card)
”
DAC-E2510EN- BB
43
Page 44

To enter: Navigate to Format data card:
AED Main Menu Ú AED maintenance Ú Format data card
What it does: The unit will format the DDC card that is inserted in the AED:
The unit says: “Formatting data card”
The unit displays: Formatting Data Card
When unit finishes formatting the DDC card, the unit will return to the menu.
Do not turn off the unit or remove the battery
WARNING
Note: If the data card is not inserted, the unit will speak and display “Data Card Missing.” (Refer to the
“
Installing The Defibtech Data Card (DDC card)
To exit: When the unit finishes formatting the data card, it will automatically return to the AED
Maintenance menu screen.
CAUTION
Run Application From Card
pack or data card until the operation is complete.
” section in Chapter 3 of this manual.)
Using non-Defibtech Data Cards (DDC cards)
may damage the unit and will void the warranty.
8. Maintenance Mode
Run application from card will initiate a card application on the Defibtech Data Card (DDC card).
The most typical application is a software upgrade.
Before you begin: Be sure the unit is in Maintenance Mode. Be sure a DDC Card, with a card
application, is installed in the device. (Refer to the “
section in Chapter 3 of this manual.)
To enter: Navigate to Run application from card:
AED Main Menu Ú AED maintenance Ú Run application from card
Do not turn off the unit or remove the battery
WARNING
Note: If a data card is not inserted, the unit will speak and display “Data Card Missing.”
(Refer to the “
To exit: When the unit finishes performing the application, follow the displayed and spoken
instructions.
pack or data card until the operation is complete.
Installing The Defibtech Data Card (DDC card)
Installing The Defibtech Data Card (DDC card)
” section in Chapter 3 of this manual.)
”
8.7 AED Options Screen
To manually configure AED options such as time, date, volume, and audio recording, select the AED options
from the AED Main Menu screen.
Before you begin: Be sure the unit is in Maintenance Mode.
To enter: Navigate to AED options:
AED Main Menu Ú AED options
44
DAC-E2510EN- BB
Page 45

What it does: The unit will display the AED options menu screen. This screen will allow the user to modify the
following user changeable parameters:
• System time
• System date
• Volume level
• Audio recording
To exit: Using the TOP or BOTTOM softkey buttons, scroll to and highlight the selection.
Go to main menu. Press the CENTER softkey button. The unit will exit the AED options menu screen and
return to the AED Main Menu.
System Time
The System time option allows the user to set the time of the internal AED clock.
Before you begin: Be sure the unit is in Maintenance Mode.
To enter: Navigate to System time:
AED Main Menu Ú AED options Ú System time
What it does: The System time option allows the user to set the time of internal AED clock (using
the 24 hour clock). Once the System time option is selected, press the CENTER softkey button to
enter set time mode:
The hours selection will be highlighted green:
• Press the TOP or BOTTOM softkey buttons to adjust the hours to the desired time.
• Press the CENTER softkey button to accept the hours setting.
The minutes selection will be highlighted green:
• Press the TOP or BOTTOM softkey buttons to adjust the minutes to the desired time.
• Press the CENTER softkey button to accept the minutes setting.
The seconds selection will be highlighted green:
• Press the TOP or BOTTOM softkey buttons to adjust the seconds to the desired time.
• Press the CENTER softkey button to accept the seconds setting.
The time is now set and the user may use TOP or BOTTOM softkey buttons to navigate to other choices
in the menu.
Note: The factory default setting of the internal AED clock is Universal Time (GMT).
8. Maintenance Mode
System Date
The System date option allows the user to set the date of the internal AED clock.
Before you begin: Be sure the unit is in Maintenance Mode.
To enter: Navigate to System date:
AED Main Menu Ú AED options Ú System date
What it does: The System date option allows the user to set the date of internal AED clock. Once
the System date option is selected, press the CENTER softkey button to enter set date mode:
The year selection will be highlighted green:
• Press the TOP or BOTTOM softkey buttons to adjust the year.
• Press the CENTER softkey button to accept the year setting.
The month selection will be highlighted green:
• Press the TOP or BOTTOM softkey buttons to adjust the month.
• Press the CENTER softkey button to accept the month setting.
The day selection will be highlighted green:
• Press the TOP or BOTTOM softkey buttons to adjust the day.
• Press the CENTER softkey button to accept the day setting.
DAC-E2510EN- BB
45
Page 46

The date is now set and the user may use TOP or BOTTOM softkey buttons to navigate to other choices
in the menu.
Note: The factory default setting of the internal AED clock is Universal Time (GMT).
Volume Level
The Volume level option allows the user to set AED audio output to high, medium, or low volume.
Changing the volume level will not change the volume of the Active Status Indicator “beep.”
Before you begin: Be sure the unit is in Maintenance Mode.
To enter: Navigate to Volume level:
AED Main Menu Ú AED options Ú Volume level
What it does: The Volume level option allows the user to set AED audio to high, medium or low
volume. Once the Volume level option is selected, use the TOP and BOTTOM softkey buttons to
cycle through the different volume settings. When the desired volume selection is chosen, press the
CENTER softkey button to set that volume level. The AED will now use that volume setting for all audio
(except the volume of the Active Status Indicator “beep”). The user may use the TOP or BOTTOM
softkey buttons to navigate to other choices in the menu.
Note: The factory default setting of the volume level is “high.”
Audio Recording
The Audio recording option allows the user to enable or disable recording of event audio data to a
Defibtech Data Card (DDC card).
Before you begin: Be sure the unit is in Maintenance Mode.
To enter: Navigate to Audio recording:
AED Main Menu Ú AED options Ú Audio recording
What it does: The Audio recording option allows the user to enable/disable recording of event audio
data. Once the Audio recording option item is selected, use the TOP and BOTTOM softkey buttons
to select either enabled or disabled settings. When the desired selection is chosen, press the CENTER
softkey button to set the feature. The AED will now use that audio recording setting. The user may use
the TOP or BOTTOM softkey buttons to navigate to other choices in the menu.
Note: The factory default setting of the audio recording is “disabled.”
8. Maintenance Mode
8.8 Rescue Options Screen
To manually configure rescue options such as Rescue protocol and CPR breathing, select the Rescue options
from the AED Main Menu screen.
Before you begin: Be sure the unit is in Maintenance Mode.
To enter: Navigate to Rescue options:
AED Main Menu Ú Rescue options
What it does: The unit will display the Rescue options menu screen. This screen will allow the user to modify
certain user changeable parameters:
• CPR breathing
• Rescue protocol
– Settings
• Default view
• Manual Mode enable
To exit: Using the TOP or BOTTOM softkey buttons, scroll to and highlight the selection Go to main menu.
Press the CENTER softkey button. The unit will exit the Rescue options menu screen and return to the
AED Main Menu.
DAC-E2510EN- BB
46
Page 47

CPR Breathing
The CPR breathing option allows the user to enable or disable the CPR breathing coaching prompts
during CPR.
Before you begin: Be sure the unit is in Maintenance Mode.
To enter: Navigate to CPR breathing:
AED Main Menu Ú Rescue options Ú CPR breathing
What it does: CPR breathing allows the user to enable/disable CPR breathing coaching prompts.
Use the TOP and BOTTOM softkey buttons to select the desired mode. When the desired selection is
chosen, press the CENTER softkey button to set the feature. The AED will now use that coaching setting.
Note: The factory default setting of CPR breathing is set to “disabled.”
Rescue Protocol
The AED supports two rescue protocols at one time. The Rescue protocol option allows the user to
select a rescue protocol. Rescue protocol options include the AHA/ERC 2010 protocol or “Custom.”
Before you begin: Be sure the unit is in Maintenance Mode.
To enter: Navigate to Rescue protocol:
AED Main Menu Ú Rescue options Ú Rescue protocol
What it does: The Rescue protocol option allows the user to select between up to two rescue protocols
that have been enabled in the unit. The factory default setting of the rescue protocol is AHA/ERC 2010.
To change the protocol, press the CENTER softkey button to highlight the protocol. The user will be
prompted to enter a password to proceed. The password may be obtained from your medical director
or from Defibtech. (For Defibtech contact information, please refer to the “Contacts” section in
Chapter 14.) Once the password has been entered, the user may select between the two protocols.
To enter the password use the TOP softkey button to scroll through numbers. Once the correct number
appears, use the CENTER softkey button to move to the next space. Once all of the numbers have been
entered press the CENTER softkey button. The user will now be able to choose a different rescue protocol.
Settings
Before you begin: Be sure the unit is in Maintenance Mode.
To enter: Navigate to Settings:
AED Main Menu Ú Rescue options Ú Settings
What it does: The Settings option allows the user to change the currently enabled
protocol by entering a special protocol code. This code is a special code that encodes
all the important information regarding the protocol. This code is custom generated by
Defibtech. If the code is not entered correctly the protocol will not be changed. Based on
the protocol code entered, the currently selected protocol will be changed to that described
by the special protocol code. You can obtain this code from your medical director or from
Defibtech. (For Defibtech contact information, please refer to the “Contacts” section in
Chapter 14.) Once the code has been entered, the settings will have been changed.
To enter the code use the TOP softkey button to scroll through numbers/letters. Once
the correct number/letter appears, use the CENTER softkey button to move to the next
space. Once all of the numbers/letters have been entered, press the CENTER softkey
button. The settings will have been changed based on the code entered.
8. Maintenance Mode
47
DAC-E2510EN- BB
Page 48

Default View (DDU-2400/2450 only)
The Default view option allows the user to select Video or ECG as the default view when the AED
is powered.
Before you begin: Be sure the unit is in Maintenance Mode.
To enter: Navigate to Default view:
AED Main Menu Ú Rescue options Ú Default view
What it does: Selects which view the AED presents on power up.
Use the TOP and BOTTOM softkey buttons to select the desired view. When the desired selection is
chosen, press the CENTER softkey button to set the feature. The AED will now use that default view
setting.
Note: The factory default setting is set to “Video.”
Manual Mode Enable (DDU-2400 only)
The Manual Mode enable option allows the user to enable or disable the Manual override feature of
the DDU-2400 (only).
Before you begin: Be sure the unit is in Maintenance Mode.
To enter: Navigate to Manual Mode enable:
AED Main Menu Ú Rescue options Ú Manual Mode enable
What it does: Enables or Disables the Manual Mode feature of the AED.
Use the TOP and BOTTOM softkey buttons to select the desired mode. When the desired selection is
chosen, press the CENTER softkey button to set the feature. The AED will now use that setting.
Note: The factory default setting is set to “Enabled.” This menu item is only available in the DDU-2400.
8. Maintenance Mode
8.9 Help Topics Screen
The Help Topics option on the AED Main Menu provides a list of available help topics.
Before you begin: Be sure the unit is in Maintenance Mode.
To enter: Navigate to Help topics:
AED Main Menu Ú Help topics
What it does: The Help topics provides a list of available help topics.
The Help topics are the following:
• Preparing the patient
• Analyzing and shocking
• Performing CPR
• Replacing the battery
• Replacing the pads
• Checking the AED status
• Replacing the data card
Use the TOP and BOTTOM softkey buttons to scroll through the different Help topics items. When the desired
help selection is highlighted (with a box), press the CENTER softkey button to get more information.
To exit: Using the TOP or BOTTOM softkey buttons, scroll and highlight the selection Go to main menu.
Press the CENTER softkey button. The unit will exit the Help Topics menu screen and return to the AED Main
Menu.
48
DAC-E2510EN- BB
Page 49

9 DDU-2000 Series AED Accessories
T
his chapter describes the component parts and the accessories that can be used with the Defibtech DDU-2000 Series AED.
For contact information on obtaining replacement component parts and accessories, refer to
9.1 Defibrillation Pads
The DDU-2000 Series AED must be used with Defibtech self-adhesive defibrillation pads for adults or with child/infant
pads for infants and children. These defibrillation pads serve two functions:
• Allow the unit to read the patient’s electrocardiograph (ECG) rhythm.
• Deliver defibrillation energy to the patient if needed.
The Defibtech self-adhesive defibrillation pad assembly comes in a “leads-out” sealed package that allows the
device to be stored with the pads connected to the AED. When the DDU-2000 Series AED is used, the operator
needs only to turn the device on, remove the pad package, tear open the package, remove the pads from the blue
liner, apply the pads to the patient, and administer care. The AED has a storage area in the back of the unit that
allows for storage of a single sealed adult pads package.
9.2 Battery Packs
The DDU-2000 Series AED uses a lithium battery pack to provide the AED with a long shelf and standby life. The
battery pack is inserted into the battery pack opening on the back of the AED and latches into place. Battery packs are
not rechargeable.
9.3 Data Cards
The DDU-2000 Series AED is designed to optionally use Defibtech Data Cards (DDC cards). The AED will operate
with or without a DDC card, but if a DDC card is installed, additional event storage capacity is available.
The DDU-2000 Series AED accepts DDC cards capable of recording an assortment of data for a given period of
time. The DDU-2000 Series allows the user to enable or disable recording of audio data. (Refer to the “AED Options
Screen” section in Chapter 8 of this manual.)
The DDC card is inserted into a slot behind the data card/USB port access door found on the side of the AED. (Refer
to the “
created on the DDC card each time the AED is turned on, and the following information is recorded:
Multiple events may be recorded on a single DDC card. If the DDC card becomes full, the AED will stop recording to
the card, however, the most critical event documentation for the current session will still be recorded internally.
Internally recorded event information can be downloaded for external review by inserting a blank DDC card into the
unit and following the Data Download procedure. (Refer to the “Downloading The Internal Data Log” section in
Chapter 10 of this manual.)
Installing The Defibtech Data Card (DDC card)
• The time the AED was turned on.
• Other data such as: ECG data, time data, audio data (audio enabled card only), event milestones such as:
motion detection, shock advice, shock delivery information.
” section in Chapter 3 of this manual.) A new event file is
Chapter 14
in this manual.
9. DDU-2000 Series AED
Accessories
CAUTION
Using non-Defibtech Data Cards (DDC cards)
may damage the unit and will void the warranty.
49
DAC-E2510EN- BB
Page 50

9.4 USB Cable
An optional USB cable may be used with the DDU-2000 Series AED for connecting the AED to a personal computer
running Defibtech maintenance software. The AED has a mini-USB connector located on the right side of the unit
behind the data card/USB port access door.
Do not have a USB cable attached
WARNING
to the unit during a rescue.
9.5 ECG Monitoring Adapter
An optional ECG Monitoring Adapter cable (DAC-2020/2021) may be used with the DDU-2400/2450 AED to provide
a non-diagnostic ECG display of the patient’s heart rhythm for attended patient monitoring. The adapter uses the
same connector socket in the AED used by the defibrillation pads.
9. DDU-2000 Series AED
Accessories
50
DAC-E2510EN- BB
Page 51

10 Event Viewing
This chapter includes information about DefibView, Defibtech Data Cards (DDC cards), and downloading internal data logs.
10.1 DefibView
DefibView is a Windows-based software application that reads data stored on a DDC card or downloaded through
the USB port and displays the data on a personal computer. DefibView serves the following primary functions:
• Enables emergency care personnel to review a cardiac episode from the time the AED was turned on and
connected to the patient until the unit is turned off.
• Provides maintenance personnel with additional parameter information to assist in troubleshooting a device
suspected of malfunctioning.
DefibView is a stand-alone software application. DefibView cannot be used while the AED is in operation, and its
function is solely to support post-event review.
Not intended for clinical use. Information presented by
CAUTION
10.2 Defibtech Data Cards (DDC Cards)
If a DDC card is installed in the unit, every time the DDU-2000 Series AED is turned on, the following information is
recorded on a new file on the card:
• The time the AED was turned on.
• Other data such as: ECG data, time data, audio data (audio enabled cards only), event milestones such as:
motion detection, shock advice, shock delivery information.
This information can be reviewed using the DefibView application.
DefibView should not be used for making clinical decisions.
10. Event Viewing
Using non-Defibtech Data Cards
(DDC cards) may damage the unit
CAUTION
and will void the warranty.
10.3 Downloading The Internal Data Log
Regardless of whether a DDC card is installed in the unit, select information is recorded internally within the
DDU-2000 Series AED. The information recorded is limited to:
• The time the AED was turned on.
• Other data such as event milestones (motion detection, shock advice, shock delivery information, etc.).
• Important ECG information.
Note: Audio data is not logged internally.
Downloading The Internal Data Log Using The DDC Card
To download the internally logged information, perform the following procedure:
• Insert a DDC card into the unit.
• Turn the unit on in Maintenance Mode by pressing the center softkey button.
• Press the tool icon to enter the AED Maintenance screen.
• From the AED Maintenance screen select the Transfer Data To Card option.
• Allow the unit to write the contents of the internal log to the DDC card.
The DDU-2000 Series AED will write the contents of the internal log onto the DDC card. This information can then
be reviewed using DefibView software.
Downloading The Internal Data Log Using The USB Port
To download the internal data log using the USB port in the unit, connect a USB cable between the unit and a PC.
Launch the DefibView software and follow USB download directions.
Do not operate the DDU-2000 Series AED in Rescue Mode
WARNING
while a USB cable is plugged into the unit.
DAC-E2510EN- BB
51
51
Page 52

11 Technical Specifications
11.1 Defibtech DDU-2000 Series AED
General
Category Specification
Size
Weight Less than 3 lbs (1.4 kg) (with battery)
Power Battery Pack (not rechargeable)
Design standards
Device Classification
Patient safety All patient connections are electrically isolated.
Defibrillator – AED Mode
7.3 x 9.5 x 2.3 inches
18.5 x 24 x 5.8 cm
Meets applicable requirements of
• IEC 60601-1
• UL 60601-1
• CAN/CSA C22.2 No.601.1-M90
• IEC 60601-1-2
• IEC 60601-2-4
• AAMI DF80
Internally powered with defibrillator-proof BF-type patient applied parts
(per EN 60601-1)
11. Technical Specifications
Category Specification
Waveform Impedance Compensated Biphasic Truncated Exponential
Energy
Charge control Automatic by Patient Analysis System
Charge time
Charge time from the initiation
of rhythm analysis to readiness
for discharge
Charge time measured from
initially switching power on to
charge ready
Charge complete indication
Shock delivery Shock is delivered by a single SHOCK button
Automatic
DISARM
Adult: 150 Joules (nominal [+/-15%] delivered into a 50 ohm load)
Child/Infant: 50 Joules (nominal [+/-15%] delivered into a 50 ohm load)
4 seconds or less (from shock advised)*
Charge time may increase at the end of battery life and for temperatures
below 10°C.
Meets or exceeds AAMI DF80 and IEC 60601-2-4 requirements
Meets or exceeds AAMI DF80 and IEC 60601-2-4 requirements
• SHOCK button flashing
• “Press flashing shock button” voice prompt
• If Patient Analysis System decides rhythm is no longer shockable, or
• Within 30 seconds after charge complete, if operator has not pressed
SHOCK button,
or
• If defibrillation pads are removed from patient or unplugged from unit.
Manual
• If operator presses and holds the ON/OFF button for approximately two
seconds, device will disarm and turn off.
*Typical, new battery, at 25°C
52
52
DAC-E2510EN- BB
Page 53

Defibtech DDU-2000 Series AED (continued)
Defibrillator – Manual Mode (DDU-2400 only)
Category Specification
User selectable:
25, 50, 70, 100, 150, 200 Joules (adult defibrillation pads)
Energy
Charge control User initiated, CHARGE softkey
Charge time See battery charge time specifications in Section 11.2 of this manual
Charge complete indication
Shock delivery Shock is delivered by a single SHOCK button
Automatic
DISARM
25, 50, 70, 100, Joules (pediatric defibrillation pads)
Note: energy is limited to 50 J only, when using DDP-2002
(attenuating pediatric defibrillation pads)
• SHOCK button flashing
• Two tone alarm
• Within 30 seconds after charge complete, if operator has not pressed
SHOCK button,
or
• If defibrillation pads are removed from patient or unplugged from unit.
11. Technical Specifications
Manual
Defibrillator – ECG Mode (DDU-2400 & DDU-2450 only)
Category Specification
Displayed ECG
Screen type TFT Color LCD with backlight (53.6mm x 71.5mm) (320 x 240 pixels)
Displayed Range Differential: +/- 2 mV full-scale
Sweep Speed 25 mm/sec
Frequency Response 1 Hz to 22 Hz (-3 dB), nominal
Sensitivity 10 mm/mV, nominal
Heart rate display
Note: The ECG Display provides non-diagnostic ECG of the patient’s heart rhythm. It is not intended to provide
diagnostic or ST segment interpretation.
Note: The ECG waveform sensitivity and magnification settings are fixed and are not user adjustable.
• If operator presses the manual DISARM softkey or ON/OFF button pressed for
greater than 2 seconds
ECG information is received from defibrillation pads in anterior-lateral or
anterior-posterior positions, or from the 3-wire ECG Monitor Adapter in Lead II
20 to 200 bpm, updated once/second
• Displayed when ECG viewing is enabled
• An out of range heart rate is indicated by dashed lines in the display
53
DAC-E2510EN- BB
Page 54

Defibtech DDU-2000 Series AED (continued)
Waveform Specifications
In AED Mode, the DDU-2000 Series AED delivers a 150 J (Adult) 50 J (Pediatric) Biphasic Truncated Exponential
waveform (AED Mode) to patients with impedances ranging from 25 to 180 ohms. In Manual Mode, the user can
select the energy level.
V
V max
V1
A
B
V1'
t
V min
The waveform is adjusted to compensate for measured patient impedance.
Nominal phase times and energy delivered are shown in the tables below.
Phase Times (DDP-2001 Adult and DDP-2003 Non-attenuating Pediatric Defibrillation Pads)
Patient Impedance
(Ohms)
Phase A Duration
(ms)
Phase B Duration
(ms)
25 2.8 2.8
50 4.1 4.1
75 7. 2 4.8
100 9.0 6.0
125 12.0 8.0
150 12.0 8.0
175 12.0 8.0
Energy – AED Mode (DDP-2001 Adult Defibrillation Pads) (Nominal)
11. Technical Specifications
Load Impedance (Ohms)
Nominal 25 50 75 10 0 125 150 175
150 J 153 151 15 2 151 153 146 142
Energy – AED Mode (DDP-2003 Non-attenuating Pediatric Defibrillation Pads) (Nominal)
Load Impedance (Ohms)
Nominal 25 50 75 10 0 125 150 175
50 J 50 50 51 51 51 50 49
54
DAC-E2510EN- BB
Page 55

Defibtech DDU-2000 Series AED (continued)
Energy – Manual Mode (DDP-2001 Adult and DDP-2003 Non-attenuating Pediatric Defibrillation Pads) (Nominal)
Load Impedance (Ohms)
Selected
Energy
25 50 75 10 0 125 150 175
25 J 25 25 26 26 26 25 25
50 J 50 50 51 51 51 50 49
70 J 70 70 71 71 72 70 68
100 J 99 100 101 101 10 2 10 0 97
150 J 153 151 152 151 15 3 146 142
200 J 194 195 198 197 201 195 189
DDP-2003 pediatric defibrillation pads Selected Energy range is limited from 25 to 100 J.
Phase Time and Energy (DDP-2002 Attenuating Pediatric Defibrillation Pads)
11. Technical Specifications
Patient Impedance
(Ohms)
Phase A Duration
(ms)
Phase B Duration
(ms)
Energy Delivered
(Joules)
25 4.1 4.1 35
50 5.8 3.8 47
75 5.8 3.8 51
100 7. 2 4.8 53
125 7. 2 4.8 52
150 9 6 53
175 9 6 51
Applies to both AED and Manual Modes.
Note: If impedance is out of range for proper analysis and shock delivery, voice and/or visual prompts will inform the user.
55
DAC-E2510EN- BB
Page 56

Defibtech DDU-2000 Series AED (continued)
Environmental
Category Specification
Operating/
Maintenance
Standby/Storage/
Transport
Altitude
Shock/Drop Abuse Tolerance
Crush test 1,000 lbs (450 kg)
Vibration
Sealing/Water Resistance
ESD and EMI (radiated and immunity) Refer to Chapter 12 for details
Radio Frequency Emissions Applicable
Directive and Standards
Aviation
Temperature 0 – 50°C (32 – 122°F)
Humidity 5% – 95% (non-condensing)
Air Pressure 700 to 1060 hPa (21 to 31 inHg)
Temperature 0 – 50°C (32 – 122°F)
Humidity 5% – 95% (non-condensing)
Air Pressure 500 to 1060 hPa (15 to 31 inHg)
-150 to 4500 meters (-500 to 15,000 feet) per
MIL-STD-810F 500.4 Procedure II
MIL-STD-810F 516.5 Procedure IV 48 in, (1.2 meters), any edge,
corner, or surface, in standby mode
MIL-STD-810F 514.5 Category 20 (Ground)
RTCA/DO-160D, Section 8.8.2, Cat R, Zone 2, Curve G (Helicopter)
RTCA/DO-160D, Section 8, Cat H, Zone 2, Curves B & R (Jet Aircraft)
IEC 60529 class IP55; Dust Protected, Protected against water jets
(Battery pack installed)
R&TTE Directive 1999/5/EC
ETSI EN 300 220-2 V2.1.2 (2007-06)
ERC RECOMMENDATION 70-03
ETSI EN 301 489-3 V1.4.1 (2002-08)
Meets RTCA/DO-160G, Section 21, RF Radiated Emissions,
Category M
11. Technical Specifications
Patient Analysis System
The DDU-2000 Series Patient Analysis System ensures that the pad/patient impedance is within the proper range
and analyzes the patient’s ECG rhythm to determine whether a shock is required. On detection of a non-shockable
rhythm, the user is prompted to perform CPR. For shockable rhythms, the AED automatically charges in preparation
for shock delivery.
The patient analysis system will detect electrical “noise” or artifact in the ECG signal that may interfere with accurate
rhythm analysis. This artifact may be caused by excessive motion to the patient or by external electrical noise. When
this artifact is present, the AED will prompt the user to “Stop motion” or “Stop Interference” until the ECG signal is
free of noise and then proceed to analysis.
56
DAC-E2510EN- BB
Page 57

Defibtech DDU-2000 Series AED (continued)
Shockable Rhythm Criteria
When placed on a patient meeting the indications for use criteria, the DDU-2000 Series AED is designed to recommend
a defibrillation shock when it detects proper pad impedance and one of the following:
Ventricular Fibrillation: Peak-to-peak amplitude at least 200 µVolts.
Some very low amplitude or low frequency VF rhythms may not be interpreted as shockable.
WARNING
Ventricular Tachycardia (Including ventricular flutter and polymorphic VT):
Cardiac rhythm rate of at least 180 bpm and peak-to-peak amplitude at least 200 µVolts.
Some very low amplitude or low frequency VT rhythms may not be interpreted as shockable.
WARNING
The DDU-2000 Series AED is designed to recommend no shock for all other rhythms, including Normal Sinus
Rhythms, fine Ventricular Fibrillation (<200 µVolts), and some slow Ventricular Tachycardia and Asystole.
Patient Analysis System Performance
Rhythm Class ECG Test
Sample1 Size
Algorithm Performance
Performance
2
90% Lower
Confidence Limit
1
Specifications
2
Meets the AAMI
Shockable Rhythm –
Ventricular Fibrillation
227 >97% >95%
DF80 requirement
and AHA
recommendation2 of
Sensitivity > 90%
Meets the AAMI
Shockable Rhythm –
Ventricular Tachycardia
101 99% >97%
DF80 requirement
and AHA
recommendation2 of
Sensitivity > 75%
Meets the AAMI
Non-Shockable
Rhythm – Normal
Sinus Rhythm
213 100% 100%
DF80 requirement
of Specificity
>95% and the AHA
recommendation2 of
Specificity > 99%
Meets the AAMI
Non-Shockable
Rhythm – Asystole
113 100% 100%
DF80 requirement
and the AHA
recommendation2 of
Specificity > 95%
Non-Shockable
Rhythm – All other
non-shockable
248 >99% >98%
rhythms
1. From Defibtech ECG Rhythm Databases.
2. Automatic External Defibrillators for Public Access Defibrillation: Recommendations for Specifying and Reporting Arrhythmia Analysis Algorithm Performance, Incorporating New Waveforms, and Enhancing Safety.
American Heart Association (AHA) Task Force on Automatic External Defibrillation, Subcommittee on AED Safety and Efficacy. Circulation, 1997;95:1677-1682.
Note: Additional information available upon request.
Meets the AAMI
DF80 requirement
and the AHA
recommendation2 of
Specificity > 95%
11. Technical Specifications
57
DAC-E2510EN- BB
Page 58

11.2 Battery Packs
Use only Defibtech battery packs in the DDU-2000 Series AED.
DBP-2003 and DBP-2013 Battery Packs
Category Specification
Model number
Main battery type
Capacity 125 shocks or 8 hours of continuous operation.*
Charge time
Standby-life (installed in unit) 4 years*
DBP-2003
DBP-2013 (Aviation;TSO C-142a)
12VDC, 2800 mAh, Lithium/Manganese Dioxide.
Disposable, recyclable, non-rechargeable.
AED Mode:
• 4 seconds or less (from shock advised)*
Manual Mode:
• 9 seconds or less (150 J)**
• 12 seconds or less (200 J)**
*Typical, new battery, at 25°C
**Typical, new battery depleted by 6 shocks, at 25°C
11.3 Self-Adhesive Defibrillation Pads
Use only Defibtech defibrillation pads with your DDU-2000 Series AED. Defibtech self-adhesive defibrillation pads
have the following characteristics:
11. Technical Specifications
Model number DDP-2001 DDP-2002 and DDP-2003
Type Adult Child/Infant < 8 years
< 55 lbs. (25 kg)
Intended use Disposable Disposable
Adhesion Self-adhesive Self-adhesive
Active gel surface area 77 cm2 each (nominal) 50 cm2 each (nominal)
Cable/connector type Integrated Integrated
Cable length 122 cm (typical) 122 cm (typical)
Expiration date 2.5 years from date of manufacture 2.5 years from date of manufacture
Note: In the event of a suspected pad defect, the pads should be clearly marked “Not for Use” and returned to
Defibtech, LLC for analysis. (Refer to Chapter 14 of this manual for contact information regarding returns.)
11.4 ECG Monitoring Adapter / Cable (Optional)
For use only with DDU-2400 and DDU-2450 AEDs.
Model number DAC-2020 and DAC-2021
Patient connection Type CF, fully defibrillation-protected
Cable length 2 meters
Lead type DAC-2020 (AHA) DAC-2021 (IEC) Placement
Patient lead wire designation
Typical lead connection Lead II
Performance with
DDU-2400/2450 AED
Positive Red - LL Green - F Left leg
Negative White - RA Red - R Right arm
Reference Black - LA Yellow - L Left arm
Meets environmental specifications for DDU-2000 Series.
58
DAC-E2510EN- BB
Page 59

11.5 Event Documentation
Internal Event Record
Critical ECG segments and rescue event parameters are recorded (greater than 60 minutes) and can be downloaded
to a removable data card.
Removable Storage (optional)
Up to 30 hours of ECG and event data storage (no audio option) or up to 3 hours of audio (audio option). ECG and
event storage on a removable data card. Actual length of storage is dependent on card capacity.
11.6 Defibtech Event Viewer
DefibView is a PC-based application program that allows review of ECG data and other patient and device performance
parameters after an emergency event.
DefibView runs on various Windows platforms including Windows XP and newer versions. Minimum system
requirements for adequate performance are as follows:
• Pentium 4 processor
• 512 MB system memory
• 1 GB free space on hard disk
• USB 1.0 connectivity
11.7 Recycling Information
At the end of useful life, recycle the defibrillator and its accessories.
Recycling Assistance
For recycling assistance contact your local Defibtech distributor.
Recycle in accordance with local and national regulations.
11. Technical Specifications
Preparation For Recycling
Items should be clean and contaminant-free prior to being recycled.
When recycling used disposable electrodes, follow local clinical procedures.
Packaging For Recycling
Packaging should be recycled in accordance with local and national requirements.
11.8 Notice To European Union Customers
The crossed-out wheeled bin symbol on this device indicates that this equipment has been
put on the market after 13 August 2005, and is included in the scope of the directive 2002/96/
EEC on Waste Electrical and Electronic Equipment (WEEE) and of the national decree(s), which
transpose provisions of such directive.
At the end of its lifetime, this device can only be disposed of in compliance with the provisions of the above-mentioned
European directive (and following possible revisions) as well as with the corresponding national regulation. Severe
penalties are possible for unauthorized disposal.
Electrical and Electronic Equipment (EEE) may contain polluting components and hazardous substances, the
accumulation of which could pose serious risk for the environment and human health. It is for this reason that local
administrations provide regulations, which encourage reuse and recycling, and prohibit the disposal of WEEE as
unsorted municipal waste and require the collection of such WEEE separately (at specifically authorized treatment
facilities). Manufacturer and authorized distributors are required to supply information about a safe treatment and
disposition of the specific device.
You may also return this equipment to your distributor when purchasing a new one. As for reuse and recycling,
notwithstanding the limits imposed by the nature and the use of this device, the manufacturer will do its best to
develop recovery processes. Please contact the local distributor for information.
59
DAC-E2510EN- BB
Page 60

12 Electromagnetic Conformity
12.1 Guidance And Manufacturer’s Declaration
The essential performance of the DDU-2000 Series AED is successful delivery of defibrillation therapy and accurate
differentiation between shockable and nonshockable rhythms.
DDU-2000 Series AEDs are intended for use within the electromagnetic environment specified below. The customer
or the user of the DDU-2000 Series AED should assure that it is used within the stated environmental specifications.
ELECTROMAGNETIC EMISSIONS
Emissions test Compliance Electromagnetic environment – guidance
RF emissions
CISPR 11
CISPR 22 Class B
FCC Part 15 Class B
Harmonic emissions IEC 61000-3-2 Not applicable Battery operated equipment
Voltage fluctuations/flicker emissions
IEC 61000-3-3
ELECTROMAGNETIC IMMUNITY
Group 1
Class B
Not applicable Battery operated equipment
The DDU-2000 Series AED uses RF energy only for its
internal function. Therefore, its RF emissions are very
low and are not likely to cause any interference in nearby
electronic equipment.
Immunity test
Electrostatic discharge (ESD)
IEC 61000-4-2
Electrical fast transient/burst
IEC 61000-4-4
Surge
IEC 61000-4-5
Voltage dips, short interruptions and
voltage variations on power supply
input lines IEC 61000-4-11
Power frequency (50/60 Hz) magnetic
field IEC 61000-4-8
IEC 60601
test level
±8 kV contact
±15 kV air
±2 kV for
power line
supply lines
±1 kV for
input/output
lines
±1 kV line(s)
to line(s)
±2 kV line(s)
to earth
Not applicable Not applicable Battery operated equipment
3 A/m 3 A/m
Compliance
level
±8 kV contact
±15 kV air
Not applicable Battery operated equipment
Not applicable Battery operated equipment
Electromagnetic environment –
guidance
There are no special requirements
with respect to electrostatic discharge.
Power frequency magnetic fields
should not be greater than levels
characteristic of a typical location in a
commercial or hospital environment.
12. Electromagnetic
Conformity
60
60
DAC-E2510EN- BB
Page 61

Electromagnetic Immunity (continued)
Immunity test
IEC 60601
test level
Compliance
level
Electromagnetic environment –
guidance
Portable and mobile RF
communications equipment should
be used no closer to any part of the
DDU-2000 Series, including cables,
than necessary. The recommended
separation distance calculated
from the equation applicable to the
frequency of the transmitter is shown
in the following table.
Radiated RF
IEC 61000-4-3
10 V/m
80 MHz to
2.5 GHz
80% 5Hz AM
Modulation
10 V/m
Interference may occur in
the vicinity of equipment
marked with this symbol.
Note 1: At 80 MHz and 800 MHz, the higher frequency range applies.
Note 2: These guidelines may not apply in all situations. Electromagnetic propagation is affected by absorption
and reflection from structures, objects and people.
The ISM (industrial, scientific and medical) bands between 150 kHz and 80 MHz are 6,765 MHz to 6,795 MHz;
13,553 MHz to 13,567; 26,957 MHz to 27,283 MHz; and 40,66 MHz to 40,70 MHz.
Field strengths from fixed transmitters, such as base stations for radio (cellular/cordless) telephones and land
mobile radios, amateur radio, AM and FM radio broadcast and TV broadcast cannot be predicted theoretically
with accuracy. To assess the electromagnetic environment due to fixed RF transmitters, an electromagnetic
site survey should be considered. If the measured field strength in the location in which the DDU-2000
Series is used exceeds the applicable RF compliance level above, the DDU-2000 Series should be observed to
verify normal operation. If abnormal performance is observed additional measures may be necessary, such as
reorienting or relocating the DDU-2000 Series AED.
Separation Distances
DDU-2000 Series AEDs are intended for use in an electromagnetic environment in which radiated RF disturbances
are controlled. The customer or the user of a DDU-2000 Series AED can help prevent electromagnetic interference by
maintaining a minimum distance between portable and mobile RF communications equipment (transmitters) and the
DDU-2000 Series AED as recommended below, according to the maximum output of the communications equipment.
Recommended separation distances between portable and mobile
RF communications equipment and DDU-2000 Series AEDs
Separation distance according to frequency of transmitter (m)
Rated maximum
output power of
transmitter (W)
80 MHz to 800 MHz
d = 1.2√P
800 MHz to 2.5 GHz
d = 2.3√P
0.01 0.12 0.23
0.1 0.38 0.73
1 1.20 2.30
10 3.79 7.27
100 12.00 23.00
12. Electromagnetic
Conformity
61
61
DAC-E2510EN- BB
Page 62

Separation Distances (continued)
For transmitters rated at a maximum output power not listed above, the recommended separation distance (d) in meters (m)
can be determined using the equation applicable to the frequency of the transmitter, where P is the maximum output power
rating of the transmitter in watts (W) according to the transmitter manufacturer.
Note 1: As 80 MHz and 800 MHz, the separation distance for the higher frequency range applies.
Note 2: The ISM (industrial, scientific and medical) bands between 150 kHz and 80 MHz are 6,765 MHz to 6,795 MHz;
13,553 MHz to 13,567 MHz; 26,957 MHz to 27,283 MHz; and 40,66 MHz to 40,70 MHz.
Note 3: An additional factor of 10/3 is used in calculating the recommended separation distance for transmitters in the ISM
frequency bands between 150 kHz and 80 MHz and in the frequency range 80 MHz to 2.5 GHz to decrease the likelihood
that mobile/portable communications equipment could cause interference if it is inadvertently brought into patient areas.
Note 4: These guidelines may not apply in all situations. Electromagnetic propagation is affected by absorption and
reflection from structures, objects and people.
Regulatory Compliance
Changes or modifications of this product, not expressly approved by Defibtech, may void the user’s authority to
operate the equipment.
This device complies with part 15 of the FCC Rules and Industry Canada Radio Standard RSS-210. Operation is
subject to the following two conditions:
(1) This device may not cause harmful interference, and
(2) This device must accept any interference received, including interference that may cause undesired operation.
This equipment has been tested and found to comply with the limits for a Class B digital device, pursuant to part
15 of the FCC Rules. These limits are designed to provide reasonable protection against harmful interference in a
residential installation. This equipment generates, uses and can radiate radio frequency energy and, if not installed
and used in accordance with the instructions, may cause harmful interference to radio communications. However,
there is no guarantee that interference will not occur in a particular installation. If this equipment does cause harmful
interference to radio or television reception, which can be determined by turning the equipment off and on, the user
is encouraged to try to correct the interference by one or more of the following measures:
• Reorient or relocate the receiving antenna.
• Increase the separation between the equipment and receiver.
• Connect the equipment into an outlet on a circuit different from that to which the receiver is connected.
• Consult the dealer or an experienced radio/TV technician for help.
12. Electromagnetic
CE Marking And European Union Compliance – Radio Transmitter
Defibtech, LLC declares that the DDU-2000 Series AED radio transmitter is in compliance with the essential requirements
and other relevant provisions of Directive 1999/5/EC. Applicable standards are listed in the “Environmental” section in
Chapter 11 of this manual.
62
62
DAC-E2510EN- BB
Conformity
Page 63

13 Glossary Of Symbols
!
YYYY
YYYY
XXXX
YYYY
Symbol Meaning
13. Glossary Of Symbols
High voltage present.
SHOCK Button – Delivers defibrillation shock to the patient when the device is ready to shock.
ON/OFF Button
• Turns the device ON when it is OFF.
• Turns the device OFF when it is ON.
Caution, consult accompanying documents.
Do not expose to high heat or open flame. Do not incinerate.
Recyclable.
Consult operating instructions.
Refer to instruction manual / booklet.
Do not damage or crush.
EC REP
Follow proper disposal procedures.
Meets the requirements of the European Medical Device Directive.
Note: XXXX represents the identification number of the notified body.
Classified by TUV Rheinland of NA with respect to electric shock, fire, and mechanical hazard only
in accordance with UL 60601-1, CAN/CSA C22.2 No.601.1-M90, IEC 60601-1, and IEC 60601-2-4.
Conforms to UL Standard UL 60601-1. Certified to CAN/CSA Standard C22.2 No. 601.1-M90.
Authorized European Representative:
Emergo Europe
Molenstraat 15
2513 BH The Hague
The Netherlands
Operational temperature limitation.
Use by (yyyy-mm).
Defibrillation proof - Can withstand the effects of an externally applied defibrillation shock.
Internally powered with defibrillator-proof BF-type patient applied parts (per EN 60601-1).
63
63
DAC-E2510EN- BB
Page 64

YYYY
YYYY
YYYY
YYYY
Glossary Of Symbols (continued)
Glossary Of Symbols (continued)
Symbol Meaning
Manufacturer.
Date of manufacture.
YYYY
Manufacturer and date of manufacture.
YYYY
Do not reuse.
For USA users only.
Federal Law (USA) restricts this device to sale by or on the order of a physician.
13. Glossary Of Symbols
LATEX
IP5 5
Catalogue number.
Keep dry.
Handle with care.
Transportation and storage requirements.
See environmental requirements.
Does not contain latex.
Lot number.
Dust protected; Protected against water jets.
Serial number.
Lithium Manganese Dioxide Battery.
Product is not sterile.
Defibrillation proof - Can withstand the effects of an externally applied defibrillation shock.
Internally powered with defibrillator-proof CF-type patient applied parts (per EN 60601-1).
64
DAC-E2510EN- BB
Page 65

14 Contacts
Manufacturer
Defibtech, L.L.C.
741 Boston Post Road
Guilford, CT 06437 USA
Tel.: 1-(866) 333-4241 (Toll-free within North America)
1-(203) 453-4507
Fax: 1-(203) 453-6657
Email:
sales@defibtech.com (Sales)
reporting@defibtech.com (Medical Device Reporting)
service@defibtech.com (Service and Repair)
14. Contacts
Patents pending.
This product and its accessories are manufactured and sold under one or more of the following United States
patents: D523,393, D548,346, D551,628.
This product and its accessories are manufactured and sold under license to at least one or more of the following
United States patents: 5,591,213; 5,593,427; 5,601,612; 5,607,454; 5,611,815; 5,617,853; 5,620,470; 5,662,690;
5,735,879; 5,749,904; 5,749,905; 5,776,166; 5,800,460; 5,803,927; 5,836,978; 5,836,993; 5,879,374; 6,016,059;
6,047,212; 6,075,369; 6,438,415; 6,441,582.
65
65
DAC-E2510EN- BB
 Loading...