

Defiant TM-087 Use And Care Manual

THANK YOU
We appreciate the trust and condence you have placed in
Deant through the purchase of this indoor digital timer. Visit
us online to see our full line of products available for your home
improvement needs. Thank you for choosing Deant!
USE AND CARE GUIDE
INDOOR DIGITAL TIMER
P
r
o
g
r
a
m
+
-
T
i
m
e
e
s
R
u
m
e
M
o
d
e
Questions, problems, missing parts? Before returning to the store,
call Deant Customer Service
8 a.m. - 6 p.m., EST, Monday - Friday
1-866-308-3976
HOMEDEPOT.COM
Item #1000-013-488
WARNING: For indoor use only.
RATINGS
125 VAC, 60 Hz
15 A, 1875W General Use/Resistive
8 A, 1000 W Tungsten
500 VA Electronic Ballast
120 VAC, 60Hz, 8.3 A Standard Ballast
1/2 HP Motor Load
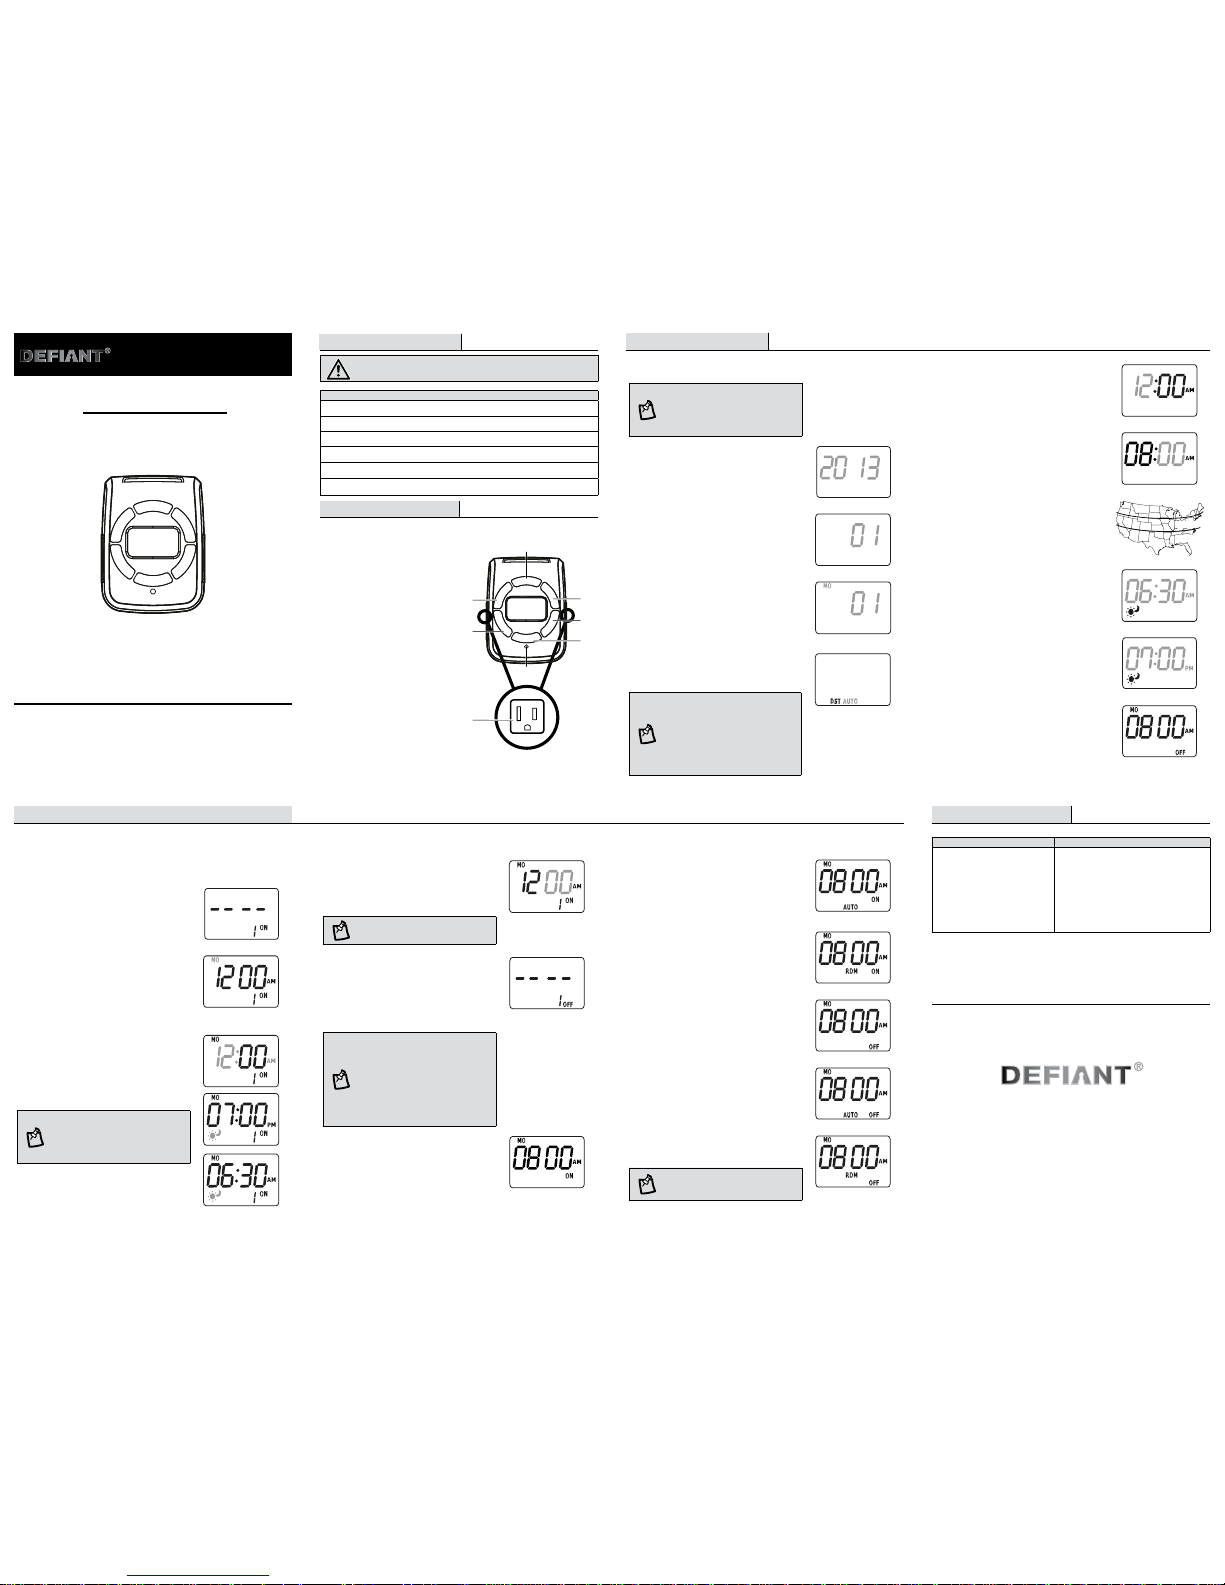
Product Description
1. Mode: Press to select the
desired working mode.
2. “-”: Press to scroll down or
reduce the time displayed.
3. “+”: Press to scroll up
or increase the time
displayed.
4. Program: Press to enter
programming mode, or to
review programs that have
been input.
5. Time: Press to set the
clock.
6. Resume: Press to erase the
current program.
7. Reset: Press to reset all
functions.
8. Outlets: Plug the lights or
devices to be controlled by
the timer into one of the
outlets.
P
r
o
g
r
a
m
+
-
T
i
m
e
e
s
R
u
m
e
M
o
d
e
7
4
6
1
2
3
5
8
Questions, problems, missing parts? Before returning to the store,
call Deant Customer Service
8 a.m. - 6 p.m., EST, Monday - Friday
1-866-308-3976
HOMEDEPOT.COM
Problem Solution
The devices do not turn OFF
and ON at the desired time.
□ Check to make sure the timer is
programmed correctly or insert an
object, such as toothpick or pencil,
into the reset hole and reprogram.
□ Make sure the light or device is on.
Press the Time button (5). Press the “+”
and “-” buttons (2 & 3) to set the minute
you wish the timer to control the device(s)
plugged into the unit.
NOTE: Pressing the Resume button
(6) will cancel the setting.
Press the Program button (4) to begin
setting the program OFF time (the time
that you want the timer to stop controlling
the device(s) plugged into the unit).
Follow the same procedure given for
setting the program ON time.
NOTE: You can program seven
different ON and OFF times for
this timer. Once nished, press the
Program button (4) to return the
timer to standby mode. If no button
is pushed for 30 seconds, the timer
will automatically return to standby
mode.
Press the Mode button (1) to select the
desired timer function:
□ ON - The timer is in continuous
ON mode.
Operating Instructions (continued)
Operating Instructions
Press the Time button (5). Press the
“+” and “-” buttons (2 & 3) to set the
current hour.
Press the Time button (5). Press the “+”
and “-” buttons (2 & 3) to set the current
minute.
Press the Time button (5). Press the
“+” and “-” buttons (2 & 3) to adjust
the Astronomic function: North, Central,
or South.
North
South
Central
Press the Time button (5). Press the “+”
and “-” buttons (2 & 3) to adjust the
sunrise time; the setting range is ± 2 hrs.
Press the Resume button (6) if you want
to keep the original sunrise setting.
Press the Time button (5). Press the “+”
and “-” buttons (2 & 3) to adjust the
sunset time; the setting range is ± 2 hrs.
Press the Resume button (6) if you want
to keep the original sunset setting.
Press the Time button (5) once more to
nish. The timer will go back to standby
mode.
1
Setting the clock
NOTE: Before initial use, plug
the timer in for at least 1 hour to
charge the internal battery. After the
screen displays, the unit is ready for
programming.
Press the Time button (5). Press the
“+” and “-” buttons (2 & 3) to set the
current year.
Press the Time button (5). Press the “+”
and “-” buttons (2 & 3) to set the current
month.
Press the Time button (5). Press the
“+” and “-” buttons (2 & 3) to set the
current date.
Press the Time button (5). Press the “+”
and “-” buttons (2 & 3) to set the daylight
savings time (DST) function to AUTO mode
or OFF mode.
NOTE: When DST is set to AUTO,
the programmed time will increase
1 hour on the second Sunday in
March, at 02:00 AM every year. The
programmed time will be reduced
by 1 hour on the rst Sunday in
November, at 02:00 AM every year.
Safety Information
2
Programming the ON and OFF times
Press the Program button (4) to enter
programming mode.
Press the Time button (5) to begin setting
the program ON time (the time that you
want the timer to control the device(s)
that are plugged into the unit).
Press the “+” and “-” buttons (2 & 3) to
set the days for the timer to control the
device(s) plugged into the unit:
□ Every day and individual days
□ Weekdays
□ Weekends
Press the Time button (5). Press the “+”
or “-” buttons (2 & 3) to set the hours you
wish the timer to control the device(s)
plugged into the unit:
□ 12-Hour Clock AM/PM
□ Sunrise/Sunset
NOTE: If you select Sunrise/Sunset
as the programmed ON time, press
the Program button (4) to continue
programming.
□ ON AUTO - The timer will turn
ON and remain ON until the next
programmed OFF time.
□ ON RDM - The timer will turn ON and
remain ON until the next programmed
RDM event. When RDM is set to ON,
the timer will turn ON/OFF at the
programmed times ± 30 minutes.
□ OFF - The timer will turn OFF and
stay OFF until another mode is
selected.
□ OFF AUTO - The timer will turn
OFF and remain OFF until the next
scheduled ON time.
□ OFF RDM - The timer will turn
OFF and remain OFF until the next
programmed RDM event.
NOTE: To review the programs that
have been input, press the Program
button (4).
Troubleshooting
http://waterheatertimer.org/plug-in-timers.html#TM-087
GRACIAS
Agradecemos la conanza que ha puesto en Deant a través de la compra
de este temporizador digital para uso en interiores. Visítenos en internet
para ver nuestra línea completa de productos disponibles para sus
necesidades de mejorar su hogar. ¡Gracias por elegir a Deant!
GUÍA DE USO Y CUIDADO
TEMPORIZADOR DIGITAL PARA
USO EN INTERIORES
P
r
o
g
r
a
m
+
-
T
i
m
e
e
s
R
u
m
e
M
o
d
e
¿Tiene preguntas, problemas, o faltan piezas? Antes de regresar a la tienda,
llame a Servicio al Cliente de Deant
de lunes a viernes de 8 a.m. a 6 p.m., hora local del Este
1-866-308-3976
HOMEDEPOT.COM
Núm. de artículo 1000-013-488
ADVERTENCIA: Únicamente para uso en interiores.
CAPACIDADES NOMINALES
125 VAC, 60 Hz
Uso general/resistivo 15 A, 1875W
Tungsteno 8 A, 1000 W
Balastro electrónico de 500 VA
Balastro estándar de 120 VAC, 60Hz, 8.3 A
Carga del motor de 1/2 HP
Descripción del producto
1. Mode (Modo): Presione
para seleccionar el modo de
funcionamiento deseado.
2. “-”: Presione para desplazarse
hacia abajo o reducir la hora
visualizada.
3. “+”: Presione para desplazarse
hacia arriba o aumentar la hora
visualizada.
4. Program (Programar): Presione
para ingresar a modo de
programación o para revisar
programas que han sido
ingresados.
5. Time (Hora): Presione para
congurar el reloj.
6. Resume (Reanudar): Presione
para eliminar el programa actual.
7. Reset (Reajuste): Presione para
reajustar todas las funciones.
8. Tomacorrientes: Conecte
las luces o dispositivos a ser
controlados por el temporizador
en uno de los tomacorrientes.
P
r
o
g
r
a
m
+
-
T
i
m
e
e
s
R
u
m
e
M
o
d
e
7
4
6
1
2
3
5
8
¿Tiene preguntas, problemas, o faltan piezas?
Antes de regresar a la tienda,
llame a Servicio al Cliente de Deant
de lunes a viernes de 8 a.m. a 6 p.m., hora local del Este.
1-866-308-3976
HOMEDEPOT.COM
Problema Solución
Los dispositivos no se APAGAN ni
ENCIENDEN en la hora deseada.
□ Revise para asegurarse de que
el temporizador está programado
correctamente o inserte un objeto,
como un mondadientes o un lápiz, en
el agujero de reajuste y reprograme.
□ Asegúrese de que la luz o el dispositivo
estén encendidos.
Presione el botón Time (Hora) (5). Presione
los botones “+” y “–” (2 y 3) para ajustar el
minuto durante el cual usted desea que el
temporizador controle el(los) dispositivo(s)
conectado(s) en la unidad.
NOTA: Al presionar el botón Resume
(Reanudar) (6) cancelará al ajuste.
Presione el botón Program (Programar) (4)
para comenzar a ajustar la hora OFF del
programa. (la hora en que usted quiere que
el temporizador deje de controlar el(los)
dispositivo(s) que está(n) conectado(s) en la
unidad). Siga el mismo procedimiento dado
para ajustar la hora ON del programa.
NOTA: Usted puede programar siete
diferentes horas ON y OFF en este
temporizador. Cuando haya terminado,
presione el botón Program (Programar)
(4) para regresar el temporizador al
modo standby (espera). Si ningún botón
es presionado durante 30 segundos,
el temporizador regresará al modo
standby (espera).
Presione el botón Mode (Modo) (1) para
seleccionar la función deseada del
temporizador.
□ ON - El temporizador está en modo ON
continuo.
Instrucciones de operación (continuación)
Instrucciones de operación
Presione el botón Time (Hora) (5). Presione
los botones “+” y “–” (2 y 3) para congurar
la hora actual.
Presione el botón Time (Hora) (5). Presione
los botones “+” y “–” (2 y 3) para congurar
el minuto actual.
Presione el botón Time (Hora) (5). Presione
los botones “+” y “–” (2 y 3) para ajustar la
función Astronómica: Norte, Centro o Sur.
Norte
Sur
Centro
Presione el botón Time (Hora) (5). Presione
los botones “+” y “–” (2 y 3) para ajustar
la hora del amanecer; el rango de ajuste
es de ± 2 hrs. Presione el botón Resume
(Reanudar) (6) si quiere mantener el ajuste
original del amanecer.
Presione el botón Time (Hora) (5). Presione
los botones “+” y “–” (2 y 3) para ajustar la
hora del atardecer; el rango de ajuste es de ±
2 hrs. Presione el botón Resume (Reanudar)
(6) si quiere mantener el ajuste original del
atardecer.
Presione el botón Time (Hora) (5) una vez más
para terminar. El temporizador regresará a
modo standby (espera).
1
Conguración del reloj
NOTA: Antes del uso inicial, conecte el
temporizador durante al menos 1 hora
para cargar la batería interna. Después
de que la pantalla se visualice, la unidad
está lista para programación.
Presione el botón Time (Hora) (5). Presione
los botones “+” y “–” (2 y 3) para congurar
el año actual.
Presione el botón Time (Hora) (5). Presione
los botones “+” o “–” (2 y 3) para congurar
el mes actual.
Presione el botón Time (Hora) (5). Presione
los botones “+” y “–” (2 y 3) para congurar
la fecha actual.
Presione el botón Time (Hora) (5). Presione
los botones “+” y “–” (2 y 3) para congurar
la función del horario de verano (DST) en
modo AUTO o modo OFF.
NOTA: Cuando DST está ajustado en
AUTO, la hora programada aumentará
1 hora el segundo domingo de marzo
a las 02:00 AM cada año. La hora
programada disminuirá 1 hora el primer
domingo de noviembre a las 02:00 AM
cada año.
Información de seguridad
2
Programación de las horas ON y OFF
Presione el botón Program (Programar) (4)
para ingresar el modo de programación.
Presione el botón Time (Hora) (5) para
comenzar a ajustar la hora ON del programa.
(la hora en que usted quiere que el
temporizador controle el(los) dispositivo(s)
que está(n) conectado(s) en la unidad.
Presione los botones “+” y “–” (2 y 3)
para ajustar los días durante los cuales el
temporizador controlará el(los) dispositivo(s)
conectado(s) en la unidad.
□ Todos los días y días individuales
□ Días de entre semana
□ Fines de semana
Presione el botón Time (Hora) (5). Presione
los botones “+” y “–” (2 y 3) para ajustar las
horas durante las cuales usted desea que el
temporizador controle el(los) dispositivo(s)
conectado(s) en la unidad.
□ Reloj de 12 horas AM/PM
□ Amanecer/Atardecer
NOTA: Si selecciona Sunrise/Sunset
(Amanecer/Atardecer) como la hora
ON programada, presione el botón
Program (Programar) (4) para continuar
programando.
□ ON AUTO - El temporizador se encenderá
y permanecerá ENCENDIDO hasta la
siguiente hora OFF programada.
□ ON RDM - El temporizador se encenderá y
permanecerá encendido hasta el siguiente
evento RDM programado. Cuando RDM
es ajustado en ON, el temporizador se
ENCENDERÁ/APAGARÁ en las horas
programadas ± 30 minutos.
□ OFF - El temporizador se APAGARÁ y
permanecerá APAGADO hasta que se
seleccione otro modo.
□ OFF AUTO - El temporizador se APAGARÁ
y permanecerá APAGADO hasta la
siguiente hora ON programada.
□ OFF RDM - El temporizador se apagará
y permanecerá apagado hasta el
siguiente evento RDM programado.
NOTA: Para revisar los programas que
han sido ingresados, presione el botón
Program (Programar)(4).
Resolución de fallas
 Loading...