

Defiant FROG-4000 Quick Start Manual
1
Precautions
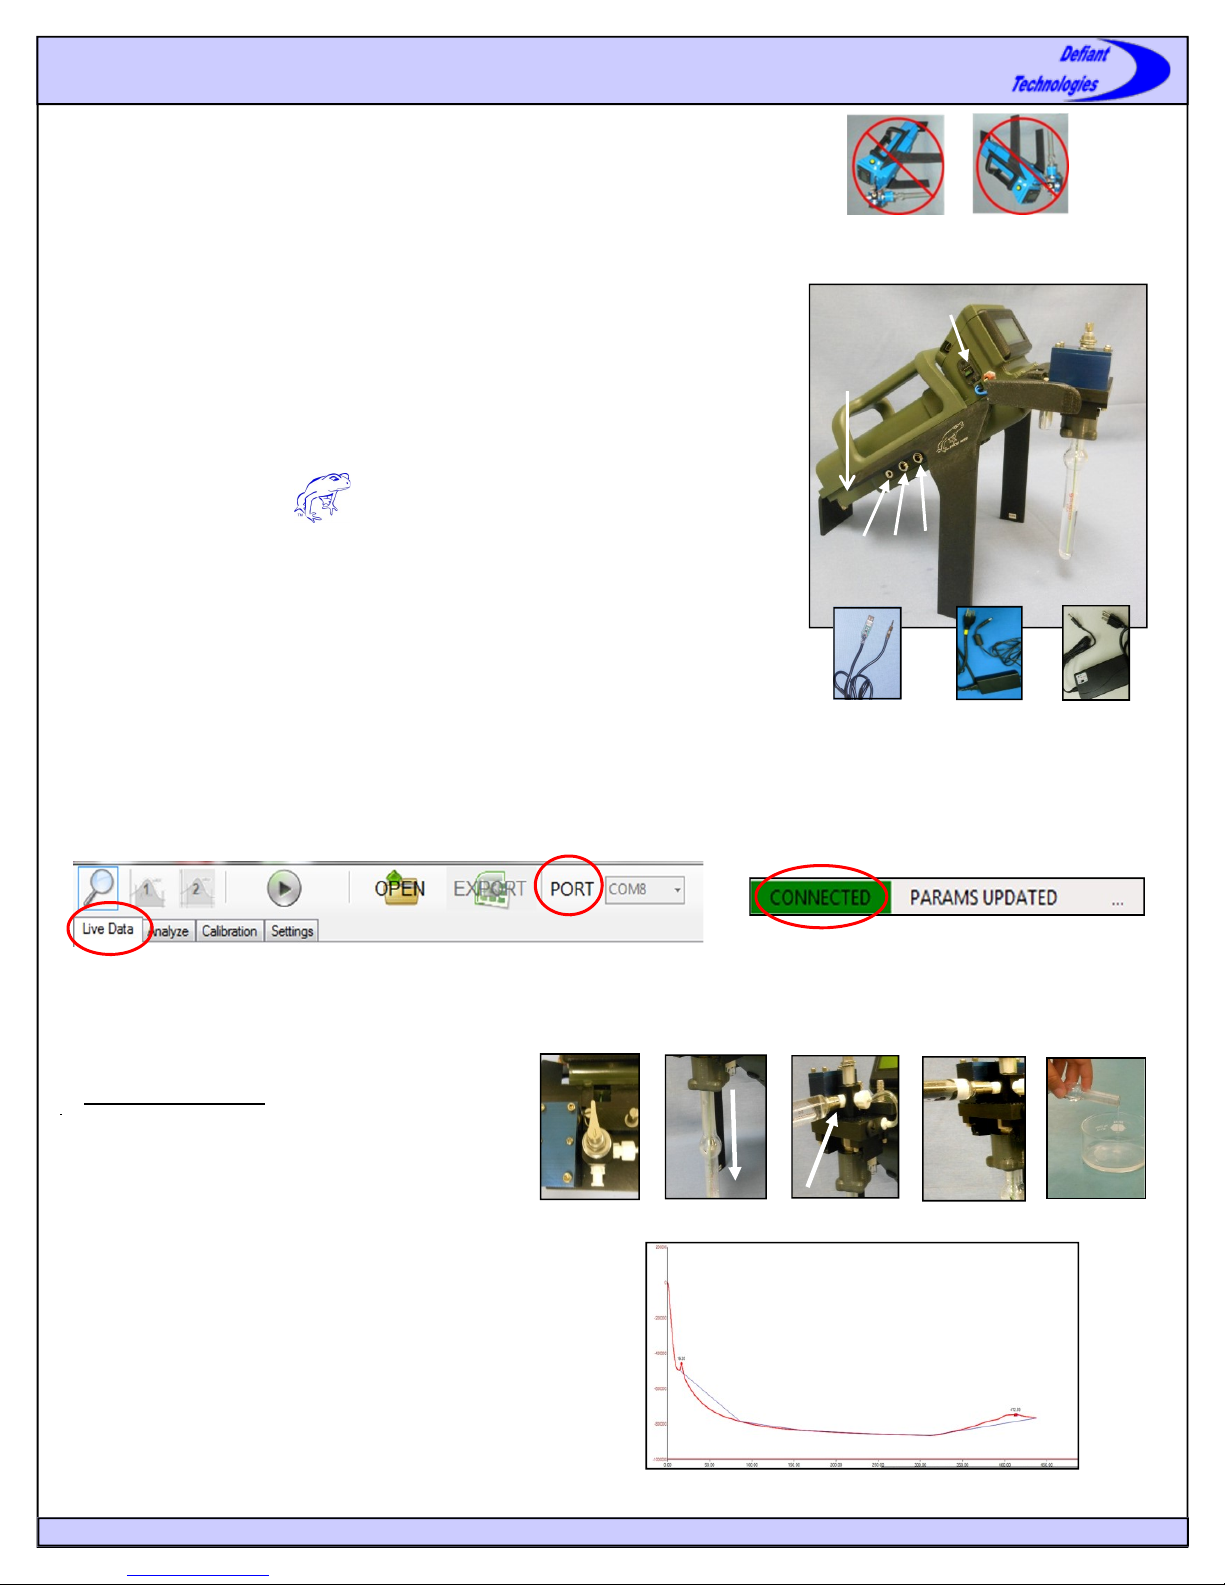
DO NOT invert the instrument with the sparge bottle attached.
DO NOT transport or store the instrument with liquid in the sparge bottle.
DO NOT handle or carry system when sample is being analyzed.
NOTE: The battery is disconnected for shipping. To reconnect: remove the two thumb-
screws on bottom near rear, slide off back cover, plug in battery, and replace back
cover.
FROG-4000TM Quick Start Guide
Charging the Battery
1. Plug the battery charger (supplied with the FROG) into battery charge port (S) and an
outlet source. The current switch can be on 0.9A or 1.8A.
2. While the battery is charging, the light on the charger switch is red.
3. When the battery is completely charged, the light on the charger switch is green.
Connecting to Ellvin
Recommended Computer Specifications: Pentium dual core or faster, Windows 7 or
more current, and 2 GB memory.
1. Install Ellvin onto laptop or PC. (Select setup on the Elvin software CD or USB
drive)
2. Connect serial data cable (supplied) to serial data port (Q) and to USB port on
computer. The computer will search and find the driver for the cable in Ellvin.
3. Connect power cable (supplied) to the instrument’s power port (R) 9V POWER, or
use battery power.
4. Turn the instrument power switch to the ON position (fully up). The instrument
display screen will be visible.
4. Open Ellvin by double clicking on the Ellvin icon.
5. Ellvin opens in the default Live Data Window.
6. Click on PORT and select the appropriate COM number to connect the instrument to
the computer.
Battery
Access
Q
Serial Data
Cable to Q
R
ON
S
Cable to R
Power
Battery
Charger to S
NOTE: Refer to User’s Manual to adjust instrument settings or recalibrate the instrument , if necessary.
NOTE: If you cannot connect to the FROG, verify that you have the driver for the communication cable. If not, the driver is located on
the software disk (or USB drive) in a folder labeled “USBtoSerialDrivers”.
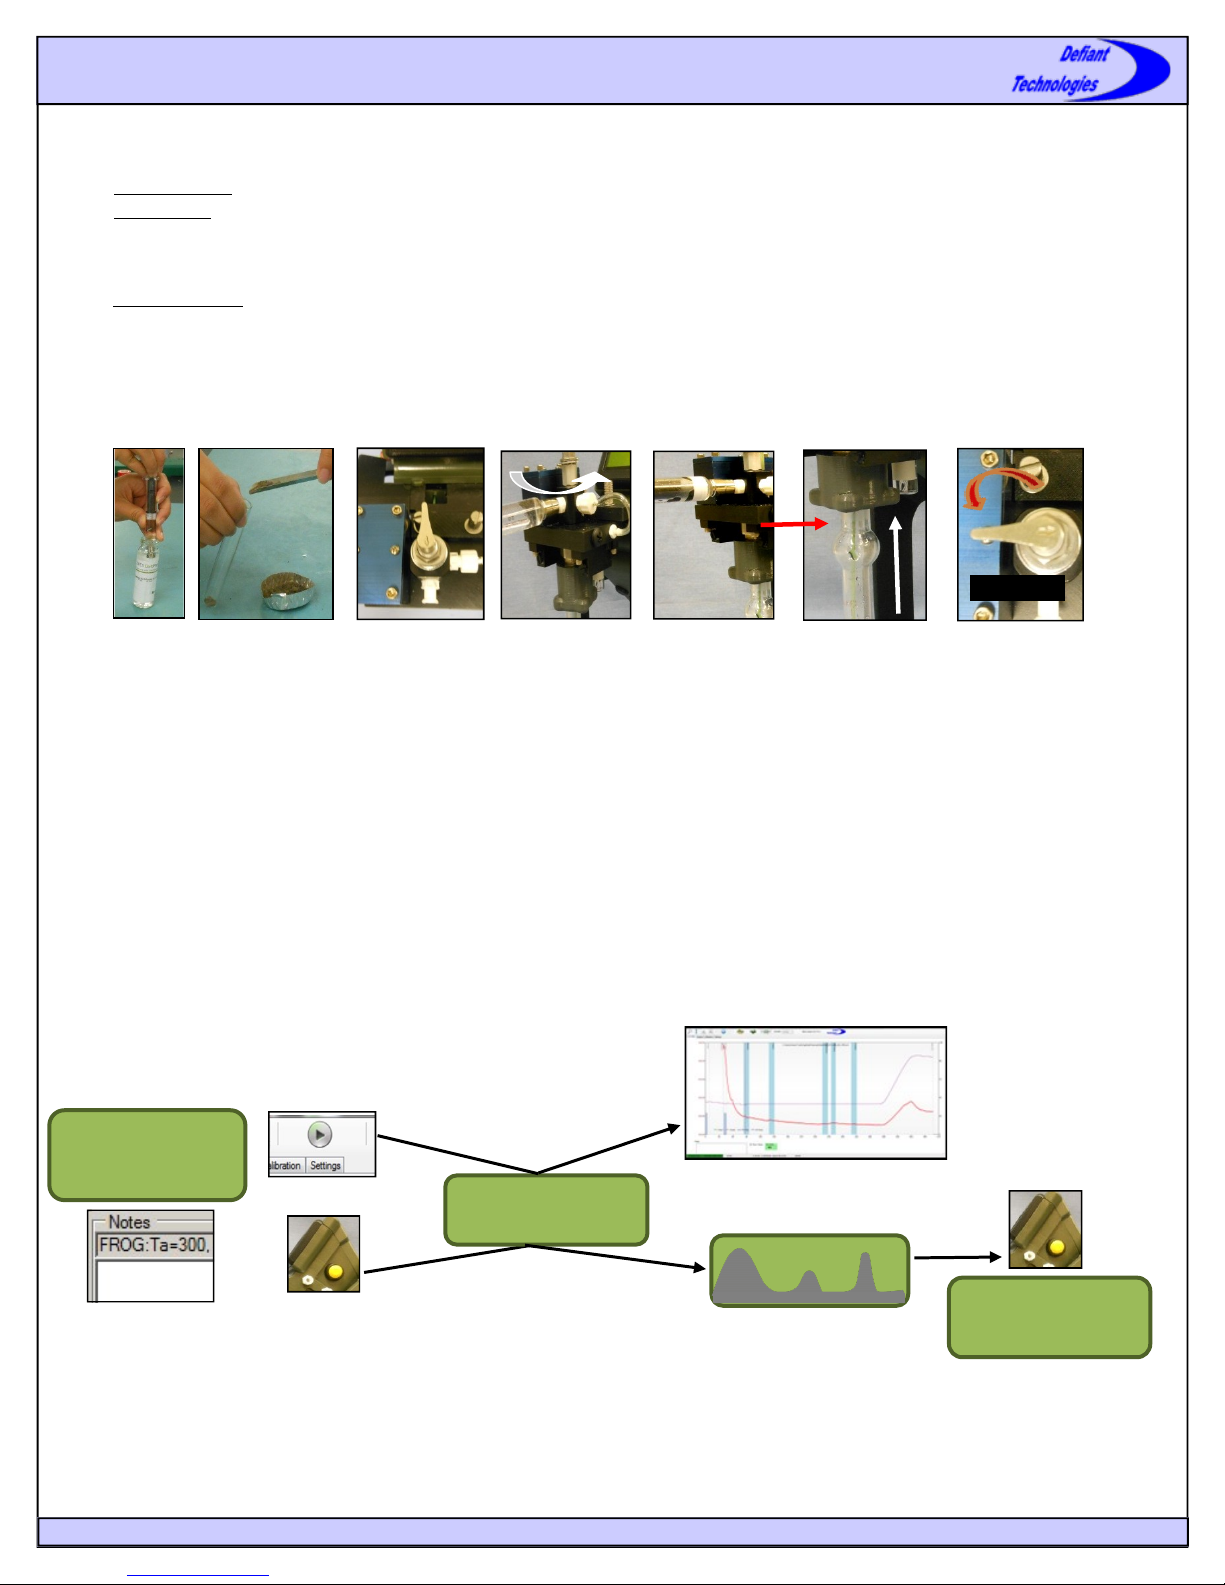
Preparing the Instrument
A. Rinse the Instrument
1. Place the load/analyze valve in the LOAD position.
2. Attach sparge bottle in the DOWN position.
3. Attach syringe with 5mL deionized water.
4. Transfer the 5mL water into the sparge bottle.
5. Remove and empty the sparge bottle.
6. Repeat steps 3-5 for at least two rinses.
7. Create a clean baseline in Ellvin by running a blank sample.
Þ Follow the instruction for “Loading a Sample “
and “Running a Sample” using 5mL deionized water. The
FROG must be connected to Ellvin to verify a clean baseline.
NOTE: It is best to have a clean baseline before attempting sample
analysis.
LOAD
1
2
Clean Baseline in Ellvin
3
4
www.defiant-tech.com
5
2
Loading a Sample
Quick Start Guide
1. Sample Preparation:
Þ Liquid Sample: Pull 5mL of the desired liquid into 5mL syringe.
Þ Soil Sample: Place 1g soil in sparge bottle. (An application note for Methanol Extraction can be found on our website.)
2. Place the load/analyze valve in the LOAD position.
3. Slip bottle over green tube (sparge needle).
4. Attach syringe to the instrument and transfer the sample to the sparge bottle.
Þ For Soil Sample: Fill the syringe with 5mL deionized water, then attach it and transfer the water to sparge bottle containing
the soil sample.
5. Attach sparge bottle in the UP position and gently tighten the sparge bottle nut counter clockwise.
6. Place load/analyze valve in the ANALYZE position.
LOAD
ANALYZE
1
Running a Sample
2
3a
3b
4
1. Instrument screen reads “READY”
2. Record Log # and other relevant sample data for future reference.
3. Press the start button in Ellvin or on the instrument to begin an analysis cycle.
4. As the analysis cycle proceeds, the instrument screen displays the analysis steps.
5. If connected to Ellvin, a chromatogram of results is displayed on the computer screen.
6. If not connected to Ellvin, the instrument screen displays a chromatogram when the cycle is finished.
7. If not connected to Ellvin, press the instrument start button to scroll through analyte concentration estimates.
8. Before loading/running another sample,
a. Empty the Sparge bottle.
b. Wait for the instrument screen to read “READY”.
NOTE: Samples must be run from low to high concentrations.
Rinse the instrument and create a clean baseline between runs if concentrations are unknown.
VOC ANALYZER
GC TEMP: 40C READY
LOG_016
BTEX V. 965 2012
or
CLEANING 4
5
5
1, 2
3
For more detailed instruction, refer to the FROG-4000TM User’s Manual
4
www.defiant-tech.com
6
BENZE 33PPB
48.33S
7
3
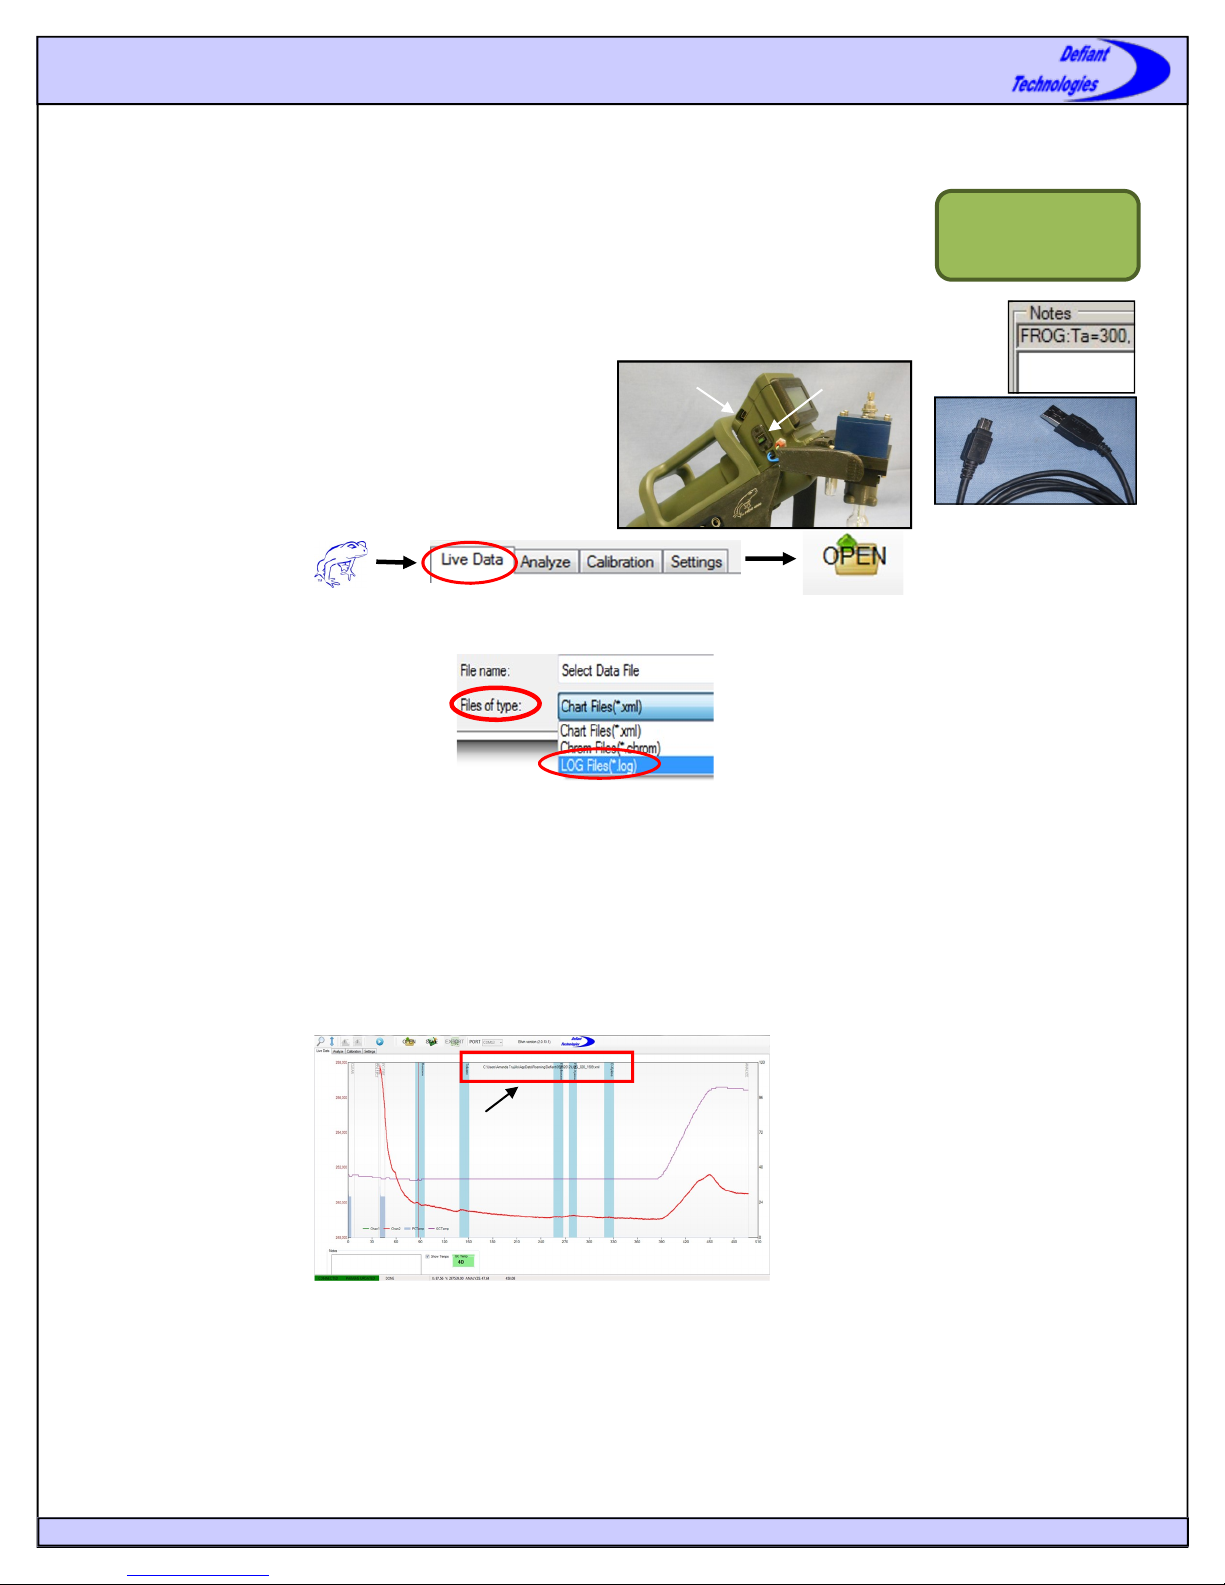
Working with Ellvin/Instrument Files
Files
The instrument stores a data file for every sample analysis on an internal SD card. If analyses are performed while the instrument is
connected to Ellvin, the files are also stored on the user’s computer.
Files stored on the SD card are labeled with a LOG# that the instrument automatically assigns to each run.
The LOG# is displayed on the instrument screen at the start of each run. The user should record the LOG#
and other relevant sample information for future reference.
Files saved by Ellvin on the user’s computer are in XML format and are labeled with the LOG# and the time
they were created by Ellvin. A separate data file is created for each analysis. The user should record the time, date and
other relevant sample information. The Ellvin notes window may be used for this purpose.
Importing LOG files from the instrument into Ellvin
Method A, Best Practice:
1. Connect Port N on the instrument to a computer using the USB-
Cable (supplied). Turn the instrument on.
2. The computer screen will display an option to “Open folder and
view files”. Open the folder and the screen displays a list of
sequential files named “LOG_XXX”.
3. Select the LOG file of interest and drag/copy it to the computer.
4. Open Ellvin.
5. Open Live Data Window
6. Click the Open Button.
7. Browse to the location where the LOG file of interest was dragged/copied.
8. At the bottom of the “Select Data File” window, change “Files of Type” to LOG Files.
9. Select the LOG file of interest and open it.
10. The computer now displays a chromatogram of the file data as it is imported into Ellvin. At this time, Ellvin also converts the data to
an XML format, labels it with the time it was converted (not the time it was recorded on the instrument) and stores it. Ellvin stores the
XML file in a folder labeled with the date that the data was converted. The location path of the stored data is displayed at the top of the
chromatogram in the Live Data Window.
Method B:
1. Connect Port N on the instrument to a computer using the USB-Cable.
Turn the instrument on.
2. Open Ellvin, open Live Data Window, click on the Open Button.
3. Select the instrument from the “Look In” drop-down menu at the top of
Live Data Window.
4. Change “Files of Type” to LOG Files.
5. Select the LOG file of interest and open it.
Data Location Path
N
ON
GC TEMP: 40C READY
USB Cable to N
VOC ANALYZER
LOG_016
BTEX V. 965 2012
www.defiant-tech.com
4
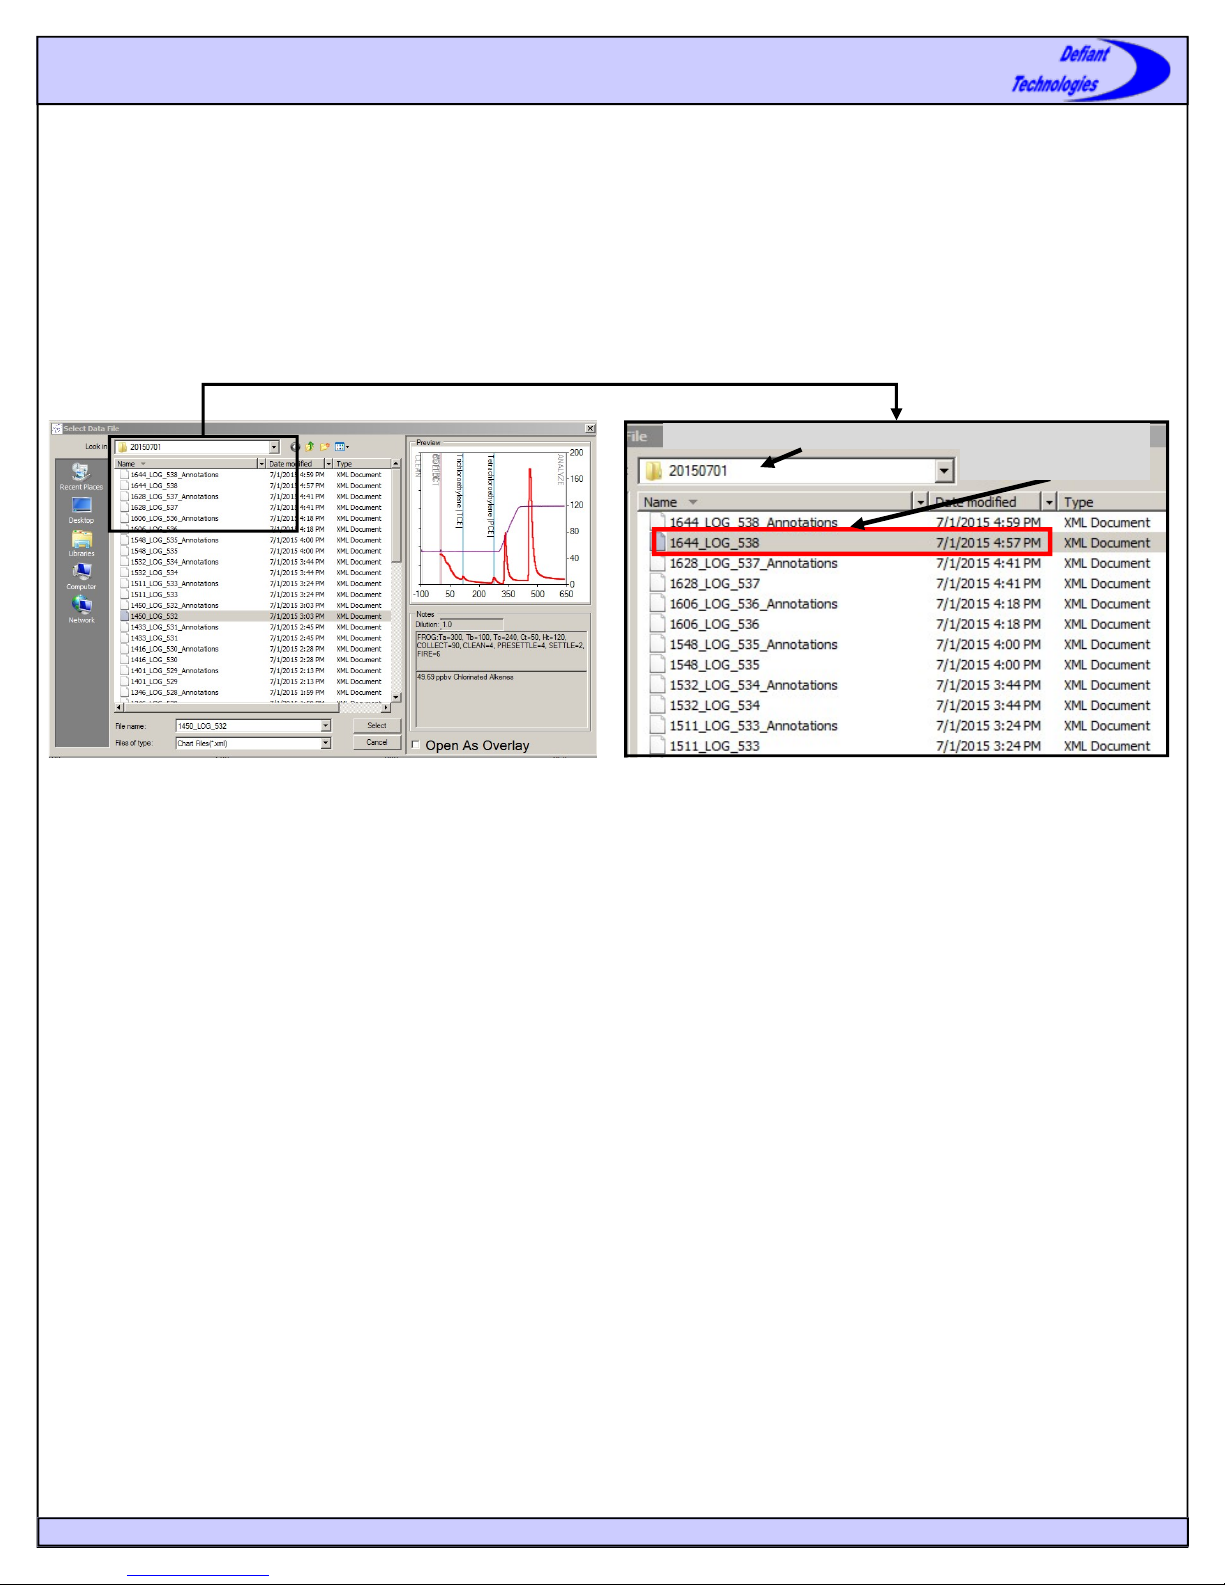
Opening Files in Analyze Window
1. Click on the Analyze Tab.
2. Click on the Open Button and a file selection appears.
3. Use the drop down list labeled “Look In” to select the FOLDER labeled with the DATE that Ellvin created/converted the file of
interest.
4. Click on the file of interest and a preview chromatogram appears on the right side of the screen. The XML FILES are labeled with the
TIME that Ellvin created/converted them and the LOG number.
5. Click “Select” to open the file for analysis.
Working with Ellvin/Instrument Files
Folder name is the Date
File name is the Time
followed by the LOG #
www.defiant-tech.com

5
Ellvin Windows
Ellvin, Chromatogram Software, has four windows that are accessed with tabs when the software is open.
Window Tabs in Ellvin
Live Data Window
This is the default window for Ellvin. In Live Data Window, Ellvin
creates a chromatogram from sample analysis data. The data source may
be:
a. From the instrument, while it is running a sample, and connected
to Ellvin.
b. From sample data previously recorded on the instrument’s SD
card, then imported to Ellvin.
Features in Live Data Window
Port
The user designates a COM# in the Port drop down list to connect the instrument to a computer.
Connection Port
When the correct COM# is designated in Port, the Connection Port indicates that the instrument is CONNECTED, and whether or not
parameters have been updated.
GC Column Temperature Indicator
Displays the GC temperature.
The icon is GREEN when instrument is ready for loading.
The icon is RED when the GC is cooling.
Start/Stop Button
Click on this button to start an analysis cycle. Once the analysis has begun, clicking the button will stop the analysis.
Notes
Record notes about samples for future reference. The notes are saved when the sample analysis is completed.
Move
Use this tool to move the chromatogram up and down the Y-axis.
Magnifying Glass
Use this tool to zoom into a chromatogram.
To Magnify:
1. Left click and drag the mouse over the area to be magnified.
2. Release the mouse button.
3. The area being magnified is highlighted light blue and the display readjust to show the magnified area.
To revert to normal view double click the left mouse button on the magnifying glass.
www.defiant-tech.com
 Loading...