

Defiant 49815 Use And Care Manual
Use and Care Guide
INDOOR DIGITAL TIMER
IP08292014 HOMEDEPOT.com
Please contact 1-866-308-3976 for further assistance.
Item #470-906
Model #49815
UPC #043180498151
Before You Begin
Product Features
□ Set one or more multiple ON/OFF settings for each day of the week, daily cycles, or weekday - weekend
cycles
□ Stores up to 4 individual programs
□ A Random feature which turns the lights off and on between 30 minutes before and after the programmed
time, giving the appearance that somebody is currently home
Pre-Installation Requirements
□ This timer will only operate with incandescent, halogen, or xenon bulbs. Do not use this timer with CFL or
LED bulbs.
□ This timer can only be installed in a single pole installation. Do not install on a 3-way switch.
Safety Information
WARNING
RISK OF ELECTRIC SHOCK:
Shut off the power at the fuse box or circuit breaker
before installation
Do not use in wet locations
Use indoors only
RISK OF ELECTRIC FIRE:
Do not use to control appliances that contain heating
elements such as cooking appliances, heaters, and irons
Do not exceed electrical ratings
Do not use to control receptacles
Use only copper wire with this device
Not for use with CFL or uorescent bulbs. Use with incandescent, xenon, or halogen bulbs.
The safety ground must be connected for proper operation.
If you are unsure or unclear about this installation, contact a qualifi ed licensed electrician.
This timer is equipped with memory back up that will protect the settings for up to 60 minutes. You never have to
replace batteries. The internal backup requires about 12 hours to fully charge.
Product Speci cations
□ Single pole, no neutral wire is needed
□ Replaces a standard wall switch or older spring wound timers
RATINGS
120 VAC,
60 Hz
5A/ 600W
Tungsten
5A/ 600W
Resistive
40
o
C Max
Temp
Hardware Included
AA - Wire Nut x3 BB - Screw x2
Suggested Tools
Phillips screwdriver Wire stripper
Installation Terms and Options
BASIC WIRING TERMINOLOGY
To better familiarize yourself with the wiring terminology and concepts referenced in this manual, please review the following information before you begin wiring this timer to your switch box.
If at any time during the wiring process you become uncertain, please contact a certi ed electrician.
□ Line: This is the 120 volt feed wire (line in).
□ Load: This is the wire that controls the xture (load out).
□ Single-Pole Switch: A single-pole switch only controls a xture from a single location. A typical example of where you would nd a single-pole switch is your bedroom or bathroom light
switch.
Programming Instructional Video
To view an instructional video on how to program this product:
1. Go to www.homedepot.com and enter either the Item or Model number found in the top right
corner of this instruction sheet in the search fi eld.
2. Click on your product from the list of search results and click on the video link in the Product
Overview section.
Single Pole Installation
1
INSTALLING THE TIMER
a. Turn OFF the main power at the circuit breaker or fuse box.
b. Remove the existing switch.
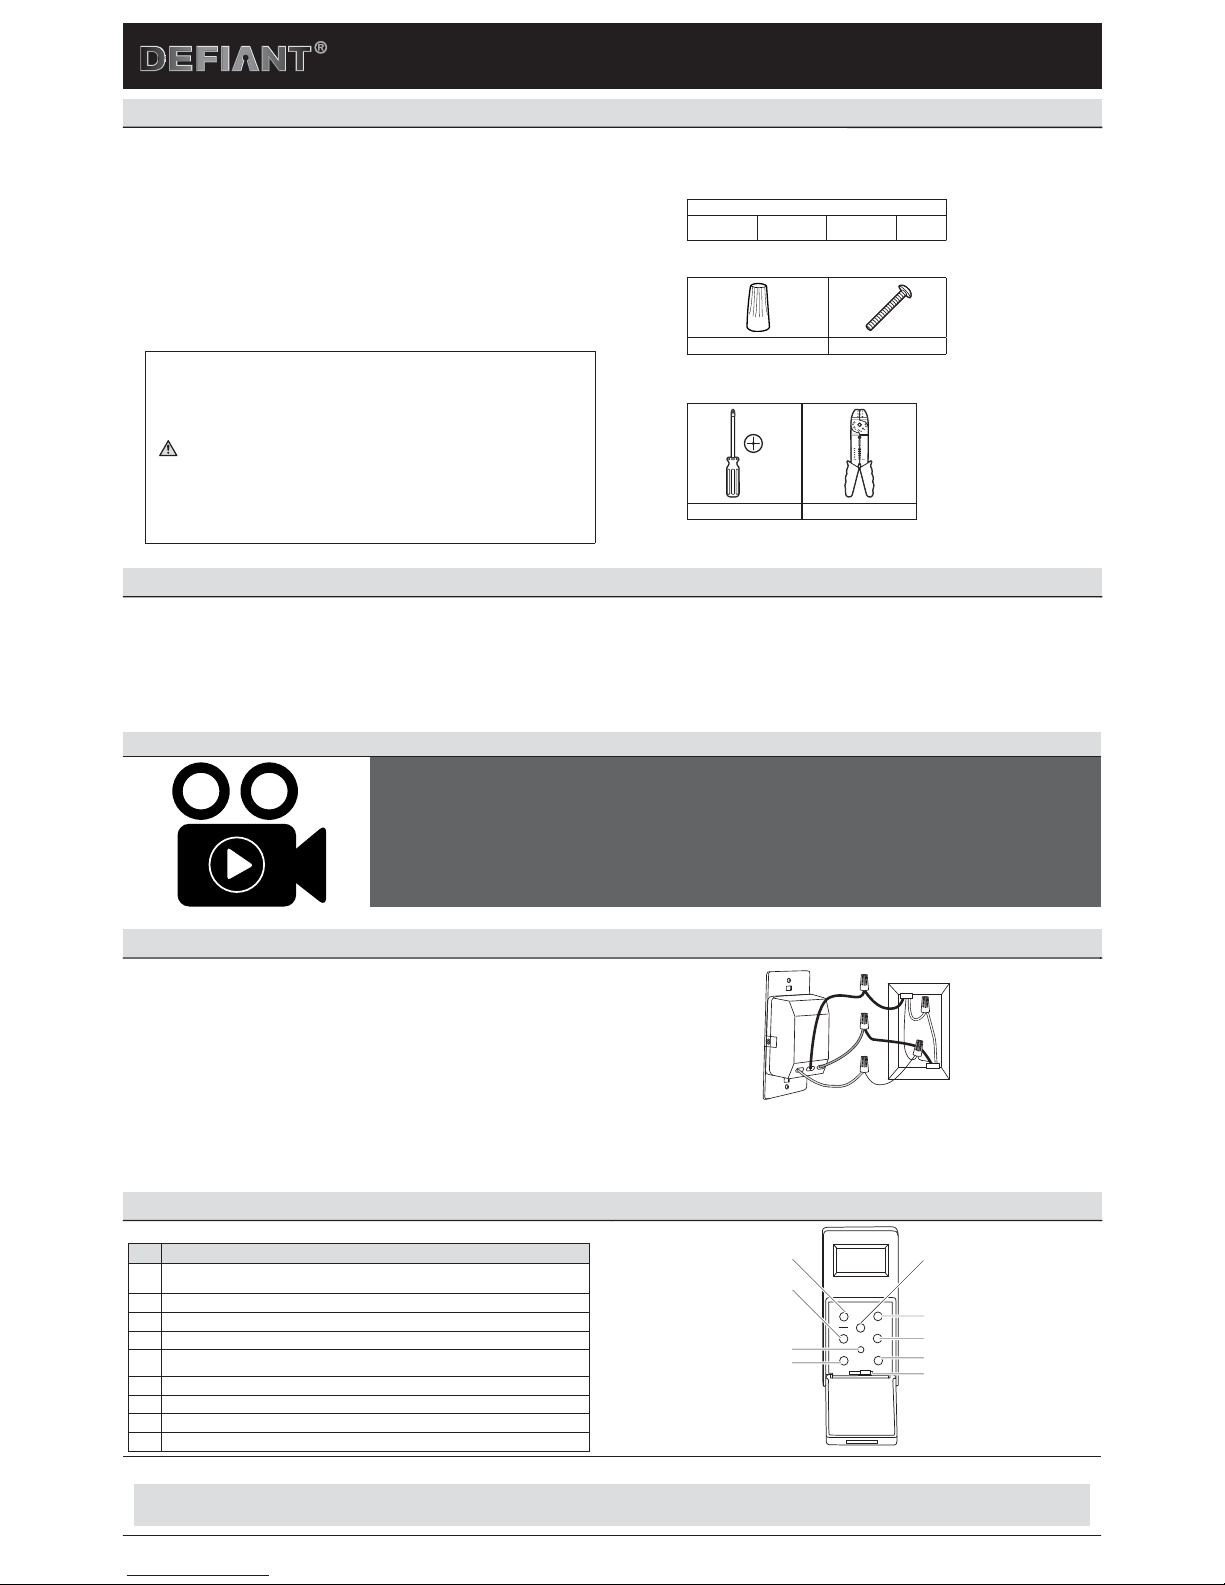
c. Connect the wires of the timer to the wall box as shown in Figure 1, using the wire nuts provided.
□ Connect the line wire to the black wire from the timer.
□ Connect the load wire to the blue wire from the timer.
□ Connect the ground wire to the green wire from the timer. Timer will not operate without a ground.
d. Ensure that all wire nuts are secure, and tuck the wires into the wall box, leaving room for the timer.
e. Using the screws provided, mount the timer to the wall box, being careful not to crush any wires.
f. Turn the main power ON at the circuit breaker or fuse box.
g. Place power switch (1) in ON position.
Green
Black
Blue
Line
Load
Ground
Figure 1
Initial Setup
PRODUCT DESCRIPTION
Part Description
1
POWER switch: Slide the switch to the left to disrupt power to the timer/ xture. Slide switch
to the right to restore power to the timer/ xture.
2 SETUP/PGM button: Press to enter/exit programming mode.
3 “+” button: Press to scroll upward.
4 “–“ button: Press to scroll downward.
5 ON/OFF button: Turns the timer ON/OFF.
6 RESET button: Press and hold for three seconds to reset the system.
7
AUTO button: Press once to activate auto mode.
8
RANDOM button: Press once to activate the random feature.
9
ENTER button: Press to con rm indicated settings.
SETUP
SSMTWT
F
PGM
ON/OFF
AUTO
RANDOM
RESET
ENTER
POWER
-
+
5
8
2
6
4
7
9
1
3
OFF
ON
CONTINUE TO PAGE 2 TO COMPLETE SETUP AND PROGRAMMING
Use and Care Guide
INDOOR DIGITAL TIMER
IP08292014 2 HOMEDEPOT.com
Please contact 1-866-308-3976 for further assistance.
Initial Setup (continued)
1
POWERING-UP THE TIMER
NOTE: If there are no numbers on the screen, ensure the unit is wired correctly and the power is set to the
ON position. Also, ensure the light bulb in the xture is screwed in tight and not burned out; a working light
bulb must be installed to complete the circuit.
NOTE: When adjusting settings on the timer, always use a nonmetallic, insulated tool, such as a toothpick or
wooden pencil.
a. Open the door by inserting a ngernail or
screwdriver in the space provided at the top
of the door and pulling forward.
b. Slide the power switch (A) to the ON postion
(to the right). The display will not appear until
the switch is on. See Figure 2.
c. Press and hold RESET for three seconds. The
word “Reset “ will appear on the display, and
the display should ash “12:00 am”. See
Figure 3. Proceed to step 2 - SETTING THE
CURRENT DAY AND TIME.
Figure 2
A
SETUP
PGM
ON/OFF
AUTO
RANDOM
RESET
ENTER
POWER
-
+
AM
OFF
Figure 3
2
SETTING THE CURRENT DAY AND TIME
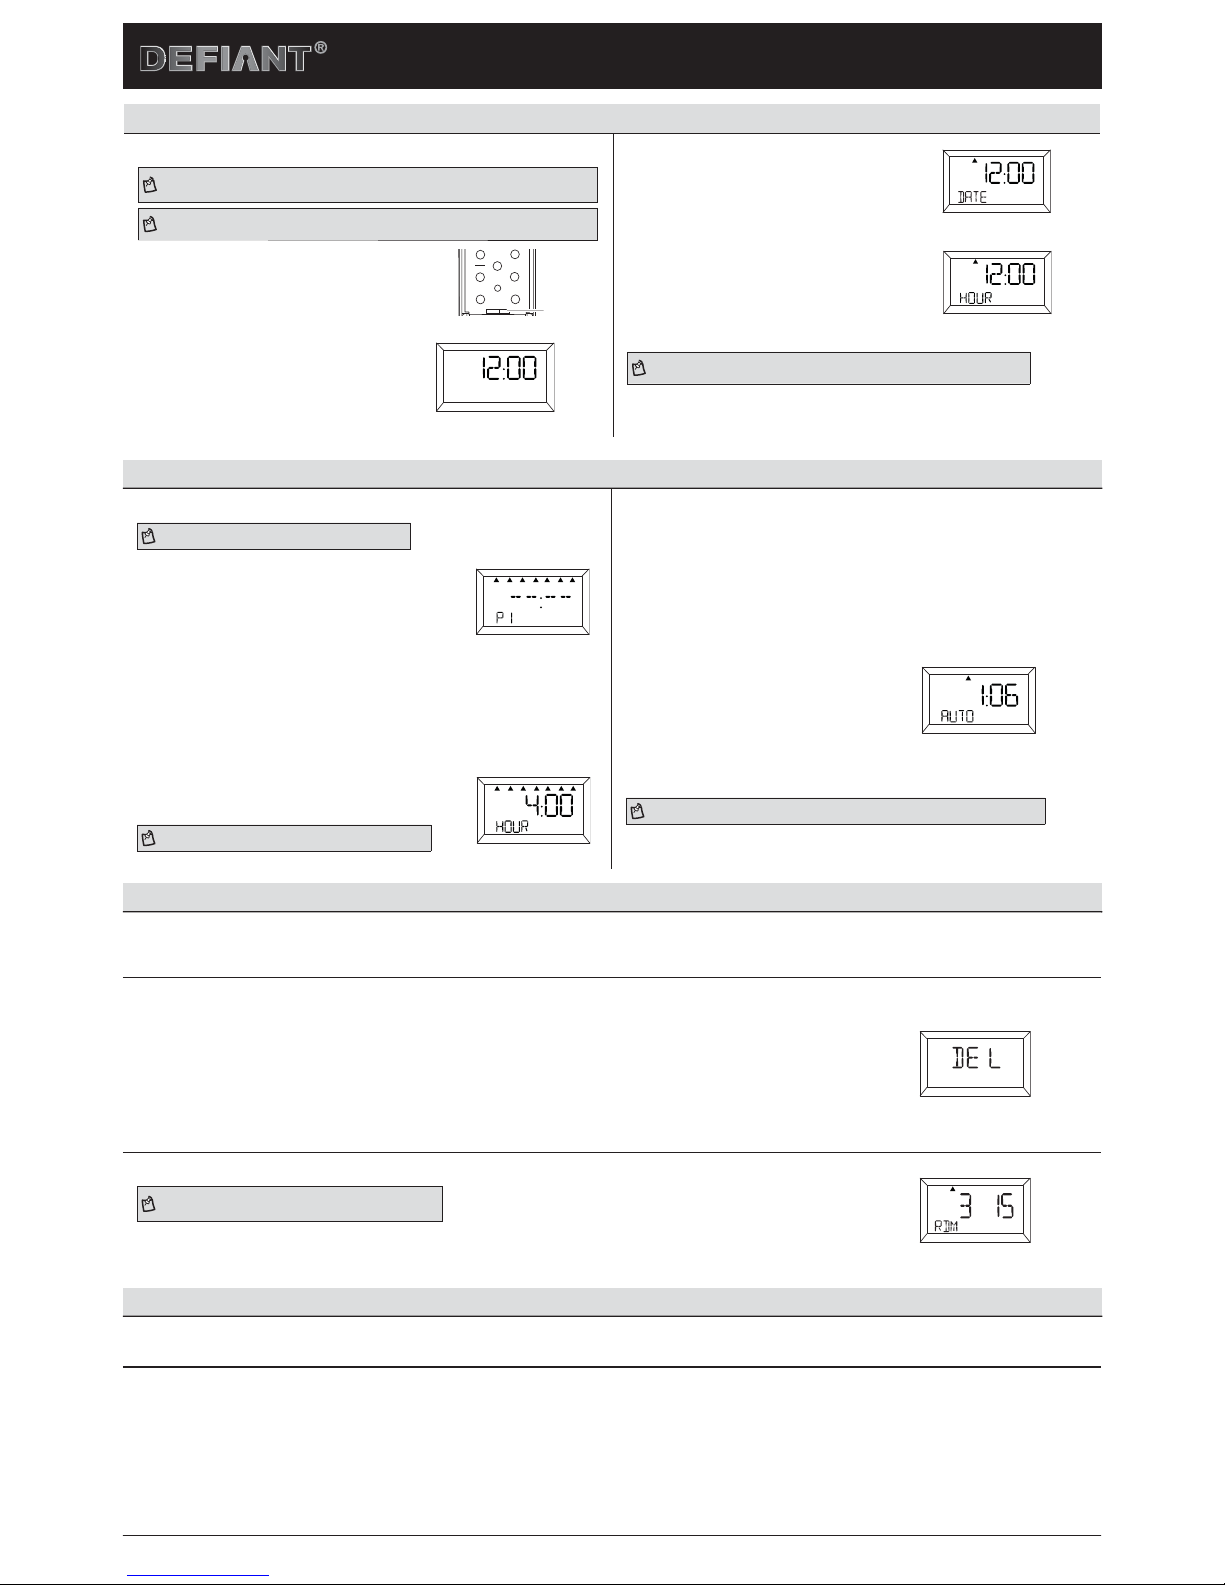
a. Press SETUP/PGM once, and DATE will appear
on the display. See Figure 4.
b. Press + or – to move the arrow under the
current day of the week (S, M, T, W, T, F, S). Press
ENTER to con rm, and the hour will appear on
the display. See Figure 5.
c. Press + or – to scroll through the hours. Press
ENTER when the correct hour is found, and the
minute will appear on the display.
d. Press + or – to scroll through the minutes.
Press ENTER when the correct minute is found.
NOTE: Ensure the “AM/PM” is correct. This is located in the lower left portion of the display.
SSMTWT
F
AM
Figure 4
SSMTWT
F
AM
Figure 5
Programming
1
PROGRAMMING ON/OFF DAYS
NOTE: You cannot exit during a programming cycle.
a. Press SETUP/PGM twice, and “P1” will ash on the
display.
b. Press + or – to choose the desired program, or start at
“P1 ON”. See Figure 6.
c. Press ENTER to con rm which program (P1, P2, P3, or P4)
you are setting.
d. Press + or – to until the display shows “SET”. Press
ENTER to con rm.
e. Press + or – to choose the desired days you would like
the timer to activate:
□ All days of the week (S, M, T, W, T, F, S)
□ Weekends only (S, S)
□ Weekdays only (M, T, W, T, F)
□ Individual days (S, M, T, W, T, F, S)
□ Alternating days (T, T)
□ Alternating days (M, W, F)
f. Press ENTER to con rm the days of week setting, and the
hour will appear. See Figure 7.
When nished with programming, press SETUP/PGM. Close the
door, and the timer is ready for use.
NOTE: The display will show “AUTO” to alert you when a program
is running.
SSMTWT
F
Figure 6
ON
SSMTWT
F
AM
Figure 7
OFF
2
PROGRAMMING ON/OFF TIMES
a. Press + or – to choose the desired hour.
Press ENTER to con rm, and the minute
will appear.
b. Press + or – to choose the desired
minute. Press ENTER to con rm. The ON
times and days for the program are now
set.
c. Repeat the previous steps to set the OFF
times and days for the program.
d. Once the ON and OFF times and days
have been set for a program, the timer
will ask you to “SAVE”. Press ENTER to
save the program. The timer displays
AUTO, indicating the program is saved
and activated. See Figure 8.
e. When nished with programming, press
SETUP/PGM and close the door. The
timer is ready for use.
NOTE: The display will show “AUTO” to alert you when a program is running.
SSMTWT
F
AM
Figure 8
OFF
Additional Programming Options
1
REVIEWING PREVIOUSLY ENTERED PROGRAMS
a. Press SETUP/PGM twice and then press + or – to scroll through the programs.
b. Press AUTO when you are nished.
2
ADDING/REMOVING ON/OFF SETTINGS
If, at any time, you wish to remove any ON/OFF settings (programs), follow these procedures:
To remove an ON/OFF setting:
a. Press SETUP/PGM twice and then press + or – to scroll to the program you wish to delete.
b. Press ENTER and “SET” displays.
c. Press + or – until the display reads “DEL” and press ENTER. See Figure 9.
d. The program is now deleted and you may press + or - to select another program for deletion following steps a - c above. Press AUTO
when you have completed deleting all desired programs.
To add an additional ON/OFF setting (program), complete step 1 - PROGRAMMING ON/OFF TIMES in the Programming section.
SSMTWT
F
Figure 9
3
SETTING THE RANDOM SECURITY OPTION (RND)
NOTE: The random feature will turn lights on and off using the
programmed times + or – 30 minutes, and gives your house a more
lived in appearance.
a. To activate the random feature, press RANDOM. The screen will change from “AUTO” to “RDM,” indicating that random mode has been
activated. See Figure 10.
b. To deactivate the random feature, press AUTO, and the “AUTO” indicator will show on the display.
SSMTWT
F
Figure 10
PM
OFF
Additional Features
USING THE MANUAL OVERRIDE FEATURE (OPTIONAL)
To manually override the timer and turn the lights off and on at your convenience, press the timer door. Additionally, you can press AUTO to turn the programmed settings off and exclusively use the
timer door to turn lights off and on.
This device complies with part 15 of the FCC and Industry Canada license-exempt RSS standard(s). Operation is subject to the following two conditions: (1) this device may not cause harmful interference, and (2) this device must accept any
interference received, including interference that may cause undesired operation.
FCC NOTE
The manufacturer is not responsible for any radio or TV interference caused by unauthorized modi cations to this equipment. Such modi cations could void the user ’s authority to operate the equipment.
NOTE: This equipment has been tested and found to comply with the limits for a Class B digital device, pursuant to Part 15 of the FCC Rules. These limits are designed to provide reasonable protection against harmful interference in a residential
installation. This equipment generates, uses and can radiate radio frequency energy and, if not installed and used in accordance with the instructions may cause harmful interference to radio communications. However, there is no guarantee that
interference will not occur in a particular installation. If this equipment does cause harmful interference to radio or television reception, which can be determined by turning the equipment off and on, the user is encouraged to try to correct the
interference by one or more of the following measures:
□ Reorient or relocate the receiving antenna.
□ Increase the separation between the equipment and receiver.
□ Connect the equipment into an outlet on a circuit different from that to which the receiver is connected.
Consult the dealer or an experienced radio/TV technician for help
CAN ICES-3(B)/NMB-3(B)
 Loading...