


Ghost Gunner 2
Operator’s Manual
An open source project by Defense Distributed

1 - Safety .................................................................................................................................................1
2 - Overview ...........................................................................................................................................2
3 - Unboxing .......................................................................................................................................... 3
3.1 - Packing List 4
4 - Software ............................................................................................................................................5
4.1.1 - Installing DDcut 5
4.1.2 - Using DDcut 5
4.1.3 - Inspecting .dd Files for Malicious Content 6
4.2 - Grbl 7
4.3 - Creating .dd Files 7
4.3.1 - Creating YAML Files 7
4.3.2 - Creating G-code 9
4.3.3 - Creating 3D Printable Jigs 9
4.1 - DDcut 5
5 - Hardware .........................................................................................................................................10
5.1 - Referencing the Machine 10
5.2 - Understanding the Work Coordinate System 10
5.3 - Spindle Operation 11
5.3.1 - Spindle g-code 12
5.4 - Installing a Work Piece 12
5.5 - Installing/Changing Tools 13
5.6 - Using the Probe 14
5.7 - Electrical Overview 15
6 - Maintenance ....................................................................................................................................17
6.1 - Removing Chip Accumulation: 17
6.2 - Protection from Rust 17
6.3 - Leveling X Axis 18
6.3.1 - Unbinding X Axis 18
6.4 - Resolving a Tripped Limit Switch 19
7 - FAQ ..................................................................................................................................................20
8 - RMA Policy .....................................................................................................................................22
9 - Specications ...................................................................................................................................23
Appendix A: Supported G-Code Commands ........................................................................................24
Appendix B: YAML Formatting ...........................................................................................................26
Appendix C: Individual Axis Labels .....................................................................................................27
Rev: A0609

1 - Safety
Ignorance is dangerous. Read and understand this manual prior to using Ghost Gunner.
The following precautionary statements are used throughout this manual:
Danger: Indicates a hazardous situation that will result in death or serious injury.
Warning: Indicates a hazardous situation that could result in death or serious injury.
Caution: Indicates a hazardous situation that could result in minor or moderate injury.
Notice: Indicates information considered important but not hazard related.
Warning: Crush hazard. Ghost Gunner’s gantry and table move with sufcient force to cut metal, and can
crush, pinch and tear body parts. Do not reach into Ghost Gunner except as indicated, AND only when
the machine is at a complete stop.
Warning: Extremely sharp rotating cutter inside. Secure spindle with wrench prior to servicing cutting
tool, following the procedure outlined in this manual.
Caution: Ghost Gunner is computer controlled and can start automatically whenever the USB cable is
powered. Keep hands away from all pinch points and cutting surfaces at all times, except as outlined in
this manual.
Caution: Never use a dropped, visibly damaged, dull, or suspect cutting tool, as it could shatter. End
mills are extremely brittle and should be discarded if dropped, as micro fractures could cause a latent
failure while the tool is in motion. Damaged tools can shatter into projectiles without warning.
Caution: The magnetic front entry guard is only intended to contain aluminum chips, and is not designed
to contain an improperly secured work piece or shattered end mill.
Caution: Always wear eye and ear protection when operating Ghost Gunner. Do not wear rings, watches,
necklaces, loose clothing, or long hair down while operating Ghost Gunner. Wear gloves when handling
parts and cleaning aluminum chips, but not while operating the machine.
Caution: Ghost Gunner does not have a dedicated hardware emergency stop button. Unplugging either
the USB or power cable will immediately stop Ghost Gunner. The software emergency stop button will
only work if Ghost Gunner has a valid USB connection to the host and the host processes the emergency
stop command. Due to the indeterminacy of modern operating systems, the software emergency stop
button is not guaranteed to stop Ghost Gunner in a reasonable time period, or at all if Ghost Gunner isn’t
enumerated as a USB device and communicating with the host software.
Caution: Ghost Gunner’s spindle and stepper motors generate considerable heat during operation and
remain hot for several minutes after unplugging. Prolonged contact with these components could result
in minor burn injuries.
Notice: Ghost Gunner is not a consumer device. It is the user’s responsibility to operate Ghost Gunner
per OSHA 1910.212 - Milling Machine, ANSI B11.8-1983, and OSHA 3067, as amended.
1

2 - Overview
Ghost Gunner is an open source CNC machine designed to machine aluminum objects. Where 3D printers
additively manufacture objects by depositing material in layers, Ghost Gunner subtractively manufactures objects
by cutting away material. Subtractive manufacturing is difcult because the machine must accurately determine
where a part is - without crashing into it - and remain rigid enough to physically cut away material with specic
geometry and tools.
The following table highlights difculties inherent to subtractive manufacturing:
Additive Manufacturing
Difculty
Part Mounting Not required Vice, expensive jigs
Initial Geometry Not required Required to prevent crashing Programmed into .dd le
Part Probing Not required Separate probe
Machine Rigidity Not required Heavy frame Unibody exoskeleton
Cutting Tools Not required Various collet systems
Tool Path Creation Simple, Automated Extensive cutting knowledge
File Distribution Universal ‘.stl’ format Job/setup-specic ‘g-code’ Distributable ‘.dd’ le
(3D Printing)
Subtractive Manufacturing
(Traditional)
Subtractive Manufacturing
(Ghost Gunner w/ .dd le)
3D printable jigs
Contained within .dd le
Cutting tool used as probe
Programmed into .dd le
ER-11 collet system
Step-by-step setup
Extensive cutting knowledge
Programmed into .dd le
Ghost Gunner grew from the hope that experienced machinists might create and share ‘.dd’ les with a wider
layman community, which could replicate distributed .dd parts with minimal prior knowledge. This ecosystem
mirrors 3D printing’s ‘.stl’ le format: some community members possess the knowledge to create .stl les, yet
any community member with a 3D printer can create objects.
Why did we bother with difcult, subtractive CNC manufacturing? 3D printing is great for prototyping, but Ghost
Gunner creates objects equivalent to those traditionally available only through regulated commerce. Ghost
Gunner fullls the promise 3D printing dreams of tomorrow, today: easily building useful products in the privacy
of your own home, free from government intervention. Defense Distributed (DD) envisions a vibrant artisan
manufacturing community fueled by experienced members’ .dd creations.
Ghost Gunner’s design goal is to enable individuals to manufacture aluminum rearm receivers, with initial
support for the venerable AR-15 lower receiver. 3D printable jigs allow Ghost Gunner to mill nearly any aluminum
shape that can t within the machine’s build envelope. We leave the machine’s wider manufacturing direction to its
community.
Ghost Gunner strikes a balance between affordability, rigidity and usability, and is cheaper than most DIY CNC
kits. We believe Ghost Gunner is the most capable machine in its class, particularly since it includes many high
end features, including limit switches, electronic probing, and a custom-designed PWM-controlled BLDC spindle.
While Ghost Gunner is capable of manufacturing small run aluminum parts, please remember that Ghost Gunner
is not a high-end CNC mill.
We spent countless hours developing the Ghost Gunner concept. We want you to succeed in yours, so please don’t
hesitate to contact us with any questions, complaints of freedback at support@ghostgunner.net. Thank you for
supporting our experimental work, and helping to protect and advance the Second Amendment!
-Defense Distributed, February 2017
2

3 - Unboxing
Remove Ghost Gunner and all accessories from the shipping container. Keep the box for future transportation
needs; protecting a 50 pound steel box is difcult without specic packaging.
Notice: Do not lift Ghost
Gunner by the external
stepper motors. Applying
excessive force to the
stepper motors could
damage Ghost Gunner’s
linear accuracy and/or
electrical wiring. Lift
Ghost Gunner only via the
reinforced 1/4” side plates
or the machine bottom.
Place Ghost Gunner on a smooth surface in a shop environment conducive to stray aluminum chips. Ghost Gunner
must operate in the upright position to prevent chip ingress to sensitive linear components.
Connect Ghost Gunner to a grounded power outlet, then plug Ghost Gunner into a computer with the included
USB cable. Place the host computer some feet from Ghost Gunner to prevent stray chip entry.
Warning: To ensure continued safe operation, Ghost Gunner must connect to earth ground via a three-pronged
IEC power cord connected to a properly grounded outlet. Defeating the ground protection prong on the included
power cable poses an electrocution hazard. In the unlikely event that aluminum chips bridge the input line to the
chassis, a properly grounded Ghost Gunner will prevent the outer metal
enclosure from energizing by tripping an upstream Ground Fault Circuit Interrupt (GFCI), circuit
breaker, or fuse.
Notice: Ghost Gunner produces audible noises when powered and connected to a USB host. This is
normal behavior. See FAQ: “Why does Ghost Gunner make noise when the USB cable is plugged in?”
Notice: You may connect the power and USB cables in any order.
3

3.1 - Packing List
Part Quantity Reference
Ghost Gunner CNC 1
6’ three prong power cable 2
6’ USB A-B cable
DD USB drive
17mm wrench 1
12mm wrench 1
3mm ball-end allen wrench
5/16" hex allen wrench
ER11 collet nut
1
1
1
1
1
1
1 9
1 10
1 11
1 12
3 14
1
1
3
4
5
6
7
8
9
5
6
4
3
7
9
8
DD recommends the purchase of our jigs, lowers, frames, and tooling for an optimal experience: https://ghostgunner.net/
e following additional items are required to manufacture an 80% lower receiver:
Part Quantity
Mil-spec AR-15 lower receiver jig (four pieces) 1
1
*Receivers with non-mil-spec trigger guards - that are otherwise mil-spec - work if they don’t contact the T-slot.
4

4 - Software
Ghost Gunner’s embedded 328p microcontroller requires the open source Arduino driver for proper enumeration.
The simplest method to install the required driver is to run the “install.bat” le included with Ghost Gunner. An
alternate method to obtain the driver is to download and install Arduino IDE 1.0.5 or later: http://www.arduino.cc/en/
Main/Software
Once the driver is installed, Ghost Gunner is supported in three software environments:
Software
DDcut
Grbl
Operating
System
MacOS/
Windows
XP/7/8*
MacOS/
Linux/
Windows
Ease-of-Use Description
Automated ‘.dd’ les guide the user through the manufacturing process,
Simple
Advanced
including step-by-step instructions with illustrations to setup the part and
tools in the machine.
Manual ‘g-code’ les are created by experienced users, using concepts not
completely described herein. Finished code is packaged into .dd les for
distribution to other users, for use with DDcut.
*Linux support is in development, but not released as of 6/1/2016.
4.1 - DDcut
DDcut replaces arduous CNC concepts with step-by-step setup instructions and automated milling code. DDcut’s
simple software interface is solely designed to interpret ‘.dd’ les, allowing users to create predened objects
without part-specic manufacturing knowledge. DDcut doesn’t generate .dd les. See “4.3 - Creating .dd Files”for
le format requirements.
To simplify part replication, DDcut intentionally lacks many features:
Lacking Feature Rationale
No g-code command entry line Automated .dd les don’t require manual code entry
No manual jog/spindle control Automated .dd les don’t require manual code entry
No machine coordinate visibility Users don’t need to understand concept
No tool path visualizer Users don’t need to understand concept
4.1.1 - Installing DDcut
DDcut runs as a standalone Windows executable. No installation is required.
4.1.2 - Using DDcut
1. Launch DDcut.exe from the included USB ash drive and select a .dd le to manufacture. DD’s AR15.dd le
enables Ghost Gunner to manufacture mil-spec 80% AR-15 lower receivers. The AR15.dd le ships with Ghost
Gunner, and may soon be available - along with other .dd les - at ghostgunner.net.
Notice: DD recommends only running .dd les from trusted, veried sources. See “4.1.3 - Inspecting .dd
Files for Malicious Content” for more information.
2. If the selected .dd le contains 3D-printable jigs, DDcut prompts whether to export .stl les for printing. Ghost
Gunner ships with jigs for mil-spec AR-15 lower receivers; printing additional jigs isn’t required. See “4.3.4 Creating 3D Printable Jigs” for more information.
3. Follow onscreen instructions as required to manufacture the specied .dd part. DDcut automatically performs
probing and cutting operations as dened by the .dd le.
5

4.1.3 - Inspecting .dd Files for Malicious Content
Similar to software viruses, unknown .dd les can recongure Ghost Gunner to destroy itself. Such is the nature
of open source hardware/software. Before running .dd les on Ghost Gunner, DD recommends simulating the
g-code contained within suspect .dd les (e.g. with OpenSCAM, G-code Optimizer, etc). See “4.3 - Creating .dd
Files” for specics on obtaining g-code from within a .dd le.
Watch out for ‘$’ commands that reprogram Ghost Gunner’s behavior, including the following:
Command Example Behavior
$X $X
Allows gantry movement without homing, potentially crashing machine
$Nx=command $N0=$X
$n=x $23=0
Congures a command that runs each time Ghost Gunner connects to the host.
Modies Grbl conguration settings, changing machine behavior
The following commands are considered safe
Command Example Behavior
$H $H
$$ $$
$# $#
$G $G
$I $I
$Nn $N1
$C $C
? ?
homes the machine along Z, then XY axes
Displays Grbl settings
Displays probe, work coordinates and offsets
Displays parser state
Displays build info
Displays stored g-code that runs at startup (should return empty)
Modal g-code status
Displays current status
See “Appendix A: Supported G-Code Commands” for a complete programming reference!
Notice: To restore Ghost Gunner’s default settings, launch DDcut and run ‘DefaultGGSettings.dd’.
Hash functions ensure a le isn’t modied in transit, assuming the hash publisher is trusted. DD maintains a .dd
le hash list at https://ghostgunner.net/hash
Users wanting only to manufacture shipped .dd files can stop reading the manual here.
End of Manual Quick Start
6

4.2 - Grbl
Machinists and designers rejoice: Ghost Gunner uses the (excellent) open source Grbl motion controller, and
is 100% hardware and software compatible with that ecosystem’s many product offerings. Grbl allows Ghost
Gunner to operate as a standard CNC machine, accepting g-code from most CAM post-processors. Rather than
introducing another generic CNC controller, DD recommends using GrblController or GrblPanel to send gcode to
Ghost Gunner.
‘Grbl’ is often confused with, but isn’t:
-GrblController/GrblPanel: GUIs that send g-code to Grbl.
-grblshield (aka ‘gshield’): a hardware board that moves stepper motors.
-GrBLDC: a hardware board that controls brushless DC motors.
Grbl users must thoroughly understand the operating principals outlined in this manual. Ghost Gunner has no
brain and is entirely capable of destroying itself when programmed incorrectly. Numerous safeguards exist to
prevent damage, but in the spirit of open source development, those features can be easily modied or disabled.
Ghost Gunner will happily plunge a stationary end mill into a work piece at 30 ipm.
4.3 - Creating .dd Files
The .dd le format simplies part sharing amongst users. A .dd le is simply a .zip archive with the le extension
changed (for user clarity). A special “manifest.yml” le denes how the le contents are displayed to the user via
a series of step-by-step instructions (see “4.3.1 - Creating YAML Files”). A properly designed .dd le houses all
manufacturing les and user instructions required to make the contained part:
Housed File Type Purpose Required Format
Pictures
G-code
3D Printable Jigs
Part Model
Guide Files
Manifest
Display visual setup .BMP, .JPG
Automate machine cutting code Any ASCII text (extension irrelevant)
Create jigs, if needed .STL is most common (extension irrelevant)
Allow user to modify part/CAM g-code Any model le (extension irrelevant)
Supplemental instructions to user,
typically PDF.
Denes le presentation order to user. manifest.yml (lower case)*
Any le (extension irrelevant)
*File names are case sensitive inside .zip archives.
Once all les are created (as described in detail below), compress all items into a .zip container, change the le
extension from ‘.zip’ to ‘.dd’, and verify the le works as desired in DDcut.
4.3.1 - Creating YAML Files
A root-level “manifest.yml” le denes how DDcut presents each le to the user. The yaml le is editable in a
standard text editor, allowing experienced machinists to create .dd les without also requiring a programming
background. DD recommends Notepad++ for formatting assistance.
Folders within the .dd le are accessed with forward slashes: MyCodeFolder/MyAwesomeFile.txt
Folder and le names within .dd containers are cAsE SeNsItIvE.
Debug tip: Comment out ‘step_gcode’ commands from manifest.yml to verify the text and images display as
intended without actually milling the part.
7

The manifest.yml le contains the following building blocks:
Syntax* Description Example (user text)**
“- job_name: “
“job_text: “
“model_les: “
“guide_les: “
“job_steps: “
A ‘job’ contains all information required to
create a part. Most .dd les make a single
part, and thus contain a single ‘job’
Additional text shown when user selects a job
(optional) One or more les used to:
-create a 3D printed jig, and/or
-model the part
If called, the user can optionally save all les
to a user-specied directory, then 3D print
and/or modify
(optional) One or more les used to provide
supplemental information. If called, the user
can optionally save all les to a user-specied
directory, then access directly
A single list of step-by-step instructions
presented to the user to manufacture a part
- job_name: Mill AR15
#At least one job step
- job_name: Mill M16
#At least one job step
job_text: Manufacture AR15
model_les:
- stl/left_jig.stl
- stl/right_jig.stl
- stl/part.ipt
guide_les:
- PDF/lower_build.pdf
job_steps:
- step_name: Verify Empty
step_text: Is GG Empty?
step_image: IMAGE/1-Empty.
bmp step_gcode: Code/01_
Home.txt
- step_name: Home step_
text: Install nuts.
“step_name: “
“step_text: “
“step_image: “
“step_gcode: “
“timeout: “
“reset: “
“pause: “
Title text summarizing step action
Bulk text shown to the user during the step.
(ASCII text)
(optional) Path to image le displayed to user
during the step. (.BMP or .JPG)
(optional) Path to g-code le that executes
AFTER the user sees ‘step_image’/’step_text’,
then presses next
(optional, step must also contain ‘step_gcode’)
Seconds DDcut waits before returning an
error each time Ghost Gunner acknowledges a
command. Default is 40 seconds.
(optional, step must also contain ‘step_gcode’)
After the step completes, Ghost Gunner: False:
doesn’t reset (default)
True: resets, unreferencing the axes
(optional, step must also contain ‘step_gcode’)
When ‘step_gcode’ nishes executing:
False: DDcut automatically progresses to the
next step (default)
True: User must press next to progress to the
next step
- step_name: Verify Empty
step_text: Why was I
only created to destroy?
step_image: IMAGE/1A-Empty.bmp
step_gcode: Code/01_Home.txt
timeout: 80
reset: true
pause: true
*Note trailing spaces
**Examples assume the .dd le has root-level folders ‘stl’, ‘PDF’, ‘Code’, & ‘IMAGE’.
See “Appendix B: YAML Formatting” for complete formatting instructions
8

Example .dd File:
- job_name: Beer Bottle Opener
job_text: Manufacture an 80% Defense Distributed beer bottle opener.
job_steps:
- step_name: Verify Empty
step_text: Is GG Empty? Verify nothing is installed.
step_image: 01_Empty.jpg
step_gcode: 01_Home.nc
- step_name: Step2#This step doesn’t show a picture or execute code.
step_text: This step only displays this text (it’s so meta).
guide_les: #le save prompt at job beginning regardless of order
- exampleGuide1.pdf
model_les: #le save prompt at job beginning regardless of order
- exampleModel1.stl
4.3.2 - Creating G-code
Appendix A lists all g-code commands supported by Ghost Gunner.
Some CAM programs generate g-code that moves the cutting tool row-by-row across the part, raising and
lowering the Z axis as needed, but otherwise paying no heed to actual part geometry. These programs are suitable for
cutting wood and plastic, but do not fare well when cutting metal. DD recommends generating g-code only with CAM
programs that cut along part geometry with uniform radial engagement.
The following recommended starting parameters cut 7075-T6 aluminum:
Rough Slot Plunge Drill Finish Pocket
Revolutions per Minute 10,000 10,000 6,500 10,000 10,000
Method
Feed rate (mm/min), or
Ramp angle (°)
Depth of Cut (mm) 3.175 - 2.5 3.0 3.8
Step over (mm) 0.375 - - 0.200 0.300
Trochoidal
Climb
Helical
Climb
750 75 2.5 380 380
Peck Conventional
Trochoidal
Climb
25.4 mm equals 1 inch
4.3.3 - Creating 3D Printable Jigs
Distributing subtractively-manufactured designs is traditionally difcult due to the various xtures, clamping tools,
and/or vices required for each design and available to each user. 3D printing attempts to overcome these obstacles
by enabling each user to reliably reproduce the exact jigs used to secure a particular part, even if that part isn’t
rectangular. 3D printed jigs abstract alignment concepts from the user, enabling automated machine alignment to the
part.
3D printed jigs must hold the work piece rigid to prevent cutting vibration. Plastics are weak when tensioned,
torqued, or sheared, but remain rigid when compressed. Thus, jigs should attempt to contact as much surface area
as possible between the part and T-slot. Apply compression with bolts, but make sure neither the bolts nor the T- slot
contact the part if using the integral probe; see “5.6 - Using the Probe”.
9

5 - Hardware
Ghost Gunner is a three-axis desktop subtractive manufacturing machine primarily designed to cut aluminum and
other soft, non-ferrous metals. The machine can also cut plastic, wood, and other soft materials. Ghost Gunner is
not designed to cut steel, titanium, or other hard metals. Skilled machinists attempting to cut hard metals must use
small cutters to prevent overloading Ghost Gunner’s limited power, torque and rigidity limits. Ghost Gunner lacks a
lubrication system, which is required when cutting most hard metals.
Ghost Gunner’s unibody steel exoskeleton increases rigidity per unit weight, but Ghost Gunner is certainly less
rigid than an 800 pound industrial machine. Understanding that Ghost Gunner - like all CNC machines - will ex
proportional to an applied load is paramount to understanding its ultimate cutting abilities. While an 8000 pound
machine might 3” inch face aluminum at 0.150” DOC, Ghost Gunner would require several passes with a much smaller
cutter and less DOC to achieve the same task. As a hobbyist CNC machine, Ghost Gunner’s part throughput is less
critical than cost.
5.1 - Referencing the Machine
Ghost Gunner prohibits motion until the machine is referenced (a.k.a ‘homed’) to a limit switch on each axis. Software
limits are then used to prevent out-of-bounds motion that could damage the machine. Tools 3” or less can remain
installed while referencing. Remove tools over 3” before homing, as they won’t clear the T-slot plate. Parts can remain
installed while referencing as long as they don’t interfere with the fully retracted tool.
‘$H’ initiates the referencing routine, which rst retracts Z, then simultaneously moves the T-slot plate up and the
spindle right. Each axis is them pulled 1 mm from its limit switch. Grbl operates all three axes in negative space (i.e.
quadrant III operation). Once referenced, the software origin (0,0,0) is at the machine’s bottom (X+), right (Y
+), and rear (Z+). However, since the limit switches are located at X-/Y+/Z+, the machine position immediately after
homing is (-74,-1, -1).
5.2 - Understanding the Work Coordinate System
Ghost Gunner is designed to cut holes much deeper than most hobbyist CNC machines. Ghost Gunner uses a horizontal
spindle to prevent chip accumulation in deep pockets. The horizontal spindle also increases 3D printed jig rigidity. All
three axes operate in negative coordinate space and follow standard right hand rule nomenclature:
Absolute Range
(mm)
Axis
Z
-60.5 <= Z <= 0 -60.5 <= Z <= -0.2 Z = 0 ...tool away ...tool away
Y
-140 <= Y <= 0 -140 <= Y <= -0.2 Y = 0 ...tool right ...tool right
X
-75 <= X <= 0 -74.8 <= X <= 0 X = -75 ...T-slot down ...tool up
*Maintain a gap to prevent accidental limit switch tripping.
The gure at right shows physical axes movement. The Y & Z axes
physically move in the same direction as seen by the part. However, the
X axis physically moves in the opposite direction than is seen by the part.
The direction shown in the gure at right is the physical direction the T-slot
will move.
Appendix C contains larger labels that attach to the machine.
Recommended
Range* (mm)
Limit Switch
Location (mm)
Positive command
physically moves...
Positive command (as
seen by part) moves...
10

5.3 - Spindle Operation
Ghost Gunner’s custom-designed spindle operates between 4,000 and 10,000 rpm via a closed-loop current- limited
PWM signal. Spindle speed is constant unless the cutting bit is loaded beyond Ghost Gunner’s torque and/ or power
capabilities. Typical mechanical cutting power and torque curves are shown below:
Observation Rationale
Ghost Gunner has considerably less power and
torque than professional CNC machines
Ghost Gunner’s optimal speed is 7,000-9,000 rpm Maximum power delivered at 9,000 rpm
Cutting below 4,000 rpm isn’t recommended Cutting torque decreases below 4,000 rpm
Ghost Gunner rapidly loses cutting power and torque
above 9,000 rpm
Set spindle speed to 10,000 rpm to mill aluminum,
but assume speed is 9,000 rpm for speed calculations
Spindle won’t rotate below 2,800 rpm Motor doesn’t turn
Professional machines deliver kW+ cutting
power and foot-pound+ cutting torque
Back-EMF = Vin at 10,400 rpm, at which
point no additional energy enters the system.
Cutting torque rapidly drops above 9,300 rpm
The spindle requires a ve minute warmup period at full speed to warm the bearings prior to cutting. Attempting
to mill before the spindle is warm could trip Ghost Gunner’s overcurrent circuitry, as the spindle itself consumes
signicant power until reaching operating temperature. The following example code properly warms the spindle:
M3 S5000 (start motor)
G4 P1 (pause 1 second for speed)
S10000 (set motor full speed)
G4 P300 (wait 5 minutes. Note timeout period requirements)
Caution: The spindle operates at elevated temperatures and remains hot long after operation ceases. Do
not directly touch the spindle subassembly for at least 15 minutes following any cutting operation.
11
5.3.1 - Spindle g-code
Ghost Gunner supports the following spindle g-code commands:
Command Example Behavior
M3 M3
M4 M4
M5 M5
Sn S10000
Full scale spindle speed/direction changes can trip Ghost Gunner’s overcurrent protection circuitry. For example,
an instantaneous request to stop a spindle operating at 10,000 rpm requires the controller to short all three phases out,
generating a massive overcurrent condition. Ghost Gunner will lose reference if the X/Y/Z axes are moving when an
overcurrent condition occurs. The following example code limits current when stopping the spindle:
M3 (Turn spindle CW. Spindle won’t spin until ‘S’ is set)
S5000 (Run spindle at half speed)
G4 P1 (Pause for one second to allow spindle to speed up)
S10000 (Run spindle at full speed)
G4 P2 (Wait for spindle to reach full speed before cutting)
S5000 (Slow down spindle)
G4 P1 (Pause for one second to allow spindle to slow down)
S0 (Set spindle to 0 rpm)
M5 (Stop spindle)
Rotate spindle clockwise
Rotate spindle counterclockwise
Stop spindle
Run spindle at speed 0 <= n <= 10000
(Cutting code)
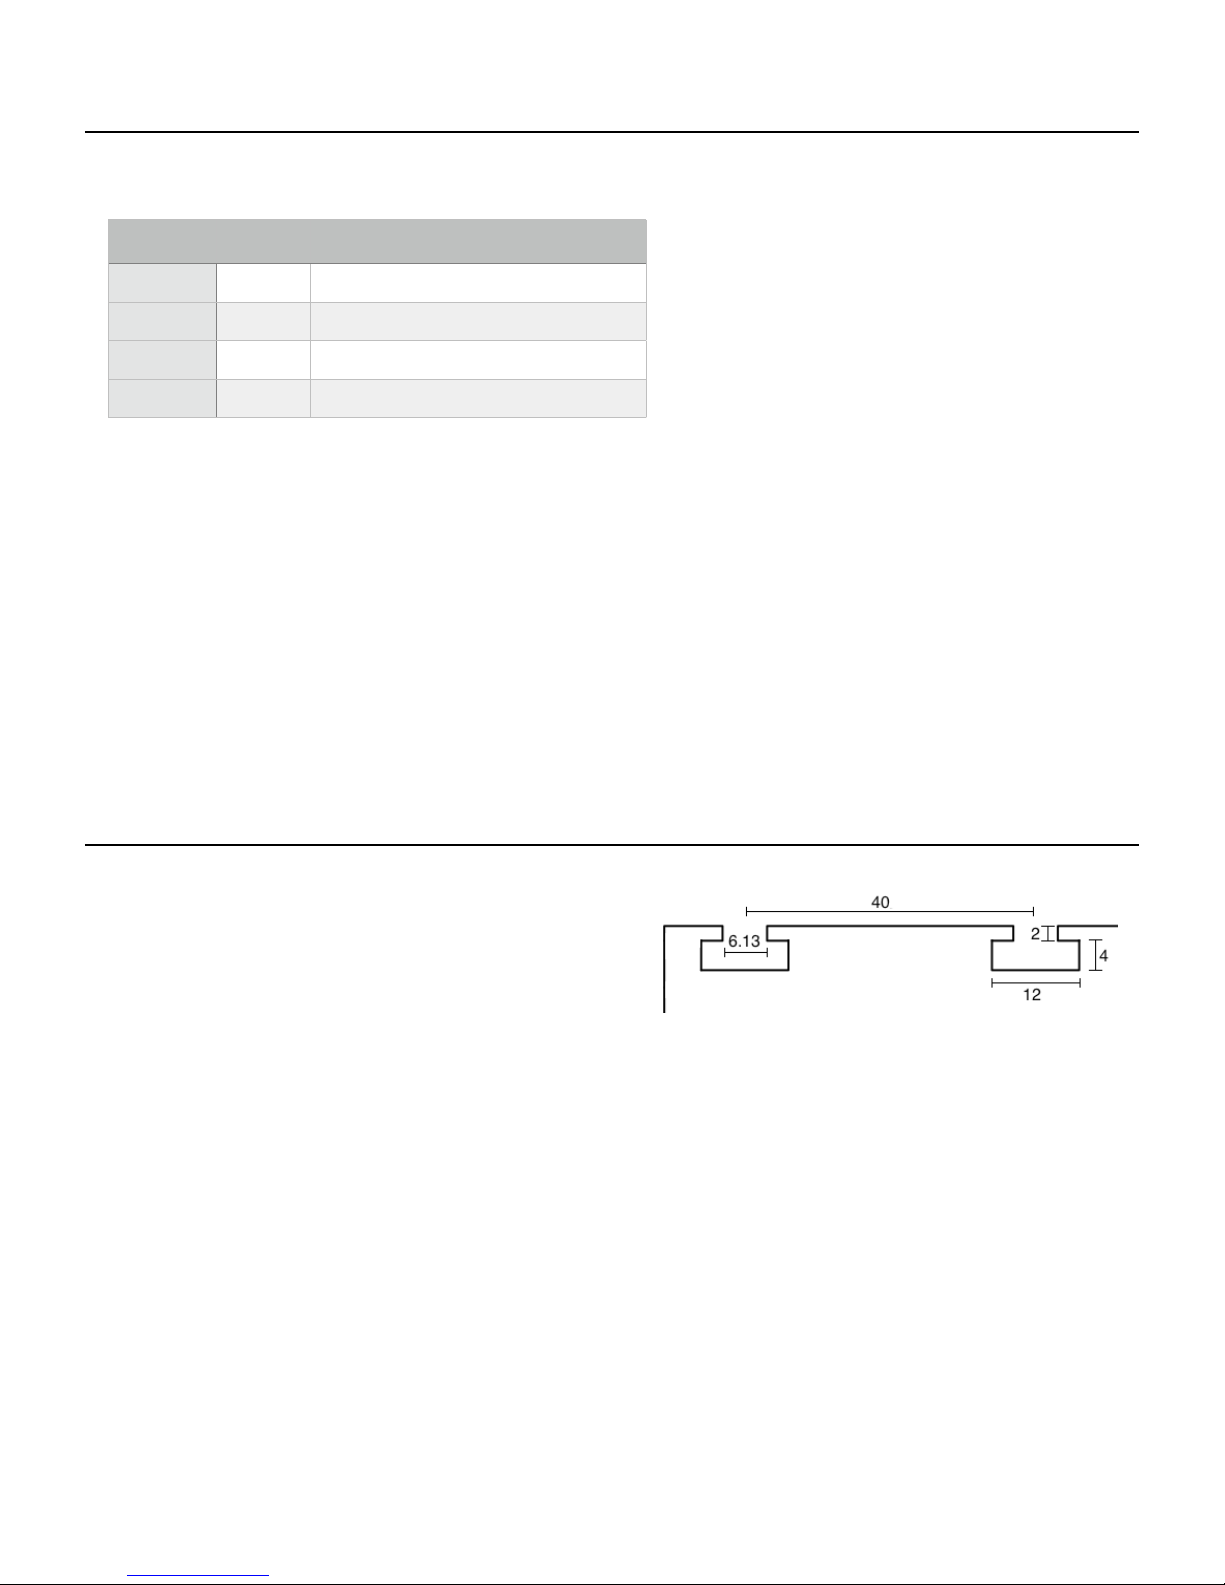
5.4 - Installing a Work Piece
Ghost Gunner’s mounting plate consists of two T-slot rails
spaced 40mm apart. The T slot rail dimensions are compatible
with industry standard 20mm T-nuts. DD recommends at
least three mounting points when possible to reduce chatter.
Two mounting points are acceptable if the mounting jig has
sufcient width and an alignment groove, to prevent part
walking during milling.
Each T-slot rail has an opening on the left side to accept
T-nuts. Insert T-nuts bump-side down (shown at right).
Caution: Loose work pieces are projectiles when
struck by a high speed end mill. Ensure your
work piece is securely fastened prior to milling.
Notice: Loose work pieces dull end mills.
12

5.5 - Installing/Changing Tools
Ghost Gunner accepts industry standard ER11 collets.
Follow these instructions to change tools:
A). Remove the work piece, if required.
B). Center the Y axis and plunge the Z axis.
Example code:
G90 (absolute position)
G21 (mm units)
G53 G0 Z-1 (Retract Z)
G53 G0 X-1 (Move table down)
G53 G0 Y-70 (Center Y axis)
G53 G0 Z-60 (Plunge Z axis)
C). Place a 13 mm wrench onto the spindle’s spanner slot. Due to the spindle’s low torque, holding the wrench
in place prevents spinning if accidentally enabled.
Caution: If the spindle enables while the 13mm wrench is installed - but not retained in hand - then the
wrench could become a projectile.
D). Place a 17mm wrench onto the collet nut.
E). While holding the 13mm wrench stationary, force the 17mm wrench counterclockwise, thus loosening the
collet nut. Apply the force from one tool to the other, not directly into the spindle’s mechanical frame. The nut
will initially loosen, then tighten again. Keep turning the collet nut counterclockwise until it loosens again.
F). Remove the existing tool.
G). Remove the collet nut and verify the collet is clean. Aluminum chips inside the collet reduce gripping force
and increase runout.
H). If the replacement tool diameter differs from the existing tool, push the collet at an angle to remove it from
the nut, then press the new collet into the nut until it clicks.
I). Screw the collet nut a few turns onto the spindle, then insert the new tool into the collet. If the tool’s shank is
greater than 1”, slide the tool in as far as possible. Don’t fully insert a tool if the shank is less than 1”, as the
collet is only designed to crimp a solid cylindrical surface.
J). Tighten the collet by holding the 13mm wrench stationary while turning the 17mm wrench clockwise. Keep
tightening the nut until it is VERY tight. The ER11 collet is sufciently tight at 30 foot pounds of applied
torque, but unless you have a torque wrench, this number is useless; it is difcult to over tighten the collet nut.
Loose nuts allow the tool to walk while milling, which will ruin your work piece, your tool, and possibly your
machine.
K). Remove the 17mm wrench, then remove the 13mm wrench.
13

5.6 - Using the Probe
Ghost Gunner includes a built-in probe to zero the part to the machine. To use the probe, connect the red cable to the part,
then mount the part to the T-slot with an electrically isolated jig. The probe won’t work if the part electrically contacts the
T-slot plate, hence the use of 3D printable mounting jigs. Jigs included with Ghost Gunner properly isolate an AR lower
from Ghost Gunner; mounting bolts are isolated from the part and the part doesn’t electrically contact the T-slot.
The probe command returns X/Y/Z coordinates when the (grounded) tool contacts the (5 V) part. Ghost Gunner supports
G38.2 probing (probe toward workpiece, stop on contact, error if no contact). G38.3/4/5 isn’t supported.
Example probing code:
S3000 (spindle set to 3000 rpm)
M3 (turn spindle clockwise)
G91 (relative movement)
G21 (mm units)
G38.2 Y-10 F40 (probe Y axis up to -10 mm at 40 mm/min)
(Grbl returns X/Y/Z position)
G10 L20 P2 Y2.5 (zero Y axis to tool center, assuming 5 mm diameter)
The last line merits further explanation:
Command As used in example General Description General Syntax
G10 Set Work Coordinate System Set Work Coordinate System G10
P2 Use WCS G55* P1 through P6 correspond to WCS
G54 through G59, respectively
Y2.5 A 5mm tool contacts the part 2.5
mm from tool center (sign changes
depending on probe direction)
L20 Set current position of Y axis of
WCS G55 to 2.5 mm
One or more axes to set (X/Y/Z).
Only called axes are set
Set current position of specied axis
of specied WCS to specied value.
*Work coordinates are persistent until explicitly changed, even aer power-cycling.
e following table summarizes potential probing outcomes:
Probe cable status when
probe command issued
Connected to part and
isolated from T-slot
Disconnected from part
and oating.
Shorted to T-slot (due to
chips, mounting, etc)
Result Hardware Outcome Software Outcome
Probed correctly Tool contacts part and stops Correct zero
determined
Tool contact with part
undetected (probe
remains high)
Ground short
detected
Tool stalls or mills into part
until reaching user-specied
maximum probing distance
No movement occurs Error, probe is shorted
Error, probe didn’t
contact part.
Reset required
to ground.
Reset required
Pn
1<=n<=6
Xn and/or Yn and/or Zn
n is a positive or negative
number within machine limits
L20
V
part-to-T-slot
4.5 to 5.5 V
0 V
0 V
Connected to part and
isolated from T-slot, but
tool too far from part
Connected to part and
isolated from T-slot, but
spindle rpm too fast
Tool never contacts
part
Tool contact time to
part insufcient to
trip probe.
*Measuring the voltage between the part and T-slot can uncover setup issues.
Tool moves to user-specied
maximum probing distance
Tool cuts aluminum until
either tripping or reaching
user-specied maximum
probing distance
Error, probe didn’t
contact part.
Reset required
Incorrect zero
determined (if probe
trips), or error (if
probe never trips)
4.5 to 5.5 V
4.5 to 5.5 V
14

e spindle must rotate while probing. A stationary tool’s contact radius isn’t constant because stationary tools
aren’t cylindrical. However, the probe circuit won’t trip if the spindle rotates too fast, due to a 110 kHz low pass lter that
prevents false tripping. Most metal cutting tools probe best around 3000 rpm. ere’s typically no advantage to probing at
higher rpm, except that anodized (aluminum oxide) part surfaces aren’t conductive, and thus the probe must tear through
that thin layer to contact the conductive aluminum below (dull tools will take longer). DD recommends lightly sanding
away anodization at each contact surface prior to probing.
e spindle is turning too fast if the end mill eats into an aluminum part before the probe trips; a properly
congured probe is sensitive enough to only microscopically cut the part before tripping. In fact, when properly
congured, repeated probing in the same location doesn’t introduce appreciable zero dri. Use the equations below to
determine maximum probing rpm:
CalculationE quationE xample* at 10000 rpm Example* at 3000 rpm
Tool Contact
Percentage
Contact
Percentage
per Tooth
Single Tooth
Contact Time
Minimum
contact time
Single Tooth Contact Time > 50us?N oY es
met?
*Example uses the Destiny Viper 0.250” end mill (included with Ghost Gunner).
It goes without saying, but the probe does not work on nonconductive parts. Traditional X/Y/Z touch-off methods
are of course supported - paper snagging, roller gauges, etc - but they’re not automated. One possible nonmetallic
probing method is to connect the probe cable to adhesive aluminum tape mounted on three surfaces (X/Y/Z). We leave
these implementations to the traditional machinist, as Ghost Gunner’s primary focus is automated aluminum machining.
DD advises creators to distribute aluminum parts to casual users, as the probe functionality is a vital simplication tool
to inexperienced users.
5.7 - Electrical Overview
Ghost Gunner contains the following power rails:
Rail Source Subsystems powered
24 V Wall-powered AC->DC converter Stepper motors, BLDC spindle motor, cooling fan
5 V USB host Limit switches, 328p uC, all I/O logic, motion control signals, probe
Ghost Gunner immediately ceases all motion if either rail is unpowered (i.e. the USB and/or power cables are
disconnected). e machine loses zero if move commands are sent while the 24 V rail is unpowered; the
soware-calculated position will update, but the motors won’t actually move. e host doesn’t know whether the 24 V rail
is powered. Ghost Gunner’s hardware can detect whether 24 V is present (via 328p pin A4), but that feature isn’t presently
implemented in soware.
Notice: To prevent crashing due to lost steps, immediately unplug the USB cable if move commands are
issued while the 24 V rail is unpowered. Reference Ghost Gunner prior to resuming movement.
15

Ghost Gunner contains three current-limiting circuits:
System
Monitored
Spindle Limits RMS
Steppers Motors are current
24 V Rail Short circuit (di/dt)
Reasons
Monitored
current! Prevents
overheating
controlled devices
Overcurrent (Imax)
Method Result Reset Required if
Current Limit Hit?
Spindle PWM
reduced
Controlled
by precision
reference circuit
Rail temporarily
disabled
Spindle slows down
until within current
limit
Steppers pull
constant current
24 V rail hiccups*
No
No
Ye s
As a safety feature, the following events will temporarily disable the 24 V rail:
-Aluminum chips short the 24 V rail to ground (the entire 24 V system is guarded from chips)
-Spindle stalls due to incorrect programming or incorrectly installed work piece
-Spindle starts or stops too quickly (see “5.3.1 - Spindle g-code” for proper coding technique)
-The cutting tool is dull/broken.
Notice: If the spindle stalls for any reason during a cutting operation, immediately stop milling by
unplugging the USB cable and assume the machine is no longer referenced.
*When overcurrent events occur, the 24 V rail turns off due to overcurrent, remains off for several seconds,
then turns back on. The cycle repeats if the overcurrent condition persists. If the overcurrent event is due to
spindle inrush current, either set the spindle speed to 0 rpm (‘S0’), or unplug the USB cable.
During an overcurrent event:
-the fan stops spinning
-the spindle stops spinning (if spinning)
-stepper motors stop moving (if moving)
Ghost Gunner is controlled by three PCBs:
PCB Function Firmware More Information
328p Uno-R3
compatible
microcontroller,
running Grbl
gShield (GG1 only) -Drives X/Y/Z stepper motors n/a github.com/synthetos/grblShield/wiki
GrBLDC -Drives spindle BLDC motor
-Communicates with host
-Interprets g-code
-Plans stepper motion
-Responds to probe
-Responds to limit switches
-Sends stepper pulses to gShield
-Generates spindle PWM signal
-Filters probe noise
-Filters limit switch noise
-Isolates gShield noise from 328p
-Fan/probe/limit connections
Custom
Grbl 1.0c
fork
n/a defdist.org
github.com/grbl/grbl
16

6 - Maintenance
Like most industrial machinery, Ghost Gunner requires periodic maintenance. With proper care, Ghost Gunner
should remain operational for many years. Some maintenance requires axes realignment to ensure the machine is
square. Ghost Gunner might not operate correctly if the machine isn’t properly aligned.
6.1 - Removing Chip Accumulation:
Routine vacuuming is the most important preventative maintenance. If allowed to accumulate, chips can work
past guards and then contact the sensitive linear rails and ball screws, reducing bearing life. Chips rapidly
accumulate while cutting; aluminum chips occupy approximately 15 times more space than the uncut solid. !
To simplify cleanup, Ghost Gunner lacks a lower panel. After milling, temporarily move the machine to another
location, then vacuum up aluminum chips. Vacuum inside the machine via the front entry access. Once most
chips are removed, tilt Ghost Gunner left to gain additional vacuuming access. The goal is to vacuum away as
many chips as possible to prevent contamination into sensitive components.
Notice: Do not use compressed air to clean Ghost Gunner. Ghost Gunner’s sensitive components are
gravity-sealed from aluminum chips. Blowing air into Ghost Gunner will force chips past the sealed
areas into sensitive components, decreasing Ghost Gunner’s useful life. !
Notice: Inverting Ghost Gunner prior to cleaning could allow chips to bypass gravity seals and contact
sensitive components. Thoroughly vacuum Ghost Gunner prior to inverting, shipping, or servicing.
6.2 - Protection from Rust
Ghost Gunner incorporates aluminum, steel, and stainless steel parts:
Material Protection Method Example Parts
Aluminum Inherent, aluminum corrodes to
stronger aluminum oxide
Stainless steel Chromium passivation Spindle
Powder coated steel Coating prevents oxygen from
contacting steel
Chrome plated steel Chromium passivation Shafts, ball screws
Black oxide bolts Oil-impregnated conversion coating Bolts
Chromoly steel None Y ange bearing housings
A few steel parts are unprotected from oxidation and will develop cosmetic rust if stored in a humid environment.
Parts with surface rust treatments will also oxidize if said treatment is compromised. As with other industrial
machinery, periodically applying a thin layer of oil will prevent cosmetic surface rust. Operate Ghost Gunner in a
climate controlled environment and prevent sudden temperature changes to reduce water condensate exposure.
Shaft Supports NEMA
mounts T-slot
Bearings
Enclosure
Plates
Spindle outer tube
17

6.3 - Leveling X Axis
The X axis is driven by two stepper motors and can unlevel when the machine is crashed hard; one stepper loses
steps, but not the other. The following example routine veries the X axis is level:
Command Description
G90 G21 G55
G53 G0 Y-70 X0
G53 G0 Z-60
G53 Y-0.5
G91 G0 X-0.1
G10 L20 P2 X0
G91 G0 X+3
G53 G90 G0 Y-140
G91 G0 X-0.1
$#
X axis leveling is required if X exceeds ± 0.1 mm.
Absolute mm movement in WCS G55
Position X & Y for 1/4” end mill installation
Plunge Z, then install 1/4” end mill
Move Y axis to machine right
Place a sheet of paper between tool and T-slot
Move X stage towards tool (relative)
(Repeat command until paper snags)
Zero X
Move X away from table (to prevent crash if unleveled)
Move Y axis to machine left
Move X stage towards tool (relative)
(Repeat command until paper snags)
Display WCS.
Adjustment not required if -0.1 <= X <= 0.1 mm
If X>0.1 mm (e.g. X = 0.5 mm):
Unplug the power cable, then rotate the left ball screw until the tool barely snags the paper. The left ballscrew is
accessed by slightly tilting Ghost Gunner. Verify the X axis is level by rerunning the above routine.
If X<-0.1 mm (e.g. X = -0.5 mm):
Move the Y axis right (‘G53 G0 Y-0.5’), unplug the power cable, then rotate the right ball screw until the tool
barely snags the paper. The right ballscrew is accessed by slightly tilting Ghost Gunner. Verify the X axis is level by
rerunning the above routine.
Notice: The Y & Z axes only use one stepper motor; leveling isn’t required on these axes.
6.3.1 - Unbinding X Axis
The X axis can bind if enough steps are lost during a crash, or if the machine is dropped or bent. If the axis binds:
A). Unplug the power.
B). Turn the X ball screws until they rotate smoothly. Smooth rotation should occur when the T-slot is
perpendicular to the X shafts.
C). Perform the “Leveling X Axis” procedure
If binding persists, contact DD for further guidance, or to create an RMA.
18

6.4 - Resolving a Tripped Limit Switch
Ghost Gunner enters an alarm state when a limit switch trips, preventing all movement, including referencing.
Tripped limit switches typically indicate something catastrophic occurred.
This procedure isn’t required on machines running the latest Ghost Gunner rmware. The latest rmware automatically
clears limit switch issues. We recommend upgrading your rmware rather than performing the steps outlined below.
To manually resolve a tripped limit switch:
Command Description
Determine which limit switch is tripped.*
Ctrl-x
$X
$20=0
Ctrl-x
$X
G91
G21
G0 X+1
or G0 Y-1
or G0 Z-1
Ctrl-x
$20=1
Ctrl-x
$H
Soft reset Grbl (ASCII code 24), or unplug and reconnect USB
Unlock Ghost Gunner**
Disable Soft Limits***
Soft reset Grbl (ASCII code 24), or unplug and reconnect USB
Unlock Ghost Gunner
Relative Movement
mm (Units)
Move away from limit switch on tripped axis. Moving an axis
closer to a tripped limit switch will destroy it.
Soft reset Grbl (ASCII code 24)****
Enable Soft Limits
Soft reset Grbl (ASCII code 24), or unplug and reconnect USB
Home machine.
*An LED on each limit switch illuminates when tripped. Limit switches are located:
Limit Switch Mounting Location Switch Contacts LED Visible
X
Y
Z
Enclosure
(behind right X ballscrew)
Y plate
(bottom right)
Y plate (rear
center)
**Allows movement without referencing. The machine remains unlocked for the remainder of the session.
***Soft limits prevent positive absolute movement (outside quadrant III), even when the machine is unlocked.
****Another reset is required because limit switches activate both when pressed AND when their state changes.
X plate
(front right corner)
Enclosure
(right side)
Z ballscrew mount
(rear)
Between T-slot and right
inner chip cover
Between gantry and right
inner enclosure
Above spindle when viewed at a
low angle
19

7 - FAQ
Q: Why does Ghost Gunner make noise when the USB cable is plugged in?
The stepper motors that position the X/Y/Z axes use microstepping to increase positioning resolution.
Microstepping uses two high current PWM waveforms to place the motor between two discrete phases. PWM
waveforms are variable frequency square waves. Square waves are mathematically innite sinusoidal sums,
resulting in audible noise.
Q: Why won’t the X stage move?
See “6.3.1 - Unbinding X Axis”.
Q: Why does Ghost Gunner keep starting and stopping?
If the machine is running known-good g-code, verify the tool isn’t worn out. As the parts wear, more energy is
required to perform the same cutting task. See “5.7 - Electrical Overview” for more information on how a dull
tool can trip the overcurrent safety feature. With proper care, the consumable end mill and drill that ship with
Ghost Gunner should manufacture numerous parts, but will eventually require replacement.
Q: Why did Ghost Gunner crash into the part while probing?
See “5.6 - Using the Probe” to verify the probe is properly connected.
Q: Why won’t Ghost Gunner respond to motion commands?
Make sure the power cable is plugged in and the fan is spinning. If Ghost Gunner still doesn’t move, see “6.4 Resolving a Tripped Limit Switch”.
Q: Why won’t Ghost Gunner work?
In the spirit of open source, DD encourages users to diagnose, troubleshoot and improve the machine as a
community. To obtain service, contact DD as described in our “RMA Policy” or email us at support@ghostgunner.net.
Q: Why does spindle motor pitch change during warmup?
Bearings are conceptually simple, but are actually quite complicated. Ghost Gunner’s spindle uses heavily
preloaded, press-t angular contact bearings to reduce runout. When the spindle is cold, non-uniform grease
viscosity and metal constriction intermittently combine to require more power than Ghost Gunner’s current-limited
PWM feedback loop is programmed to deliver. As the bearings heat, the metal expands and grease
viscosity decreases, thus decreasing power lost as friction. Human ears are incredibly sensitive to pitch changes,
but assuming the spindle is used within specication, the actual RPM value changes very little (less than 5%).
Q: How is spindle power measured?
Most manufacturers list their machine’s peak power consumption, which occurs only when power is rst applied
to a stationary motor. This gure is typically MUCH higher than the motor’s actual rated continuous power
consumption. For example, a certain ‘300 W’ spindle used in other machines overheats in under 15 minutes if
continuously loaded to 75 W using a dynamometer. Ghost Gunner’s specied power is the continuous cutting
energy transferable to the work piece, as measured by a dynamometer.
Q: Why are there two X stepper motors?
Ghost Gunner’s horizontal spindle conguration doesn’t allow a single, central linear X drive; the screw would
punch through the build platform. Placing a single drive screw at one edge reduces the other edge’s rigidity.
Thus, two ball screws are required (one at each edge).
Q: Why are there two stepper motors sticking outside the machine?
Ghost Gunner’s mechanical rigidity is derived from its compact, single-piece enclosure. Increasing the enclosure
dimensions (to encompass the Y & Z stepper motors) exponentially decreases overall rigidity. Note these motors
aren’t handles and are easily damaged. Also note the pinch points on either side of the Y (rear) stepper.
20

Q: Are non-conductive jigs required to mill parts?
To use the probe, the mounting method must not allow the part to conduct to the aluminum T-slot. 3D printed jigs are
easy to design and can secure nearly any part geometry, allowing probe use and distribution within .dd les.
Q: Why are all specications metric? This is America!
The metric system is nearly universally adopted because it’s better, namely when converting between units (e.g.
1000 mg = 1 g = 0.001 kg). But Ghost Gunner supports the Imperial system, too, via ‘G20’. To pay
homage to Eugene Stoner, Jim Sullivan, and Bob Fremont, the AR15.dd le is written in Imperial inches.
Q: Where is Ghost Gunner’s serial number?
Serial numbers permit government surveillance and abuse. Ghost Gunner doesn’t have a serial number, but it does contain certain universal identifying marks that we may use to verify a particular machine was of our manufacture.
Q: Just how open source is Ghost Gunner?
CC0 1.0 Universal (CC0 1.0) 2015 - 2017 Defense Distributed
All design les and models by Defense Distributed are licensed under Creative Commons Zero, which means you can
copy, modify, distribute and use the les for free, including for commercial purposes, without asking permission from or
providing attribution to Defense Distributed.
-The Product is provided “as is,” without warranty of any kind.
Incorporated hardware and software is sub-licensed under the terms of separate licenses, including:
-328p Uno Driver, Copyright 2012 Blacklabel Development, Inc.
-zlib and minizip
-Grbl(tm) v1.0 fork
Copyright (c) 2012-2014 Sungeun K. Jeon
Grbl v1.0 is free software: you can redistribute it and/or modify it under the terms of the GNU General Public
License as published by the Free Software Foundation, either version 3 of the License, or (at your option) any
later version.
Grbl v1.0 is distributed in the hope that it will be useful, but WITHOUT ANY WARRANTY; without even the
implied warranty of MERCHANTABILITY or FITNESS FOR A PARTICULAR PURPOSE. See the GNU
General Public License for more details.
You should have received a copy of the GNU General Public License along with Grbl v1.0.
If not, see <http://www.gnu.org/licenses/>.
A full list of hardware and software sub-licenses is available on the USB ash drive that ships with Ghost Gunner.
Q: Ghost Gunner is open source. Where can I nd ______?
DD makes every effort to publish content into the public domain. The US Government illegally asserts prepublication
approval authority over technical data it claims is directly related to “defense articles” as dened by the International
Trafc in Arms Regulations. DD distributes such content as is legally permitted. At present, DD can only send rearms-related .dd les to veried customers who are US persons.
Q: How is Ghost Gunner Assembled?
Meticulous assembly instructions are available at ghostgunner.net. DD advises against disassembling Ghost Gunner
unless required; proper axes alignment requires considerable time and effort.
Q: What’s the difference between a ‘jig’ and a ‘xture’?
As it pertains to metalworking:
-Fixtures hold parts stationary to allow cutting via moving tools.
-Jigs hold parts, but must also somehow mechanically guide cutting tools (e.g. via a lever, alignment race, etc).
However, the terms are used nearly synonymously in industry, with a prevalence towards ‘jig’. Thus, Ghost
Gunner (incorrectly) uses the term ‘jig’.
21

8 - RMA Policy
This RMA Policy applies to all customer requests for Return Merchandise Authorization (RMA), and is in
addition to those found in the Ghost Gunner Terms and Conditions of Sale (Terms of Sale). The Terms of Sale
take precedence and supersede this RMA Policy.
DD may modify this RMA Policy at its sole discretion from time to time. The most recent RMA Policy is
available at: Ghostgunner.net/terms/rma-policy.html
DD will not accept any product for service or repair without prior authorization, as evidenced by an RMA
Number. To receive an RMA Number, a Customer must:
-Request an RMA Application Form by emailing support@ghostgunner.net, and
-Fully complete the RMA Application Form to receive an RMA Number, and
-Include the completed RMA Application Form with all returned product, and
-Write the RMA Number on the outside of all shipping containers used to return product.
Non-functional/defective peripherals are considered separate items and are treated as a separate RMA. Customer
must only send nonfunctional products as described in the RMA Application Form used to create the RMA
Number. Do not return functional peripherals unless requested by DD.
An RMA Number is valid for sixty (60) days from issuance, at which time said RMA Number expires and is void;
DD must receive the returned product under said RMA Number within this sixty (60) day period.
DD IS NOT OBLIGATED TO ACCEPT ANY RETURNED PRODUCT not in compliance with DD’s RMA
Policy. SUCH PRODUCT MAY BE returned to CUSTOMER freight collect.
DO NOT SEND FIREARMS TO DD. DD is not licensed to accept rearms sent via courier, per 18 U.S.C.
922(a)(3) and 922(a)(1)(A). DD will legally dispose any received rearms.
DD products are sold without warranty. DD charges a at $200 Service Charge that covers all parts and labor
required to replace materials deemed defective through normal use. DD may, at its discretion and on a case-bycase
basis, offer to waive some or all incurred Service Charges. RMA repair work is not warrantied.
DD’s RMA Department will notify Customer prior to charging more than the Service Charge and will provide
Customer with an estimate regarding the cost of such service. DD reserves the right to charge the Customer for
parts, labor, and shipping expenses if DD determines that:
-Consumable components returned with product require replacement, or
-The cause for RMA was: misuse, abuse, alteration, improper installation, incorrect repair, negligence in
use, improper handling, or inadequate protection during transportation by any party other than DD, or
-The customer intensionally misrepresented information on the RMA Application Form to make it appear
that the product required RMA due to normal use, or
-No defect is found.
If no defect is found, DD will attempt to contact the Customer to obtain additional information to reproduce the
defect. If DD is unable to obtain further Customer information to reproduce the defect, DD will assume the
product is operating correctly and will return it without additional testing.
DD expects to ship serviced or repaired products within thirty (30) business days of receipt (Turn Around Time).
This Turn Around Time is an estimate; failure to repair or replace the product within Turn Around Time does not
breach this RMA Policy.
DD shall not be liable for any delay in performance directly or indirectly caused by or resulting from acts of
nature, re, ood, accident, riot, war, government intervention, embargoes, strikes, labor difculties, equipment
failure, late deliveries by suppliers, or other difculties which are beyond the control and without the fault or
gross negligence of DD.
22

9 - Specications
Parameter Value Unit Note
X/Y/Z travel 75/180/60.5 mm -
X/Y/Z table size 125/270/95 mm Larger X and Z dimensions possible depending on part geometry
Spindle Cutting Power 115 W Irms limited
Spindle speed 3000-10000 rpm Variable
Input Voltage 90-250 Vac -
Input Frequency 45-70 Hz Sinusoidal
Weight 23 Kg ~51 pounds
Shipping Weight 25 Kg ~55 pounds
T-slot spacing 40 mm Center-to-center
Table T-slots 2 QTY Compatible with 20 mm T-nuts
Collet system ER11 - Accepts tools up to 8 mm
Operating temperature 0-40 °C To prevent overheating
Relative Humidity 0-50 % To reduce oxidation
Max linear velocity 28 mm/s Simultaneous X/Y/Z Traverse
Max single-axis velocity 16 mm/s Software-limited
5 V current (max) 95 mA Can plug into unpowered hubs
24 V current (max) 185 W For 10 minutes
24 V current (continuous) 160 W -
23

Appendix A: Supported G-Code Commands
Supported g-code command summary (less used commands in gray):
Command Example Name Summary
Fn F10
G0 G0 X-2 Y-1
G1 G1 X-2 F1
G2
G3
G4 G4 P2
G10 L2 G10 P2 L2 X1
G10 L20 G10 P2 L20 X1
G17 G17
G18 G18
G19 G19
search online CW Arc Arc at specied Feed Rate in specied plane
search online CCW Arc Arc at specied Feed Rate in specied plane
Feed Rate Set maximum velocity on speed-limited commands. Unit = G20/21
Rapid Move Move as fast as possible in a straight line to the specied point
Linear Move Move at specied Feed Rate in a straight line to the specied point
Dwell Pause for specied period (seconds)
Set WCS point
Set WCS point
Set XY Plane Sets arc plane to XY
Set XZ Plane Sets arc plane to XZ
Set YZ Plane Sets arc plane to YZ
P1:P6 indicates which WCS - G54:G59 - to modify, respectively.
Set specied WCS axes to specied value based on machine
absolute origin, without movement (current position ignored).
Example sets WCS G55’s X axis 1 unit from machine absolute zero
P1:P6 indicates which WCS - G54:G59 - to modify, respectively.
Set specied WCS axes so current position becomes specied value,
without movement. Use to set WCS based on probed result.
Example sets current X position to 1 in WCS G55
G20 G20
G21 G21
G28 G28 Z-1
G28.1 G28.1
G30 G30 Z-1
G30.1 G30.1
G38.2 G38.2 X-2 F5
G53 G53 G0 X-2
G54
G55
G56
G57
G58
G59
G55 X-2
Unit = inch Set units to inches. Persists until G21 is called, or reset.
Unit = mm Set units to mm. Persists until G20 is called, default on reset.
Move to G28.1
via axes
Store nal G28
position
Move to G30.1
via axes
Store nal G30
position
Probe Probe towards part, stop on contact, error if no contact
Use Machine
origin
Work Offsets
‘WCS’
Move to specied position (in current WCS), then move to absolute
position stored in G28.1.
Example moves to Z-1 in the current WCS, then moves to G28.1
Store the current absolute position, for use by G28
Move to specied position (in current WCS), then move to absolute
position stored in G30.1
Example moves to Z-1 in the current WCS, then moves to G30.1
Store the current absolute position, for use by G30
Move in machine coordinates, regardless of active WCS.
G53 only applies to code on the same line (not persistent)
Work offsets dene an origin in relation to absolute machine zero.
Work offsets are persistent,
Use the origin dened in the specied work coordinate system
(persistent). See ‘G10’ to dene the origin. Example moves 2 units
from origin dened by WCS G55
24

Command Example Name Summary
G90 G90 X-2
G91 G91 X-2
G92 G92 X0Y0Z1
G92.1 G92.1
G93 G93
G94 G94
M3 M3
M4 M4 S5000
M5 M5
M8 M8
M9 M9
Absolute Move
Relative Move
Coordinate
Offset
Clear Offset Clear previously set G92 coordinate offset.
Minutes/Unit F interpreted as inverse feed rate
Units/Minute F interpreted as feed rate
Spindle CW Spin spindle CW at specied speed
Spindle CCW Spin spindle CCW at specied speed
Stop Spindle Stop the spindle, as specied in “Spindle Operation”
Enable Coolant Ghost Gunner supports coolant, but no system is installed
Disable Coolant Ghost Gunner supports coolant, but no system is installed
Move relative to current WCS. Example moves 2 units from origin
Move relative to current position. Example moves X axis 2 units
Source of epic misery, do not use; use WCS instead.
Set active WCS position as specied (without movement).
Modies all WCS axes to match calculated offset.
Unspecied axes aren’t modied.
Not stored in EEPROM, cleared when reset.
Example sets active WCS origin Z+1 from current position and
modies all WCS axes to match calculated offset.
M30 M30
M100 Un M100 X10
M101 Vm M101 X1
Sn S5000
End End program.
Before calling M30, stop spindle as per “Spindle Operation”
Verify
Remaining
Travel
Verify Delta
Between Points
Spindle Speed Set the spindle speed, as specied in “Spindle Operation”
(Supported in DDcut only)
Verify at least n distance is available on U axis between last probe
point and absolute machine limit. Alarm if n exceeds available
distance on U axis. Error if no probe has occurred.
M100 disregards unit mode; all arguments are in mm
(Supported in DDcut only)
Verify distance between the two most recent G38.2 probe results is
less than m along axis V. Alarm if calculated delta exceeds m.
Error if less than two previous probe operations have occurred.
M101 disregards unit mode; all arguments are in mm.
More Grbl-specic command information:
http://www.shapeoko.com/wiki/index.php/G-Code !
Grbl attempts to follow LinuxCNC’s g-code syntax and methodologies:
http://linuxcnc.org/docs/html/gcode/gcode.html !
Grbl conguration commands:
https://github.com/grbl/grbl/wiki/Conguring-Grbl-v0.9
25

Appendix B: YAML Formatting
YAML is a new-line-separated, space-delimited format:
Description Example
Subsequent lines are Children
if space-indented further than
the Parent line
Text following the pound
symbol (‘#’) is a Comment
Strings are simple text
data. Indicate a new line
with “\n”
Arrays are groups of named values
Lists are a group of
values indicated with a
“- “
(Note a space follows the dash)
List and Array items may
have String, Array, or List
Children
Parent:
Child:
NotChild:
#Comment
This is a string\nThis is on a new line
red: (value)
green: (value)
blue: (value)
- (value)
- (value)
- (value)
name1: this is a string value\nthis text is on a new line
name2: #a comment is placed here
child1: (value)
child2: (value)
child3: (value)
name3:
- (value)
- (value)
- (value)
Children of String, Array and
List items are allowed.
Lists of lists aren’t allowed
- this is a string value\nthis text is on a new line
- child1: (value)
child2: (value)
child3: (value)
#note a list of lists is never used in the manifest
- - (value)
- (value)
- (value)
26

Appendix C: Individual Axis Labels
Section “5.2 - Understanding the Work Coordinate System” creates an axis movement reference. If desired, cut
out these larger labels and tape them to Ghost Gunner.
Y-170 mm
Gantry Left
Z-60.5 mm
Towards Part
- Y +
- Z +
Y-1 mm
Gantry Lef
Z-1 mm
Away from part
t
X-75 mm
(T Slot Up)
Top of Machine Back of Machine Left of Machine
Physical T-slot Movement
X-0
( T Slot Down)
- X +
27

28
 Loading...