

82-12890
8-Channel Standalone DVR
Installation Guide & User’s Manual
USS
U
User’s Manual 8CH DVR
E
R’’SS
E
R
M
M
A
A
N
N
U
U
A
A
L
L
- 0 -
Version 2.41

User’s Manual 8CH DVR
Directory
1. DVR Feature............................................................................................................3
2. Outlook....................................................................................................................3
2.1. Front Panel .......................................................................................................................... 3
2.2. Rear Panel........................................................................................................................... 4
2.3. Remote Controller................................................................................................................ 5
2.4. Removable HDD Box Introduction ....................................................................................... 5
3. DVR Installation......................................................................................................6
3.1. Install Hard Disk................................................................................................................... 6
3.2. Connect Camera and Monitor.............................................................................................. 7
3.3. Connect Power Cord ........................................................................................................... 7
4. DVR System Boot...................................................................................................7
4.1. Detect Installed Hard Disk ................................................................................................... 7
4.2. Main Screen ........................................................................................................................ 7
5. DVR Setup...............................................................................................................8
5.1. Camera................................................................................................................................ 8
5.2. Record ................................................................................................................................. 9
5.2.1 Record Framerate................................................................................................................ 9
5.2.2 Record Quality..................................................................................................................... 9
5.2.3 Record Schedule ................................................................................................................. 9
5.3 Alarm ................................................................................................................................. 10
5.3.1 Sensor ................................................................................................................................11
5.3.2 Motion................................................................................................................................ 12
5.4 Audio ................................................................................................................................. 13
5.5 System............................................................................................................................... 13
5.5.1 Password Change ............................................................................................................. 14
5.5.2 Hard Disk Setup................................................................................................................. 14
5.5.3 Time Setup ........................................................................................................................ 15
5.5.4 Event List........................................................................................................................... 15
5.5.5 Network Settings................................................................................................................ 15
5.5.5.1 Local IP.............................................................................................................................. 16
5.5.5.2 Name Server ..................................................................................................................... 16
5.5.6 PTZ Setup.......................................................................................................................... 16
5.5.7 Screen Adjustment............................................................................................................. 17
5.6 Search ............................................................................................................................... 18
- 1 -

User’s Manual 8CH DVR
5.7 Language........................................................................................................................... 18
5.8 Exit..................................................................................................................................... 18
5.8 NTSC/PAL Output Select................................................................................................... 18
6. Record...................................................................................................................19
6.1. Start Recording.................................................................................................................. 19
6.2. Stop Recording .................................................................................................................. 19
6.3. Recording Length .............................................................................................................. 20
7. Playback................................................................................................................21
8. Backup…………………………………………………………………………………….21
9. Network……………………………………………………………………………………22
9.1. Hardware Install................................................................................................................. 22
9.2. Setup IP Address Of DVR.................................................................................................. 22
9.3. Configure IP Address Of PC .............................................................................................. 23
9.4. Connect PC to DVR—Net Viewer...................................................................................... 24
9.4.1 Install ................................................................................................................................. 24
9.4.2 Program Interface.............................................................................................................. 24
9.4.3 Button Function ................................................................................................................. 26
9.4.4 Local Recording................................................................................................................. 27
9.4.5 Play Local Recording......................................................................................................... 28
9.5. Connect PC to DVR –IE Browser ...................................................................................... 29
10. Specification……………………………………………………………………………31
11. Appendix ...............................................................................................................32
11.1. System Connect Sketch Map ............................................................................................ 32
11.2. Fittings Come Along With DVR.......................................................................................... 32
- 2 -
1. DVR Feature
8 Channel BNC Camera Input
2 Channel BNC Monitor Output
Support Network: Static, DHCP, PPPOE
USB 2.0 Port For Backup And Playback With PC
VGA Output (Optional)
NTSC / PAL
Video Loss Alarm
Motion Detection With Area Setting
PTZ Control With RS485 Port.
8 Sets NO/NC Sensor Input
1 Alarm Output (2A 28VDC / 2A 125 VAC)
User’s Manual 8CH DVR
Two ATA-100 Hard Disk Interface, Support Over 500G Byte
Time Schedule Record / Sensor Triggered Record / Motion Triggered Record/Motion and
Sensor Triggered Record
IR Remote Controller
This DVR is provided with double function. That means when it’s recording, user can play
back or handle menu bar simultaneously.
2. Outlook
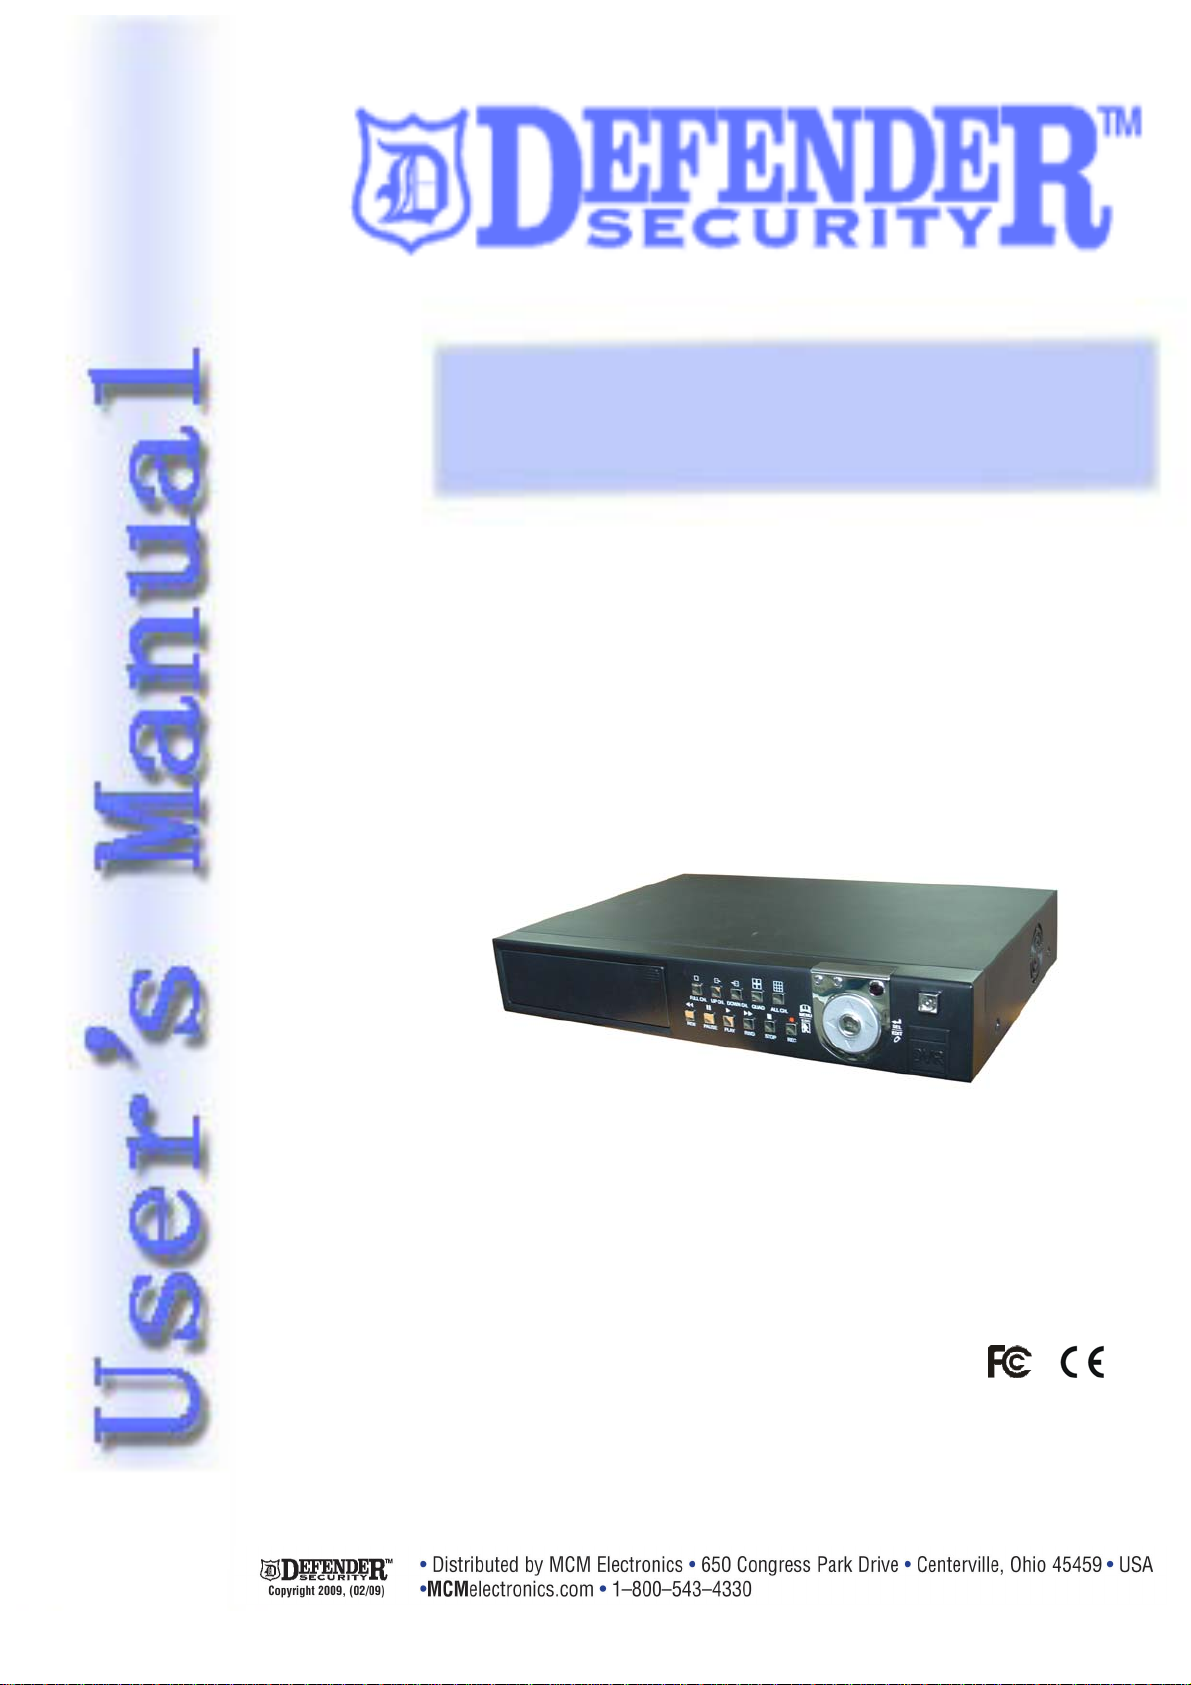
2.1 Front Panel
- 3 -

User’s Manual 8CH DVR
1 Full Screen 2 Channel Up 3 Channel Down
4 Quad View 5 All Channel 6 Enter/Exit Menu Setup
7 Move Prompt Up 8 Modify Item 9 Move Prompt Down
10 Record, Stop manual record or Reduce value
11 Stop playing or dome running 12 Forward or Zoom+ 13 Play or Focus+
14 Pause or Focus- 15 Rewind or Zoom- 16 Power Indicator
17 HDD Access Indicator 18 IR Window 19 Power Switch
20 USB Press-button 21 HDD Box Press-button 22 PTZ Switch
23 Active-handle 24 Radiator 25 Key Locker
2.2 Rear Panel
1. Network 2. VGA Output (Optional) 3. Audio Input
4. Audio Output 5. Video Output 6. Video Input
7. Sensor/Alarm/RS485 8. DC Input 9. Grounding
- 4 -
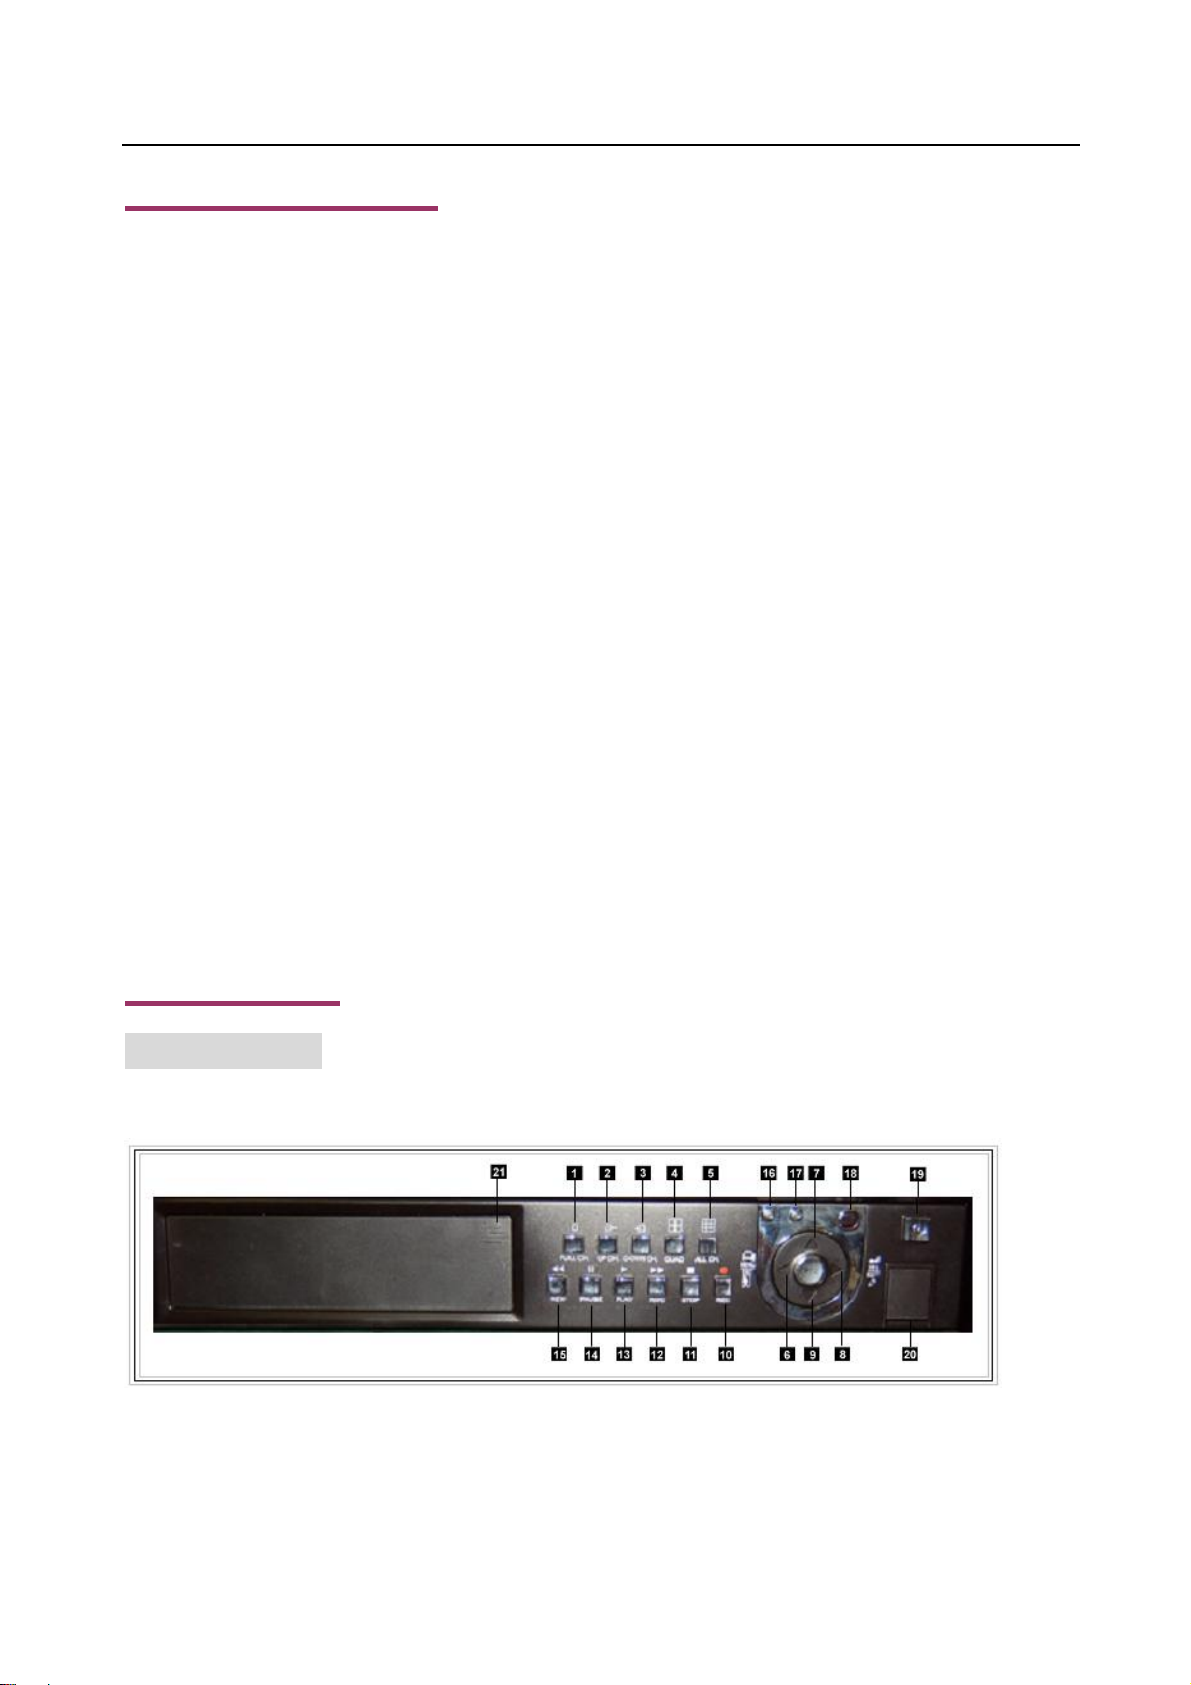
2.3 Remote Controller
User’s Manual 8CH DVR
1. FULL One Channel View or Move Dome Up
2. ALL
3. UP CH. UP Channel View or Move Dome Down
4. QUAD Quad View or Move Dome Right
5. DOWN CH. Down Channel View or Move Dome Left
6. REW Rewind or Zoom-
7. PLAY Play record or Focus+
8. FWD Forward or Zoom+
9. RECORD Record or Stop manual record
10. PAUSE Pause or Focus-
11. STOP Stop Playing or Dome running
12. PTZ PTZ Switch
13. MENU Enter or Exit Setup Menu
14. SEL/EDIT Modify Item
15. UP Move Prompt Up
All Channel View
16. DOWN Move Prompt Down
2.4 Removable HDD Box Introduction
1. Power Indicator 2 .HDD Access Indicator
3. Key Lock 4 .PVC Frame
5. Active-handle 6. Radiator
7. HDD data cable 8 .HDD power cable
- 5 -

3. DVR Installation
A
A
B
3.1 Install Hard Disk
Fig1
Fig2
Fig3
Slide the carrier body out of the cartridge frame (Fig1)
DON’T take out HDD when DVR running!
Connect the HDD data cable and the power cable to
the HDD (Fig2)
Push carrier body further into cartridge frame until
fully inserted (Fig3)
User’s Manual 8CH DVR
(HDD is recommend to be provided by user)
- 6 -
Key Locker
: Locked (Non-removable)
B: Unlocked (Removable)

User’s Manual 8CH DVR
A
3.2 Connect Camera and Monitor
There are eight cameras input and two monitors output with BNC connector.
3.3 Connect Power Cord
Please use the power adapter supplied with DVR.
4. DVR System Boot
4.1 Detect Installed Hard Disk
FW:2.41,UCODE:86
DATE:2007/10/30
VIDEO:PAL
DISK0:
4.2 Main Screen
fter connecting the power, system will boot-up
firmware, date, video and detect installed hard
disk. Master and Slave hard-disk information will
show up on monitor.
Please make reference to hard disk manual to
configure hard disk sequence. (Master or Slave)
Notice: When user only uses one hard disk
drive, make sure the HDD is master HDD.
Firstly, start the DVR system. DVR will be
sense of eight cameras shown on the
monitor.
Name:(CH1 ~ CH8).
Bottom rightDate and Time shown on
there. DVR is waiting for key function,
Press “
Menu” into DVR setup process.
- 7 -
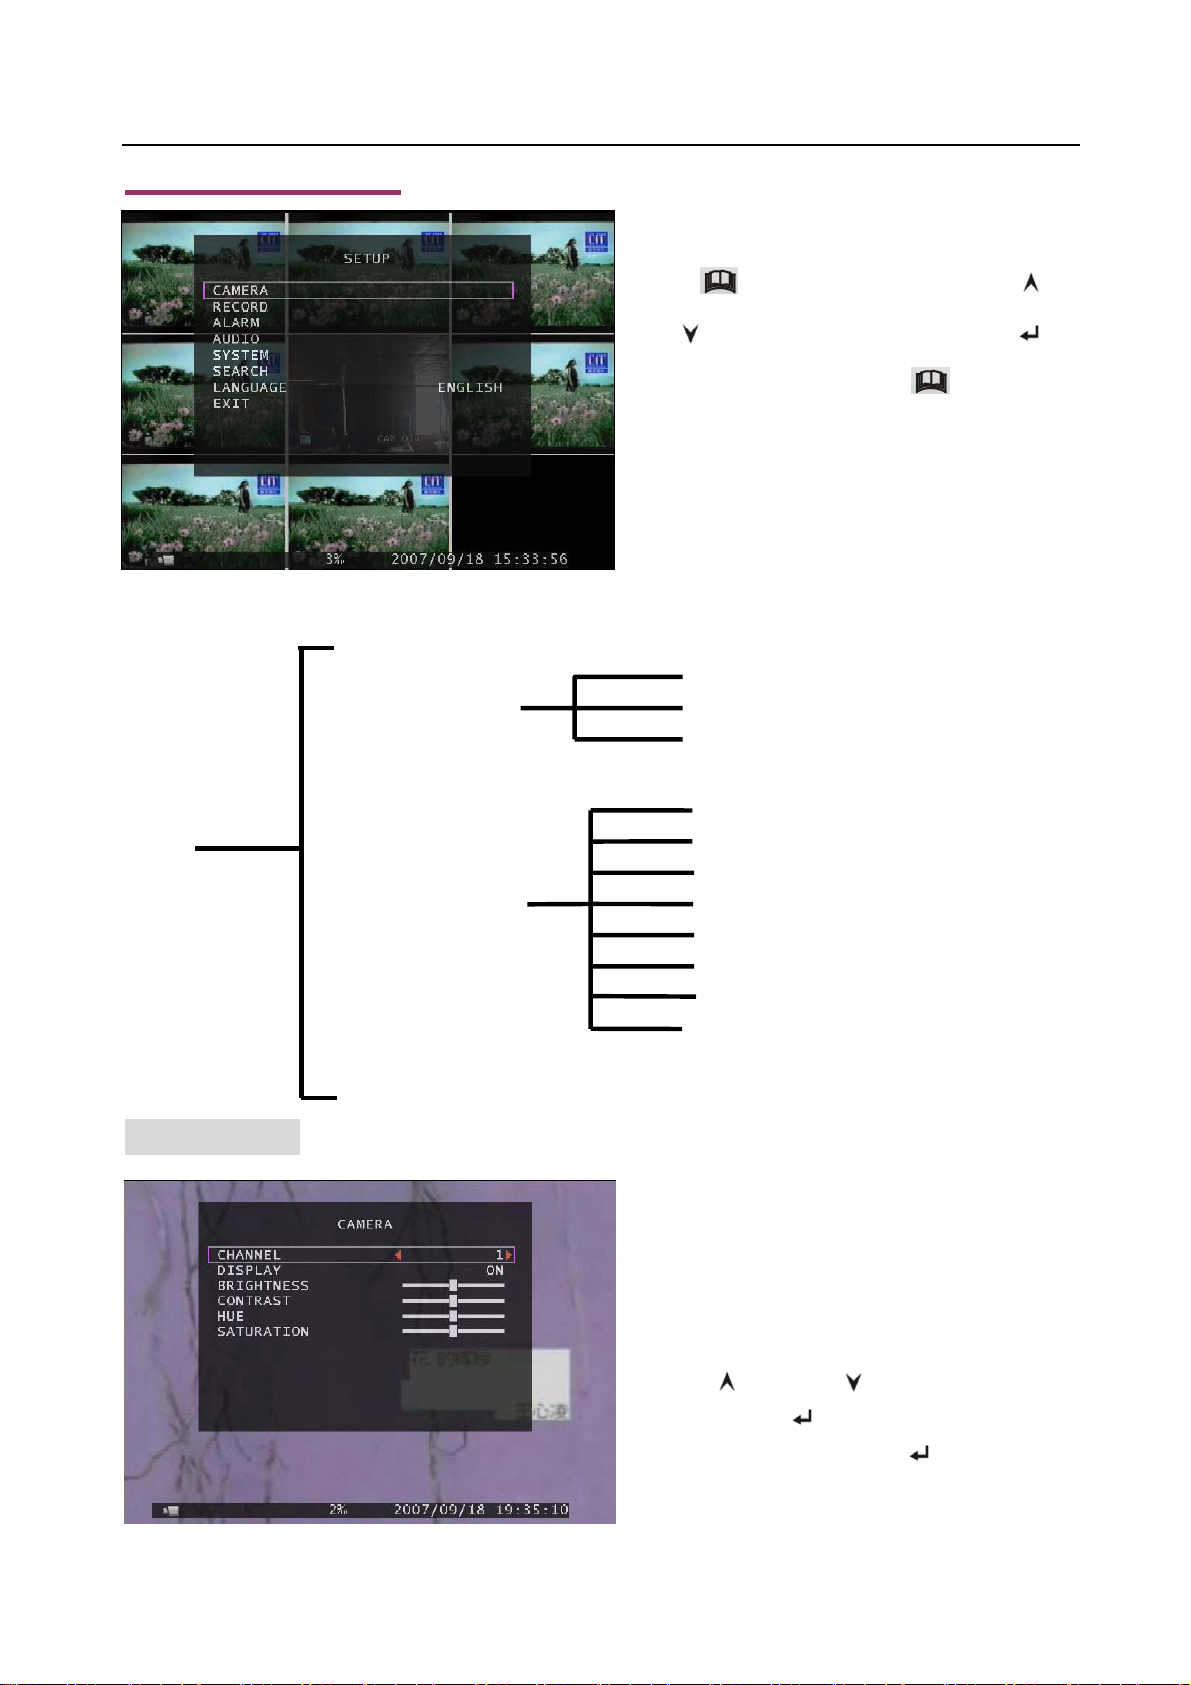
5. DVR Setup
User’s Manual 8CH DVR
Setup
Menu
Camera
Record
Alarm
Audio
System
Search
Language
Press “ Menu” into setup menu, use “ Up”
and “
Select” to modify setting and “
Down” to select item, then press“
confirm and exit.
Directory
Record Frame Rate
Record Quality
Record Schedule
Password Setup
Password Change
Hard Disk Setup
Time Setup
Event List
Network Settings
PTZ Setup
Screen Adjustment
Menu” to
Exit
5.1 Camera
- 8 -
DVR system can display eight cameras and
videos in one picture. User can configure
which camera to display. If the order of
“Display” for one channel is OFF, system
will display black on monitor.
Press「
prompt. Press「
modify setting. The button 「
increase value and the button 「REC」can
reduce value.
Up」 or 「 Down」to move the
Select」 or 「REC」 to
Select」can

5.2 Record
5.2.1 Record Framerate
User’s Manual 8CH DVR
Press「
Press 「
and press 「
each parameter.
Up」 or 「 Down」to move the prompt.
Select」to enter each sub menu,
Select」 or 「REC」to modify
Record frame rate will affect the movement
of object in recorded video. More frames
means more smooth movement and cost
more hard disk space. System default
value is 48 FPS. That means system will
record 48 frames per second. Total used
frame is 50 FPS. That means system can
record 50 frames per second at most.
5.2.2 Record Quality
There are three level of record quality, High, Normal and Low. Higher quality cost more hard disk
space. In Chinese captions the best record quality is three, and the worst record quality is one.
Record frame rate, record quality and hard disk space will affect total record time of DVR system.
5.2.3 Record Schedule
User can setup video record method by time, sensor triggered, motion triggered or motion
&sensor triggered.
Notice: To start motion record, make sure the period that you intend to record is “ ” in the “record
schedule” menu. To start sensor record, make sure the period that you intend to record is “
“record schedule” menu. And to start motion & sensor record, make sure the period that you intend to
record is “ ”in the “record schedule” menu.
- 9 -
”in the

User’s Manual 8CH DVR
Press 「 Up」 or 「 Down」to move the prompt ,and press「 SEL」to select video record method.
User can press the button 「ALL」to set up the same record method during the whole time.
λ “ ” Manual Record(System Default)
λ “
” Time Record.
λ “
” Motion Triggered.
λ “
” Sensor Triggered.
λ “
” Motion & Sensor Triggered.
Cooperate with many kinds of external sensor
equipment like PIR, Gas sensor. DVR will not
record video until external sensor was triggered
and output signal to notify DVR during this
specified period of time.
5.3 Alarm
The order of “Alarm duration” & “Buzzer
duration” has “OFF, 05,10,15,20,25,30 and
CONT” to select, and the order of “Event REC
Duration” has “05,10,15,20,25,30” to select.
User can press [
time.
Select] or [ REC ] to set the
after the system is triggered.
BUZZER DURATION
When Buzzer Duration is “OFF”, all the buzzers will be shut off. When “Buzzer Duration” is “CONT”, the
buzzer will work continuously.
EVENT REC DURATION
The number indicates how long triggered recording lasts after the sensors are triggered or the
movements in front of the camera.
- 10 -
ALARM DURATION
It controls how long (in seconds) the alarm lasts

5.3.1 SENSOR
r
p
User’s Manual 8CH DVR
There are three different modes for sensor
setting: NONE & N.C & N.O.
NONE means NOT INSTALLED,
N.C means NORMAL-CLOSE,
N.O means NORMAL-OPEN.
It depends on what type of external senso
you use. If sensor’s output is N.O, then
select N.O mode in DVR.
If sensor triggered by an intruder, then the cable line connects to DVR input terminal will notify system
to start recording. There are eight pairs of input terminal supported by DVR.
Sensor Input 1 2 3 4 5 6 7 8
PTZ Alarm Out
* Push the UNLOCK BUTTON to insert and
ull out the wire
- 11 -

Install example diagram:
User’s Manual 8CH DVR
Power
PTZ Setup
DVR
PIR Sensor
Connect PIR sensor
NO/NC output to DVR
input terminal.
(Max. 5V DC)
Alarm
5.3.2 MOTION
Power
The first step, User need setup video record
method by Motion Triggered. Please make
Reference to 5.2.3.
CHANNEL 1~8 SENSITIVITY:
User can press [
sensitivity grade of motion detection.
High (1----------4,OFF) Low
When it is set to “OFF”, the channel can’t be
trigger by movement.
Select] or [REC] to adjust
- 12 -

CHANNEL 1- 8 AREA SET:
t
A
User’s Manual 8CH DVR
Press “
active or not. Press “
Press “CH1” to move the prompt up, press “CH2” to move down, press “CH3” to move left, press “CH4”
to move right. By the way, the area only can be selected from up to down and from left to right. When
the block is covered by blue shadow, it’s active to record. When the block is transparent, it can’t be
recorded.
After completed the motion area setting, press “MENU” button to exit.
To start Motion Record, User must complete the “Motion area”.
Select” to enter motion area setting state, and then press “ Select” to set the block is
Select” once to pitch on the area, press “ Select” twice to cancel the area.
5.4 AUDIO
Press 「 Up」 or 「 Down」to move the
prompt ,and press「
SEL」or 「REC」to adjus
each parameter.
When the order of “Record” is “ON”, audio
channel can be record. When the order of
“Record” is “OFF”, audio channel can’t be record.
When the order of “MUTE” is “ON”, the audio
output will be shut off. When the order of “MUTE”
is “OFF”, the audio output will be turn on.
Input volume and output volume can all be
adjusted.
5.5 SYSTEM
Press 「 Up 」 or 「 Down 」 to move the
prompt ,and press「
SEL」to enter each
order.
When the order of “password setup” is “ ON”,
stop record or enter menu will need password.
nd if the order of “password setup” is “OFF”, all
operation won’t need password except
formatting HDD.
- 13 -

User’s Manual 8CH DVR
f
p
r
5.5.1 Password Change
Press 「 SEL」to enter “password change”
setup. Press 「
then move the prompt to the option o
“ENTER”, press 「
password. And the same operation measure
to input new password and confirm
assword.
All numbers, letters and sign in the pane can be used as password. The default password of System
is pressing six times of “1”.
SEL」to input value, and
SEL」to input current
)EXIT
5.5.2 Hard Disk Setup
OVERWRITE ENABLE:
If you format the hard disk, it will erase all the data recorded on the master HDD and the slave HDD.
SIZE
It shows the size of the current hard disk drive installed in the DVR.
USED
If you choose ON, the recording continues
and overwrites previous recording when
hard disk drive space is full.
If you choose OFF, the recording session
stops when all hard disk drive is full fo
recording.
FORMAT HDD:
It shows the space used on the current hard disk drive for recording and the percent of the used hard
disk.
Notice: When you first use a HDD in the DVR, please use this function to format the HDD, otherwise
the data of the HDD will slip a cog possibly.
- 14 -
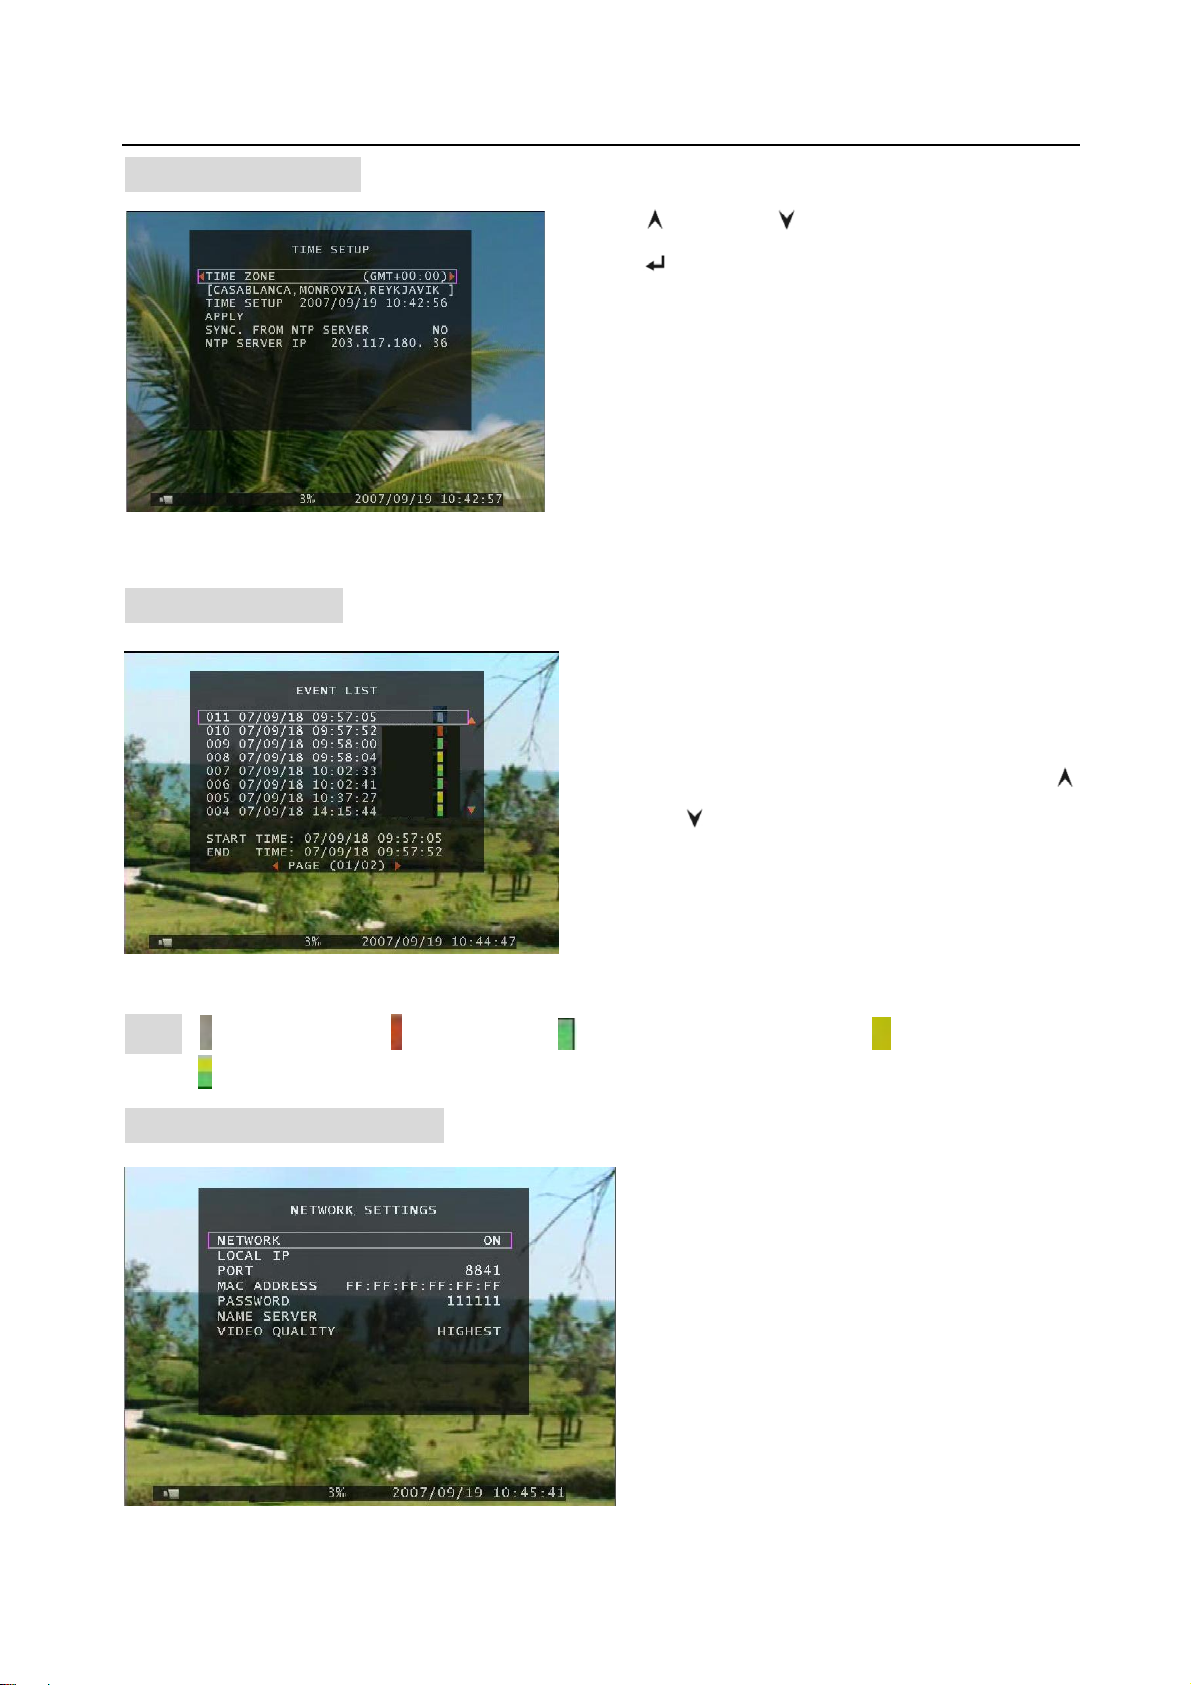
5.5.3 Time Setup
r
r
r
f
User’s Manual 8CH DVR
When “SYNC. FROM NTP SERVER” is “NO”, DVR system time will be asynchronous with NTP server.
Press「
press「
select time zone. After confirming time zone,
configure DVR system time. Move the prompt to the
order of “APPLY”, and then press to confirm.
When “SYNC. FROM NTP SERVER” is “YES”, DVR
system time will be in-phase with NTP server.
Up」and「 Down」to move prompt and
Select」or 「REC」to modify. User can
5.5.4 Event List
In the menu of “EVENT LIST” user can look ove
annals of all recorded video, start time and end time
of each recorded video.
Press「CH1」or 「CH2」to change page, press 「
Up」and「 Down」to move prompt.
DVR can be storage 250 pieces of events separately at most.
If user uses IDE HDD, all the HDD connected to the
DVR can be storage 250 pieces of events at most.
If user uses SATA HDD, each HDD connected to the
Note: -Manual Record; -Time Record; - Motion Triggered Record; -Sensor Triggered
Record;
-Motion & Sensor Triggered Record.
5.5.5 Network Settings
In the menu of “Network Setting”, use
can set up “local IP, port, password, name
server and video quality”.
Video quality includes highest, high,
normal, low and lowest.
When the order of “network” is “ON”, use
can connect the DVR to PC. If the order o
“network” is “OFF”, the DVR can’t be
connected to PC.
- 15 -
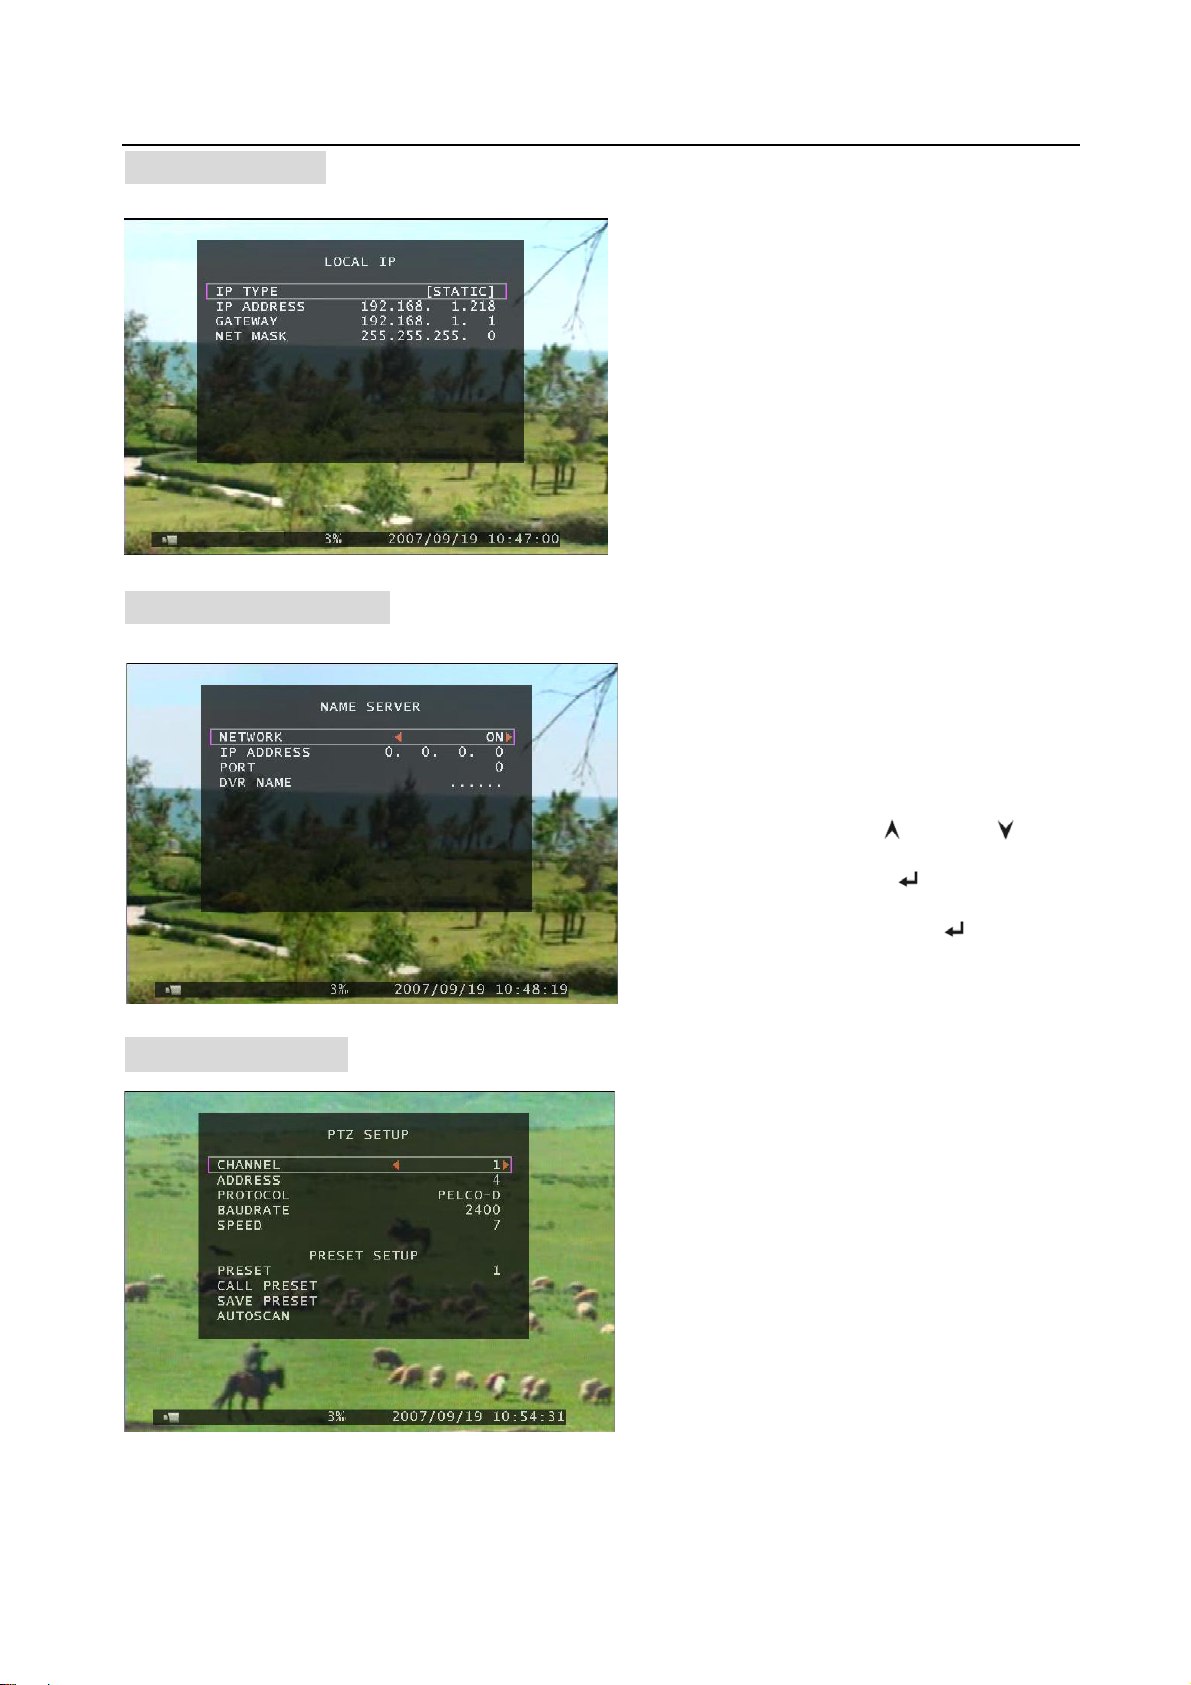
5.5.5.1 Local IP
f
r
f
s
User’s Manual 8CH DVR
In the menu of “Local IP” user can set up IP
5.5.5.2 Name Server
type. IP type includes static, DHCP and
PPPOE.
If IP type is static, user can adjust the order o
“IP address, gateway and net mask”.
If IP type is PPPOE, user can adjust the orde
of “PPPOE ID and PPPOE password”.
Press 「 Select 」 button to enter “Name
Server”, on the menu bar the order o
“Network、IP Address、Port and DVR Name”
can be modified. Press「 Up」and「 Down」
to move prompt. Press 「
into each submenu. Press「
「REC」to modify value.
Select」to enter
Select」or
5.5.6 PTZ Setup
ADDRESS: Dome’s address “0-255” (PELCO-D) and”0-31” (PELCO-P).
PROTOCOL: Including “PELCO-D”, “PELCO-P”. Setting the protocol according to the dome’s protocol.
- 16 -
Press 「Select」 button accessing to “PTZ Setup”.
Now user can select channels that he wants to
set.
Then we can see the diagram that is on the left.
For example, we select the channel 1 to set up.
Dome’s address is 4. Protocol makes use of
PELCO-D. Baud rate is 2400 and Dome’s speed
is 7.

User’s Manual 8CH DVR
BAUD RATE: Press “EDIT” button to select the value 1200,2400,4800,9600,19200bps.
SPEED: Having “1-10” to select.
PRESET: If protocol is PELCO-D, preset includes “1-32”. If protocol is PELCO-P, preset includes
“1-255”. When it displays 0, it suggests that the place’s preset is not using.
Button function:
「Select」:Make sure the setting.
「Up」「Down」:Move the cursor.
「SEL」:Increase Value.
「REC」:Reduce Value.
「Ch1」「Ch2」: Move the dome upwards and downwards.
「Ch3」「Ch4」: Move the dome leftwards and rightwards.
「STOP」:Stop the dome running.
「REW」「Fwd」:Zoom.
「Pause」「Play」: Focus.
Preset setup
User must set preset at first. The address, protocol and baud rate of DVR is consistent with Dome’s.
You can make use of buttons to control dome and save the preset.
If user wants to call preset, user can modify the value of preset to come true. Press「Select」button to
finish the order of “call preset”.
User can perform auto scan when he saves the presets within cruise locus. Then he needs to press
「Select」button to finish the order of “auto scan”, the dome will run all along unless user presses
「STOP」button to stop it.
Attention
User can start-up automatic scout in “PTZ SETUP” menu or PTZ mode. It doesn’t stop when user exits.
If user wants to stop scouting, press 「STOP」button in PTZ SETUP menu or PTZ mode.
During live view, user can press「PTZ」button to enter PTZ SETUP, and then user can operate to control
the dome according to the method of above paragraphs.
5.5.7 Screen Adjustment
- 17 -
User’s Manual 8CH DVR
r
Press「Select」button accessing to “ Screen Adjustment”. Press 「CH1」button to move the screen up,
press「CH2」button to move down, press「CH3」button to move left, press「CH4」button to move right.
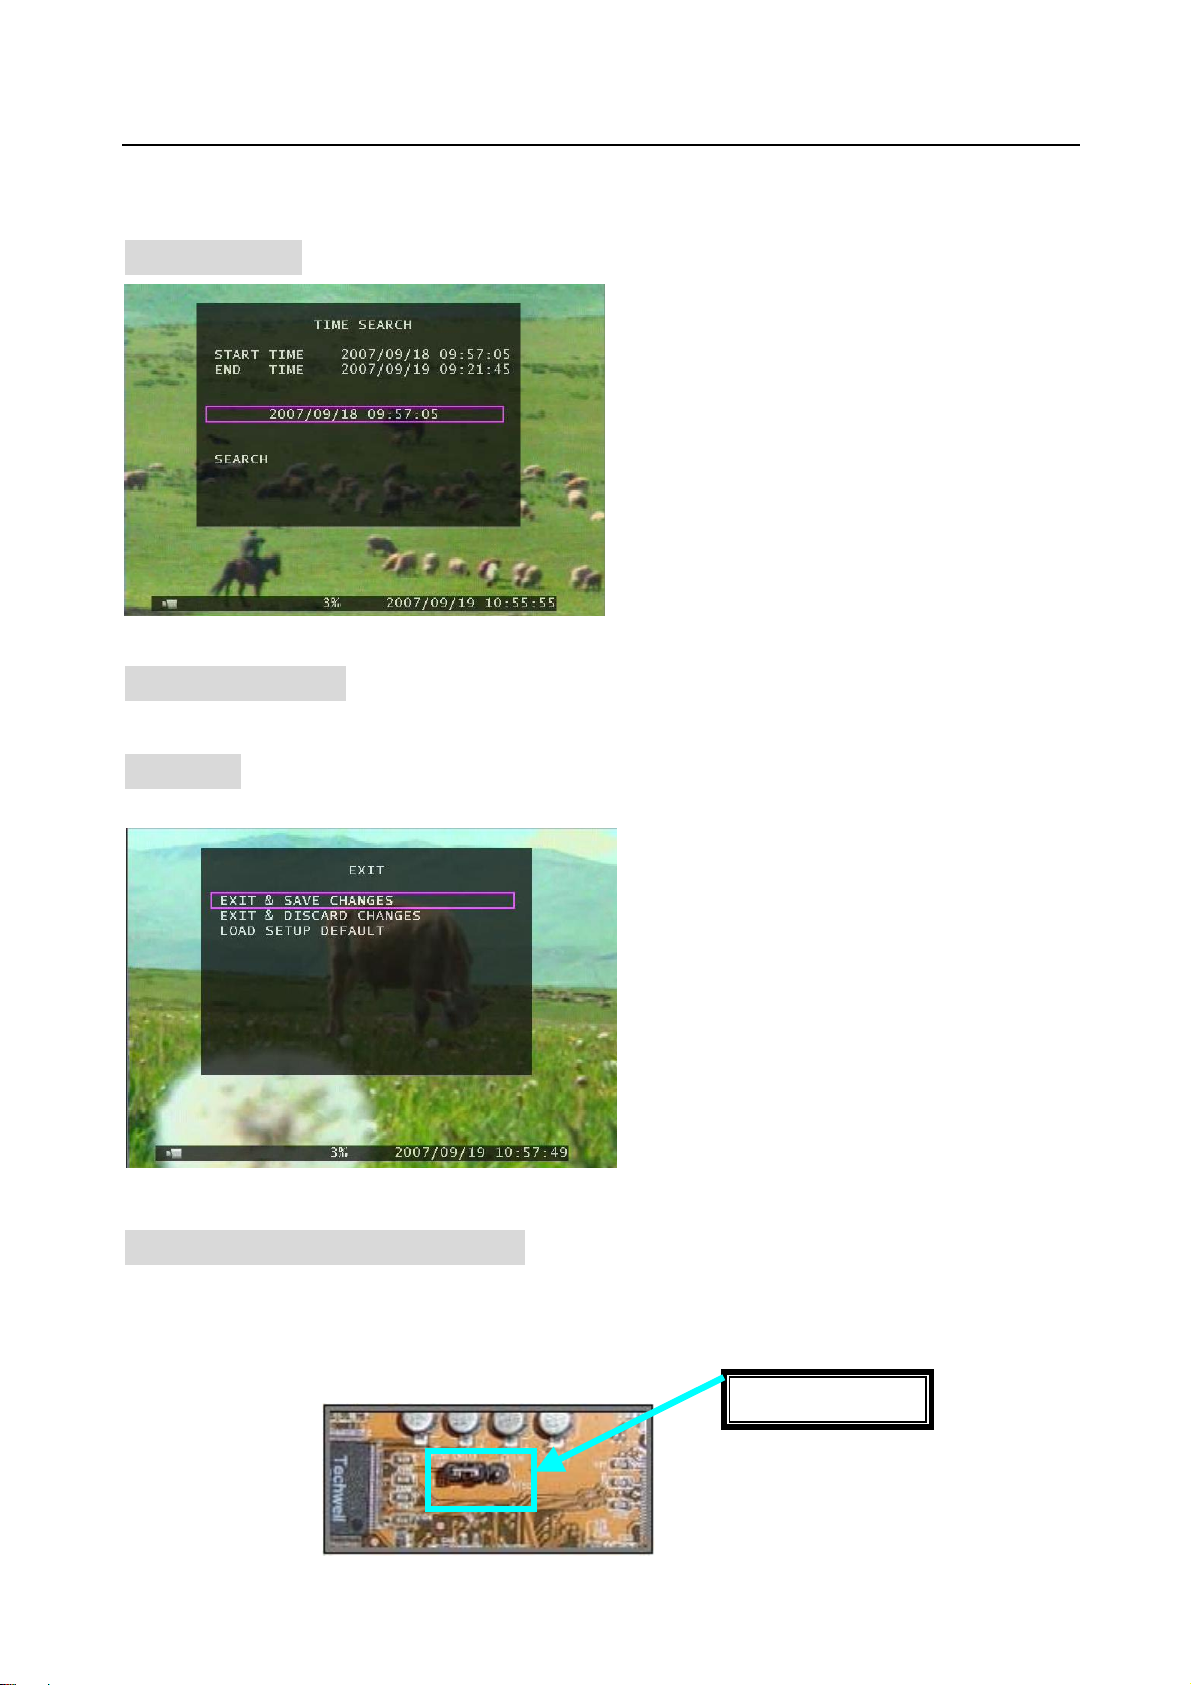
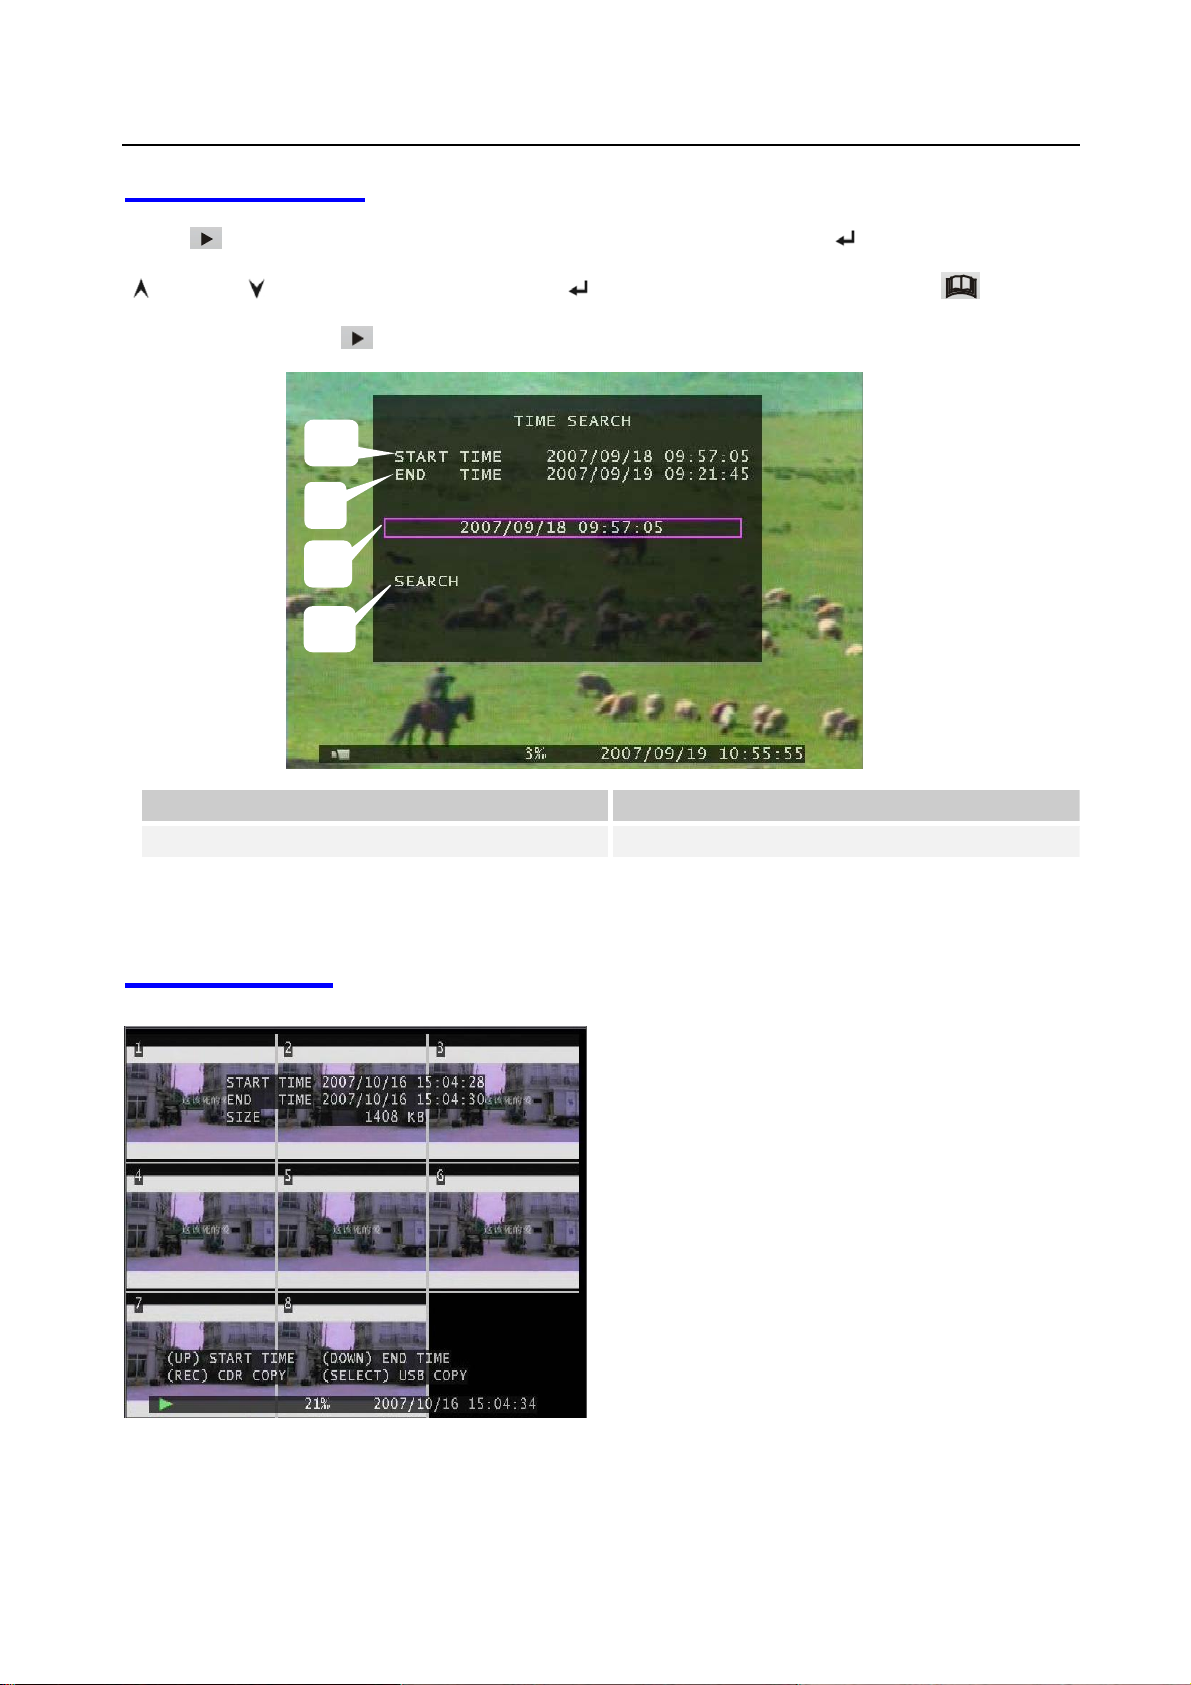
5.6 SEARCH
If the time goes beyond recording range, it will display black on the screen.
Press the button「SEL」 to enter “ Time Search”,
on the menu user can look over start time and
end time of all recording. Press 「SEL」to ente
option of time to adjust the time you want to
search. Finish adjusting time, press「MENU」to
confirm. Then press 「Play」directly . Or press
the prompt to the order of “Search” , and then
press 「SEL」.
If the time is within recording range, wait for a
moment it will play from the time you searched.
5.7 LANGUAGE
Press the button 「Select」to change language.
5.8 EXIT
Press「Select」button accessing to “ EXIT”, and
Default”, all settings will be restored factory default except time.
press 「UP」or 「DOWN」to move the prompt,
then press 「Select」to confirm.
When choose the order of “Exit & Save
Changes”, it will come back to live view and the
setting will be saved.
When choose the order of “Exit & Save
Changes”, it will come back to live view and the
setting won’t be saved.
When choose the order of “Load Setup
5.9 NTSC/PAL Output Select
Change jumper JS1 to select NTSC or PAL video output format according to the silkscreen on
the PCB.
Note: please unplug the power cord first.
NTSC/PAL Select
- 18 -

User’s Manual 8CH DVR
6. Record
6.1 Start Recording
Press “ Record” to start recording. System will display some information on Screen.
Note: When the DVR is recording, user can play back or handle menu bar simultaneously.
① Channel Name
② Recording Symbol
③ Hard Disk Usage Ration
④ The time and date of the DVR
⑤ Video Symbol
Notice: When HDD-error happens during recording process, system will automatically restore recording
process after power comes back up.
5
3
4
6.2 Stop Recording
If user startup manual record, press “ REC” to stop recording. If user startup schedule record, he can
enter the menu bar “Record Schedule” to select “No Record” to stop recording. And if the order of
“Password Setup” is ON, system will prompt to input password. Only correct password can stop
recording process.
- 19 -

User’s Manual 8CH DVR
6.3 Recording Length
The lengths of record time based on 250G HDD are estimated as follows, using
eight cameras:(just for reference)
Format Record Quality
High 5.85 43
PAL
Normal 4.59 55
Low
High 4.67 53
Record Frame
Rate
50F/Sec
Data Rate
(GB/Hour)
2.48 101
Record Time
(Hour)
NTSC
Normal 3.59 69
Low
60F/Sec
- 20 -
2.38 105
User’s Manual 8CH DVR
f
7. Playback
Press “ Play” then system will list the time of all videos from HDD. Press “ Select” and then press
Up” and “ Down” to move prompt. Press “ Select” to edit time value and press “ Menu ”to
“
confirm. Then press“
1. Start time of all recorded video 2. End Time of all recorded video
3. The time to start play video 4. Search video of playback
Another way to search video is directly entry main menu to select the order of “Search”.
Play” to play video.
1
2
3
4
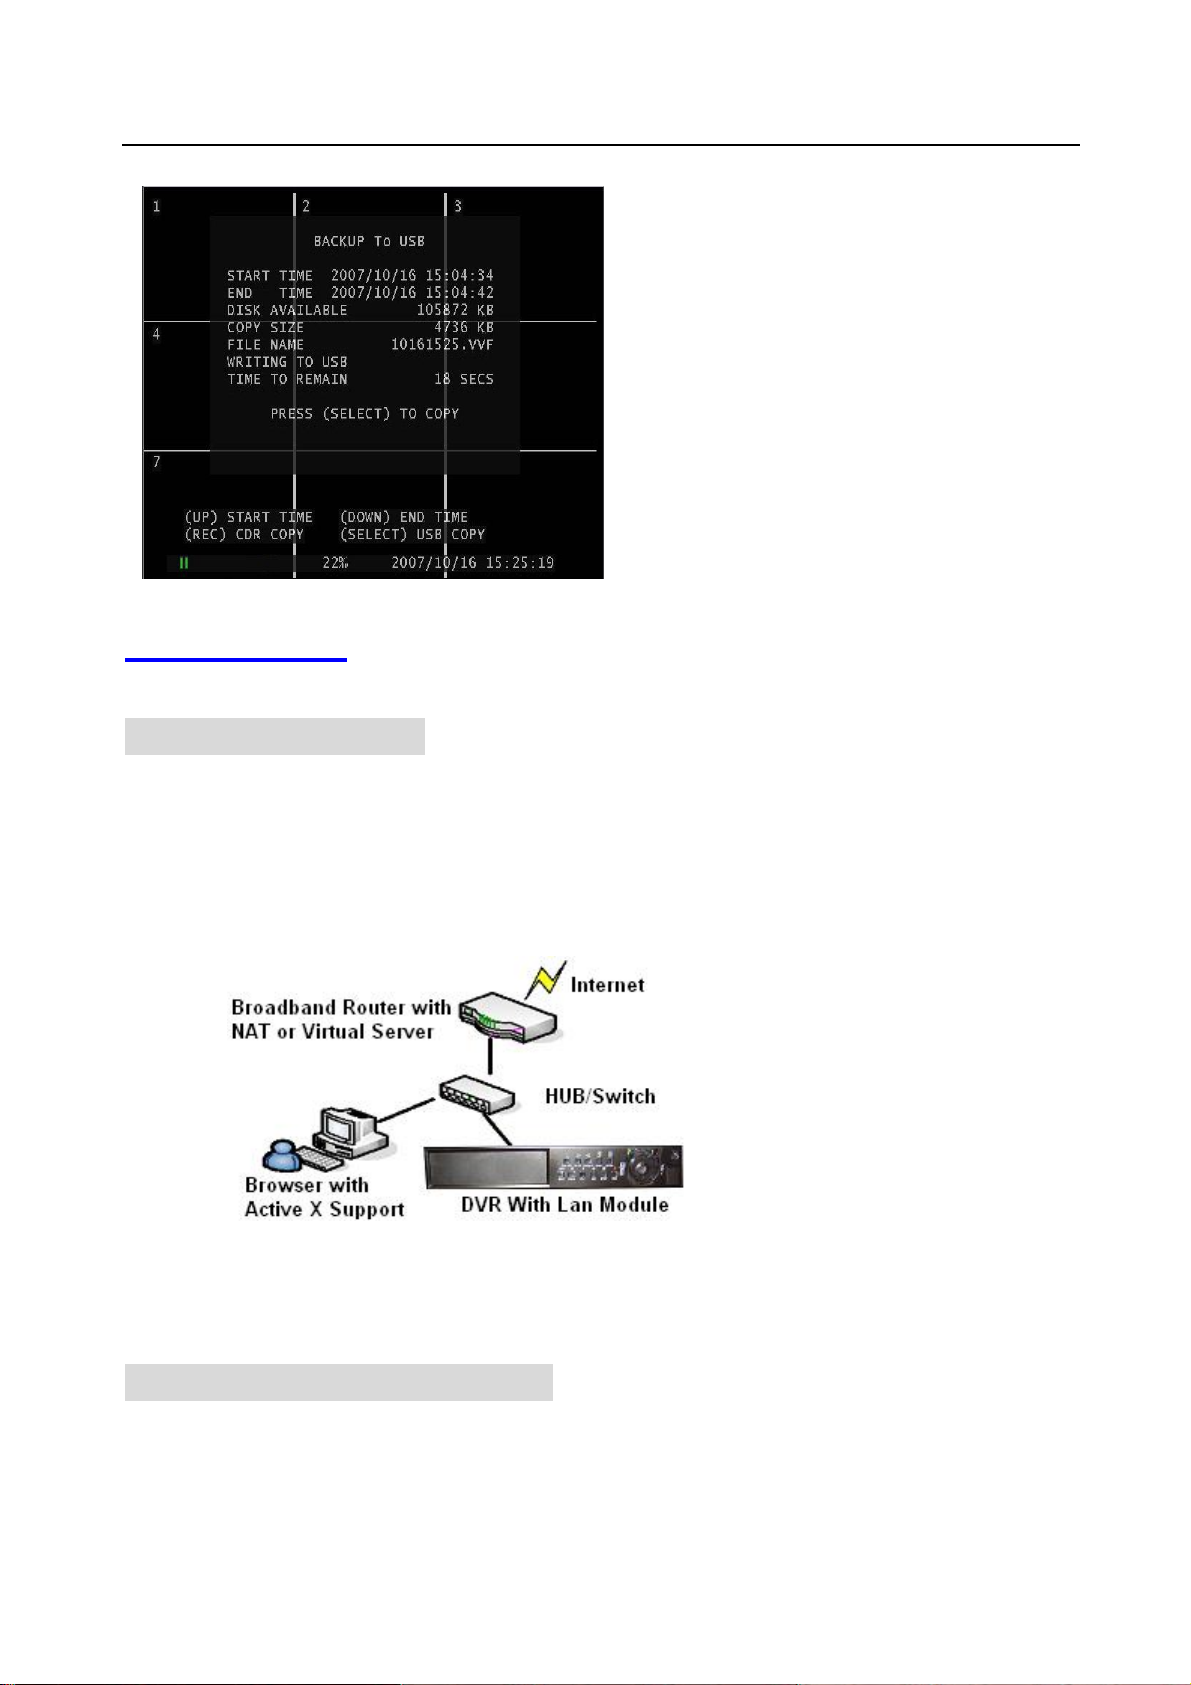
8. Backup
- 21 -
During playing back recorded video, user can
backup. Press「MENU」, then press 「UP」
to select start time and press [DOWN] to
select end time. After setting the time o
backup, press [SELECT] to enter into next
interface. Press [Select] to start copying.
During backup “Writing to disk” is always
displaying in the menu. After complete backup
there will be a piece of suggestive message.
r
User’s Manual 8CH DVR
9. Network
9.1 Hardware Install
“Complete”, press 「MENU」to return to
live view.
Note:
Before backup, user must stop recording
firstly.
Complete backup once, user must pull out
USB disk. If user wants to backup ove
again, he must plug into USB disk again.
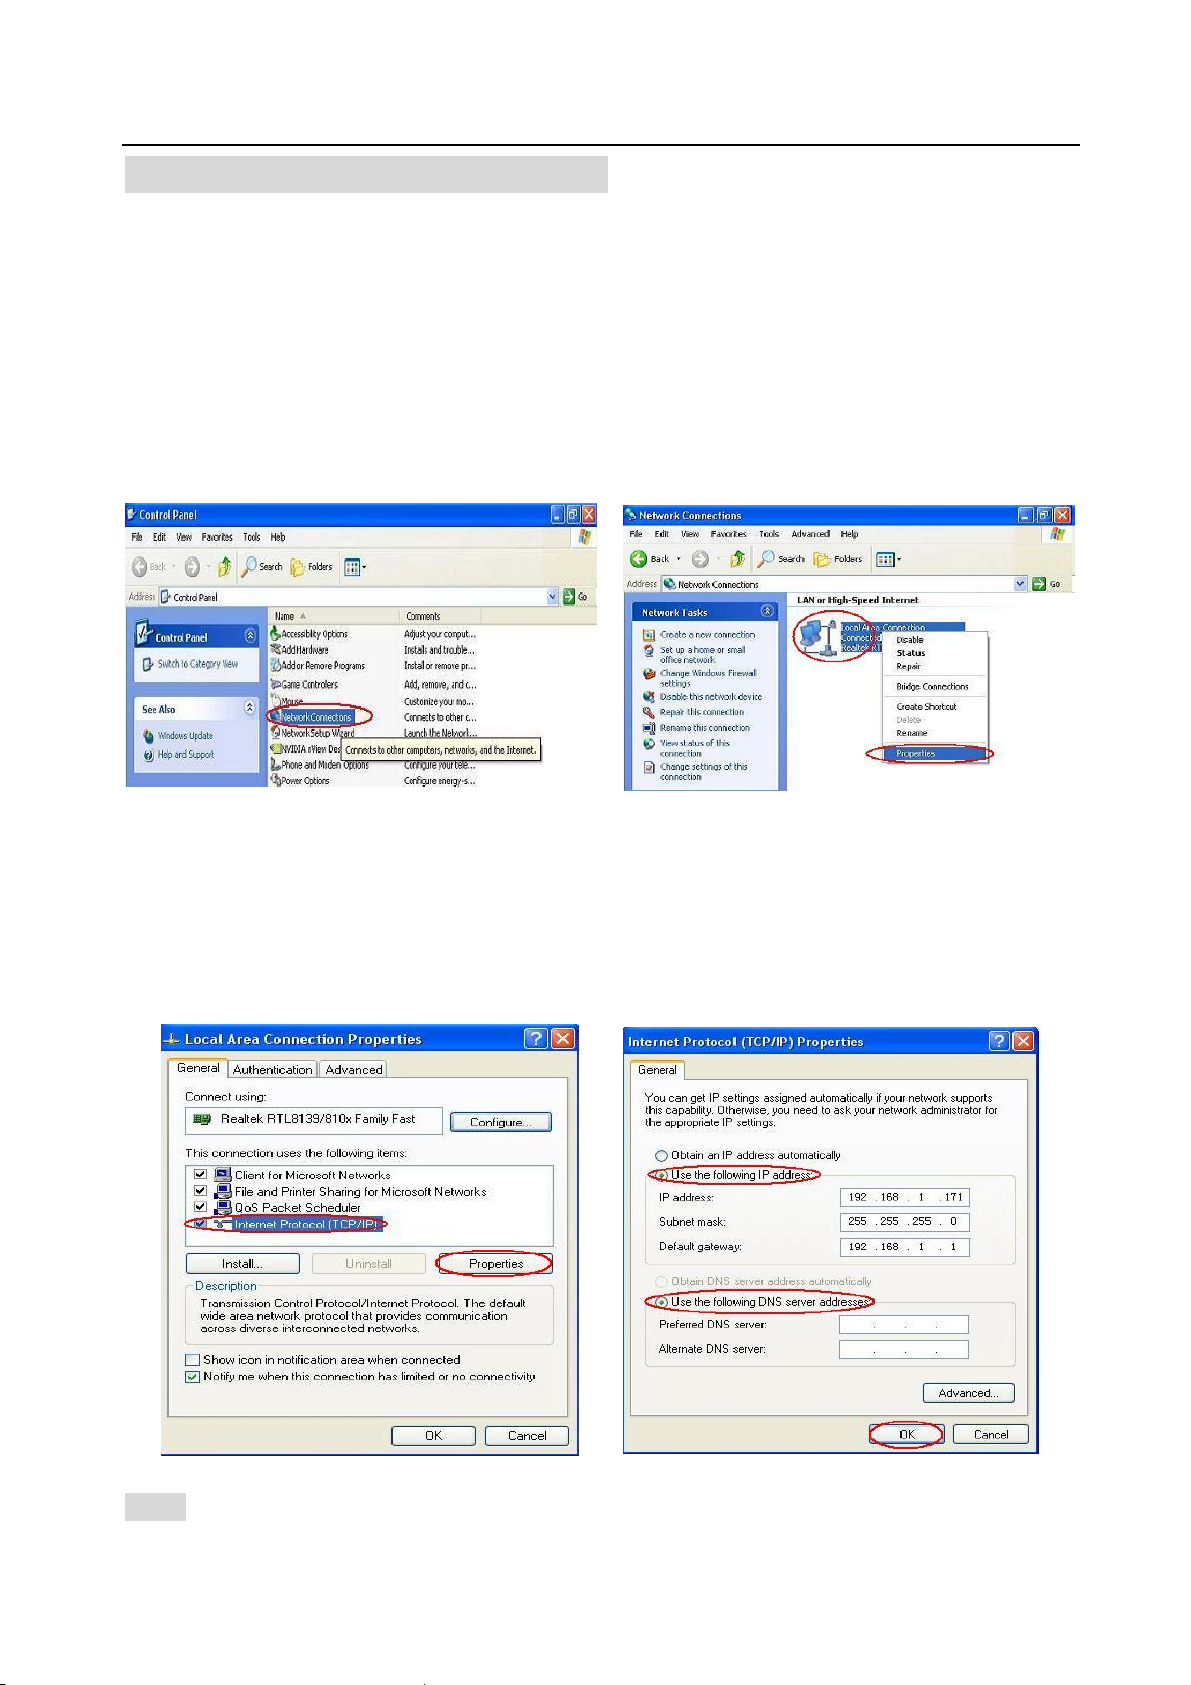
If you use Static or DHCP IP method:
A. Connect the DVR to HUB/Switch via Cat network cable.
B. Connect a PC to HUB/Switch via Cat network cable.
IF you use PPPOE IP method:
Connect the DVR to ADSL/CABLE modem directly.
9.2 Setup IP address of DVR
Press 「MENU」to enter “SETUP”, move the prompt to the order of “System”. Then Press 「SEL」to
confirm. On the menu of “System” enter the menu bar of “Network Settings”, choose the order of “Local
IP” to setup.
- 22 -
User’s Manual 8CH DVR
9.3 Configure IP address of PC
If IP address of DVR is “192.168.1.161”, ”IP Type” is “Static” and “Gateway” is”192.168.1.1”. User
must manually configure IP address of PC to connect DVR.
For example: Configure PC address as 192.168.1.171.
Windows XP:
Click “Start”→ “Settings”→ “Control Panel”→ “View”→ Double click the “Network Connections ”
icon.
Find ”Local Area Connection” and Right Click and select ”Properties”.
Find ”Internet Protocol [TCP/IP]” and click “Properties”. Select ”Use the following IP address” and ”Use
the following DNS server address”, and then input IP value.
Finally, Click ”OK” to Save Change.
Note: Before connecting network make sure the order of “Network” is “ON” on the menu “Network
- 23 -
settings”.
9.4 Connect PC to DVR—Net Viewer
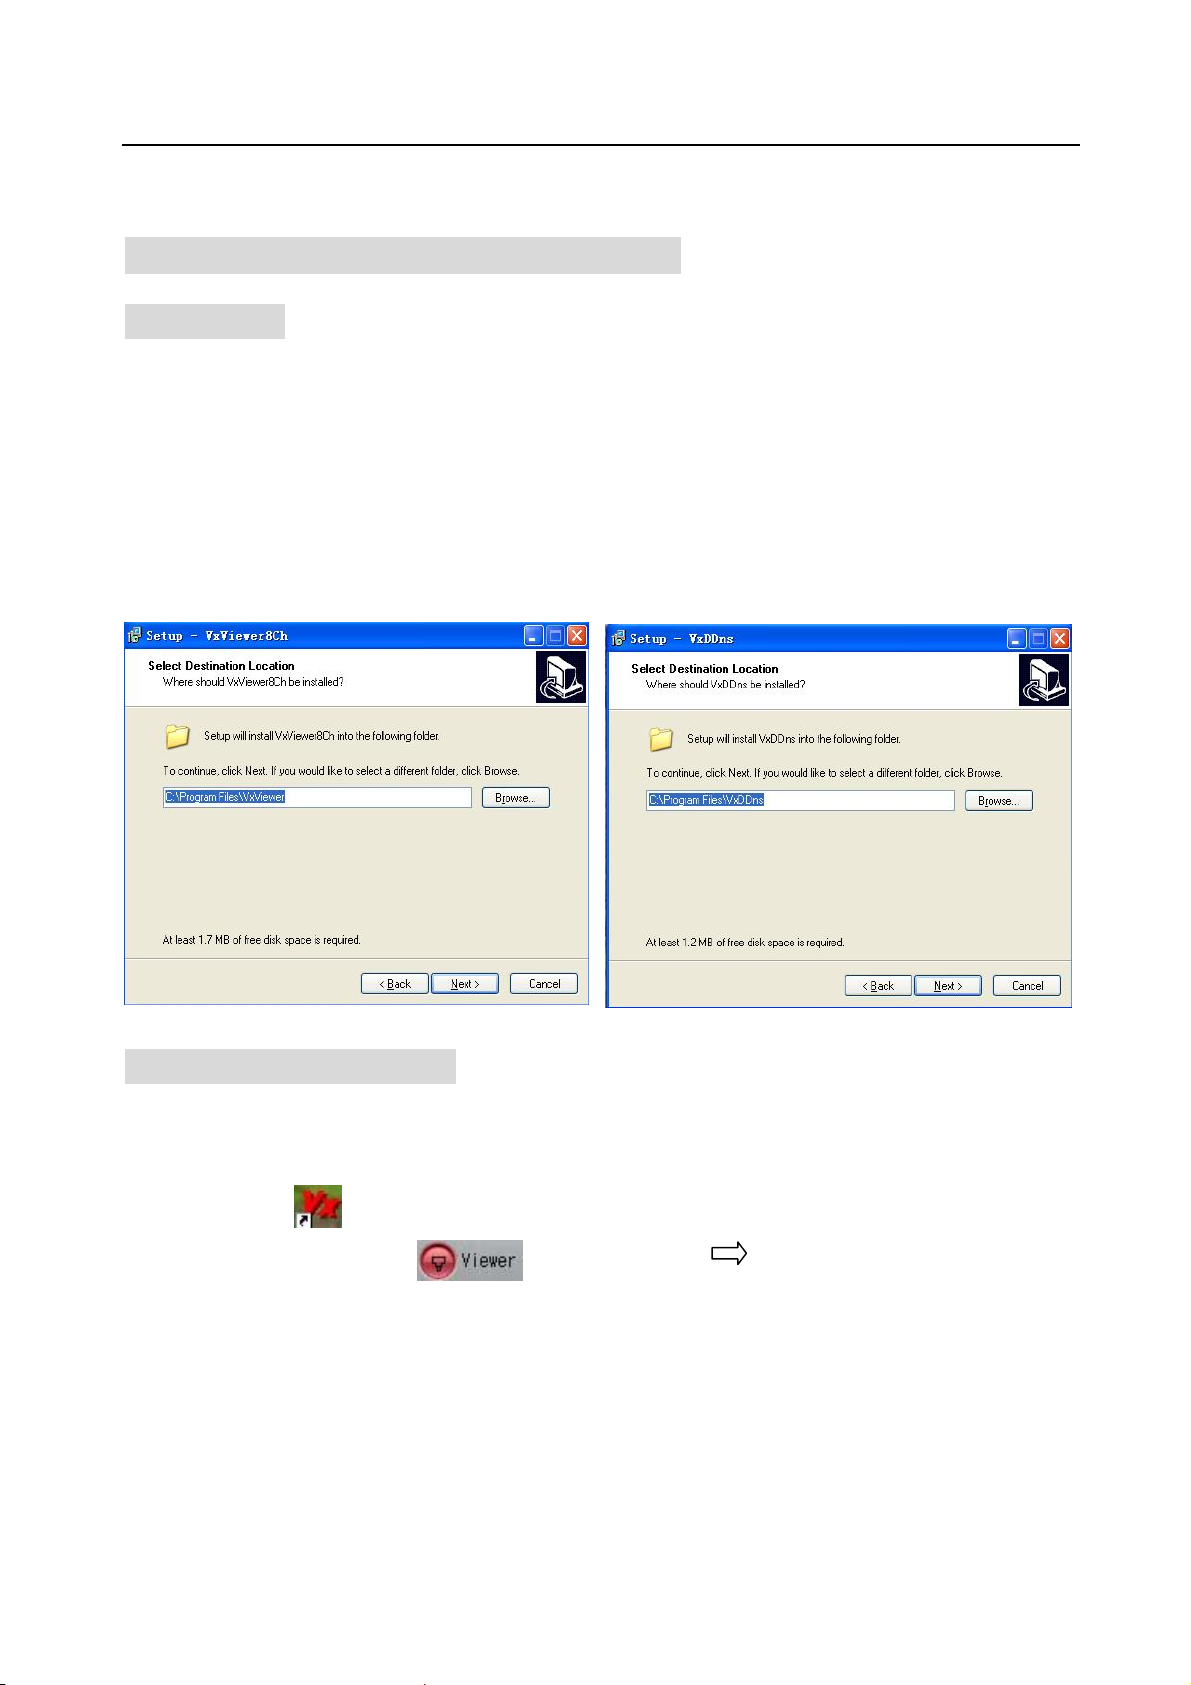
9.4.1 Install
1. Put the Driver Program CD in your CD-ROM.
1. Go for installing by setup.
2. Set up the install directory.
3. Execute: 1.Start >Program> VxViewer8Ch.
2.Start>Program> VxDDns.
User’s Manual 8CH DVR
9.4.2 Program Interface
A: Run Vxviewer8Ch.
1. Double click “ ” icon on desktop to run the program.
2. First make sure the button “ ” is red. Then Click “ ” icon or click the right button of the
mouse and click the option “Connect… ”, there will be a dialog box for logon. To input IP address,
port and password according to the order of “Local IP” of DVR in the dialog box. For example, “IP
Type” is “Static”, ”IP Address” is “192.168.1.161”, “Gateway” is “192.168.1.1”. Then click the
button “Logon” to enter into live view.
When browser net viewer, user can click the buttons on the interface to control DVR.
- 24 -

B: Run VxDDns.
User’s Manual 8CH DVR
Make use of VxDDns, user can connect synchronously many DVRs to one PC.
First set up DVR, enter menu bar “Network Settings”, adjust “Network” is “ON”, select order of “Name
Server”. On the interface of “Name Server”, make sure “Network” is “ON”, “IP Address” is the PC
which is connected to the DVR, “Port” is UDP port, setup “DVR Name”.
For example, connect two DVRs to one PC, PC’s IP address is 192.192.10.173, UDP port is 8880,
TCP port is 8881, one DVR’s name is XYS, another’s is 111111.
1. Double click “ ” icon on desktop to run the program. Then click the button “Options…”,in the
dialog box, input “UDP Port” 8880 and “TCP Port” 8881. Then click “OK” →”Run”. Connect
successfully, user can look over some messages of DVR which is connected to PC.
- 25 -

User’s Manual 8CH DVR
2. Double click “ ” icon on desktop to run the program.
3. First make sure the button “ ” is red. Click “the right button of the mouse” →”Options…”.
In the bar of “DDNS Configuration” input IP and port. IP is PC’s IP (192.192.10.173) connected to
the DVR, port is TCP port (8881). Click “OK”. Then Click “ ” icon or click the right button of the
mouse and click the option “Connect… ”, there will be a dialog box for logon. Click “Use dynamic
ip server”, input DVR ID and password. DVR ID is DVR’s name connected to PC, password is the
order of “password” in the menu bar “Network Setting”.
4. After log in successfully, user can enter live view of DVR and control the DVR long-distance.
9.4.3 Button Function
- 26 -

User’s Manual 8CH DVR
1. Connect/Disconnect 2. Pause
3. Rewind 4. Play
5. Fast forward 6. Stop playing or Dome running
7. Record, Stop manual record or Reduce Value 8. Split 9
9. Channel 1 10. Channel Up
11. Channel Down 12. Split 4
13. Enter or Exit Setup Menu 14. Move Prompt UP
15. Move Prompt Down 16. Modify Item or Increase Value
17. Volume 18. Minimize the window
19. Close the window 20. Mute On/Off
9.4.4 Local Recording
User can save current view into PC.Click→”Start Local Recording” to start recoding.
According to the following method to setup storage path for recording. Click “the right button of the
mouse”→ ”Options…”. In the bar “Path for local recording” setup.
- 27 -

User’s Manual 8CH DVR
9.4.5 Play Local Recording
Click “ ” to change to the Player mode. Then click “ ” to play the video in “”VVF” format.
Still Capture
In the player mode, click the right button of the mouse to select “Options…” to setup path for still
capture.
- 28 -

User’s Manual 8CH DVR
9.5. Connect PC to DVR — IE Browser
At first please turn all the Active X option ON at IE Internet safety setup. Select menu setup to enable
the Active X option.
Network module use Active X applet to display remote image. Any web browser with Active X support
can connect to DVR.
Click “Start”→ ”Program” →”Internet Explorer” →”Tools” →”Internet Options…”.
Click “Security” → ”Internet” →”Custom Level…”.
Click “Security” → ”Local intranet” →”Custom Level…”.
Make sure all the ActiveX controls and plug-ins are in “enable” mode. Click “OK”.
Open IE browser and input IP address of DVR in address bar. Press “Enter ” to connect PC to DVR.
- 29 -

User’s Manual 8CH DVR
In the interface of “Viewer Player”, input “IP”、”PORT”、”PASSWORD” of DVR, then click ”CONNECT”
to enter live view of DVR. Click buttons on the right to control DVR directly though network.
NOTE: All the button functions on the right are the same as DVR’s.
- 30 -

User’s Manual 8CH DVR
10. Specification
ITEM DESCRIPTION NOTE
Video Format NTSC / PAL
Operation System None STAND-ALONE
Camera Input Channel 8 channel Composite BNC
Video Output Channel 2 channel Composite BNC
NTSC Max 60 fps (Total)
Recording Frame Rate
PAL Max.50 fps (Total)
Record Mode
Display
Resolution
Recording
Compression Method
HDD Support Over 500G Byte
Estimated Record Length
Search
Sensor, Alarm
Method
Full Screen YES
Time schedule, Motion detection, Sensor activated, Motion
detection & Sensor activated
NTSC:640 x 448
PAL:640 x 544
NTSC:640×224(Half D1)
PAL:640×272(Half D1)
Enhanced MJPEG
(12-20K Bytes/frame)
120G Hard disk @ 50 fame per second @ Normal Quality
(120*1024*1024 K byte) ÷ (50*15*60*60) = 46 Hours
Time、Event
8 Input (Normal Open / Normal Close)
1 Output (20 Pin DIP Switch)
Camera Signal Loss Alarm
2 Pin for RS485 control Pan/Tilt/Zoom
Max. 30 frames/s
(Each Channel)
Max. 25 frames/s
(Each Channel)
Video Quality:
Low@12K Bytes;
Normal@ 15K Bytes;
High@20K Bytes
ATA -100 Interface HDD×2
PTZ YES PELCO-D PELCO-P
USB YES USB 2.0 For media Backup
VGA Optional
Dimension Length 400mm * Width 276mm * Height 69mm
- 31 -
800*600,1024*768,
1280* 1024
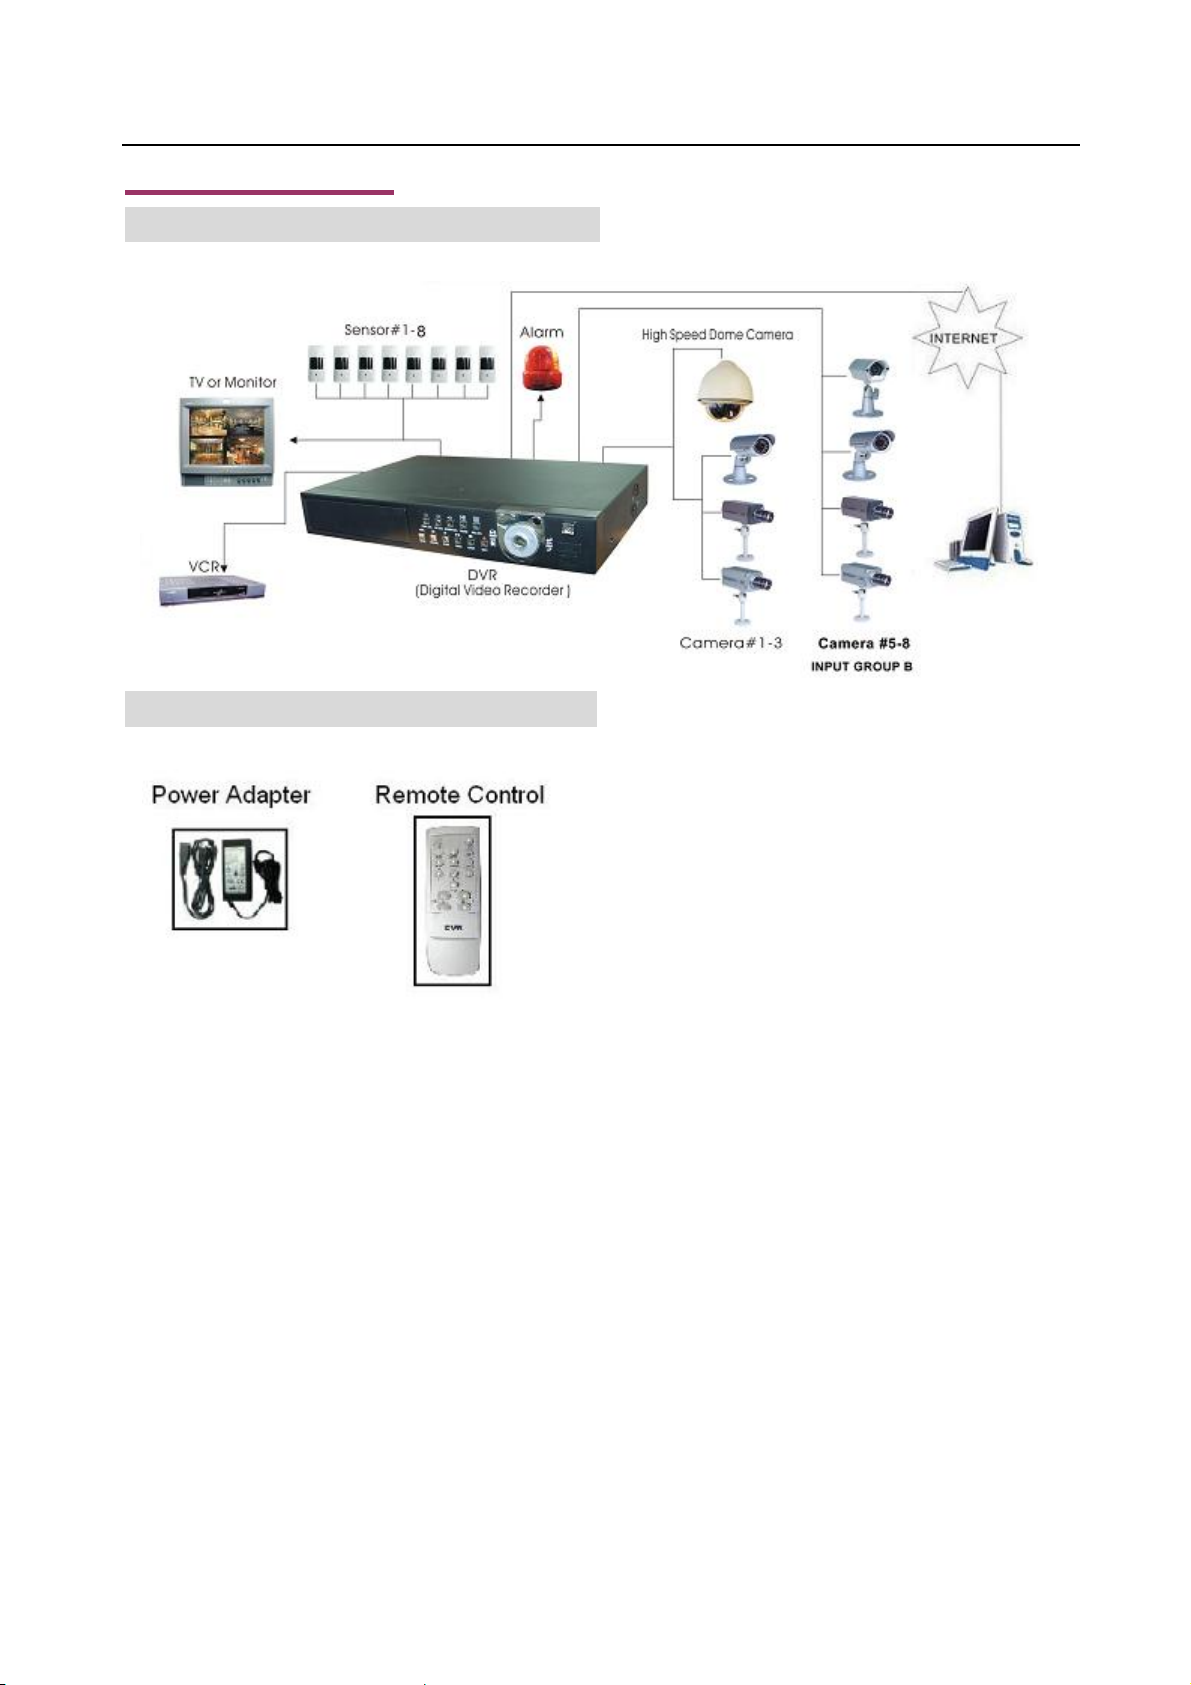
11. Appendix
11.1 System Connect Sketch Map
User’s Manual 8CH DVR
11.2 Fittings Come Along With DVR
- 32 -
 Loading...