

Page 1

QUICK START GUIDE
IP4MCB1
Page 2
WELCOME TO DO-IT-YOURSELF PEACE OF MIND.
Thank you for choosing Defender to protect what you value.
We continually improve our products with your feedback.
Help spread the word by leaving a review!
SHARE YOUR MOMENTS WITH US!
#DefenderMoments
/DefenderUSA @DefenderSolutions
2
Need Help? Visit defender-usa.com/guardsupport
Page 3
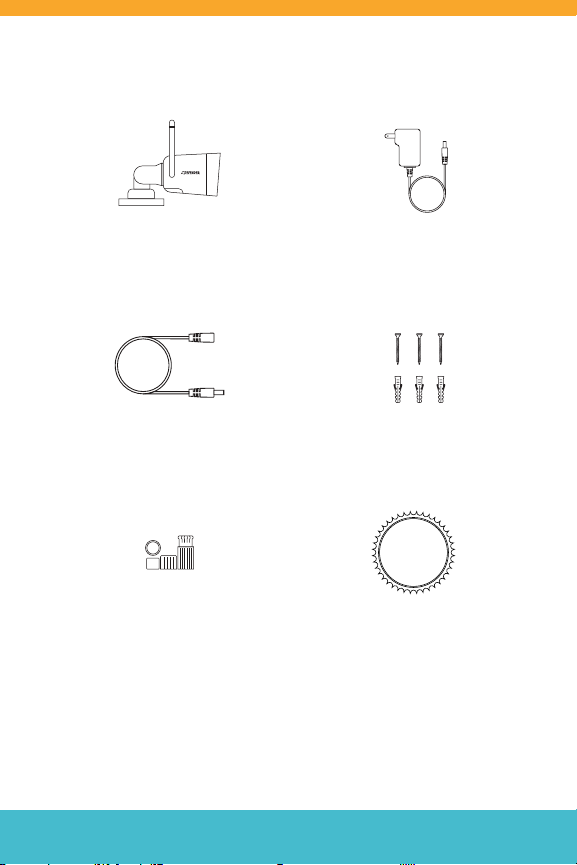
WHAT’S INCLUDED
Camera with pre-installed
16GB Micro SD Card
Camera Power
Extension (25 ft)
Ethernet
Cable Shield
IMPORTANT:
The Defender Guard power supply is not waterproof.
Camera Power
Supply (10 ft)
Camera Mounting
Hardware
LIFETIME
Customer Support
Free Lifetime
Customer Support
3
Need Help? Visit defender-usa.com/guardsupport
Page 4
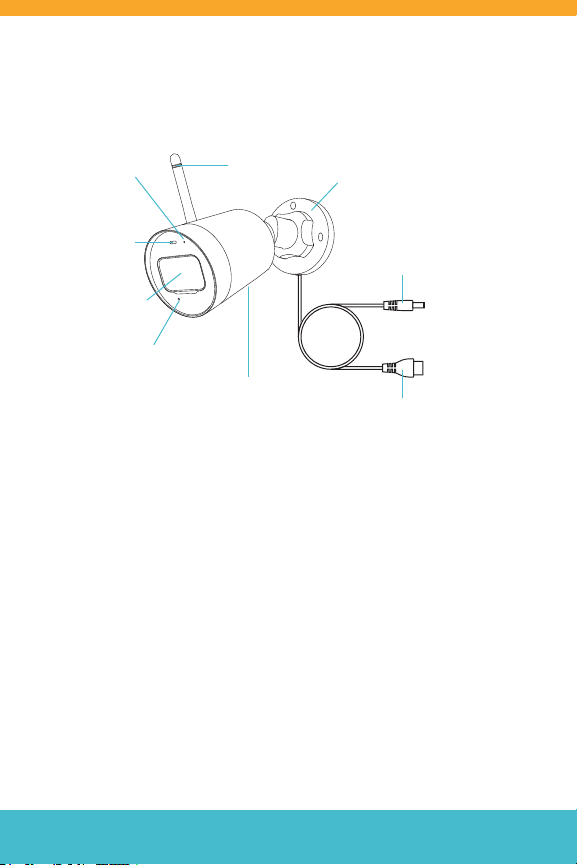
FIRST, SOME LEARNING
Microphone
Night Vision
Sensor
Camera Lens
Indicator Light
(Reset Button & SD Card)
Tip: Turn o the Indicator Light by tapping Device Settings, then Device
Details. Tap More and turn o Device Indicator
Antenna
Lower Cover
Detachable
Mounting Base
Power Adapter
Connector
Ethernet Cable
Connector
WHAT YOU’LL NEED
• High speed internet connection and wireless router
• Drill and drill bit set, or Phillips #2 screwdriver
• A compatible Android or iOS phone or tablet
• Ethernet cable (if you’d like a wired camera setup)
Note: The 4MP Wi-Fi Camera will only work on 2.4 GHz frequency and is
not compatible with 5 GHz networks
4
Need Help? Visit defender-usa.com/guardsupport
Page 5

LET’S GET STARTED
1. Power ON your Camera
Note: You can also setup a wired ethernet connection. See pg. 11
for more details.
2. Download the App
Download the Defender Guard app and follow the steps to create an
account. An email account is required for verication.
Need Help? Visit defender-usa.com/guardsupport
5
Page 6

ADDING YOUR CAMERA
Connect to Wi-Fi and Pair Your Camera
1. After powering on your
device, wait 60 seconds for
the LED to ash green before
pairing.
3. When prompted, select your
Wi-Fi network and enter its
password.
2. Tap + to add your camera.
Scan the QR code on your
camera and follow the
on-screen steps.
4. Enter a device password
to protect your camera.
6
Need Help? Visit defender-usa.com/guardsupport
Page 7

Position and Install Your Camera
Important: Before mounting, test Wi-FI
strength by plugging the camera in and
viewing streaming in the app.
Cement walls, exterior nishes, and thick
insulation can signicantly aect Wi-Fi strength.
Install your camera in a preferred place, at
2.5 m
(8 ft)
a height where you can clearly see faces.
Make sure there is a nearby power outlet.
Position your camera using the adjustable
joints to ensure you get the best video feed.
TIP: From the app home screen, tap Me and then Network Quality
Check. This will quickly run a test over Wi-Fi.
Need Help? Visit defender-usa.com/guardsupport
7
Page 8

USING THE APP
Get To Know Your Home Screen
Do Not Disturb Toggle
Add a CameraLive View
Device Settings
Device Menu
Notications Menu
8
Need Help? Visit defender-usa.com/guardsupport
Account Settings
Page 9

Setting Up Motion Detection
To access notication settings, open Device Settings, tap Device
Details, and then Motion Detection Setting.
Set a schedule to turn o motion
notications
Set how sensitive your camera is to
motion on a scale of 1-5 by tapping
Motion Detection Sensitivity
Tap (or drag) to select a detection
region(s). Region(s) highlighted in
orange detect motion
Need Help? Visit defender-usa.com/guardsupport
9
Page 10

Setting Up Continuous Recording
To access continuous recording settings, open Device Settings, tap
Device Details, and then Local Recording Settings.
Activate Continuous Video Recording
for non-stop recording.
Note: Once your SD card is full, older
footage will be overwritten.
Set a schedule for continuous recording
by tapping Storage Period.
Tap the gear icon or any day of the
week to add recording periods.
10
Need Help? Visit defender-usa.com/guardsupport
Page 11

See It All With Live View
Live Stream
Share Camera to
Other Accounts
Device Settings
Live View
Toolbar
Store a snapshot to
your phone/tablet
(access via
Me >
Local Files)
View Recorded
Footage
Store a video to your
phone/tablet
(access via Me >
Local Files)
Note: To activate continuous recording to your camera SD card, see pg.10
OPTIONAL: WIRED SETUP
If you have an unstable Wi-Fi connection, connect your camera to your router using
an ethernet cable (not included).
When prompted for Wi-Fi,
tap the Menu button at
the top right and then tap
wired add.
Need Help? Visit defender-usa.com/guardsupport
Connect an ethernet
cable to the camera,
the other end inserted
into the router.
Make sure your phone/
tablet is connected to Wi-Fi
and then continue setup.
11
Page 12

DEFENDER-USA.com
© 2019 Defender. All rights reserved.
 Loading...