

Page 1

MOBILE APP MANUAL
COMPATIBLE WITH DVR KITS:
4K1T4B4 – 4K2T8B8 – 4K4T16B16
Page 2

CONTENTS
1 THANK YOU.................................................................................................................................................................................................................................................2
1.1 SUPPORT ........................................................................................................................................................................................................................................2
1.2 FEEDBACK ......................................................................................................................................................................................................................................2
1.3 ADDITIONAL INFORMATION .......................................................................................................................................................................................................2
2 DISCLAIMERS ..............................................................................................................................................................................................................................................3
3 ABOUT .........................................................................................................................................................................................................................................................4
4 GETTING STARTED .....................................................................................................................................................................................................................................5
4.1 DVR SETUP .....................................................................................................................................................................................................................................5
4.2 DEFENDER 24-7 SETUP ................................................................................................................................................................................................................5
4.3 ADDING A DEVICE .........................................................................................................................................................................................................................7
5 DEFENDER 24-7 (MAIN SCREEN) ..............................................................................................................................................................................................................9
5.1 NAVIGATING THE SCREENS .........................................................................................................................................................................................................9
5.2 MAIN SCREEN ............................................................................................................................................................................................................................. 10
5.3 PLAYBACK ................................................................................................................................................................................................................................... 16
5.4 LIVE VIEW .................................................................................................................................................................................................................................... 18
6 NOTIFICATIONS ....................................................................................................................................................................................................................................... 20
7 MORE (APP SETTINGS) ............................................................................................................................................................................................................................ 22
7.1 PICTURES AND VIDEOS ............................................................................................................................................................................................................. 22
7.2 MANAGE SHARING SETTINGS .................................................................................................................................................................................................. 23
7.3 ACCOUNT MANAGEMENT ........................................................................................................................................................................................................ 25
7.4 SETTINGS .................................................................................................................................................................................................................................... 26
7.5 RESET DEVICE PASSWORD ........................................................................................................................................................................................................ 29
7.6 ABOUT ......................................................................................................................................................................................................................................... 29
1
Page 3

1 THANK YOU
CONTENTS
Congratulations on your Defender 4K purchase! You’ve made the best choice to protect what you value most.
We take our product performance and quality very seriously and we want you to be completely satisfied with your purchase.
If you have any questions, or to get the most out of your product, visit us at www.defender-usa.com
specifications or assistance with setup.
1.1 SUPPORT
www.defender-usa.com/support/ www.defender-usa.com/contact/
1.2 FEEDBACK
At DEFENDER® we’re always looking to improve our customer’s experience! Please share any suggestions for this product manual to help us
continue on this journey.
FEEDBACK SURVEY LINK
1.3 ADDITIONAL INFORMATION
The following text is used to provide additional instruction in the manual:
first for additional product information,
www.defender-usa.com/videos/
Indicates that an exception or note about the topic.
Indicates a callout or important detail about the topic.
• Press CTRL + Click in the Table of Contents to move to the section selected.
• Press CTRL + Click on the Table of Content links on each page to return to the content page.
• Press CTRL + Click on any LINK to go to that section (TIP: Press ALT + Left arrow to return).
2
Page 4

2 DISCLAIMERS
CONTENTS
1. When viewing remotely: Video quality and connectivity is dependent on network performance.
2. DEFENDER® highly recommends the use of an Uninterruptible Power Supply (UPS) with surge protection for all products.
3. The product requires a broadband router and broadband internet connection – not included.
4. A user profile must be set up on the DVR before using the system and the mobile app.
5. DEFENDER® does not endorse any DEFENDER® products for illegal activities.
6. DEFENDER® is not responsible or liable in any way for any damage, vandalism, theft or any other action that may occur while a DEFENDER® product
is in use by the purchaser.
7. We reserve the right to change models, configuration or specifications without notice or liability. Product may not be exactly as shown.
8. ©2019 DEFENDER®. All rights reserved. DEFENDER®, the DEFENDER® logo, and other DEFENDER® marks may be registered. All other Trademarks
are the property of their respective owners.
9. Night vision range is up to 40M (130ft) under ideal conditions in ambient lighting. Objects at or beyond this range may be partially or completely
obscured, depending on the camera application.
10. The app requires access to Wi-Fi, 3G or 4G networks (mobile network charges may apply).
11. Firmware and App Updates may affect the accuracy of this manual. Updated manuals are available at www.defender-usa.com
Resources.
12. This product contains small parts. Exercise care when unpacking and assembling the product around children.
3
> Product Page >
Page 5

3 ABOUT
CONTENTS
The Defender 4K 24-7 App links your mobile device to your DVR so you can be notified when an event occurs, access your live view, save recorded
footage, and more. Since the DVR is added to the app, it is important to complete the DVR setup before you start.
4
Page 6

4 GETTING STARTED
CONTENTS
4.1 DVR SETUP
Before you start:
You must setup the DVR system before setting the mobile app. This includes the physical setup, setting up the DVR Activation, and
completing the Setup Wizard. The DVR system comes with a Quick Start Guide to provide easy to follow instruction to get you started. The full
product manual can be accessed at www.DEFENDER-USA.COM/SUPPORT for more detailed instructions on using and customizing your system.
4.2 DEFENDER 24-7 SETUP
Download the DEFENDER 24-7
mobile app from your app store.
Open the App.
Tap Register to begin setup.
Tap Privacy Policy to
review the Defender
statement.
Tap Agree to continue.
5
Page 7
DEFENDER 4K 24-7 SETUP CONTINUED
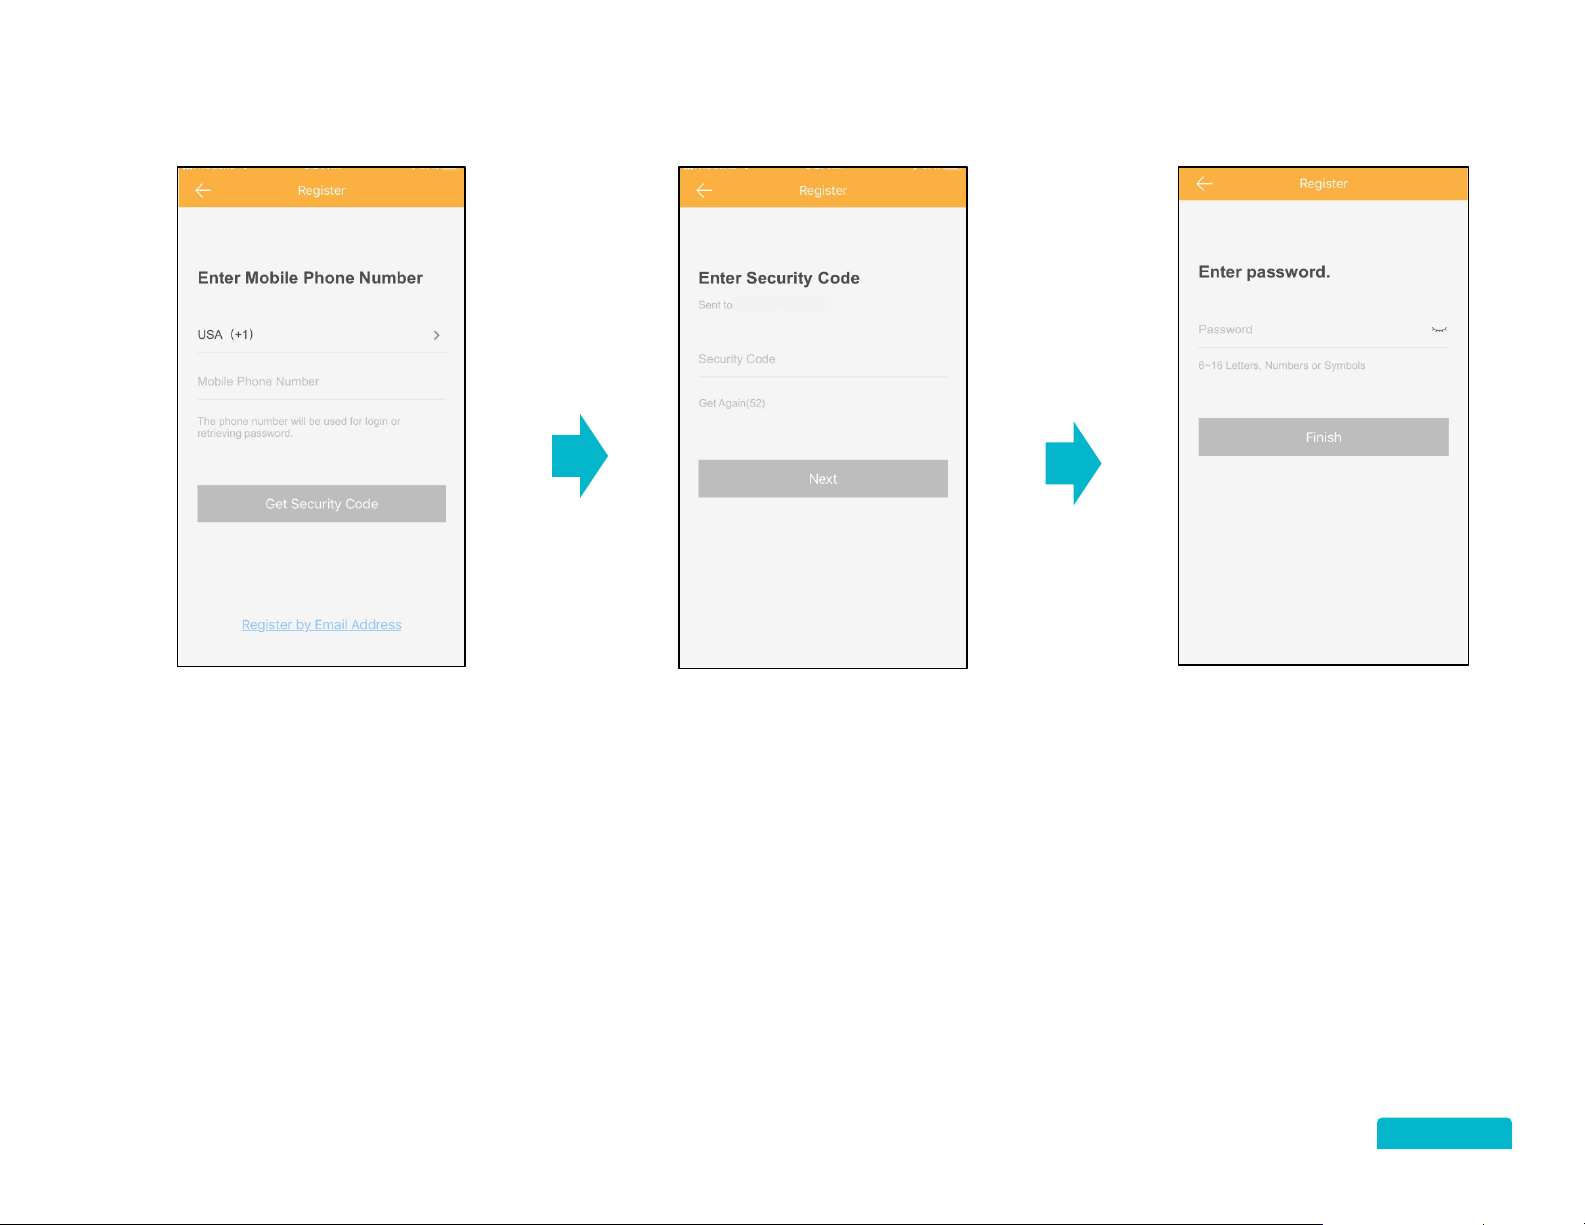
Tap Country to select your
CONTENTS
country code.
If you do not select the
correct region the live
view, playback and alarm
notifications will not work
correctly.
Tap to enter your Mobile
Phone Number OR Tap
Register by Email
Address.
Tap to enter the Security
Code sent to your phone
or email.
Tap Next to continue.
Tap to enter a Password
for the App. The Password
needs to be 6 to 16
characters long and should
include letters, numbers or
symbols.
Tap Finish to continue.
Your account is now
setup and ready to add a
device.
6
Page 8
4.3 ADDING A DEVICE
CONTENTS
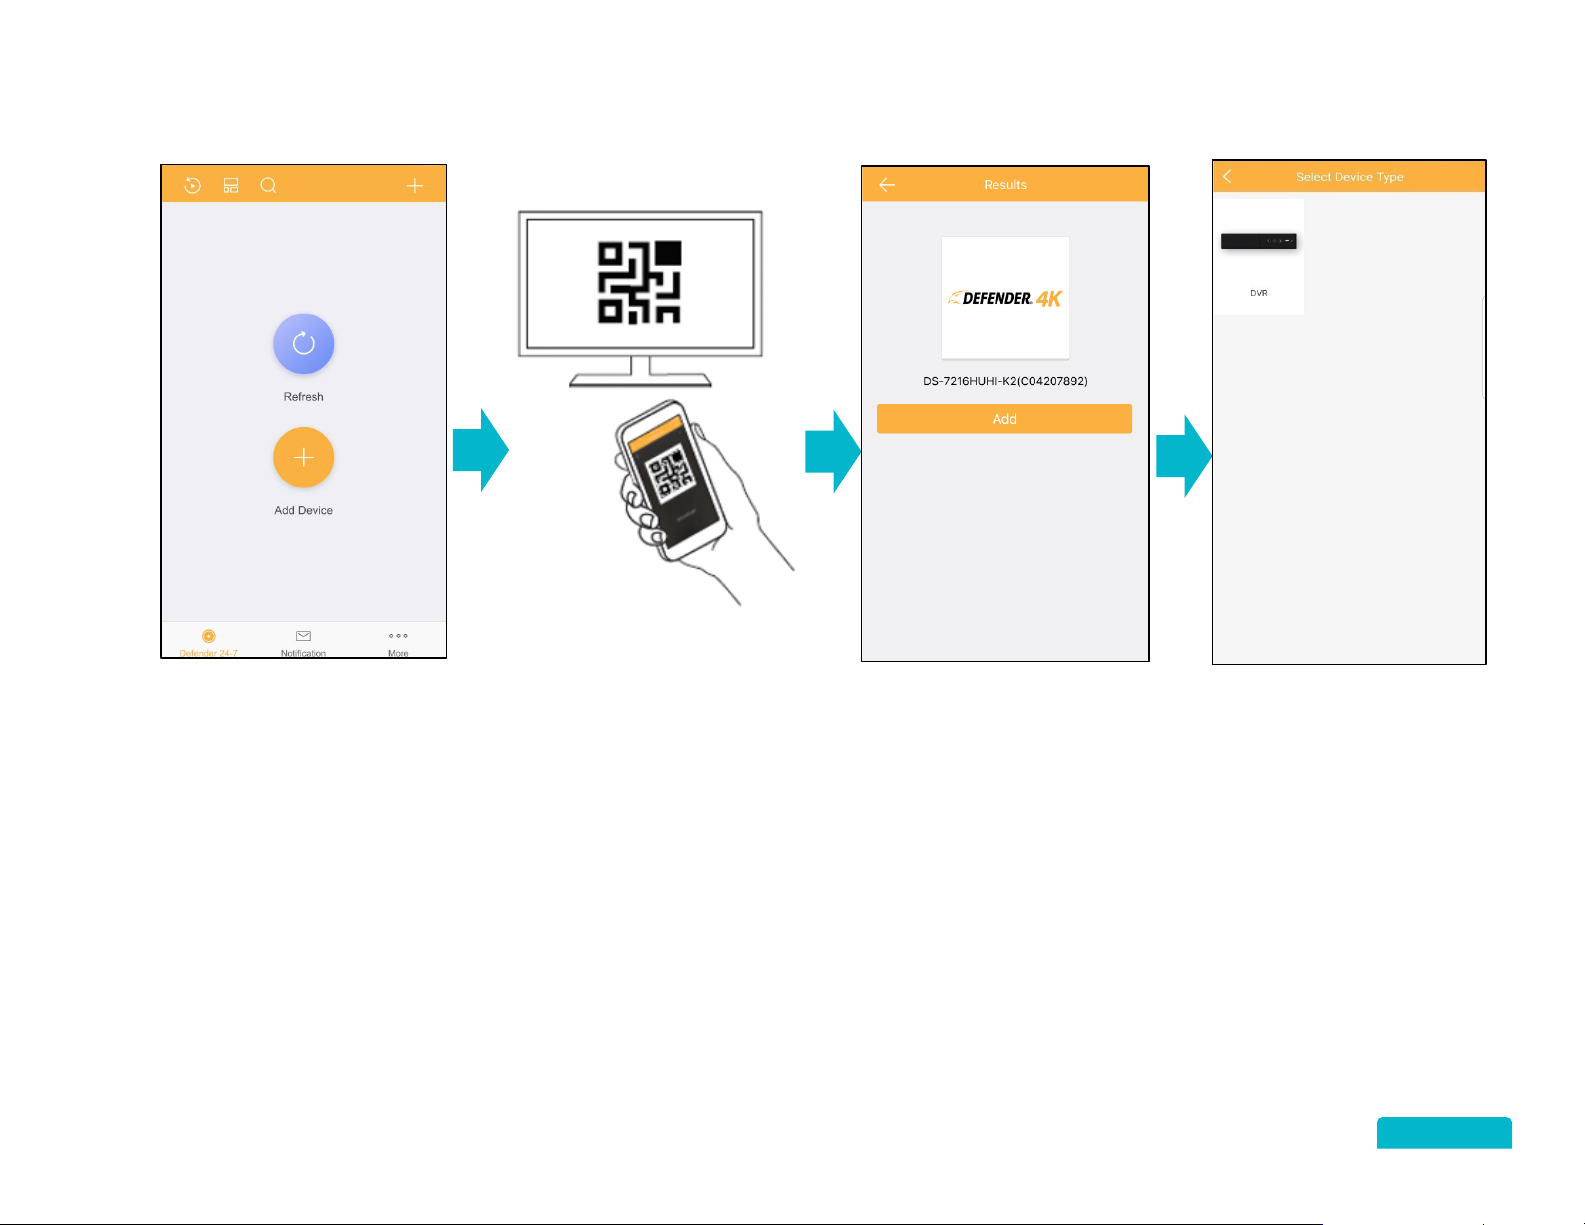
Tap the (+) icon to add the
DVR.
Open the DVR Defender
4K Menu > Configuration
> Network > App Access.
Scan the QR Code by lining
up the code on the mobile
app code reader.
Tap Add to start
connecting the App to the
DVR.
Tap DVR to select the
device type.
7
Page 9
ADDING A DEVICE CONTINUED
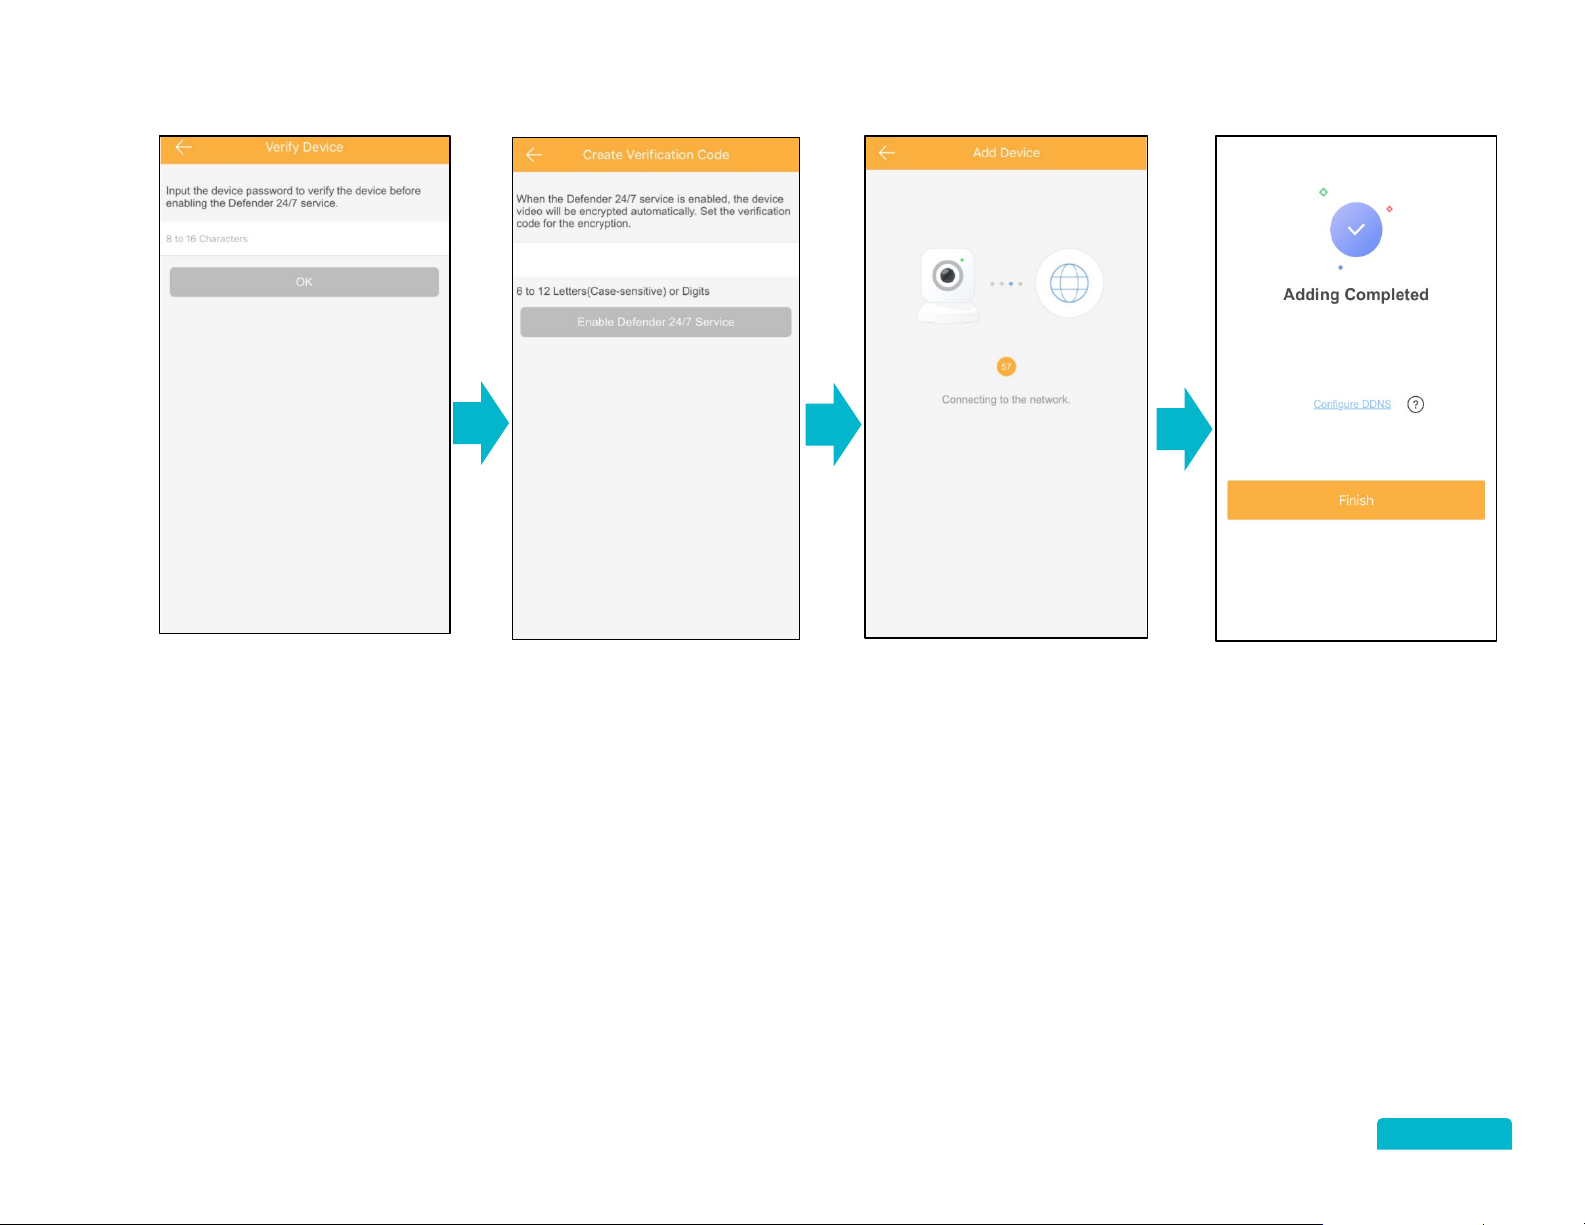
Tap to enter the Password
CONTENTS
created during the DVR
setup.
Tap OK to continue.
Tap to enter the
Verification Code created
during the DVR setup.
Tap OK to continue.
The App will show the
connection status.
Tap Finish to open the
App.
Tap Defender 24-7 on
the bottom of the App
screen to select the DVR
and open the Live View.
8
Page 10

5 DEFENDER 24-7 (MAIN SCREEN)
CONTENTS
5.1 NAVIGATING THE SCREENS
Before you start using the system, here are few of the more standard buttons, commands, and features you may need to use.
BACK: Tap to return to the previous screen.
FORWARD: Indicates that there are more options on the next screen. Tap to open the next screen.
OFF: Indicates that a feature is not selected. Slide to the right to turn on the feature.
ON: Indicates that a feature is selected. Slide to the left to turn off the feature.
EDIT: Tap to allow changes/selection to be made on the screen.
ACCEPT: Tap to accept the changes/selection made on a screen.
SAVE: Tap to save changes/selections make on the screen.
ZOOM IN/OUT: You can zoom in/out on any view screen (live view, recorded footage). Pinch and spread your fingers
outward to zoom in – Pinch and spread your fingers inward to zoom out.
Main screen: Select to add a new device (+), open Live View or select the Recent Live View.
Alerts: All system notification are listed on this screen. If messages are waiting a red dot appears on the icon indicating that
there is something new (system notification, recorded footage or messages).
Settings: Account and app settings and details.
9
Page 11

5.2 MAIN SCREEN
CONTENTS
Playback: Tap to search and play recorded footage. See section for more details.
View Options: Tap to change the My Device views between images and list.
Search: Tap to search footage from the Device, Channel (Camera), and Favorites.
Add: Tap to open the screen menu to:
• Scan QR Code to add another device or to share a device.
• Manual Adding tap the field to enter the Serial No. of the DVR (located on the bottom
of the DVR.
• Online Device to view online accessible devices.
• Add to Favorites to add this device to your favorites for searching.
Recent Live View: Tap the Arrow icon to open the last Live View screen. See section for
more details.
Tap the Down arrow to view the Camera list. Tap the View Options to change to images.
Tap a Camera to open it in Live View. See section for more details.
Tap the App Screens to move through the application.
10
Page 12

VIEW OPTIONS – IMAGES
CONTENTS
When you select the Image view there is a menu option that becomes available.
View Options: Tap to change the Recent Live View and My Device from list view to show
images of the camera views.
Device Menu: Tap the menu icon to view and modify the Device.
DEVICE MENU
Device Name:
• Tap the Arrow icon to open the Device Name screen and select Edit.
• Tap the Alias field to rename the Device. You can choose a name up to 32 characters.
• Tap the Checkmark icon to save the changes.
Linked Cameras:
• Tap the Arrow icon to open the Linked Camera list screen. This screen displays all Cameras
connected to the Device (DVR).
• Tap the Eye icon to Show or Hide the camera on the Defender 24-7 page.
• Tap the Edit icon to change the Camera Name. Tap the Field or the X icon to rename the
Camera.
• Tap the Save icon to keep the change.
11
Page 13

Alarm Notification:
CONTENTS
• Tap the slide switch to turn Alarm Notifications ON/OFF. When ON the system will push alarm
notifications as they happen.
• Tap the slide switch to change to a Notification Schedule. When ON the system will only push
alarm notifications during the times setup in the schedule.
• Tap the Arrow icon to open the Notification Schedule screen.
Create a Schedule
• Tap the Day to start the schedule.
• Tap Set a Time Schedule to create or tap a schedule and Edit to change an existing one.
• Tap the Arrow icon beside the Start/End Time.
• Tap a time on the Clock screen and OK to save your selection.
• Tap the Arrow icon beside Repeat to select multiple days
12
Page 14

CONTENTS
• Tap the Days to include in the schedule.
• Tap the Arrow to return to the schedule screen.
Edit Schedule
You can change the Start/End Time of each schedule. You cannot change the Day.
• Tap the Schedule to open.
• Tap the Start/End Time to change using the Clock option.
• Tap OK
Delete a Schedule
• Tap the Checkmark icon to save your changes.
• Tap Edit to open the selection options.
• Tap the Checkmark icon beside each schedule.
• Tap Delete to remove the schedule.
13
Page 15

Storage Status:
CONTENTS
• Tap the Arrow icon to view the status of the DVR hard drive.
Device Version:
• View the current Version of the mobile app and if there is an update available.
Image and Video Encryption:
This password protects your video and image files using the Verification Code created during the DVR setup (App Access screen). When enabled
you will need to enter the Verification Code to view videos and images.
• Use the slide switch to turn Image and Video Encryptions ON/OFF.
Configure DDNS:
If DDNS is enabled, the device can be accessed via IP Address to allow for remote configuration. To enable DDNS you will require a static IP
Address.
• Tap the Arrow icon to open the Configure DDNS screen.
• You can tap to change the Device Domain Name (optional).
characters (including numbers, letters, and dashes).
• If you change the Port Mapping Mode to Manual you will need to edit the Server Port Number and HTTP
Port Number.
to open.
•
Tap to enter the Device User Name and Device Password.
the App.
There are additional instructions available and examples in the How to Set Port Mapping –
14
The Domain Name should be 1 to 64
This is the DVR user name and password not
Page 16

Remote Configuration:
CONTENTS
This option will only be available if you have configured DDNS. Remote Configuration will allow you to remotely configure the Device parameters
including basis information, time settings, recording schedule, etc.
• Basic Information: Review the basic information about the Device. Tap Edit to make changes and the Save icon to keep your changes.
• Time Configuration: Tap the Arrow icon to change the Time Zone on the Device and the Save icon to keep your changes.
• Synchronization Mode: Tap Synchronize with Phone to update the Device time with the phone time and the Save icon to keep your
changes. NTP time will update automatically at the set interval with the NTP server.
• Change Device Password: Tap the Arrow icon to change the Device password. You will be required to enter the Old password to change.
Tap the Save icon to keep your changes.
• Recording Schedule: Tap the Arrow icon to open the Recording Schedule screen. Use the slide switch to turn the Recording Schedule
ON/OFF. Tap the Day to set a schedule.
Up to 8 time periods can be added in to 1 day, however the time periods cannot overlap. Tap the
Time Period and set the Recording Type and Start/End Time.
• Normal Event: Tap the Arrow icon to open the Event screen. Tap the slide switch to turn each Event ON/OFF.
• Smart Event: This requires an IP Camera – not available from Defender for the 4K system.
• Temperature Measurement: This requires a thermal camera (not included).
Delete Device:
• Tap Delete Device to remote the DVR from you account.
• Tap to Confirm and the Device will be deleted.
15
Page 17

5.3 PLAYBACK
CONTENTS
Tap the Playback icon to open.
Playback Date:
• Tap to open the Calendar.
• Slide the calendar up/down to change the months.
• Tap the Date to select.
Playback Time:
• Tap to open the Time option.
• Slide the hours/minutes up/down to change the time.
Tap the Checkmark icon to select.
My Device:
• Tap the select icon beside the Device or tap the down arrow to select by camera.
Start Playback:
• Tap to search for recorded footage.
16
Page 18

CONTENTS
Tap the Back arrow to return to the search screen. The name of the camera will appear
on the top of the screen.
View Window: The View area will show the recorded footage for the date/time selected. You
can tap and move the image to zoom in/out or use the Zoom icon on the bottom toolbar.
Calendar: Tap the back/forward arrows to change the Date selected.
Time: Tap and drag (left/right) to change the Time selected. Times that have recorded
footage will appear in light blue. As you move the timeline the exact time will appear above
the timeline.
Tap to Pause/Play the playback (the icon will change to play). Tap again to start play or
tap the play icon on the view.
Tap to Pause/Play all playback windows.
Tap to adjust the Sound volume – sound capture is not available on Defender cameras.
Tap to view Multiple cameras (if selected in your search). Tap again to change back to
single view or tap a camera view.
Tap to Zoom in up to 8 times. You can tap hold and move the image to change the view.
Tap zoom again to return to regular view.
Tap to take a Snapshot of the current view. The image will be saved to the app. See
section 7.1 PICTURES AND VIDEOS
for details.
Tap to start a Video capture of the current view. Tap again to stop the video.
Tap to adjust the Playback Speed of the footage.
Tap to change the image quality between HD and Basic.
17
Page 19

5.4 LIVE VIEW
CONTENTS
Tap the Back arrow to return to the search screen. The name of the camera will appear
on the top of the screen.
Tap to view the List of available devices and cameras.
Tap the Down arrow beside the device name to view
the available cameras.
Tap the Select icon beside the device/camera to
select for view.
Tap the Menu icon to view the options at the bottom of the screen.
• Playback: Tap to open the playback screen for the camera selected.
• Share: Tap to use the apps available on the mobile device to share live footage.
• Settings: Tap to view the Device Information screen.
• Add to Favourites: Tap to add the selected camera to the favourites list.
• Cancel: Tap to close the menu.
View Window: The View area will show the current view from the camera selected.
You can tap and move the image to zoom in/out or use the Zoom icon on the bottom
toolbar. Tap the Number icons below the view to change the number of cameras to
view. Double tap on a camera to change to single view.
Tap to change the image quality between HD and Basic. The default view is Basic
because HD will use more data.
18
Page 20

Sound capture is not available on Defender cameras.
CONTENTS
Tap to Pause/Play the current view (the icon will change to play). Tap again to play or tap the play icon on the view.
Tap to Zoom in up to 8 times. You can tap hold and move the image to change the view. Tap Zoom again to return to regular view.
Tap to take a Snapshot of the current view. The image will be saved to the app. See section 7.1 PICTURES AND VIDEOS
Tap to start a Video capture of the current view. Tap again to stop the video. The video will be saved to the app.
PTZ (pan – tilt – zoom) is not available on Defender cameras. If a PTZ camera is connected use the on-screen arrows to move the view.
Sound recording is not available on Defender cameras.
Tap to Pause/Play all playback windows.
for details.
19
Page 21

6 NOTIFICATIONS
CONTENTS
Tap Notifications on the bottom of the screen to open the list of events. Events on this screen are sorted by date.
Filter:
• Tap Filter to select events from different dates.
• Tap to select the Device and Date.
• Tap Complete to view a list of events from the Device and Date selected.
• Tap Clear to remove a Filter.
• Tap the X icon to close the Filter without applying the selections.
Edit:
• Tap Edit to select events to Mark as Read or to
Delete.
• Tap the Select icon beside each event or Select All to
include all events.
• Tap Mark as Read to remove the selected events from the unread list.
• Tap Delete to remove the selected events from the list.
• The number of events on the Notification icon will change based on the number of
events selected.
• Tap Cancel to exit the screen without selecting.
20
Page 22

Playback:
CONTENTS
• Tap Event to open the view screen.
• Tap the Back arrow to return to the list of events.
• Tap the Menu icon to select Live View or Save Image.
o Live View: Return to the Live View screen.
o Save Image: Save the event to the app. See section 7.1 PICTURES AND VIDEOS
for details.
• Tap Playback to view the event.
• Tap the Back arrow to return to the list of events.
• Tap the Pause/Play icon to stop and play the event.
• Tap and move the Progress Bar to move through the footage.
• Tap the Camera icon to take a snapshot of the current image.
• Tap the Video icon to record part of the event. Tap again to stop recording.
Images and videos will be saved to the Picture and Video section.
21
Page 23

7 MORE (APP SETTINGS)
CONTENTS
7.1 PICTURES AND VIDEOS
When you take a snapshot or create a video file from Live View, Playback, and Notifications, the file is saved in the Pictures and Videos screen.
Tap the More icon from any main screen and select Pictures and Videos to open the list screen. Files are sorted on this screen by the date of
creation.
Tap the Back arrow to return to the More screen. The name of the camera will appear
on the top of the screen.
Edit:
• Tap Edit to select images by tapping them. You can select:
o Share: To use your mobile device apps to send the image.
o Delete: To remove the image from the app. The app will ask for verification before
deleting the file.
Preview:
• Tap an image to open the Preview screen.
• Tap the Back arrow to return to the file list.
• You can also Share and Delete the file from the Preview
screen by tapping the icon.
• If the file is a Video tap the Play icon to playback.
• Tap the Pause/Play icon to start and stop the playback.
• Tap to move the Progress Bar to move through the footage.
22
Page 24

7.2 MANAGE SHARING SETTINGS
CONTENTS
You can share Devices (DVR) with other mobile devices through the sharing feature. To share a device on another mobile device it must be set up
on the Defender 24-7 app. See section 4 GETTING STARTED
My Device:
• These are devices you have added by scanning the QR Code on the DVR.
Other Devices:
• These are devices added by the device owner that you can share with another device.
Sharing Options:
• Tap Add Recipient.
• Enter the Mobile Phone Number or Email Address of the person you want to share with.
• Enter Remarks to leave the recipient details about the request. Never send the device password in the
remarks section.
• Tap the Checkmark icon to send. The recipient will receive a notification that there is a device to share.
• Tap Scan QR Code to scan the recipient’s device QR Code. The recipient will receive a notification that there
is a device to share.
for details.
• The Recipient can find their QR Code by tapping More > Account Management > My QR Code. The code
can be sent to the requester and scanned remotely.
23
Page 25

Receiving a Share Request:
CONTENTS
When a device has been shared by either Email/Text Message or Scanning the recipient receives a notification that a device has been shared.
• When you open the App, the notification will appear.
• Tap View Now to open the notification.
• Tap Later to delay sharing.
• Tap Accept to add the device to your account.
• Tap Reject to decline adding. Once selected the device will need to shared again to add it.
• Tap the Back arrow to open the main screen. The Device will appear as an option to view.
24
Page 26

7.3 ACCOUNT MANAGEMENT
CONTENTS
Your account details are listed on this screen. These include your User Name, Email Address (if entered during setup), Mobile Phone Number (if
entered during setup), and Country/Region.
QR CODE
Allows another account holder to share their device with you. Your code can be scanned to allow access. See section 7.2
SETTINGS for details.
CHANGE PASSWORD
Tap to enter your Old Password, New Password and Confirm. This changes the password for your mobile device app.
DELETE ACCOUNT PERMANENTLY
You can permanently delete your account. You will be able to create a new account with the same login details as the deleted account, however
all data will be lost.
• Tap the Arrow icon to open the Delete Account Permanently screen.
• Read the Caution statement and tap Submit Request.
• Tap Confirm to continue or Cancel to exit without deleting your account.
• You will be sent a Security Code to either your Mobile Phone Number (text) or Email Address based on with
option you used to Register your account.
MANAGE SHARING
• Enter the Security Code and tap Delete Account. Your account will be deleted.
25
Page 27

7.4 SETTINGS
CONTENTS
MESSAGE PUSH NOTIFICATIONS
• Use the slide switch to allow notifications to be pushed to the mobile app as they occur.
NOTIFICATION SOUNDS
SAVE DEVICE PARAMETERS
• Use the slide switch to turn Save Device Parameters ON/OFF. When enabled the device parameters will be saved automatically. This means
that you will not need to input the password to access encrypted images, live view or playback.
AUTO-RECEIVE ALARM AFTER POWER ON
• Tap the Arrow icon to open the options.
• Select to receive a Soft or Intense sound alert when a notification is received. The Intense option will sound
for 30 seconds.
• Tap Custom Sound to select a ring tone from your mobile device.
mobile device, the Notification Sounds will not work.
If you turn off the sound on your
• Use the slide switch to turn Auto-receive Alarm ON/OFF. When enabled notifications will be received by the app automatically when the
mobile device is powered on.
GENERATE QR CODE
Use this feature to generate a QR code for a device that has been added manually (not by scanning a QR code).
This feature may consume more batter power.
• Tap to select the Device.
• Tap Generate QR Code to create.
• Tap Save to keep the code on the mobile device.
26
Page 28

HARD-DECODING PREFERRED
CONTENTS
• Use the slide switch to turn Hard-Decoding ON/OFF. When enabled, hard-decoding can provide better decoding performance and lower CPU
usage when playing HD videos in Live View and Playback.
TRAFFIC STATISTICS
• Tap the Arrow icon to open the Traffic Statistics screen. Tap Clear All to reset the traffic stats to 0.
• This displays the data usage while using Wi-Fi and your mobile network by Day, Month, and since your
started using the app.
WI-FI SETTINGS
• Tap the Arrow icon to open the Wi-Fi Setting screen. The feature allows you to create a QR Code for the Wi-
Fi Network.
• Tap to enter the Wi-Fi Name and Password.
• Select the Encryption, if None is selected the Wi-Fi Password will not be required.
• Tap Generate to create the QR Code.
• Tap Save to keep the code on the mobile device.
27
Page 29

FLOATING LIVE VIEW
CONTENTS
• Use the slide switch to turn Floating Live View ON/OFF. When enabled the current live view will display on
the Defender 24-7 screen.
RESUME LATEST LIVE VIEW
• Use the slide switch to turn Latest Live View ON/OFF. When enabled the latest live view will show when the app is opened. If there are
multiple windows all view will resume when the app is opened.
TABLET MODE
• Use the slide switch to turn Tablet Mode on if your mobile device is a tablet. The app will need to be restarted for this change to take affect.
DISPLAY CHANNEL-ZERO
• Use the slide switch to turn Display Channel-Zero ON/OFF. This is used when viewing multiple cameras in real time to decrease the
bandwidth. To use this feature, it must be enabled on the DVR – Defender 4K Menu > Configuration > Live View > Channel-Zero
Encoding,
AUTO-DOWNLOAD UPGRADE FILE
• Use the slide switch to automatically download app updates when the mobile device is connected to Wi-Fi.
28
Page 30

7.5 RESET DEVICE PASSWORD
CONTENTS
This is another option for changing the Device (DVR) Password. Scan the QR Code and enter a new password. You will be asked for the old
password when resetting the Device Password. Enter the Old, New, and Confirm passwords on the screens.
7.6 ABOUT
• About: Tap to access the Defender 4K Privacy Policy.
• Logout: Tap to logout of the app.
• Exit: Tap to exit the app.
29
 Loading...