

Page 1

1
High Definition
Network Video Recorder
User Manual
Page 2

2
IMPORTANT! PLEASE READ.
RISK OF ELECTRIC SHOCK
ATTENTION
DO NOT OPEN
DO NOT RETURN THIS PRODUCT TO THE STORE
Please contact a DEFENDER® customer support representative first regarding any additional information on
product features, specifications or assistance with setup. Please contact us via one of the methods below:
Email: support@defender-usa.com
Online web chat: www.defender-usa.com
Telephone: 1.866.946.7828
WARRANTY INFORMATION
We take quality very seriously. This is why all of our products come with a one-year warranty from the original
purchase date against defects in workmanship and materials. If you have warranty or support issues, please
contact us: support@defender-usa.com
DEFENDER® Canada: 4080 Montrose Road Niagara Falls, Ontario, Canada L2H 1J9
DEFENDER® USA: 60 Industrial Parkway #Z64 Cheektowaga, NY, USA 14227
For more information about your product’s warranty, please visit our website at www.defender-usa.com
WARRANTY TERMS
1 . DEFENDER® products are guaranteed for a period of one year from the date of purchase against defects
in workmanship and materials. This warranty is limited to the repair, replacement or refund of the
purchase price at DEFENDER®’s option.
2 . This warranty becomes void if the product shows evidence of having been misused, mishandled or
tampered with contrary to the applicable instruction manual.
3 . Routine cleaning, normal cosmetic and mechanical wear and tear are not covered under the terms of
this warranty.
4 . The warranty expressly provided for herein is the sole warranty provided in connection with the product
itself and no other warranty, expressed or implied is provided. DEFENDER® assumes no responsibilities for
any other claims not specifically mentioned in this warranty.
5 . This warranty does not cover shipping costs, insurance, or any other incidental charges.
6 . You MUST contact DEFENDER® before sending any product back for repair. You will be sent a Return
Authorization number with return instructions. When returning the product for warranty service, please
pack it carefully in the original box with all supplied accessories, and enclose your original receipt or
copy, and a brief explanation of the problem (include RA #).
7 . This warranty is valid only in Canada and the continental U.S.
8 . This warranty cannot be re-issued.
Page 3

3
DEFAULT PASSWORD INFORMATION
To ensure your privacy, this device supports
password protection. The default, all-access
username is admin, the default password is 12345.
To ensure your ongoing privacy, we strongly
recommend setting a password as soon as possible.
Choose something that you’ll remember, but that
others would be unlikely to guess.
THANK YOU
Congratulations on your purchase of this Defender
NVR (Network Video Recorder)
You’ve made a fine choice to protect what you
value most. Let’s take a moment to talk about the
setup of your manual.
Note: The basic settings really do work well, and
we’d only suggest changing them if you’ve got a
really specific plan in mind.
IMPORTANT! PLEASE READ.
1 FPS is recommended to be used for HD image quality recoding.
The IR illumination range is up to 150 ft in low light conditions. Objects at or beyond this range may be
partially or completely obscured, depending on camera application.
Cameras are weather resistant, they are not weatherproof. Not intended for use in direct exposure to water,
rain or snow.
DEFENDER® highly recommends the use of an Uninterruptable Power Supply (UPS) with surge protection for
all products.
DEFENDER® does not endorse any DEFENDER® products for illegal activities.DEFENDER® is not responsible or
liable in any way for any damage, vandalism or any other action that may occur while a DEFENDER® product
is in use by the purchaser.
We reserve the right to change models, configuration or specifications without notice or liability.Product may
not be exactly as shown.
©2015 DEFENDER®. All rights reserved. DEFENDER®, the DEFENDER® logo and other DEFENDER® marks may
be registered.All other Trademarks add to the bottom of this page :
Page 4

4
TABLE OF CONTENTS
IMPORTANT! PLEASE READ. .............................................................................................................................................................2
DO NOT RETURN THIS PRODUCT TO THE STORE ........................................................................................................................2
Warranty Information ..............................................................................................................................................................2
Warranty Terms ........................................................................................................................................................................2
Important! please read. ..........................................................................................................................................................3
Thank You ................................................................................................................................................................................3
Default Password Information ................................................................................................................................................3
CONNECTING YOUR NVR ...............................................................................................................................................................5
NVR and Camera Setup .........................................................................................................................................................5
Requirements before operating the NVR ...............................................................................................................................5
Basic Connection Setup .........................................................................................................................................................6
Mounting Cameras ................................................................................................................................................................6
Ethernet Connection ..............................................................................................................................................................7
USB Mouse Connection ..........................................................................................................................................................7
Powering On the NVR .............................................................................................................................................................7
Connecting Your NVR .............................................................................................................................................................8
Nvr Wizard Set Up ...................................................................................................................................................................8
Network ...................................................................................................................................................................................8
How do I make my Setup Wizard show up again? ................................................................................................................8
Ipc Setup .................................................................................................................................................................................9
Deleting an IP Camera .........................................................................................................................................................10
Editing IP Information ...........................................................................................................................................................10
Assigning an Alias to a Camera ..........................................................................................................................................10
Changing the Camera Order ..............................................................................................................................................10
Changing Camera Username and Password ....................................................................................................................10
Connecting Your NVR ...........................................................................................................................................................11
Schedule ..............................................................................................................................................................................11
HDD ........................................................................................................................................................................................11
Wizard Completion ...............................................................................................................................................................12
BASIC NVR SETUP .........................................................................................................................................................................13
Accessing The Quick Menu Using The Mouse .....................................................................................................................13
Accessing The Quick Menu Using The Remote ...................................................................................................................13
Live View Screen Options......................................................................................................................................................13
Changing View Option (Only For 8 Channel Nvr Systems) ................................................................................................13
Accessing The Screen Views Using The Mouse ....................................................................................................................13
Access The Pop-Up Toolbar And Select A Different View Mode. ..........................................................................................13
Basic Nvr Set Up ....................................................................................................................................................................14
Main Menu ............................................................................................................................................................................14
Accessing The Main Menu ..................................................................................................................................................14
Changing General Settings For Nvr ....................................................................................................................................14
Changing The Date ..............................................................................................................................................................14
Changing The Time ...............................................................................................................................................................14
Basic Nvr Set Up ....................................................................................................................................................................15
Changing The Date Format ..................................................................................................................................................15
Changing The Language .....................................................................................................................................................15
Record ...................................................................................................................................................................................15
Page 5

5
Enable or Disable Record ....................................................................................................................................................15
Select the Channel drop down list and select the desired channel. .................................................................................15
To copy this setting to another channel or to all channels: ...............................................................................................15
Record Setup ........................................................................................................................................................................15
Setting the Continuous Record Schedule ..........................................................................................................................16
Setting Motion Record Schedule .........................................................................................................................................16
copy this setting to another Channel (s) ............................................................................................................................16
Mobile Viewing......................................................................................................................................................................17
Enabling Motion Record ......................................................................................................................................................19
Setting up Privacy Zones .....................................................................................................................................................20
Using the Netviewer Software ...............................................................................................................................................21
Basic Functions within the Menu .........................................................................................................................................21
Understanding the Playback Screen ...................................................................................................................................22
Event Search .........................................................................................................................................................................23
Backup to USB .......................................................................................................................................................................23
Advanced Setup ...................................................................................................................................................................24
Troubleshooting ....................................................................................................................................................................25
Advanced Setup ...................................................................................................................................................................25
IP Camera Options ..............................................................................................................................................................25
Deleting an IP Camera .........................................................................................................................................................25
Advanced Setup ...................................................................................................................................................................26
Editing IP InformationINSERT Edit Icon ................................................................................................................................26
Assigning an Alias to a Camera ..........................................................................................................................................26
ADVANCED SETUP ........................................................................................................................................................................27
Changing the User Password ..............................................................................................................................................27
Changing the Port ...............................................................................................................................................................27
Setting Protocol ....................................................................................................................................................................27
Changing the User Name ...................................................................................................................................................28
LIVE DISPLAY ..........................................................................................................................................................................28
Changing the Camera Order ..............................................................................................................................................28
Naming Channels And Positioning ......................................................................................................................................29
Displaying or Hiding Camera Name and Time ...................................................................................................................29
Changing Camera Name ....................................................................................................................................................29
Changing on Screen Display Position of Date &Time .........................................................................................................30
Changing the Colour ...........................................................................................................................................................30
Sequence Mode Control ......................................................................................................................................................31
Changing Sequence mode Cycle Time ..............................................................................................................................31
VGA/HDMI Resolution ...........................................................................................................................................................31
Changing Transparency .......................................................................................................................................................31
Image Control .......................................................................................................................................................................31
Selecting IR Cut Mode ..........................................................................................................................................................32
IR Cut Display ........................................................................................................................................................................32
Lens Flip .................................................................................................................................................................................33
Angle Flip ..............................................................................................................................................................................33
Changing the Back Light .....................................................................................................................................................33
TABLE OF CONTENTS
Page 6

6
Adjusting Noise Reduction ...................................................................................................................................................34
WDR-Wide Dynamic Range ..................................................................................................................................................34
AGC – Automatic Gain Control ............................................................................................................................................34
Record Options .....................................................................................................................................................................35
Mainstream ...........................................................................................................................................................................35
Changing Resolution ............................................................................................................................................................35
Changing Frames Per Second (FPS) ....................................................................................................................................36
Changing Bitrate Mode ........................................................................................................................................................36
Changing BitrateINSERT ........................................................................................................................................................36
Substream .............................................................................................................................................................................37
Changing Resolution ............................................................................................................................................................37
Changing Frames Per Second (FPS) ....................................................................................................................................37
Changing Bitrate Mode ........................................................................................................................................................38
Mobilestream ........................................................................................................................................................................38
Changing Resolution ............................................................................................................................................................39
Changing Frames Per Second (FPS) ....................................................................................................................................39
Changing Bitrate Mode ........................................................................................................................................................39
Networking ...........................................................................................................................................................................40
Manual Networking Setup ....................................................................................................................................................41
Change the Active X settings listed below: .........................................................................................................................42
Switch ....................................................................................................................................................................................43
Setting up Email Alerts ..........................................................................................................................................................43
Dynamic DNS (DDNS) ...........................................................................................................................................................45
Device Menu .........................................................................................................................................................................45
Setting up an Overwrite Schedule .......................................................................................................................................47
Cloud Storage INSERT CLOUD STORAGE ..............................................................................................................................47
How to use NVR Cloud Storage ............................................................................................................................................47
Enable Cloud Storage ..........................................................................................................................................................48
System ...................................................................................................................................................................................49
Changing the Date ...............................................................................................................................................................49
Changing the Time .............................................................................................................................................................. 49
Changing the Date Format ..................................................................................................................................................50
Changing the Language .....................................................................................................................................................50
Select your desired language. Setting Video Format ..........................................................................................................50
Setting Menu Time Out .........................................................................................................................................................50
Changing the Daylight Savings Time (DST) ........................................................................................................................51
Time Offset ............................................................................................................................................................................51
NTP ........................................................................................................................................................................................52
Maintain ................................................................................................................................................................................52
Load Default Setting .............................................................................................................................................................53
Events ....................................................................................................................................................................................53
GLOSSARY ....................................................................................................................................................................................54
TROUBLESHOOTING ......................................................................................................................................................................55
TABLE OF CONTENTS
Page 7

7
This section will help you with all your connection how to steps. Instructions may vary depending on the
model but this will help guide you through the basics.
DEFAULT PASSWORD INFORMATION
To ensure your privacy, this device supports
password protection.
• All access username: admin
• All access password: 123456
NOTE:
For increased security, we strongly recommend setting up your
own password as soon as possible. Choose something that
you’ll remember, but that others would be unlikely to guess.
NVR AND CAMERA SETUP
It is recommended that you set-up the cameras
before starting the NVR set-up. Some features on
the NVR will not be available without the cameras
installed completely.
REQUIREMENTS BEFORE OPERATING THE
NVR
1 . The mouse is required for part of the setup,
therefore make sure your NVR is in a location
that allows you to easily use the mouse.
2 . Set-up the cameras on the NVR, it will take
approximately 20-30 seconds for the NVR to
recognize the camera.
3 . If using a television, use your television remote
control to switch the video source to match the
port being used for the NVR.
(example: HDMI or VGA).
CONNECTING YOUR NVR
Page 8
8
HDMI
• Power Light - When the light is green the
NVR is on.
• HDD - When the light is flashing the NVR is
recording. When the light is solid the NVR is
not recording.
• USB Port - Allows you to attach a USB memory
stick when backing up files from the NVR or
when updating software
NOTE:
A software/firmware update should only be done if a
DEFENDER® representative recommends it.
HDMI
• LAN Port - Used to connect the cameras to the
NVR using the Ethernet cables (included).
• Audio In - Used to connect a microphone if you
wish to record audio.
• VGA - Used to connect your monitor to the NVR
using a VGA cable.
• HDMI - Used to connect the NVR to a monitor
using an HDMI cable (included).
• Power Input - Used to connect the NVR
power cord.
• ON/OFF Switch - Turns the NVR ON/OFF.
BASIC CONNECTION SETUP
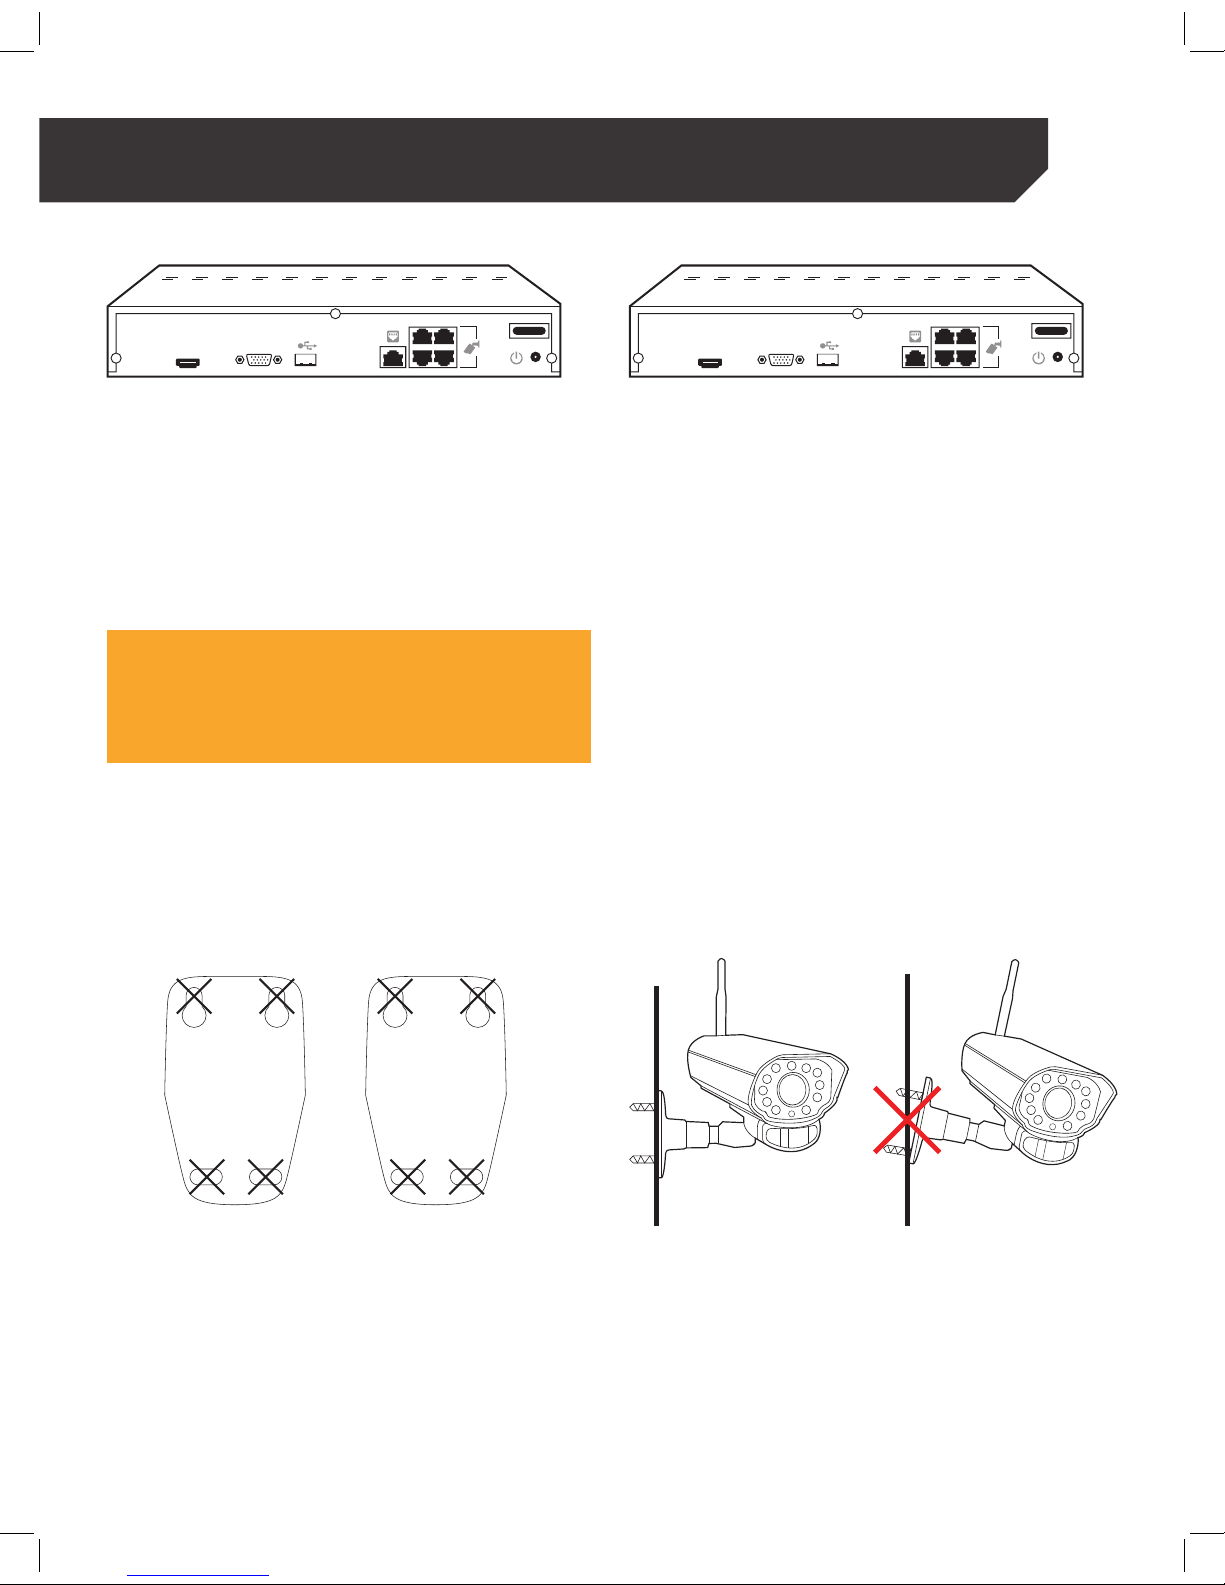
MOUNTING CAMERAS
Please insert Camera mounting guide. Connecting the Cameras Take picture of camera and cable, and
then to connecting to the NVR
1
2
3
4
Repeat steps 2 and 3 for all cameras.
Rép
étez les étapes 2 et 3 pour toutes
l
es cameras
.
R
epetir pasos 2 y 3 para todas las cámaras.
DRILL HOLES IN
SELECTED AREAS
P
ERCEZ LES TROUS AUX
ENDROITS SÉLECTIONNÉS
TALADRE AGUJEROS EN LAS
A
REAS SELECCIONADAS
1 . Connect one end of the Ethernet cable (cord labeled camera) to the LAN port on the camera.
2 . Connect the opposite end of the Ethernet cable to the LAN port on the back of the NVR.
3 . Repeat steps 1 – 2 for all cameras.
CONNECTING YOUR NVR
Page 9

9
ETHERNET CONNECTION
Connect DVR to modem
Connectez DVR au modem
HDMI
1 . Connect one end of the Ethernet cable to the
Ethernet port located on the back of the NVR.
2 . Connect the opposite end of the same Ethernet
cable to your router or wall Ethernet port.
USB MOUSE CONNECTION
HDMI
1 . Connect the USB mouse to one of the USB ports
located on the NVR
POWERING ON THE NVR
1 . Connect the power cord to the back of the NVR
and plug the cord into a power outlet.
2 . Turn the power switch on the back of the NVR to
the ON position.
CONNECTING YOUR NVR
Page 10
10
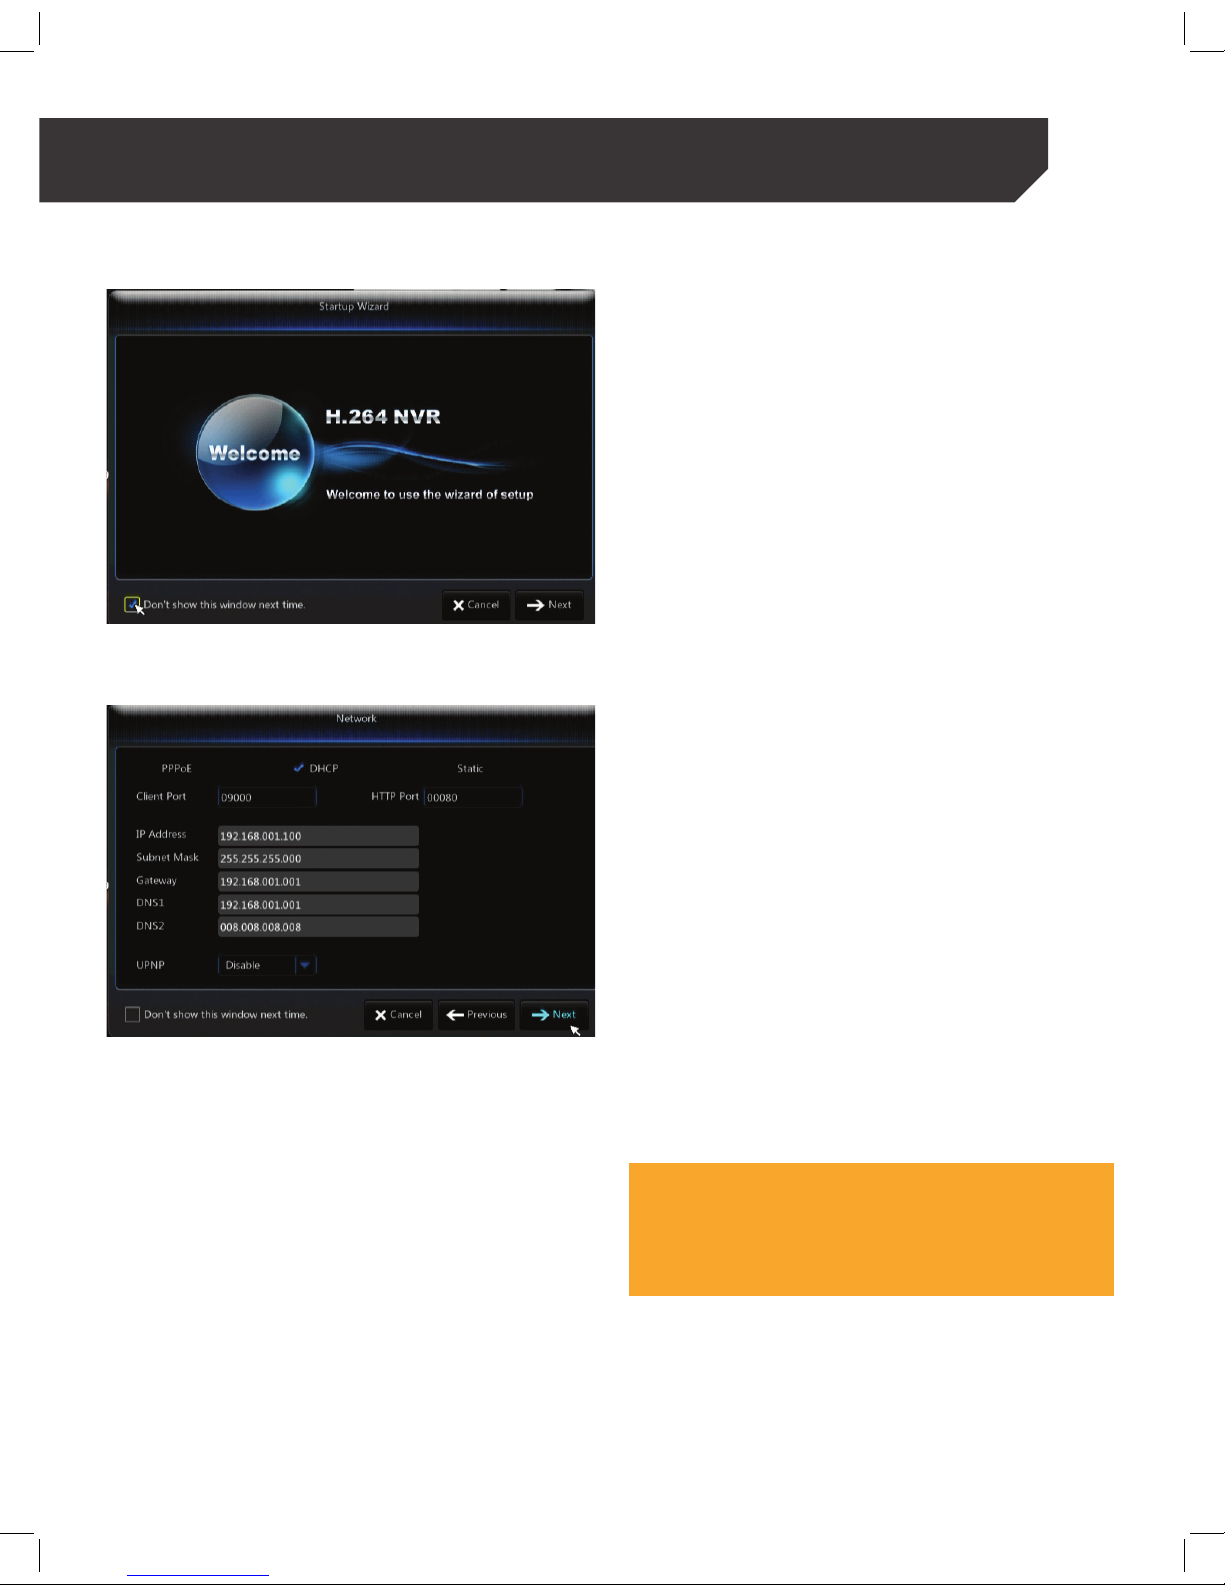
NVR WIZARD SET UP
The Setup Wizard will appear every time your
NVR is restarted.
NETWORK
The Setup Wizard will guide you through steps to get
your NVR up and running in no time! Select Next in
order to continue the Setup Wizard or select
Cancel to exit.
HOW DO I MAKE MY SETUP WIZARD SHOW UP AGAIN?
1 . Simply go to the
Advance Tab > Maintain Sub-tab.
2 . Click on the Load Default and choose All, then
select Save.
3 . A message confirming the change of your
settings will appear.
4 . Select OK to confirm or Cancel on the Main
Menu screen.
5 . Your NVR will restart and your Setup Wizard will
re-appear.
TIP!
If you don’t wish to see the Setup Wizard each time the NVR is
restarted, select the option: “Do not show this window
next time”.
CONNECTING YOUR NVR
Page 11

11
This section provides you with your IP address,
Gateway, and Ports used by the NVR.
TIP!
Using the QR code set up is the easiest and fastest way to get
to view your camera through Internet Explorer. To manually set
up your NVR to view through Internet Explorer, please see the
advanced section of your manual.
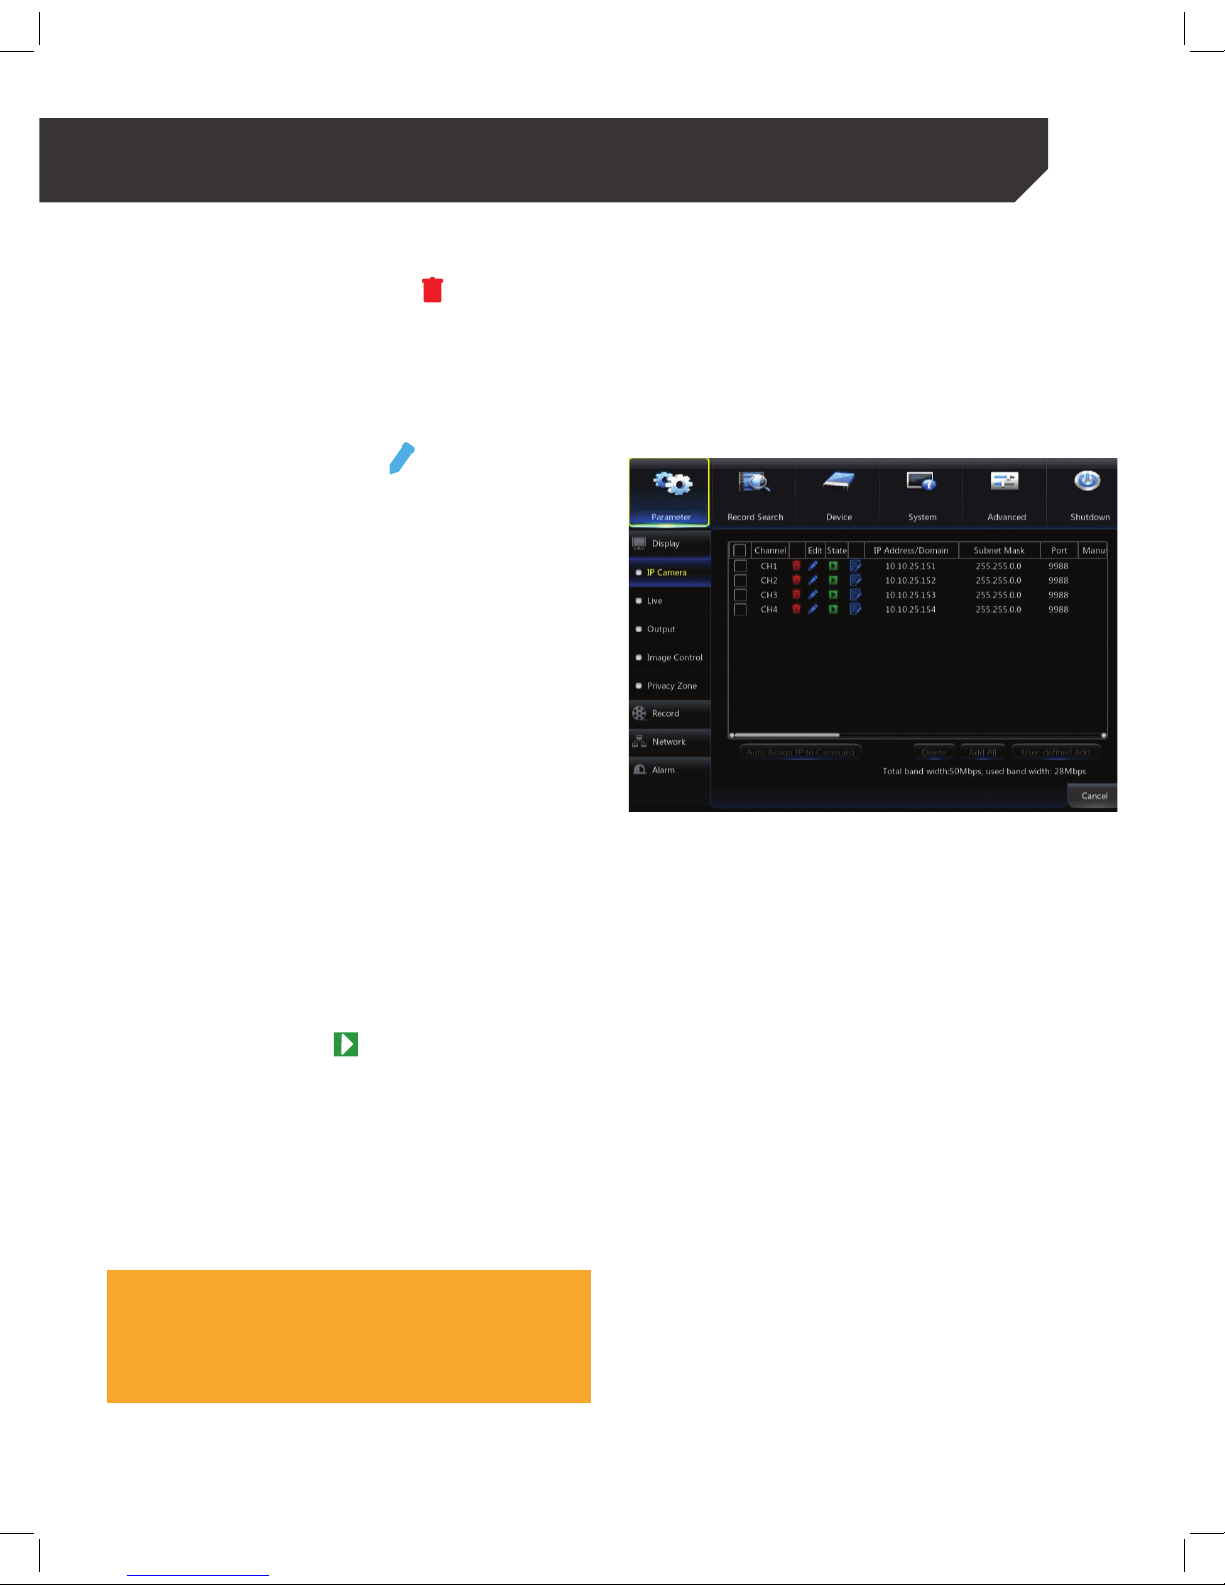
IPC SETUP
TIP!
In order to add or delete an IP camera manually, make sure that
the Switch Mode in the Network section is in Manual
This section provides the steps to access your
cameras. Make sure your cameras are properly
connected to view the camera in the Setup Wizard.
NOTE:
If there is already a camera in the location, it will switch loca-
tions with the camera you are moving.
TIP!
n easier and faster way to change the order of the camera view
is to select the image and drag it to another location. You will
need to use the mouse to perform this action.
IMPORTANT!
The yellow numbers that appear on the top left corner of the
channel represent the LAN port (on the back of the NVR) that
the camera(s) plug into. These numbers will not change when
the channel is moved in the Live View screen.
CONNECTING YOUR NVR
Page 12
12
DELETING AN IP CAMERA
1 . Select the Red Trash Can icon shown beside
the channel.
2 . The following message will appear: “Are you sure
you would like to delete this IP camera?”.
3 . Select OK to delete or NO to cancel.
EDITING IP INFORMATION
1 . Select the Blue Pencil icon under edit for the
channel you wish to change.
2 . Select Next to move forward.
ASSIGNING AN ALIAS TO A CAMERA
1 . Select the checkbox next to Alias and a
keyboard will appear.
2 . Enter the name you would like to assign
to the camera
3 . Select Enter to keep the changes and repeat
steps 1 – 2 for each camera you wish to change.
4 . Select Next to move forward.
CHANGING THE CAMERA ORDER
1 . Select the Arrow icon next to the Position box.
2 . The drop down list shows all locations available
(example: Left Top, Left Bottom, Right Top, and
Right Bottom).
3 . Select the new location for the camera.
4 . Make sure you are in the Live View screen.
5 . In the Live View screen, select and hold the
camera you would like to move.
6 . Drag the camera to the new location and
release it.
7 . Select Next to move forward.
CHANGING CAMERA USERNAME AND PASSWORD
NOTE:
FOR SECURITY REASONS IT IS HIGHLY RECOMMENDED TO
CHANGE THE USER NAME AND PASSWORD OF YOUR CAMERA To
change the username and password access the Camera Edit
feature.
CONNECTING YOUR NVR
Page 13
13
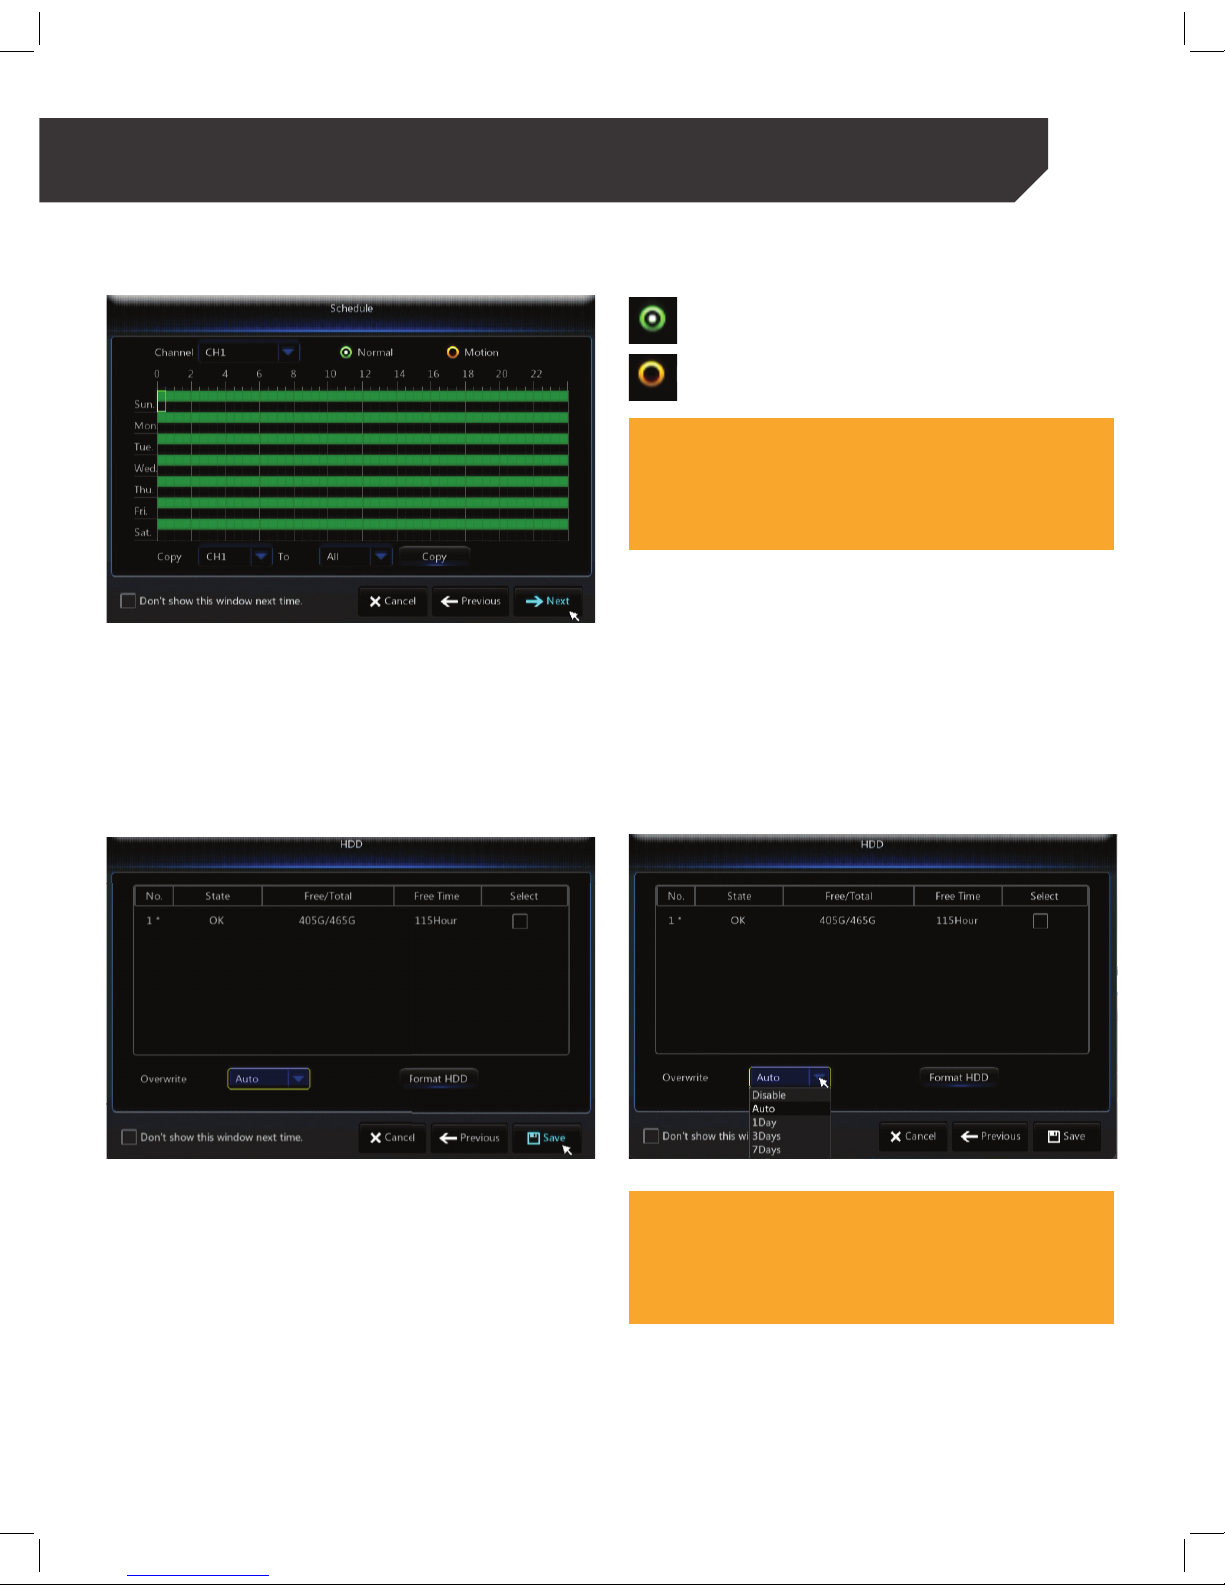
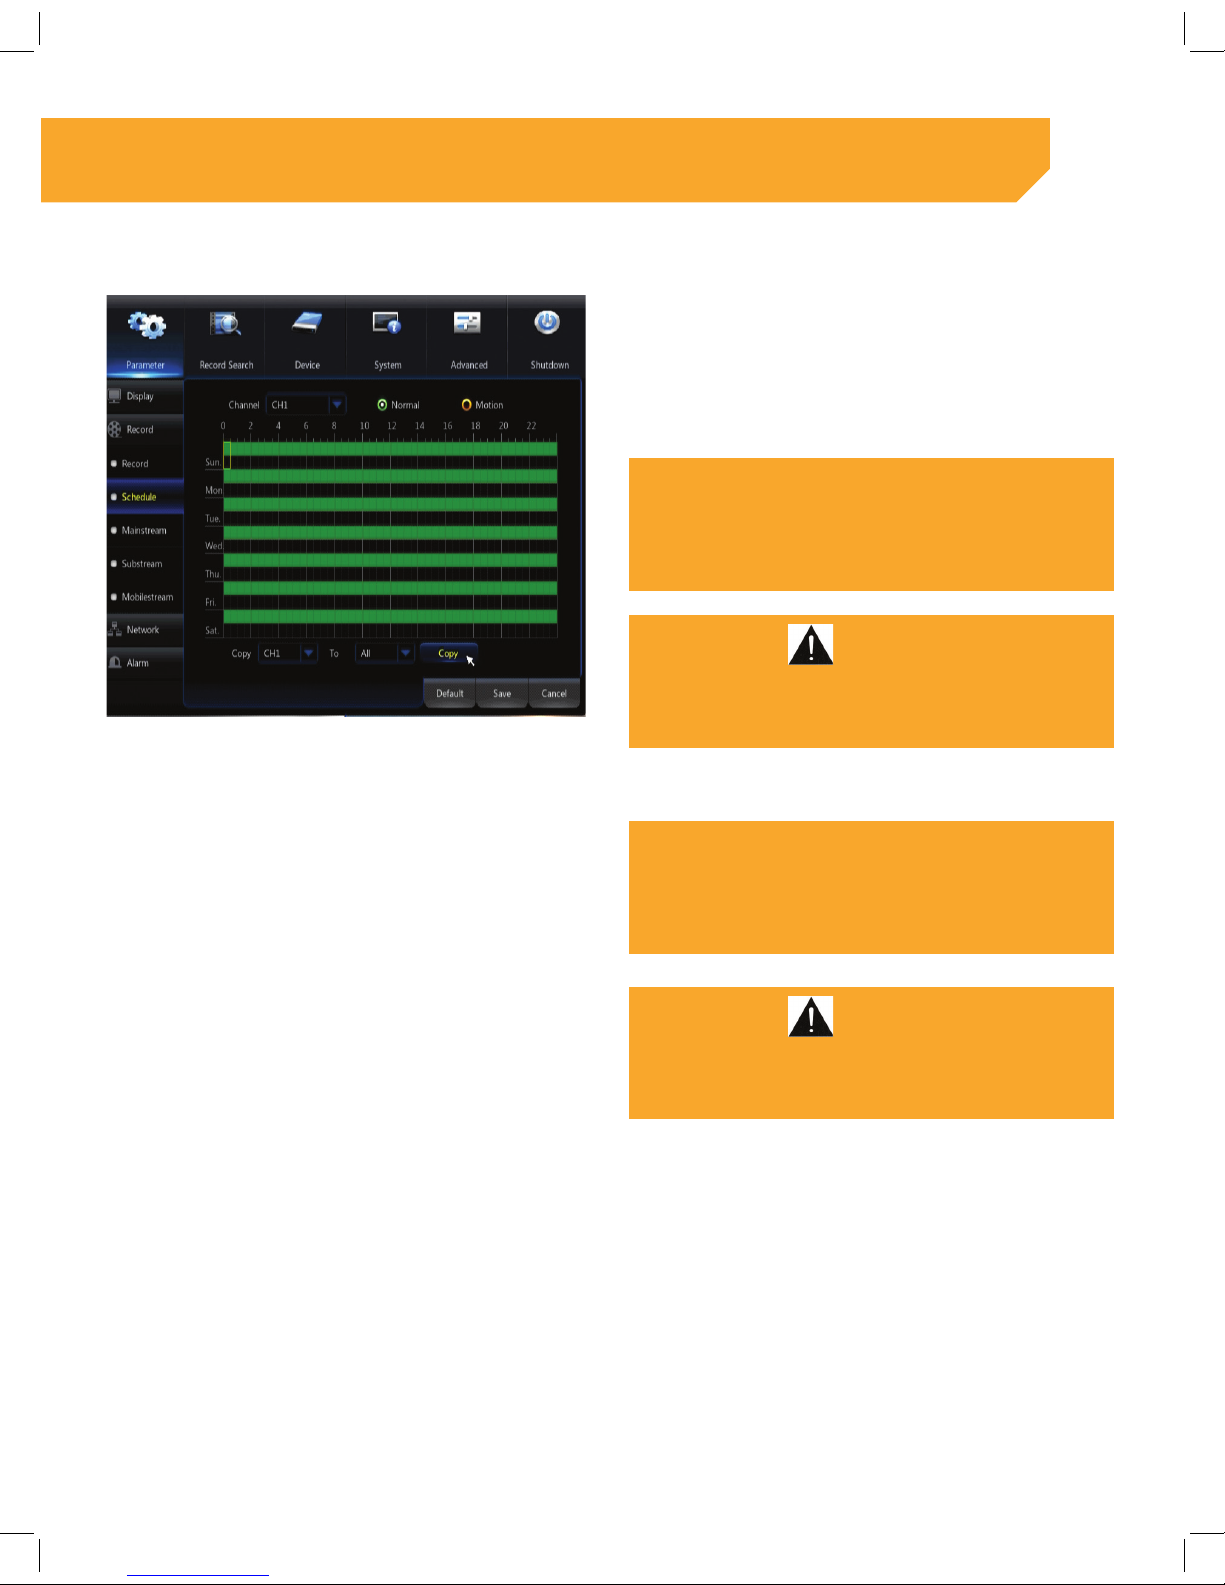
SCHEDULE
This section allows you to set up a schedule
for recording video. For easy navigation, we
recommend you use your mouse. There are two
different recording options available: motion and
continuous.
: will continuously record.
: will only record when motion is detected.
IMPORTANT!
If motion recording is selected, you need to select all desired
orange boxes (motion areas) and set up the function in the
menu. Go to the Parameter Menu > Device > Alarm and select
Motion to enable the function and set up the motion area.
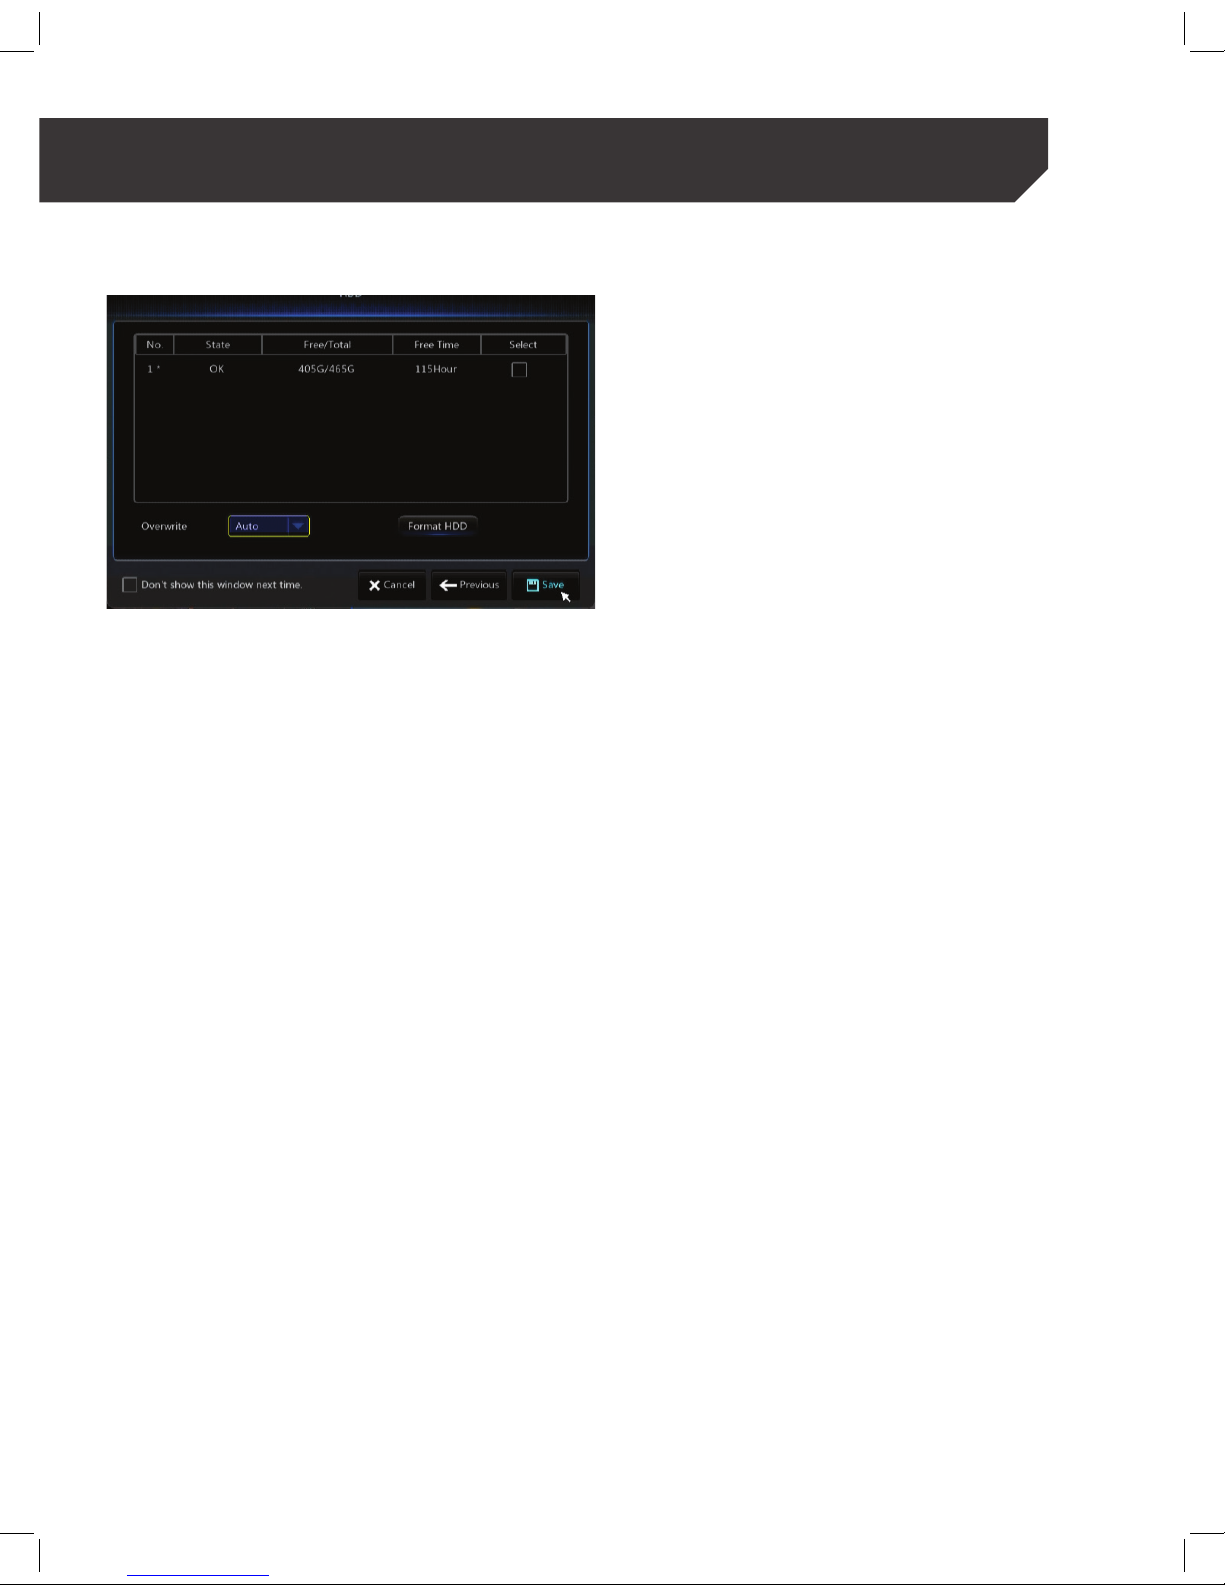
HDD
This section provides details on viewing the status of
your Hard Drive.
1 . Hard Drive status OK or Full
2 . Space available versus total Hard Drive space
3 . Free time available for recording
In order to format your Hard Drive, select the
checkbox beside the available free time, then click
on Format HDD.
IMPORTANT!
Formatting the NVR will delete all footage. Make sure you back-
up your information before formatting.
CONNECTING YOUR NVR
Page 14
14
WIZARD COMPLETION
Select Save to apply your settings. Once applied you
will return to the live camera view.
The basic setup will allow you to get your system
up and running. This section covers all basic menu
navigation, setting up recording and searching
recorded footage features.
CONNECTING YOUR NVR
Page 15
15
BASIC NVR SETUP
ACCESSING THE QUICK MENU USING THE MOUSE
1 . Right click on the mouse to open the Toolbar.
(The Toolbar will appear at the bottom center of
the screen)
ACCESSING THE QUICK MENU USING THE REMOTE
1 . Press the Menu button on the remote to open the
Toolbar (the Toolbar will appear at the bottom
center of the screen)
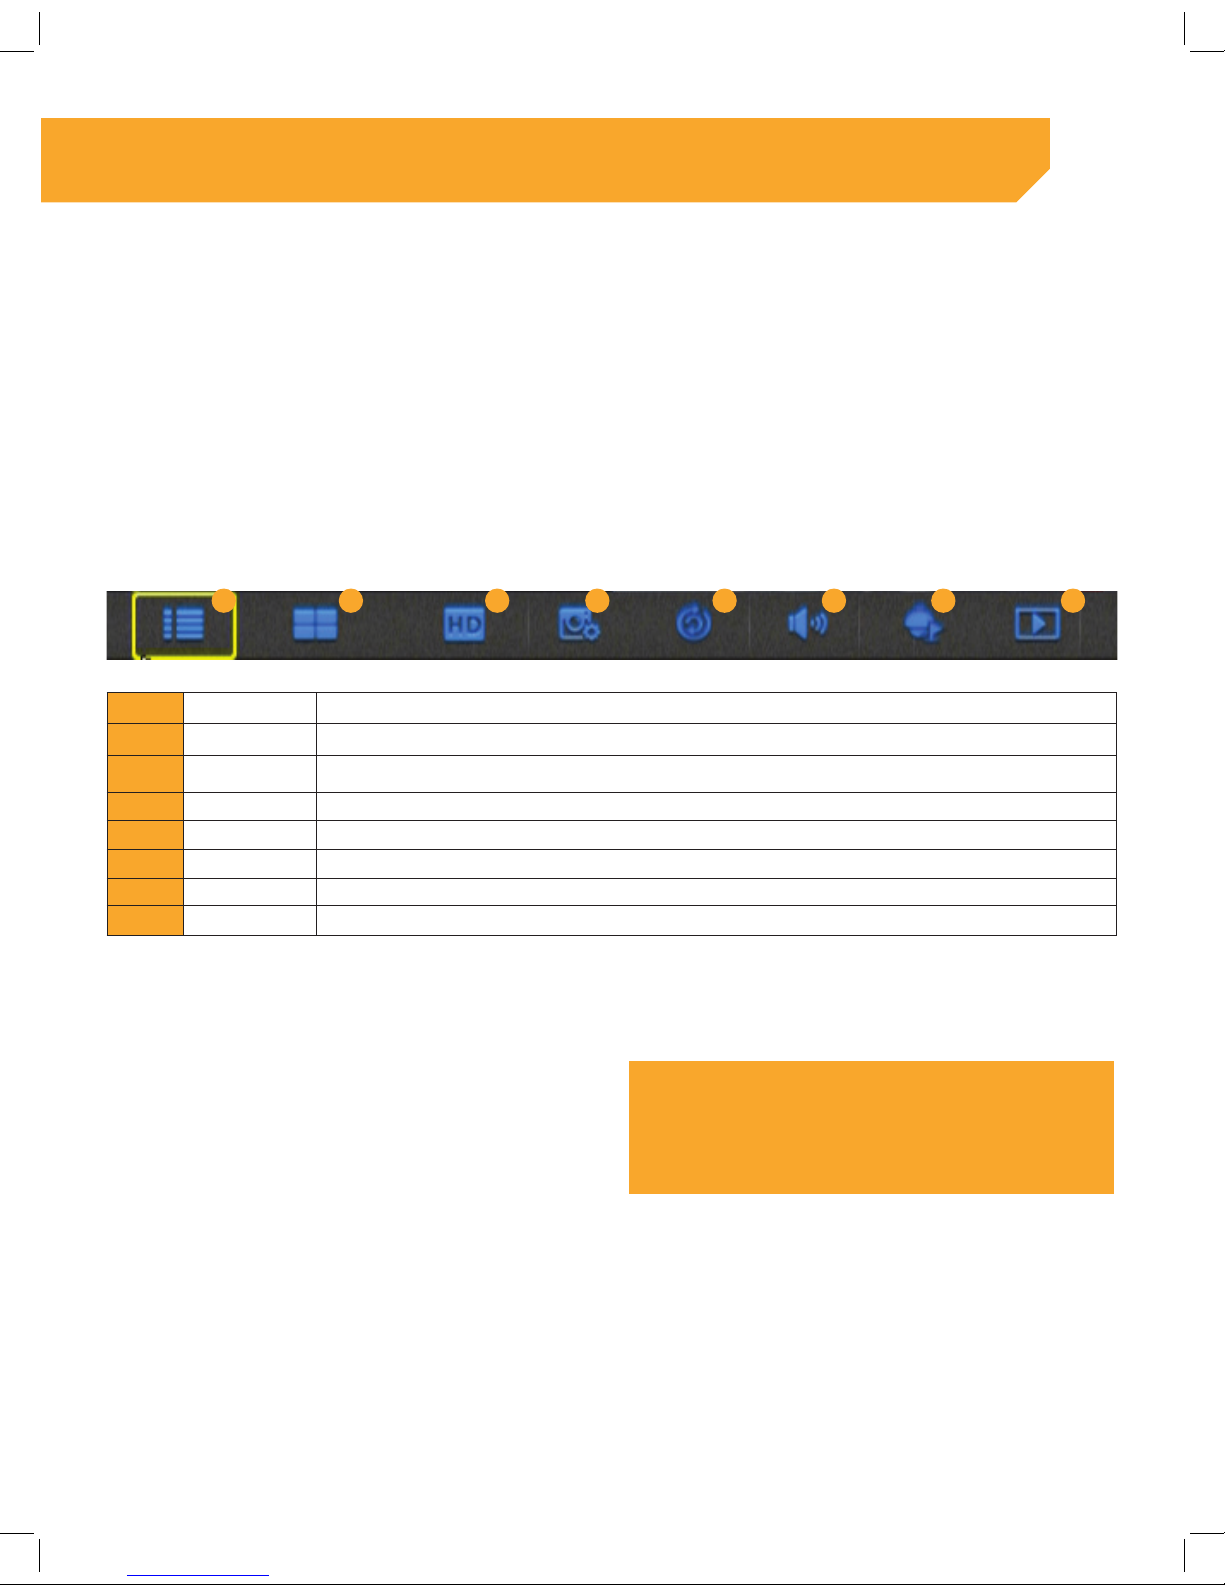
1 Main Menu Allows you to access main menu.
2 View 4 Allows you to view cameras in quad screen mode.
3 HD Allows you to switch between mainstream and substream.
4 Balanced Allows you to balance your image according to the different options.
5 Sequence Allows you to cycle through all cameras attached in live viewing mode.
6 Volume Allows you to set the volume if a microphone is attached.
7 Cruise Allows you to navigate a PTZ camera when available.
8 Playback Allows you to search and view recorded footage.
LIVE VIEW SCREEN OPTIONS
When you restart the NVR all channels will be displayed.
CHANGING VIEW OPTION (ONLY FOR 8 CHANNEL NVR SYSTEMS)
1 . Access the pop-up Toolbar and select the View
Mode icon.
2 . Select the Blue Arrow icon for more options
3 . Select your desired View Option.
TIP!
A 4 channel NVR will only have quad screen or full screen
modes available.
ACCESSING THE SCREEN VIEWS USING THE MOUSE
1 . Double click the channel to open the full
screen view.
2 . To exit Full Screen Mode
ACCESS THE POP-UP TOOLBAR AND SELECT A DIFFERENT VIEW MODE.
1 . Accessing the Screen Views using the remote,
press the channel number on the remote to
open the full screen view.
2 . To exit Full Screen Mode press the channel
number again to exit the full screen view.
BASIC NVR SET UP
1 2 3 4 5 6 7 8
Page 16
16
MAIN MENU
ACCESSING THE MAIN MENU
TIP!
It is recommended to use the mouse going forward within the
menu.
1 . Right click the mouse anywhere on the Live View
screen to open the Menu.
2 . The Toolbar will appear at bottom center
of the screen.
3 . Select the first icon in the Toolbar which will be
the Main Menu icon.
In the main menu screen and the sub-screens within
the main menu, you will have three tab options
available at the bottom left:
Cancel: will allow you to exit a screen and the
Main Menu.
4 . Default: will restore NVR back to factory settings
for that specific portion of the NVR.
5 . Ok: will allow you to apply changes when
changes were made or to exit a screen as well.
NOTE:
If you select Ok when changes have been made, those changes
will remain.
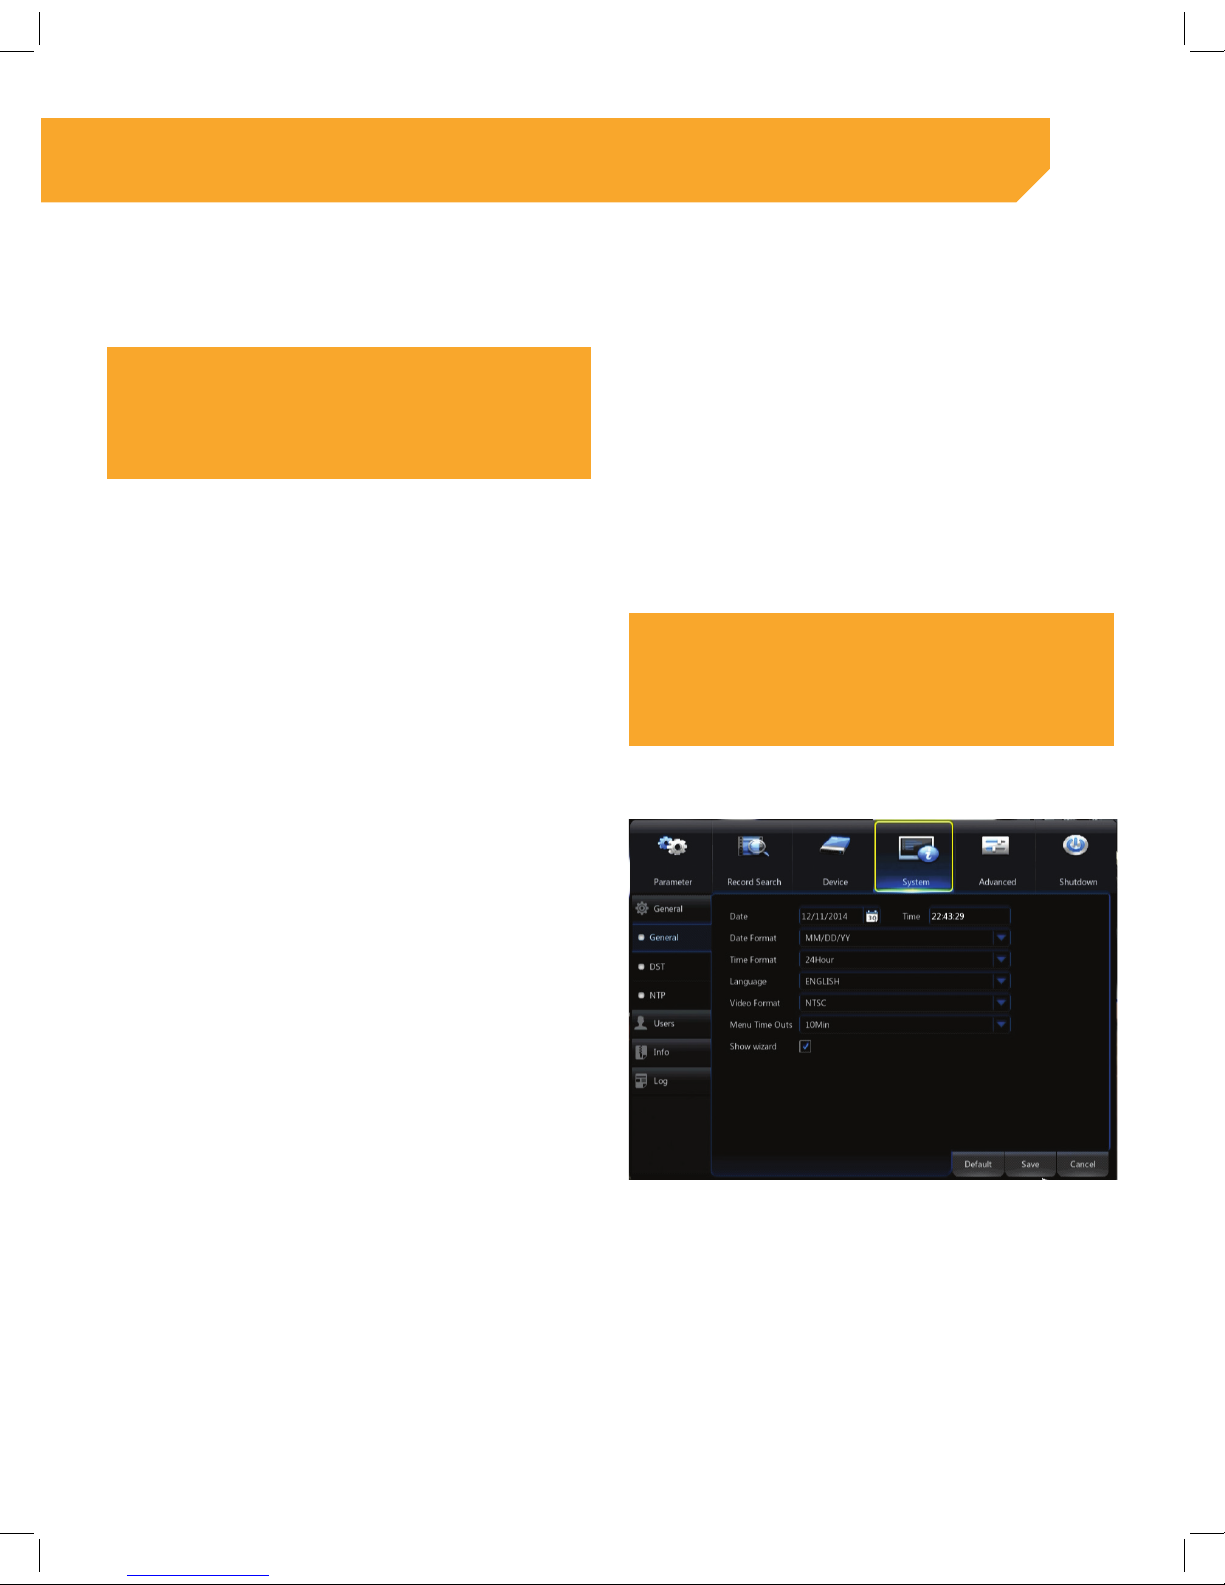
CHANGING GENERAL SETTINGS FOR NVR
1 . Setting the Date, Time and Language
2 . Access the Main Menu.
3 . Select Device > System> General.
CHANGING THE DATE
1 . Select the Calendar icon next to the date. 2 . Select the current date on the Calendar window.
Select Save to update the settings.
CHANGING THE TIME
1 . Select the Time drop down list and a keyboard
will appear.
2 . Enter the current time.
3 . Select Save to update the settings.
BASIC NVR SET UP
Page 17
17
CHANGING THE DATE FORMAT
1 . Select the Date Format drop down list.
2 . Select your desired Format (example: 12H or 24H).
3 . Select Save to update the settings.
CHANGING THE LANGUAGE
1 . Select the Language drop down list.
2 . Select your desired language.
3 . Select Save to update the settings.
TIP!
You can turn the Wizard option off by unchecking the checkbox
next to ‘Show Wizard” shown on this screen. This will ensure
that the Wizard does not appear when the NVR is restarted.
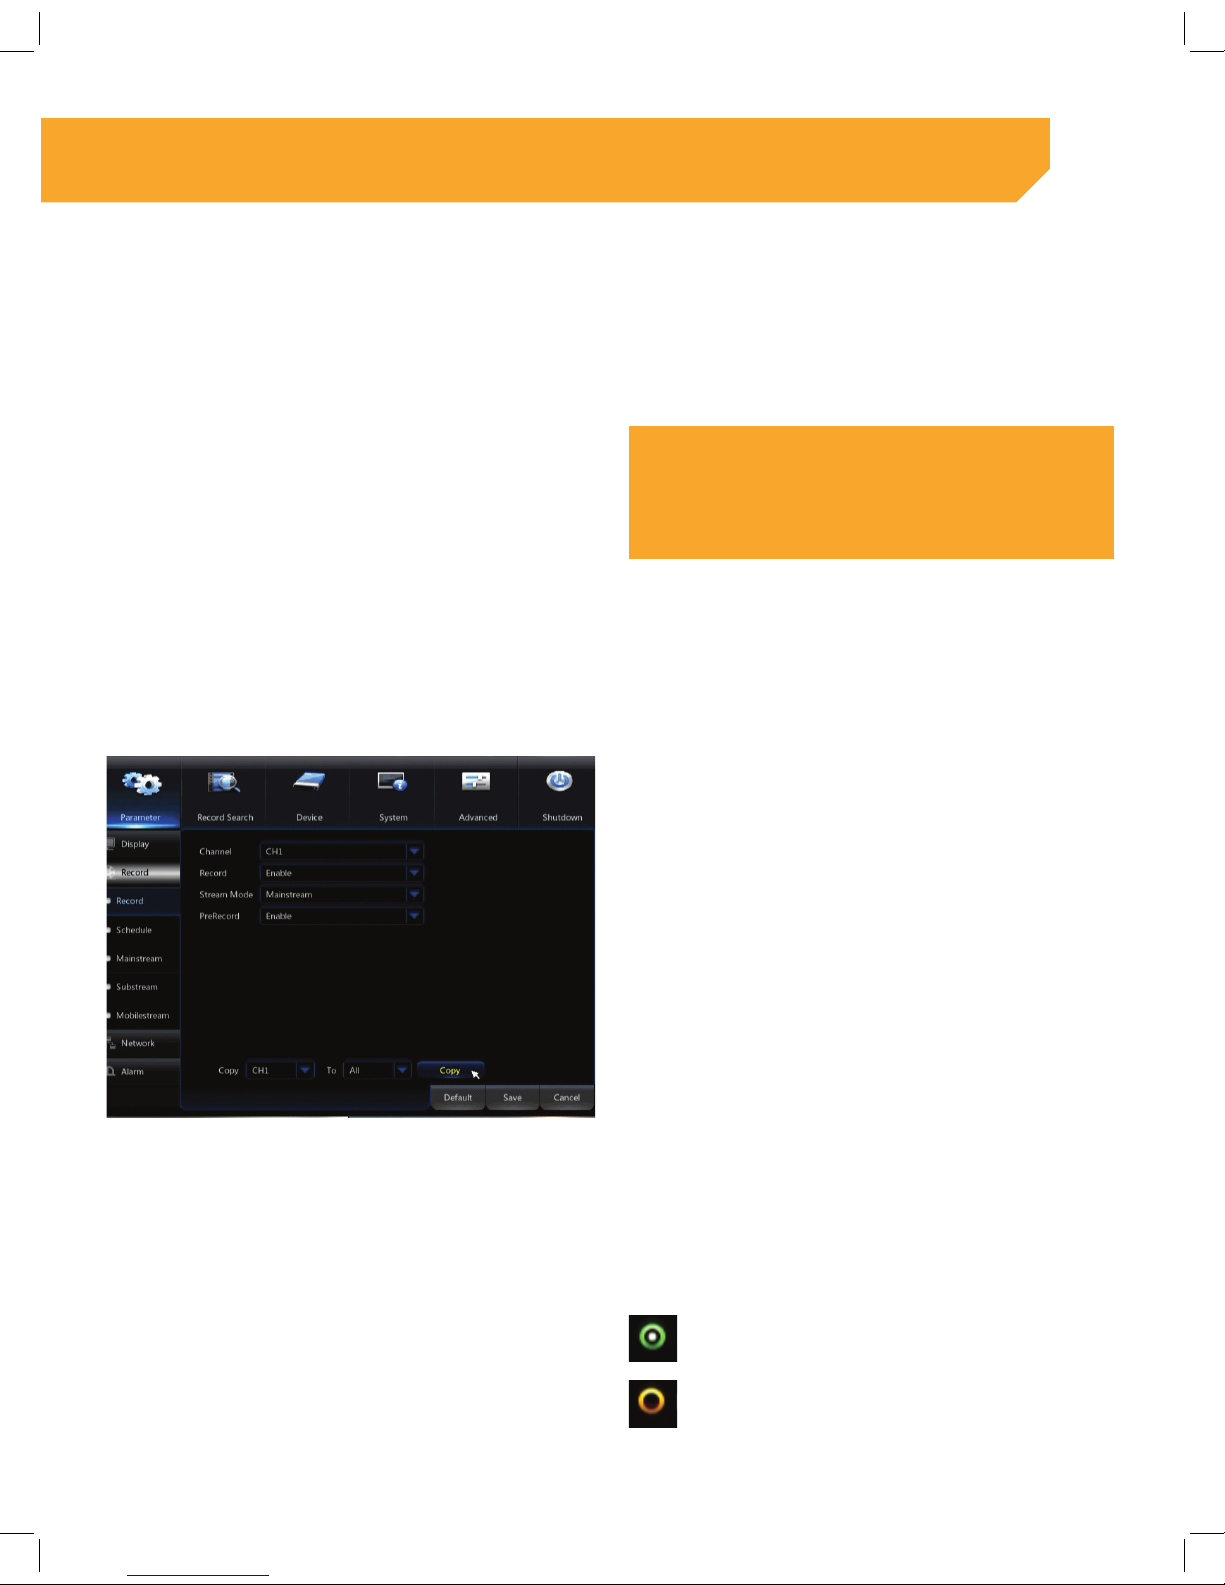
RECORD
1 . This section provides the steps to set up video
recording options.
Access the Main Menu > Parameter > Record.
ENABLE OR DISABLE RECORD
Select the Channel drop down list and select the
desired channel.
2 . Select the Record drop down list.
3 . Select ENABLE to record the channel.
4 . Select DISABLE to prevent recording the channel.
TO COPY THIS SETTING TO ANOTHER CHANNEL OR TO ALL CHANNELS:
1 . Select the Copy drop down list and select the
channel previously set up in steps 1 – 4
2 . Select the drop down list to choose a channel or
all channels
3 . Select Copy to add the settings to the channel
or all channels
4 . Select Save to apply the settings
RECORD SETUP
This section provides the steps to set up recording
of video. There are two different recording options
available; motion and continuous.
: will continuously record.
: will only record when motion is detected.
BASIC NVR SET UP
Page 18
18
SETTING THE CONTINUOUS RECORD SCHEDULE
1 . Select the Channel drop down list and select the
desired channel.
2 . Select Normal for continuous recording.
3 . Place the mouse curser inside the box on the
first line of the desired day of the week. Click and
drag across all desired recording times.
NOTE:
Recording times will now appear with a green highlight.
The schedule is set up with a 24 hour clock system. Each
square represents half an hour.
IMPORTANT!
If continuous recording is set up by highlighting the green
boxes and motion is also selected by highlighting the orange
boxes the NVR will record continuously by default.
SETTING MOTION RECORD SCHEDULE
1 . Select the Channel drop down list and select the
desired channel.
2 . Select Motion to trigger recording when motion
is detected.
3 . Place the mouse curser inside the box on the
second line of the desired day of the week. Click
and drag across all desired recording times.
NOTE:
Recording times will now appear with an orange highlight.
4. The schedule is set up with a 24 hour clock system. Each
square represents half an hour.
IMPORTANT!
Remember continuous recording overrides motion recording
settings when set up for the same time.
COPY THIS SETTING TO ANOTHER CHANNEL (S)
1 . Select the Copy drop down list and select the
Channel previously set up in steps 1 – 4
2 . Select the drop down list to choose a Channel or
All Channels
3 . Select Copy to add the settings to the Channel
or All Channels
4 . Select Save to apply the settings
BASIC NVR SET UP
Page 19

19
MOBILE VIEWING
1 . Visit the “Google Play” Store or the “App Store” for
your app
2 . Download the “ClearVu®” app to your
mobile device
3 . Tap “Device Manager” from the main menu
4 . Tap the “+” or “ADD” icon at the top right of
your screen
BASIC NVR SET UP
Page 20

20
Tap the “QR” code to scan
Fit the square directly around the “QR” icon the
camera will automaticallty take a photo
Androids square will be green.
TIP!
Using the QR code set up and UID is the easiest and fastest
way to get to view your camera through Internet Explorer.
Disclaimer:
at bottom of page Disclaimer: iPhone is a registered trademark of Apple Inc. BlackBerry is a registered trademark of Research in Motion
Limited. Android is a registered trademark of Google Inc.
BASIC NVR SET UP
Page 21

21
ENABLING MOTION RECORD
TIP!
Motion record will take up less space on your HDD.
1 . Select Parameter > Alarm > Motion.
2 . Select Enable in the Enable drop down list.
3 . Select the Sensitivity drop down list and select
the desired sensitivity (1 being the lowest and 8
being the highest). The higher the sensitivity, the
less movement it takes for motion recording to
be activated.
4 . Select Enable in the Buzzer drop down list to hear
an audible alert when motion is detected.
5 . Select Show Message to receive an on screen
message when motion is detected.
6 . Select Send Email to receive an email alert when
motion is detected.
NOTE:
See the Networking section for Email Setup instructions.
7. Select the Full Screen checkbox to have the
channel change to full screen when motion is
detected.
8. Select Save to apply the settings.
MOTION AREA SETUP
TIP!
Areas that do not appear in red will not trigger motion recording.
This section provides you with the details on how
to block areas out of the motion detection area
(Example: A tree that moves on a windy day can be
blocked out to not trigger motion recording).
1 . Select Parameter > Alarm > Motion.
2 . Place the mouse curser inside the box where
you would like motion to be blocked and release
the mouse key when desired area is reached.
Click and drag across all areas to block. Follow
the same steps for multiple areas that need to
be blocked. Click and drag across all desired
recording times.
3. Right click when you are finished to exit the
area Setup.
4. Select Save to apply the settings.
BASIC NVR SET UP
Page 22

22
SETTING UP PRIVACY ZONES
Privacy Zones block areas that the camera is
viewing. Those blocked areas will not be recorded by
the camera.
1 . Select Parameter > Display > Privacy Zones.
2 . Select the Channel drop down list and select the
desired Channel.
3 . Select Enable in the Privacy Zone drop down list
to set Privacy Areas. Select Disable to show all
areas on the Live View screen.
4 . Select the number of areas you would
like to block.
NOTE:
You may choose up to four areas to block.
5 . Select setup to open the Privacy Zone area.
TIP!
You can only use the mouse to adjust and move Privacy Zone
blocks
6 . Place the mouse curser on the box screen and
click to have the red box appear. Drag the box
to the desired area to remove them from the Live
View screen.
7 . Click and drag each corner to adjust the size of
the box.
8 . Repeat steps 6 – 7 if additional areas
are needed.
9 . Right click when you are finished to exit the
Privacy Zones Setup.
10. Select Save to apply the settings.
NOTE:
Areas you have set as Privacy Zones will show up as black
boxes on live video feed.
BASIC NVR SET UP
Page 23

23
USING THE NETVIEWER SOFTWARE
1 . Install the Netviewer Software on the computer
(included on the Software CD) and open
the program.
2 . Select the Login Type drop down list and
select Device ID.
3 . In the Device ID box, input the UID (located
below the QR code sticker on the DVR).
4 . Select Login.
NOTE:
If this option does not work, you will need to proceed with
networking manually as outlined in the next steps.
BASIC FUNCTIONS WITHIN THE MENU
1 . Record Search
2 . Select Record Search > Record Search
3 . Select the Channel drop down list and select the
desired channel
4 . Select the type of recorded footage you would
like to view (example: continuous, motion or all).
5 . Select the drop down list above the calendar to
choose the month you would like to view
footage from.
6 . Select the drop down to change the month
shown or click the arrows on either side to
change the month.
7 . To change the year, select the up and down
arrows beside the year you wish to change.
8 . Select Search to find available footage from the
options you have selected.
TIP!
The calendar will now update and have an orange triangle in
the corner of each day where footage is available to view.
9 . Select the day in which you wish to review
footage from and select Playback. This will open
the Playback screen.
10. Select the Menu button to exit the
Playback screen.
BASIC NVR SET UP
Page 24

24
UNDERSTANDING THE PLAYBACK SCREEN
1 Calendar Allows you to search for footage.
2 Channels Channels with a blue triangle have recorded footage and can be selected to view.
3 Backup icon Allows you to select footage to backup.
4 Full screen Allows you to hide side bars.
5 Rewind Allows you to rewind footage.
6 Slow motion Allows you to see your footage in slow motion to view in more detail.
7 Play Allows you to play footage.
8 Pause Allows you to pause footage.
9 Stop Allows you to stop footage.
10 Fast forward Allows you to fast forward footage.
11 Zoom in Allows you to zoom in on the recorded footage.
12 Trim
Allows you to trim a portion of your recorded footage and save it to a USB memory stick
To trim and save:
1 . Plug a USB memory stick to any of the USB ports
2 . Choose the section of your recorded footage that you want to save
3 . Go to the beginning of the recorded footage that you want to save and click on the
Scissor icon
4 . The Scissor icon will now be a Disk icon
5 . When the recorded footage that you want to save reaches its end, click on the Disk icon
6 . Select your USB memory icon on the left side of the window that appears
7 . Select Ok to save footage to the USB memory stick
8 . Once the footage is saved, click Cancel to return to the Main Menu
BASIC NVR SET UP
3
1
4
2
5
6
7
8
9
10
11
12
Page 25

25
EVENT SEARCH
1 . This section provides details to search a specific
event to back up onto a USB device.
2 . Select Record Search > Event Search.
3 . Select the calendar icon next to Search Date to
make the calendar screen appear and select
the desired date.
4 . Select the box next to Search Start Time if you
know the exact time of the event needed and
a number keyboard will appear. To refine the
search time, we recommend inputting an End
Time as well. Select the Enter key to close the
number keyboard.
5 . Select the Channel drop down list and select the
desired channel.
6 . Select the type of recording from the drop down
list (example: continuous, motion or all) and
select Search.
NOTE:
For increased security, we strongly recommend setting up your
own password as soon as possible. Choose something that
you’ll remember, but that others would be unlikely to guess.
Link: defender-usa.com/support
BACKUP TO USB
1 . Insert the USB memory stick into the bottom USB
port on the back of the NVR front port of the NVR
2 . If prompted, enter the username and/or
password in the NVR Main Menu
Select Menu > System > Log.
3 . Select a Start Date, End Date, Start Time and End
Time. Then click Search.
NOTE:
The time format will match what is set up for the NVR (example:
12H or 24H).
4 . Select the USB icon shown on the left. Select the
file you wish to back up from the list shown.
5 . Select Backup and wait for the process to
complete.
6 . Once you have backed up the files on your USB
memory stick, you will need to convert the files
using the AVI software to play them back on your
computer. Please visit our website to find the NVR
you own. Once you have found your NVR, click
on AVI Generator under the Download section.
Link: defender-usa.com/support
7 . Once the software is installed, the conversion
process can begin.
8 . Open the AVI Generator software.
9 . Click Open and locate the file that was saved to
the USB memory stick.
10. Click Save As. Name the file and identify the
directory where the file will be saved.
11. Once saved, click Start.
12. The converted file will be saved in the specified
location and will be ready to review with any
AVI supported media player (example: Windows
Media Player).
BASIC NVR SET UP
Page 26

26
SECTION 3
This last section of the manual will provide with more
in depth explanations of the menus and what your
NVR can do. We recommend you read through this
section at your leisure to learn more. Your basic set
up will get you up and running in the meantime.
ADVANCED SETUP
Page 27

27
IP CAMERA OPTIONS
TIP!
In order to add or delete an IP Camera, make sure that the
Switch Mode in the Network section is set to Manual Mode.
DELETING AN IP CAMERA
1 . Select Parameter > IP Camera.
2 . Select the checkbox for the desired camera.
3 . Select the Red Trash Can icon shown beside
the channel.
4 . The following message will appear “Are you sure
you would like to delete this IP camera?”
5 . Select Ok to delete or select No to cancel.
TROUBLESHOOTINGADVANCED SETUP
Page 28

28
EDITING IP INFORMATIONINSERT EDIT ICON
1 . Select Parameter > IP Camera 2 . Select the blue pencil symbol under edit for
the Channel you wish to make changes to.
3 . You will now see the Edit IP camera window.
ASSIGNING AN ALIAS TO A CAMERA
1 . Select the checkbox next to Alias and a
keyboard will appear.
2 . Enter the name you would like to assign to the
camera.
3 . Select Enter to keep the changes and repeat
steps 1 – 2 for each camera you wish to change.
4 . Select Ok to confirm.
ADVANCED SETUP
Page 29

29
CHANGING THE USER PASSWORD
1 . Select the box next to Password and a keyboard
will appea
2 . Enter the desired password and select Enter.
Changing Subnet Mask Edit Icon
TIP!
In order to change the Subnet Mask, make sure that the Switch
Mode in the Network section is set to Manual Mode.
3 . Select the checkbox next to Subnet Mask and a
keyboard will appear.
4 . Enter desired Subnet Mask.
5 . Select Enter to keep the changes and repeat
steps 1 – 2 for each camera you wish to change.
6 . Select Ok to confirm.
CHANGING THE PORT
1 . Select the checkbox next to Port and a keyboard
will appear.
2 . Enter desired port.
3 . Select Enter to keep the changes and repeat
4 . steps 1 - 2 for each camera you wish to change.
5 . Select Ok to confirm.
SETTING PROTOCOL
1 . Select the drop down menu next to Protocol.
2 . Select the Protocol drop down list and select
Private or Onvif.
ADVANCED SETUP
Page 30

30
CHANGING THE USER NAME
1 . Select the box next to User Name and a
keyboard will appear.
2 . Enter the desired name and select Enter.
LIVE DISPLAY
CHANGING THE CAMERA ORDER
Select the Arrow icon next to the Position box.
3 . The drop down list shows all locations available
(example: Left Top, Left Bottom, Right Top, and
Right Bottom).
4 . Select the new location for the camera.
NOTE:
If there is already a camera in the location it will switch
locations with the camera you are moving.
TIP!
An easier and faster way to change the order of the camera
view is to select the image and drag it to another location. You
will need to use the mouse to perform this action.
TROUBLESHOOTINGTROUBLESHOOTINGTROUBLESHOOTINGADVANCED SETUP
Page 31

31
MAKE SURE YOU ARE IN THE LIVE VIEW SCREEN.
1 . In the Live View screen, select and hold the
camera you would like to move.
2 . Drag the camera to the new location and
release it.
3 . Select Next to move forward.
IMPORTANT!
The yellow numbers that appear on the top left corner of the
channel represent the LAN port (on the back of the NVR) the
camera is plugged into. These numbers will not change when
the channel is moved on the Live View screen.
NAMING CHANNELS AND POSITIONING
Select Parameter > Display > Live.
DISPLAYING OR HIDING CAMERA NAME AND TIME
1 . Select the Show Name checkbox in order to
display the camera name. Uncheck to hide the
camera name.
2 . Select the Show Time checkbox in order to
display the time. Uncheck to hide the time.
3 . Select Save to apply the changes.
CHANGING CAMERA NAME
1 . Select the box next to Camera Name and a
keyboard will appear.
2 . Enter the name you would like to assign
to the camera.
3 . Select Enter to keep the changes and repeat
steps 1 – 2 for each camera you wish to change.
4 . Select Ok to confirm.
5 . Select Save to apply the changes.
ADVANCED SETUP
Page 32

32
CHANGING ON SCREEN DISPLAY POSITION OF DATE &TIME
1 . Select the Setup button next to OSD Position, the
Live View will appear.
2 .
Click and drag the Date and Channel name to a
location on the screen.
3 . Right click to exit.
4 . Select Save to apply the changes.
CHANGING THE COLOUR
1 . Select the Setup button next to Colour.
2 . Select the channel and make changes
as desired.
TIP!
To exit this menu, right click on the box to return to the Main
Menu. Clicking outside this box will not return to the
Main Menu.
3 . Select Save to apply the changes.
ADVANCED SETUP
Page 33

33
SEQUENCE MODE CONTROL
TIP!
When the sequence mode is on, it will cycle through the live
feed of all cameras attached to the NVR. This allows you to
control the Live View Screen in which it cycles through cameras
as well as the amount of time that each camera is displayed
when in Sequence mode.
Select Parameter > Output.
1 . Changing Sequence Mode Viewing Options
2 . Select the Sequence Mode drop down.
3 . Select the desired View mode.
CHANGING SEQUENCE MODE CYCLE TIME
1 . Select the Sequence Mode Time drop down. 2 . Select desired Time.
VGA/HDMI RESOLUTION
1 . Select VGA/HDMI Resolution drop down. 2 . Select desired Resolution.
CHANGING TRANSPARENCY
1 . Select and drag the circular dial to adjust the
transparency.
NOTE:
This will change the level of transparency for the menu.
IMAGE CONTROL
1 . This section allows you to fine tune your images.
2 . Selecting a Channel
3 . Select the Channel in the drop down.
4 . Select desired Channel.
ADVANCED SETUP
Page 34

34
SELECTING IR CUT MODE
1 . Select the IR Cut Display drop down.
2 . Select desired IR Cut Mode.
Colour Mode: The image will show color, not black &
white even when the light is very weak.
GPIO Auto:The IR cut will switch automatically
according to the light the camera receives.
Video Mode: This is for IP cameras that do not have
LEDs or IR cut filters. They will switch from color to
black and white mode. If the lens receives enough
light, the image will be in color. If not, the image will
be in black and white.
IR CUT DISPLAY
1 . Select and drag the dial to adjust the delay for
the Transition Time.
TIP!
If there is a constant transition of light but for only a few sec-
onds, you may want to consider adding a delay on the IR Cut
Flip. This will prevent the IR Cut Filter from constantly changing
in short low light situations.
ADVANCED SETUP
Page 35

35
LENS FLIP
I
1 . if the camera needs to be mounted upside
down, this will allow you to change the image to
be correct.
2 . Select the checkbox beside Lens Flip to enable it.
ANGLE FLIP
1 . Selecting the Angle Flip check box allows you to
rotate the image 180 degrees.
CHANGING THE BACK LIGHT
1 . Select Enable from the Back Light drop down. 2 . Select your desired setting from the Back Light
Level drop down list (example: High,
Medium, or Low).
ADVANCED SETUP
Page 36

36
ADJUSTING NOISE REDUCTION IMAGES TO BE USED
1 . This option will reduce the noise or dead pixels
around your image.
2 . Select Parameter > Display > Image Control.
3 . Select the 3D Noise reduction drop down and
select the desired option (example: Disable,
Manual, or Auto).
WDR-WIDE DYNAMIC RANGE
1 . Select the Wide Dynamic Range drop down. 2 . Select your desired setting from the Wide
Dynamic Range drop down list (example:
Disable, Manual, or Auto).
AGC – AUTOMATIC GAIN CONTROL
1 . Select the Automatic Gain Control drop down. 2 . Select your desired setting from the Automatic
Gain Control drop down list (example: High,
Medium, or Low).
ADVANCED SETUP
Page 37

37
RECORD OPTIONS
MAINSTREAM
Select Parameter > Record > Mainstream.
CHANGING RESOLUTION
1 . Select the Channel drop down and select
desired Channel.
2 . Select the Resolution drop down and select
desired Resolution.
TROUBLESHOOTINGTROUBLESHOOTINGADVANCED SETUP
Page 38

38
CHANGING FRAMES PER SECOND (FPS)
1 . Select the Channel drop down and choose
desired Channel.
2 . Select the Frames Per Second drop down and
select desired Frames Per Second.
CHANGING BITRATE MODE
1 . Select the Channel drop down and choose
desired Channel.
2 . Select the Bitrate Mode drop down list and select
desired Bitrate Mode.
CHANGING BITRATEINSERT
1 . Select the Channel drop down and choose
desired Channel.
2 . Select the Bitrate dropdown list and select
desired Bitrate.
NOTE:
Below Bitrate, you have the option to enable audio. Please note
this option will only apply if you have attached a microphone to
the camera. (Microphone Not Included) INSERT IMG46
3 . Once all Mainstream settings have been set,
select Save to apply the changes.
TROUBLESHOOTINGTROUBLESHOOTINGADVANCED SETUP
Page 39

39
SUBSTREAM
Select Parameter > Record > Substream.
CHANGING RESOLUTION
1 . Select the Channel drop down and select
desired Channel.
2 . Select the Resolution drop down and select
desired Resolution.
CHANGING FRAMES PER SECOND (FPS)
1 . Select the Channel drop down and choose
desired Channel.
2 . Select the Frames Per Second drop down and
select desired Frames Per Second.
ADVANCED SETUP
Page 40

40
CHANGING BITRATE MODE
1 . Select the Channel drop down and choose
desired Channel.
2 . Select the Bitrate Mode drop down list and select
desired Bitrate Mode.
CHANGING BITRATE
1 . Select the Channel drop down and choose
desired Channel.
2 . Select the Bitrate drop down list and select the
desired Bitrate.
NOTE:
Below Bitrate you have the option to enable audio. Please note
this option will only apply if you have attached a microphone to
the camera. (Microphone Not Included)INSERT IMG52
3 . Once all Substream settings have been set
select Save to apply the changes.
MOBILESTREAM
Select Parameter > Record > Mobilestream.
ADVANCED SETUP
Page 41

41
CHANGING RESOLUTION
1 . Select the Channel drop down and select
desired Channel.
2 . Select the Resolution drop down and select
desired Resolution.
CHANGING FRAMES PER SECOND (FPS)
1 . Select the Channel drop down and choose
desired Channel.
2 . Select the Frames Per Second drop down and
select desired Frames Per Second.
CHANGING BITRATE MODE
1 . Select the Channel drop down and choose
desired Channel.
2 . Select the Bitrate Mode drop down list and select
desired Bitrate Mode.
ADVANCED SETUP
Page 42

42
CHANGING BITRATE
1 . Select the Channel drop down and choose
desired Channel.
2 . Select the Bitrate drop down list and select the
desired Bitrate.
NOTE:
Below Bitrate, you have the option to enable audio. Please
note: This option will only apply if you have attached a micro-
phone to the camera (Microphone Not Included).INSERT IMG58
NETWORKING
NOTE:
For increased security, we strongly recommend setting up your
own password as soon as possible. Choose something that
you’ll remember, but that others would be unlikely to guess.
1 . Using the Netviewer Software
2 . Install the Netviewer Software on the computer
(included on the Software CD) and open the
program.
3 . Select the Login Type drop down and select
Device ID.
4 . In the Device ID box, input the UID (located
below the QR code sticker on the NVR).
5 . Select Login.
NOTE:
If this option does not work, you will need to proceed with
networking manually as outlined in the next steps
ADVANCED SETUP
Page 43

43
MANUAL NETWORKING SETUP
1 . Select the Networking section in the Main Menu.
Ensure that the type is set to DHCP. If it is set
to Static, change it to DHCP, select Apply and
restart the NVR.
TIP!
Please write down the IP address, Gateway IP address, HTTP
port, Client port and the Mobile port.
2 . Go to a computer that is connected to the same
network as the NVR and open Internet Explorer.
PLEASE SHOW INTERNET EXPLORER PAGE AND
INSERT IMAGE. Enter the Gateway IP address into
the address bar in the format shown below.
TIP!
Most Gateway IP addresses are 192.168.1.1 or
192.168.1.254. Ensure it follows this format when entering
http://192.168.1.1.
NOTE:
This is an example only, please confi rm your Gateway IP in the
networking menu.
3 . In another tab of the Internet Explorer window,
go to the website shown below. Locate the make
of your router/ modem and the model number.
http://portforward.com/english/routers/port_
forwarding/routerindex.htm
IMPORTANT!:
This website offers FREE how to guides. Defender does not
endorse a payment being made for the services of this website,
nor is it needed. You can simply click X on the top right to close
the purchase offer and continue to the guide.
4 . Once the guide is displayed, it will provide you
the correct step by step instructions on how set
up the port forwarding rules for your router /
modem. Please Note: The ports listed here may
be different than what you have written down
from your NVR Menu. Please ensure you are
using the ports listed on your NVR when making
the rules for your router / modem. Ensure that
you create a listing for each of the three ports;
HTTP, Client and Mobile.
5 . Once you have completed the steps for your
router / modem, go to the website below and
check your ports.
www.canyouseeme.org
ADVANCED SETUP
Page 44

44
This site will also give you your external IP address,
please make sure you write this down. When you
enter in a port and click “Check my Port” you will
receive 1 of 2 messages:
• “Success, I can see your service” which indicates
you have successfully opened your ports.
• “Cannot see service on port XX” which indicates
there is an issue with the rules set up. Please
repeat steps 1 – 6.
6 . Go back to the networking section of the NVR
and change the type to Static and select Save
to apply the changes.
7 . You are now ready to view your cameras from
your computer and smart phone. To view from a
computer at the location of the NVR, you will use
the IP address listed in the NVR by entering it into
the address bar in Internet Explorer.
8 . To view from a computer that is away from the
location of the NVR, you will need to use the
external IP address that you have copied down
in step 7. Please ensure that you enter it using
the format listed below.
Http://0.0.0.0
TIP!
If a blue screen appears and the login section is greyed out,
please ensure your Active X Controls are properly confi gured.
1 . Open Internet Explorer and select Tools.
2 . Select Internet Options.
3 . Select the Security tab, and then select the
Custom Level button.
4 . A new window will open (Security Settings-
Internet Zone).
CHANGE THE ACTIVE X SETTINGS LISTED BELOW:
1 . Download signed Active X controls:
PROMPT or ENABLE
2 . Download unsigned Active X controls: PROMPT
3 . Initialize and script Active X controls not marked
as safe: PROMPT
4 . Run ActiveX controls and plug-ins: ENABLE
5 . Script ActiveX controls marked as safe for
scripting: ENABLE
TIP!
If this is an option:
Allow automatic prompting for fi le and code
downloads: ENABLE
6 . Select Ok to go back to Internet Options and
select Apply. Close the options window.
7 . Close Internet Explorer, reopen and type in the IP
Address again. It will now allow you to enter your
username and password.
ADVANCED SETUP
Page 45

45
SWITCH
This section allows you to change the NVR to
Manual Mode. Once enabled you can enter in the IP
Address, Subnet Mask, and Gateway manually.
NOTE:
This also will allow the ability to delete and add cameras in the
display menu.
TIP!
Unless you have specifi c knowledge of the information in this
tab and understand the changes that will take effect in the NVR,
we recommend you never change these settings. They are by
default correct and should only be changed on advice from
your Internet Service Provider.
SETTING UP EMAIL ALERTS
ADVANCED SETUP
Page 46

46
Setting up an email allows you to get alerts when
certain events happen on your NVR such as motion
detection, HDD issue, and video loss.
1 . 1. Select Parameter > Network > Email.
2. Select the Email drop down and select Enable.
Enter the SMTP Port and Server.
2 . Enter the Sender (your e-mail address) and the
password for the email address being used.
3 . Enter the Receiver (your e-mail address).
4 . Select the Interval drop down list and select how
often you would like to receive Email alerts when
events occur.
SMTP Port and Server we recommend completing a
quick online search. Type in your Email provider
along with SMTP server.
ADVANCED SETUP
Page 47

47
DYNAMIC DNS (DDNS)
This section allows you to setup or make changes to
the DDNS settings.
NOTE:
DDNS is a service that is paid for monthly by the providers in
the list. This section only needs to be confi gured if you have
already purchased a subscription.
Select Parameter > Network> DDNS.
1 . Select the DDNS drop down and select Enable.
2 . Select the Server drop down and select a
Server Provider.
3 . Select the User box and a keyboard will appear
to input the username that was set up with the
DDNS Service Provider.
4 . Select the Password box and a keyboard will
appear to input your password.
5 . Select Save to apply the changes.
DEVICE MENU
This section provides information on the Hard Drive
(HDD) and formatting.
NOTE:
Formatting the NVR will delete footage.
1
Shows the number of hard drives in the
NVR.
2 Shows the current state of the hard drive.
3
Shows the available free space and total
space is on NVR.
4
Shows remaining record time on the hard
drive
ADVANCED SETUP
Page 48

48
FORMATTING THE HARD DRIVE (HDD)
1 . Select the hard drive (HDD), check box you
would like to format.
2 .
3 . Select Format HDD, a message will appear.
4 . If Ok is selected, you will see a “Formatting”
message on the screen with a green
progress bar.
5 . Once complete, you will see a “Formatting
Complete” message under the green
progress bar.
ADVANCED SETUP
Page 49

49
6 . Select Ok to confirm and return to the
main screen
SETTING UP AN OVERWRITE SCHEDULE
NOTE:
If overwrite is set to auto, it will begin to overwrite all saved
footage on the HDD when the hard drive is full.
1 . Select the Overwrite drop down list.
2 . Select from the list to assign how often you would
like the NVR to overwrite on the Hard Drive (HDD).
3 . Select Save to confirm.
CLOUD STORAGE INSERT CLOUD STORAGE
Create a Dropbox Account
NOTE:
If you don’t have an account, please register on https://www.
dropbox.com/. You can register for a free account, however the
space provided with a free account is minimal. Depending on
the amount of storage you need you may need to purchase a
larger Dropbox.
HOW TO USE NVR CLOUD STORAGE
1 . Ensure the Networking portion has been
completed and successfully set up.
2 . Ensure the NVR is connected to the Internet.
3 . Ensure the NVR has a free hard drive space of
more than 10 MB.
4. Select Device > Cloud Storage.
ADVANCED SETUP
Page 50

50
ENABLE CLOUD STORAGE
1 . Select Enable from the Cloud Storage drop
down list.
2 . Select Dropbox from the Cloud Type drop
down list.
3 . Select the channel you wish to have snapshots
taken from.
4 . Time trigger is the time interval of snapshots sent
to your Dropbox account.
5 . Enabling Motion Detection to receive snapshots
from the unit when motion is triggered.
6 . Select the Directory Name (DirName) to choose/
create a folder where snapshots will be saved
to. By default they will save to a folder named
CloudNVR.
7 . Input your email account information to set up
the Cloud Email. This will be used to combine
your email address with you Dropbox account.
8 . Select Enable from the Email drop down list.
9 . Select Enable from the SSL drop down list.
10. Enter the SMTP Port and Server.
11. Enter the Sender (your email address) and the
password for the email address being used.
12. Enter the Receiver (your email address).
13. Select Save to apply the changes.
TIP!
The SMTP Port and Server are unique to each Email provider. To
fi nd the Email Service Providers SMTP Port and Server we recommend completing a quick online search. Type in your Email
provider along with SMTP server.
Select Email Test to receive a test email. If you have
received the test email, setup was successful. If you
do not receive an email, please repeat steps 1 – 11
to ensure your setup is correct.
14. Exit the Cloud Email Setup to Select Activate
Cloud to activate Cloud storage. If it is activated
successfully, you will receive an email and get
a verification link. Or you can scan the QR code
generated by the NVR to do the verification.
ADVANCED SETUP
Page 51

51
15. Click the link and then log in to your Dropbox
account, click Permit, then the NVR Cloud
Storage function will be activated successfully.
If you have logged into your Dropbox account
before Cloud storage activation, then there is no
need to re-login. Just click Permit to complete
the activation. Please finish the activation within
3 minutes. After activation is completed, you can
use the Cloud storage function.
SYSTEM
This section outlines all General settings for the NVR
and how to change them.
1 . Select Device > System > General
CHANGING THE DATE
1 . Select the Calendar icon next to the date. 2 . Select the current date.
CHANGING THE TIME
3 . Select Time drop down list and a number
keyboard will appear. Enter the current time.
ADVANCED SETUP
Page 52

52
CHANGING THE DATE FORMAT
1 . Select the Date Format drop down list. 2 . Select your desired format
(Example: 12H or 24H).
CHANGING THE LANGUAGE
1 . Select the Language drop down list.
SELECT YOUR DESIRED LANGUAGE. SETTING VIDEO FORMAT
1 . Select the Format drop down.
2 . Select desired Format.
SETTING MENU TIME OUT
1 . Select the Time Out drop down list.
2 . Select desired time or select OFF if you do not
want the menu to time out.
3 . Select Save to confirm you settings.
ADVANCED SETUP
Page 53

53
CHANGING THE DAYLIGHT SAVINGS TIME (DST)
Select System > General > DST.
Select Enable if you would like the NVR to change
time when daylight savings occurs in your area
TIME OFFSET
1 . Select the Offset drop down list.
2 . Select the amount of time you would like the
clock to change (example: 1 Hour)
3 . Setting the Date for Daylight Savings Time (DST)
4 . Select the Start Time drop down list.
5 . Select the month your Daylight Savings Time
(DST) begins.
6 . Select the next drop down to choose the number
of the day of the week you would like time
change to occur (example 1st Sunday of
the month).
7 . Select the next drop down to select which day
you would like the time change to occur on.
8 . Select the box next to the day drop down and a
keyboard will appear.
9 . Enter the time you wish the change to take place
on and confirm by selecting the Enter key.
10. Select Save to apply the changes.
11. Follow steps 1 – 5 to set up the End Date.
TIP!
Schedule your Daylight Savings Time according to your calen-
dar. Start time represents when Daylight Savings Time begins,
which is spring forward. The end time is when Daylight Savings
Time ends which is “fall back”. Enter the corresponding times
for “spring forward” and “fall back” in your area.
ADVANCED SETUP
Page 54

54
NTP
1 . Select System > General > NTP.
2 . Select the Server Address drop down.
3 . Select the drop down list next to Time Zone and
select the correct one.
NOTE:
If the NVR is connected to a computer it will use one of the sites
in the list to automatically sync the time with your computer.
TIP!
You must be connected to the Internet to synchronize your NTP
settings to web servers.
MAINTAIN
1 . Select Advanced > Maintain.
2 . Select the Auto Reboot drop down.
3 . Select Enable if you wish to proceed to set up
Auto Reboot. Leave Disable if you do not wish
to proceed.
4 . Select the Reboot drop down to select the
interval, day and time for the reboot to take
place. When selecting the time, a keyboard
will appear.
NOTE:
If you chose every week, select second drop down box to select
the desired day you would like the unit to Auto Reboot. If you
choose a month, select the second drop down box and choose
the day of the month you would like the Auto Reboot to occur.
ADVANCED SETUP
Page 55

55
LOAD DEFAULT SETTING
NOTE:
This will set the NVR back to the factory default settings in all
menu options selected.
1 . Select the Load Default button and a list of all
available options will appear:
• Display
• Record
• Network
• Alarm
• Device
• System
• Advanced
2 . Check all boxes that apply and select Save to
load the default settings chosen.
3 . When saved, your system will restart and apply
the selected Default Settings.
EVENTS
Select Advanced > Events.
1 . The events tab allows you to receive a
notification when your HDD is full, if there is an
error, or if a camera loses video connection.
2 . Select the Event Type drop down and choose
desired event (example: Disk Full, Disk Error, Video
Loss).
3 . Select the Enable checkbox.
4 . Select the Show Message checkbox if you wish
to have a message appear on the screen when
an event occurs.
5 . Select the Email checkbox if you wish to receive
an email when an event occurs.
6 . Select the Buzzer drop down if you would like
an alarm to sound when event occurs and the
desired length of time before the Buzzer sounds
after an event occurs. Select Disable if you do
not want buzzer to sound.
ADVANCED SETUP
Page 56

56
GLOSSARY: PLEASE PUT INTO A TABLE FORMAT.
Bitrate: Rate at which bits are transferred from the
camera to the NVR. This will define the quality of your
video. The higher the bitrate, the higher the quality of
your video.
DDNS: A method of automatically updating a
name server in the Domain Name System (DNS),
often in real time, with the active DNS configuration
of its configured hostnames, addresses or other
information. The term is used to describe two
different concepts.
Frames Per Second (FPS): Number of consecutive
images that a camera can handle per second. The
higher the FPS, the higher the image quality.
Mainstream: It refers to the settings of the recording
stored locally on the NVR’s.
Mobile stream: It refers to the settings of the
recording that is viewed through a mobile device.
Substream: It refers to the settings of the recording
to be viewed from a computer.
HDD: Hard drive.
Cloud Storage: A model of datastoragewhere
the digital data isstoredin logical pools. The
physicalstoragespans multiple servers (and often
locations), and the physical environment is typically
owned and managed by a hosting company.
Privacy Zoom: Privacy zones block areas that the
camera is viewing. Those blocked areas will not be
recorded by the camera.
AVI Generator: Our DVR’s record in a highly
compressed package called h.264. This is a video
file that allows for high compression which saves
space on the hard drive.
TVL: Is the maximum number of alternating light and
dark vertical lines that can be resolved per
picture height.
Firmware: Firmware updates will become
available periodically to add new features or
address technical issues. Completing a firmware
update intended for a different model of DVR may
permanently damage the system. As this would not
be considered a manufacturer defect, it would not
be covered under warranty.
GLOSSARY
Page 57

57
TROUBLESHOOTING
MOUSE IS NOT WORKING:
Ensure the mouse is connected to the top USB port
on the back of the NVR.
Press and hold 0 on the remote until a beep is
heard. You should be able to regain control of
the mouse.
REMOTE CONTROL IS NOT WORKING:
Ensure the batteries are installed correctly.
Ensure you are pointing the remote at the IR sensor.
Point the IR remote at the camera lens and press a
button. You should be able to see the IR LED flicker
through the NVR monitoring device.
Try replacing the batteries in the remote.
HDD LIGHT IS BLINKING:
If the hard drive is playing back footage or
recording, the light will blink to notify you that
there is activity.
I am prompted to put in a password for everything:
PASSWORD ENABLE set to ON in the SYSTEM → USERS
menu. Change this setting to turn it OFF
I CANNOT LOGIN TO MY NVR:
Ensure you are entering the correct username and
password. By default both are admin.
If you have changed your username and password
and can no longer remember what they were
changed to, you will require an override password
to reset it. Please contact our Customer Experience
team to receive an override password to allow
access to the NVR to reset the username and
password. (link to the contact us section of the
manual or website)
CANNOT POWER OFF NVR:
The NVR is set to run as long as it is plugged in.
To power off the NVR, go to SHUTDOWN→ Enter your
username and password. The default username and
password are admin.
Turn the switch at the back of the NVR to the
OFF position.
The hard drive fills up too quickly:
Check your video quality settings. A high video
quality fills up the hard drive faster.
Try lowering the video quality.
Adjust your schedule or resolution – If you are on
Schedule Record for 24 hours a day the hard drive
fills up faster. Try periodically switching to
Motion Record.
NVR BEEPS WHENEVER MOTION IS DETECTED:
Alarm is set to ON. Go to MOTION → MOTION TAB and
turn Alarm function OFF.
The NVR keeps beeping:
There could be video loss, HDD loss, motion
detection or no HDD space on your NVR. The NVR
can be set to alarm when these actions take
place. The alarm alerts you if there is tampering
with the camera to NVR connections. Check your
connections and keep the NVR in a safe place
where it will not be tampered with or moved around.
Disconnect and reconnect all camera connections
to make sure they are snug and tight fitting.
The NVR is not recording according to my schedule
Check to see if you have the proper time set on your
NVR. Refer to the instruction manual under
RECORD → SCHEDULE.
Check your schedule record times – you may have
NVR set to “no record”.
TROUBLESHOOTING
Page 58

58
PLAYBACK VIDEO IS CHOPPY:
Check the FPS for each camera that is recording
choppy video. Refer to your settings in the RECORD →
STREAM section. The higher the FPS, the smoother the
video. If the FPS is set too low, the video will appear
choppy.
Cannot see all/one of the camera(s) on the
monitor:
Confirm that the cameras are properly connected to
the back of the NVR.
Check that DISPLAY → CAM SETUP → COVERT is not set
to ENABLE.
I have lost video footage:
The cameras might have been tampered with. Be
sure to check that all connections are secure and
properly set.
The HDD overwrite feature is enabled. When enabled,
the NVR will begin overwriting the earliest stored
footage once the HDD is full.
Unplug the power to the cameras and/or NVR and
plug it back in.
Ensure you have set the proper date during set up.
You can confirm this by going to your live feed and
looking at the date on the top.
THE CAMERAS ARE NOT APPEARING IN SEQUENCE
MODE:
Check if you have selected START SEQ in the
FUNCTION TOOLBAR. The cameras will start to
sequence according to the sequence time.
You must be in LIVE viewing mode.
To stop, click STOP SEQ in the FUNCTION TOOLBAR.
NOTHING IS RECORDING HOWEVER ALL THE IMAGES
ARE APPEARING ON THE SCREEN:
You must initiate the recording to start by pressing
the RECORD button on the remote.
RECORD → REC SETTINGS → RECORD to ensure all
cameras are set to ENABLE.
Check your record schedule to make sure the NVR is
set to record that hour.
Verify that the HDD is installed and formatted in the
MEMORY menu.
THE CAMERA PICTURE ISTOO DARK:
Adjust camera brightness settings under DISPLAY →
CAM SETUP → COLOR.
Try moving your camera to a brighter location.
Make sure the camera is not pointing directly into a
light source.
Your camera may not be getting enough light
towards it during the day. Adjust the sun shade (top
of camera) to allow more sunlight.
THE NIGHT VISION WILL NOT TURN ON OR I CAN’T
SEE AT NIGHT:
Night vision turns on automatically when the sensor
detects a lack of light. If your cameras are in a
space with too much light, the night vision will not
turn on.
MY NVR WILL NOT ACQUIRE AN IP ADDRESS:
Check the Ethernet connections; ensure that the
connection lights are lit (on the router and the back
of NVR).
Try using a different Ethernet cable and/or a
different port on your router.
THE NETWORK SETTINGS IN THE NVR MENU HAVE NO
INFORMATION:
Be sure the NVR is properly connected to the router.
There should be green link indicator lights if the NVR
is properly connected.
Make sure the NVR IP allocation is set to DHCP. This
is a standard default setting that will work in most
networking situations.
Power cycle the NVR to ensure it is properly
connected and the IP allocation is set to DHCP.
THE NVR IS NOT RECORDING ACCORDING TO MY
SCHEDULE:
Check to see if you have the proper time set on your
NVR. Refer to the instruction manual under RECORD
→ SCHEDULE.
Check your schedule record times – you may have
NVR set to “no record”.
TROUBLESHOOTING
Page 59

59
CANNOT VIEW ONLINE FOOTAGE USING MY
EXTERNAL IP ADDRESS:
Sometimes your router will not allow you to view the
footage with your external IP address because the
NVR is connected to the same router. Try typing the
NVR’s internal IP address in the address bar.
If using a port other than 80, add your port
forwarded port to the end the IP address.
See the NETWORK section for setup instructions.
CANNOT VIEW THE NVR THROUGH A REMOTE
INTERNET CONNECTION:
PORT FORWARDING may not be set up correctly.
The external IP address of the NVR may have
changed. Try setting up a DDNS account to stay
connected with the latest IP information.
The ISP may be blocking port the port you
selected. Try changing HTTP Port to 5000. Be sure to
reconfigure the port forwarding.
Refer to the NETWORK SETUP section of the manual
for detailed instructions on NETWORKING setup.
The browser keeps freezing or I can’t play the
footage:
Make sure you have an up-to-date browser to view
the footage with the proper ActiveX options.
Make sure the browser is Internet Explorer. The
software will not play on any other browser.
Download all Windows Updates to make sure you
have the latest version of Windows and Internet
Explorer.
THE VIDEO IS CHOPPY WHEN VIEWING LIVE
FOOTAGE ONLINE:
When multiple users view the NVR at the same time,
it slows the connection to the NVR. Try accessing the
NVR at a later time.
The speed of your Internet connection may be too
slow. Check with your ISP if the video seems to be
choppy every time you check it.
It is normal to experience a small time delay
between the live footage and the network viewing.
TROUBLESHOOTING
 Loading...